By Bonemap Extending Isadora s 3D Particles and 3D Model Particles
|
|
|
- Joella Hodges
- 5 years ago
- Views:
Transcription


1 Extending Isadora s 3D Particles and 3D Model Particles By Bonemap 2018 Page 1

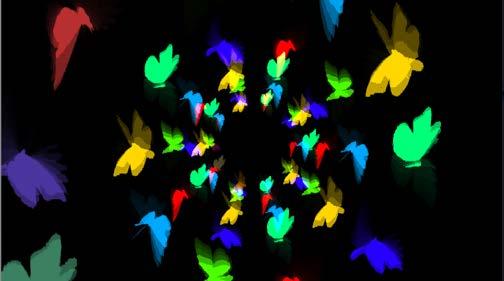
2 v.1 Extending Isadora s 3D Particles and 3D Model Particles with media instances By Bonemap 2018 One of the more difficult tasks for a visually oriented person, like myself, is to write descriptions of the processes that occur at a visual level. In light of this I hope that the following reference for extending 3D Particles will be useful to the Isadora user community. I engage with Isadora because it provides a visual programming environment at its heart. For the most part, all of the code fragments are neatly packaged into visual nodes with only the variable parameters available for input or modification. These nodes represent the functionality of programming as visual snippets with inputs and outputs that are wired together in a process called patching. In Isadora the nodes are called actors and connection wires are used to link actors within a work area before their visual effects are routed to a stage or video output for display. Isadora patches can do more than just output to a visual screen. The potential for interactivity and connectivity with other devices and physical Fig 1. Isadora 3D Particles with custom particle animation. There are no limits to the variations possible. computing that links Isadora to the analogue world is another compelling function of the software. Over the last couple of years I have turned to Isadora s particle actors to achieve interactive effects that are responsive to real time input. There are two particle actors that are fundamentally different, but have very similar characteristics and parameters. One is the 3D Particles and the other is 3D Model Particles. The simple difference is that 3D Particles use a 2D image source and 3D Model Particles use a 3D model, specifically a.3ds file, as its source. However, both the 3D Particles and the 3D Model Particles have options to assign different source instances to sequential particles making it possible to produce animation effects within the emitted particles themselves. The functionality of animating individual particles makes Isadora s native particle actors very powerful and effective. While these appear as the most complex actors native to Isadora, and therefore the most challenging to learn and master, they are also possibly the most playful and rewarding in terms of the breadth of responsive visual effects that they can achieve. You can jump in and generate 3D particles with a Shapes actor connected. However, for this tutorial I have pre-prepared the media in other image editing software. There are three types of files that will demonstrate how the 3D particle actors can be extended to achieve a greater range of effects. Page 2

 describes the process of manipulating this file into a particle system using the 3D Particles actor in Isadora.")

3 Fig 2, Source One represents a single movie file that has been composited in a grid of six animated butterflies. Each animation has a different flight path orientation that represents the butterfly. However each instance is derived from a single video source and re-composited into continuously looping motion graphics. Source One (figure 2) represents a single movie file that has been composited in a grid of six animated sections. The first tutorial (page 4) describes the process of manipulating this file into a particle system using the 3D Particles actor in Isadora. Source Two (figure 3) is a 10 x 10 grid of 2d raster image with an inherent transparency channel. Isadora will recognise the transparency (alpha channel) of the PSD as well as PNG file formats. The Diffusion Cloud tutorial that begins on page 7 outlines how the file is used to create a particle system with the 3D Particles actor. Fig 3. Source Two, a PNG file that has 100 different images within a 10 x 10 grid. The file has inherent transparency incorporated into the file when editing in image manipulation software. Fig 4, Source Three is a 3DS file (below) that has four separate 3D geometry components. The composition of the elements in the source file is irrelevant as Isaodra will read the geometry and display the mesh as individual components that can be manipulated and modified, in terms of their independent motion within the patch Source Three (figure 4) represents a 3D file with grouped geometry instances for use with the 3D Model Particles actor. The tutorial for working with the 3D Model Particles actor starts on page 11. Each of these types of media sources linked to Isadora s particle actors are able to be segmented and assigned to individual particle instances within a patch. Page 3
: represents a file providing six different temporal iterations of the same animation sequence composited into a single looping movie file using video editing")
4 EXAMPLE ONE: BUTTERFLIES Fig 5 & 6. Before and After :Source One (left): represents a file providing six different temporal iterations of the same animation sequence composited into a single looping movie file using video editing software. This will allow variation in the individual particles emitted by Isadora s 3D Particle actor as demonstrated in the screen capture of the Stage output on the right. Let s start with Source One, the animated butterflies. First import the video source file into the Media Bin. To construct the particles we will begin by patching in the Scene Editor (Isadora s workspace) using the following actors: 1 x Movie Player, 2 x Counters, 1 x Pulse Generator, and 1 x 3D Particles. Page 4
.")
 output -> tex map col Counter (2) output -> tex map row Pulse")
 Pulse Generator trigger 1 -> add obj (at the bottom of the 3DParticles actor) In figure 7, the following parameters of the Counter actors are set to")

5 Working from the top of the 3D Particles actor the following connection and parameters are going to be adjusted (figure 7): The Movie Player handles the linked source file The Pulse Generator provides a trigger in hertz (triggers per second). Its purpose in the patch is to initiate each new particle in the system The Counters are cycling through the coordinates of the grid areas (columns and rows) The first 8 parameters of the 3D Particles actor calibrates a gridded image input Movie Player video out -> texture map 3 -> tex map across 2 -> tex map down Counter (1) output -> tex map col Counter (2) output -> tex map row Pulse Generator trigger 1 -> add Counter (1 & 2) > z (at the bottom of the 3DParticles actor) Pulse Generator trigger 1 -> add obj (at the bottom of the 3DParticles actor) In figure 7, the following parameters of the Counter actors are set to match the number of grid cells associated with the movie file. Note the parameters of the Counters match the tex map across and tex map down of the 3D Particles actor. The grid of the movie is 3 x 2, therefore the counters are set to wrap at 3 and 2 and then linked to the tex map column and tex map row inputs of the 3D Particles. The Pulse Generator is also linked to the add of each Counter and to the add obj input at the very bottom of the 3D Particles actor. The z depth parameter will require a negative number before the particles will appear on the stage in this case The Pulse Generator is also connected to the add obj input at the bottom of the 3D Particles actor Fig 7. The first patching task sets up the counters that will assign a specific part of the movie file area each time the Pulse Generator triggers. The effects generated by the patch require some refinement and additional actors can be added (figure 8). The green background of the video can be removed using a Chroma Key actor. The color calibration can be shifted to the 3D Particles color shift, start, mid and end color parameters but first desaturate the movie with a HSL Adjust actor. Page 5 The Counter system can be enhanced with a Comparator actor to create a switch that more accurately moves along the columns and rows of the movie s image grid cells. Fig 8. Additional actors refine the video input and the way the movie image grid cells are being distributed to the 3D Particles.

6 Now that the foundation of the particle system is in place the spatial qualities of the particle motion can be established by adding inputs to the various x, y and z parameters in the lower half of the 3D Particles actor. And using a combination of Pulse Generator (Hz) values, particle count, hold time (life span) and parameters such as z gravity and z velocity, different animated effects can be achieved. Additional effects and modifications can continue to be added to various areas of the patch, for example Color Maker HSBA and Motion Blur. In Figure 9, the Color Maker HSBA is represented with a series of Trigger Value actors and a Sequential Trigger actor all connected to the same Pulse Generator as the rest of the patch. Synchronising all of the changing attributes, to match the input at the add obj trigger, allows individual parameters to be delivered to the particle as it is being generated by the 3D Particles actor. Using actors that perform a cycle such as Wave Generators and Sequential Trigger, allows some control over how different parameters are delivered to individual particles in turn. Fig 9. The direction and path that the particles travel can be controlled in many different ways. Here, two Wave Generator actors provide a circular path for the particles by changing the x and y parameters. At the same time z gravity and z velocity move the particles along the depth (z) axis giving the effect of the butterflies flying towards the viewer and out of the screen.. Page 6


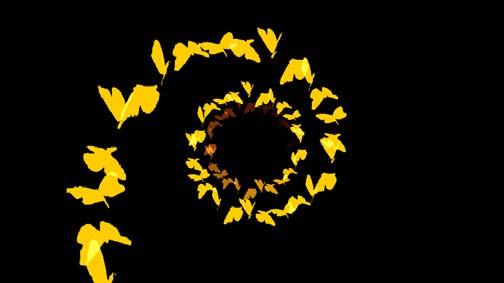
7 EXAMPLE TWO: DIFFUSION CLOUD Fig 10 & 11. Before and After. Source Two, a PNG file that has 100 different images within a 10 x 10 grid. The file has inherent transparency around each shape and the overall negative spaces. The size of the grid and the number of unique 2d images that can be incorporated into a particle system can be much larger than this. I have used a sprite sheet with more than 2000 unique icons without any performance issues. This example, Source Two (figure 10) replicates some aspects of the previous demonstration, but instead uses a PNG file prepared in image editing software. The file consists of a 10 x 10 grid of shapes with varying degrees of transparency and levels of opacity. The intention, when preparing this file, was to create a particle effect with a high percentage of diffusion as the particles overlap creating a smoke or cloud-like simulation. Unlike the movie file, the PNG file does not have inherent animation and the individual image elements are reliant on the parameters of the 3D Particles actor for all motion and movement effects. The development of this particle system begins by importing the PNG source image and a source music/audio (MP4) file into the Media Bin. To construct the particles we will begin by patching: 1 x Picture Player, 2 x Counters, 1 x Comparator, 1 x Movie Player, 1 x Pulse Generator and 1 x 3D Particles actor Picture Player video -> texture map 3D Particles 10 -> tex map across 3D Particles 10 -> tex map down 3D Particles Counter (1) output -> tex map col 3D Particles Counter (1) output -> value1 Comparator Comparator true -> add Counter (2) Counter (2) output -> tex map row 3D Particles Pulse Generator trigger1 -> add Counter (1) > z (at the bottom of the 3DParticles actor) Pulse Generator trigger1 -> add obj (at the bottom of the 3DParticles actor) The schematic is represented in figure 12 on page 8. Page 7


 to accomplish a freq output that can be integrated into the patch The Movie Player audio")
.")

8 There are some standard concepts to consider when entering the parameters for your patch. For example, knowing how many columns and rows there are in your source image media may involve counting the horizontal and vertical grid axis in image preview software. The Pulse Generator triggers individual particles to be emitted from the 3D Particles actor. Higher frequencies produce more particles per second. This patch uses audio frequency analysis from the Movie Player to drive a series of generative cycles within the composition. This requires preparing the Movie Player actor (figure 13 & 14) to accomplish a freq output that can be integrated into the patch The Movie Player audio track is used in interaction mode and the freq bands enabled by clicking through the Movie Player tab at the top of the actor. Place a 1 in the freq bands channel of the Movie Player (figure 14). We will use only one audio frequency output to drive the parameters of the particle system.. Figure 12. The schematic for connecting the actors to the top half of the 3D Particles actor Double click on the Movie Player tab to access the drop down options Change the Movie Player mode to interaction Check the box next to freq bands to enable audio frequency analysis of the sound file Audio frequency output is activated Type 1 into the freq bands channel Fig 13 & 14. The Movie Player has built in audio frequency analysis, but it must be turned on by placing the actor in interaction mode and then accessing the in/out drop-down options by double clicking the actor name tab eye symbol Page 8

9 Now we will construct a Value Delay Line chain. It will take the frequency response from the Movie Player audio and spread the output across 10 x instances that will then be assigned to a cycle of particles in turn. To build the chain place 10 x Value Delay Line actors in a column within the work area of your Isadora patch. Link the value out to the value of the actor immediately below until they are all connected. A single output of a Absolute Value actor linked to all of the size inputs creates a value delay chain that can be calibrated easily. The Absolute Value actor can then be renamed to a more descriptive title such as delay chain amount (Figure 15). The input value going to the first Value Delay Line actor in the stack comes from the Movie Player freq 1 output The input select value is linked from the Counter(1) output that is already cycling through 1-10 and synchronised with the Pulse Generator. The use of 10 actors in the column is a number derived from the Source Two image grid 10 x 10. The intention is to spread out the repetition within the cycle so that there is less chance of visible patterns of repetition appearing in the final video output. Fig15. The Value Delay Line chain delivers 10 unique numerical representations of the audio frequency analysis that can be used to distribute the particles across the visual display. This kind of complexity in an Isadora patch can be encapsulated in a user actor to reduce the amount of patch clutter. The column of Value Delay Line actors are connected to a Selector actor with 10 inputs. The select input has a connection from the Counter (1) actor that is driving the grid selection at the top of the 3D Particles actor. Counter (1) is already programmed to wrap in a series of 10 linked to the Pulse Generator, therefore its value output is perfect for also linking to the select input of the Selector actor. In turn the Selector output is connected to a Limit-Scale Value actor and then to y input at the bottom of the 3D Particles actor. Note that the calibration of the Limit-Scale Value actor is intended to spread the appearance of the particles along the vertical axis of the stage, in this case the range is -1.5, 1.5 and this is dependent on what has been set in the z (depth) input. Generally, a patch like this will require a bit of fine tuning or tweaking in a number of different places to find the balance of variables to create an acceptable particle display. Try changing the z value in the 3D Particles to -5, for example. There are infinite variations and nuance possible through small incremental changes to the variable parameters of the 3D Particles parameters. Page 9
.")


10 The Max Value Hold calibrates the limit max based on the incoming frequency analysis and resets when the loop end is triggered in the Movie Player. The out min and out max of this Limit Scale Value actor is directly responsible for the position of particles across the height of the display (y axis). The particle count determines how many particles can be active at one time. Once the limit is reached older particles will disappear. The obj scale h and obj scale v are determining the overall scale and aspect ratio of the particles as they are being emitted. The size shift parameters determine the changes of a particles size over its lifespan. The color of each particle can be determined using the color shift parameters. In this case the colors are unchanging. The fade-in time, hold-time and fade-out time determine the lifespan of each particle and dependant on if there are enough in the particle count to allow a complete lifespan to occur. Fig 16. The final inclusions to the particle system are the attenuation of the audio frequency output linked to a Max Value Hold x progressively updating the Limit Scale Value and hence the distribution of particles along the y axis through 3D Particles actor. Page 10
.")

 that is linked to the diffusion texture material applied to the 3D model before the file is exported from the 3D modelling software.")

11 EXAMPLE THREE: GEOMETRY GROUPS & 3D MODEL PARTICLES Fig 17 & 18. Before & After: Source Three represents a 3DS file (left) that has four separate 3D geometry components. In the image render on the left, one of the components is completely hidden inside another (there is a capsule shape inside the sphere). Using the 3D Model Particles actor in the Isadora software (right) with similar data delivery techniques used in the previous demonstrations the individual geometry encapsulated in a 3DS file can appear to respond independently. We take a step away from the 3D Particles actor to explore how the concepts used in the previous demonstrations might work in the 3D Model Particles actor. There are three media files that have been prepared for use with the 3D Model Particles actor. The first, figure 19, is an image file (.JPG) that is linked to the diffusion texture material applied to the 3D model before the file is exported from the 3D modelling software. This file must be present in the folder of linked media along with the.3ds file or the Isadora software will not function as expected with this demonstration. Fig 19. A jpeg file used to apply a diffusion material texture to the 3D model and saved along with the.3ds file Fig 20. A 3D scene with numerous individual geometry models, in this case four, exported and saved in a single.3ds formatted file Fig 21. An MP4 movie file with six animated zones, this will be used to replace the 3D models material texture through the 3D Model Particles actor inside the Isadora patch Page 11


12 This technique involves considering the 3D mesh models within a single file as geometry groups. The models can be complex but the 3DS file format is limited to a mesh constructed of under 65,000 vertices. (I use the open source software Meshlab to effectively simplify complex geometry to fit this limitation: In 3D modelling software shapes can be grouped together to form more complex forms. The 3D Model Particles actor in Isadora segments the different groups of geometry within a single 3DS file. In this demonstration we are using very simple geometry (Figure 17): a sphere, torus, capsule and a relief or deformed plane. However, this technique will work with many more geometry groups within a single 3DS file. Fig 22. The 3DS file is assigned to the 3D Model Particles in the first parameter channel at the very top of the actor. Follow this schematic to patch the top half of the 3D Model Particles to use geometry groups embedded in the 3DS file.. After the media components are prepared, saved and imported into Isadora, the following actors can be placed in the work area (Scene Editor): 1 x 3D Model Particles 1 x Pulse Generator 1 x Movie Player 3 x Counter 1 x comparator 1 x Trigger Divider This patch will cycle through the groups in the geometry groups in the.3ds file. And, in addition, cycle through the animated zones associated with the movie file. Therefore, x 3 Counter actors are required to be setup. Page 12 The Pulse Generator will drive the first Counter (1) and a Trigger Divider will drive the Counter (2). Patch the actor set as indicated in Figure 22. Pulse Generator trigger1 -> add Counter (1) Counter (1) output -> group index 3D Model Particles Pulse Generator trigger1 -> trig in Trigger Divider Trigger Divider trig out -> add Counter (2) Counter(2) output -> value1 Comparator Comparator true -> add Counter (3) Movie Player video out -> texture map 3D Model Particles Pulse Generator trigger1 -> add obj 3D Model Particles -75 -> z 3D Model Particles We can begin to calibrate the parameters based on the number of geometry groups and the layout of texture map grid segments.

: 4 x 25 = 100.")
13 In this example (figure 22), there are four geometry groups that the 3D Model Particles actor can access for display and manipulation. However, to calibrate an acceptable display of the individual geometry groups a number of variables are required to work together so that the frequency of the model switching at the group index input is aligned with the particle hold-time (lifespan). Let s make some calculations based on an intended minimum of 25 frames per second (fps). The first calculation will return the frequency rate of the Pulse Generator, it is the number of geometry groups in the 3DS file multiplied by 25 (the target fps): 4 x 25 = 100. Setting the Pulse Generator at a frequency of 100Hz will return an adequate particle refresh and persistence for each of the geometry groups encapsulated in the Source Three 3DS file used in the patch. Adjusting the parameter at the hold time input will provide an indication of how this is going to work. For example 0.01 may produce flashing but 0.08 might present a constant image of the geometry. Higher amounts again can produce repetitious effects if the particle count is set high enough, try Next, the Counter (1) is driving the display of the geometry through the group index input of the 3D Model Particles actor. Therefore Counter (1) will wrap with a minimum of 1 and a maximum of 4. This creates a particle instance of the four geometry meshes each in turn. The Movie Player is outputting a 3 x 2 grid of animated material. Counter (2) and (3) wrap on a minimum of 1 and a maximum of 3 for Counter (2) and a minimum of 1 and a maximum of 2 for Counter (3). The output values will update the tex map col and tex map row with individual sections of the movie image. This connection to the 3d Model Particles actor will replace the jpeg texture associated with the 3D meshes when the file was modelled. The Trigger Divider determines the rate at which the movie sections appear on the geometry. With the Pulse Generator set at 100Hz then a value of 300 divisor in the Trigger Divider will produce a 3 second increment of change to the texture map grid. Change the parameters of the 3D Model Particles as follows: 3 -> tex map across and 2 -> tex map down. Refer to figure 18 to check all connections and parameters match. Now that the top section of the 3D Model Particles system has been set-up we can start to look at the spatial manipulation of the geometry groups. We will construct a way to deliver the unique coordinate variable each time the particle emitter is displaying one of the 4 group geometries. A nested patch inside a user actor will be needed to effectively manage connections in the Scene Editor. Place a new User Actor in the work area and double-click to open it s editor window. Place the following actors into the User Actor (figure 23): Fig 23, A user actor is a nested scene editor within a node in Isadora. They assist with the management of complex networks within a patch Page 13


. Link the output to the mid color with a connection wire.")

14 1 x Wave Generator 4 x Limit -Scale Value 1 x Selector 16 x User Input 1 x User Output Fig 24, The User Actor is transformed into a Macro that can be duplicated to apply to different variable parameters in the patch Save the User Actor as a Macro then rename it, for example: Range Selector. inputs of the 6 x user actors. It is now time to start providing the parameters for each numbered as a minimum and maximum range and connect it to the variables of the 3D Model Particles. The sets of ranges associated with the user actor, 1-4, will correspond to the same number and sequence of geometry groups being assigned by the particle system. You should expect the geometry order that appeared as a list in the 3D modelling to be the order in Isadora. Place a Color Maker HSBA near to the output of the user actor closest to the color shift parameters of the 3D Model Particles (Figure 25). Link the output to the mid color with a connection wire. Try the following settings in the user actor: Range > out min 240 -> out max Range > out min 360 -> out max If the patch is operating correctly the geometry will each have its own colour. If the colour is not independent or there is flashing try Duplicate (copy/paste) the custom user generated actor x 6 and position in 3 rows in the Scene Editor next to the 3d Model Particles and under the Counter actors. Create a reset actor by renaming a Trigger Value then connect its output to all the reset Range 1 0 -> out min 90 -> out max Range > out min 180 -> out max Fig 25, The User Actor can be copy and pasted to create numerous instances, we will be using six. Page 14


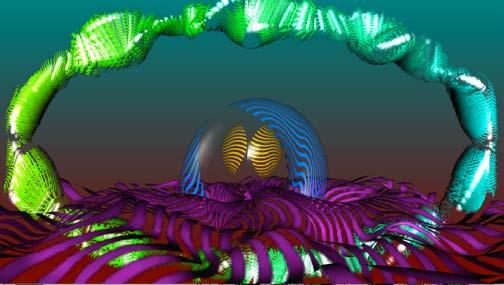
15 Incorporating the Add Alpha Channel actor after the Movie Player provides the transparency needed for the image file texture map A second Movie Player with an audio file can introduce real time frequency response to the x, y, z position parameters, as is indicated here by the Calculator groups below the Movie Player adjusting the parameter settings based on the indicated settings in figure 26. The movie with the six spinning rosettes is intended to display with transparency. Although transparency is not inherently encoded in the file it is possible to use the contrast in the image to effect an appropriate transparency channel. Place an Add Alpha Channel actor onto the Scene Editor. Connect the Movie Player video output to both the video and mask inputs. Transparency will now replace the darker areas of the video. Page 15 Fig. 26 The final patch layout.


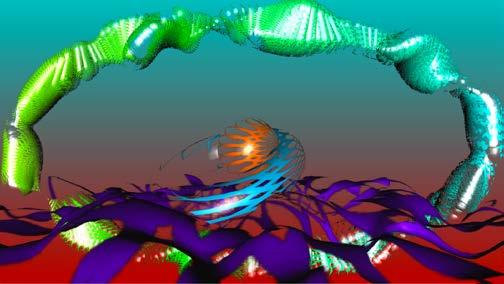
16 Fig. 27 The use of a FFGLGradient actor places colour behind the particles and provides additional atmosphere within the generated image. Fig 28. A still image captured from the Isadora stage displaying the animation of a 3DS file using 3D Model Particles Isadora tutorial document prepared by Bonemap Page 16
MotionGraphix. User Guide. Quick Start. Overview
 MotionGraphix User Guide Quick Start Create a Project Add Elements Position, scale and rotate the elements Change the time and reposition, scale and rotate the elements Change the time again, etc. Double
move object resize object create a sphere create light source camera left view camera view animation tracks
 Computer Graphics & Animation: CS Day @ SIUC This session explores computer graphics and animation using software that will let you create, display and animate 3D Objects. Basically we will create a 3
BCC Sphere Transition
 BCC Sphere Transition The Sphere Transition shape models the source image onto a sphere. Unlike the Sphere filter, the Sphere Transition filter allows you to animate Perspective, which is useful in creating
How to create interactive documents
 Adobe InDesign Guide How to create interactive documents You can use Adobe InDesign to create dynamic web content or interactive documents. InDesign supports export to web-ready HTML or interactive PDF.
Adobe Flash Course Syllabus
 Adobe Flash Course Syllabus A Quick Flash Demo Introducing the Flash Interface Adding Elements to the Stage Duplicating Library Items Introducing Keyframes, the Transform Tool & Tweening Creating Animations
BCC Comet Generator Source XY Source Z Destination XY Destination Z Completion Time
 BCC Comet Generator Comet creates an auto-animated comet that streaks across the screen. The comet is compromised of particles whose sizes, shapes, and colors can be adjusted. You can also set the length
Adobe After Effects CS6 Digital Classroom
 Adobe After Effects CS6 Digital Classroom AGI Creative ISBN-13: 9781118142790 Table of Contents Starting up About Digital Classroom 1 Prerequisites 1 System requirements 1 Starting Adobe After Effects
 Page 1 of 10 Creating Cigarette Smoke In this tutorial, you use a particle system to create a stream of cigarette smoke trailing from an ashtray. The animation relies on space warps to affect the movement
Photoshop PSD Export. Basic Tab. Click here to expand Table of Contents... Basic Tab Additional Shading Tab Material Tab Motion Tab Geometry Tab
 Photoshop PSD Export Click here to expand Table of Contents... Basic Tab Additional Shading Tab Material Tab Motion Tab Geometry Tab The Photoshop PSD Export image filter is an image saver masquerading
Table of contents. I Preface. II First steps 1. 3D stage 2. Your first stage
 Table of contents I Preface 1 II First steps 3 1. 3D stage 2. Your first stage III User mode 2 3 7 1. Rendering options 2. Resolution 3. Cameras 4. DMX levels 5. Universes patch 6. Movie recorder 6 7 7
Lesson 11. Polygonal Spaceship
 11 Polygonal Spaceship In this lesson, you will build and texture map a polygonal spaceship. Starting with a polygonal cube, you will extrude facets until you have a completed ship. You will then be able
Adobe Premiere Pro CC 2018
 Course Outline Adobe Premiere Pro CC 2018 1 TOURING ADOBE PREMIERE PRO CC Performing nonlinear editing in Premiere Pro Expanding the workflow Touring the Premiere Pro interface Keyboard shortcuts 2 SETTING
Animation Basics. Learning Objectives
 Animation Basics Learning Objectives After completing this chapter, you will be able to: Work with the time slider Understand animation playback controls Understand animation and time controls Morph compound
Adobe After Effects CS5 Digital Classroom
 Adobe After Effects CS5 Digital Classroom Team, AGI Creative ISBN-13: 9780470595244 Table of Contents Starting Up. About Digital Classroom. Prerequisites. System requirements. Starting Adobe After Effects
Avid FX Tutorials. Understanding the Tutorial Exercises
 Avid FX Tutorials Understanding the Tutorial Exercises The following tutorial exercises provide step-by-step instructions for creating various kinds of effects, while exploring many aspects of the Avid
Introduction to Digital Modelling and Animation in Design week 4 Textures
 Introduction to Digital Modelling and Animation in Design week 4 Textures Thaleia Deniozou - - - - - - - - - - - - - - - - - - - - - - - - - - - - - - - - - - - - - - - - - - - - - - - - - - - - - - -
Actions and Graphs in Blender - Week 8
 Actions and Graphs in Blender - Week 8 Sculpt Tool Sculpting tools in Blender are very easy to use and they will help you create interesting effects and model characters when working with animation and
Keynote 08 Basics Website:
 Website: http://etc.usf.edu/te/ Keynote is Apple's presentation application. Keynote is installed as part of the iwork suite, which also includes the word processing program Pages and the spreadsheet program
Keynote Basics Website:
 Keynote Basics Website: http://etc.usf.edu/te/ Keynote is Apple's presentation application. Keynote is installed as part of the iwork suite, which also includes the word processing program Pages. If you
Easy View Manual Nicolaudie-Sunlite
 1989-2004 Nicolaudie-Sunlite Table of Contents Part I Preface Part II 3D Visualizer 1 2... 2 1 First steps Menu... 2 Toolbar... 3 Mouse move... 4... 5 2 3D stage Your first stage... 5... 7 3 Stage settings
LIGHTCONVERSE TOOLS Interface Overview
 MANUAL 1 Contents Contents... 1 LIGHTCONVERSE TOOLS Interface Overview... 2 Tool Manager... 3 Mouse... 4 Mouse Control Operation:... 4 3D Space Area... 4 Modes... 5 Balance Calculator in Warehouse Mode...
: Rendered background can show navigation mesh : Multi-level backgrounds, priority backgrounds and Z-ordering.
 Update history: 2017-04-13: Initial release on Marketplace for UE4.15. 2017-05-09: Rendered background can show navigation mesh. 2017-05-19: Multi-level backgrounds, priority backgrounds and Z-ordering.
Controlling Particle Systems. All elements of a particle system are controlled through this dialog: There are several key parts to this dialog:
 Controlling Particle Systems All elements of a particle system are controlled through this dialog: There are several key parts to this dialog: The timeline extent - OK, Cancel and Delete buttons are common
Using Flash Animation Basics
 Using Flash Contents Using Flash... 1 Animation Basics... 1 Exercise 1. Creating a Symbol... 2 Exercise 2. Working with Layers... 4 Exercise 3. Using the Timeline... 6 Exercise 4. Previewing an animation...
BCC Particle System Generator
 BCC Particle System Generator BCC Particle System is an auto-animated particle generator that provides in-depth control over individual particles as well as the overall shape and movement of the system.
Adobe Flash CS4 Part 3: Animation
 CALIFORNIA STATE UNIVERSITY, LOS ANGELES INFORMATION TECHNOLOGY SERVICES Adobe Flash CS4 Part 3: Animation Fall 2010, Version 1.0 Table of Contents Introduction...2 Downloading the Data Files...2 Understanding
Sliding and Rotating Objects. Appendix 1: Author s Notes
 AnimationWorks User Guide AnimationWORKS Introduction Camera Paths Cameras Moving Objects Moving Object Paths Sliding and Rotating Objects Light Objects Class Visibility Objects Transparency Objects Appendix
Animating the Page IN THIS CHAPTER. Timelines and Frames
 e r ch02.fm Page 41 Friday, September 17, 1999 10:45 AM c h a p t 2 Animating the Page IN THIS CHAPTER Timelines and Frames Movement Tweening Shape Tweening Fading Recap Advanced Projects You have totally
Adobe InDesign CC. 1. Introducing the Workspace. 2. Getting to Know InDesign. 3. Setting Up a Document and Working with Pages
 Adobe InDesign CC 1. Introducing the Workspace Getting started Looking at the workspace Working with panels Customizing the workspace Navigating through a document Using context menus Using Panel Menus
Introduction to MS Office Somy Kuriakose Principal Scientist, FRAD, CMFRI
 Introduction to MS Office Somy Kuriakose Principal Scientist, FRAD, CMFRI Email: somycmfri@gmail.com 29 Word, Excel and Power Point Microsoft Office is a productivity suite which integrates office tools
Flames in Particle Flow
 Flames in Particle Flow In this tutorial we are going to take a look at creating some licking flames in Particle Flow. I warn you however, is that this method of fire creation is very processor intensive.
Adobe After Effects level 1 beginner course outline (3-day)
") http://www.americanmediatraining.com Tel: 800 2787876 Adobe After Effects level 1 beginner course outline (3-day) Lesson 1: Getting to Know the Workflow Creating a project and importing footage Creating
http://www.americanmediatraining.com Tel: 800 2787876 Adobe After Effects level 1 beginner course outline (3-day) Lesson 1: Getting to Know the Workflow Creating a project and importing footage Creating
Artlantis training for new users
 Artlantis training for new users page 2 This training program reviews the main features of Artlantis. You will learn about the various presentation types such as still images, ivisit 3D panoramas, VR objects
1 Tutorials About the Tutorial Exercises
 1 Tutorials About the Tutorial Exercises..............................................2 Getting Started........................................................3 Exercise 1: Animating a 3D Model Using Keyframes............................3
FLASH ANIMATION TUTORIAL
 FLASH ANIMATION TUTORIAL This tutorial will show you how to make a simple flash animation using basic graphic elements and sounds. It will also work as the display page for your Bullet Movie soundtrack
Exit: These control how the object exits the slide. For example, with the Fade animation the object will simply fade away.
 PowerPoint 2013 Animating Text and Objects Introduction In PowerPoint, you can animate text and objects such as clip art, shapes, and pictures. Animation or movement on the slide can be used to draw the
1 INTRoduCTIon to BLENDER 1. 3 PREPARATIon 19
 INTRoduCTIoN xv 2 INTRoduCTIon to GIMP 13 Topics Covered... xv What Isn t Covered...xvi Requirements....xvi The Projects....xvi The Bat Creature... xvii The Spider Bot... xvii The Jungle Temple... xvii
Introduction to Unreal Engine Blueprints for Beginners. By Chaven R Yenketswamy
 Introduction to Unreal Engine Blueprints for Beginners By Chaven R Yenketswamy Introduction My first two tutorials covered creating and painting 3D objects for inclusion in your Unreal Project. In this
BCC 3D Extruded Image Shatter Filter
 BCC 3D Extruded Image Shatter Filter 3D Extruded Image Shatter shatters the image in 3D space and disperses the image fragments. Unlike the 3D Image Shatter filter, this filter allows you to create threedimensional
Working with the BCC Bump Map Generator
 Working with the BCC Bump Map Generator Bump mapping is used to create three dimensional detail on an image based on the luminance information in the image. The luminance value of each pixel of the image
Animated Modifiers (Morphing Teapot) Richard J Lapidus
 Richard J Lapidus") Animated Modifiers (Morphing Teapot) Richard J Lapidus Learning Objectives After completing this chapter, you will be able to: Add and adjust a wide range of modifiers. Work in both object and world space
Animated Modifiers (Morphing Teapot) Richard J Lapidus Learning Objectives After completing this chapter, you will be able to: Add and adjust a wide range of modifiers. Work in both object and world space
The playhead, shown as a vertical red beam, passes each frame when a movie plays back, much like movie fi lm passing in front of a projector bulb.
 The project: AIRPLANE I will show you a completed version of this project.. Introducing keyframes and the Timeline One of the most important panels in the Flash workspace is the Timeline, which is where
Max scene used to generate the image from the second pdf in this tutorial.
 Tutorial covers creating vector drawings from a 3ds max scene and methods for compositing these drawings back into a rendering. Rendering set up is based of the lighting set up from the mental ray/skylight/mr
Microsoft Office PowerPoint 2013 Courses 24 Hours
 Microsoft Office PowerPoint 2013 Courses 24 Hours COURSE OUTLINES FOUNDATION LEVEL COURSE OUTLINE Using PowerPoint 2013 Opening PowerPoint 2013 Opening a Presentation Navigating between Slides Using the
Tutorial: Simulating a 3D Check Valve Using Dynamic Mesh 6DOF Model And Diffusion Smoothing
 Tutorial: Simulating a 3D Check Valve Using Dynamic Mesh 6DOF Model And Diffusion Smoothing Introduction The purpose of this tutorial is to demonstrate how to simulate a ball check valve with small displacement
BCC Rays Ripply Filter
 BCC Rays Ripply Filter The BCC Rays Ripply filter combines a light rays effect with a rippled light effect. The resulting light is generated from a selected channel in the source image and spreads from
adobe after effects training. For the staff of CHUM Television, a recap of the after effects interface, from March 6th and 7th, 2006.
 adobe after effects Imagine taking Adobe s superb render engine at the heart of Photoshop and setting it to a timeline not unlike an Avid or Final Cut Pro editor. Every Photoshop parameter that is numerically
newfasant US User Guide
 newfasant US User Guide Software Version: 6.2.10 Date: April 15, 2018 Index 1. FILE MENU 2. EDIT MENU 3. VIEW MENU 4. GEOMETRY MENU 5. MATERIALS MENU 6. SIMULATION MENU 6.1. PARAMETERS 6.2. DOPPLER 7.
Adobe Premiere Pro CC 2015 Certification Review
 Adobe Premiere Pro CC 2015 Certification Review 40 questions; 50 Minutes Need to know for matching and/or multiple choice: Razor tool Slide tool Rate Stretch tool Ripple Edit tool Mark In Mark Out Insert
Zappar's coordinate system is based on the center of the scene being the center of the target image.
 3D for Zappar Coordinate system Zappar's coordinate system is based on the center of the scene being the center of the target image. The top of the image is Y = 1 and the bottom is Y = -1. The X coordinates
Overview of Adobe Fireworks
 Adobe Fireworks Overview of Adobe Fireworks In this guide, you ll learn how to do the following: Work with the Adobe Fireworks workspace: tools, Document windows, menus, and panels. Customize the workspace.
Adobe Flash CS4 Part 1: Introduction to Flash
 CALIFORNIA STATE UNIVERSITY, LOS ANGELES INFORMATION TECHNOLOGY SERVICES Adobe Flash CS4 Part 1: Introduction to Flash Fall 2010, Version 1.0 Table of Contents Introduction...3 Downloading the Data Files...3
Adobe Flash CS4 Part 2: Working with Symbols
 CALIFORNIA STATE UNIVERSITY, LOS ANGELES INFORMATION TECHNOLOGY SERVICES Adobe Flash CS4 Part 2: Working with Symbols Fall 2010, Version 1.0 Table of Contents Introduction...2 Downloading the Data Files...2
LAB # 2 3D Modeling, Properties Commands & Attributes
 COMSATS Institute of Information Technology Electrical Engineering Department (Islamabad Campus) LAB # 2 3D Modeling, Properties Commands & Attributes Designed by Syed Muzahir Abbas 1 1. Overview of the
Working with the BCC Z Space II Filter
 Working with the BCC Z Space II Filter Normally, if you create an effect with multiple DVE layers, each layer is rendered separately. The layer that is topmost in the timeline overlaps all other layers,
Working with the BCC Brick Generator
 Working with the BCC Brick Generator Brick is a versatile generator of tiled surfaces with realistic texture and lighting controls. The bricks can act as a Þlter on a layer or generate a brick surface
Adobe Premiere Pro CC 2015 Tutorial
 Adobe Premiere Pro CC 2015 Tutorial Film/Lit--Yee GETTING STARTED Adobe Premiere Pro CC is a video layout software that can be used to create videos as well as manipulate video and audio files. Whether
3D Space is one of the most rewarding areas
 Lesson 8 206 3D Space Add a new dimension to your animations. In This Lesson 207 enabling layers for 3D 208 moving and rotating layers in 3D space 210 multiplaning effects 212 3D motion paths 213 multiple
CROSSFADE ANIMATION with AFTEREFFECTS
 CROSSFADE ANIMATION with AFTEREFFECTS Consider using the Internet as a new presentation medium for photographs. The fluid nature of the medium allows the removal of photography from its present static
9 Dynamics. Getting Started with Maya 491
 9 Dynamics Dynamics is a branch of physics that describes how objects move using physical rules to simulate the natural forces that act upon them. Dynamic simulations are difficult to achieve with traditional
Lightning Strikes. In this tutorial we are going to take a look at a method of creating some electricity zapper effects using Particle Flow.
 Lightning Strikes In this tutorial we are going to take a look at a method of creating some electricity zapper effects using Particle Flow. Open a new scene in 3DS Max and press 6 to open particle view.
A Step-by-step guide to creating a Professional PowerPoint Presentation
 Quick introduction to Microsoft PowerPoint A Step-by-step guide to creating a Professional PowerPoint Presentation Created by Cruse Control creative services Tel +44 (0) 1923 842 295 training@crusecontrol.com
Pictures. Getting Started 1
 Getting Started 1 In this tutorial, we ll introduce you to importing, placing, and managing images on your website. Along the way, we ll also highlight some useful dos and don'ts. In this exercise, you
Index FEATURES LIST 2
 FULL FEATURES LIST Index RealFlow Features 4 Liquids 4 Elastics 4 Granulars 4 Rigids 5 Viscous Materials 5 Viscoelastic Materials 5 Fibres 5 Built-in Basic Primitives 6 Particle Emitters 6 Rigid Bodies
Overview of Adobe Fireworks CS6
 Overview of Adobe Fireworks CS6 Lesson topics: Work with the Adobe Fireworks CS6 workspace: tools, Document windows, menus, and panels. Customize the workspace. Change the magnification of a document.
12 APPLYING EFFECTS. Lesson overview
 12 APPLYING EFFECTS Lesson overview In this lesson, you ll learn how to do the following: Use various effects, such as Pathfinder, Scribble, and Drop Shadow. Use Warp effects to distort type. Create three-dimensional
CECOS University Department of Electrical Engineering. Wave Propagation and Antennas LAB # 1
 CECOS University Department of Electrical Engineering Wave Propagation and Antennas LAB # 1 Introduction to HFSS 3D Modeling, Properties, Commands & Attributes Lab Instructor: Amjad Iqbal 1. What is HFSS?
ver Wfl Adobe lif Sams Teach Yourself Betsy Bruce Robyn Ness SAMS 800 East 96th Street, Indianapolis, Indiana, USA WlM John Ray ^lg^
 Betsy Bruce John Ray Robyn Ness Sams Teach Yourself Adobe Wfl lif ver W ^msssi^ mm WlM ^lg^ SAMS 800 East 96th Street, Indianapolis, Indiana, 46240 USA Table of Contents Introduction What Is Dreamweaver
MODELING AND ANIMATION
 UNIVERSITY OF CALICUT SCHOOL OF DISTANCE EDUCATION D M A MODELING AND ANIMATION QUESTION BANK 1. 2D Animation a) Wire Frame b) More than two Dimension c) Cel animation 2. 3D Animation a) Illution of three-dimensional
UI Elements. If you are not working in 2D mode, you need to change the texture type to Sprite (2D and UI)
") UI Elements 1 2D Sprites If you are not working in 2D mode, you need to change the texture type to Sprite (2D and UI) Change Sprite Mode based on how many images are contained in your texture If you are
UI Elements 1 2D Sprites If you are not working in 2D mode, you need to change the texture type to Sprite (2D and UI) Change Sprite Mode based on how many images are contained in your texture If you are
Scale Rate by Object Size: Only available when the current Emitter Type is Surface, Curve, or Volume. If you turn on this attribute, the
 Basic Emitter Attributes Emitter Name: The name helps you identify the emitter object in the Outliner. If you don t enter a name, the emitter object receives a default name such as emitter1. Solver: (For
Renderize Live Overview
 Renderize Live Overview The Renderize Live interface is designed to offer a comfortable, intuitive environment in which an operator can create projects. A project is a savable work session that contains
Designer 2.2 holds several new features and fixes. This document contains the following items:
 Contents VLC, Quick Start, Live Video for LPC X Designer 2.2 holds several new features and fixes. This document contains the following items: Pharos VLC o Overview o Programming a VLC in Designer 2 o
BASICS OF MOTIONSTUDIO
 EXPERIMENT NO: 1 BASICS OF MOTIONSTUDIO User Interface MotionStudio combines draw, paint and animation in one easy easy-to-use program gram to save time and make work easy. Main Window Main Window is the
Mobile MOUSe WEB SITE DESIGN ONLINE COURSE OUTLINE
 Mobile MOUSe WEB SITE DESIGN ONLINE COURSE OUTLINE COURSE TITLE WEB SITE DESIGN COURSE DURATION 19 Hours of Interactive Training COURSE OVERVIEW In this 7 session course Debbie will take you through the
User's Guide Low Poly OBJ Importer v1.0
 User's Guide Low Poly OBJ Importer v1.0 Chapter 1 How It Works 1 Chapter 2 Quick Start 2 Chapter 3 Main Interface 3 Import 3 Object/SubObject Selector 4 Fill Options 5 Stroke Options 7 Global Options 8
Chapter 9- Animation Basics
 Timing, Moving, Rotating and Scaling Now that we know how to make stuff and make it look good, it s time to figure out how to move it around in your scene. Another name for an animation is Interpolation
EXCEL 2007 GETTING STARTED
 EXCEL 2007 GETTING STARTED TODAY S DESTINATION Quick Access Toolbar Customize it! Office Button Click Excel Options BREAK DOWN OF TABS & RIBBON Tab Name Contains Information relating to Contains the following
Editing in Premiere Pro CC 2015
 Editing in Premiere Pro CC 2015 Lesson 1: Exploring the Interface Exploring the Interface The Source Window The Program Window The Settings Menu Revealing the Video Scopes The Workspace Bar The Project
Picturall Media Servers Changelog
 Picturall series Picturall Media Servers Changelog Picturall Media Servers Changelog Known problems Known issues General Various operations may slow down significantly while the GUI is transferring large
Hardware-driven visibility culling
 Hardware-driven visibility culling I. Introduction 20073114 김정현 The goal of the 3D graphics is to generate a realistic and accurate 3D image. To achieve this, it needs to process not only large amount
CGWAVE Analysis SURFACE WATER MODELING SYSTEM. 1 Introduction
 SURFACE WATER MODELING SYSTEM CGWAVE Analysis 1 Introduction This lesson will teach you how to prepare a mesh for analysis and run a solution for CGWAVE. You will start with the data file indiana.xyz which
5. ADOBE AFTER EFFECTS MANUAL
 5. Introduction to Adobe After Effects Version 1.0-0913 2013 by VirTra Inc. All Rights Reserved. VirTra, the VirTra logo are either registered trademarks or trademarks of VirTra in the United States and/or
AUTODESK FUSION 360 Designing a RC Car Body
 AUTODESK FUSION 360 Designing a RC Car Body Abstract This project explores how to use the sculpting tools available in Autodesk Fusion 360 Ultimate to design the body of a RC car. John Helfen john.helfen@autodesk.com
Unbelievable Visualization Techniques: Letting Your Imagination Soar!
 11/29/2005-5:00 pm - 6:30 pm Room:N. Hemispheres (Salon A4) (Dolphin) Walt Disney World Swan and Dolphin Resort Orlando, Florida Unbelievable Visualization Techniques: Letting Your Imagination Soar! Chris
Maya Lesson 3 Temple Base & Columns
 Maya Lesson 3 Temple Base & Columns Make a new Folder inside your Computer Animation Folder and name it: Temple Save using Save As, and select Incremental Save, with 5 Saves. Name: Lesson3Temple YourName.ma
SimTenero Particle Physics
 SimTenero Particle Physics Getting Started The heart of the particle system is the Emitter. This represents the point in space where particles will be created and contains all of the parameters that define
animation, and what interface elements the Flash editor contains to help you create and control your animation.
 e r ch02.fm Page 43 Wednesday, November 15, 2000 8:52 AM c h a p t 2 Animating the Page IN THIS CHAPTER Timelines and Frames Movement Tweening Shape Tweening Fading Recap Advanced Projects You have totally
Import / Object modes: 5 Layers for organising your scene are available at the top of the screen.
 LUMION 1 VS LUMION 2 SCENES - In Lumion 2, the sky, clouds, fog, material settings, ambient shadows and reflections have been overhauled, so don't expect your Lumion 1 scenes to look identical when you
PCB Object and Layer Transparency
 PCB Object and Layer Transparency Old Content - visit altium.com/documentation Modified by on 6-Nov-2013 Related Videos PCB Object and Layer Transparency Settings Offering increased control over the display
Tutorial 3: Using the Waveform Viewer Introduces the basics of using the waveform viewer. Read Tutorial SIMPLIS Tutorials SIMPLIS provide a range of t
 Tutorials Introductory Tutorials These tutorials are designed to give new users a basic understanding of how to use SIMetrix and SIMetrix/SIMPLIS. Tutorial 1: Getting Started Guides you through getting
Working with the BCC 2D Particles Filter
 Working with the BCC 2D Particles Filter 2D Particles breaks the source image into particles and disperses them in 2D space. This Þlter also provides a variety of explosion, velocity, and gravity controls
Data Visualization. What is the goal? A generalized environment for manipulation and visualization of multidimensional data
 Data Visualization NIH-NSF NSF BBSI: Simulation and Computer Visualization of Biological Systems at Multiple Scales June 2-4, 2 2004 Joel R. Stiles, MD, PhD What is the goal? A generalized environment
How to view details for your project and view the project map
 Tutorial How to view details for your project and view the project map Objectives This tutorial shows how to access EPANET model details and visualize model results using the Map page. Prerequisites Login
Beginners Guide Maya. To be used next to Learning Maya 5 Foundation. 15 juni 2005 Clara Coepijn Raoul Franker
 Beginners Guide Maya To be used next to Learning Maya 5 Foundation 15 juni 2005 Clara Coepijn 0928283 Raoul Franker 1202596 Index Index 1 Introduction 2 The Interface 3 Main Shortcuts 4 Building a Character
Awesome PowerPoint Tricks for Effective Presentations
 EFFECTIVE LEARNING STARTS WITH COMPELLING CONTENT Awesome PowerPoint Tricks for Effective Presentations Instructional Design and Content Creation for Live Training and elearning info.com +1 866 789 2482
Game Design Unity Workshop
 Game Design Unity Workshop Activity 2 Goals: - Creation of small world - Creation of character - Scripting of player movement and camera following Load up unity Build Object: Mini World and basic Chase
DG Shader Essentials User s Guide
 DG Shader Essentials User s Guide Thank you for purchasing DestinysGarden s Shader Essentials Pack. This shader set is intended to be a basic set of shader presets to get you started on your way to customizing
GRAPHIC WEB DESIGNER PROGRAM
 NH135 InDesign Level 2 24 Total Hours COURSE TITLE: InDesign Level 2 COURSE OVERVIEW: This course builds on the fundamentals taught in InDesign Level 1. Students will start by learning how to create complex
Chart And Graph. Features. Features. Quick Start Folders of interest Bar Chart Pie Chart Graph Chart Legend
 Chart And Graph Features Quick Start Folders of interest Bar Chart Pie Chart Graph Chart Legend Overview Bar Chart Canvas World Space Category settings Pie Chart canvas World Space Pie Category Graph Chart