Turn your movie file into the homework folder on the server called Lights, Camera, Action.
|
|
|
- Michael Jennings
- 5 years ago
- Views:
Transcription
1 CS32 W11 Homework 3: Due MONDAY, APRIL 18 Now let s put the ball in a world of your making and have some fun. Create a simple AND WE MEAN SIMPLE environment for one of your ball bounces. You will assign materials to the objects, add color and simple texture, then place cameras and lights. In this project you will learn, (1) about materials and shaders in Maya, (2) basics on procedural and file textures, (3) basic lighting concepts, (4) how to add shadows, (5) some very simple modeling, (6) how to set up a camera, (7) rendering basics. DUE Monday, April 18th What you will turn in: Turn in a QuickTime (.mov) file of you RENDERED animation. This movie will be compressed. Details on how to render a scene and which compression to use will be provided this week in a tutorial. Turn your movie file into the homework folder on the server called Lights, Camera, Action. Be sure to save a copy of your project file in your home directory (on the server use fetch).
2 Materials: Let s start by giving your ball a material and color. In Maya, shading is the term for applying colors and textures. Step one is to decide upon the characteristics of the animated object. Is it made of plastic? Metal? Glass? What color is it? Transparent? Translucent? Does it have a smooth and shiny surface, or is it dull? Simply put, a shader defines an object s look. The tools for assigning materials and textures reside primarily in the Hypershade and Attribute editors. A material is a description of an object s surface that is used by Maya to render. There are five basic options for materials: Anastropic, Blinn, Lambert, Phong and Phong E Except for Lambert, the main difference between these materials is the way light bounces off them. The highlights you see on an object are actually the reflection of the lighting source. Since it would be very computationally costly to do this the right way in Maya, another method has been created. In this method, shiny spots are created on surfaces automatically, with the spots corresponding to the positions of lights in your scene. Picking a shader that corresponds closely to the type of material you are trying to simulate is very important. Blinn tends to have soft highlights Phongs and Phong E s have more concentrated, high-contrast highlights, very reflective and glossy looking. Anastropic is used for surfaces that require a highlight that is broken up by grooves in the surface (hair, the underside of a CD, brushed metal, for example). Anastropic is defined as having properties that differ according to direction. This creates a specular highlight that is uneven across the surface, changing according to the direction you specify. Lambert has no highlight and is used for a dull, non-reflective surface. Layered shaders allow the stacking of shaders to create complex shading effects. This is good for objects made of different materials, such as a bottle with a paper label or applying dirt to an aged surface. This makes it possible to save computer power by eliminating the need to create a separate geometry for different each material. Layered shaders are controlled by using transparency maps, stacking them from left to right in the Attribute Editor (the left layer is the topmost layer). Ramped shaders apply a texture that is a gradient. Ramps create a smooth transition between colors and can even be used to control particles. When used as a texture, it is applied to any attribute of a shader to created graduated colors or transparency, increasing glow effects, etc. Ramp shaders can also be
3 applied as a self-contained shader node that automatically has several shader nodes attached to its attributes. It is a simplified editing environment for the shader because all the colors and handles are accessible through the Ramp shader s own Attribute Editor. You apply a material to you object: RMB click on the object and then select Material > Assign new Material (or existing material) Another way to apply shaders, is in the Hypershade window. Window > Rendering Editors > Hypershade In the left column of that window, you will see a list of Maya shading nodes. The first section has the Surface nodes described above. Shader Attributes: Shaders are composed of nodes just like other Maya objects. Within these nodes, attributes define define what shaders do. Color: An RGB or HSV value that defines what color the shader is when it receives a neutral color light. Transparency: The higher the transparency value, the less opaque and more see-through the object becomes (can have color). Ambient Color: This color affects the color attribute of the shader as more ambient light is created in the scene. Ambient color tends to flatten an object because Ambient Color evenly colors the object.
4 Cameras You can create a camera that will follow an object or that can be animated. The best way to do this is to create a camera that has an aim control. 1. From the Create menu, select Cameras > Camera and Aim 2. A new camera appears in the Perspective view. The dot in front of the camera is the aim. 3. From the window menu, select Hypergraph. You can see the nodes associated with the camera group. 4. From the Hypergraph, select the group node of the camera (probably called camera1_group). 5. Move the camera around. The aim and camera move together. 6. In the Perspective view, select and then move the aim. The Camera remains aimed at the dot. 7. In the Perspective view, select and then move the camera. The camera moves but continues to point at the aim. 8. Animating the camera is just like animating anything else. You select it, keyframe it, move to another frame, move the camera, keyframe it again,etc. 9. Be sure you are looking at the view through the camera you are animating! You can use tumble, track and dolly just as you did with the perspective view, to move the camera and set the shot up. To make the aim follow an object: 1. Select the object you want the camera to follow. (if you want to test it on a test shot, create a nurb sphere. Keyframe it at frame 1, move it in frame 30 and keyframe it again to create a simple animation. 2. From the Create menu, select Cameras > Camera and Aim 3. Select and move the aim of the camera to the center of the sphere 4. With the aim still selected, shift-select the sphere (so that both are selected at once). Press p to parent the aim to the sphere (or go to Edit > Parent in the menu). 5. Rewind to the beginning of the animation and play it. The camera will follow the sphere. If you look through the camera, you will see that the sphere is centered in the camera at all times. Creating an Image Plane Image planes are a component of the camera that remains in the background of the view no matter where the camera is moved. It can be
5 used to create a template for modeling or it can be used to place a backdrop in a scene for rendering. 1. From the View menu of the Perspective view, select Image Plane > Import Image. 2. An Open dialog box appears. 3. Browse for your image and click open. The image now appears on the image plane. 4. To move the image around, you must set the pick mask to Select by Component Type and select the Miscellaneous icon (the question mark). 5. Once you have selected the image plane, you can move it by changing the Center x.y. and z settings in the Channel box. You can delete it by pressing delete. 6. A quick way to hide an image plane is to uncheck the Cameras from the Show menu of the view pane you are in. Since the image plane is a component of the camera and you are hiding the camera, the image plane is also hidden.
6
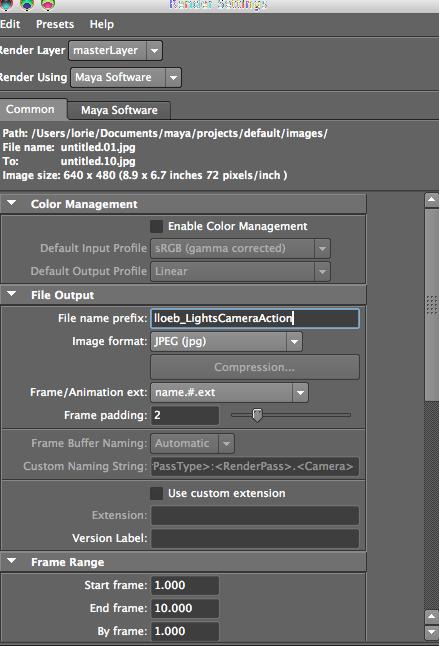
7 Rendering Rendering is how you output completed images. In this course, we output them as a sequence of images that are put together into a movie (using Quicktime). The main window for setting the option is the Render Settings window. FIRST. MAKE SURE YOUR PROJECT IS SET CORRECTLY! YOU SHOULD SEE SOMETHING LIKE: Users/imac/documents/maya/projects/your project name/scenes/your scene name ALONG THE TOP OF THE MAYA WINDOW AND IN THE RENDER SETTINGS WINDOW. IF YOU DON T.GO TO FILE>PROJECTS>SET AND SELECT THE CORRECT PROJECT FOLDER. How you set your options depends on what you are outputting to. 640X480 is good for this class. The higher the resolution, the longer each frame takes to render. 1. Make sure you are in the Render Module. Open the Render Settings window. Click on the icon, or, go to Windows > Render Editors > Render Settings. The Render Settings window opens. 2. Click on the Common Tab to open the common settings 3. Click the triangle next to Image File Output to expand the options (if it isn t already expanded) 4. In the File Name Prefix field, type a file name for the render 5. In the image Format selection field, choose jpeg 6. The Frame/Animation ext: changes to name.#.ext 7. The Compression button becomes active. Click on it. 8. Set the Start and end frames of your animation. This should be set to the range of time you want to render. 9. Under Renderable Cameras, choose the camera you want to render with for the frames you ve selected. 10. You don t need a Depth Channel right now. 11. Under Resolution, click the arrow to expand the options (if it isn t already expanded). From the Presets menu choose the resolution you want Maintain Aspect Ratio 13. Enable Default Lights should be un-checked Click the Maya Software render tab. 1. Under quality, choose Production Quality 2. Under Edge Anti-aliasing, choose Highest Quality. 3. Under Field Options choose Frames

8 4. If you are using Raytracing, set the quality here. 5. If you are using Motion Blur, set it up here 6. Under Render Options, make sure you have Enable Depth Maps set if you are using Depth Map shadows and Shadows Obey Light Linking should be checked. 7. Click Close.

9 You are ready to render. In the menu, go to Render > Batch Render. The Render begins. If you click on the Script Editor icon in the lower right corner of the interface you can watch the progress of the render. To view the render: From the Render menu, select Render > Show Batch Render Your image sequence will be saved in the images folder for your project. To open the images and turn them into a movie, open Quicktime.

10 Go to File>Open Image Sequence Select the first image in the sequence. Choose the frame rate you want (24 or 30 frames per second, depending on what you set your playback rate to in Maya). To save your movie, you can either go to File>Save Scene As and Choose Self- Contained Movie, or go to File>Export. Choose Movie to Quicktime Move. Select Options and make sure compression is set to H264. Be sure your name is in the movie file name. Save. Other options for rendering: Hardware Rendering: Hardware Rendering is an option between playblasting and Software rendering. It is essentially a series of screen snapshots. It is a bit
11 better than playblasting because it can anti-alias the edges, create motion blur, create an alpha channel so you can composite better. Like playblasts, you will not have shadows, reflections, refractions, or special effects. About Raytracing: Raytracing is a way to get more believable reflections and refractions. It is significantly slower than using depth map shadows. To create reflections: Reflections happen when the light rays are bouncing off one surface and then bouncing off another surface and then bouncing into your eye or the camera lens. 1. Create a scene with a large plane, a sphere and many cubes and some lights. 2. For the cubes, assign a red Phong material and for the sphere, assign a reflective Phong material. Frame the sphere in the perspective view. 3. Open the Render Settings window and set it to use Maya Software to render. 4. Set everything as before. Be sure you are in Production Quality. 5. Under Raytracing Quality, click the arrow to expand the options window. 6. Select Raytracing to activate it. 7. Render it. Note: Objects can be visible or invisible in reflections. To change an object s reflection state, select the object and open the Attribute Editor, expand the Render Stats section, and uncheck Visible in Reflections to make the object not visible in reflections! To create refractions: Refractions are the bending of light as it travels through a dense, transparent material such as glass or liquid. Without it, glass doesn t look real. You can set the amount of bending the light does as it passes through the surface. 1. Using the scene from above, select the sphere. 2. Click on the Graph Materials on Selected Items in the Hypershade. The material for the sphere appears in the work area of the Hypershade. 3. Double click the Phong material assigned to the sphere. The Attribute Editor opens 4. Drag the Transparency slider all the way to the right. The color field next to transparency becomes white. 5. Scroll down in the Attribute Editor and click the arrow next to Raytrace Options to expand the window. 6. Select Refractions 7. Change Refractive Index to 1.333
12 8. Click the Render button. The sphere refracts the light, which causes the objects seen through it to appear warped. 9. As with reflections, you can make objects visible or invisible in refractions under the Render Stats section of the Attribute Editor. Mental Ray is like the Maya Renderer but it has more advanced features. If you want to play around with it, feel free. The main advantages to Mental Ray are the ability to create Caustics and Global Illumination. Feel free to look into this more.
CGS 3034 Lecture 2 Ball Bounce
 CGS 3034 Lecture 2 Ball Bounce Introduction to Computer Aided Animation Instructor: Brent Rossen Ball Bounce Example 1 Setup a new project: BallBounce Use Default placement settings Exports to Image folder
Advanced Maya Texturing and Lighting
 Advanced Maya Texturing and Lighting Lanier, Lee ISBN-13: 9780470292730 Table of Contents Introduction. Chapter 1 Understanding Lighting, Color, and Composition. Understanding the Art of Lighting. Using
Advanced Maya e Texturing. and Lighting. Second Edition WILEY PUBLISHING, INC.
 Advanced Maya e Texturing and Lighting Second Edition Lee Lanier WILEY PUBLISHING, INC. Contents Introduction xvi Chapter 1 Understanding Lighting, Color, and Composition 1 Understanding the Art of Lighting
CGS 3220 Lecture 4 Shaders, Textures, and Light
 CGS 3220 Lecture 4 Shaders, Textures, and Light Introduction to Computer Aided Modeling Instructor: Brent Rossen Overview Working with the menu-less UI Working with the Hypershade Creating shading groups
CGDD 4113 Final Review. Chapter 7: Maya Shading and Texturing
 CGDD 4113 Final Review Chapter 7: Maya Shading and Texturing Maya topics covered in this chapter include the following: Shader Types Shader Attributes Texturing the Axe Life, Love, Textures and Surfaces
Beginners Guide Maya. To be used next to Learning Maya 5 Foundation. 15 juni 2005 Clara Coepijn Raoul Franker
 Beginners Guide Maya To be used next to Learning Maya 5 Foundation 15 juni 2005 Clara Coepijn 0928283 Raoul Franker 1202596 Index Index 1 Introduction 2 The Interface 3 Main Shortcuts 4 Building a Character
Raycast Rendering Maya 2013
 2000 2012 Michael O'Rourke Raycast Rendering Maya 2013 (See also the Intro to Lights and Rendering tutorial for an introduction to the basics of rendering an image) Concept There are several algorithms
An Introduction to Maya. Maya. Used in industrial design, CAD, computer games and motion picture effects. The ambition is what get
 An Introduction to Maya Gustav Taxén gustavt@nada.kth.se 2D1640 Grafik och Interaktionsprogrammering VT 2006 Maya Used in industrial design, CAD, computer games and motion picture effects Special focus
The Special Effects Handbook
 FREE MODELS From TurboSquid Value $298.00 USD Official Autodesk Training Guide Learning Autodesk Maya 2009 The Special Effects Handbook A hands-on introduction to key tools and techniques in Autodesk Maya
audio, 57 auto-orientation, 215 automatic mapping, 243 average vertices, 239 axis, 3-6, 12, 94, 126, 149, 191, 199, 290
 Index 307 Index A added attributes, 196, 205 Adobe Premiere, 256 aim constraint, 271, 272, 277 airplane, 5, 13-17, 197-199, 206-207, 252-253 Alias manuals, 54 alpha channel, 174 alpha gain, 231 ambient,
LIGHTING - 1. Note. Lights. Ambient occlusion
 Note LIGHTING - 1 The creation and use of lights varies greatly between the default Blender renderer and the Cycles renderer. This section refers only to simple lighting in the default renderer. Lights
Chapter 4- Blender Render Engines
 Chapter 4- Render Engines What is a Render Engine? As you make your 3D models in, your goal will probably be to generate (render) an image or a movie as a final result. The software that determines how
Me Again! Peter Chapman. if it s important / time-sensitive
 Me Again! Peter Chapman P.Chapman1@bradford.ac.uk pchapman86@gmail.com if it s important / time-sensitive Issues? Working on something specific? Need some direction? Don t hesitate to get in touch http://peter-chapman.co.uk/teaching
After saving out your Rhino model as an IGES file: Open up Maya Go to File - Import
 After saving out your Rhino model as an IGES file: Open up Maya Go to File - Import Select your file at the saved location Click Import *NOTE: If your model imports rotated 90 degrees, you can change the
Art? 2 Computer Graphics 2 The Stages of Production 4 The CG Production Workflow 8 Core Concepts 10 Basic Film Concepts 21 Summary 26
 Contents Introduction xvii Chapter 1 Introduction to Computer Graphics and 3D 1 Art? 2 Computer Graphics 2 The Stages of Production 4 The CG Production Workflow 8 Core Concepts 10 Basic Film Concepts 21
Chapter 11. Caustics and Global Illumination
 11 and Global Illumination Chapter 11 Direct illumination occurs when a light source directly illuminates an object or objects in a scene. Indirect illumination occurs if light illuminates objects by reflection
STARTING COMPOSITING PROJECT
 STARTING COMPOSITING PROJECT This tutorial is divided in two parts: Lighting in Maya and compositing in Nuke. Only describe basics techniques but it is your task to learn them and go beyond. These are
Autodesk Fusion 360: Render. Overview
 Overview Rendering is the process of generating an image by combining geometry, camera, texture, lighting and shading (also called materials) information using a computer program. Before an image can be
Texture Mapping. Images from 3D Creative Magazine
 Texture Mapping Images from 3D Creative Magazine Contents Introduction Definitions Light And Colour Surface Attributes Surface Attributes: Colour Surface Attributes: Shininess Surface Attributes: Specularity
Learning Autodesk Maya The Special Effects Handbook. Free Model From Turbo Squid Value US $ Official Autodesk Training Guide
 Free Model From Turbo Squid Value US $100.00 Official Autodesk Training Guide Learning Autodesk Maya 2008 The Special Effects Handbook A hands-on introduction to key tools and techniques in Autodesk Maya
Chapter 9- Ray-Tracing
 Ray-tracing is used to produce mirrored and reflective surfaces. It is also being used to create transparency and refraction (bending of images through transparent surfaceslike a magnifying glass or a
Lesson 11. Polygonal Spaceship
 11 Polygonal Spaceship In this lesson, you will build and texture map a polygonal spaceship. Starting with a polygonal cube, you will extrude facets until you have a completed ship. You will then be able
Mia Round Corners Node
 Mia Round Corners Node NAKHLE Georges - july 2007 This tutorial describes how to use the mental ray MIA Round Corners node. 1) Create a polygonal cube, and make sure that mental ray plug-in is loaded.
REU Modeling Course Day 1 pt2 AutoDesk Maya - More Modeling
 REU Modeling Course Day 1 pt2 AutoDesk Maya - More Modeling Maggie Iglesias Pena iglesias@iastate.edu Workshop Workflow Let s Review last session Creating & Applying Materials Rendering Today s mini goal
MAYA; AN INTRODUCTION TO MAYA; EndOfLine.info;
 MAYA; AN INTRODUCTION TO MAYA; EndOfLine.info; Maya is an intuitive modelling and animation software that relies on a different set of techniques and strategies than Rhinoceros. It is important to note
Announcements. Written Assignment 2 out (due March 8) Computer Graphics
 Computer Graphics") Announcements Written Assignment 2 out (due March 8) 1 Advanced Ray Tracing (Recursive) Ray Tracing Antialiasing Motion Blur Distribution Ray Tracing Ray Tracing and Radiosity Assumptions Simple shading
Announcements Written Assignment 2 out (due March 8) 1 Advanced Ray Tracing (Recursive) Ray Tracing Antialiasing Motion Blur Distribution Ray Tracing Ray Tracing and Radiosity Assumptions Simple shading
Introduction to Maya
 1 M CO PY RI GH TE D MA TE RI AL Introduction to Maya aya is a powerful 3D modeling, animation, effects, and rendering solution that has been used in everything from product design to feature films. In
Working with the BCC Bump Map Generator
 Working with the BCC Bump Map Generator Bump mapping is used to create three dimensional detail on an image based on the luminance information in the image. The luminance value of each pixel of the image
Graphical Editors used at CSC/Nada earlier. Main competitors. What is Maya? What is Maya? An Introduction to Maya. Maya
 DH2640 Grafik och interaktionsprogrammering DH2323 Datorgrafik och interaktion NA8740 Datorgrafik och användargränssnitt An Introduction to Maya original slides by Gustav Taxén Lars Kjelldahl lassekj@csc.kth.se
Animation Basics. Learning Objectives
 Animation Basics Learning Objectives After completing this chapter, you will be able to: Work with the time slider Understand animation playback controls Understand animation and time controls Morph compound
Homework 2: Bouncing Ball Part 1: Bouncing Ball Key poses (timing and spacing) - DUE Tuesday, January 17
 - DUE Tuesday, January 17") Homework 2: Bouncing Ball Part 1: Bouncing Ball Key poses (timing and spacing) - DUE Tuesday, January 17 A bouncing ball is a classic place to begin animating. If you can make a bouncing ball look convincing,
Homework 2: Bouncing Ball Part 1: Bouncing Ball Key poses (timing and spacing) - DUE Tuesday, January 17 A bouncing ball is a classic place to begin animating. If you can make a bouncing ball look convincing,
1 Tutorials About the Tutorial Exercises
 1 Tutorials About the Tutorial Exercises..............................................2 Getting Started........................................................3 Exercise 1: Animating a 3D Model Using Keyframes............................3
COS 116 The Computational Universe Laboratory 10: Computer Graphics
 COS 116 The Computational Universe Laboratory 10: Computer Graphics As mentioned in lecture, computer graphics has four major parts: imaging, rendering, modeling, and animation. In this lab you will learn
Rendering Engines - Specific tools may depend on "Rendering Engine"
 Week 5 3DS Max, Cameras, Lighting and Materials Rendering - Process of turning geometry into pixels Rendering Engines - Specific tools may depend on "Rendering Engine" 1. Internal (3DS MAX) ART (Autodesk
Computer Graphics (CS 543) Lecture 7b: Intro to lighting, Shading and Materials + Phong Lighting Model
 Lecture 7b: Intro to lighting, Shading and Materials + Phong Lighting Model") Computer Graphics (CS 543) Lecture 7b: Intro to lighting, Shading and Materials + Phong Lighting Model Prof Emmanuel Agu Computer Science Dept. Worcester Polytechnic Institute (WPI) Why do we need Lighting
Computer Graphics (CS 543) Lecture 7b: Intro to lighting, Shading and Materials + Phong Lighting Model Prof Emmanuel Agu Computer Science Dept. Worcester Polytechnic Institute (WPI) Why do we need Lighting
Avid FX Tutorials. Understanding the Tutorial Exercises
 Avid FX Tutorials Understanding the Tutorial Exercises The following tutorial exercises provide step-by-step instructions for creating various kinds of effects, while exploring many aspects of the Avid
ECS 175 COMPUTER GRAPHICS. Ken Joy.! Winter 2014
 ECS 175 COMPUTER GRAPHICS Ken Joy Winter 2014 Shading To be able to model shading, we simplify Uniform Media no scattering of light Opaque Objects No Interreflection Point Light Sources RGB Color (eliminating
Maya Lesson 3 Temple Base & Columns
 Maya Lesson 3 Temple Base & Columns Make a new Folder inside your Computer Animation Folder and name it: Temple Save using Save As, and select Incremental Save, with 5 Saves. Name: Lesson3Temple YourName.ma
Cast Shadows Maya 2013
 2000-2012 Michael O'Rourke Cast Shadows Maya 2013 Concept Cast shadows are defined on a per-light basis, because shadow-casting computations can be time-consuming Cast shadows are off by default in Maya,
COS 116 The Computational Universe Laboratory 10: Computer Graphics
 COS 116 The Computational Universe Laboratory 10: Computer Graphics As mentioned in lecture, computer graphics has four major parts: imaging, rendering, modeling, and animation. In this lab you will learn
How to Create a Simple Animation Using MAYA
 How to Create a Simple Animation Using MAYA Jennifer Soltz July 29, 2011 0 Table of Contents Introduction Safety Information. 2. 3 What you need Materials Overview Diagram. 4. 4 Instructions Setup Modeling
Chapter 4- Materials and Textures
 Chapter 4- Materials and Textures Materials and textures are what change your model from being gray to brilliant. You can add color, make things glow, become transparent like glass or make them look like
Flames in Particle Flow
 Flames in Particle Flow In this tutorial we are going to take a look at creating some licking flames in Particle Flow. I warn you however, is that this method of fire creation is very processor intensive.
3ds Max certification prep
 3ds Max certification prep Study online at quizlet.com/_25oorz 1. 24 Frames per second 2. 25 Frames per second, Europe 3. 30 Frames per second, Americas and Japan 4. Absolute mode, off set mode 5. How
Basic Rendering Techniques Part B
 Basic Rendering Techniques Part B Using Materials in 3d Max The simplest method for changing g the default gray color of a 3d object is to apply hue to the object using the diffuse color feature. The physical
TUTORIAL 7: Global Illumination & Ambient Occlusion
 TUTORIAL 7: Global Illumination & Ambient Occlusion The goal of this short tutorial is to introduce a few select aspects of mental ray so that you may consider incorporating them in your projects if appropriate.
Basic Texturing Tutorial by Gary Wu
 Basic Texturing Tutorial by Gary Wu This tutorial will teach you how to use basic shaders as textures on your models. In this example, we will be using a pumpkin model. The first step assumes you have
Maya tutorial. 1 Camera calibration
 Maya tutorial In this tutorial we will augment a real scene with virtual objects. This tutorial assumes that you have downloaded the file Maya.zip from the course web page and extracted it somewhere. 1
Today. Global illumination. Shading. Interactive applications. Rendering pipeline. Computergrafik. Shading Introduction Local shading models
 Computergrafik Thomas Buchberger, Matthias Zwicker Universität Bern Herbst 2008 Today Introduction Local shading models Light sources strategies Compute interaction of light with surfaces Requires simulation
MR Shaders Dielectric Materials Rendering Glass and Simple Caustics
 Dielectric Material This shader is a physically based material shader that can be used to simulate dielectric media such as glass, water, and other liquids. The shader uses Fresnel's formulas for dielectric
Topics and things to know about them:
 Practice Final CMSC 427 Distributed Tuesday, December 11, 2007 Review Session, Monday, December 17, 5:00pm, 4424 AV Williams Final: 10:30 AM Wednesday, December 19, 2007 General Guidelines: The final will
Computer Graphics (CS 4731) Lecture 16: Lighting, Shading and Materials (Part 1)
 Lecture 16: Lighting, Shading and Materials (Part 1)") Computer Graphics (CS 4731) Lecture 16: Lighting, Shading and Materials (Part 1) Prof Emmanuel Agu Computer Science Dept. Worcester Polytechnic Institute (WPI) Why do we need Lighting & shading? Sphere
Computer Graphics (CS 4731) Lecture 16: Lighting, Shading and Materials (Part 1) Prof Emmanuel Agu Computer Science Dept. Worcester Polytechnic Institute (WPI) Why do we need Lighting & shading? Sphere
Chapter 12- NURBS & Meta Shape Basics
 Chapter 12- NURBS & Meta Shape Basics When you press Shift-A for Add, you will notice other object types beside meshes, cameras and lights that can be created. Two types of objects that can be created
critical theory Computer Science
 Art/Science Shading, Materials, Collaboration Textures Example title Artists In the recommend real world, two the main following: factors determine the appearance of a surface: basic understanding what
LEVEL 1 ANIMATION ACADEMY2010
 1 Textures add more realism to an environment and characters. There are many 2D painting programs that can be used to create textures, such as Adobe Photoshop and Corel Painter. Many artists use photographs
1. Click on the link below, this will open your web browser.
 Walk-in Slide: AU 2014 Social Media Feed 1. Click on the link below, this will open your web browser http://aucache.autodesk.com/social/visualization.html 2. Use Extended Display to project the website
Mental Ray for BK5100
 for BK5100 Practical guide: Global Illumination Interior and MIA Materials Tweety 1 Technisch Ontwerp en Informatica Lecture overview Final Gather Exterior Lighting and rendering an exterior scene using
WEB 2 CREATING ROLLOVERS AND ANIMATIONS I N T H I S C H A P T E R. Creating Rollovers: The Basics 2. Simple Buttons: Lighting and Position 4
 WEB CREATING ROLLOVERS AND ANIMATIONS I N T H I S C H A P T E R Creating Rollovers: The Basics Simple Buttons: Lighting and Position 4 Animation Basics 9 Animating Text 13 Animating Effects in ImageReady
move object resize object create a sphere create light source camera left view camera view animation tracks
 Computer Graphics & Animation: CS Day @ SIUC This session explores computer graphics and animation using software that will let you create, display and animate 3D Objects. Basically we will create a 3
Max scene used to generate the image from the second pdf in this tutorial.
 Tutorial covers creating vector drawings from a 3ds max scene and methods for compositing these drawings back into a rendering. Rendering set up is based of the lighting set up from the mental ray/skylight/mr
There are many kinds of surface shaders, from those that affect basic surface color, to ones that apply bitmap textures and displacement.
 mental ray Overview Mental ray is a powerful renderer which is based on a scene description language. You can use it as a standalone renderer, or even better, integrated with 3D applications. In 3D applications,
About this manual. How it works
 Welcome to KeyShot 2 KeyShot is the first interactive image creation tool of its kind that allows anyone with little or no experience to create photographic images from their 3D digital data within minutes.
3D Space is one of the most rewarding areas
 Lesson 8 206 3D Space Add a new dimension to your animations. In This Lesson 207 enabling layers for 3D 208 moving and rotating layers in 3D space 210 multiplaning effects 212 3D motion paths 213 multiple
Maya 2014 Introduction to Maya
 Maya 2014 Introduction to Maya Maya is an incredibly powerful animation software that can be used to create almost anything you can imagine. The purpose of this document is to help you become familiar
booklet_new 11/7/02 2:39 PM Page 1 Learning Maya R
 Learning Maya R Learning Maya TM Beginner s Guide This material ("Material") is copyrighted (c) 2002 Alias Wavefront, a division of Silicon Graphics Limited ("Alias Wavefront") and contains proprietary
ART 268 3D Computer Graphics Texture Mapping and Rendering. Texture Mapping
 ART 268 3D Computer Graphics Texture Mapping and Rendering Texture Mapping Is the way in which a material is wrapped around an object. The default method is UVW mapping (see below). When you drag a material
Caustics - Mental Ray
 Caustics - Mental Ray (Working with real caustic generation) In this tutorial we are going to go over some advanced lighting techniques for creating realistic caustic effects. Caustics are the bent reflections
ADOBE 9A After Effects(R) CS3 ACE. Download Full Version :
 CS3 ACE. Download Full Version :") ADOBE 9A0-068 After Effects(R) CS3 ACE Download Full Version : http://killexams.com/pass4sure/exam-detail/9a0-068 D. Increase the Maximum RAM Cache Size to 100%. Question: 71 For a presentation, you want
ADOBE 9A0-068 After Effects(R) CS3 ACE Download Full Version : http://killexams.com/pass4sure/exam-detail/9a0-068 D. Increase the Maximum RAM Cache Size to 100%. Question: 71 For a presentation, you want
Chapter 5- Materials & Textures
 Chapter 5- Materials & Textures As mentioned in the past chapter, materials and textures are what change your model from being gray to brilliant. You can add color, make things glow, become transparent
Ray tracing. EECS 487 March 19,
 Ray tracing EECS 487 March 19, 2007 http://radsite.lbl.gov/radiance/book/ 1 Conventional pipeline (rasterization) For each triangle Compute lighting at vertices For each pixel within triangle Compute interpolated
Topic 12: Texture Mapping. Motivation Sources of texture Texture coordinates Bump mapping, mip-mapping & env mapping
 Topic 12: Texture Mapping Motivation Sources of texture Texture coordinates Bump mapping, mip-mapping & env mapping Texture sources: Photographs Texture sources: Procedural Texture sources: Solid textures
Today. Global illumination. Shading. Interactive applications. Rendering pipeline. Computergrafik. Shading Introduction Local shading models
 Computergrafik Matthias Zwicker Universität Bern Herbst 2009 Today Introduction Local shading models Light sources strategies Compute interaction of light with surfaces Requires simulation of physics Global
A Quick Introduction to POV-Ray
 A Quick Introduction to POV-Ray POV-Ray, the Persistence of Vision ray tracer, is open source software available from www.povray.org. This is good, highly functional software that you might enjoy playing
Draw Guide. Chapter 7 Working with 3D Objects
 Draw Guide Chapter 7 Working with 3D Objects Copyright This document is Copyright 2011 2014 by the LibreOffice Documentation Team. Contributors are listed below. You may distribute or modify it under the
Chapter 4- Materials and Textures
 Chapter 4- Materials and Textures Materials and textures are what change your model from being gray to brilliant. You can add color, make things glow, become transparent like glass or make them look like
Topic 11: Texture Mapping 11/13/2017. Texture sources: Solid textures. Texture sources: Synthesized
 Topic 11: Texture Mapping Motivation Sources of texture Texture coordinates Bump mapping, mip mapping & env mapping Texture sources: Photographs Texture sources: Procedural Texture sources: Solid textures
Glass Gambit: Chess set and shader presets for DAZ Studio
 Glass Gambit: Chess set and shader presets for DAZ Studio This product includes a beautiful glass chess set, 70 faceted glass shader presets and a 360 degree prop with 5 material files. Some people find
12 APPLYING EFFECTS. Lesson overview
 12 APPLYING EFFECTS Lesson overview In this lesson, you ll learn how to do the following: Use various effects, such as Pathfinder, Scribble, and Drop Shadow. Use Warp effects to distort type. Create three-dimensional
Working with the BCC Brick Generator
 Working with the BCC Brick Generator Brick is a versatile generator of tiled surfaces with realistic texture and lighting controls. The bricks can act as a Þlter on a layer or generate a brick surface
Artlantis training for new users
 Artlantis training for new users page 2 This training program reviews the main features of Artlantis. You will learn about the various presentation types such as still images, ivisit 3D panoramas, VR objects
4) Finish the spline here. To complete the spline, double click the last point or select the spline tool again.
 Finish the spline here. To complete the spline, double click the last point or select the spline tool again.") 1) Select the line tool 3) Move the cursor along the X direction (be careful to stay on the X axis alignment so that the line is perpendicular) and click for the second point of the line. Type 0.5 for
1) Select the line tool 3) Move the cursor along the X direction (be careful to stay on the X axis alignment so that the line is perpendicular) and click for the second point of the line. Type 0.5 for
Photorealism: Ray Tracing
 Photorealism: Ray Tracing Reading Assignment: Chapter 13 Local vs. Global Illumination Local Illumination depends on local object and light sources only Global Illumination at a point can depend on any
Ray Tracing. CSCI 420 Computer Graphics Lecture 15. Ray Casting Shadow Rays Reflection and Transmission [Ch ]
![Ray Tracing. CSCI 420 Computer Graphics Lecture 15. Ray Casting Shadow Rays Reflection and Transmission [Ch ]](/thumbs/78/78594982.jpg "Ray Tracing. CSCI 420 Computer Graphics Lecture 15. Ray Casting Shadow Rays Reflection and Transmission [Ch ]") CSCI 420 Computer Graphics Lecture 15 Ray Tracing Ray Casting Shadow Rays Reflection and Transmission [Ch. 13.2-13.3] Jernej Barbic University of Southern California 1 Local Illumination Object illuminations
CSCI 420 Computer Graphics Lecture 15 Ray Tracing Ray Casting Shadow Rays Reflection and Transmission [Ch. 13.2-13.3] Jernej Barbic University of Southern California 1 Local Illumination Object illuminations
Dissolving Models with Particle Flow and Animated Opacity Map
 Dissolving Models with Particle Flow and Animated Opacity Map In this tutorial we are going to start taking a look at Particle Flow, and one of its uses in digital effects of making a model look as though
Visual cues to 3D geometry. Light Reflection and Advanced Shading. Shading. Recognizing materials. size (perspective) occlusion shading
 occlusion shading") Visual cues to 3D geometry Light Reflection and Advanced Shading size (perspective) occlusion shading CS 4620 Lecture 17 1 2 Shading Recognizing materials Variation in observed color across an object strongly
Visual cues to 3D geometry Light Reflection and Advanced Shading size (perspective) occlusion shading CS 4620 Lecture 17 1 2 Shading Recognizing materials Variation in observed color across an object strongly
Rendering: Reality. Eye acts as pinhole camera. Photons from light hit objects
 Basic Ray Tracing Rendering: Reality Eye acts as pinhole camera Photons from light hit objects Rendering: Reality Eye acts as pinhole camera Photons from light hit objects Rendering: Reality Eye acts as
Using advanced DVD authoring techniques with Encore
 Adobe Encore CS4 Project 8 guide Using advanced DVD authoring techniques with Encore This guide shows you how to use Adobe Encore CS4 to build customized menus, buttons, text, and graphics by using Encore
CS5620 Intro to Computer Graphics
 So Far wireframe hidden surfaces Next step 1 2 Light! Need to understand: How lighting works Types of lights Types of surfaces How shading works Shading algorithms What s Missing? Lighting vs. Shading
FLAMINGO CHEAT SHEET FOR ES 305 CLASS 5 Pages of Fresh Flamingo Goodness
 FLAMINGO CHEAT SHEET FOR ES 305 CLASS 5 Pages of Fresh Flamingo Goodness *Keep this PDF with you at all times it will help you to maneuver the vast and confusing ocean that is the Flamingo Materials Editor!
12 APPLYING EFFECTS. Lesson overview
 12 APPLYING EFFECTS Lesson overview In this lesson, you ll learn how to do the following: Use various effects like Pathfinder, Distort & Transform, Offset Path, and Drop Shadow effects. Use Warp effects
Topic 11: Texture Mapping 10/21/2015. Photographs. Solid textures. Procedural
 Topic 11: Texture Mapping Motivation Sources of texture Texture coordinates Bump mapping, mip mapping & env mapping Topic 11: Photographs Texture Mapping Motivation Sources of texture Texture coordinates
Rendering & Project Management. Dillon Courts Sandy Natarajan Spencer Balogh Do Young Park
 Rendering & Project Management Dillon Courts Sandy Natarajan Spencer Balogh Do Young Park PLAYBLAST PlayBlast is a short cut to check the time and frame speed of your animation before creating the final
Dave s Phenomenal Maya Cheat Sheet The 7 Default Menus By Dave
 Dave s Phenomenal Maya Cheat Sheet The 7 Default Menus By Dave Menu Set Hot Keys F2 F3 F4 F5 Animation Modeling Dynamics Rendering Transformation / Manipulator Hot Keys Q W E R T Y Select Tool Move Tool
Local Illumination. CMPT 361 Introduction to Computer Graphics Torsten Möller. Machiraju/Zhang/Möller
 Local Illumination CMPT 361 Introduction to Computer Graphics Torsten Möller Graphics Pipeline Hardware Modelling Transform Visibility Illumination + Shading Perception, Interaction Color Texture/ Realism
CS452/552; EE465/505. Intro to Lighting
 CS452/552; EE465/505 Intro to Lighting 2-10 15 Outline! Projection Normalization! Introduction to Lighting (and Shading) Read: Angel Chapter 5., sections 5.4-5.7 Parallel Projections Chapter 6, sections
CSE 167: Introduction to Computer Graphics Lecture #6: Lights. Jürgen P. Schulze, Ph.D. University of California, San Diego Fall Quarter 2016
 CSE 167: Introduction to Computer Graphics Lecture #6: Lights Jürgen P. Schulze, Ph.D. University of California, San Diego Fall Quarter 2016 Announcements Thursday in class: midterm #1 Closed book Material
I have a meeting with Peter Lee and Bob Cosgrove on Wednesday to discuss the future of the cluster. Computer Graphics
 Announcements Assignment 4 will be out later today Problem Set 3 is due today or tomorrow by 9am in my mail box (4 th floor NSH) How are the machines working out? I have a meeting with Peter Lee and Bob
Lighting & 3D Graphics. Images from 3D Creative Magazine
 Lighting & 3D Graphics Images from 3D Creative Magazine Contents Introduction Definitions 3D Lighting Basics 3D Light Sources Lighting Controls & Effects Brightness & Colour Shadows Hotspot And Falloff
How to apply and adjust video effects
 Adobe Premiere Pro CS6 Project 4 guide How to apply and adjust video effects Adobe Premiere Pro CS6 features more than 130 video effects. You apply video effects to clips to give them special visual characteristics
Homework #2. Shading, Ray Tracing, and Texture Mapping
 Computer Graphics Prof. Brian Curless CSE 457 Spring 2000 Homework #2 Shading, Ray Tracing, and Texture Mapping Prepared by: Doug Johnson, Maya Widyasari, and Brian Curless Assigned: Monday, May 8, 2000