AV Using Autodesk 3ds Max Design, Autodesk Revit, and iray to Render Compelling Photographic Scenes
|
|
|
- Dina Sherman
- 5 years ago
- Views:
Transcription
1 AV Using Autodesk 3ds Max Design, Autodesk Revit, and iray to Render Compelling Photographic Scenes Steven Schain Autodesk Certified Instructor AV4672 This virtual class introduces designers to the real world use of and best practices for rendering Revit models using 3ds Max Design and iray. Learn key techniques for working with Revit models inside of 3ds Max, and what it takes to render photographic quality images using iray. Explore the creation and application of Autodesk Library materials to quickly create accurate surface textures. Utilize the daylight lighting system to simulate outdoor lighting. This class will introduce the use of traditional architectural photographic techniques and composition to create compelling images. Learn how to control the camera through the use of composition techniques like the rule of thirds and diagonals. Use 3ds Max exposure controls to adjust the scene exposure and set up and render using the iray renderer. See how you can get ahead of the competition by creating visually compelling, photorealistic renderings using photographic compositions and iray. Learning Objectives At the end of this class, you will be able to: Successfully link to a Revit model from within 3ds Max Design 2013 Edit and apply Autodesk Library materials to a model. Create and configure the daylight system, and place cameras using the rule of thirds and diagonals to create compelling images Adjust scene exposure to establish the optimum light levels and render a scene using the iray renderer. About the Speaker Steven is a graduate of the R.I.T. film/animation program and recently, the AB Tech Entrepreneurship program. He started Spectralight Images in 1989 delivering 3D software training and computer animation. He moved to Orlando, Florida from New York in 1990 to pursue a future in the computer graphics field. In 1995, he was vice president of Computer Animators Plus, and began teaching 3D animation at several local schools including Seminole Community College. His love of art brought him to open Gallery 611 in 1997, and helped to form the Orlando Visual Artists League (OVAL) in 2000, serving as president until Steven became a Kinetix/Discreet /Autodesk training specialist in 1998, and has contributed to the development of Autodesk certified training material for nine releases of 3ds Max, the Autodesk Certified Instructor Program, and the Autodesk 3ds Max fundamental standards (MEIS) Documents. In 2007, he took Spectralight Images, LLC full-time, sharing with others his love of teaching and computer graphics. steve@sli-3d.com
2 Table of Contents Learning Objectives... 1 About the Speaker... 1 Introduction... 3 Exporting an FBX from Revit... 4 Linking to a Revit FBX model... 4 Using Autodesk Library materials... 6 Selecting current materials... 6 Editing existing materials... 7 Assigning new materials... 8 Working with the Daylight System... 9 Introduction to the daylight system... 9 Modifying the time, date and location...10 Establishing a Point of View...11 Creating a camera...11 Composition basics...12 Rule of 3rds...13 Diagonals...13 Rendering the scene...14 Configuring the renderer...14 Adjusting scene exposure...16 Rendering a final image
3 Introduction As an architect or designer you can use Autodesk s Revit software to create buildable designs for anything from simple framed structures all the way to complex, multi-floor high-rise buildings. There are many times when it is a requirement to render a design using a method that provides photorealistic results. While Revit is capable of high quality renderings of your design, often it is beneficial that you have a higher level of control over the look of the final image, and the rendering tools used to generate the final image. Iray is a rendering tool that provides an exceptional level of rendering quality and a true photographic view of your design. 3ds Max Design is the ideal environment for the creation of photorealistic renderings of your Revit designs. You can import your Revit models into 3ds Max Design by exporting an FBX formatted file out of Revit or by linking to the Revit file directly. Once imported, you can edit materials that were assigned in Revit, or assign new materials you create. Often, 3D Revit models will come into 3ds Max design with a default Daylight system that is used for rendering the direct sunlight and the scattered skylight. Once imported, you are able to modify the Daylight system. You can change the time and date, as well as the location that you want to use for the rendering. Controlling the cameras point of view is a critical part of generating a compelling rendering. By using simple compositional rules you can set up a camera view that will present a compelling and dynamic rendering of your design. Once you set your view point, you need to decide what the output will be for the final rendered image. In many cases images are rendered to a file that will be used either for printing or digital presentation. The size and level of quality of final rendering will usually be based on specific output requirements. For generating truly photographic quality renderings, you can use the iray renderer. If you re running a test to if the image looks the way you want it to, you can set a short rendering time limit. When it comes time to creating a final high quality rendering, you only need to change the amount of time you will allow for iray to render. This class will discuss and outline the steps you would take to go from an Autodesk Revit design file to a fully rendered photorealistic image using 3ds Max Design and the iray renderer. 3
4 Exporting an FBX from Revit Revit is a powerful tool for creating architectural designs ranging from simple houses to highly complex building structures. Once a 3d model has been created, it is possible to render the scene from within Revit and obtain an acceptable result using the built in Mental Ray renderer. However, many times you will want more control over the final look and quality of the final rendering. Perhaps you want to use a completely different rendering tool such as 3ds Max Design to obtain an even more realistic result. Or, you may want to add additional objects into a scene, such as trees or shrubs. Whatever your reason, you have two option for using a Revit model in 3ds Max. You are able to directly link to the RVT file directly, or you may want to export an FBX file from Revit and link to the FBX file. The FBX Export process is a simple process with few steps and minimal configuration requirements. In Revit, configure any 3d View so the visibility graphics override has been set on certain categories in order to hide them from the current 3d view. Exporting the design to an FBX file is a simple process. Click on the Application button in the upper left of the screen. In the Export panel, click on the FBX option. This opens the FBX export dialog. Click Save, and save the file to your project folder. Linking to a Revit FBX model Now that we understand the how to export an FBX file from Revit, we should look at the process of linking an FBX file into 3DS Max Design. The process we will be using is called linking, because it creates a live link between the Revit FBX file and the model inside of 3ds Max Design. While we could just as easily link to the Revit file directly, linking to an FBX file requires less computer overhead and generally takes less time to create the link. We re going to link a file verses importing a file because if our design changes, we can overwrite the FBX file and reload it through the file link manager. The file link manager is the dialog that gives you access to the file link tools. You can choose what file you wish to link, choosing from DWG, FBX, and Revit FBX. Once you link to a Revit FBX file, you re able to choose from a number of preset options which control how the file is linked into 3ds Max Design. 4


5 From the 3ds Max Design application button, click on the Import option, and then click on the Link Revit File option. In the File Link Manager dialog, under the Attach panel, click on the File button. This will open the Open dialog and allow you to select the FBX file exported from Revit. Using the preset that organizes the scene based on Revit materials will make it easier to edit the materials that are assigned to different objects in the scene. Then click on the Attach this file button to link the Revit model. Once the import process is complete we will see the File Link Manager and the linked model in the viewport. 5
6 Using Autodesk Library materials Now we are going to work with the materials in the scene. Linked Revit models, like other types of imported models contain the materials that were applied to the individual objects from the Revit project. When working in 3ds Max there are a few ways to work with materials that are applied to the linked objects in the scene. First, you can edit existing materials by getting the material from the scene. You can easily select materials on objects and instance them into the material editor. Once a material is instanced into the material editor any changes you make are reflected directly in the material applied to scene objects. This allows you to make changes to materials that were applied in Revit but did not look quite the way you wanted them to. The second option is to create and assign new materials from the Autodesk Material Library built into 3ds Max. Autodesk materials are designed to provide photorealistic materials that you can apply to objects in your scene that provide settings that are simple to adjust. Selecting current materials For this we will work in the Slate material editor, since the Slate material editor gives us a good look at the overall structure of the material at a glance. We will open the Slate material editor by selecting the Slate material editor from the Material Editor flyout. One of the nice features of the Slate material editor is the ability to have the material/map browser available all the time. Once open, you can scroll to the Scene Materials rollout. When we open the Scene Materials rollout we can view and select any material currently applied to objects in the scene listed in alphabetical order. 6

7 Editing existing materials To adjust the parameters of a material in your scene, go to the material/map browser, and click and drag a material into the work area. Select Instance from the dialog that pops up and click OK. That will bring an instance of the material into the work area of the Materials Editor. Making any change to this material will change any material that is in the scene. 7

8 Assigning new materials To assign a new material, click on any Autodesk material available from the material/map browser. Click and drag the material into the work area. Select Instance from the dialog that pops up and click OK. That will bring an instance of the material into the work are of the materials editor, making any change to this material will change any material that is in the scene. Double clicking on the material allows us to access the material parameters. Then, select the objects in your scene, select the desired material, and click the Assign Material to Selection button in the Material Editor toolbar. Double clicking on the material allows you to access the material parameters. To change the material type, for example, you would right-click on the material, choose Change material/map type from the right-click menu and select a new material. 8

9 Working with the Daylight System Introduction to the daylight system One advantage of linking to a Revit file is that we are able to use the Daylight system that is imported through the link. The daylight system is a lighting system that is designed to simulate the effects of outdoor sunlight and skylight. The sunlight provides the direct illumination and direct shadows, where the skylight provides the light that is scattered by the atmosphere. When used in combination, the finished rendering can be visually accurate and highly Photoreal. The daylight system also provides a simple interface for placing the sun in the sky in relationship to the scene. All we have to do is set the time of day, the date and the location in order to accurately place the sun. In order to orient the scene geometry, we can simply determine what the north direction should be and reorient the daylight system to match that orientation. 9

10 Modifying the time, date and location Editing the daylight system in our current scene is a simple process. Then we will set the location and reorient north so the building is facing in the proper direction. To edit the daylight system, select the Daylight object in your scene and click on the Motion panel. This is the key to the daylight system and contains the sun and sky objects as well as the location parameters. In order to change the time and date, select the Date, time and location option and modify the parameters. You can also change the geographic location of the building. Click on the Get Location button, which opens a dialog containing a map and city list. The last thing to do is determine the orientation of the building. To orient the building correctly, enter the required angle in the North Direction entry and press enter. 10


11 Establishing a Point of View At this point we are ready to establish a camera view. Choosing a point of view is not as simple as just placing a camera in the scene and rendering the scene. If you want a compelling image, it is important to understand and employ a few basic rules of image composition. Creating a camera There are two types of camera in 3DS Max, the Target camera and the Free camera. 11
12 A Target camera is attached to a target, so it views the area around the target object. When you click and drag in a viewport and create a Target camera, you will create a two-part icon. The first icon represents the camera and the second icon produced is the camera s target (displayed as a white box). The camera and the camera target can be animated independently. A Free camera is a free-standing object that views the area in the direction that you have aimed the camera. When you click in a viewport and create a free camera, you see a single icon. This icon represents both the camera and its field of view (FOV). Once the camera is located in your scene, the icon for the camera will look the same as a Target camera, but the Free camera does not contain a separate target. Free cameras are useful when you need to animate a camera along a path. Composition basics If you want a compelling image, it is important to understand and employ a few basic rules of image composition. Many of the rules of composition have been around for centuries. We are going to take a look at two simple rules that can easily be implemented to give you better looking images almost immediately. 12

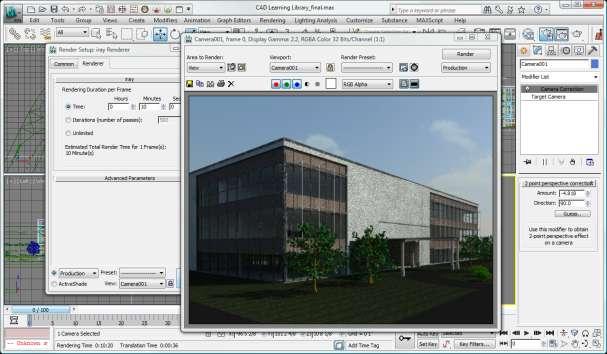
13 Rule of 3rds The first rule is the rule of thirds. This rule breaks the screen into three sections vertically and three horizontally. When composing a scene using the rule of thirds we use the two vertical lines and the two horizontal lines to locate key horizontal and vertical image elements. There are four key interest points that get created at the intersection of each of the one third lines. When there is a particular object or scene element that is to be the focus, it can be placed at one of the intersection points. By using this rule, we can create an image with a more interesting composition. Diagonals The second rule we will look at is the use of diagonals within the image frame. By incorporating diagonal lines into any image, we can create a more dynamic image and lead the viewer s eye through the scene. Diagonals are easy to incorporate into a final image, and by using it in combination with the rule of thirds we can create an image that will appeal to a much wider audience. The last thing we will touch on is the use of camera correction. Since this is to be an architectural rendering we want to make sure the vertical lines are all vertical. We can accomplish this by adding a camera correction modifier to the camera. To add a camera correction modifier to a camera in your scene, right-click on a camera and choose the Apply Camera Correction modifier. In the Modify tab, in order to establish the correct amount of correction and obtain a 2 point perspective view we need to enter a value. Once the proper value is entered, the camera view will have vertical object lines that are perfectly vertical. 13

14 Rendering the scene Rendering a virtual photograph has become increasingly simpler as the quality and simplicity of advanced renderers have improved over the years. The rendering options in 3ds Max Design are no exception. With the release of 3ds Max Design 2012, we now have the iray renderer available to everyone. This renderer is very simple to configure, only needing a time limit or a maximum number of iterations. The iray renderer is a highly photorealistic renderer capable of generating physically accurate lighting with very little worry about rendering settings. It does this by tracing the path of light through a scene. The longer iray renders the better the image quality. Once we set and configure the renderer it is important to make sure the exposure is properly set. We can use the mental ray photographic exposure control available in the Exposure control section of the Environment and Effects dialog. If we do not properly set the exposure value, the final image may end up either too dark or too light. Once we set the proper exposure we are ready to render the scene. Configuring the renderer The default renderer in 3ds Max Design is typically the mental ray renderer. Let s change the renderer to use the newer iray renderer. In the main toolbar, open the Render Setup dialog. On the common panel, open the Assign renderer rollout. Clicking on the production renderer option opens the choose renderer dialog. Double clicking on iray will assign it as the current renderer. 14

15 In the render setup dialog, select the Renderer tab. Notice that there are very few options for the iray render. For initial draft renders, set the Time value to 5 minutes or less. The longer we set the time, the better the final image quality will be. In the iray Advanced Parameters, you can fine-tune the rendering in several ways. Under Trace/Bounce Limits, you can limit the number of light bounces, which can speed up rendering time. This option can be helpful when you want to render a preview that doesn t have to have full and finished reflections. If you limit the number of light bounces, scenes can appear darker than the final rendering with unlimited bounces would appear. This is true especially for interior scenes, and exterior scenes that are lit from all around (typically by the sky). 15

16 Under Image Filtering (Antialiasing), you can select the Type and Width of the sample area. Increasing the value of Width can soften the image, but it increases render time. Under Material Override, you can render a scene with all its materials replaced by a single master material. For example, if you want to do a shadow study using only a single uniform color, use these controls to specify a neutral gray material. When you render, all surfaces will use the gray material. Adjusting scene exposure Before we render a final image, we need to adjust the exposure of the scene. From the rendering menu option, select Exposure Control. This opens the Environment and Effects dialog and the Exposure Control rollout. Choose the mental ray photographic exposure control option from the drop down list. mr Photographic Exposure Control allows you to modify your rendered images with controls similar to those used with real-world cameras. You can set a general Exposure Value or, if you are accustomed to working with cameras, you can set specific shutter speed, aperture, and film speed settings as you would with actual photography. It also gives you image-control settings with values for highlights, midtones, and shadows. The light levels of the scene do not change; only the sensitivity and amount of light entering the virtual camera is changed. Exposure Presets can be used to initially set up a scene s exposure setting, but settings typically have to be fine-tuned. The four Physically Based Lighting presets are for Outdoor Daylight Clear Sky, Outdoor Nighttime, Indoor Daylight and Indoor Nighttime. Two methods are available to fine-tune the exposure 16
17 settings; either the Exposure Value (EV) setting or the Photographic Exposure settings (Shutter Speed, Aperture or f-stop, and Film Speed or ISO) can be modified. Whichever method is used, adjusting the value of one also changes the other (for example, changing the EV will also change the Shutter Speed setting). If you are familiar with camera settings, using the Photographic Exposure settings will be most suitable to use. For non-photographers, the EV value is easier to use. The single Exposure Value setting corresponds to a combination of the three Photographic Exposure values. Each increment or decrement in the EV value corresponds to halving or doubling, respectively, the effective exposure, as expressed in the resultant change in the Shutter Speed value. The general rule of thumb is that higher EV values result in darker images, and lower values result in brighter images. The default EV is 15, which typically results in an extremely dark rendered image. The Photographic Exposure settings only affect exposure. The Shutter Speed is the duration, in fractions of a second, that the shutter is open (the higher the value, the greater the exposure). The Aperture setting is the size of the opening of the camera iris, expressed as a ratio (the higher this value, the lower the exposure). The Film Speed (ISO) setting is the sensitivity of the camera film, expressed as an index (the higher this value, the greater the exposure). For an exterior setting on a sunny day, you would combine a faster shutter speed with a small aperture to compensate for the bright environment (for example, Shutter Speed of 1/250s and f-stop of f/11). If the day is cloudy, however, you might want to reduce the speed so that more light travels through the lens and your shot will not appear too dark (for example, Shutter Speed of 1/100s and f-stop of f/11). If there were fast moving objects in the environment, you would want a faster Shutter Speed to prevent blurring and would open the Aperture to let in more light (for example, Shutter Speed of 1/500s and f-stop of f/2.8). To preview the render to see what the current exposure looks like, click on the Render Preview button. Once it is complete, the Exposure Value can be modified as needed to increase or decrease the brightness of the final rendered image. Rendering a final image Once the rendering is complete we can see the result of the material changes, the lighting and exposure settings. 17
18 18
Lighting Techniques 1
 STEP 1: open your Class-05 Max fi le _ main menu / Customize / Units Setup _ set Display Unit Scale as shown in Image 1 _ set Lighting Units to: American STEP 2: select Daylight.01 _ command panel / modify
Rendering Engines - Specific tools may depend on "Rendering Engine"
 Week 5 3DS Max, Cameras, Lighting and Materials Rendering - Process of turning geometry into pixels Rendering Engines - Specific tools may depend on "Rendering Engine" 1. Internal (3DS MAX) ART (Autodesk
Architectural Visualization Workflow in Autodesk Building Design Suite 2013
 Architectural Visualization Workflow in Autodesk Building Design Suite 2013 Marvi Basha TU Graz Class Summary - What is Arch-Viz? - Revit vs. 3Ds Max - Workflow - Post Production Class Summary - What is
Rendering and Animation for Building Design with 3ds Max
 Rendering and Animation for Building Design with 3ds Max Matt Dillon Vice President, Technical Services Enceptia Join us on Twitter: #AU2014 Agenda Setting up a 3ds Max Scene Exposure Control, Cameras
V-RAY 3.6 FOR SKETCHUP KEY FEATURES
 V-RAY 3.6 FOR SKETCHUP KEY FEATURES November 2017 NEW FEATURES VIEWPORT RENDERING POWERFUL GPU RENDERING With new Viewport rendering, you can easily select and render multiple regions at once, and quickly
ICDAS 3ds Max Design & 3ds Max
 ICDAS 3ds Max Design & 3ds Max 2016.0 2016.0 C:\ICDAS\MANUAL\3ds Max Design\ICDAS 3ds Max Design & 3ds Max 2016.0, 2 ICDAS 2015-06-01 2014-06-01 2013-06-01 Dear user Welcome to 3ds Max Design and 3ds Max.
Manual Exposure without a Meter
 Manual Exposure without a Meter Scotty Elmslie, June 2018 Many books explain how to use your camera s meter the various metering modes, the difference between incident and reflective metering, how to compensate
Or select Reset button under the application button (3ds Max symbol top left of screen)
") 3ds Max Notes 1. Starting 3ds Max file Open 3ds Max If Welcome to 3ds Max menu appears then select New Empty Scene Or select Reset button under the application button (3ds Max symbol top left of screen)
3ds Max Notes 1. Starting 3ds Max file Open 3ds Max If Welcome to 3ds Max menu appears then select New Empty Scene Or select Reset button under the application button (3ds Max symbol top left of screen)
Interior space in daylight Elsevier Inc. All rights reserved.
 Interior space in daylight Bonus Chapter 1 Day Lighting an Interior Space 1.1 Introduction In this chapter, you will learn about lighting an interior scene while you work on the lighting for the living
Autodesk Viz Render Illuminated Speaker; Charles Busa
 December 2-5, 2003 MGM Grand Hotel Las Vegas Autodesk Viz Render Illuminated Speaker; Charles Busa BD3-3 Autodesk Viz Render Illuminated This course is an introduction to the new Autodesk VIZ Render. Learn
Who Turned the Lights Out? Lighting Analysis with Autodesk Revit MEP 2012 and Autodesk 3ds Max Design 2012
 Who Turned the Lights Out? Lighting Analysis with Autodesk Revit MEP 2012 and Autodesk 3ds Max Design 2012 Eric Bogenschutz BSA LifeStructures MP5719 In this class, we will discuss multiple different lighting
(Note: Gray text needs verification) 3DS Max - Merge native MAX files (Same or earlier version). Must select from list.
 3DS Max - Merge native MAX files (Same or earlier version). Must select from list.") Importing (Note: Gray text needs verification) 3DS Max - Merge native MAX files (Same or earlier version). Must select from list. 1. Geometry All 3D object and 2D shapes merge as do associated modifiers.
Importing (Note: Gray text needs verification) 3DS Max - Merge native MAX files (Same or earlier version). Must select from list. 1. Geometry All 3D object and 2D shapes merge as do associated modifiers.
Mastering Autodesk 3ds Max 2013
 Mastering Autodesk 3ds Max 2013 Harper, J ISBN-13: 9781118129715 Table of Contents Introduction? xxi Chapter 1? Getting to Know Autodesk? 3ds Max? 2013??? 1 Introducing the New 3ds Max 2013 Features????
V-RAY 3.6 FOR RHINO KEY FEATURES. January 2018
 V-RAY 3.6 FOR RHINO KEY FEATURES January 2018 NEW FEATURES MORE POWERFUL GPU RENDERING Faster, more powerful GPU rendering adds support for on-demand mip-mapping, aerial perspective, displacement, subsurface
Tangents. In this tutorial we are going to take a look at how tangents can affect an animation.
 Tangents In this tutorial we are going to take a look at how tangents can affect an animation. One of the 12 Principles of Animation is called Slow In and Slow Out. This refers to the spacing of the in
Ambient Occlusion Pass
 Ambient Occlusion Pass (Soft Shadows in the Nooks and Crannies to Replicate Photorealistic Lighting) In this tutorial we are going to go over some advanced lighting techniques for an Ambient Occlusion
Advanced VFX with Softimage particles (Lagoa) and 3dsmax interoperability
 and 3dsmax interoperability") Victor Herrera Davila -Autodesk Latin America In this class the audience will learn how to create elegant and quick VFX with the new Send to from 3dsmax to Softimage to 3dsmax again. Objetivo de aprendizado
Victor Herrera Davila -Autodesk Latin America In this class the audience will learn how to create elegant and quick VFX with the new Send to from 3dsmax to Softimage to 3dsmax again. Objetivo de aprendizado
Fundamentals of Photography presented by Keith Bauer.
 Fundamentals of Photography presented by Keith Bauer kcbauer@juno.com http://keithbauer.smugmug.com Homework Assignment Composition Class will be February 7, 2012 Please provide 2 images by next Tuesday,
Corona Sky Corona Sun Corona Light Create Camera About
 Plugin menu Corona Sky creates Sky object with attached Corona Sky tag Corona Sun creates Corona Sun object Corona Light creates Corona Light object Create Camera creates Camera with attached Corona Camera
Fundamentals. Autodesk SDC. Better Textbooks. Lower Prices. Schroff Development Corporation. Supplemental Files
 Autodesk 3ds Max Design 2012 Fundamentals Supplemental Files SDC PUBLICATIONS Schroff Development Corporation Better Textbooks. Lower Prices. www.sdcpublications.com Tutorial files on enclosed CD Table
AECOsim Building Designer Quick Start Guide
 AECOsim Building Designer Quick Start Guide Chapter A17 Rendering 2012 Bentley Systems, Incorporated www.bentley.com/aecosim Table of Contents Rendering...3 The Camera... 3 Materials... 5 Material Palettes...
Extrude. Taper. STEP 04: Ctrl +V _ select Copy from the clone window _ name the copy: Slabs Mesh _ click OK
 Extrude STEP 01: open the class-08 3ds Max file _ select the ellipse _ command panel / modifier list _ select Extrude _ set the extrusion Amount: 400 _ STEP 02: with the perspective viewport current press
Autodesk 3ds Max Design 2013 Fundamentals
 Autodesk 3ds Max Design 2013 Fundamentals Supplemental Files SDC P U B L I C AT I O N S Schroff Development Corporation Better Textbooks. Lower Prices. www.sdcpublications.com Tutorial files on enclosed
AR-media TUTORIALS IMPROVING REALISM AMBIENT OCCLUSION. (June, 2011)
") AR-media TUTORIALS IMPROVING REALISM AMBIENT OCCLUSION (June, 2011) Copyright Copyright 2008/2011 Inglobe Technologies S.r.l. All rights reserved. No part of this publication may be reproduced, transmitted,
AR-media TUTORIALS IMPROVING REALISM AMBIENT OCCLUSION (June, 2011) Copyright Copyright 2008/2011 Inglobe Technologies S.r.l. All rights reserved. No part of this publication may be reproduced, transmitted,
Artlantis training for new users
 Artlantis training for new users page 2 This training program reviews the main features of Artlantis. You will learn about the various presentation types such as still images, ivisit 3D panoramas, VR objects
Using mental ray for Exterior Renderings
 12/1/2005-8:00 am - 11:30 am Room:N. Hemispheres (Salon A4) (Dolphin) Walt Disney World Swan and Dolphin Resort Orlando, Florida Using mental ray for Exterior Renderings Mark Couture - Intellicon Solutions,
3ds Max certification prep
 3ds Max certification prep Study online at quizlet.com/_25oorz 1. 24 Frames per second 2. 25 Frames per second, Europe 3. 30 Frames per second, Americas and Japan 4. Absolute mode, off set mode 5. How
Show Me the Money: Impress Your Customers by Presenting with Autodesk Showcase
 Show Me the Money: Impress Your Customers by Presenting with Autodesk Showcase Guillermo Melantoni - Autodesk, Inc. AC3361 Learning Objectives At the end of this class, you will be able to: Apply best
Caustics - Mental Ray
 Caustics - Mental Ray (Working with real caustic generation) In this tutorial we are going to go over some advanced lighting techniques for creating realistic caustic effects. Caustics are the bent reflections
Autodesk Fusion 360: Render. Overview
 Overview Rendering is the process of generating an image by combining geometry, camera, texture, lighting and shading (also called materials) information using a computer program. Before an image can be
03. 3ds Max Design & Mental Ray
 Design + Computing 03. 3ds Max Design & Mental Ray 9/23/2015 CAD & Graphics II HOM2027 Fall 2014 Every Wednesday 2:00 pm 5:50 pm Jin Kook Lee, PhD. 02-2220-2645 designit@hanyang.ac.kr Assistant Professor,
Unbelievable Visualization Techniques: Letting Your Imagination Soar!
 11/29/2005-5:00 pm - 6:30 pm Room:N. Hemispheres (Salon A4) (Dolphin) Walt Disney World Swan and Dolphin Resort Orlando, Florida Unbelievable Visualization Techniques: Letting Your Imagination Soar! Chris
We ll go over a few simple tips for digital photographers.
 Jim West We ll go over a few simple tips for digital photographers. We ll spend a fair amount of time learning the basics of photography and how to use your camera beyond the basic full automatic mode.
DV15437 Revit to 3ds Max Workflows for Realistic Rendering with NVIDIA Iray
 DV15437 Revit to 3ds Max Workflows for Realistic Rendering with NVIDIA Iray Scott DeWoody Gensler Learning Objectives Effectively set up models in Revit for transfer to 3ds Max. Set up a direct link between
EXERCISE 12: ANIMATION
 EXERCISE 12: ANIMATION ASSIGNMENT: In this exercise you will create a study animation of the Farnsworth House model you created for exercise 8. This exercise will animation basics through the creation
Iray Worlds-Plus User Guide
 Iray Worlds-Plus User Guide DEFAULT SCENES These are very simple and easy to understand, the 1st is empty and the others have different types of trees, or skies added. These are either beginning scenes,
Oso Toon Shader. Step 1: Flat Color
 Oso Toon Shader By default the Oso Toon Shader has most of the same elements of standard Iray Uber Shader, that it is based on. However, there are some additional functions that allow OTS to do some dramatic
Hemlock Folly v2 Notes
 Hemlock Folly v2 Notes DAZ Studio Iray Instance Optimization - IMPORTANT When rendering the full scene preset, it is important that you set Instance Optimization to Memory, otherwise Daz Studio will go
Radeon ProRender add-in for SOLIDWORKS. User Guide v1.1
 Radeon ProRender add-in for SOLIDWORKS User Guide v1.1 This document is a user and setup guide with tips and tricks on how to render photorealistic images in real-time, apply decals and create animations.
Turn your movie file into the homework folder on the server called Lights, Camera, Action.
 CS32 W11 Homework 3: Due MONDAY, APRIL 18 Now let s put the ball in a world of your making and have some fun. Create a simple AND WE MEAN SIMPLE environment for one of your ball bounces. You will assign
AMD Radeon ProRender add-in for SOLIDWORKS. User Guide
 AMD Radeon ProRender add-in for SOLIDWORKS User Guide This document is a user and setup guide with tips and tricks on how to render photorealistic images in real-time, apply decals and create animations.
Radeon ProRender plug-in for 3ds Max. User Guide v1.0
 Radeon ProRender plug-in for 3ds Max User Guide v1.0 This document is a user and setup guide with tips and tricks on how to render photorealistic images in real-time, set materials and lighting. DISCLAIMER
Keynote Basics Website:
 Keynote Basics Website: http://etc.usf.edu/te/ Keynote is Apple's presentation application. Keynote is installed as part of the iwork suite, which also includes the word processing program Pages. If you
Rendering and Presentation
 Bonus Chapter 4 Rendering and Presentation Well, here we are the chapter you ve probably been chomping at the bit to get into and for good reason. The output that you create from this chapter will make
Buxton & District U3A Digital Photography Beginners Group Lesson 6: Understanding Exposure. 19 November 2013
 U3A Group Lesson 6: Understanding Exposure 19 November 2013 Programme Buxton & District 19 September Exploring your camera 1 October You ve taken some pictures now what? (Viewing pictures; filing on your
AMD Radeon ProRender plug-in for PTC Creo. User Guide
 AMD Radeon ProRender plug-in for PTC Creo User Guide This document is a user and setup guide on how to render photorealistic images in real-time and apply decals for PTC Creo. DISCLAIMER The information
WHAT S NEW IN V-RAY NEXT FOR SKETCHUP. February 2019
 WHAT S NEW IN V-RAY NEXT FOR SKETCHUP February 2019 PRODUCT DESCRIPTION V-Ray Next for SketchUp is more than just a rendering engine. Designed to fit right within your SketchUp workflow, V-Ray Next for
If orthographic Choose a scale or scaled to fit If perspective No scale. Use current viewport, extents or window.
 Week 9 Rhino, Output and Rendering Output 2D Printing, 3D Printing, Rendering and Exporting 1. 2D Printing/plotting to paper or lasercutter. Two Choices Viewport or Layout Viewport Using Print (Print Setup):
WORKFLOW OF EXPORTING REVIT MODELS TO UNITY
 WORKFLOW OF EXPORTING REVIT MODELS TO UNITY 2016 by Penn State CIC Research Group. All rights reserved May 26, 2014 NOTE: THIS WORKFLOW IS FOR USERS WHO USE REVIT 2016 AND ABOVE, AND 3DS MAX 2016 AND ABOVE.
Affordable, fast and open. Open. Preview. Interface
 Simply physical Drawing on the concepts that made it the success it is today the user-friendly interface and the power of its features Artlantis meets all your needs when it comes to speed, ease-of-use,
Animation Basics. Learning Objectives
 Animation Basics Learning Objectives After completing this chapter, you will be able to: Work with the time slider Understand animation playback controls Understand animation and time controls Morph compound
Radeon ProRender plug-in for 3ds Max. User Guide v2.1
 Radeon ProRender plug-in for 3ds Max User Guide v2.1 This document is a user and setup guide with tips and tricks on how to render photorealistic images in real-time, set materials and lighting. DISCLAIMER
Autodesk Revit Building and 3ds Max : A One-Two Punch
 11/28/2005-8:00 am - 9:30 am Room:N. Hemispheres (Salon A2) (Dolphin) Walt Disney World Swan and Dolphin Resort Orlando, Florida Autodesk Revit Building and 3ds Max : A One-Two Punch Roger Cusson - L'Atelier
Working with multimedia
 L E S S O N 2 Working with multimedia Suggested teaching time 60-70 minutes Lesson objectives To become familiar with PowerPoint s multimedia functions, you will: a b c Insert and customize clip art by
04. 3d Graphics UI & 3ds Max + MR
 Design + Computing 04. 3d Graphics UI & 3ds Max + MR 9/26/2014 CAD & Graphics II HOM2027 Fall 2014 Every Friday 2:00 pm 6:00 pm Jin Kook Lee, PhD. 02-2220-2645 designit@hanyang.ac.kr Assistant Professor,
Architecture Engineering Training courses : Course BIM Architecture Diploma Revit Architecture 3D Max Vasari Navis Works Photoshop For Architects
 Architecture Engineering Training courses : Course BIM Architecture Diploma Revit Architecture 3D Max Vasari Navis Works Photoshop For Architects BIM ARCHITECTURAL DIPLOMA ( Design and visualization ):
Keynote 08 Basics Website:
 Website: http://etc.usf.edu/te/ Keynote is Apple's presentation application. Keynote is installed as part of the iwork suite, which also includes the word processing program Pages and the spreadsheet program
Table of Contents. What are Ghost Lights? What is Two-sided? What is Kcdm2?
 Page 1 Table of Contents What are Ghost Lights?...1 What is Two-sided?...1 What is Kcdm2?...1 What is Kelvin?...2 Included Props...2 Utility Props...2 Ghost Setup Material...2 GLK Materials...3 How to
**These steps start after you have a complete model and decide to start rendering views.
 Abstract: This step by step guide will help you understand how to render camera views as well as set up your own screen views straight from the render dialog box. **These steps start after you have a complete
Section Ⅱ The X-Pro1 CONTENTS 24
 Section Ⅱ The X-Pro1 24 The Hybrid Multi Viewfinder The Optical Viewfinder (OVF) The attraction of optical viewfinders is that they provide a clear optical image with sharp bright brackets superimposed
Advanced Rendering CHAPTER. Render Window. Learning Objectives. Image Pane
 CHAPTER Advanced Rendering Learning Objectives After completing this chapter, you will be able to: Make advanced rendering settings. Set the resolution for a rendering. Save a rendering to an image file.
Camera & Imaging. Capturing Image, Recording Video & Editing Camera Using Display as Viewfinder...7-9
 Capturing Image, Recording Video & Editing... -2 Camera... -3 Using Display as Viewfinder...-3 Single Shot...-5 Normal...-6 Scene...-6 Multi Shot...-6 Photo Combination...- Panorama Shot...- Viewing Captured
Render methods, Compositing, Post-process and NPR in NX Render
 Render methods, Compositing, Post-process and NPR in NX Render Overview What makes a good rendered image Render methods in NX Render Foregrounds and backgrounds Post-processing effects Compositing models
Autodesk Combustion 4 Integration with 3ds Max and Autodesk VIZ
 12/1/2005-8:00 am - 11:30 am Room:Peacock 2 (Swan) Walt Disney World Swan and Dolphin Resort Orlando, Florida Autodesk Combustion 4 Integration with 3ds Max and Autodesk VIZ Gary Davis - visualz, LLC DV41-2
Introduction to Shutter Speed in Digital Photography. Read more:
 Introduction to Shutter Speed in Digital Photography Read more: http://digital-photography-school.com/shutterspeed#ixzz26mrybgum What is Shutter Speed? shutter speed is the amount of time that the shutter
Rendering Techniques in 3D AutoCAD, Part 2. David Cohn Independent Consultant
 Rendering Techniques in 3D AutoCAD, Part 2 David Cohn Independent Consultant 1 Evaluation Forms Please remember to fill out your evaluation form This is session GD115 2 And, please silence your cell phone.
Tutorial: Working with Lighting through Components
 Tutorial: Working with Lighting through Components With a populated scene we can begin layering in light sources to add realism and light to our level. For this we will need to use an environmental probe
Intro to Lights & Rendering Maya 2013
 2000 2012 Michael O'Rourke Intro to Lights & Rendering Maya 2013 Concepts You must define lights in order for your scene/models to be visible Same as the real world if there is zero light, you can t see
two using your LensbAby
 two Using Your Lensbaby 28 Lensbaby Exposure and the Lensbaby When you attach your Lensbaby to your camera for the first time, there are a few settings to review so that you can start taking photos as
High definition digital microscope. visioneng.us/lynxevo
 visioneng.us/lynxevo High definition digital microscope Exceptional high resolution 1080p/60fps image quality Intuitive image capture and documentation Stand alone, wireless or PC connectivity High quality
ahhdri IBL Daylight Pack for ahenvironmentlight Version 2.0
 Page 1 of 9 ahhdri IBL Daylight Pack for ahenvironmentlight Version 2.0 Table of Contents ahhdri IBL Daylight Pack...2 Introduction...2 Where to find the DayLight Presets after Installation...3 Loading
Using the Web in Mathematics Foundations Course An Introduction to Microsoft PowerPoint Sarah L. Mabrouk, Framingham State College
 Using the Web in Mathematics Foundations Course An Introduction to Microsoft PowerPoint Sarah L. Mabrouk, Framingham State College Overview: MS PowerPoint is powerful presentation software that enables
V-RAY NEXT FOR 3DS MAX
 V-RAY NEXT FOR 3DS MAX May 2018 Dabarti Studio NEW FEATURES POWERFUL SCENE INTELLIGENCE V-Ray Scene Intelligence analyzes your scene to optimize rendering. You automatically get the best quality in less
Camera. Mobile Camera Mobile Camera Precautions Camera Using Display as Viewfinder
 Mobile....................................... -2 Mobile Precautions................................ -3............................................. -3 Using Display as Viewfinder................................
A Basic Guide to Modeling Landscapes in Google SketchUp
 DYNASCAPE SOFTWARE INC. A Basic Guide to Modeling Landscapes in Google SketchUp A DS Sketch 3D User Guide Volume 2 This guide will take you through the steps of creating a 3D model of a landscape in Google
Photo-realism Fundamentals
 1-(800) 877-2745 www.ashlar-vellum.com Photo-realism Fundamentals Using Cobalt, Xenon, Argon Copyright 2008 Ashlar Incorporated. All rights reserved. Photo-realism Fundamentals Photo-realistic rendering
Radeon ProRender add-in for SOLIDWORKS. User Guide v2.3
 Radeon ProRender add-in for SOLIDWORKS User Guide v2.3 This document is a user and setup guide with tips and tricks on how to render photorealistic images in real-time, apply decals and create animations.
Scene Assembly CHAPTER 4
 CHAPTER 4 Scene Assembly Scene assembly in the 3ds Max production pipeline is the process of tracking and assembling your scene assets for the complete presentation. A typical production workflow usually
Shooting Modes Using Shooting Modes Editing Images Picture Editor Composite
 Camera...-2 Getting Started... -2 Photo Camera... -4 Capturing Still Images... -4 Using Portrait Photography Features...-5 Video Camera... -6 Recording Video... -6 Review...- Opening Saved Files... - Shooting
Design Visualization with Autodesk Alias, Part 2
 Design Visualization with Autodesk Alias, Part 2 Wonjin John Autodesk Who am I? Wonjin John is an automotive and industrial designer. Born in Seoul, Korea, he moved to United States after finishing engineering
Printing a Presentation
 LESSON 3 Printing a Presentation 3.1 After completing this lesson, you will be able to: Open an existing presentation. Add a header and a footer. Preview a presentation. Print a presentation. Microsoft
AMD Radeon ProRender plug-in for 3ds Max. User Guide
 AMD Radeon ProRender plug-in for 3ds Max User Guide This document is a user and setup guide with tips and tricks on how to render photorealistic images in real-time, set materials and lighting. DISCLAIMER
Introduction to Photography
 Topic 5 - Basic DSLR Settings Learning Outcomes In this topic, you will learn about the functions of the buttons on the top, the side and the back of your camera. This will give you the platform to begin
Iray for Cinema 4D Release Version 2.0 New Features Improved MDL Material Browser Stacking of MDL Material Layers
 Iray for Cinema 4D Release Version 2.0 Version 2.0.15, Iray 2016.3 Copyright 2017 NVIDIA Corporation Improved MDL Material Browser The MDL Material Browser has been greatly enhanced to allow quick and
Introduction to Photography
 Introduction to Photography The Camera Digital Cameras The Camera (front & top) The Camera (back & bottom) Digital Camera Modes Scene Modes Landscape Photography What makes a good landscape? http://photography.nationalgeographic.com/phot
CHAPTER 1 COPYRIGHTED MATERIAL. Finding Your Way in the Inventor Interface
 CHAPTER 1 Finding Your Way in the Inventor Interface COPYRIGHTED MATERIAL Understanding Inventor s interface behavior Opening existing files Creating new files Modifying the look and feel of Inventor Managing
,
 [Class Room Online Training] Weekdays:- 2hrs / 3 days Fastrack:- 1½hrs / Day Weekend:- 2½ hrs (Sat & Sun) An ISO 9001:2015 Institute ADMEC Multimedia Institute www.admecindia.co.in 9911782350, 9811818122
Shadows. COMP 575/770 Spring 2013
 Shadows COMP 575/770 Spring 2013 Shadows in Ray Tracing Shadows are important for realism Basic idea: figure out whether a point on an object is illuminated by a light source Easy for ray tracers Just
Creative Efficiency Research: MODO 801 vs. Maya From CAD file to finished rendering: How MODO stacks up in a real-world workflow situation
 Creative Efficiency Research: vs. From CAD file to finished rendering: How MODO stacks up in a real-world workflow situation About this Benchmark Project This benchmark project was conducted to measure
Submerge Camera Shader
 Submerge Camera Shader In this tutorial we are going to take a look at a simple scene with a swimming pool and a teapot and we will use the Mental Ray Camera shader called "Submerge" to change the look
Intended Topics. Low-Cost Underwater Camera Types General Tips Composition Camera Shooting Modes Exposure Strobe Placement Q & A
 By Jim Driggers Intended Topics Low-Cost Underwater Camera Types General Tips Composition Camera Shooting Modes Exposure Strobe Placement Q & A Difference Between Low-Cost Underwater Cameras Types Point
Adding Video Filters and Transitions
 Adding Video Filters and Transitions 8 You can add professional touches to your movie by applying filters to clips to create special looks or effects and adding transitions between your clips. Applying
Science & Technology Group
 Cannock Chase U3A Science & Technology Group Programme June 12 th PC fundamentals 1: July 17th Camera fundamentals 1 August Tablet PC fundamentals 1 September PC applications 2 (Word, Excel, Music, Photos,
To familiarize of 3ds Max user interface and adapt a workflow based on preferences of navigating Autodesk 3D Max.
 Job No: 01 Duration: 8H Job Title: User interface overview Objective: To familiarize of 3ds Max user interface and adapt a workflow based on preferences of navigating Autodesk 3D Max. Students should be
Houdini Light, Shade, Render
 Houdini Light, Shade, Render M06: Creating a Light Rig Ari Danesh ari@sidefx.com Agenda More Managing Desktop (A Diversion) Looking at Existing Light Rig Digital Assets (Three Point Light) Creating our
Video Options. Tap ➀ while not recording to open video options.
 Instructions Video Options Tap ➀ while not recording to open video options. ➀ ➁ ➂ ➃ ➅ ➄ ➁ Switch between 16:9 and 4:3 formats. Some devices do not support video formats in 4:3 aspectratio. ➂ Video Resolution
How to prepare your files for competition using
 How to prepare your files for competition using Many thanks to Margaret Carter Baumgartner for the use of her portrait painting in this demonstration. 2016 Christine Ivers Before you do anything! MAKE
 Page 1 of 10 Creating Cigarette Smoke In this tutorial, you use a particle system to create a stream of cigarette smoke trailing from an ashtray. The animation relies on space warps to affect the movement
Course Information Package
 Course Information Package PLANNING FORM FOR AN EDUCATIONAL MODULE (to be completed by the teacher) Programme of Studies: Name of the module: Target group: Level of the unit: Entrance requirements: Number
design solutions Visualize Product Matrix
 Product Matrix RENDERING Hardware agnostic, unbiased, interactive wysiwyg pathtracing using NVIDIA iray (Accurate Mode) Hardware agnostic, biased, interactive wysiwyg raytracing using NVIDIA iray (Fast