Vector Art 3D, Inc. Disclaimer
|
|
|
- Louise Booker
- 6 years ago
- Views:
Transcription
1
2 Vector Art 3D, Inc. Disclaimer All CNC machines (routing, engraving, and milling) are potentially dangerous and because Vector Art 3D has no control over how the files and projects described in this document might be used, Vector Art 3D, Inc. or any associated Resellers cannot accept responsibility for any loss or damage to the work piece, machine or any individual, howsoever caused. Extreme care should always be taken and the output from the software thoroughly checked before sending it to a CNC machine. The information in this document may be subject to change without any prior notice. The files and projects described in this manual is supplied under the terms and conditions of the Vector Art 3D, inc. license agreement and may only be used in accordance with the terms of this agreement Copyright Vector Art 3D, Inc info@vectorart3d.com Phone (607)
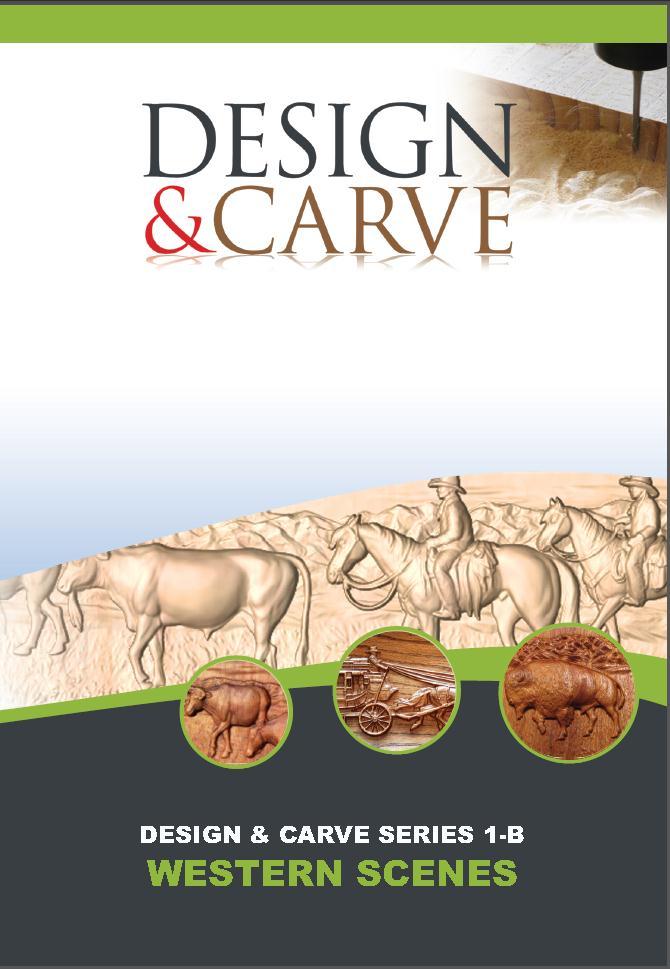
3 Design and Carve Series 1-B Western Scenes Introduction The Design and Carve Series disks from Vector Art 3D have been created to provide a combination of 3D clipart and tutorials which show the steps required to create finished projects using the models. This particular edition includes animals, objects and natural scenery to allow the user to create Western themed artwork, Mantels, Door Panels and other carved products. This disk and its contents are designed exclusively for use with Vectric`s Aspire software In this document you can read an overview of the content of the disk, read a review of each project and also see images of all the clipart and finished parts which are included in the folders on the disk. Disk Navigation All the files on the disk can be accessed from the Menu that should appear when the disk is put into the PC. The files can also be accessed manually from the disk. The main disk has four folders at its root level that contain the data and tutorial files; these are called Object Models, Scenery Models, Project Layouts and Tutorials. The folder Object Models contains all the Aspire models for the individual animals and people included in the collection as well as a file called All-Objects-DC1-B.crv3d which contains all the files in the folder for copying and pasting into other sessions of Aspire. The Scenery Models folder contains all the Aspire models for the individual pieces of natural scenery (rocks, plants, mountains, backgrounds etc.) as well as a file which contains all the Scenery files (All-Scenery-DC1-B.crv3d) to use for copying and pasting between Aspire sessions. The Project Layouts folder contains a selection of CRV3D files which are either finished background scenes or complete project layouts, some even contain example toolpaths. These additional designs are included as resources either for reference to see how they were put together or they can be edited to create your own unique variations. Images of all the files included in these three folders are shown towards the end of this document. The folder Tutorials has 14 sub-folders; these contain the relevant tutorial videos (self playing exe-avi files) and where applicable files used during the tutorial and the finished saved Aspire files created during the video. All these can be accessed from the Menu that should open when the disk is inserted into your PC. A description and images of each tutorial project are shown on the following pages. Tutorials S1 S9 are the basic concepts associated with this type of scene-layout work. They are the same basic tutorials that appear on the DC1-A Wildlife Scenes Disk. Tutorials B1-B5 are exclusive to this Western Scenes disk. If you are new to Design and Carve you will benefit from working through all tutorials on the disk in order. If you have questions about using this product then please contact us at info@vectorart3d.com.


4 S1 & 2 Basic Process Overview / Example Project Overview Tutorial S1 is approx. 10 minutes long. It consists of a presentation which outlines the basic process used in most projects on this disk. Tutorial S2 is approx. 12 minutes long. In it we create the Bison/Mountain scene shown in the image above. This is designed as a quick overview of the process discussed in S1. Skills and Tools Covered General Process Overview and Explanation Job Setup Import Components Scaling and Moving Components Tilt and Fading Components Basic Sculpting Create Shape Rough, Finish and Cut-Out Toolpaths


5 S3 Layout Basics Project Overview Tutorial S3 is approx. 11 minutes long. It shows the basics associated with the setup and layout of an Aspire project. This includes how to import an image to help you do your layout as well importing and positioning components. A second file is used to show how you can take an imported component (mountains) and use the distortion tools to adjust their 2D shape. Skills and Tools Covered Job Setup Importing an Image to help with layout Importing Components Scaling and Moving Components Distorting Components

6 S4 Height Adjustment Basics Project Overview Tutorial S4 is approx. 11 minutes long. It covers the basics associated with adjusting the tilt and fade on components to get overlapping areas to have the correct perception of depth, while minimizing the amount of overall height of the model. Skills and Tools Covered Adjusting Base Height Fading Components Tilting Components Grouping Components Adjusting Overall Project Height


7 S5 Sculpting Basics Project Overview Tutorial S5 is approx. 17 minutes long. It covers some useful Sculpting techniques. The first part of the tutorial shows how to use the sculpting tools to smooth out a hard vertical edge to soften it to make it look more natural. The second part shows how to use the sculpting tools to edit the background texture to make it create more natural transition with the feet of an animal. The last part takes two overlapping mountain components and shows how to use the erase, smooth and smudge functions to create a natural blend between the two components. Skills and Tools Covered Sculpting Smooth Sculpting - Add Material Sculpting - Erase (Undo + Shift) Material Sculpting - Smudge
8 S6 Pheasant Dog Mantel Project Overview This project comprises 4 sections: Tutorial S6A is approx. 11 minutes long. It covers importing the components, making copies, adjusting size and position and using the distortion tools to create the basic background layout. Tutorial S6B is approx. 17 minutes long. It covers adjustment of the components height, tilt and fade and sculpting to finish the background (shown in the top image on this page). Tutorial S6C is approx. 18 minutes long. It covers importing two different sets of components to show how to create alternate layouts with the same background. Tutorial S6D is approx. 7 minutes long. and covers the creation of 3D Rough and 3D Finish toolpaths. Skills and Tools Covered Import Components Dynamic Scaling, Positioning and Copying of Components Grouping Components Base Height Adjustment Tilt and Fade Sculpting Grouping and Hiding Components Toolpath Creation


9 S7 Wolf Eagle Panel Project Overview This project comprises 3 sections: Tutorial S7A is approx. 12 minutes long. It covers setting up the part, drawing the outline shape, importing the components, adjusting size and position and using the distortion tools to create the basic layout of the components. Tutorial S7B is approx. 11 minutes long. It covers adjustment of component heights, tilt and fade and creating the shape to make the bevelled edge to create a style of model that could be used as a raised panel. Tutorial S7C is approx. 15 minutes long. It covers creating the vectors needed for the toolpath boundaries and creating 2D Pocket, 3D Rough, 3D Finish, 2 different Texture and a Cut-Out Toolpath. Skills and Tools Covered Vector Drawing Import - Dynamic Scaling and Moving Components Set Exact Height for Components Tilt and Fade Components Create Shape Combine Mode Low Vector Creation/Edit for Toolpath Boundaries 2D Pocket, Rough, Finish, Texture and Profile Toolpaths

10 S8 Big Horn Sheep Background Crop Project Overview This project comprises 3 sections: Tutorial S8A is approx. 13 minutes long. It covers importing the two components, cropping the background and simple sculpting. Tutorial S8B is approx. 14 minutes long. It covers splitting the background component, scaling the height and detailed sculpting to blend the split areas. Tutorial S8C is approx. 8 minutes long. It covers creating 3D Rough, 3D Finish and the 2D Profile Cut- Out Toolpath. Skills and Tools Covered Import 3D Clipart Dynamic Scaling, Positioning and Copying of Components Trimming one Component to the other Sculpting - Smooth Creation of a Vector from a Component boundary Splitting Components Scale Components Sculpting Smooth Smudge Rough, Finish and Profile Toolpath Creation


11 S9 Framing Examples Project Overview This project comprises 5 sections, all tutorials include toolpath creation: Tutorial S9A is approx. 10 minutes long and covers toolpath creation to leave a vertical pocket edge Tutorial S9B is approx. 9 minutes long and covers modelling a bevelled pocket frame edge Tutorial S9C is approx. 18 minutes long and covers vector creation and modeling to create a window frame effect Tutorial S9D is approx. 20 minutes long and covers the creation of a rustic frame. This includes vector creation, modelling the texture by converting the toolpath preview to a component, using the 2-Rail Sweep for the log shape and finally copying and distorting the components to make the complete frame. Tutorial S9E is approx. 16 minutes long and covers creating a part in a dish with a rough/rustic edge. Skills and Tools Covered Toolpath Creation using negative Boundary Vector Offset Create Shape Vector Drawing 2 Rail Sweep Create Component from Toolpath Preview Component height adjustment Low Combine Mode 3D Rough, 3D Finish, Profile Toolpaths


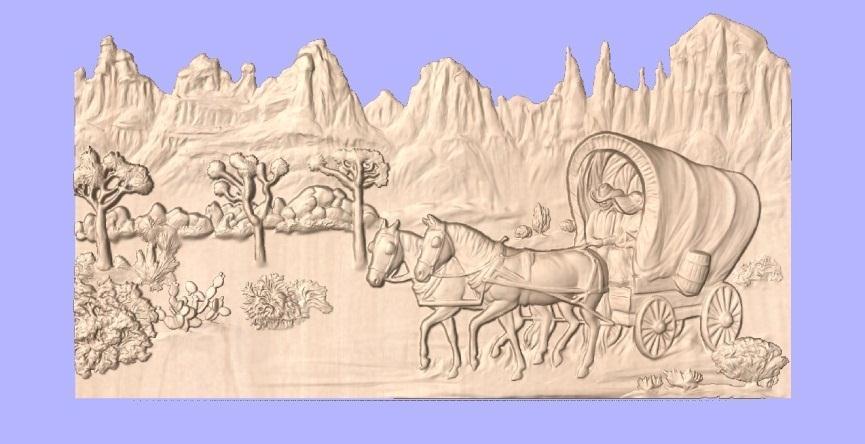
12 B1 Covered Wagon Welcome Sign Project Overview Tutorial B1A is approx. 7 minutes long. It shows the layout of the 3D Component and 2 vector text and creation of the sign shape from the vectors. Tutorial B1B is approx. 16 minutes long. It covers calculating the 3D and 2D toolpaths required to make this project including copying the text into another software session to create the cut-out toolpaths for the inlay-letters. Skills and Tools Covered Import 3D Clipart Scaling and Positioning of Components Text Drawing and Vector Editing Component Boundary Creation Rough, Finish, Pocket and Inlay Pocket Toolpaths Copy/Paste between Aspire sessions Inlay Profile Toolpaths

13 B2 Ranch Scene Mantel Project Overview This project comprises 3 sections: Tutorial B2A is approx. 15 minutes long. It covers importing all the components and doing the basic 2D layout for the Ranch Scene Tutorial B2B is approx. 17 minutes long. This tutorial covers the adjustment of the height of each component, using fade and tilt to get them into the correct position relative to the other models in the part Tutorial B2C is approx. 17 minutes long. It covers sculpting the components for the background together, creation of the face and slight angled recess shape for the 3D components to sit within and the roughing and finishing toolpath calculation. Skills and Tools Covered Import Components Dynamic Scaling, Positioning and Copying of Components Component Height Adjustment, Fade and Tilt Sculpting Vector Creation Create Shape to make planes and recessed shape for 3D parts to sit within 3D Rough, 3D Finish toolpath creation

14 B3 Belt Buckle Sign Project Overview This project comprises 3 sections: Tutorial B3A is approx. 14 minutes long. It covers importing the rope border, setting up the dome shape and cropping that back to the edge of the rope. This is followed by creating the vector text, offsetting and modelling the platform for the text and importing and positioning the Horse models. Tutorial B3B is approx. 18 minutes long. This covers taking the leaf swirl model and making edits to it to extract parts of it. These parts are then imported into the main model and laid out to produce the decorative elements on the plain areas of the buckle sign. Tutorial B3C is approx. 8 minutes long. It covers grouping the leaf decoration and smoothing it. Creating Rough and Finish 3D toolpaths along with toolpaths projected onto the model for the letters and then finally the vector and toolpath for the cut-out. Skills and Tools Covered Basic Vector Drawing Create Shape Component Trimming Import Components Scaling, Positioning and Mirroring of Components Splitting Components Copy and Paste Components between Aspire sessions Smoothing Components 3D Rough, Finish and Cut-Out toolpaths Profile Toolpath projected onto the 3D model

15 B4 Sunset Saguaro Scene Project Overview This project comprises 3 sections plus a companion tutorial: Tutorial B4A is approx. 15 minutes long. It covers importing the cacti and the small bush components, making edits to them and making copies to create the ground area, these pieces are then sculpted. Tutorial B4B is approx. 10 minutes long. It covers modelling the sun and clouds and then adjusting the Z depths, tilt and fade of the components to get them to have the correct depth perception Tutorial B4C is approx. 14 minutes long. It covers importing the cowboy-guitarist component, adjusting his height and then sculpting him into the layout. Once complete Rough, Finish and Cut-Out toolpaths are calculated. Tutorial B4X is approx. 11 minutes long. It is not a direct part of the model process for this example but does show how to take the Saguaro cactus from a more complex scene so it can be used as a component in the layout of the main part. Skills and Tools Covered Import Components Dynamic Scaling, Positioning and Copying of Components Fade and Tilt Sculpting Create Shape Generating toolpath boundary vector Creating 3D Rough, 3D Finish and 2D Profile (Cut-Out) toolpaths

16 B5 Western Raised Panel Door Project Overview This project comprises 3 sections: Tutorial B5A is approx. 12 minutes long. It covers creating a raised panel shape using 2-Rail Sweep, importing the 3D components for the pictorial part of the design and adjusting their position and Z depths. Tutorial B5B is approx. 14 minutes long. It covers cropping components and sculpting the edges to make them blend more naturally, then creating a background plane to combine all components with. Tutorial B5C is approx. 12 minutes long. It covers creating the recessed shape and a dummy machining surface along with calculation of rough, finish and cut-out toolpaths. Skills and Tools Covered 2 Rail Sweep Import Components Dynamic Scaling, Positioning Fade and Tilt Sculpting Creating and lowering the components into a recessed shape Generating a dummy machining plane Creating 3D Rough, 3DFinish and a Cut-Out toolpath

17 Object Models The image above shows all 35 individual Object models which are included with the DC1-B Western Scenes Disk.

18 Scenery Models The image above shows all 39 individual Scenery models which are included with the DC1-B Western Scenes Disk, some additional scenery models are included as part of some tutorials.


19 Project Layout Files The Project Layouts folder contains a mix of Aspire files that are additional undocumented projects and variations of the ones covered in the tutorials. Images of the contents of each file are shown on this and the following 7 pages all these models are created from components included on the disk. Within these files you will typically find Grouped sets of Components that contain the original individual models used to layout the full scene. This method is designed to show you how the parts were assembled and allows the user to easily customize the project or utilize them other layouts. 2Panel-30x34-Desert-Mountain-Scene.crv3d Barn-Bronco-12x8.crv3d

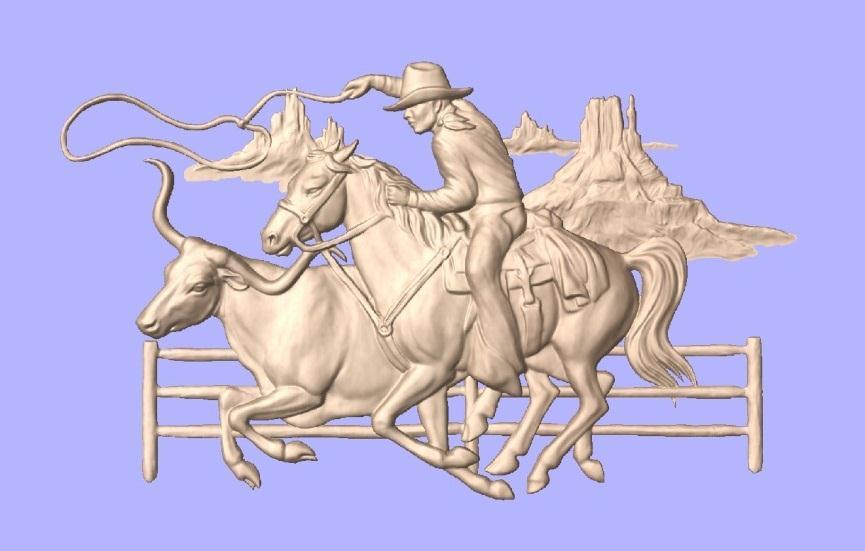
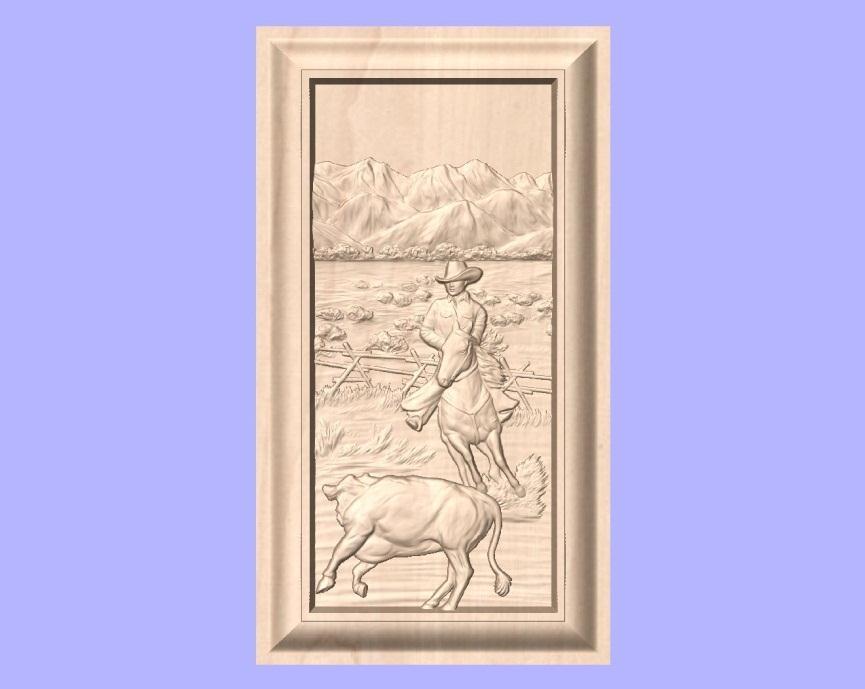
20 Belt-Buckle-Sign12x9.crv3d Covered-Wagon-Desert-30x17.crv3d Cowboy-Bull-Mesa-Fence-12x10.crv3d
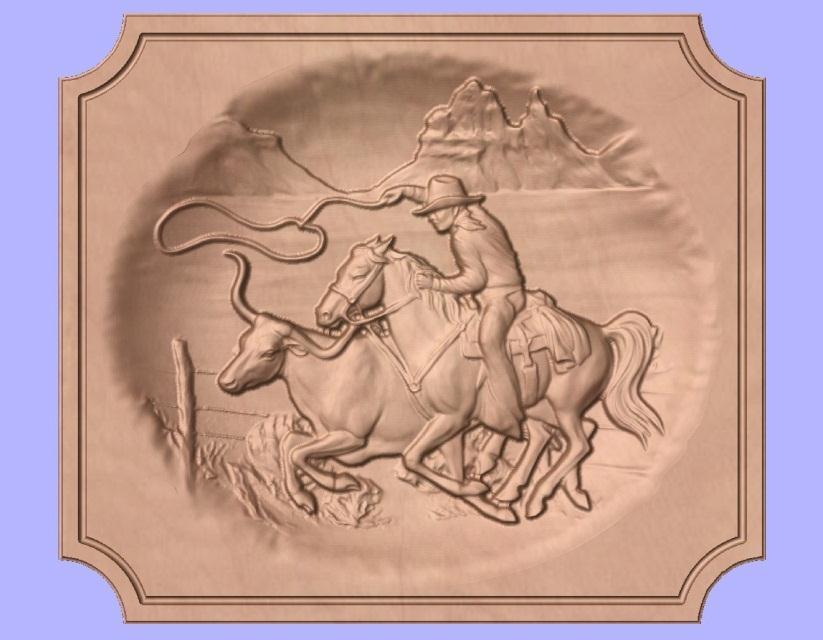
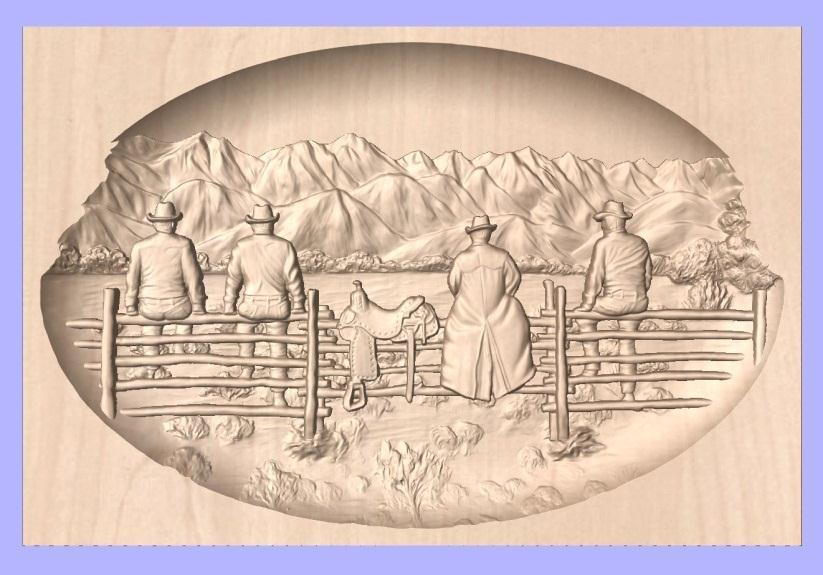
21 Cowboy-Bull-Rough-Dish-11x9-5.crv3d Cowboy-Fence-Oval12x8.crv3d Cowboy-Fence-Oval12x8-Sculpted.crv3d

22 Cowboy-Guitar-Oval-8x10.crv3d Desert-Background60x8.crv3d Desert-Train-Mantel60x8.crv3d
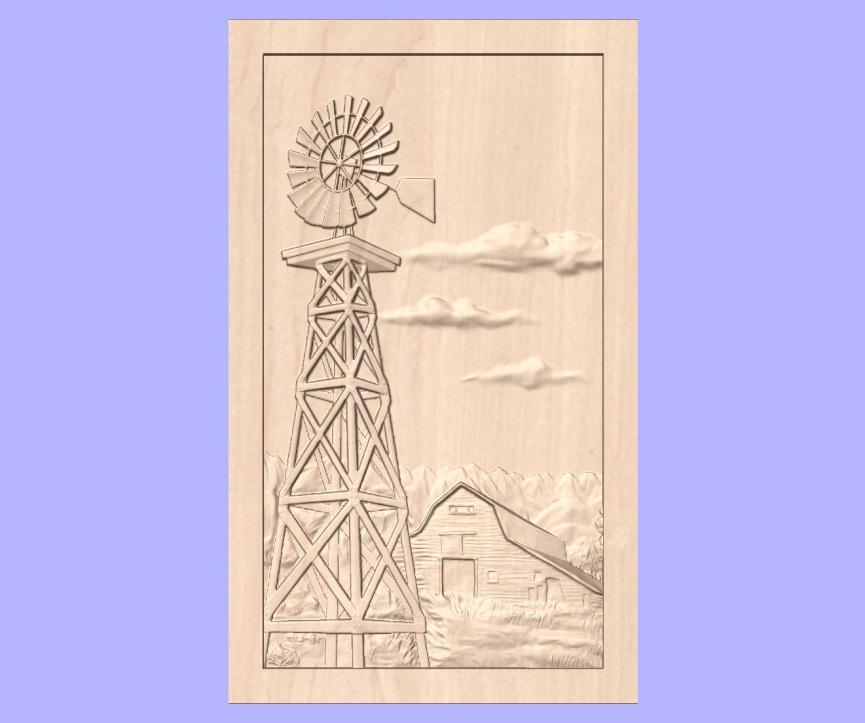
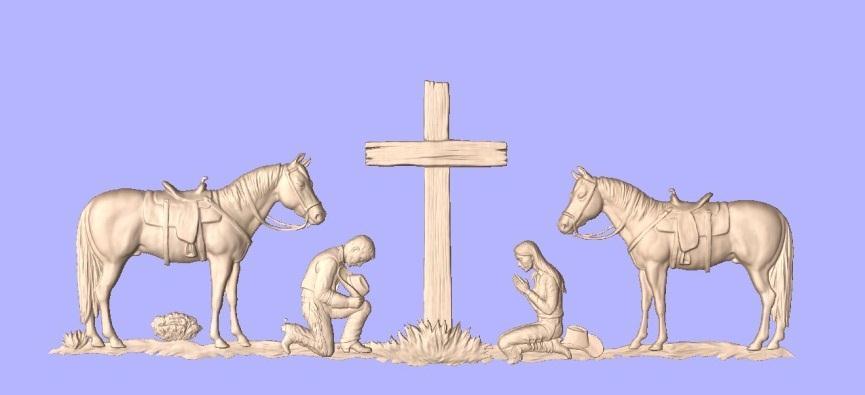
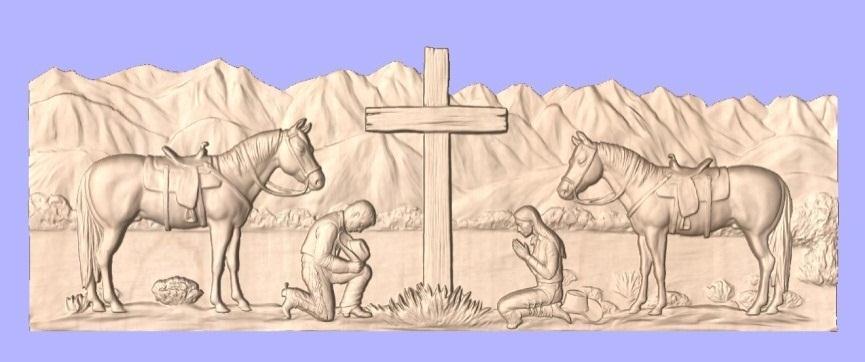
23 Door-Panel-Windmill-Barn36x60.crv3d Praying-Cowboy-Girl-22x8.crv3d Praying-Cowboy-Girl-Mountains22x8.crv3d

24 Ranch-Mantel-60x7-5.crv3d Saw-Blade-Mule-Cactus-12x12.crv3d Stage-Coach-Mantel-60x7-5.crv3d
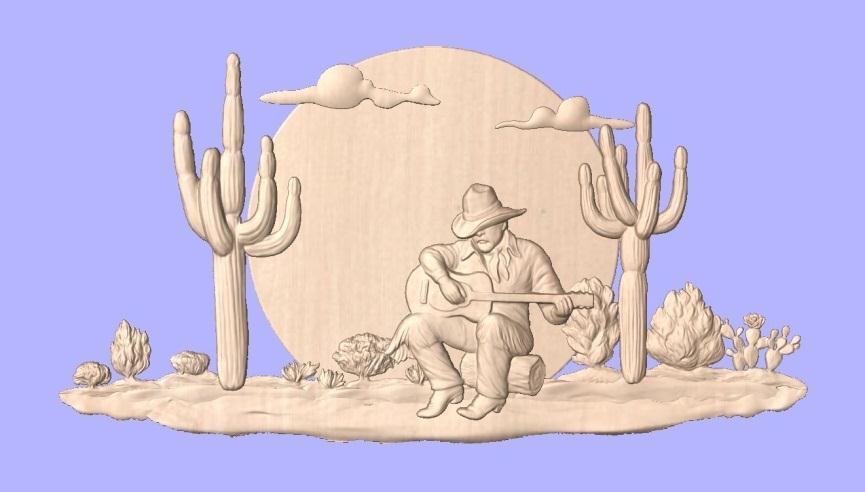
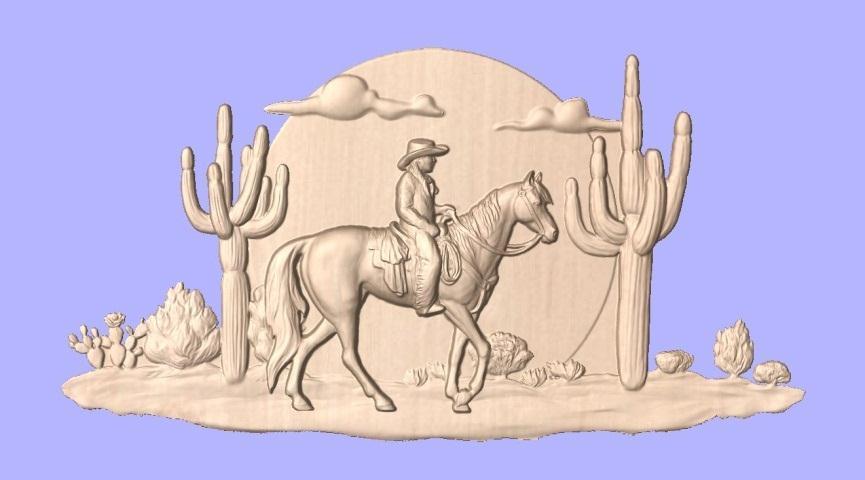
25 Sunset-Saguaro-Background24x16.crv3d Sunset-Saguaro-Cowboy-Guitar24x16.crv3d Sunset-Saguaro-Cowgirl-24x16.crv3d
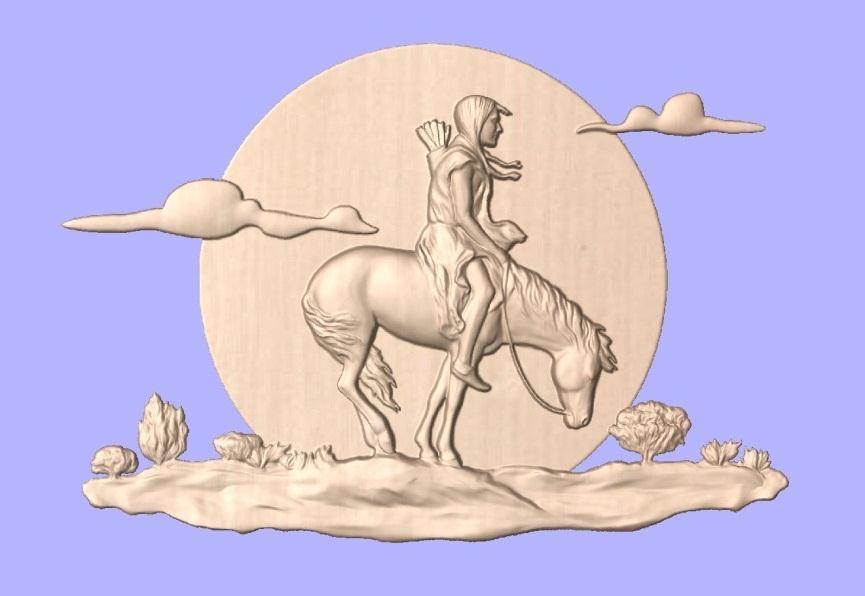
26 Sunset-Warrior-16x11.crv3d Western-Raised-Panel-15x24-Display.crv3d
Tutorial Engraving Badges
 Getting Started With Tutorial Engraving Badges VCarve Pro Disclaimer All CNC machines (routing, engraving, and milling) are potentially dangerous and because Vectric Ltd has no control over how the software
Getting Started. Tutorial 2 Flat Bottom V-Carving. A quick start guide for VCarve Pro & Aspire users. Vectric Ltd. Document V.6.0 V3.
 Getting Started A quick start guide for VCarve Pro & Aspire users Vectric Ltd. Document V.6.0 V3.0 Tutorial 2 Flat Bottom V-Carving Getting Started with Aspire & VCarve Pro Disclaimer All CNC machines
Working with PhotoVCarve files
 Getting Started with Tutorial 4 Intermediate Level Working with PhotoVCarve files VCarve Pro Disclaimer All CNC machines (routing, engraving, and milling) are potentially dangerous and because Vectric
our products. Vector drawing 2D toolpaths 3D toolpath import 2 sided machining
 Vector drawing 2D toolpaths 2.5D toolpaths 3D toolpaths 3D model Import Unlimited 3D Assembly Over 1000 pieces of 2D & 3D clipart 3D Model editing 3D modelling 2 sided machining Vector drawing 2D toolpaths
Tutorial Tracing and Machining Images
 Getting Started With Tutorial Tracing and Machining Images VCarve Pro Disclaimer All CNC machines (routing, engraving, and milling) are potentially dangerous and because Vectric Ltd has no control over
Tutorial 3 Kitchen Cabinet Door
 Getting Started With Tutorial 3 Kitchen Cabinet Door VCarve Pro Disclaimer All CNC machines (routing, engraving, and milling) are potentially dangerous and because Vectric Ltd has no control over how
Tutorial: Connecting Rod
 Tutorial: Connecting Rod Cut2D Disclaimer All CNC machines (routing, engraving, and milling) are potentially dangerous and because Vectric Ltd. has no control over how the software described in this manual
Tutorial VCarving Christmas Decorations
 Getting Started With Tutorial VCarving Christmas Decorations VCarve Pro Disclaimer All CNC machines (routing, engraving, and milling) are potentially dangerous and because Vectric Ltd has no control over
Tutorial 1 Bulls Head Sign
 Getting Started With Tutorial 1 Bulls Head Sign VCarve Pro Disclaimer All CNC machines (routing, engraving, and milling) are potentially dangerous and because Vectric Ltd has no control over how the software
Tutorial 1 Engraved Brass Plate
 Getting Started With Tutorial 1 Engraved Brass Plate VCarve Pro Disclaimer All CNC machines (routing, engraving, and milling) are potentially dangerous and because Vectric Ltd has no control over how the
Tutorial 3 Model Locomotive Name plate
 Getting Started With Tutorial 3 Model Locomotive Name plate Cut2D Disclaimer All CNC machines (routing, engraving, and milling) are potentially dangerous and because Vectric Ltd. has no control over how
Vectric Cut 3D (Frogmill)
") II. Subtractive Rapid Prototyping / VECTRIC CUT 3D (Frogmill) SUBTRACTIVE RAPID PROTOTYPING Vectric Cut 3D (Frogmill) INTERFACE: VECTRIC CUT 3D Model: Frogmill Size: W3050 x D1828 X H419 Material: EPS
II. Subtractive Rapid Prototyping / VECTRIC CUT 3D (Frogmill) SUBTRACTIVE RAPID PROTOTYPING Vectric Cut 3D (Frogmill) INTERFACE: VECTRIC CUT 3D Model: Frogmill Size: W3050 x D1828 X H419 Material: EPS
Tutorial 1 Engraved Brass Plate R
 Getting Started With Tutorial 1 Engraved Brass Plate R4-090123 Table of Contents What is V-Carving?... 2 What the software allows you to do... 3 What file formats can be used?... 3 Getting Help... 3 Overview
VCarve Pro. Vectric Ltd Unit 2B Dunstall Court Astwood Lane Feckenham B96 6QH UK.
 What's New In VCarve Pro Disclaimer All CNC machines (routing, engraving, and milling) are potentially dangerous and because Vectric Ltd has no control over how the software described in this manual might
2D Design. Window. 3D Window. Toolpat h Operati ons. Navigation Homepage. Layer Managemen t. Component Manager. Modeling Tools
 Navigation Homepage Click on the region of the interface you are interested in to navigate to the relevant section of this manual. At the foot of each page is a Navigation Homepage link, click on this
ArtCAM JewelSmith 2008
 What s New in ArtCAM JewelSmith 2008 by Delcam plc Issue: 259 Released: 20/03/2008 Disclaimer Delcam plc has no control over the use made of the software described in this manual and cannot accept responsibility
Process. IMPORT FORMAT - DXF, ISO, HPGL, IGES, STEP, STL, SAT, *NC, WMF - EPS, AI, BMP, DIG, PNG, TIFF, JPG, +OLE protocol
 APPLICATIONS Ruler/Dialer creation Router8 provide a Ruler/Dialer wizard to let user create ruler or dialer just steps, save design time. ADVANCED NODE EDITION Industry leading advanced node editing allows
CAD/CAM Software for Artistic Machining & Custom Woodworking
 Integrated Machining? In the not too distant past, woodworkers and designers were left with innovating their designs on paper. Thanks to the modern era of Computer Aided Design & Machining technology,
2. Open VCarve Pro. Click the Open an existing file button and select your file.
 VCarve Pro This software is used for 2D design and calculation of 2D and 2.5D toolpaths for cutting parts on a CNC Router. The software can import 2D designs from other programs such as FormZ, Rhino and
Autodesk Fusion 360 Training: The Future of Making Things Attendee Guide
 Autodesk Fusion 360 Training: The Future of Making Things Attendee Guide Abstract After completing this workshop, you will have a basic understanding of editing 3D models using Autodesk Fusion 360 TM to
Flowmap Generator River Tutorial
 Flowmap Generator River Tutorial Table of Contents First steps... 3 Preview Material Setup... 3 Creating a Generator... 5 Assign to preview material... 9 Fields... 10 Simulating... 11 Using the baked flowmap
New Perspectives Microsoft Office 365 and PowerPoint 2016 Comprehensive 1st Edition Pinard TEST BANK
 New Perspectives Microsoft Office 365 and PowerPoint 2016 Comprehensive 1st Edition Pinard TEST BANK Full download at: https://testbankreal.com/download/new-perspectives-microsoft-office-365-powerpoint-
Fast. Flexible. Reliable. Art
 Fast. Fleible. Reliable. Art Combining an artist s eye with a computer s ease Mastercam brings its power and eperience to artistic relief design and cutting with Mastercam X 2 Art. This eciting new product
What's New in Aspire 4.5
 What's New in Aspire 4.5 A quick start guide for Aspire upgraders Vectric Ltd. Document V.1.0 Contents CONTENTS... 2 OVERVIEW... 3 NEW DRAWING TOOLS... 4 Vector Boundary... 5 ENHANCED & EXTENDED DRAWING
Freeform / Freeform PLUS
 Freeform / Freeform PLUS WORKING WITH FREEFORM Work from Coarse Clay to Fine When creating new models from scratch, it is best to first create a rough shape using a coarse clay setting such as Rough Shape
CNC ROUTER - GRANITE 1200 X 1600 X 200
 KRITELAS ATHANASIOS CNC MANIFACTURE FARMAKI 23 STR- 52100 KASTORIA - GREECE TEL: ++30 2467023619 Fax: ++30 2467023886 www.servo.gr - email: krit01@otenet.gr CNC ROUTER - GRANITE 1200 X 1600 X 200 Greece
Feature-based CAM software for mills, multi-tasking lathes and wire EDM. Getting Started
 Feature-based CAM software for mills, multi-tasking lathes and wire EDM www.featurecam.com Getting Started FeatureCAM 2015 R3 Getting Started FeatureCAM Copyright 1995-2015 Delcam Ltd. All rights reserved.
CHAPTER 6 THE SUITES VECTOR DRAWING SUITE
 CHAPTER 6 THE SUITES There are two additional tool bar suites for Project Designer sold separately as add-on modules. These are the Vector Drawing Suite, and the Pattern Modeling Suite. This section will
Designer Reference 1
 Designer Reference 1 Table of Contents USE OF THE DESIGNER...4 KEYBOARD SHORTCUTS...5 Shortcuts...5 Keyboard Hints...5 MENUS...7 File Menu...7 Edit Menu...8 Favorites Menu...9 Document Menu...10 Item Menu...12
17. Feature Machining.
 ArtCAM Pro 5.5 17. Feature Machining 17. Feature Machining. Overview Feature Machining is the engraving strategy and requires a feature to be specified in the 2D view. The vectors that make up the feature
Prototext 4. Why use Prototext 4
 Prototext 4 Prototext is a simple & affordable windows based program for custom engraving used with 2 & 3 axis CNC milling machines. Prototext has been used by machinists for over 15 years. Up till now
ArtCAM Pro. Tutorials. By Delcam plc. Issue: 7.0 Date: 24/03/04
 ArtCAM Pro Tutorials By Delcam plc Issue: 7.0 Date: 24/03/04 Disclaimer Delcam plc has no control over the use made of the software described in this manual and cannot accept responsibility for any loss
Dave s Phenomenal Maya Cheat Sheet Polygon Modeling Menu Set By David Schneider
 Dave s Phenomenal Maya Cheat Sheet Polygon Modeling Menu Set By David Schneider POLYGONS NURBS to Polygons This allows the user to change the objects created with NURBS into polygons so that polygon tools
PowerPoint 2010 Quick Start to a Presentation
 PowerPoint 2010 Quick Start to a Presentation Backstage View Button Similar to old File button 1 On opening a new presentation, from Slides choose a Layout for a particular template, e.g. a title page.
How to machine a 3D Scene?
 How to machine a 3D Scene? Import any 3D model from the 3D Models folder. On the left side of the screen click the Cam tab to be directed in the Machining Module. Open the Create toolpath window if not
3 AXIS STANDARD CAD. BobCAD-CAM Version 28 Training Workbook 3 Axis Standard CAD
 3 AXIS STANDARD CAD This tutorial explains how to create the CAD model for the Mill 3 Axis Standard demonstration file. The design process includes using the Shape Library and other wireframe functions
ARCHITECTURE & GAMES. A is for Architect Simple Mass Modeling FORM & SPACE. Industry Careers Framework. Applied. Getting Started.
 A is for Architect Simple Mass Modeling One of the first introductions to form and space usually comes at a very early age. As an infant, you might have played with building blocks to help hone your motor
What's New in VCarve Pro 8.5
 What's New in VCarve Pro 8.5 A quick start guide for VCarve Pro upgraders Copyright Vectric Ltd. Document V.1.0 Contents CONTENTS... 2 OVERVIEW... 3 ENHANCED & EXTENDED DRAWING TOOLS... 4 NEW TOOLPATH
USER GUIDE MONOGRAMMING
 USER GUIDE MONOGRAMMING CONTENTS Monogramming... 1 Monogram elements... 1 Monogram designs... 3 Designs tab... 3 Monogram letters... 5 Monogram ornaments... 7 Modify ornaments... 7 Add ornaments... 8 Create
1. In the first step, the polylines are created which represent the geometry that has to be cut:
 QCAD/CAM Tutorial Caution should be exercised when working with hazardous machinery. Simulation is no substitute for the careful verification of the accuracy and safety of your CNC programs. QCAD/CAM or
ADOBE ILLUSTRATOR CS3
 ADOBE ILLUSTRATOR CS3 Chapter 2 Creating Text and Gradients Chapter 2 1 Creating type Create and Format Text Create text anywhere Select the Type Tool Click the artboard and start typing or click and drag
Images from 3D Creative Magazine. 3D Modelling Systems
 Images from 3D Creative Magazine 3D Modelling Systems Contents Reference & Accuracy 3D Primitives Transforms Move (Translate) Rotate Scale Mirror Align 3D Booleans Deforms Bend Taper Skew Twist Squash
2D Profile Cutting - Stinger CNC Digital Fabrication Lab College of Design, Iowa State University
 2D Profile Cutting - Stinger CNC Digital Fabrication Lab College of Design, Iowa State University 2D Profile Cutting - Guidelines - The following steps will guide the user on how to transfer digital work
Epilog Laser Galvo Model G2 Operating Instructions
 Epilog Laser Galvo Model G2 Operating Instructions The Epilog G2 galvo system is a three-axis galvanometer comprised of two galvanometers (motors), a translating lens, and a fixed focus length lens. This
Adobe Premiere Pro CC 2015 Tutorial
 Adobe Premiere Pro CC 2015 Tutorial Film/Lit--Yee GETTING STARTED Adobe Premiere Pro CC is a video layout software that can be used to create videos as well as manipulate video and audio files. Whether
WHAT'S NEW IN MASTERCAM 2018 FOR SOLIDWORKS
 WHAT'S NEW IN MASTERCAM 2018 FOR SOLIDWORKS March 2017 WHAT'S NEW IN MASTERCAM 2018 FOR SOLIDWORKS March 2017 2017 CNC Software, Inc. All rights reserved. Software: Mastercam 2018 for SOLIDWORKS Terms
MICROSOFT WORD. Table of Contents. What is MSWord? Features LINC FIVE
 Table of Contents What is MSWord? MSWord is a word-processing program that allows users to insert, edit, and enhance text in a variety of formats. Word is a powerful word processor with sophisticated editing
Learning Microsoft PowerPoint Contents. Chapter 1: Getting Started With PowerPoint
 Contents Chapter 1: Getting Started With PowerPoint Starting a Presentation...1-1 The PowerPoint Screen Sections...1-2 The Backstage View... 1-2 The Quick Access Toolbar... 1-3 The Ribbon... 1-4 Zoom Controls...1-6
Session 7 MS Word. Graphics. Inserting Clipart, and Graphics Modify graphics Position graphics
 Session 7 MS Word Graphics Inserting Clipart, and Graphics Modify graphics Position graphics Table of Contents Session 7 Working with Graphics... 1 The Toolbar... 1 Drawing Toolbar... 1 Picture Toolbar...
Microsoft PowerPoint Illustrated. Unit C: Inserting Objects into a Presentation
 Microsoft PowerPoint 2010- Illustrated Unit C: Inserting Objects into a Presentation Objectives Insert text from Microsoft Word Insert clip art Insert and style a picture Insert a text box Objectives Insert
Virginia Western Community College ARC 221 Architectural CAD Applications Software I
 Virginia Western Community College ARC 221 Architectural CAD Applications Software I Prerequisites CAD 241 Course Description Teaches the principles and techniques of architectural drawing practices through
Creating. an Illustration. Illustrator 9.0. Objectives
 U B nit Creating an Illustration Objectives Plan your illustration Work with palettes Draw with the Paintbrush Tool Scale objects Distort an object Choose colors from the Web Swatch library Use the Transform
Home Designer Update Notes
 Home Designer 18.3.2.2 Update Notes October 28, 2016 1 General Notes This is a list of the changes made to Home Designer 2017 in the 18.3.2.2, 18.3.1.2, 18.3.0.47, 18.2.1.2, 18.2.0.42, and 18.1.1.4 program
Adobe InDesign CS6 Tutorial
 Adobe InDesign CS6 Tutorial Adobe InDesign CS6 is a page-layout software that takes print publishing and page design beyond current boundaries. InDesign is a desktop publishing program that incorporates
Summer STEM Academy. VCarve Name Sign Instructions
 Summer STEM Academy VCarve Name Sign Instructions Follow these instructions to draw your personalized sign on the CNC router in the Woodshop / Manufacturing shop. 1. Log on to your computer and double
LAB # 2 3D Modeling, Properties Commands & Attributes
 COMSATS Institute of Information Technology Electrical Engineering Department (Islamabad Campus) LAB # 2 3D Modeling, Properties Commands & Attributes Designed by Syed Muzahir Abbas 1 1. Overview of the
POWERPOINT Add the Pizzazz to Your Presentation
 POWERPOINT 2007 Add the Pizzazz to Your Presentation Microsoft Office 2007 TABLE OF CONTENTS ADDING GRAPHICS TO YOUR PRESENTATION... 1 DRAWINGS... 1 CLIP ART... 2 PICTURES... 3 SMARTART... 4 WORDART...
POWERPOINT Build a Presentation to Remember
 POWERPOINT 2007 Build a Presentation to Remember Microsoft Office 2007 TABLE OF CONTENTS DOCUMENT THEMES... 1 THEMES... 1 COLOR SETS... 1 FONT SETS... 1 MASTER SLIDES... 2 USING THEMES IN THE SLIDE MASTER...
Creative Sewing Machines Workbook based on BERNINA Embroidery Software V8
 V8 Lesson 49 Using an Object for a Carving Stamp Edited for V8.1 update. We will start by using Corel to find and save an image. On your desktop there should be 4 Corel icons. I have grouped mine together
WORD Creating Objects: Tables, Charts and More
 WORD 2007 Creating Objects: Tables, Charts and More Microsoft Office 2007 TABLE OF CONTENTS TABLES... 1 TABLE LAYOUT... 1 TABLE DESIGN... 2 CHARTS... 4 PICTURES AND DRAWINGS... 8 USING DRAWINGS... 8 Drawing
USER GUIDE MONOGRAMMING
 USER GUIDE MONOGRAMMING COPYRIGHT Copyright 2016. Wilcom Pty Ltd, Wilcom International Pty Ltd. All Rights reserved. No parts of this publication or the accompanying software may be copied or distributed,
Introduction to CNC. A detailed beginners guide to the basics of CNC technology, process workflow and terminology
 Introduction to CNC A detailed beginners guide to the basics of CNC technology, process workflow and terminology Vectric Ltd. Document V.1.0 June 2013 Page 1 Contents Introduction... 3 CNC Overview...
Beginning Paint 3D A Step by Step Tutorial. By Len Nasman
 A Step by Step Tutorial By Len Nasman Table of Contents Introduction... 3 The Paint 3D User Interface...4 Creating 2D Shapes...5 Drawing Lines with Paint 3D...6 Straight Lines...6 Multi-Point Curves...6
Microsoft Office PowerPoint 2013 Courses 24 Hours
 Microsoft Office PowerPoint 2013 Courses 24 Hours COURSE OUTLINES FOUNDATION LEVEL COURSE OUTLINE Using PowerPoint 2013 Opening PowerPoint 2013 Opening a Presentation Navigating between Slides Using the
MASTERCAM DYNAMIC MILLING TUTORIAL. June 2018
 MASTERCAM DYNAMIC MILLING TUTORIAL June 2018 MASTERCAM DYNAMIC MILLING TUTORIAL June 2018 2018 CNC Software, Inc. All rights reserved. Software: Mastercam 2019 Terms of Use Use of this document is subject
Mastering Truspace 7
 How to move your Truespace models in Dark Basic Pro by Vickie Eagle Welcome Dark Basic Users to the Vickie Eagle Truspace Tutorials, In this first tutorial we are going to build some basic landscape models
Automatic PDF Refresh. PDF file references will refresh display when they have been externally updated, ensuring accuracy.
 PRODUCTIVITY / USER INTERFACE Revisions to 3D Viewer Files. Choose to update existing 3D Viewer models with newer revisions from Chief Architect, no need to manage multiple versions of the same project.
Education and Training CUFMEM14A. Exercise 2. Create, Manipulate and Incorporate 2D Graphics
 Education and Training CUFMEM14A Exercise 2 Create, Manipulate and Incorporate 2D Graphics Menu Exercise 2 Exercise 2a: Scarecrow Exercise - Painting and Drawing Tools... 3 Exercise 2b: Scarecrow Exercise
Autodesk Inventor 11 Certified User and Expert Exam Preparation Class [Part 2]
![Autodesk Inventor 11 Certified User and Expert Exam Preparation Class [Part 2]](/thumbs/73/68780725.jpg "Autodesk Inventor 11 Certified User and Expert Exam Preparation Class [Part 2]") 11/29/2006-5:00 pm - 6:30 pm Room:Marcello - 4404 (MSD Campus) Autodesk Inventor 11 Certified User and Expert Exam Preparation Class [Part 2] Daniel Banach - MasterGraphics MA25-3 See MA24-2: Autodesk
11/29/2006-5:00 pm - 6:30 pm Room:Marcello - 4404 (MSD Campus) Autodesk Inventor 11 Certified User and Expert Exam Preparation Class [Part 2] Daniel Banach - MasterGraphics MA25-3 See MA24-2: Autodesk
Pro/ENGINEER Wildfire 2.0 Curriculum
 Pro/ENGINEER Wildfire 2.0 Curriculum Live Classroom Virtual Class Web Based NOTE: For a graphical depiction of the curriculum based on job role, please visit this page: http://www.ptc.com/services/edserv/learning/paths/ptc/proe_wf2.htm
GENIO CAD/CAM software powered by Autodesk technology for parametric programming of boring, routing and edge-banding work centers Genio SPAI SOFTWARE
 GENIO CAD/CAM software powered by Autodesk technology for parametric programming of boring, routing and edge-banding work centers Overview is a powerful CAD/CAM system powered by Autodesk 3D environment
Setting up the Roland EGX-300 and EngraveLab to cut IkonicsMetal
 Setting up the Roland EGX-300 and EngraveLab to cut IkonicsMetal Setting Up the Roland EGX-300: 1. Power unit off 2. Remove any existing tools and install the 11/64 solid collet to the bottom of the spindle
Publisher 2013 Foundation SAMPLE
 Publisher 2013 Foundation Publisher 2013 Foundation Microsoft Publisher 2013 Foundation - Page 2 2013 Cheltenham Group Pty. Ltd. All trademarks acknowledged. E&OE. No part of this document may be copied
SNOWFLAKES PHOTO BORDER - PHOTOSHOP CS6 / CC
 Photo Effects: Snowflakes Photo Border (Photoshop CS6 / CC) SNOWFLAKES PHOTO BORDER - PHOTOSHOP CS6 / CC In this Photoshop tutorial, we ll learn how to create a simple and fun snowflakes photo border,
PowerPoint 2016 Basics for Mac
 1 PowerPoint 2016 Basics for Mac PowerPoint 2016 Basics for Mac Training Objective To learn the tools and features to get started using PowerPoint more efficiently and effectively. What you can expect
Technology Applications Guide 5th Grade
 Sub Category Explanation Technology TEKS Subject Foundations Terminology & AUP Use grade level appropriate technology terminology. 1A Teachers will explain the rules according to the NBISD Acceptable Use
PowerPoint. Tutorial 1 Creating a Presentation. Tutorial 2 Applying and Modifying Text and Graphic Objects
 PowerPoint Tutorial 1 Creating a Presentation Tutorial 2 Applying and Modifying Text and Graphic Objects Tutorial 3 Adding Special Effects to a Presentation COMPREHENSIVE PowerPoint Tutorial 1 Creating
What's New in BobCAD-CAM V29
 Introduction Release Date: August 31, 2016 The release of BobCAD-CAM V29 brings with it, the most powerful, versatile Lathe module in the history of the BobCAD-CAM software family. The Development team
Edgecam Getting Started Guide
 Edgecam Getting Started Guide Getting Started October 2016 1 Contents Contents... 2 Introduction... 4 About this Guide... 4 Other Resources... 5 What is Edgecam?... 6 Supporting Applications... 7 Installing
Creating a Snowman Scene
 Creating a Snowman Scene By: Shane Trautsch Blender 2.72 What you will learn Basic Modeling Particle systems sculpting Materials and Textures Lighting Creating a Snow By now, you have created a snowman.
User Guide Belltech Systems, LLC
 User Guide Belltech Systems, LLC http://www.belltechsystems.com May, 2006 1. Introducing Belltech CaptureXT 2. Installation and Uninstallation Installation Running the Application Uninstallation 3. User
TRAINING GUIDE SOLIDS-LESSON-3
 TRAINING GUIDE SOLIDS-LESSON-3 Mastercam Training Guide Objectives You will generate the solid model from the existing 2-dimensional geometry. This Lesson covers the following topics: Open an existing
Microsoft Publisher 2013 Foundation. Publisher 2013 Foundation SAMPLE
 Microsoft Publisher 2013 Foundation Publisher 2013 Foundation Microsoft Publisher 2013 Foundation - Page 2 2013 Cheltenham Group Pty. Ltd. All trademarks acknowledged. E&OE. No part of this document may
My Awesome Presentation Exercise
 My Awesome Presentation Exercise Part One: Creating a Photo Album 1. Click on the Insert tab. In the Images group click on the Photo Album command. 2. In the Photo Album window that pops up, look in the
7/21/2009. Chapters Learning Objectives. Fillet Tool
 Chapters 12-13 JULY 21, 2009 Learning Objectives Chapter 12 Chapter 13 Use the FILLET tool to draw fillets, rounds, and other rounded corners. Place chamfers and angled corners with the CHAMFER tool. Separate
KODAK Software User s Guide. Software Version 9.0
 KODAK Create@Home Software User s Guide Software Version 9.0 Table of Contents 1 Welcome to KODAK Create@Home Software Features... 1-1 Supported File Formats... 1-1 System Requirements... 1-1 Software
Working with PowerPoint. Modify PowerPoint. Views
 Working with PowerPoint The new user interface The Backstage view The Office Ribbon with its tabs The Quick Access Toolbar The Status Bar How to Use Smart Tags The New File Format Live Preview Protected
Producing a Slide Show
 LESSON 7 Producing a Slide Show 7.1 After completing this lesson, you will be able to: Annotate slides during a slide show. Set slide transitions. Animate slide text. Animate slide objects. Hide a slide
3D Routing Guide. PART 2: 3D software, Partworks 3D. Video: CNC Training - 3D. 3D modeling conventions (Rhino, SketchUp, 3D scanner, etc.
 3D Routing Guide PART 2: 3D software, Partworks 3D Video: CNC Training - 3D The 3D software is a little simpler than the 2D because you typically only have to assign one toolpath for the entire surface.
Solidworks 2006 Surface-modeling
 Solidworks 2006 Surface-modeling (Tutorial 2-Mouse) Surface-modeling Solid-modeling A- 1 Assembly Design Design with a Master Model Surface-modeling Tutorial 2A Import 2D outline drawing into Solidworks2006
Microsoft Word
 OBJECTS: Shapes (part 1) Shapes and the Drawing Tools Basic shapes can be used to graphically represent information or categories. The NOTE: Please read the Objects (add-on) document before continuing.
USER GUID E EASY COFFEE-COZY
 USER GUIDE EASY COFFEE-COZY COPYRIGHT Copyright 2018. Wilcom Pty Ltd, Wilcom International Pty Ltd. All Rights reserved. No parts of this publication or the accompanying software may be copied or distributed,
4 TRANSFORMING OBJECTS
 4 TRANSFORMING OBJECTS Lesson overview In this lesson, you ll learn how to do the following: Add, edit, rename, and reorder artboards in an existing document. Navigate artboards. Select individual objects,
Exploring Microsoft Office Word 2007
 Exploring Microsoft Office Word 2007 Chapter 3: Enhancing a Document Robert Grauer, Keith Mulbery, Michelle Hulett Objectives Insert a table Format a table Sort and apply formulas to table data Convert
VERO UK TRAINING MATERIAL. 2D CAM Training
 VERO UK TRAINING MATERIAL 2D CAM Training Vcamtech Co., Ltd 1 INTRODUCTION During this exercise, it is assumed that the user has a basic knowledge of the VISI-Series software. OBJECTIVE This tutorial has
Recipes4Success. Animate Plant Growth. Share 4 - Animation
 Recipes4Success In this Recipe, you will create an animated science diagram of plant growth. You will learn how to add images, draw shapes, use the animation options, preview, and publish your project.
Using Graphics. Digital Camera. Auto Shapes
 AutoShape Using Graphics Internet The following graphic elements are available to enhance your presentation Clip Art AutoShapes Fill effects Shadow effects 3D effects Digital Camera WordArt Digital Camera
A Study of Angles & Curves
 A Study of Angles & Curves Method 1: Cutting Quilt Shapes/Using the Shapes Tools Open BERNINA CutWork Software. Make sure that Create New is selected. Click Next. Place a dot in front of New Graphic. Select
Contents. Introduction... 4
 Copyright 2008 Idea Spectrum, Inc. All Rights Reserved. Realtime Landscaping Plus, the Realtime Landscaping Plus logo, Idea Spectrum, and the Idea Spectrum logo are all trademarks of Idea Spectrum, Inc.
Getting Started Guide
 SnagIt Getting Started Guide Welcome to SnagIt Thank you for your purchase of SnagIt. SnagIt is the premier application to use for all of your screen capturing needs. Whatever you can see on your screen,