Tutorial Model the perfect 3D face
|
|
|
- Lorraine Bradford
- 6 years ago
- Views:
Transcription
1


 is the single most important aspect of head modelling.")
.")

![He has worked in D for over seven years and has written several books on D and 2D graphics, and is currently working on another. You can contact him at [e] simon.danaher@ntlworld.](/docs-images/75/72285823/images/2-5.jpg "com Material changes You can change the material to green so it's easier to see. Set the material properties and apply materials to objects using the Hypergraph in Maya.")

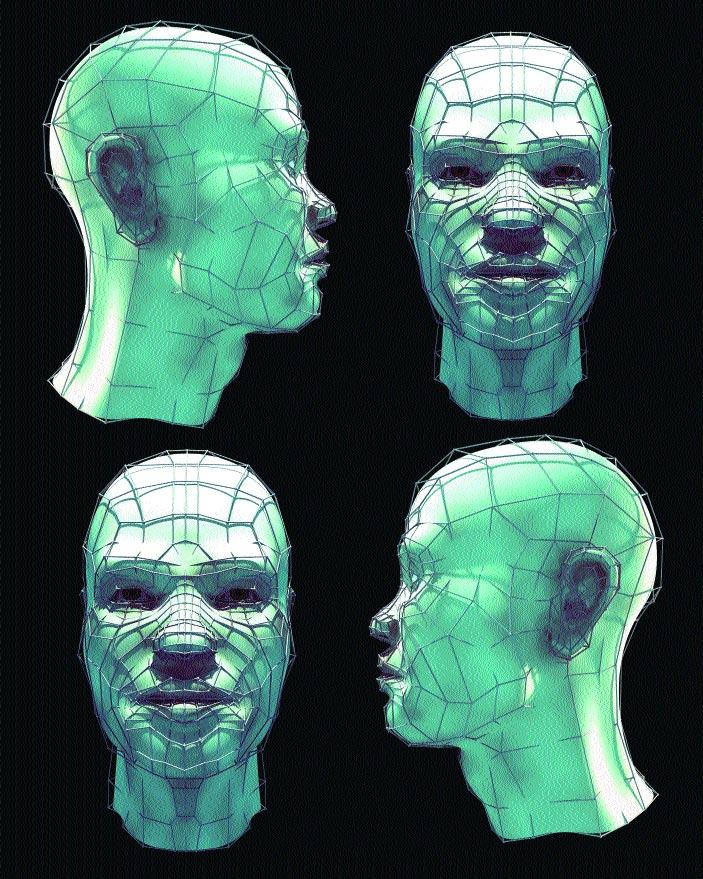
2 Model the perfect D face Want to get your head around D modelling? We use Maya to show you how to build an animatable face feature by feature T here are many ways in which to model a head in D. In this tutorial, we'll look at polygon modelling with subdivision smoothing for mesh refinement. This approach enables you to create the topology of the face mesh in a very direct and hands-on manner. With NURBS modelling, creating a human head can be problematic, and the best method involves stitching multiple surfaces together. This takes an awful lot of planning and isn t a method you can jump straight into. Polygon modelling enables you to correct mistakes more easily. Correct topology (the way a surface is structured) is the single most important aspect of head modelling. We'll be creating special topological structures, known as edge loops', which outline areas of the face and mimic the rings of muscle under the skin. Without proper loops, a head will be difficult to animate. We ll also be making sure all the polygons have four vertices (called quads). A mesh of all quads is less likely to pinch when smoothed and animated. Although this tutorial uses Maya, the principles employed are applicable whatever app you use. Part : Initial features Create a cage mesh in Maya and begin modelling the mouth Expertise provided by Simon Danaher. Simon is an acclaimed D artist and writer. He has worked in D for over seven years and has written several books on D and 2D graphics, and is currently working on another. You can contact him at [e] simon.danaher@ntlworld.com Material changes You can change the material to green so it's easier to see. Set the material properties and apply materials to objects using the Hypergraph in Maya. Writing scripts You can also create two scripts to change the visibility of the layers on which the proxy and smooth meshes appear as well as the transparency of the surface of the proxy mesh. This enables you to switch between the low-res cage and smoothed versions of the model as you work with a single click. Copy the directory called D_Head from the download to your hard drive. Set this as your current project (File>Project>Set...) then open the scene file FaceTemplates.mb. Switch to side view and enable textured display (key 6). Now trace the outline of the head using a single polygon. In Maya, use the Create Polygon tool (Modelling>Polygons>Create Polygon Tool). Click around the outline to make the polygon, and hit Return to finish. Don t place too many points yet just make a rough outline. Remember that this will be a cage not the smoothed surface. 2 The face that s created is selected and extruded slightly to make a band of quad polygons right around the face. In Maya, use the Edit Polygons>Extrude Face command and drag the z handle to the desired distance. Using outlines The main reason for the outline is to provide some sort of guide. Without experience, it can be hard to model a head in D from scratch. Starting with an outline can help, but it's not essential. With the face still selected, press Delete to Begin with the mouth. First, adjust the 5 clear it. Repeat for the face on the opposite positions of the vertices so they match the side. Switch to object mode (right-click-hold template better, then select four edges that define or press F8 until the polygons turn green) and the lips and extrude and adjust them to also follow then use Polygons>Smooth Proxy. This generates the template. Repeat this to form two extra polygon a subdivided version of the cage if you re using segments for the lips. Since not all D apps handle another app, apply its own subdivision surface edges in the same way, use whatever tools you see option. The cage mesh is saved as Outline.obj. fit it s the mesh topology that's important here. It s now time to create the first loop. You need 6 an extra row of polygons above and below the lips, so add these by using Extrude Edge in Maya. Join any hanging points to the rest of the mesh using Weld or Merge Vertices. Tutorial Model the perfect D face


3 Part 2: Creating loops You ll need to use edge loops to mimic muscles under the skin. Without these, the head will be hard to animate Workflow considerations In reality, you might be better off fixing the lone triangle in steps and 2 later when you add more detail to the lips. The reason we ve suggested you do it here is to show you the workflow sooner rather than later. Create the first loop at the corner of the mouth. Here, the outer row of polygons is connected to the lower row by a single quad polygon to create a ring. Another ring is formed for the lips themselves. Finally, you re left with a triangle, which you ll have to fill in. This isn t a problem. Use the Split Polygon tool 2 in Maya to draw a cut through the polygons you ve just created up to the triangle, converting it into a quad. You simply need to move the point so you can see it better. Next, work on the nose area. This is often a tricky part, especially in the area where the nose and cheek meet. Two of the nose edges are extruded twice here. Join the nose edges to the upper lip by creating three extra polygons in between, and then join them to the upper lip. Notice that refinement is also continuing on the mesh an extra loop around the lips has been added to define the edge. As long as you have closed loops, it s easy to add extra detail like this without creating triangles or n-gons. Extrude the edges up again creating two more 5 polygons. Join these to the nose junction using the Append to Polygon tool in Maya. This is an important joint in the topology because it marks a change. Note that the highlighted point has five quads connected to it. This enables a loop (highlighted in red) to continue up over the nose while accommodating the extra polygons for the nostril area. The cage object is called FaceNose.obj in the download. Fill in the chin and cheek area economically 6 with polygons. There are ways to stop a loop or redirect it to help keep the mesh optimised. The red dots indicate vertices that are connected to only three polygons. This is another kind of junction, one that enables you to reduce the mesh its topology is like the corner of a cube and helps to fold the mesh around corners. To create a strong jawline you need to 7 concentrate on the mesh and begin a nice oneshaped loop that runs beneath the chin and up the side of the jowls. This will eventually connect to the eyebrow region, closing the loop. Note the path of the polygons in the loop and also the five (white) and three (green) quad junctions in the mesh which have been created in the process. This is saved as ChinJaw.obj you ll find the file in the download. Take a minute to examine the mesh. As you 8 can see, there s a nice array of loops following the features and muscles of the face. However, there are one or two problem areas. The corner of the mouth will need looking at later, as will the radial edges perpendicular to the loops. These can be dealt with when we add more detail. Use the Create Polygon tool to trace the 9 outline of the eye opening. We ve used ten points in total notice that the corners both have two points not one.


4 Part : Adding the eye Position an eye socket, create some loops and weld it to the mesh Strange shading Occasionally, you might have to align the normals of the mesh if its shading suddenly looks odd. Use Edit Polygons> Normals>Set To Face to fix most problems. You can also run the Polygons>Cleanup command to fix problem geometry. Before you start to combine the eye with the Add and position a sphere for the eye. This 2 rest of the face, first select and delete the is just a stand-in to enable you to move the smoothed surface, leaving just the cage. Select points of the eye polygon to the correct location the face and the eye objects then use a better eyeball can be modelled later if you wish. Polygons>Combine. Reapply Smooth Proxy to Select and move the vertices of the flat eye polygon the resulting mesh. so they just touch the sphere. You then need to extrude this polygon outwards to make a ring of polygons around the eye. In some apps, such as Maya, you can just extrude the edges instead both methods work well. Repeat the extrusion process until you get three loops around the eye. If using the polygon extrude method, you can now delete the central n-gons, leaving just the loops. The eye socket is connected to the rest of the mesh by selecting and welding the vertices (green dots). Notice that we re creating concentric loops around the eye, plus one loop that goes over the bridge of the nose and up over the brow. In order to join these smoothly with the rest of the face, a five-point vertex junction is used (yellow dot). This creates a branching loop, which continues down around the mouth and jowl area. Hiding the sphere and activating all four views, 5 move the vertices to match the template. There are no real rules for this you just need to practise working with a mesh and try to build up the volume of the face in D. Using photo references or a mirror will help with this process. The nose-eye loop is finished by extruding the 6 edges above the eye socket and welding the end points back into the rest of the face. The large thin forehead polygon has been split to supply a vertex for welding the brow polygons to. Part : Building the skull You won t need many polygons for the skull, but creating the ear is an intricate process Now you need to extend the brow to create the skull, where the polygon density is thinned out. You need few polygons here because the skull is not as detailed as the face. The vertices are edited and the smoothed mesh is previewed. Note we've cut in an extra set of edges running from the inner edge of the eye around the temple to help sculpt this area. Maya s Split Polygon tool is ideal for this. The cage is called Brow.obj in the download. The rest of the skull should be completed using 2 similar techniques. Again, pay attention to the bones, tendons and muscles under the skin, though if the character is going to have hair, you won t need to be too particular with the topology of the skull itself. As you can see here, it s by no means perfect, but should be fine for most situations. Model the ears as a separate object. Begin by tracing the outline of the ear in the template using the Create Polygon tool (or similar) to make a single n-gon. This is moved to the side of the head and then the polygon is extruded outwards, inset twice and then extruded back in again to create a section of polygons for the edge of the ear. The centre n-gons can then be deleted. Tutorial Model the perfect D face

![In Maya, use the Append Polygon tool and click on opposite edges to create each quad hit [y] to reactivate the tool.](/docs-images/75/72285823/images/5-1.jpg "Select the quads and extrude them inwards, then move them slightly to create the hump inside the ear.")


5 Part : Building the skull continued... Delete a few of the polygons at the front of the ear, then extrude the free edge a number of times, moving and rotating it at each step. This creates the curled inner portion of the ear. Close the open section inside by creating 5 polygons between the edges, making sure they re all quads. In Maya, use the Append Polygon tool and click on opposite edges to create each quad hit [y] to reactivate the tool. Select the quads and extrude them inwards, then move them slightly to create the hump inside the ear. Using the same technique with which you 6 began the ear, create an n-gon where you want the ear-hole to be then extrude it inwards a few times moving and rotating as you go. Next, sculpt the ear some more and create the remaining border polygons. Around the back of the ear, select the outer 7 edge and extrude inwards ready to connect it to the head. Some junctions will need to be created for this. A combination of Split Polygon tool, Append Polygon and Merge Vertices is good for constructing this part of the model. By connecting one edge on the ear perimeter 8 to the next-but-one edge, you create a quad that has the effect of reducing the resolution around the perimeter of the ear. Two or three of these should do the trick. This enables you to connect the ear to the head with less of a chance of encountering triangles. You ll probably spend quite a while on this part, because it requires perseverance. If triangles are unavoidable, that s fine this section of the head hardly moves if animated. The final steps involve cutting in some details. 9 Maya s Split Polygon tool can be used here to add geometry to the lips. A loop is created around the centre edge triangles are created at the corners but we ll get rid of these soon. Part 5: Final steps Refine the model and duplicate it to see the full effect of what you ve created Reading meshes The ability to read a mesh is a skill that you ll acquire as you create more D models. You'll soon begin to recognise common topological patterns and gain an instinct of how to cut them or clean them up. As with most things, this skill comes only with practice. Delete the centre edge, leaving a single row Detail can be added to the nose so that you of quads. These can then be extruded inwards 2 can create the tight folds around the nostrils twice to create the inside of the mouth. The and cheek. As you cut in extra edges, you ll corners of the mouth need a bit of work to remove find triangles unavoidable. One trick is, if you the triangles and create a cleaner loop of quads. create a triangle by slicing a quad, create another Edges can be cut in under the lower lip to facilitate triangle straight away after it. By removing the edge this and make the result much cleaner. between the two triangles, you leave a quad. Refining the rest of the model is really just a matter of time, patience and experience. The more you do it, the better you ll become. As we ve modelled only half of the face, all we need to do is select the whole model and run Polygons>Mirror, to duplicate this side of the face. Increase the Poly Merge History attribute in the polymergevert node to weld the seam. ca p
Character Modeling IAT 343 Lab 6. Lanz Singbeil
 Character Modeling IAT 343 Lab 6 Modeling Using Reference Sketches Start by creating a character sketch in a T-Pose (arms outstretched) Separate the sketch into 2 images with the same pixel height. Make
5 Subdivision Surfaces
 5 Subdivision Surfaces In Maya, subdivision surfaces possess characteristics of both polygon and NURBS surface types. This hybrid surface type offers some features not offered by the other surface types.
Character Modeling COPYRIGHTED MATERIAL
 38 Character Modeling p a r t _ 1 COPYRIGHTED MATERIAL 39 Character Modeling Character Modeling 40 1Subdivision & Polygon Modeling Many of Maya's features have seen great improvements in recent updates
CGS 3220 Lecture 13 Polygonal Character Modeling
 CGS 3220 Lecture 13 Polygonal Character Modeling Introduction to Computer Aided Modeling Instructor: Brent Rossen Overview Box modeling Polygon proxy Mirroring Polygonal components Topology editing Procedural
Key 3D Modeling Terms Beginners Need To Master
 Key 3D Modeling Terms Beginners Need To Master Starting your 3D modeling journey is an exciting and rewarding experience. As you begin to learn and practice, there are essential terms you need to know
The Pilot Bust: Low-Poly Head CHAPTER Modeling 7
 Li kewhatyou see? Buyt hebookat t hefocalbookst or e Mayaf orgames Ingr assi a ISBN 9780240810645 The Pilot Bust: Low-Poly Head CHAPTER Modeling 7 The Pilot Bust: Low-Poly Head Modeling This lesson will
Bonus Ch. 1. Subdivisional Modeling. Understanding Sub-Ds
 Bonus Ch. 1 Subdivisional Modeling Throughout this book, you ve used the modo toolset to create various objects. Some objects included the use of subdivisional surfaces, and some did not. But I ve yet
Editing Polygons. Adding material/volume: Extrude. Learning objectives
 Learning objectives Be able to: use the Extrude tool to add volume to a polygon know what edge loops are and how to insert edge loops in a polygon cut edges in a polygon know multiple methods of sewing
Brief 3ds max Shaping Tutorial
 Brief 3ds max Shaping Tutorial Part1: Power Key Axe Shaft Written by Maestro 1. Creation: Go to top view, create a 6 sided cylinder, 0.1 radius this is the perfect shaft thickness to fit in the hand, so
Actions and Graphs in Blender - Week 8
 Actions and Graphs in Blender - Week 8 Sculpt Tool Sculpting tools in Blender are very easy to use and they will help you create interesting effects and model characters when working with animation and
UV Mapping to avoid texture flaws and enable proper shading
 UV Mapping to avoid texture flaws and enable proper shading Foreword: Throughout this tutorial I am going to be using Maya s built in UV Mapping utility, which I am going to base my projections on individual
Transforming Objects and Components
 4 Transforming Objects and Components Arrow selection Lasso selection Paint selection Move Rotate Scale Universal Manipulator Soft Modification Show Manipulator Last tool used Figure 4.1 Maya s manipulation
How to model a car body in T-Splines
 How to model a car body in T-Splines My name is and I ll show you how to model complex cars like the Alfa Romeo 147 gta using the T-Splines Maya plugin and various techniques. This will be useful if you
ARCHITECTURE & GAMES. A is for Architect Simple Mass Modeling FORM & SPACE. Industry Careers Framework. Applied. Getting Started.
 A is for Architect Simple Mass Modeling One of the first introductions to form and space usually comes at a very early age. As an infant, you might have played with building blocks to help hone your motor
3 Polygonal Modeling. Getting Started with Maya 103
 3 Polygonal Modeling In Maya, modeling refers to the process of creating virtual 3D surfaces for the characters and objects in the Maya scene. Surfaces play an important role in the overall Maya workflow
Lesson 01 Polygon Basics 17. Lesson 02 Modeling a Body 27. Lesson 03 Modeling a Head 63. Lesson 04 Polygon Texturing 87. Lesson 05 NURBS Basics 117
 Table of Contents Project 01 Lesson 01 Polygon Basics 17 Lesson 02 Modeling a Body 27 Lesson 03 Modeling a Head 63 Lesson 04 Polygon Texturing 87 Project 02 Lesson 05 NURBS Basics 117 Lesson 06 Modeling
Box Modeling a Character Model Maya 2013
 2007-2013 Michael O'Rourke Box Modeling a Character Model Maya 2013 Concept When modeling a polygon character model, it can be faster to create a symmetrical model at first by working on only one half
Facial Animation. Chapter 7
 Chapter 7 Facial Animation Although you can go a long way toward completing a scene simply by animating the character s body, animating the character s face adds greatly to the expressiveness of a sequence.
Modeling Technology Group
 Modeling Technology Group Hiroshi Hayashi David Ogirala Matt Nedrich Jeff Ridenbaugh Spencer Smith Saba Bokhari John Gray Charles Hellstrom Bryan Linthicum Polygon Models (part-1) What are polygons? -
Basic Blender Commands This is just a partial list of Blender commands. Please visit the Blender.org website for more details.
 Basic Key Commands Basic Blender Commands This is just a partial list of Blender commands. Please visit the Blender.org website for more details. TAB key- Toggles between edit mode (vertex editing) and
Lesson 11. Polygonal Spaceship
 11 Polygonal Spaceship In this lesson, you will build and texture map a polygonal spaceship. Starting with a polygonal cube, you will extrude facets until you have a completed ship. You will then be able
CGS 3220 Lecture 17 Subdivision Surfaces
 CGS 3220 Lecture 17 Subdivision Surfaces Introduction to Computer Aided Modeling Instructor: Brent Rossen Overview Converting from polygons to subdivision surfaces (sub-d) Modeling with sub-d using polygon
Dave s Phenomenal Maya Cheat Sheet Polygon Modeling Menu Set By David Schneider
 Dave s Phenomenal Maya Cheat Sheet Polygon Modeling Menu Set By David Schneider POLYGONS NURBS to Polygons This allows the user to change the objects created with NURBS into polygons so that polygon tools
Polygon & Subdivision Surface Modeling in Maya: The Mouse Embryo
 Polygon & Subdivision Surface Modeling in Maya: The Mouse Embryo Maya s polygon toolset has evolved over the past several versions to include numerous approaches for the creation of organic and hard surface
Chapter 3- Creating & Editing Objects
 ` Chapter 3- Creating & Editing Objects Edit Mode- Mesh Editing Object Mode After you have created a mesh, you can go into Edit mode (Tab key or Mode option in window) and change its shape. In edit mode,
By Roland Hess -- Based on the Blender Summer of Code tutorial by Michael Worcester
 Mesh Modeling Tutorial By Roland Hess -- Based on the Blender Summer of Code tutorial by Michael Worcester In the previous chapter, you learned how to manipulate objects in Blender. You've seen how to
Images from 3D Creative Magazine. 3D Modelling Systems
 Images from 3D Creative Magazine 3D Modelling Systems Contents Reference & Accuracy 3D Primitives Transforms Move (Translate) Rotate Scale Mirror Align 3D Booleans Deforms Bend Taper Skew Twist Squash
Google SketchUp. and SketchUp Pro 7. The book you need to succeed! CD-ROM Included! Kelly L. Murdock. Master SketchUp Pro 7 s tools and features
 CD-ROM Included! Free version of Google SketchUp 7 Trial version of Google SketchUp Pro 7 Chapter example files from the book Kelly L. Murdock Google SketchUp and SketchUp Pro 7 Master SketchUp Pro 7 s
VANSTEENKISTE LEO DAE GD ENG UNFOLD SHADER. Introduction
 VANSTEENKISTE LEO 2015 G E O M E T RY S H A D E R 2 DAE GD ENG UNFOLD SHADER Introduction Geometry shaders are a powerful tool for technical artists, but they always seem to be used for the same kind of
O Hailey: Chapter 3 Bonus Materials
 O Hailey: Chapter 3 Bonus Materials Maya s Toon Line For those familiar with toon lines in Maya, you may skip ahead past this section. Those not familiar might find it useful to understand the basics of
lundi 7 janvier 2002 Blender: tutorial: Building a Castle Page: 1
 lundi 7 janvier 2002 Blender: tutorial: Building a Castle Page: 1 www.blender.nl this document is online at http://www.blender.nl/showitem.php?id=4 Building a Castle 2000 07 19 Bart Veldhuizen id4 Introduction
Topology. Blender Master Class 2013, Ben Simonds
 5 Modeling the Details In Chapter 4, we blocked in the basic elements of the projects, creating the block-in of the Jungle Temple and modeling base meshes for sculpting the Bat Creature and Spider Bot.
Polygon Modeling Basics Chapter 1 - Vertices
 Polygon Modeling Basics Chapter 1 - Vertices In this tutorial we will cover the basic tools necessary for Polygon Modeling using the Vertex sub-object selection. It is less of a how to tutorial and more
Autodesk Fusion 360: Model. Overview. Modeling techniques in Fusion 360
 Overview Modeling techniques in Fusion 360 Modeling in Fusion 360 is quite a different experience from how you would model in conventional history-based CAD software. Some users have expressed that it
RETOPOLOGY. Introduction. Technique
 Introduction RETOPOLOGY Occationally we need to convert a high resolution mesh into a low resolution version for animation or game development. Working entirely in Blender we can do this automatically
Modeling a Low-Poly Character
 NOTE Once you make a manual change to the original orientation of the normal, the normal changes to a green color, signifying that it's now an Explicit normal. 6 Experiment by selecting some of the other
2 Working with Selections
 2 Working with Selections Learning how to select areas of an image is of primary importance you must first select what you want to affect. Once you ve made a selection, only the area within the selection
Chapter 3- Creating & Editing Objects
 Working with Basic Meshes Chapter 3- Creating & Editing Objects Now that we know how to move around in Blender, let s start doing some basic building and shaping. In this chapter we will talk about creating
Basic Walk Mesh Editing. for Neverwinter Nights 2. Using Blender
 Basic Walk Mesh Editing for Neverwinter Nights 2 Using Blender Copyright 2013 by Robert J. Hall November 16, 2013 Introduction Greetings. In this introductory tutorial I propose to show how to edit the
MAYA; AN INTRODUCTION TO MAYA; EndOfLine.info;
 MAYA; AN INTRODUCTION TO MAYA; EndOfLine.info; Maya is an intuitive modelling and animation software that relies on a different set of techniques and strategies than Rhinoceros. It is important to note
Pipeline and Modeling Guidelines
 Li kewhatyou see? Buyt hebookat t hefocalbookst or e Char act ermodel i ng wi t h Mayaand ZBr ush Jason Pat node ISBN 9780240520346 CH01-K52034.indd viii 12/4/07 1:52:00 PM CHAPTER 1 Pipeline and Modeling
Learning Autodesk Maya The Modeling & Animation Handbook. Free Models From Turbo Squid Value US $ Official Autodesk Training Guide
 Free Models From Turbo Squid Value US $239.00 Official Autodesk Training Guide Learning Autodesk Maya 2008 The Modeling & Animation Handbook A hands-on introduction to key tools and techniques in Autodesk
Low Poly Game Plants
 Low Poly Game Plants In this tutorial we are going to create some very simple low poly plants like the kind you find in video games all over the place. If you don t need to know the photoshop steps, or
Blender Character Modeling A companion book to the Blender Character Creation Series on Youtube
 Blender Character Modeling A companion book to the Blender Character Creation Series on Youtube https://www.youtube.com/user/darrinlile Darrin Lile Blender Foundation Certified Trainer 2017, Darrin Lile.
Kobold. Shoe Modeling Tutorial 01: Model and animate a red high heel shoe. Software: CINEMA 4D R14
 Kobold Chara teranimation Shoe Modeling Tutorial 01: Model and animate a red high heel shoe Software: CINEMA 4D R14 www.koboldcharakteranimation.com Shoe Modeling Tutorial 01: Model and animate a red high
Create an Adorable Hedgehog with Basic Tools in Inkscape Aaron Nieze on Sep 23rd 2013 with 5 Comments
 Create an Adorable Hedgehog with Basic Tools in Inkscape Aaron Nieze on Sep 23rd 2013 with 5 Comments Tutorial Details Software: Inkscape Difficulty: Beginner Completion Time: 2 hours View post on Tuts+
T-Splines for Rhino manual Part II: How to get started
 T-Splines for Rhino manual Part II: How to get started Download the complete manual from www.tsplines.com/ usermanual.html Contents 2009 T-Splines, Inc. 34 E 1700 S Suite A134 Provo, UT 84606 801-841-1234
Mount Points Mount Points is a super simple tool for connecting objects together and managing those relationships.
 Mount Points Mount Points is a super simple tool for connecting objects together and managing those relationships. With Mount Points, you can simply drag two objects together and when their mount points
Chapter 3- Creating & Editing Objects
 ` Chapter 3- Creating & Editing Objects Working with Basic Meshes Now that you can move around in Blender, let s start doing some basic building and shaping. In this chapter we will talk about creating
Using Flash Animation Basics
 Using Flash Contents Using Flash... 1 Animation Basics... 1 Exercise 1. Creating a Symbol... 2 Exercise 2. Working with Layers... 4 Exercise 3. Using the Timeline... 6 Exercise 4. Previewing an animation...
Porsche 91 1GT D m o d e ling tutorial - by Nim
 orsche 911GT 3D modeling tutorial - by Nimish In this tutorial you will learn to model a car using Spline modeling method. This method is not very much famous as it requires considerable amount of skill
How to draw and create shapes
 Adobe Flash Professional Guide How to draw and create shapes You can add artwork to your Adobe Flash Professional documents in two ways: You can import images or draw original artwork in Flash by using
Working with the Dope Sheet Editor to speed up animation and reverse time.
 Bouncing a Ball Page 1 of 2 Tutorial Bouncing a Ball A bouncing ball is a common first project for new animators. This classic example is an excellent tool for explaining basic animation processes in 3ds
Freeform / Freeform PLUS
 Freeform / Freeform PLUS WORKING WITH FREEFORM Work from Coarse Clay to Fine When creating new models from scratch, it is best to first create a rough shape using a coarse clay setting such as Rough Shape
Trimmed Surfaces Maya 2013
 2000-2013 Michael O'Rourke Trimmed Surfaces Maya 2013 Concepts Trimming works only on patches (in Maya, this means NURBS patches) Does not work with polygonal models A trim can look similar to a Boolean
MODELING EYES ESTIMATED TIME REQUIRED
 MODELING EYES This tutorial will teach you how to model a pair of realistic-looking eyes and insert them into the head of a character. ESTIMATED TIME REQUIRED 30 Minutes LEARNING GOALS In this tutorial,
Using Selection Tools and Layers
 Using Selection Tools and Layers A version of the melon head. Yours does not need to look just like this. Start by opening the Lesson 02 Start file provided. Select File>Save As and rename file adding
Guide for Geomagic Design X 3D Scan Data Cleanup and Editing. General Information
 Guide for Geomagic Design X 3D Scan Data Cleanup and Editing General Information Geomagic Design X (formerly Rapidform XOR) is an extremely powerful reverse engineering and 3D modeling software that combines
Creating Digital Illustrations for Your Research Workshop III Basic Illustration Demo
 Creating Digital Illustrations for Your Research Workshop III Basic Illustration Demo Final Figure Size exclusion chromatography (SEC) is used primarily for the analysis of large molecules such as proteins
The University of Nottingham Second Life Building Tutorial
 s Web Campus Sandbox is open to the public for anyone to practise their building and scripting skills. A personal building tutorial is available in the sandbox (simply click the crate beneath the sign
Presets are the heart of Genoma. They can be added to so you can build up a library of reusable rig parts or even complete rigs to suit your
 Genoma 1 Genoma 1 Presets Presets are the heart of Genoma. They can be added to so you can build up a library of reusable rig parts or even complete rigs to suit your needs. Opening the Genoma Presets
Lesson 1: Creating T- Spline Forms. In Samples section of your Data Panel, browse to: Fusion 101 Training > 03 Sculpt > 03_Sculpting_Introduction.
 3.1: Sculpting Sculpting in Fusion 360 allows for the intuitive freeform creation of organic solid bodies and surfaces by leveraging the T- Splines technology. In the Sculpt Workspace, you can rapidly
Text Page 1 Chris Shaw
 Text 101 www.fridgemonsters.com Page 1 Chris Shaw Copyright and Terms of Use Please leave all references to FridgeMonsters intact in the documentation and code examples. 1. Except as otherwise provided,
MODEL AIRCRAFT SIMON REEVES
 MOEL IRRFT Let your 3 skills take flight with our in-depth guide to modelling this Sea King helicopter using 3ds max. Follow along yourself with the files on the, and you ll never have to wing it again...
GMH 2 GMH Poly Style Tutorial
 GMH 2 GMH Poly Style Tutorial 1 CONTENT 2 Prepare polygon hair models... 2 3 Create GMH Poly Style System... 3 4 Convert polygon meshes to GMH Surface... 3 5 Edit GMH Poly Style System... 5 5.1 EDIT TUBE
SOLIDWORKS: Lesson III Patterns & Mirrors. UCF Engineering
 SOLIDWORKS: Lesson III Patterns & Mirrors UCF Engineering Solidworks Review Last lesson we discussed several more features that can be added to models in order to increase their complexity. We are now
CG Cookie Workshop: Mastering Mesh Modeling
 CG Cookie Workshop: Mastering Mesh Modeling By: Jonathan Williamson This CG Cookie workshop is intended to provide an in-depth study of the key theories, fundamentals, and techniques you need to know about
Taking the Best Reference Photos
 Sides Three and Four To fill in the other two sides select the top vertice and the corners on a side where there is no face yet. Again, use FKEY to fill in a face. Repeat this for the last side to have
GroBoto v3 SeamNet Mesh Notes
 GroBoto v3 SeamNet Mesh Notes These notes offer some detailed descriptions of Seam Settings in the GroBoto OS X 3.0 release and Windows Beta 2.9.9e released in mid February 2011. These tools will continue
Textures and UV Mapping in Blender
 Textures and UV Mapping in Blender Categories : Uncategorised Date : 21st November 2017 1 / 25 (See below for an introduction to UV maps and unwrapping) Jim s Notes regarding Blender objects, the UV Editor
4) Finish the spline here. To complete the spline, double click the last point or select the spline tool again.
 Finish the spline here. To complete the spline, double click the last point or select the spline tool again.") 1) Select the line tool 3) Move the cursor along the X direction (be careful to stay on the X axis alignment so that the line is perpendicular) and click for the second point of the line. Type 0.5 for
1) Select the line tool 3) Move the cursor along the X direction (be careful to stay on the X axis alignment so that the line is perpendicular) and click for the second point of the line. Type 0.5 for
Beginners Guide Maya. To be used next to Learning Maya 5 Foundation. 15 juni 2005 Clara Coepijn Raoul Franker
 Beginners Guide Maya To be used next to Learning Maya 5 Foundation 15 juni 2005 Clara Coepijn 0928283 Raoul Franker 1202596 Index Index 1 Introduction 2 The Interface 3 Main Shortcuts 4 Building a Character
Walls and Windows. Here is a useful link to explore for later -- AutoCAD drawing tutorials:
 Walls and Windows Eventually we will import your CAD drawings and you will need well-constructed files which we will then use extrude, loft, and sweep, etc., in Max. Here is a useful link to explore for
Modeling a Fluted Column in Google SketchUp
 Architectural columns in ancient Greece, Rome, and even China used flutes - vertical grooves cut along the outside of the cylinder. If you want to create a model of an ancient temple, or perhaps one of
In Wings 3D: Basic Pants
 Modeling for Poser In Wings 3D: Basic Pants Cyberwoman 2010; illustrations by Cyberwoman with the cooperation of Sydney G2. Do not reproduce or redistribute without permission. This tutorial will show
SketchUp. SketchUp. Google SketchUp. Using SketchUp. The Tool Set
 Google Google is a 3D Modelling program which specialises in making computer generated representations of real-world objects, especially architectural, mechanical and building components, such as windows,
Maya Lesson 3 Temple Base & Columns
 Maya Lesson 3 Temple Base & Columns Make a new Folder inside your Computer Animation Folder and name it: Temple Save using Save As, and select Incremental Save, with 5 Saves. Name: Lesson3Temple YourName.ma
Step 1: Create A New Photoshop Document
 Snowflakes Photo Border In this Photoshop tutorial, we ll learn how to create a simple snowflakes photo border, which can be a fun finishing touch for photos of family and friends during the holidays,
ppmodeler Real Time Character Modelling Tutorial
 This tutorial is based on the "Real Time Character Modelling Tutorial" by Antony Ward that can be found at : http://www.ant online.co.uk/downloads/modtutorial.htm. Please, read it before this one. We will
SNOWFLAKES PHOTO BORDER - PHOTOSHOP CS6 / CC
 Photo Effects: Snowflakes Photo Border (Photoshop CS6 / CC) SNOWFLAKES PHOTO BORDER - PHOTOSHOP CS6 / CC In this Photoshop tutorial, we ll learn how to create a simple and fun snowflakes photo border,
An Approach to Content Creation for Trainz
 An Approach to Content Creation for Trainz Paul Hobbs Part 6 GMax Basics (Updates and sample files available from http://www.44090digitalmodels.de) Page 1 of 18 Version 3 Index Foreward... 3 The Interface...
Basics of Design p. 2 Approaching Design as an Artist p. 4 Knowing Your Character p. 4 Making Decisions p. 4 Categories of Design p.
 Basics of Design p. 2 Approaching Design as an Artist p. 4 Knowing Your Character p. 4 Making Decisions p. 4 Categories of Design p. 6 Realistic Designs p. 6 Stylized Designs p. 7 Designing a Character
Facade Stanford Facial Animation System. Instruction Manual:
 Facade Stanford Facial Animation System Instruction Manual: A. Introduction 1. What is Facade? 2. What can you do with Facade? 3. What can t you do with Facade? 4. Who can use Facade? B. Overview of Facade
Adobe. Photoshop CC. Alberto Seveso. CLASSROOM IN A BOOK The official training workbook from Adobe. Andrew Faulkner & Conrad Chavez
 Adobe Photoshop CC 2015 ERRATA release 2015.5 RELEASE Alberto Seveso CLASSROOM IN A BOOK The official training workbook from Adobe Andrew Faulkner & Conrad Chavez ERRATA AND FEATURE UPDATES Errata and
Dice in Google SketchUp
 A die (the singular of dice) looks so simple. But if you want the holes placed exactly and consistently, you need to create some extra geometry to use as guides. Plus, using components for the holes is
123D Catch - Tutorial
 123D Catch - Tutorial Autodesk s 123D Catch software (formerly Project Photofly) is based on photogrammetry. Photogrammetry is a process which derives geometric properties of an object from a series of
Computer Graphics Fundamentals. Jon Macey
 Computer Graphics Fundamentals Jon Macey jmacey@bournemouth.ac.uk http://nccastaff.bournemouth.ac.uk/jmacey/ 1 1 What is CG Fundamentals Looking at how Images (and Animations) are actually produced in
Manual Version September 2018
 Mesh Modeler Manual Version 3.5.0 September 2018 1 1. Introduction 1.1 Background SCAN2FX was developed out of the need to create photo-realistic assets, visualizations, structures and sets for production
This is the opening view of blender.
 This is the opening view of blender. Note that interacting with Blender is a little different from other programs that you may be used to. For example, left clicking won t select objects on the scene,
Spring 2011 Workshop ESSENTIALS OF 3D MODELING IN RHINOCEROS February 10 th 2011 S.R. Crown Hall Lower Core Computer Lab
 [1] Open Rhinoceros. PART 1 INTRODUCTION [4] Click and hold on the Boundary Lines in where they form a crossing and Drag from TOP RIGHT to BOTTOM LEFT to enable only the PERSPECTIVE VIEW. [2] When the
Rigging Half-Life 2 Bones
 Rigging Half-Life 2 Bones You have the bone in position with your model but of course the bone is not properly fits with your model size. In order to fix it: Resize or Move your model until its fits the
3D Modeling. Computer Science
 3D Modeling Vertices, edges, and faces are the basic components of polygons. When you model with polygons you usually use three-sided polygons called triangles or four-sided polygons called quadrilaterals
Part II: Creating Visio Drawings
 128 Part II: Creating Visio Drawings Figure 5-3: Use any of five alignment styles where appropriate. Figure 5-4: Vertical alignment places your text at the top, bottom, or middle of a text block. You could
NURBS Sailboat on Ocean (Modeling/Animation)
") Course: 3D Design Title: NURBS Sailboat Blender: Version 2.6X Level: Beginning Author; Neal Hirsig (nhirsig@tufts.edu) (April 2013) NURBS Sailboat on Ocean (Modeling/Animation) The objective of this PDF
Course: 3D Design Title: NURBS Sailboat Blender: Version 2.6X Level: Beginning Author; Neal Hirsig (nhirsig@tufts.edu) (April 2013) NURBS Sailboat on Ocean (Modeling/Animation) The objective of this PDF
You can select polygons that use per-poly UVs by choosing the Select by Polymap command ( View > Selection > Maps > Select by Polygon Map).
.") UV Texture What is UV Mapping? Sometimes, when mapping textures onto objects, you will find that the normal projection mapping just doesn t work. This usually happens when the object is organic, or irregular
UV Texture What is UV Mapping? Sometimes, when mapping textures onto objects, you will find that the normal projection mapping just doesn t work. This usually happens when the object is organic, or irregular
PowerPoint 2003 for Windows Version Technology Workshop: Basic PowerPoint Animation for Music Presentations
 PowerPoint 2003 for Windows Version! Technology Workshop: Basic PowerPoint Animation for Music Presentations Edmond Johnson February 13, 2008 Three Basic Animation Techniques 1. Making things appear 2.
The Creep SOP. 3. Delete the sky, logo and ground objects. 4. Place a new geometry object into the Network editor.
 1 Film Strip Ribbon 1 THE CREEP SOP In this exercise, you will use the Creep SOP to simulate a length of film that flows off of the reel spool on a frame by frame basis. 1.1 GETTING STARTED 1. Launch Houdini.
Sculpting 3D Models. Glossary
 A Array An array clones copies of an object in a pattern, such as in rows and columns, or in a circle. Each object in an array can be transformed individually. Array Flyout Array flyout is available in
doi: / The Application of Polygon Modeling Method in the Maya Persona Model Shaping
 doi:10.21311/001.39.12.37 The Application of Polygon Modeling Method in the Maya Persona Model Shaping Qinggang Sun Harbin University of Science and Technology RongCheng Campus, RongCheng Shandong, 264300
MR Shaders Dielectric Materials Rendering Glass and Simple Caustics
 Dielectric Material This shader is a physically based material shader that can be used to simulate dielectric media such as glass, water, and other liquids. The shader uses Fresnel's formulas for dielectric