Create a Swirly Lollipop Using the Spiral Tool Philip Christie on Jun 13th 2012 with 12 Comments
|
|
|
- Olivia Bailey
- 5 years ago
- Views:
Transcription

1 Advertise Here Create a Swirly Lollipop Using the Spiral Tool Philip Christie on Jun 13th 2012 with 12 Comments Tutorial Details Program: Adobe Illustrator CS5 Difficulty: Beginner Es timated Completion Time: 30 Minutes Download Source Files Source files for this tutorial are available to Premium members. Get a Premium Membership Final Product What You'll Be Creating vector.tutsplus.com/tutorials/illustration/create-a-swirly-lollipop/ 1/27
2 In this tutorial, you ll be shown an easy and accurate way of creating your own swirly lollipop using a custom Art Brush and the Spiral Tool in Adobe Illustrator. If you re a beginner Illustrator user, this tutorial will help you get familiar with how to use Illustrator s tools creatively. Step 1 Open a new document that is 600px wide by 800px high. Now make sure you have Smart Guides turned on by going to View > Smart Guides. First thing we ll do is make the gradients needed for the lollipop s shading. Use the Rectangle Tool (M) to draw a small square of any size and give it a linear gradient with three sliders. Then use RGB colors orange (247, 147, 30), yellow (252, 238, 33), and orange (247, 147, 30) setting the middle slider to a location of 30%. vector.tutsplus.com/tutorials/illustration/create-a-swirly-lollipop/ 2/27
 and dark red (193, 39, 45) with a location for the center at 80%.")
3 Now draw another for the second swatch and by default this should be filled with the same gradient. Delete the last slider so you re left with only two and change the colors to re (133, 0, 0) and dark red (193, 39, 45) with a location for the center at 80%. Now we can drag them off to the side where we ll use them later. Step 2 Click on the artboard, with the Rectangle Tool (M) still selected and draw a rectangle 15px wide by 30px in height. Change the fill to yellow. Next go to Effect > Distort & Transform > Transform and move the rectangle 15px horizontal and for number of copies enter 34, then hit OK. Now proceed to Object > Expand Appearance. vector.tutsplus.com/tutorials/illustration/create-a-swirly-lollipop/ 3/27
 to click on the second rectangle from the left.")

4 Step 3 Click anywhere on the artboard to deselect the new set of rectangles. Then use the Direct Selection Tool (A) to click on the second rectangle from the left. While holding Shift, select every other rectangle from there on. When that s done simply change the fill color of the selected rectangles to red. vector.tutsplus.com/tutorials/illustration/create-a-swirly-lollipop/ 4/27


5 Step 4 Hit Command + A to select all the rectangles, then go to Object > Transform > Shear, and give a Shear Angle of 30 degrees. The axis will remain Horizontal, then click OK. vector.tutsplus.com/tutorials/illustration/create-a-swirly-lollipop/ 5/27

6 Step 5 From the Toolbar select the Rounded Rectangle Tool, then drag it from the top left corner of the rectangles you created earlier all the way over to the bottom right. While holding it in place, hit the Left Arrow key on the keyboard once to make the edges as round as possible. With Smart Guides enabled everything should just snap into place. Select this and the rectangles below the Pathfinder Panel (Window > Pathfinder) simply select Crop. vector.tutsplus.com/tutorials/illustration/create-a-swirly-lollipop/ 6/27

7 Step 5 Drag this new shape into the Brush Panel and in the New Brush options select Art Brush. The only setting you will need to change here is the direction, this will need to go in the opposite direction which is left. With that done we ll no longer need the shape we created earlier so you can go ahead and delete it. vector.tutsplus.com/tutorials/illustration/create-a-swirly-lollipop/ 7/27

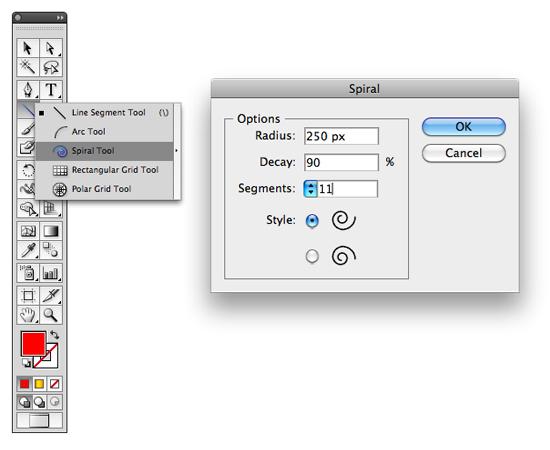
8 Step 6 From under the Line Segment Tool (/) select the Spiral Tool and click in the center of the artboard to bring up a dialogue box. Give your spiral a radius of 250px, with a 90% decay and 11 segments making sure the style goes in a clockwise direction. Keeping the spiral selected, proceed to the Brush Panel and select the Art Brush you made earlier giving it a stroke of 4px. Now using the Selection Tool, hold Shift, and rotate the new lollipop clockwise 90 degrees. vector.tutsplus.com/tutorials/illustration/create-a-swirly-lollipop/ 8/27
9 vector.tutsplus.com/tutorials/illustration/create-a-swirly-lollipop/ 9/27

10 Step 7 Use the Direct Selection Tool (A) to select the bottom point on the spiral. Then hold down the Shift key and nudge upwards eight times. Then nudge to the right five times. Next, grab hold of the left handle and drag downward about 35 degrees, you might have to play around with this until it looks right. Lastly select the point farthest to the left and nudge inwards about ten pixels or until it looks right. When satisfied go to Object > Expand Appearance to make your stroke into a solid set of shapes. vector.tutsplus.com/tutorials/illustration/create-a-swirly-lollipop/ 10/27
11 vector.tutsplus.com/tutorials/illustration/create-a-swirly-lollipop/ 11/27
 to apply the red gradient you created in step one.")
12 Step 8 Use the Magic Wand Tool (Y) to select all of the shapes with a red fill. Then use the Eyedropper Tool (I) to apply the red gradient you created in step one. Now repeat for all the yellow shapes this time filling with the yellow gradient. vector.tutsplus.com/tutorials/illustration/create-a-swirly-lollipop/ 12/27
 and the Gradient Tool (G) work your way around the lollipop and draw new gradients from the outside and drag inwards to the nearest edge.")
13 Step 9 Now we just have to fix all the angles. Using the Direct Selection Tool (A) and the Gradient Tool (G) work your way around the lollipop and draw new gradients from the outside and drag inwards to the nearest edge. You don t have to be really accurate but we want to avoid any obvious straight lines, so it may take a few attempts before you get it looking just right. vector.tutsplus.com/tutorials/illustration/create-a-swirly-lollipop/ 13/27
14 Step 10 For the missing piece in the center, copy the lollipop (Command + C) and paste in front (Command + F). Then in the Pathfinder Panel click Unite, followed by a Right-click on the new shape, then choose Release Compound Path from the menu. Now just delete the outer shape and fill what s left with the appropriate gradient. F R E E I M A G E D O W N L O A D StockFreeImages.com 1,000,000 Free Photos Online Sign Up For Free Hi-Res Images! Select the entire lollipop and group it together (Command + G). vector.tutsplus.com/tutorials/illustration/create-a-swirly-lollipop/ 14/27

15 Step 11 For highlights draw a circle slightly smaller than the lollipop itself and fill it with white. On top of this draw another circle slightly larger and more to the left. When you re happy with what you ve got, select both and then choose Minus Front from the Pathfinder Panel. Take this shape, hold Alt and drag another copy, then rotate and resize it as you see fit. I used four copies in total, but you can vector.tutsplus.com/tutorials/illustration/create-a-swirly-lollipop/ 15/27
16 use more or less if you d prefer. Step 12 With the last reflection still selected, go to Select > Same > Fill Color and group (Command + G). Now just change the Opacity to 50% and you re done! Drag the Selection Tool over everything vector.tutsplus.com/tutorials/illustration/create-a-swirly-lollipop/ 16/27

17 you ve created so far, group together once more, then hold Shift and scale everything down to approximately 350px in width. Step 13 Now we ll work on creating the lollipop s stick. Select the Rectangle Tool and click on the artboard. Create a new shape 20px wide by 430px in height. Give the stick a linear gradient fill using the colors RGB Gray (179, 179, 179) to light gray (245, 245, 245) with a location of 30%. vector.tutsplus.com/tutorials/illustration/create-a-swirly-lollipop/ 17/27

18 Step 14 Change to the Ellipse Tool (L), and click once more on the artboard to create a ellipse with the same 20px width, but only a height of 3px. Drag this to the bottom of the rectangle, snap it into place, and with both shapes selected choose the Unite option over in the Pathfinder Panel. Now make a new copy (Command + C) and Paste in Front (Command + F). vector.tutsplus.com/tutorials/illustration/create-a-swirly-lollipop/ 18/27


19 Step 15 Select both the lollipop and stick, then in the Align Panel click on Horizontal Align Center. This just makes it easier for us to see where the shadow from the lollipop needs to be on the stick. Grab the Pen Tool (P) and the draw a shape with a slight curve at the bottom, it doesn t need to be perfectly accurate; it just needs to somewhat match the curve of the lollipop. Select this and the vector.tutsplus.com/tutorials/illustration/create-a-swirly-lollipop/ 19/27

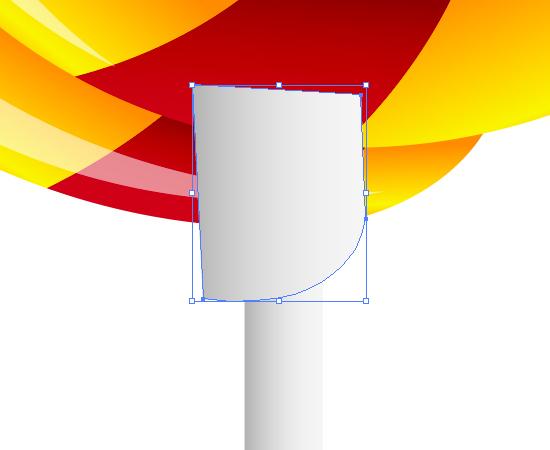
20 stick copy below it, then go to the Pathfinder and apply Intersect. vector.tutsplus.com/tutorials/illustration/create-a-swirly-lollipop/ 20/27
. Finally, apply Object > Arrange > Send to Back and nudge up or down as needed.")
21 Step 16 Now all we have to do is make it actually look shaded. With the new shape highlighted, go to Recolor Artwork and select Global Adjust from the options menu. Lower the Luminosity to -15% and click OK. Select both the stick and shadow, then group them together (Command + G). Finally, apply Object > Arrange > Send to Back and nudge up or down as needed. vector.tutsplus.com/tutorials/illustration/create-a-swirly-lollipop/ 21/27

 add a point roughly one third of the way up and about an eighth of the way")
22 Step 17 Lastly, we just need to create the shadow. For this, we need to draw a rectangle about 250px wide by 60px in height. Give it the same color fill as your background, which in this case set it to white. Now with the Mesh Tool (U) add a point roughly one third of the way up and about an eighth of the way in from the right side. vector.tutsplus.com/tutorials/illustration/create-a-swirly-lollipop/ 22/27
23 You ll also need to place one point slightly above, slightly below, and finally to the right. Try if you can to make these approximately the same distance apart from each other. With those all done, now click on the center mesh point and change the fill color to a light gray. The exact color I used was R=171, G=171, B=171, but you can make it as light or as dark as you like. vector.tutsplus.com/tutorials/illustration/create-a-swirly-lollipop/ 23/27

24 Step 18 Finally, using the Direct Selection Tool (A) go over to the points on the left edge of the rectangle. The center of the shadow needs to stay put. Now shift-click and drag the point above it towards the top left, but not actually touching the corner. Do the same for the point beneath, then Object > Arrange > Send to Back. vector.tutsplus.com/tutorials/illustration/create-a-swirly-lollipop/ 24/27
25 Final Image Now you re done and here s the result! Go have fun and experiment with different colors! vector.tutsplus.com/tutorials/illustration/create-a-swirly-lollipop/ 25/27

26 Like 19 people like this. Sign Up to see w hat your friends like. vector.tutsplus.com/tutorials/illustration/create-a-swirly-lollipop/ 26/27
27 By Philip Christie Born in the USA, raised in the UK I've been working within the design and print industry for the last 5 years focusing mainly in illustration and t-shirt designs. vector.tutsplus.com/tutorials/illustration/create-a-swirly-lollipop/ 27/27
Captain America Shield
 Captain America Shield 1. Create a New Document and Set Up a Grid Hit Control-N to create a new document. Select Pixels from the Units drop-down menu, enter 600 in the width and height boxes then click
Creating Digital Illustrations for Your Research Workshop III Basic Illustration Demo
 Creating Digital Illustrations for Your Research Workshop III Basic Illustration Demo Final Figure Size exclusion chromatography (SEC) is used primarily for the analysis of large molecules such as proteins
Step 1: Create A New Photoshop Document
 Snowflakes Photo Border In this Photoshop tutorial, we ll learn how to create a simple snowflakes photo border, which can be a fun finishing touch for photos of family and friends during the holidays,
Shape and Line Tools. tip: Some drawing techniques are so much easier if you use a pressuresensitive
 4Drawing with Shape and Line Tools Illustrator provides tools for easily creating lines and shapes. Drawing with shapes (rectangles, ellipses, stars, etc.) can be a surprisingly creative and satisfying
SNOWFLAKES PHOTO BORDER - PHOTOSHOP CS6 / CC
 Photo Effects: Snowflakes Photo Border (Photoshop CS6 / CC) SNOWFLAKES PHOTO BORDER - PHOTOSHOP CS6 / CC In this Photoshop tutorial, we ll learn how to create a simple and fun snowflakes photo border,
Drawing shapes and lines
 Fine F Fi i Handmade H d d Ch Chocolates l Hours Mon Sat 10am 6pm In this demonstration of Adobe Illustrator CS6, you will be introduced to new and exciting application features, like gradients on a stroke
2 SELECTING AND ALIGNING
 2 SELECTING AND ALIGNING Lesson overview In this lesson, you ll learn how to do the following: Differentiate between the various selection tools and employ different selection techniques. Recognize Smart
Create a Cute Vector Penguin Character in Illustrator
 Create a Cute Vector Penguin Character in Illustrator Follow this step by step Adobe Illustrator tutorial to create a simple vector penguin character. We ll be using many of Illustrator s basic shapes
Keyboard Shortcuts. Command Windows Macintosh
 S00ILCS5.qxp 3/19/2010 1:11 AM Page 477 Keyboard Shortcuts k Adobe Illustrator CS5 If a command on a menu includes a keyboard reference, known as a keyboard shortcut, to the right of the command name,
Create a Cool Vector Robot Character in Illustrator
 Create a Cool Vector Robot Character in Illustrator In this tutorial, we will use various tools and techniques to create a simple vector robot character and learn the basic of Adobe Illustrated. With this
A QUICK TOUR OF ADOBE ILLUSTRATOR CC (2018 RELEASE)
") A QUICK TOUR OF ADOBE ILLUSTRATOR CC (2018 RELEASE) Lesson overview In this interactive demonstration of Adobe Illustrator CC (2018 release), you ll get an overview of the main features of the application.
A QUICK TOUR OF ADOBE ILLUSTRATOR CC (2018 RELEASE) Lesson overview In this interactive demonstration of Adobe Illustrator CC (2018 release), you ll get an overview of the main features of the application.
Advanced Special Effects
 Adobe Illustrator Advanced Special Effects AI exercise preview exercise overview The object is to create a poster with a unified color scheme by compositing artwork drawn in Illustrator with various effects
Graphic Design & Digital Photography. Photoshop Basics: Working With Selection.
 1 Graphic Design & Digital Photography Photoshop Basics: Working With Selection. What You ll Learn: Make specific areas of an image active using selection tools, reposition a selection marquee, move and
Adobe Illustrator CS5 Part 2: Vector Graphic Effects
 CALIFORNIA STATE UNIVERSITY, LOS ANGELES INFORMATION TECHNOLOGY SERVICES Adobe Illustrator CS5 Part 2: Vector Graphic Effects Summer 2011, Version 1.0 Table of Contents Introduction...2 Downloading the
Creative Effects with Illustrator
 ADOBE ILLUSTRATOR Creative Effects with Illustrator PREVIEW OVERVIEW The object is to create a poster with a unified color scheme by compositing artwork drawn in Illustrator with various effects and photographs.
EDITING SHAPES. Lesson overview
 3 CREATING AND EDITING SHAPES Lesson overview In this lesson, you ll learn how to do the following: Create a document with multiple artboards. Use tools and commands to create basic shapes. Work with drawing
The original image. Let s get started! The final result.
 Vertical Photo Panels Effect In this Photoshop tutorial, we ll learn how to create the illusion that a single photo is being displayed as a series of vertical panels. It may look complicated, but as we
Creative Effects with Illustrator
 ADOBE ILLUSTRATOR PREVIEW Creative Effects with Illustrator AI OVERVIEW The object is to create a poster with a unified color scheme by compositing artwork drawn in Illustrator with various effects and
4 TRANSFORMING OBJECTS
 4 TRANSFORMING OBJECTS Lesson overview In this lesson, you ll learn how to do the following: Add, edit, rename, and reorder artboards in an existing document. Navigate artboards. Select individual objects,
Exercise III: Creating a Logo with Illustrator CS6
 Exercise III: Creating a Logo with Illustrator CS6 Project 1: Creating Logos with the Shape Tools Now that we have some experience with Illustrator s tools, let s expand our goal to create a logo, web
SETTINGS AND WORKSPACE
 ADOBE ILLUSTRATOR Adobe Illustrator is a program used to create vector illustrations / graphics (.ai/.eps/.svg). These graphics will then be used for logos, banners, infographics, flyers... in print and
UV Mapping to avoid texture flaws and enable proper shading
 UV Mapping to avoid texture flaws and enable proper shading Foreword: Throughout this tutorial I am going to be using Maya s built in UV Mapping utility, which I am going to base my projections on individual
12 APPLYING EFFECTS. Lesson overview
 12 APPLYING EFFECTS Lesson overview In this lesson, you ll learn how to do the following: Use various effects like Pathfinder, Distort & Transform, Offset Path, and Drop Shadow effects. Use Warp effects
Adobe Illustrator CC 2018 Tutorial
 Adobe Illustrator CC 2018 Tutorial GETTING STARTED Adobe Illustrator CC is an illustration program that can be used for print, multimedia and online graphics. Whether you plan to design or illustrate multimedia
Expression Design Lab Exercises
 Expression Design Lab Exercises Creating Images with Expression Design 2 Beaches Around the World (Part 1: Beaches Around the World Series) Information in this document, including URL and other Internet
Adobe Illustrator. Always NAME your project file. It should be specific to you and the project you are working on.
 Adobe Illustrator This packet will serve as a basic introduction to Adobe Illustrator and some of the tools it has to offer. It is recommended that anyone looking to become more familiar with the program
Chapter 1. Getting to Know Illustrator
 Chapter 1 Getting to Know Illustrator Exploring the Illustrator Workspace The arrangement of windows and panels that you see on your monitor is called the workspace. The Illustrator workspace features
COPYRIGHTED MATERIAL. Adobe Illustrator CC Jumpstart. Lesson 1
 Lesson 1 Adobe Illustrator CC Jumpstart What you ll learn in this lesson: Setting up an Artboard Creating and combining shapes Applying color with the new Kuler panel and effects Adding and adjusting text
Pen Tool, Fill Layers, Color Range, Levels Adjustments, Magic Wand tool, and shadowing techniques
 Creating a superhero using the pen tool Topics covered: Pen Tool, Fill Layers, Color Range, Levels Adjustments, Magic Wand tool, and shadowing techniques Getting Started 1. Reset your work environment
Paint/Draw Tools. Foreground color. Free-form select. Select. Eraser/Color Eraser. Fill Color. Color Picker. Magnify. Pencil. Brush.
 Paint/Draw Tools There are two types of draw programs. Bitmap (Paint) Uses pixels mapped to a grid More suitable for photo-realistic images Not easily scalable loses sharpness if resized File sizes are
ILLUSTRATOR TUTORIAL-1 workshop handout
 Why is Illustrator a powerful tool? ILLUSTRATOR TUTORIAL-1 workshop handout Computer graphics fall into two main categories, bitmap graphics and vector graphics. Adobe Illustrator is a vector based software
Adding Objects Creating Shapes Adding. Text Printing and Exporting Getting Started Creating a. Creating Shapes Adding Text Printing and Exporting
 Getting Started Creating a Workspace Pages, Masters and Guides Adding Objects Creating Shapes Adding Text Printing and Exporting Getting Started Creating a Workspace Pages, Masters and Guides Adding Objects
Learning to use the drawing tools
 Create a blank slide This module was developed for Office 2000 and 2001, but although there are cosmetic changes in the appearance of some of the tools, the basic functionality is the same in Powerpoint
12 APPLYING EFFECTS. Lesson overview
 12 APPLYING EFFECTS Lesson overview In this lesson, you ll learn how to do the following: Use various effects, such as Pathfinder, Scribble, and Drop Shadow. Use Warp effects to distort type. Create three-dimensional
creating files and saving for web
 creating files and saving for web the template files assume a default image size of 300 x 300 pixels images intended for the web should be produced in rgb mode name your images in a logical format, so
ADOBE ILLUSTRATOR CS3
 ADOBE ILLUSTRATOR CS3 Chapter 2 Creating Text and Gradients Chapter 2 1 Creating type Create and Format Text Create text anywhere Select the Type Tool Click the artboard and start typing or click and drag
EDITING AND COMBINING SHAPES AND PATHS
 4 EDITING AND COMBINING SHAPES AND PATHS Lesson overview In this lesson, you ll learn how to do the following: Cut with the Scissors tool. Join paths. Work with the Knife tool. Outline strokes. Work with
HAPPY HOLIDAYS PHOTO BORDER
 HAPPY HOLIDAYS PHOTO BORDER In this Photoshop tutorial, we ll learn how to create a simple and fun Happy Holidays winter photo border! Photoshop ships with some great snowflake shapes that we can use in
Drawing tool gallery 2 06/06/07 09:21:26. Illustrator provides the following drawing tools: The Add Anchor Point tool (+) adds anchor points to paths.
 adds anchor points to paths.") pport/adobe/adobehelpdata/cache/illustrator/12.0/en_us/htmłpage/ws714a382cdf7d304e7e07d0100196cbc5f-6266.html Drawing tool gallery Drawing tool gallery Illustrator provides the following drawing tools:
pport/adobe/adobehelpdata/cache/illustrator/12.0/en_us/htmłpage/ws714a382cdf7d304e7e07d0100196cbc5f-6266.html Drawing tool gallery Drawing tool gallery Illustrator provides the following drawing tools:
Note: Photoshop tutorial is spread over two pages. Click on 2 (top or bottom) to go to the second page.
 to go to the second page.") Introduction During the course of this Photoshop tutorial we're going through 9 major steps to create a glass ball. The main goal of this tutorial is that you get an idea how to approach this. It's not
Introduction During the course of this Photoshop tutorial we're going through 9 major steps to create a glass ball. The main goal of this tutorial is that you get an idea how to approach this. It's not
Adobe Illustrator A Hot Air Balloon Sky Scene In this tutorial, we'll explain how to create a fun sky scene with hot air balloons.
 Adobe Illustrator A Hot Air Balloon Sky Scene In this tutorial, we'll explain how to create a fun sky scene with hot air balloons. We will take advantage of the Blend Tool and the Symbol Sprayer Tool and
Creating Vector Shapes Week 2 Assignment 1. Illustrator Defaults
 Illustrator Defaults Before we begin, we are going to make sure that all of us are using the same settings within our application. For this class, we will always want to make sure that our application
Inkscape tutorial: Donate button
 Inkscape tutorial: Donate button By: Very Simple Designs (BDT466) Web Site: http://verysimpledesigns.com/vectors/inkscape-tutorial-donate-button.html This Inkscape beginner tutorial teaches the viewer
How to draw and create shapes
 Adobe Flash Professional Guide How to draw and create shapes You can add artwork to your Adobe Flash Professional documents in two ways: You can import images or draw original artwork in Flash by using
9 Using Appearance Attributes, Styles, and Effects
 9 Using Appearance Attributes, Styles, and Effects You can alter the look of an object without changing its structure using appearance attributes fills, strokes, effects, transparency, blending modes,
Create an Adorable Hedgehog with Basic Tools in Inkscape Aaron Nieze on Sep 23rd 2013 with 5 Comments
 Create an Adorable Hedgehog with Basic Tools in Inkscape Aaron Nieze on Sep 23rd 2013 with 5 Comments Tutorial Details Software: Inkscape Difficulty: Beginner Completion Time: 2 hours View post on Tuts+
14. Using Illustrator CC with Other Adobe Applications
 14. Using Illustrator CC with Other Adobe Applications Lesson overview In this lesson, you ll learn how to do the following: Place linked and embedded graphics in an Illustrator file. Place multiple images
MAKING A TRIPTYCH IN PHOTOSHOP CC
 MAKING A TRIPTYCH IN PHOTOSHOP CC Open Photoshop CC and create a New Document Remember, the images shown here are 'screen grabs from my computer. I am using Photoshop CC. Therefore your screen may look
Cell Phone. Adobe Illustrator Lesson 16 Working with Gradients Transparency Menu 1. START>PROGRAMS>ADOBE ILLUSTRATOR CS3
 L e s s o n 1 6, P a g e 1 Adobe Illustrator Lesson 16 Working with Gradients Transparency Menu Cell Phone 1. START>PROGRAMS>ADOBE ILLUSTRATOR CS3 2. File>New and use these settings. Be sure to change
Introduction To Inkscape Creating Custom Graphics For Websites, Displays & Lessons
 Introduction To Inkscape Creating Custom Graphics For Websites, Displays & Lessons The Inkscape Program Inkscape is a free, but very powerful vector graphics program. Available for all computer formats
CREATING THE FUNKY BUSINESS CARD
 CREATING THE FUNKY BUSINESS CARD This is what the final product should look like. 1. Open Illustrator 2. Create a new document (file new) Name your document. Change the units to inches. Change the document
ADOBE ILLUSTRATOR CS3. Chapter 4 Transforming and Distorting Objects
 ADOBE ILLUSTRATOR CS3 Chapter 4 Transforming and Distorting Objects Transform objects Defining the Transform Tools Transformation occurs when an object s size, shape, or position is changed on artboard
How to create shapes. Drawing basic shapes. Adobe Photoshop Elements 8 guide
 How to create shapes With the shape tools in Adobe Photoshop Elements, you can draw perfect geometric shapes, regardless of your artistic ability or illustration experience. The first step to drawing shapes
Actualtests.9A QA
 Actualtests.9A0-351.51.QA Number: 9A0-351 Passing Score: 800 Time Limit: 120 min File Version: 5.6 http://www.gratisexam.com/ 9A0-351 Adobe Illustrator CC Recertification Exam Marvelous planning guide
Add Photo Mounts To A Photo With Photoshop Part 1
 Add Photo Mounts To A Photo With Photoshop Part 1 Written by Steve Patterson. In this Photoshop Effects tutorial, we ll learn how to create and add simplephoto mounts to an image, a nice finishing touch
Adobe photoshop Using Masks for Illustration Effects
 Adobe photoshop Using Masks for Illustration Effects PS Preview Overview In this exercise you ll see a more illustrative use of Photoshop. You ll combine existing photos with digital art created from scratch
L E S S O N 2 Background
 Flight, Naperville Central High School, Naperville, Ill. No hard hat needed in the InDesign work area Once you learn the concepts of good page design, and you learn how to use InDesign, you are limited
1. New document, set to 5in x 5in, no bleed. Color Mode should be default at CMYK. If it s not, changed that when the new document opens.
 art 2413 typography fall 17 software review This exercise will reacquaint students with Adobe Illustrator, Photoshop, and InDesign. These are the three main design programs used by the industry. There
View the final cute monster character
 Follow this step by step Illustrator tutorial to create a cute vector monster character. Weʼll create the character from basic shapes to give a cute and friendly appearance then weʼll bring the character
User Manual Version 1.1 January 2015
 User Manual Version 1.1 January 2015 - 2 / 112 - V1.1 Variegator... 7 Variegator Features... 7 1. Variable elements... 7 2. Static elements... 7 3. Element Manipulation... 7 4. Document Formats... 7 5.
Create ruler guides. Create a ruler guide
 Create ruler guides Ruler guides are different from grids in that they can be positioned freely on a page or on a pasteboard. You can create two kinds of ruler guides: page guides, which appear only on
Interactive Tourist Map
 Adobe Edge Animate Tutorial Mouse Events Interactive Tourist Map Lesson 1 Set up your project This lesson aims to teach you how to: Import images Set up the stage Place and size images Draw shapes Make
INTRODUCTION TO ADOBE ILLUSTRATOR
 INTRODUCTION TO ADOBE ILLUSTRATOR Instructor: Gillian Goerz Website: GillianG.com This powerful design tool effectively creates crisp graphics and illustrations for all medias, including print, web and
ILLUSTRATOR. Introduction to Adobe Illustrator. You will;
 ILLUSTRATOR You will; 1. Learn Basic Navigation. 2. Learn about Paths. 3. Learn about the Line Tools. 4. Learn about the Shape Tools. 5. Learn about Strokes and Fills. 6. Learn about Transformations. 7.
Objec&ve % U&lize appropriate tools and methods to produce digital graphics.
 Objec&ve 102.04 20% U&lize appropriate tools and methods to produce digital graphics. Fill and Stroke q Stroke is the outline of a shape, text or image. Weight Color Style q Fill is the inside color of
Using Masks for Illustration Effects
 These instructions were written for Photoshop CS4 but things should work the same or similarly in most recent versions Photoshop. 1. To download the files you ll use in this exercise please visit: http:///goodies.html
Illustrator 1 Object Creation and Modification Tools
 Illustrator 1 Object Creation and Modification Tools Pen Tool Creates a precision shape using points and curve handles. Shape Tools Creates geometric solids. Selection Tool Selects objects and groups.
Basic Scene Composition
 Basic Scene Composition Welcome to the Basic Scene Composition tutorial. This tutorial was designed to teach you how to many of Illustrator key tools to create a sunset scene, this should give you good
CHAPTER 7 Enrichment Activity
 Create an Illustration with Symbols The Symbols palette is a collection of images, like clip art. Choose Window>Symbols to view the Symbols pallet. When you open the palette, it looks like you have only
Course Prerequisite: CE 1403 or 1404 Adobe Creative Suite, or equivalent experience.
 Syllabus: Adobe Illustrator Continuing Education-SPRING 12 CE*2407 Adobe Illustrator 10 Mondays, 7:00 10:00 pm, Jan 23 April 2 Sarah Gager Lochrie, sarah@sarahgager.com Course Description Turn out professional-looking
How to...create a Video VBOX Gauge in Inkscape. So you want to create your own gauge? How about a transparent background for those text elements?
 BASIC GAUGE CREATION The Video VBox setup software is capable of using many different image formats for gauge backgrounds, static images, or logos, including Bitmaps, JPEGs, or PNG s. When the software
13 PREPARING FILES FOR THE WEB
 13 PREPARING FILES FOR THE WEB Lesson overview In this lesson, you ll learn how to do the following: Create and stylize a button for a website. Use layer groups and artboards. Optimize design assets for
Education and Training CUFMEM14A. Exercise 2. Create, Manipulate and Incorporate 2D Graphics
 Education and Training CUFMEM14A Exercise 2 Create, Manipulate and Incorporate 2D Graphics Menu Exercise 2 Exercise 2a: Scarecrow Exercise - Painting and Drawing Tools... 3 Exercise 2b: Scarecrow Exercise
Objective Utilize appropriate tools and methods to produce digital graphics.
 INSTRUCTIONAL NOTES There are many similarities between Photoshop and Illustrator. We have attempted to place tools and commands in the context of where they are most effective or used most often. This
tool brush pen rectangle tool J Direct Selection Shift + E Shift+K Group Selection H Magic Wand Z Lasso X Pen Shift+W D Add Anchor Point Shift+R
 delete lasso blend free transform rotate text magic wand mesh eye drop reflect pen tab direct selection gradient scale hand column graph live paint bucket ellipse enter caps lock return zoom scissors selection
ADOBE PHOTOSHOP Using Masks for Illustration Effects
 ADOBE PHOTOSHOP Using Masks for Illustration Effects PS PREVIEW OVERVIEW In this exercise, you ll see a more illustrative use of Photoshop. You ll combine existing photos with digital art created from
On the Web sun.com/aboutsun/comm_invest STAROFFICE 8 DRAW
 STAROFFICE 8 DRAW Graphics They say a picture is worth a thousand words. Pictures are often used along with our words for good reason. They help communicate our thoughts. They give extra information that
Vectornator Pro. Manual Version 1.0.2, April 5th, A Linearity GmbH Production
 Vectornator Pro Manual Version 1.0.2, April 5th, 2018 A Linearity GmbH Production Vectornator Pro The best and most advanced vector graphic design software for ios A Linearity GmbH Production What you
Illustrator Domains 1-4: Getting to Know Your Workspace. Dreamweaver Domain 3
 Illustrator Domains 1-4: Getting to Know Your Workspace 1 Lesson 1: Getting to Know the Work Area Toolbar Fly-out menus for hidden tools Panels Can be opened, closed, docked, or hide all (Tab) Like your
Interface Overview. Menu Bar. Control Palette. Toolbox. Palettes. Document Window. Status Bar
 Lesson overview: This module covers basic elements of the Illustrator work area. Learn how to open and close plaettes, choose tools, and learn the funtions of each tool. Learn how to reset your workspace
4 Working with Selections
 4 Working with Selections Learning how to select areas of an image is of primary importance you must first select what you want to affect. Once you ve made a selection, only the area within the selection
Worn And Torn Text In Photoshop
 Worn And Torn Text In Photoshop Written by Steve Patterson. In this Photoshop text effects tutorial, we re going to learn how to create a worn and torn effect with our text. Here s the effect we re going
Adobe Illustrator CC Advanced
 Copy/Paste Objects 1. Select with Selection-Tool 1. Hold Alt-Key Drag with Selection-Tool while still holding the Alt-Key (Additionally holding Shift will move straight or in 45/90/180 Degrees) Align Objects
This Photoshop Tutorial 2011 Steve Patterson, Photoshop Essentials.com. Not To Be Reproduced Or Redistributed Without Permission.
 Rotate, Flip & Scale Individual Letters In Text Photoshop makes it easy to rotate, flip and scale entire words or lines of text in a document, but what if we want to transform only a single letter in a
3. Let s say that we are unsure about what kind of
 Class Objectives Creating/mixing gradients Loading and using custom brushes Applying/modifying layer styles (drop shadow, glow, pattern overlay, stroke, etc.) Using transformations rotate, perspective,
Tower Drawing. Learning how to combine shapes and lines
 Tower Drawing Learning how to combine shapes and lines 1) Go to Layout > Page Background. In the Options menu choose Solid and Ghost Green for a background color. This changes your workspace background
Description: Learn how to create a beautiful pumpkin using Bitmaps for Textures and the Gradient Fill Editor to colour the shapes.
 Title: PUMPKIN Software: Serif DrawPlus X8 Author: Teejay Joyce Website: Tutorials by Teejay Skill Level: Intermediate Supplies: None Description: Learn how to create a beautiful pumpkin using Bitmaps
Photoshop / Editing paths
 Photoshop / Editing paths Path segments, components, and points Select a path Adjust path segments Add or delete anchor points Convert between smooth points and corner points Adjust path components Path
Creating a 3D bottle with a label in Adobe Illustrator CS6.
 Creating a 3D bottle with a label in Adobe Illustrator CS6. Step 1 Click on File and then New to begin a new document. Step 2 Set up the width and height of the new document so that there is enough room
Photoshop Basics A quick introduction to the basic tools in Photoshop
 Photoshop Basics A quick introduction to the basic tools in Photoshop Photoshop logo courtesy Adobe Systems Inc. By Dr. Anthony R. Curtis Mass Communication Department University of North Carolina at Pembroke
Fig. A. Fig. B. Fig. 1. Fig. 2. Fig. 3 Fig. 4
 Create A Spinning Logo Tutorial. Bob Taylor 2009 To do this you will need two programs from Xara: Xara Xtreme (or Xtreme Pro) and Xara 3D They are available from: http://www.xara.com. Xtreme is available
Quick Guide for Photoshop CC Basics April 2016 Training:
 Photoshop CC Basics Creating a New File 1. Click File > New 2. Keep Default Photoshop Size selected in the Preset drop-down list. 3. Click OK. Showing Rulers 1. On the Menu bar, click View. 2. Click Rulers.
Adobe Flash CS4 Part 1: Introduction to Flash
 CALIFORNIA STATE UNIVERSITY, LOS ANGELES INFORMATION TECHNOLOGY SERVICES Adobe Flash CS4 Part 1: Introduction to Flash Fall 2010, Version 1.0 Table of Contents Introduction...3 Downloading the Data Files...3
In this exercise you will be creating the graphics for the index page of a Website for children about reptiles.
 LESSON 2: CREATING AND MANIPULATING IMAGES OBJECTIVES By the end of this lesson, you will be able to: create and import graphics use the text tool attach text to a path create shapes create curved and
A Guide to Autodesk Maya 2015
 A Guide to Autodesk Maya 2015 Written by Mitchell Youngerman Table of Contents Layout of Toolbars...pg 1 Creating Objects...pg 2 Selecting & Deselecting Objects...pg 3 Changing Perspective... pg 4 Transforming
Adobe Illustrator. Quick Start Guide
 Adobe Illustrator Quick Start Guide 1 In this guide we will cover the basics of setting up an Illustrator file for use with the laser cutter in the InnovationStudio. We will also cover the creation of
TITLE: GLASS GOBLET. Software: Serif DrawPlus X8. Author: Sandra Jewry. Website: Draw Plus Tutorials by San. Skill Level: Beginner.
 TITLE: GLASS GOBLET Software: Serif DrawPlus X8 Author: Sandra Jewry Website: Draw Plus Tutorials by San Skill Level: Beginner Supplies: None Description: This is a very easy beginner tutorial that shows
Adobe Illustrator CS Design Professional CREATING TEXT AND GRADIENTS
 Adobe Illustrator CS Design Professional CREATING TEXT AND GRADIENTS Chapter Lessons Create and format text Flow text into an object Position text on a path Create colors and gradients Apply colors and
The Background layer now filled with black.
 GOLD PLATED TEXT In this Photoshop text effects tutorial, we re going to learn how to turn text into gold using Photoshop s Layer Styles. We ll even throw in some sparkles at the end to make our gold letters
Work with Shapes. Concepts CHAPTER. Concepts, page 3-1 Procedures, page 3-5
 3 CHAPTER Revised: November 15, 2011 Concepts, page 3-1, page 3-5 Concepts The Shapes Tool is Versatile, page 3-2 Guidelines for Shapes, page 3-2 Visual Density Transparent, Translucent, or Opaque?, page