Developing Applications for ios
|
|
|
- Marcus Gray
- 6 years ago
- Views:
Transcription

1 Developing Applications for ios Lab 2: RPN Calculator App (1 of 3) Radu Ionescu Faculty of Mathematics and Computer Science University of Bucharest
2 Task 1 Task: Create a new application in Xcode called Calculator. 1. Launch Xcode and select the Create a new Xcode project option. If you don't see the splash window, you should go to File > New > New Project... in Xcode menu. 2. Select the Single View Application template and click Next. 3. Type in Calculator for the Product Name. 4. Enter com.fmi.firstname.lastname for the Company Identifier. Notice how Bundle Identifier changes as you type. You should obtain something like com.fmi.radu.ionescu.calculator as your bundle identifier. 5. Enter Calculator as the Class Prefix for the classes this template is going to generate for us. 6. Select iphone for Device Family. We are going to make this application only for the iphone (not ipad).
3 Task 1 Task: Create a new application in Xcode called Calculator. 7. Check Use Storyboard. Storyboards are a new (ios 5) way to organize your MVC's Views that we are going to use. 8. Check Use Automatic Reference Counting. 9. We won't be creating Unit Tests for this application so we are going to leave the Include Unit Tests option unchecked. 10. Click Next. 11. Navigate to ~/Developer/Apps/ folder inside the home directory. If you want to keep your project for later use, please save it in a directory with your name like this: ~/Developer/Apps/<YourName>. 12. Click Create to create your project directory inside the ~/Developer/Apps folder.
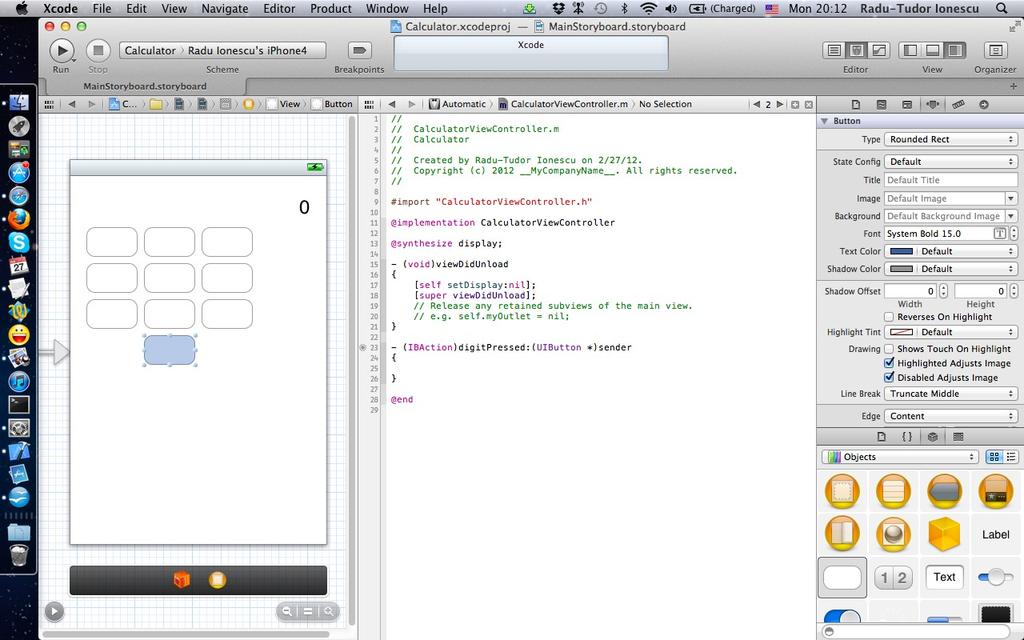
4 Task 2 Task: Start building our Calculator s View by adding a text label to be the Calculator's display. 1. Open up our MVC's View by clicking on MainStoryboard.storyboard in Project Navigator. 2. Hide the Document Outline if it's not already hidden. 3. Click on the butler icon on the Toolbar to show up the Assistant Editor. This will by default bring up the View s Controller. 4. We don t need the Project Navigator at the far left either, so let s hide it by using the Hide or show the Navigator button available on the Toolbar. 5. Bring up the Utilities area by clicking on the Hide or show the Utilities button that is also available on the Toolbar. 6. In Utilities area, click on the Object Library (it might already be selected). Some objects (those appropriate to dragging into your View) should appear in the Object Library.
5 Task 2 Task: Start building our Calculator s View by adding a text label to be the Calculator's display. 7. Find a UILabel object in Object Library. 8. Drag the UILabel from the Object Library to your View. 9. In Utilities area, click on the Attributes Inspector. You should see attributes of the Label you just created. 10. Grab the lower right "handle" on the label and resize it to 280 x 36 pixels. Use the dashed blue guidelines to pick a good size. Make sure you align and resize it as in the preview screenshot from the next slide. 11. The numbers in a Calculator's display are never (rarely?) left aligned, so let's change the alignment of the text in our display label to right by clicking on the appropriate button in the inspector.
6
7 Task 2 Task: Start building our Calculator s View by adding a text label to be the Calculator's display. 12. Let's also make the font bigger. Increase the font size to 24 point Helvetica. 13. We don't want our Calculator to appear with "Label" in its display! So double-click on the label to put it in an editing state then type Hold down CTRL while mousing down and dragging a line from the text label directly into the code of our Controller. 15. We are going to name this outlet display (since it is the display of our Calculator). So type "display" for the outlet name. 16. Select the "Weak" storage type and click Connect to create a property (called display) in our Controller which will point to this UILabel in our View. The screenshot from the next slide gives you a hint of how everything should look like.
8
9 Task 3 Task: Add our Calculator s keypad buttons. 1. Switch Assistant Editor to the Controller's implementation file named CalculatorViewController.m. 2. Delete the code that we don't need which was automatically added by Xcode. Make sure NOT to remove declaration and the implementation of the viewdidunload method. 3. Drag a Round Rect Button from the Object Library to your View. 4. Grab the middle-right "handle" on the button and resize it. A width of 64 points works extremely well, so use that. The screenshot from the next slide gives you a hint of how everything should look like after this step. 5. Hold down CTRL while mousing down and dragging a line from the button directly to the text area where your code is.
10
11 Task 3 Task: Add our Calculator s keypad buttons. 6. Enter digitpressed as the name of the action message (which makes sense since this button is going to be a digit button in our Calculator s keypad). 7. You can leave the rest of the fields alone (the defaults are fine for this button). Then press Connect. 8. Similar to an outlet, you can mouse over the little icon on the left of the method implementation and see which object(s) in your View send(s) this message. Notice how the button highlights. Check out the screenshot from the next slide for a hint of how everything should look like.
12
13 Task 3 Task: Add our Calculator s keypad buttons. 9. The type id is a very special type. There are some times when we want to use it because either we allow any class of object to be passed into a method (uncommon) or because the class of the object is opaque (it's like a cookie). But neither of those cases applies here. In this case, we know that the sender to digitpressed: is going to be a UIButton. Therefore we are going to change this type to be pointer to a UIButton instead of pointer to an object of any class. Select the type of the sender argument to this method and replace it with the type UIButton *". Check out the screenshot from the next slide.
14 Using UIButton * rather than id is called "static typing". Static typing is purely a compiler thing. It has no effect on what happens at run time. The compiler will just generate better warnings if you try to write code that sends a message to sender which a UIButton does not recognize. If you send a message to sender that it does not recognize, your program will crash, regardless of whether you statically typed sender.
15 Task 3 Task: Add our Calculator s keypad buttons. 10. Copy and paste our first button to make another button. The copied button will send the same action (digitpressed:) as the original. 11. Move the copied button to line up horizontally with the original (the dashed blue lines are awesome here). 12. Copy and paste again to obtain 3 buttons horizontally aligned. 13. Now copy and paste 3 buttons at a time. 14. Using copy and paste and the grid lines, create the entire keypad for the Calculator. It should look like in the screenshot from the next slide.
16
17 Task 3 Task: Add our Calculator s keypad buttons. 15. Double-click on a button to make its text editable. Then type the number that goes in the appropriate spot. 16. Do this for all the buttons. Your keypad should now look like the one in the screenshot from the following slide. 17. Right-click on the nine button. 18. Mouse over the "Touch Up Inside" connection and you will see that the whole View will highlight (that's its way of showing you that this button sends its message to the Controller). 19. Right-click on the icon that represents the Controller (it's under the View). 20. Then mouse over this "Button - 4" entry. Notice how the button highlights.
18
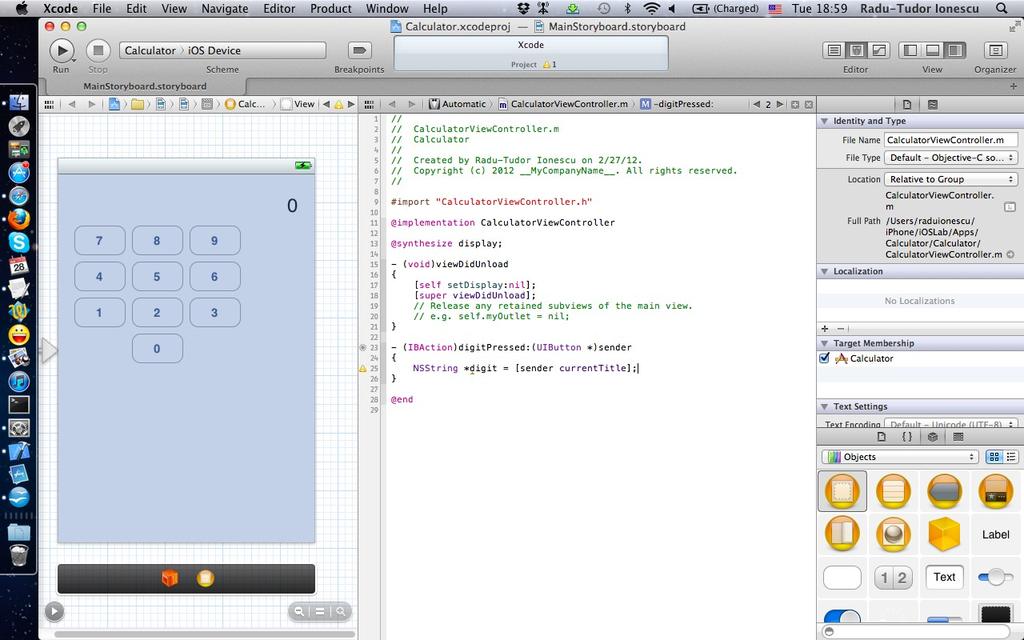
19 Task 4 Task: Write the code inside digitpressed: that will get executed whenever any of the keypad buttons gets touched. 1. We won't need the Utilities area for a while, so close it from the Hide or show the Utilities button from the Toolbar. 2. Start by declaring a local variable called digit inside the digitpressed: method implementation. This local variable will be of type "pointer to an NSString object". 3. Since all the buttons send the same action message to our Controller, we have to look at the action message s argument (sender) to find out which one was touched. UIButton objects respond to the message currenttitle which returns an NSString containing the title of the button. We'll use that to figure out which button was touched. Make sure your code looks like in the next screenshot.
20
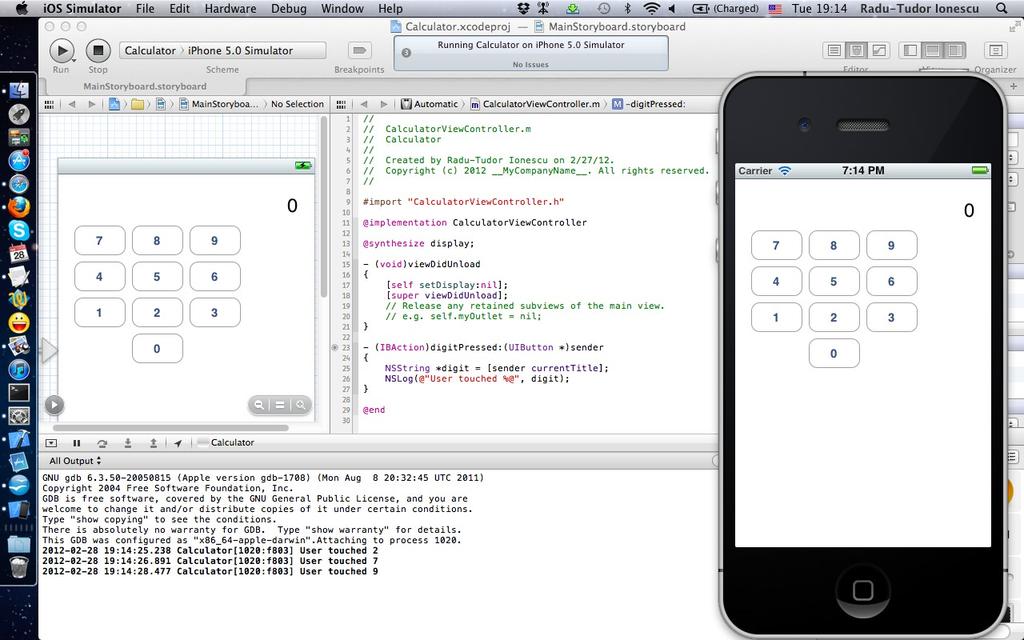
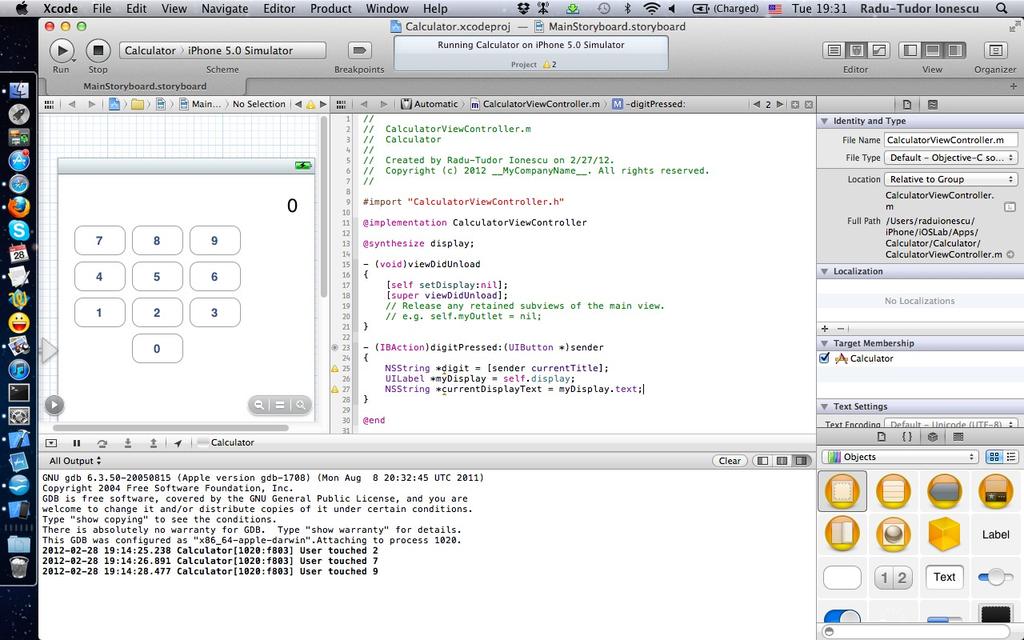
21 Task 4 Task: Write the code inside digitpressed: that will get executed whenever any of the keypad buttons gets touched. 4. Add an NSLog() to print the digit chosen by the user to the console. Your code should be something like the code in the next screenshot. 5. Run the application with this NSLog() in place. 6. Touch a few keys and check out the console for the messages printed by NSLog(). 7. Stop the simulator and delete the line of code with NSLog(). 8. Now that we have the digit from the button, we need to update our display by appending the digit onto the end of it. This actually only takes one line of code, but we ll break it down into steps. Let's make another local variable called mydisplay (of type "pointer to a UILabel") into which we'll just put the value of our display outlet. Make sure you express calling the getter of our using dot notation.
22
23 Task 4 Task: Write the code inside digitpressed: that will get executed whenever any of the keypad buttons gets touched. 9. Now that we have a pointer to our display, let's send it a message to find out what text is currently in it. The message to send is called (appropriately) text. Add a line of code to get the text out of our display UILabel and store it in a local variable (a pointer to an NSString object) called currentdisplaytext. Note that text is a property of UILabel and you can use dot notation to access it. Look at the screenshot from the next slide to see how your code should look at this moment.
24
25 Task 4 Task: Write the code inside digitpressed: that will get executed whenever any of the keypad buttons gets touched. 10. There's really no need for the local variable mydisplay. So let's select and copy its value (self.display) and paste it where we use it. 11. Now you can delete the line of code that declares the local mydisplay variable. 12. Next we need to append the digit that the user just touched onto the end of what is currently in the display. Create a local variable called newdisplaytext and assign it with the value returned by messaging the currentdisplaytext local variable with stringbyappendingstring: with the argument digit. Look at the screenshot from the next slide to see how your code should look at this moment.
26
27 Task 4 Task: Write the code inside digitpressed: that will get executed whenever any of the keypad buttons gets touched. 13. We need to set our display UILabel's text to the new string with the digit appended to the end.you can use dot notation to set the self.display.text property to be the newdisplaytext. Note that dot notation for setters is exactly the same as dot notation for getters, it s just that they appear on the left-hand side of equals signs rather than the right-hand side. 14. We don't need the newdisplay local variable really, so let's copy its value (the stringbyappendingstring: message-sending construct) and paste it where it is used. 15. Then we can delete the previous line (that declares the newdisplaytext variable). Look at the screenshot from the next slide to see how your code should look at this moment.
28
29 Task 4 Task: Write the code inside digitpressed: that will get executed whenever any of the keypad buttons gets touched. 16. The same thing happens for the currentdisplaytext local variable. It is not really needed. Copy the value o f currentdisplaytext and paste it where it is used. 17. Okay, let s Run and see if this works! 18. Touch a few keypads. Notice the leading zero that doesn't look right on the display. We should try to fix the problem with the leading zero. The problem with the leading zero is that we are appending new digits even if the user is not currently in the middle of entering a number. The display should get cleared when the user starts typing a new number instead of appending to whatever happens to be there (like the 0 at the beginning or some operation s result later on). Look at the screenshot from the next slide to see how things should look by now.
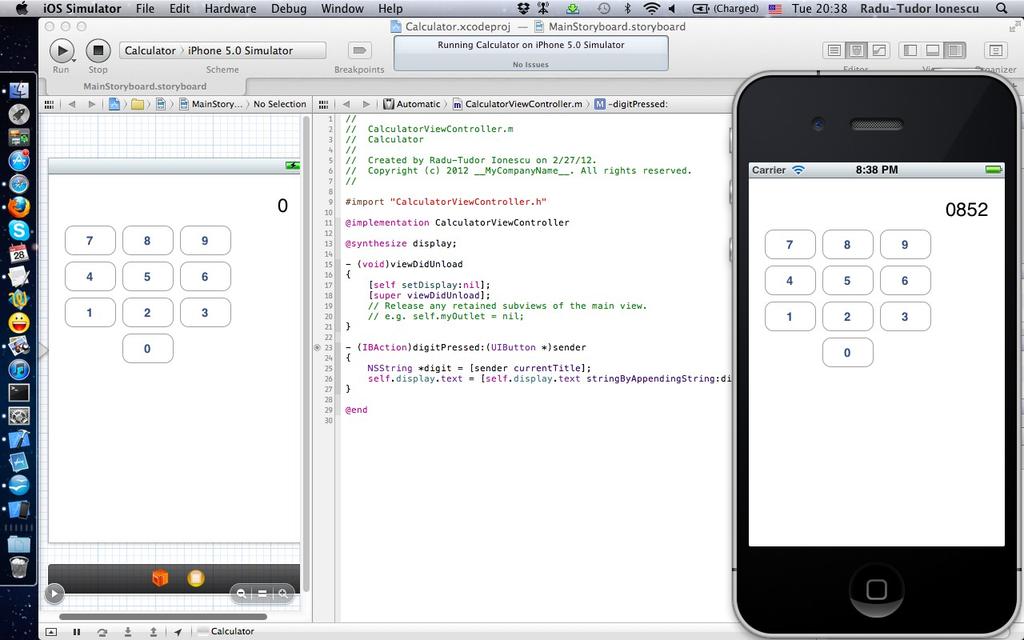
30
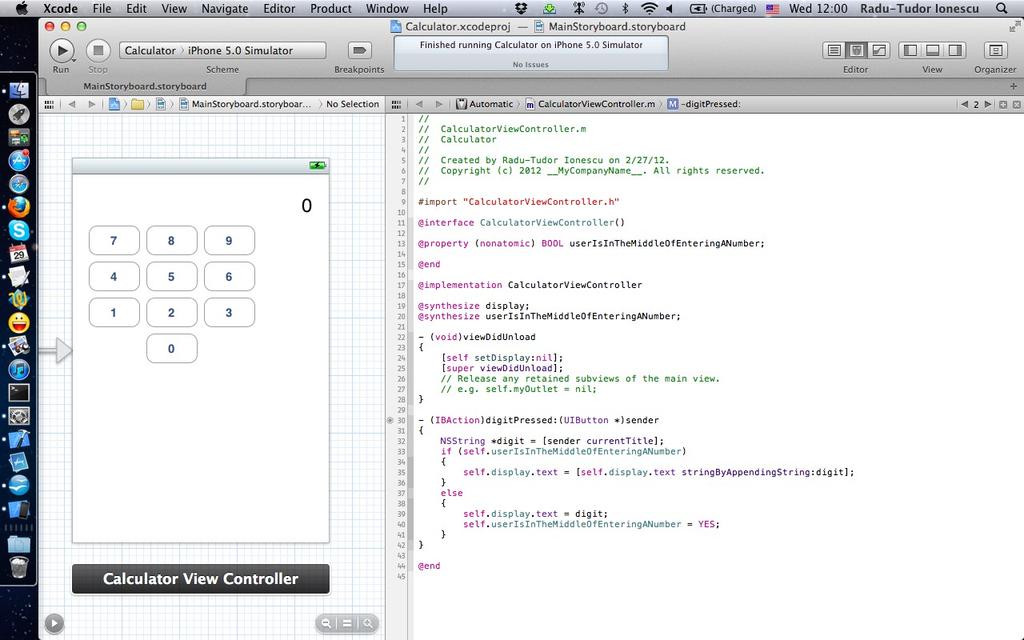
31 Task 4 Task: Write the code inside digitpressed: that will get executed whenever any of the keypad buttons gets touched. 19. To fix this, we are going to need to keep track of whether the user is in the middle of entering a number. But we don't want to add to our header file because those properties are public. So where do we add private properties? We need to add a to our implementation file. This is called a Class Extension. The concept of public versus private in Objective-C is done via "header file versus implementation file". You declare public stuff in your header file block. You declare private stuff in your implementation file block. 20. Add a private boolean property to track whether the user is in the middle of entering a number. Check out the screenshot in the following slide to understand how to do this.
32 You might think userisinthemiddleofenteringanumber is sort of a silly name for a variable. But long variable names are encouraged in ios development because Xcode completes them for you after only a few characters and self-documentation is very important to good coding style. This is called a Class Extension. Notice the () at the end. BOOL is the typedef used for boolean values in Objective-C. Its value is either YES or NO. NO is zero, YES is non-zero. nonatomic means that the setter and getter for this property will not be thread-safe. You will always use this keyword unless you really know what you are doing. It s not really a problem because even though we will do lots of multi-threaded programming in ios, virtually all methods in UIKit must be performed on the main thread of execution in your application (it is non-ui activity that we will put in other threads). There s no strong or weak here because a BOOL is not a pointer.
33 Task 4 Task: Write the code inside digitpressed: that will get executed whenever any of the keypad buttons gets touched. 21. There are two warnings for the declaration. The problem is that we declared but we have not implemented the getter (first warning) or the setter (second warning). Let's (again) to implement both the getter and the setter for us! Note doesn't care whether is public (declared in the header) or private (declared in the implementation file).
34 Task 4 Task: Write the code inside digitpressed: that will get executed whenever any of the keypad buttons gets touched. 22. Now we just need to only do the appending if the user is in the middle of entering a number. But what value does userisinthemiddleofenteringanumber start out with? All properties start out with a value of zero. For a pointer to an object (like display) zero is called nil. Your program will not crash if you send a message to nil. It just does nothing in that case (any value the method returns will be zero). If the user is not in the middle of typing, just start off a new number with the digit that was touched. In this case we must set userisinthemiddleofenteringanumber to YES because we are now in the middle of entering a number. Check out the screenshot from the next slide to see the final implementation of digitpressed:. 23. That should do it. Let's run again.
35
36 Task 5 Task: Add some more buttons (for operations *, /, +, - and Enter). 1. Bring back the Utilities area. 2. Drag a Round Rect Button from the Object Library to your View. Do NOT copy and paste a digit button to make this first operation button. Copying and pasting buttons brings the button's action message along with it and we want operation buttons to send a different message than digit buttons! 3. Resize the button to 64 x 37 pixels. 4. CTRL-drag to create this button's action. 5. Name the action operationpressed: then click Connect. 6. You should statically type the sender to UIButton *. Check out the screenshot from the next slide to see how the button and the action should look like.
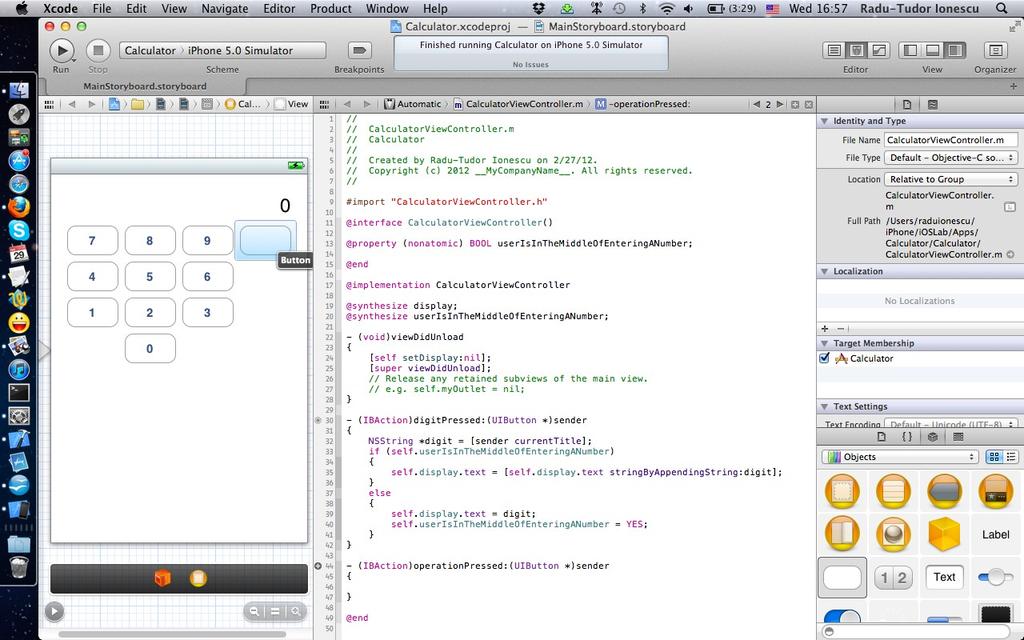
37
38 Task 5 Task: Add some more buttons (for operations *, /, +, - and Enter). 7. Now use copy and paste to create 4 operation buttons. Again, do not copy and paste a digit button to make an operation button! 8. Set the title of each to these four operations to *, /, + and -, respectively. Check out the screenshot from the next slide to see how your view should look like by now. 9. We need an Enter button because an RPN calculator puts all of its operands on a stack and then operates on them. Enter is used to push a number onto the operand stack (e.g. 6 Enter 5 Enter + results in 11). Drag a Round Rect Button from the Object Library to the View and place it between 0 and - buttons. Do NOT copy and paste either a digit button or an operation button to make an Enter button. The Enter button will have a different action than either digit buttons or operation buttons.
39
40 Task 5 Task: Add some more buttons (for operations *, /, +, - and Enter). 10. Resize it to 64 x 37 pixels and set its title to Enter. 11. CTRL-drag to create this button's action. Put this action before operationpressed: in the file. We are going to call the Enter action from operationpressed:, so it needs to be declared earlier in the file. This is not a compiler restriction, but only a good coding practice. 12. Name this action enterpressed. 13. There's something a little different about this action method. We don't need the sender argument because there's only one Enter key. Note that we can control whether an action message includes the sender as an argument. Change the Arguments to None and click Connect. Everything should look like in the following screenshot.

41 Notice the enterpressed action has no arguments.
42 Task 6 Task: Create the Model of our MVC for the calculator brain. 1. We cannot proceed any further with our implementation without the Model of our MVC. So we re going to take a time-out from implementing our MVC s Controller to go implement our MVC s Model. Hide the Utilities area again. 2. Before we switch to our writing our Model, it would be nice to capture the setup on the screen (i.e.view and Controller) so that we can easily return to it later. We can do that using Tabs in Xcode (just like Tabs in a Browser). In Xcode menu go to File > New > New Tab (or use the CMD + T shortcut) to open a new tab. Notice the new tab starts out as a snapshot of the old tab. Once we start changing it, we can get back to the old arrangement by clicking the other tab.
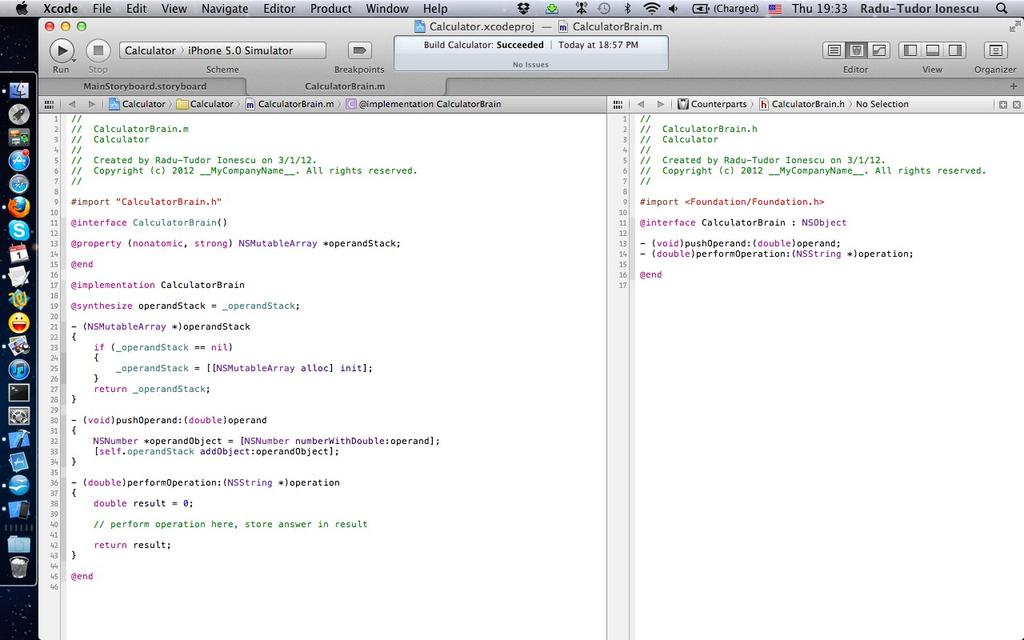
43 Task 6 Task: Create the Model of our MVC for the calculator brain. 3. Time to create our Model. Do this by selecting New File from the File menu. The File menu's New File item is the gateway to creating a wide variety of things in an application. Including not only new classes (as in this case), but also user-interface elements, database schema, and more. 4. Select the Objective-C class option and click Next. 5. We are going to call our Model's class CalculatorBrain, so type that in the Class field. Check out the following screenshot. Our Model is going to be a direct subclass of NSObject, so this is correctly selected. NSObject is the root superclass of all objects in ios. Classes inherit some nice generic functionality from NSObject including the method called description which returns an NSString representation of the object which is useful for debugging with NSLog().

44 Also notice the new tab.
45 Task 6 Task: Create the Model of our MVC for the calculator brain. 6. Then click Next to choose where to put your Model s.m and.h files. 7. Make sure you put your Model s.m and.h files in the same place as all of your other.m and.h files, that is in the "Calculator" subfolder. 8. Don t put your Model s.m and.h files in the top-level group in the Navigator either. Put them in this group one level down. Check out the screenshot from the following slide to understand how to set things up. 9. Click Create. Notice the Navigator shows up after you create your Model. Also notice that Xcode has created stubs for both the header and implementation of our MVC s Model and it has automatically renamed the current tab. You can name it yourself by double-clicking on it if you wish. 10. Close the Navigator to make space.
.")
46 This chooser defines where your Model s.m and.h files will appear in the file system. This pop-up defines where your Model's files will appear in the Navigator. (the area on the left that we hid at the start). Other.m and.h files in your project.
47 Task 6 Task: Create the Model of our MVC for the calculator brain. 11. We re going to start by defining the public API of our Model. All of our public API lives in the header file (that s what makes it public). Public API are method and properties other objects (besides our Model itself) are allowed to invoke. First add the pushoperand: which will provide a way to push operands onto our Calculator's stack of operands. This method must return nothing (void). The argument must be a double-precision floating point number called operand. Notice the warning that was introduced by declaring this method. It says "Incomplete implementation". This makes sense because we have not yet implemented pushoperand:. The following screenshot will show you how to declare this method.
 which must be declared with a + at the beginning.")
48 The - means this is an instance method (i.e. instances of this class respond to it). There is also such a thing as a class method (i.e. the class itself responds to it) which must be declared with a + at the beginning.
49 Task 6 Task: Create the Model of our MVC for the calculator brain. 12. Now add the performoperation: method that performs a given operation using the operands on the stack. We are going to use a string to describe the operation (the same string that is on the operation buttons in our UI). This is pretty bad design to have strings in the UI also have meaning in your Model, but it s simple and so we ll go with it for this demo. This method returns a double (the result of performing the operation). The argument to this method is a pointer to an NSString object called operation. 13. Let s stub out both of our methods in our implementation. 14. Let's have the performoperation: method return a default value of zero for now. The.m and.h files of our model should like in the next screenshot.
50
51 Task 6 Task: Create the Model of our MVC for the calculator brain. 15. How are we going to store our stack of operands? We are going to use an array. Pushing onto our stack will just add an item to the end of the array. Popping will grab the last item in the array, then remove that item from the array. Add a so that we can declare the array we need to store the operand stack. 16. Add a nonatomic and called operandstack of type pointer to NSMutableArray object. We will cover much more later about arrays, strings, etc., but notice that this array s class name is NSMutableArray. The base array class (NSArray) is not modifiable. Clearly that wouldn t work for this class s implementation. Check out the next screenshot.
52 strong means keep this object (the array) around until I m done using it. Most are strong. As we saw earlier, the alternative to strong is weak. weak means if no one else is interested in this object, then neither am I, so set to nil (zero) if that becomes the case. This time, our Model s implementation is the only one interested in operandstack, so we must make it strong.
53 Task 6 Task: Create the Model of our MVC for the calculator brain. 17. Check the warnings for the previously declared property. As we saw last time we added the compiler warns us that we need to create its getter (operandstack) and setter (setoperandstack:). It s even suggesting that we to generate the getter and the setter. Add for the operandstack in the implementation. 18. And then, as an exercise, let's type in exactly would generate. Check out the next screenshot to make sure you did this right.
54
55 Task 6 Task: Create the Model of our MVC for the calculator brain. 19. Now that we have a stack, let s try to push an operand onto it. Note that NSMutableArray is an array of objects and a double is a primitive type, not an object. But there is a class called NSNumber which can be used to wrap primitive types into an object. Wrap the operand with an NSNumber by using the NSNumber's class method numberwithdouble: and store it into a pointer to NSNumber object called operandobject. 20. Then, add the operandobject to the stack with the addobject: method. Again, check out the next screenshot to make sure you did this right.
56 Recall that start out nil (zero). And recall that sending a message to nil does nothing. So this line of code will be doing nothing. Somewhere we need to initialize the
57 Task 6 Task: Create the Model of our MVC for the calculator brain. 21. There is a perfect place to initialize operandstack. Its getter! If someone tries to get operandstack and it is not initialized, initialize it before returning it. This sort of initialization is called lazy instantiation and is a common paradigm in ios. To create a mutable array (or any object in general) you should use the [[NSMutableArray alloc] init] construct. But first you must test if the operand stack is nil. Notice the implicit testing of a pointer (to see if it is nil) is if (operandstack == nil). You could also say if (!operandstack). Check out the next screenshot to make sure you did everything right.
58
59 Task 6 Task: Create the Model of our MVC for the calculator brain. 22. Recall the fact creates an instance variable with the same name as the property is dangerous. We can avoid this potential accident by use a different name for its instance variable than the name of the property. Prefix the instance variable with an underscore (_operandstack). 23. Only setters and getters should access the instance variable directly. Fix the setter and getter to access the instance variable by its new name, _operandstack. 24. We are not going to do anything with the setter, so you can delete it. Remember will always create whichever setter and/or getter that you do not. Check out the next screenshot to make sure you did everything right.
60
61 Task 6 Task: Create the Model of our MVC for the calculator brain. 25. It is time to implement the performoperation: method. Let's start by implementing the + operation. First, we should verify that the operation + with the isequaltostring: method. Then we must pop two operands and add them into the result. Let's write this. Check out the next screenshot to make sure you did everything right.
62
63 Task 6 Task: Create the Model of our MVC for the calculator brain. 26. Notice the error that tell us that popoperand is not implemented. Implement popoperand method by getting the lastobject in our operandstack array, then returning that last object s doublevalue. Note that lastobject is a method that NSMutableArray inherits from NSArray which returns the last object in the array. All the objects in our operandstack array are NSNumbers and NSNumber responds to the method doublevalue (which returns a double). 27. We got the value off the end of the array, but we also need to pop it off by removing it. We have to send the removelastobject message to the operandstack, but not before testing if the lastobject is not nil. The next slide shows you a screenshot with the popoperand method implementation.
64 Sending lastobject to an array that is empty just returns nil (it does not raise an exception or do anything bad). And sending any message to nil returns nil. Unlike lastobject, sending removelastobject to an array that is empty will raise an exception (index out of bounds) and crash your program! That is why we check to see if we actually got a non-nil operandobject from the array before trying to call removelastobject.
65 Task 6 Task: Create the Model of our MVC for the calculator brain. 28. Implement the *, -, and / operantions. Make sure to get the order of operands correct for the - and / operations! For example, the input 6 Enter 2 - should be 4, not Finally, we must be sure to push the result back onto the stack so that the next operation we are asked to do will use it. The screenshot from the next slide shows the final implementation of our CalculatorBrain Model.
66 Notice that this time we send the isequaltostring: to the constant NSString the compiler creates for us when we use notation. That NSString is every bit as much an NSString as operation is. We return zero on divide by zero instead of not a number. We are sort of a return zero on failure calculator!
67 Task 7 Task: Finish the Controller implementation by connecting it to the Model. 1. Switch back to our Controller to finish it off. Click on the name of the file in the top bar and use it to navigate to your Controller s implementation (CalculatorViewController.m). 2. Your Controller s implementation (.m) file should appear on the left. Note that the Automatic Assistant switched the right-hand side to our Controller s header file (instead of our Model s). But actually, we want our Model s header file on the right because we are going to use it in our Controller. But to have our Model s header file on the right-side in Automatic mode, we need to create the relationship between our Controller and the Model in our code. We do that by #importing our Model into our Controller s implementation. #import the Model s header file into our Controller s implementation. Make sure you save the implementation at this moment. The screenshot from the next slide shows the project configuration at this moment.
68 This is where you switch from the Model's implementation to the Controller's implementation (CalculatorViewController.m).
69 Task 7 Task: Finish the Controller implementation by connecting it to the Model. 3. Put the CalculatorBrain header file on the right in Assistant Editor. Check the next slide to understand how to do this. Your Model s header file should appear on the right. It is common to put the header file (public API) of a class on the right-hand side of the screen as you are working in your implementation on the left. 4. All we need to do next is to add a in our Controller that points to our Model. And then use an instance of our Model to implement operationpressed: and enterpressed. Add (called brain) to hold a pointer from our Controller to our Model.
70 Click here and navigate through Includes to get CalculatorBrain.h to show up on the right. If you have not #imported CalculatorBrain.h into your CalculatorViewController.m or haven t saved it, CalculatorBrain.h may not appear here.
71 Task 7 Task: Finish the Controller implementation by connecting it to the Model. 5. Add to create the brain setter & getter. Again, we will use the most common naming convention for the corresponding instance variable (underscore plus property name). 6. We need to implement the getter of the in order to lazily instantiate the brain (in its getter method). See how to set things up in the next screenshot.
72
73 Task 7 Task: Finish the Controller implementation by connecting it to the Model. 7. Next let's handle the Enter button being touched. All we need to do is push the double value of the display into our Model (self.brain). Note that NSString responds to doublevalue as well. It tries to parse a double out of whatever is in the string. Luckily, there is no way to put anything but a number into our Calculator s display. 8. Of course, touching Enter means we are no longer in the middle of typing a number. We need to set userisinthemiddleofenteringanumber to NO. See how to set things up in the next screenshot.
74
75 Task 7 Task: Finish the Controller implementation by connecting it to the Model. 9. To implement operationpressed: we have to look at the button that sent us the action to determine which operation to perform. As for digits, we look at the sender's currenttitle. 10.Then we just perform the operation using our Model and store the result in local variable of double type. 11. We also need to update the display with the result of the operation. We can use the NSString's stringwithformat: class method to convert the double result into a string object. See how to implement the operationpressed: method on the next slide.
76
77 Task 7 Task: Finish the Controller implementation by connecting it to the Model. 12. By the way, when an operation is pressed and the user is in the middle of typing a number, let s do an implicit Enter. For example, 6 Enter 4 - would be the same as 6 Enter 4 Enter -. The screenshot from the next slide shows the final implementation of the operationpressed: method. 13. All done! Hit Run again. Touch 360 Enter 9 /. The result should be Then touch The result should be 360 / = 117.
78
79 Assignment 1 Assignment: Your calculator already works with floating point numbers (e.g. if you touch the buttons 3 Enter 4 / it will properly show the resulting value of 0.75), however, there is no way for the user to enter a floating point number. Remedy this. Allow only legal floating point numbers to be entered (e.g is not a legal floating point number). Hint: Add another button for. and the action pointpressed. There s an NSString method which you might find quite useful. It s called rangeofstring:. Check it out in the documentation. It returns an NSRange which is just a normal C struct which you can access using normal C dot notation. For example, consider the following code: NSString *greeting There Joe, how are ya?"; NSRange range = [greeting rangeofstring:@"bob"]; if (range.location == NSNotFound) {... /* no Bob */ } Be careful of the case where the user starts off entering a new number by pressing the decimal point, e.g., they want to enter the number.5 into their calculator. Handle this case properly.
80 Assignment 2 Assignment: Add a C button that clears everything (for example, the display in your View, the operand stack in your Model, any state you maintain in your Controller, etc.). Make sure 3 7 C 5 results in 5 showing in the display. Hint: Add another button for C and the action clearpressed. You will have to add API to your Model to support this feature. To be more precise you will have to declare and implement another method in CalculatorBrain to emptyoperandstack. Note that you can remove all objects from an NSMutableArray by calling a single method. Look into the NSMutableArray documentation for this.
81 Congratulations!
Assignment I Walkthrough
 Assignment I Walkthrough Objective Reproduce the demonstration (building a calculator) given in class. Materials By this point, you should have been sent an invitation to your sunet e-mail to join the
CS193P: HelloPoly Walkthrough
 CS193P: HelloPoly Walkthrough Overview The goal of this walkthrough is to give you a fairly step by step path through building a simple Cocoa Touch application. You are encouraged to follow the walkthrough,
Assignment III: Graphing Calculator
 Assignment III: Graphing Calculator Objective The goal of this assignment is to reuse your CalculatorBrain and CalculatorViewController objects to build a Graphing Calculator for iphone and ipad. By doing
Assignment II: Foundation Calculator
 Assignment II: Foundation Calculator Objective The goal of this assignment is to extend the CalculatorBrain from last week to allow inputting variables into the expression the user is typing into the calculator.
Objective-C. Stanford CS193p Fall 2013
 New language to learn! Strict superset of C Adds syntax for classes, methods, etc. A few things to think differently about (e.g. properties, dynamic binding) Most important concept to understand today:
My First iphone App. 1. Tutorial Overview
 My First iphone App 1. Tutorial Overview In this tutorial, you re going to create a very simple application on the iphone or ipod Touch. It has a text field, a label, and a button. You can type your name
My First Cocoa Program
 My First Cocoa Program 1. Tutorial Overview In this tutorial, you re going to create a very simple Cocoa application for the Mac. Unlike a line-command program, a Cocoa program uses a graphical window
Developing Applications for ios
 Developing Applications for ios Lab 10: Nearby Deals (6 of 6) Radu Ionescu raducu.ionescu@gmail.com Faculty of Mathematics and Computer Science University of Bucharest Task 1 Task: Save the favorite deals
Objective-C. Deck.m. Deck.h. Let s look at another class. This one represents a deck of cards. #import <Foundation/Foundation.h> #import "Deck.
 Deck.h #import @interface Deck : NSObject @interface Deck() @implementation Deck Deck.m Let s look at another class. This one represents a deck of cards. Deck.h #import
1 Build Your First App. The way to get started is to quit talking and begin doing. Walt Disney
 1 Build Your First App The way to get started is to quit talking and begin doing. Walt Disney Copyright 2015 AppCoda Limited All rights reserved. Please do not distribute or share without permission. No
My First iphone App (for Xcode version 6.4)
") My First iphone App (for Xcode version 6.4) 1. Tutorial Overview In this tutorial, you re going to create a very simple application on the iphone or ipod Touch. It has a text field, a label, and a button
My First iphone App (for Xcode version 6.4) 1. Tutorial Overview In this tutorial, you re going to create a very simple application on the iphone or ipod Touch. It has a text field, a label, and a button
Assignment III: Graphing Calculator
 Assignment III: Graphing Calculator Objective The goal of this assignment is to reuse your CalculatorBrain and CalculatorViewController objects to build a Graphing Calculator. By doing this, you will gain
Assignment III: Graphing Calculator
 Assignment III: Graphing Calculator Objective You will enhance your Calculator to create a graph of the program the user has entered which can be zoomed in on and panned around. Your app will now work
Stanford CS193p. Developing Applications for ios. Fall Stanford CS193p. Fall 2011
 Developing Applications for ios Today UI Element of the Week UIToolbar ipad Split View Popover Universal (iphone + ipad) Application Demo Friday Section AVFoundation framework - Capturing and manipulating
Assignment II: Calculator Brain
 Assignment II: Calculator Brain Objective You will start this assignment by enhancing your Assignment 1 Calculator to include the changes made in lecture (i.e. CalculatorBrain, etc.). This is the last
Review (Basic Objective-C)
") Classes Header.h (public) versus Implementation.m (private) @interface MyClass : MySuperclass... @end (only in header file) @interface MyClass()... @end (only in implementation file) @implementation...
Classes Header.h (public) versus Implementation.m (private) @interface MyClass : MySuperclass... @end (only in header file) @interface MyClass()... @end (only in implementation file) @implementation...
Stanford CS193p. Developing Applications for ios Fall Stanford CS193p. Fall 2013
 Developing Applications for ios -14 Today What is this class all about? Description Prerequisites Homework / Final Project ios Overview What s in ios? MVC Object-Oriented Design Concept Objective C (Time
In the first class, you'll learn how to create a simple single-view app, following a 3-step process:
 Class 1 In the first class, you'll learn how to create a simple single-view app, following a 3-step process: 1. Design the app's user interface (UI) in Xcode's storyboard. 2. Open the assistant editor,
CSC 581: Mobile App Development Spring 2019
 CSC 581: Mobile App Development Spring 2019 Unit 1: Getting Started with App Development Xcode installing XCode, creating a project, MVC pattern interface builder, storyboards, object library outlets vs.
iphone Programming Patrick H. Madden SUNY Binghamton Computer Science Department
 iphone Programming Patrick H. Madden SUNY Binghamton Computer Science Department pmadden@acm.org http://optimal.cs.binghamton.edu General Outline Overview of the tools, and where to get more information
Assignment III: Graphing Calculator
 Assignment III: Graphing Calculator Objective You will enhance your Calculator to create a graph of the program the user has entered which can be zoomed in on and panned around. Your app will now work
CS193E: Temperature Converter Walkthrough
 CS193E: Temperature Converter Walkthrough The goal of this walkthrough is to give you a fairly step by step path through building a simple Cocoa application. You are encouraged to follow the walkthrough,
CS193p Spring 2010 Thursday, April 29, 2010
 CS193p Spring 2010 Announcements You should have received an e-mail by now If you received e-mail approving enrollment, but are not in Axess, do it! If you have any questions, please ask via e-mail or
Let s Make a Front Panel using FrontCAD
 Let s Make a Front Panel using FrontCAD By Jim Patchell FrontCad is meant to be a simple, easy to use CAD program for creating front panel designs and artwork. It is a free, open source program, with the
The purpose of this tutorial is to introduce you to the Construct 2 program. First, you will be told where the software is located on the computer
 Learning Targets: Students will be introduced to industry recognized game development software Students will learn how to navigate within the software Students will learn the basics on how to use Construct
ITP 342 Mobile App Dev. Fundamentals
 ITP 342 Mobile App Dev Fundamentals Objective-C Classes Encapsulate data with the methods that operate on that data An object is a runtime instance of a class Contains its own in-memory copy of the instance
ITP 342 Mobile App Dev. Interface Builder in Xcode
 ITP 342 Mobile App Dev Interface Builder in Xcode New Project From the Main Menu, select the File à New à Project option For the template, make sure Application is selected under ios on the left-hand side
Stanford CS193p. Developing Applications for ios. Spring Stanford CS193p. Spring 2012
 Developing Applications for ios Today Blocks Objective-C language feature for in-lining blocks of code Foundation of multi-threaded support (GCD) What is a block? A block of code (i.e. a sequence of statements
Java Programming Constructs Java Programming 2 Lesson 1
 Java Programming Constructs Java Programming 2 Lesson 1 Course Objectives Welcome to OST's Java 2 course! In this course, you'll learn more in-depth concepts and syntax of the Java Programming language.
ITP 342 Mobile App Dev. Connections
 ITP 342 Mobile App Dev Connections User Interface Interactions First project displayed information to the user, but there was no interaction. We want the users of our app to touch UI components such as
Step 1: Open Xcode and select Create a new Xcode Project from the Welcome to Xcode menu.
 In this tutorial we are going to build a simple calculator using buttons that are all linked together using the same method. We will also add our own method to the source code to create some additional
Chapter 1 Getting Started
 Chapter 1 Getting Started The C# class Just like all object oriented programming languages, C# supports the concept of a class. A class is a little like a data structure in that it aggregates different
Using Windows 7 Explorer By Len Nasman, Bristol Village Computer Club
 By Len Nasman, Bristol Village Computer Club Understanding Windows 7 Explorer is key to taking control of your computer. If you have ever created a file and later had a hard time finding it, or if you
The MVC Design Pattern
 The MVC Design Pattern The structure of iphone applications is based on the Model-View-Controller (MVC) design pattern because it benefits object-oriented programs in several ways. MVC based programs tend
iphone App Basics iphone and ipod touch Development Fall 2009 Lecture 5
 iphone App Basics iphone and ipod touch Development Fall 2009 Lecture 5 Questions? Announcements Assignment #1 due this evening by 11:59pm Remember, if you wish to use a free late you must email me before
Object-Oriented Programming in Objective-C
 In order to build the powerful, complex, and attractive apps that people want today, you need more complex tools than a keyboard and an empty file. In this section, you visit some of the concepts behind
Stanford CS193p. Developing Applications for ios. Spring CS193p. Spring 2016
 Stanford Developing Applications for ios Today Views Custom Drawing Demo FaceView Views A view (i.e. UIView subclass) represents a rectangular area Defines a coordinate space For drawing And for handling
Stanford CS193p. Developing Applications for iphone 4, ipod Touch, & ipad Spring Stanford CS193p Spring 2011
 Developing Applications for iphone 4, ipod Touch, & ipad Today Dynamic Binding Introspection Foundation Framework Enumeration More Objective-C Allocating and Initializing objects Memory Management Demo
Stanford CS193p. Developing Applications for ios. Fall CS193p. Fall
 Stanford Developing Applications for ios Today Mostly Swift but some other stuff too Autolayout teaser Quick review of what we learned in Concentration CountableRange of floating point numbers Tuples Computed
Learn to make watchosle
 HACKING WITH SWIFT COMPLETE TUTORIAL COURSE Learn to make watchosle P apps with real-worldam S Swift projects REEPaul Hudson F Project 1 NoteDictate 2 www.hackingwithswift.com Setting up In this project
ios: Objective-C Primer
 ios: Objective-C Primer Jp LaFond Jp.LaFond+e76@gmail.com TF, CS76 Announcements n-puzzle feedback this week (if not already returned) ios Setup project released Android Student Choice project due Tonight
Programming in C++ Prof. Partha Pratim Das Department of Computer Science and Engineering Indian Institute of Technology, Kharagpur
 Programming in C++ Prof. Partha Pratim Das Department of Computer Science and Engineering Indian Institute of Technology, Kharagpur Lecture 04 Programs with IO and Loop We will now discuss the module 2,
Mobile Application Programming. Objective-C Classes
 Mobile Application Programming Objective-C Classes Custom Classes @interface Car : NSObject #import Car.h + (int) viper; - (id) initwithmodel:(int)m; @implementation Car Point position; float velocity;
Intro. Scheme Basics. scm> 5 5. scm>
 Intro Let s take some time to talk about LISP. It stands for LISt Processing a way of coding using only lists! It sounds pretty radical, and it is. There are lots of cool things to know about LISP; if
Barchard Introduction to SPSS Marks
 Barchard Introduction to SPSS 22.0 3 Marks Purpose The purpose of this assignment is to introduce you to SPSS, the most commonly used statistical package in the social sciences. You will create a new data
2.2 - Layouts. Bforartists Reference Manual - Copyright - This page is Public Domain
 2.2 - Layouts Introduction...2 Switching Layouts...2 Standard Layouts...3 3D View full...3 Animation...3 Compositing...3 Default...4 Motion Tracking...4 Scripting...4 UV Editing...5 Video Editing...5 Game
Organizing your Outlook Inbox
 Organizing your Outlook Inbox Tip 1: Filing system Tip 2: Create and name folders Tip 3: Folder structures Tip 4: Automatically organizing incoming emails into folders Tip 5: Using Colors Tip 6: Using
Stanford CS193p. Developing Applications for ios. Fall Stanford CS193p. Fall 2011
 Developing Applications for ios Views A view (i.e. UIView subclass) represents a rectangular area Defines a coordinate space Draws and handles events in that rectangle Hierarchical A view has only one
Using Dreamweaver CC. Logo. 4 Creating a Template. Page Heading. Page content in this area. About Us Gallery Ordering Contact Us Links
 Using Dreamweaver CC 4 Creating a Template Now that the main page of our website is complete, we need to create the rest of the pages. Each of them will have a layout that follows the plan shown below.
ios Core Data Example Application
 ios Core Data Example Application The Core Data framework provides an abstract, object oriented interface to database storage within ios applications. This does not require extensive knowledge of database
USING DRUPAL. Hampshire College Website Editors Guide https://drupal.hampshire.edu
 USING DRUPAL Hampshire College Website Editors Guide 2014 https://drupal.hampshire.edu Asha Kinney Hampshire College Information Technology - 2014 HOW TO GET HELP Your best bet is ALWAYS going to be to
Objectives. Submission. Register for an Apple account. Notes on Saving Projects. Xcode Shortcuts. CprE 388 Lab 1: Introduction to Xcode
 Objectives Register for an Apple account Create an application using Xcode Test your application with the iphone simulator Import certificates for development Build your application to the device Expand
Introductory ios Development
 Introductory ios Development 152-164 Unit 2 - Basic Objective-C Syntax Quick Links & Text References Console Application Pages Running Console App Pages Basic Syntax Pages Variables & Types Pages Sequential
Stanford CS193p. Developing Applications for ios. Winter CS193p. Winter 2017
 Stanford Developing Applications for ios Today Views Custom Drawing Demo FaceView Views A view (i.e. UIView subclass) represents a rectangular area Defines a coordinate space For drawing And for handling
CSE 438: Mobile Application Development Lab 2: Virtual Pet App
 CSE 438: Mobile Application Development Lab 2: Virtual Pet App Overview In this lab, you will create an app to take care of your very own virtual pets! The app will only have one screen and simple logic,
ITP 342 Advanced Mobile App Dev. Memory
 ITP 342 Advanced Mobile App Dev Memory Memory Management Objective-C provides two methods of application memory management. 1. In the method described in this guide, referred to as manual retain-release
Lesson 10A OOP Fundamentals. By John B. Owen All rights reserved 2011, revised 2014
 Lesson 10A OOP Fundamentals By John B. Owen All rights reserved 2011, revised 2014 Table of Contents Objectives Definition Pointers vs containers Object vs primitives Constructors Methods Object class
Barchard Introduction to SPSS Marks
 Barchard Introduction to SPSS 21.0 3 Marks Purpose The purpose of this assignment is to introduce you to SPSS, the most commonly used statistical package in the social sciences. You will create a new data
Introduction to SPSS
 Introduction to SPSS Purpose The purpose of this assignment is to introduce you to SPSS, the most commonly used statistical package in the social sciences. You will create a new data file and calculate
The Mathcad Workspace 7
 For information on system requirements and how to install Mathcad on your computer, refer to Chapter 1, Welcome to Mathcad. When you start Mathcad, you ll see a window like that shown in Figure 2-1. By
When we re first learning Cocoa (or Java, or Qt, or any other application framework),
,") MacDevCenter http://www.macdevcenter.com/lpt/a/4752 6 April 2004 The Cocoa Controller Layer by Michael Beam When we re first learning Cocoa (or Java, or Qt, or any other application framework), one of
MacDevCenter http://www.macdevcenter.com/lpt/a/4752 6 April 2004 The Cocoa Controller Layer by Michael Beam When we re first learning Cocoa (or Java, or Qt, or any other application framework), one of
Corrections and version notes
 Last updated 7 th May, 2014 Programming apps for the iphone Corrections and version notes Please feel free to email Graeme (gbsummers@graemesummers.info) for additional help or clarification on any of
Mobile Application Development
 Mobile Application Development Lecture 13 Introduction to ObjectiveC Part II 2013/2014 Parma Università degli Studi di Parma Lecture Summary Object creation Memory management Automatic Reference Counting
Using Dreamweaver. 4 Creating a Template. Logo. Page Heading. Home About Us Gallery Ordering Contact Us Links. Page content in this area
 4 Creating a Template Now that the main page of our website is complete, we need to create the rest of the pages. Each of them will have a layout that follows the plan that is shown below. Logo Page Heading
COPYRIGHTED MATERIAL. 1Hello ios! A Suitable Mac. ios Developer Essentials
 1Hello ios! Hello and welcome to the exciting world of ios application development. ios is Apple s operating system for mobile devices; the current version as of writing this book is 5.0. It was originally
Microsoft Expression Web is usually obtained as a program within Microsoft Expression Studio. This tutorial deals specifically with Versions 3 and 4,
 Microsoft Expression Web is usually obtained as a program within Microsoft Expression Studio. This tutorial deals specifically with Versions 3 and 4, which are very similar in most respects and the important
SharePoint SITE OWNER TRAINING
 SharePoint SITE OWNER TRAINING Contents Customizing Your Site... 3 Editing Links...4 Give the site a new look...5 Changing Title, Description, or Logo...6 Remove the Getting Started Icons...6 Adding Apps
Strategic Series-7001 Introduction to Custom Screens Version 9.0
 Strategic Series-7001 Introduction to Custom Screens Version 9.0 Information in this document is subject to change without notice and does not represent a commitment on the part of Technical Difference,
CSCU9B2 Practical 1: Introduction to HTML 5
 CSCU9B2 Practical 1: Introduction to HTML 5 Aim: To learn the basics of creating web pages with HTML5. Please register your practical attendance: Go to the GROUPS\CSCU9B2 folder in your Computer folder
Chaos Culture. MIDI Modulators / Multiclip Note preview 1.6. Edited by Jason Cowling
 Chaos Culture Introduction... 2 Important stuff... 2 Setup... 3 Editing clips... 4 Using the editor... 5 Modulators... 8 Settings... 9 Work$ow settings... 10 Performance... 13 Future updates... 13 1.8.99
ITP 342 Mobile App Dev. Connections
 ITP 342 Mobile App Dev Connections User Interface Interactions First project displayed information to the user, but there was no interaction. We want the users of our app to touch UI components such as
Learn to make desktop LE
 HACKING WITH SWIFT COMPLETE TUTORIAL COURSE Learn to make desktop LE P apps with real-worldam S Swift projects REEPaul Hudson F Project 1 Storm Viewer Get started coding in Swift by making an image viewer
Excel Basics Rice Digital Media Commons Guide Written for Microsoft Excel 2010 Windows Edition by Eric Miller
 Excel Basics Rice Digital Media Commons Guide Written for Microsoft Excel 2010 Windows Edition by Eric Miller Table of Contents Introduction!... 1 Part 1: Entering Data!... 2 1.a: Typing!... 2 1.b: Editing
CommCare for Android Smartphones
 CommCare for Android Smartphones The information on this page reflects the old design of CommCare This page is primarily useful for programs using older versions of CommCare. A page directed at the newer
S A M P L E C H A P T E R
 SAMPLE CHAPTER Anyone Can Create an App by Wendy L. Wise Chapter 5 Copyright 2017 Manning Publications brief contents PART 1 YOUR VERY FIRST APP...1 1 Getting started 3 2 Building your first app 14 3 Your
How to make labels in Word By Kathleen K. Koch 26 April Introduction
 How to make labels in Word By Kathleen K. Koch 26 April 2003 Introduction This tutorial is set up in small steps to help you make your own cigar band labels using Microsoft s Word program. Included in
Introduction to Microsoft Excel 2010
 Introduction to Microsoft Excel 2010 THE BASICS PAGE 02! What is Microsoft Excel?! Important Microsoft Excel Terms! Opening Microsoft Excel 2010! The Title Bar! Page View, Zoom, and Sheets MENUS...PAGE
Mac OS X and ios operating systems. Lab 1 Introduction to Mac OS X and ios app development. Gdańsk 2015 Tomasz Idzi
 Mac OS X and ios operating systems Lab 1 Introduction to Mac OS X and ios app development Gdańsk 2015 Tomasz Idzi Introduction This lab is designed to acquaint the student with the basic functionality
View Controller Lifecycle
 View Controller Lifecycle View Controllers have a Lifecycle A sequence of messages is sent to them as they progress through it Why does this matter? You very commonly override these methods to do certain
CSE 101 Introduction to Computers Development / Tutorial / Lab Environment Setup
 CSE 101 Introduction to Computers Development / Tutorial / Lab Environment Setup Purpose: The purpose of this lab is to setup software that you will be using throughout the term for learning about Python
FanBuzz Business-Enterprise-Create A New fan Page
 This Tutorial video can be found here http://instamagicplugins.com/aio-tutorial-videos/create-a-new-fan-page/ Hi, this is Nick LaPolla with Red Zebra Media and InstaMagic Plugins. Welcome to the the All-inOne
Stanford CS193p. Developing Applications for ios Fall Stanford CS193p. Fall 2013
 Developing Applications for ios -14 Coming Up Wednesday Alternate Final Presentation. If you are using Alternate Presentation time, submit your Keynote by noon tomorrow (Tuesday). Submit the slides using
IBM Rational Rhapsody Gateway Add On. User Guide
 User Guide Rhapsody IBM Rational Rhapsody Gateway Add On User Guide License Agreement No part of this publication may be reproduced, transmitted, stored in a retrieval system, nor translated into any
Word Tips (using Word but these work with Excel, PowerPoint, etc) Paul Davis Crosslake Communications
 Paul Davis Crosslake Communications") Word Tips (using Word but these work with Excel, PowerPoint, etc) Paul Davis Crosslake Communications What tips are we going to discuss? First of all, HELP Fonts Tables Columns Pasting Images Mail Merge
Word Tips (using Word but these work with Excel, PowerPoint, etc) Paul Davis Crosslake Communications What tips are we going to discuss? First of all, HELP Fonts Tables Columns Pasting Images Mail Merge
Announcement. Final Project Proposal Presentations and Updates
 Announcement Start Final Project Pitches on Wednesday Presentation slides dues by Tuesday at 11:59 PM Email slides to cse438ta@gmail.com Extensible Networking Platform 1 1 - CSE 438 Mobile Application
Registering for the Apple Developer Program
 It isn t necessary to be a member of the Apple Developer Program if you don t intend to submit apps to the App Stores, or don t need the cloud-dependent features. We strongly recommend joining, though,
Bindings Example Exercise James Dempsey - WWDC Pre-Show Cocoa Workshop
 Bindings Example Exercise James Dempsey - WWDC Pre-Show Cocoa Workshop In this exercise you will create a basic document-based application using Cocoa Bindings. This application will allow the user to
ADOBE DREAMWEAVER CS4 BASICS
 ADOBE DREAMWEAVER CS4 BASICS Dreamweaver CS4 2 This tutorial focuses on the basic steps involved in creating an attractive, functional website. In using this tutorial you will learn to design a site layout,
printf( Please enter another number: ); scanf( %d, &num2);
; scanf( %d, &num2);") CIT 593 Intro to Computer Systems Lecture #13 (11/1/12) Now that we've looked at how an assembly language program runs on a computer, we're ready to move up a level and start working with more powerful
CIT 593 Intro to Computer Systems Lecture #13 (11/1/12) Now that we've looked at how an assembly language program runs on a computer, we're ready to move up a level and start working with more powerful
Stanford CS193p. Developing Applications for iphone 4, ipod Touch, & ipad Fall Stanford CS193p Fall 2010
 Developing Applications for iphone 4, ipod Touch, & ipad Today Blocks Language syntax for declaring a function on the fly. Grand Central Dispatch C API for leveraging blocks to make writing multithreaded
ios 9 SDK Development
 Extracted from: ios 9 SDK Development Creating iphone and ipad Apps with Swift This PDF file contains pages extracted from ios 9 SDK Development, published by the Pragmatic Bookshelf. For more information
Quick Start Guide. ARIS Architect. Version 9.8 Service Release 2
 ARIS Architect Version 9.8 Service Release 2 October 2015 This document applies to ARIS Version 9.8 and to all subsequent releases. Specifications contained herein are subject to change and these changes
Structuring an App Copyright 2013 Apple Inc. All Rights Reserved.
 Structuring an App App Development Process (page 30) Designing a User Interface (page 36) Defining the Interaction (page 42) Tutorial: Storyboards (page 47) 29 App Development Process Although the task
Roxen Content Provider
 Roxen Content Provider Generation 3 Templates Purpose This workbook is designed to provide a training and reference tool for placing University of Alaska information on the World Wide Web (WWW) using the
GoLive will first ask you if your new site will be for one individual or a work group; select for a Single User, and click Next.
 Getting Started From the Start menu, located the Adobe folder which should contain the Adobe GoLive 6.0 folder. Inside this folder, click Adobe GoLive 6.0. GoLive will open to its initial project selection
Introductory ios Development
 Instructor s Introductory ios Development Unit 3 - Objective-C Classes Introductory ios Development 152-164 Unit 3 - Swift Classes Quick Links & Text References Structs vs. Classes Structs intended for
Word Tips and Tricks - by Rick Black
 Most of these tips and tricks will work with all versions of Microsoft Word from 2003 to 2010 on both Windows and Macintosh computers. Show and Hide Special Characters Word had a special switch that will
SolidWorks Intro Part 1b
 SolidWorks Intro Part 1b Dave Touretzky and Susan Finger 1. Create a new part We ll create a CAD model of the 2 ½ D key fob below to make on the laser cutter. Select File New Templates IPSpart If the SolidWorks
Hello! ios Development
 SAMPLE CHAPTER Hello! ios Development by Lou Franco Eitan Mendelowitz Chapter 1 Copyright 2013 Manning Publications Brief contents PART 1 HELLO! IPHONE 1 1 Hello! iphone 3 2 Thinking like an iphone developer
This Tutorial is for Word 2007 but 2003 instructions are included in [brackets] after of each step.
![This Tutorial is for Word 2007 but 2003 instructions are included in [brackets] after of each step.](/thumbs/72/67280806.jpg "This Tutorial is for Word 2007 but 2003 instructions are included in [brackets] after of each step.") This Tutorial is for Word 2007 but 2003 instructions are included in [brackets] after of each step. Table of Contents Just so you know: Things You Can t Do with Word... 1 Get Organized... 1 Create the
This Tutorial is for Word 2007 but 2003 instructions are included in [brackets] after of each step. Table of Contents Just so you know: Things You Can t Do with Word... 1 Get Organized... 1 Create the