MODEL-BASED DEVELOPMENT -TUTORIAL
|
|
|
- Hilary Cain
- 6 years ago
- Views:
Transcription
1 MODEL-BASED DEVELOPMENT -TUTORIAL 1
2 Objectives To get familiar with the fundamentals of Rational Rhapsody. You start with the simplest example possible. You end with more complex functionality, and a more complex state machine. 2
3 At the end of this section At the end of this section, you will be able to: Create a new project Perform some basic modeling using classes, attributes, operations, relations, and state charts Generate and compile code Debug the model by injecting events, setting breakpoints, capturing behavior on sequence diagrams, visualizing the state of objects, and so on 3
4 Agenda Exercise 1 : Hello World You start with the simplest example possible, just a single object that prints out Hello World. Exercise 2 : Count Down Next, you create a simple counter using a simple statechart. Exercise 3 : Dishwasher Finally, you create a dishwasher and a more complex statechart. Summary 4
5 Before you start Rational Rhapsody uses C, which is case-sensitive. Most of the errors that are made during this training course are due to entering text incorrectly. During this training, you use a naming convention where all classes start with an upper case, and all operations and attributes with a lower case. If two words are concatenated, then the first letter of each word is capitalized, for example, thisisanoperation, MyClass, anattribute. 5
6 Where are we? Exercise 1 : Hello World You start with the simplest example possible, just a single object that prints out Hello World. Exercise 2 : Count Down Next, you create a simple counter using a simple statechart. Exercise 3 : Dishwasher Finally, you create a dishwasher and a more complex statechart. Summary 6

7 Exercise 1 : Hello World 7
 icon or select File > New or New Project to create a new")

8 Creating a project Start Rational Rhapsody in C (development edition). Use either the (new) icon or select File > New or New Project to create a new project called Hello in a desired working directory. Click OK then Yes to save project. You can choose any working directory you want. Just make sure you create subfolder named Hello. 8


9 Browser Browser Object Model diagram The browser displays everything that is in the model. Note that Rational Rhapsody creates an Object Model diagram. 9
10 Drawing a class In this Object Model diagram, use the class icon to draw a class named Display. Expand the browser as show above - to see that the display class also appears in the browser. 10
.")

11 Adding an initializer The simplest way to add an initializer to the class is to double-click on the class to open the features (or rightclick and select Features). Select the Operations tab, click New, and select Initializer. You do not need any Initializer arguments, so click OK. An Initializer is the operation that gets executed when the object is created at runtime. (It is the equivalent of a constructor in C++.) 11


12 Display options You would expect to see the Initializer shown on the class on the Object Model diagram. You can control what gets displayed on this view of the class by selecting Display Options. Right-click the Display class, select Display Options, and then set the options to show All on both the Attributes and Operations tabs. 12

.")
13 Display initializer You should be able to see that the Initializer is now shown in both the browser and the OMD (Object Model diagram). Initializer Init() 13
; If you want to close the window by clicking (the upper-right \"x\"), then make")
14 Adding an implementation Select the Display Initializer in the browser and double-click to open the features window. Select the Implementation tab and enter the following: printf ( Hello World\n ); If you want to close the window by clicking (the upper-right "x"), then make sure that you apply the changes first. 14
 and enter stdio.h into the ImpIncludes property.")
15 #include stdio.h Because you used printf(), you must do an include of the stdio.h file in the Display class. In the browser, select the Display class and doubleclick to bring up the features. Select the Properties tab (ensure that the Common view is selected) and enter stdio.h into the ImpIncludes property. ImpIncludes is an abbreviation for Implementation Includes; C_CG means C Code Generation. 15


16 Renaming a component In order to generate code, you must first create a component. Expand the components in the browser and rename the existing component called DefaultComponent to Test. 16


17 The Test component Now expand the Configurations tab under the Test component and rename the DefaultConfig to Release using the General tab. In a component, you tell Rational Rhapsody what to compile. In a configuration, you define how to compile in detail. 17

18 Initial instance double-click the Release configuration to bring up the features. Select the Initialization tab, expand the Default package, and select the Display class. The main now executes and creates an initial instance of the Display class. The difference between explicit and derived is explained later. 18

19 Settings You need to select an environment so that Rational Rhapsody knows how to create an appropriate Makefile. Select the Settings tab. Select the appropriate Environment in our case - MSVC9. Click OK MSVC9 Many other settings are explained later. A Rational Rhapsody component can contain multiple configurations. 19


20 Renaming the OMD Expand the Object Model Diagrams in the browser and use the features dialog to rename the diagram from Model1 to Overview. Apply your change or click OK to apply and close the features dialog. 20


21 Generating code You are now ready to generate code. Save the model (click the Disk icon) Select the Generate/Make/Run icon Click Yes to create the directory 21
.")
22 Hello World You should see the following: Before continuing, make sure that you stop the executable. Do this either by closing the console window or by using the icon (white hand on stop sign). If there was a compilation error during compilation, then simply double-click on the error and Rational Rhapsody indicates where in the model the error occurred. 22


23 Handling errors If there are errors during the compilation, then double-click the relevant line to find out where the error occurred. 23


24 The generated files The generated files are located in the following directory (YourDirectory\Hello\Test\Release): Display class (Display.c) Error messages (error.txt) Main (MainTest.c) Executable (Test.exe) Makefile (Test.mak) 24


25 Editing the code You can edit the generated files from within Rational Rhapsody. Select the Display class in the diagram or in the browser Right-click and select Edit Code. 25
26 Generated code You can see that the class Display is a struct; however, because you have no attributes or relations, it is empty. Any public operation of the Display class is prefixed with Display_ to make it a member operation of the class. There are several properties to customize the code generation. These are discussed later. 26
27 Auto generated operations Display_Init is an Initializer that is used to initialize an object after it has been created. It is the equivalent of a C++ constructor. Display_Cleanup is used to clean up any allocated memory (and so on) before the object gets destroyed. This is the equivalent of a C++ destructor. Display_Create is used to dynamically create an instance of the object_type. It is the equivalent of new Display in C++. Display_Destroy is used to delete an instance of the object_type. It is the equivalent of delete Display in C++. You will see later how to generate instances statically, and also how to avoid generating the Create and Destroy operations. 27
28 What is this me pointer? You could have several instances of a class, so all operations must know which instance they can access. In C++, there is the this pointer that gets passed automatically. In C, this is a reserved word, so instead, a pointer to the class called me is used. Later, you will look at a way of eliminating the me pointer for classes that have only one single instance. 28
29 Modifying the code You can modify the generated code. In the Display.c file, change the implementation to print out Constructed instead of Hello World. Transfer the focus back to another window to roundtrip the modifications back into the model. Note that the model has been updated automatically. 29


30 Displaying the Main File and Makefile The Main File and Makefile can be displayed from within Rational Rhapsody by double-clicking the hyperlinks: 30

")


 Roundtrip")
 The model")
31 Project files AutoSave (Hello_auto_rpy folder) Generated code (Hello_rpy folder) Event history list (Hello.ehl) Project workspace (Hello.rpy) Roundtrip log (Roundtrip.log) The model (Hello_rpy folder and Hello.rpy file) 31


32 Extended exercise You can customize Rational Rhapsody to allow quick access to the location of current project. Select Tools > Customize. 32

.")

33 Customize Use the New icon to enter a new entry Explore to the Tools menu. Enter explorer in the Command field. Set Arguments to. (a period). Select the option Show in Tools menu. Click the OK button. Select Tools > Explore. 33
34 Where are we? Exercise 1 : Hello World You start with the simplest example possible, just a single object that prints out Hello World. Exercise 2 : Count Down Next, you create a simple counter using a simple statechart. Exercise 3 : Dishwasher Finally, you create a dishwasher and a more complex statechart. Summary 34

35 Exercise 2: Count down 35
 to select your working folder.")


36 Copying a project Select File > Save As. Select (up a level) to select your working folder. Select (new folder) to create a new folder. Rename New Folder to CountDown. Select the CountDown folder. Save the project as CountDown.rpy. The new CountDown project is opened in Rational Rhapsody with the previous workspace preserved. Each time there is an auto-save, Rational Rhapsody only saves what has changed since the last manual save. 36


37 Adding an attribute To add an attribute, double-click the Display class to bring up the features, and then select the Attributes tab. Click New to add an attribute count of type int. Set the initial value to 0. 37
38 Generated code The attribute count is declared in the struct in Display.h: The attribute count gets initialized by the Initializer in Display.c: 38


39 Additional code for an attribute Rational Rhapsody also generates object oriented (OO)-style accessor and mutator operations to encapsulate attributes, if you enable the corresponding properties of the count attribute in the features dialog under the Properties tab: Accessor Mutator 39
40 What are accessors and a mutators? If one needs access to the attributes, then they should use an accessor, such as Display_getCount(), or a mutator, such as Display_setCount(). This allows the designer of a class the freedom to change the type of an attribute without having to alert all users of the class. The designer needs to modify the accessor and mutator implementation. In most cases, attributes do not need accessors or mutators, so by default they are not generated. 40


 and select Add")
41 Adding an operation Use the features for the Display class, select the Operations tab, and add a new primitive operation print. Or, right-click the Display class (or Operations in the browser) and select Add New > Operation to add print. 41
")


42 Arguments for operation print() Double-click print to open the features for the print operation. Add an argument n of type int. 42
;")
43 Adding implementation Select the Implementation tab for the print operation and add: printf ( Count = %d\n, n); 43

; Are your operations not visible as")
 Right-click on the class, (2) choose Display")
44 Operation printstr(char *) In a similar way, add another operation called printstr, this time with an argument s of type char* and with implementation: printf ( %s\n,s); Are your operations not visible as above? (1) Right-click on the class, (2) choose Display Options, (3) on the Operations tab, select Show:All. 44

45 Operation isdone() Add another operation called isdone that returns a RiCBoolean and has the following implementation: return (0 = = me->count); Typing 0==me->count instead of me->count==0 enables the compiler to detect the common error of where = is typed instead of ==. RiCBoolean is defined in rhapsody\share\langc\oxf\rictypes.h as an unsigned char. 45


46 Active code view Click Active Code View. The active code view is context-sensitive and automatically updates as the model is changed. The window changes to dynamically show the code for any highlighted model element. Although leaving the active code view open is useful, it does slow down model manipulation, because the code regenerates anytime any model element gets modified. 46

47 Generated code Because the added operations are public, the name of the generated operations are preceded by the name of the class. This avoids potential name clashing with other classes. Note that you have to pass the me pointer as the first argument of each operation to specify an instance of the class you access. 47


48 Using the print operation In the Active Code View, (make sure you have selected the Display.c tab), change the code for the Initializer to use the Display_printStr operation. Change the focus to another window, such as the browser, and check that this modification has been automatically round-tripped. Save, and then click the Generate/Make/Run icon. 48

49 Adding a statechart You would like to get the Display class to count down from 10 to 0 in intervals of 200ms. In order to do so, you need to give some behavior to the class. You can do this by adding a statechart. Right-click the Display class and select New Statechart. 49


50 Simple statechart Draw the following statechart Some hints in the comming slides. But see how far you can go by yourself! Default Transition Timeout Guards 50

![[Display_isDone(me)]/Display_printStr(me, Done ); By the features of the](/docs-images/76/73050412/images/51-2.jpg "transition (activated by doubleclicking or right-clicking the transition).")
51 Transitions Once a transition has been drawn, there are two ways in which to enter information: In text format, for example: [Display_isDone(me)]/Display_printStr(me, Done ); By the features of the transition (activated by doubleclicking or right-clicking the transition). An empty line forces the action to appear on a new line. 51

52 Timer mechanism A timer is provided that you can use within the statecharts. tm(200) acts as an event that is taken 200ms after the state has been entered. On entering into the state, the timer is started. On exiting from the state, the timer is stopped. The timer uses the OS Tick and only generates timeouts that are a multiple of ticks. 52
53 Timeouts If there is a system tick of, say, 20ms and you ask for a timeout of 65ms, then the resulting timeout will actually be between 80ms and 100ms, depending on when the timeout is started relative to the system tick. System tick 20ms 80ms Timeout 100ms time Start timeout End timeout If precise timeouts are required, then it is recommended to use a hardware timer in combination with triggered operations. 53


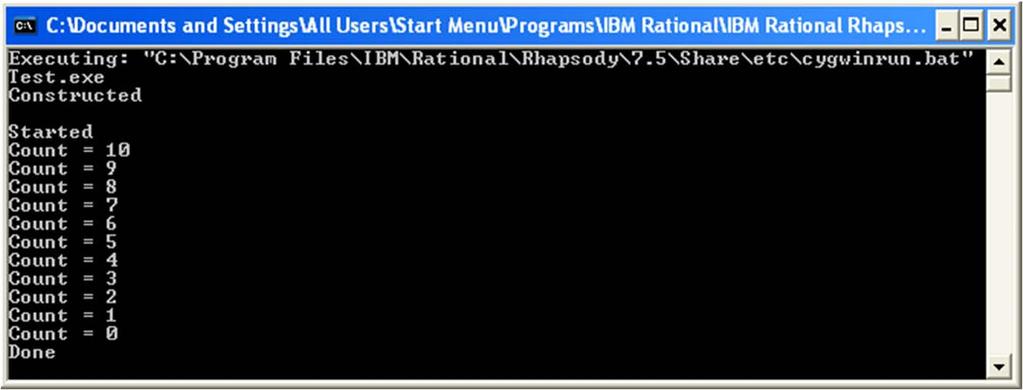
54 Counting down Save, and then Generate/Make/Run Initializer Default transition Do not forget to close this window before doing another Generate/Make/Run. 54
55 Make sure you understand Now is the time! Do you understand the behaviour of the state machine? Explain it to your partner! Can you related the produced output to the state machine model? Do you understand the relation between the graphical model, and the C code behind it? 55


56 Statechart symbol Now that the Display class is reactive, it has a special symbol in both the: Browser OMD Statechart appears in the browser and indicates that the features dialog can be used to access the state / transition details. A reactive class is one that reacts to receiving events or timeouts. 56

57 Extended exercise Experiment with the line shape of transitions. 57
58 Design level debugging Until now, you have generated code and executed it, hoping that it works. However, as the model gets more and more complicated, you need to validate the model. From now on, you are going to validate the model by doing design level debugging known as animation. 58


59 Animation Create a new configuration by copying the Release configuration. Press Ctrl while dragging Release onto the Configurations folder. Rename the new configuration Debug. In the Debug Features window, select Animation from the Instrumentation Mode list. 59

60 Multiple configurations Now that you have more than one configuration, you must select which one to use. There are two ways to do this: Select the configuration using the Debug/Release pulldown list. Or, right-click the configuration and select Set as Active Configuration. 60


61 Animating Make sure that the active configuration is Debug before clicking Save, and then Generate/Make/Run. Animation bar Call stack Event queue Animation status 61
62 Animation toolbar Go Step Go Go Idle Go Event Animation Break Command Prompt Quit Animation Threads Breakpoints Event Generator Call Operations Watch Display Continuous Update When disabled, this indicates a singled-threaded application. 62


63 Starting the animation Go Step. The Display initializer appears in the call stack. Continue to Go Step until the Executable is Idle message appears in the Animation window. 63


64 Animated browser The browser view can be filtered for animation. Note that there is now an instance of the Display class Open Features in New Window for this instance, and note that the count attribute has been initialized to be


65 Animated statechart Right-click the instance and select Open Instance Statechart. Highlighted state If you do not see a highlighted state, then you might be looking at the statechart of the class rather than the instance statechart. If code is changed and recompiled, close and reopen the instance statechart. 65

66 Go Idle / Go Repeatedly click Go Idle or Go and watch the animation until the instance is destroyed. At the same time, observe the instance state machine, as well as the output window. The value of the count attribute also changes and indicates that the transition taken in the statechart is highlighted. 66
. This operation is executed when the instance is terminated (corresponds to a C++ destructor.")

67 Destructor Exit the animation Add a CleanUp operation to the Display class (right-click Opertations and select Add New > CleanUp). This operation is executed when the instance is terminated (corresponds to a C++ destructor.). Implement CleanUp: Display_printStr(me, Destroyed ); Save, and then Generate/Make/Run. Can you see the effect of this new operation? Make sure that you enter the code into the Implementation and not the Description field. 67
68 Where are we? Exercise 1 : Hello World You start with the simplest example possible, just a single object that prints out Hello World. Exercise 2 : Count Down Next, you create a simple counter using a simple statechart. Exercise 3 : Dishwasher Finally, you create a dishwasher and a more complex statechart. Summary 68

69 Exercise 3: dishwasher 69
70 Dishwasher Create a new project Dishwasher, making sure that it is created in its own folder. Draw a single class Dishwasher. 70


71 Attributes Add the following attributes, all of which are of type int and with initial value of 0: 71


72 Operations Add the following private operations, with appropriate return types and implementations: 72

73 Types (part 1) In the implementation for the operation isinneedofservice(), you used a constant called MAX_CYCLES. Select the Default package, right-click, and select Add New > Type. 73


74 Types (part 2) Enter MAX_CYCLES as the Name and make this Declaration: %s is a shortcut for the name of the type. #define %s 3 74


75 Creating a component As in the previous exercises Rename the DefaultComponent to Test and the DefaultConfig to Debug. Select Animation for Instrumentation Mode Create an initial instance of Dishwasher. Select MSVC9 for the Environment. MSVC9 75

76 Save / Generate / Make Before adding a statechart, make sure that you have not made any errors by doing a build. Make sure you deal with all errors before you proceed Save, and then Generate/Make/Run. 76

77 Creating a statechart Add a Statechart to the Dishwasher class. Draw a single state as large as possible called active. Because you are drawing a complex diagram, it is highly recommended you maximize the Statechart window and close all other windows. 77


78 Creating concurrent states Use the and-line icon to create concurrent states. This box with active inside appears when the AND lines are drawn. To draw the AND line, either click and drag the line, or click to start the line and then double-click to end it. Draw this line first Concurrent states 78

79 Displaying state names Each of the three AND state names can be displayed by selecting each state and selecting Display Options to show the Name. 79

80 Naming the concurrent states With the concurrent states names displayed, they can now be changed using the features to running, service, and mode. 80
81 Adding nested states Select the Stamp mode, then add the following states: To change the size of an outer state, without changing the inner states, press the Alt when changing the size. 81

82 Adding History and Diagram connectors Add a History Connector to the on state. Add two Diagram Connectors, both named done. 82

83 Adding default transitions Add the 4 Default Transitions below: 83

84 Adding the transitions Add transitions and actions: Can you identify any missing transitions in this model? If so, make the appropriate corrections now! When you need to type a name of an existing operation or attribute, press Ctrl+Space to facilitate entering these names. 84


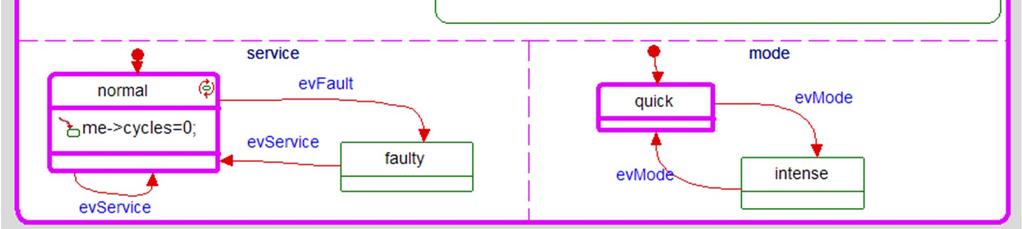
85 Action on entry In the normal state, add an Action on entry to set me->cycles=0;. Once an action has been set, the symbol is shown (two red arrows circling an oval icon). 85


86 Save / Generate / Make / Run Save, and then Generate/Make/Run. Click Go Idle to create a Dishwasher instance. Select Open Instance Statechart for the Dishwasher instance created. If there is no instance created, then it is possible that an initial instance of Dishwasher was not selected in the configuration. 86


87 Animated statechart Check that there are three concurrent animated states:


88 Injecting events The Dishwasher is in an idle state waiting for some events. Generate the event evstart by right-clicking anywhere inside the active state and selecting Generate Event. The event evstart appears in the event queue. Events can also be generated via the Command prompt (slider) or via the Event Generator (lightning bolt). 88

89 Design level debugging Click Go and watch the animation. Does your Dishwasher work as expected? What happens if you open the door when it is on, does it remember what state it was in? Why does the Dishwasher become faulty after four cycles? Can you get the Dishwasher back to the normal state? 89

90 Intense / quick Modify the setup operation so that the timings are different in the quick and intense modes. Save, and then Generate/Make/Run. It should now be quicker to get the Dishwasher into the faulty state. IS_IN is a macro that tests to see if the object is in a particular state. (You could use the IS_IN macro also in a guard) 90


91 Additional Info: Breakpoints Setting breakpoints can be done in a similar way to injecting events by right-clicking a state in the animated statechart. Breakpoints can be added/removed via the breakpoint icon on the animation toolbar. 91
92 Additional Info: Using the simulated time model At the moment, you are using the System tick for all the timeouts, and so a timeout of 1000ms takes 1000ms, which means that all simulations can be long. There is an alternative time model that can be used which is referred to as the simulated time model. When this time model is used, all of the timeouts are executed in the appropriate order; but rather than waiting, the shortest timeout immediately times out. This means that models such as this one, can be tested much quicker. 92


93 Additional Info: Using the simulated time model Make a copy of the Debug configuration, rename it to Sim and set the Time Model to Simulated. 93
 in the command window. It may be useful to use the command window to invoke scripts.")
94 Additional Info: Command prompt Events and breakpoints can also be generated through the command prompt. For example, you can inject the evstart by typing Dishwasher[0]->GEN(evStart) in the command window. It may be useful to use the command window to invoke scripts. GEN is a macro that creates the event before sending it to the object. If there are multiple instances of a class, then you need to explicitly provide the instance. With only one instance, it is not necessary to write Dishwasher[0]->GEN(evStart), because instance [0] is the default. 94


95 Panel diagram One way to test the Dishwasher is to use a panel. Add a Panel Diagram called Dishwasher Panel. To do so, right-click Dishwasher and select Add New > Diagrams > Panel Diagram. Panel Diagrams can only be used with animation. 95


96 Panel diagram Add LEDs, push buttons, level indicators, and a digital display to the panel. 96


97 Box Draw a box around the panel. Right-click and select Send to Back. Right-click and select Format to change the fill color. Add Rational Rhapsody Dishwasher, with desired font and size. 97


98 Bind Double-click each panel element and bind them to the appropriate event, attribute or state: 98

99 Renaming panel elements Double-click on the text of each LED and the digital display, renaming the panel elements as shown below: 99


.")

100 Level indicators For each Level Indicator: Use the Display Options to display no name (None). Use the Features to set the Maximum Value to
. Select Features to set the caption appropriately: 101")
101 Push buttons For each push button: Use the Display Options to display no name (None). Select Features to set the caption appropriately: 101


102 Panel There is no need to Generate or Make, just Run. Use the panel to drive the dishwasher. When using the panel, you should use the Debug configuration. 102
103 Where are we? Exercise 1 : Hello World You start with the simplest example possible, just a single object that prints out Hello World. Exercise 2 : Count Down Next, you create a simple counter using a simple statechart. Exercise 3 : Dishwasher Finally, you create a dishwasher and a more complex statechart. Summary 103
104 Summary You should be starting to understand the basics of Rational Rhapsody, and you should now be able to do the following: Create a new project. Do some basic modeling using classes, attributes, operations, relations, and state charts. Generate and compile code. Set properties to customize the tool and the generated code. Edit the code and roundtrip the changes back into the model. Debug the model by injecting events, setting breakpoints, capturing behavior on sequence diagrams, visualizing the state of objects, and so on. 104
Essentials of IBM Rational Rhapsody v7.5 for Software Engineers (C++)
") IBM Software Group Essentials of IBM Rational Rhapsody v7.5 for Software Engineers (C++) Basic Rational Rhapsody IBM Corporation Exercise 1 : Hello World 2 Start Rhapsody in C++ Double click RhapsodyInC++
IBM Software Group Essentials of IBM Rational Rhapsody v7.5 for Software Engineers (C++) Basic Rational Rhapsody IBM Corporation Exercise 1 : Hello World 2 Start Rhapsody in C++ Double click RhapsodyInC++
Essentials of IBM Rational Rhapsody v7.6 for Software Engineers QQ139 ERC 1.0 Student Workbook
 Essentials of IBM Rational Rhapsody v7.6 for Software Engineers QQ139 ERC 1.0 Student Workbook IBM Corporation Rational software U.S. Government Users Restricted Rights - Use, duplication or disclosure
Introduction. Key features and lab exercises to familiarize new users to the Visual environment
 Introduction Key features and lab exercises to familiarize new users to the Visual environment January 1999 CONTENTS KEY FEATURES... 3 Statement Completion Options 3 Auto List Members 3 Auto Type Info
Module 3: Working with C/C++
 Module 3: Working with C/C++ Objective Learn basic Eclipse concepts: Perspectives, Views, Learn how to use Eclipse to manage a remote project Learn how to use Eclipse to develop C programs Learn how to
IBM Rational Rhapsody Properties
 IBM Rational Rhapsody Properties Every model element in Rational Rhapsody has a set of properties associated with it which can be accessed through the features window of Rational Rhapsody. These properties
At the shell prompt, enter idlde
 IDL Workbench Quick Reference The IDL Workbench is IDL s graphical user interface and integrated development environment. The IDL Workbench is based on the Eclipse framework; if you are already familiar
Computer Essentials Session 1 Lesson Plan
 Note: Completing the Mouse Tutorial and Mousercise exercise which are available on the Class Resources webpage constitutes the first part of this lesson. ABOUT PROGRAMS AND OPERATING SYSTEMS Any time a
Code::Blocks Student Manual
 Code::Blocks Student Manual Lawrence Goetz, Network Administrator Yedidyah Langsam, Professor and Theodore Raphan, Distinguished Professor Dept. of Computer and Information Science Brooklyn College of
3 Getting Started with Objects
 3 Getting Started with Objects If you are an experienced IDE user, you may be able to do this tutorial without having done the previous tutorial, Getting Started. However, at some point you should read
SQL Server. Management Studio. Chapter 3. In This Chapter. Management Studio. c Introduction to SQL Server
 Chapter 3 SQL Server Management Studio In This Chapter c Introduction to SQL Server Management Studio c Using SQL Server Management Studio with the Database Engine c Authoring Activities Using SQL Server
Simulator. Chapter 4 Tutorial: The SDL
 4 Tutorial: The SDL Simulator The SDL Simulator is the tool that you use for testing the behavior of your SDL systems. In this tutorial, you will practice hands-on on the DemonGame system. To be properly
TxWin 5.xx Programming and User Guide
 TxWin 5.xx Programming and User Guide Jan van Wijk Brief programming and user guide for the open-source TxWin text UI library Presentation contents Interfacing, include files, LIBs The message event model
Code::Blocks Student Manual
 Code::Blocks Student Manual Lawrence Goetz, Network Administrator Yedidyah Langsam, Professor and Theodore Raphan, Distinguished Professor Dept. of Computer and Information Science Brooklyn College of
2 Getting Started. Getting Started (v1.8.6) 3/5/2007
 3/5/2007") 2 Getting Started Java will be used in the examples in this section; however, the information applies to all supported languages for which you have installed a compiler (e.g., Ada, C, C++, Java) unless
2 Getting Started Java will be used in the examples in this section; however, the information applies to all supported languages for which you have installed a compiler (e.g., Ada, C, C++, Java) unless
Getting Started (1.8.7) 9/2/2009
 9/2/2009") 2 Getting Started For the examples in this section, Microsoft Windows and Java will be used. However, much of the information applies to other operating systems and supported languages for which you have
2 Getting Started For the examples in this section, Microsoft Windows and Java will be used. However, much of the information applies to other operating systems and supported languages for which you have
RVDS 4.0 Introductory Tutorial
 RVDS 4.0 Introductory Tutorial 402v02 RVDS 4.0 Introductory Tutorial 1 Introduction Aim This tutorial provides you with a basic introduction to the tools provided with the RealView Development Suite version
Rhapsody in J Tutorial
 Rhapsody in J Tutorial Rhapsody in J Tutorial Release 2.3 I-Logix Inc. Three Riverside Drive Andover, Massachusetts 01810 The software described in this document is furnished under a license and may be
Getting started 7. Setting properties 23
 Contents 1 2 3 Getting started 7 Introducing Visual Basic 8 Installing Visual Studio 10 Exploring the IDE 12 Starting a new project 14 Adding a visual control 16 Adding functional code 18 Saving projects
PART - I 75 x 1 = The building blocks of C++ program are (a) functions (b) classes (c) statements (d) operations
 functions (b) classes (c) statements (d) operations") OCTOBER 2007 COMPUTER SCIENCE Choose the best answer: PART - I 75 x 1 = 75 1. Which of the following functions will be executed first automatically, when a C++ Program is (a) void (b) Main (c) Recursive
OCTOBER 2007 COMPUTER SCIENCE Choose the best answer: PART - I 75 x 1 = 75 1. Which of the following functions will be executed first automatically, when a C++ Program is (a) void (b) Main (c) Recursive
Lesson 1 New Presentation
 Powerpoint Lesson 1 New Presentation 1. When PowerPoint first opens, there are four choices on how to create a new presentation. You can select AutoContent wizard, Template, Blank presentation or Open
RVDS 3.0 Introductory Tutorial
 RVDS 3.0 Introductory Tutorial 338v00 RVDS 3.0 Introductory Tutorial 1 Introduction Aim This tutorial provides you with a basic introduction to the tools provided with the RealView Development Suite version
7 Cmicro Targeting. Tutorial. Chapter
 7 Cmicro Targeting Tutorial This tutorial takes you through the first steps of targeting. Currently this tutorial is designed for using a Borland C or a Microsoft Visual C compiler in Windows, and gcc
Miami s Quick Start Guide for Using. Snap 9 Professional. to Create a Paper Keyed Survey. Miami s Survey Solutions
 Miami s Quick Start Guide for Using Snap 9 Professional to Create a Paper Keyed Survey 1 Miami s Survey Solutions Snap 9 Professional Getting Started This Quick Start Guide is intended to help you become
Integration for Rhapsody in C/C++
 Integration for Rhapsody in C/C++ TRACE32 Online Help TRACE32 Directory TRACE32 Index TRACE32 Documents... 3rd Party Tool Integrations... Integration for Rhapsody in C/C++... 1 Overview... 2 Architecture
HOW TO USE CODE::BLOCKS IDE FOR COMPUTER PROGRAMMING LABORATORY SESSIONS
 HOW TO USE CODE::BLOCKS IDE FOR COMPUTER PROGRAMMING LABORATORY SESSIONS INTRODUCTION A program written in a computer language, such as C/C++, is turned into executable using special translator software.
5 Setting Preferences 15 Preferences 15 Configure Chart Colors 16
 CRITERION Vantage 3 Acquire Training Manual Contents 1 Introduction 3 Collecting Data 3 2 Starting the Program 3 Logging In and Logging Out 3 Logging In 3 Logging in as an Administrator 3 Logging in as
Introduction to Microsoft Word
 Chapter Microsoft Word is a powerful word processing program that allows you to enter text, make changes to it, format it, record and print it. You can use it to produce professional business letters,
Supplement: Visual C++ Debugging
 Supplement: Visual C++ Debugging For Introduction to C++ Programming By Y. Daniel Liang Note: The screen shots are taken from VC++ 2010. It is the same for the later version. 1 Introduction The debugger
1. The PowerPoint Window
 1. The PowerPoint Window PowerPoint is a presentation software package. With PowerPoint, you can easily create slide shows. Trainers and other presenters use slide shows to illustrate their presentations.
Chapter 9 Slide Shows
 Impress Guide Chapter 9 Slide Shows Transitions, animations, and more Copyright This document is Copyright 2007 2011 by its contributors as listed below. You may distribute it and/or modify it under the
Introduction to Windows
 Introduction to Windows Naturally, if you have downloaded this document, you will already be to some extent anyway familiar with Windows. If so you can skip the first couple of pages and move on to the
Creating Buttons and Pop-up Menus
 Using Fireworks CHAPTER 12 Creating Buttons and Pop-up Menus 12 In Macromedia Fireworks 8 you can create a variety of JavaScript buttons and CSS or JavaScript pop-up menus, even if you know nothing about
Start Menu Log off Turn Off Computer Run Search Help and Support
 Windows Basics Start Menu Start Menu Log off - Log off the current user. Turn Off Computer - shutdown, restart and standby. Run - Used to manually start executable files (programs). Search - Search your
IBM Rational Rhapsody Properties
 IBM Rational Rhapsody Properties Every model element in Rational Rhapsody has a set of properties associated with it which can be accessed through the features window of Rational Rhapsody. These properties
Chapter 6 Introduction to Defining Classes
 Introduction to Defining Classes Fundamentals of Java: AP Computer Science Essentials, 4th Edition 1 Objectives Design and implement a simple class from user requirements. Organize a program in terms of
Tutorial 3: Using the Waveform Viewer Introduces the basics of using the waveform viewer. Read Tutorial SIMPLIS Tutorials SIMPLIS provide a range of t
 Tutorials Introductory Tutorials These tutorials are designed to give new users a basic understanding of how to use SIMetrix and SIMetrix/SIMPLIS. Tutorial 1: Getting Started Guides you through getting
TUTORIAL #2 HIERARCHICAL DESIGNS AND TEST FIXTURES
 Introduction to Active-HDL TUTORIAL #2 HIERARCHICAL DESIGNS AND TEST FIXTURES This tutorial will use the 1-bit full adder you designed in Tutorial #1 to construct larger adders. This will introduce the
Exercise 1: Introduction to MapInfo
 Geog 578 Exercise 1: Introduction to MapInfo Page: 1/22 Geog 578: GIS Applications Exercise 1: Introduction to MapInfo Assigned on January 25 th, 2006 Due on February 1 st, 2006 Total Points: 10 0. Convention
Getting started with UNIX/Linux for G51PRG and G51CSA
 Getting started with UNIX/Linux for G51PRG and G51CSA David F. Brailsford Steven R. Bagley 1. Introduction These first exercises are very simple and are primarily to get you used to the systems we shall
2 TUTORIAL. Overview. VisualDSP Getting Started Guide 2-1 for SHARC DSPs
 2 TUTORIAL This chapter contains the following topics. Overview on page 2-1 Exercise One: Building and Running a C Program on page 2-3 Exercise Two: Calling an Assembly Routine and Creating an LDF on page
Text box. Command button. 1. Click the tool for the control you choose to draw in this case, the text box.
 Visual Basic Concepts Hello, Visual Basic See Also There are three main steps to creating an application in Visual Basic: 1. Create the interface. 2. Set properties. 3. Write code. To see how this is done,
Web Accessibility Change Your Mouse Pointer Visibility Handbook
 Web Accessibility Change Your Mouse Pointer Visibility Handbook H2O Power is committed to providing our services in a way that respects the dignity and independence of persons with disabilities. H2O power
BASIC MICROSOFT POWERPOINT
 BASIC MICROSOFT POWERPOINT PART ONE PHONE: 504-838-1144 IT Training Team Jefferson Parish Library EMAIL: jpltrain@jplibrary.net In this class you will learn to: Launch, close, and interact with Microsoft
All textures produced with Texture Maker. Not Applicable. Beginner.
 Tutorial for Texture Maker 2.8 or above. Note:- Texture Maker is a texture creation tool by Tobias Reichert. For further product information please visit the official site at http://www.texturemaker.com
TRACE32 Debugger Getting Started... ICD Tutorial About the Tutorial... 2
 ICD Tutorial TRACE32 Online Help TRACE32 Directory TRACE32 Index TRACE32 Debugger Getting Started... ICD Tutorial... 1 About the Tutorial... 2 Working with the Debugger... 3 Set up the Program Environment
JobSite OnLine User s Guide Table of Contents
 JobSite OnLine User s Guide Table of Contents For the Beginner: 2 Preparing and Logging In to Run JobSite OnLine...2 How Drawings and Specs are Organized - Ease of Use...3 Searching for Files or Containers...4
Conventions in this tutorial
 This document provides an exercise using Digi JumpStart for Windows Embedded CE 6.0. This document shows how to develop, run, and debug a simple application on your target hardware platform. This tutorial
EW The Source Browser might fail to start data collection properly in large projects until the Source Browser window is opened manually.
 EW 25462 The Source Browser might fail to start data collection properly in large projects until the Source Browser window is opened manually. EW 25460 Some objects of a struct/union type defined with
QUIZ on Ch.5. Why is it sometimes not a good idea to place the private part of the interface in a header file?
 QUIZ on Ch.5 Why is it sometimes not a good idea to place the private part of the interface in a header file? Example projects where we don t want the implementation visible to the client programmer: The
Contents Microsoft PowerPoint Lesson 1: The PowerPoint Window...2 The Quick Access Toolbar...3 The Title Bar...3 Rulers...
 Contents Microsoft PowerPoint 2007...2 Lesson 1: The PowerPoint Window...2 The Quick Access Toolbar...3 The Title Bar...3 Rulers...3 Slides, Placeholders, and Notes...4 Status Bar, Tabs, View Buttons,
Word 2007/10/13 1 Introduction
 Objectives Word 2007/10/13 1 Introduction Understand the new Word 2007 Interface Navigate the Office button Learn about the Quick Access menu Navigate the Ribbon menu interface Understand the I-beam Learn
Adding Existing Source Code in NetBeans CS288, Autumn 2005 Lab 002
 Adding Existing Source Code in NetBeans CS288, Autumn 2005 Lab 002 Purpose This document will show how to incorporate existing source code within a NetBeans project. It will also introduce the concept
Chapter 9 Slide Shows
 Impress Guide Chapter 9 Slide Shows Transitions, animations, and more Copyright This document is Copyright 2007 2012 by its contributors as listed below. You may distribute it and/or modify it under the
CS-Studio Display Builder
 CS-Studio Display Builder Tutorial presented: Spring 2017 EPICS Collaboration Meeting at KURRI, Osaka, Japan Megan Grodowitz, Kay Kasemir (kasemir@ornl.gov) Overview Display Builder replaces OPI Builder
Lesson 6 Adding Graphics
 Lesson 6 Adding Graphics Inserting Graphics Images Graphics files (pictures, drawings, and other images) can be inserted into documents, or into frames within documents. They can either be embedded or
Section 3 Formatting
 Section 3 Formatting ECDL 5.0 Section 3 Formatting By the end of this Section you should be able to: Apply Formatting, Text Effects and Bullets Use Undo and Redo Change Alignment and Spacing Use Cut, Copy
Click the buttons in the interactive below to become familiar with the drawing tool's commands.
 Google Documents Inserting Text Boxes and Shapes Introduction Page 1 Google Documents has a drawing tool designed for inserting text boxes and shapes into your document. Although not necessary for every
The Fundamentals. Document Basics
 3 The Fundamentals Opening a Program... 3 Similarities in All Programs... 3 It's On Now What?...4 Making things easier to see.. 4 Adjusting Text Size.....4 My Computer. 4 Control Panel... 5 Accessibility
Getting started 7. Setting properties 23
 Contents 1 2 3 Getting started 7 Introduction 8 Installing Visual Basic 10 Exploring the IDE 12 Starting a new project 14 Adding a visual control 16 Adding functional code 18 Saving projects 20 Reopening
Lab Android Development Environment
 Lab Android Development Environment Setting up the ADT, Creating, Running and Debugging Your First Application Objectives: Familiarize yourself with the Android Development Environment Important Note:
Installation & Operating Instructions Macro Naming Version 1.0
 Malerzów, April 28, 2013 Installation & Operating Instructions Macro Naming Version 1.0 1. Preliminary remarks This document is a simplified installation & operating guide for Macro Naming version 1.0
ArcView QuickStart Guide. Contents. The ArcView Screen. Elements of an ArcView Project. Creating an ArcView Project. Adding Themes to Views
 ArcView QuickStart Guide Page 1 ArcView QuickStart Guide Contents The ArcView Screen Elements of an ArcView Project Creating an ArcView Project Adding Themes to Views Zoom and Pan Tools Querying Themes
CS 261 Fall C Introduction. Variables, Memory Model, Pointers, and Debugging. Mike Lam, Professor
 CS 261 Fall 2017 Mike Lam, Professor C Introduction Variables, Memory Model, Pointers, and Debugging The C Language Systems language originally developed for Unix Imperative, compiled language with static
Application Note Using CodeTEST Native with Rhapsody by I-Logix Revision 0.2
 Application Note Using CodeTEST Native with Rhapsody by I-Logix Revision 0.2 Metrowerks Revision History Revision Description Date 0.1 First Draft. 01/23/2001 0.2 CodeTEST v3.0 and Windows 2000 snapshots
IT Essentials v6.0 Windows 10 Software Labs
 IT Essentials v6.0 Windows 10 Software Labs 5.2.1.7 Install Windows 10... 1 5.2.1.10 Check for Updates in Windows 10... 10 5.2.4.7 Create a Partition in Windows 10... 16 6.1.1.5 Task Manager in Windows
ActiveBPEL Fundamentals
 Unit 22: Simulation ActiveBPEL Fundamentals This is Unit #22 of the BPEL Fundamentals course. In past Units we ve looked at ActiveBPEL Designer, Workspaces and Projects, created the Process itself and
User Manual pdoc Signer
 User Manual pdoc Signer August 11, 2014 Copyright 1995-2014 Topaz Systems Inc. All rights reserved. For Topaz Systems, Inc. trademarks, visit www.topazsystems.com/information/legal.htm#trademarks. www.topazsystems.com
Using Microsoft Word. Working With Objects
 Using Microsoft Word Many Word documents will require elements that were created in programs other than Word, such as the picture to the right. Nontext elements in a document are referred to as Objects
Introduction. This tutorial introduces the following SingleStep features:
 Introduction This tutorial introduces the following SingleStep features: Starting a debug session. Watching variables. Setting breakpoints. Modifying breakpoints. Stepping through a program. Changing variables
2 The Stata user interface
 2 The Stata user interface The windows This chapter introduces the core of Stata s interface: its main windows, its toolbar, its menus, and its dialogs. The five main windows are the Review, Results, Command,
Once you have entered your Google and password, you can click the Sign In button to continue.
 Slide 1 Welcome to the Creating and Uploading with Google Docs Tutorial. Google Docs allows you to create documents, spreadsheets, presentations, draw pictures, create forms, and much more directly within
Start Active-HDL. Create a new workspace TUTORIAL #1 CREATING AND SIMULATING SIMPLE SCHEMATICS
 Introduction to Active-HDL TUTORIAL #1 CREATING AND SIMULATING SIMPLE SCHEMATICS This tutorial will introduce the tools and techniques necessary to design a basic schematic. The goal of this tutorial is
Kidspiration Quick Start Tutorial
 Kidspiration Quick Start Tutorial This is a tutorial that introduces basic Kidspiration diagram and writing tools. The tutorial takes about 30 minutes from start to finish. You use Kidspiration the same
GDC MEMORIAL COLLEGE BAHAL (BHIWANI)
") GDC MEMORIAL COLLEGE BAHAL (BHIWANI)-127028 Lab Manual MS-Power Point (B.Com(pass &Voc).;B.Sc.(cs);M.Com) Department of Computer Science The PowerPoint Window Table of Contents PowerPoint is a presentation
GDC MEMORIAL COLLEGE BAHAL (BHIWANI)-127028 Lab Manual MS-Power Point (B.Com(pass &Voc).;B.Sc.(cs);M.Com) Department of Computer Science The PowerPoint Window Table of Contents PowerPoint is a presentation
User s Manual CAP 531*1.5 Configuration and Programming tool
 User s Manual CAP 531*1.5 Configuration and Programming tool This manual belongs to: Contents Chapter Page About this manual 1 Introduction 3 Technical descriptions 81 References 177 Customer feedback
Rhapsody in C Tutorial
 Tutorial for TestConductor for Rhapsody in C Rhapsody in C Tutorial for IBM Rational Rhapsody TestConductor Add On License Agreement No part of this publication may be reproduced, transmitted, stored in
Short Notes of CS201
 #includes: Short Notes of CS201 The #include directive instructs the preprocessor to read and include a file into a source code file. The file name is typically enclosed with < and > if the file is a system
Lab 0 Introduction to the MSP430F5529 Launchpad-based Lab Board and Code Composer Studio
 ECE2049 Embedded Computing in Engineering Design Lab 0 Introduction to the MSP430F5529 Launchpad-based Lab Board and Code Composer Studio In this lab, you will be introduced to the Code Composer Studio
Windows Computer A to Z Shortcut Key list with PDF
 Windows Computer A to Z Shortcut Key list with PDF In the Computer world, a keyboard shortcut is a combination of one or more command to execute a particular action. These shortcuts are really helpful
Programs. Function main. C Refresher. CSCI 4061 Introduction to Operating Systems
 Programs CSCI 4061 Introduction to Operating Systems C Program Structure Libraries and header files Compiling and building programs Executing and debugging Instructor: Abhishek Chandra Assume familiarity
Chapter11 practice file folder. For more information, see Download the practice files in this book s Introduction.
 Make databases user friendly 11 IN THIS CHAPTER, YOU WILL LEARN HOW TO Design navigation forms. Create custom categories. Control which features are available. A Microsoft Access 2013 database can be a
Welcome Application. Introducing the Visual Studio.NET IDE. Objectives. Outline
 2 T U T O R I A L Objectives In this tutorial, you will learn to: Navigate Visual Studio.NET s Start Page. Create a Visual Basic.NET solution. Use the IDE s menus and toolbars. Manipulate windows in the
CS201 - Introduction to Programming Glossary By
 CS201 - Introduction to Programming Glossary By #include : The #include directive instructs the preprocessor to read and include a file into a source code file. The file name is typically enclosed with
NEW CEIBO DEBUGGER. Menus and Commands
 NEW CEIBO DEBUGGER Menus and Commands Ceibo Debugger Menus and Commands D.1. Introduction CEIBO DEBUGGER is the latest software available from Ceibo and can be used with most of Ceibo emulators. You will
IBM Rational Rhapsody Gateway Add On. User Guide
 User Guide Rhapsody IBM Rational Rhapsody Gateway Add On User Guide License Agreement No part of this publication may be reproduced, transmitted, stored in a retrieval system, nor translated into any
A Fast Review of C Essentials Part I
 A Fast Review of C Essentials Part I Structural Programming by Z. Cihan TAYSI Outline Program development C Essentials Functions Variables & constants Names Formatting Comments Preprocessor Data types
PowerPoint X. 1. The Project Gallery window with the PowerPoint presentation icon already selected. 2. Click on OK.
 PowerPoint X Launching PowerPointX 1. Start PowerPointX by clicking on the PowerPoint icon in the dock or finding it in the hard drive in the Applications folder under Microsoft PowerPoint. PowerPoint
Program and Graphical User Interface Design
 CHAPTER 2 Program and Graphical User Interface Design OBJECTIVES You will have mastered the material in this chapter when you can: Open and close Visual Studio 2010 Create a Visual Basic 2010 Windows Application
Interactive Powerpoint. Jessica Stenzel Hunter Singleton
 Interactive Powerpoint Jessica Stenzel Hunter Singleton Table of Contents iii Table of Contents Table of Contents... iii Introduction... 1 Basics of Powerpoint... 3 How to Insert Shapes... 3 How to Insert
My Awesome Presentation Exercise
 My Awesome Presentation Exercise Part One: Creating a Photo Album 1. Click on the Insert tab. In the Images group click on the Photo Album command. 2. In the Photo Album window that pops up, look in the
FIT 100. Lab 8: Writing and Running Your First Visual Basic Program Spring 2002
 FIT 100 Lab 8: Writing and Running Your First Visual Basic Program Spring 2002 1. Create a New Project and Form... 1 2. Add Objects to the Form and Name Them... 3 3. Manipulate Object Properties... 3 4.
A Student s Guide to Taking Notes Using Microsoft Word 2013
 A Student s Guide to Taking Notes Using Microsoft Word 2013 Erin Moreira UMass Amherst 2015 A Student s Guide to Taking Notes Using Microsoft Word 2013 Acknowledgements I would like to thank Professor
BASICS OF THE RENESAS SYNERGY PLATFORM
 BASICS OF THE RENESAS SYNERGY PLATFORM TM Richard Oed 2018.11 02 CHAPTER 11 EVENT ANALYSIS WITH TRACEX CONTENTS 11 EVENT ANALYSIS WITH TRACEX 03 11.1 An Introduction to TraceX 03 11.2 Built-in Views and
Code Composer Studio. MSP Project Setup
 Code Composer Studio MSP Project Setup Complete the installation of the Code Composer Studio software using the Code Composer Studio setup slides Start Code Composer Studio desktop shortcut start menu
BEAWebLogic Server. Using the WebLogic Diagnostic Framework Console Extension
 BEAWebLogic Server Using the WebLogic Diagnostic Framework Console Extension Version 10.0 Revised: March 30, 2007 Contents 1. Introduction and Roadmap What Is the WebLogic Diagnostic Framework Console
Excel Main Screen. Fundamental Concepts. General Keyboard Shortcuts Open a workbook Create New Save Preview and Print Close a Workbook
 Excel 2016 Main Screen Fundamental Concepts General Keyboard Shortcuts Open a workbook Create New Save Preview and Print Close a Ctrl + O Ctrl + N Ctrl + S Ctrl + P Ctrl + W Help Run Spell Check Calculate
Visual Studio.NET. Although it is possible to program.net using only the command OVERVIEW OF VISUAL STUDIO.NET
 Chapter. 03 9/17/01 6:08 PM Page 35 Visual Studio.NET T H R E E Although it is possible to program.net using only the command line compiler, it is much easier and more enjoyable to use Visual Studio.NET.
NiceForm User Guide. English Edition. Rev Euro Plus d.o.o. & Niceware International LLC All rights reserved.
 www.nicelabel.com, info@nicelabel.com English Edition Rev-0910 2009 Euro Plus d.o.o. & Niceware International LLC All rights reserved. www.nicelabel.com Head Office Euro Plus d.o.o. Ulica Lojzeta Hrovata
Application of Skills: Microsoft PowerPoint 2013 Tutorial
 Application of Skills: Microsoft PowerPoint 2013 Tutorial Throughout this tutorial, you will progress through a series of steps to create a presentation about yourself. You will continue to add to this
European Computer Driving Licence
 European Computer Driving Licence E C D L S y l l a b u s 5. 0 Module 6 Presentation Contents GRAPHICAL OBJECTS... 1 INSERTING DRAWN OBJECTS... 1 ADDING TEXT TO A DRAWN OBJECT... 2 FORMATTING DRAWN OBJECTS...