Arduino Prof. Dr. Magdy M. Abdelhameed
|
|
|
- Tyrone Jefferson
- 5 years ago
- Views:
Transcription

1 Course Code: MDP 454, Course Name:, Second Semester 2014 Arduino
2 What is Arduino? Microcontroller Platform Okay but what s a Microcontroller? Tiny, self-contained computers in an IC Often contain peripherals Different packages available Vast array of size and power available
3 Why Arduino? Students, hobbyist, artists & designers open source hardware Open Source Physical Computing Platform open source free to inspect & modify community wiki, forums, tutorials
4 What can it do? Input Sensors (buttons, light sensors, ultrasound, ) Digital Input (Serial, SPI, I2C) Output LEDs & Lasers LCD/OLED/Touch Displays Speakers Motors, Servos, Steppers Control and Communication Drive other machinery Directly or using a communication protocol

5 Sensors
6 Arduino hardware Arduino models differ in design but all share some basic functionality AVR Microcontroller Atmel AVR Mega168 or AVR Mega 328 Powered either directly or via USB power Communications Serial (older models) USB (most models) Connections to a USB interface (smaller models) Pins for various functions
7 Digital pins Pins 0-13 (GPIO pins) Can output 40 ma Either input our output (default to input)
8 Digital pins Switching without Pull-up and pull-down resistors
9 Digital pins Switching with Pull-up and pull-down resistors Pull-down Pull-up
 (RES + LED) Analogue pins A0-A5 can be used as digital pins 14-19 (GPIO) Read up to 5V.")
10 Digital pins What happens if we Digital Read a pin that is not connected? 20K internal pull-up resistor Serial pins 0 (RX) and 1 (TX). Connected to FTDI USB-to-TTL Pin 13 is different (input) (RES + LED) Analogue pins A0-A5 can be used as digital pins (GPIO) Read up to 5V. Don t fry your pin!
11 Pulse Width Modulation (PWM) PWM used to create analogue output on digital pins Simulate voltage between 5V and 0V using square waves (signal switching between on and off) Pins 3, 5, 6, 9, 10, and 11
12 Analogue pins Pins A0-A5 (signal switching between on and off) 10 bit resolution (from 0-5V to int ) 100 microseconds ( s) to read an analog input, maximum reading rate is about 10,000 times a second.
13 Other pins ICSP (In Circuit Serial Programming) directly program AVR micro-controllers I2C / TWI (Two-wire interface) communication Inter IC control Arduino analog input A4 = I2C SDA (serial data line) Arduino analog input A5 = I2C SCL (serial clock line) External interrupts Event-handling without polling Interrupt 0 (on digital pin 2) and 1 (on digital pin 3) Analogue reference (Set analogue reference for ADC)
14 Arduino Environment

15 The Arduino Environment

16 Board Type
")
17 Serial (COM) port
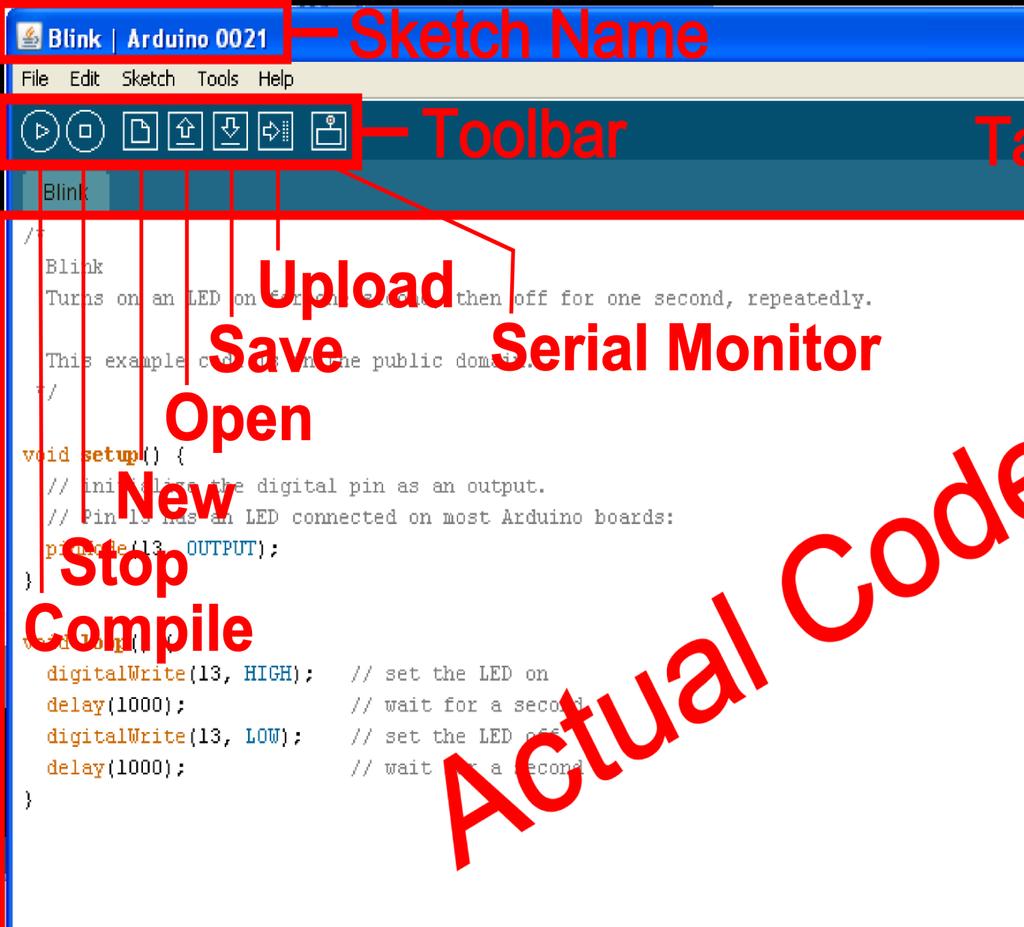
18 The Environment

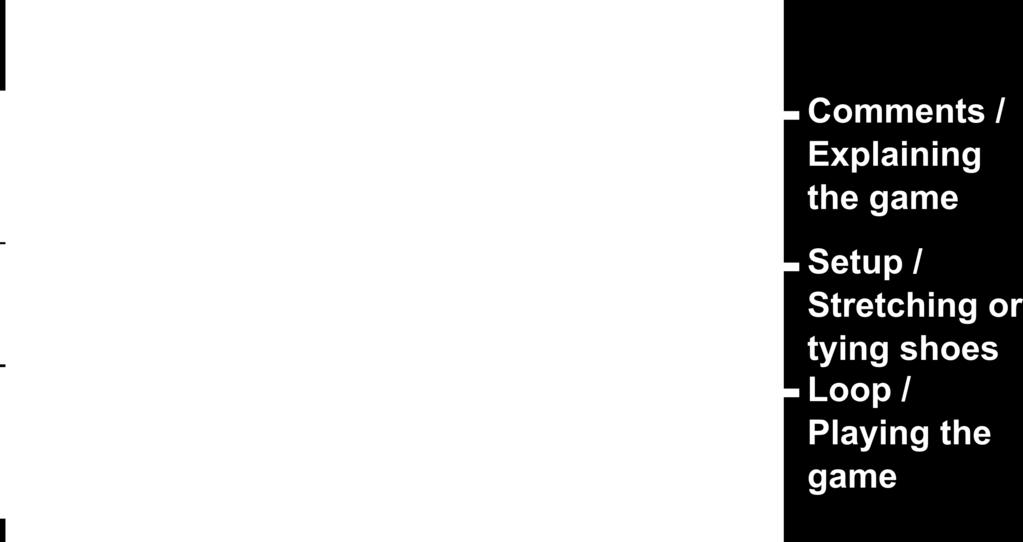
19 Parts of the code
20 Comments Comments can be anywhere
21 Comments Comments can be anywhere Comments created with // or /* and */
22 Comments Comments can be anywhere Comments created with // or /* and */ Comments do not affect code
23 Comments Comments can be anywhere Comments created with // or /* and */ Comments do not affect code You may not need comments, but think about the community!
24 Operators The equals sign = is used to assign a value == is used to compare values
25 Operators And & Or && is and is or
26 Variables Basic variable types: Boolean Integer Character String
27 Declaring variables Boolean: boolean variablename;
28 Declaring variables Boolean: boolean variablename; Integer: int variablename;
29 Declaring variables Boolean: boolean variablename; Integer: int variablename; Character: char variablename;
30 Declaring variables Boolean: boolean variablename; Integer: int variablename; Character: char variablename; String: stringname [ ];
31 Assigning variables Boolean: variablename = true; or variablename = false;
32 Assigning variables Boolean: variablename = true; or variablename = false; Integer: variablename = 32767; or variablename = ;
33 Assigning variables Boolean: variablename = true; or variablename = false; Integer: variablename = 32767; or variablename = ; Character: variablename = A ; or stringname = SparkFun ;

34 Variable Scope

35 Setup void setup ( ) { } The setup function comes before the loop function and is necessary for all Arduino sketches
36 Setup void setup ( ) { } The setup header will never change, everything else that occurs in setup happens inside the curly brackets

37 Setup Outputs are declare in setup, this is done by using the pinmode function This particular example declares digital pin # 13 as an output, remember to use CAPS

38 Setup Serial communication also begins in setup This particular example declares Serial communication at a baud rate of More on Serial later...

39 Setup You can also create internal pullup resistors in setup, to do so digitalwrite the pin HIGH This takes the place of the pullup resistors currently on your circuit 7 buttons
40 Setup Setup, Interrupts void setup ( ) { attachinterrupt (interrupt, function, mode) } You can designate an interrupt function to Arduino pins # 2 and 3 This is a way around the linear processing of Arduino
41 Setup Setup, Interrupts void setup ( ) { attachinterrupt (interrupt, function, mode) } Interrupt: the number of the interrupt, 0 or 1, corresponding to Arduino pins # 2 and 3 respectively Function: the function to call when the interrupt occurs Mode: defines when the interrupt should be triggered
42 Setup Setup, Interrupts void setup ( ) { attachinterrupt (interrupt, function, mode) } LOW whenever pin state is low CHANGE whenever pin changes value RISING whenever pin goes from low to high FALLING whenever pin goes from low to high Don t forget to CAPITALIZE
43 If statements if ( this is true ) { do this; }
44 If statements if ( this is true ) { do this; }
 { do")
45 If statements if ( this is true ) { do this; }

 {")
46 If statements if ( this is true ) { do this; }
47 Else else { do this; }
48 Basic Repetition loop For while
49 Basic Repetition void loop ( ) { }
50 Basic Repetition void loop ( ) { }
51 Basic Repetition void loop ( ) { } The void in the header is what the function will return (or spit out) when it happens, in this case it returns nothing so it is void
52 Basic Repetition void loop ( ) { } The loop in the header is what the function is called, sometimes you make the name up, sometimes (like loop) the function already has a name
53 Basic Repetition void loop ( ) { } The ( ) in the header is where you declare any variables that you are passing (or sending) the function, the loop function is never passed any variables
 {")
54 Basic Repetition void loop ( ) { }
55 Basic Repetition for (int count = 0; count<10; count++) { //for action code goes here //this could be anything }
56 Basic Repetition for (int count = 0; count<10; count++) { //for action code goes here }
57 Basic Repetition for (int count = 0; count<10; count++) { //for action code goes here }
58 Basic Repetition for (int count = 0; count<10; count++) { //for action code goes here }
 { //for action code goes")
59 Basic Repetition for (int count = 0; count<10; count++) { //for action code goes here }
60 Basic Repetition for (int count = 0; count<10; count++) { //for action code goes here }
 { //for action code goes")
61 Basic Repetition for (int count = 0; count<10; count++) { //for action code goes here }
62 Basic Repetition while ( count<10 ) { //while action code goes here }
63 Basic Repetition while ( count<10 ) { //while action code goes here //should include a way to change count //variable so the computer is not stuck //inside the while loop forever }
64 Basic Repetition while ( count<10 ) { //looks basically like a for loop //except the variable is declared before //and incremented inside the while //loop }
65 Basic Repetition Or maybe: while ( digitalread(buttonpin)==1 ) { //instead of changing a variable //you just read a pin so the computer //exits when you press a button //or a sensor is tripped }
66 Arduino Programming Structure
 run repeatedly, after")
67 Arduino Software Layout Declare variables at top Initialize setup() run once at beginning, set pins Running loop() run repeatedly, after setup()

68 Arduino Software Layout int ledpin = 13; led connected to control pin 13 Global Variables int asensor = 0; setup sensor 'asensor' on analog pin 0 int statepin = LOW; use this to hold the state of a pin

69 Arduino Software Layout setup() pinmode() set a pin as input or output serial.begin() setup to `talk' to the computer

70 Arduino Software Layout setup() pinmode(ledpin, Output); set the pin `ledpin' as an output serial.begin(9600); talk to the computer at 9600 baud rate
71 Arduino Software Layout loop() digitalwrite() set a digital pin high/low digitalread() read a digital pin s state analogread() read an analog pin analogwrite() write an analog PWM value delay() wait an amount of time millis() get the current tim
 6 Analog Out (pins 3, 5, 6, 9, 10,")
72 Input / Output 14 Digital IO (pins 0-13) 6 Analog In (pins 0-5) 6 Analog Out (pins 3, 5, 6, 9, 10, 11)
73 Digital? Analog? Digital only has two values: on/off Analog has many (infinite) values Computers don t really do analog - use quantization instead
74 Digital? Analog? Many states (Analog) or just two (HIGH/LOW - Digital) Number of states (or bins ) is resolution Common computer resolutions: 8-bit = 256 states 16-bit = 65,536 states 32-bit = 4,294,967,296 states
75 I/O to/from What? Sensors LDR / IR Switch / Potentiometer / Joystick / Piezo Accelerometer Ultrasonic Indicators LED / Lamps Buzzers Actuators Solenoid Stepper Motor Other Circuits Prototype shields Special ICs
76 Hello World! void setup() { Run Arduino IDE // start serial port at 9600 bps: Serial.begin(9600); } Install latest Arduino IDE from arduino.cc Write the code on the left into the editor Compile / Verify the code by clicking the play button void loop() Before uploading your sketch, check the board and the serial port are correct for your Arduino and for { your computer Serial.print("Hello World!\n\r"); // wait 2sec for next reading: delay(2000); Menu -> Tools -> Board Menu -> Tools -> Serial Port } Upload the code from the computer to the Arduino using the upload button

77 LED Blink Turn Led on and off according to the byte coming from the serial port, if a zero byte then the Led off else the Led on.
78 LED Blink /* Blinking LED --- * turns on and off a light emitting diode(led) connected to a digital * pin, based on data coming over serial */ int ledpin = 13; // LED connected to digital pin 13 int inbyte = 0; void setup() { pinmode(ledpin, OUTPUT); // sets the digital pin as output Serial.begin(19200); // initiate serial communication } void loop() { while (Serial.available()>0) { inbyte = Serial.read(); } if (inbyte>0) { digitalwrite(ledpin, HIGH); // sets the LED on } else { digitalwrite(ledpin, LOW); // sets the LED off } }
79 LED Blink /* Blinking LED --- * turns on and off a light emitting diode(led) connected to a digital * pin, based on data coming over serial */ Initialise int ledpin = 13; // LED connected to digital pin 13 int inbyte = 0; void setup() { pinmode(ledpin, OUTPUT); // sets the digital pin as output Serial.begin(19200); // initiate serial communication } void loop() { while (Serial.available()>0) { inbyte = Serial.read(); } if (inbyte>0) { digitalwrite(ledpin, HIGH); // sets the LED on } else { digitalwrite(ledpin, LOW); // sets the LED off } } some of the variables
80 LED Blink /* Blinking LED --- * turns on and off a light emitting diode(led) connected to a digital * pin, based on data coming over serial */ int ledpin = 13; // LED connected to digital pin 13 int inbyte = 0; void setup() { pinmode(ledpin, OUTPUT); // sets the digital pin as output Serial.begin(19200); // initiate serial communication } void loop() { Setup LED pin and while (Serial.available()>0) { inbyte = Serial.read(); serial connection } } if (inbyte>0) { digitalwrite(ledpin, HIGH); // sets the LED on } else { digitalwrite(ledpin, LOW); // sets the LED off }
81 LED Blink /* Blinking LED --- * turns on and off a light emitting diode(led) connected to a digital * pin, based on data coming over serial */ int ledpin = 13; // LED connected to digital pin 13 int inbyte = 0; void setup() { pinmode(ledpin, OUTPUT); // sets the digital pin as output Serial.begin(19200); // initiate serial communication } Loop - Reading the void loop() { serial for info, when } while (Serial.available()>0) { inbyte = Serial.read(); something is received } turn if (inbyte>0) { digitalwrite(ledpin, HIGH); // sets the } else { digitalwrite(ledpin, LOW); // sets the LED off } theled on LED on
 and led off when the button status is low; Also send this status via serial port with baud rate")
82 Digital Input/ Output Write Arduino code that uses to turn led on (on pin 13) when the button status is high (on pin 7) and led off when the button status is low; Also send this status via serial port with baud rate
83 Digital Input/ Output /* Digital reading, turns on and off a light emitting diode (LED) connected to digital * pin 13, when pressing a pushbutton attached to pin 7. It illustrates the concept of * Active-Low, which consists in connecting buttons using a 1K to 10K pull-up resistor. */ intledpin = 13; // choose the pin for the LED int inpin = 7; // choose the input pin (button) int buttonval = 0; // variable for reading the pin status void setup() { pinmode(ledpin, OUTPUT); // set LED as output pinmode(inpin, INPUT); // set pushbutton as input Serial.begin(19200); // start serial communication to computer } void loop() { buttonval = digitalread(inpin); // read the pin and get the button's state if (buttonval == HIGH) { // check if the input is HIGH (button released) digitalwrite(ledpin, LOW); // turn LED OFF Serial.write('0'); // Button off (0) sent to computer } else { digitalwrite(ledpin, HIGH); // turn LED ON Serial.write('1'); // Button on (1) sent to computer } }
84 Digital Input/ Output /* Digital reading, turns on and off a light emitting diode (LED) connected to digital * pin 13, when pressing a pushbutton attached to pin 7. It illustrates the concept of * Active-Low, which consists in connecting buttons using a 1K to 10K pull-up resistor. */ intledpin = 13; // choose the pin for the LED int inpin = 7; // choose the input pin (button) int buttonval = 0; // variable for reading the pin status void setup() { pinmode(ledpin, OUTPUT); // set LED as output pinmode(inpin, INPUT); // set pushbutton as input Serial.begin(19200); // start serial communication to computer } void loop() { buttonval = digitalread(inpin); // read the pin and get the button's state if (buttonval == HIGH) { // check if the input is HIGH (button released) digitalwrite(ledpin, LOW); // turn LED OFF Serial.write('0'); // Button off (0) sent to computer } else { digitalwrite(ledpin, HIGH); // turn LED ON Serial.write('1'); // Button on (1) sent to computer } } Initialise some of the variables
85 Digital Input/ Output /* Digital reading, turns on and off a light emitting diode (LED) connected to digital * pin 13, when pressing a pushbutton attached to pin 7. It illustrates the concept of * Active-Low, which consists in connecting buttons using a 1K to 10K pull-up resistor. */ intledpin = 13; // choose the pin for the LED int inpin = 7; // choose the input pin (button) int buttonval = 0; // variable for reading the pin status void setup() { pinmode(ledpin, OUTPUT); // set LED as output pinmode(inpin, INPUT); // set pushbutton as input Serial.begin(19200); // start serial communication to computer } void loop() { buttonval = digitalread(inpin); // read the pin and get the button's state if (buttonval == HIGH) { // check if the input is HIGH (button released) digitalwrite(ledpin, LOW); // turn LED OFF Serial.write('0'); // Button off (0) sent to computer } else { digitalwrite(ledpin, HIGH); // turn LED ON Serial.write('1'); // Button on (1) sent to computer } } Setup LED pin, switch pin and serial connection
86 Digital Input/ Output /* Digital reading, turns on and off a light emitting diode (LED) connected to digital * pin 13, when pressing a pushbutton attached to pin 7. It illustrates the concept of * Active-Low, which consists in connecting buttons using a 1K to 10K pull-up resistor. */ int inpin = 7; // choose the input pin (button) button for info, when intledpin = 13; // choose the pin for the LED int buttonval = 0; // variable for reading the pin status void setup() { pinmode(ledpin, OUTPUT); // set LED as output pinmode(inpin, INPUT); // set pushbutton asthe LED on and input } Serial.begin(19200); // start serial communication to computer void loop() { } buttonval = digitalread(inpin); // read the pin and get if (buttonval == HIGH) { // check if the input is HIGH (button released) digitalwrite(ledpin, LOW); // turn LED OFF Serial.write('0'); // Button off (0) sent to computer } else { digitalwrite(ledpin, HIGH); // turn LED ON Serial.write('1'); // Button on (1) sent to computer } Loop - Reading the button is press turn signal the computer change Of the button's state

87 Thank You For Your Attention! Questions?
FUNCTIONS For controlling the Arduino board and performing computations.
 d i g i t a l R e a d ( ) [Digital I/O] Reads the value from a specified digital pin, either HIGH or LOW. digitalread(pin) pin: the number of the digital pin you want to read HIGH or LOW Sets pin 13 to
keyestudio Keyestudio MEGA 2560 R3 Board
 Keyestudio MEGA 2560 R3 Board Introduction: Keyestudio Mega 2560 R3 is a microcontroller board based on the ATMEGA2560-16AU, fully compatible with ARDUINO MEGA 2560 REV3. It has 54 digital input/output
Introduction to Arduino. Wilson Wingston Sharon
 Introduction to Arduino Wilson Wingston Sharon cto@workshopindia.com Physical computing Developing solutions that implement a software to interact with elements in the physical universe. 1. Sensors convert
More Arduino Programming
 Introductory Medical Device Prototyping Arduino Part 2, http://saliterman.umn.edu/ Department of Biomedical Engineering, University of Minnesota More Arduino Programming Digital I/O (Read/Write) Analog
Arduino Part 2. Introductory Medical Device Prototyping
 Introductory Medical Device Prototyping Arduino Part 2, http://saliterman.umn.edu/ Department of Biomedical Engineering, University of Minnesota More Arduino Programming Digital I/O (Read/Write) Analog
Arduino Uno Microcontroller Overview
 Innovation Fellows Program Arduino Uno Microcontroller Overview, http://saliterman.umn.edu/ Department of Biomedical Engineering, University of Minnesota Arduino Uno Power & Interface Reset Button USB
Lab 01 Arduino 程式設計實驗. Essential Arduino Programming and Digital Signal Process
 Lab 01 Arduino 程式設計實驗 Essential Arduino Programming and Digital Signal Process Arduino Arduino is an open-source electronics prototyping platform based on flexible, easy-to-use hardware and software. It's
How to Use an Arduino
 How to Use an Arduino By Vivian Law Introduction The first microcontroller, TMS-1802-NC, was built in 1971 by Texas Instruments. It owed its existence to the innovation and versatility of silicon and the
IME-100 Interdisciplinary Design and Manufacturing
 IME-100 Interdisciplinary Design and Manufacturing Introduction Arduino and Programming Topics: 1. Introduction to Microprocessors/Microcontrollers 2. Introduction to Arduino 3. Arduino Programming Basics
Introduction to Arduino
 Introduction to Arduino Paco Abad May 20 th, 2011 WGM #21 Outline What is Arduino? Where to start Types Shields Alternatives Know your board Installing and using the IDE Digital output Serial communication
FUNCTIONS USED IN CODING pinmode()
") FUNCTIONS USED IN CODING pinmode() Configures the specified pin to behave either as an input or an output. See the description of digital pins for details on the functionality of the pins. As of Arduino
FUNCTIONS USED IN CODING pinmode() Configures the specified pin to behave either as an input or an output. See the description of digital pins for details on the functionality of the pins. As of Arduino
<Table of content> <Parts and description> <Circuit board Guide> <Pins> <Basics of Coding> <Intro to Arduino> <Intro> <Downloading Arduino IDO>
 http://www.arduino.cc/
Smart Objects. SAPIENZA Università di Roma, M.Sc. in Product Design Fabio Patrizi
 Smart Objects SAPIENZA Università di Roma, M.Sc. in Product Design Fabio Patrizi 1 What is a Smart Object? Essentially, an object that: Senses Thinks Acts 2 Example 1 https://www.youtube.com/watch?v=6bncjd8eke0
Introduction to Microcontrollers Using Arduino. PhilRobotics
 Introduction to Microcontrollers Using Arduino PhilRobotics Objectives Know what is a microcontroller Learn the capabilities of a microcontroller Understand how microcontroller execute instructions Objectives
TANGIBLE MEDIA & PHYSICAL COMPUTING INTRODUCTION TO ARDUINO
 TANGIBLE MEDIA & PHYSICAL COMPUTING INTRODUCTION TO ARDUINO AGENDA ARDUINO HARDWARE THE IDE & SETUP BASIC PROGRAMMING CONCEPTS DEBUGGING & HELLO WORLD INPUTS AND OUTPUTS DEMOS ARDUINO HISTORY IN 2003 HERNANDO
ARDUINO LEONARDO ETH Code: A000022
 ARDUINO LEONARDO ETH Code: A000022 All the fun of a Leonardo, plus an Ethernet port to extend your project to the IoT world. You can control sensors and actuators via the internet as a client or server.
PROGRAMMING ARDUINO COURSE ON ADVANCED INTERACTION TECHNIQUES. Luís Carriço FCUL 2012/13
 Sources: Arduino Hands-on Workshop, SITI, Universidad Lusófona Arduino Spooky projects Basic electronics, University Pennsylvania Beginning Arduino Programming Getting Started With Arduino COURSE ON ADVANCED
ARDUINO LEONARDO WITH HEADERS Code: A000057
 ARDUINO LEONARDO WITH HEADERS Code: A000057 Similar to an Arduino UNO, can be recognized by computer as a mouse or keyboard. The Arduino Leonardo is a microcontroller board based on the ATmega32u4 (datasheet).
Arduino Uno. Arduino Uno R3 Front. Arduino Uno R2 Front
 Arduino Uno Arduino Uno R3 Front Arduino Uno R2 Front Arduino Uno SMD Arduino Uno R3 Back Arduino Uno Front Arduino Uno Back Overview The Arduino Uno is a microcontroller board based on the ATmega328 (datasheet).
ARDUINO. By Kiran Tiwari BCT 2072 CoTS.
 ARDUINO By Kiran Tiwari BCT 2072 CoTS www.kirantiwari.com.np SO What is an Arduino? WELL!! Arduino is an open-source prototyping platform based on easy-to-use hardware and software. Why Arduino? Simplifies
Introduction to Arduino
 Introduction to Arduino Mobile Computing, aa. 2016/2017 May 12, 2017 Daniele Ronzani - Ph.D student in Computer Science dronzani@math.unipd.it What are Microcontrollers Very small and simple computers
Introduction To Arduino
 Introduction To Arduino What is Arduino? Hardware Boards / microcontrollers Shields Software Arduino IDE Simplified C Community Tutorials Forums Sample projects Arduino Uno Power: 5v (7-12v input) Digital
ARDUINO MEGA 2560 REV3 Code: A000067
 ARDUINO MEGA 2560 REV3 Code: A000067 The MEGA 2560 is designed for more complex projects. With 54 digital I/O pins, 16 analog inputs and a larger space for your sketch it is the recommended board for 3D
IME-100 ECE. Lab 3. Electrical and Computer Engineering Department Kettering University. G. Tewolde, IME100-ECE,
 IME-100 ECE Lab 3 Electrical and Computer Engineering Department Kettering University 3-1 1. Laboratory Computers Getting Started i. Log-in with User Name: Kettering Student (no password required) ii.
ARDUINO YÚN Code: A000008
 ARDUINO YÚN Code: A000008 Arduino YÚN is the perfect board to use when designing connected devices and, more in general, Internet of Things projects. It combines the power of Linux with the ease of use
ARDUINO UNO REV3 Code: A000066
 ARDUINO UNO REV3 Code: A000066 The UNO is the best board to get started with electronics and coding. If this is your first experience tinkering with the platform, the UNO is the most robust board you can
ARDUINO MICRO WITHOUT HEADERS Code: A000093
 ARDUINO MICRO WITHOUT HEADERS Code: A000093 Arduino Micro is the smallest board of the family, easy to integrate it in everyday objects to make them interactive. The Micro is based on the ATmega32U4 microcontroller
TABLE OF CONTENTS INTRODUCTION LESSONS PROJECTS
 TABLE OF CONTENTS INTRODUCTION Introduction to Components - Maker UNO 5 - Maker UNO Board 6 - Setting Up - Download Arduino IDE 7 - Install Maker UNO Drivers - Install Maker UNO Board Package 3 LESSONS.
Arduino ADK Rev.3 Board A000069
 Arduino ADK Rev.3 Board A000069 Overview The Arduino ADK is a microcontroller board based on the ATmega2560 (datasheet). It has a USB host interface to connect with Android based phones, based on the MAX3421e
Arduino Programming. Arduino UNO & Innoesys Educational Shield
 Arduino Programming Arduino UNO & Innoesys Educational Shield www.devobox.com Electronic Components & Prototyping Tools 79 Leandrou, 10443, Athens +30 210 51 55 513, info@devobox.com ARDUINO UNO... 3 INNOESYS
Note. The above image and many others are courtesy of - this is a wonderful resource for designing circuits.
 Robotics and Electronics Unit 2. Arduino Objectives. Students will understand the basic characteristics of an Arduino Uno microcontroller. understand the basic structure of an Arduino program. know how
EXPERIMENT 7 Please visit https://www.arduino.cc/en/reference/homepage to learn all features of arduino before you start the experiments
 EXPERIMENT 7 Please visit https://www.arduino.cc/en/reference/homepage to learn all features of arduino before you start the experiments TEMPERATURE MEASUREMENT AND CONTROL USING LM35 Purpose: To measure
USER MANUAL ARDUINO I/O EXPANSION SHIELD
 USER MANUAL ARDUINO I/O EXPANSION SHIELD Description: Sometimes Arduino Uno users run short of pins because there s a lot of projects that requires more than 20 signal pins. The only option they are left
IME-100 ECE. Lab 4. Electrical and Computer Engineering Department Kettering University. G. Tewolde, IME100-ECE,
 IME-100 ECE Lab 4 Electrical and Computer Engineering Department Kettering University 4-1 1. Laboratory Computers Getting Started i. Log-in with User Name: Kettering Student (no password required) ii.
BASIC ARDUINO WORKSHOP. Mr. Aldwin and Mr. Bernardo
 BASIC ARDUINO WORKSHOP Mr. Aldwin and Mr. Bernardo 1 BASIC ARDUINO WORKSHOP Course Goals Introduce Arduino Hardware and Understand Input Software and Output Create simple project 2 Arduino Open-source
Arduino and Matlab for prototyping and manufacturing
 Arduino and Matlab for prototyping and manufacturing Enrique Chacón Tanarro 11th - 15th December 2017 UBORA First Design School - Nairobi Enrique Chacón Tanarro e.chacon@upm.es Index 1. Arduino 2. Arduino
Arduino Programming and Interfacing
 Arduino Programming and Interfacing Stensat Group LLC, Copyright 2017 1 Robotic Arm Experimenters Kit 2 Legal Stuff Stensat Group LLC assumes no responsibility and/or liability for the use of the kit and
ARDUINO MEGA ADK REV3 Code: A000069
 ARDUINO MEGA ADK REV3 Code: A000069 OVERVIEW The Arduino MEGA ADK is a microcontroller board based on the ATmega2560. It has a USB host interface to connect with Android based phones, based on the MAX3421e
ARDUINO PRIMO. Code: A000135
 ARDUINO PRIMO Code: A000135 Primo combines the processing power from the Nordic nrf52 processor, an Espressif ESP8266 for WiFi, as well as several onboard sensors and a battery charger. The nrf52 includes
Lecture 7. Processing Development Environment (or PDE)
") Lecture 7 Processing Development Environment (or PDE) Processing Class Overview What is Processing? Installation and Intro. Serial Comm. from Arduino to Processing Drawing a dot & controlling position
Lecture 7 Processing Development Environment (or PDE) Processing Class Overview What is Processing? Installation and Intro. Serial Comm. from Arduino to Processing Drawing a dot & controlling position
Chapter 2 The Basic Functions
 Chapter 2 The Basic Functions 2.1 Overview The code you learn to write for your Arduino is very similar to the code you write in any other computer language. This implies that all the basic concepts remain
ARDUINO UNO REV3 SMD Code: A The board everybody gets started with, based on the ATmega328 (SMD).
.") ARDUINO UNO REV3 SMD Code: A000073 The board everybody gets started with, based on the ATmega328 (SMD). The Arduino Uno SMD R3 is a microcontroller board based on the ATmega328. It has 14 digital input/output
ARDUINO UNO REV3 SMD Code: A000073 The board everybody gets started with, based on the ATmega328 (SMD). The Arduino Uno SMD R3 is a microcontroller board based on the ATmega328. It has 14 digital input/output
University of Portland EE 271 Electrical Circuits Laboratory. Experiment: Arduino
 University of Portland EE 271 Electrical Circuits Laboratory Experiment: Arduino I. Objective The objective of this experiment is to learn how to use the Arduino microcontroller to monitor switches and
ARDUINO YÚN MINI Code: A000108
 ARDUINO YÚN MINI Code: A000108 The Arduino Yún Mini is a compact version of the Arduino YUN OVERVIEW: Arduino Yún Mini is a breadboard PCB developed with ATmega 32u4 MCU and QCA MIPS 24K SoC CPU operating
Adapted from a lab originally written by Simon Hastings and Bill Ashmanskas
 Physics 364 Arduino Lab 1 Adapted from a lab originally written by Simon Hastings and Bill Ashmanskas Vithayathil/Kroll Introduction Last revised: 2014-11-12 This lab introduces you to an electronic development
Serial.begin ( ); Serial.println( ); analogread ( ); map ( );
; Serial.println( ); analogread ( ); map ( );") Control and Serial.begin ( ); Serial.println( ); analogread ( ); map ( ); A system output can be changed through the use of knobs, motion, or environmental conditions. Many electronic systems in our world
Control and Serial.begin ( ); Serial.println( ); analogread ( ); map ( ); A system output can be changed through the use of knobs, motion, or environmental conditions. Many electronic systems in our world
Arduino 101 AN INTRODUCTION TO ARDUINO BY WOMEN IN ENGINEERING FT T I NA A ND AW E S O ME ME NTO R S
 Arduino 101 AN INTRODUCTION TO ARDUINO BY WOMEN IN ENGINEERING FT T I NA A ND AW E S O ME ME NTO R S Overview Motivation Circuit Design and Arduino Architecture Projects Blink the LED Switch Night Lamp
CTEC 1802 Embedded Programming Labs
 CTEC 1802 Embedded Programming Labs This document is intended to get you started using the Arduino and our I/O board in the laboratory - and at home! Many of the lab sessions this year will involve 'embedded
Laboratory 1 Introduction to the Arduino boards
 Laboratory 1 Introduction to the Arduino boards The set of Arduino development tools include µc (microcontroller) boards, accessories (peripheral modules, components etc.) and open source software tools
Arduino Uno. Power & Interface. Arduino Part 1. Introductory Medical Device Prototyping. Digital I/O Pins. Reset Button. USB Interface.
 Introductory Medical Device Prototyping Arduino Part 1, http://saliterman.umn.edu/ Department of Biomedical Engineering, University of Minnesota Arduino Uno Power & Interface Reset Button USB Interface
University of Hull Department of Computer Science C4DI Interfacing with Arduinos
 Introduction Welcome to our Arduino hardware sessions. University of Hull Department of Computer Science C4DI Interfacing with Arduinos Vsn. 1.0 Rob Miles 2014 Please follow the instructions carefully.
Procedure: Determine the polarity of the LED. Use the following image to help:
 Section 2: Lab Activity Section 2.1 Getting started: LED Blink Purpose: To understand how to upload a program to the Arduino and to understand the function of each line of code in a simple program. This
4Serial SIK BINDER //77
 4Serial SIK BINDER //77 SIK BINDER //78 Serial Communication Serial is used to communicate between your computer and the RedBoard as well as between RedBoard boards and other devices. Serial uses a serial
EEG 101L INTRODUCTION TO ENGINEERING EXPERIENCE
 EEG 101L INTRODUCTION TO ENGINEERING EXPERIENCE LABORATORY 1: INTRODUCTION TO ARDUINO IDE AND PROGRAMMING DEPARTMENT OF ELECTRICAL AND COMPUTER ENGINEERING UNIVERSITY OF NEVADA, LAS VEGAS 1. FYS KIT COMPONENTS
Arduino Uno R3 INTRODUCTION
 Arduino Uno R3 INTRODUCTION Arduino is used for building different types of electronic circuits easily using of both a physical programmable circuit board usually microcontroller and piece of code running
Robotics/Electronics Review for the Final Exam
 Robotics/Electronics Review for the Final Exam Unit 1 Review. 1. The battery is 12V, R1 is 400 ohms, and the current through R1 is 20 ma. How many ohms is R2? ohms What is the voltage drop across R1? V
Electronic Brick Starter Kit
 Electronic Brick Starter Kit Getting Started Guide v1.0 by Introduction Hello and thank you for purchasing the Electronic Brick Starter Pack from Little Bird Electronics. We hope that you will find learning
CN310 Microprocessor Systems Design
 CN310 Microprocessor Systems Design Microcontroller Nawin Somyat Department of Electrical and Computer Engineering Thammasat University Outline Course Contents 1 Introduction 2 Simple Computer 3 Microprocessor
Connecting Arduino to Processing
 Connecting Arduino to Processing Introduction to Processing So, you ve blinked some LEDs with Arduino, and maybe you ve even drawn some pretty pictures with Processing - what s next? At this point you
ARDUINO M0 PRO Code: A000111
 ARDUINO M0 PRO Code: A000111 The Arduino M0 Pro is an Arduino M0 with a step by step debugger With the new Arduino M0 Pro board, the more creative individual will have the potential to create one s most
ArdOS The Arduino Operating System Quick Start Guide and Examples
 ArdOS The Arduino Operating System Quick Start Guide and Examples Contents 1. Introduction... 1 2. Obtaining ArdOS... 2 3. Installing ArdOS... 2 a. Arduino IDE Versions 1.0.4 and Prior... 2 b. Arduino
SX1509 I/O Expander Breakout Hookup Guide
 Page 1 of 16 SX1509 I/O Expander Breakout Hookup Guide Introduction Is your Arduino running low on GPIO? Looking to control the brightness of 16 LEDs individually? Maybe blink or breathe a few autonomously?
Arduino Platform Part I
 Arduino Platform Part I Justin Mclean Class Software Email: justin@classsoftware.com Twitter: @justinmclean Blog: http://blog.classsoftware.com Who am I? Director of Class Software for almost 15 years
The Big Idea: Background: About Serial
 Lesson 6 Lesson 6: Serial Serial Input Input The Big Idea: Information coming into an Arduino sketch is called input. This lesson focuses on text in the form of characters that come from the user via the
TANGIBLE MEDIA & PHYSICAL COMPUTING MORE ARDUINO
 TANGIBLE MEDIA & PHYSICAL COMPUTING MORE ARDUINO AGENDA RECAP ALGORITHMIC APPROACHES TIMERS RECAP: LAST WEEK WE DID: ARDUINO IDE INTRO MAKE SURE BOARD AND USB PORT SELECTED UPLOAD PROCESS COVERED DATATYPES
analogwrite(); The analogwrite function writes an analog value (PWM wave) to a PWM-enabled pin.
; The analogwrite function writes an analog value (PWM wave) to a PWM-enabled pin.") analogwrite(); The analogwrite function writes an analog value (PWM wave) to a PWM-enabled pin. Syntax analogwrite(pin, value); For example: analogwrite(2, 255); or analogwrite(13, 0); Note: Capitalization
analogwrite(); The analogwrite function writes an analog value (PWM wave) to a PWM-enabled pin. Syntax analogwrite(pin, value); For example: analogwrite(2, 255); or analogwrite(13, 0); Note: Capitalization
Connecting Arduino to Processing a
 Connecting Arduino to Processing a learn.sparkfun.com tutorial Available online at: http://sfe.io/t69 Contents Introduction From Arduino......to Processing From Processing......to Arduino Shaking Hands
Arduino For Amateur Radio
 Arduino For Amateur Radio Introduction to Arduino Micro controller vs. a PI Arduino Models, Books and Add-Ons Amateur Radio Applications Arduino Uno/Pro Micro Introduction to Arduino Programming More on
Lab 2 - Powering the Fubarino. Fubarino,, Intro to Serial, Functions and Variables
 Lab 2 - Powering the Fubarino Fubarino,, Intro to Serial, Functions and Variables Part 1 - Powering the Fubarino SD The Fubarino SD is a 56 pin device. Each pin on a chipkit device falls broadly into one
Review of the syntax and use of Arduino functions, with special attention to the setup and loop functions.
 Living with the Lab Fall 2011 What s this void loop thing? Gerald Recktenwald v: October 31, 2011 gerry@me.pdx.edu 1 Overview This document aims to explain two kinds of loops: the loop function that is
Arduino provides a standard form factor that breaks the functions of the micro-controller into a more accessible package.
 About the Tutorial Arduino is a prototype platform (open-source) based on an easy-to-use hardware and software. It consists of a circuit board, which can be programed (referred to as a microcontroller)
ARDUINO INDUSTRIAL 1 01 Code: A000126
 ARDUINO INDUSTRIAL 1 01 Code: A000126 The Industrial 101 is a small form-factor YUN designed for product integration. OVERVIEW: Arduino Industrial 101 is an Evaluation board for Arduino 101 LGA module.
Microcontrollers and Interfacing week 8 exercises
 2 HARDWARE DEBOUNCING Microcontrollers and Interfacing week 8 exercises 1 More digital input When using a switch for digital input we always need a pull-up resistor. For convenience, the microcontroller
Introduction to Microcontrollers
 Introduction to Microcontrollers June 2017 Scott A. Theis W2LW Rev 5 ( 0 8 / 0 2 / 2 0 1 7 ) What s it all about How to get started What are some of the common controller options General introduction to
Workshop on Microcontroller Based Project Development
 Organized by: EEE Club Workshop on Microcontroller Based Project Development Presented By Mohammed Abdul Kader Assistant Professor, Dept. of EEE, IIUC Email:kader05cuet@gmail.com Website: kader05cuet.wordpress.com
Intro to Arduino. Zero to Prototyping in a Flash! Material designed by Linz Craig and Brian Huang
 Intro to Arduino Zero to Prototyping in a Flash! Material designed by Linz Craig and Brian Huang Overview of Class Getting Started: Installation, Applications and Materials Electrical: Components, Ohm's
INDUSTRIAL TRAINING:6 MONTHS PROGRAM TEVATRON TECHNOLOGIES PVT LTD
 MODULE-1 C Programming Language Introduction to C Objectives of C Applications of C Relational and logical operators Bit wise operators The assignment statement Intermixing of data types type conversion
1 Overview. 2 Basic Program Structure. 2.1 Required and Optional Parts of Sketch
 Living with the Lab Winter 2015 What s this void loop thing? Gerald Recktenwald v: February 7, 2015 gerry@me.pdx.edu 1 Overview This document aims to explain two kinds of loops: the loop function that
Introduction to Arduino (programming, wiring, and more!)
") Introduction to Arduino (programming, wiring, and more!) James Flaten, MN Space Grant Consortium with Ben Geadelmann, Austin Langford, et al. University of MN Twin Cities Aerospace Engineering and Mechanics
Introduction to Arduino (programming, wiring, and more!) James Flaten, MN Space Grant Consortium with Ben Geadelmann, Austin Langford, et al. University of MN Twin Cities Aerospace Engineering and Mechanics
Prototyping & Engineering Electronics Kits Basic Kit Guide
 Prototyping & Engineering Electronics Kits Basic Kit Guide odysseyboard.com Please refer to www.odysseyboard.com for a PDF updated version of this guide. Guide version 1.0, February, 2018. Copyright Odyssey
Alessandra de Vitis. Arduino
 Alessandra de Vitis Arduino Arduino types Alessandra de Vitis 2 Interfacing Interfacing represents the link between devices that operate with different physical quantities. Interface board or simply or
Update: Ver 1.3 Dec Arduino Learning Guide For Beginner Using. Created by Cytron Technologies Sdn Bhd - All Rights Reserved
 Update: Ver 1.3 Dec 2018 Arduino Learning Guide For Beginner Using Created by Cytron Technologies Sdn Bhd - All Rights Reserved LESSON 0 SETTING UP HARDWARE & SOFTWARE Part 1: Put Up Label Stickers for
This is the Arduino Uno: This is the Arduino motor shield: Digital pins (0-13) Ground Rail
 Ground Rail") Reacting to Sensors In this tutorial we will be going over how to program the Arduino to react to sensors. By the end of this workshop you will have an understanding of how to use sensors with the Arduino
Reacting to Sensors In this tutorial we will be going over how to program the Arduino to react to sensors. By the end of this workshop you will have an understanding of how to use sensors with the Arduino
ECGR 4101/5101, Fall 2016: Lab 1 First Embedded Systems Project Learning Objectives:
 ECGR 4101/5101, Fall 2016: Lab 1 First Embedded Systems Project Learning Objectives: This lab will introduce basic embedded systems programming concepts by familiarizing the user with an embedded programming
IR Breakbeam Sensors. Created by lady ada. Last updated on :32:59 PM UTC
 IR Breakbeam Sensors Created by lady ada Last updated on 2017-12-08 10:32:59 PM UTC Guide Contents Guide Contents Overview Arduino CircuitPython 2 3 5 8 Adafruit Industries https://learn.adafruit.com/ir-breakbeam-sensors
Lab 2 - Powering the Fubarino, Intro to Serial, Functions and Variables
 Lab 2 - Powering the Fubarino, Intro to Serial, Functions and Variables Part 1 - Powering the Fubarino SD The Fubarino SD is a 56 pin device. Each pin on a chipkit device falls broadly into one of 9 categories:
Schedule. Sanford Bernhardt, Sangster, Kumfer, Michalaka. 3:10-5:00 Workshop: Build a speedometer 5:15-7:30 Dinner and Symposium: Group 2
 Schedule 8:00-11:00 Workshop: Arduino Fundamentals 11:00-12:00 Workshop: Build a follower robot 1:30-3:00 Symposium: Group 1 Sanford Bernhardt, Sangster, Kumfer, Michalaka 3:10-5:00 Workshop: Build a speedometer
Laboratory 5 Communication Interfaces
 Laboratory 5 Communication Interfaces Embedded electronics refers to the interconnection of circuits (micro-processors or other integrated circuits) with the goal of creating a unified system. In order
Computer Architectures
 Implementing the door lock with Arduino Gábor Horváth 2017. február 24. Budapest associate professor BUTE Dept. Of Networked Systems and Services ghorvath@hit.bme.hu Outline Aim of the lecture: To show
Goal: We want to build an autonomous vehicle (robot)
") Goal: We want to build an autonomous vehicle (robot) This means it will have to think for itself, its going to need a brain Our robot s brain will be a tiny computer called a microcontroller Specifically
Goal: We want to build an autonomous vehicle (robot) This means it will have to think for itself, its going to need a brain Our robot s brain will be a tiny computer called a microcontroller Specifically
Distributed Real- Time Control Systems. Lecture 3 Embedded Systems Interfacing the OuterWorld
 Distributed Real- Time Control Systems Lecture 3 Embedded Systems Interfacing the OuterWorld 1 Bibliography ATMEGA 328 Datasheet. arduino.cc Book: Arduino Cookbook, 2nd Ed. Michael Margolis O Reilly, 2012
Introducting Itsy Bitsy 32u4
 Introducting Itsy Bitsy 32u4 Created by lady ada Last updated on 2018-01-03 05:47:20 AM UTC Guide Contents Guide Contents Overview Pinouts Which do you have? Power Pins Adafruit Pro Trinket LiIon/LiPoly
The Arduino IDE and coding in C (part 1)
") The Arduino IDE and coding in C (part 1) Introduction to the Arduino IDE (integrated development environment) Based on C++ Latest version ARDUINO IDE 1.8.3 can be downloaded from: https://www.arduino.cc/en/main/software
The Arduino IDE and coding in C (part 1) Introduction to the Arduino IDE (integrated development environment) Based on C++ Latest version ARDUINO IDE 1.8.3 can be downloaded from: https://www.arduino.cc/en/main/software
Welcome to Apollo. For more information, please visit the website and select Apollo. Default Code
 Welcome to Apollo For more information, please visit the website and select Apollo Arduino Pins Default Code D49 LED Digital Pins digitalwrite digitalread pinmode Analog Pins analogread digitalread D33
Arduino Programming Part 4: Flow Control
 Arduino Programming Part 4: Flow Control EAS 199B, Winter 2010 Gerald Recktenwald Portland State University gerry@me.pdx.edu Goal Make choices based on conditions in the environment Logical expressions:
Seeeduino LoRaWAN. Description
 Seeeduino LoRaWAN SKU 102010128 LoRaWAN Class A/C Ultra long range communication Ultra low power consumption Arduino programming (based on Arduino Zero bootloader) Embeded with lithim battery management
Arduino Workshop. Overview. What is an Arduino? Why Arduino? Setting up your Arduino Environment. Get an Arduino based board and usb cable
 Arduino Workshop Overview Arduino, The open source Microcontroller for easy prototyping and development What is an Arduino? Arduino is a tool for making computers that can sense and control more of the
SquareWear Programming Reference 1.0 Oct 10, 2012
 Content: 1. Overview 2. Basic Data Types 3. Pin Functions 4. main() and initsquarewear() 5. Digital Input/Output 6. Analog Input/PWM Output 7. Timing, Delay, Reset, and Sleep 8. USB Serial Functions 9.
ARDUINO EXPERIMENTS ARDUINO EXPERIMENTS
 ARDUINO EXPERIMENTS IR OBSTACLE SENSOR... 3 OVERVIEW... 3 OBJECTIVE OF THE EXPERIMENT... 3 EXPERIMENTAL SETUP... 3 IR SENSOR ARDUINO CODE... 4 ARDUINO IDE SERIAL MONITOR... 5 GAS SENSOR... 6 OVERVIEW...
Lab 02 Arduino 數位感測訊號處理, SPI I2C 介面實驗. More Arduino Digital Signal Process
 Lab 02 Arduino 數位感測訊號處理, SPI I2C 介面實驗 More Arduino Digital Signal Process Blink Without Delay Sometimes you need to do two things at once. For example you might want to blink an LED (or some other timesensitive