Formulate Designer Series 20 Backwall - Kit 11
|
|
|
- Spencer Stewart
- 5 years ago
- Views:
Transcription


1 Formulate Designer Series 20 Backwall - Kit 11 FMLT-DS Formulate Designer Series 20ft displays have unique stylistic features and shapes, are portable and easy to assemble. The aluminum tube frame features snap-buttons and/ or spigot connections and zipper pillowcase fabric graphics. All displays come in portable, wheeled transit cases. Simply pull the pillowcase fabric graphic(s) over the frame and zip. features and benefits: - Premium aluminum tube frames with snap button / spigot assembly - Easy to store and ship - Quick to set up - Weighted feet for added stability dimensions: Hardware Assembled unit: w x h x d 5839mm(w) x 2393mm(h) x 1203mm(d) Approximate weight with cases: 203 lbs / 92.1 kgs - Zipper pillowcase fabric graphic - Kit includes: medium monitor mount, can hold monitor/ max weight 40lbs, and four literature holders - Lifetime limited hardware warranty against manufacturer defects Graphic Refer to related graphic template for more information. Visit: graphic-templates Shipping Packing case(s): 3 OCE Cases Shipping dimensions: OCE: Expandable case length (l) may vary l x 18 h x 18 d 1016mm-1677mm(l) x 458mm(h) x 458mm(d) Approximate total shipping weight (includes cases & graphics): 235 lbs / kgs additional information: Graphic material: dye-sublimation zipper pillowcase fabric We are continually improving and modifying our product range and reserve the right to vary the specifications without prior notice. All dimensions and weights quoted are approximate and we accept no responsibility for variance. E&OE. See Graphic Templates for graphic bleed specifications. 12/12/2017


2 Included In Your Kit Tools, Components, & Connectors HEX KEY SET x1 TC-30-A-TC-30-B-ASY x2 TC-30-T x7 TC T x4 TC-30-X x1 ES30 x6 ES50-1 x16 LN112 x4 TC-30-C x4 Graphics FMLT-DS A-G FMLT-DS B-G

3 Included In Your Kit DS A-T1 x4 DS A-T2 x6 DS A-T3 x2 DS A-T4 x2 DS A-T5 x2 Tubes DS A-T6 x1 DS A-T7 x1 DS A-T8 x2 DS A-T9 x2 DS T1 x1 DS T2 x1 DS T3 x1 DS T4 x1 DS T5 x2 DS T6 x4
4 Included In Your Kit Tubes DS T7 x1 DS T8 x4 DS T9 x2 DS T10 x1 DS T11 x1 DS T12 x2 DS T13 x2 DS T14 x2
5 Exploded View FMLT-DS FRAME A
6 Exploded View FMLT-DS FRAME B
7 Labeling Diagram FMLT-DS FRAME B


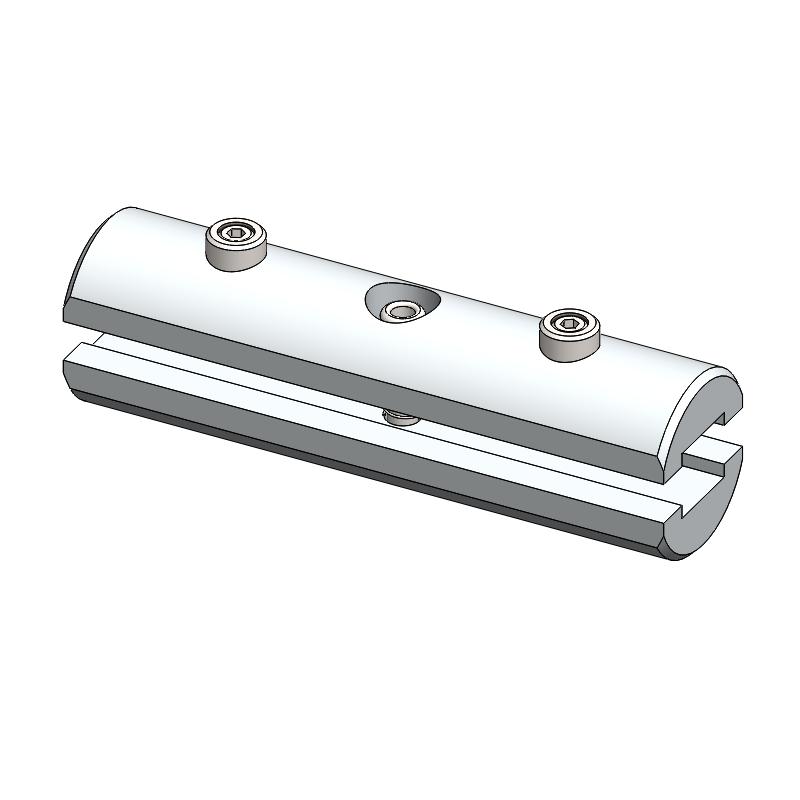
8 Connection Methods Formulate structures use a number of different yet simple connection methods. Your kit will include one or more of the connection methods shown below. Steps within the Kit Assembly will reference a specific method for each connection point. Connection Method 1: ES30 / ES50 / ES75 Connection Method 2: Snap Buttons & Swage Connection Method 3: ES30-90B / ES30-I / ES30-C Swage Snap Buttons Compress the unlocked connector and slide one tube onto each end. Lock both screws carefully using your hex key tool. Be sure to lock securely, but do not overtighten. Locate the snap button on the connector or swage tube. Locate the hole on the corresponding tube. Press the snap button with your thumb and slide the tube and connector together so that the snap button snaps fully into the lock hole. To disassemble, press the snap button and pull apart. ES30-90B ES30-90B Compress one unlocked end of the connector and slide it through one tube end. Compress the other end of the connector and slide the second tube on. Lock both screws carefully using your hex key tool. Be sure to lock securely, but do not overtighten. Connection Method 4: Tube Clamps TCP TC TCH Be sure to fully assemble all frames before using clamps. With the clamp unlocked, place one tube of the first frame into the mouth of the clamp. Place the second tube (if applicable) into the second mouth of the clamp. With both frame s tubes in the clamp, be sure to lock securely, but do not overtighten.


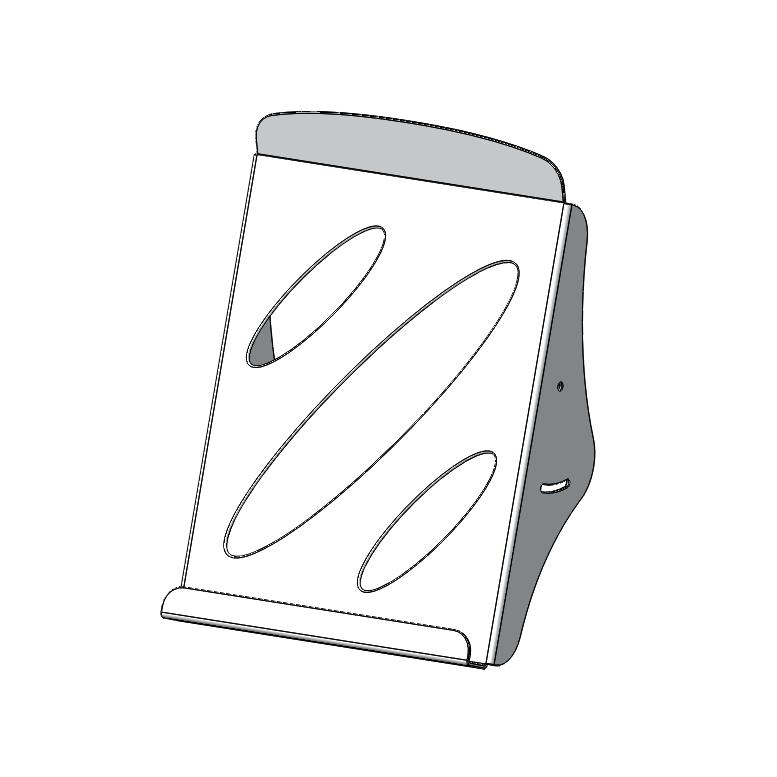
9 Literature Pocket Assembly Tube Connections LN Locate and unpack your LN112 assembly. Assemble the components in the order shown in step 2. Before tightening into place, adjust angle. Use your hex key tool to lock the mounting screw. Attach the tube clamp to the tube in the desired location. Use your hex key tool to lock the clamp into place. Extrusion Connections LN Locate and unpack your LN112 assembly. Assemble the components in the order shown in step 2, do not tighten. Slide the LN100 through the channel to the desired mounting location. Adjust angle. Hand tighten to lock into place. LN112-2 LN112-3 LN Locate and unpack your literature pocket. Tilt your literature pocket so that the end of the flange sits inside of the desired horizontal channel. Rotate your literature pocket so the end of the flange rests inside of the channel. ABH Locate and unpack your ABH-01 assembly. Disassemble your CKSO standoff barrels by unscrewing their caps. Screw the long barrel base into the channel to lock into place. Align the holes of your ABH-01 literature pocket with the CKSO barrels, adjust the CKSO location if neccessary. Screw the CKSO caps onto over the holes of the ABH-01 into the barrels.


10 Kit Assembly Step by Step Step 1. Locate the components necessary for assembling Frame B. Assemble your frame in order according to the Labeling Diagram. Please reference Connection Methods 1 & 2 for more details. Step 2. Fit the FMLT-DS B-G graphic onto Frame B. For ease of installation, pull the fabric cover over the top of the frame while the frame rests flat on the floor. Zip to enclose. Zipper located on the bottom of Graphic B. Bottom Of Frame Step 3. Attach the FMLT-DS A-T14 to the connectors protruding through the graphics. Please reference Connection Method 2 for more details Step 4. Locate the components necessary for assembling Frame A. Assemble your frame in order according to the Exploded View. Please reference Connection Method 2 for more details.


 LN112 Literature pockets with TC-30 clamps for left side mounting and (2) for right side mounting.")
11 Kit Assembly Step by Step Step 5. Step 6. Fit the FMLT-DS A-G graphic onto Frame A. For ease of installation, pull the fabric cover from the bottom of the frame while the frame rests flat on the floor. Zip to enclose. Zipper located to the top of Graphic A. Locate the two T9 tube clamping components that will connect your Frame A onto Frame B. First, attach them onto the T5 tube clamps located at the top of Frame A. Second, attach the T9 tube clamps onto the top of Frame B. Please reference Connection Method 4 for more details. Bottom Of Frame Step 7. Locate your PM4S3 Monitor Kiosk Kit. Assemble it according to the order of the provided setup instructions. Place the kiosk behind Frame A as shown in the image to the right. The monitor bracket should be protruding out in front of the pillowcase graphic. Step 8. Assemble (2) LN112 Literature pockets with TC-30 clamps for left side mounting and (2) for right side mounting. Lock the LN112 assemblies to the left and right sides of Frame A. Be sure to lock to the bare post by sticking the clamps through the holes in the graphic. Please reference the Literature Pocket Assembly page and Connection Method 4 for more details. Setup is complete.

12 PM4S3 Monitor Kiosk PM4S3-MK-M PM4S3-MK-L Kiosk displays are portable and easy to assemble. The aluminum extrusion frame features cam locks, tension glide connections and medium or large monitor mounts. This kiosk comes in a expandable shipping case. features and benefits: - Premium aluminum extrusion frames with cam lock and tension glide assembly - Easy to store and ship - Quick to set up - Weighted feet for added stability - Kiosk Kit includes a medium or large monitor mount - Lifetime limited hardware warranty against manufacturer defects dimensions: Hardware Assembled unit: Medium or Large w x h x d 650mm(w) x 1800mm(h) x 650mm(d) Approximate weight: (excludes cases & monitor mount) Medium or Large 40 lbs / 19 kgs Shipping Packing case(s): Medium or Large 1 OCE Case Shipping dimensions: OCE: Expandable case length (l) may vary l x 18 h x 18 d 1016mm-1677mm(l) x 458mm(h) x 458mm(d) Approximate total shipping weight: (includes cases & monitor mount) Medium 83 lbs / 38 kgs Large 85 lbs / 39 kgs We are continually improving and modifying our product range and reserve the right to vary the specifications without prior notice. All dimensions and weights quoted are approximate and we accept no responsibility for variance. E&OE. additional information: -Medium monitor mount can hold monitor/ max weight 40lbs -Large monitor mount can hold monitor/ max weight 40lbs -Monitor not included -If shipping with backwall kit cases may vary 03/03/17


13 Included In Your PM4S3 Monitor Kiosk Tools, Components, Connectors & Extrusions 5MM ALLEN-T x1 PH2-350-L-L x3 PM4S3-MM-FOOT-L x1 PM4S3-MM-FOOT-R x1 LN100 x6 M5 THUMBSCREW x8 PH5-100-L-L x2 PM4S4-150 x2 PM4S3-600-A165-A165 x2 PM4S A165-A165 x2 PH2-300-TG x2 EXT-M-MB (or) EXT-LG-MB x1 Fastening Hardware Included
14 Exploded View PM4S3-MK-M PM4S3-MK-L Please note: This is the the kiosk frame build for either medium or large kit.


15 Kit Assembly Step by Step Step 1. Reference the image to the right. Locate the coded extrusions. Slide the PH2-300-TG connector into one end of the PM4S A165-A165 so that it goes as deep as the internal pins. Connect the PM4S3-600-A165-A165 by sliding it over the PH2-300-TG. Repeat for this step for the second vertical. PM4S3-600-A165-A165 PH2-300-TG Step 2. Collect your extrusions and handtool. Using the provided handtool, lock the extrusions into the back channel of the three channel PM4S3 faces as shown in the image below. Be sure the locks face toward the back of the assembly and do not over tighten. PH2-350-L-L PH2-350-L-L PH2-350-L-L PM4S A165-A165 Step 3. Step 4. Locate the M5 thumbscrews, LN100s, and the PM4S3-MM stabilizing bases. Slide the LN100s into the middle channel of the PM4S3. Hand screw the M5 thumbscrews through the base holes and into the LN100 holes. Use the handtool to securely fasten the M5 Thumbscrews. Do not over tighten. M5 Thumbscrew Measure from the ground to the center of the hole in your main kit s graphic. Lock the center of your PH5-100-L-L into the PM4S3 stacks at the dimension height of the graphic hole. Do not over tighten. PH5-100-L-L LN100


16 Kit Assembly Step by Step Step 5. Step 6. NOTE: Your main backwall assembly must be completed with graphics before completing this step of the monitor kit. Lock your PM4S4-150 to the ends of the PH5-100-L-L. Do not over tighten. PM4S4-150 Set your monitor stand so that the extrusion arms fit through the graphic hole. Use the provided fastening hardware to complete your monitor stand. Slide the LN100 into the bottom center channel of the PM4S Next, slide the Square Head Bolt into the top center channel of the PM4S Apply the monitor bracket and spacer washer before fastening with the wingnut. Monitor mount may vary depending on size. Monitor not included. Square Head Bolt Wing Nut LN100 Step 7. Setup is complete.

 Approximate total shipping weight: 6 lbs / 2.")

 Approximate total shipping weight: 7 lbs / 3.")

17 Monitor Bracket Instructions Extrusion Channel Applications EXT-SM-MB Sizes: Max weight varies per application Assembled unit: 9 w x 16 h x 1.4 d 230mm (w) x 410mm (h) x 35mm (d) Shipping dimensions: 14 l x 6 h x 4 d 356mm (l) x 152mm (h) x 102mm (d) Approximate total shipping weight: 6 lbs / 2.7 kgs VESA: 75 x x 200mm EXT-M-MB Sizes: Max weight varies per application Assembled unit: 16 w x 16 h x 1.4 d 410mm (w) x 410mm (h) x 35mm (d) Shipping dimensions: 24 l x 4 h x 4 d 610mm (l) x 102mm (h) x 102mm (d) Approximate total shipping weight: 7 lbs / 3.2 kgs VESA: 100 x x 400mm EXT-LG-MB Sizes: Max weight varies per application Assembled unit: 24 w x 16 h x 1.4 d 610mm (w) x 410mm (h) x 35mm (d) Shipping dimensions: 28 l x 6 h x 6 d 711mm (l) x 152mm (h) x 152mm (d) Approximate total shipping weight: 8 lbs. / 3.6 kgs VESA: 100 x x 400mm Included hardware: M5 x 10 1/4-20 x 1 1/4-20 LN-100 x2 LN-LCD-SCW x2 BOLT-1 x2 Flange Wingnut x2 03/08/2017

 monitor bracket, (2) square head bolts, (2) washers, and (2)")


 washers.")


")

18 EXTRUSION CONNECTION Channel Connection A 1 2 Channel Connection B 3 4 Locate all components needed to assemble the monitor mount with the channel connection A method. You will need (1) monitor bracket, (2) square head bolts, (2) washers, and (2) wingnuts. Step 1: Apply pressure to the rear side of the leveling gauge clipped into the monitor mount to remove it. Step 2: Insert the provided bolts through the washers and center top and bottom holes of the monitor mount. Loosly thread your wingnuts onto the end of the bolts.step 3: Slide the bolt heads down the extrusion channel. Step 4: Tighten your wingnuts to lock the monitor bracket in place. Step 5: Reference the included manufacturer monitor mount instructions for fastening your monitor to the bracket Locate all components needed to assemble the monitor mount with the channel connection B method. You will need (1) monitor bracket, (2) LN-LCD-SCW, (2) LN-100, and (2) washers. Step 1: Apply pressure to the rear side of the leveling gauge clipped into the monitor mount to remove it. Step 2: Loosly thread the LN-LCD-SCW screws through the washers, the center top and bottom holes of the monitor bracket, and through the LN-50 holes.step 3: Slide the LN-100s down the extrusion channel. Step 4: Tighten your LN- LCD-SCW to lock the monitor bracket in place. Step 5: Reference the included manufacturer monitor mount instructions for fastening your monitor to the bracket. TRI-30MM Channel Tube Connection Locate all components needed to assemble the monitor mount with the TRI-30MM Channel Tube Connection method. You will need (1) monitor bracket, (2) Square Bolts, and (2) Wingnuts. Step 1: Slip the head of the square bolts into the extrusion channel of the tube. Step 2: Apply your monitor bracket to the protruding square bolts. Step 3: Lock your monitor bracket to the square bolts using the provided wingnuts. Step 4: Reference the included manufacturer monitor mount instructions for fastening your monitor to the bracket.
Formulate Kiosk features and benefits: dimensions: additional information:
 Formulate Kiosk - 03 FMLT-KIOSK-03 Formulate Kiosks with light weight aluminum tube frames with state-of-the-art printed stretch zipper pillowcase fabric graphics to create funky and functional multimedia
features and benefits: dimensions: Approximate weight with cases: 124 lbs / 56.2kgs Shipping Packing case(s): 1 OCE 1 OCH
: 1 OCE 1 OCH") Formulate Kiosk 02 FMLT-KIOSK-02 Formulate Kiosks with light weight aluminum tube frames with state-of-the-art printed stretch zipper pillowcase fabric graphics to create funky and functional multimedia
Formulate Kiosk 02 FMLT-KIOSK-02 Formulate Kiosks with light weight aluminum tube frames with state-of-the-art printed stretch zipper pillowcase fabric graphics to create funky and functional multimedia
TensionLitePlus Kiosk Design 4
 TensionLitePlus Kiosk Design 4 TensionLite Plus Kiosks combine lightweight aluminum tube frames with state-of-the-art printed stretch zipper pillowcase fabric graphics to create funky and functional multimedia
Formulate Accent - 04
 Formulate Accent - 04 FMLT-WL04 Formulate accents enhance the funtionality of any 10ft or 20ft backwall and add more real estate for messaging too! With monitor supports, literature pockets, shelves, tables,
Formulate Designer Series 20 Backwall - Kit 02
 Formulate Designer Series 20 Backwall - Kit 02 FMLT-DS-20-02 Formulate Designer Series 20ft displays have unique stylistic features and shapes, are portable and easy to assemble. The aluminum tube frame
Formulate Accent Ladder 12
 Formulate Accent Ladder 12 FMLT-WL12 Formulate Master Accents enhance the functionality of many Formulate Master 10 and 20 backwalls and add more real estate for messaging too! With monitor supports, literature
Formulate 20 x 20 Island Exhibit - Kit 10
 Formulate 20 x 20 Island Exhibit - Kit 10 CFAB-K-10 Formulate Fusion provides an unparalleled dynamic that elevates and accentuates a message and brand, but also maximizes the return on tradeshow investment.
Formulate 20 Vertical Curve
 Formulate 20 Vertical Curve FMLT-WV20-03 Formulate TM is a collection of sophisticated, ergonomically designed exhibit booths. Formulate combines state-of-the-art zipper pillowcase dye-sublimated fabric
features and benefits: - 50mm silver extrusion frame - Single or double-sided SEG dye-sublimated fabric graphics - Easy assembly dimensions:
 Vector Frame S-01 VF-S-01 Vector Frame TM is a collection of modern extrusion-based fabric graphic banner displays. Vector Frame is easy to assemble and disassemble and provides your choice of single-sided
Vector Frame Kit 22. features and benefits: dimensions: additional information:
 Vector Frame Kit 22 VF-K-22 The innovative, contemporary and clean appearance of the Vector Frame TM line of exhibit kits will captivate your audience. Kits feature push-fit fabric graphics, easy-to-assemble
Vector Frame R-07. features and benefits: dimensions: additional information:
 Vector Frame R-07 VF-R-07 Vector Frame TM is a collection of modern extrusion-based fabric graphic banner displays. Vector Frame is easy to assemble and disassemble and provides your choice of single-sided
Vector Frame Light Box R-07
 Vector Frame Light Box R-07 VF-LB-R-07 Vector Frame fabric light boxes feature durable 100mm aluminum extrusion frames, push-fit back-lit fabric graphics and LED top and bottom lighting. Single and double-sided
Vector Frame Light Box R-05
 Vector Frame Light Box R-05 VF-LB-R-05 Vector Frame fabric light boxes feature durable 100mm aluminum extrusion frames, push-fit back-lit fabric graphics and LED top and bottom lighting. Single and double-sided
Vector Frame Kit 18. features and benefits: dimensions: additional information:
 Vector Frame Kit 18 VF-K-18 The innovative, contemporary and clean appearance of the Vector Frame TM line of exhibit kits will captivate your audience. Kits feature push-fit fabric graphics, easyto-assemble
Linear Kiosk 02. features and benefits: dimensions: additional information:
 Linear Kiosk 02 LN-K-02 Dress up and add wow to your space with state-of-the-art multimedia kiosks. features and benefits: - Custom appearance - Easy to assemble - Bases available in four finishes - Aluminum
wave 20S curve kit 04
 wave 20S curve kit 04 WAVE-WSC20-04 Wave TM is a collection of stylish, ergonomically designed 20 exhibit booths. Wave combines state-of-the-art, zipper pillowcase dye-sublimated fabric coverings with
velocity kiosk 02 velocity features and benefits: dimensions: additional information:
 velocity kiosk 02 V-K-02 Dress up and add wow to your space with state-of-the-art multimedia kiosks. features and benefits: - Custom appearance - Easy to assemble - Bases available in four finishes - Aluminum
features and benefits: dimensions: Hardware Shipping additional information: Graphic Material: Dye-sublimated fabric Tabletop color options:
 Vector Frame Kit 10 VF-K-10 The innovative, contemporary and clean appearance of the Vector Frame TM line of exhibit kits will captivate your audience. Kits feature push-fit fabric graphics, easyto-assemble
features and benefits: dimensions: Hardware additional information: Graphic material: Dye-sublimated fabric Tabletop color options:
 Vector Frame Kit 02 VF-K-02 Stand apart from the competition with a clean, sophisticated 10 x 10 or 10 x 20 Vector Frame TM exhibit kit. These graphic mural kits feature square-corner 50mm extrusion frames
features and benefits: dimensions: Hardware Shipping additional information: Graphic Material: Dye-sublimated fabric Tabletop color options:
 Vector Frame Kit 16 VF-K-16 The innovative, contemporary and clean appearance of the Vector Frame TM line of exhibit kits will captivate your audience. Kits feature push-fit fabric graphics, easyto-assemble
features and benefits: dimensions: Hardware Shipping additional information: Graphic material: Dye-sublimated fabric Tabletop color options:
 Vector Frame Kit 23 VF-K-23 The innovative, contemporary and clean appearance of the Vector Frame TM line of exhibit kits will captivate your audience. Kits feature push-fit fabric graphics, easyto-assemble
Vector Frame Counter 03
 Vector Frame Counter 03 VFC-03 Vector Frame TM counters compliment the Vector Frame series of exhibit kits, but are also ideal for any stand-alone event or display. Vector Frame counters couple simple
Vibe Kit 05. features and benefits: dimensions: additional information:
 Vibe Kit 05 VBK-5 Vibe is a collection of cleverly-designed state-of-the-art 10 exhibit booths. Vibe combines light-weight aluminum structures with pillowcase dyesublimated printed fabric graphics for
features and benefits: dimensions: Hardware Shipping additional information: Graphic material: Dye-sublimated fabric Tabletop Color Options:
 Vector Frame Kit 05 VF-K-05 Stand apart from the competition with a clean, sophisticated 10 x 10 or 10 x 20 Vector Frame TM exhibit kit. These graphic mural kits feature square-corner 50mm extrusion frames
Linear Kiosk 03. features and benefits: dimensions: additional information:
 Linear Kiosk 03 LN-K-03 Dress up and add wow to your space with state-of-the-art multimedia kiosks. features and benefits: - Custom appearance - Easy to assemble - Top available in four finishes - Aluminum
10 ModLite Minimal (Option 3) Trade Show Display Booth
 Trade Show Display Booth") This Display provides a modern, slick, and stylish appearance. The extrusion based exhibit features a NEW velcro-applied fabric graphic. Headers and wings are available in UV printed graphics or frosted
This Display provides a modern, slick, and stylish appearance. The extrusion based exhibit features a NEW velcro-applied fabric graphic. Headers and wings are available in UV printed graphics or frosted
Vector Frame Light Box S-02
 Vector Frame Light Box S-02 VF-LB-S-02 Vector Frame TM fabric light boxes feature durable 100mm aluminum extrusion frames, push-fit backlit fabric graphics and LED edge lighting. Single and double-sided
Vector Frame Light Box R-04
 Vector Frame Light Box R-04 VF-LB-R-04 Vector Frame TM fabric light boxes feature durable 100mm aluminum extrusion frames, push-fit backlit fabric graphics and LED edge lighting. Single and double-sided
Vector Frame Light Box R-03
 Vector Frame Light Box R-03 VF-LB-R-03 Vector Frame TM fabric light boxes feature durable 100mm aluminum extrusion frames, push-fit backlit fabric graphics and LED edge lighting. Single and double-sided
velocity lite 08 velocity features and benefits: dimensions: additional information:
 velocity lite 08 VL08 Attractive and versatile a lightweight, portable 10 x20 structure is complemented with dyesublimated fabric graphics and rigid accent graphics to emphasize your facetoface marketing
Vector Frame Light Box R-01
 Vector Frame Light Box R-01 VF-LB-R-01 Vector Frame TM fabric light boxes feature durable 100mm aluminum extrusion frames, push-fit backlit fabric graphics and LED edge lighting. Single and double-sided
features and benefits: dimensions: Hardware Assembled unit: Tabletop/2x2: w x h x 12.8 d mm(w) x 1509.
 x 1509.") XClaim Twenty nine XClaim TM fabric popup display sizes and configurations are available. XClaim is a versitile stretch fabric popup display system. Add dimesion to your event or tradeshow with unique,
XClaim Twenty nine XClaim TM fabric popup display sizes and configurations are available. XClaim is a versitile stretch fabric popup display system. Add dimesion to your event or tradeshow with unique,
EVOLVE1-M MONITOR ARM
 EVOLVE1-M MONITOR ARM EVOLVE1-M Rev A 2/17 Model EVOLVE1-M-SLV Model EVOLVE1-M-BLK Model EVOLVE1-M-WHT ASSEMBLY AND ADJUSTMENT EVOLVE1-M MONITOR ARM PARTS AND TOOLS PLEASE REVIEW these instructions before
Extra Large Full Motion TV Mount for Televisions
 8008981 TV Size Range: 47 ~ 84 Maximum Weight Capacity: 60 kg/132 lbs Maximum Mounting Pattern: 800 mm x 600 mm (31.4 x 23.6 ) Distance to the Wall: 5.5-45 cm Extra Large Full Motion TV Mount for 47-84
features and benefits:
 compact image Compact Image is a collection of efficient, lightweight, portable tension fabric backwall systems. Compact Image is easy to assemble and disassemble and includes an integrated fabric graphic
ASSEMBLY AND ADJUSTMENT
 EDGE-WALL MONITOR ARM EDGE-WALL Rev A 2/17 Model EDGE-WALL-SLV ASSEMBLY AND ADJUSTMENT EDGE-WALL MONITOR ARM PLEASE REVIEW these instructions before beginning the installation. Check that all parts and
Installation and Assembly: 2 x 2 Video Wall Ceiling Mount for 40" - 55" flat Panel Displays
 Installation and Assembly: 2 x 2 Video Wall Ceiling Mount for 40" - 55" flat Panel Displays Model: DS-VWT955-2X2 EXTENSION COLUMN (SOLD SEPARATELY) COMPATIBILITY Display width must be a minimum of 36"
Assembly Manual for Mobile X-ray
 Suitable for Kodak 2000, Kodak 2100, Kodak 2200 and Trophy Elytis - 12 th January 2011 William Green Page 1 of 8 Printed 12/01/2011, 2:07:42 PM Mobile X-ray Parts List 1. 6 x M10 x 65mm UNB CAP Bolts 2.
MBX INSTRUCTION MANUAL. Please read this manual carefully before using the MBX! Mid-range studio stand
 MBX Mid-range studio stand INSTRUCTION MANUAL EN Please read this manual carefully before using the MBX! CAMBO Thank you for purchasing a Cambo product. This new classed Mid-range studio stand will suit
Installation Guide Mounting Kit for Mounting Philips Avalon CTS Cordless Fetal Transducer System on Wall, 2'' Post, Rail, or Slide-on Mounting Plate
 Installation Guide Mounting Kit for Mounting Philips Avalon CTS Cordless Fetal Transducer System on Wall, 2'' Post, Rail, or Slide-on Mounting Plate The purpose of this guide is to: 1. Describe mounting
Hercules 15 with OCH2 Cases
 Hercules 15 with OCH2 Cases OR-K-HC15-OCH2 The Hercules line of Orbital Express Truss features basic backwalls and kits in a variety of sizes to suit a range of space needs. A benefit to this versatile
Quick Installation Guide
 Full Motion Dual Monitor Arm, Pole Mount Quick Installation Guide Please Review the entire Quick Installation Guide prior to installation. If you have any questions regarding the compatibility of this
MD-BSL15W / SPRING-LOADED TWIN-ARM. For ( cm) LCD desktop computer. User Manual
 LCD desktop computer. User Manual") MD-BSL15W / SPRING-LOADED TWIN-ARM MONITOR mount For 15 27 (38.1 68.6 cm) LCD desktop computer User Manual Thank you for choosing Gabor. The Gabor MD-BSL15W mounts two 15 27 (38.1 68.6 cm) LCD computer
MD-BSL15W / SPRING-LOADED TWIN-ARM MONITOR mount For 15 27 (38.1 68.6 cm) LCD desktop computer User Manual Thank you for choosing Gabor. The Gabor MD-BSL15W mounts two 15 27 (38.1 68.6 cm) LCD computer
Sit-Stand Monitor Arm
 Sit-Stand Monitor Arm Product ID: ARMSTSCP1 This sit-stand monitor arm transforms your desk or tabletop into an ergonomic workstation. The monitor arm features a keyboard tray and easy height adjustment
Quad Monitor Desk Stand - 13" to 24" Installation Instructions
 Quad Monitor Desk Stand - 13" to 24" Installation Instructions 04-0885A 1 Unpacking Carefully remove the contents and lay out on cardboard or other protective surface Check package contents against the
The QSR kitchen video bracketing options can be assembled to fit your specific kitchen environment needs.
 QSR Kitchen Video Bracket Configurations and Instructions The QSR kitchen video bracketing options can be assembled to fit your specific kitchen environment needs. A variety of mounting solution configurations
Quick Installation Guide
 Full Motion Single Monitor Arm, Pole Mount Quick Installation Guide Please Review the entire Quick Installation Guide prior to installation. If you have any questions regarding the compatibility of this
Treadmill Integrated LCD Screen Option. Cardio Theater Integrated Bracket Assembly Instructions
 Treadmill Integrated LCD Screen Option Cardio Theater Integrated Bracket Assembly Instructions Table of Contents 1 2 3 4 5 6 Before You Begin... 4 Obtaining Service... 4 Unpacking the Equipment... 4 Important
serial number A1159T or lower, which includes all manufactured in 2008 Not compatible and not required. Figure 1 Auger Update Sites Call-Outs R B
 Installation Instructions 1 Auger Carrier Update ADC2350 Air Carts Used with: ADC2350B General Information These instructions explain how to install an Auger Carrier Update on a pre-2009 pull-behind air
Quick Installation Guide
 Full Motion Dual Monitor Arm, Pole Mount Quick Installation Guide Please Review the entire Quick Installation Guide prior to installation. If you have any questions regarding the compatibility of this
G12/G12x USER S MANUAL
 G12/G12x USER S MANUAL TABLE OF CONTENTS SECTION 1 SLIDE CONFIGURATION SECTION 2 SLIDE CONFIGURATION ACCESSORIES SECTION 3 TABLETOP CONFIGURATION SECTION 4 TABLETOP CONFIGURATION ACCESSORIES SECTION 5
Shop Fox Fence Kit Installation Instructions:
 Shop Fox Fence Kit Installation Instructions: Please note this installation kit is designed solely for installation on a Shop Fox Classic Fence. Accurate Technology manufactures kits for other saw fences
Installation Guide Philips MP20/30/40/50/60/70 IntelliVue M-Series Arm Rail Mount Kit
 Installation Guide Philips MP20/30/40/50/60/70 IntelliVue M-Series Arm Rail Mount Kit The purpose of this guide is to: 1. Describe attachment of Table Top Mount to Mounting Adapter on Arm (page 2). 2.
Classic ipad/tablet Stand Display
 Classic ipad/tablet Stand Display The Classic ipad Stand is a versatile and functional stand that can be used with ipad 2 and later and Samsung Galaxy 10.1. The angle can be adjusted and the ipad can be
Specification. Width - 190mm Length - 230mm Thickness - 8mm Assembled height - 78mm Weight - 805g Table material - AL5052 Screw material - SS304
 Specification Width - 190mm Length - 230mm Thickness - 8mm Assembled height - 78mm Weight - 805g Table material - AL5052 Screw material - SS304 Motherboard support - Mini ITX Drive support - Up to 2 x
Universal Desktop and Monitor Stand
 Universal Desktop and Monitor Stand Installation Instructions Kit P/N: 114-6013 Kit Contents Kit Contents: (1) Stand Assembly (1) VESA Monitor Bracket (1) Bottom Bracket (1) Top Bracket (1) Clamp Bracket
TABLE OF CONTENTS SECTION 1 TABLETOP CONFIGURATION SECTION 2 TABLETOP CONFIGURATION ACCESSORIES SECTION 3 SLIDE CONFIGURATION
 S6 USER S MANUAL TABLE OF CONTENTS SECTION 1 TABLETOP CONFIGURATION SECTION 2 TABLETOP CONFIGURATION ACCESSORIES SECTION 3 SLIDE CONFIGURATION SECTION 4 SLIDE CONFIGURATION ACCESSORIES SECTION 5 RACK MOUNT
SITRANS F. Flowmeters SysCom Upgrade Kit IP65 (NEMA 4X) Multi-Channel. Introduction 1. Installing/Mounting 2. Hardware Installation Instructions
 Multi-Channel. Introduction 1. Installing/Mounting 2. Hardware Installation Instructions") Introduction 1 Installing/Mounting 2 SITRANS F Flowmeters SysCom Upgrade Kit IP65 (NEMA 4X) Multi-Channel Hardware Installation Instructions 1/2010 A5E02518333A Revision 04 Legal information Warning notice
Introduction 1 Installing/Mounting 2 SITRANS F Flowmeters SysCom Upgrade Kit IP65 (NEMA 4X) Multi-Channel Hardware Installation Instructions 1/2010 A5E02518333A Revision 04 Legal information Warning notice
Portable Staging User Guide
 Portable Staging User Guide Components: ExpressDeck was designed for quick and easy assembly: set up is a snap, even if you have no experience! So let s take a moment to meet the components of your new
Articulated Freestanding Dual Monitor Desk Stand - 13" to 27" Installation Instructions
 Articulated Freestanding Dual Monitor Desk Stand - 13" to 27" Installation Instructions 04-1019A 1 Unpacking Carefully remove the contents and lay them out on cardboard or other protective surface Check
Elecraft W1 SWR/Wattmeter Enclosure by W8FGU
 Elecraft W1 SWR/Wattmeter Enclosure by W8FGU The W1 enclosure is made of Lexan, a polycarbonate, which is very strong. It also has a UV blocking coating on one side and was assembled carefully with this
features and benefits:
 Polaris OR-K-PR1 The Planetary line of Orbital Express Truss features over 4 professionally designed off-the-shelf kits for a variety of booth sizes and configurations. Each kit comes complete with all
IBM. Rack Installation Instructions
 IBM Rack Installation Instructions Review the documentation that comes with your rack cabinet for safety and cabling information. When installing your server in a rack cabinet, consider the following:
Rack Installation Instructions
 Rack Installation Instructions Review the documentation that comes with your rack cabinet for safety and cabling information. When installing your server in a rack cabinet, consider the following: v Two
Articulated Freestanding Triple Monitor Desk Stand - 13" to 27" Installation Instructions
 Articulated Freestanding Triple Monitor Desk Stand - 13" to 27" Installation Instructions 04-1020A 1 Unpacking Carefully remove the contents and lay them out on cardboard or other protective surface Check
2 x Dynamic Arms on 135 Post with C-Clamp
 Installation Guide AWMS-2-D13-C 2 x Dynamic Arms on 135 Post with C-Clamp COMPONENT CHECKLIST RANGE A AWM-LC Post Clamp B AWM-AD Dynamic Arm (x2) C AWM-P13 135 Post D AWM-FC C-Clamp CONTENTS C-Clamp Page
TIM J 5/16 USER MANUAL
 TIM J 5/16 USER MANUAL 10.b 10.a 11.a 11.b 10.f 11.c 10.g 11.d 12.a/b 10.c 10.d 10.h/i 9 1.a 8 3 4 1.c 1.b 2 5 6 13.a/b 7 11.e FULL PART LIST: 1. Drum Head: a. 10 tom-tom head x 2 pcs b. 12 floor tom head
Floor Standing Pedestal
 2336 K052 Floor Standing Pedestal Kit Instructions Issue C Revision Record Issue Date Remarks A Feb 20021 First issue B June 2007 Added pedestal floor bolting procedure C Mar 2011 Added Universal Mounting
Star Trac Fitness E-ST 5090 Stepper. Install Guide
 Star Trac Fitness E-ST 5090 Stepper Install Guide STAR TRAC E-ST STEPPER Install Guide E-ST 5090 E Series Stepper ASSEMBLY AND SETUP The following parts are included with the base STAR TRAC E-ST STEPPER:
features and benefits:
 Tucana OR-K-TU1 The Planetary line of Orbital Express Truss features over 4 professionally designed off-the-shelf kits for a variety of booth sizes and configurations. Each kit comes complete with all
Universal Tablet Mount Accessory for Flex TechBridge
 Assembly Instructions Universal Tablet Mount Accessory for Flex TechBridge Universal Tablet Mount Accessory Universal Tablet Mount Accessory mounted on Flex Arm CONTENTS Important User Information...........................2
DUAL-ARM MONITOR MOUNT For in. ( cm) desktop computer monitors
 desktop computer monitors") LeviTouch DM-502 DUAL-ARM MONITOR MOUNT For 15 27 in. (38.1 68.6 cm) desktop computer monitors User Manual Thank you for choosing Gabor. The Gabor Dual-Arm Desktop Mount can securely support two monitors
LeviTouch DM-502 DUAL-ARM MONITOR MOUNT For 15 27 in. (38.1 68.6 cm) desktop computer monitors User Manual Thank you for choosing Gabor. The Gabor Dual-Arm Desktop Mount can securely support two monitors
7403 K321. Display Wall Mount. Kit Instructions. Issue A
 7403 K321 Display Wall Mount Kit Instructions Issue A ii Revision Record Issue Date Remarks A Nov 2008 First issue 1 Introduction This kit is used in to secure a 7403 Display Head on a vertical surface.
MD-BD13B / DUAL SEGMENT TWIN-ARM. For (33-69 cm) LCD desktop computer monitors. User Manual
 LCD desktop computer monitors. User Manual") MD-BD13B / DUAL SEGMENT TWIN-ARM MONITOR mount For 13 27 (33-69 cm) LCD desktop computer monitors User Manual Thank you for choosing Gabor. The Gabor MD-BD13B mounts two 13 27 (33 69 cm) LCD computer monitors
MD-BD13B / DUAL SEGMENT TWIN-ARM MONITOR mount For 13 27 (33-69 cm) LCD desktop computer monitors User Manual Thank you for choosing Gabor. The Gabor MD-BD13B mounts two 13 27 (33 69 cm) LCD computer monitors
Breeze Film Shooting Equipment (P-W5P-BRZ) I N STR UC TI ON MANUAL
 I N STR UC TI ON MANUAL") Breeze Film Shooting Equipment (P-W5P-BRZ) I N STR UC TI ON MANUAL All rights reserved No part of this document may be reproduced, stored in a retrieval system, or transmitted by any form or by any means,
Breeze Film Shooting Equipment (P-W5P-BRZ) I N STR UC TI ON MANUAL All rights reserved No part of this document may be reproduced, stored in a retrieval system, or transmitted by any form or by any means,
CLIMB2 DUAL MONITOR SIT/STAND WORKSTATION
 CLIMB2 DUAL MONITOR SIT/STAND WORKSTATION CLIMB2 Rev A 3/17 Model CLIMB2-SLV ASSEMBLY AND ADJUSTMENT CLIMB2 PARTS AND TOOLS PLEASE REVIEW these instructions before beginning the assembly and adjustment
Addendum to the Actalyst Interactive Digital Signage Installation and User s Guide
 Addendum to the Actalyst Interactive Digital Signage Installation and User s Guide This addendum contains information about the Actalyst Interactive Overlay that has changed since the release of the Actalyst
Rack Installation Instructions
 Rack Installation Instructions Review the documentation that comes with your rack cabinet for safety and cabling information. Before installing your server in a rack cabinet, review the following guidelines:
DIGITAL Server Rackmount Installation Guide
 DIGITAL Server Rackmount Installation Guide Part Number: ER-PCSRA-IA. E01 Digital Equipment Corporation December 1997 The information in this document is subject to change without notice and should not
Installation Guide. Retrofit Kit for USB Ready Intraoral Systems
 Installation Guide Retrofit Kit for USB Ready Intraoral Systems Table of Contents Wall-Mount Retrofit Kit... 2 Introduction... 2 Connecting the Articulating and Horizontal Arm Cables... 2 Installing the
Blackout Shutter Kits with Breathable Wall Light Traps
 Blackout Shutter Kits with Breathable Wall Light Traps 2018 Growers Supply All Rights Reserved. Reproduction is prohibited without permission. Maintain controlled airflow without sacrificing blackout environments.
features and benefits:
 Hercules 4 OR-K-HC4 The Hercules line of Orbital Express Truss features basic backwalls and kits in a variety of sizes to suit a range of space needs. A benefit to this versatile system is that it enables
Operating Instructions
 Operating Instructions Model Numbers: LS LS M LS G LS A LS LS 00 LS M-WC LS A LS X LS M-WC LS B LS X LS M LS Dimensions A / B / C / D / E 0 / F / Electrical Information Voltage AMPS Frequency 0 HZ Single
unity kit 4-Piece Shell Pack Plus Drum Kit (D4420) 5-Piece Complete Drum Kit (D4522) D4420 & D4522 Drum Set Owner s Manual SoundPercussionLabs.
 5-Piece Complete Drum Kit (D4522) D4420 & D4522 Drum Set Owner s Manual SoundPercussionLabs.") D4420 & D4522 Drum Set Owner s Manual 4-Piece Shell Pack Plus Drum Kit (D4420) 5-Piece Complete Drum Kit (D4522) SoundPercussionLabs.com Thank you for purchasing this kit from Sound Percussion Labs outstanding
D4420 & D4522 Drum Set Owner s Manual 4-Piece Shell Pack Plus Drum Kit (D4420) 5-Piece Complete Drum Kit (D4522) SoundPercussionLabs.com Thank you for purchasing this kit from Sound Percussion Labs outstanding
DIGITAL OBSERVATION GUARD LOW PROFILE PAN TILT KIT USER MANUAL
 DIGITAL OBSERVATION GUARD LOW PROFILE PAN TILT KIT USER MANUAL Version 2.1 June 4, 2013 0 Table of Contents Low Profile Pan Tilt Kit Description... 3 Low Profile Pan Tilt Unit Basic Operation... 4 Mounting
Monitor Mount with Articulating Arm and Laptop Riser
 Monitor Mount with Articulating Arm and Laptop Riser ARMUNONB *actual product may vary from photos FR: Guide de l utilisateur - fr.startech.com DE: Bedienungsanleitung - de.startech.com ES: Guía del usuario
C764i Integrated LCD Screen Option. Cardio Theater Integrated Bracket Assembly Instructions
 C764i Integrated LCD Screen Option Cardio Theater Integrated Bracket Assembly Instructions Table of Contents 1 2 3 4 5 6 7 Before You Begin... 3 Obtaining Service... 3 Unpacking the Equipment... 3 Important
IBM Systems. Quick start guide for IBM System p5 505 ( )
") IBM Systems Quick start guide for IBM System p5 505 (9115-505) 1 Before you begin This Quick start guide contains an abbreviated set of setup instructions designed to help you quickly unpack and set up
IBM Systems Quick start guide for IBM System p5 505 (9115-505) 1 Before you begin This Quick start guide contains an abbreviated set of setup instructions designed to help you quickly unpack and set up
Flat Panel Static Wall Mount MSP-SS (GSM-210)
") INSTALLATION INSTRUCTIONS Flat Panel Static Wall Mount (GSM-2) The static wall mount fits most 23 to 30 displays. The mount was designed to adapt to the VESA 75mm/0mm, 0mm/0mm, and 200mm/0mm compliant
INSTALLATION INSTRUCTIONS Flat Panel Static Wall Mount (GSM-2) The static wall mount fits most 23 to 30 displays. The mount was designed to adapt to the VESA 75mm/0mm, 0mm/0mm, and 200mm/0mm compliant
Tile Plow Installation O Connell
 NOTE: Indented items indicate parts included in an assembly listed above Part Name/Description Part Number Quantity Tile Plow Kit O Connell System 4100471 1 Hex head cap screw 3/8-16 x 3 2002003-38300
Adjustable Desktop Monitor Stand with Cable Hook
 Adjustable Desktop Monitor Stand with Cable Hook ARMPIVSTND *actual product may vary from photos DE: Bedienungsanleitung - de.startech.com FR: Guide de l'utilisateur - fr.startech.com ES: Guía del usuario
INSTALLATION INSTRUCTIONS
 INSTALLATION INSTRUCTIONS 19 20 21 01 07 22 23 13 10 12 08 17 18 11 02 14 15 04 03 16 WELCOME PARTS LIST Thank you for purchasing this HealthPoint Technology Cabinet from Humanscale! Before you begin installing
TDM To MiniMech conversion ProceDure
 TDM To MiniMech conversion ProceDure (Model 9100 ATM) TDN 07102-00079 Apr 1 2009 CorporATe HeAdquArTers: 522 E. Railroad Street Long Beach, MS 39560 PHONE: (228) 868-1317 FAX: (228) 868-0437 COPYRIGHT
unity kit 5-Piece Complete Drum Set (D4522) D4522 Drum Set Owner s Manual SoundPercussionLabs.com
 D4522 Drum Set Owner s Manual SoundPercussionLabs.com") unity kit D4522 Drum Set Owner s Manual 5-Piece Complete Drum Set (D4522) SoundPercussionLabs.com 5-Piece D4522 Thank you for purchasing this kit from Sound Percussion Labs outstanding line of drums, percussion
unity kit D4522 Drum Set Owner s Manual 5-Piece Complete Drum Set (D4522) SoundPercussionLabs.com 5-Piece D4522 Thank you for purchasing this kit from Sound Percussion Labs outstanding line of drums, percussion
Rack Installation Instructions
 Rack Installation Instructions Review the documentation that comes with your rack cabinet for safety and cabling information. Before installing your server in a rack cabinet, review the following guidelines:
Additional Help For additional installation instructions and videos, please visit our website at What s Included
 Model 400, 40, 40 Additional Help For additional installation instructions and videos, please visit our website at www.current-usa.com What s Included Each LOOP Marine Bundle Kit includes: Item A B C D
Parts and Service Manual IMCO
 XXTREME ADVANTAGE Gimbal Parts and Service Manual IMCO 510 East Arrow Highway San Dimas, CA 91773 (800) 899-8058 (909) 592-6162 Fax (909) 592-6052 www.imcomarine.com email info@imcomarine.com TABLE OF
Cycles Integrated LCD Screen Option. Cardio Theater Integrated Bracket Assembly Instructions
 Recumbent Upright Cycles Integrated LCD Screen Option Cardio Theater Integrated Bracket Assembly Instructions Table of Contents 1 2 3 4 5 6 7 Before You Begin... 4 Obtaining Service... 4 Unpacking the
Page COPYRIGHT NOTICE. A Message from the Team
 Page 2 3 4 5 6 7 8 9 10 11 Contents Index, message Product overview, specifications Introduction to the BC1 screws Removing, feet, brackets, screws from the main body Fitting feet and PSU Fitting hard
Section. Service & Maintenance. - Core & Hard Disk Drive (HDD) - Amplifier - Monitor - UPS - Dollar Bill Acceptor - Fan Filter G - 1
 - Amplifier - Monitor - UPS - Dollar Bill Acceptor - Fan Filter G - 1") Section G Service & Maintenance - Core & Hard Disk Drive (HDD) - Amplifier - Monitor - UPS - Dollar Bill Acceptor - Fan Filter G - 1 Core Removal Core & HDD 1. Open the door. 2. Perform shutdown procedure.
Section G Service & Maintenance - Core & Hard Disk Drive (HDD) - Amplifier - Monitor - UPS - Dollar Bill Acceptor - Fan Filter G - 1 Core Removal Core & HDD 1. Open the door. 2. Perform shutdown procedure.