Guilin Zhishen Information Technology Co., Ltd.
|
|
|
- Rebecca Wells
- 5 years ago
- Views:
Transcription
1 CRANE User Guide
2 Guilin Zhishen Information Technology Co., Ltd.
3 Contents Packing List 1 Disclaimer and Warning 2 Quick Start Guide 7 Preparing and Charging the Batteries 8 Camera Installation 9 Balance Adjustment 11 Start Up 14 Introducing Gimbal Control Modes 16 Initialization and Various Operations 17 APP Operations 19 Usage of Main Accessories 21 Product Specifications 27 Operation guide on motor torque adjustment 28 Warranty Card 29 Contact Card 31
4 Packing List Disclaimer and Warning The product package comes with the following items. In case that any item is found missing, please contact ZHIYUN or your local selling agent. Crane 3-Axis Gimbal Stabilizer 1 Lens Mounting Clamp Battery Charger 1 Micro USB Cable 1 Battery Compartment 1 Mounting Screw Li-ion Battery 2 Thank you for using ZHIYUN CRANE. The information contains herein affects your safety and your legal rights and responsibilities. Read this entire document carefully to ensure proper configuration before use. Failure to read and follow the instructions and warnings herein may result in serious injury to you or bystanders, or damage to your device or property. ZHIYUN reserves the right of final explanation for this document and all relevant documents relating to CRANE, and the right to make changes at any time without notice. Please visit www. ZHIYUN-TECH.com for the latest product information. By using this product, you hereby signify that you have read this document carefully and that you understand and agree to abide by the terms and conditions herein. You agree that you are solely responsible for your own conduct while using this product, and for any consequences thereof. You agree to use this product only for purposes that are proper and in accordance with all terms, precautions, practices, policies and guidelines ZHIYUN has made and may make available. ZHIYUN accepts no liability for damage, injury or any legal responsibility incurred directly or indirectly from the use of this product. Users shall observe safe and lawful practices including, but not limited to, those set forth herein. ZHIYUN is the trademark of Guilin Zhishen Information Technology Co., Ltd. (hereinafter referred to as "ZHIYUN" or "ZHIYUN TECH") and its affiliates. All product names or marks referred to hereunder are trademarks or registered trademarks of their respective holders. Glossary The following terms are used throughout the product literature to indicate various levels of potential harm when operating this product. WARNING: Procedures, which if not properly followed, may incur property damage, grave accident, or serious injury. CAUTION: Procedures, which if not properly followed, may incur property damage and serious injury. NOTICE: Procedures, which if not properly followed, may incur property damage or minor injury. 1 2
5 Disclaimer and Warning Warning Read the ENTIRE User Guide to become familiar with the features of this product before operating. Failure to operate the product correctly can result in damage to the product or personal property and cause serious injury. This is a sophisticated product. It must be operated with caution and common sense and requires some basic mechanical ability. Failure to operate this product in a safe and responsible manner could result in injury or damage to the product or other property. This product is not intended for use by children without direct adult supervision. DO NOT use with incompatible components or in any way otherwise as mentioned or instructed in the product documents provided by ZHIYUN. The safety guidelines herein contain instructions for safety, operation and maintenance. It is essential to read and follow all of the instructions and warnings in the User Guide, prior to assembly, setup or use, in order to operate the product correctly and avoid damage or serious injury. Safe Operation Guidelines CAUTION: CRANE is a high-precision control device. Damage may be caused to CRANE if it is dropped or subject to external force, and this may result in malfunction. Make sure the rotation of the gimbal axes is not blocked by external force when CRANE is turned on. CRANE is not waterproof. Prevent contacts of any kind of liquid or cleaner with CRANE. It is recommended to use dry cloth for cleaning. CRANE is not waterproof. Prevent contacts of any kind of liquid or cleaner with CRANE. It is recommended to use dry cloth for cleaning. Protect CRANE from dust and sand during use. NOTICE: Keep the handle stable when CRANE is powered on, as shaking may cause failure to start up. Reading Tips Legends: Hints and tips Important. Disclaimer and Warning Battery Safety Guidelines 1. Prevent the batteries to come into contact with any kind of liquid. Do not leave batteries out in the rain or near a source of moisture. Do not drop the battery into water. If the inside of the battery comes into contact with water, chemical decomposition may occur, potentially resulting in the battery catching on fire, and may even lead to an explosion. 2. If the battery falls into water with the stabilizer during use, take it out immediately and put it in a safe and open area. Maintain a safe distance from the battery until it is completely dry. Never use the battery again, and dispose of the battery properly as described in the Battery Disposal section below. 3. If the battery catches fire, use water, water spray, sand, fire blanket, dry powder, or carbon dioxide fire extinguisher immediately to put out the fire. Please extinct the fire by applying the methods recommended above according to the actual situation. 4. Never use non-zhiyun batteries. If replacement or backup is needed, please purchase new batteries from ZHIYUN's official website or authorized channels. ZHIYUN takes no responsibility for any damage caused by non-zhiyun batteries. 5. Never use or charge swollen, leaky, or damaged batteries. Never use or charge if the battery smells, or overheats (exceeding maximum temperature of 160 F / 71 C). If your batteries are abnormal, contact ZHIYUN or a ZHIYUN authorized dealer for further assistance. 6. The battery should be used within the temperature range from -10 C to 50 C. Use the battery in environments above 50 C can lead to a fire or explosion. Use of battery below -10 C can lead to serious battery damage. 7. Do not use the battery in strong electrostatic or electromagnetic environments. Otherwise, the battery protection board may malfunction. 8. Do not disassemble or use any sharp object to puncture the battery in any way. Otherwise, the battery may leak, catch fire or explode. 9. Do not mechanically strike, crush, or throw the battery. Do not place heavy objects on the battery or charger. 10. Electrolytes inside the battery are highly corrosive. In case of accidental contact of any electrolytes with your skin or eyes, rinse immediately with water for at least 15 minutes and seek medical advice as soon as possible. 11. Do not use the battery if it has been involved in a crash or heavy impact. 12. Do not heat the battery and never put the battery in a microwave oven or in a pressurized container. 3 4
6 Disclaimer and Warning Disclaimer and Warning 13.Do not place the battery cell on a conductive surface (such as a metal desk surface). 14. Prevent use of wires or other metal objects that could cause positive and negative short-circuit to the battery. 15. If the battery terminal is dirty, wipe it with a clean, dry cloth. Otherwise it will cause a bad battery connection, which may result in energy loss or charging failure. Battery Charging 1. Do not attach the batteries to a wall outlet or car charger socket directly. Always use a ZHIYUN approved adapter for charging. ZHIYUN takes no responsibility if the battery is charged using a non-zhiyun charger. 2. Do not put the battery and charger near flammable materials or on flammable surfaces (such as carpet or wood). Never leave the battery unattended during charging to prevent any accident. 3. Do not charge the battery immediately after use, because the battery temperature may be too high. Do not charge the battery until it cools down to normal room temperature. Charging the battery with its temperature over 40 C or lower than 15 C may lead to leakage, overheating, or damage. 4. Examine the charger before use, make sure there is no damage to the enclosure, cord, plug, or other parts. Never use a damaged charger. Do not clean the charger with any liquid containing alcohol or other flammable solvents. Disconnect the charger when not in use. Battery Storage 1. Keep batteries out of the reach of children and pets. 2. Do not leave the battery near heat sources such as a furnace or heater, or inside of a vehicle on hot days. Never expose the battery in any environment with temperature of over 60 C. The ideal storage temperature is 22 C-28 C. 3. Store batteries in a dry environment. 4. Do not leave the battery unused for too long after it has been completely discharged to prevent over-discharge of battery which may result in battery damage and permanent failure. Battery Maintenance 1. Never use the battery when the temperature is too high or too low. 2. Do not store the battery in any environment with a temperature of over 60 C. Transportation Notice 1. Discharge the battery power to 5% or lower before carrying the battery on an airline flight. Only discharge the battery in a fireproof location, ideally in a dry and open area. 2. Do not store or transport batteries together with metal objects such as eyeglasses, watch, and jewelries, etc. 3. Do not transport damaged batteries. When transporting, be sure to discharge the battery to less than 50%. Battery Disposal Dispose of the battery in specific recycling boxes only after a complete discharge. Do not put away the battery in regular trash containers. Strictly follow your local regulations regarding the disposal and recycling of batteries. NOTICE Battery Use Make sure the batteries are fully charged before each time of use. Battery Charging The battery will stop charging automatically when it is full. Disconnect the batteries from the charger when fully charged. Battery Storage 1. Discharge the battery to 40%-65% if it will NOT be used for over 10 days. This can greatly extend the battery life. 2. The battery enters hibernation mode when voltage gets too low. Charge the battery will bring it out of hibernation. 3. Remove batteries from the stabilizer when not in use and store them in a specialized container. Battery Disposal If the battery cannot be fully discharged, do not leave it in the recycling box, but contact a professional battery disposal/recycling agent for further assistance. This document is subject to change. ZHIYUN TM is a trademark of ZHISHEN TECH. Copyright ZHISHEN TECH. All rights reserved. 5 6
7 Quick Start Guide Preparing and Charging the Batteries Get to Know CRANE Before using CRANE for the first time, please fully charge the batteries to activate and ensure normal operation by using the charger that comes in the package. Check the product package before use, make sure that all items below have arrived with the product. In case that any item is found missing, please contact ZHIYUN or your local selling agent. Name: Li-ion battery charger Model: ZC Input voltage: DC 5V 2400mA Output voltage: DC 4.2V 1200mA*2 Status Indicator Light Thumb Screw Shines solid RED light when charging Horizontal Arm Thumb Screw Lens Mounting Clamp Shines BLUE light when fully charged Micro USB Port (5V power input) Mounting Screw Vertical Arm Micro USB Port MODE 1/4" Threaded Hole (compatible with 3/8") Battery Level Indicator Joystick ON/OFF Shifter Lever Camera Mounting Screw Camera Mounting Plate Mounting plate thumbscrew Camera control interface Micro USB Cable Li-ion Battery Capacity: 3600mAh Voltage: 3.7V NOTICE 1. The charger is for charging ZHIYUN's IMR Li-ion Battery only. Do not charge batteries of other models or brands, otherwise it may lead to accident. 2. Use qualified 5V adapter with output current of 1000mA only. Charging time depends on the max. output current of the adapter. Please use and charge batteries provided or approved by ZHIYUN only. ZHIYUN will not take any responsibility for explosion, fire and/or accidents caused by non- ZHIYUN batteries. NOTICE: Camera is not included in product package, and shall be bought separately.the depictions provided herein are for reference only. 7 8
8 Camera Installation Camera Installation Operation Method Top Down Mode Bottom Up Mode Gimbal balance shall be properly adjusted before accessing Bottom Up mode. Do not rotate the handle while turning it straight up/down to switch between Top Down and Bottom Up mode. Note: The size of the camera and its balance condition when mounted may affect the successful access to Bottom Up mode. For certain camera models, balance should be adjusted after access to Bottom Up mode. When the motor arm is pulled to an extreme extent in case of big lens mounting, Bottom Up Holding Gesture may not be supported. 2 Mount the camera in parallel with the mounting plate, match the 1/4" Threaded Hole at the bottom of the camera with the empty slot of the mounting plate. Move the camera as close as possible to the Tilt Motor, and tighten the Camera Mounting Screw ❹ to fix the camera positiontilt Motor, and tighten the Camera Mounting Screw ❹ to fix the camera position. 4 3 Do not power on the stabilizer before the camera is properly mounted. 9 10
9 Balance Adjustment Balance Adjustment Mounting Plate Level Adjustment on Tilt Axis Loosen the thumbscrew at the bottom of the quick mounting plate to allow forward and backward sliding of the plate. Firstly, loosen Thumb Screw ❷ (rotate for 3 times). Adjust the Tilt Axis until the camera can stay still with the lens facing up (i.e. the camera stays still and vertical to the ground), complete this step by tightening up Thumb Screw ❷. 2 Balance Adjustment on Roll Axis Push the camera forward or backward to find its level balance. Once the camera can stay still and almost level with its lens facing front, complete this step by tightening up the Camera Mounting Screw. 1 1 Loosen Thumb Screw ❶. Adjust the Roll Axis until the camera can stay still while keeping the Horizontal Arm 1 level. Complete this step by tightening up Thumb Screw ❶
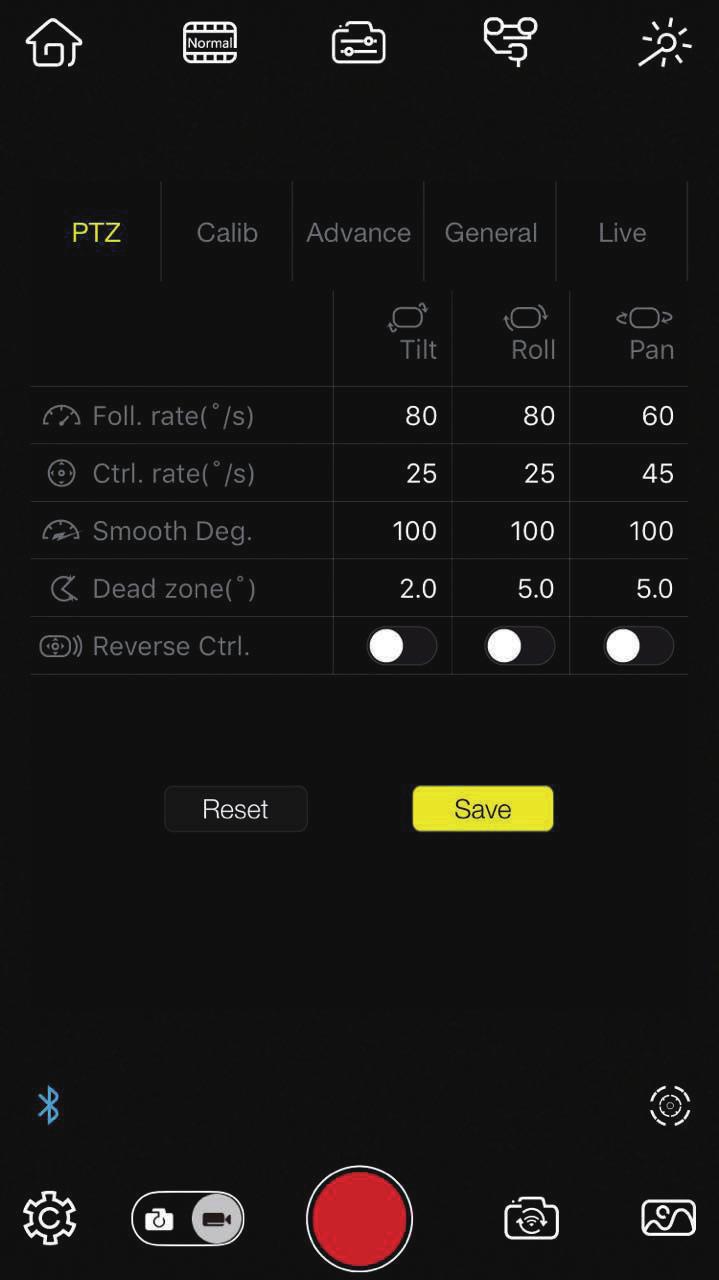
10 Balance Adjustment Start Up Level Adjustment on Pan Axis Control Panel Introduction 2 3 Loosen Thumb Screw ❸. Adjust the Pan Axis until the camera can stay still while keeping the Vertical Arm 2 level when turned to the right/left side. Complete balance adjustment by tightening up Thumb Screw ❸. Battery Level Indicator Joystick Power ON/OFF Mode Button Shifter Lever Battery Level Indicator Shines YELLOW light when the stabilizer is Powered on/off: Quick flash for 3 sec. and shines solid for 1 sec. when powered on. Quick flash for 3 sec. when powered off. Shines BLUE light when the stabilizer is in normal operation, the flashing frequency of the BLUE light indicates the current battery level: Quick flash 4 times for battery level of 75%-100%. Quick flash 3 times for battery level of 50%-75%. Quick flash 2 times for battery level of 25%-50%. Quick flash 1 time for battery level of 0%-25%. Shifter Lever Operation In the event when a SONY camera is connected: Push the Shifter Lever in T direction to zoom out, and in W direction to zoom in. In the event when a Panasonic camera is connected: Move the Shifter Lever to either direction for focusing. Micro USB Port Connects the stabilizer to a computer through a Micro USB cable for on-line Mode Button Press for 1 second to enter or exit standby mode. Single press to switch between pan-following and lock mode. Quick double press to enter the following mode. Quick triple press to enter the selfie mode (180 rotation on pan axis) Power ON/OFF Power on the stabilizer by pressing the Power button for about 3 sec. After the stabilizer is powered on, the Power button can be used for camera shooting control (only after the camera is connected to the stabilizer). Single press the button to take photos. Double press the button to start video recording. Double press the button again to stop recording. Joystick Operation Joystick controls the camera movement by turning the 3 axes up/down or left/right
11 Start Up Introducing Gimbal Control Modes How to Start Up 1. Rotate to loosen the end cover, then install two Li-ion batteries. Make sure to tighten the end cover properly after battery installation, or the stabilizer cannot be turned on. Batteries shall be installed with the positive pole heading the arrow direction as shown in the figure. Locking Mode Single Press MODE Pan Following Mode Single Press MODE Double Press MODE Single Press MODE Double Press MODE Single Press MODE Following Mode Mode switch: The stabilizer enters Pan Following Mode by default each time when powered on. Switch into Locking Mode by single pressing on the MODE button. Double press the MODE button to enter the Following mode. Single press the MODE button under the Following Mode will return to the previous mode.quick press MODE three times and the camera will turn 180 along the pan axis while the active control mode remains unchanged. See ZHIYUN's product training videos on for more operation tips. Mode Switch Schematic Figure Roll Axis Roll Axis Roll Axis Tilt Axis Tilt Axis Tilt Axis 2.After the batteries are installed properly, long press the power button for 3 sec. to power on. Please use batteries provided or approved by ZHIYUN only, otherwise it may cause accidents. When using the stabilizer, please hold the camera with one hand to prevent severe shaking of the camera in case a malfunction occurs to the stabilizer (in very rare cases). Pan Following Mode:The camera pans left/right following the movement of the stabilizer while the tilt and roll axes are locked. Push the joystick up/down allows manual control of the tilt axis. Pan Axis Pan Axis Pan Axis Locking Mode: This mode locks movement of all three axes to keep the camera still and stable. Push the joystick up/down and left/right allows manual control of the tilt axis and pan axis. Following Mode: The camera pans and tilts following the movement of the stabilizer. Push the joystick left/right allows manual control of the roll axis
12 Initialization and Various Operations Initialization and Various Operations Initializing the Stabilizer Firmware Upgrade Initialize the stabilizer under the following circumstances: 1. Slight deviation is found in the tilt angle of the camera in level position after startup. 2. Slight deviation is found in the roll angle of the camera in level position after startup. 3. Frequent small angle correction is found when the camera is in level position while the stabilizer stays still. Initialization Procedure USB Make sure batteries are installed during upgrade. 1. Install the batteries properly. 2. Hold the camera mounting plate and long press the Power Button to turn on the stabilizer. The motor will generate acting force upon activation, hold the camera mounting plate still, and long press the Mode Button to enter standby mode. 3. Put the stabilizer still on a table surface, wait for about 10 sec., and the stabilizer will automatically complete initialization. 1. Visit ZHIYUN's official website: 2. Click to open the "Downloads" page, and find the Firmware Upgrade Tutorial package. 3. Download the driver, calibration tool and latest firmware corresponding to your stabilizer. 4. Upgrade firmware following the instructions indicated in the Firmware Upgrade Tutorial. If slight deviation can still be found after initialization, repeat the procedure above to initialize again


13
14 Usage of Main Accessories Usage of Main Accessories Applicable camera models : GH3/GH4/GH5 Supported Functions: 1.Shutter control 2.Video recording Panasonic Camera Control Line Compatible Stabilizer Model(s): CRANE,Crane Plus with firmware version of V1.50 and above. How to Use Connection 1.Firstly, connect the stabilizer to your PC or smart phone. 2.Configure the stabilizer to suits "Panasonic" in Gimbal Setting Screen, then save the settings. 3. Connect the Micro USB plug of the Panasonic camera control line to the camera connection port on the side of the tilt motor, and then connect the other end of the control line to the REMOTE port on the camera. 4. Power on the stabilizer before turning on the camera, otherwise camera remote control may not work. Operations 1.Shutter control (including focusing): Press the Power Button to take single shots. 2. Video recording: Double press the Power Button to start video recording, and double press again to stop recording. Applicable camera models : Compatible with SONY cameras controlled by MULTI port. Sony Camera Control Line Compatible Stabilizer Model(s): CRANE, CRANE-M,Crane Plus with firmware version of V1.50 and above. Supported Functions: 1.Shutter control 2.Video recording 3.Zooming NOTICE: Optical zooming is not supported in case of non-electrical lenses (Recommended electrical zoom lenses: E PZ mm F4 GOSS, E PZ 16-50mm F OSS). How to Use Connection 1. Firstly, connect the stabilizer to your PC or smart phone. 2. Configure the stabilizer to suits "Sony" in Gimbal Setting Screen, then save the settings. 3. Connect the Micro USB plug of the SONY camera control line to the camera connection port on the side of the tilt motor, and then connect the other end of the control line to the MULTI port on the camera. 4. Power on the stabilizer before turning on the camera, otherwise camera remote control may not work Operations 1. Shutter control (including focusing): Press the Power Button to take single shots. 2. Video recording: Double press the Power Button to start video recording, and double press again to stop recording. 3. Zooming: Push the Shifter Lever on the stabilizer handle in T direction to zoom out or W direction to zoom in
15 Usage of Main Accessories ZW-B02 Wireless Remote Control(purchase separately) MODE Button Power/Shutter (Dual-function button) Bluetooth Indicator Charging Indicator Shifter Lever Joystick Power Level Indicator ON/OFF & Video (Two-step shutter-release button) 1. Fully press the button for over 1sec. to turn on the remote control and enter master mode by default. 2. Fully press the button for over 1s, when it is on to turn off the remote control (the indicator switches off accordingly) 3. While stabilizer is connected to the camera: Under Photo mode, press the shutter button halfway down to focus then fully press it to take the shot; Quickly double press the button (fully press) to switch between Video and Photo mode. Button Combinations Power button + Toggle: While powering on, push the toggle in the W direction to enter into Slave mode to upgrade the remote control firmware via the phone (First download the ZY Play App and then update). Power button + Mode Button: Press the mode button and power button at the same time to pair the nearest stabilizer via bluetooth. Mode button: Mode selection (sharing the same feature with gimbal) Joystick: Directional control (sharing the same feature with gimbal) Toggle: To zoom in/out. Proper camera cable connection is required to control the camera. Some remote control features may not be supported for some camera models. Specifications: Charging voltage: 5V Charging current: 100mA Theoretical work time: 30 hr. Built-in Polymer lithium battery capacity: 150mAh Emission and received current: 11.9mA Operating current: 4.2mA Effective control distance: 10m /394 inch (without blockage) Bluetooth Indicator No connection: Continuous flashing. Connected: Shines solid light. 1. Loosen the thumb screw on the back of the remote controller to let loose of the rubber case (as marked red in the Figure). Mounting Method 2. Install the remote controller to the extension rod or dual handle for convenient operations (as shown in the Figure above). Fasten up by tightening the thumb screw on the back. The remote controller turns off automatically when left idle for 2 minutes. Usage of Main Accessories Power Level Indicator 90%-100%: quick flash for 4 times each second. 75%-90%: quick flash for3 times each second. 55%-75%: quick flash for2 times each second. 30%-55%: quick flash for1 time each second. 0%-30%: quick flashing. Charging Indicator Charging: RED light. Charging complete: GREEN light
16 Usage of Main Accessories Usage of Main Accessories Crane-EH001 CRANE Extended Handle (purchase separately) Top down gesture Bottom up gesture Installation method: 1.Insert in the two handles from the two sides of the horizontal rod. 2.Tighten the screws on the handles. 3. Unscrew the fixing clamp in the middle of the handles, take out the protection ring and insert it into the stabilizer. 4. Clip the fixing clamp onto the stabilizer with the protection ring, and then tighten the screws of the fixing clamp. Clip onto the area as marked RED above

17 Product Specifications Operation guide on motor torque adjustment Min Standard Max Remarks Input Voltage 6.8V 8.4V 12.6V Operation Current 80mA 110mA 6000mA Operation Temperature -10 C 25 C 45 C Operation Time 12h 18h Charging Time 3h Tested under static operation after proper balancing Weight 950g Excluding batteries Tilt Mechanical Range 360 Unlimited rotation Roll Mechanical Range 360 Unlimited rotation Pan Mechanical Range 360 Unlimited rotation Payload 350g 1800g Crane Firmware V1.52 and above supports parameter setting for motor force. Users can set the motor force to adapt to cameras with different weights via the calibration upgrade tool or the app. Setting process Adjustment method 1 :The motor force of the stabilizer needs to be adjusted (3 levels) to adapt the stabilizer to cameras and lens of different weight for ideal use. Please refer to the connection way on the APP introduction, firstly connect the Crane by ZY PLAY, then choose the suitable strength to set up the motor force in ZY PLAY correctly. Adjustment method 2 : 1. Download the calibration upgrade tool and USB driver from Zhiyun official website. Double click to install USB driver. 2. Connected gimbal and PC by USB cable, double-click Tool to run Tool. Power on gimbal, press and hold Mode button for seconds, gimbal enter to standby mode. 3. Click Setting to enter to parameter setting page. Click Open, Users can set motor power in Other Module. 4. Motor power have low, medium and high three options. Low: Default setting ( recommend : Crane + Sony A7S or below weight) Medium: Moderate setting ( recommend : Crane + Sony A7S) High: Maximum setting ( recommend :Crane + Canon 5D) All the data in this guide is gathered from internal experiments of Zhiyun laboratories. Under different scenarios, data is different to some extent and please refer to actual use of Crane
18 Warranty Card Warranty Card Warranty Period 1. Customers are entitled to replacement or free repair service in case of quality defect(s) found in the product within 15 days upon receipt of the product. 2. Customers are entitled to free repair service from ZHIYUN for any product proven defective in material or workmanship that results in product failure during normal consumer usage and conditions within the valid warranty period, which is 12 months counting from the date of selling. 3. Some states or countries do not allow limitations on how long an implied warranty lasts, so the above warranty term may not apply to you. This warranty does not apply to the followings 1. Products subjected to unauthorized repair, misuse, collision, neglect, mishandling, soaking, accident, and unauthorized alteration. 2. Products subjected to improper use or whose labels or security tags have been torn off or altered. 3. Products whose warranty has expired. 4. Products damaged due to force majeure, such as fire, flood, lightning, etc. Warranty Claim Procedure 1. If failure or any problem occurs to your product after purchase, please contact a local agent for assistant, or you can always contact ZHIYUN's customer service through at service@ or website at 2. Your local agent or ZHIYUN s customer service will guide you through the whole service procedure regarding any product issue or problem you have encountered. 3. ZHIYUN reserves the right to reexamine damaged or returned products. Custom information Customer Name : Contact No : Address : Sales Information Sales Date : Prod. Serial No : Dealer Contact No : #1 Maintenance Record Service Date : Signature of Repairman : Cause of Problem : Service Result : Solved Unsolved Refunded(Replaced) 29 30


19 Contact Card Website Weibo Vimeo Certificate of Quality This product is confirmed to meet quality standards and permitted for sale after strict inspection. Google+ Facebook Wechat QC Inspector: Youku Youtube Tel: USA Hotline: ,9:00-18:00 GMT-7,Mon-Fri Europe Hotline: ,10:00-17:00 GMT+1,Mon-Fri Web: www. Address: Building No. 13, Creative Industrial Park, Guimo Road, Qixing District, Guilin , Guangxi, China Please download the latest version from www. This document is subject to change. ZHIYUN is a trademark of ZHISHEN. Copyright ZHISHEN. All rights reserved. 31
20 V2.01
V1.01. CRANE 2 User Guide
 V1.01 CRANE 2 User Guide Contents Packing List...1 Disclaimer and Warning...2 Get to Know CRANE 2...7 Preparing and Charging the Batteries...8 Installation...10 Balance Adjustment...13 How to Use...16
The following features are available in this PDF document.
 The following features are available in this PDF document. Quick Keyword Search Enter the keyword in the search box and hit the search button Quick Jump between Chapters Click the title of a specific chapter
CRANE 2 User Guide V1.00
 CRANE 2 User Guide V1.00 桂林智神信息技术有限公司 Contents Packing List Disclaimer and Warning Get to Know CRANE 2 Preparing and Charging the Batteries Installation Balance Adjustment How to Use APP Operations Calibration
20810 Sockeye Pl #200 Bend, OR Support and Sales Questions:
 2080 Sockeye Pl #200 Bend, OR 9770 English Manual V.0 Support and Sales Questions: Tel: (866) 977-6688 Monday to Friday 9AM to 5PM Pacific Time or email support@evogimbals.com EVOGimbals.com CONTENTS
20810 Sockeye Pl #200 Bend, OR Support and Sales Questions:
 20810 Sockeye Pl #200 Bend, OR 97701 Support and Sales Questions: Tel: (866) 977-6688 Monday to Friday 9AM to 5PM Pacific Time or email support@evogimbals.com EVOGimbals.com English Manual V2.0 CONTENTS
3-Axis Stabilizing Gimbal For Smartphone
 3-Axis Stabilizing Gimbal For Smartphone Hohem Technology Co.,Ltd Safety instructions>> Read the operating instructions carefully and especially observe the safety information. If you do not follow the
IMPORTANT MESSAGE BATTERY SAFETY! USER MANUAL English v1.2 WARRANTY LATEST INFORMATION
 IMPORTANT MESSAGE Thank you for choosing EVO Gimbals as your camera stabilization solution! We know that buying a new product can be very exciting and we are sure that you probably can not wait to use
3-AXIS HANDHELD GIMBAL BATTERY SAFETY! WARRANTY LATEST INFORMATION
 I M PO R T A NT M E S S AGE 3-AXIS HANDHELD GIMBAL FOR MIRRORLESS CAMERAS Thank you for choosing EVO Gimbals as your camera stabilization solution! We know that buying a new product can be very exciting
MOZA Air. User Manual
 MOZA Air User Manual Contents 1. Instruction 1. Instruction 2. Packing list 3. Getting to Know the MOZA Air 4. Getting Started 5. Gimbal Control 6. Wireless Thumb Controller 7. Mimic Motion Control 8.
Contents. Packing List. VILTA Mobile. Overview. Portable Bag. Quick Start. Charging Cable. Start Up. Lanyard. Specifications.
 www.freevisiontech.com Feel free to share your photos and videos with us and we might put them on our website. User Manual Facebook.com/FreevisionVILTA Twitter.com/FreeVisionVILTA instagram.com/freevision_vilta
IMPORTANT MESSAGE 3 AXIS HANDHELD GIMBAL BATTERY SAFETY! USER MANUAL V1.2. Compatible With: WARRANTY LATEST INFORMATION
 IMPORTANT MESSAGE Thank you for choosing EVO Gimbals as your camera stabilization solution! We know that buying a new product can be very exciting and we are sure that you probably can not wait to use
3-Axis Stabilized Handheld Gimbal for Camera. Instructions. Guilin Feiyu Technology Incorporated Company
 3-Axis Stabilized Handheld Gimbal for Camera Instructions Guilin Feiyu Technology Incorporated Company User Manual E N V2.0 Catalogue 1.Product Overview 1 2.Installation 2.1Battery Charging 2.2Battery
Mi Smartphone Gimbal Manual Please read the manual carefully before using the product.
 Mi Smartphone Gimbal Manual Please read the manual carefully before using the product. 1. Product Introduction Product accessories list USB charging cable x1 Mi Smartphone Gimbal Manual Please read the
3-Axis Stabilized Handheld Gimbal for Camera. Instructions. Guilin Feiyu Technology Incorporated Company
 3-Axis Stabilized Handheld Gimbal for Camera Instructions Guilin Feiyu Technology Incorporated Company User Manual E N V. 0 Catalogue. G6 Plus Overview 2. Quick Start Guide 3 3. Balance the Gimbal 4 Balance
3-Axis Gimbal for Mirrorless Camera. Guilin Feiyu Technology Incorporated Company
 3-Axis Gimbal for Mirrorless Camera Guilin Feiyu Technology Incorporated Company User Manual EN V 2.2 1. Product Overview 1 [5] [1] [11] [2] [4] [3] [6] [7] [8] [9] [10] [16] [17] [22] [23] [12] [13] [14]
FREEWAVE FUSION USER MANUAL
 FREEWAVE FUSION USER MANUAL 2 INTRODUCTION Thank you for choosing the Vello FreeWave Fusion Wireless Shutter/Flash/Grouping Remote. This device triggers off-camera lights remotely from up to 300 feet away.
Operating Instructions
 9000 Operating Instructions Contents Introduction 1 Operating Instructions 2-5 Demonstrations 6-8 Storing/Handling/Cleaning 9 Safety Precautions 9-10 Specifications 10 FCC Compliance Statement 11-12 Limited
RONIN THUMB CONTROLLER
 RONIN THUMB CONTROLLER User Manual V1.0 2015.6 Disclaimers and Warnings Congratulations on purchasing your new DJI product. Carefully read the manual and all disclaimers before using this product. By using
3-axis Handheld Stabilizer Gimbal. Beholder DS2. Instruction Manual
 3-axis Handheld Stabilizer Gimbal Beholder DS2 Instruction Manual V1.0 2017.07 Before using the product, please read this manual carefully. Be sure to keep this book in a safe place so that you can check
FULLY CHARGE THE BATTERY BEFORE USING YOUR NEW CAMERA. NO ONE WANTS TO GET 5 MINUTES OF FOOTAGE BEFORE THE FUN STOPS.
 QUICK START GUIDE Getting Started FULLY CHARGE THE BATTERY BEFORE USING YOUR NEW CAMERA. NO ONE WANTS TO GET 5 MINUTES OF FOOTAGE BEFORE THE FUN STOPS. CHARGE THE BATTERY WITH THE INCLUDED MICRO USB-B
PLEASE READ BEFORE OPERATING THIS EQUIPMENT.
 PLEASE READ BEFORE OPERATING THIS EQUIPMENT. HALO BOLT ACDC WIRELESS Thank you for choosing HALO! Powerful, compact and easy to use, the HALO BOLT ACDC WIRELESS can safely jump start your car or charge
3-Axis Gimbal for Mirrorless and DSLR Cameras. Guilin Feiyu Technology Incorporated Company
 3-Axis Gimbal for Mirrorless and DSLR Cameras Guilin Feiyu Technology Incorporated Company User Manual EN V 2.1 1. Product Overview [5] [4] [3] [12] [7] [6] [9] [8] [2] [13] [14] [1] [15] [16] [17] [10]
PSL-C / PSL-N / PSL-R PowerSlave Transmitter / Receiver INSTRUCTIONS
 PSL-C / PSL-N / PSL-R PowerSlave Transmitter / Receiver INSTRUCTIONS Table of Contents Introduction...3 Key Features...4 Precautions...5 Overview...6 Contents Include...8 Compatible Devices...10 Battery
COMPACT LED DESK LAMP WITH LCD DISPLAY
 COMPACT LED DESK LAMP WITH LCD DISPLAY User manual, Operating- and safety instructions, Warranty conditions LED 12 MON Item no.: MROS501 Getting started and operation 1 180 1. Setting up Place the LED
WIRELESS SHUTTERBOSS. User Manual
 WIRELESS SHUTTERBOSS User Manual INTRODUCTION Thank you for choosing the Vello Wireless ShutterBoss. It has a range of up to 250 feet on 99 channels over the reliable FSK modulated 2.4 GHz frequency. But
Owner's Manual. For latest instructions please go to
 mycharge name and logo are registered trademarks of RFA Brands. 2012-2013 RFA Brands. All Rights Reserved. Patent Pending. Made in China. IB-MYC05001RM Owner's Manual For latest instructions please go
HX1 Bluetooth Stereo Headset
 HX1 Bluetooth Stereo Headset Ref. nr.: 130.115 INSTRUCTION MANUAL V1.1 ENGLISH Congratulations to the purchase of this Max product. Please read this manual thoroughly prior to using the product in order
CRYSTALSKY CS785/CS785U/CS550. User Manual
 CRYSTALSKY CS785/CS785U/CS550 User Manual V1.0 2018.08 Contents Disclaimer 2 Warning 2 Introduction 2 In the Box 3 Overview 3 Usage 4 Charging the Battery 4 Mounting the Battery 4 Mounting the Monitor
3-Axis Gimbal for Mirrorless Camera. Guilin Feiyu Technology Incorporated Company
 3-Axis Gimbal for Mirrorless Camera Guilin Feiyu Technology Incorporated Company User Manual EN V 1.0 1. Product Overview 1 [6] [12] [1] [2] [3] [4] [5] [7] [8] [9] [10] [11] [24] [21] [13] [14] [15] [17]
PIPE INSPECTION CAMERA SYSTEM AX-B2120CW/AX- B2120RD/AX-2120ST/AX-B2135CW/AX-B2135ST
 PIPE INSPECTION CAMERA SYSTEM AX-B2120CW/AX- B2120RD/AX-2120ST/AX-B2135CW/AX-B2135ST 1. Warning Read these instructions completely before operating this system. Please charge the battery first before use.
LED FOLDING WORKLIGHT TM
 LED FOLDING WORKLIGHT TM LED LIGHT POWERSTRIP USB CHARGING ITM. / ART. 689211 Model: LM55812 CARE & USE INSTRUCTIONS IMPORTANT, RETAIN FOR FUTURE REFERENCE: READ CAREFULLY For assistance with assembly
3-Axis Gimbal for Sony Camera. Guilin Feiyu Technology Incorporated Company
 3-Axis Gimbal for Sony Camera Guilin Feiyu Technology Incorporated Company User Manual EN V 1.1 1. Product Overview Tilt axis Cross arm Roll axis Vertical arm Adapter(Clamping plate) Camera thumb screw
ZTE MOBILE HOTSPOT QUICK START GUIDE
 ZTE MOBILE HOTSPOT QUICK START GUIDE INTRODUCTION Thank you for choosing Consumer Cellular! We know you re excited to use your new ZTE Mobile Hotspot, and this short guide will help you get familiar with
G360 Panoramic Camera Gimbal
 Instruction Manual EN V 1.0 G360 Panoramic Camera Gimbal Compatible with Samsung gear 360/Kodak pixpro sp360/kodak pixpro sp360 4k/Sony FDR-X3000 etc. GuiLin FeiYu Technology Incorporated Company Product
WIRELESS SHUTTERBOSS. User Manual
 WIRELESS SHUTTERBOSS User Manual THANK YOU FOR CHOOSING VELLO The Vello Wireless ShutterBoss has a range of up to 250 feet on 99 channels over the reliable FSK modulated 2.4 GHz frequency. But this device
9.5 Dual-Sided Wall Mount LED Lighted Mirror, 1x/10x
 9.5 Dual-Sided Wall Mount LED Lighted Mirror, 1x/10x MLW45 Series Before using please read the instruction manual and keep it for future use. WALL MOUNT VANITY MIRROR Ovente mirrors are equipped with energy-saving
Light as soft as a cloud.
 Light as soft as a cloud. As part of Luxli s Softi series, the LED Ring Light with Camera Mount provides soft, flattering light without harsh shadows. Control the intensity when illuminating your subject
FREEWAVE STRYKER LIGHTNING/MOTION TRIGGER. User Manual
 FREEWAVE STRYKER LIGHTNING/MOTION TRIGGER User Manual THANK YOU FOR CHOOSING VELLO The Vello FreeWave Stryker for Canon and Nikon is a 2-in-1 solution for intense light and infrared (IR) image triggering.
Model P4017 Single Channel USB Oscilloscope. Quick Start Guide
 Model P4017 Single Channel USB Oscilloscope Quick Start Guide General Warranty BNC warrants that the product will be free from defects in materials and workmanship for 3 years from the date of purchase
smartentry Wireless Video Doorphone User Manual
 smartentry Wireless Video Doorphone User Manual Designed & Engineered Version 1.2 in the United Kingdom Contents Precautions... 3 1. Product Overview... 4 1.1. Product Features... 4 1.2. Contents... 4
OSMO MOBILE. User Manual V
 OSMO MOBILE User Manual V1.2 2017.03 Searching for Keywords Search for keywords such as battery and install to find a topic. If you are using Adobe Acrobat Reader to read this document, press Ctrl+F on
ESV1200 Quantum Illuminator Cabinet INSTRUCTION MANUAL
 ESV1200 Quantum Illuminator Cabinet INSTRUCTION MANUAL Universal Power Supply ESV1200 Illuminated Cabinet Charts Charts HOTV Charts Letter Charts 2 ESV1200 Quantum Viewer Table Of Contents Introduction.......
HOW TO USE THE SKY GLIDE - A GUIDE
 HOW TO USE THE SKY GLIDE - A GUIDE 1 Remove the stand from the box. Set on a flat surface. (In the version STR rack, turn the 5 elements). 2 Pull the unit SKY GLIDE and set it on a stand. 3 Turn the camera
C-pan arm USERS INSTRUCTIONS
 C-pan arm USERS INSTRUCTIONS Designed 1 of 12 and made in Denmark Thanks for purchasing a 9.Solutions product. With great passion, we design our products to be as versatile as possible. We hope that our
INSPIRE 1 Quick Start Guide V1.0
 INSPIRE Quick Start Guide V.0 The Inspire is a professional aerial filmmaking and photography platform that is ready to fly right out of the box. Featuring an onboard camera equipped with a 0mm lens and
TG VR Gimbal User Manual V Accsoon. All Rights Reserved.
 TG20 360 VR Gimbal User Manual V1.0 20161209 www.accsoon.com E-mail: salse@accsoon.com 0 Disclaimers and Warnings Congratulations on purchasing you new VR Gimbal. Please read this manual and disclaimer
OPERATING INSTRUCTIONS POWERSMART 10 10,000 MAH PORTABLE POWER PLEASE READ BEFORE OPERATING THIS EQUIPMENT
 POWERSMART 10 10,000 MAH PORTABLE POWER OPERATING INSTRUCTIONS PLEASE READ BEFORE OPERATING THIS EQUIPMENT HALO POWERSMART 10 Thank you for choosing HALO. Innovative and easy to use, the HALO POWERSMART
To connect the AC adapter:
 Replacing the AC Adapter Replacing the AC Adapter 3 Plug the power cord into a wall outlet. The power indicator turns on. To connect the AC adapter: Connect the power cord to the AC adapter. Power indicator
USER MANUAL OVO MINI SPEAKER
 USER MANUAL OVO MINI SPEAKER Safety Warnings - Precautions! Keep this product out of reach of children younger than 8 years of age. Do not permit children to play with this appliance. This device should
W IRELESS8000 T. Powerful Universal Portable Charger PLEASE READ BEFORE OPERATING THIS EQUIPMENT
 W IRELESS8000 T M Powerful Universal Portable Charger PLEASE READ BEFORE OPERATING THIS EQUIPMENT HALO WIRELESS 8000 Thank you for choosing HALO. The HALO WIRELESS 8000 is a portable charger with 8000mAh
Wireless Earbuds D32. User Manual
 Wireless Earbuds D32 User Manual Thank you for purchasing our products. This manual addresses the safety guidelines, warranty and operating instructions. Please review this manual thoroughly before operating
Multi Battery Charger MBC-08. Manual
 Multi Battery Charger MBC-08 Manual Imprint Information in this document is subject to change without notice. No part of this document may be reproduced or transmitted without the express written permission
360 VR Camera FOR USB-C MOBILE DEVICES
 360 VR Camera FOR USB-C MOBILE DEVICES TABLE OF CONTENTS Warnings and Cautions...1 Location of Parts... 2 Installing the Opai360 App.... 3 Connecting the Camera To Your Phone... 4 Taking Photos and Recording
FULLY CHARGE THE BATTERY BEFORE USING YOUR NEW CAMERA. NO ONE WANTS TO GET 5 MINUTES OF FOOTAGE BEFORE THE FUN STOPS.
 QUICK START GUIDE 1 BEFORE YOU START FULLY CHARGE THE BATTERY BEFORE USING YOUR NEW CAMERA. NO ONE WANTS TO GET 5 MINUTES OF FOOTAGE BEFORE THE FUN STOPS. CHARGE THE BATTERY WITH THE INCLUDED MICRO USB-B
JANOME DESKTOP ROBOT JR2000N Series. Operation Manual. <Setup> For Qualified Installer ONLY
 JANOME DESKTOP ROBOT JR2000N Series Operation Manual For Qualified Installer ONLY Thank you for purchasing the Janome Robot. *Read this manual thoroughly in order to properly use this robot. Be sure
P OWERBUDS. The perfect accessory for anyone who wants to be truly wireless PLEASE READ BEFORE OPERATING THIS EQUIPMENT
 P OWERBUDS The perfect accessory for anyone who wants to be truly wireless PLEASE READ BEFORE OPERATING THIS EQUIPMENT HALO POWERBUDS Thank you for choosing HALO. The HALO POWERBUDS are the perfect accessory
ESV1500 Quantum Illuminator Cabinet INSTRUCTION MANUAL
 ESV1500 Quantum Illuminator Cabinet INSTRUCTION MANUAL B A C Universal Power Supply Remote Control ESV1500 Illuminated Cabinet Battery Pack: Optional Charts Charts HOTV Charts Letter Charts GL TABLE OF
FINDSTER USER GUIDE - KIDS -
 FINDSTER USER GUIDE - KIDS - 1 TABLE OF CONTENTS 1. In the box 2. Findster modules overview 3. Getting Started 4. Exploring the App 5. Understaning your Findster 6. Charging the Findster modules 7. Care
Case for iphone 7 USER GUIDE [ 1 ]
![Case for iphone 7 USER GUIDE [ 1 ]](/thumbs/92/107993548.jpg "Case for iphone 7 USER GUIDE [ 1 ]") Case for iphone 7 USER GUIDE [ 1 ] Important Product Instructions Please take a few moments to read through this user guide prior to using this product. This product is only made to be used with the Apple
Case for iphone 7 USER GUIDE [ 1 ] Important Product Instructions Please take a few moments to read through this user guide prior to using this product. This product is only made to be used with the Apple
3-Axis Stabilized Handheld Gimbal
 3-Axis Stabilized Handheld Gimbal Guilin Feiyu Technology Incorporated Company User Manual EN V1.3 1. Product Overview * The showing sports camera is not included in the package Accessories Thumb Screw
Lotus DX. sit-stand workstation. assembly and operation instructions. MODEL # s: LOTUS-DX-BLK LOTUS-DX-WHT
 Lotus DX assembly and operation instructions sit-stand workstation MODEL # s: LOTUS-DX-BLK LOTUS-DX-WHT safety warnings 13.6 Kg 30 lbs. 2.2 Kg 5 lbs. safety instructions/warning Read and follow all instructions
impact INSTRUCTIONS LiteTrek 4.0 Monolight lighting equipment and accessories
 impact lighting equipment and accessories LiteTrek 4.0 Monolight INSTRUCTIONS Congratulations on your purchase of the Impact LiteTrek 4.0 Portable Monolight. Enjoy the many benefits of a portable strobe
PLEASE READ INSTRUCTIONS BEFORE USE. DO NOT DISCARD. MobilePro Series Bluetooth Keyboard with Carrying Case
 PLEASE READ INSTRUCTIONS BEFORE USE. DO NOT DISCARD. MobilePro Series Bluetooth Keyboard with Carrying Case USER MANUAL Thank you for choosing Fellowes. For optimum performance, please read this instruction
OSMO MOBILE 2. User Manual. v
 OSMO MOBILE 2 User Manual v1.0 2018.02 Searching for Keywords Search for keywords such as battery and install to find a topic. If you are using Adobe Acrobat Reader to read this document, press Ctrl+F
ESV1018 Quantum Illuminator Cabinet INSTRUCTION MANUAL
 ESV1018 Quantum Illuminator Cabinet INSTRUCTION MANUAL Universal Power Supply EVS1018 Illuminated Cabinet Battery Pack: Optional Charts Charts HOTV Charts Letter Charts and Tumbling E More charts available
3-Axis Stabilized Handheld Gimbal for Smartphone. Instructions. Guilin Feiyu Technology Incorporated Company. User Manual EN V1.0
 -Axis Stabilized Handheld Gimbal for Smartphone Instructions Guilin Feiyu Technology Incorporated Company User Manual EN V.0 Catalogue. SPG Overview. Quick Start Guide. Charging 5 4. Function operation
BORESCOPE INSTRUCTIONS INSPECTION CAMERA RANGE RBS100 RBS200 RBS300. Retain these instructions for future reference
 BORESCOPE INSPECTION CAMERA RANGE RBS100 RBS200 RBS300 INSTRUCTIONS Retain these instructions for future reference www.ringautomotive.co.uk 1 Instructions for Ring Automotive Borescope Inspection Camera
ZTE WIRELESS HOME PHONE BASE QUICK START GUIDE
 ZTE WIRELESS HOME PHONE BASE QUICK START GUIDE Thank you for choosing Consumer Cellular! We know you re excited to use your new ZTE Wireless Home Phone Base, and this short guide will help you get familiar
ESV3000 ETDRS Illuminated Cabinet INSTRUCTION MANUAL
 ESV000 ETDRS Illuminated Cabinet INSTRUCTION MANUAL ACTUAL SIZE LETTER FOOT METER SIZE 0 0 80 24 24M 6 50 40 2 25 20 16 19 15 12 9.5 7.5 6 4.8 Developed by Lea Hyvärinen, M.D. FOR TESTING AT FEET ( METERS)
SHINE 3000 WITH FASHION CABLE
 SHINE 3000 WITH FASHION CABLE POWERFUL UNIVERSAL PORTABLE CHARGER OPERATING INSTRUCTIONS HALO SHINE 3000 Thank you for choosing HALO. From HALO, the SHINE 3000 with fashion cable is the most perfect and
3-Axis Stabilized Handheld Gimbal for Smartphone
 3-Axis Stabilized Handheld Gimbal for Smartphone Guilin Feiyu Technology Incorporated Company User Manual EN V 1.1 Product overview 1. Structure Smartphone shown in illustrations is for reference only
MOZA AirCross. User Manual.
 MOZA AirCross User Manual www.gudsen.com Contents 1. Instruction Ⅱ 2.Package List 01 3.Getting to know about Moza AirCross 04 4.Getting Start 05 5.Gimbal Control 10 6. Firmware update 11 7. App Installation
E-37-V Dome Network Camera. Quick Start Guide
 E-37-V Dome Network Camera Quick Start Guide i Welcome Thank you for purchasing our Network camera! This user s manual is designed to be a reference tool for your system. Please read the following safeguard
MOVEBAND Display Quick Start Guide
 MOVEBAND Display Quick Start Guide CJB1HD0LCAAA About the MOVEBAND Display MOVEBAND Display tracks your daily fitness activity and sleep data, allows you to set your own targets and then motivates you
Thanks for you purchasing of this product. Please kindly read this user manual and keep it carefully for reference.
 CONTENTS Thanks for you purchasing of this product. Please kindly read this user manual and keep it carefully for reference. 01Read This First...01 Product Information...01 Standard Package Contents...02
User Guide Microsoft Portable Power (DC-21)
") User Guide Microsoft Portable Power (DC-21) Issue 1.0 EN-US User Guide Microsoft Portable Power (DC-21) Contents For your safety 3 About your portable charger 4 Keys and parts 5 Charge your portable charger
User Guide Microsoft Portable Power (DC-21) Issue 1.0 EN-US User Guide Microsoft Portable Power (DC-21) Contents For your safety 3 About your portable charger 4 Keys and parts 5 Charge your portable charger
HD40H(X) Performance Series Camera. User Guide
 Performance Series Camera. User Guide") HD31H(X) HD30H(X) HD40H(X) Performance Series Camera User Guide Document 1 2 HD40H(X)/HD30H(X)/HD31H(X) Camera User Guide Thank you for purchasing our product. If there are any questions, or requests,
HD31H(X) HD30H(X) HD40H(X) Performance Series Camera User Guide Document 1 2 HD40H(X)/HD30H(X)/HD31H(X) Camera User Guide Thank you for purchasing our product. If there are any questions, or requests,
Smartest Gimbal Stabilizer for GoPro
 USER MANUAL V 1.1 Smartest Gimbal Stabilizer for GoPro TABLE OF CONTENTS 1. Parts 3 2. Getting Started 6 3. Gimbal Mode 10 4. How to use the Remote Control 12 5. Calibration of Gimbal 13 6. How to use
Instruction Manual. 9 Dual Screen Portable DVD Player - BPDVD99
 Instruction Manual 9 Dual Screen Portable DVD Player - BPDVD99 CONTENTS General Safety 4 Product Overview 7 Remote Control 9 Getting Started 10 Setup 11 Troubleshooting 12 Specifications 12 Support 16
Escort LED LIGHTS USER MANUAL
 Escort LED LIGHTS USER MANUAL Escort INTRODUCTION THANK YOU FOR CHOOSING GENARAY The Escort series of LED light fixtures provides photographers and videographers with flicker-free continuous light. They
Dahua HD IR Vari-Focal Fixed Network Camera. Quick Start Guide
 Dahua HD IR Vari-Focal Fixed Network Camera Quick Start Guide Version 1.0.0 Dahua Technology CO., LTD Welcome Thank you for purchasing our Network camera! This user s manual is designed to be a reference
3-Axis Wearable Gimbal for Action Camera. Instructions. Guilin Feiyu Technology Incorporated Company
 -Axis Wearable Gimbal for Action Camera Instructions Guilin Feiyu Technology Incorporated Company User Manual E N V. Catalogue. WGX Overview. Quick Start Guide. Function operation 4 Working Mode 4 Function
Breeze Film Shooting Equipment (P-W5P-BRZ) I N STR UC TI ON MANUAL
 I N STR UC TI ON MANUAL") Breeze Film Shooting Equipment (P-W5P-BRZ) I N STR UC TI ON MANUAL All rights reserved No part of this document may be reproduced, stored in a retrieval system, or transmitted by any form or by any means,
Breeze Film Shooting Equipment (P-W5P-BRZ) I N STR UC TI ON MANUAL All rights reserved No part of this document may be reproduced, stored in a retrieval system, or transmitted by any form or by any means,
Line Interactive 1000VA/1400VA/2000VA Uninterruptible Power System
 USER MANUAL Line Interactive 1000VA/1400VA/2000VA Uninterruptible Power System 614-06762-00 IMPORTANT SAFETY INSTRUCTIONS SAVE THESE INSTRUCTIONS This manual contains important instructions for Line Interactive
USER MANUAL. For Flic. English
 USER MANUAL For Flic English Welcome to the Flic family! Take control and simplify your life with the push of a Flic. - Love, Flic Team Contents Setup guide 1 Pairing your Flic 2 Bluetooth connection 3
User Manual for the Antari M-1 Mobile Fog Machine. Congratulations on the purchase of your new ANTARI M-1 Mobile Fog Machine
 User Manual for the Antari M-1 Mobile Fog Machine Congratulations on the purchase of your new ANTARI M-1 Mobile Fog Machine Save and read these instructions Bitte lesen Sie und sichern Sie diese Anweisungen
P OCKET POWER 9000 T. Powerful Universal Portable Charger PLEASE READ BEFORE OPERATING THIS EQUIPMENT
 P OCKET POWER 9000 T M Powerful Universal Portable Charger PLEASE READ BEFORE OPERATING THIS EQUIPMENT HALO POCKET POWER 9000 Thank you for choosing HALO. Innovative, fashionable and easy to use, the HALO
NEC VersaBay IV 6-Cell Secondary Battery
 NEC VersaBay IV 6-Cell Secondary Battery Congratulations on purchasing an NEC VersaBay IV 6-cell secondary battery for your NEC Versa notebook computer! Use the VersaBay IV secondary battery in addition
CONTENDER LED FRESNEL SPOT FOCUSING LIGHT USER MANUAL
 CONTENDER LED FRESNEL SPOT FOCUSING LIGHT USER MANUAL Contender INTRODUCTION THANK YOU FOR CHOOSING GENARAY The Genaray Contender is a compact and versatile light that s ideal for still and tabletop photography,
Removal and Installation8
 8 Screw Types 8-4 Top Cover Assembly 8-5 Left Hand Cover 8-6 Right Hand Cover 8-10 Front Panel Assembly 8-14 Left Rear Cover 8-15 Right Rear Cover 8-16 Extension Cover (60" Model only) 8-17 Media Lever
INSEBO2IRF 2.1MP 1080P IP Eyeball Camera with IR
 INSEBO2IRF 2.1MP 1080P IP Eyeball Camera with IR Quick Start Guide Version 1.0.0 Welcome Thank you for purchasing our Network camera! This user s manual is designed to be a reference tool for your system.
User Manual Revised 1-July-2015
 User Manual Revised 1-July-2015 LIMITED WARRANTY AND LIMITATION OF LIABILITY The use of the Auguscope is subject at all times to Augury's standard Management Platform Terms of Use, which can be viewed
TAKAMA FLIP-ZIP INTRODUCTION. KEY FEATURES (Illustration - 1) MULTI-FUNCTIONAL TRIPOD MONOPOD KIT. Thanks for choosing Takama!
 MULTI-FUNCTIONAL TRIPOD MONOPOD KIT. Thanks for choosing Takama!") FLIP-ZIP TAKP4H58 TAKAMA FLIP-ZIP MULTI-FUNCTIONAL TRIPOD MONOPOD KIT INTRODUCTION Thanks for choosing Takama! The perfect hybrid accessory for photo and video cameras, this unique tripod will bring stability
FLIP-ZIP TAKP4H58 TAKAMA FLIP-ZIP MULTI-FUNCTIONAL TRIPOD MONOPOD KIT INTRODUCTION Thanks for choosing Takama! The perfect hybrid accessory for photo and video cameras, this unique tripod will bring stability
STYLISH LED DESK LAMP WITH DIFFERENT LIGHT MODES
 STYLISH LED DESK LAMP WITH DIFFERENT LIGHT MODES User manual, Operating- and safety instructions, Warranty conditions LED 12 MON Item no.: MROS501 1 Getting started and operation 1. Setting up and connecting
X-Beam Waterproof Action Camera Light USER GUIDE
 X-Beam Waterproof Action Camera Light USER GUIDE EN Join the social movement and follow us on #ChallengeYourself Share your footage with us on our social media Need help? www.kaiserbaas.com/support To
3M Duplex Polishing Machine 6851-E with Universal Dual Holder Instructions
 3M Duplex Polishing Machine 6851-E with Universal Dual Holder Instructions Safety Information Read, understand and follow all safety information contained in these user instructions prior to use of the
User Manual V K Camera with an Integrated 3-axis Gimbal
 User Manual V 1.1 4K Camera with an Integrated 3-axis Gimbal Table of Contents Introduction 3 At a Glance 3 Charging the Battery 4 Status Battery LED Indicator Description 4 Check the Battery Level 5 Insert
juice pack Made for Samsung Galaxy S7 & Samsung Galaxy S7 edge USER MANUAL
 juice pack Made for Samsung Galaxy S7 & Samsung Galaxy S7 edge USER MANUAL Welcome Thank you for purchasing the mophie juice pack battery case made for Samsung Galaxy S7 or S7 edge. Your juice pack case
Flycam Buddy Mini Gimbal Camera Stabilizer (FLCM-BDY-MINI) 2
 2") Flycam Buddy Mini Gimbal Camera Stabilizer (FLCM-BDY-MINI) 2 At FLYCAM, our goal is to ensure 100% Customer satisfaction in all that we do. We back our sales with a 6-months warranty from the date of purchase
Flycam Buddy Mini Gimbal Camera Stabilizer (FLCM-BDY-MINI) 2 At FLYCAM, our goal is to ensure 100% Customer satisfaction in all that we do. We back our sales with a 6-months warranty from the date of purchase
DISCLAIMER: All products, logos, brand names, or companies are trademarks or registered trademarks of their respective owners!
 DISCLAIMER: While every effort has been made to ensure that the information in this manual is accurate and complete, no liability can be accepted for any errors or omissions ELTRADE reserves the right