Ricoh XR-X3pf. This is the full text and images from the manual. If you find this manual useful, how about a donation of $4 to:
|
|
|
- Thomasina Riley
- 5 years ago
- Views:
Transcription

1 Ricoh XR-X3pf This is the full text and images from the manual. This camera manual library is for reference and historical purposes, all rights reserved. This page is copyright by M. Butkus, N.J. This page may not be sold or distributed without the expressed permission of the producer I have no connection with Ricoh Cameras, Japan If you find this manual useful, how about a donation of $4 to: M. Butkus, 29 Lake Ave., High Bridge, NJ This will help me to continue to host this site, buy new manuals, and pay their shipping costs. It'll make you feel better, won't it? If you use Pay Pal, use the link below. Use the above address for a check, M.O. or cash. Ricoh XR-X3pf camera manual This printed manual is some 63 pages long. I broke up the on-line manual into sections to cut up the 90+ images.
2 ,">Problems, suggestions - Web Master 1. Locating the Controls 2. Function Map 3. LCD Information 4. Quick Guide in Program Mode 7. INSERTING BATTERIES 10. MAIN SWITCH 13. SETTING THE FILM SPEED 5. CONTENTS 6. ATTACHING THE STRAP 8. MOUNTING AND REMOVING THE LENS 11. MONITORING CONDITION OF BATTERIES 9. SETTING LENS TO THE P (PROGRAM) POSITION 12. LOADING THE FILM 14. MAIN SWITCH 15. CONFIRMING THE SHOOTING MODE 16. USING THE FLASH 17. HOLDING THE CAMERA 18. SHOOTING 19. FOCUSING 20. REWINDING THE FILM 21. SELF-TIMER FUNCTION 22. SETTING THE MODES 23. RESETTING THE MODES 24. SHOOTING MODES 25. PROGRAM AE MODE 26. SHUTTER PRIORITY AE MODE 27. APERTURE PRIORITY AE MODE 28. MANUAL MODE 29. to to 51 <<< update - I have been told a Olympus or Pentax eyecups and other accessories will work on XR cameras >>> 1. Locating the Controls 2. Function Map Camera parts - Click here for images of the camera parts and LCD images


3 3. LCD Information Reading the Exposure Indicator The exposure indicator is displayed on the LCD Panel in the following conditions: In Manual Mode When the exposure compensation has been set. When the exposure compensation will be set. When Auto Bracketing Mode or flash compensation have been set. When the film speed is set. 4www.butku s.org
. The * (dot) mark flashes when the value is over -2EV or +2EV.")
 of the manually set film speed and the automatically set film speed are displayed. 4. Quick Guide in Program Mode - Click here 5. CONTENTS 6. ATTACHING THE STRAP 1.")
4 In Manual Mode and with exposure compensation, it is displayed in both the LCD Panel and in viewfinder display. In Manual Mode, or with exposure compensation, the exposure indicator will display the correct exposure difference (EV). The * (dot) mark flashes when the value is over -2EV or +2EV. The exposure range (EV) in Auto Bracketing Mode and the flash compensation value (EV) in Flash Compensation Mode are displayed. The exposure difference (EV) of the manually set film speed and the automatically set film speed are displayed. 4. Quick Guide in Program Mode - Click here 5. CONTENTS 6. ATTACHING THE STRAP 1. Remove the Battery Holder by turning the Battery Holder Screw counterclockwise with a coin. (Fig. 1) 2. Slip the Viewfinder Cap and Shoulder Pad on to the strap. (Fig. 2) 3. Run the Strap Through the Strap Eyelet and set as shown. (Fig. 3) 4. Secure the Battery Holder to the camera body by turning the Battery Holder Screw clockwise with a coin. (Fig. 4) 5. Adjust the strap length as desired.
 on each battery are lined up correctly according to the polarity indications inside the")
 * Condition of batteries should be monitored frequently. See Section 11 for details.")
5 7. INSERTING BATTERIES 1. Insert four new alkaline batteries into the Battery Holder, first checking that the + and the - (negative) on each battery are lined up correctly according to the polarity indications inside the Battery Holder. (Fig. 5) 2. Secure the Battery Holder to the camera body by turning the Battery Holder Screw clockwise with a coin. (Fig. 6) Battery Choices: * Four Penlight (AA) alkaline batteries. (nickel cadmium batteries possible.) * Condition of batteries should be monitored frequently. See Section 11 for details. * When changing the batteries, be sure to replace all four and to use the same battery brand. * AA Size lithium batteries can not be used. 4www.butku s.org 8. MOUNTING AND REMOVING THE LENS 1. Pull off the Camera Body Cap. (Fig. 7) 2. Align the red dot on the camera with the red dot on the lens and mount the lens on the camera. (Fig. 8) 3. Turn the lens in the direction shown by the arrow until it clicks into place. (Fig. 9)
 * Conventional K mount lenses can be used in Aperture priority and Manual Modes but cannot be used for Programmed AE Photography or Shutter Priority AE.")
 or KA/R (Ricoh and Pentax lens contact pins) 9. SETTING LENS TO THE P (PROGRAM) POSITION 1.")
 10. MAIN SWITCH 1. Slide the Main Switch to ON. (Fig. 12) * The camera is designed to shut off the main power supply automatically to save battery energy when the camera is not in use for about 30 secs.")
6 4. To remove the lens, press the Lens Release Button, then turn the lens in the direction shown by the arrow. (Fig. 10) * Conventional K mount lenses can be used in Aperture priority and Manual Modes but cannot be used for Programmed AE Photography or Shutter Priority AE. * For best results, use Ricoh original equipment lens. Proper performance of camera may not always be assured with other lenses. (MIKE: you must use a KR (Ricoh lens contact pin) or KA/R (Ricoh and Pentax lens contact pins) 9. SETTING LENS TO THE P (PROGRAM) POSITION 1. While the P Lock Button is pressed, turn the Aperture Ring. 2. Set it to the locked P position for programmed automatic exposure photography. To unlock the Aperture ring from P. turn it while the P Lock Button is depressed. (Fig. 11 ) 10. MAIN SWITCH 1. Slide the Main Switch to ON. (Fig. 12) * The camera is designed to shut off the main power supply automatically to save battery energy when the camera is not in use for about 30 secs. even if the Main Switch is left ON. This will turn off the LCD Panel, but the information contained in camera memory will be retained. Lightly press the Shutter Release Button to turn on the power and update the LCD Panel. For maximum battery life, always turn the Main Switch to the OFF position when the camera is stored.
 symbol appears on the LCD Panel. (Fig. 13) 2.")
 symbol flashes, the Built-in Flash cannot be used. To use the Built-in Flash, replace the batteries with 4 new (alkaline) batteries. (Fig. 15) 4.")
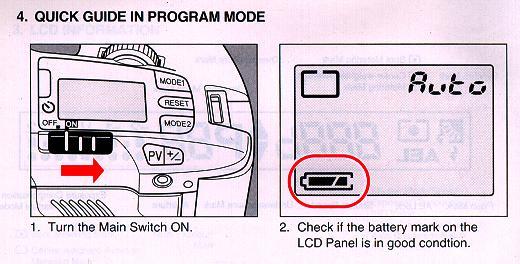
7 11. MONITORING CONDITION OF BATTERIES When the Power Switch is turned on, the battery condition is displayed in the LCD Panel. 1. Batteries are in good condition when the (battery in full black) symbol appears on the LCD Panel. (Fig. 13) 2. When the batteries are nearly exhausted, the (battery and 1 dot) symbol will be displayed on the LCD Panel. (Fig. 14) Replace with 4 new alkaline batteries. 3. When the (battery and 1 dot) symbol flashes, the Built-in Flash cannot be used. To use the Built-in Flash, replace the batteries with 4 new (alkaline) batteries. (Fig. 15) 4. When the batteries are virtually exhausted, the (empty battery) symbol will appear in the LCD Panel. For a few sec. then disappear all display. Replace with 4 new alkaline batteries. (Fig. 16) Cold temperatures will reduce battery efficiency. In freezing weather, the symbol may turn off and only the (battery and one dot) symbol may show on the LCD Panel. If you are taking pictures in cold weather, keep the batteries warm and insert them just before shooting. 4www.butkus.org
 2.")
 * If the film leader is pulled out more than necessary when loading, the number of exposures could be reduced. 3.")
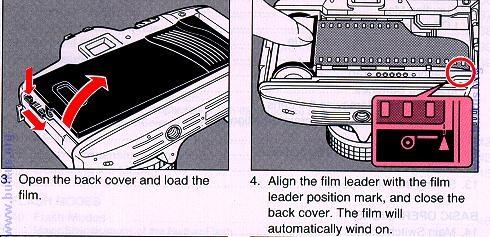
8 12. LOADING THE FILM Always avoid direct sunlight when loading the film. 1. Depress the Back Cover Lock Release Button and slide the Back Cover Latch down to open the Back Cover. (Fig. 17) 2. Load the Film Cassette into the Film Chamber and pull out enough film leader to extend just beyond the Film Leader Index against the Take-up Spool. (Fig. 18) * If the film leader is pulled out more than necessary when loading, the number of exposures could be reduced. 3. Make sure that the film is within the Film Guides, and that the upper sprocket edge is under the Guide Plate. (Fig. 19) The film may not load properly if the film leader is too loose. Make sure it is flat as shown in the illustration. (Fig. 20)
. 4www.butkus.org If display shuts off, lightly press Shutter Release Button to update LCD.")


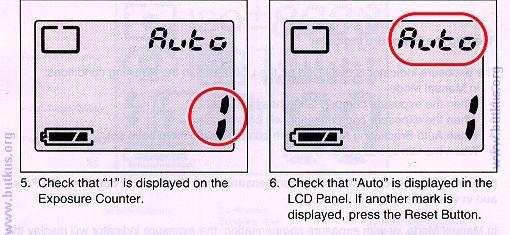
9 4. Close the Back Cover so that the Back Cover Latch snaps shut. (Fig. 21) If the film has been properly loaded, the film speed will first appear on the LCD Panel for about 2 seconds. Then, the Exposure Counter will display "1" (Fig. 22). 4www.butkus.org If display shuts off, lightly press Shutter Release Button to update LCD. LCD display data can be verified by checking the information visible through Film Loaded Window on camera back. 5. If the film has not advanced correctly or was not taken up onto the Film Take-up Spool, the Exposure Counter "O" will blink and Shutter is locked until the film has been loaded correctly. Reload the film by repeating steps 1-4 shown above. (Fig. 23) If Non-DX films are loaded in the camera, no LCD warnings will be observed and Shutter can be released. (The film speed must also be set manually. See next section.) 13 SETTING THE FILM SPEED DX coded films are provided with black-and-silver patterns corresponding to film speed and number of exposures on roll. The camera reads this pattern and automatically sets itself for DX films with speeds ranging from ISO 25 to (Fig. 24)

10 DX films 1. The film speed and the "DX" verification symbols are briefly displayed on the LCD Panel. * For advanced applications, you may wish to raise or lower the ISO speed of a DX coded film. You can override automatic ISO setting with manual setting. Refer to sec. 35 At this time, ISO range is from Non-DX films Refer to page 39 for loading non-dx films. 14.MAIN SWITCH 1. Turn the Main Switch ON. (Fig. 25) * The LCD Panel and the display inside the viewfinder are displayed. * If there is a film loaded in the camera, the film speed will be displayed for the first 2 seconds. 2. Check the batteries. * See "Monitoring Condition of Batteries" on P.14. * If the Main Switch is turned OFF, the power will be completely cut off. The LCD Panel and the viewfinder display will disappear. * If the following functions are set, they will be canceled when the Main Switch is turned OFF. Multiple Exposure Mode AE Lock Self timer Mode * To prevent unnecessary battery depletion, turn the Main switch OFF when you are not shooting. Power consumption timer If the camera controls ~ or functions ** are not operated for about 30 seconds, the power consumption timer will cancel the display on the LCD Panel. At this time, if the Shutter Button is pressed lightly halfway, the display will appear again. All Buttons, Dial, Main Switch.


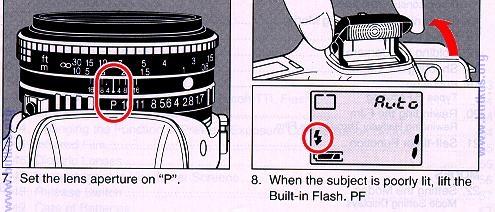
11 * * Shooting, Film loading, Film rewinding. * The mode settings performed before the display disappears will not be canceled. * When the power consumption timer has canceled the display, only the following can be operated: Shutter Button, Self-timer Button, Manual Rewind Button and Main Switch. To set or change the mode settings, press the Shutter Button halfway to display the LCD Panel. 15. CONFIRMING THE SHOOTING MODE The following section explains how to shoot with the simplest shooting mode. If the shooting mode is set to Program AK, the camera will automatically adjust the shutter speed and aperture to the brightness of the subject you are shooting. * Refer to "Shooting Modes" on P.26 and " Program AE Shooting" on P.27 for more information. 1. Confirm that "Auto" is displayed in the LCD Panel. (Fig. 26) * If there are other displays besides the "Auto" display in the LCD Panel, press the RESET Button. If 'Auto" does not appear when the RESET Button is pressed, refer to "Changing the Reset Settings" pg While pressing the P Lock Pin on the lens, turn the "P" mark on the Aperture Ring to the Distance/Aperture Index. (Fig. 27) * Shooting in this mode is not possible with a lens that cannot be used with the Program Mode. * On some lenses, the "P" mark is indicated as an "A".
 * Open the flash by pulling on the protruding grips on the sides of the flash. 2. Check that the Flash symbol (lightning bolt) is displayed on the LCD Panel. (Fig. 29) 17.")
 With your right hand lightly grasp the grip and place your index finger lightly over the Shutter Button. When pressing the Shutter Button, grasp the grip firmly.")
12 16. USING THE FLASH Use the flash when shooting in dark places, in backlit conditions or when the subject is dark. 1. Pull up the Built-in Flash. (Fig. 28) * Open the flash by pulling on the protruding grips on the sides of the flash. 2. Check that the Flash symbol (lightning bolt) is displayed on the LCD Panel. (Fig. 29) 17. HOLDING THE CAMERA To prevent camera shake, be sure to hold the camera correctly when shooting. Support the camera on the palm of your left hand so as you can turn the focusing ring with your fingers. (Fig. 30) With your right hand lightly grasp the grip and place your index finger lightly over the Shutter Button. When pressing the Shutter Button, grasp the grip firmly. Place your elbows against your body when shooting with the camera in a horizontal position, or place your left elbow against your body when shooting with the camera in a vertical position. (Fig. 31 ) Place your forehead against the camera and look through the viewfinder.4www.butku s.org

 * The viewfinder display should be as shown in the illustration. The \"P\" mark indicates that it is set to Program AE Mode.")
13 18. SHOOTING 1. Press the Shutter Button halfway. (Fig. 32) * A display will appear at the bottom, inside the viewfinder. * The Shutter Button can be pressed in two ways. If it is pressed halfway, the LCD Panel display and the viewfinder display will appear. If it is fully pressed, the shutter will be released. * If the camera is not operated for about 10 seconds, the display insides the viewfinder will disappear. By pressing the shutter release button half way the display will appear. 2. Confirm that the viewfinder display has appeared. (Fig. 33) * The viewfinder display should be as shown in the illustration. The "P" mark indicates that it is set to Program AE Mode. The number on the left of the "P" mark is the shutter speed. The number on the right side is the aperture setting. * If the camera is not operated for approximately 30 seconds, he display on the LCD panel will disappear. By pressing the Shutter Button halfway, the display will reappear. 19. FOCUSING * When a slow shutter speed has been set, use a tripod to prevent camera shake. Focusing is achieved with the Split image focusing, the Microprism focusing or the Matte screen focusing in the viewfinder. The type of focusing depends on the subject and the lens being used. (Fig. 34, 35) 1. While looking through the viewfinder, focus by turning the Focusing Ring. (Fig. 36) 2. Press the Shutter Button. (Fig. 37)

 with a lens such as a zoom lens, half of the split image becomes dark.")
14 * The film is wound on when the shutter is released. Types of Focusing 1. Split image The area inside of the center circle is the split image. When both images in the split image spot form a single, clear image, the subject is in focus. 2. Microprism The area inside the outer circle is the microprism. When the subject loses its shimmering appearance, the subject is in focus. 3. Matte screen 4www.butkus.org The area outside the microprism is the matte screen. When the image loses its blurred appearance, the subject is in focus. * When you use a small aperture (high aperture value) with a lens such as a zoom lens, half of the split image becomes dark. In this case, use the matte screen to focus. 20. REWINDING THE FILM 1. When the film has reached the end, it will automatically rewind while the Exposure Counter counts down. (Fig. 38) * When the film is completely rewound "E" is displayed in the Exposure Counter. (Fig. 39) 2. While pressing the Back Cover Lock Release Button, slide the Back Cover Latch down and open the back cover. 3. Remove the film. * When you are in a quiet location and the noise produced during film rewinding is disturbing, turn the Main Switch OFF and it will be temporarily stopped. When the Main Switch is turned ON again, the film will finish rewinding. * If the Manual Rewind Button is pressed while the film is rewinding, the film leader will not be rewound into the film cassette.
 * When removing the film, be careful not to touch the shutter with your fingers or with the edge of the film. * The shutter cannot be released when \"E\" is displayed in the LCD Panel.")

15 Rewinding halfway through the film 1. Turn the Main Switch ON. 2. Press the Manual Rewind Button. (Fig. 40) * When removing the film, be careful not to touch the shutter with your fingers or with the edge of the film. * The shutter cannot be released when "E" is displayed in the LCD Panel. * It is sometimes possible to take more exposures than the number indicated on the box of the film. These "extra" exposures may come out overlapped or be cut off. 21. SELF-TIMER FUNCTION 1. After focusing, slip the viewfinder cap attached to the strap, over the viewfinder eyepiece. (Fig. 41) * The viewfinder cap is used to avoid incorrect exposure due to stray light entering the viewfinder eyepiece. Press the Self-timer Button. (Fig. 42) When the Self-timer has been activated, the Self-timer indicator will start flashing and approximately 10 seconds later, the shutter will be released. The indicator remains lit for the last 2 seconds before the shutter is released. To cancel the Self-timer function after pressing the Self-timer Button, press this button again or turn the Main Switch OFF. * The Exposure Counter on the LCD Panel displays the number of seconds remaining before the shutter is released. (Fig. 43) * The "Bulb" function cannot be used with the Self-timer function. * For combining the Continuous Shooting Mode, Multi Exposure Mode, and Auto Bracketing Mode, refer to "Combining the Functions" on P.45.
. The settings are displayed in the LCD Panel.")
 * When there is no display on the LCD Panel and the Main Switch is ON, press the Shutter Button halfway and the display will appear. The modes cannot be set when this display is not showing. 1.")
16 22. SETTING THE MODES With this camera, the shooting mode, shutter speed, exposure metering, as well as many other functions can be set using the 2 Mode Buttons and the Dial. * You can combine the modes and set them. Refer to P.45 (Combining the Functions). The settings are displayed in the LCD Panel. (From this point onwards, the LCD Panel display will be referred to as the "Normal Display".) (Fig. 44) * When there is no display on the LCD Panel and the Main Switch is ON, press the Shutter Button halfway and the display will appear. The modes cannot be set when this display is not showing. 1. Press the Mode Button (Mode 1 or Mode 2) of the mode you wish to set. Press until the mode to be set is displayed. (Fig. 45) For detailed information on setting a mode, refer to the explanation of each mode. When you remove your finger from the Mode Button, the LCD Panel display will return to the "Normal Display" after approximately 5 seconds. 2. Turn the Dial and set or adjust the value of the mode you have selected. (Fig. 46) 3. Press the Shutter Button halfway to return the LCD Panel display to the "Normal Display". * Even if the Shutter Button is not pressed halfway, the "Normal Display" will automatically be displayed after 5 seconds.

17 Mode Setting Displays Each time you press a Mode Button, the modes will always appear in the same order. However, when you press a Mode Button, the first mode displayed will be the last mode that was displayed. If the power is switched off, the next time it is switched on, the mode that was last displayed will be the first to appear. Select the mode and set with the Dial. Mode 1 Button This button is used to set the shutter speed and the Creative Modes. Shutter Speed Mode A.OFF ~ Auto A.OFF (Auto OFF): Shutter Priority AE Mode/Manual Mode Auto: Program AE Mode/Aperture Priority AE Mode Exposure Metering Mode I ~ ~ ~ 1 Center-weighted average exposure metering/spot metering Continuous Shooting Mode OFF=ON Red-eye Reduction Mode OFF ~ ON * When Manual Mode is set, the exposure compensation display will not appear. 23. RESETTING THE MODES By pressing the Reset Button, all the modes that were set will be canceled. 1. Press the Reset Button (Fig. 47) * When there is no display in the LCD Panel, press the Shutter Button halfway and it will appear. The modes cannot be reset if this display is not showing. * When the Reset Button is pressed, settings will return to their original settings as follows:
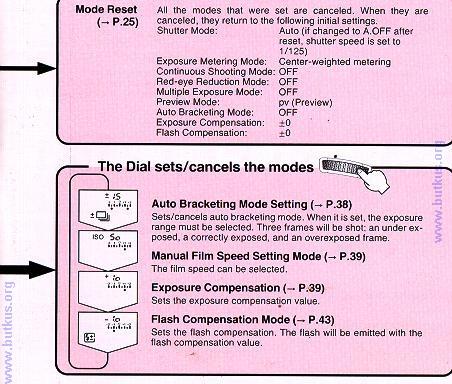
18 Shutter Speed: Exposure Metering Modes: Preview Mode: Manual Film Speed: Other Modes: Compensation Modes: Auto Center Weighted Average Metering On (pv) No change OFF Compensation values are cancelled * The modes may not be reset to their initial settings even if the Reset Button is pressed. * This occurs when a Mode Button and Reset Button are pressed together. * In this case, even if the Reset Button is pressed, the modes that were set will not be canceled. Also, if a mode is set to OFF with the Mode Button and Dial, it will be reset to ON when the Reset Button is pressed. * To cancel a mode, keep the Reset Button pressed and use the Mode Button and Dial to set the mode to OFF. * When pressing a Mode Button, be careful not to press the Reset Button at the same time. For more information refer to P SHOOTING MODES The 4 shooting modes are the Program AE Mode, Shutter Priority AE Mode, Aperture priority AE Mode and Manual Mode. Program AE Mode The camera automatically selects the shutter speed and aperture according to the subject illumination. This mode is ideal for general photography of people and scenery. You can also change the shutter speed and the aperture setting combination in this mode (See "Program Shift" on P.27). Shutter Priority AE Mode You can select the shutter speed setting and the correct aperture will automatically be set. You may wish to set a high shutter speed when, for example, shooting a still picture of a moving subject. A slow shutter speed will emphasize the movement of a moving subject. You may also wish to set a high shutter speed to avoid handshake when using a telephoto lens. Aperture Priority AE Mode You can select the aperture setting and the camera will automatically set the correct shutter speed. The aperture priority function is ideal for increasing the depth-of-field. For example, in a portrait photograph, you can use a wide aperture to create an out of focused background and emphasize the subject, or in a landscape photo you can focus a wide area by setting a small aperture.
.")
. If the display shows A.OFF, use the Dial to change it to AUTO by turning right. (Fig. 50) Press the Shutter Button halfway and the \"Normal Display\" will appear.")
19 Manual Mode You can freely select the shutter speed and aperture setting. They can be set according to the subject and shooting conditions. 25. PROGRAM AE MODE [MODE 1] The Program AE Mode is set when the display is as shown in the illustration, and the lens aperture is set to "P" (or "A"). By pressing the Shutter Button halfway, the "P" mark will be displayed inside the viewfinder. (Fig. 48) 1. Press the green Reset Button to set the shutter speed to AUTO. OR Press the MODE 1 Button until the AUTO or A.OFF display appears. (Fig. 49). If the display shows A.OFF, use the Dial to change it to AUTO by turning right. (Fig. 50) Press the Shutter Button halfway and the "Normal Display" will appear.2. Set the lens aperture to "P". * This mode cannot be used with lenses unadjustable to Program AE Photography (K Mount Lenses).


20 Program Graph When the Program AE mode has been set, the camera automatically sets the correct combination of shutter speed and aperture, as shown in the graph. * This graph will vary depending on the lens. Lens: F1.4 - F22 Film Speed: ISO 100 (Fig. 51) Program Shift Even if the camera is set to Program AK, you can freely change the shutter speed and aperture settings. The program shift allows you to change the combination of the shutter speed and aperture without changing the exposure. This function allows you to use functions similar to the Shutter priority AE and Aperture priority AE without having to change from Program AE Mode. Example of combinations that have the same exposure as when the aperture is set to F5.6 and shutter speed is set to 1/125 seconds. Aperture (F) Shutter Speed 1/2000 1/1000 1/500 1/250 1/125 1/60 1/30 1/15 1/8 1. When the Program AE mode has been set, look through the viewfinder and turn the Dial to set the shutter speed and aperture. When performing Program Shift, the "P" mark inside the viewfinder will flash. (Fig. 52) If the viewfinder display has disappeared, press the Shutter Button halfway to display it. Depending on the lens used, the shutter speed and aperture settings may be limited. To cancel Program Shift, follow the procedure below. Press the Reset Button Turn the Dial until the "P" mark inside the viewfinder stops flashing.
![26. SHUTTER PRIORITY AE MODE [MODE1 ] The camera is set to Shutter Speed Priority Mode when the display is as shown in the illustration (shutter speed is displayed) and the lens](/docs-images/94/119652550/images/21-0.jpg "aperture is set to \"P\" (or \"A\"). (Fig. 53, 54) * If there is no display in the LCD Panel, press the Shutter Button halfway and it will appear.")
 2. Turn the Dial to the left to display \"A.OFF\". (Fig. 56) 3.")
21 26. SHUTTER PRIORITY AE MODE [MODE1 ] The camera is set to Shutter Speed Priority Mode when the display is as shown in the illustration (shutter speed is displayed) and the lens aperture is set to "P" (or "A"). (Fig. 53, 54) * If there is no display in the LCD Panel, press the Shutter Button halfway and it will appear. The mode cannot set if this display is not showing. When "Auto" is displayed in the "Normal Display" in the LCD Panel, follow the procedure below. If "Auto" is not displayed, follow the procedure from step Press the MODE 1 Button until "Auto" appears. (Fig. 55) 2. Turn the Dial to the left to display "A.OFF". (Fig. 56) 3. Press the Shutter Button halfway to display the "Normal Display".
22 4. Turn the Dial to set the shutter speed on the LCD Panel. (Fig. 57) 5. Set the lens aperture ring to "P". * This mode cannot be used with lenses unadjustable to Program AE Mode (K Mount Lenses). * In some lenses, the "P" mark will be shown as an "A". 6. Look through the viewfinder and make sure viewfinder display is showing. (Fig. 58) * The number on the left is the shutter speed, and the number on the right is the aperture number. * With this mode, the aperture is automatically set to match the shutter speed setting and to allow correct exposure. However, correct exposure cannot be achieved when the aperture cannot be set any smaller for a high shutter speed setting, or when the aperture cannot be set any wider for a slow shutter speed setting. In this case, the camera will automatically set the shutter speed to allow correct exposure. The shutter speed displayed in the viewfinder display will be the actual shutter speed. This function is called automatic shift.
 appears in the viewfinder.")

23 * When the viewfinder display is not showing, press the Shutter Button halfway and it will appear. * When the shutter speed is set to "bulb", the smallest aperture will be set. * In certain cases, a subject may still be underexposed even if the slowest shutter speed is set. If this occurs, the underexposure mark (down arrow) appears in the viewfinder. Use a flash or the Bulb function to correct this situation. (Fig. 59) Program graph When the Shutter Priority AE Mode is set, the camera will automatically set the aperture. The program shift will occur depending on the shutter speed setting. * When the Shutter Speed is set to "bulb", the smallest aperture will be set and is therefore not set according to the brightness of the subject. When shutter speed is 1/250 (Fig. 60) 27. APERTURE PRIORITY AE MODE [MODE 1] The camera is set to the Aperture Priority AE Mode when the display is as shown in the illustration, and the lens aperture is set to "P" (or "A"). (Fig. 61, 62) * If there is no display in the LCD Panel, press the Shutter Button halfway and it will appear. The mode cannot be set when this display is not showing. When "Auto" is not displayed in the "Normal Display" in the LCD Panel, follow the procedure below. If "Auto" is displayed, follow the procedure from step Press the MODE 1 Button until "A.OFF" appears. 2. Turn the Dial to the right to display "Auto". (Fig. 63) 3. Press the Shutter Button halfway to display the "Normal Display". 4. Set the lens aperture value. (Fig. 64)


24 * If the aperture is set on "P", turn the aperture ring while pressing on the "P" Lock Pin. 5. Look through the viewfinder and make sure the viewfinder display is showing. (Fig. 65) * Only the shutter speed will appear inside the viewfinder display. * In certain cases, a subject may still be underexposed even when the slowest shutter speed is set. If this occurs, the underexposure mark (down arrow) appears in the viewfinder. Use a flash or the Bulb function to correct this situation. (Fig. 66)
![28. MANUAL MODE [MODE1 ] The Manual Mode has been set when the display is as shown in the illustration (shutter speed number or "bulb" is showing) and the lens aperture is not set on "P" (or](/docs-images/94/119652550/images/25-0.jpg "\"A\"). (Fig. 67, 68) * If there is no display in the LCD Panel, press the Shutter Button halfway and it will appear. The mode cannot be set when this display is not showing.")
 3. Press the Shutter Button halfway and set the shutter speed in the LCD Panel to 125. 4.")
25 28. MANUAL MODE [MODE1 ] The Manual Mode has been set when the display is as shown in the illustration (shutter speed number or "bulb" is showing) and the lens aperture is not set on "P" (or "A"). (Fig. 67, 68) * If there is no display in the LCD Panel, press the Shutter Button halfway and it will appear. The mode cannot be set when this display is not showing. If "Auto" is displayed in the LCD Panel, follow the procedure below. (Fig. 69) If "Auto" is not displayed, follow the procedures from step Press the MODE 1 Button to display "Auto". 2. Turn the Dial to the left to display "A.OFF". (Fig. 70) 3. Press the Shutter Button halfway and set the shutter speed in the LCD Panel to Turn the Dial to display the shutter speed you wish to set. (Fig. 71)

 will appear. For underexposed pictures, set a wider aperture (smaller number) or slower shutter speed.")
26 5. Look through the viewfinder and adjust the aperture setting by turning the aperture ring. To change the shutter speed, turn the Dial. Inside the viewfinder, the exposure indicator will be displayed. Look at the exposure indicator when setting the aperture and shutter speed. When the dot (e) of the exposure indicator is under the "0", the correct exposure has been set. (Fig. 72) When it is underexposed, the under-exposed mark (up arrow) will appear. When it is overexposed, the over-exposed mark (down arrow) will appear. For underexposed pictures, set a wider aperture (smaller number) or slower shutter speed. For over exposed pictures, set a smaller aperture (larger number) or higher shutter speed. * If the viewfinder display is not showing, press the Shutter Button Halfway and it will appear. * If the lens aperture is set on ``P", turn the aperture ring while pressing on the "P" Lock Pin. * The exposure indicator also appears in the LCD Panel. * Exposure compensation cannot be set in the Manual Mode. Bulb Function If the shutter speed is set to "bulb" in the Manual Mode, the shutter will remain open for as long as you keep the Shutter Button pressed. This is called Bulb Photography. Bulb Photography is used for shooting night scenes, or other images with long exposure times. 1. Use the MODE 1 Button and the Dial to expose the "A.OFF" display. (Fig. 73) 2. Press the Shutter Button halfway to display the "Normal Display." 3. Turn the Dial until "bulb" is displayed. (Fig. 74) * The "bulb" mark is also displayed in the viewfinder display.
 [MIKE: this eats your batteries, bring spares if you intend to do a lot of time exposures] * If you remove your finger from the Shutter Button, the shutter will close.")
27 4. Set the aperture. * When the aperture is set on "P" the smallest aperture will be set. 5. Keep the Shutter Button pressed for as long as wish the shutter to remain open. (Fig. 75) [MIKE: this eats your batteries, bring spares if you intend to do a lot of time exposures] * If you remove your finger from the Shutter Button, the shutter will close. * The Exposure Counter on the LCD Panel will display the time (in seconds) that the shutter has been open. * To avoid camera shake, use a tripod and a release switch.

28 1. Locating the Controls pg4

29 2. Function Map pg. 4
30 pg.5
31

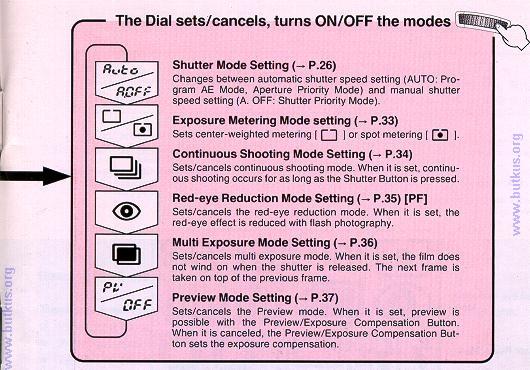
![RED-EYE REDUCTION MODE [PF] 32. MULTI EXPOSURE MODE 33.](/docs-images/94/119652550/images/32-1.jpg "PREVIEW MODE 34. AUTO BRACKETING MODE 35.")
32 29. EXPOSURE METERING MODE 30. CONTINUOUS SHOOTING MODE 31. RED-EYE REDUCTION MODE [PF] 32. MULTI EXPOSURE MODE 33. PREVIEW MODE 34. AUTO BRACKETING MODE 35. MANUAL FILM SPEED SETTING MODE 36. EXPOSURE COMPENSATION MODE 37. AE LOCK

 Spot metering This system only measures the central spot (inside the microprism This mode is effective when there is a wide contrast between the subject and the background, or when you wish to")
33 area).4www.butkus.org 29. EXPOSURE METERING MODE This camera has 2 types of exposure metering systems: Center-weighted average exposure metering and Spot metering mode. Choose the appropriate metering mode according to the situation or subject you are shooting. Center-weighted metering This system measures the viewing area, emphasizing the center portion. This metering mode is ideal for general shooting and landscape shooting. (Fig. 76) Spot metering This system only measures the central spot (inside the microprism This mode is effective when there is a wide contrast between the subject and the background, or when you wish to emphasize a section of the subject (e.g. portrait shooting in backlit conditions, subjects on stage etc.) (Fig. 77) 1. Press the MODE 1 Button until [blank square] or [square with dot in center] appears. (Fig. 78)
 will be set. (Fig. 79) Press the Shutter Button halfway to return to the \"Normal Display\". 30.")
![CONTINUOUS SHOOTING MODE [MODE 1] The Continuous Shooting Mode has been set when the ~ mark appears in the LCD Panel (Fig. 80).](/docs-images/94/119652550/images/34-1.jpg "Continuous shooting occurs for as long as you press the Shutter Button. About two shots can be taken in one second.")
34 2. Turn the Dial and set the exposure metering mode. By turning to the right, the spot metering (I) will be set. By turning to the left, the center-weighted metering (Up) will be set. (Fig. 79) Press the Shutter Button halfway to return to the "Normal Display". 30. CONTINUOUS SHOOTING MODE [MODE 1] The Continuous Shooting Mode has been set when the ~ mark appears in the LCD Panel (Fig. 80). Continuous shooting occurs for as long as you press the Shutter Button. About two shots can be taken in one second. The number of shots that can be taken also depends on the condition of the batteries. 4www.butkus.org
![1. Press the MODE 1 Button until [three squares] OFF appears. (Fig. 81) 2. Turn the Dial to the left to display [three squares] ON. (Fig. 82) 3.](/docs-images/94/119652550/images/35-0.jpg "Press the Shutter Button halfway to return to the \"Normal Display\".")
![* To cancel the mode, press the RESET Button or follow steps 1 and 2 above, reversing the [three squares] ON and the [three squares] OFF displays.](/docs-images/94/119652550/images/35-1.jpg "* For combining this mode with other functions, refer to \"Combining the Functions\" on P.45. 31.")
35 1. Press the MODE 1 Button until [three squares] OFF appears. (Fig. 81) 2. Turn the Dial to the left to display [three squares] ON. (Fig. 82) 3. Press the Shutter Button halfway to return to the "Normal Display". * To cancel the mode, press the RESET Button or follow steps 1 and 2 above, reversing the [three squares] ON and the [three squares] OFF displays. * For combining this mode with other functions, refer to "Combining the Functions" on P RED-EYE REDUCTION MODE [PF] [MODE 1] The Red-eye Reduction Mode is set when the Built-in Flash is open and the <eye mark> mark is displayed as shown in the illustration. (Fig. 83, 84) To reduce the effect of red eyes in flash photography, the flash will pre-flash several times before the shutter is released with the main flash. When this mode is used with other flash units, the Built-in Flash will also pre-flash if it is open. * When the Built-in Flash has not been opened, the AD mark will not appear in the "Normal Display".


36 shot.4www.butkus.org 1. Pull up the Built-in Flash to open it. (Fig. 85) 2. Press the MODE 1 Button until " <ID OFF" appears. (Fig. 86) 3. Turn the Dial to the right, to display " <eye mark> ON". (Fig. 87) * To cancel this mode, press the RESET Button or follow steps 1 and 2 above, reversing the " <eye mark> OFF" and " <eye mark> ON". 4. Press the Shutter Button halfway to return to the "Normal Display". 32. MULTI EXPOSURE MODE [MODE 1] The Multi Exposure Mode is set when the [dark double square] mark is displayed. (Fig. 88) In this mode, the film will not wind on when the shutter is released, and the next shot will be taken on top the previous
![1. Press the MODE 1 Button until " [dark double square] OFF" appears. (Fig. 89) 2. Turn the Dial to the right to display " [dark double square] ON". (Fig. 90) 3.](/docs-images/94/119652550/images/37-0.jpg "Press the Shutter Button halfway to return to the \"Normal Display\". 4. Press the Shutter Button as many times as you want the frame to be overlapped.")

37 1. Press the MODE 1 Button until " [dark double square] OFF" appears. (Fig. 89) 2. Turn the Dial to the right to display " [dark double square] ON". (Fig. 90) 3. Press the Shutter Button halfway to return to the "Normal Display". 4. Press the Shutter Button as many times as you want the frame to be overlapped. * The film will not wind on and the Exposure Counter number will not change. 5. To cancel the Multi Exposure Mode, press the RESET Button or turn the Main Switch OFF. The Multi Exposure Mode will be canceled and the film will wind on. * To cancel the mode, follow steps 1 and 2 above reversing " [dark double square] OFF" and "[dark double square] ON". * For combining this mode with other functions, refer to "Combining the Function" on P.45. * When developing the film, make sure you indicate that you have used multi exposure photography. The multi exposed negative may be mistaken for an error and may not be printed.
![33. PREVIEW MODE [MODE 1] Normally, the image seen through the viewfinder is an image with the aperture open.](/docs-images/94/119652550/images/38-0.jpg "The Preview Mode sets the actual aperture you have selected allowing you to confirm the depth-of-field of the image. 1.")
 * The aperture will be set to the aperture opening you have selected and you can confirm the areas that are focused. * The viewfinder image will darken when the aperture is set.")
38 33. PREVIEW MODE [MODE 1] Normally, the image seen through the viewfinder is an image with the aperture open. The Preview Mode sets the actual aperture you have selected allowing you to confirm the depth-of-field of the image. 1. While looking through the viewfinder, press the Preview/Exposure Compensation Button. (Fig. 91) * The aperture will be set to the aperture opening you have selected and you can confirm the areas that are focused. * The viewfinder image will darken when the aperture is set. Canceling and Setting the Preview Mode. The Preview/Exposure Compensation Button is used for two Modes. When the Preview Mode has been set, this button is used to view the preview. If the Preview Mode has been canceled, this button can be used to set the exposure compensation. Canceling the Preview Mode 1. Press the MODE 1 Button until "pv" appears. (Fig. 92) * The Preview Mode is set when "pv" is displayed. 4www.butkus.org * The Preview Mode is canceled when "OFF" is displayed.

![AUTO BRACKETING MODE [MODE 2] When the shutter Button is pressed and held down, the camera will take 3 frames of an under-exposed, a correctly exposed, and an over-exposed picture in the exposure](/docs-images/94/119652550/images/39-1.jpg "range you have selected. You can also take these 3 frames one by one by pressing the shutter Button 3 times. Auto Bracketing is especially effective when using a reversal film.")
39 2. Turn the Dial to the left to display "OFF". (Fig. 93) Setting the Preview Mode Follow steps 1 and 2 of "Canceling the Preview Mode", reversing "pv" and "OFF". (Fig. 94) For setting the exposure compensation with the Preview/ Exposure Compensation Button, refer to P AUTO BRACKETING MODE [MODE 2] When the shutter Button is pressed and held down, the camera will take 3 frames of an under-exposed, a correctly exposed, and an over-exposed picture in the exposure range you have selected. You can also take these 3 frames one by one by pressing the shutter Button 3 times. Auto Bracketing is especially effective when using a reversal film. The exposure range can be set from -O.5EV to +4.0EV. When exposure compensation is applied to this mode, the exposure range will be based around the exposure compensation value selected. For example: Exposure compensation is set to Exposure range is set to +/- O.5EV Auto bracketing frames will be -1.5, -1.0, -0.5
![Example when the exposure range is set to +/- 0.5 EV 1. Press the MODE 2 Button until " [three squares] " appear. (Fig. 95) * The exposure range display and the exposure indicator are also displayed.](/docs-images/94/119652550/images/40-0.jpg "2. Turn the Dial to set the exposure range. (Fig. 96) * When the exposure range surpasses +/- 2EV, the exposure indicator (DOT) will flash. 3. Press and hold down the Shutter Button. 4www.butkus.")
40 Example when the exposure range is set to +/- 0.5 EV 1. Press the MODE 2 Button until " [three squares] " appear. (Fig. 95) * The exposure range display and the exposure indicator are also displayed. 2. Turn the Dial to set the exposure range. (Fig. 96) * When the exposure range surpasses +/- 2EV, the exposure indicator (DOT) will flash. 3. Press and hold down the Shutter Button. 4www.butkus.org * 3 frames will be taken in the following order: under-exposed, correctly exposed (+/- 0EV), over-exposed. * If you remove you finger from the shutter Button before it has finished shooting the 3 frames, the remaining frame number(s) (1 or 2) will flash in the Exposure Counter. By pressing the Shutter Button again, the remaining frame(s) will be taken. [MIKE: you must shoot all three, only the middle exposure will be according to the meter] 4. To cancel this mode, press the RESET Button [MIKE: everything is reset!] or follow the same procedures for setting the mode, and set the exposure indicator to 0 (OFF). The mode will not be canceled when the Main Switch is turned off. * When this mode is set, the [three squares] mark flashes in the normal display. * When the exposure compensation and the AE lock are combined, the exposure range of this value will be set. * This mode cannot be combined with the flash modes. * If you turn the Main Switch OFF after taking 1 or 2 of the 3 frames, the next time you turn the Main Switch ON, the Auto bracketing will be set to take 3 frames. [again] For combining this mode with other functions, refer to "Combining the Functions" on P.45.
![35. MANUAL FILM SPEED SETTING MODE [MODE 21] The Manual Film Speed Setting Mode is set when "ISO" is displayed, as shown in the illustration. (Fig.](/docs-images/94/119652550/images/41-0.jpg "97) The Manual Film Speed Setting has priority over the automatically read film speed setting.")

41 35. MANUAL FILM SPEED SETTING MODE [MODE 21] The Manual Film Speed Setting Mode is set when "ISO" is displayed, as shown in the illustration. (Fig. 97) The Manual Film Speed Setting has priority over the automatically read film speed setting. This mode is used to set the film speed of films without the OX code or to set a different film speed than that indicated on a DX film. 1. Press the MODE 2 Button until "ISO" appears. (Fig. 98) 2. Use the Dial to display the film speed you wish to set. (Fig, 99) * The exposure indicator displays the exposure difference of the automatically read film speed setting and the manually set film speed setting. * When the exposure indicator (DOT) exceeds 2 EV, it will flash. * The film speed you have selected will be displayed for about 2 seconds when the Main Switch is turned on. To cancel the mode, follow the same procedure as setting the mode, but set the exposure indicator to EXPOSURE COMPENSATION MODE [MODE 2] In AE Photography, when there is an excessive contrast between the subject and the background, the subject may be under (dark) or over (light) exposed. When this occurs, and when you cannot bring the camera close to the subject, the Exposure Compensation Mode can be used. (Use the AE Lock when you can bring the camera close to the subject. See P. 42.) Also, an image may come out gray when white or black is dominant. The light and dark colors of your picture can be shot correctly by using this mode. You can also set this mode to shoot photos intentionally under exposed or overexposed.


42 Exposure compensation can be set up +/- 4.0 EV in 0.5 EV increments. Shooting in Backlit Conditions In backlit conditions the subject will be underexposed because of a very bright background. In this case, set the exposure compensation to a + value. Dominantly white subject If a dominantly white subject is photographed, it will be underexposed and appear dark. In addition, white areas will come out gray. Set the exposure compensation to a plus (+) value.
 value.")

43 Dominantly dark-colored subjects If a dominantly dark-colored subject is shot, the whole image will be overexposed, making the subject light (white) and dark-colored areas will come out gray. Set the exposure compensation to a minus ( - ) value. * When the exposure indicator is displayed as shown in the illustration, the exposure compensation has been set. The exposure indicator displays the exposure compensation value set. (Fig. 100) Press the Shutter Button halfway to display the exposure indicator in the viewfinder display. * Exposure Compensation can be set in 2 ways: 1. With the Exposure Compensation Mode. 2. With the Preview/Exposure Compensation Button. 4www.butkus.org
 1. Press the MODE 2 Button until the exposure compensation value display and the exposure indicator are displayed. (Fig. 102) * The exposure indicator also appears flashing in the viewfinder.")

44 Setting the Exposure Compensation with the Exposure Compensation Mode Set the exposure compensation with the Exposure Compensation Mode when you wish to use the Preview/Exposure Compensation Button for the Exposure Compensation Mode. (Fig. 101) 1. Press the MODE 2 Button until the exposure compensation value display and the exposure indicator are displayed. (Fig. 102) * The exposure indicator also appears flashing in the viewfinder. This allows you to set the exposure compensation while looking through the viewfinder. * If you do not make any changes within 5 seconds of pressing the Mode Button, the LCD Panel will return to the "Normal Display" and the Exposure indicator in the viewfinder display will also disappear. 2. Turn the Dial to set the exposure compensation value. (Fig. 103) * The dot (DOT) of the exposure indicator will flash when it surpasses +2 or Press the Shutter Button halfway to return to the "Normal Display". 4. To cancel exposure compensation, cancel the Exposure Compensation Mode or press the Reset Button. * To cancel this mode, follow the same procedure as setting the mode, but change the exposure compensation value in * When you have finished shooting with the Exposure Compensation mode, be sure to return the exposure compensation value to +/- 0. Setting the Exposure Compensation with the Preview/Exposure Compensation Button. The Preview Mode must be canceled to be able to set the exposure compensation with the Preview/Exposure Compensation Button. See "Canceling and Setting the Preview Mode" on P Press the Preview/Exposure Compensation Button and turn the Dial to set the exposure compensation value. (Fig. 104,105) * Exposure compensation cannot be combined with the Manual Mode. See "Combining the Functions" on P. 45.
, or when it is possible to approach the subject, to produce correct exposure of the subject.")
45 37. AE LOCK The AE Lock function can be used to set exposure compensation in AE Modes (see "Exposure Compensation Mode" on P.39), or when it is possible to approach the subject, to produce correct exposure of the subject. * When the subject cannot be approached, AE Lock will be more effective when the Exposure Metering Mode is set to Spot metering. 1. Bring the camera close to the subject to the point where exposure is not affected by the background. (Fig. 106) * If there is no display in the LCD Panel, press the Shutter Button halfway and it will appear. The mode cannot be set when this display is not showing. 2. Press the AE Lock Button. (Fig. 107) The exposure value will be locked. The "AEL" mark will flash in the viewfinder. 3. Compose your picture and press the Shutter Button to shoot. * The photo will be taken with the locked exposure value. When the photo has been taken, the AE Lock will be canceled and the AE Lock mark (AEL) will disappear. * To cancel AE Lock before releasing the shutter, press the AE Lock Button again or turn the Main Switch OFF. * If the AE Lock Button is kept pressed while shooting, It is possible to shoot again with the locked exposure 38. FLASH COMPENSATION 40. FLASH MODES 43. CHANGING THE RESET SETTINGS 47. INTERCHANGEABLE VIEWFINDER SCREENS 51. PROPER CARE OF YOUR CAMERA 44. CHANGING THE FUNCTION OF THE PREVIEW/EXPOSURE COMPENSATION BUTTON 48. RELEASE SWITCH Major Specifications 41. OTHER FLASH UNITES 45. INFRARED FILM 49. CARE OF BATTERIES 42. COMBINING THE BUILT-IN FLASH AND THE RICOH TTL FLASH 46. DIOPTRIC LENSES 50. DATA BACK 3
![ww.butkus. org 38. FLASH COMPENSATION [MODE 2] Depending on the subject or the special effects you wish to achieve, the amount of light emitted by the flash can be adjusted.](/docs-images/94/119652550/images/46-0.jpg "This mode can be used to create a correct balance between flash light and natural light, or to create special effects by producing light or dark photos with flash photography.")

46 ww.butkus. org 38. FLASH COMPENSATION [MODE 2] Depending on the subject or the special effects you wish to achieve, the amount of light emitted by the flash can be adjusted. This mode can be used to create a correct balance between flash light and natural light, or to create special effects by producing light or dark photos with flash photography. The light emitted by the Built-in Flash, the Ricoh Speedlite 303P or any other Ricoh TTL type flash can be adjusted with this mode. It can be adjusted up to i2.0 EV in 0.5 EV increments. Dominantly white or backlit picture If the picture is dominantly white, or is in a backlit condition, the main subject may be underexposed. In this case, set the flash compensation to a plus (+) value. Adjust the flash compensation to a plus (+) value. 4w Distant or dominantly dark-colored picture When the main subject is comparatively small and the background is distant, or when the picture is dominantly dark-colored, the subject may be overexposed. In this case, set the flash compensation to a minus ( - ) value. Adjust the flash compensation to a minus ( - ) value.
 * The flash compensation value display and the exposure indicator are both displayed.")
 3. Press the shutter Button halfway to return to the \"Normal Display\". 4.")
47 The Flash Compensation Mode is set when "lightning bolt and +/_" is displayed as shown in the illustration. (Fig. 108) 1. Press the MODE 2 Button until "lightning bolt and +/_" appears. (Fig. 109) * The flash compensation value display and the exposure indicator are both displayed. * If the settings are not changed within 5 seconds of pressing the Mode Button, the LCD Panel display will return to the "Normal Display". 2. Turn the Dial and set the flash compensation value. (Fig, 110) 3. Press the shutter Button halfway to return to the "Normal Display". 4. To cancel the Flash Compensation Mode press the RESET Button or follow the procedures for seeing the mode and set the flash compensation value to +0. (Fig. 111)
48 39.COMBINING THE FUNCTIONS Possible combinations with the Continuous Shooting Mode, Multi Exposure Mode and Auto Bracketing Mode. Combination Continuous Shooting Mode + Multi Exposure Mode Continuous Shooting Mode + Auto Bracketing Exposure Mode Multi Exposure Mode + Auto Bracketing Exposure Mode Continuous Shooting Mode + Multi Exposure Mode + Auto Bracketing Exposure Mode Function when modes are combined Multi exposure with continuous shooting when the Shutter Button is pressed and held down. Auto Bracketing Exposure Mode. 3 times exposure of Auto Bracketing Exposure on the same frame. 3 times exposure of Auto Bracketing Exposure on the same frame. Combinations with the Flash Photography. Combination Auto Bracketing Exposure Mode + Bulb Mode Self-timer Mode + Bulb Mode Function when modes are combined Bulb Photography (Auto Bracketing Exposure Mode cannot be used.) The Self-timer will not start. Combinations with the Self-timer Mode Combination Continuous Shooting Mode + Self-timer Mode Multi Exposure Mode + Self-timer Mode Function when modes are combined 2 continuous frames will be taken with the Self-timer. After Self timer Photography, the film will not be wound on.
49 Auto Bracketing Exposure Mode + Self-timer Mode Continuous Shooting Mode + Self-timer Mode + Auto Bracketing Exposure Mode Continuous Shooting Mode + Self-timer Mode + Multi Exposure Mode Self-timer Photography with Auto Bracketing Exposure Photography (3 continuous frames) Self-timer Photography with Auto Bracketing Exposure Photography (3 continuous frames) After one frame is taken with the Self-timer, the film will not wind on. (Continuous Shooting Mode will not function.) Other Combinations Combination Exposure Compensation + Manual Photography Mode Auto Bracketing Exposure Mode + Flash Photography Function when modes are combined You cannot combine these modes. The Auto Bracketing Exposure Mode will not function. 40. FLASH MODES The following Modes can be achieved using the Built-in Flash. 1. Program Auto Flash Mode This mode is normally used when shooting. By just opening the Built-in Flash, the shutter speed and aperture will automatically be set. The aperture setting can be changed with the Program Shift Mode. 2. Daylight Synchro Mode 4www.butkus.org Even in daylight, the flash can be used to automatically create a good balance between natural light and flash light. The flash light ratio is 1:4. Red-eye Reduction Mode The pre-flash of this mode makes it possible to minimize the red-eye effect of the subject that sometimes occurs when using flash photography in dark places.
50 4. Slow Synchro Mode (Shutter Priority Flash Mode) The background in a photo often comes out dark because of the distance limit of the flash light. By setting a slow shutter speed you can create a good balance between the subject and the background with flash photography. 5. Aperture Priority Auto Flash Mode For flash photography with a good depth-of field (portraits etc.) you can freely select the aperture setting. The shutter speed will be automatically set. However, if a small aperture is set, the flash light distance will be reduced. 6. Flash Compensation Mode The amount of light emitted by the flash can be regulated or normal photography or special effects. It car be adjusted up to REV. Major Specifications of the Built-in Flash TTL Flash System G. No. 11 (ISO 100/m) Distance Range At F2.8 Approx. 4m /ls0 100 Image Angle Coverage 28 mm However, the flash light may cause vignetting around the edges of the picture, depending on the size and length of the lens, and when the shooting distance is short. The border of the image may become dark depending on the characteristics of the lens and the aperture value. Uses the TTL (Through The Lens) Flash System With the sensor of the Built-in Flash, the light reflected from the subject is measured and the light emitted from the flash is controlled. Uses the Advanced Thyristor Flash System (IGBT) When the distance to the subject is short, only a small amount of flash light is emitted, making the recharging time short. The value of the aperture automatically changes depending on the film speed. However, if the maximum aperture (F) value of the lens is darker than the set F value, it will be set to this value. ISO 100: F2.8 ISO 400: F5.6 ISO 200: F4.0 ISO 800: F8.0
51 The highest shutter speed in flash photography is 1/100 seconds. If the Shutter speed is set above 1/100 ( 1/125 sec., 1/500 sec. for example), the shutter will automatically be released at 1/100 seconds. Flash Marks [lightning bolt] :On: Charged [lightning bolt] :Quick flashing: Correct Strobe Exposure [lightning bolt]: Slow flashing: Indicates that the flashes are charged, when using both the Built-in Flash and an external flash. [Sun + lightning bolt] :Synchro Mark Lights during daylight synchro and slow synchro. Film speed ISO 25 ISO 200 ISO 400 F FT FT FT F FT FT FT F FT FT FT F FT FT F FT FT FT F FT FT F FT FT F FT FT * Daylight Synchro with long distance, it becomes 2x normal flash photography. Working out the flash distance range (Long distance flash range) Flash distance range (m)=guide Number (G. No.)* DIVIDED BY Aperture (F) * With ISO 100, G. No. =11
 3. Check to see if the displays in the LCD Panel and inside the viewfinder are displayed. (Fig. 115) * The display inside the viewfinder shows the shutter speed (set at 1/100 sec.")
 before shooting.")
52 1. Program Auto Flash Mode This mode is used in normal shooting. 1. Set the camera and lens to the Program AE Mode (Fig.112, 113) 2. Open the Built-in Flash by pulling upwards on the sides of the flash. (Fig. 114) 3. Check to see if the displays in the LCD Panel and inside the viewfinder are displayed. (Fig. 115) * The display inside the viewfinder shows the shutter speed (set at 1/100 sec.) as well as the aperture value. 4. Focus and release the shutter. 5. The flash mark will blink if the subject has been sufficiently lit by the flash. * If the flash mark does not blink, change the shooting condition (make the distance shorter, change the aperture value with the Dial) before shooting. * The distance range of the flash will vary depending on the film speed and the aperture setting. See the table on page 48. (4m for ISO 100 film with aperture set at F2.8)
 will not appear when the flash is charging. When repeating flash photography, make sure the flash mark is lit to show that the flash has fully charged. (Fig.")

53 6. The flash mark ( d' ) will not appear when the flash is charging. When repeating flash photography, make sure the flash mark is lit to show that the flash has fully charged. (Fig. 116) 6. The flash mark ( d' ) will not appear when the flash is charging. When repeating flash photography, make sure the flash mark is lit to show that the flash has fully charged. (Fig. 116) * If the shutter is released before the flash has recycled, the photo will be taken in normal Program AE Mode without the flash. * A slow shutter speed is often set and the camera may shake. * With the program shift, you can freely set the aperture value by turning the Dial. * When the flash is used in bright light conditions, [SUN and lightning bolt] will appear in the viewfinder to indicate that it has automatically been set to the Daylight Synchro Mode or the Slow Synchro Mode. In this case, to obtain a good light balance, the aperture may automatically be set to a smaller aperture. 2.Daylight Synchro Mode When taking pictures in backlit conditions, the subject is affected by strong background light and dark (underexposed) subjects may result. Natural lit photographs can easily be obtained by using the Built-in Flash even in daylight. This mode also enhances portrait photographs. 4www.butkus.org
 as well as the")
 mark is on before releasing the shutter. (Fig.")
 and the distance range of the flash will")
54 1. Make sure the shooting mode is set to Program AK. (Fig. 117, 118) 2. Open the Built-in Flash. 3. Make sure the LCD Panel, the display inside the viewfinder, the daylight synchro mark (SUN and lightning bolt) as well as the aperture and shutter speed displays are showing. (Fig. 119) 4. Release the shutter 5. To shoot again, make sure the Load (lightning bolt) mark is on before releasing the shutter. (Fig. 120) * The aperture will automatically be set according to the amount of light. If the conditions are bright, the aperture setting will be small (large number) and the distance range of the flash will consequently be short. (See the table on P.48) * The flash light ratio is programmed to 1:4. Therefore, the flash will not be as strong, creating a natural lit photograph.
 on P.48. * When an external flash is installed and used with the Daylight Synchro Mode, the light emitted will be half of that emitted in normal flash photography.")
 will disappear.")
55 * When an ISO 100 film is loaded and the aperture is set at F5.6, the distance range of the flash is 4m. This may vary depending on the type of film, the aperture value and the lightning conditions. Refer to the chart (table/ graph) on P.48. * When an external flash is installed and used with the Daylight Synchro Mode, the light emitted will be half of that emitted in normal flash photography. * When shooting evening or dark images, or when the aperture is set to a small aperture, the daylight Synchro flash will not be effective and normal flash photography will occur, producing a dark background. In this case, the daylight Synchro mark (AS) will disappear. * When you wish to shoot a well lit background, set the shutter speed to a slow setting and change the mode to the Slow Synchro Mode. 3.Red-eye Reduction Mode Refer to page Slow Synchro Mode (Shutter Priority Flash Mode) In normal flash photography the background comes out dark. This mode allows you to obtain a good light balance between the subject and the background. If you set the shutter speed to a seeing below 1/90 sec. (1/2 sec. for example), the actual shutter speed will automatically be set by the camera to a seeing between 1/2 sec. to 1/100 sec. depending on the brightness of the subject and the background. The shutter will be released at this speed when the picture is taken. We recommend you use this mode when shooting indoors and evening or night scenes.


56 1. Set the shutter speed to a seeing under 1/90 sec. (Fig. 121) 2. Set the lens aperture on "P". (Fig. 122) 3. Check the actual shutter speed in the display inside the viewfinder. (Fig. 123) 4. Release the shutter. * If the shutter speed is set to "bulb", the flash will fire during the bulb shooting. 5. Aperture Priority Auto Flash Mode You can freely set the aperture value and shoot with the flash. 1. Set the aperture value on the Aperture Ring. Set the Shutter Speed Mode to Auto and set the Aperture Priority Mode. 2. Open the Built-in Flash. 3. Check that the [lightning] Mark is lit inside the viewfinder. 4. Release the shutter. * If a small aperture value is set, the flash distance will decrease. (Refer to the table on P.48.) 6. Flash Compensation Mode Refer to page 43.
57 shock.4www.butku s.org 41. OTHER FLASH UNITES Basic operations are the same as for the Built-in Flash. Refer to each mode for operating the Built-in Flash. Refer to the instruction manual of other flash units. * Generally, set the flash unit to the "TTL" position. The shutter speed will automatically be set to 1/100 sec. and the aperture to F5.6. However, with the Daylight Synchro Mode, the aperture value will change depending on the brightness of the subject. 1. Take note of the following when using Ricoh flash units (SL-303P) set to non-ttl automatic flash mode. * The camera's aperture will not be automatically set. Be sure to change the Program AE Mode to Aperture Priority Mode or Manual Mode, and set the aperture value according to the specified flash value. * The blinking correct auto flash indicator mark (lightning bolt) only functions with the TTL. Even if the mark flashes, it is not relevant here. 2. Note the following points when performing flash photography with the Ricoh SL 323 or other grip type with flash synchro terminal. * The shutter speed and aperture value will not be automatically set because there is no special signal contact for the flash. Therefore, set the shutter speed and aperture value as explained in the instruction manual before using. * Do not use the synchro terminal together with the Hot Shoe. 3. Do not use another maker's signal pin on the flash as this can cause trouble with the exposure, or damage the circuits of the camera. * When using any other flash than a Ricoh product and inserting it into the hot shoe, please do not touch the synchro contact. If you touch the synchro contact, you may be subjected to a 42. COMBINING THE BUILT-IN FLASH AND THE RICOH TTL FLASH Note the following points when using the Built-in Flash and an external flash. 1. The Built-in Flash does not flash if the light emitted by the external flash. 2. When the Red-eye Reduction Mode is set, the Built-in Flash will pre-flash followed by the flash of the external flash. When the flash range is not sufficient with just the external flash, the flashing mark (lightning bolt ) will not appear and the Built-in Flash will flash with the external flash. However in this case, it is necessary to set the shutter speed from "Auto" to Manual (shutter Priority Mode, Manual Exposure Mode) and set the value to less that 1/50 sec. 4www.butku s.org 3. The flash mark (lightning bolt ) will flash inside the viewfinder when the Built-in Flash and the external flash are charged. (It will be lit when only one of the flashes is charged.


58 43. CHANGING THE RESET SETTINGS It is possible to change the initial settings of the Reset Button. These can be set according to your needs. * The Manual Film Speed Setting will not change when the Reset Button is pressed. 1. Press and hold down the Reset Button. Then press the appropriate Mode Button of the mode to be set. (Fig. 124) * Keep the Reset Button pressed. 2. While pressing the Reset Button, turn the dial to set or adjust the value of the mode to be changed. (Fig. 125) 3. Release the Reset Button * To set the modes to their initial settings, repeat this procedure and cancel all the modes. 44. CHANGING THE FUNCTION OF THE PREVIEW/EXPOSURE COMPENSATION BUTTON The Preview/Compensation Button can also be used to instantly recall the mode you most frequently use. 1. Press the appropriate Mode Button to display the mode to be set. Do not release the Mode Button. (Fig. 126) 2. While keeping the Mode Button pressed, press and hold down the other Mode Button, and then the Preview/ Exposure Compensation Button. (Fig. 127) * Be sure to press the buttons in this order. * To recall the set mode, be sure to turn the Preview Mode OFF. * The exposure compensation function is replaced with the set mode. Therefore, to set the exposure compensation, use Mode Button 2.

59 45. INFRARED FILM Shooting with an Infrared film Always re-adjust your focus to the infrared focusing mark when using infrared films and infrared filters. This is necessary because the infrared rays have longer wave lengths than the visible light rays you see and focus with, and the camera lens focuses them slightly further back inside the camera. Therefore visual focusing cannot be accurate without some compensation. 1. Attach the infrared filter and focus on the subject. Read the indicated distance off the lens barrel. (Fig. 1 28) 2. Shift that distance setting over to the red infrared index mark. Set the exposure in accordance with the operating instructions for the film. (Fig. 129) 46. DIOPTRIC LENSES The viewfinder eyepiece has a built-in -1 correction (suitable for most normal vision). If a dioptric lens is fitted, you do not have to wear eyeglasses when taking pictures. Slip the lens in the groove in the finder eyepiece. Dioptric lenses are available in 7 types: -4, - 3, - 2, - 1, +1, +2 and +3 (Diopters) Note: Some forms of astigmatism etc. may make dioptric eyepiece correction impossible. Please check with your vision specialist for a recommendation based on your prescription. 47. INTERCHANGEABLE VIEWFINDER SCREENS Ricoh offers a choice of 3 viewfinder screens to suit your needs or taste. Each features Ricoh's Acu- Bright mat for optimum brightness and easier focusing in dim light.
 A matte screen with horizontal and vertical lines. This screen facilitates composition of your photograph. (Fig.")
60 Horizontal split type screen (MH type) This screen is normally installed. Recommended for general shooting. (Fig. 130)4www.butkus.org Lined matte type screen (MS type) A matte screen with horizontal and vertical lines. This screen facilitates composition of your photograph. (Fig. 131) All Matte type screen (MB type) For general shooting and close-up photography. Also recommended when focusing is difficult with a split image. (Fig. 132) 48. RELEASE SWITCH By using the separately sold Release Switch, the shutter can be released from a distance. 1. Turn the Main Switch OFF. * The shutter may release if the release cable is connected to the camera when the power is on. 2. Connect the Release Switch to the Release Socket of the camera. 3. Turn the Main Switch ON. 4www.butku s.org 4. Press the Release Switch to shoot. 49. CARE OF BATTERIES 1. This camera is equipped with highly accurate electronic parts. To insure best performance, use high quality alkaline batteries.

61 2. The capacity of the batteries depends on the brand and type of batteries. 3. Before installing, be sure to clean all moisture and skin oil off all battery contact surfaces in order to avoid future problems of corrosion and poor electrical contact. Remove batteries when the camera is not used for a long period of time. 4. Removal of the battery case may result in a loss of camera memory. The film may also advance two or three frames when the batteries are replaced. * Dispose of batteries properly. Do not throw them into fire or expose to high temperature. CARE OF FILM * When loading the film in a very cold place, the film leader may become stiff and break off. In this case heat the film leader with your hands before loading the film. * Use up a loaded film as quickly as possible and have it developed as soon as it is removed. Leaving a film loaded inside the camera for a long time will deteriorate the color etc. 50. DATA BACK 3 Nomenclature of the date imprinting feature (Fig. 133) (1) Display Panel (2) Mode Selector Button (3) Year/Hour Adjust Button (4) Month Adjust Button (5) Day/Minute Adjust Button
 (2) Attach the Data Back 3 to the camera while pushing down the release pin on the Data Back 3. (Fig. 135) * When detaching the Data Back 3.")
 Examples of date imprinting 1) August 30, 1990 2) 15:59 (Time) 3) No imprinting The date imprinting mode can be divided into 3 types; year/month/day, hour/minute, and no")
62 Attaching the Data Back 3 ( 1 ) Open the Back Cover and push down the release pin on the back cover. The cover will come off. (Fig. 134) (2) Attach the Data Back 3 to the camera while pushing down the release pin on the Data Back 3. (Fig. 135) * When detaching the Data Back 3. follow the same procedure as in (1). 4www.butku s.org Imprinting Mode (Fig. 136) Examples of date imprinting 1) August 30, ) 15:59 (Time) 3) No imprinting The date imprinting mode can be divided into 3 types; year/month/day, hour/minute, and no imprinting Selecting imprinting mode (Fig. 137) Each time the Mode Selector Button is pressed, the display changes as shown below. 1) Date (Year/month/day) 2) Time (Hour/minute) 3) No imprinting
 Press the Mode Selector Button to show the mode to be changed. (Fig. 139)4www.butkus.org (2) Press each Adjust Button until the desired digit is displayed.")

63 Checking imprinting (Fig. 138) After shooting, the word "PRINT" appears in the Display Panel to confirm correct imprinting. "PRINT" is not imprinted on the picture. Resetting the date and time (1 ) Press the Mode Selector Button to show the mode to be changed. (Fig. 139)4www.butkus.org (2) Press each Adjust Button until the desired digit is displayed. Digits can be changed fast by keeping the button pressed. (Fig. 140) Accurately setting seconds (1 ) Press the Mode Selector Button for Time display mode. (Fig. 141) (2) Press the Month Adjust Button according to the radio or telephone time signal. The time count starts from 0 seconds, and the minutes will not change when it is 0 to 29 seconds. At 30 to 59 seconds the minutes will move up. (Fig. 142) * It is recommended that the minute digits be adjusted after adjusting the seconds digits.
4www.butkus.org (4) Remove the battery. (Fig. 146) (5) Load the new battery with the side marked (+) facing upwards. Then, close the Battery Compartment Cover using the (+) screwdriver.")

64 Battery Replacement (1 ) Open the Back Cover. (Fig. 143) (2) Remove the screws from the Date Battery Compartment Cover with a small (+) screwdriver. (Fig. 144) (3) Remove the Battery Compartment Cover holding the roller section. (Fig. 145)4www.butkus.org (4) Remove the battery. (Fig. 146) (5) Load the new battery with the side marked (+) facing upwards. Then, close the Battery Compartment Cover using the (+) screwdriver. (Use lithium battery CR2025. The life is about 3 years.) * When the battery is exhausted, the imprinted digits become faint or the display panel flashes. At that time, replace the bakery. * Do not open the Date Battery Compartment Cover except when replacing the battery. * Keep the battery out of reach of children. If a child swallows the battery, contact your doctor immediately. Notes on date imprinting feature * In a place at a temperature of below 0 C (32 F), the battery performance deteriorates. The date imprinting feature may not function correctly and imprinting may become impossible. * When the battery is replaced, the display panel sometimes shows wrong digits. Reset the digits for correct indication. 4www.butku s.org * The date is sometimes illegible if it is imprinted on the following objects.
Ricoh FF-90. This camera manual library is for reference and historical purposes, all rights reserved.
 Ricoh FF-90 This camera manual library is for reference and historical purposes, all rights reserved. This page is copyright by, M. Butkus, NJ. This page may not be sold or distributed without the expressed
Ricoh FF-3AF. This camera manual library is for reference and historical purposes, all rights reserved.
 Ricoh FF-3AF This camera manual library is for reference and historical purposes, all rights reserved. This page is copyright by, M. Butkus, NJ. This page may not be sold or distributed without the expressed
Ricoh AF-7. This camera manual library is for reference and historical purposes, all rights reserved.
 Ricoh AF-7 This camera manual library is for reference and historical purposes, all rights reserved. This page is copyright by, M. Butkus, NJ. This page may not be sold or distributed without the expressed
Ricoh AF-5. This camera manual library is for reference and historical purposes, all rights reserved.
 Ricoh AF-5 This camera manual library is for reference and historical purposes, all rights reserved. This page is copyright by M. Butkus, NJ. This page may not be sold or distributed without the expressed
Ricoh FF-700 posted 8-10-'03
 Ricoh FF-700 posted 8-10-'03 This camera manual library is for reference and historical purposes, all rights reserved. This page is copyright by, M. Butkus, NJ. This page may not be sold or distributed
Ricoh L-20 posted
 Ricoh L-20 posted 8-10-2003 This camera manual library is for reference and historical purposes, all rights reserved. This page is copyright by, M. Butkus, NJ. This page may not be sold or distributed
Ricoh KR-10M. This camera manual library is for reference and historical purposes, all rights reserved.
 Ricoh KR-10M This camera manual library is for reference and historical purposes, all rights reserved. This page is copyright by, M. Butkus, N.J. This page may not be sold or distributed without the expressed
Chinon 35 FS-A
 Chinon 35 FS-A This camera manual library is for reference and historical purposes, all rights reserved. This page is copyright by mike@butkus.org, M. Butkus, NJ. This page may not be sold or distributed
Yashica 635 On-line users manual Posted 4-21-'03
 Yashica 635 On-line users manual Posted 4-21-'03 This camera manual library is for reference and historical purposes, all rights reserved. This page is copyright by, M. Butkus, NJ. This page may not be
Chinon 35FA Super / 35FA II
 Chinon 35FA Super / 35FA II Auto Focus camera Instruction and Illustrated manua This camera manual library is for reference and historical purposes, all rights reserved. This page is copyright by mike@butkus.org,
Chinon 35F-A Auto Focus camera Instruction and Illustrated manual On-line camera manual library
 Chinon 35F-A Auto Focus camera Instruction and Illustrated manual This camera manual library is for reference and historical purposes, all rights reserved. This page is copyright by mike@butkus.org, M.
Ricoh 35 Flex (aka Sears SL-9) posted 2-29-'04
 posted 2-29-'04") Ricoh 35 Flex (aka Sears SL-9) posted 2-29-'04 This camera manual library is for reference and historical purposes, all rights reserved. This page is copyright by, M. Butkus, NJ. This page may not be sold
Ricoh 35 Flex (aka Sears SL-9) posted 2-29-'04 This camera manual library is for reference and historical purposes, all rights reserved. This page is copyright by, M. Butkus, NJ. This page may not be sold
Konica TC-X posted 5-11-'03
 Konica TC-X posted 5-11-'03 This camera manual library is for reference and historical purposes, all rights reserved. This page is copyright by, M. Butkus, NJ. This page may not be sold or distributed
Cosina Hi-Lite CE posted 5-22-'03
 Cosina Hi-Lite CE posted 5-22-'03 This camera manual library is for reference and historical purposes, all rights reserved. This page is copyright by, M. Butkus, NJ. This page may not be sold or distributed
Mamiya Winder ZE Posted 4-26-'03
 Mamiya Winder ZE Posted 4-26-'03 This camera manual library is for reference and historical purposes, all rights reserved. This page is copyright by, M. Butkus, NJ. This page may not be sold or distributed
Cosina E1 SOLAR. This camera manual library is for reference and historical purposes, all rights reserved.
 Cosina E1 SOLAR This camera manual library is for reference and historical purposes, all rights reserved. This page is copyright by, M. Butkus, NJ. This page may not be sold or distributed without the
CHINON SPLASH On line manual posted 12-8-'02
 CHINON SPLASH On line manual posted 12-8-'02 This manual can be used as a reference for many Chinon "Auto" cameras If the images are too small, I may have larger, almost identical images, from the CE-4
Chinon Intrafocus 35F-MA
 Chinon Intrafocus 35F-MA This camera manual library is for reference and historical purposes, all rights reserved. This page is copyright by mike@butkus.org, M. Butkus, NJ. This page may not be sold or
Chinon Auto 357z posted On-line camera manual library Back to main on-line manual page
 Chinon Auto 357z posted 9-8-03 This camera manual library is for reference and historical purposes, all rights reserved. This page is copyright by mike@butkus.org M. Butkus, NJ. This page may not be sold
I. BASIC OPERATION (PREPARATION)
") 10 lcon indicators used in this manual I. BASIC OPERATION (PREPARATION) Operation direction Attention Lamp blinking Attaching the Camera Strap 11 1 2 3 1. Use a coin or similar object to slide the clasp
10 lcon indicators used in this manual I. BASIC OPERATION (PREPARATION) Operation direction Attention Lamp blinking Attaching the Camera Strap 11 1 2 3 1. Use a coin or similar object to slide the clasp
Ricoh 500G. This camera manual library is for reference and historical purposes, all rights reserved.
 Ricoh 500G This camera manual library is for reference and historical purposes, all rights reserved. This page is copyright by, M. Butkus, NJ. This page may not be sold or distributed without the expressed
CREATIVE EXPOSURE MODES
 9-6- MM-B08 (E).qxd 0.8. 6: Page 50 DRIVE MODES Focus Lock in Remote Control Mode When your subject is not centered in the focus frame, use manual focus or focus lock. Set the camera to the remotecontrol
Ricoh FF-9/FF-9s. This camera manual library is for reference and historical purposes, all rights reserved.
 Ricoh FF-9/FF-9s This camera manual library is for reference and historical purposes, all rights reserved. This page is copyright by, M. Butkus, NJ. This page may not be sold or distributed without the
Chinon Handyzoom 5001 This camera manual library is for reference and historical purposes, all rights reserved.
 Chinon Handyzoom 5001 This camera manual library is for reference and historical purposes, all rights reserved. This page is copyright by M. Butkus, N.J. This page may not be sold or distributed without
Ricoh 240 SPEEDLIGHT
 Ricoh 240 SPEEDLIGHT This camera manual library is for reference and historical purposes, all rights reserved. This page is copyright by, M. Butkus, NJ. This page may not be sold or distributed without
Ricoh XR-10 (KR-10X)
") Ricoh XR-10 (KR-10X) This camera manual library is for reference and historical purposes, all rights reserved. This page is copyright by, M. Butkus, NJ. This page may not be sold or distributed without
Ricoh XR-10 (KR-10X) This camera manual library is for reference and historical purposes, all rights reserved. This page is copyright by, M. Butkus, NJ. This page may not be sold or distributed without
Yashica 35-ME posted
 Yashica 35-ME posted 9-18-03 This camera manual library is for reference and historical purposes, all rights reserved. This page is copyright by, M. Butkus, NJ. This page may not be sold or distributed
Back to main on-line manual page
 This camera manual library is for reference and historical purposes, all rights reserved. This page is copyright by, M. Butkus, NJ. This page may not be sold or distributed without the expressed permission
INSTRUCTION MANUAL QUICK OPERATION GETTING STARTED FULL-AUTO OPERATION SUBJECT PROGRAM SELECTION CREATIVE EXPOSURE MODES ADDITIONAL FEATURES APPENDIX
 E INSTRUCTION MANUAL QUICK OPERATION GETTING STARTED FULL-AUTO OPERATION SUBJECT PROGRAM SELECTION CREATIVE EXPOSURE MODES ADDITIONAL FEATURES APPENDIX FOR PROPER AND SAFE USE This manual has been designed
Chinon PW-600 / PW-610 Power Winder for Chinon cameras
 Chinon PW-600 / PW-610 Power Winder for Chinon cameras This camera manual library is for reference and historical purposes, all rights reserved. This page is copyright by M. Butkus, N.J. This page may
COSINA CS-2. This camera manual library is for reference and historical purposes, all rights reserved.
 COSINA CS-2 This camera manual library is for reference and historical purposes, all rights reserved. This page is copyright by, M. Butkus, NJ. This page may not be sold or distributed without the expressed
Contax Aria posted 7-3-'03
 Contax Aria posted 7-3-'03 This camera manual library is for reference and historical purposes, all rights reserved. This page is copyright by, M. Butkus, NJ. This page may not be sold or distributed without
Chinon Power Winder For Chinon CE-3 Memotron and CM-3
 Chinon Power Winder For Chinon CE-3 Memotron and CM-3 This camera manual library is for reference and historical purposes, all rights reserved. This page is copyright by mike@butkus.org M. Butkus, N.J.
Selecting a Drive Mode
 38 Selecting a Drive Mode III. Consecutive-Frame Mode Consecutive pictures can be taken by holding down the shutter release button. Set the drive mode selector to P. if the AF mode selector is set to [S].
Chinon CE-5 On line manual
 Chinon CE-5 On line manual This manual can be used as a reference for many Chinon "Auto" cameras If the images are too small, I may have larger, almost identical images, from the CE-4 camera page. This
Ricoh auto TLS EE posted 9-29-'03
 Ricoh auto TLS EE posted 9-29-'03 This camera manual library is for reference and historical purposes, all rights reserved. This page is copyright by, M. Butkus, NJ. This page may not be sold or distributed
Ricoh Singlex TLS. This camera manual library is for reference and historical purposes, all rights reserved.
 Ricoh Singlex TLS This camera manual library is for reference and historical purposes, all rights reserved. This page is copyright by, M. Butkus, NJ. This page may not be sold or distributed without the
Chinon Genesis II. This camera manual library is for reference and historical purposes, all rights reserved.
 Chinon Genesis II This camera manual library is for reference and historical purposes, all rights reserved. This page is copyright by, M. Butkus, N.J. This page may not be sold or distributed without the
Petri MF-3 posted 3-16-'04
 Petri MF-3 posted 3-16-'04 This camera manual library is for reference and historical purposes, all rights reserved. This page is copyright by, M. Butkus, NJ. This page may not be sold or distributed without
Chinon DSL Posted 7-11-'03
 Chinon DSL Posted 7-11-'03 This camera manual library is for reference and historical purposes, all rights reserved. This page is copyright by mike@butkus.org, M. Butkus, NJ. This page may not be sold
Ricoh SLX 500 Posted 3-7-'04
 Ricoh SLX 500 Posted 3-7-'04 This camera manual library is for reference and historical purposes, all rights reserved. This page is copyright by, M. Butkus, NJ. This page may not be sold or distributed
INSTRUCTION MANUAL QUICK OPERATION GETTING STARTED FULL-AUTO OPERATION SUBJECT PROGRAM SELECTION CREATIVE EXPOSURE MODES ADDITIONAL FEATURES APPENDIX
 E INSTRUCTION MANUAL QUICK OPERATION GETTING STARTED FULL-AUTO OPERATION SUBJECT PROGRAM SELECTION CREATIVE EXPOSURE MODES ADDITIONAL FEATURES APPENDIX FOR PROPER AND SAFE USE This manual has been designed
RICOH MIRAI 105. HTML Translations - German - Italian - French - Spanish - Others These links will not translate any PDF files
 RICOH MIRAI 105 HTML Translations - German - Italian - French - Spanish - Others These links will not translate any PDF files This camera manual library is for reference and historical purposes, all rights
(En) INSTRUCTION MANUAL
 INSTRUCTION MANUAL") (En) INSTRUCTION MANUAL En Introduction Thank you for purchasing the Nikon F55/F55D a camera that is sure to make photography a bigger part of your life. Get to know your F55/F55D camera, and be sure to
(En) INSTRUCTION MANUAL En Introduction Thank you for purchasing the Nikon F55/F55D a camera that is sure to make photography a bigger part of your life. Get to know your F55/F55D camera, and be sure to
Chinon GS-7 (Genesis)
") Chinon GS-7 (Genesis) This camera manual library is for reference and historical purposes, all rights reserved. This page is copyright by mike@butkus.org M. Butkus, NJ. This page may not be sold or distributed
Chinon GS-7 (Genesis) This camera manual library is for reference and historical purposes, all rights reserved. This page is copyright by mike@butkus.org M. Butkus, NJ. This page may not be sold or distributed
Ricoh Shotmaster Tru-Zoom posted 7-4-'03
 Ricoh Shotmaster Tru-Zoom posted 7-4-'03 This is the full text and images from the manual. This may take 3 full minutes for all images to appear. If they do not all appear, try clicking the browser "refresh"
Praktica LB2 This camera manual library is for reference and historical purposes, all rights reserved.
 Praktica LB2 This camera manual library is for reference and historical purposes, all rights reserved. This page is copyright by, M. Butkus, NJ. This page may not be sold or distributed without the expressed
Yashica A Posted 8-26-'02
 Yashica A Posted 8-26-'02 This camera manual library is for reference and historical purposes, all rights reserved. This page is copyright by, M. Butkus, NJ. This page may not be sold or distributed without
Konica FP-1 On-line users manual Posted: April 21st 2003
 Konica FP-1 On-line users manual Posted: April 21st 2003 This camera manual library is for reference and historical purposes, all rights reserved. This page is copyright by, M. Butkus, NJ. This page may
INSTRUCTION MANUAL QUICK OPERATION GETTING STARTED FULL-AUTO OPERATION SUBJECT PROGRAM SELECTION CREATIVE EXPOSURE MODES ADDITIONAL FEATURES APPENDIX
 E INSTRUCTION MANUAL QUICK OPERATION GETTING STARTED FULL-AUTO OPERATION SUBJECT PROGRAM SELECTION CREATIVE EXPOSURE MODES ADDITIONAL FEATURES APPENDIX FOR PROPER AND SAFE USE This manual has been designed
Ricoh Mirai. HTML Translations - German - Italian - French - Spanish - Others These links will not translate any PDF files.
 Ricoh Mirai HTML Translations - German - Italian - French - Spanish - Others These links will not translate any PDF files AKA Olympus AZ-4 This camera manual library is for reference and historical purposes,
Using the Apperture-Priority AE Mode
 Using the Apperture-Priority AE Mode When the desired aperture is selected, an appropriate shutter speed is automatically set by the camera for a proper exposure. The shutter speed dial can be released
Ricoh RZ This camera manual library is for reference and historical purposes, all rights reserved.
 Ricoh RZ-3000 This camera manual library is for reference and historical purposes, all rights reserved. This page is copyright by M. Butkus, NJ. This page may not be sold or distributed without the expressed
I n s t r u c t i o n Manual
 Instruction Manual DESCRIPTION OF PARTS 1. Film Plane Reference Mark 2. "X" Synchr. Hot Shoe 3. Film Advance Lever 4. Cable Release Socket 5. Shutter Release/Meter ON Button 6. Exposure Counter Window
INSTRUCTION MANUAL QUICK OPERATION GETTING STARTED FULL-AUTO OPERATION SUBJECT PROGRAM SELECTION CREATIVE EXPOSURE MODES ADDITIONAL FEATURES APPENDIX
 E INSTRUCTION MANUAL QUICK OPERATION GETTING STARTED FULL-AUTO OPERATION SUBJECT PROGRAM SELECTION CREATIVE EXPOSURE MODES ADDITIONAL FEATURES APPENDIX FOR PROPER AND SAFE USE This manual has been designed
Ricoh Shotmaster ultra zoom
 Ricoh Shotmaster ultra zoom This camera manual library is for reference and historical purposes, all rights reserved. This page is copyright by M. Butkus, NJ. This page may not be sold or distributed without
Table of contents Preparations before taking pictures Simple operating procedures Advanced shooting techniques
 INSTRUCTIONS Table of contents Preparations before taking pictures Loading the batteries... 2 Simple operating procedures Loading the film... 4 Taking pictures... 7 Unloading the film... 13 Automatic flash
Fujica ST 801. posted 2-8-'04. This camera manual library is for reference and historical purposes, all rights reserved.
 Fujica ST 801 posted 2-8-'04 This camera manual library is for reference and historical purposes, all rights reserved. This page is copyright by, M. Butkus, NJ. 2001 This page may not be sold or distributed
Chinon CP-X. HTML Translations - German - Italian - French - Spanish - Others These links will not translate any PDF files
 Chinon CP-X HTML Translations - German - Italian - French - Spanish - Others These links will not translate any PDF files This is the full text and images from the manual. This may take 3 full minutes
FOR PROPER AND SAFE USE WARNING CAUTION
 1 FOR PROPER AND SAFE USE Thank you for purchasing a Minolta camera. A valuable tool for photographers, the Maxxum/Dynax 7 has been designed with precision in mind to help you capture your photographic
Chinon CEII Memotron
 Chinon CEII Memotron This camera manual library is for reference and historical purposes, all rights reserved. This page is copyright by mike@butkus.org, M. Butkus, NJ. This page may not be sold or distributed
Ricoh TLS 401 Posted 12-8-'02
 Ricoh TLS 401 Posted 12-8-'02 This camera manual library is for reference and historical purposes, all rights reserved. This page is copyright by, M. Butkus, NJ. This page may not be sold or distributed
Manual 35mm SLR Camera Controls
 Manual 35mm SLR Camera Controls A single-lens reflex camera (SLR) typically uses a mirror and prism system (hence "reflex", from the mirror's reflection) that permits the photographer to view through the
Ricoh KR-10 (XR 1000X)
") Ricoh KR-10 (XR 1000X) This camera manual library is for reference and historical purposes, all rights reserved. This page is 2001 by M. Butkus, NJ. This page may not be sold or distributed without the
Ricoh KR-10 (XR 1000X) This camera manual library is for reference and historical purposes, all rights reserved. This page is 2001 by M. Butkus, NJ. This page may not be sold or distributed without the
Praktica BCA On line manual
 Praktica BCA On line manual Posted by Alex Albu 12-19-'02 This manual can be used as a reference for many Praktica "Auto" cameras If the images are too small, I may have larger, almost identical images,
Ricoh R1 on-line camera manual Ultra Slim AF Compact with 24mm Wide Panorama
 Ricoh R1 on-line camera manual Ultra Slim AF Compact with 24mm Wide Panorama This camera manual library is for reference and historical purposes, all rights reserved. This page is copyright by, M. Butkus,
Genesis III. On-line camera manual library Back to main on-line manual page
 Genesis III This camera manual library is for reference and historical purposes, all rights reserved. This page is copyright by mike@butkus.org, M. Butkus, NJ. This page may not be sold or distributed
ROAMER I and ROAMER II posted 7-12-'03
 ROAMER I and ROAMER II posted 7-12-'03 This camera manual library is for reference and historical purposes, all rights reserved. This page is copyright by. M. Butkus, NJ. This page may not be sold or distributed
Ricoh KR-5 - similar to Sears KS-500 and CR-5-35mm camera manual
 www.orphancameras.com Ricoh KR-5 - similar to Sears KS-500 and CR-5-35mm camera manual This camera manual library is for reference and historical purposes, all rights reserved. This page is copyright by
Canon EOS Camera Manual POSTED This is the full text and images from the manual.
 Canon EOS 620-650 Camera Manual POSTED 12-5-02 This is the full text and images from the manual. This camera manual library is for reference and historical purposes, all rights reserved. This page is copyright
E INSTRUCTION MANUAL BASIC OPERATION FOCUS BASICS FLASH BASICS SUBJECT PROGRAM MODES EXPOSURE BASICS ADVANCED AUTOFOCUS ADVANCED EXPOSURE
 BASIC OPERATION E INSTRUCTION MANUAL FOCUS BASICS FLASH BASICS SUBJECT PROGRAM MODES EXPOSURE BASICS ADVANCED AUTOFOCUS ADVANCED EXPOSURE ADVANCED FLASH ADDITIONAL FEATURES APPENDIX Thank you for purchasing
Ricoh KR-5 Super
 Ricoh KR-5 Super This camera manual library is for reference and historical purposes, all rights reserved. This page is copyright by mike@butkus.org M. Butkus, N.J. Back to main on-line manual page If
Genesis IV. Back to main camera manual page
 Genesis IV This camera manual library is for reference and historical purposes, all rights reserved. This page is copyright by mike@butkus.org, M. Butkus, NJ. This page may not be sold or distributed without
BASIC OPERATION DETAILED OPERATION INSTRUCTION MANUAL APPENDIX
 E INSTRUCTION MANUAL APPENDIX DETAILED OPERATION BASIC OPERATION FOR PROPER AND SAFE USE The ultimate tool for creative professionals and advanced amateurs alike, the Maxxum / Dynax 9 has been designed
Yashica Mat 124G posted '02
 Yashica Mat 124G posted 12-22-'02 This camera manual library is for reference and historical purposes, all rights reserved. This page is copyright by, M. Butkus, NJ. This page may not be sold or distributed
Flash Socket Safety Cover Film Rewind Crank Film Plane Indicator Accessory Shoe Frame Counter Shutter Button Cable Release Socket Film Advance Lever
 Focusing Lever Selftimer Lever Shutter Speed Ring AUTOMATIC/MANUAL Aperture Ring ASA Film Speed Indicator Window Automatic EE Mark Focusing Ring Viewfinder Window Flash Socket Safety Cover Film Rewind
We ll go over a few simple tips for digital photographers.
 Jim West We ll go over a few simple tips for digital photographers. We ll spend a fair amount of time learning the basics of photography and how to use your camera beyond the basic full automatic mode.
SP AF 17-50mm F/2.8 XR Di-II VC LD Aspherical [IF] (Model B005)
![SP AF 17-50mm F/2.8 XR Di-II VC LD Aspherical [IF] (Model B005)](/thumbs/72/66333745.jpg "SP AF 17-50mm F/2.8 XR Di-II VC LD Aspherical [IF] (Model B005)") SP AF 17-50mm F/2.8 XR Di-II VC LD Aspherical [IF] (Model B005) Thank you for purchasing the Tamron lens as the latest addition to your photographic equipment. Before using your new lens, please read the
SP AF 17-50mm F/2.8 XR Di-II VC LD Aspherical [IF] (Model B005) Thank you for purchasing the Tamron lens as the latest addition to your photographic equipment. Before using your new lens, please read the
Instruction Manual DIGITAL CAMERA. Basic guide. Mastering the E-510. Improving your shooting skills Shooting guides. Shooting functions
 EN DIGITAL CAMERA Instruction Manual Basic guide Mastering the E-510 Improving your shooting skills Shooting guides Shooting functions Playback functions Customizing the settings / functions of your camera
TT680 Canon E-TTL II Compatible Flash
 TT6 Canon E- II Compatible Flash INSTRUCTION MANUAL Warning Always keep this product dry. Do not use in rain or in damp conditions. Do not disassemble. Should repairs become necessary, this product must
Ricoh XR-1 On-line camera manual library
 Ricoh XR-1 On-line camera manual library This is the full text and images from the manual. This may take 3 full minutes for all images to appear. If they do not all appear, try clicking the browser "refresh"
28-300mm F/ XR Di VC LD Aspherical [IF] Macro (Model A020)
![28-300mm F/ XR Di VC LD Aspherical [IF] Macro (Model A020)](/thumbs/82/86828397.jpg "28-300mm F/ XR Di VC LD Aspherical [IF] Macro (Model A020)") R 28-300mm F/3.5-6.3 XR Di VC LD Aspherical [IF] Macro (Model A020) Thank you for purchasing the Tamron lens as the latest addition to your photographic equipment. Before using your new lens, please read
R 28-300mm F/3.5-6.3 XR Di VC LD Aspherical [IF] Macro (Model A020) Thank you for purchasing the Tamron lens as the latest addition to your photographic equipment. Before using your new lens, please read
Built-in 38mm~70mm (approx. 2X) zoom lens
 zoom lens") INSTRUCTIONS Before using your camera, read this manual carefully to ensure correct use. We recommend that you take test shots to get accustomed to your camera before taking important photographs. Thank
INSTRUCTIONS Before using your camera, read this manual carefully to ensure correct use. We recommend that you take test shots to get accustomed to your camera before taking important photographs. Thank
Chinon CG-5 On-line users manual
 Chinon CG-5 On-line users manual This camera manual library is for reference and historical purposes, all rights reserved. This page is copyright by mike@butkus.org, M. Butkus, NJ. This page may not be
Ricoh Mirai zoom 3 posted
 Ricoh Mirai zoom 3 posted 03-09-03 HTML Translations - German - Italian - French - Spanish - Others These links will not translate any PDF files For reference use on many Chinon manual focus and metering
Yashica 230-AF Posted 9-1-'02
 Yashica 230-AF Posted 9-1-'02 This camera manual library is for reference and historical purposes, all rights reserved. This page is copyright by, M. Butkus, NJ. This page may not be sold or distributed
Ansco Viking 6.3 posted '03
 Ansco Viking 6.3 posted 10-17-'03 This camera manual library is for reference and historical purposes, all rights reserved. This page is copyright by, M. Butkus, NJ. This page may not be sold or distributed
Chinon S-360 Flash unit
 Chinon S-360 Flash unit This camera manual library is for reference and historical purposes, all rights reserved. This page is copyright by mike@butkus.org, M. Butkus, N.J. This page may not be sold or
Instruction Manual DIGITAL CAMERA. Basic guide. Mastering the E-410. Improving your shooting skills Shooting guides. Shooting functions
 EN DIGITAL CAMERA Instruction Manual Basic guide Mastering the E-410 Improving your shooting skills Shooting guides Shooting functions Playback functions Customizing the settings / functions of your camera
Vivitar 2000 posted
 Vivitar 2000 posted 1-26-03 Camera Manual This is the full text and images from the manual. This may take 3 full minutes for all images to appear. If they do not all appear. Try clicking the browser "refresh"
Universal STERE-ALL Posted 1-17-'04
 Universal STERE-ALL Posted 1-17-'04 This camera manual library is for reference and historical purposes, all rights reserved. This page is copyright by, M. Butkus, NJ. This page may not be sold or distributed
Chinon CM-1. This camera manual library is for reference and historical purposes, all rights reserved.
 Chinon CM-1 This camera manual library is for reference and historical purposes, all rights reserved. This page is copyright by M. Butkus, NJ. This page may not be sold or distributed without the expressed
Yashica 230-AF Posted 9-1-'02
 Yashica 230-AF Posted 9-1-'02 This camera manual library is for reference and historical purposes, all rights reserved. This page is copyright by, M. Butkus, NJ. This page may not be sold or distributed
SP mm F/2.8 Di VC USD (Model A009)
") SP 70-200mm F/2.8 Di VC USD (Model A009) Thank you for purchasing the Tamron lens as the latest addition to your photographic equipment. Before using your new lens, please read the contents of this Owner
SP 70-200mm F/2.8 Di VC USD (Model A009) Thank you for purchasing the Tamron lens as the latest addition to your photographic equipment. Before using your new lens, please read the contents of this Owner
This device complies with part 15 of the FCC Rules. Operation is subject to the following two conditions: (1) This device may not cause harmful
 This device may not cause harmful") KC50/55 Camera 1 This device complies with part 15 of the FCC Rules. Operation is subject to the following two conditions: (1) This device may not cause harmful interference, and (2) this device must accept
KC50/55 Camera 1 This device complies with part 15 of the FCC Rules. Operation is subject to the following two conditions: (1) This device may not cause harmful interference, and (2) this device must accept
Science & Technology Group
 Cannock Chase U3A Science & Technology Group Programme June 12 th PC fundamentals 1: July 17th Camera fundamentals 1 August Tablet PC fundamentals 1 September PC applications 2 (Word, Excel, Music, Photos,
E INSTRUCTION MANUAL DETAILED OPERATION CREATIVE EXPOSURE CUSTOM FUNCTIONS SUBJECT / DRIVE AUTOMATIC OPERATION GETTING STARTED APPENDIX
 E INSTRUCTION MANUAL APPENDIX CUSTOM FUNCTIONS DETAILED CREATIVE EXPOSURE SUBJECT / DRIVE AUTOMATIC GETTING STARTED TABLE OF CONTENTS The GETTING STARTED section describes how to prepare the camera for
Sears KS-1000 AKS Ricoh XR-1 Posted 3-7-'04
 Sears KS-1000 AKS Ricoh XR-1 Posted 3-7-'04 This camera manual library is for reference and historical purposes, all rights reserved. This page is copyright by, M. Butkus, NJ. This page may not be sold
Praktica BC 1 Posted 9-27-'03
 Praktica BC 1 Posted 9-27-'03 This camera manual library is for reference and historical purposes, all rights reserved. This page is copyright by M. Butkus, NJ. This page may not be sold or distributed
COPY INSTRUCTION MANUAL MODE D EMPLOI MANUAL DE INSTRUCCIONES. English. Français. Español
 English INSTRUCTION MANUAL MODE D EMPLOI MANUAL DE INSTRUCCIONES Français Español English 1 Introduction The Canon Speedlite 600EX-RT/600EX is a high-output, multi-feature flash unit for Canon EOS cameras,