SPYDER POD VEHICLE CAMERA MOUNTING SYSTEM. USER s GUIDE
|
|
|
- Dorthy Skinner
- 6 years ago
- Views:
Transcription


1 POD MOUNTING SYSTEM USER s GUIDE
2
3 Table of Contents About the Vehicle Camera Mounting System 2 Specifications 3 What s Included 3 Key Features 4 Using the System 5 Using the suction cup mounts 5 Adjusting leg lengths & angles 5 Adjusting & locking camera plate leg joints 6 Attaching camera & accessories to the camera base plate 7 Mounting the to your vehicle 7 Using the Safety Kit 9 Vehicle Mounting Options 10 Care & Maintenance 12 Cautions & Warnings 12 Limited Warranty 13

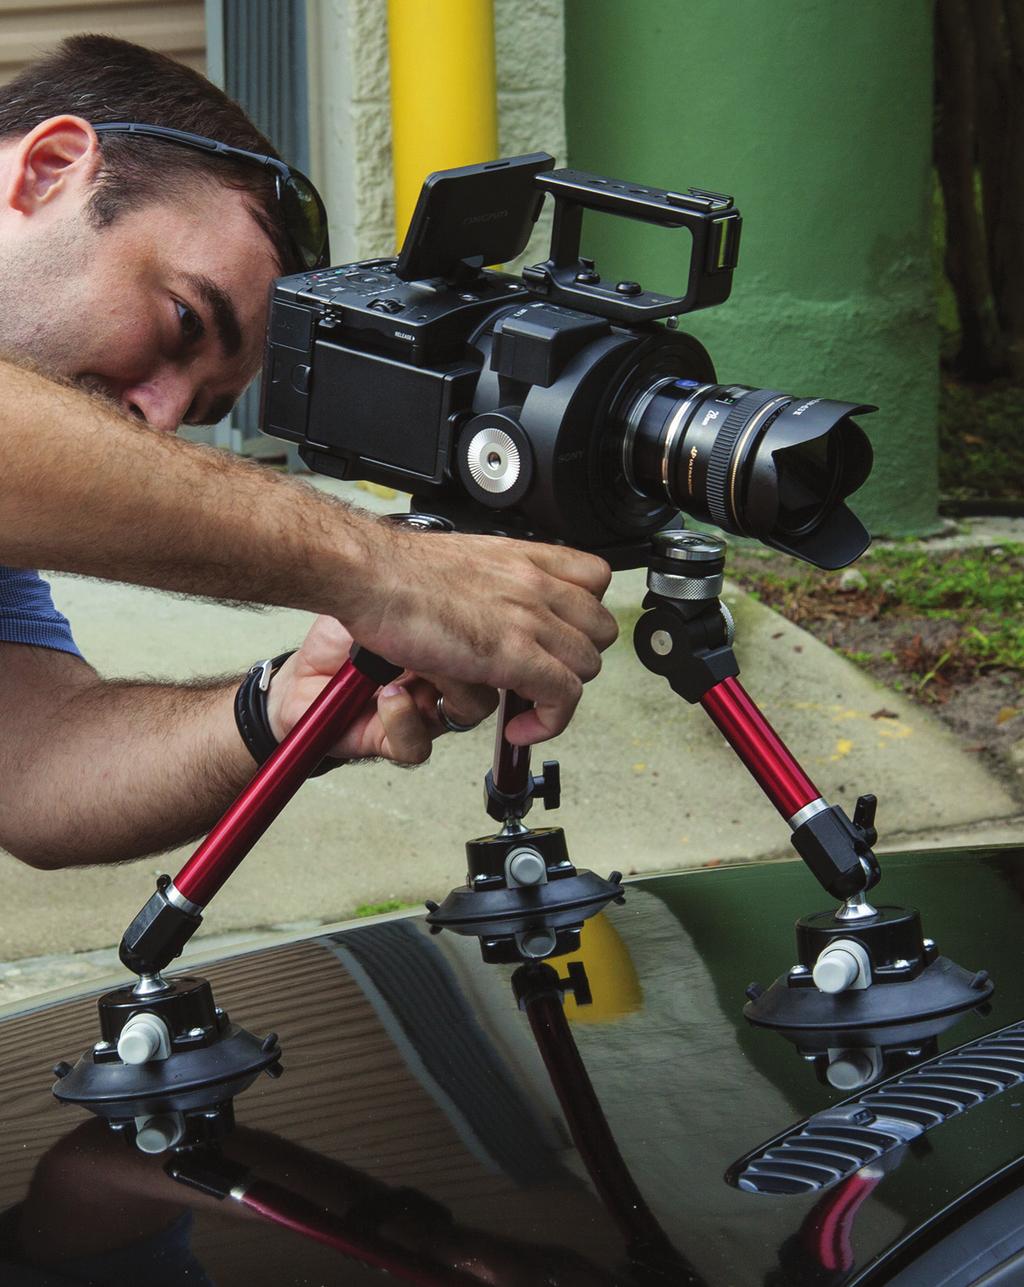
4 User s Guide About the Vehicle Camera Mounting System Congratulations on your purchase of this Digital Juice Vehicle Camera Mounting System. Please read this guide carefully before using the unit. Follow the procedures described, in order to optimize the lifespan and functionality of the components of this Digital Juice Gear product. Shooting video from a moving vehicle can be a challenge, but if done well it can add tremendous impact to your shots and increased value to your production. Until now, vehicle camera mounting systems have been expensive, ungainly, complicated, risky to use, unattractive to look at or all of the above. Once again, Digital Juice has come to the rescue with the development of a professional video gear solution which is innovative, attractive, easy-to-use, reliable and a tremendous value for the money. The Digital Juice Vehicle Camera Mounting System is a complete solution contained in a lightweight attractive carry bag. Using three professional-grade suction mounts and built with precisionmachined high-grade aluminum and stainless steel components, this system is strong and secure giving you the confidence you need to safely achieve your desired vehicle shots. 2 Each suction mount is fitted with an adjustable ball joint, allowing for an extensive range of lockable positions for the attached interchangeable multi-length legs. The camera mounting stage of the has three attachment points for the suction mounted legs, each fitted with two positive locking ratchet joints, one for tilt and one for swivel. Each joint has a quick-turn lock ring that makes adjusting and locking supremely easy. The mounting system also includes a comprehensive safety kit that allows you to secure your camera to three additional anchors on your vehicle for added safety and security for you and your camera.
 Dimensions: 13 height x 8.")
;.6 lbs/.27kg ( leg extension rod - 12 );.4 lbs/.18kg ( leg extension rod - 6 );.2 lbs/.09kg ( leg extension rod - 3 ); 3 lbs/ 1.")
5 Materials: Precision-machined high-grade aluminum and stainless steel (legs & camera plate), sealed spring-loaded ball bearing positive locking ratchet joints (camera plate), soft cloth suction mount carry bags, vacuum-actuated industrial-grade 4.75-inch rubber suction cup mounts, heavyweight nylon polyester fabric & sueded leather (carry bag and straps) Dimensions: 13 height x 8.5 diameter / 33cm height x 21.6cm diameter (Complete Kit in Carry Bag) Weight: 15 lbs/ 6.8kg (Complete Kit in Carry Bag); 3 lbs/ 1.36kg ( camera base plate); 1 lbs/.45kg ( suction cup mount); 2.2 lbs/ 1kg ( Safety Kit - straps & anchors);.6 lbs/.27kg ( leg extension rod - 12 );.4 lbs/.18kg ( leg extension rod - 6 );.2 lbs/.09kg ( leg extension rod - 3 ); 3 lbs/ 1.36kg ( carry bag) Check to see that the following components are included when you receive your kit: User s Guide Specifications What s Included : camera base plate with 3 leg attachment joints (1); three 3 (2), three 6 (3) and three 12 (4) solid aluminum legs; 3 suction mount units (one for each leg) (5), each in its own black soft cloth bag (6) Safety Kit: 2 suction mount safety anchors (7) (each in a red soft cloth bag (8)); 3 variable length safety straps, 2 pinch strap anchors, 2 velcro anchor straps & 2 carbiner anchor straps (9) (all contained in 1 grey soft cloth bag (10)) Carry Bag: Includes attractive cylindrical carry bag (11), detachable padded shoulder strap, zippered full access top lid, padded top carry handle, nine cloth loops around inner edge to hold the leg extension rods (12) 12 3


.")
6 User s Guide 4 Key Features Quick and easy to set up on any vehicle with any camera rig or configuration. Variable length legs, adjustable ball joints on top of each suction cup, ratcheting attachment joints and a variety of accessory mount and safety tether options mean you can adapt the to any shooting situation quickly and easily (13). Vacuum-actuated industrial grade 4.75 suction cup mounts can be affixed to just about any smooth surface on any vehicle (14). Each suction mount is fitted with an adjustable ball joint allowing for an extensive range of lockable positions for the attached legs. Three variable length legs can be created from the nine linkable 7/8 diameter leg extension rods (15) provided in three lengths (3, 6 & 12 ) to create the perfect length legs to fit your shooting situation, positioning your camera at a variety of distances and angles from the vehicle. s camera mounting base plate has one 3/8-16 threaded and eleven 1/4-20 threaded mounting holes, in addition to a thru-hole for each thread pitch (16), allowing you to attach accessories such as articulating arms, lights, monitors and more. It can also accommodate just about any camera configuration. The innovative ratchet lock system for the s three legs improves on the usual friction lock method through a spring-loaded ball bearing mechanism, assuring the camera won t shake from joint movement while the vehicle is in motion. Positive locking ratchet joints at the top of each leg control tilt and swivel and can be locked or unlocked with a slight twist of the wrist and no pressure (17). components are machined from solid high quality aluminum and stainless steel, with a high attention to quality, durability and usability. The is an attractive, professional-looking piece of gear that you will be proud to display on any production set, both in and out of its compact carry bag. Suggested 50-lb load capacity for camera base mounted with three suction cup legs means that just about any camera rig or setup can be safely accomodated by the on your next vehicle shoot. A versatile safety kit (18) is included to provide flexibility & safety for you & your camera when shooting from inside or outside of a moving vehicle. You don t have to worry about damaging or dropping your gear when getting that all-important moving vehicle shot. Plus, you can rely on the shake-free footage you can capture with your camera attached safely where you need it.


7 POD User s Guide MOUNTING SYSTEM Using the Suction Cup Mounts The s vacuum-actuated industrial grade 4.75 suction cup mounts can be affixed to just about any smooth surface on any vehicle. They provide a solid, stable, adjustable base for the 3 variable length legs. A few pumps of the large pin on the side of each unit and you are in business. A red line on the side of the pin will disappear once adhesion is achieved (19). The built-in low suction indicator helps to insure that the, and its valuable cargo, remain securely attached to your vehicle. Releasing the suction when you are done is as simple as lifting one or both of the tabs on the sides of the suction cups (20). Each suction mount is fitted with an adjustable ball joint allowing for an extensive range of lockable positions for the attached legs (21). The suction cup mount units are each contained in their own soft cloth bag to keep them clean and undamaged so that adhesion will be optimized every time they are used (22). 19 Using the System Adjusting leg lengths and angles Three adjustable length legs screw into the camera base plate ratchet joints at one end (23) and into the adjustable locking ball joint at the top of the 3 suction cup mounts on the other end (24). The nine leg extension rods are all 7/8 in diameter. Three rods are provided for each length 3, 6 & 12. These rods can be linked together in any combination you need to create the perfect length legs to fit your shooting situation, positioning the unit at a variety of distances and angles from the vehicle (25)
 and one")


8 User s Guide Using the System (continued) NOTE: There is no need to wrench the lock ring tightly closed the lock will engage with a gentle twist in the right direction. Adjusting & locking camera plate leg joints The mounting stage of the has three leg attachment points that are each fitted with two positive locking ratchet joints, one for tilt (26) and one for swivel (27). Each locking ratchet joint has a quickturn knurled lock ring that makes adjusting a breeze. This innovative ratchet lock system improves on the usual friction lock method through a spring-loaded ball bearing mechanism. You can unlock and lock each joint with a slight twist of the wrist and no pressure. The joints are marked for easy reference (28). To adjust the tilt or swivel of each leg, first make sure the lock ring on the appropriate joint is in the UNLOCK position, then adjust the position of the leg in the joint, moving the leg through the ratchet positions (29). Finally, turn the lock ring back in the LOCK direction. Once locked, the no-slip ratchet positioning system assures the camera won t shake from joint movement while the vehicle is in motion
, allowing you to attach accessories")

, enabling the use of a fluid head for")
 30 31 Mounting the to your vehicle 1) Have a plan: Decide where the camera needs to be")
9 Attaching camera & accessories to the camera base plate The versatile camera mounting plate on the unit has one 3/8-16 threaded and eleven 1/4-20 threaded mounting holes, in addition to a thru-hole for each thread pitch (30), allowing you to attach accessories such as articulating arms, lights, monitors and more. It can also accommodate just about any camera configuration including direct camera attachment as well as cameras on ball head or fluid head attachments. Four of the 1/4-20 holes are designed to accept our own optional high hat riser unit (31), enabling the use of a fluid head for more flexible and smooth camera movement. User s Guide Using the System (continued) Mounting the to your vehicle 1) Have a plan: Decide where the camera needs to be placed to get the desired shot (32). Familiarize yourself with the vehicle by inspecting it for places where additional safety mounting points can reside. This could include door jambs, ridges, a wheel well, chassis, hood, frame etc. (33) These areas are defined as anchor points
.")
.")
10 User s Guide 34 Using the System (continued) Mounting the to your vehicle (continued) 2) Mount the : Construct your custom configuration by attaching three legs to the suction cup mounts at one end and to the camera base plate at the other end (34). Figure out the best placement of the three suction cup mounts on the vehicle, taking into account where the smoothest surfaces and best adhesion will be. Pump the suction cup mounts to achieve vacuum adhesion in the desired positions. Your aim is to form a solid balanced three-legged base for the camera platform and for your attached camera (35). Adjust the leg lengths, if required, by swapping in and out different rod lengths on each leg, in order to get the camera plate level and at the right distance from your shooting subject and vehicle. Adjust the ball joints on the top of each suction cup and the ratchet joints on the camera plate to place the legs in the position needed to create a level base for your camera. Lock down the ball and ratchet joints to form your solid shooting platform ) Identify & attach the safety kit hardware needed: Now that the camera position and attachment points have been determined, you will want to add additional security for your prescious equipment using the provided safety kit straps and anchors (36). There are many methods and combinations possible, all of which will provide secure anchor points, but some offer advantages over others. Anchor points on a vehicle can include hood edges, door jambs, wheel wells and the front chassis, to name just a few of the possibilities.
, 2 pinch strap anchors (39), 2 velcro anchor straps (40), 2 carbiner anchor straps (41) and a convenient set of soft cloth bags to keep everything organized and clean between")

11 User s Guide Using the System (continued) 36 Using the Safety Kit The safety kit provided with the includes 2 suction mount safety anchors with heavy duty metal loops (37), 3 variable length safety straps (38), 2 pinch strap anchors (39), 2 velcro anchor straps (40), 2 carbiner anchor straps (41) and a convenient set of soft cloth bags to keep everything organized and clean between uses (42). This comprehensive safety kit allows you to secure your camera and the mount to up to three additional anchors on your vehicle The three variable length safety straps provided in the kit have quick release buckles at both ends for attachment to any of the 3 safety anchor options to a pinch strap, a velcro strap or to a carbiner (continued on next page) 9
 or between a car hood and hood lock channel.")
.")

, you can use a highhat riser accessory to attach your camera with a fluid head controlled by a cameraperson for more seamless control of the shot and of the camera s movement.")
12 User s Guide Using the System (continued) Using the Safety Kit (continued) anchor strap/suction safety mount combination (43). Which type of anchor you use depends on where it is needed. Pinch anchors work well wedged between a door and door frame (44) or between a car hood and hood lock channel. The sturdy Velcro strap anchors can be used to securely loop around a car mirror, hitch or any other surface you can safely wrap around. Finally the suction cup safety mounts are handy when you need to secure your rig in places where no other safe mounting option can be found such as on the roof or back door of a vehicle (45) Vehicle Mounting Options 10 NOTE: You should not feel limited to the possible setups described here. Every situation is different. By using the suggestions provided as a starting point, you should be able to customize the basic setups to create an option that works best for you. 1) The system can be mounted to the side of a follow vehicle that will be used to track shots of a second vehicle. In this setup (46), you can use a highhat riser accessory to attach your camera with a fluid head controlled by a cameraperson for more seamless control of the shot and of the camera s movement. This setup is great for tracking cars with almost 180 degrees of pan, something that would be impossible while shooting through a window. 2) You can mount the system on the side of a vehicle to get a close-up shot of the driver (47). This is great for capturing one or more people in a car while in motion. This shot could be achieved using a green screen, but with the SpyderPod you can capture the real-life action of driving and the real motion of the background, saving you from a time-consuming composite in post-production. 46
 47 48 49 3) Mounting the on the")
.")


 To achieve a dynamic low-angle shot of the front")
.")
13 POD User s Guide MOUNTING SYSTEM Vehicle Mounting Options (continued) ) Mounting the on the hood of a car allows you to capture the car s interior through the windshield (48). For this shot you can mount the camera directly to the mounting stage of the Spyder Pod. This setup allows you to see the motion of the exterior of the vehicle and its surroundings, as well as the reflections in the windshield. Once again, this will save you time in post. Plus, actors will always give you a better performance when their actions are as real as possible. 4) To achieve a dynamic low-angle shot of the front of a vehicle, you can suspend the camera inverted from the rear of a lead vehicle (49). The camera can be attached directly to the camera mounting stage of the and secured with additional safety straps from the Safety Kit. 11
 will ensure your remains in the best workable condition.")


14 User s Guide Care & Maintenance Cautions & Warnings The kit includes a sturdy, compact 50 carry bag carefully designed to hold and protect the various components of the system (50). Returning the various components to their original placement within the bag (51) will ensure your remains in the best workable condition. After every use, you should make sure to wipe the suction cup mount units with a damp or dry cloth and remove any dirt, grease or debris that they may have picked up. They should then be returned to the soft cloth bags provided in the kit in order to ensure that the rubber suction surface does not get dirty or incur any damage during transport and storage. You should also return the nine solid screw-in leg rods to their designated holders on the sides of the cylindrical bag so as to avoid any damage they may do to each other or the other components of the kit. Likewise, returning the safety kit straps and wiped-clean suction anchors to their respective bags (52) will keep your kit organized and working as well the 100th time you use it as the first. We strongly suggest using the provided safety kit to add additional security when using your expensive camera equipment with the. Safety straps can be attached to the camera mounting stage and/or the camera itself with up to three anchors at various locations on the vehicle. These safety anchors and straps are not designed to hold the in place and should be snug but not pulled overtight. Correct use of safety straps & anchors will ensure that, if you do unexpectedly lose suction on the s legs for any reason, your camera will not fall to the road or ground. When a pinch strap is used as a safety anchor for the Spyder Pod on a car door, that door should remain closed. Remember to leave an entry way for the driver to enter and exit the vehicle. Make sure to abide by any traffic laws when operating any motor vehicle with a mounted to it. While we do not endorse any minimum or maximum speeds, we have internally tested this device at speeds of 70 mph. Should an operator need to ride along on the shot in the back of a pickup truck for example the necessary precautions must be taken. If your shot requires a lot of turns, creating added inertia to the camera and, the proper precautions must be taken. Extra fastening may be necessary. 12
15 Digital Juice, Inc. warrants all Digital Juice-built s and accessories purchased new by original owner to be free from defects in the material and workmanship under normal use for a period of 24 months from the date of purchase. Warranty is void when misuse or neglect is the cause. THIS WARRANTY IS VALID ONLY IN THE UNITED STATES AND CANADA. User s Guide Limited Warranty No other express warranty or guaranty, except as mentioned above, given by any person or entity with respect to Digital Juice shall bind Digital Juice, Inc. This warranty supersedes all other warranties expressed or implied. NO IMPLIED WARRANTIES, INCLUDING ANY IMPLIED WARRANTY OF MERCHANTABILITY OR FITNESS FOR A PARTICULAR PURPOSE APPLY TO DIGITAL JUICE POD AND ARE HEREBY DISCLAIMED. In the event of a possible warranty claim, the defective products must be returned to Digital Juice, Inc. If proven to be defective upon inspection, they will be exchanged for new or comparable rebuilt products, as determined by Digital Juice, Inc. and shipped back to the original purchaser. All shipping costs are the responsibility of the customer. Warranty replacement shall not extend the original warranty period of the defective Digital Juice. The customer s remedies with respect to defective Digital Juice or accessories shall be exclusively limited to the repair or replacement remedy as above provided and in no event shall Digital Juice, Inc. be liable for loss of profits, revenues, savings, inconvenience, associated costs, expense for equipment or service, use of capital, facilities, services, storage charges, damage to property, or any other special, incidental or consequential damages caused by the use or misuse of, or inability to use, the Digital Juice or accessories, regardless of the legal theory on which the claim is based, and even if Digital Juice, Inc. has been advised of such damages. In no event shall recovery of any kind against Digital Juice, Inc. be greater in amount than the purchase price of the Digital Juice product sold by Digital Juice, Inc. and causing the alleged damage. Without limiting the foregoing, the purchaser assumes all risk and liability for loss, damage or injury to persons, animals or property arising out of use or misuse of, or inability to use, the Digital Juice and accessories. Digital Juice, Inc. is not liable for third party claims. This limited warranty shall not extend to anyone other than the original purchaser of the Digital Juice product, or the person for whom it was purchased as a gift, and states your exclusive remedy. In no event shall Digital Juice, Inc. be liable for incidental or consequential damages to the full extent such may be disclaimed by law. Unless otherwise noted this warranty agreement is the only warranty agreement between the parties. This agreement states the limits and association of risk between the two parties. By use of the and accessories the customer acknowledges understanding of this warranty and agreement and binding to the terms contained within. 13

16
Product Overview. Features
 APCF1 Model Tripod Product Overview The Ravelli APCF1 is a Professional Quality Carbon Fiber Tripod providing a solid base for high-end photographic equipment. This model is a mix of carbon fiber and magnesium
RS-600AF-V2 RS-850AF-V2. Camera. Track Slider. with Adjustable Feet
 RS-600AF-V RS-850AF-V Camera Track Slider with Adjustable Feet Warnings Please read and follow these instructions, and keep this manual in a safe place. Handle the unit with care. The camera sliding rail
Tripod System. With fluid Head USER S GUIDE
 Tripod System With fluid Head USER S GUIDE ATTENTION To ensure the best performance of your EVO PRO Fluid Head, each time you set it up, dial back the Pan and Tilt Drag knobs to their lowest resistance
Table of Contents. About the Free Spirit Handheld Camera Stabilizer 2. Free Spirit Component Parts 3. Free Spirit Key Features 4
 Table of Contents About the Handheld Camera Stabilizer 2 Component Parts 3 Key Features 4 Using the Camera Stabilizer 5 Attaching your camera to the 5 Achieving balance with your camera 6 Horizontal Balance
C-pan arm USERS INSTRUCTIONS
 C-pan arm USERS INSTRUCTIONS Designed 1 of 12 and made in Denmark Thanks for purchasing a 9.Solutions product. With great passion, we design our products to be as versatile as possible. We hope that our
DSLR Video Shoulder Mount Rig (FC-55)
") DSLR Video Shoulder Mount Rig (FC-55) INSTRUCTION MANUAL All rights reserved. No part of this document may be reproduced, stored in a retrieval system, or transmitted by any form or by any means, electronic,
DSLR Video Shoulder Mount Rig (FC-55) INSTRUCTION MANUAL All rights reserved. No part of this document may be reproduced, stored in a retrieval system, or transmitted by any form or by any means, electronic,
Wall. No opening (Example: LA-030-W)
") Thank you very much for choosing an EIZO product. Please read this User s Manual carefully to familiarize yourself with safe and effective usage procedures. Please retain this manual for future reference.
Thank you very much for choosing an EIZO product. Please read this User s Manual carefully to familiarize yourself with safe and effective usage procedures. Please retain this manual for future reference.
AVT Model Tripod.
 AVT Model Tripod www.ravelliphoto.com Product Overview: The Ravelli AVT professional tripod is a high performance, fluid drag tripod that provides smooth continuous drag control and operates on both pan
Monitor Mount with Articulating Arm and Laptop Riser
 Monitor Mount with Articulating Arm and Laptop Riser ARMUNONB *actual product may vary from photos FR: Guide de l utilisateur - fr.startech.com DE: Bedienungsanleitung - de.startech.com ES: Guía del usuario
Lotus DX. sit-stand workstation. assembly and operation instructions. MODEL # s: LOTUS-DX-BLK LOTUS-DX-WHT
 Lotus DX assembly and operation instructions sit-stand workstation MODEL # s: LOTUS-DX-BLK LOTUS-DX-WHT safety warnings 13.6 Kg 30 lbs. 2.2 Kg 5 lbs. safety instructions/warning Read and follow all instructions
RS-600AF RS-850AF RS-1200AF. Camera. Track Slider. With Adjustable Feet
 Camera Track Slider With Adjustable Feet RS-600AF RS-850AF RS-00AF Congratulations on your purchase of the Revo Camera Track Slider. Revo s camera track slider is a sturdy, portable, and lightweight mini
OWNER S MANUAL RLE-382 AMERICA S PREMIER EXERCISE EQUIPMENT. Seated leg ext / curl bench RLE-382 L 61 W 44 H 38
 OWNER S MANUAL RLE-382 Seated leg ext / curl bench AMERICA S PREMIER EXERCISE EQUIPMENT RLE-382 L 61 W 44 H 38 RLE-382 Rev1 Revision Date 9-11-2008 Introduction About the RLE-382 Seated leg ext/curl bench
Everything in its place. OWNER S MANUAL. TRINITY 56 ROLLING WORKBENCH STAINLESS STEEL Model # TLS-4804 (Stainless Body) TLS-4805 (Black Body)
 TLS-4805 (Black Body)") Everything in its place. OWNER S MANUAL TRINITY 56 ROLLING WORKBENCH STAINLESS STEEL Model # TLS-4804 (Stainless Body) TLS-4805 (Black Body) PARTS LIST Your TRINITY 56in Stainless Steel Workbench should
Everything in its place. OWNER S MANUAL TRINITY 56 ROLLING WORKBENCH STAINLESS STEEL Model # TLS-4804 (Stainless Body) TLS-4805 (Black Body) PARTS LIST Your TRINITY 56in Stainless Steel Workbench should
GH-30. Gimbal Head. You re on steady ground
 GH-30 Gimbal Head You re on steady ground 1 INTRODUCTION Thank You for choosing Oben! The Oben GH-30 is a gimbal-type tripod head designed to balance a lens along its vertical and horizontal axes. The
Advanced Camcorder Support System. Instruction Manual
 Advanced Camcorder Support System Instruction Manual PAG ORBITOR Advanced Camcorder Support System Instruction Manual CONTENTS SECTION PAGE 1 SAFETY 2 2 ASSEMBLY & OPERATION 3 3 PARTS AND ASSEMBLIES 9
with External Springs
 Two-Section Broadcast Arm with External Springs Owner s Manual Introduction Thank you for choosing the Auray two-section broadcast arm with external springs. This versatile and sturdy broadcast arm is
AMERICA S PREMIER EXERCISE EQUIPMENT RAB-336. Abdominal / Back Bench. TuffStuff Fitness Equipment, Inc. 46" 61 3/4" 44 1/4"
 A S S E M B L Y I N S T R U C T I O N S 46" 44 1/4" 61 3/4" RAB-336 Abdominal / Back Bench TuffStuff Fitness Equipment, Inc. 25 E. Franklin Avenue Pomona, CA 91766, USA Ph: 909-629-1600 Fax: 909-629-4967
SP-C1 Mobile Docking Station Installation Guide
 SP-C1 Mobile Docking Station Installation Guide Box Contents After you unpack your SP-C1 Mobile Docking Station, make sure everything here is included: 1 x Docking Cradle 1 x Audio Cable 1 x Adhesive Mount
Titan Media Cart. Installation and Operation Manual
 Titan Media Cart Installation and Operation Manual Table of Contents INTRODUCTION SERVICE AND SUPPORT... 1 PRODUCT RETURNS... 1 UNPACKING... 1 TITAN SINGLE MEDIA CART... 2 TITAN DUAL MEDIA CART... 2 BEFORE
Extra Large Full Motion TV Mount for Televisions
 8008981 TV Size Range: 47 ~ 84 Maximum Weight Capacity: 60 kg/132 lbs Maximum Mounting Pattern: 800 mm x 600 mm (31.4 x 23.6 ) Distance to the Wall: 5.5-45 cm Extra Large Full Motion TV Mount for 47-84
OWNER S MANUAL AMERICA S PREMIER EXERCISE EQUIPMENT RLM-855WS. Lat Machine W/200 Lbs Steel Weight Stack 83 1/2" 64 3/4" 45 1/4"
 OWNER S MANUAL 83 1/2" RLM-8WS 4 1/4" 64 3/4" Lat Machine W/200 Lbs Steel Weight Stack AMERICA S PREMIER EXERCISE EQUIPMENT RLM-8WS Rev0 Revision Date -30-2007 Introduction About the Lat Machine W/200
SAVE THESE INSTRUCTIONS
 and Height Mounts Assembly, Installation and Operating Instructions Model Nos. QL, QLA, ARM250, QLM6 and QLAM6 NOTE: Check all parts for shipping damage. In case of shipping damage, DO NOT use. Contact
Vortex Series 2-leg Desk Assembly Guide
 ELECTRIC HEIGHT-ADJUSTED SIT TO STAND DESK Vortex Series 2-leg Desk Assembly Guide For desk with underframe Model No. AL4628-XX REV-1509A Table of Contents IMPORTANT SAFETY INSTRUCTIONS... 3 CAUTION, USE
DUAL-ARM MONITOR MOUNT For in. ( cm) desktop computer monitors
 desktop computer monitors") LeviTouch DM-502 DUAL-ARM MONITOR MOUNT For 15 27 in. (38.1 68.6 cm) desktop computer monitors User Manual Thank you for choosing Gabor. The Gabor Dual-Arm Desktop Mount can securely support two monitors
LeviTouch DM-502 DUAL-ARM MONITOR MOUNT For 15 27 in. (38.1 68.6 cm) desktop computer monitors User Manual Thank you for choosing Gabor. The Gabor Dual-Arm Desktop Mount can securely support two monitors
TAKAMA FLIP-ZIP INTRODUCTION. KEY FEATURES (Illustration - 1) MULTI-FUNCTIONAL TRIPOD MONOPOD KIT. Thanks for choosing Takama!
 MULTI-FUNCTIONAL TRIPOD MONOPOD KIT. Thanks for choosing Takama!") FLIP-ZIP TAKP4H58 TAKAMA FLIP-ZIP MULTI-FUNCTIONAL TRIPOD MONOPOD KIT INTRODUCTION Thanks for choosing Takama! The perfect hybrid accessory for photo and video cameras, this unique tripod will bring stability
FLIP-ZIP TAKP4H58 TAKAMA FLIP-ZIP MULTI-FUNCTIONAL TRIPOD MONOPOD KIT INTRODUCTION Thanks for choosing Takama! The perfect hybrid accessory for photo and video cameras, this unique tripod will bring stability
USER S GUIDE. DVD401 Road Warrior. Making Your Mobile Life Easier. Portable DVD Player Case. Making Your Mobile Life Easier.
 DVD401 Road Warrior Portable DVD Player Case Making Your Mobile Life Easier. Visit our Web site at: www.targus.com Features and specifications are subject to change without notice. 2003 Targus Corp. 400-0121-001A
MANUAL. Set-up and Operations Guide Glidecam Industries, Inc. 23 Joseph Street, Kingston, MA Customer Service Line
 MANUAL Set-up and Operations Guide Glidecam Industries, Inc. 23 Joseph Street, Kingston, MA 02364 Customer Service Line 1-781-585-7900 Manufactured in the U.S.A. COPYRIGHT 2015 GLIDECAM INDUSTRIES,Inc.
DSLR Camera Cage Shoulder Rig Kit (FC-03)
") FILMCITY DSLR Camera Cage Shoulder Rig Kit 1 DSLR Camera Cage Shoulder Rig Kit (FC-03) I N S T R U C T I O N M A N U A L All rights reserved. No part of this document may be reproduced, stored in a retrieval
FILMCITY DSLR Camera Cage Shoulder Rig Kit 1 DSLR Camera Cage Shoulder Rig Kit (FC-03) I N S T R U C T I O N M A N U A L All rights reserved. No part of this document may be reproduced, stored in a retrieval
Shoulder Support System
 SR-500 Video Shoulder Support System Thank you for choosing Revo and congratulations on your purchase of the Revo SR-500 Video Shoulder Support System. The Revo Video Shoulder Support System is a lightweight,
POWER DSLR Camera Cage Shoulder Rig Kit
 FILMCITY POWER SHOULDER RIG 1 POWER DSLR Camera Cage Shoulder Rig Kit I N S T R U C T I O N M A N U A L All rights reserved. No part of this document may be reproduced, stored in a retrieval system, or
Installation and User Guide
 Installation and User Guide VADDIO DOMEVIEW HD INDOOR PENDANT MOUNT DOME ENCLOSURE FOR THE VADDIO HD-20, HD-19 AND HD-18 PTZ CAMERAS Part Number: 998-9100-200 2011 Vaddio - All Rights Reserved DomeVIEW
TV & Office Solutions by equip solutions with a high value of benefit
 TV & Office Solutions by equip solutions with a high value of benefit The brand equip stands for a product development driven by quality management and continuous adjustments to the requirements of the
9ft Jib Arm with Tripod (P-9-TS)
") 9ft Jib Arm with Tripod (P-9-TS) I NSTRUC TI ON MANUA L All rights reserved. No part of this document may be reproduced, stored in a retrieval system, or transmitted by any form or by any means, electronic,
9ft Jib Arm with Tripod (P-9-TS) I NSTRUC TI ON MANUA L All rights reserved. No part of this document may be reproduced, stored in a retrieval system, or transmitted by any form or by any means, electronic,
GLIDECAM CAMCRANE 200TM. Set-up and Operations Guide
 GLIDECAM CAMCRANE 200TM Set-up and Operations Guide Glidecam Industries, Inc. 23 Joseph Street, Kingston, MA 02364 Customer Service Line (781) 585-7900 Manufactured in the U.S.A. COPYRIGHT 2000-2008 GLIDECAM
AUREOL RECESSED BEAMSHAPER OPERATION MANUAL
 AUREOL RECESSED BEAMSHAPER OPERATION MANUAL Thank you for purchasing an Aureol Recessed BeamShaper. We have designed this luminaire to provide superior performance in design and engineering and we are
DSLR Gear Head ( FC-GR-H)
") DSLR Gear Head ( FC-GR-H) I N STRUC TI ON MANUAL Fo r d e m o n s t ra t i o n p u r p o s e o n l y All rights reserved No part of this document may be reproduced, stored in a retrieval system, or transmitted
DSLR Gear Head ( FC-GR-H) I N STRUC TI ON MANUAL Fo r d e m o n s t ra t i o n p u r p o s e o n l y All rights reserved No part of this document may be reproduced, stored in a retrieval system, or transmitted
UWL-400F Wide Angle Lens
 Fantasea Line UWL-400F Wide Angle Lens Cat. No. 5140 Instruction Manual 1 DISCLAIMER While every effort has been made in order to ensure that the information included in this instruction manual is accurate
MD-BD13B / DUAL SEGMENT TWIN-ARM. For (33-69 cm) LCD desktop computer monitors. User Manual
 LCD desktop computer monitors. User Manual") MD-BD13B / DUAL SEGMENT TWIN-ARM MONITOR mount For 13 27 (33-69 cm) LCD desktop computer monitors User Manual Thank you for choosing Gabor. The Gabor MD-BD13B mounts two 13 27 (33 69 cm) LCD computer monitors
MD-BD13B / DUAL SEGMENT TWIN-ARM MONITOR mount For 13 27 (33-69 cm) LCD desktop computer monitors User Manual Thank you for choosing Gabor. The Gabor MD-BD13B mounts two 13 27 (33 69 cm) LCD computer monitors
AMT-12 AMT-15. Professional Loudspeakers. Installation and Use Manual
 AMT-12 AMT-15 Professional Loudspeakers Installation and Use Manual 2008 Bogen Communications, Inc. Specifications subject to change without notice. 54-2183-01C 0907 Table of Contents Introduction 2 Speaker
3M Cross-Connect Cabinet Riser Installation Guide
 3M Cross-Connect Cabinet Riser Installation Guide Installing riser in stake, hand hole and pad-mount applications Instructions October 2016 78-0015-3063-9-B 2 October 2016 78-0015-3063-9-B Contents 1.
ATV Single Gang Disc Harrow OWNER S MANUAL
 ATV Single Gang Disc Harrow OWNER S MANUAL WARNING: Read carefully and understand all ASSEMBLY AND OPERATION INSTRUCTIONS before operating. Failure to follow the safety rules and other basic safety precautions
PIM-Mini Pulsed Current Source Operation Manual
 PIM-Mini Pulsed Current Source Operation Manual Directed Energy, Inc. 1609 Oakridge Dr., Suite 100, Fort Collins, CO 80525 (970) 493-1901 sales@ixyscolorado.com www.ixyscolorado.com Manual Document 7650-0007
Supports. Tripods. camera should be equipped with a quick-release plate. This saves much time.
 Tripods Tripods ensure excellent shots when persons move, in case of long distances, (self-) portraits or horizontal tilts and vertical pans. If you use several cameras together with one tripod, every
RV LEVELING SYSTEM AUTO LEVEL SYSTEM WARNING! FAILURE TO ACT IN ACCORDANCE WITH THE FOLLOWING MAY RESULT IN SERIOUS PERSONAL INJURY OR DEATH.
 RV LEVELING SYSTEM AUTO LEVEL SYSTEM WARNING! FAILURE TO ACT IN ACCORDANCE WITH THE FOLLOWING MAY RESULT IN SERIOUS PERSONAL INJURY OR DEATH. THE USE OF THE GROUND CONTROL AUTO LEVELING SYSTEM TO SUPPORT
DSLR Camera Cage Carbon Fiber Shoulder Rig Kit ( FC-02-CF )
") FILMCITY DSLR Camera Cage Carbon Fiber Shoulder Rig Kit 1 DSLR Camera Cage Carbon Fiber Shoulder Rig Kit ( FC-02-CF ) I N S T R U C T I O N M A N U A L All rights reserved. No part of this document may
FILMCITY DSLR Camera Cage Carbon Fiber Shoulder Rig Kit 1 DSLR Camera Cage Carbon Fiber Shoulder Rig Kit ( FC-02-CF ) I N S T R U C T I O N M A N U A L All rights reserved. No part of this document may
All rights reserved. No part of this document may be reproduced, stored in a retrieval system, or transmitted by any form or by any means,
 Gripper Car Sucti on Mount G-10 I NSTRUC TI ON MANUA L All rights reserved. No part of this document may be reproduced, stored in a retrieval system, or transmitted by any form or by any means, electronic,
AMERICA S PREMIER EXERCISE EQUIPMENT RCD-347. Chin-Dip / Ab-Back / Push-Up Stand. TuffStuff Fitness Equipment, Inc. 83 3/4" 43 1/4" 44 3/4"
 ASSEMBLY INSTRUCTIONS 83 3/4" RCD-347 44 3/4" 43 1/4" Chin-Dip / Ab-Back / Push-Up Stand TuffStuff Fitness Equipment, Inc. 1325 E. Franklin Avenue Pomona, CA 91766, USA Ph: 909-629-1600 Fax: 909-629-4967
Fabric Rain Cover RC-FC500 RC-FC500B. for Canon and select Nikon DSLRs. Fits lenses from 7 14 long and lens diameters of
 RC-FC500 RC-FC500B Fabric Rain Cover for Canon and select Nikon DSLRs Fits lenses from 7 14 long and lens diameters of 4 4.5 User Manual Thank you for choosing Ruggard. Designed for use with longer lenses,
3500 Series Tripod Kit
 3500 Series Tripod Kit You re on steady ground 1 INTRODUCTION Thank You for choosing Oben! This versatile and durable Oben tripod and ballhead is a compact and lightweight kit that sets up quickly, folds
ALS Model Light Stand
 ALS Model Light Stand Product Overview: The completely redesigned Ravelli ALS model light stand is 10' tall. It is comprised of one stand with a reversible adapter and includes a heavy duty carry bag.
Introduction...1. Package Contents... 1 Product Features... 1 Specifications Product Schematic...2. HDD Installation...3
 1 Table of Contents Introduction...1 Package Contents... 1 Product Features... 1 Specifications... 1 Product Schematic...2 HDD Installation...3 Connecting to your Computer...6 Connecting to Mac...7 Connecting
OWNER S MANUAL AMERICA S PREMIER EXERCISE EQUIPMENT RHE-340. Adjustable Hyper Extension Bench 31 1/4" 49 3/4" 33 3/4"
 OWNER S MANUAL 1/4" 49 3/4" 3/4" RHE-0 Adjustable Hyper Extension Bench AMERICA S PREMIER EXERCISE EQUIPMENT RHE-0 Rev0 Revision Date 3-26-2007 About the Adjustable Hyper Extension Bench RHE-0 Congratulations
MESACONTRACT i n c o r p o r a t e d
 MESACONTRACT PRICE LIST & ORDERING INFORMATION AUGUST 2007 Terms and Conditions of Sale Credit terms: Terms are net 30 days of shipment, with approved credit. Cash discount of 1% if paid in 10 days. A
WCC100 IN-VEHICLE CHARGING CRADLE OWNER S MANUAL
 WCC100 IN-VEHICLE CHARGING CRADLE OWNER S MANUAL 128-9237B WCC100 In-Vehicle Charging Cradle 12 03 13.indd 1 12/4/2013 10:38:04 AM 128-9237B WCC100 In-Vehicle Charging Cradle 12 03 13.indd 2 12/4/2013
PD10. Pulse Divider Instructions PROUDLY MADE IN THE USA
 PD10 Pulse Divider Instructions PROUDLY MADE IN THE USA ISO 001:200 Certified Company General Information General Information...Page 3 Features...Page 3 Specifications...Page 4 Installation Mounting...Page
User Guide. Control Box. RoscoLED TM.
 RoscoLED TM Control Box User Guide This guide applies to the following RoscoLED Control Box models: RoscoLED Control Box 300W/Static White (293 22250 0000) RoscoLED Control Box 400W/VariWhite (293 22260
PSA200 User s Manual
 2011 Visionary Solutions, Inc. All rights reserved. Please visit the support section of our website at www.vsicam.com for manuals, other documentation, and software downloads. Visionary Solutions, Inc.
Gripper Campod Suction Car Mount (G-51)
") Gripper Campod Suction Car Mount (G-51) I NSTRUC TI ON MANUA L All rights reserved. No part of this document may be reproduced, stored in a retrieval system, or transmitted by any form or by any means,
Gripper Campod Suction Car Mount (G-51) I NSTRUC TI ON MANUA L All rights reserved. No part of this document may be reproduced, stored in a retrieval system, or transmitted by any form or by any means,
B/W PAN/TILT FIXED DOME CAMERA
 B/W PAN/TILT FIXED DOME CAMERA OWNER S MANUAL INSTALLATION AND OPERATION MODEL: BEFORE INSTALLING OR OPERATING THE SYSTEM, PLEASE READ THIS MANUAL. CA1022 Important Safety Instructions Remove all packaging
Breeze Film Shooting Equipment (P-W5P-BRZ) I N STR UC TI ON MANUAL
 I N STR UC TI ON MANUAL") Breeze Film Shooting Equipment (P-W5P-BRZ) I N STR UC TI ON MANUAL All rights reserved No part of this document may be reproduced, stored in a retrieval system, or transmitted by any form or by any means,
Breeze Film Shooting Equipment (P-W5P-BRZ) I N STR UC TI ON MANUAL All rights reserved No part of this document may be reproduced, stored in a retrieval system, or transmitted by any form or by any means,
Owner s Manual. TSD-ZDC Audio Impedance Combiner/Divider. TSD-ZDC Audio Impedance Combiner/Divider. AtlasIED.com
 Owner s Manual 1 AtlasIED.com Owner s Manual Description The AtlasIED is a universal impedance divider/combiner for passively summing or splitting of mic or line level signals. Features include four balanced
OWNER & OPERATOR INSTRUCTION MANUAL
 For service contact: German Knife Inc. -00-00- www.turboairinc.com OWNER & OPERATOR INSTRUCTION MANUAL Model No. GBS-0S IMPORTANT SAFETY NOTICE To ensure safe and trouble free performance of you new German
MD-BSL15W / SPRING-LOADED TWIN-ARM. For ( cm) LCD desktop computer. User Manual
 LCD desktop computer. User Manual") MD-BSL15W / SPRING-LOADED TWIN-ARM MONITOR mount For 15 27 (38.1 68.6 cm) LCD desktop computer User Manual Thank you for choosing Gabor. The Gabor MD-BSL15W mounts two 15 27 (38.1 68.6 cm) LCD computer
MD-BSL15W / SPRING-LOADED TWIN-ARM MONITOR mount For 15 27 (38.1 68.6 cm) LCD desktop computer User Manual Thank you for choosing Gabor. The Gabor MD-BSL15W mounts two 15 27 (38.1 68.6 cm) LCD computer
Vacuum Tubes Power Supply Unit. for WA7 and WA7d Fireflies. Owner s Manual. Please review this manual before operating your WOO AUDIO product.
 WOO AUDIO WA7tp Vacuum Tubes Power Supply Unit for WA7 and WA7d Fireflies Owner s Manual Please review this manual before operating your WOO AUDIO product. Inc. All rights reserved. www.wooaudio.com Rev
DSLR Camera Cage Shoulder Rig Kit
 DSLR Camera Cage Shoulder Rig Kit I N S T R U C T I O N M A N U A L All rights reserved. No part of this document may be reproduced, stored in a retrieval system, or transmitted by any form or by any means,
Owner s Manual. TSD-DCPDV DC Power Distribution with Fixed & Variable Outputs. TSD-DCPDV DC Power Distribution. AtlasIED.com
 Owner s Manual with Fixed & Variable Outputs 1 AtlasIED.com Owner s Manual Description The AtlasIED Variable Block is designed to reduce cost and wiring clutter in installations where multiple DC power
SATA II HDD Canister KISS DA 435 Quick Reference Guide
 SATA II HDD Canister KISS DA 435 Quick Reference Guide If it s embedded, it s Kontron 1. Table of Contents SATA II HDD Canister KISS DA 435 1. Table of Contents 1. Table of Contents... 1 2. Important Information...
SpectroLED STUDIO 800/1200 LED LIGHT USER MANUAL
 SpectroLED STUDIO 800/1200 LED LIGHT USER MANUAL SpectroLED INTRODUCTION THANK YOU FOR CHOOSING GENARAY The Genaray SpectroLED Studio Lights provide bright, continuous light with flicker-free dimming for
OPERATION MANUAL SERIES BORESCOPES INSTRUMENT TECHNOLOGY, INC. POB 381, Westfield, MA Airport Road, Westfield, MA 01085
 OPERATION MANUAL SERIES 123000 BORESCOPES INSTRUMENT TECHNOLOGY, INC. POB 381, Westfield, MA 01086 33 Airport Road, Westfield, MA 01085 Tel: (413) 562-3606 Fax: (413) 568-9809 Email: iti@scopes.com www.scopes.com
Drive 3G-S ENGLISH. Cellular Signal Booster A Customer Support: Mon-Fri 8 am to 6 pm.
 ENGLISH Drive 3G-S Cellular Signal Booster A512626 ENGLISH!! IT IS VERY IMPORTANT TO POWER YOUR SIGNAL BOOSTER USING A SURGE PROTECTED AC POWER STRIP WITH AT LEAST A 1000 JOULE RATING. FAILURE TO DO THIS
9.5 Dual-Sided Wall Mount LED Lighted Mirror, 1x/10x
 9.5 Dual-Sided Wall Mount LED Lighted Mirror, 1x/10x MLW45 Series Before using please read the instruction manual and keep it for future use. WALL MOUNT VANITY MIRROR Ovente mirrors are equipped with energy-saving
Power Series Camera Support
 Power Series Camera Support Power Jib Power Column Power Dolly Power Series Camera Support Equipment Assembly Manual Remark: Before assemble the jib, please check the inventory and read this manual carefully
Operators Guide. Vision 8 Pan & Tilt Head. Vinten Camera Control Solutions
 Operators Guide Vision 8 Pan & Tilt Head Vinten Camera Control Solutions Vision 8 Pan and Tilt Head Publication Part No. 3441-8 Issue 4 Copyright Vinten Broadcast Limited 2004 All rights reserved throughout
Hi-Tech Transport Electronics, Inc. DUAL LEVELING VALVE PROCESSOR INSTALLATION MANUAL. For the 4600 Scale System For the 5600 Scale System
 Hi-Tech Transport Electronics, Inc. DUAL LEVELING VALVE PROCESSOR INSTALLATION MANUAL For the 4600 Scale System For the 5600 Scale System September 1999 THE ACCURATE ON-BOARD ELECTRONIC SCALE For Air-Ride
MFJ ENTERPRISES, INC.
 Model MFJ-1142 INSTRUCTION MANUAL CAUTION: Read All Instructions Before Operating Equipment MFJ ENTERPRISES, INC. 300 Industrial Park Road Starkville, MS 39759 USA Tel: 662-323-5869 Fax: 662-323-6551 VERSION
Atlona 7 PRO HD Monitor with HDMI, VGA and Component Inputs
 AT-DIS7-PROHD User Manual Table of Contents 1. Introduction... 3 2. Applications... 3 3. Package Contents... 3 4. Features... 4 5. Specification... 4 6. Operation Controls and Functions a. Front Panel...
User Manual. Setup and Adjustment
 User Manual Setup and Adjustment Easyrig 3 with Gimbal Rig Specifications Model of Easyrig 1/4 in. screw-holder Suspension line Camera hook Serial no. Side support adjustment Support arm Adjustment knobs
OPERATION MANUAL SERIES MICRO BORESCOPES INSTRUMENT TECHNOLOGY, INC. POB 381, Westfield, MA Airport Road, Westfield, MA 01085
 OPERATION MANUAL SERIES 124000 MICRO BORESCOPES INSTRUMENT TECHNOLOGY, INC. POB 381, Westfield, MA 01086 33 Airport Road, Westfield, MA 01085 Tel: (413) 562-3606 Fax: (413) 568-9809 Email: iti@scopes.com
TH ST N OAK PARK HEIGHTS, MN P F
 12430 55 TH ST N OAK PARK HEIGHTS, MN 55082 P 651-342-1756 F 651-342-1293 INFO@DIACRO.COM SAFETY INFORMATION PG. 3 TECHNICAL DATA PG. 3 FORMING CIRCLES PG. 4 SHAPING METAL PG. 5 #24 ROLLER BREAKDOWN AND
Instruction Guide. Removable Drive Drawer With Shock Absorbers for 3.5 IDE Hard Drive DRW110ATA DRW110ATABK DRW113ATA DRW113ATABK
 REMOVABLE HARD DRIVE DRAWER Removable Drive Drawer With Shock Absorbers for 3.5 IDE Hard Drive DRW110ATA DRW110ATABK DRW113ATA DRW113ATABK Instruction Guide * Actual product may vary from photo *DRW110ATA
PCM-7140 Pulsed Current Source Operation Manual
 PCM-7140 Pulsed Current Source Operation Manual Directed Energy, Inc. 1609 Oakridge Dr., Suite 100, Fort Collins, CO 80525 (970) 493-1901 sales@ixyscolorado.com www.ixyscolorado.com Manual Document 7650-0031
Table of Contents: TOPIC: Safe Operation: READ THIS FIRST Page: 3 Warranty 4 Specifications 4 Installation 5-7 Operating Instructions 8 Parts Diagram
 INSTALLATION & OPERATIONS MANUAL FlexArm B-19 FlexArm Inc. Division of Midwest Specialties, Inc. 851 Industrial Drive Wapakoneta, Ohio 45895 419-738-8147 Book Part No 360740 12/2014 1 Table of Contents:
SKIVING MACHINE MAINTENANCE & INSTRUCTIONS MANUAL ASSK2. Allswage UK. Roebuck Street, West Bromwich, B70 6RB
 SKIVING MACHINE ASSK2 MAINTENANCE & INSTRUCTIONS MANUAL A. WARRANTY AND RESPONSIBILITY Warranty: It's the supplier's responsibility to guarantee the conformity of the product, assuring that it's manufactured
Rackmount Keyboard Installation Instructions. Revision A A-0000
 Rackmount Keyboard Installation Instructions Revision A 22000200A-0000 WARRANTY The following is an abbreviated version of warranty policy for keyboard products. For a complete warranty statement, contact
CUBE Micro Station User Guide
 CUBE Micro Station User Guide Models TVS10AC CUBE Micro Station - User Guide 1 of 23 How To Use This Guide This User Guide is a resource to provide you guidelines and best practices as you begin using
Digital Menu Board Wall Mount Installation Instructions
 Digital Menu Board Wall Mount Installation MDSWMB2T4249 MDSWMB3T4249 www.microndisplaysolutions.com Table of Contents Important Safety... 3 Models and Specifications... 4 Package Contents... 5 Step 1 Two(2)
STANDS Speaker Television. All-Steel Speaker Stand SS7725B (page 82)
") STANDS Speaker Television SS8800B+ Power Crank-Up Speaker Stand 80 (page 82) All-Steel Speaker Stand SS7725B 1 2 4 7 1 Cl assic Speaker Stand SS7730B 1 0 6 4 9 Upper Shaft Tubing: 1.375"or 1.5" Upper Shaft
STANDS Speaker Television SS8800B+ Power Crank-Up Speaker Stand 80 (page 82) All-Steel Speaker Stand SS7725B 1 2 4 7 1 Cl assic Speaker Stand SS7730B 1 0 6 4 9 Upper Shaft Tubing: 1.375"or 1.5" Upper Shaft
CubePro. Main PCB Replacement Guide. Prosumer 3D Printer. Original Instructions
 CubePro Prosumer 3D Printer Main PCB Replacement Guide Original Instructions 1 INTRODUCTION COPYRIGHT 2014 by All rights reserved. This document is subject to change without notice. This document is copyrighted
DSLR Camera Cage Shoulder Rig Kit
 DSLR Camera Cage Shoulder Rig Kit I N S T R U C T I O N M A N U A L For de monstratio n only All rights reserved. No part of this document may be reproduced, stored in a retrieval system, or transmitted
i-series Videoconference Fixture
 TM i-series Videoconference Fixture Operating Instructions 580 Mayer Street, Building #7, Bridgeville, PA 15017 phone 412.206.0106 fax 412.206.0146 www.brightlines.com 2013 Brightline, L.P. Safety To prevent
PREFACE. Thank you for choosing Zen Space Desks. We hope your desk helps you find your zen when being used. Zen Space Desks Team
 INSTRUCTION MANUAL PREFACE We are thrilled that you have chosen Zen Space. Congratulations, you have selected one of the most advanced and sophisticated Power Adjustable Workstations available today. Our
Spotting Scope Instruction Manual
 Spotting Scope Instruction Manual Model#s : 841100 / 841101 Lit. #: 98-0080 / 11-09 1 SETUP and OPERATION Congratulations on the purchase of your Simmons spotting scope, a versatile high-performance spotting
INSTALLATION AND USER GUIDE 2800MWB SINGLE LINE BASIC FEATURE TELEPHONE
 INSTALLATION AND USER GUIDE 2800MWB SINGLE LINE BASIC FEATURE TELEPHONE TeleMatrix Copyright 2005 COMPLIANCE AND SAFETY As specified by FCC regulation, we are required to inform you of specific governmental
MP3 Speaker USER GUIDE
 MP3 Speaker USER GUIDE Jazwares, Inc. 2012 CONTENTS Please read the instructions along with the Speaker carefully before you use it, so that you can operate it conveniently. WELCOME, Warnings & Safety
MESACONTRACT PRICE LIST & ORDERING INFORMATION FEBRUARY To Order: Phone: Fax:
 MESACONTRACT i n c o r p o r a t e d PRICE LIST & ORDERING INFORMATION FEBRUARY 2005 Terms and Conditions of Sale Credit terms: Terms are net 30 days of shipment, with approved credit. Cash discount of
CTT Section Carbon-Fiber Tabletop Tripod. You re on steady ground 1
 CTT-1000 3-Section Carbon-Fiber Tabletop Tripod You re on steady ground 1 INTRODUCTION Thank you for choosing Oben! The Oben CTT tripod is a sturdy and high-quality carbon-fiber tabletop tripod that provides
5.25in Bay IDE Hard Drive Mobile Rack
 5.25in Bay IDE Hard Drive Mobile Rack DRW110ATA / DRW110ATABK *DRW110ATABK shown *actual product may vary from photos DE: Bedienungsanleitung - de.startech.com FR: Guide de l'utilisateur - fr.startech.com
RAS REFLECTOR ADAPTER FOR SPEEDLIGHT
 RAS REFLECTOR ADAPTER FOR SPEEDLIGHT INTRODUCTION Thank you for choosing the Raya Reflector Adapter for Speedlight. This kit enables you to securely mount flashes of all sizes to a softbox using its built-in
MICROPHONE stands & accessories
 MICROPHONE stands & accessories 03 Microphone Stands & Accessories 300 SERIES MICROLITE MICROPHONE STANDS - Constructed with strong, lightweight Microlite tubular steel - Fast, smooth, non-slip boom swivel
TDM-150 TIMER DISPLAY
 TDM-150 TIMER DISPLAY TECHNICAL MANUAL Covers TDM-150D, TDM-150F Version 1.1 August 2016 Safety Precautions Caution Read Instructions: Read and understand all safety and operating instructions before using