Rapid deployment surveillance system
|
|
|
- Jessica Townsend
- 6 years ago
- Views:
Transcription

1 Rapid deployment surveillance system
2 Table of contents Camera Kit Contents... 2 System Requirements and Compatibility... 3 General Information... 3 Battery Life... 3 Quick Start Guide... 4 Camera Overview... 5 Installation... 8 Battery and Memory Installation... 9 Viewing and Deleting Files Advanced Instructions / Camera Setup and Programming CanCam Features and Specification Camera Kit Contents CanCam Instruction Manual Strap USB Cable AV Cable Wall Bracket and Screws SD Card Mains Adaptor 4 x C Cell Batteries (Installed) 2
3 System Requirements and Compatibility Windows XP/Vista/Windows 7 and MAC 10.6 or above Pentium 4, 2GHz or above 1GB RAM (2GB recommended) 32 bit colour, Resolution 800x600 or above w/ 256MB 2GB free hard disc space USB 1.1 port (USB 2.0 recommended) Direct X 9.0 or above NOTE: If there any questions regarding PC specifications please contact the PC s manufacturer. General Information Care instructions The camera is designed to be weather proof however never attempt to immerse the unit in water or any other type of liquid. This will damage the unit and void the warranty. Do not attempt to enter the internal workings of CanCam as this could cause serious damage and invalidate the warranty. Storage and operating environment : -10 to 40 C Take the batteries out when the camera is not in use over extended periods of time. Do not mix new and old batteries. Battery Life Potential operational battery life Max Number of Triggers/Hour Sleep mode setting 10mins 6mins 3mins 2mins Day Video (30s) max days Night Video (30s) max days Day Still - 3 shot burst max days Night Still - 3 shot burst max days Day Still - 9 shot burst max days Night Still - 9 shot burst max days
4 Quick Start Guide This guide is designed to get the camera up and running in a matter of moments. To get the most out of the CanCam and obtain a full understanding of its wide range of options, please read the manual thoroughly before operating. Quick Start-up: Pull battery tab to activate batteries / Install 4 C cell batteries in correct polarity (+/-) as indicated in the battery compartment. Insert SD card into the camera. Turn switch to CAM to adjust the Time and Date. The internal LCD screen displays T blinking. Press the [OK] button to start the Time settings. Press the [UP] or [DN] button to adjust the Minute setting and press [OK] to confirm and move to the Hour setting. Repeat to set the Hour and then press [OK] to confirm and move to Date. Adjust the Month, Day, and Year by using [UP] or [DN] button. Each time you finish an adjustment you MUST press the [OK] button to confirm and move to the next field for adjustment. Once done, the word - del - will be blinking, this stands for Delete menu and will allow you to format your SD Card. (This will delete ALL images). Press the [M] button to exit. Select PSET (or CAM to input customised settings, see advanced programming) PSET P-SET This bypasses all user defined settings and uses the following settings: (PIR mode / Resolution: 3MP / Burst: 3P / Time out: 30 seconds) Factory Default Settings: Time Out: 30 Sec Burst Mode: 3 Still Image Resolution: 3M Operation Mode: PIR Video Mode: 10 Seconds (VGA Resolution) Time lapse setting: 19:00-07:00 (Next day) 4


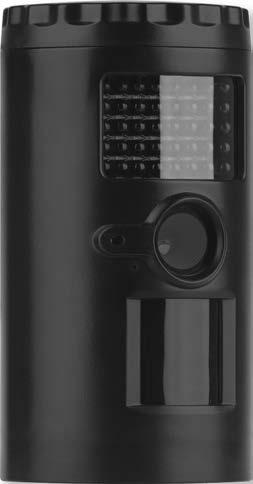
5 Camera Overview Front View 1 Batteries Cover : Turn to open the cover to install the batteries. To replace cover line up the arrows on the cover and main body of CanCam, open then press down and rotate the cover in a clockwise direction. 2 Infrared LED : Allows stills / video to be taken at night time. 3 Camera Lens. 4 Test Laser Beam : Shows the direction that the camera is pointing in. Important note: Avoid looking directly into the laser beam. 5 Microphone. 6 Passive Infrared Sensor. 7 Bottom Cover : Turn to open the cover to access camera settings. Back View 8 Tripod Nut : Enables wall mount attachment. 9 Strap Holes : Facilitates the mounting strap


6 Bottom view 1 Open the Bottom Cover to show camera s interface. 2 LCD display : displays the menu s option and modes. 3 USB port : Connects the camera to a PC via USB cable to view stills or video clips. 4 AV out : Connects camera to monitor on TV to view stills or video clips. 5 Menu Button : Changes mode or setting in the menu. 6 Up and Down Button : Enables mode selection and adjustments to the settings. 7 Switch : Select camera mode: Turn on/turn off /Test mode/preset Mode. 8 SD Card Slot : Compartment for SD card. 9 Confirm Button : Confirms the selection made. 10 DC 6V port : Connection for DC 6V external power adaptor. NB Only use supplied power adaptor to avoid damage to CanCam
 Half (Icon blinking) Low (Icon off) When batteries are low, the LCD display shows batlo. Please replace with new batteries.")
7 LCD Display CAM : Indicates the camera is in still image mode. VIDEO : Indicates the camera is in video mode. : Indicates the camera is in burst mode or video length mode. : Indicates the battery status. Full (Icon on) Half (Icon blinking) Low (Icon off) When batteries are low, the LCD display shows batlo. Please replace with new batteries. Indicates the still image/video resolutions. Image resolution is 8Mp. Image resolution is 5Mp or video resolution is HD 720P. Image resolution is 3Mp or video resolution is VGA D : Indicates the camera is in date setting. T : Indicates the camera is in time setting. T-O : Indicates the camera is in time out setting. PIR : Indicates the camera is in PIR detection Mode. TLS : Indicates the camera is in Time Lapse Mode. : Indicates the date/time/time out value during setting or captured image/video quality. The date and time will visible on the still image and video 7
8 Installation STRAP MOUNTING WALL MOUNTING EFFECTIVE RANGE EFFECTIVE ANGLE Listed below are some helpful pointers on how to use your camera to get the best results. Mount the camera between 1.5~2M (5~6 feet) high with the camera pointed at a slight downward angle. Clear away any objects such as grass, leafs or weeds etc. from in front of the camera. This will cause false pictures caused by wind or during high temperatures. Double check the battery polarity before turning the camera on. Make sure to insert the SD card after setting up the camera. Make sure to turn the camera to CAM or PSET mode (or take out of Test Mode) before you leave. Verify time and date is correct. 8
9 Battery and Memory Installation WARNING : Do not use different Voltage batteries other than the one specified in this section. Doing so will damage the camera and will void the warranty. WARNING : ALWAYS have the camera in the OFF position when installing or removing batteries and SD card. Removing batteries or memory card while the camera is ON may damage the camera. Your CanCam is designed to operate using two different types of battery power options. Batteries C cell The internal battery compartment accepts 4 C cell batteries. Be sure to use high quality brand name alkaline batteries. Install batteries with correct polarity (+/-) as noted inside the battery compartment. DC 6V external power The camera is equipped with an external power jack designed to accept a barrel plug cable of the DC 6V adaptor. Make sure the camera is in the OFF position. Insert the external AC to DC power adaptor barrel plug into the DC 6V jack on the bottom of camera housing. Turn the switch to CAM or PSET. Memory Options The camera is equipped with an expandable media card slot capable of accepting up to 32GB SD card with Class 6 or below speed rating. The LCD display will show the number of images stored on the SD card. If no SD card is inserted the front counter display will show NOSd. Once memory capacity is up to full, the camera will re-loop the memory to keep the last image and delete the first image from the memory. Inserting SD memory card NOTE: Make sure camera is in the OFF position whenever adding or removing the SD card. Insert the SD card into the SD card slot completely and in the correct direction as shown by the sticker located on the side of the housing. To remove the SD card, depress the SD card and pull out the card gently. SD cards must be formatted. Make sure to format the SD card in a computer prior to use in the camera. FORMAT Definition : When formatting a SD memory card, the operating system erases all information and files on the card. Then it creates an internal address table that is later used to locate information and files. DO NOT USE File System type: NTFS or exfat, these formats are not supported. 9

10 Viewing and Deleting Files The CanCam offers the user different options for viewing images. You can view images or videos through your computer or home TV that is equipped with an RCA Inputs. The LCD display on bottom of the housing will show the number of stills stored on the SD card. Viewing files by computer Your CanCam is a plug and play USB storage device for users of Windows XP / Vista / Windows 7 operating systems. This camera is compatible with MAC 10.6 and above. Viewing files on your computer via USB connection. Make sure the camera s power switch is in the OFF position. Plug the larger end of the USB cable into an available USB port on the computer. Mini 5P type B type CanCam PC with USB port Plug the smaller end of USB cable into the camera s side panel. The camera will automatically power ON and will display the word USb on the LCD screen. At the same time the computer will recognize the camera as a Removable Storage device. It can be found under MY COMPUTER. 10
11 At this point there are several options: To view images or play videos: Click on the Removable Storage device and then select the file you want to see. To save images and videos: Highlight the file or files you want to save and drag them to your hard drive. To delete images and videos: Highlight the files or files you want to delete and press the [DELETE] button. To erase all files and reformat the SD card: Right click on the Removable Storage device under My Computer and select FORMAT then click START. A Warning message will appear, press [OK]. Then CLOSE to exit. NOTE: Before you FORMAT, make sure you are certain it is the Removable Storage icon for the camera is selected, and not any other device associated with your computer. Once complete, simply unplug the cable from both the computer and the camera. The camera will turn OFF automatically. For Viewing on Your home TV: Attach the provided TV out cable to the TV port on the bottom of the camera and insert the other end into the RCA VIDEO IN jacks on the TV. Turn on both the camera and TV. Make sure to switch to AUX / VIDEO IN mode on the TV. (See TV owner s manual for operations). If the TV monitor flickers, then you will need to proceed to the next step TV Out System Settings to change your camera s TV OUT from NTSC to PAL. A series of stills will be visible on the TV. Press the [UP] or [DN] button to navigate through your thumbnail images. On the upper left hand corner of the TV monitor, it will either display the still OR the image with a video icon which indicates it s a video clip. To view in full screen, press the [OK] button. Press the [OK] button again, it will return to the thumbnail view from the full screen image. NOTE: All videos are recorded with audio, but only have sound when viewing playback on a PC. 11
![TV Out System Settings: Press the [M] button once. The word tu on the camera s internal screen will be blinking. Press the [OK] once and now you ll see tu n blinking.](/docs-images/76/73420687/images/12-0.jpg "Press the [DN] button to set the camera s TV OUT to PAL. The word tu P will now be blinking. Press the [OK] to confirm this setting. The word tu - P will be blinking and then stops.")
12 TV Out System Settings: Press the [M] button once. The word tu on the camera s internal screen will be blinking. Press the [OK] once and now you ll see tu n blinking. Press the [DN] button to set the camera s TV OUT to PAL. The word tu P will now be blinking. Press the [OK] to confirm this setting. The word tu - P will be blinking and then stops. Once the blinking stops, power off the camera. Wait for 5 seconds and then power up your camera again. Advanced Instructions There are 2 ways the camera can be programmed; 1. The camera unit can be programmed by using the pre-set mode: PSET - This bypasses all user defined settings and uses the following settings: (PIR mode / Resolution: 3MP / Burst: 3P / Time out: 30 seconds). 2. A fully user defined setting selection, which continues on the rest of the manual s pages. CAM - This allows the user to define what setting the camera will use. Camera Setup and Programming When the camera switch is first turned to the CAM location, the internal LCD display shows the camera status. The following information is present on this screen. 12 Passive Infrared Mode Time-Lapse / PIR Mode If no buttons are pressed after 30 seconds the LCD display will go into sleep mode and the LCD display will switch to show the capture quality and enter a 1-minute count down for the user to leave the capture area. The camera will then enter the PIR detection mode or the Time lapse mode. To wake up the camera: press the UP or DOWN button once, the LCD display will show the status of the camera.
13 Program CanCam using CAM mode Setting the CAM Operation Mode: The CanCam can be programmed to operation either in PIR Detection mode or Time Lapse / PIR mode. Slide the switch to the CAM position. LCD display will show the camera status screen. Press the [M] button once within 30 seconds to enter the programming mode, the word PIR or TLS will be blinking. Press the [UP] or [DN] button to select PIR mode. Press [OK] to save your selection. Press [M] button to exit. Setting the Image Resolution in PIR mode: The CanCam can be programmed to 3 different image resolutions: 3 Stars is 8Mp, 2 Stars is 5Mp and 1 Star is 3Mp. Slide the switch to the CAM position, LCD display will show the camera status screen. Press the [M] button once within 30 seconds to enter the programming mode. The word PIR will be blinking, press [OK] to confirm the camera s operation is PIR detection. Press [UP] or [DN] button until the word CAM is blinking. Press the [OK] button ONCE to confirm the camera into CAM mode, the STARTS will be blinking. Press the [UP] or [DN] button to select the desired resolution. Press [OK] to save your selection, then current number of burst shoot will blinking. Press [OK] to enter the burst shoot setting or press [M] button to exit. Setting the Image burst shoot in PIR mode: The CanCam can be programmed to shoot 1-9 pictures per triggering. Slide the switch to the CAM position, LCD display will show the camera status screen. Press the [M] button once within 30 seconds to enter the programming mode. The word PIR will be blinking, press [OK] to confirm the camera s operation is PIR detection. Press [UP] or [DN] button until the word CAM is blinking. Press [OK] button ONCE to confirm camera into CAM mode. Press [UP] button ONCE to enter burst shoot setting, the current number of burst shoot will blink. 13
14 Press [OK] then press the [UP] or [DN] button to select the desired burst mode setting or number of pictures per triggering. Press [OK] to save your selection, then the time out T-O will blinking. Press [OK] button to enter time out setting or press [M] button to exit. Setting the Video Resolution in PIR mode: The CanCam can be programmed to 2 different video resolutions: 2 Stars is HD 720, 1 Star is VGA 640 x 480 pixels. Slide the switch to the CAM position, LCD display will show the camera status screen. Press the [M] button once within 30 seconds to enter the programming mode. The word PIR will be blinking, press [OK] to confirm the camera s operation is PIR detection. Press [UP] or [DN] button until the word VIDEO is blinking. Press the [OK] button ONCE to confirm the camera in VIDEO mode, the STARS will be blinking. Press the [UP] or [DN] button to select the desired resolution. Press [OK] to save your selection, then current number of video length will blinking. Press [OK] button to enter video length setting or press [M] to exit. Setting the Video length in PIR mode: TheCanCam can be programmed to record seconds of video per triggering. The Video mode is only workable under PIR mode. Slide the switch to the CAM position, LCD display will show the camera status screen. Press the [M] button once within 30 seconds to enter the programming mode. The word PIR will be blinking, press [OK] to confirm the camera s operation is PIR detection. Press [UP] or [DN] button until the word VIDEO is blinking. Press the [OK] button ONCE to confirm the camera in VIDEO mode. Press [UP] button ONCE and the video length in seconds will be blinking. Press [UP] or [DN] button to select the desired video length from 5 to 300 seconds in 5-second increments. Press [OK] to save your selection then the time out T-O will blinking. Press [OK] button to enter time out setting or press [M] button to exit. 14
15 Setting the Time Out in PIR mode: The CanCam can be programmed to set the amount of time in seconds or minutes the camera will sleep between PIR triggers. Slide the switch to the CAM position, LCD display will show the camera status screen. Press the [M] button once within 30 seconds to enter the programming mode. The word PIR will be blinking, press [OK] to confirm the camera s operation is PIR detection. Press [UP] or [DN] button until the word T-O (Time Out) is blinking. Press [OK] button and the MINUTES digits will be blinking. Press [UP] or [DN] button to increase or decrease the time value in minutes from 00 to 10 minutes in 1-minute increments. Press [OK] to save the minute setting and the SECONDS digits will be blinking. Press [UP] or [DN] button to increase or decrease the time value in seconds from 01 to 55 seconds in 5-second increments. Press [OK] to save the second setting. The letter T (Time) will be blinking. Press [OK] button to enter time setting or press [M] button to exit. Setting the Time and Date in PIR operation mode: The CanCam uses the 24hr time format. Slide the switch to the CAM position, LCD display will show the camera status screen. Press the [M] button once within 30 seconds to enter the programming mode. The word PIR will be blinking, press [OK] to confirm the camera s operation is PIR detection. Press [UP] or [DN] button until the letter T is blinking. Press [OK] to enter Minute setting first. The MINUTE digits will be blinking. Press [UP] or [DN] to increase or decrease the minute value (00 59). Press [OK] to save your selection and enter Hour setting. The HOUR digits will be blinking. Press [UP] or [DN] to increase or decrease the hour value (00 23). Press [OK] to save your selection and enter Month setting. The MONTH digits will be blinking. 15
![Press [UP] or [DN] to increase or decrease the Month value (1-12). Press [OK] to save your selection and enter Day setting. The DAY digits will be blinking.](/docs-images/76/73420687/images/16-0.jpg "Press [UP] or [DN] to increase or decrease the Day value (01 31). Press [OK] to confirm the Date setting and enter Year setting. The YEAR digits will be blinking.")
16 Press [UP] or [DN] to increase or decrease the Month value (1-12). Press [OK] to save your selection and enter Day setting. The DAY digits will be blinking. Press [UP] or [DN] to increase or decrease the Day value (01 31). Press [OK] to confirm the Date setting and enter Year setting. The YEAR digits will be blinking. Press [UP] or [DN] to increase or decrease the Year value (01 99). Once this is all done, press [OK]. You ll then see the word - del - blinking. Press [M] button to exit the program setting and back to the status screen. Setting the Time Lapse Mode: The Time Lapse default setting value is from 17:00 to 07:00 the next day. When the camera is set to use the Time-Lapse mode (TLS), the program settings will follow the Time Lapse settings. Outside of the Time Lapse time frame; the camera will follow the user defined PIR settings. The user can set the program for a pre-determined time period [such as 19:00 to 07:00]. The user then sets the frequency of still images only (video function not available in Time Lapse mode). The camera will remain in Time Lapse mode until the user has changed the program setting. Slide the switch to the CAM position, LCD display will show the camera status screen. Press the [M] button once within 30 seconds to enter the programming mode, the word PIR or TLS will be blinking. Press [UP] button until you see the word TLS blinking. Press [OK] to confirm and go into TLS Mode "Start Time" setting. The display will show T + S-88:88 (S = Start, 88:88 = time in HH:MM). Press [OK] to set the Start Time setting. At this point you can adjust the time from 00:00 to 23:59. The MINUTE digits will be blinking. Press [UP] or [DN] to increase or decrease the minute value (00 59). Press [OK] to save your selection and enter Hour setting. The HOUR digits will be blinking. 16
17 Press [UP] or [DN] to increase or decrease the hour value (00 23). Press [OK] to save the Start Time setting and move to the End Time setting. After completing the start time setting, camera will go into TLS Mode "End Time" setting. The display will show T + E-88:88 (E = End, 88:88 = time in HH:MM) At this point you can adjust the time from 00:00 to 23:59 by pressing the [UP/DN/OK] buttons same as Start Time settings. Press [OK] to save the End Time settings and move directly to the TIME OUT setting. Please complete the TIME OUT, Still Image Resolution, Burst Mode, Zoom settings like the settings on the PIR operation mode. Then press [M] button to exit. EXAMPLE: 1 If a user selected the Time Lapse mode, and sets the Start Time to 07:00 and End Time at 20:30, then selects the Timeout to be 3mins with a Burst mode of 3 pictures, this means that the camera will keep taking 3 pictures for every 3 minutes within the time frame of 7:00AM to 8:30PM. When not within the Time Lapse time frame, the camera will follow the normal PIR detection settings. 2 If a user selected the Time Lapse mode setting as Start Time 00:00 and End Time 00:00, then selected the Timeout to be 5mins with a Burst mode of 3 pictures, this means the camera will keep taking 3 pictures for every 5 minutes, 24 hours a day non-stop. Using The Camera in PIR Detection Mode Open the bottom housing and slide the switch to either one of the CAM or PSET modes. At this point, you have 30 seconds to make any mode selection changes before camera is ready to use. If you chose CAM mode then make sure your camera is in the PIR mode and not Time Lapse (TLS). If you are not sure, please follow the Camera setup and program above to set the camera into the proper mode. To Capture Images, make sure display reads CAM: Once in CAM mode, if the display does not read CAM then, Press the [M] button once. If the LCD display does not show word CAM in blinking. Press the [UP] button ONCE to toggle to Camera mode. Press the [OK] button and then [M] Button to exit. 17
18 To Capture Videos, make sure display reads VIDEO: Once in CAM mode, if the display does not read VIDEO then, Press the [M] button once. If the LCD display does not show word VIDEO in blinking. Press the [UP] button ONCE to toggle to Video mode. Press the [OK] button and then [M] Button to exit. 30 seconds after making adjustments, the laser beam will begin blinking and enter the countdown mode. After one minute, the camera will enter either Burst mode or Video mode based on the programmed settings. The cameras will then time out between seconds or 1-59 minutes depending on the programmed setting. NOTE: The time between motion detection and the camera taking the pictures may vary due to lighting conditions, program settings, and battery power level. Using The Camera In Time Lapse Mode Open the bottom housing and slide the switch to CAM mode. At this point, you have 30 seconds to make any mode selection changes before camera is ready to use. Make sure your camera is in Time Lapse (TLS) mode and not PIR mode. If your not sure, please follow the Camera setup and program above to set the camera into TLS mode. 30 seconds after making adjustments, the laser beam will begin blinking and enter countdown mode. This is your indication to leave the coverage area within one minute, then the camera will enter Time Lapse Mode. Deleting files on the Camera Slide the switch the CAM position. LCD screen will display the camera status screen. Press the [M] button within 30 seconds to enter the programming mode. Press the [DN] button until you see the word - del - in blinking on LCD display. Press [OK] button to enter the DELETE & FORMAT menu. Press [UP] or [DN] button to select the desired function. NO-dL (No Delete) - No images get deleted. d-one (Delete One) - Only the last file will get deleted. d-all (Delete ALL) - Deletes ALL images on the SD card. Ft (Format) - Deletes all files and reformats the SD card. Press [OK] to confirm your selection. Press [M] button to exit the program setting and back to the status screen. 18
19 CanCam Features and Specification High precision multi-layer glass lens with coating. Effective viewing angle: 50 degrees Infrared LED effective Range for picture up to 18M (50 ft). Infrared LED effective Range for Video clip up to 18M (50 ft). PIR detection angle: 48 degrees Image resolution Options: 8MP, 5MP, 3MP Video resolution Options: HD 720P, VGA pixels with Audio recording. Capture Options: 1-9 image burst mode or up to 300 seconds video recording with audio. Time Lapse Mode: Creates specific settings for a defined time of day. Real time clock for date and time stamping. Auto white balance and auto expose. Auto IR emitter light control. External memory support: Up to 32GB SD card. Laser beam TEST indication and countdown indication. Interface type: USB 2.0 Built in TV output. Power: C cell alkaline Batteries x 4 or optional 6vdc power adaptor supplied. Weather resistant housing - IP55 rating. 19
20 Elite Security Products Unit 7, Target Park, Shawbank Rd Lakeside, Redditch B98 8YN Telephone: Fax:
User Manual. 5MP Outdoor Camera. with PIR
 User Manual 5MP Outdoor Camera with PIR TABLE OF CONTENTS Camera Kit Contents 3 Camera Overview 4 General Information 8 Definitions 9 Quick Start Guide 13 Battery and Memory Installation 14 Camera Setup
HUNTING CAMERA. INSTRUCTION MANUAL Model #: SL1007 Hunting series. V Dec
 HUNTING CAMERA INSTRUCTION MANUAL Model #: SL1007 Hunting series V1.2 2012. Dec TABLE OF CONTENTS Camera Kit Contents.....3 Camera Overview...4 General Information..8 Definitions. 9 Quick Start Guide.12
SECURITY CAMERA. INSTRUCTION MANUAL Model: VKPCCTV
 SECURITY CAMERA INSTRUCTION MANUAL Model: VKPCCTV TABLE OF CONTENTS Camera Kit Contents.. 3 Camera Overview. 3 General Information.. 5 Definitions. 6 Quick Start Guide. 10 Battery and Memory Installation..
TABLE OF CONTENTS V1.3- OP2014.OCT
 USER MANUAL 2 V1.3- OP2014.OCT TABLE OF CONTENTS Important Notice... 4 General Information... 5 WATCHMAN Overview... 7 Parts Definitions... 11 Battery and Memory Installation... 14 WATCHMAN Setup and Program...
** IMPORTANT NOTE ** INSTRUCTION MANUAL Model #: STC AC540IR CAMERA OVERVIEW TABLE OF CONTENTS
 ** IMPORTANT NOTE ** First, congratulations on purchasing one of the finest scouting cameras on the market today. We appreciate your business and want to prove to you we are committed to providing you
** IMPORTANT NOTE ** INSTRUCTION MANUAL Model #: STC U732IR CAMERA OVERVIEW TABLE OF CONTENTS
 ** IMPORTANT NOTE ** First, congratulations on purchasing one of the finest scouting cameras on the market today. We appreciate your business and want to prove to you we are committed to providing you
** IMPORTANT NOTE ** INSTRUCTION MANUAL Model #: STC-SK732NG TABLE OF CONTENTS
 ** IMPORTANT NOTE ** First, congratulations on purchasing one of the finest scouting cameras on the market today. We appreciate your business and want to prove to you we are committed to providing you
STC-WD2-IR User s Manual Toll Free Customer Support
 User s Manual Toll Free Customer Support 1-877-269-8490 www.stealthcam.net Version 1.0 5/06 For Customer Service or Warranty Information Call Toll Free 877-269-8490 Stealth Cam, LLC P.O. Box 535189 Grand
STC-I530IR User s Manual Toll Free Customer Support
 User s Manual Toll Free Customer Support 1-877-269-8490 www.stealthcam.net Version 6.0 09/15 For Customer Service or Warranty Information Call Toll Free 877-269-8490 Stealth Cam, LLC P.O. Box 539504 Grand
INSTRUCTION MANUAL Model #: STC- SNX1
 INSTRUCTION MANUAL Model #: STC- SNX1 Toll Free 1-877- 269-8490 Version 1.0 10/11 ** IMPORTANT NOTE ** First, congratulations on purchasing one of the finest scouting cameras on the market today. We appreciate
Stealth Cam. STC-I550 User s Manual. Toll Free Customer Support Version /08
 Stealth Cam STC-I550 User s Manual Toll Free Customer Support 1-877-269-8490 www.stealthcam.net Version 1.0 03/08 For Customer Service or Warranty Information Call Toll Free 877-269-8490 Stealth Cam, LLC
Stealth Cam. STC-V450 User s Manual. Toll Free Customer Support Version /07
 Stealth Cam STC-V450 User s Manual Toll Free Customer Support 1-877-269-8490 www.stealthcam.net Version 1.1 07/07 For Customer Service or Warranty Information Call Toll Free 877-269-8490 Stealth Cam, LLC
Stealth Cam STC-WD3MT-RT User s Manual. Toll Free Customer Support
 Stealth Cam STC-WD3MT-RT User s Manual Toll Free Customer Support 1-877-269-8490 www.stealthcam.net Version 1.0 Jan/06 For Customer Service or Warranty Information Call Toll Free 877-269-8490 Stealth Cam,
ProStalk PC2000. Nature Camera User Manual
 ProStalk PC2000 Nature Camera User Manual Index 1. Introduction... 3 2. Camera Specifications... 4 3. Parts Identification... 5 4. Packing Contents... 6 5. Battery and SD Card Installation... 6 6. Setup
Trail Camera TC2201NA User Manual
 Trail Camera TC2201NA User Manual Index 1. Introduction... 3 2. Digital Trail Scout Specifications... 4 3. Parts Identification... 5 4. Packing Contents... 6 5. Battery and SD Card Installation... 6 6.
RANGER. Digital Trail Camera Instructions for use: Model BN057
 RANGER Digital Trail Camera Instructions for use: Model BN057 In d e x 1. Introduction... 3 2. Specifications... 3 3. Parts identification... 5 4. Package contents... 6 5. Battery and SD card installation...
STC-TGL1 User s Manual. Toll Free Customer Support Version /07
 User s Manual Toll Free Customer Support 1-888-304-6125 www.wildviewcam.com Version 1.7 07/07 For Customer Service or Warranty Information Call Toll Free 888-304-6125 WILDVIEW P.O. Box 535189 Grand Prairie,
RANGER. 8MP Digital Trail Camera Instructions for use Model BN061 / BN062
 RANGER 8MP Digital Trail Camera Instructions for use Model BN061 / BN062 1 Introduction... 3 2 Specifications... 3 3 Parts identification... 5 4 Package contents... 6 5 Battery and SD card installation...
STC-TGLX35IR User s Manual Toll Free Customer Support
 User s Manual Toll Free Customer Support 1-888-304-6125 www.wildviewcam.com Version 3.0 07/10 For Customer Service or Warranty Information Call Toll Free 888-304-6125 WILDVIEW P.O. Box 535189 Grand Prairie,
Infrared Digital Scouting Camera. User s Manual Covert Deuce
 Infrared Digital Scouting Camera User s Manual Covert Deuce Content 1 Instruction... 1 1.1 General Description... 1 1.2 Application... 1 1.3 Camera Interface... 1 1.4 Saving Images or Videos... 3 2 Cautions...
Digital Surveillance Camera INT SPYP. IR-B model. User s manual.
 TM Digital Surveillance Camera SPYP IR-B model INT User s manual www.spy-point.com Thank you for purchasing SPYPOINT IR-B product. You can now enjoy the many benefits of a full feature and easy to use
Digital Wireless Lighting Cam
 Digital Wireless Lighting Cam SLDCRF User s Manual Version 0.1 01/Apr Manual Contents: A. Camera kit contents 3 B. SLDCRF overview 4 C. Mounting the camera 15 D. Setup Getting started 18 E. Program the
STC-TGL2M / STC-TGL5M User s Manual. Toll Free Customer Support Version /15
 STC-TGL2M / STC-TGL5M User s Manual Toll Free Customer Support 1-888-304-6125 www.wildviewcam.com Version 6.0 09/15 For Customer Service or Warranty Information Call Toll Free 888-304-6125 WILDVIEW P.O.
TITAN INSTRUCTION MANUAL Model #: STC- Z3IR. Version /11
 TITAN INSTRUCTION MANUAL Model #: STC- Z3IR Toll Free 1-877- 269-8490 Version 1.0 07/11 ** IMPORTANT NOTE ** First, congratulations on purchasing one of the finest scouting cameras on the market today.
Digital Surveillance Camera
 Digital Surveillance Camera FL-A model User s manual www.spy-point.com Thank you for purchasing SPYPOINT FL-A product. You can now enjoy the many benefits of a full feature and easy to use digital surveillance
2.4GHz Digital Wireless 7 LCD Surveillance Kit
 2.4GHz Digital Wireless 7 LCD Surveillance Kit User Manual QC-3762 Box Contents: 1 x 7 LCD Monitor 1 x Wireless Camera 2 x Mains Power Adaptors 1 x Camera Antenna 1 x Mounting Hardware Product Diagram:
Instructions for I40XT GameSpy Digital Camera
 Instructions for I40XT GameSpy Digital Camera THANK YOU for your purchase of the Model. Please read this booklet before using the unit. If you should have any questions about this product or any other
** IMPORTANT NOTE ** INSTRUCTION MANUAL For TGLX8IR Series CAMERA OVERVIEW
 ** IMPORTANT NOTE ** First, congratulations on purchasing one of the finest scouting cameras on the market today. We appreciate your business and want to prove to you we are committed to providing you
Instructions for PREMISE PRO Digital Surveillance Camera
 Important Battery lnformation - Only use Alkaline or Lithium batteries. We recommend the use of Energizer batteries. - Do not mix old and new batteries. Always replace ALL the batteries at the same time.
Infrared Digital Scouting Camera. User s Manual Scouting Camera SG560P-8M
 Infrared Digital Scouting Camera User s Manual Scouting Camera SG560P-8M Content 1 Instruction...1 1.1 General Description...1 1.2 Application...1 1.3 Camera Interface... 2 1.4 Saving Images or Videos...
615HD Digital Video Camera
 615HD Digital Video Camera User Manual 2009-2011 Sakar International, Inc. All rights reserved. Windows and the Windows logo are registered trademarks of Microsoft Corporation. All other trademarks are
DVR 514 Digital Video Recorder
 DVR 514 Digital Video Recorder User Manual 2010 Sakar International, Inc. All rights reserved. Windows and the Windows logo are registered trademarks of Microsoft Corporation. All other trademarks are
Instructions for D-55IRXT GameSpy Digital Camera
 Instructions for D-55IRXT GameSpy Digital Camera THANK YOU for your purchase of the D-55IRXT GameSpy Digital Camera. Please read this booklet before using the unit. If you should have any questions about
Infrared Digital Scouting Camera User s Manual Scouting Camera SG560K-8M
 Infrared Digital Scouting Camera User s Manual Scouting Camera SG560K-8M For model: SG560K-8M Content 1 Instruction...1 1.1 General Description...1 1.2 Application...1 1.3 Camera Interface...1 1.4 Saving
Instructions for M100 GameSpy Digital Camera
 Instructions for M100 GameSpy Digital Camera THANK YOU for your purchase of the. Please read this booklet before using the unit. If you should have any questions about this product or any other Moultrie
DVR 710HDv2 Digital Video Recorder
 DVR 710HDv2 Digital Video Recorder User Manual 2009-2011 Sakar International, Inc. All rights reserved. Windows and the Windows logo are registered trademarks of Microsoft Corporation. All other trademarks
RANGER. 5MP Security Digital Trail Camera Instructions for use Model BN058 / BN059 / BN060
 RANGER 5MP Security Digital Trail Camera Instructions for use Model BN058 / BN059 / BN060 In d e x 1 Introduction...3 2 Specifications...4,5 3 Parts identification...6 4 Package contents...7 5 Battery
Infrared Digital Scouting Camera User s Manual Scouting Camera SG560K-8mHD
 Infrared Digital Scouting Camera User s Manual Scouting Camera SG560K-8mHD Content 1 Instruction... 1 1.1 General Description... 1 1.2 Application... 1 1.3 Camera Interface... 2 1.4 Saving Images or Videos...
Superb Full HD Trail Camera Uovision UV785 12MP Instruction Manual
 Superb Full HD Trail Camera Uovision UV785 12MP Instruction Manual UV785 Model Content Page 1 General Description 1 2 Camera button info diagram 1 3 Installing the batteries 2 4 Inserting SD card 2 5 Customizing
Full Color Digital Scouting Camera. User s Manual HCO ScoutGuard SG560C
 Full Color Digital Scouting Camera User s Manual HCO ScoutGuard SG560C Content 1 Instruction... 1 1.1 General Description... 1 1.2 Application... 1 1.3 Camera Interface... 2 1.4 Saving Images or Videos...
DVR 528 Digital Video Camera
 DVR 528 Digital Video Camera User Manual 2010 Sakar International, Inc. All rights reserved. Windows and the Windows logo are registered trademarks of Microsoft Corporation. All other trademarks are the
Full Color Digital Scouting Camera. User s Manual Scouting Camera SG860C-HD
 Full Color Digital Scouting Camera User s Manual Scouting Camera SG860C-HD Content 1 Instruction...1 1.1 General Description...1 1.2 Application... 2 1.3 Camera Interface... 2 1.4 Saving Images or Videos...
Nature Cam TX-09. User Manual Declaration of Conformity internet link:: (in bottom bar Konformitätserkärung ) Features
 Features") Nature Cam TX-09 User Manual Declaration of Conformity internet link:: www.technaxx.de/ (in bottom bar Konformitätserkärung ) Features Security camera for indoor and outdoor use Ideal for viewing wild
Nature Cam TX-09 User Manual Declaration of Conformity internet link:: www.technaxx.de/ (in bottom bar Konformitätserkärung ) Features Security camera for indoor and outdoor use Ideal for viewing wild
Table of contents Introduction Getting Started Taking still images or videos
 User Manual Table of contents Introduction Features............................................1 Package contents.....................................2 Camera overview.....................................2
DVR 560HD Digital Video Recorder
 DVR 560HD Digital Video Recorder User Manual 2010 Sakar International, Inc. All rights reserved. Windows and the Windows logo are registered trademarks of Microsoft Corporation. All other trademarks are
Drive. User Manual. HD Vehicle Accident Camera USB. Version 1 Video Video 1920x x LCD Screen. Night Operation
 Drive HD Vehicle Accident Camera HD User Manual Version 1 Video Video 1920x1080 1280x720 Supports up to 32GB USB Windows Compatible 2.0 Mac Built-in and Windows Microphone Compatible Night Operation 16.9
Trail Camera User s Manual
 Trail Camera User s Manual (for S100/S108/S120/S128/S158) V1.1 PLEASE READ CAREFULLY BEFORE USING CAMERA Package Contents Mounting Strap 1 Trail Camera 1 Antenna(wireless camera only) 1 USB Cable 1 User
Complete User Guide. X1 Action Camera
 1 Complete User Guide X1 Action Camera x1 DISCOVER: ADVENTURE Contents Share your footage with us on social media #KBdiscover To view the entire Kaiser Baas product range visit: www.kaiserbaas.com Join
USER S MANUAL Scouting Trail Camera
 USER S MANUAL Scouting Trail Camera Contents 1. Whole View and Details of Camera...- 1 - Figure 1: Front View of Camera...- 1 - Camera Screen Display (Test Mode Main Interface)...- 2-2. Camera Menu List
Stealth Cam STC-CRV20 User s Manual
 Stealth Cam STC-CRV20 User s Manual Toll Free Customer Support 1-877-269-8490 www.stealthcam.net Version 1.1 08/08 For Customer Service or Warranty Information Call Toll Free 877-269-8490 Stealth Cam,
VC2100 / VC MB Digital Event Recorder
 VC2100 / VC2100 32MB Digital Event Recorder Product Description: This system includes one VS2100 single channel digital event recorder and one color camera. It will automatically have image capture or
DVR 960HD Digital Video Recorder
 DVR 960HD Digital Video Recorder User Manual 2010 Sakar International, Inc. All rights reserved. Windows and the Windows logo are registered trademarks of Microsoft Corporation. All other trademarks are
Digital Game & Trail Hunting Camera
 Digital Game & Trail Hunting Camera User Manual ATC-801 Version 1.1.3 Table of Contents 1. Instructions... 1 1.1 General Description... 1 1.2 Camera Body Interface... 1 1.3 Camera components and features...
User Manual HC-500A ENG-1
 User Manual HC-500A ENG-1 Contents 1. Instructions... 3 1.1 General Description... 3 1.2 Camera Body Interface... 3 1.3 Camera components and features... 3 1.4 Remote Control... 4 5.1 Shooting Information
DVR 520 / 1.8 Digital Video Recorder
 DVR 520 / 1.8 Digital Video Recorder User Manual 2010 Sakar International, Inc. All rights reserved. Windows and the Windows logo are registered trademarks of Microsoft Corporation. All other trademarks
DVR 548HD Digital Video Recorder
 DVR 548HD Digital Video Recorder User Manual 2009-2011 Sakar International, Inc. All rights reserved. Windows and the Windows logo are registered trademarks of Microsoft Corporation. All other trademarks
Wildlife Digital Infrared Trail Camera User s Manual HC-300
 Wildlife Digital Infrared Trail Camera User s Manual HC-300 Table of Contents 1 Instructions...1 1.1 General Description...1 1.2 Camera Body Interfaces...1 1.3 Camera Components and Features...1 1.4 Remote
Operation Manual Defender Car Vision 2020 HD Car DVR
 Operation Manual Defender Car Vision 2020 HD Car DVR 1 Thank you for buying Defender Car Vision 2020 HD car DVR. Before using the device read carefully this manual. mini-usb connector HDMI connector Function
User s Guide for PRIMOS Mug Shot Trail Camera
 User s Guide for PRIMOS Mug Shot Trail Camera Model# 65063 Thanks for purchasing this Primos Mug Shot Trail Camera. Please read this user s guide carefully before your first use. Product overview Fig.1
DVR 548NHD Digital Camcorder
 DVR 548NHD Digital Camcorder User Manual 2009-2012 Sakar International, Inc. All rights reserved. Windows and the Windows logo are registered trademarks of Microsoft Corporation. All other trademarks are
DVR 508NHD Digital Camcorder
 DVR 508NHD Digital Camcorder User Manual 2009-2012 Sakar International, Inc. All rights reserved. Windows and the Windows logo are registered trademarks of Microsoft Corporation. All other trademarks are
Standalone combined PIR camera with RF transmitter
 AlertCam Manual_Layout 5 28/02/2013 16:57 Page 1 Standalone combined PIR camera with RF transmitter AlertCam Manual_Layout 5 28/02/2013 16:57 Page 2 IMPORTANT IF IN ANY DOUBT ABOUT THE INSTALLATION OF
Infrared Digital Scouting Camera. User s Manual
 Infrared Digital Scouting Camera User s Manual Quick Start 1. Load the fully charged AA batteries, 12(recommended), 8 or 4(emergency); or connect 6 V external power supply; 2. Insert the SD card (32GB
Applicable models:hunting B
 Highly Recommended by Outdoor Explorers - Hunting Wildlife Scouting Cam Cams Instruction Book This Hunting cam is the best-selling scouting camera which is designed for activity and is resistant against
DVR 505 Digital Camcorder
 DVR 505 Digital Camcorder User Manual 2016 Sakar International, Inc. All rights reserved. Windows and the Windows logo are registered trademarks of Microsoft Corporation. All other trademarks are the property
USER MANUAL MINI WILDLIFE CAMERA
 USER MANUAL MINI WILDLIFE CAMERA INTRODUCTION Thank you for purchasing our mini wildlife camera. This device is a special camera designed specifically for recording and observing wildlife. These easy to
INSTRUCTION MANUAL Kingfisher Micro DVR w/ Button Cam SB-MSDVR660
 INSTRUCTION MANUAL Kingfisher Micro DVR w/ Button Cam SB-MSDVR660 Revised: March 15, 2013 Thank you for purchasing from SafetyBasement.com! We appreciate your business. We made this simple manual to help
Technaxx Wild Cam TX 44. User Manual
 EN Technaxx Wild Cam TX 44 User Manual The Declaration of Conformity for this device is under the Internet link: www.technaxx.de/ (in bottom bar Konformitätserklärung ). Before using the device the first
Wildlife Digital Infrared Trail Camera User s Manual HT A
 Wildlife Digital Infrared Trail Camera User s Manual HT-200 002A Table of Contents 1 Instructions...1 1.1 General Description...1 1.2 Camera Body Interfaces...1 1.3 Camera Components and Features...1 1.4
PRADCO Outdoor Brands 3280 Highway 31, Ste B Calera, AL 35040
 FCC Statements Moultrie Products MCG-13181 Moultrie Products MCG-13182 Instructions for M-Series Digital Game Cameras M-40 M-40i Note: changes and modifications not expressly approved by the party responsible
DVR 426HDv3. Digital Camcorder
 DVR 426HDv3 Digital Camcorder User Manual 2009-2012 Sakar International, Inc. All rights reserved. Windows and the Windows logo are registered trademarks of Microsoft Corporation. All other trademarks
PRADCO Outdoor Brands 3280 Highway 31, Ste B Calera, AL 35040
 FCC Statements S-50i Moultrie Products MCG-13183 Note: changes and modifications not expressly approved by the party responsible could void the user s authority to operate this device. Instructions for
Scouting Cam BLACK300. Instruction Manual. BRAUN PHOTO TECHNIK GmbH Merkurstrasse Eutingen
 Scouting Cam BLACK300 Instruction Manual BRAUN PHOTO TECHNIK GmbH Merkurstrasse 8 72184 Eutingen www.braun-phototechnik.de 1 Inhalt 1. Caution... 3 2. Instructions... 4 2.1 Camera Body Interface... 4 2.2
Xenon Flash Digital Scouting Camera. User Manual SG565F-14mHD
 Xenon Flash Digital Scouting Camera User Manual SG565F-14mHD Content 1 Instruction... 1 1.1 Camera Body Interfaces... 1 1.2 General Description... 2 1.3 Application... 2 1.4 Shooting Information Display...
SG520 Series. Infrared Digital Scouting Camera User Manual. Page 1
 1 Instruction Infrared Digital Scouting Camera User Manual SG520 Series Page 1 1 Instruction Content 1 Instruction... 3 1.1 Camera Body Interface... 3 1.2 General Description...4 1.3 Shooting Information
Superb HD Scouting Camera UV785-HD Instruction Manual
 Superb HD Scouting Camera UV785-HD Instruction Manual (For UV785-HD Model) Content 1 General Description... 1 2 Camera button info diagram... 2 3 Installing the batteries... 3 4 Inserting SD card... 4
Trail Camera User s Manual (for S378) V1.0
 V1.0") Trail Camera User s Manual (for S378) V1.0 PLEASE READ CAREFULLY BEFORE USING CAMERA Package Contents Mounting Strap 1 Trail Camera 1 Antenna(wireless camera only) 1 USB Cable 1 User s Manual 1 Camera
Trail Camera User s Manual (for S378) V1.0 PLEASE READ CAREFULLY BEFORE USING CAMERA Package Contents Mounting Strap 1 Trail Camera 1 Antenna(wireless camera only) 1 USB Cable 1 User s Manual 1 Camera
CAM-KIT6. User Manual. Connects2Vision. Mirror with DVR & Rear Camera PRODUCT FEATURES:
 User Manual CAM-KIT6 Mirror with DVR & Rear Camera PRODUCT FEATURES: Display: 5 inch Speaker: Built in MIC: Built in Mini USB: 5V 2A Micro SD Card Support: 32G max (not supplied) Rear Camera Input: 2.5mm
High Intensity Invisible IR Digital Scouting Camera
 High Intensity Invisible IR Digital Scouting Camera User s Manual Model # KP10B8-7 Includes Camera Unit 2 - Bungee Cords User Manual page 1 Features RESOLUTION MAX: 10 MP FLASH FLASH RANGE SENSOR SENSOR
26690 Digital Camera with Water Resistant casing
 26690 Digital Camera with Water Resistant casing User s Manual 2009 Sakar International, Inc. All rights reserved. Windows and the Windows logo are registered trademarks of Microsoft Corporation. All other
Instructions for M-999i Digital Game Camera
 Important Battery lnformation - Only use Alkaline or Lithium batteries. We recommend the use of Energizer batteries. - Do not mix old and new batteries. Always replace ALL the batteries at the same time.
YHC-308 & YHC-618 YHC-309M & YHC-619M
 YHC-308 & YHC-618 YHC-309M & YHC-619M YHC-308 Mini Digital Video Recorder and YHC- 618 Mini Button Camera YHC-309M Mini Digital Video Recorder and YHC-619M Motion Activation Camera Operating Instructions
Infrared Digital Scouting Camera. User s Manual Scouting Camera SG560K-12mHD
 Infrared Digital Scouting Camera User s Manual Scouting Camera Content 1 Instruction...1 1.1 Camera Body Interfaces...1 1.2 General Description... 2 1.3 Application... 2 1.4 Shooting Information Display...
USER S MANUAL for DLC Covert II
 USER S MANUAL for Unbeatable Compact Size Ultra Low Stand-by Current Quick Trigger Time Thank you for purchasing the DLC COVERT II, A digital scouting camera, For making best use of all the functions of
ViviCam T026 Digital Camera
 ViviCam T026 Digital Camera User Manual 2010 Sakar International, Inc. All rights reserved. Windows and the Windows logo are registered trademarks of Microsoft Corporation. All other trademarks are the
G-SHOT3000CC. (User Guide)
") 82-170-00041 G-SHOT3000CC Digital Video (User Guide) Warning: In the event of return of this product, it will only be accepted by the retailer with the supplied 32Mb memory card. Goodmans Helpline Phone
82-170-00041 G-SHOT3000CC Digital Video (User Guide) Warning: In the event of return of this product, it will only be accepted by the retailer with the supplied 32Mb memory card. Goodmans Helpline Phone
DVR 808HD Digital Camcorder
 DVR 808HD Digital Camcorder User Manual 2009-2016 Sakar International, Inc. All rights reserved. Windows and the Windows logo are registered trademarks of Microsoft Corporation. All other trademarks are
PRADCO Outdoor Brands 3280 Highway 31, Ste B Calera, AL 35040
 FCC Statements Moultrie Products MCG-13036 Moultrie Products MCG-13269 Instructions for P-Series Digital Game Camera Panoramic 180i Panoramic 120i Note: changes and modifications not expressly approved
PRADCO Outdoor Brands 3280 Highway 31, Ste B Calera, AL 35040
 FCC Statements Moultrie Products MCG-13036 Moultrie Products MCG-13269 Instructions for P-Series Digital Game Camera Panoramic 180i Panoramic 120i Note: changes and modifications not expressly approved
DIGITAL GAME CAMERA. Model DC-6SS
 DIGITAL GAME CAMERA Model DC-6SS CONTENTS: WELCOME... 2 GETTING STARTED... 3 MOTION DETECTOR... 4-8 CAMERA MENUS... 9-10 CONNECTING TO A COMPUTER... 11 TROUBLESHOOTING... 12 WARRANTY... 13 Leaf River Outdoor
High Intensity Invisible IR Digital Scouting Camera
 High Intensity Invisible IR Digital Scouting Camera User s Manual Model # TR8B1-7 Includes Camera Unit 2 - Bungee Cords User Manual page 1 Features RESOLUTION MAX: 8 MP FLASH FLASH RANGE SENSOR SENSOR
CONTENTS. Before You Start. Initial Operation. Prepare For Shooting. What's in the Box Camera Parts Display Icons
 CONTENTS Before You Start What's in the Box Camera Parts Display Icons Initial Operation Install microsd Card & Batteries Power On/ Off Power Saving Mode Set Date & Time Prepare For Shooting Change Capture
Important Tips. The working voltage of the camera is 6 V. You can either use 4 or 8 AA batteries, or use an
 Content General Information... 1 1.1 Features... 1 1.2 Application... 1 1.3 Standard Components... 1 1.4 Memory... 3 Quick Start... 4 2.1 Loading Batteries... 4 2.2 Connecting External Power... 5 2.3 Inserting
SD-595 Covert Surveillance Camera
 1 Brite Star http://www.starweb.com.au/index.html SD-595 Covert Surveillance Camera 12 Mega Pixel + Hi Definition Video with Audio 2016 - User s Manual 2 CONTENTS Page 1 About the Covert Trail Camera 1.1
Body Cam Pro PFBCPRO
 Body Cam Pro PFBCPRO 1 Important: 1. To avoid a loss of data stored in the camera, we recommend transferring the data to your computer's hard drive. 2. Immediately charge the camera when the battery is
MINI CLOCK CAMERA HD HIDDEN CLOCK DVR SKU: MiniClockCamHD
 THANK YOU FOR PURCHASING THE MINI CLOCK CAMERA HD HIDDEN CLOCK DVR MINI CLOCK CAMERA HD HIDDEN CLOCK DVR SKU: MiniClockCamHD Please read this manual before operating the mini clock camera HD and keep it
2014 All Rights Reserved. Windows and the Windows logo are registered trademarks of Microsoft Corporation. All other trademarks are the property of
 2014 All Rights Reserved. Windows and the Windows logo are registered trademarks of Microsoft Corporation. All other trademarks are the property of their respective companies. 1 2 Thank you for purchasing
Crenova Trail Hunting Camera
 Crenova Trail Hunting Camera Quick User s Manual Congratulations on your purchase of this high quality Crenova Trail Hunting Camera! It has been designed to provide you with the best capturing technology
Thanks for purchasing this EVOLVE 4000HD v2 Sport.
 Thanks for purchasing this EVOLVE 4000HD v2 Sport. - Please read this instruction manual to ensure correct use of the product prior to use. - Please keep this instruction manual in a safe place. - Please
PMI Borescope Lizard 100 Series User Guide
 PMI Borescope Lizard 100 Series User Guide Thank you very much for purchasing Lizard 100 borescope. Be sure to read this Instruction manual before using, for operating it safely and correctly. Please keep