AscTec Laser Scanner Mount V2 - manual
|
|
|
- Linda Lang
- 6 years ago
- Views:
Transcription

1 AscTec Laser Scanner Mount V2 - manual Mounting option: + -configuration Please follow the steps in this manual to mount your AscTec Laser Scanner Mount (LSM) onto your AscTec Pelican. For new users, please note, that the AscTec UAVs are completely tested and ready set up. If the laser scanner mount is not mounted due to transportation issues, you can just skip to page configuration If you want to change the orientation of your flight system, it is also possible to turn the laser scanner mount. To do that, unmount the laser scanner mount and follow the next steps. Before you attach the LSM to your AscTec Pelican, please decide in which direction the laser scanner needs to be facing. Fig. 1 shows the Pelican in the + - configuration, which means the nose of the flight system / laser scanner, is in the direction of the red flagged motor boom. Fig. 1 1
.")
2 Mounting option: x -configuration Fig. 2 shows the Pelican in the x -configuration, which means the nose of the flight system / laser scanner, is pointing in the direction between two motor booms (45 ). If you are flying the AscTec Pelican in the x - configuration, we recommend to mark both motor booms (front and right) with red tape as seen in Fig. 2. Technically, the front of the Pelican is depending on the orientation of the AscTec AutoPilot (IMU). For the position of the front, have a look at the AutoPilot in Fig. 19, page 9. Please contact support@asctec.de for information how to change the parameters of the AutoPilot, to switch the remote control commands to the x -configuration. XBee x - configuration Front Fig. 2 2


3 Orientation of the compass Depending on the configuration of your AscTec Pelican, the compass module needs to be positioned accordingly. Fig. 3 shows the orientation of the compass in the + -configuration. If you switch to the x - configuration, you will have to turn the compass on the laser scanner mount. Fig. 4 shows the orientation of the compass in the x - configuration. GPS compass Fig. 3 Fig. 4 3
. Use the same 3 screws and spacers to fix the compass. Fig.")
4 Turning the compass To reposition the compass, unscrew the white plastic screws and turn the compass 45 to the position corresponding to your configuration (page 3). Use the same 3 screws and spacers to fix the compass. Fig. 5 4


5 Preparing the + -configuration 1. Attach the 3 black L-connectors below the base plate (Fig. 6). Each L-connector is held to the base plate by 2 screws (Fig. 7). 2. Insert the laser scanner mount into the base plate, then fasten it with the included screws to the L-connectors below the plate (Fig. 8). 3. Feed the cables through the robber grommets and place them in the appropriate slots (Fig. 7). View from below R/C receiver power switch Front Fig. 6 Fig. 7 Fig. 8 5


6 Preparing the x -configuration 1. Attach the 3 black L-connectors below the base plate (Fig. 9). Each L-connector is held to the base plate by 2 screws (Fig. 10). 2. Insert the laser scanner mount into the base plate, then fasten it with the included screws to the L-connectors below the plate as shown in Fig Feed the cables through the robber grommets and place them in the appropriate slots (Fig. 10). View from below power switch Fig. 9 Fig. 10 Front Fig. 11 6
. 2.")
 and then put the laser scanner mount on top, in the position corresponding to the")
. 4.")
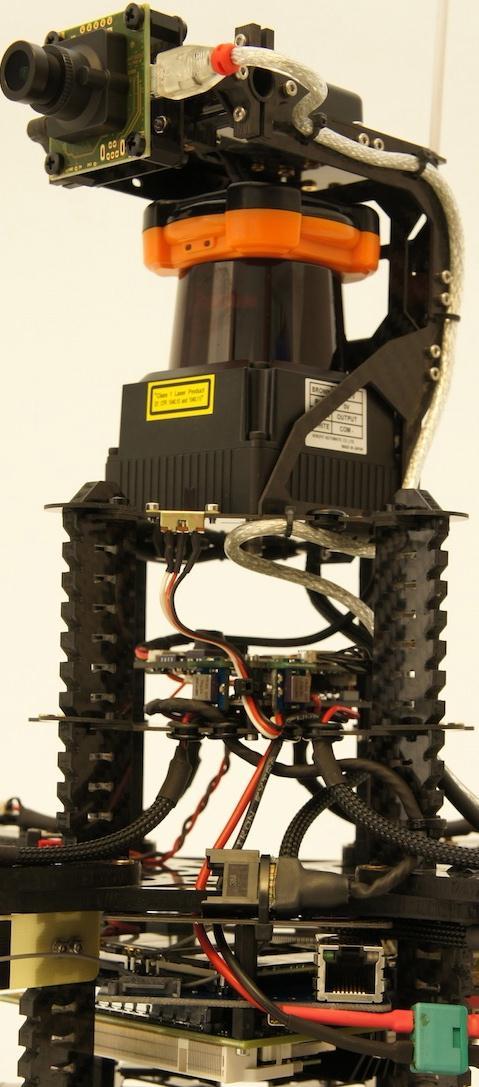
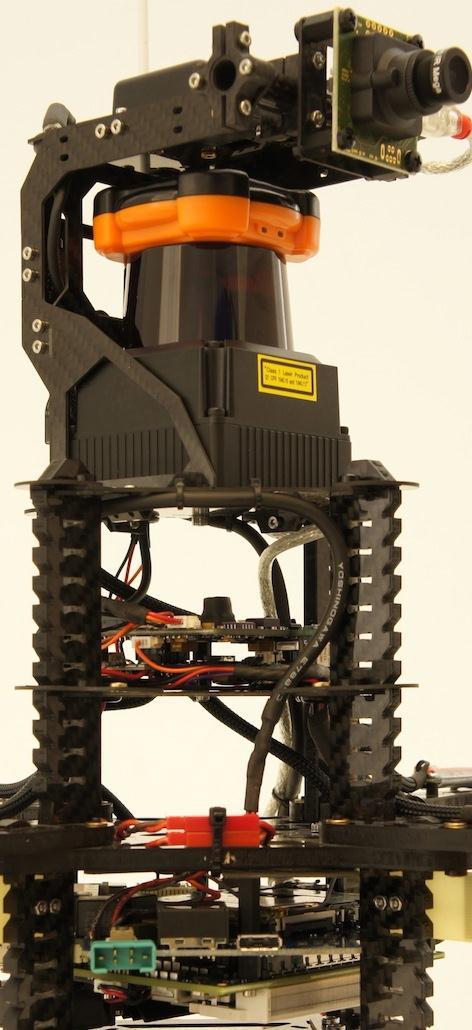
7 Mounting the AscTec Laser Scanner Mount V2 1. Insert the 4 support keys in the third slot from above of the Pelican foot (Fig. 12). 2. Place the 4 half moon clips onto the 4 support keys (Fig. 13) and then put the laser scanner mount on top, in the position corresponding to the AscTec Pelican configuration ( + - or x - configuration on page 1 and page 2). 3. Use the black plastic screws to tighten the laser scanner mount (Fig. 14). 4. Attach the power switch on the base plate of the LSM (Fig. 14). Fig. 12 Fig. 13 Fig. 14 7
 with the compass-cable to the compass connector (Fig. 15 and Fig. 16). Connect the Xbee (Fig.")
 with the R/C data-cable to the LL I/O (Fig. 15 and Fig. 17). Connect the Futaba receiver (Fig.")
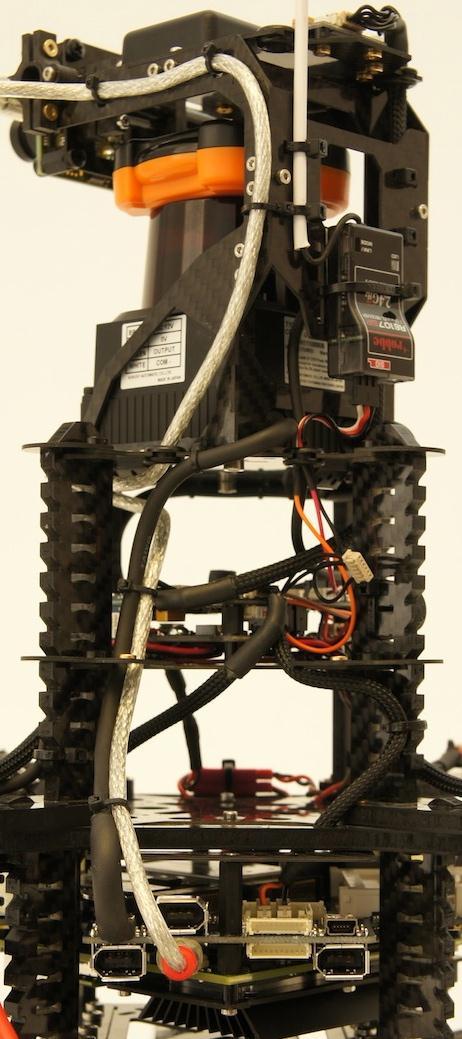
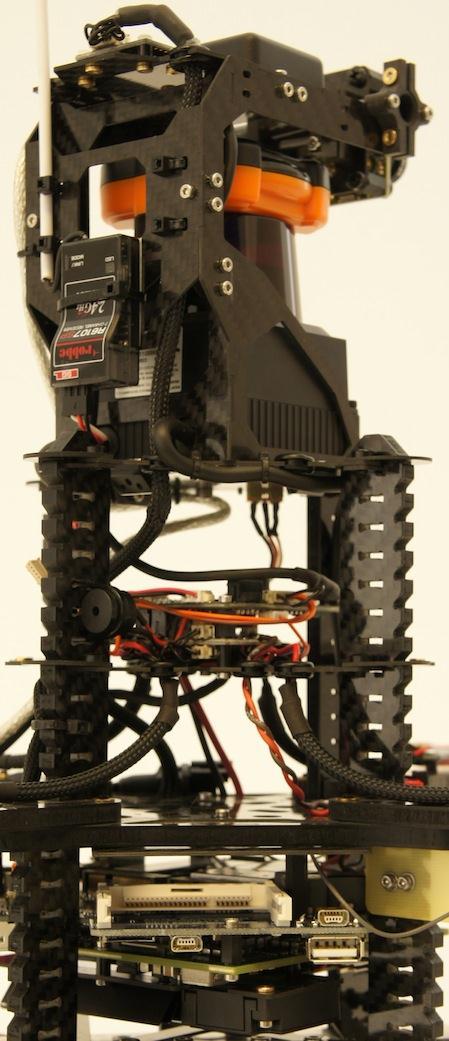
8 Wiring of the sensors on the AscTec Laser Scanner Mount V2 Connect the compass (Fig. 3) with the compass-cable to the compass connector (Fig. 15 and Fig. 16). Connect the Xbee (Fig. 2) with the XBee-cable to the LL Serial 0 (Fig. 15 and Fig. 16). Connect the Futaba receiver (Fig. 7) with the R/C data-cable to the LL I/O (Fig. 15 and Fig. 17). Connect the Futaba receiver (Fig. 7) with the R/C power-cable to LL Serial 1 / R/C receiver (Fig. 16 and Fig. 18). compass XBee R/C data Fig. 15 Fig. 16 Fig. 17 8

.")

9 Wiring of the sensors on the AscTec Laser Scanner Mount V2 Connect the GPS-module (Fig. 3) with the GPS-cable to the HL Serial 1 / GPS (Fig. 18 and Fig. 19). Please make sure, that all cables are fixed with zip ties, that they can not get into the propellers of your flight system. GPS + -config. front R/C power x -config. front Fig. 18 Fig. 19 9


10 Mounting the laser scanner If the camera mount option 1 or 2 is in use, you need to rotate it in an upwards direction before mounting the laser scanner. To rotate it up, loosen the two screws as seen in Fig. 21. Fig. 21 Fig

. 2. Screw the laser scanner to the LSM with 4 screws below the")

11 Mounting the big laser scanner (Hokuyo UTM-30LX) 1. Insert the laser scanner carefully into the LSM. The cables run through the mount (Fig. 23). 2. Screw the laser scanner to the LSM with 4 screws below the base plate (Fig. 24). 3. Attach the laser scanner cables with zip ties as seen in Fig. 25. Make sure the cables can not get into the propellers of the flight system. Fig. 23 Fig. 24 Fig

. 2. Solder the power cable to the 5V power")
12 Mounting the small laser scanner (Hokuyo URG-04LX) 1. Attach the receiver to the LSM with a zip tie.(fig. 26). 2. Solder the power cable to the 5V power supply on the autopilot.(fig.27) Fig. 26 Fig


13 Mounting the small laser scanner (Hokuyo URG-04LX) 1. Attach the GPS and compass cable with zip ties as seen in Fig. 28 and Fig.29. Make sure the cables can not get into the propellers of the flight system. Fig. 28 Fig
14 06. 14

15 Check your flight system After installing the laser scanner, make sure to check all functions of your flight system carefully before flying! Especially an incorrect mount of the compass can lead to problems flying in the GPS mode. Check its function by monitoring the telemetric data with the AutoPilot Control software. If the nose is pointing towards South, the compass should show approx. 180 (Fig. 30). To test the GPS-mode the first time, find a large open field and make sure a safety pilot is ready to switch back to the height mode. If you observe an unusual behavior, please read the manuals or contact the AscTec support for further instructions. We wish you good flights with your AscTec UAV! Fig
MacBook Pro 15" Core 2 Duo Models A1226 and A1260 SSD Installation
 MacBook Pro 15" Core 2 Duo Models A1226 and A1260 SSD Installation Written By: Dozuki System 2017 guides.crucial.com Page 1 of 10 INTRODUCTION You can install hard drives up to 9.5mm thick. Some drive
Phantom 2 Reference Guide
 Phantom 2 Reference Guide Contents Section 1: Operation and Preparing for Flight. 2 Transmitter introduction 2 Controlling the Drone 2 Turning on the Transmitter 3 Range Extender 3 Basic Drone Parts 4
HQuad500 Frame Assembly Guide
 HQuad500 Frame Assembly Guide V1.0 June 2015 1 What s Included Kit Content Hardware Bag Content 2 HQuad500 Assembly 2.1 Arm & Motor Mount Sub Assembly 2.2 Landing Gear Step 1 2.3 Center Plates Sub Assembly
How to assemble and disassemble Anafi
 How to assemble and disassemble Anafi Prerequisites The best way to repair ANAFI is to use Parrot official drones repair kit. You will need the cruciform as well as the Torx 5 (T5) in order to carry out
RedEdge/3DR Solo INTEGRATION GUIDE
 by RedEdge/3DR Solo INTEGRATION GUIDE P/N: 900-00008 Rev 01 May 2017 Table of Contents Thank you for your purchase! 1 What s inside? 1 What s required 2 Let s get started! 2 Attaching the power board 2
LED Maintenance Instructions
 Chapter 5 LED Maintenance Instructions This guide describes the maintenance procedures for the LED portion of your DayStar or TekStar sign. 1.800.237.3928 stewartsigns.com Rev1802 Intentionally Left Blank
A B C D REV 1 SHEET 1 OF 1 1 G NO assy_011 DW TITLE SIZE C SCALE 9/17/2016 N 2 2 FG APPROVED CHECKED QA M Henri DRAW PHALANX A B C D
 4 A BPHALANX Greetings and good fortune be on you as you have aquired your new greatness. As you work through the assembly passages, please, READ THE DIRECTIONS! There are fine points covered that you
CINTENNA ANTENNA REPAIR GUIDE
 The Cintenna is a great tool when looking to transmit WIRELESS DMX data over obstacles or hard to reach places. Wireless DMX can have its issues when not having a good line of sight between the transmitter
Mac Mini Mid 2010 SSD Installation
 Mac Mini Mid 2010 SSD Installation Replace your Mac Mini Mid 2010's hard drive for more storage space and an increase in speed. Written By: Dozuki System 2017 guides.crucial.com Page 1 of 15 INTRODUCTION
Main Menu. Menu II. UNPACKING AND SETUP II-5. RADF MR-3021/3022
 PRECAUTIONS UNPACKING ACCESSORIES SETUP CLEARANCE ADJUSTMENT OPERATION CHECK SKEW ADJUSTMENT LEADING EDGE POSITION ADJUSTMENT HORIZONTAL POSITION ADJUSTMENT COPY RATIO ADJUSTMENT There is no difference
Warning Before Installation. Package Contents EN - 1. Refer to your user s manual for the operating temperature.
 5000020G Warning Before Installation English Power off the Network Camera as soon as smoke or unusual odors are detected. Do not place the Network Camera on unsteady surfaces. Do not insert sharp or tiny
Manual DJI Phantom 2 Vision Dronexpert Gimbal
 Manual DJI Phantom 2 Vision Dronexpert Gimbal V2 1. Remove battery from the phantom. 2. Place the Phantom upside down. 3. Pull the jackplug out of the camera 4. Lift the frame carefully from rubber holders.
Cutter Option Installation Instructions
 This kit includes the parts and documentation necessary to install the cutter option on the Zebra XiII, XiIII, and XiIIIPlus-Series printers. NOTE: The Cutter Option is not available for the 96XiIII. Adding
25 Sport Scope Instruction Manual
 25 Sport Scope Instruction Manual Dear Customer, We appreciate your business and value your support for our product. At Sport Scope, we strive to provide our customers with quality, easy to use, and affordable
Q2 XBee Handheld Controller Assembly Guide
 Q2 XBee Handheld Controller Assembly Guide Copyright Quantum Robotics Inc. Q2 Controller V1.0 1 Parts List: The kit comes with 14 individual bags. 1. Case Top and Bottom 2. Case Screw Package containing:
Connecting PLH3D-6W Laser Heads to Openbuilds Acro-System: Getting Started Guide
 Connecting PLH3D-6W Laser Heads to Openbuilds Acro-System: Getting Started Guide Table of Contents 1. Attaching the Laser Head to the X-Y CNC... 2 2. Connecting the Electronics... 5 3. Installation and
Installation Guide. Retrofit Kit for USB Ready Intraoral Systems
 Installation Guide Retrofit Kit for USB Ready Intraoral Systems Table of Contents Wall-Mount Retrofit Kit... 2 Introduction... 2 Connecting the Articulating and Horizontal Arm Cables... 2 Installing the
Nov. 07, 2013 p. 5 - changed the B axis unit value to from Changed by Randy per Frank s request.
 Correction notes Nov. 07, 2013 p. 5 - changed the B axis unit value to 45.1389 from 40.0000. Changed by Randy per Frank s request. Jan. 22, 2018 p. 5 - changed the B axis unit value and corresponding picture
Royal RVV-500 (B) Retrofit Kit
 Retrofit Kit") Optipay BV/RC/CC into a Non-Fascia Vending Machine This document contains information for installing and configuring the JCM Optipay DBV-01 Bill Validator, RC-10 Bill Recycler and A-66 Coin Changer into
Optipay BV/RC/CC into a Non-Fascia Vending Machine This document contains information for installing and configuring the JCM Optipay DBV-01 Bill Validator, RC-10 Bill Recycler and A-66 Coin Changer into
Panasonic DMP-BD35/BD55
 Panasonic DMP-BD35/BD55 Region switching guide With the mod. chip fitted the player will automatically play DVD's from all regions (1-6), but for Blu-ray disc playback the region must be manually selected.
ASSET LGA1366 Top-side Probe
 ASSET LGA1366 Top-side Probe (Manual version 1.1) For gaining test access to the debug port of Intel processors that are designed for use in LGA1366 Sockets (Socket B). These include the Intel Core i7
Installing 6 Indexer: PRS Standard Tools
 888-680-4466 ShopBotTools.com Installing 6 Indexer: PRS Standard Tools Copyright 2016 ShopBot Tools, Inc. page 1 Copyright 2016 ShopBot Tools, Inc. page 2 Table of Contents Overview...5 Installing the
Replacing the Encoder Strip
 6-1-11. Replacing the Encoder Strip The following describes the procedure for replacing the Encoder Strip. Refer to the diagram below for identifying the parts and their positions. (The numbers shown in
FALCON CP-90 FPV RACING DRONE BUILD GUIDE INSTRUCTIONS V1.0
 FALCON CP-90 FPV RACING DRONE BUILD GUIDE INSTRUCTIONS V1.0 INTRODUCTION The present guide was developed to show you how to build your personal Racing Drone. The model we will be assembling together is
Dual Mount Universal Kit Aftermarket CMOS Camera with Optional Parking Gridlines Installation Instructions (Kit # )
") Please read thoroughly before starting installation and check that kit contents are complete. Items Included in Kit: Chassis Harness Power Harness with RCA connectors Camera mounted on license plate bracket
Please read thoroughly before starting installation and check that kit contents are complete. Items Included in Kit: Chassis Harness Power Harness with RCA connectors Camera mounted on license plate bracket
ColorMaxLP Label Roll Rewinder
 ColorMaxLP Label Roll Rewinder 5/2017 INSTALLATION/OPERATOR MANUAL Included: Rewinder Base plate Power supply Power Cord Thumb screws Assembly instructions 1. Install base plate Lift front of printer and
LG Chocolate Touch VX-8575 Side Buttons Replacement
 LG Chocolate Touch VX-8575 Side Buttons Replacement This guide shows how to remove the five side buttons (camera, speaker, volume, music, and lock/unlock) on the LG Chocolate Touch VX-8575. Written By:
Maintenance. Every Flying Session:
 Maintenance Maintenance The Draganflyer series aircraft feature a direct drive system requiring minimal maintenance as compared to a tradition style helicopter with servo linkages, gears, drive shafts,
Plasma Retrofit Guide Upgrade Kit Installation Instructions
 Upgrade Kit Installation Instructions 1. TMC 3-in-1 Installation 1.1 Unplug the power cable from your CPR800 Control Unit and open the lid. Note The pictures show a NEMA 23 CRP800 Control Unit but the
Articulating TV/Monitor Clamp/Grommet Desk Mount Model: DE640S (Hydro Series)
") Articulating TV/Monitor Clamp/Grommet Desk Mount Model: DE640S (Hydro Series) Instruction Manual Images may be different from actual product Disclaimer It is Dyconn s intention to have all the correct
Articulating TV/Monitor Clamp/Grommet Desk Mount Model: DE640S (Hydro Series) Instruction Manual Images may be different from actual product Disclaimer It is Dyconn s intention to have all the correct
Supplementary instructions. Plug connector Harting HAN 8D. for continuously measuring sensors. Document ID: 30376
 Supplementary instructions Plug connector Harting HAN 8D for continuously measuring sensors Document ID: 30376 Contents Contents 1 For your safety 1.1 Appropriate use... 3 1.2 Impermissible use... 3 1.3
Mac Mini Mid 2011 SSD Installation
 Mac Mini Mid 2011 SSD Installation Replace your Mac Mini Mid 2011's hard drive for more storage space and an increase in speed. Written By: Dozuki System 2017 guides.crucial.com Page 1 of 14 INTRODUCTION
X CNC Control with Mitsubishi Drives and Servo Motors Setup Guide
 X15-350-04 CNC Control with Mitsubishi Drives and Servo Motors Setup Guide 2007 Mach Motion MachMotion X15-350-04 CNC Control with: Mitsubisi Drives Mitsubisi Motors 24V Power Supply IO6 Breakout Board
Quad Monitor Desk Stand - 13" to 24" Installation Instructions
 Quad Monitor Desk Stand - 13" to 24" Installation Instructions 04-0885A 1 Unpacking Carefully remove the contents and lay out on cardboard or other protective surface Check package contents against the
LENS REPLACEMENT PROCEDURE
 LCD PROJECTOR LENS MODEL LNS-T31A/W31A LENS REPLACEMENT PROCEDURE NOTE; Lens installation is different in cabinet design (Type A and B). Before installation the lens, check cabinet design and proper installation
Constructing a Low-Cost Mobile Eye Tracker
 ==== Constructing a Low-Cost Mobile Eye Tracker ==== Section 1: Introduction This is a detailed set of instructions on how to build a low-cost mobile eye-tracking system from off-the-shelf components.
How to Perform an IBM ThinkPad X60s Fan Spindle Replacement
 How to Perform an IBM ThinkPad X60s Fan Spindle Replacement This guide details an IBM ThinkPad X60s fan spindle replacement. Written By: Samuel Lees ifixit CC BY-NC-SA www.ifixit.com Page 1 of 10 INTRODUCTION
Upgrade Instructions. P/N Revision A. October Printer Terminal Holder * *
 Upgrade Instructions P/N 96-08-0 Revision A October 000 480 Printer Terminal Holder P/N 96-08-0 Revision A *96080* Instructions This terminal holder connects the INTERMEC R 600 Series and 700 Series Computers
Assembly Instructions for #5630 Medication PalWOW
 Assembly Instructions for #5630 Medication PalWOW Before assembling, please familiarize yourself with all the parts and check to make sure you have all the parts as listed below. A B A & B - The box in
Specification. Width - 190mm Length - 230mm Thickness - 8mm Assembled height - 78mm Weight - 805g Table material - AL5052 Screw material - SS304
 Specification Width - 190mm Length - 230mm Thickness - 8mm Assembled height - 78mm Weight - 805g Table material - AL5052 Screw material - SS304 Motherboard support - Mini ITX Drive support - Up to 2 x
INSTALLING ColorDMD LED DISPLAY IN BALLY GAMES WITH DISPLAY ON LAMP BOARD
 INSTALLING ColorDMD LED DISPLAY IN BALLY GAMES WITH DISPLAY ON LAMP BOARD These instructions are for mounting a ColorDMD LED display in a Bally game that has the display mounted on the swinging backbox
OctoCam - Pi Zero W Project Kit
 OctoCam - Pi Zero W Project Kit PIM286 A cute, connected, cephalopod camera to stick on your window or sit on your shelf! The OctoCam kit has everything* you'll need, including a Pi Zero W, a super-small
Cannes Edition Product List
 Cannes Edition Product List Congratulations on your purchase of a DSLRProsCannes Edition Aerial Kit. Inside your Special Edition tough case you will find the following items with numbers that correspond
Mac Mini Mid 2011 SSD Dual Drive Installation
 Mac Mini Mid 2011 SSD Dual Drive Installation Install a second hard drive in your mid 2011 Mac Mini. Written By: Dozuki System 2017 guides.crucial.com Page 1 of 19 INTRODUCTION Use this guide to install
INSTALLATION INSTRUCTIONS
 INSTALLATION INSTRUCTIONS 19 20 21 01 07 22 23 13 10 12 08 17 18 11 02 14 15 04 03 16 WELCOME PARTS LIST Thank you for purchasing this HealthPoint Technology Cabinet from Humanscale! Before you begin installing
2 x Dynamic Arms on 135 Post with C-Clamp
 Installation Guide AWMS-2-D13-C 2 x Dynamic Arms on 135 Post with C-Clamp COMPONENT CHECKLIST RANGE A AWM-LC Post Clamp B AWM-AD Dynamic Arm (x2) C AWM-P13 135 Post D AWM-FC C-Clamp CONTENTS C-Clamp Page
ASSEMBLY AND ADJUSTMENT
 EDGE-WALL MONITOR ARM EDGE-WALL Rev A 2/17 Model EDGE-WALL-SLV ASSEMBLY AND ADJUSTMENT EDGE-WALL MONITOR ARM PLEASE REVIEW these instructions before beginning the installation. Check that all parts and
Panasonic DMP-BD60/BD80
 Panasonic DMP-BD60/BD80 Region switching guide With the mod. chip fitted the player will automatically play DVD's from all regions (1-6), but for Blu-ray disc playback the region must be manually selected.
PING))) Kit for Stingray (#28985)
)) Kit for Stingray (#28985)") Web Site: www.parallax.com Forums: forums.parallax.com Sales: sales@parallax.com Technical: support@parallax.com Office: (916) 624-8333 Fax: (916) 624-8003 Sales: (888) 512-1024 Tech Support: (888) 997-8267
Web Site: www.parallax.com Forums: forums.parallax.com Sales: sales@parallax.com Technical: support@parallax.com Office: (916) 624-8333 Fax: (916) 624-8003 Sales: (888) 512-1024 Tech Support: (888) 997-8267
P160 User s Manual Manuel de l utilisateur Anwenderhandbuch Manuale per l operatore Manual del usuario
 P10 User s Manual Manuel de l utilisateur Anwenderhandbuch Manuale per l operatore Manual del usuario At Antec, we continually refine and improve our products to ensure the highest quality. So it's possible
21 TRACK MAINTENANCE GUIDE
 Mountain Engineering II, Inc. 21 TRACK MAINTENANCE GUIDE 1233 Sherman Drive, Longmont, CO 80501-6133 303-651-0277 303-651-6371 (fax) www.mountainengineering.com Table of contents Table of contents...2
Asus ZenFone 2 Motherboard Replacement
 Asus ZenFone 2 Motherboard Replacement If you have problems with your phone rebooting at random times, you could have a faulty motherboard in your phone. Written By: Eduardo Nodarse ifixit CC BY-NC-SA
MINDRACER USER MANUAL
 MindPX T h e U l t i m a t e Racer MINDRACER USER MANUAL Highlights - Ultra mini size, weight only ~6g - High performance F4 168MHz floating point processor, super fast throttle response - Support OneShot
Series 1780 dynamometer and thrust stand datasheet
 Series 1780 dynamometer and thrust stand datasheet Typical use Inrunner and outrunner brushless motor characterization (0-100A) Propeller characterization (max 40 ) Servo testing and control Battery endurance
3 Indexer Installation For PRSalpha Tools
 888-680-4466 ShopBotTools.com 3 Indexer Installation For PRSalpha Tools Copyright 2016 ShopBot Tools, Inc. page 1 Copyright 2016 ShopBot Tools, Inc. page 2 Table of Contents General Safety and Precautions...5
Field Service Procedure - Pol Motor Kit, XX97, XX97A, XX97B, XX00 & XX00B
 1. Brief Summary: Troubleshooting document for diagnosing a fault with and replacing the pol motor on the XX97, XX97A, XX97B, XX00 and Series TVRO and VSAT antennas. 2. Checklist: Verify Range of Motion
RedEdge-M TM / DJI Matrice 100 INTEGRATION GUIDE
 by RedEdge-M TM / DJI Matrice 100 INTEGRATION GUIDE P/N: 900-00009 Rev 01 - Nov 2017 Table of Contents Thank you for your purchase! 1 What s inside? 1 What s Required? 2 Let s get started! 2 Attaching
EVOLVE1-M MONITOR ARM
 EVOLVE1-M MONITOR ARM EVOLVE1-M Rev A 2/17 Model EVOLVE1-M-SLV Model EVOLVE1-M-BLK Model EVOLVE1-M-WHT ASSEMBLY AND ADJUSTMENT EVOLVE1-M MONITOR ARM PARTS AND TOOLS PLEASE REVIEW these instructions before
CNC 200MM COIL WINDER
 CNC 200MM COIL WINDER INSTRUCTIONS IMPORTANT: PLEASE READ THESE INSTRUCTIONS CAREFULLY TO ENSURE THE SAFE AND EFFECTIVE USE OF THIS MACHINE. Version 3 21/03/2018 [1] CONTENTS Declaration Of Conformity...
PoE/FPR Kit for Auto-Sync Time Clock. The Auto-Sync Time Clock is a validated time system with a Web interface and auto discovery.
 ASTCPOEK PoE/FPR Kit for Auto-Sync Time Clock The Auto-Sync Time Clock is a validated time system with a Web interface and auto discovery. The ASTCPOEK Kit provides Power over Ethernet with Full Power
IMPORTANT AS YOU REMOVE THE CONNECTORS LABEL THE CONNECTOR WITH THE NAME OF PLUG WITH THE SHARPIE
 TOOLS REQUIRED : small flat head screwdriver no wider than ⅛ or 3mm wide, phillips head screwdriver, 3mm allen wrench, self tapping screws #6 x ½, ¼ hex head driver, electric drill, wire cutters, fine
NANOMIND 110 USER MANUAL
 NANOMIND 110 USER MANUAL Highlights - MindRacer in nano size frame, running MindPX & PX4 flight stack - heavy lifter, maximum take-off weight up to 80 g - 5~7 minutes flight time - full modularized, stackable,
Supplementary instructions. Plug connector Harting HAN 7D. For point level sensors. Document ID: 34456
 Supplementary instructions Plug connector Harting HAN 7D For point level sensors Document ID: 446 Contents Contents For your safety.... Appropriate use.... General safety instructions.... Safety instructions
Ematic Genesis Screen Replacement
 Screen replacement for the Ematic Genesis tablet Written By: Justin Rohrman ifixit CC BY-NC-SA www.ifixit.com Page 1 of 11 INTRODUCTION If the screen is cracked or damaged it may need to be replaced. This
Instructions for installing your QuiltCam on your Gammill quilt machine.
 Instructions for installing your QuiltCam on your Gammill quilt machine. The items include with your QuiltCam Items included in all packages: QuiltCam Control Box, See Figure 1 Power Supply, Figure 2 Video
Supplementary instructions. Plug connector ISO for level sensors. Document ID: 30380
 Supplementary instructions Plug connector ISO 4400 for level sensors Document ID: 30380 Contents Contents For your safety. Appropriate use... 3.2 General safety instructions... 3.3 Safety instructions
Archos 605 WiFi Battery Replacement
 Archos 605 WiFi Battery Replacement Replacing the battery on the Archos 605 WiFi requires patience. The most interesting part is that the Archos may come on at any time if the power button is pressed.
Supplementary instructions. Plug connector ISO for continuously measuring sensors. Document ID: 30375
 Supplementary instructions Plug connector ISO 4400 for continuously measuring sensors Document ID: 30375 Contents Contents For your safety. Appropriate use... 3.2 Impermissible use... 3.3 General safety
 Photography tripod Why do I Need a Tripod? http://www.bhphotovideo.com/explora/video/buying-guides/what-look-when-you-are-looking-videotripod Tripod Tricks? http://vimeo.com/videoschool/lesson/110/tripod-tricks
HP Photosmart c3180 Main Circuit Board Replacement
 HP Photosmart c3180 Main Circuit Board Replacement Replacing a faulty main circuit board. Written By: Jim ifixit CC BY-NC-SA www.ifixit.com Page 1 of 26 TOOLS: Spudger (1) T10 Torx Screwdriver (1) ifixit
ATTENTION: OBSERVE PRECAUTIONS FOR HANDLING ESD-SENSITIVE DEVICES
 15 Monitor Removal 1. Turn off and unplug the game. 2. Place something in front of the game to brace the bezel once the strain relief cord is undone, then unlock and open the CPU section. 3. Remove the
Installation Manual Konica Minolta Kit ~ Bizhub ~
 Konica Minolta Kit ~ Bizhub ~ 132312 Installation Manual Konica Minolta Kit ~ Bizhub ~ 132312 Product Version: Colour V5 Version of this manual: 2.2.30 Inepro Kit number: 132312 Konica Kit number: 9967000949
GV-EL124S Electric Strike
 GV-EL124S Electric Strike Featured with a built-in door status sensor, the GV-EL124S is a fail-secure electric strike, but it is field convertible from fail secure to fail safe. It can be mounted either
Floor Standing Pedestal
 2336 K052 Floor Standing Pedestal Kit Instructions Issue C Revision Record Issue Date Remarks A Feb 20021 First issue B June 2007 Added pedestal floor bolting procedure C Mar 2011 Added Universal Mounting
X-Hubsan App. The Battery. Aircraft Component Breakdown
 E N X-Hubsan App Download the X-Hubsan application for free by scanning the code on the right or by finding it on the App Store (ios) and Google Play (Android). X-Hubsan The Battery Wall Adapter Balance
MacBook Pro 15" Core 2 Duo Models A1226 and A1260 SSD Dual Drive Installation
 MacBook Pro 15" Core 2 Duo Models A1226 and A1260 SSD Dual Drive Installation Use this guide to install a second hard drive in place of the optical drive. Written By: Dozuki System 2017 guides.crucial.com
Garage Door Control Button. What s inside: Quickstart Guide Model No. WGO x Garage Door Control Button
 Add-On Device Quickstart Guide 1 Garage Door Control Button Quickstart Guide Model No. WGO2001 What s inside: 1x Garage Door Control Button 1x Power Adapter 2x U-fork Wires Mounting Accessories and Double-sided
Metham Aviation Design Limited Station Approach, Four Marks, Alton. Hants. GU34 5HN Tel +44 (0) Fax +44 (0)
 Fax +44 (0)") Contents Page General Information 1 Items Supplied 1 Variants 1 Compatibility with other products 2 Mounting the Housing assembly 2 Mounting the Camera/Lens assembly 3 Safety Precautions 4 Control Connections
Contents Page General Information 1 Items Supplied 1 Variants 1 Compatibility with other products 2 Mounting the Housing assembly 2 Mounting the Camera/Lens assembly 3 Safety Precautions 4 Control Connections
Olympus Stylus 1030 SW Camera Lens Replacement
 Olympus Stylus 1030 SW Camera Lens Replacement Written By: Shanmei Zheng ifixit CC BY-NC-SA www.ifixit.com Page 1 of 11 TOOLS: Phillips #00 Screwdriver (1) ifixit Opening Tools (1) Spudger (1) T6 Torx
Counters, Process Displays, Timers, Tachometers. Product overview
 Counters, Process Displays, Timers, Tachometers Product overview Totalizers mechanical Stroke counters Three designs, optional with 5-, 6- or 7-digit display. Manual reset Surface mount with mounting plate
How to add a Second Drive to a Mac mini (2012) using the OWC Data Doubler SSD/2.5 Installation Kit
 using the OWC Data Doubler SSD/2.5 Installation Kit") Instructional Video Series How to add a Second Drive to a Mac mini (2012) using the OWC Data Doubler SSD/2.5 Installation Kit Skill Level: Challenging Time to Complete: Approximately 45 Minutes Required
Instructional Video Series How to add a Second Drive to a Mac mini (2012) using the OWC Data Doubler SSD/2.5 Installation Kit Skill Level: Challenging Time to Complete: Approximately 45 Minutes Required
Ag Leader Technology. DirectCommand Installation RoGator Model Years
 Note: Indented items indicate parts included in an assembly listed above Part Name/Description Part Number Quantity Direct Command Kit 4100550 1 Dual Lock 2000052-9 1 Dual Lock 2000053-9 1 Hardware Kit
PTC/PT100 board 2.0 Option
 PTC/PT100 board 2.0 Option For Emotron VFX/FDU 2.0 AC drive and Emotron TSA softstarter Instruction Manual English PTC/PT100 board 2.0 Option For Emotron VFX/FDU 2.0 AC drive and Emotron TSA softstarter
MCH WIRE HARNESS WITH QUICK DISCONNECT REPLACEMENT Initial Release 1/31/2013
 1. Table of Contents 1. Table of Contents Page 1 2. Remove Failed MCH-103.2 Page 1 3. Install MCH-103.2 to MCH-102NW Page 2 4. Install NC3FX-HD to MCH-103.2 Page 3 5. Install MCH-103.2 Battery Terminal
VISY-X. Technical Documentation. Subsequent installation of VISY-Density. Edition: Version: 2 Art. No.:
 Technical Documentation VISY-X Subsequent installation of VISY-Density Edition: 2016-08 Version: 2 Art. No.: 350063 FAFNIR GmbH Schnackenburgallee 149 c 22525 Hamburg Tel.: +49 / 40 / 39 82 07 0 Fax: +49
VZ-SnapCrane-12 Professional Modular Camera Crane Instruction Manuall
 VZ-SnapCrane-12 Professional Modular Camera Crane Instruction Manuall WEIGHTS NOT INCLUDED STANDARD 1 -HOLE BARBELL WEIGHTS ARE AVAILABLE AT MOST SPORTING GOODS STORES For a video tutorial SnapCrane Build,
EASTERN LABS. Instructions Model RM /25/2007. Operation. Junction Box Assembly. Different Types of Switch Installations
 EASTERN LABS Instructions Model RM-1205 04/25/2007 Operation Junction Box Assembly Different Types of Switch Installations Counter Mounting Suggestions Operation Total Counter Mix Counter Thru counter
VZ-SnapCrane-16 Professional Modular Camera Crane Instruction Manuall
 VZ-SnapCrane-16 Professional Modular Camera Crane Instruction Manuall WEIGHTS NOT INCLUDED STANDARD 1 -HOLE BARBELL WEIGHTS ARE AVAILABLE AT MOST SPORTING GOODS STORES For a video tutorial SnapCrane Build,
EDUCATIONAL SPECTROPHOTOMETER ACCESSORY KIT AND EDUCATIONAL SPECTROPHOTOMETER SYSTEM
 GAIN 0 Instruction Manual and Experiment Guide for the PASCO scientific Model OS-8537 and OS-8539 02-06575A 3/98 EDUCATIONAL SPECTROPHOTOMETER ACCESSORY KIT AND EDUCATIONAL SPECTROPHOTOMETER SYSTEM CI-6604A
BEST Control System. Dave Wilkerson. September 12, 2015
 BEST Control System BEST Robotics, Inc. Dave Wilkerson September 12, 2015 Copyright 2012 BEST Robotics, Inc. All rights reserved. 1 Servos Joystick Return Kit AAA Battery Charger Analog WiFi key USB/Tether
Curve-N-Line Camera Video Slider with Motion Control System (P-CNL-3MC)
") Curve-N-Line Camera Video Slider with Motion Control System (P-CNL-3MC) I N STRUC TI ON MANUAL All rights reserved No part of this document may be reproduced, stored in a retrieval system, or transmitted
Curve-N-Line Camera Video Slider with Motion Control System (P-CNL-3MC) I N STRUC TI ON MANUAL All rights reserved No part of this document may be reproduced, stored in a retrieval system, or transmitted
HOW TO REPLACE A PARKER INVERTER DRIVE WITH A YASKAWA V1000 INVERTER DRIVE
 HOW TO REPLACE A PARKER INVERTER DRIVE WITH A YASKAWA V1000 INVERTER DRIVE Important: Please read this document in its entirety before removing the Parker VFD drive and installing the Yaskawa V1000 drive.
641G-001A PRINTER KIT INSTRUCTIONS
 641G-001A PRINTER KIT INSTRUCTIONS P-11351 5/05/98 SAFETY The installer of this equipment must assume the responsibility for his own safety, and that of those working around him. He must also make sure
PTC/PT100 board 2.0 Option
 PTC/PT100 board 2.0 Option For Emotron VFX/FDU 2.0 AC drive Emotron VFXR/FDUL Emotron FlowDrive Emotron TSA softstarter Instruction Manual English PTC/PT100 board 2.0 Option For Emotron VFX/FDU 2.0 AC
ZC-OH5 TAMPER-RESISTANT INDOOR/OUTDOOR HOUSING INSTRUCTION MANUAL FOR USE WITH GANZ ZC-D5000 SERIES MINIDOME CAMERAS
 ZC-OH5 TAMPER-RESISTANT INDOOR/OUTDOOR HOUSING INSTRUCTION MANUAL FOR USE WITH GANZ ZC-D5000 SERIES MINIDOME CAMERAS Please carefully read and observe all instructions and warnings contained in this manual
911 Additional Instructions. Barcode scanner
 911 Additional Instructions Barcode scanner IMPORTANT READ CAREFULLY BEFORE USE KEEP FOR FUTURE REFERENCE All rights reserved. Property of Dürkopp Adler AG and protected by copyright. Any reuse of these
JET RANGER / LONG RANGER INSTALLATION MANUAL. Tyler - Nose Mount For Bell 206 & 206L Series Helicopters FAA STC # SH2256NM
 JET RANGER / LONG RANGER INSTALLATION MANUAL Tyler - Nose Mount For Bell 206 & 206L Series Helicopters FAA STC # SH2256NM PLEASE RETURN THIS MANUAL WITH EQUIPMENT This manual is available for download
Removal and Installation8
 8 Screw Types 8-4 Top Cover Assembly 8-5 Left Hand Cover 8-6 Right Hand Cover 8-10 Front Panel Assembly 8-14 Left Rear Cover 8-15 Right Rear Cover 8-16 Extension Cover (60" Model only) 8-17 Media Lever
imac Intel 21.5" EMC 2389 SSD Dual Drive
 imac Intel 21.5" EMC 2389 SSD Dual Drive Installation Use this guide to install a second SSD in place of the optical drive. Written By: Dozuki System 2017 guides.crucial.com Page 1 of 17 INTRODUCTION There
DirectCommand Installation Case/Flexi-Coil/New Holland Air Cart Kit (Variable Rate Electro Hydraulic Systems) Ag Leader Technology
 Ag Leader Technology") Part Name/Description Part Number Quantity Flexi-Coil Air Seeder Kit 4100889 1 Generic Cable Installation Kit 2000901-1 1 Hardware Kit Large Module 2001354-1 1 Deutsch Dust Plug 8-pin 2002899-8 1 Quick
Part Name/Description Part Number Quantity Flexi-Coil Air Seeder Kit 4100889 1 Generic Cable Installation Kit 2000901-1 1 Hardware Kit Large Module 2001354-1 1 Deutsch Dust Plug 8-pin 2002899-8 1 Quick