Copyright. Trademarks. FCC Compliance. Equipment Recycling. Canada. EN Warning
|
|
|
- Sherilyn Woods
- 6 years ago
- Views:
Transcription
1
2
3 Copyright Kodak, All rights reserved. This document is also distributed in Adobe Systems Incorporated's PDF (Portable Document Format). You may reproduce the document from the PDF file for internal use. Copies produced from the PDF file must be reproduced in whole. Trademarks Adobe, Acrobat, Adobe Illustrator, Distiller, Photoshop, PostScript, and PageMaker are trademarks of Adobe Systems Incorporated. Apple, AppleShare, AppleTalk, imac, ImageWriter, LaserWriter, Mac OS, Power Macintosh, and TrueType are registered trademarks of Apple Computer, Inc. Macintosh is a trademark of Apple Computer, Inc., registered in the U.S.A. and other countries. FCC Compliance Any Kodak equipment referred to in this document has been tested and found to comply with the limits for a Class A digital device, pursuant to part 15 of the FCC Rules. These limits are designed to provide reasonable protection against harmful interference when the equipment is operated in a commercial environment. This equipment generates, uses, and can radiate radio frequency energy and, if not installed and used in accordance with the instruction manual, may cause harmful interference to radio communications. Operation of this equipment in a residential area is likely to cause harmful interference in which case the user will be required to correct the interference at his own expense. Canada This Class A digital apparatus complies with Canadian ICES-003. Cet appareil numérique de la classe A est conforme à la norme NMB-003 du Canada. EN Warning This is a Class A product. In a domestic environment it may cause radio interference, in which case the user may be required to take adequate measures. Equipment Recycling In the European Union, this symbol indicates that when the last user wishes to discard this product, it must be sent to appropriate facilities for recovery and recycling. Contact your local Kodak representative or refer to for additional information on the collection and recovery programs available for this product. This electronic information product complies with Standard SJ/T of the Electronics Industry of the People's Republic of China.
4 Limitation of Liability The product, software or services are being provided on an as is and as available basis. Except as may be stated specifically in your contract, Kodak expressly disclaims all warranties of any kind, whether express or implied, including, but not limited to, any implied warranties of merchantability, fitness for a particular purpose and noninfringement. You understand and agree that, except as may be stated specifically in your contract, Kodak shall not be liable for any direct, indirect, incidental, special, consequential or exemplary damages, including but not limited to, damages for loss of profits, goodwill, use, data or other intangible losses (even if Kodak has been advised of the possibility of such damages), resulting from: (i) the use or the inability to use the product or software; (ii) the cost of procurement of substitute goods and services resulting from any products, goods, data, software, information or services purchased; (iii) unauthorized access to or alteration of your products, software or data; (iv) statements or conduct of any third party; (v) any other matter relating to the product, software, or services. The text and drawings herein are for illustration and reference only. The specifications on which they are based are subject to change. Kodak may, at any time and without notice, make changes to this document. Kodak assumes no liability for technical or editorial errors or omissions made herein, and shall not be liable for incidental, consequential, indirect, or special damages, including, without limitation, loss of use, loss or alteration of data, delays, or lost profits or savings arising from the use of this document. Copyright 2007 Kodak. All rights reserved. Internal E-EN Revised November 2007
5 Contents 1 Introduction 1 Overview... 2 Using the Stylus... 4 The Basic Steps Getting Started 7 Turning on the Leaf Aptus Digital Camera Back... 8 Compact Flash Card and Battery... 8 Digital Magazine... 9 Tethered Mode... 9 Turning off the Leaf Aptus Digital Camera Back Preparing a Compact Flash Card for Shoot Formatting in Mac OS X Formatting in Windows Inserting a Compact Flash Card Removing a Compact Flash Card Preparing to Shoot 17 Changing the Interface language Setting the Date and Time Viewing and Defining Camera Settings Creating a Folder Selecting a Folder for Your Shot Assigning a Base Name to a Shot Adding Notes and Copyright Information to Your Shots Taking a Shot 25 Taking a Shot Evaluating Your Shot 27 Checking the Exposure Checking Exposure with the Histogram...28 Checking Exposure with the Picker Tool Checking Exposure with the Overexposure and Underexposure Alarms Checking Focus Setting the Gray Balance Checking Composition Browsing Through Your Images Deleting Shots in Shoot View... 34
6 6 Leaf Aptus User Guide Flagging and Annotating in Shoot View Viewing Information About Your Shot Editing Your Images 37 Edit View Accessing Edit View from Shoot View Browsing Through Your Images Selecting a View for Your Images Viewing Information and EXIF Data Viewing Information Using the User Button Selecting Multiple Images Flagging, Annotating, and Deleting in Edit View Sorting Your Images Selecting a Folder Moving Your Images Opening Images in Shoot View Adjusting Settings for a Shoot 47 Shooting Without Overlays Working in Full-Screen View Using the Crop Mask Adjusting the Transparency of the Crop Mask Adjusting the Transparency of the Histogram and Info Bar Setting the Exposure Alarm Resetting the File Name Counter Defining the Camera Back Settings 55 Formatting the Compact Flash Card in Portable Mode Configuring the User Button Configuring the User Button for Shoot View Configuring the User Button for Edit View...59 Configuring a Long Press of the User Button Aligning the Touch Screen Turning Off the Backlight Turning On the Backlight Setting the Volume for the Camera Back Sounds Setting the Owner Information Restoring Factory Settings Viewing the Leaf Aptus Version Information... 67
7 Contents 7 9 Working With Leaf WiView 69 What Is Leaf WiView? Starting Leaf WiView on Your Leaf Aptus Camera Back Changing the PIN Working With Leaf WiView on an ipaq Pocket PC Starting Leaf WiView on the ipaq Pocket PC Changing the Name of the Camera Back Evaluating the Current Shot With Leaf WiView Editing With Leaf WiView Changing the Shoot View Options in Leaf WiView Changing the Interface Language in Leaf WiView About Leaf WiView... 79
8 8 Leaf Aptus User Guide
9 Introduction Overview...2 Using the Stylus... 4 The Basic Steps...5
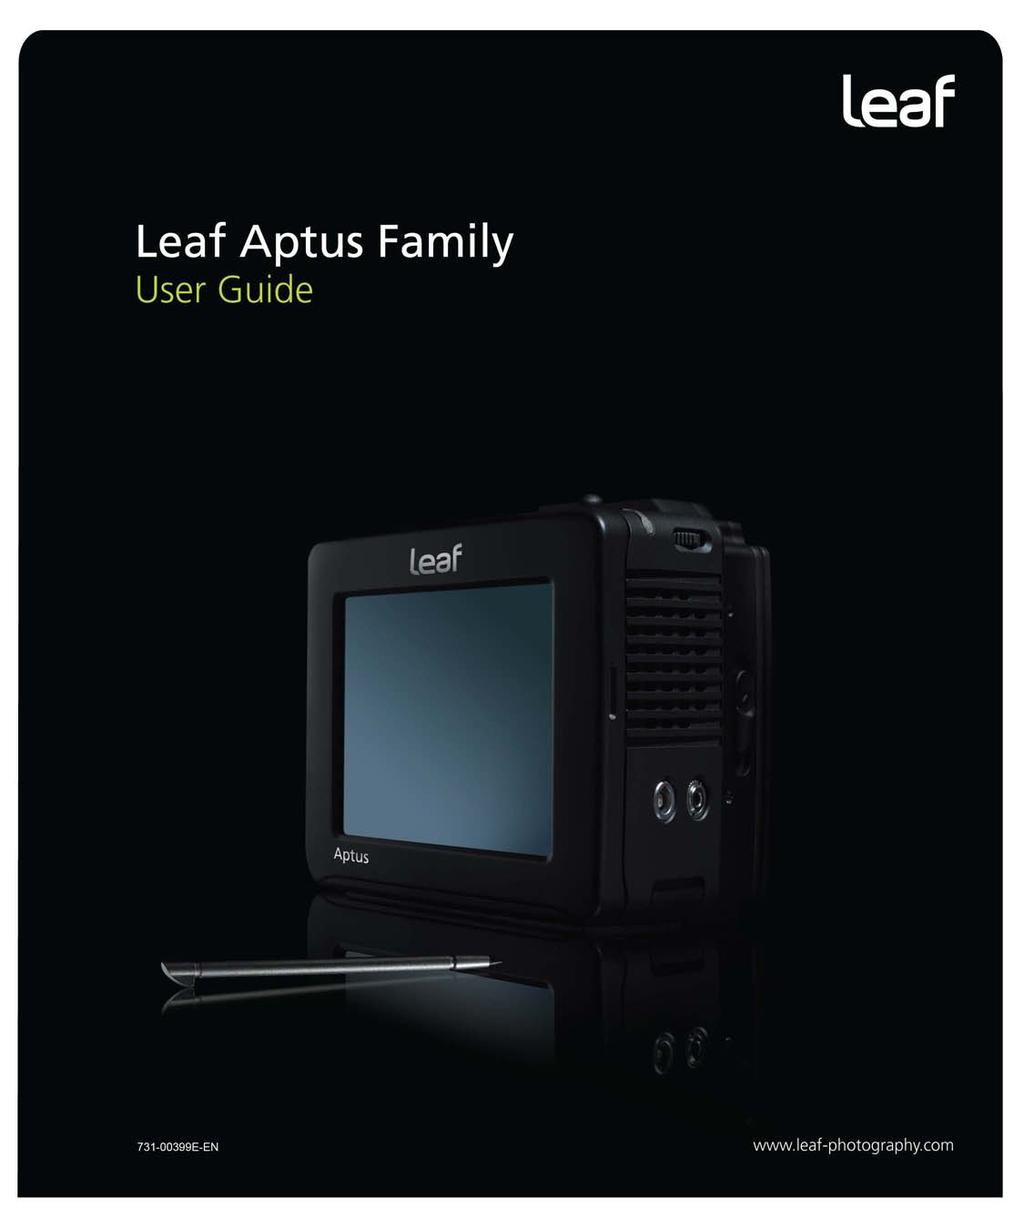
10 2 Chapter 1 Introduction Overview The Leaf Aptus digital camera back is the world s first camera back that includes a built-in (6 7 cm) LCD screen and an innovative graphic user interface. An integrated battery and compact flash (CF) storage card facilitate shooting. New hardware offers continuous non-stop shooting and a faster capture rate. These shooting capabilities, combined with large storage options, give professionals the flexibility to meet the most demanding shooting situations. A new raw HDR format that uses lossless compression to reduce file size and a completely new Leaf Capture application enhance workflow and teamwork both on location and in the studio. This user guide explains how to set up the camera back for first-time use, take a shot, evaluate it, and edit it. The following picture shows the Leaf Aptus digital camera back opening screen and menu buttons: Current user-button action Camera settings Number of images in the current folder or on the disk Number of shots you can still take Shoot view Edit view Setup menu Remaining battery power

11 Overview 3 The following picture shows the location of the Leaf Aptus digital camera back controls and stylus: On/Off button User button Stylus
12 4 Chapter 1 Introduction Using the Stylus The Leaf Aptus digital camera back is supplied with a stylus. Use the stylus to tap the touch screen. To remove the stylus for use, slide it out of the slot located at the top of the LLeaf Aptus digital camera back.
13 The Basic Steps 5 The Basic Steps Follow these steps to shoot and edit your images: Prepare to shoot. View the camera settings. Take and evaluate a shot. Edit your images. Turn on your camera and camera back, and perform some basic steps before taking your first shot. View the predefined camera settings, choose another setting, or make changes to specific camera settings. Take a shot. Check the exposure, focus, and composition of your shot, and set the gray balance for future shots. Organize your images using the Leaf Aptus digital camera back editing tools.
14
15 Getting Started Turning on the Leaf Aptus Digital Camera Back... 8 Turning off the Leaf Aptus Digital Camera Back...10 Preparing a Compact Flash Card for Shoot...11 Inserting a Compact Flash Card...15 Removing a Compact Flash Card...16

16 8 Chapter 2 Getting Started Turning on the Leaf Aptus Digital Camera Back The procedure for turning on your Leaf Aptus digital camera back depends on whether you use a compact flash card and battery, use a digital magazine, or work in tethered mode. Compact Flash Card and Battery To turn on your Leaf Aptus digital camera back when using a compact flash card and battery: 1. Ensure that the battery is charged. For more information, see the Installation Guide. 2. If this is the first time that you are using the compact flash card with your Leaf Aptus digital camera back, you should format the card. For detailed instructions on formatting the compact flash card, see Preparing a Compact Flash Card for Shoot on page Insert the compact flash card. For more information, see Inserting a Compact Flash Card on page Press and hold the On/Off button on the camera back until the orange light turns on, and then release the On/Off button. The light turns green and a beep sounds to indicate that the camera is ready for you to shoot. On/Off button 5. Verify that the Ready to Shoot message appears on the touch screen.
. 2.")

17 Turning on the Leaf Aptus Digital Camera Back 9 Ready to Shoot Digital Magazine To turn on your Leaf Aptus digital camera back when using a digital magazine: 1. Connect the digital magazine to the camera back with an Apple FireWire cable. For more information, see the Leaf Aptus Installation Guide ( D). 2. Press and hold the On/Off button on the digital magazine until the green light turns on. 3. Verify that the Ready to Shoot message appears on the touch screen. Tethered Mode To turn on your Leaf Aptus digital camera back when working in tethered mode: 1. Plug the FireWire cable into the camera back and the computer. If there is a compact flash in the camera back, the compact flash icon appears on the desktop. 2. Turn on the camera. For more information, see the Leaf Aptus Installation Guide ( D).
18 10 Chapter 2 Getting Started Turning off the Leaf Aptus Digital Camera Back Turn the Leaf Aptus digital camera back off in one of the following ways: When using a compact flash and battery: Press and hold the On/Off button until the light turns orange. If you changed a setting in the Setup menu, the camera saves the new setting and then shuts down. When using a digital magazine: Press the On/Off button. When working in tethered mode: Do one of the following: If you are using a compact flash card, on the desktop, right-click the compact flash card and select Move to Trash (Apple Mac OS X operating system) or Eject (Microsoft Windows operating system), and then unplug the FireWire cable. If you are not using a compact flash card, unplug the FireWire cable.
19 Preparing a Compact Flash Card for Shoot 11 Preparing a Compact Flash Card for Shoot Format a compact flash card in the following circumstances: If the compact flash card is new. If you have used the compact flash card on a non-leaf digital camera back. You can format the card on a computer running either Mac OS or Windows. When formatting the compact flash card, you can use either a card reader, or the Leaf Aptus digital camera back to read the card. Notes: If you use the Leaf Aptus digital camera back as a card reader, we recommend that you use a computer running Mac OS X. Formatting the compact flash card erases all data on the card. If you have been using the compact flash card with your Aptus and wish to erase all the data on the card, perform a quick format. For more information, see Formatting the Compact Flash Card in Portable Mode on page 56. Formatting in Mac OS X 1. Insert the compact flash card into the card reader or the Leaf Aptus digital camera back. 2. On the desktop, double-click the system disk. 3. Select Applications > Utilities > Disk Utility. 4. On the left panel of the Disk Utility dialog box, select the removable disk that you want to format.


20 12 Chapter 2 Getting Started 5. Click the Erase tab. 6. In the Volume Format box, select MS-DOS File System. 7. In the Name box, type LEAF-CF. 8. Click Erase.
, and the Name box shows")
. 13. Close the Disk Utility application. 14.")
21 Preparing a Compact Flash Card for Shoot In the confirmation message that appears, click Erase. Formatting is complete when the progress bar disappears from view, the Volume Format box shows Mac OS Extended (journaled), and the Name box shows Untitled. 10. On the desktop, select the LEAF-CF volume. 11. Select File > Get Info. 12. In the Leaf-CF Info window, ensure that Format shows Macintosh PC Exchange (MS-DOS). 13. Close the Disk Utility application. 14. Drag the LEAF-CF volume to Trash. Formatting in Windows 1. Insert the compact flash card in a card reader. 2. On the desktop, click My Computer.


22 14 Chapter 2 Getting Started 3. Right-click Removable Disk, and from the menu, select Format. 4. In the Format dialog box, in the File System box, select FAT In the Volume label box, type LEAF-CF. 6. Click Start. 7. When the format procedure is complete, go to the desktop and click My Computer. 8. Right-click Removable Disk, and from the menu, select Eject.

23 Inserting a Compact Flash Card 15 Inserting a Compact Flash Card If this is the first time that you are using the compact flash card with your Leaf Aptus digital camera back, you should first format the card. For more information, see Preparing a Compact Flash Card for Shoot on page Open the compact flash card door. Compact flash card door 2. Insert the compact flash card. Compact flash card

24 16 Chapter 2 Getting Started Removing a Compact Flash Card 1. Open the compact flash card door, and then press the Release button. Release button 2. Remove the compact flash card.
25 Preparing to Shoot Changing the Interface language...18 Setting the Date and Time...19 Viewing and Defining Camera Settings...20 Creating a Folder...21 Selecting a Folder for Your Shot Assigning a Base Name to a Shot Adding Notes and Copyright Information to Your Shots... 24


26 18 Chapter 3 Preparing to Shoot Changing the Interface language 1. Scroll down, and then tap Interface Language. 2. Tap the desired language.

27 Setting the Date and Time 19 Setting the Date and Time 1. Scroll down, and then tap Date and Time. 2. Using the virtual keypad, tap the date and time values, and then tap ok. Note: You need to set the date and time only once. If the time-zone that you work in changes, reset the date and time accordingly. To take a shot now, skip to the section Taking a Shot on page 26. To view and customize your camera settings, go to the next section.

28 20 Chapter 3 Preparing to Shoot Viewing and Defining Camera Settings The selected camera setting. To view and select other predefined camera settings, tap presets. 1. View the current settings by scrolling up and down. 2. If necessary, change the camera setting or an individual setting. The camera settings specified here are applied to all future shots. To change a camera setting: Tap the relevant setting, and from the menu that appears, select an option.

29 Creating a Folder 21 Creating a Folder Your shots are automatically saved in the storage unit connected to your camera: digital magazine (Leaf DM) or compact flash (CF). To enhance organization, you can create folders for storing your shots. 1. Tap Shots Folder. 2. Tap down. 3. Tap new. 4. Using the virtual keypad, tap the name of the folder, and then tap OK. To create a subfolder, tap the new folder, tap open, and then tap new.
30 22 Chapter 3 Preparing to Shoot Selecting a Folder for Your Shot Select the folder to save your shots in, Tap a folder, and then tap choose.
31 Assigning a Base Name to a Shot 23 Assigning a Base Name to a Shot You can define a base name for your shots. The Leaf Aptus digital camera back applies this name to all shots, adding a number in sequence each time, until you define a new base name. 1. Tap File name. 2. Using the virtual keypad, enter a base name for the shot, and then tap ok.


32 24 Chapter 3 Preparing to Shoot Adding Notes and Copyright Information to Your Shots 1. Scroll down, and then tap Notes. 2. Click in either the Description or Copyright Notice area. 3. Use the virtual keypad to enter the desired information, and then tap ok.
33 Taking a Shot Taking a Shot... 26

34 26 Chapter 4 Taking a Shot Taking a Shot Take a shot. Note: To guard against accidental taps to the screen, you can lock it. For more information, see Configuring a Long Press of the User Button on page 60.
35 Evaluating Your Shot Checking the Exposure...28 Checking Focus...31 Setting the Gray Balance Checking Composition Browsing Through Your Images...34 Browsing Through Your Images...34 Flagging and Annotating in Shoot View Viewing Information About Your Shot... 36
36 28 Chapter 5 Evaluating Your Shot Checking the Exposure Check the exposure of your shot in the following ways: Examine the histogram exposure data. Use the picker tool to view the exposure data for a specific spot on the image. Use the exposure alarms to view the overexposed and underexposed areas of the image. Tips Press the user button to view the histogram, the exposure alarms and additional shot information when in Shoot view. To specify what appears when you press the user button, see Formatting the Compact Flash Card in Portable Mode on page 56. To maximize the display size of your shot, double-tap the image. Checking Exposure with the Histogram 1. Tap histog. 2. Examine the histogram to check that most of the exposure data lies within the exposure limits. Exposure data that lies within the limits is shown in white. Overexposed and underexposed data is shown in gray.
37 Checking the Exposure 29 Checking Exposure with the Picker Tool 1. Tap histog to open the histogram. 2. Tap, and then tap a spot on the image. The spot that you tap is marked by a magenta circle. A magenta line on the histogram indicates the exposure data related to the spot. Tap to enlarge the histogram. The exposure meter,, shows the overall exposure in f-stops. Note: To remove the spot from the image, tap and then tap outside the image area. on the histogram,
38 30 Chapter 5 Evaluating Your Shot Checking Exposure with the Overexposure and Underexposure Alarms 1. Tap over. A flashing mask covers the overexposed and underexposed areas of the image. Note: It is possible to configure which exposure areas appear, overexposed or underexposed. For more information, see Setting the Exposure Alarm on page 53.

39 Checking Focus 31 Checking Focus 1. Tap zoom. 2. To magnify the image area 100% (1:1), tap a desired point on the image. 3. To Increase or reduce the magnification, tap either in or out, and then tap the image. Each tap on the image changes the magnification by a fixed percentage. 4. To pan the image, tap the arrows. 5. To revert to a view of the entire image, tap fit.

40 32 Chapter 5 Evaluating Your Shot Setting the Gray Balance To set the gray balance for future shots: 1. Do one of the following: Include a gray card in your shot. Ensure that there is a neutral gray area in your shot. 2. Tap gray. 3. Tap the gray card or on a gray area in the image. 4. Tap OK to use the new gray balance setting, or tap cancel. Note: If your gray card is not large enough in full-screen view, use the zoom tool to enlarge your picture before setting the gray balance.
41 Checking Composition 33 Checking Composition View the image. To help your composition you can use a grid (see next paragraph) or a crop mask. For more information on setting crop masks, see Adjusting Settings for a Shoot on page 47.
42 34 Chapter 5 Evaluating Your Shot Browsing Through Your Images Do one of the following: Tap more and then tap the prev and next buttons. Roll the user button back or forwards. Deleting Shots in Shoot View To delete shots in Shoot view: 1. Tap the image and hold until the flag, note and delete buttons appear. 2. Tap delete to delete the image.
43 Flagging and Annotating in Shoot View 35 Flagging and Annotating in Shoot View While you are shooting, you can flag your image or add a note, as desired. You can then see the flag or note on the image in Edit view and in the image information. 1. Tap the image and hold until the flag, note and delete buttons appear. 2. Do one of the following: Tap flag to flag the image. Tap note to add a comment about the image.

44 36 Chapter 5 Evaluating Your Shot Viewing Information About Your Shot Tap info. The image information and EXIF data appear on the image.
45 Editing Your Images Edit View Browsing Through Your Images Viewing Information and EXIF Data Viewing Information Using the User Button...41 Selecting Multiple Images...42 Flagging, Annotating, and Deleting in Edit View...42 Selecting a Folder...44 Moving Your Images...45 Opening Images in Shoot View...46
46 38 Chapter 6 Editing Your Images Edit View Use Edit view to: Display your images in various view modes Browse through your images Flag, annotate, and delete single or multiple images Move images from one folder to another Accessing Edit View from Shoot View If you are in Shoot view, you can access Edit view directly without returning to the main menu. In Shoot view, tap edit. You are now in Edit view.
47 Browsing Through Your Images 39 Browsing Through Your Images To browse through your images, do one of the following: Tap prev and next. Use the scroll bar. Roll the user button back or forward. As you move from one image to the next, the image is automatically selected. Selecting a View for Your Images 1. Tap more. 2. Tap view, and select a view.


48 40 Chapter 6 Editing Your Images Viewing Information and EXIF Data 1. Tap more, and tap an image. 2. Tap view, and select a single view. Information saved with the image and the EXIF data appears beside the image.

49 Viewing Information Using the User Button 41 Viewing Information Using the User Button To show/hide information using the user button: Press the user button.
50 42 Chapter 6 Editing Your Images Selecting Multiple Images 1. In Edit view, tap an image and hold your stylus on it until the Multi button appears on the image. 2. Tap the Multi button, and then tap the images that you want to select. Flagging, Annotating, and Deleting in Edit View Tap the image, and then tap flag, note, or delete. Note: If you select multiple images, the action is performed on all the selected images.
51 Sorting Your Images 43 Sorting Your Images 1. Tap more. 2. Tap sort, and select the desired sort method (by name, time or flag).

52 44 Chapter 6 Editing Your Images Selecting a Folder 1. Tap more. 2. Tap folder. Shots folder 3. Tap on the desired folder, and tap choose. Note: The Shots folder always appears at the top of the folder list.

53 Moving Your Images 45 Moving Your Images 1. Tap an image and hold your stylus on it until the Move button appears on the screen. 2. Tap Move. 3. Tap the desired destination folder. 4. Tap Move.
54 46 Chapter 6 Editing Your Images Opening Images in Shoot View If you want to view your images at full-screen size, you can open individual images in Shoot view. This is useful for checking focus or composition. To open a specific image in Shoot view: Do one of the following: Tap the image and then tap shoot. Double-tap the image.
55 Adjusting Settings for a Shoot Shooting Without Overlays...48 Working in Full-Screen View...49 Using the Crop Mask...50 Adjusting the Transparency of the Crop Mask Adjusting the Transparency of the Histogram and Info Bar Setting the Exposure Alarm Resetting the File Name Counter...54
56 48 Chapter 7 Adjusting Settings for a Shoot Shooting Without Overlays After you take each shot, indicators and information about the shot appear as an overlay. Clear the overlays if you do not want this information to appear while you are shooting. 1. Tap Shoot View Options. 2. Tap On Shoot. 3. On the Clear overlays bar, tap Yes.
57 Working in Full-Screen View 49 Working in Full-Screen View If desired, hide the menu buttons and view your shots full-screen while you work. 1. Tap Shoot View Options. 2. Tap On Shoot. 3. On the Maximize image bar, tap Yes. To view the menu buttons when working in full-screen view, tap the image.
58 50 Chapter 7 Adjusting Settings for a Shoot Using the Crop Mask You can show or hide the crop mask as you shoot. 1. Tap Shoot View Options. 2. In the Crop Masking bar, do one of the following: To view the crop mask, tap On. To hide the crop mask, tap Off.
59 Adjusting the Transparency of the Crop Mask 51 Adjusting the Transparency of the Crop Mask 1. Tap Shoot View Options. 2. Tap Crop Mask Transparency. 3. Tap the desired intensity, where 0% is opaque and 100% is completely transparent.
60 52 Chapter 7 Adjusting Settings for a Shoot Adjusting the Transparency of the Histogram and Info Bar 1. Tap Shoot View Options. 2. Tap Histogram/ Info Transparency. 3. Tap the desired intensity, where 0% is opaque and 100% is completely transparent.


61 Setting the Exposure Alarm 53 Setting the Exposure Alarm Set the exposure alarm to show underexposed areas, overexposed areas, or both. 1. Tap Shoot View Options. 2. Tap Exposure Alarm. 3. Tap the desired setting.
62 54 Chapter 7 Adjusting Settings for a Shoot Resetting the File Name Counter Leaf Aptus adds a number in sequence to the base name that you define each time you take a shot. You can reset the counter to zero at any time. 1. Tap File name. 2. Tap reset.
63 Defining the Camera Back Settings Formatting the Compact Flash Card in Portable Mode...56 Configuring a Long Press of the User Button...60 Aligning the Touch Screen...61 Turning Off the Backlight Turning On the Backlight Setting the Volume for the Camera Back Sounds...64 Setting the Owner Information Restoring Factory Settings...66 Viewing the Leaf Aptus Version Information... 67


64 56 Chapter 8 Defining the Camera Back Settings Formatting the Compact Flash Card in Portable Mode If you have been using the compact flash card with your Leaf Aptus, use this procedure to perform a quick format of your compact flash card. Quick format is useful in the following circumstances: If you wish to erase all the data on the card If the card is not performing as expected, for example, you cannot save pictures on the card, saving on the card takes a long time, or if you receive error messages concerning the card If the compact flash card is new, or if you have used the compact flash card on a non- Leaf digital camera back, do not perform a quick format. Perform the procedure detailed in Preparing a Compact Flash Card for Shoot on page 11. Note: Formatting the compact flash card erases all data on the card. 1. Tap Quick Format. 2. Tap the disk that you want to format, and then tap choose.

65 Formatting the Compact Flash Card in Portable Mode Tap ok.

66 58 Chapter 8 Defining the Camera Back Settings Configuring the User Button Configure the user button for viewing indicators or flagging images in Shoot view, and for flagging or deleting images in Edit view. Configuring the User Button for Shoot View 1. Tap User Button. 2. Tap Shoot view. 3. In the Action bar, select Indicators or Flag. 4. If you selected Indicators in step 3, tap Actions Settings and select the desired indicators.
67 Configuring the User Button 59 Configuring the User Button for Edit View To configure the user button for flagging or deleting images: 1. Tap User Button. 2. Tap Edit view. 3. Tap Flag or Delete.
68 60 Chapter 8 Defining the Camera Back Settings Configuring a Long Press of the User Button You can set the user button so that a long press can either lock or unlock the touch screen, or turn the display on or off. 1. Tap User Button. 2. Tap Long Press. 3. Select the desired option.
69 Aligning the Touch Screen 61 Aligning the Touch Screen 1. Tap Display. 2. Tap Align Touch Screen. 3. Follow the instructions on the screen.

70 62 Chapter 8 Defining the Camera Back Settings Turning Off the Backlight 1. Tap Display. 2. Tap Backlight Off After. 3. Tap a power source. 4. Tap the desired time.
71 Turning On the Backlight 63 Turning On the Backlight 1. Tap Display. 2. Tap Backlight On After. 3. Select the desired option.

72 64 Chapter 8 Defining the Camera Back Settings Setting the Volume for the Camera Back Sounds 1. Tap Sounds. 2. Tap the desired option and set the volume as desired.


73 Setting the Owner Information 65 Setting the Owner Information 1. Tap Owner Information. 2. Tap the relevant area. 3. Use the virtual keypad to enter the desired information, and tap ok.

74 66 Chapter 8 Defining the Camera Back Settings Restoring Factory Settings 1. Tap Restore Factory Settings. 2. Tap ok.

75 Viewing the Leaf Aptus Version Information 67 Viewing the Leaf Aptus Version Information Tap About. The Leaf Aptus About screen displays the Leaf Aptus version information.
76 68 Chapter 8 Defining the Camera Back Settings
77 Working With Leaf WiView What Is Leaf WiView?...70 Starting Leaf WiView on Your Leaf Aptus Camera Back...70 Changing the PIN...71 Working With Leaf WiView on an ipaq Pocket PC... 72
78 70 Chapter 9 Working With Leaf WiView What Is Leaf WiView? Leaf WiView is a wireless application that enables you to view and work with images on an HP ipaq Pocket PC as you shoot. Before you begin working with the Leaf WiView application, you must first install it on the ipaq Pocket PC. For more information, see the Leaf WiView Installation Guide ( E-EN). Starting Leaf WiView on Your Leaf Aptus Camera Back 1. Tap Wireless. 2. Tap On. Once you have activated the wireless connection, the bluetooth symbol is displayed:


79 Changing the PIN 71 Changing the PIN The Leaf Aptus digital camera back comes with a default personal identification number, To change the PIN: 1. Tap Wireless. 2. Tap Change PIN. 3. In the Enter new PIN box, use the virtual keyboard to tap a new PIN. 4. In the Reenter new PIN box, tap the new PIN again, and then tap ok.

80 72 Chapter 9 Working With Leaf WiView Working With Leaf WiView on an ipaq Pocket PC The Leaf WiView application enables you to work independently on an ipaq Pocket PC while another person is working with the Leaf Aptus digital camera back. You can perform all image functions on the ipaq Pocket PC. Every time you take a shot, the shot is sent to and appears on the ipaq Pocket PC. The incoming shot replaces whatever is displayed on the ipaq Pocket PC. Note: If the incoming shot interrupts your workflow, your changes are not saved unless you actively saved them before the shot arrived. Tip: Avoid setting the gray balance, flagging, or adding a note to the same image on the Leaf Aptus digital camera back and ipaq Pocket PC at the same time.


81 Working With Leaf WiView on an ipaq Pocket PC 73 Starting Leaf WiView on the ipaq Pocket PC The first time you work with the Leaf WiView application, you need to set the ipaq Pocket PC to work with your Leaf Aptus digital camera back. For more information on installing the Leaf WiView application, see the Leaf WiView Installation Guide ( E-EN). 1. On the ipaq Pocket PC, select Start > Programs > Leaf WiView. 2. Tap Setup. 3. Tap Wireless.

82 74 Chapter 9 Working With Leaf WiView 4. Tap Search 5. Wait while the Leaf WiView application searches for the camera back. This process takes 30 seconds.

83 Working With Leaf WiView on an ipaq Pocket PC 75 A list of available camera backs appears. 6. Tap the camera back that you want to connect to, and tap choose. 7. Enter the PIN that you set up for the WiView. 8. Tap ok. Note: After the first time, the ipaq Pocket PC automatically connects to the Leaf Aptus digital camera back. If your ipaq Pocket PC does not connect to the camera back, perform steps 2-5 of this procedure.

84 76 Chapter 9 Working With Leaf WiView Changing the Name of the Camera Back 1. Tap name. 2. Using the virtual keypad, tap a new name. 3. Tap ok.
85 Working With Leaf WiView on an ipaq Pocket PC 77 Evaluating the Current Shot With Leaf WiView While another person is shooting with the Leaf Aptus digital camera back, you can do the following in Shoot view on the ipaq Pocket PC: View the exposure of the current shot. For more information see Checking the Exposure on page 28. See information about the shot. For more information, see Viewing Information About Your Shot on page 36. Browse through your images. For more information, see Browsing Through Your Images on page 34. Go directly to Edit view. For more information, see Accessing Edit View from Shoot View on page 38. Editing With Leaf WiView While another person is shooting with the Leaf Aptus digital camera back, you can do the following in Edit view on the ipaq Pocket PC: Browse through your images. For more information, see Viewing Information and EXIF Data on page 40. Select a folder. For more information, see Selecting a Folder on page 44. Sort your images. For more information, see Sorting Your Images on page 43. Change the view. For more information, see Browsing Through Your Images on page 39. Go directly to Shoot view. For more information, see Opening Images in Shoot View on page 46.
86 78 Chapter 9 Working With Leaf WiView Changing the Shoot View Options in Leaf WiView While another person is shooting with the Leaf Aptus digital camera back, you can change the following Shoot view options on the ipaq Pocket PC: Clear Overlays. For more information, see Shooting Without Overlays on page 48. Maximize Image. For more information, see Working in Full-Screen View on page 49. Crop Masking. For more information, see Using the Crop Mask on page 50. Crop Mask Transparency. For more information, see Adjusting the Transparency of the Crop Mask on page 51. Histogram/Info Transparency. For more information, see Adjusting the Transparency of the Histogram and Info Bar on page 52. Changing the Interface Language in Leaf WiView To change the language displayed in the Leaf WiView application, see Changing the Interface language on page 18.
87 Working With Leaf WiView on an ipaq Pocket PC 79 About Leaf WiView 1. Tap About. The Leaf WiView application About screen displays the Leaf WiView version number.
88
Copyrights. Trademarks. FCC Compliance. Equipment Recycling
 Copyrights Trademarks FCC Compliance Equipment Recycling Leaf Imaging Ltd., 2009. All rights reserved. This document is also distributed in Adobe Systems Incorporated's PDF (Portable Document Format).
Leaf Aptus-II. User Guide
 Leaf Aptus-II User Guide Copyrights Leaf Imaging Ltd., 2011. All rights reserved. Adobe, Acrobat, Adobe Illustrator, Distiller, Photoshop, PostScript, and PageMaker are trademarks of Adobe Systems Incorporated.
IC-309 Print Controller, Powered by Creo Server Technology, for the Konica Minolta bizhub PRESS C1070/C1070P/C1060
 Release Notes English IC-309 Print Controller, Powered by Creo Server Technology, for the Konica Minolta bizhub PRESS C1070/C1070P/C1060 Version 1.0 653-01929A-EN Rev A Copyright Trademarks Eastman Kodak,
Xerox CX Print Server, Powered by Creo Color Server Technology,
 Release Notes English Xerox CX Print Server, Powered by Creo Color Server Technology, for the Xerox Color 550/560 Printer Version 1.0 739-00607A-EN Rev A Copyright Eastman Kodak Company, 2010. All rights
DATALOCKER H100 ENCRYPTED HARD DRIVE. User Guide
 DATALOCKER H100 ENCRYPTED HARD DRIVE User Guide CONTENTS Introducing DataLocker H100 Minimum System Requirements Device accessories DataLocker Documentation Getting Started Plugging in the device Personalizing
InSite Prepress Portal
 InSite Prepress Portal ipad Application Version 6.7 Quick Start Guide English 2014-03-12 Copyright Trademarks FCC compliance Kodak, 2014. All rights reserved. Some documentation is distributed in Portable
Xerox CX Print Server, Powered by Creo Color Server Technology,
 Release Notes English Xerox CX Print Server, Powered by Creo Color Server Technology, for the Xerox 700 Digital Color Press Version 2.0 739-00642A-EN Rev A Copyright Eastman Kodak Company, 2011. All rights
Dual-Bay Drive Eraser, Duplicator, and Docking Station for 2.5 and 3.5 SATA
 Dual-Bay Drive Eraser, Duplicator, and Docking Station for 2.5 and 3.5 SATA SDOCK2ERU33 *actual product may vary from photos FR: Guide de l utilisateur - fr.startech.com DE: Bedienungsanleitung - de.startech.com
Manual Download. Please visit SUNIX website by searching keyword isafe or KEY-256UN1 for detail.
 Manual Download Please visit SUNIX website http://www.sunix.com by searching keyword isafe or KEY-256UN1 for detail. 1 User s Manual Copyright Copyright 2014 SUNIX Co., Ltd. All Rights Reserved. No part
Matchprint Virtual. for InSite Prepress Portal. Quick Start Guide. Technology. Version 6.0. English
 Matchprint Virtual Technology Version 6.0 for InSite Prepress Portal Quick Start Guide English 2010-07-25 Copyright Trademarks FCC compliance Kodak, 2010. All rights reserved. Some documentation is distributed
Stacking Module. Installation Guide AT-MCF2000S. PN Rev A
 Stacking Module AT-MCF2000S Installation Guide PN 613-000708 Rev A Copyright 2007 Allied Telesis, Inc. All rights reserved. No part of this publication may be reproduced without prior written permission
Česky. Introduction... E-1 Minimum system requirements for PC... E-1 Using the AVerVision Application for PC.. E-3
 Table of Contents Introduction... E-1 Minimum system requirements for PC... E-1 Using the AVerVision Application for PC.. E-3 Video Screen... E-3 Control Panel... E-3 Document Camera Control Panel... E-4
CAUTION: Before installing the Windows or Macintosh operating system, see our knowledge base answer ID 1485 for precautionary procedures.
 Quick Start Guide Getting Started Kit Contents USB external drive USB cable AC adapter Quick Install Guide USB External Drive AC Adapter USB Cable Quick Install Guide Compatibility CAUTION: Before installing
KONICA DIGITAL CAMERA. Instruction Manual
 KONICA DIGITAL CAMERA Instruction Manual FCC Statement: Declaration of Conformity Trade name: Konica Model: e-mini Responsible party: KONICA PHOTO IMAGING, INC. Address: 725 Darlington Avenue Mahwar, NJ
Tric Flash Trigger TRIC-100 User s Manual
 Tric Flash Trigger TRIC-100 User s Manual 2017/7 rev. 1.4 1 Safety Statements FCC Class B Notice This device complies with Part 15 of the FCC Rules. Operation is subject to the following two conditions:
PRINTER Controller Type 850
 PRINTER Controller Type 850 OPERATING INSTRUCTIONS PRINTER REFERENCE 1 (option) Read this manual carefully before you use this product and keep it handy for future reference. For safety, please follow
Addendum to Cisco Physical Security Operations Manager Documentation, Release 6.1
 Addendum to Cisco Physical Security Operations Manager Documentation, Release 6.1 January 31, 2013 Americas Headquarters Cisco Systems, Inc. 170 West Tasman Drive San Jose, CA 95134-1706 USA http://www.cisco.com
USER S MANUAL MODEL VP6630
 USER S MANUAL MODEL VP6630 Regulatory Compliance This device complies with Part 15 of the FCC Rules. Operation is subject to the following two conditions: (1) This device may not cause harmful interference,
iq 16 Sync Charge Box
 USER INSTRUCTIONS iq 16 Sync Charge Box (iq 16 SCB Sync Station ) www.lockncharge.com iq 16 Sync Charge Box Contents Overview...1 Specifications...1 Safety instructions...2 Set up...2 How to charge multiple
Contents. 1 Introduction. 2 Setting up PC scanning. 3 Connecting to the copier. 4 Installing the TWAIN driver
 User s Guide Contents 1 Introduction 1.1 Welcome...1-1 1.2 END USER LICENSE AGREEMENT...1-2 1. SOFTWARE...1-2 2. LICENSE AGREEMENT...1-2 3. LICENSE...1-2 4. RESTRICTIONS...1-3 5. LIMITED WARRANTY...1-3
Graphic Inspector 2 User Guide
 www.zevrix.com support@zevrix.com Graphic Inspector 2 User Guide Installation & System Requirements 2 Scanning Files and Folders 2 Checkup Presets 3 File Table and Info Panel 4 Export Data 5 Support 6
User Guide. HAWKEYE CLASSIC VIDEO BORESCOPES (Non-Articulating) Hawkeye Classic Video Borescope. Hawkeye Classic Video Borescope - Set Up
 Hawkeye Classic Video Borescope. Hawkeye Classic Video Borescope - Set Up") User Guide Hawkeye Classic Video Borescope HAWKEYE CLASSIC VIDEO BORESCOPES (Non-Articulating) Table of Contents Set Up... Page 2 Operation.. Page 4 Troubleshooting Page 12 Specifications. Page 13 Hawkeye
User Guide Hawkeye Classic Video Borescope HAWKEYE CLASSIC VIDEO BORESCOPES (Non-Articulating) Table of Contents Set Up... Page 2 Operation.. Page 4 Troubleshooting Page 12 Specifications. Page 13 Hawkeye
ZQ110. Mobile Printer Bluetooth Connection Manual. P Rev. 1.00
 Bluetooth Connection Manual P1069089-001 Rev. 1.00 Table of Contents 1. Manual Information... 6 2. Precautions... 6 3. Made For ios (MFi) Mode Change... 6 4. Bluetooth Connection Instructions... 7 5. Troubleshooting...
USB 3.0 SATA/IDE 2.5 Hard Drive Enclosure
 USB 3.0 SATA/IDE 2.5 Hard Drive Enclosure UNI251BMU33 *actual product may vary from photos DE: Bedienungsanleitung - de.startech.com FR: Guide de l'utilisateur - fr.startech.com ES: Guía del usuario -
ilink Installation & User Manual Internet Downloadable MP3 Music & Message Series
 ilink by Installation & User Manual ilink Magic On Hold 800.584.4653 Internet Downloadable MP3 Music & Message Series Magic On Hold 720 Brooker Creek Blvd., Ste. 215 Oldsmar, FL 34677 800.584.HOLD (4653)
ONCE YOU HAVE READ THIS LICENSE AGREEMENT AND AGREE TO ITS TERMS, YOU MAY USE THE SOFTWARE AND/OR FIRMWARE INCORPORATED INTO THE PARADYNE PRODUCT.
 MIM-2000F Installation Instructions Document Number MIM2-A2-GZ42-00 June 2005 Contents Software and Firmware License Agreement... 1 Product Documentation Online... 3 Unpacking and Inspecting the Equipment...
HDD external enclosure for data-storage mobility with LAN sharing LAN MAC. USER Manual
 HDD external enclosure for data-storage mobility with LAN sharing LAN MAC USER Manual English AKASA Company notices The information contained in this document is subject to change without notice. All rights
InSite Prepress Portal
 InSite Prepress Portal System Version 5.0 Customer Quick Start Guide English 731-00089G-EN Rev C Copyright Kodak, 2008. All rights reserved. Creo and ecentral are trademarks of Kodak. Adobe, Acrobat, Adobe
Messager USB by Nel-Tech Labs, Inc. Installation & User Manual
 Messager USB by Nel-Tech Labs, Inc. Installation & User Manual Index: Introduction... 3 Messager USB Layout Summary... Installation... Message Programming & Operation... Troubleshooting... 4 5 6 6 Warranty
USB 3.1 (10Gbps) Standalone Duplicator Dock for 2.5 and 3.5 SATA Drives
 Standalone Duplicator Dock for 2.5 and 3.5 SATA Drives") USB 3.1 (10Gbps) Standalone Duplicator Dock for 2.5 and 3.5 SATA Drives SDOCK2U313R FR: Guide de l utilisateur - fr.startech.com DE: Bedienungsanleitung - de.startech.com ES: Guía del usuario - es.startech.com
USB 3.1 (10Gbps) Standalone Duplicator Dock for 2.5 and 3.5 SATA Drives SDOCK2U313R FR: Guide de l utilisateur - fr.startech.com DE: Bedienungsanleitung - de.startech.com ES: Guía del usuario - es.startech.com
10 Digital Photo Frame Instructional Manual
 10 Digital Photo Frame Instructional Manual aluratek.com mnl M10403 model ADMPF410T Copyright 2016 Aluratek, Inc. All Rights Reserved. Table of Contents Frame Features... Frame Control Close-up... Remote
IMAGE STUDIO LITE. Tutorial Guide Featuring Image Studio Analysis Software Version 3.1
 IMAGE STUDIO LITE Tutorial Guide Featuring Image Studio Analysis Software Version 3.1 Notice The information contained in this document is subject to change without notice. LI-COR MAKES NO WARRANTY OF
Assembly Manual & User Guide
 Assembly Manual & User Guide TABLE OF CONTENTS 1. INTRODUCTION... 1 1.1 MINIMUM SYSTEM REQUIREMENTS 1.1.1 Apple Mac Requirements 1.1.2 PC Requirements 1.2 PACKAGE CONTENTS 1.3 ABOUT THIS MANUAL 1.4 FRONT
Notice about the law and the standard
 Notice about the law and the standard High Speed Colour Printer Model: HC5500T This product contains RFID (Radio Frequency Identification) system. Model: 444-59005 Contains FCC ID: RPARFMHL00 This device
Mini Speaker. CWA BT300 Product Information Guide
 Mini Speaker CWA BT300 Product Information Guide IMPORTANT To get the full capability of your new Cobra Airwave Mini, please read this manual. It's more than just a Bluetooth Speaker! Volume Down Micro-USB
use. Best of all, the is affordable and will keep you in touch with those important to you.
 Congratulations on your purchase of our Pager. By incorporating some of the most advanced electronic paging technologies, the is reliable and easy to use. Best of all, the is affordable and will keep you
User Guide. USB/Ethernet Charging Cradle. Mobility Electronics, Inc Via Pasar, San Diego, CA 92126, USA
 USB/Ethernet Charging Cradle 9918 Via Pasar, San Diego, CA 92126, USA User Guide Phone: (858) 880-2225 Fax: (858) 530-2733 www.invisioncradles.com Copyright 2006. All rights reserved. The information in
Hard Drive Enclosure for 3.5 SATA HDDs - USB 3.0/eSATA - Trayless
 Hard Drive Enclosure for 3.5 SATA HDDs - USB 3.0/eSATA - Trayless S351BMU33ET *actual product may vary from photos FR: Guide de l utilisateur - fr.startech.com DE: Bedienungsanleitung - de.startech.com
Chapter5 Camera Settings and Other Functions
 Chapter5 Camera Settings and Other Functions Changing Camera Settings.. 116 Keep Settings... 116 Beep Sound Setting... 117 Auto Power Off Setting... 117 Changing the Display Language... 119 Changing the
Introduction. Package Contents. System Requirements
 VP6230 Page 1 Page 2 Introduction Congratulations on your purchase of the Blu-Link Folding Bluetooth Keyboard. This innovative portable folding keyboard connects via Bluetooth technology to provide a wireless
56-A11A Plantronics Calisto Headset with Bluetooth USB Adapter. User Guide
 56-A11A-10511 Plantronics Calisto Headset with Bluetooth USB Adapter User Guide ii Table of Contents Package Contents... 1 Product Features... 2 Wearing The Headset... 3 Powering... 4 Charging... 4 Indicator
Honor Whistle Smart Control Rechargeable Headset User Guide
 Honor Whistle Smart Control Rechargeable Headset User Guide Box contents 1 x Headset 3 x Ear tips (small, medium and large) 1 x Ear hook Your headset at a glance 1 x USB adapter 1 x User guide 1 Charging
Sonorous v2.0. Installation & User Manual
 Sonorous v2.0 Installation & User Manual Audio Messaging Solutions, LLC 720 Brooker Creek Blvd., Ste. 215 Oldsmar, FL 34677 800.584.HOLD (4653) Fax: 727.785.7659 http://onholdbusiness.com info@onholdbusiness.com
3M Workstation Monitor Checker CTE701A User s Guide
 3M Workstation Monitor Checker CTE701A User s Guide Table of Contents Section Page Intended Use...3 1.0 Quick Tour of your 3M Workstation Monitor Checker CTE701A...4 2.0 Basics...5 3.0 Metal Ground...5
USB-C Multiport Adapter - 4K HDMI - SD (UHS-II) - PD - GbE - 1xUSB 3.0
 - PD - GbE - 1xUSB 3.0") USB-C Multiport Adapter - 4K HDMI - SD (UHS-II) - PD - GbE - 1xUSB 3.0 DKT3CHSD4GPD *actual product may vary from photos FR: Guide de l utilisateur - fr.startech.com DE: Bedienungsanleitung - de.startech.com
USB-C Multiport Adapter - 4K HDMI - SD (UHS-II) - PD - GbE - 1xUSB 3.0 DKT3CHSD4GPD *actual product may vary from photos FR: Guide de l utilisateur - fr.startech.com DE: Bedienungsanleitung - de.startech.com
Plantronics Calisto II Headset with Bluetooth USB Adapter User Guide 56-K61A-23010
 56-K61A-23010 Plantronics Calisto II Headset with Bluetooth USB Adapter User Guide Contents Package Contents... 1 Product Features... 2 Wearing Your Headset... 3 Powering Your Headset and USB Bluetooth
IRONKEY H80 USER GUIDE
 IRONKEY H80 USER GUIDE Contents Introducing IronKey H80 2 Minimum System Requirements 2 Device accessories 2 Imation Documentation 3 Getting Started 4 Plugging in the device 4 Personalizing a device 4
5.2. Click these tabs to jump to the Table of Contents, Index or start of each chapter.
 5.2 Click this button to advance to the next page. Click this button to return to the previous page. (Since this is the starting page, the [Back] button cannot be used.) Click these tabs to jump to the,
USB Ranger 110/410 User Guide
 USB Ranger 110/410 User Guide Featuring ExtremeUSB Technology USB Ranger 110/410 Thank you for purchasing the USB Ranger. Please read this guide thoroughly before installation. This document applies to
OWC Mercury On-The-Go Pro USER GUIDE
 OWC Mercury On-The-Go Pro USER GUIDE TABLE OF CONTENTS 1. INTRODUCTION... 1 1.1 MINIMUM SYSTEM REQUIREMENTS 1.1.1 Apple Mac Requirements 1.1.2 PC Requirements 1.2 PACKAGE CONTENTS 1.3 ABOUT THIS MANUAL
Mobile Printer Unified Utility Manual ZQ110. P Rev. A
 Mobile Printer ZQ110 P1069081-001 Rev. A Table of Contents 1. Notice... 6 2. Operating System (OS) Environment... 6 3. Virtual Memory Switch Manager... 7 3-1 When Using on a PC... 7 3-2 When Using on a
2-Port Serial Card with 16C1050 UART - RS232 PCIe
 2-Port Serial Card with 16C1050 UART - RS232 PCIe PEX2S1050 *actual product may vary from photos FR: Guide de l utilisateur - fr.startech.com DE: Bedienungsanleitung - de.startech.com ES: Guía del usuario
Quick Start Guide. USB 2.0 Portable Laptop Crash Cart KVM Adapter Model: B032-VU1
 Quick Start Guide USB 2.0 Portable Laptop Crash Cart KVM Adapter Model: B032-VU1 The complete Owner s Manual is available on Tripp Lite s website: www.tripplite.com/support El manual completo esta disponible
Content. 1 Welcome Your phone Phone overview Functions of Keys Getting started... 6
 User Manual -1- Content 1 Welcome... 3 2 Your phone... 4 2.1 Phone overview... 4 2.2 Functions of Keys... 5 3 Getting started... 6 3.1 Installing the SIM Cards and the Battery... 6 3.2 Linking to the Network...
8 WiFi Digital Photo Frame with Touchscreen LCD Display Instructional Manual
 8 WiFi Digital Photo Frame with Touchscreen LCD Display Instructional Manual aluratek.com mnl M10438 model AWDMPF8BB Copyright 2017 Aluratek, Inc. All Rights Reserved. Table of Contents Frame Features...
10 Slim Digital Photo Frame Instructional Manual
 10 Slim Digital Photo Frame Instructional Manual aluratek.com mnl M10447 model ASGK410B Copyright 2017 Aluratek, Inc. All Rights Reserved. Table of Contents Frame Features... Frame Control Close-up...
USB 3.0 Spectra
 USB 3.0 Spectra 3001-15 1-Port USB 3.0 15m Active Extension Cable User Guide Thank you for purchasing the Icron USB 3.0 Spectra 3001-15. Please read this guide thoroughly. This document applies to Part
4-Port USB KVM Switch - DisplayPort - 4K 60Hz
 4-Port USB KVM Switch - DisplayPort - 4K 60Hz SV431DPUA2 *actual product may vary from photos FR: Guide de l utilisateur - fr.startech.com DE: Bedienungsanleitung - de.startech.com ES: Guía del usuario
Windows XP Installation Guide
 E3484 Windows XP Installation Guide November 2007 15G06Q009000 Copyright Information No part of this manual, including the products and software described in it, may be reproduced, transmitted, transcribed,
Basic Operation Guide
 Basic Operation Guide EPSON is a registered trademark of Seiko Epson Corporation. Photo Fine and its logo are registered trademarks or trademarks of Seiko Epson Corporation in Japan and other countries.
14 Digital Photo Frame Instructional Manual
 14 Digital Photo Frame Instructional Manual aluratek.com mnl M10423 model ADMPF214B Copyright 2017 Aluratek, Inc. All Rights Reserved. Table of Contents Frame Features... Frame Control Close-up... Remote
ONCE YOU HAVE READ THIS LICENSE AGREEMENT AND AGREE TO ITS TERMS, YOU MAY USE THE SOFTWARE AND/OR FIRMWARE INCORPORATED INTO THE PARADYNE PRODUCT.
 MIM-4E1 Installation Instructions Document Number MIM4-A2-GZ42-00 June 2005 Contents Software and Firmware License Agreement... 1 Unpacking and Inspecting the Equipment... 3 Installing the MIM-4E1... 3
Mercury Elite Pro mini ASSEMBLY MANUAL & USER GUIDE
 Mercury Elite Pro mini ASSEMBLY MANUAL & USER GUIDE TABLE OF CONTENTS 1. INTRODUCTION... 1 1.1 MINIMUM SYSTEM REQUIREMENTS 1.1.1 Mac Requirements 1.1.2 PC Requirements 1.2 PACKAGE CONTENTS 1.3 ABOUT THIS
1 ZoomBrowser EX Software User Guide 5.0
 1 ZoomBrowser EX Software User Guide 5.0 Table of Contents (1/2) Chapter 1 Chapter 2 Chapter 3 What is ZoomBrowser EX? What Can ZoomBrowser EX Do?... 4 Guide to the ZoomBrowser EX Windows... 5 Task Buttons
READ FIRST! User Manual _PktMedaCntr 2/4/05 9:47 AM Page 1
 33216_PktMedaCntr 2/4/05 9:47 AM Page 1 READ FIRST! Pocket Media Center User Manual Card Reader Side High Speed USB 2.0 Hub Side Please read this short manual to learn valuable information about the proper
12 Digital Photo Frame Instructional Manual
 12 Digital Photo Frame Instructional Manual aluratek.com mnl M10208 model ADMPF512F Copyright 2017 Aluratek, Inc. All Rights Reserved. Table of Contents Frame Features... Frame Control Close-up... Remote
GV-Joystick. User's Manual
 GV-Joystick User's Manual Before attempting to connect or operate this product, please read these instructions carefully and save this manual for future use. JKV10-C 2012 GeoVision, Inc. All rights reserved.
DEFENDER F100 & DEFENDER F150 USER GUIDE
 DEFENDER F100 & DEFENDER F150 USER GUIDE Contents Introducing Defender F100 & Defender F150 2 Minimum System Requirements 2 Imation Documentation 2 Getting Started 3 Opening and closing a device 3 Attaching
USB Transfer Cable. for Windows and Mac User s Guide
 2604052 User s Guide USB Transfer Cable for Windows and Mac We hope you enjoy your USB Transfer Cable from RadioShack. Please read this user s guide before using your new cable. Package Contents USB Transfer
2 Mesa Ethernet Dock User s Manual
 owner s manual Mesa Ethernet Dock The Mesa Ethernet Dock is an optional accessory that provides an ethernet port for networking, power input jack, USB client port, and a mounting station for the Mesa Rugged
3.5 External IDE Drive Case
 EXTERNAL DRIVE CASE 3.5 External IDE Drive Case IDECASE35F IDECASE35U2 Instruction Guide * IDECASE35U2 shown * Actual product may vary from photo The Professionals Source For Hard-to-Find Computer Parts
User guide. Bluetooth Keyboard BKB50
 User guide Bluetooth Keyboard BKB50 Contents Basics...3 General overview...3 Keyboard overview...3 Charging the keyboard...4 Turning on and off...5 Getting started...6 Setting up the keyboard...6 Assembly...6
PowerPC G GHz or above MAC OS 10.3.x (Panther), or 10.4.x (Tiger) 256 MB of RAM
, or 10.4.x (Tiger) 256 MB of RAM") Introduction This is your guide in setting up AVerMedia AVerVision software for Mac. The bundled AVerVision software enables you to record video or capture still image of your presentation into your Mac
Introduction This is your guide in setting up AVerMedia AVerVision software for Mac. The bundled AVerVision software enables you to record video or capture still image of your presentation into your Mac
User Guide TABLE OF CONTENTS Rename Copy and Paste Delete Export Extras
 TABLE OF CONTENTS GETTING STARTED 1.1Pairing the inotebook 2 USING THE inotebook TO CAPTURE HANDWRITTEN NOTES 2.1 Storing Pages in the Sensor 3 USING THE inotebook APP 3.1 List and Grid View 3.2 Creating
External Portable. HP SimpleSave. Portable Hard Drive User Manual. SimpleSave
 HP SimpleSave Portable Hard Drive User Manual External Portable SimpleSave Getting Help For additional help with your drive, its installation, and the software, contact one of the following: HP Customer
Customer Quick Start Guide English. InSite 4.5. graphics.kodak.com F-EN Rev A
 Customer Quick Start Guide English InSite 4.5 731-00089F-EN Rev A graphics.kodak.com Copyright 2006 Kodak. All rights reserved. Creo and ecentral are trademarks of Kodak. Adobe, Acrobat, Adobe Illustrator,
Operating Instructions
 Providing presentation solutions V iewer Software Program Operating Instructions NIPPON AVIONICS CO., LTD. 1 This manual describes the functions and operations for conducting presentations using ip Viewer.
CWA BT320 Product Information Guide
 TM Printed in China Part No. 480-900-P Version A CWA BT320 Product Information Guide IMPORTANT To get the full capability of your new Cobra Airwave 360, please read this manual. It's more than just a Bluetooth
5-Port USB 3.1 (10Gbps) Combo Card - 1x USB-C, 2x USB-A + 2x IDC (5Gbps)
 Combo Card - 1x USB-C, 2x USB-A + 2x IDC (5Gbps)") 5-Port USB 3.1 (10Gbps) Combo Card - 1x USB-C, 2x USB-A + 2x IDC (5Gbps) PEXUSB312EIC *actual product may vary from photos FR: Guide de l utilisateur - fr.startech.com DE: Bedienungsanleitung - de.startech.com
5-Port USB 3.1 (10Gbps) Combo Card - 1x USB-C, 2x USB-A + 2x IDC (5Gbps) PEXUSB312EIC *actual product may vary from photos FR: Guide de l utilisateur - fr.startech.com DE: Bedienungsanleitung - de.startech.com
Operating Instructions
 Operating Instructions For Digital Camera PC Connection QuickTime and the QuickTime logo are trademarks or registered trademarks of Apple Inc., used under license therefrom. VQT1H07 Connection with the
5.25 Bay Multi-Port Panel with a 6-in-1 Flash Card Reader/Writer
 USB 2.0 FLASH CARD READER 5.25 Bay Multi-Port Panel with a 6-in-1 Flash Card Reader/Writer 525FCREAD 525FCREADBK Instruction Guide * Actual product may vary from photo * 525FCREADBK shown The Professionals
2.5 USB-C External Hard Drive Enclosure - Rugged - USB 3.1 (10Gbps)
") 2.5 USB-C External Hard Drive Enclosure - Rugged - USB 3.1 (10Gbps) S251BRU31C3 *actual product may vary from photos FR: Guide de l utilisateur - fr.startech.com DE: Bedienungsanleitung - de.startech.com
2.5 USB-C External Hard Drive Enclosure - Rugged - USB 3.1 (10Gbps) S251BRU31C3 *actual product may vary from photos FR: Guide de l utilisateur - fr.startech.com DE: Bedienungsanleitung - de.startech.com
DIGITAL MAGNIFIER OPERATOR'S MANUAL. Technical Data and Reference Information SIRCHIE
 RIDGE PRO PLUS DIGITAL MAGNIFIER OPERATOR'S MANUAL Technical Data and Reference Information SIRCHIE Products Vehicles Training 100 Hunter Place, Youngsville, NC 27596 USA (919) 554-2244, (800) 356-7311
USB VideoBus for Macintosh User Guide
 P73261/F5U206-MAC/US/man.qxd 1/7/00 5:23 PM Page 1 USB VideoBus for Macintosh User Guide P73261 F5U206-MAC P73261/F5U206-MAC/US/man.qxd 1/7/00 5:23 PM Page 2 P73261/F5U206-MAC/US/man.qxd 1/7/00 5:23 PM
TRF-ZW1 Z-Wave Extender. Owner s Manual
 TRF-ZW1 Z-Wave Extender Owner s Manual TRF-ZW1 Z-Wave Extender Owner's Manual 2014 Universal Remote Control, Inc. The information in this Owner s Manual is copyright protected. No part of this manual may
CHS 7Ci. Bluetooth Cordless Barcode Scanner. Quick Start Guide
 Quick Start Guide CHS 7Ci Bluetooth Cordless Barcode Scanner www.socketmobile.com PACKAGE CONTENTS Product Information Product label Blue/Green/Red LED Scanner head Trigger button CHS 7Ci Lanyard NiMH
ZQ Peripherals Connection. 7-1 Bluetooth Connection (see the following manual for details) 7-2 Wireless LAN. 7-3 Interface Cable Connection
 7-2 Wireless LAN. 7-3 Interface Cable Connection") 7. Peripherals Connection ZQ110 This product can communicate with other devices via Bluetooth communication and cable. 7-1 Bluetooth Connection (see the following manual for details) 1. The printer can
7. Peripherals Connection ZQ110 This product can communicate with other devices via Bluetooth communication and cable. 7-1 Bluetooth Connection (see the following manual for details) 1. The printer can
2009 VTECH Printed in China
 2009 VTECH Printed in China 91-002371-000-000 INTRODUCTION Welcome to the wonderful world of reading with the Bugsby Reading System! Bugsby is an adorable bookworm who will introduce your child to reading
Messager USB w/ Night Answer
 Messager USB w/ Night Answer Digital Messaging System Installation & Users Guide Attention! Some USB drives have indicator LEDs - These LEDs may blink slow, fast, or may stay solid during playback. Any
Please read this guide before using of the PowerShot A5. You will find instructions on how to use basic camera functions.
 Please read this guide before using of the PowerShot A5. You will find instructions on how to use basic camera functions. Introduction Thank you for purchasing a Canon PowerShot A5, the easy-to-use, compact
CHANGING VIEWS AND SCREEN MODES
 In Lightroom 4 it is possible to edit the keyboard shortcuts and assign your own shortcuts or change or replace existing shortcuts. This list is based on the default shortcuts for Lightroom 4. NAPP members
USER'S MANUAL. FLEX Numeric Pager
 USER'S MANUAL ST 800TM FLEX Numeric Pager SUN TELECOM INTERNATIONAL ST 800 Congratulations on your purchase of our ST 800 pager. By incorporating some of the most advanced electronic paging technologies,
OPOS Driver Installation Guide ZQ110. P Rev. A
 OPOS Driver Installation Guide ZQ110 P1069380-001 Rev. A Table of Contents 1. Manual Information... 6 2. Development Precondition... 7 2-1 Features... 7 2-2 Operating Environment... 7 2-3 Accessible Devices...
USB 3.0 to M.2 NGFF SSD Enclosure with UASP
 USB 3.0 to M.2 NGFF SSD Enclosure with UASP SM2NGFFMBU33 *actual product may vary from photos FR: Guide de l utilisateur - fr.startech.com DE: Bedienungsanleitung - de.startech.com ES: Guía del usuario
User s Manual. Version September 2011 Impatica Inc.
 Version 1.1.7 September 2011 Impatica Inc. Legal Notice Copyright 2011 Impatica Inc. All rights reserved. The contents of this manual and associated Impatica software are the property of Impatica Inc.
Printer Driver. User Guide. Macintosh
 Card Photo Printer CP-100/CP-10 Printer Driver User Guide Macintosh 1 Contents Safety Precautions...4 Read This First...5 About the Manuals...5 Printing Flow Diagram...6 About the Connection Cable...7
User s Manual. Rechargeable Wireless Presenter Mouse. Page
 User s Manual Rechargeable Wireless Presenter Mouse Regulatory Compliance This device complies with Part 15 of the FCC Rules. Operation is subject to the following two conditions: (1) This device may not
ImageMate 12-in-1 Reader/Writer User Guide
 ImageMate 12-in-1 Reader/Writer User Guide Model Number SDDR-89 Product Description The Multi-Function Hi-Speed USB 2.0 Reader/Writer CompactFlash Type I/II, SD TM, minisd TM, MultiMediaCard TM, RS-MMC
BLUETOOTH SPEAKER. for ipod/iphone/ipad/android. User s Manual. Item #TA-11BTSP. PC Mac Ultrabook COMPATIBLE BLUETOOTH WIRELESS USB
 BLUETOOTH SPEAKER for ipod/iphone/ipad/android User s Manual BLUETOOTH WIRELESS PC Mac Ultrabook COMPATIBLE DETACHABLE USB POWER CABLE USB Item #TA-11BTSP Sakar One Year Warranty This warranty covers the
THUNDERBAY 4 MINI. Assembly Manual & User Guide
 THUNDERBAY 4 MINI Assembly Manual & User Guide CONTENTS INTRODUCTION 1.1 Minimum System Requirements...1 1.1.1 Apple Mac Requirements 1.1.2 PC Requirements 1.1.3 Supported Drives 1.2 Package Contents...1