Moneris e355 PIN Pad: Quick Install Guide
|
|
|
- Byron Glenn
- 6 years ago
- Views:
Transcription


1 Moneris e355 PIN Pad: Quick Install Guide (11/17)
2 For more information and assistance: Web: moneris.com/support-paydproplus-mobile Toll-free: PAYD (7293) Record your Moneris merchant ID here:
3 Contents Introduction... 3 Before you get started... 4 Learning about e355 basics 5 Pairing an e355 with your Apple ipad... 7 Pairing an e355 via Bluetooth 7 Unpairing the e355 PIN Pad 12 Pairing an e355 via Wi-Fi 13 Initializing the e355 PIN Pad e355 best practices Powering on the e Powering off the e Charging the e Charge indicator light 23 e355 conserving power in stand-by/sleep mode 24 Maintaining battery charge 24 Staying within communication range 24 Communication status indicators 25 Accessing PIN Pad configuration screens 25 Switching e355 connections 25 Switching from Bluetooth to Wi-Fi 25 Switching from Wi-Fi to Bluetooth 26 1
4 e355 keyboard: entering numbers, letters, and special characters 27 Troubleshooting Merchant support MONERIS E355 PIN PAD: QUICK INSTALL GUIDE
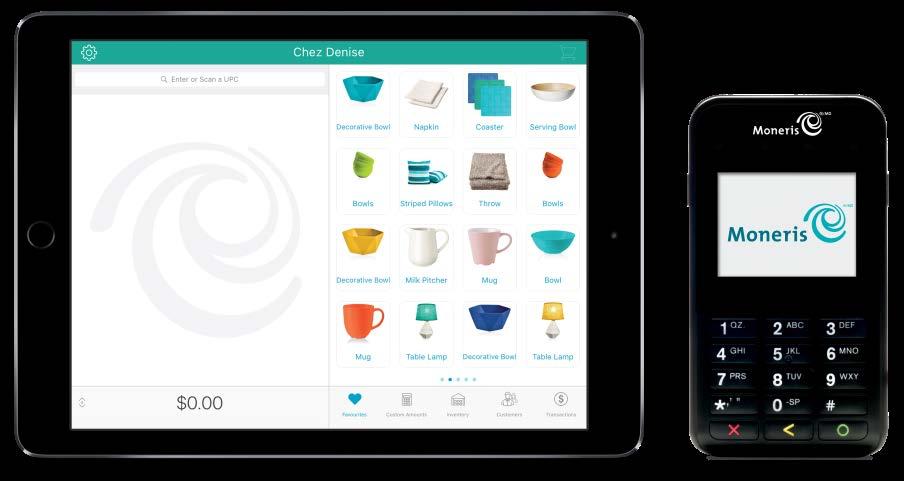
5 Introduction PAYD Pro Plus lets you turn your Apple ipad into a mobile POS Payment Solution, with great features that let you run your business from just about anywhere. This guide explains how to pair and configure the Moneris e355 PIN Pad for the PAYD Pro Plus Mobile App on an Apple ipad. 3
6 Before you get started 1. Ensure that you have the following components: An Apple ipad that supports Bluetooth and/or Wi-Fi connectivity. Note: If you want to pair the e355 via Wi-Fi, ensure that you have access to a secure (non-public) Wi-Fi network using WPA2 encryption. e355 and USB charging cable (provided in your welcome kit). Note: You will be required to plug this cable into a powered USB port (e.g., on a computer). The e355's terminal ID (also known as the "PIN Pad ID"), which is an 8-digit alpha-numeric code starting with "E1" (e.g., "E ") that is printed on a label affixed to the underside of the e355. Important! You will be required to refer to this terminal ID during the setup procedures. 2. Ensure the PAYD Pro Plus App is downloaded and installed on your Apple ipad. 3. Proceed to Learning about e355 basics on page 5. 4 MONERIS E355 PIN PAD: QUICK INSTALL GUIDE
 2 Micro-USB port (right side of the e355) Connect the USB charging cable here.")
7 Learning about e355 basics 1. Familiarize yourself with the key elements of the e355: 1 Power indicator light (right side of the e355) 2 Micro-USB port (right side of the e355) Connect the USB charging cable here. 3 Cancel key (red) Clear a displayed message, or cancel a transaction. Power off the e355 (press and hold down until the e355 beeps and starts to power off). 5
8 4 Correct key (yellow) Clear data entered on the e OK/Enter key (green) Submit data or acknowledge a message on the e355. Power on the e355 (press and hold down until the e355 starts to power up). 6 Chip Reader (slot at the bottom of the e355) 7 Display Screen/Contactless Reader The WELCOME/BONJOUR screen displays while the PIN Pad is idle. 8 Magnetic Stripe Reader (slot along the top of the e355) 9 Contactless Reader Indicator (green flashing lights) 2. Once you have familiarized yourself with the e355, follow the setup procedures for instruction on how to pair the e355 with your Apple ipad: To pair the e355 via Bluetooth, proceed to page 7. To pair the e355 via Wi-Fi, proceed to page MONERIS E355 PIN PAD: QUICK INSTALL GUIDE
9 Pairing an e355 with your Apple ipad Pairing an e355 via Bluetooth Follow the steps below to pair the e355 via Bluetooth. Important! Before you begin this setup procedure, ensure that the PAYD Pro Plus App is closed so that it is not running in the background on your Apple ipad. 1. Power on the e355: a. Plug the small end of the USB charging cable into the micro-usb port on the e355 (see page 5). Important! Use the USB charging cable provided with the e355. Failure to do so may affect the operability of, or cause damage to, the e355. b. Plug the other end of the USB charging cable into a powered USB port (e.g., on a laptop or computer). Note: Leave the USB charging cable connected to the e355 for the remainder of the setup process. c. Wait while the e355 powers on. d. When the LANGUAGE/LANGUE screen appears, proceed to step Ready your Apple ipad for Bluetooth pairing: a. Power on your Apple ipad to which you want to pair the e355. b. Ensure that Bluetooth is turned on, that the ipad is discoverable, and its Bluetooth settings screen is displayed. Note: If the Apple ipad has ever been paired with a different e355 or another type of PIN Pad (e.g., a PAYD PIN Pad), ensure that the ipad does not continue to retain the other PIN Pad s terminal ID in its Bluetooth memory (i.e., if necessary, un-pair the other PIN 7
10 Pad from the Apple ipad so that it forgets the terminal ID). Refer to Unpairing the e355 PIN Pad on page 12 for more information. c. Place the Apple ipad beside the e355 with which you want to pair. 3. Configure the e355 for Bluetooth communication: a. On the LANGUAGE/LANGUE screen, press the 1 key to select ENGLISH. b. When the TERMINAL SETUP screen appears, press the 1 key to select Communication. c. When the COMMUNICATION screen appears, press the 1 key to select PAYD Family. d. When the ECR CONNECTION screen appears, press the 2 key to select Bluetooth. e. When the ECR OS screen appears, press the 1 key to select ios. f. When the Bluetooth screen appears, proceed to step Pair the e355 with your Apple ipad via Bluetooth: a. On the Bluetooth screen, press the green key to select Add device. b. Wait while the e355 searches for devices with which to pair. c. When the Add device screen displays, scroll to your ipad name, and press the green key to select it. Note: To scroll up, press the 2 key; to scroll down, press the 5 key. If your ipad name is not listed, press the yellow key, and return to step 4a. d. When the Pair device screen appears, press the 3 key to select Yes. e. When the Pairing screen displays, wait while the passkey is generated. f. When the Please compare screen appears, note the six-digit passkey. 8 MONERIS E355 PIN PAD: QUICK INSTALL GUIDE
11 g. On your Apple ipad, wait for the Bluetooth pairing request popup to appear. This popup will include a six-digit passkey/code. h. Compare the passkey displayed on the e355 and the passkey on the Apple ipad. If the passkeys are identical, go to the next step. If the passkeys are different, power off the e355 PIN Pad (press and hold down the red key until it powers down), power it back up and repeat steps 3 and 4. i. Tap Pair on the Apple ipad s Bluetooth Pairing Request popup. On the e355, press the 3 key to select Yes. j. When the Paired screen appears, press the green key to select OK. k. When the REBOOT TERMINAL screen displays, wait while the e355 reboots. l. Wait while the e355 re-establishes its Bluetooth connection with the ipad (during this period, the WELCOME/BONJOUR NOT CONNECTED screen displays). m. Proceed to step Confirm that your Apple ipad is successfully paired with the e355: a. When the CONNECTED TO BT <your ipad name> screen displays, it means the e355 has successfully established a Bluetooth connection with your Apple ipad. Note: As long as the e355 can detect the Apple ipad, the ipad s name will display at five-second intervals at the top centre of the e355 screen (otherwise the e355 s internal clock time will display). The clock time will be synchronized to the correct time when you initialize the e355. b. When the WELCOME/BONJOUR screen appears, proceed to the next step. c. On your Apple ipad s Bluetooth settings screen, locate the e355's 8-digit terminal ID, which displays with the prefix "e355-" as in 9
12 "e355-e " (or sometimes the terminal ID may display simply as "Verifone BTx Host"). Note: The e355's terminal ID (e.g., "E ") is also printed on a label affixed to the underside of the e355. d. On your Apple ipad s Bluetooth settings screen, confirm that the terminal ID (or "Verifone BTx Host") is shown as a "Connected" device. 6. Log in to the PAYD Pro Plus App using your PAYD login credentials (Username, Password and Store ID), your Quick PIN, or your fingerprint (using Touch ID). 7. Tap the Settings button ( ). 8. On the main menu, tap Configuration. 9. On the Configuration screen, tap Devices. 10. On the Devices screen, in the PIN PAD section, toggle the Enable PIN Pad switch to the right (Enabled). 11. Tap Setup. 12. In the PIN Pad Configuration popup, in the CONNECTION TYPE section, tap Bluetooth. 10 MONERIS E355 PIN PAD: QUICK INSTALL GUIDE

13 13. Tap Finish at the top of the PIN Pad Configuration popup. Connecting to PIN Pad appears on the screen, then the Configuration Devices screen appears. 11
14 14. Do one of the following: To enable tip prompts to be displayed on the PIN Pad when customers use Interac debit and credit cards, toggle the Enable debit/credit card tipping switch to the right (Default = Disabled). To not display tipping prompts, leave the Enable debit/credit card tipping switch toggled to the left (Disabled). 15. Proceed to Initializing the e355 PIN Pad on page 20. Unpairing the e355 PIN Pad It may become necessary to unpair the e355 from your Apple ipad in order to pair it to another Apple ipad. Use the steps below as a guide for performing this task. Note: You should only have one PIN Pad paired via Bluetooth at a time. 1. Log out of the PAYD Pro Plus App. 2. Tap the Settings icon ( ) on the Apple ipad s main screen. 12 MONERIS E355 PIN PAD: QUICK INSTALL GUIDE
15 3. In the Settings menu, tap Bluetooth. 4. In the Bluetooth menu, in the MY DEVICES list, tap the Info button ( ) next to the PIN Pad name (e.g., e355-e ). 5. Tap Forget This Device. A confirmation popup appears. 6. Tap OK. The Bluetooth menu reappears, and the e355 PIN Pad is removed from the MY DEVICES list. Pairing an e355 via Wi-Fi Follow the steps below to pair the e355 via Wi-Fi. Important! Before you begin this setup procedure, ensure that the PAYD Pro Plus App is closed so that it is not running in the background on your Apple ipad. 1. Power on the e355: a. Plug the small end of the USB charging cable into the micro-usb port on the e355 (see page 5). Important! Use the USB charging cable provided with the e355. Failure to do so may affect the operability of, or cause damage to, the e355. b. Plug the other end of the USB charging cable into a powered USB port (e.g., on a laptop or computer). Note: Leave the USB charging cable connected to the e355 for the remainder of the setup process. c. Wait while the e355 powers on. d. When the LANGUAGE/LANGUE screen appears, proceed to step Ready your Apple ipad for Wi-Fi pairing: a. Power on your Apple ipad to which you want to pair the e
16 b. Determine which is the network that you want to use to pair the e355 with the Apple ipad: If you want the Apple ipad to connect an external Wi-Fi network, configure the ipad to connect to the network. Note: In the upcoming steps, you will be instructed to configure the e355 to connect to the same Wi-Fi network as the mobile device. Important! Do not attempt to configure the e355 to connect to a public Wi-Fi network. If you want the e355 to connect to the Apple ipad s personal Wi-Fi hotspot, generate the hotspot from the ipad now. c. Place the Apple ipad beside the e355 with which you want to pair. d. Proceed to step Configure the e355 for Wi-Fi communication: a. On the LANGUAGE/LANGUE screen, press the 1 key to select ENGLISH. b. When the TERMINAL SETUP screen appears, press the 1 key to select Communication. c. When the COMMUNICATION screen appears, press the 1 key to select PAYD Family. d. When the ECR CONNECTION screen appears, press the 1 key to select WiFi. e. When the WiFi screen displays, create a profile for the Wi-Fi network to which you want the e355 to connect: To manually enter the Wi-Fi network name (SSID), proceed to step 4. To scan for the Wi-Fi network name (SSID), proceed to step 5. Note: Use the scan option only if you are certain that the desired Wi-Fi network is broadcasting its SSID. 14 MONERIS E355 PIN PAD: QUICK INSTALL GUIDE
17 4. Manually enter the Wi-Fi network name (SSID): a. On the WiFi screen, press the 1 key to select New. Note: If you have already configured a Wi-Fi network profile, it will be listed on this screen. b. When the View/Edit screen appears, press the green key to select SSID. c. When the SSID screen displays, enter the name/ssid of the Wi- Fi network to which you want the e355 to connect, and key. Note: This parameter is case-sensitive. To enter the small/capital letters and special symbols, see page 27. d. When the View/Edit screen appears, press the 5 key to scroll to Wi-Fi Password and press the green key. e. When the WiFi Password screen displays, enter the password of the Wi-Fi network to which you want the e355 to connect, and press the key. Note: This parameter is case-sensitive. To enter the small/capital letters and special symbols, see page 27. f. When the View/Edit screen appears, press the 3 key to select Save. g. When the Configure Interface screen appears, wait while the e355 applies the network settings. h. When the Accepted screen appears, press the green key. i. Wait while the e355 establishes its connection to the Wi-Fi network (during this period, the "WELCOME/BONJOUR NOT CONNECTED" screen displays). The CONNECTED TO WI-FI <Your Wi-Fi network SSID> screen appears, displaying your network SSID and the e355 s IP address. j. When the WELCOME/BONJOUR screen appears, proceed to step 6. 15
18 5. Scan for the SSID: a. On the WiFi screen, press the 3 key to select WiFi Scan. b. When the WiFi Scan screen displays, wait while the e355 scans for available Wi-Fi networks. c. When the list of available Wi-Fi networks displays, scroll to the Wi-Fi network to which you want the e355 to connect, and press the green key to select it. Note: To scroll up, press the 2 key; to scroll down, press the 5 key. If your Wi-Fi network is not listed, press the yellow key, and return to step 5a of this procedure. d. When the next screen displays your Wi-Fi network profile settings, press the 3 key to select Add. e. When the Wi-Fi Password screen appears, enter the password for your Wi-Fi network and press the green key. Note: This parameter is case-sensitive. To enter the small/capital letters and special symbols, see page 27. f. When the Configure Interface screen appears, wait while the e355 applies the network settings. g. When the Accepted screen appears, press the green key. Note: If the Internal error screen appears, press the green key and go back to step 5a of this procedure. Note: If the Failed: Wifi already present screen displays, press the green key to clear the error screen, and then press the red key twice. h. Wait while the e355 establishes its connection to the Wi-Fi network (during this period, the "WELCOME/BONJOUR NOT CONNECTED" screen displays). The CONNECTED TO WI-FI <Your Wi-Fi network SSID> screen appears, displaying your network SSID and the e355 s IP address. i. When the WELCOME/BONJOUR screen appears, proceed to step MONERIS E355 PIN PAD: QUICK INSTALL GUIDE
19 6. On the WELCOME/BONJOUR screen, confirm that the Wi-Fi icon ( ) is displayed in the upper left corner of the screen, and your Wi-Fi network SSID is displayed at the top centre of the screen. The network icon ( ) may display periodically beside the Wi-Fi icon. Note: As long as the e355 can connect to the Wi-Fi network, the network SSID will display at five-second intervals at the top centre of the e355 screen (otherwise the e355 s internal clock time will display). The clock time will be synchronized to the correct time when you initialize the e Log in to the PAYD Pro Plus App using your PAYD login credentials (Username, Password and Store ID), your Quick PIN, or your fingerprint (using Touch ID). 8. Tap the Settings button ( ). 9. On the main menu, tap Configuration. 10. On the Configuration screen, tap Devices. 11. On the Devices screen, in the PIN PAD section, toggle the Enable PIN Pad switch to the right (Enabled). 12. Tap Setup. 13. In the PIN Pad Configuration popup, in the CONNECTION TYPE section, select Network. 14. In the NETWORK ADDRESS section, tap Search. The PIN Pad Search popup appears. Note: It is possible to also manually enter a network (IP) address. Refer to the PAYD Pro Plus Online Help for information on performing this task. 17
20 15. In the PIN Pad Search popup, tap the IP address of the e355 you paired with the ipad, then tap <Back at the top of the popup. The PIN Pad Configuration popup appears with the IP Address fields populated. 18 MONERIS E355 PIN PAD: QUICK INSTALL GUIDE
21 16. Tap Finish at the top of the PIN Pad Configuration popup. The screen displays Connecting to PIN Pad, then the Configuration Devices screen reappears. 17. Do one of the following: To enable tip prompts to be displayed on the PIN Pad when customers use Interac debit and credit cards, toggle the Enable debit/credit card tipping switch to the right (Default = Disabled). To not display tipping prompts, leave the Enable debit/credit card tipping switch toggled to the left (Disabled). 18. Proceed to Initializing the e355 PIN Pad on page

22 Initializing the e355 PIN Pad Follow the steps below to select the e355 PIN Pad in the PAYD Pro Plus App, then initialize the PIN Pad. 1. In the Configuration Devices screen, in the PIN PAD section, tap Initialize. A warning popup appears informing you the initialization could take several minutes. 2. Tap Yes to proceed. The PAYD Pro Plus App displays Initializing PIN Pad and the PIN Pad displays PLEASE WAIT. 3. Wait while the PIN Pad initializes. Once complete, the message PIN Pad has been successfully initialized appears on the ipad. Tap the OK button. The e355 PIN Pad returns to the WELCOME/BONJOUR screen and the PAYD Pro Plus App returns to the Configuration Devices screen. 20 MONERIS E355 PIN PAD: QUICK INSTALL GUIDE
23 Congratulations! You are now ready to process Interac debit and credit card transactions with your PAYD Pro Plus App and the e355 PIN Pad. 21
24 e355 best practices Moneris recommends that you follow these general guidelines to use and maintain your e355 PIN Pad. Powering on the e355 Before you perform a PAYD Pro Plus transaction, confirm that the e355 is powered on by pressing the green key and waiting for a response: e355 response Beeps and displays the "WELCOME/BONJOUR" screen. Screen remains dark (the backlight is turned off completely). e355 status The e355 is fully powered on and awake; ready to do transactions. The e355 is powered off and/or in sleep mode. Press and hold down the green key until the e355 starts to power on. Powering off the e355 To power off the e355, press and hold the red process can take several seconds. key. Please note, this Note: If the e355 is connected to power and charging, it will not power off. You will need to disconnect the cable from the e355 PIN Pad before attempting to power off. Charging the e Plug the small end of the USB charging cable into the micro-usb port on the e355 (see page 5). 22 MONERIS E355 PIN PAD: QUICK INSTALL GUIDE
25 Important! Use the USB charging cable provided with the e355 PIN Pad. Failure to do so may affect the operability of, or cause damage to, the e Plug the other end of the USB charging cable into a powered USB port (e.g., on a laptop or computer). Note: It may take up to 3 hours to reach optimum charge depending on the battery's current charge status. The orange light above the micro-usb port will blink continuously while the battery is charging. Note: The battery charge indicator displays on the e355's "WELCOME/BONJOUR" screen. If the e355 screen backlight is dim and/or "Moneris BE PAYMENT READY" displays during charging, simply press the green key to return to the "WELCOME/BONJOUR" screen. 3. Once the battery has reached optimum charge (at least 90%), you may disconnect the USB charging cable. Charge indicator light The charge indicator light is located on the right side of the e355 PIN Pad (see page 5). The colour of the light indicates the charge level of the e355. If the e355 is powered off or it is powered on but goes into a sleep/stand-by state to conserve power (see below), the charge indicator light will turn off. Light colour Orange Green Yellow Red Description Battery is charging (blinking light). Battery charge is moderate to high. Battery charge is moderate to low. Battery charge is low. Connect the e355 to a power source. 23
26 e355 conserving power in stand-by/sleep mode If the e355 is powered on but not being used to perform transactions, it will go into an idle state to conserve power (the e355 screen backlight dims and/or "Moneris BE PAYMENT READY" displays). If you do not initiate a transaction from the PAYD App or press the green key /the red key on the e355 keypad, and: Bluetooth is enabled: The e355 will go into a sleep/stand-by state (the screen backlight will turn off completely) for up to several hours, and then the e355 will shut down/power off completely. Wi-Fi is enabled: The e355 will remain in its idle state for as long as the battery is sufficiently charged. Note: If the e355 loses its connection with the Apple ipad for up to 15 minutes (e.g., the e355 is outside its Bluetooth communication range/cannot connect to the Wi-Fi network), the e355 will shut down/power off completely. Maintaining battery charge When you are not using the e355 (e.g., at night), connect it to a power source via the USB charging cable, and leave the e355 to recharge to full capacity. OR Power off the e355 by pressing and holding down the red key until the e355 beeps and starts to shutdown/power off (ensure that the USB charging cable is not connected to a power source). Staying within communication range Keep the e355 and your Apple ipad in close proximity to each other. Do not attempt to perform PAYD Pro Plus transactions near strong sources of electromagnetic interference. 24 MONERIS E355 PIN PAD: QUICK INSTALL GUIDE
27 Communication status indicators The indicators shown below should display on your e355's "WELCOME/ BONJOUR" screen when you are ready to perform transactions. Communication type E355 screen status indicators Bluetooth Wi-Fi Accessing PIN Pad configuration screens If you need to access the configuration screens again, press the 1 key and the yellow key at the same time. Switching e355 connections You may need to remove a connection in order to connect via another method. For example, you initially configured a Bluetooth connection, but now wish to switch to a Wi-Fi connection instead. Follow the steps below to manage the connections. Switching from Bluetooth to Wi-Fi 1. Log out of PAYD Pro Plus. 2. On your Apple ipad, disable Bluetooth communication for the moment. a. Tap the Settings icon ( ) on the Apple ipad s main screen. b. In the Settings screen, tap Bluetooth. c. In the Bluetooth screen, toggle the Bluetooth switch to the left (Disabled). d. Proceed to step 3. 25
28 3. Access the e355 configuration screen (see page 22 for instructions). 4. On the LANGUAGE/LANGUE screen, press the 1 key to select ENGLISH. 5. When the TERMINAL SETUP screen appears, press the 1 key to select Communication. 6. When the COMMUNICATION screen appears, press the 1 key to select PAYD Family. 7. At the ECR CONNECTION screen, press the 2 key to select Bluetooth. 8. At the ECR OS screen, press the 1 key to select ios. 9. At the Bluetooth screen, press the 5 key to scroll down and select Manage devices, then press the green key. 10. In the Manage devices screen, your ipad name is highlighted. Press the green key to select it. 11. In the <your ipad name> screen, press the 5 key to scroll down and select Remove, then press the green key. The e355 processes the request and then the Remove OK screen appears. 12. Press the green key. The No devices screen appears. 13. On the Apple ipad, enable Bluetooth again in the Bluetooth screen. 14. Power off the e355 PIN Pad (see page 22). 15. Power on the e355 PIN Pad (see page 22). 16. Access the e355 configuration screen (see page 22). 17. Begin the process of connecting via Wi-Fi. See Pairing an e355 via Wi-Fi on page 13 for more information. Switching from Wi-Fi to Bluetooth 1. Log out of PAYD Pro Plus. 2. Ensure Bluetooth is enabled and that your ipad is discoverable by other Bluetooth devices. 26 MONERIS E355 PIN PAD: QUICK INSTALL GUIDE
29 3. Access the e355 configuration screen (see page 22 for instructions). 4. On the LANGUAGE/LANGUE screen, press the 1 key to select ENGLISH. 5. When the TERMINAL SETUP screen appears, press the 1 key to select Communication. 6. When the COMMUNICATION screen appears, press the 1 key to select PAYD Family. 7. At the ECR CONNECTION screen, press the 1 key to select WiFi. 8. In the WiFi screen, the network SSID is highlighted. Press the green key to select it. 9. In the <your network name> screen, press the 5 key to scroll down and select Remove network, then press the green key. The e355 processes the request and then the WiFi screen appears empty. 10. Press the red key. The WELCOME/BONJOUR screen appears. 11. Power off the e355 PIN Pad (see page 22). 12. Power on the e355 PIN Pad (see page 22). 13. Access the e355 configuration screen (see page 22). 14. Begin the process of connecting via Bluetooth. See Pairing an e355 via Bluetooth on page 7 for more information. e355 keyboard: entering numbers, letters, and special characters Press the e355 keys to enter numbers, letters, and special symbols. 1. To enter the desired value in a data field, press the key that corresponds to the value that you want to enter (press the key repeatedly as necessary until the desired value is displayed in the field. Refer to the table below for the full list of corresponding values.) 2. Once a value is successfully entered, proceed to enter the next value. 27
30 Note: The SSID (network name) and password parameters are case sensitive (i.e., if your network SSID and password contain capital and small letters, you must enter capital and small letters in the data fields). To delete/correct the last entered value, press the yellow key. Key Enters this value 1, Q, Z, <period>, q, z 2, A, B, C, a, b, c 3, D, E, F, d, e, f 4, G, H, I, g, h, i 5, J, K, L, j, k, l 6, M, N, O, m, n, o 7, P, R, S, p, r, s 8, T, U, V, t, u, v 9, W, X, Y, w, x, y 0, *, #, <period>, -, <space>, +, <comma>,,,!, :, =, &, /, \, %, $, (, ), ^, _ For example, to enter the word Moneris, use the following sequence: M 6, 6 o 6, 6, 6, 6, 6, 6, 6 n 6, 6, 6, 6, 6, 6 e 3, 3, 3, 3, 3, 3 r 7, 7, 7, 7, 7, 7 i 4, 4, 4, 4, 4, 4, 4 s 7, 7, 7, 7, 7, 7, 7 28 MONERIS E355 PIN PAD: QUICK INSTALL GUIDE
31 Troubleshooting If a problem occurs and is listed in the table below, follow the instructions in the table. If the problem is still not resolved, call Moneris Customer Care tollfree at Issue The e355 screen is black. Solution The e355 may be powered off, or conserving battery life in sleep mode. Press and hold the green (or revive from sleep mode). key to power it on The e355 PIN Pad is paired to the ipad and appears Connected in the ipad s Bluetooth menu, but in the PAYD Pro Plus App, it appears as Not connected ( ). PIN Pad initialization error. The e355 PIN Pad may need to refresh its connection to the Apple ipad. Follow these steps to address the issue: 1. Power off the e355 PIN Pad (see page 22). 2. Power on the e355 PIN Pad (see page 22). If this doesn t work, it may need to be unpaired and re-paired to the ipad. 1. Power off the e355 PIN Pad (see page 22). 2. Follow the steps in Unpairing the e355 PIN Pad on page Power on the e355 PIN Pad (see page 22). 4. Access the e355 configuration screen (see page 22). 5. Follow the steps in Pairing an e355 via Bluetooth on page 7. Tap OK, then contact Moneris Customer Care tollfree at PAYD (7293). 29
32 Merchant support If you need assistance with your payment processing solution, we re here to help, 24/7. We re only one click away. Visit moneris.com/support-paydproplus-mobile to: consult the FAQs on how to set up and use PAYD Pro Plus download PAYD Pro Plus guides to assist with getting started, hardware installation, configuration, and usage instructions Visit shop.moneris.com to purchase point-of-sale supplies and receipt paper Visit moneris.com/insights for business and payment news & trends, customer success stories, and quarterly reports & insights Need help setting up? We ll be there. Moneris offers quick, hassle-free on-site setup of your complete ipad POS Solution by our in-house technicians. Contact us at MONERIS or visit moneris.com/ipadpos to learn more. Can t find what you are looking for? Call Moneris Customer Care toll-free (available 24/7) at PAYD (7293). We ll be happy to help. You can also send us a secure message 24/7 by logging in to Merchant Direct at moneris.com/mymerchantdirect. 30 MONERIS E355 PIN PAD: QUICK INSTALL GUIDE
33 MONERIS, PAYD PRO PLUS, MONERIS PAYD, MONERIS BE PAYMENT READY & Design and MERCHANT DIRECT are registered trade-marks of Moneris Solutions Corporation. Apple and ipad are trade-marks of Apple Inc., registered in the U.S. and other countries. All other marks or registered trade-marks are the property of their respective owners Moneris Solutions Corporation, 3300 Bloor Street West, Toronto, Ontario, M8X 2X2. All Rights Reserved. This document shall not wholly or in part, in any form or by any means, electronic, mechanical, including photocopying, be reproduced or transmitted without the authorized consent of Moneris Solutions Corporation ( Moneris ). This manual is for informational purposes only. Neither Moneris nor any of its affiliates shall be liable for any direct, indirect, incidental, consequential or punitive damages arising out of use of any of the information contained in this manual. Neither Moneris or any of its affiliates nor any of our or their respective licensors, licensees, service providers or suppliers warrant or make any representation regarding the use or the results of the use of the information, content and materials contained in this manual in terms of their correctness, accuracy, reliability or otherwise. This guide has not been authorized, sponsored, or otherwise approved by Apple Inc. Your Gift card processing is governed by your Moneris Gift Program Agreement with Moneris. Your Loyalty card processing is governed by your Moneris Loyalty Program Agreement with Moneris. Your DCC processing is governed by your Moneris Dynamic Currency Conversion Agreement; and your credit and/or debit card processing is governed by the terms and conditions of the Moneris PAYD Merchant Agreement (the Merchant Agreement ) with Moneris. It is the merchant s responsibility to ensure that proper card processing procedures are followed at all times. Please refer to your Merchant manuals and the Terms and Conditions of your Merchant Agreement(s) for details. The Moneris Merchant Operating Manual is available at moneris.com/support-paydproplus. PPPM e355 QIG-EN (11/17)
Hardware Install Guide
 Hardware Install Guide (11/17) For more information and assistance: Web: moneris.com/support-paydproplus-mobile Toll-free: 1-855-423-PAYD (7293) Record your Moneris merchant ID here: Contents Introduction...
PAYD PRO. Setup Guide 7. Let s get started
 1 4 2 5 3 6 PAYD PRO Setup Guide 7 8 9 + 0 - Let s get started TM Get started with PAYD PRO You re about to turn your smartphone into a mobile point-of-sale solution that moves as fast as you do. With
USING THE MERCHANT RESOURCE CENTER. Moneris ipp320 PINpad Setup Guide (08/16)
") USING THE MERCHANT RESOURCE CENTER Moneris ipp320 PINpad Setup Guide (08/16) Contents Introduction 2 Before you get started 3 Hardware setup 4 Using a USB cable 4 Using a serial cable 5 For more information
USING THE MERCHANT RESOURCE CENTER Moneris ipp320 PINpad Setup Guide (08/16) Contents Introduction 2 Before you get started 3 Hardware setup 4 Using a USB cable 4 Using a serial cable 5 For more information
Setting up Your Terminal. Moneris iwl220 Short-Range Mobile (10/13)
") 2 Setting up Your Terminal Moneris iwl220 Short-Range Mobile (10/13) IMPORTANT: READ FIRST If this is your first POS terminal with Moneris: Enclosed you should find your Moneris Visa Merchant Agreement/Moneris
2 Setting up Your Terminal Moneris iwl220 Short-Range Mobile (10/13) IMPORTANT: READ FIRST If this is your first POS terminal with Moneris: Enclosed you should find your Moneris Visa Merchant Agreement/Moneris
Setting up Your Terminal. Moneris iwl255 Long-Range Mobile (09/13)
") 2 Setting up Your Terminal Moneris iwl255 Long-Range Mobile (09/13) IMPORTANT: READ FIRST If this is your first POS terminal with Moneris: Enclosed you should find your Moneris Visa Merchant Agreement/Moneris
2 Setting up Your Terminal Moneris iwl255 Long-Range Mobile (09/13) IMPORTANT: READ FIRST If this is your first POS terminal with Moneris: Enclosed you should find your Moneris Visa Merchant Agreement/Moneris
Setting up Your Terminal. Moneris iwl255 Long-Range Mobile (05/15)
") 2 Setting up Your Terminal Moneris iwl255 Long-Range Mobile (05/15) IMPORTANT: READ FIRST If this is your first POS terminal with Moneris: Enclosed you should find your Moneris Visa Merchant Agreement/Moneris
2 Setting up Your Terminal Moneris iwl255 Long-Range Mobile (05/15) IMPORTANT: READ FIRST If this is your first POS terminal with Moneris: Enclosed you should find your Moneris Visa Merchant Agreement/Moneris
Setting up Your Terminal. Moneris Mobile 8300 (09/13)
") 2 Setting up Your Terminal Moneris Mobile 8300 (09/13) IMPORTANT: READ FIRST If this is your first POS terminal with Moneris: Enclosed you should find your Moneris Visa Merchant Agreement/Moneris MasterCard
2 Setting up Your Terminal Moneris Mobile 8300 (09/13) IMPORTANT: READ FIRST If this is your first POS terminal with Moneris: Enclosed you should find your Moneris Visa Merchant Agreement/Moneris MasterCard
Gift, Loyalty, and Tracking Program Web Portal Operating Manual
 Gift, Loyalty, and Tracking Program Web Portal Operating Manual (11/17) Need help? Web: moneris.com/support Toll-free: 1-866-319-7450 Record your Moneris merchant ID here: Contents Welcome to the Moneris
mypos Mini - User Manual mypos Europe Ltd. mypos Mini En
 mypos Mini - User Manual mypos Europe Ltd. mypos Mini En CONTENTS Introduction... 2 Scope... 2 Related documentation... 2 Internet connectivity... 2 Using mypos Mini with a mobile phone (via Bluetooth
mpos Merchant User Guide
 Version 1.0 Mint mpos User Guide: Version 1.0 SEP16 Contents CHAPTER 1: LOGGING INTO THE NETS MPOS MERCHANT PORTAL 6 First time Login 6 Next time Login 6 Forgot your password? 7 CHAPTER 2: MERCHANT PORTAL
CONVERGE MOBILE User Guide - ios
 How to take payments with the Converge Mobile app? CONVERGE MOBILE User Guide - ios Version 1.6 CONTACT 4576 Yonge Street, Suite 200, Toronto, ON M2N 6N4, Canada DOWNLOAD APP Store Google Play 2017 Elavon
mypos Combo - User Manual mypos Europe Ltd. mypos Combo En
 mypos Combo - User Manual mypos Europe Ltd. mypos Combo En CONTENTS Introduction... 2 Scope... 2 Related documentation... 2 Internet connectivity... 2 Using mypos Combo with a mobile phone (via Bluetooth
Card Reader User Guide
 Card Reader User Guide 1 MYOB PayDirect User Guide Getting started in a few easy steps MYOB PayDirect turns your smartphone into a mobile payments terminal, so you can get paid on the spot anywhere, anytime.
User Guide. for Card Reader and Payment Application
 User Guide for Card Reader and Payment Application Introduction to Pogo> This document provides detailed information on how best to use the Pogo> application to benefit your business. The intention is
D220 - User Manual mypos Europe Ltd. mypos Mini Ice En
 D220 - User Manual mypos Europe Ltd. mypos Mini Ice En CONTENTS Introduction... 2 Scope... 2 Related documentation... 2 Internet connectivity... 2 Using D220 with a mobile phone (via Bluetooth or personal
QUICK REFERENCE GUIDE iphone. Chase Mobile Checkout. FOR U.S. CLIENTS NOVEMBER 2017 NEXT è
 QUICK REFERENCE GUIDE iphone Chase Mobile Checkout FOR U.S. CLIENTS NOVEMBER 2017 NEXT è QUICK REFERENCE GUIDE iphone CHASE MOBILE CHECKOUT U.S. 2 CHASE MAKES NO WARRANTY OF ANY KIND, EITHER EXPRESSED
CONVERGE MOBILE User Guide - ios
 How to take payments with the Converge Mobile app? CONVERGE MOBILE User Guide - ios Version 1.6 CONTACT Two Concourse Parkway, Suite 800 Atlanta, GA 30328 DOWNLOAD APP Store Google Play 2017 Elavon Inc.
CONVERGE MOBILE User Guide - ios
 How to take payments with the Converge Mobile app? CONVERGE MOBILE User Guide - ios Version 2.0 CONTACT Two Concourse Parkway, Suite 800 Atlanta, GA 30328 DOWNLOAD APP Store Google Play 2017 Elavon Inc.
Castles MP200 Merchant Companion Guide
 Integrated Payments Castles MP00 Merchant Companion Guide 0/16/018 v. Payment Device Anatomy: Payment Device Anatomy Getting Started Completing a Sale System Settings 3 6 8 9 Payment Device Anatomy: Front
Congratulations on the purchase of your new Clover Flex
 Congratulations on the purchase of your new Clover Flex Set Up the Hardware What s included Clover Flex Charging cradle Receipt paper Power cord (2 for EU) Power brick Screwdriver Clover Flex Features
ANZ FASTPAY USER GUIDE
 ANZ FASTPAY USER GUIDE WELCOME TO YOUR ANZ FASTPAY USER GUIDE CONTENTS What you need to set up ANZ FastPay 2 What s in your ANZ FastPay box? 2 Where else to find help and information 3 Get to know your
Congratulations on the purchase of your new Clover Mobile
 Congratulations on the purchase of your new Clover Mobile Set Up the Hardware What s included Optional Accessories USB wall charger USB cable Clover Mobile Dock Clover Mobile Printer Clover Mobile Clover
QUICK REFERENCE GUIDE ipad. Chase Mobile Checkout
 QUICK REFERENCE GUIDE ipad Chase Mobile Checkout FOR U.S. CLIENTS OCTOBER 2018 QUICK REFERENCE GUIDE ipad CHASE MOBILE CHECKOUT U.S. 2 CHASE MAKES NO WARRANTY OF ANY KIND, EITHER EXPRESSED OR IMPLIED,
User Guide. mpos Readers RP350x & RP457c Mobile Payment Acceptance User Guide for Android
 mpos Readers RP350x & RP457c Mobile Payment Acceptance User Guide for Android Disclosure Statements Confidential Notice The information contained herein is the property of Total System Services, Inc. (TSYS
CONVERGE MOBILE User Guide - Android
 How to take payments with the Converge Mobile app? CONVERGE MOBILE User Guide - Android Version 2.0 CONTACT Two Concourse Parkway, Suite 800 Atlanta, GA 30328 DOWNLOAD Google Play APP Store 2017 Elavon
CONVERGE MOBILE User Guide - Android
 How to take payments with the Converge Mobile app? CONVERGE MOBILE User Guide - Android Version 1.5 CONTACT Two Concourse Parkway, Suite 800 Atlanta, GA 30328 DOWNLOAD Google Play APP Store 2017 Elavon
Thank you for purchasing the Mobile WiFi. This Mobile WiFi brings you a high speed wireless network connection.
 Quick Start Thank you for purchasing the Mobile WiFi. This Mobile WiFi brings you a high speed wireless network connection. This document will help you understand your Mobile WiFi so you can start using
Mobile POS icmp Bluetooth Card Reader
 Mobile POS icmp Bluetooth Card Reader F1 F2 F F4 Quick Start Guide v1.0 1 2 F ABC DEF 4 5 6 GHI JKL MNO 7 8 9 PQRS TUV WXYZ + 0 - and are registered trademarks of Apple Inc. Welcome to This quick start
Congratulations on the purchase of your new Clover Mobile
 Congratulations on the purchase of your new Clover Mobile Set Up the Hardware What s included Optional Accessories Clover Mobile Dock Clover Mobile Printer Clover Mobile Clover Clip Clover PIN Entry Aid
Presto Smart e355. Quick Reference Guide. Presto. Connected to YOUR POS NAME
 Presto Smart e355. Quick Reference Guide. Presto Connected to YOUR POS NAME Connectivity network & pairing. Connecting your Presto Smart e355 to your Point of Sale (POS) system. 1. The technician will
Connection Guide. Do this second:
 2 Do this second: Connection Guide 1 Install your lock. Use this Hardware Installation guide to get your lock hardware installed. Prefer a video? You are here. 2 Get connected. Use the Connection Guide
MYOB PayDirect Mobile quick start guide. quick start guide
 1 quick start guide 1 Getting started in a few easy steps MYOB PayDirect Mobile turns your smartphone into a mobile card payment terminal, so you can get paid on the spot anywhere, anytime. This Quick
Congratulations on the purchase of your new Clover Mini
 Congratulations on the purchase of your new Clover Mini Set Up the Hardware What s included The white USB cord provided can be used to plug into the Hub and connected to other accessories (such as the
User Guide. Accept EFTPOS, Visa and Mastercard payments on the go with Kiwibank QuickPay.
 User Guide Accept EFTPOS, Visa and Mastercard payments on the go with Kiwibank QuickPay. Kiwibank QuickPay terms and conditions apply. Kiwibank QuickPay is only available for business banking purposes.
Downloaded from manuals search engine. Quick Start
 Quick Start Thank you for purchasing the Mobile WiFi. This Mobile WiFi brings you a high speed wireless network connection. This document will help you understand your Mobile WiFi so you can start using
Active Club POS Hardware Setup
 Active Club POS Hardware Setup The Active Club POS hardware package includes the following (see figure 1): Heckler stand for ipad APG Vasario 1616 cash drawer Connecting cable for cash drawer Star Micronics
Connection Guide (for D SLR Cameras) En
 En") SB7J02(11)/ 6MB41011-02 Connection Guide (for D SLR Cameras) En Table of Contents Introduction...2 The Interface...2 Trouble Connecting?...2 More on SnapBridge...2 What You ll Need...3 What SnapBridge
SB7J02(11)/ 6MB41011-02 Connection Guide (for D SLR Cameras) En Table of Contents Introduction...2 The Interface...2 Trouble Connecting?...2 More on SnapBridge...2 What You ll Need...3 What SnapBridge
Pilot Pro SVC Terminal User Guide Triple E Technologies, LLC
 Pilot Pro SVC Terminal User Guide Triple E Technologies, LLC Version 042216.01 Triple E Technologies, LLC P.O. Box 2677 Post Falls, ID 83877 Phone: 208.777.9300 Fax: 208.777.9304 2016 Triple E Technologies,
Mobile Application User Guide
 Mobile Application User Guide SwipeSimple ios version 3.0 1 Contents 3 Part 1: Getting Started 3 Downloading the app 4 Signing in 5 Familiarizing yourself with the interface 19 Part 5: Items 19 Sorting
MobileMerchant App Guide. United Kingdom Ireland
 MobileMerchant App Guide United Kingdom Ireland Contents 1 Welcome to MobileMerchant from Elavon 3 1.1 How does it work? 3 1.2 What do I need? 3 1.3 How to get in touch 3 2 Datecs BluePad-50 PIN Pad 4
Let s get started. Need more help getting started?
 Need more help getting started? www.zencam.com/support Let s get started. We hope you love your new Zencam Camera. If you have any questions, we're here for you. M1. M2. E1. E2 Series support@zencam.com
LI Automated Soil CO 2 Flux System. Configuring the Palm Tungsten C for use with the LI-8100
 LI-8100 Automated Soil CO 2 Flux System Configuring the Palm Tungsten C for use with the LI-8100 NOTICE The information contained in this document is subject to change without notice. LI-COR MAKES NO WARRANTY
Getting to Know Your Mobile WiFi Note: Thank you for choosing VIVA LTE Mobile WiFi
 GUIDE BOOK 2 Thank you for choosing VIVA LTE Mobile WiFi This document will help you understand your Mobile WiFi so you can start using it right away. Please read this document carefully before using your
Thank you for purchasing the Mobile WiFi. This Mobile WiFi brings you a high speed wireless network connection.
 Quick Start Thank you for purchasing the Mobile WiFi. This Mobile WiFi brings you a high speed wireless network connection. This document will help you understand your Mobile WiFi so you can start using
User Guide. Accept EFTPOS, Visa and Mastercard payments on the go with Kiwibank QuickPay.
 User Guide Accept EFTPOS, Visa and Mastercard payments on the go with Kiwibank QuickPay. Kiwibank QuickPay terms and conditions apply. Kiwibank QuickPay is only available for business banking purposes.
Setting up Your Brand New ipad for Individual Use
 Setting up Your Brand New ipad for Individual Use A Basic Setup Guide for NEW ipads Instructional Technology May 2012 HCPS Page 1 I Have an ipad... So Now What? ipad Setup This setup requires that you
IFLEX SETUP INSTRUCTIONS FOR IPAD
 IFLEX SETUP INSTRUCTIONS FOR IPAD BEFORE YOU BEGIN: CONNECT: Ensure you have quality Wi-Fi connectivity to a wireless network (at least 2 or 3 bars). NOTE: The Quintiles Wi-Fi network in the office is
How to use the HTC Desire C mobile devices
 How to use the HTC Desire C mobile devices Orientation First, a quick overview of your primary buttons and areas of your phone. A B C D E F G H A) Headphone Jack B) Power Hold down to power your phone
Bluetooth 4.0 USB Adapter Model
 Bluetooth 4.0 USB Adapter Model 604002 Windows OS 8.1/10: Drivers auto-install 7/Vista/XP: Drivers are required Quick Start Guide Download drivers at cablematters.com/downloads Email: support@cablematters.com
Carrington College Student ipad Setup Guide
 Carrington College Student ipad Setup Guide Welcome Carrington College! We are very excited you have chosen this journey. One of your first steps on your Carrington College journey is setting up some of
Setting up NCR Silver for ios. This guide will walk you through the initial set up of NCR Silver ios.
 Setting up NCR Silver for ios This guide will walk you through the initial set up of NCR Silver ios. V3 INTRODUCTION Welcome to NCR Silver! Use this document to set up your NCR Silver system. This document
Getting to Know Your Mobile WiFi
 Quick Start Thank you for purchasing the O2 4G Pocket Hotspot Mobile WiFi. Mobile WiFi allows you to connect to high speed mobile broadband from any Wi-Fi capable device. This document will help you understand
Maxwell RSC Tablet PC Configuration Manual for use with Windows 8 Operating System
 Maxwell RSC Tablet PC Configuration Manual for use with Windows 8 Operating System TM537 1/18 Table of Contents 1 Maxwell RSC Instrument and Tablet PC...1 2 Glossary...3 3 Adjusting Volume Settings...5
Apple Pay FREQUENTLY ASKED QUESTIONS
 Apple Pay FREQUENTLY ASKED QUESTIONS At Park Bank, we want to make it easy and secure for you to use your credit card to make payments in stores and online. That s why we re pleased to offer Apple Pay
Thank you for purchasing the Mobile WiFi. This Mobile WiFi brings you a high speed wireless network connection.
 Thank you for purchasing the Mobile WiFi. This Mobile WiFi brings you a high speed wireless network connection. This document will help you understand your Mobile WiFi so you can start using it right away.
Thank you for purchasing the CharJi EVO CLOUD. This CharJi EVO CLOUD brings you a high speed wireless network connection.
 Thank you for purchasing the CharJi EVO CLOUD. This CharJi EVO CLOUD brings you a high speed wireless network connection. This document will help you understand your CharJi EVO CLOUD so you can start using
iphone/ipad Connection Manual
 For Electone users / Connection Manual By connecting your, or ipod touch to a compatible Electone and using the various dedicated applications, you can expand the potential of the Electone and make it
7 Touchscreen Tablet Quick Start Guide Model: V7TAB8S
 7 Touchscreen Tablet Quick Start Guide Model: V7TAB8S Important Information If you are experiencing a problem with the operation of this Tablet Do not return it to the retailer! Your Touchscreen Tablet
Bedford Falls Book Fairs Bedford Falls Book Fairs. Customer Bedford Falls BookScanner2 App Instructions TABLET
 Customer Bedford Falls BookScanner2 App Instructions TABLET 1. Turn on tablet press and hold power button (top right corner) for 3 seconds then release. It should start to power on. This takes about 20
BT MobileXpress App V2 for Android Quick Guide
 BT MobileXpress App V2 for Android Quick Guide 2 P a g e Overview This quick guide provides an overview on how to use the BT MobileXpress App to connect to the BT MobileXpress Wi-Fi service. While the
Quick Start Guide D502PB. U.S Service Hotline : More support at
 Quick Start Guide D502PB U.S Service Hotline : 1-888-863-0138 More support at www.d2pad.info Overview ENGLISH 1 2 3 8 7 4 5 6 1 2 3 4 5 6 7 8 Volume Keys Status Bar Front Camera Menu Key Home Key Back
C hase Mobile Checkout PLUS Mobile Application Quick Start Guide. Grow your business whenever and wherever you want!
 SM C hase Mobile Checkout PLUS Mobile Application Quick Start Guide Grow your business whenever and wherever you want! 1 Contents Getting Started Download the App Signing In Activating Your Card Reader
Forte Mobile Application
 Forte Mobile Application User Guide v3.1.2 Updated 5.25.2017 Revision History Forte Mobile Application: User Guide v3.1.2 Version Date Changes 3.1.1 4/6/2016 New Format. Added Merchant Settings Admin Password.
3MP WI-FI SECURITY CAMERA QUICK START GUIDE ENGLISH
 3MP WI-FI SECURITY CAMERA QUICK START GUIDE ENGLISH WELCOME! Congratulations on your latest purchase and welcome to the Q-See family. This guide will help get your camera up and running. WHAT S INCLUDED
Albert. User Guide. Version 6.0 September Albert User Guide Commonwealth Bank 1
 Albert User Guide. Version 6.0 September 2016 Albert User Guide Commonwealth Bank 1 2 Commonwealth Bank Albert User Guide Contents Introducing Albert 4 1. Getting started 5 Getting to know the hardware
User s Manual. Bluetooth Slim Keyboard. Page
 User s Manual Bluetooth Slim Keyboard Page Regulatory Compliance This device complies with Part 15 of the FCC Rules. Operation is subject to the following two conditions: (1) This device may not cause
TROUBLESHOOTING GUIDE
 TROUBLESHOOTING GUIDE Difficulty installing apps on LeapFrog Epic tablet Q: While purchased apps appear in the App Manager on the "Not installed" tab, the Install button is grayed out. How can I install
mypos Go User Manual mypos.com mypos Go - User Manual
 mypos Go User Manual mypos.com mypos Go - User Manual Table of Contents Introduction...2 Related documentation 2 Activation...3 Activation code 4 Getting started...5 Learn about your device 5 Home screen
Emmy. User Guide. 1. Emmy Terminal Features. 2. Important information to protect your business. 3. Getting Started
 User Guide 1. Emmy Terminal Features 2. Important information to protect your business The following steps should be followed at all times to protect you and your customers from fraud. You must ensure
Pairing two devices with the Belkin QODE Ultimate Pro and Slim Style Keyboard Cases
 Pairing two devices with the Belkin QODE Ultimate Pro and Slim Style Keyboard Cases If you are having trouble pairing a second device to the Belkin QODE Keyboard Cases, F5L171, F5L176, and F5L174, you
Cisco Instant Connect MIDlet Reference Guide
 Cisco Instant Connect MIDlet Reference Guide Cisco IPICS 4.7 Americas Headquarters Cisco Systems, Inc. 170 West Tasman Drive San Jose, CA 95134-1706 USA http://www.cisco.com Tel: 408 526-4000 800 553-NETS
Mobile App User Guide
 Download the Mobile App iphone and ipad To find our Freedom Credit Union Mobile App just scan the appropriate QR code to the right with your Apple device: iphone Download Or you can find it through the
Thank you for purchasing the Mobile WiFi. This Mobile WiFi brings you a high speed wireless network connection.
 Quick Start Thank you for purchasing the Mobile WiFi. This Mobile WiFi brings you a high speed wireless network connection. This document will help you understand your Mobile WiFi so you can start using
Chapter 1 Preparing Your ipads for Q-interactive
 Chapter 1 Preparing Your ipads for Q-interactive Q-interactive User Guide December 2016! Configuring Your ipad Settings for Q-interactive Before you can administer tests with Q-interactive, you need complete
Clover Installation Guides. For Clover Go Clover Mobile Clover Mini
 Clover Installation Guides For Clover Go Clover Mobile Clover Mini This document provides instructions to setup the 3 types of Clover terminals that are sold for Epicor Stand-Alone Processing. The three
Internet User Guide, Technicolor TG589ac 1
 Internet User Guide b TV Ethernet WPS Wireless 5 Gz Wireless 2.4 Gz Internet Broadband Status For the Technicolor TG589ac router @ Internet User Guide, Technicolor TG589ac 1 seethelight.co.uk 0800 331
Table of Contents: ipayment for Android
 for Android Tablets Table of Contents: Two-Factor Authentication... 3 Card reader... 4 Bluetooth Card reader... 5 Receipt Printer... 6 Logging in to ipayment MobilePay... 7 Demo Mode... 7 Reset Password...
Model 3000 Series Bluetooth User s Manual. May 2017 Revision 2
 Model 3000 Series Bluetooth User s Manual May 2017 Revision 2 Model 3000 Series Bluetooth User s Manual Table of Contents Overview... 1 Model 3000 Series Guide... 1 Firmware... 1 Status LEDs... 2 User
If you get stuck at any point, please let us know! We love talking to our customers! You can reach us at the number below:
 Thank you for purchasing the HomeMinder Remote Video and Temperature Monitoring System. We wrote these instructions so you can get the most out of your HomeMinder, regardless of your technical knowledge.
NovoConnect B360. Wireless Presentation & Collaboration System. User Manual Version 0.98
 NovoConnect B360 Wireless Presentation & Collaboration System User Manual Version 0.98 Copyright 2013 DELTA Electronics, Inc. All rights reserved. Page 1 Table of Contents TABLE OF CONTENTS... 2 1. GETTING
Registering a Card and Creating an Account on
 Installing MyCardRules The MyCardRules App is available for both iphones and Android phones. To install MyCardRules: 1. Search for the app in the App Store or on Google Play. 2. Follow the instructions
FAQ for KULT Basic. Connections. Settings. Calls. Apps. Media
 FAQ for KULT Basic 1. What do the Icons mean that can be found in notifications bar at the top of my screen? 2. How can I move an item on the home screen? 3. How can I switch between home screens? 4. How
ipad + itunes Tips & Tricks 2012
 Contents How to Set Up a Brand New ipad Without Wi-Fi Access... 1 Prevent Syncing... 4 Setting up an itunes Account Without a Credit Card... 5 Purchasing & Transferring Apps to an ipad Using a Laptop...
HD Ovi Digital Clock WiFi Hidden Camera. User s Guide WHEN YOU NEED TO KNOW.
 HD Ovi Digital Clock WiFi Hidden Camera User s Guide WHEN YOU NEED TO KNOW. HD Ovi Digital Clock WiFi Hidden Camera The HD Ovi Digital Clock WiFi Hidden Camera is a fully functional clock, displaying time
Welcome to Secure Wi-Fi. Your company enrolled you in this service to ensure the business and personal data on your device remains secure.
 Secure Wi-Fi User Guide Welcome to Secure Wi-Fi. Your company enrolled you in this service to ensure the business and personal data on your device remains secure. Secure Wi-Fi protects on all Wi-Fi networks
TeleNavTrack TM v3.2 User s Guide for RIM BlackBerry
 TeleNavTrack TM v3.2 User s Guide for RIM BlackBerry Copyright 2004-2006 TeleNav, Inc. All other trademarks or registered trademarks are acknowledged as the exclusive property of their respective owners.
User Manual. ipad 360 Keyboard Case. For more support, please us at Your questions will be answered promptly.
 User Manual ipad 360 Keyboard Case For more support, please email us at cs@yekbee.com Your questions will be answered promptly. 1 Overview Charging light Battery light Pairing light Function keys Up key
Thank you for purchasing the Mobile WiFi. This Mobile WiFi brings you a high speed wireless network connection.
 Quick Start Thank you for purchasing the Mobile WiFi. This Mobile WiFi brings you a high speed wireless network connection. This document will help you understand your Mobile WiFi so you can start using
CardNav. Member Experience Training Guide. CO-OP Financial Services
 CardNav Member Experience Training Guide CO-OP Financial Services TABLE OF CONTENTS Getting Started...4-5 Installing and Upgrading...8-10 Logging in to the App...12-15 Navigating the App...17-31 Viewing
for iphone for iphone
 for iphone for iphone Table of Contents: Two-Factor Authentication...3 Overview...4 Card reader...4 Bluetooth Card reader...5 Receipt Printer...6 Logging in to ipayment MobilePay...7 Demo Mode...7 Reset
Suncorp MPOS User Guide (ICMP)
") Suncorp MPOS User Guide (ICMP) Contents How to Use this Guide 3 Contact Details 4 Terminal Overview 5 MPOS ICMP Terminal Pin Pad Layout 5 MPOS ICMP Terminal Display Layout 6 How to Get Started? 8 How to
Suncorp MPOS User Guide (ICMP) Contents How to Use this Guide 3 Contact Details 4 Terminal Overview 5 MPOS ICMP Terminal Pin Pad Layout 5 MPOS ICMP Terminal Display Layout 6 How to Get Started? 8 How to
Quick Start Guide D U.S Service Hotline : More support at
 TM Quick Start Guide D-7 U.S Service Hotline : -888-707-655 More support at www.dpad.info Overview Touch Screen App Menu 4 5 4 5 6 Camera Power Key Earphone Jack Mini USB Port 7 6 7 8 9 8 7 Power DC Input
mpos USER GUIDE Chip & PIN Bluetooth Reader May 2016 version
 mpos USER GUIDE Chip & PIN Bluetooth Reader TABLE OF CONTENTS 1.0 Getting Started: mpos Card Reader & Mobile App 1.1 Charging your card reader 1.2 Downloading the mpos Mobile App 1.3 Getting your smart
Payment Solutions MyCardRules. MyCardRules Mobile App. User Guide. Release 3.1
 Payment Solutions November 27, 2017 Installing MyCardRules... 2 Registering a Card and Creating an Account on MyCardRules... 2 Logging In to MyCardRules... 2 Registering a Card... 3 Creating an Account...
Moneris HiSpeed 6200 Merchant Self Installation Guide
 Moneris HiSpeed 6200 Merchant Self Installation Guide IMPORTANT If this is your first POS device with Moneris Solutions, in the package with your POS device you should have received your Moneris Visa Merchant
TELEVISION. WiFi Plans. Interactive Guide and DVR (Digital Video Recorder) Manual for the Amazon Fire TV Stick. WiFi ARVIG arvig.
 Manual for the Amazon Fire TV Stick. WiFi ARVIG arvig.") TELEVISION WiFi Plans WiFi Delivered by Arvig Interactive Guide and DVR (Digital Video Recorder) Manual for the Amazon Fire TV Stick 888.99.ARVIG arvig.net/wifitv TABLE OF CONTENTS Getting Started My Arvig
TELEVISION WiFi Plans WiFi Delivered by Arvig Interactive Guide and DVR (Digital Video Recorder) Manual for the Amazon Fire TV Stick 888.99.ARVIG arvig.net/wifitv TABLE OF CONTENTS Getting Started My Arvig
Get. Started. All you need to know to get going. Sprint Phone Connect System 1
 Get Started All you need to know to get going. Sprint Phone Connect System 1 Special note for Sprint As You Go customers With Sprint As You Go you can free yourself from long-term contracts and enjoy more
Mobile Pay Plus Get Started Guide
 Mobile Pay Plus Get Started Guide For Apple Devices Version 2.2 April 2017 2 P age Table of Contents Introduction... 3 Supported Devices... 3 Preparing Your Apple Device to be Paired... 4 Pairing Your
MaxGalaxy Hardware Manual
 MaxGalaxy Hardware Manual Getting Started... 2 MaxGalaxy Requirements... 2 Installs Software/ Hardware... 3 Peripheral Service/ Certificate Application... 3 Hardware... 3 Installation Guides... 4 Installing
iphone User Guide & Manual
 iphone User Guide & Manual Telephone Support 866-680-8324 Email Support customerservice@bluepay.com Contents 1. Introduction... 3 2. Security... 3 3. Demo Mode... 3 4. Setup... 4 4.1 Activation... 4 4.2