Winmate S430M4 Series PDA User Guide
|
|
|
- Christina Holt
- 6 years ago
- Views:
Transcription
1 Version 2.00 Revision A March 2015
2 Contents Chapter 1: Safety Information Exposure to Radio Use...3 RF Exposure Information...3 Battery Safety Information...4 Electrostatic Discharge...4 Driving...4 Chapter 2: About Winmate S430M4 Series About S430M4...5 Features...6 Getting started...6 Sim Card and SD Card Installation...7 Battery Installation...7 Battery Charging...8 Turning On and Off the Device...9 Turning the S430M4 On...9 Turning the S430M4 Off...9 Resetting to Factory Defaults...9 Chapter 3: Using Android 4.2 Operating System Wake Up the Phone...10 Using the Touch Screen...11 Using the Home Screen...11 Personalizing Home Screen...12 View other parts of the Home Screen...13 Status and Notification Icons...14 Using the On-Screen Keyboard...15 Enter Text by Typing...16 Editing Text...17 Display Setting...18 Audio Profile Setting...18 Sounds Setting...18 Adjust Volume
3 Language & Keyboard Setting...19 Change the Keyboard Language...20 USB Debugging Setting...20 Using the Phone...21 About Phone...23 Chapter 4: Connecting to Network and Devices Connecting to Mobile Networks...24 Checking the Network (GPRS/3G) Connection...24 Turning on Data Service...24 Connecting to Wi-Fi Networks...24 Turn On the Wi-Fi and Connect to a Wi-Fi Network...24 Add a Wi-Fi Networks...25 Connecting to Bluetooth Devices...25 Turn Bluetooth On or Off...25 Connect to a Bluetooth Device...25 Disconnect from a Bluetooth Device...26 Connecting to Computer via USB...26 Chapter 5: Using the Camera Open Camera...28 Take a Picture...28 Viewing Picture...29 Shoot a Video...29 Opening the gallery...30 Chapter 6: Using the Readers Using the Barcode Reader Feature...31 Scanning Tips and Consideration...33 Using the RFID Reader Feature...34 Chapter 7: Accessories S430M4 Accessories
4 Chapter 1: Safety Information Exposure to Radio Use S430 series is equipped with Bluetooth, WI-Fi and Cellular modem radio. In some situation or area, user may be required to turn off the radios. For example; User s needs to turn the phone OFF when in an area posted TURN OFF RADIO SIGNAL. to avoid interfering with blasting operations. User needs to turn OFF the radio signal in health care facilities. Hospitals or health care facilities may be using devices that sensitive to Radio Frequency energy. Aviation authority regulations prohibit user from using phone while in the aircraft. In order to prevent the handheld from emitting radio signals, do the following step: To turn off the device: Press and hold the power button to display the Phone Options menu for 3 sec then tap the Power Off To set the device into airplane mode: Press and hold the power button to display the Phone Options menu for 3 sec then tap Airplane mode To turn off the Communication options e.g. Bluetooth, Wi-Fi, cellular modem radio: Select MENU, tap Setting, and then tap Wireless & networks. If any radios are on, tap them to uncheck all the radios checkboxes in the devices RF Exposure Information This PDA meets the government s requirement for exposure to radio waves. This PDA is designed and manufactured not to exceed the emission limits for exposure to radio frequency (RF) energy set by the Federal Communications Commission of the U.S. Government. The exposure standard for wireless devices employs a unit of measurement known as the Specific Absorption Rate (SAR). The SAR limit set by the FCC is 1.6W/Kg. Test for SAR are conducted using standard operating positions accepted by the FCC with the device transmitting at its highest certified power level in all tested frequency bands. Although SAR is determined at the highest certified power level, the actual SAR level of the device while operating can be well below the maximum value. This is because the PDA is designed to operate at multiple power levels so as to use only the poser required to reach the network. In general, the closer user to a wireless base station antenna, the lower the power output. For body worn operation, this PDA has been tested and meets the FCC RF exposure guidelines for use with an accessory that contains no metal and the positions of the handset 3
5 minimum of 1.5 cm from the body. User of other enhancements may not ensure compliance with FCC RF exposure guidelines. If user do not use a body-worn accessory and are not holding the PDA at the ear, position the handset a minimum of 1.5 cm from your body when the device is switched on. Battery Safety Information Do not use other battery which is not intended for the product. Use only the battery compatible for the device and follow battery usage, storage, and charging guidelines in this user guide. A damage rechargeable Lithium-ion polymer battery can cause explosion or fire. To prevent personal injury and/or property damage: Do not open, disassemble, puncture, or crush the battery Do not leave or store the PDA in an area which is near a heat source such as vehicle dashboard, dryer or other heat source. Do not attempt to insert foreign object into the battery or allow conductive objects to contact the battery In the event of battery leak: Do not have any contact with the battery fluid If battery fluid leaks onto the skin or cloth, wash the affected area with clean water Please contact your current Winmate distributor or local Winmate vendor if you suspect damage to your PDA or battery for inspection and reparation. Electrostatic Discharge Please follow proper electrostatic discharge precaution to prevent static damage that can harm electronic components inside your device Driving Using mobile device or accessory while driving may cause distraction and maybe illegal in some areas where you drive. Please obey the laws and regulations on the use of mobile device 4
6 Winmate S430M4 Series PDA Chapter 2: About Winmate S430M4 Series About S430M4 Winmate S430M4 Industrial Handheld is based on the ARM Cortex A7 processor running at 1.5 GHz. This device is compatible package with an ARM Cortex-A7 Quad Core and powerful graphics accelerator. The 4.3-inch capacitive multi-touch display offers 480 x 800 pixel WVGA resolution. Other new era tech includes 8MP rear camera, a micro-sd card slot, speedy Wi-Fi, integrated GPS and optional 3G mobile broadband. Features This section provides the features of the S430M4 series and describes how to set this device for the first time. 5


7 Features 1 Audio Phone Emit Sounds 2 Light sensor Light sensor detect the availability of light and automatically control the brightness of a screen backlight intensity 3 Proximity sensor Proximity function is used specifically towards near field proximity applications. In mobile phones, the proximity detection can detect when the user positions of mobile phone is close to their ear 4 Touch Screen Resistive touch screen 5 Keypad Button Search for IE Back to previous page Menu Home WiFi / Bluetooth Volume up Volume down Power Camera Scan barcode / RFID 6 WiFi / BT Status Indicator LED indicator indicates the WiFi or BT status 7 Power Status 8 RS232 RS232 Connector LED indicator indicates the battery power or charging status 9 Mini USB Use for data transfer via Mini USB cable 10 DC Jack Use for charging 11 DC Dock Use it for docking 12 Audio Jack Headset or Headphone can be connected 13 1D/2D Barcode Barcode Scanner for reading of 1D/2D barcode. 14 Camera 8 megapixel camera 15 Flash Camera flash for additional light during camera capture Hand Strap Fixing Hole 17 Speaker 18 Battery Latch screw To secure the battery To improve usability and ease of use when using the product Audio speaker provides a variety of sounds when user operating the device Getting started To start using the S430M4 for the first time:...install SIM Card and SD Card 6


8 ...Install the battery...chargi ng the Battery SIM Card and SD Card Installation To Install the SIM Card and SD Card: 1. Place the S430M4 facing down and then locate the screws on the backside 2. Unscrew the screws and gently pull the back cover 3. Pull the battery to remove it 4. Locate the SD and SIM card holder 5. Insert the SIM and SD card accordingly as shown in the figure 6. Locate the SD and SIM card holder 7. Push the SD and SIM card holder in the direction of the arrow Battery Installation 1. Reinsert the battery by latching the bottom first and then push it down. 7

9 2. After battery installation, put back the back cover and make sure all the screw fit with the hole. Screw and fix the back cover. Battery charging Please charge the battery before using the device for the first time, charge the battery until the LED indicator turns solid green. To charge the S430M4, use a cable or a docking with appropriate power supply. For more information about the S430M4 accessories, see chapter 7. To charge the battery using USB/ Charge cable: 1. Connect the power supply output connector to the input power port on the USB/Charge cable. 2. Connect the USB/ Charge cable to the bottom of S430M4. The battery charge LED indicates the battery charging status OFF LED Status Indication S430M4 is not charging S430M4 is not properly connected to a power source Solid Blue Solid Green S430M4 is in charging process Charging complete 8
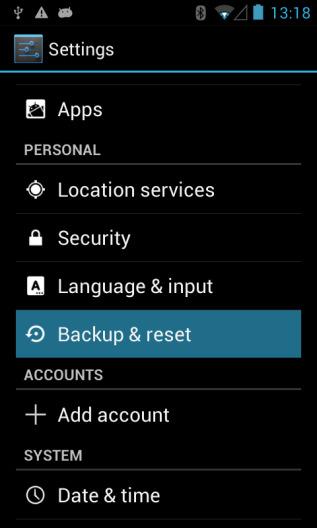
10 This product uses a non-removable battery. The battery should only be removed when you want to change the SD Card or SIM Card Turning On and Off the Device Turning the S430M4 On 1. Press and hold the power button for 3 seconds, located on the right side of the unit 2. When the device vibrates, release the power button The desktop screen is displayed Turning the S430M4 Off 1. To turn off the device, press and hold the power button until the phone options menu appears, tap the Power off. 2. User can also use the Phone options menu to put the device into silent or airplane mode, see features table. Resetting to Factory Defaults To reset the device to factory defaults: 1. Tap MENU, than tap System settings 2. Locate Backup & reset and then tap it 3. Tap Factory data reset, user can select to back up application data, Wi-Fi passwords and other settings to Google servers by tapping Back up my data. 4. Read all the available information and then check Erase phone storage if user want to erase all the data on the phone storage such as music or photo 9


11 10

12 Chapter 3: Using Android 4.2 Operating System Wake Up the Phone If you do not use the phone for a while, the screen dims and then darkens to conserve the battery. To wake up the phone: 1. Press the Power button on the side of the PDA. 2. Drag the lock icon to the right Using the Touch Screen To gain full access of the Android interface is by using your finger to manipulate icons, on screen keyboard, menu items, and other items on the touch screen. Tap Simply touch the icon, symbol, or onscreen button using your finger Tap and hold Touching an item using your finger and not lifting it until an action occurs Drag Touch and hold an item for some amount of time and then, without lifting your finger, move your finger along the screen until you reach target position Swipe or slide Quickly move your finger across the surface of the screen, without pausing it when you first touch it. (e.g. scroll a page or a list up or down) Double tap Tap quickly twice on a webpage, map, or other screen to zoom. Double tapping after pinching the zoom in some application to fit the width of the screen Pinch Place two fingers on the screen at once and pinching them together (to zoom out) and spreading them apart (to zoom in). Rotate the screen Orientation of the screens rotates with the phone as user turn it from upright to its side and back again. Using the Home Screen 11


13 Home screen is the starting point to access all the features on your PDA Device. It displays application icons, widgets, shortcuts, and other features. User can personalize the home screen. See Personalizing home screen Status Bar shows the time, signal strength, battery status, and other information. It also display notification icons APPS which is applications that user can use directly on the Home screen Launcher icon to open the launcher and view all applications Personalizing Home Screen User can add application icons, shortcuts, widgets, and other items to any part of any Home screen where there is free space. User can also switch the wallpaper. To change wallpaper on the Home screen: 1. Tap and then tap Wallpaper 2. On the menu that opens tap the type of item you want to add. To move an item on the Home screen: 1. Tap and hold the item you want to move, until it can be moved. 2. Drag it to a new location on the screen 3. Place the item where you want to put it and lift your finger 12


14 Move the APPS (Camera) to Home screen To remove an item from the Home screen: 1. Tap and hold the item you want to remove. The launcher icon will change into a Remove icon 2. Drag the item you want to remove to the Remove icon 3. When the icon turns red, release your finger View other parts of the Home Screen 1. Slide your finger left or right across the Home screen Extensions to the Home screen provide extra space for APPS, shortcuts, and other items. 13
15 2...Tap the launcher icon to view the entire APPS and Widgets of the device. Status and Notification Icons The status bar appears at the top of every screen. On the left are notification icons and on the right are status icons, along with the current time. Notification icons Status icons Status Icon The following icons indicates the status of your PDA, for example if users are connected to a Wi-Fi network that is not connected to the internet, the network icons are appears in white color Status icons that appear in the status bar are as follows: 14

16 Notification Icon The following icons indicate that you have received notification Using the On-Screen Keyboard User will be able to enter text using the On-Screen Keyboard. Some applications will launch the keyboard automatically. In others, user needs to touch a text field where user wants to enter text to launch the keyboard. 15


17 Enter Text by Typing 1. Open a text field, in this example we used ToDo to create a note The On-Screen Keyboard opens. Tap a suggestion to enter it in place of the underlined word in the text box. Tap once to capitalize the alphabet If user taps in a text field which already contains text, the insertion point is set where user tap and the cursor appears. User can drag the cursor to pick exactly where you want to add more text. User can also select a word to copy, cut and paste it. See Editing Text 2. Tap the delete key to erase characters to the left of the cursor 3. Tap to enter numbers. Tap to return to letters 4. To enter symbols and other characters, tap and hold one of the top-row keys and slide your finger up to the list of the options. Lift your finger when you find your selection. 5. To view additional symbols, tap on the numeric keyboard. 6. To open a small window with as set of common symbols, tap & hold the periode key 16


18 7. To close the On-Screen keyboard, tap the back button Editing Text To select text 1. Double Tap the text you want to select 2. Tap to select all the sentences in the menu that appears, the selected text is highlighted in blue, with a tab at each end of the selected word 3. Drag selection tab to expand or reduce the range of the selected text To Cut or Copy Text 1. Select the text to cut or copy, see to select text 2. Tap or in the Edit text menu. 3. If you select, the selected text is removed from the text field; it is stored in temporary area so that you can paste it into different text field. To Paste Text 1. After Cut or Copy the text, see To Cut or Copy Text 2. Place the cursor in the text field where you want to paste the text, user can paste text that you copied from one application into a text field in any application 3. Tap and hold into the location that you want to paste, Tap Paste in the menu that opens or user can also tap to replace the existing text with copied text 17


19 Display Setting Use the display settings to configure brightness and other screen settings. 1. Tap and then tap System settings 2. Tap Display and in the DEVICE part there are: Brightness for adjusting the brightness of the screen. Wallpaper to select wallpaper Auto-rotate screen for switching the orientation of the screen as user turn the device sideways or upright Sleep to inactivate the device after some time Font Size for adjusting the font in the device For the longest battery life between charges, use the shortest Sleep time Audio Profile Setting Use the sound settings to configure how and at what volume the phone rings, vibrates or alerts user in other ways when user receive a call, receive a notification or an alarm sounds. Sounds Setting 1. Tap and then tap System settings 18
 or during a call Language & Keyboard Setting Use the Language & keyboard settings to select the language for the text on your phone and")
20 2. Tap Adjust profiles and then user can select General, Silent, Meeting or Outdoor profile. Adjust Volume 1. Press the volume keys to change the ring volume (On the keypad) or during a call Language & Keyboard Setting Use the Language & keyboard settings to select the language for the text on your phone and for configuring On-Screen Keyboard, including words that you have added to its dictionary 1. Tap and then tap System Settings 2. Tap Language & Input language to open the language screen, where user can select the language to use for the text on the device. Default to apply the onscreen keyboard that is included with user s device. The correction and capitalization features affect only the English version of the keyboard. Android keyboard settings the setting screen is available only if user s device has a physical keyboard. There are three options; Auto-replace (check to correct misspelled words), Auto-cap (check to capitalize the first letter of the first word in sentences), and Auto-punctuate (check to insert a period when user press the space key twice in a row) Input Language (Active Input Methods) user can select language(s) that will appear in the android keyboard 19


21 Change the Keyboard Language The current keyboard language is displayed on the Space key and user can switch languages. 1...Tap and hold the space key 2...Witho ut lifting the finger, slide it to the left or right until the language you want to use appears in the center of the small window above the Space Key 3...Lift the finger to change the keyboard language USB Debugging Setting To permit debugging tools on a computer to communicate with User s PDA via USB Connection. 1. Tap and then tap System Settings 2...Tap { } Developer options and then tap USB debugging 20


22 Using the Phone User can make a phone call by dialing a phone number; touch a number in the contact list, on the web pages or other places. To Make a Phone Call 1. Please make sure the SIM card is properly installed 2. Tap the Phone icon at the bottom of the Home screen or in the launcher or on the Home screen 3. Tap the numeric keys on the screen to enter the phone number and then tap to dial the number that you have entered If you enter a wrong number, tap this button to erase digits one by one. To erase the entire number, tap and hold this button Tap and hold to enter + 4. Adjust the call volume by pressing the volume up / down button on the side of the PDA device To Make a Phone Call Using Contact List 1. Tap the launcher and then tap Contacts Or 21


23 2. Tap the Phone icon at the bottom of the Home screen and then tap the Contacts 3. Select the required contact and then tap it to call Answering or Declining Calls When user receive a phone call, the incoming call screen opens with the caller ID and any additional information about the caller that you have entered in contacts. Tap the answer icon to answering calls Tap the Reject icon To rejecting calls Messaging Send a Text Message 1. Tap the launcher and then tap 2. Tap Compose new message and enter a mobile phone number in the To field. You can tap to find your contact 3. Tap the composition text box to start entering your message 22


24 Open and Respond to Text Message If you are working in a message window, message that you receive are display in it. Otherwise, you receive a new message notification and a new message icon appears in the status bar. To reply a message When user tap the new message notification, the message window opens and user can reply the message To forward a message 1. Tap & hold a message in a message window 2. Tap Forward message in the menu that opens 3. Enter a recipient for message and edit the content if necessary 4. Tap Send About Phone About Phone includes information about user s phone System Update provides information regarding the local or online update of your devices Status opens the status screen with a list of information about battery, network, signal strength and other details Legal Information lists details about the model number, Android Version, Baseband version etc. this information is useful if user need to work with support team 23
25 Chapter 4: Connecting to Network and Devices Connecting to Mobile Networks When users assemble their PDA with a SIM card from service provider, their phone is configured to use their provider networks for voice calls and for transmitting data. Different locations may have different mobile networks available; user may need to configure their phone to use certain networks. To obtain fastest networks user can configure their phone to 4G and to extend the life of battery user can use 2G network. Checking the Network (GPRS/3G) connection 1. Tap and then tap System Settings 2. Tap More in the Wireless & networks, and then tap Mobile networks 3. Tap 3G Service to check the network connection Do not change the parameters of the access point to prevent user may not be able to access network sources Turning on data service 1. Tap and then tap System Settings 2. Tap More in the Wireless & networks, and then tap Mobile networks 3. Tap Data connection 4. Select the desired network operator to enable the data connection Connecting to Wi-Fi Networks Turn On the Wi-Fi and Connect to a Wi-Fi network 1. Tap and then tap System Settings 2. Tap Wireless & networks and then select Wi-Fi to turn it on 3. Tap Wi-Fi The device scans for available Wi-Fi networks and displays the list of it. Secured networks are indicated with a lock icon If the phone finds a network that you have connected previously, it connects to it automatically. 4. Tap a network to connect to it; If the network is open, you are prompted to confirm that you want to connect it by tapping Connect If the network is secured, users are prompted to enter a password or other credentials 5. To check the details about the speed, security, address and related settings, tap its name in the Wi-Fi settings screen 24
 of the network, if the network is secured, tap the security menu and then tap the type of security deployed on the network. 3. Enter any required security credentials 4.")

26 Add a Wi-Fi Network 1. Turn on Wi-Fi, in the Wi-Fi settings screen, tap + icon (at the bottom right of the list of discovered networks) 2. Input the SSID (name) of the network, if the network is secured, tap the security menu and then tap the type of security deployed on the network. 3. Enter any required security credentials 4. Tap Save Connecting to Bluetooth Devices Turn Bluetooth On or Off 1. Tap and then tap System settings 2. Tap Wireless & networks and then select Bluetooth to turn it on Connect to a Bluetooth device 1. Tap and then tap System settings 2. Tap Wireless & networks, and then tap Bluetooth settings 3. It will automatically scans and displays the IDs of all available Bluetooth devices in range. Tap SEARCH FOR DEVICES to search other Bluetooth devices 25

27 4. Tap the ID of the other device in the list in Settings to pair them Disconnect from a Bluetooth device 1. Tap the device in the Bluetooth settings screen 2. Tap OK to confirm that you want to disconnect Connecting to Computer via USB User can connect their PDA to a computer with USB cable to transfer files between PDA and computer When connecting your PDA to a computer and mounting its USB storage or SD card, user must follow the computer s instructions for connecting and disconnecting USB device, to avoid damaging or corrupting files. To connect your PDA to a computer via USB: 1. Use the USB cable that came with your PDA to connect the phone to a USB port on your computer 2. After received a notification that the USB is connected, tap the notification panel and then tap USB connected 3. Tap Turn on USB storage in the screen that opens to confirm that user wants to transfer files. When the phone is connected as USB storage, the screen indicates that USB storage is in use and user will receive a notification Carefully follow your computer s instructions to un-mount the USB storage or SD card. Disconnect USB device not properly can cause a loss of important data or information. 26


28 To disconnect your PDA from the computer: 1. Open the Notifications panel and tap USB connected 2. Tap Turn off USB storage in the screen that opens 27

29 Chapter 5: Using the Camera Winmate S430M4 equipped with 8MP on the rear side, which user can use to capture photos or video Open Camera 1...Tap the launcher and then tap Camera or press Camera opens in portrait mode, ready to take a picture or shoot a video Make sure the protective lens cover is clean before taking pictures. A lens cover with smudges from fingers can cause blurry picture Take a picture 1...Adjust the exposure, flash, and other necessary settings. Or leave it automatic. 2...Frame your subject / object on screen User can use pinch gesture to zoom in or out. 3...Tap the On Screen Shutter icon The camera brings the image into focus, when the image is in focus, the focus indicators in each corner will turn green and ready to capture 4...Touch the to change camera settings 28

30 Viewing pictures 1...After taking a photo, a thumbnail of the picture is shown on the corner of the capture screen. Tap the thumbnail to view it 2...Tap the onscreen button to view other photo or video in the galleries to delete photo to share photo 3...Swipe right or left to view more photos Shoot a video 29

31 1...Point the lens to record the scene where you want to start 2...Tap the On Screen Start Video icon The time remaining to shoot counts down at the upper left; when less than a minute is left, the countdown turns red 3...Tap the icon to stop shooting and tap to start again Opening the Gallery 1...Tap the launcher and then tap Gallery 2...Tap a folder to view the pictures or video inside in full screen mode 3...Flick the pictures left or right to view the previous or next picture 30


32 Chapter 6: Using the Readers Winmate S430M4 equipped with embedded 1D/2D barcode reader and RFID all in one device, allow user to collect data by scanning barcodes or RFID tags. Our S430M4 scan engine comes in compact size that attached on the top of the devices Using the Barcode Reader Feature To scan, perform the following procedure: 1. Ensure the Winmate Data Capture / Scan enabled application was installed on the device Select the Barcode Preference to enable or disable all the Code 31

33 Select the Prefix/ Suffix to allow special characters to be added at the beginning (prefix) or end (suffix) of the scanned barcode. Select the Trigger Settings to adjust the scan mode and read time options 2. Aim the Barcode 3. Press the trigger button to scan, in the S430M4, Trigger Button is located in the center (marked in red color) 32
34 4. Ensure the entire barcode is within the rectangular area formed by the brackets in the laser framing Correct Framing Wrong Framing 5. Release the trigger Scanning Tips and Considerations 1. Distance Scanning device will decode perfectly over a certain working range, there are minimum and maximum distance from the barcode. To specify the appropriate working range per barcode type is through a table as follows Symbology Density Min Distance Max Distance Code mm mm mm mm 9.5 cm 8.0 cm 6.5 cm 9.5 cm 11.5 cm 14.5 cm 50 cm 75 cm EAN / UPS 100% 0.33 mm 6 cm 34 cm DataMatrix 0.18 mm 0.25 mm 0.38 mm 7.5 cm 6.0 cm 5.5 cm 16.5 cm 23.0 cm 34.5 cm PDF mm 0.38 mm 5.5 cm 6.5 cm 26 cm 37 cm 2. Angle Scanning angle is important for promoting quick decodes, Scan Angle Framing Angle Horizontal Vertical Horizontal Vertical 34.4 o 22.2 o 30 o 20 o 33

35 Using the RFID Reader Feature To scan, perform the following procedure: 1. Ensure the Winmate Data Capture / Scan enabled application was installed on the device Select the RFID Output Setting to enable or disable all the Code Select the Prefix/ Suffix to allow special characters to be added at the beginning (prefix) or end (suffix) of the scanned RFID. 34

36 Select the Trigger Settings to adjust the scan mode and read time options 2. Tap the RFID Tag, it needs to have contact between the tag and the reader 3. Press the trigger button to scan, in the S430M4, Trigger Button for RFID is located in the right (marked in red color) 35
37 Chapter 7: Accessories S430M4 Standard Accessories Standard Accessory Part Number Details Universal Adapter Mini USB Cable Hand Strap W05V P0 9B Input : AC V Output : 5V-3A Provides power to the S430M4 and USB communication with a host computer Provides an ease of use interface for managing the device Micro SD Card 76G GB Micro SD Card 36
Winmate E430M2 Series PDA User Guide
 Version 1.00 Revision A June 2012 Contents Chapter 1: Safety Information Exposure to Radio Use... 3 RF Exposure Information... 3 Battery Safety Information... 4 Electrostatic Discharge... 4 Driving...
Winmate E430RM4-3HF Series PDA. User Guide
 Winmate E430RM4-3HF Series PDA Version 4.00 Revision A March 2016 0 Contents Chapter 1: Safety Information Exposure to Radio Use... 3 RF Exposure Information... 3 Battery Safety Information... 4 Electrostatic
Winmate S430T2-NKM Series PDA. With Windows Mobile 6.5. User Guide
 With Windows Mobile 6.5 Version 1.1 February 2017 Contents Chapter 1: Safety Information Exposure to Radio Use... 3 RF Exposure Information... 3 Battery Safety Information... 4 Electrostatic Discharge...
Contents. Get Started Install SIM Card
 Contents Get Started... 2 Install SIM Card... 2 Insert Micro SD card... 2 Charge Mobile Phone... 3 PC-Phone File Transfer... 4 Keys and Parts... 5 Fingerprint... 7 Lock and Unlock the Screen... 9 Notification
BEAT 2.0 USER MANUAL
 BEAT 2.0 USER MANUAL FCC ID: 2ADLJBEAT20 The device complies with part 15 of the FCC Rules. Operation is subject to the following two conditions: (1) This device may not cause harmful interference, and
Get Started. Insert SIM card The phone is a Dual SIM mobile phone allowing you to use the facility of two networks.
 Thank You for Purchasing this Smart mobile device. This device will provide you with high quality mobile communication and entertainment based on SMART and high standards. Content in this manual may differ
STUDIO 7.0 USER MANUAL
 STUDIO 7.0 USER MANUAL 1 Table of Contents Safety Information... 3 Appearance and Key Functions... 4 Introduction... 5 Call Functions... 6 Notifications Bar... 7 Contacts... 8 Messaging... 9 Internet Browser...
1. Introduction P Package Contents 1.
 1 Contents 1. Introduction ------------------------------------------------------------------------------- P. 3-5 1.1 Package Contents 1.2 Tablet Overview 2. Using the Tablet for the first time ---------------------------------------------------
Discovery Elite User Manual
 Discovery Elite User Manual 1 1. For your safety... 3 2. Learn about the phone... 4 3. Before using... 5 4. Getting started... 5 5. Communication... 8 6. Multimedia... 8 7. Connecting to networks and devices...
NEO 4.5. User Manual
 1 NEO 4.5 User Manual Table of Contents Safety Information... 3 Appearance and Key Function... 4 Introduction... 5 Call Functions... 6 Contacts... 7 Messaging... 8 Internet Browser... 9 Bluetooth & Wi-Fi...
1. Introduction P Package Contents 1.
 1 Contents 1. Introduction ------------------------------------------------------------------------------- P. 3-5 1.1 Package Contents 1.2 Tablet Overview 2. Using the Tablet for the first time ---------------------------------------------------
Limited Edition Product Overview
 Limited Edition Product Overview INTRODUCTION REDEFINING LUXURY beléci is built with impeccable craftsmanship and is designed to meet the 21st century mobile security challenges with its built-in CodeTel
Dash 4.0. User Manual
 1 Dash 4.0 User Manual Table of Contents Safety Information... 3 Appearance and Key Function... 4 Introduction... 5 Call Functions... 6 Contacts... 7 Messaging... 8 Internet Browser... 9 Bluetooth... 10
LIFE PURE User Manual
 LIFE PURE User Manual 1 Table of Contents Safety Information... 3 Appearance and Key Function... 4 Introduction... 5 Call Functions... 6 Contacts... 7 Messaging... 8 Internet Browser... 9 Bluetooth...
Studio 5.5. User Manual
 Studio 5.5 User Manual 1 Table of Contents Safety Information... 3 Appearance and Key Function... 4 Introduction... 5 Call Functions... 6 Contacts... 7 Messaging... 8 Internet Browser... 9 Bluetooth...
Content. Bluetooth... 20
 1 Content Assembling... 3 Install the SIM card and Memory card... 3 Charge the battery... 3 Getting started... 4 Use the touch panel... 5 Home screen... 6 Notification panel... 7 Lock & unlock the screen...
User Guide M101M8. Rugged Android Tablet. ARM Cortex -A53 Octa-Core, 1.3 GHz Android 7.0 Nougat
 M101M8 Rugged Android Tablet ARM Cortex -A53 Octa-Core, 1.3 GHz Android 7.0 Nougat User Guide Document Part Number: 9152111K1054 Version 1.1 Please read these instructions carefully before using this product,
DASH 4.5 user manual 1
 DASH 4.5 user manual 1 Table of Contents Safety Information... 3 Appearance and Key Function... 4 Introduction... 4 Call Functions... 6 Contacts... 6 Messaging... 8 Internet Browser... 9 Bluetooth... 10
M101M4 Tablet PC Quick Start Guide V1.0
 M101M4 Tablet PC Quick Start Guide V1.0 Please read these instructions carefully before using this product, and save this manual for future use. Getting Started Congratulations on purchasing this rugged
CONTENT FUNCTION MENU... 6
 CONTENT BASIC INFORMATION... 3 Phone Instruction... 3 Interface Icons... 4 Insert SIM card... 5 Charging the battery... 5 Power on/off your phone... 5 FUNCTION MENU... 6 PHONEBOOK... 6 MESSAGING... 6 Write
Q U I C K S T A R T G U I D E
 QUICKSTART GUIDE 2 Top 4 5 6 3 13 14 18 19 16 17 12 1 20 7 8 9 10 15 Left Side Front Right Side Back 11 Bottom 1 Power Button 2 Earphone Connector 3 Front-Facing Camera 4 Speaker 5 Ambient Light Sensor
VEGA. Operation Manual T A B L E T P C. advent vega operation manaul_new.indd 1
 VEGA T A B L E T P C Operation Manual advent vega operation manaul_new.indd 1 advent vega operation manaul_new.indd 2 CONTENTS SETTING UP YOUR TABLET FOR THE FIRST TIME... 4 USING THE DEVICE S BUTTONS
FAQ for KULT Basic. Connections. Settings. Calls. Apps. Media
 FAQ for KULT Basic 1. What do the Icons mean that can be found in notifications bar at the top of my screen? 2. How can I move an item on the home screen? 3. How can I switch between home screens? 4. How
Tablet PC. Android 5.1 User Manual
 Tablet PC Android 5.1 User Manual Tablet of Contents Specifications. What s inside the box Tablet Parts Getting started... How to use TF card How to connect to PC Connection to Internet.. Camera. Trouble
Tablet PC User Manual
 Tablet PC User Manual Please read all instructions carefully before use to get the most out of your Time2Touch Tablet PC. The design and features are subject to change without notice. Contents Important
Dash Jr. User Manual
 Dash Jr. User Manual 1 Table of Contents Safety Information...4 Appearance and Key Function...6 Introduction...8 Call Functions...9 Contacts... 11 Messaging... 12 Internet Browser... 13 Bluetooth... 14
Open your package. Your phone at a glance EN-1. Micro USB port. Headset. jack Rear camera. Earpiece. Front camera. Volume. button. Power.
 Open your package Prestigio MultiPhone Battery Travel charger Headset USB cable Quick start guide Your phone at a glance Earpiece Front camera Headset jack Rear camera Micro USB port Touch screen Volume
Quick Start Guide. Rugged Android Tablet M101M8 Series V1.0
 Rugged Android Tablet M101M8 Series Quick Start Guide V1.0 For more information on this and other Winmate products, please visit our website at: www.winmate.com Document Part Number: 9152111K1054 Please
Quick Start Guide. Rugged Android Tablet M101RK Series V1.0
 Rugged Android Tablet M101RK Series V1.0 For more information on this and other Winmate products, please visit our website at: www.winmate.com Document Part Number: 9152111K1057 Please read these instructions
CONTENTS. Safety Information Cleaning and Maintenance Function Information Messaging
 CONTENTS Safety Information... - 3 - Cleaning and Maintenance... - 3 - Function Information... - 5 - Messaging... - 7 - Email... - 8 - Camera... - 9 - Music... - 10 - FM Radio... - 12 - Sound Recorder...
i9 MID User Manual ShenZhen Ramos Digital Technology Co.,Ltd
 i9 MID User Manual ShenZhen Ramos Digital Technology Co.,Ltd 1 Thank you for your choosing and buying the i9 tablet. Please carefully read this operation manual before using the product. Precautions 1.
User Manual. LTE GSM/WCDMA Smartphone. S80 Lite
 User Manual LTE GSM/WCDMA Smartphone S80 Lite 1 Contents Let s get started Getting to know your phone Key definitions Screen control Open and switch applications Home Screen Switch to sleep mode Wake up
CONTACTS. Install the SIM card Install the memory card Charge the battery Getting started Turn your device on and off...
 Model Z407 CONTACTS Install the SIM card... 5 Install the memory card... 5 Charge the battery... 6 Getting started... 6 Turn your device on and off... 6 Airplane mode... 6 Use the touch panel... 7 Home
Tablet PC User Manual
 Tablet PC User Manual Please read all instructions carefully before use to get the most out of your Time2Touch Tablet PC. The design and features are subject to change without notice. Contents Important
Optus Blitz ZTE BLADE V7 LITE Quick Start Guide
 Optus Blitz ZTE BLADE V7 LITE Quick Start Guide Search ZTE Australia on Facebook, Google+ and Twitter to keep in touch. ZTE 2016 Ver 1.0 May 2016 Copyright 2016 by ZTE Corporation All rights reserved.
Contents 1. For your safety... Learn about the phone... 4 Before using Getting started Communication Multimedia...
 P6 User Guide Disclaimer: The colors, specifications, functions and graphics shown/mentioned in the user manual may differ from the actual product. In such a case, the latter shall govern. Images shown
1. Introduction. 1.1 Cosmo Specifications
 1. Introduction 1.1 Cosmo Specifications Details CPU Memory Storage Operating System Connectivity Sensor Camera Display Video Formats Description Quad Core 1.3 GHz ARM Cortex A7 Processor 512MB RAM 8 GB
Aspera R7. User Manual
 1 Aspera R7 User Manual Contents Safety Information... 3 Appearance and Key Function... 5 Introduction... 6 Call Functions... 7 Notifications Bar... 8 Contacts... 9 Messaging... 9 Bluetooth and Wi-Fi...
Thank you for choosing VOYAGER
 Svenska English Thank you for choosing VOYAGER VOYAGER is a 3G Connected Vehicle Smartphone using software based on Android OS. VOYAGER was created specifically for use in a vehicle. The device was designed
xtab 7Q Tablet PC User s manual
 xtab 7Q Tablet PC User s manual TABLE OF CONTENTS INTRODUCTION... 3 I - GETTING STARTED... 3 Important Safety Precautions... 3 Cleaning the Panel... 3 Cleaning the Tablet... 3 Features... 4 Buttons Overview...
NETWORK THE HOME 10 FOLDERS APPS
 NID-7006 NAXA NID Tablet User s Guide Table of Contents GETTING STARTED 4 CONNECTING TO A WIRELESS NETWORK 4 USING THE TOUCHSCREEN 4 USING THE HOME SCREENS 5 USING THE NAVIGATION ICONS 6 USING THE ALL
Product Key. Installing the SIM Cards. Top
 QUICK START GUIDE Product Key 2 Top 3 4 5 6 1 Power Button 2 Earphone Connector 3 Front-Facing Camera 4 Speaker 5 Ambient Light Sensor 6 LED Indicator 7 Microphone 8 Menu 9 Home 10 Back 11 USB Connector
WLAN USB...
 VIVO XL4 User Guide Contents 1. For your safety... 1 2. Learn about the phone... 2 Overview... 2 Function Keys... 2 3. Before using... 3 Insert SIM cards and TF card... 3 Charge the Battery... 5 4. Getting
VIVO GO USER MANUAL FCC ID: YHLBLUVIVOGO
 VIVO GO USER MANUAL FCC ID: YHLBLUVIVOGO Table of Contents Safety Information... 37 FCC Regulations... 41 RF Exposure Information (SAR)... 42 Introduction... 44 Navigation Bar... 44 Notifications Bar...
Battery Charging The tablet has a built-in rechargeable Li-polymer battery.
 Attention: This handbook contains important security measures and the correct use of the product information, in order to avoid accidents. Pls make sure to reading the manual carefully before use the device.
79 Backup and Reset DRAFT FOR INTERNAL USE ONLY. Factory Data Reset
 Backup and Reset Back up your data to Google servers. You can also reset your device to its factory defaults. Backup and Restore Samsung Account Enable backup of your information to Samsung servers. 2.
User Manual Model: X5 Brand: DOOGEE
 User Manual Model: X5 Brand: DOOGEE 1 User Manual Contents Let s get started Getting to know your phone Key definitions Screen control Open and switch applications Home Screen Switch to sleep mode Wake
Table of Contents 2 Device Functions 4 Device Setup 8 Call Features 9 Voic Customize Your Device 12 Contacts 13 Messages 15 Connections
 Table of Contents 2 Device Functions 4 Device Setup 8 Call Features 9 Voicemail 10 Customize Your Device 12 Contacts 13 Messages 15 Connections 16 Apps & More 19 Security Device Functions Front View Front
Contents. Introduction. Getting Started. Navigating your Device. Customizing the Panels. Pure Android Audio. E-Books. Browsing the Internet
 Contents Introduction Getting Started Your Device at a Glance Charging Assembling the Power Adapter Turning On/Off, Unlocking Setting to Sleep and Waking Up Connecting to a Computer Navigating your Device
IdeaTab S6000. User Guide V1.0. Please read the safety precautions and important notes in the supplied manual before use.
 IdeaTab S6000 User Guide V1.0 Please read the safety precautions and important notes in the supplied manual before use. Chapter 01 IdeaTab S6000 Overview *Specific models only 1-1 IdeaTab Appearance 1-2
Quick Reference Guide
 Quick Reference Guide Unlocked ¹ Table of Contents 2 Samsung Care 3 Know your device 5 Device setup 9 Home screen 12 Volume and ringtones 13 Hello Bixby 14 Useful apps 15 Calls 16 Voicemail 17 Contacts
Contents Welcome Know your Device Greeting started Features Accessing the Internet Taking Care of Your Device
 Thank you for purchasing the tablet PC and it is packaged with the following state of the art features and much more: 1 GHz Processor 7 Inch Full touch screen with Pinch Zoom 3G Dongle support via USB
1 Safety & Notice Your Phone Keypad function descriptions Icons (Icon changes without prior NOTICE) Battery...
 Battery...") 1 E435 User Manual 1 Safety & Notice... 3 2 Your Phone... 4 2.1.1 Keypad function descriptions... 5 2.1.2 Icons (Icon changes without prior NOTICE)... 6 2.2 Battery... 7 2.2.1 Remove and install of the
1 E435 User Manual 1 Safety & Notice... 3 2 Your Phone... 4 2.1.1 Keypad function descriptions... 5 2.1.2 Icons (Icon changes without prior NOTICE)... 6 2.2 Battery... 7 2.2.1 Remove and install of the
MANUAL PELITT MINI 1
 MANUAL PELITT MINI 1 TABLE OF CONTENTS 1. Warnings 3 2. Getting Started 3 3. Your Phone 4 4. File Manager 4 5. Phone book 4 6. Fun&Games 4 7. Call center 4 8. Messaging 4 9. Multimedia 5 10. Organizer
Contents. Introduction. Getting Started. Navigating your Device. Customizing the Panels. Pure Android Audio. E-Books
 Contents Introduction Getting Started Your Device at a Glance Charging Assembling the Power Adapter Turning On/Off, Unlocking Setting to Sleep and Waking Up Inserting and Removing a microsd Card Connecting
Z710 USER MANUAL. Rugged Mobile Computing Solutions
 Z710 USER MANUAL Rugged Mobile Computing Solutions . 2012 Trademarks Google and Android are trademarks of Google Inc. The Bluetooth word mark and logos are owned by the Bluetooth SIG, Inc. All other brand
Happy Phone 3G 4.0. User Manual
 Happy Phone 3G 4.0 User Manual 1 Getting Started Overview Indicator Receiver Front Camera Sensor Volume Key Power Key Touch Screen Home Key Hardkey-Menu Hardkey-Back 2 Headset Jack Charging/USB Jack Volume
Get to Know Your Tablet
 Get to Know Your Tablet 1 8 My Verizon You re now connected to Verizon 4G LTE. Lightning fast, Lightning strong. For more information, visit verizonwireless.com/4glte. REGISTER at verizonwireless.com/myverizon
Contents. Introduction
 Page 1 of 15 Contents Introduction Getting Started Your Device at a Glance Charging Assembling the Power Adapter Turning On/Off, Unlocking Setting to Sleep and Waking Up Inserting and Removing a microsd
Lenovo B. Quick Start Guide. Lenovo A2016b30. Read this guide carefully before using your smartphone.
 Lenovo B Quick Start Guide Lenovo A2016b30 Read this guide carefully before using your smartphone. Reading before using your smartphone For your safety Before assembling, charging or using your mobile
Connectivity Wi-Fi BT Find and connect to BT Safety Precautions Care & Maintenance Other Warning...
 1 Content Assembling... 4 Install the SIM card... 4 Install the memory card... 4 Charge the battery... 5 Getting started... 5 Turn your device on and off... 5 Airplane mode... 5 Use the touch panel...
<,W,EϬϱ E USER MANUAL
 USER MANUAL GETTING STARTED To get started with the Agora handset, please take both the phone and the battery out of the box. On the rear of the phone you will find a plastic backing cover with a small
Getting Started. Parts & Functions Handset Status Bar
 Getting Started 1 Parts & Functions... 1-2 Handset... 1-2 Status Bar... 1-4 Memory Card... 1-6 Enabling Automatic Backup... 1-6 Restoring Backed Up Data to Handset... 1-6 Memory Card Installation... 1-6
MO-01J. Quick Start Guide
 MO-01J Quick Start Guide 1 LEGAL INFORMATION Copyright 2016 ZTE CORPORATION. All rights reserved. No part of this publication may be quoted, reproduced, translated or used in any form or by any means,
USER MANUAL FCC ID: YHLBLUC518
 C5 USER MANUAL FCC ID: YHLBLUC518 1 Table of Contents Safety Information... 5 FCC Regulations:... 9 RF Exposure Information (SAR)... 10 Introduction... 12 Navigation Bar... 13 Notifications Bar... 14 Call
K8 smart watch phone quick start guide
 K8 smart watch phone quick start guide K8 smart watches are built-in android 4.4, call, text messages, audio and video, pictures, Internet radio, weather, tape recorder, step, health management, WIFI,
Lenovo S60-a. Quick Start Guide. Read this guide carefully before using your smartphone.
 Lenovo S60-a Quick Start Guide Read this guide carefully before using your smartphone. First glance 1 2 3 4 11 12 13 5 6 14 15 7 10 9 8 16 17 13 1 Headset connector 2 Light/Proximity sensor 3 Receiver
Breeze FB201 Phone User Guide
 Breeze FB201 Phone User Guide Table of Contents Getting Started... 3 Insert the SIM Card and Battery... 3 Insert the Media Card... 3 Keys and Parts... 4 Basics... 5 Display Indicators... 5 Writing Text...
Lenovo Miix User Guide. Read the safety notices and important tips in the included manuals before using your computer.
 Lenovo Miix 2 11 User Guide Read the safety notices and important tips in the included manuals before using your computer. Notes Before using the product, be sure to read Lenovo Safety and General Information
1. Notes. 2. Accessories. 3. Main Functions
 Contents 1. Notes... 2 2. Accessories... 2 3. Main Functions... 2 4. Appearance And Buttons... 3 5. MID Hardware Parameters... 4 6. MID Use And Preparation... 4 7. Keys Functions... 4 8. Start-up And Shutdown...
Dash Jr. User Manual Table of Contents
 (/usermanuals) Dash Jr. User Manual Table of Contents Safety Information Safety Information Call Functions Contacts Messaging Opera Mini Browser Bluetooth & Wi Fi Camera Gallery Music Sound Recorder Alarm
TALK 5H USER S MANUAL
 TALK 5H USER S MANUAL 2 INTRODUCTION... 5 GETTING STARTED... 5 Important Safety Precautions... 5 Cleaning the Panel... 6 Cleaning the Phone... 6 Features... 6 Buttons overview... 7 What s int he Box...
Content. 1 Welcome Your phone Phone overview Functions of Keys Getting started... 6
 User Manual -1- Content 1 Welcome... 3 2 Your phone... 4 2.1 Phone overview... 4 2.2 Functions of Keys... 5 3 Getting started... 6 3.1 Installing the SIM Cards and the Battery... 6 3.2 Linking to the Network...
User Manual. Product Model: MiTraveler 7D-8B. OS: Android 4.1
 User Manual Product Model: MiTraveler 7D-8B OS: Android 4.1 Tablet of Contents Specifications.1 What s inside the box 2 Tablet Parts 2 Getting started...2 Connection to Internet..6 Task Bar..8 Install
Senior Phone BAS User Guide English
 Senior Phone BAS-24100 www.facebook.com/denverelectronics User Guide English ENG-1 Insert the SIM card: The SIM card contains your phone number, PIN code, links to operator services, contacts and SMS messages.
Specifications. What s Inside The box
 Tablet of Contents Specifications.1 What s inside the box 1 Tablet Parts 2 Getting started...2 Connecting to the Internet..6 Task Bar..8 Install and Uninstall 9 Camera.10 HDMI.11 Trouble Shooting 11 Warranty..13
Table of contents. 2 Samsung Care. 3 Know Your Device. 5 S Pen. 7 Device Setup. 12 Home Screen. 18 Apps. 19 Calls. 20 Voic .
 Table of contents 2 Samsung Care 3 Know Your Device 5 S Pen 7 Device Setup 12 Home Screen 18 Apps 19 Calls 20 Voicemail 21 Contacts 22 Messages 24 Camera 25 Internet 26 Connections 27 Security Samsung
STUDIO MINI LTE USER MANUAL
 Studio Mini LTE English Manual STUDIO MINI LTE USER MANUAL Table of Contents Safety Information Call Functions Notifications Bar Contacts Messaging Bluetooth & Wi-Fi Opera Browser Gmail Play Store Camera
battery icon in the bottom right corner of the display screen.
 ATTENTION: This handbook contains important information regarding the safe and correct use of your tablet. Please be sure to read the following in order to maximize your enjoyment of the device and to
Chapter 1 Preparing Your ipads for Q-interactive
 Chapter 1 Preparing Your ipads for Q-interactive Q-interactive User Guide December 2016! Configuring Your ipad Settings for Q-interactive Before you can administer tests with Q-interactive, you need complete
Lenovo K6 NOTE. Quick Start Guide. Lenovo K53a48. Read this guide carefully before using your smartphone.
 Lenovo K6 NOTE Quick Start Guide Lenovo K53a48 Read this guide carefully before using your smartphone. Reading before using your smartphone For your safety Before assembling, charging or using your mobile
December 13, 2010 AUG Android mobile technology platform 2.3. Android 2.3 User s Guide
 December 13, 2010 Android mobile technology platform 2.3 Android 2.3 User s Guide 2 Legal Copyright 2010 Google Inc. All rights reserved. Google, the stylized Google logo, Android, the stylized Android
User s Guide. Contents. Get started 3
 Contents User s Guide Get started 3 Get around 3 Touch & type 4 Use the lock screen 5 Make yourself at home 6 Change the wallpaper 6 Arrange & work with apps 7 Use folders 8 Add widgets 9 Try some apps
Content. Welcome... 5 Getting Started... 5 Initial setup... 5 Setting a SIM card... 5 Locking and unlocking the screen... 7
 User Guide Content Welcome... 5 Getting Started... 5 Initial setup... 5 Setting a SIM card... 5 Locking and unlocking the screen... 7 Screen and Display... 8 The home screen... 8 Notifications... 11 Managing
Mobile Phone. I7A User Manual
 Mobile Phone I7A User Manual Dear Customer, Thank you for purchasing i7a Full Touch Screen Mobile Phone. Kindly read this user manual carefully to learn about key functional characteristics and operational
Lenovo A5500. User Guide V1.0. Please read the safety precautions and important notes in the supplied manual before use.
 Lenovo A5500 User Guide V1.0 Please read the safety precautions and important notes in the supplied manual before use. Chapter 01 Lenovo A5500 Overview 1-1 Appearance 1-2 Buttons 1-3 Activating/Deactivating
NID- 7006A. Memory Powered by Android TM OS 4.1
 THE NEW GENERATION IN TECHNOLOGY NID- 7006A Core TM 7 Tablet PC with 8GB Built- In Memory Powered by Android TM OS 4.1 Basic Introduction... 1 Quick Start... 1 Battery management and charging... 1 Boot
NeoIDesc 595. Quick Guide The NeoIDesc 595 is mainly screen driven and easy to use by icons and instructions.
 NeoIDesc 595 Quick Guide The NeoIDesc 595 is mainly screen driven and easy to use by icons and instructions. 1. Content of the box: - NeoIDesc 595 - Charger - USB cable - Headset - Touchscreen pen - Leather
Basics. screen? CALLS. In call. Missed call. Speakerphone on. Mute your microphone. Make another call. Turn on the speakerphone
 Basics 1. What do the Icons mean that can be found in notifications bar at the top of my screen? CALLS In call Missed call Speakerphone on Mute your microphone Show the dial pad Put a call on hold Make
motorola A1600 Quick Start Guide
 motorola A1600 Quick Start Guide get started CAUTION: Before using the phone for the first time, read the Important Safety and Legal Information guide included in the box. get started insert SIM card
Sign up for an Acer ID and enjoy great benefits
 USER S MANUAL 2-2017 All Rights Reserved Acer Liquid Zest Plus User s Manual Model: T08 This revision: January 2017 Sign up for an Acer ID and enjoy great benefits Open the Acer Portal app from the Start
User s Guide. March 15, 2010 NOUG-2.1-update1-105 Nexus One phone and Android mobile technology platform 2.1-update1
 User s Guide March 15, 2010 Nexus One phone and Android mobile technology platform 2.1-update1 2 Legal Copyright 2010 Google Inc. All rights reserved. Google, the stylized Google logo, Android, the stylized
Z981 User Manual and Safety Information
 Z981 User Manual and Safety Information 1 About This Manual Thank you for choosing this mobile device. In order to keep your device in its best condition, please read this manual and keep it for future
Lenovo ideapad D330-10IGM
 Lenovo ideapad D330-10IGM User Guide Read the safety notices and important tips in the included manuals before using your computer. Notes Before using the product, be sure to read Lenovo Safety and General
Z837VL EXPLORE NEW HEIGHTS USER MANUAL Z ZTEUSA.COM
 Z837VL EXPLORE NEW HEIGHTS USER MANUAL Z079584508294 ZTEUSA.COM About This Manual Thank you for choosing this ZTE mobile device. In order to keep your device in its best condition, please read this manual
STUDIO 6.0 LTE USER MANUAL
 STUDIO 6.0 LTE USER MANUAL 1 Table of Contents Safety Information... 3 Appearance and Key Function... 5 Introduction... 6 Call Functions... 7 Notifications Bar... 8 Contacts... 9 Messaging... 11 Bluetooth
ZYRO. User Guide.
 ZYRO User Guide www.v7devices.com To ensure safe and proper use, please read all the safety precautions and this manual carefully before using your device. The descriptions in this manual are based on
Copyright 2012 ZTE CORPORATION.
 Quick Guide LEGAL INFORMATION Copyright 2012 ZTE CORPORATION. All rights reserved. No part of this publication may be quoted, reproduced, translated or used in any form or by any means, electronic or mechanical,
ZTE Grand X View2. User Manual
 ZTE Grand X View2 User Manual About This Manual Thank you for choosing this ZTE mobile device. In order to keep your device in its best condition, please read this manual and keep it for future reference.
POCKETALK[W] User Manual
![POCKETALK[W] User Manual](/thumbs/94/120114724.jpg "POCKETALK[W] User Manual") POCKETALK[W] User Manual Contents Appearance 02 Specifications 04 Safety Instructions 05 Safety and Handling Instructions 05 Recycling 06 Certifications 06 Charging 07 Configuring System Language 07 Setting
POCKETALK[W] User Manual Contents Appearance 02 Specifications 04 Safety Instructions 05 Safety and Handling Instructions 05 Recycling 06 Certifications 06 Charging 07 Configuring System Language 07 Setting