Z981 User Manual and Safety Information
|
|
|
- Maurice Underwood
- 6 years ago
- Views:
Transcription
1 Z981 User Manual and Safety Information 1
2
3 About This Manual Thank you for choosing this mobile device. In order to keep your device in its best condition, please read this manual and keep it for future reference. Notice This manual has been designed with the utmost care to ensure the accuracy of its content. However, all statements, information and recommendations contained therein do not constitute a warranty of any kind, either expressed or implied. Please refer to For Your Safety to be sure to use your phone properly and safely. Disclaimer Images and screenshots used in this manual may differ from the actual product. Content in this manual may differ from the actual product or software. Trademarks Google and Android are trademarks of Google, Inc. The Bluetooth trademark and logos are owned by the Bluetooth SIG, Inc. and any use of such trademarks by ZTE Corporation is under license. microsdxc Logo is a trademark of SD-3C, LLC. Manufactured under license from Dolby Laboratories. Dolby, Dolby Audio, and the double-d symbol are trademarks of Dolby Laboratories. Other trademarks and trade names are the property of their respective owners. Version No.: R1.0 Edition Time: June 20,
4 Contents Getting Started... 7 Getting to Know Your Phone... 7 Knowing the Keys... 9 Installing the nano-sim Card and microsdxc card... 9 Charging the Battery Powering On/Off Your Phone Extending the Battery Life Setting Up for the First Time Locking/Unlocking the Screen and Keys Using the Touch Screen Getting to Know the Home Screen Personalizing Changing the System Language Setting the Date and Time Changing Ringtone and Notification Sound Turning On/Off System Sounds Adjusting Volume Switching to Silent Mode Applying New Wallpapers Changing Screen Brightness Protecting Your Phone With Screen Locks Protecting Your Phone With Screen Pinning Fingerprints Knowing the Basics Monitoring the Phone Status Managing Notifications Managing Shortcuts and Widgets
5 Organizing With Folders Rearranging the Primary Shortcuts Entering Text Editing Text Opening and Switching Apps Connecting to Networks and Devices Connecting to Mobile Networks Connecting to Wi-Fi Using Wi-Fi Direct Connecting to Bluetooth Devices Using the microsd card as portable or internal storage Connecting to Your Computer via USB Sharing Your Mobile Data Connection Connecting to Virtual Private Networks Phone Calls Placing and Ending Calls Answering or Rejecting Calls Making a VoWi-Fi Call Working With the Call History Calling Your Contacts Checking Voic Using Options During a Call Managing Multi-party Calls Adjusting Your Call Settings Checking Contact Details Adding a New Contact Setting Up Your Own Profile Importing, Exporting, and Sharing Contacts Working With Favorite Contacts Searching for a Contact
6 Editing Contacts Displaying Contacts Accounts Adding or Removing Accounts Configuring Account Sync Setting Up the First Account Checking Your s Responding to an Writing and Sending an Adding and Editing Accounts Changing General Settings Messaging Opening the Messaging Screen Sending a Message Replying to a Message Managing the Message Thread Managing the Message Changing Message Settings Calendar Viewing Your Calendars and Events Creating an Event Searching an Event Editing/Deleting/Sharing/Exporting/Copying an Event Changing Calendar Settings Browser Opening a Web Page Customizing the Browsers
7 Capturing a Photo Recording a Video Using Other Camera Modes Using Manual Camera Mode Customizing Camera/Camcorder Settings Gallery Opening Gallery Working With Albums Working With Pictures Retouching Your Pictures Playing Videos Music Copying Music Files to Your Phone Viewing Your Music Library Setting a Song as the Default Ringtone Playing Music Managing Playlists FM Radio Scanning and Saving Channels Listening to FM Radio Adding a Channel to Favorites Sound Recorder Recording a voice memo Viewing all the recordings Deleting a voice memo Playing a voice memo
8 More Apps Calculator Clock Downloads File Manager Google Apps Settings Wireless and Networks Personal Device Accounts System Troubleshooting For Your Safety General Safety Product Handling Distraction Electrical Safety Radio Frequency Interference Explosive environments Radio Frequency (RF) Energy FCC Compliance Hearing Aid Compatibility (HAC) regulations for Mobile phones CTIA Requirements Manufacturer s Warranty
9 Getting Started Getting to Know Your Phone Proximity & light sensor Front camera Earpiece camera nano-sim/ microsd card tray Home screen camera Back key Recent apps key Home key 7
10 Headset jack Back camera Volume up key Volume down key Flash Fingerprint sensor Power key Back cover Speaker Main microphone Charging/USB type-c jack 8
11 Knowing the Keys Key Function Power key Press and hold to turn on or off airplane mode, power off or restart the phone. Press to turn off or on the screen display. Home key Touch to return to the home screen. Touch and hold to open Google Search. Back key Recent apps key Touch to go to the previous screen. Touch to see recently used applications. Volume up key Press or hold the key to turn up the volume for media, alarm, ringtone, or notification. Volume down key Press or hold the key to turn down the volume for media, alarm, ringtone, or notification. Installing the nano-sim Card and microsdxc card The nano-sim card, and the microsd card can be installed or removed while the phone is turned on. You need to unmount the microsd card (not included) before removing it. WARNING! To avoid damage to the phone, do not use any non-standard nano-sim card cut from a card. You can get a standard nano-sim card from your service provider. 9
12 1. Insert the tip of the tray eject tool to eject the SIM / SD card tray. 2. Pull out the SIM / SD tray and place the nano-sim card (right) /microsd card (left) facing down on the tray. Gently slide the tray in until it clicks into place. 10
13 The nano-sim card, and the microsd card can be installed or removed while the phone is turned on. You need to unmount the microsd (not included) card before removing it. If you experience any issues with your phone, contact customer service or visit your nearest retail location. WARNING! To avoid damage to the phone, do not use any non-standard nano-sim card cut from a card. You can get a standard nano-sim card from your service provider. 1. Insert the tip of the tray eject tool into the hole on the card tray. 2. Pull out the card tray and place the nano-sim card (right) /microsdxc card (left) facing down on the tray. Gently slide the card tray in until it clicks into place. 11
14 Charging the Battery Your phone s battery should have enough power for the phone to turn on, find a signal, and make a few calls. You should fully charge the battery as soon as possible. WARNING! Use only ZTE-approved chargers and cables. The use of unapproved accessories could damage your phone or cause the battery to explode. 1. Connect the adapter to the charging/usb type-c jack. 2. Connect the charger to a standard AC power outlet. If the phone is on, you ll see a charging icon, such as or, appear in the status bar. 3. Disconnect the charger when the battery is fully charged. 12
15 If the battery is extremely low, you may be unable to power on the phone even when it is being charged. In this case, try again after charging the phone for at least 20 minutes. Contact the customer service if you still cannot power on the phone after prolonged charging. Powering On/Off Your Phone Make sure the battery is charged before powering on. Press and hold the Power key to turn on your phone. To turn it off, press and hold the Power key to open the options menu. Then touch Power off. M Extending the Battery Life Active applications, screen brightness levels, Bluetooth and Wi-Fi usage and GPS functionality can drain your battery. You can follow the helpful tips below to conserve your battery power: Reduce the screen backlight time. Lower the screen brightness. Turn Wi-Fi, Bluetooth and auto-sync off when not in use. Disable the GPS function when not in use. Most applications using this function will periodically query the GPS satellites for your current location, and each query drains your battery. Setting Up for the First Time When you first power on your phone after you purchase it or reset it to factory settings (see Backup and Reset), you need to do some settings before using it. 1. Touch the language field to select the language. 2. Touch. 3. Follow the prompts to Select Wi-Fi network, set Date & time, type your Name, set screen lock to protect your phone, set notification settings, and check Google services. 13
16 Locking/Unlocking the Screen and Keys Your phone allows you to quickly lock the screen and keys (put the phone to sleep mode) when not in use and to turn the screen back on and unlock it when you need it. To lock the screen and keys: To quickly turn the screen off and lock the keys, press the Power key. To save battery power, the phone automatically turns off the screen after a certain period of time when you leave it idle. You will still be able to receive messages and calls while the phone screen is off. To unlock the screen and keys: 1. Press the Power key to turn the screen on. 2. Swipe up on the screen. - or - swipe right from the icon for voice assist, or swipe left from the icon for taking a phone or a video. - or - Touch a notification twice consecutively to open the related app. If you have set an unlock pattern, a PIN or a password for your phone (see Protecting Your Phone With Screen Locks), swipe up on the screen and then draw the pattern, or enter the PIN/password to unlock your phone. Using the Touch Screen Your phone s touch screen enables you to control actions through a variety of touch gestures. 14

17 Touch When you want to type using the onscreen keyboard, select items on the screen such as the application and settings icons, or press the onscreen buttons, simply touch them with your finger. Touch and Hold To open the available options for an item (for example, a message or link in a web page), touch and hold the item. 15


18 Swipe or Slide To swipe or slide means to quickly drag your finger vertically or horizontally across the screen. Drag To drag, press and hold your finger with some pressure before you start to move your finger. While dragging, do not release your finger until you have reached the target position. 16
. Rotate the screen For most screens, you can automatically change the screen orientation from portrait to landscape by turning the phone sideways.")

19 Pinch In some apps (such as Maps, Browser, and Gallery), you can zoom in and out by placing two fingers on the screen at once and pinching them together (to zoom out) or spreading them apart (to zoom in). Rotate the screen For most screens, you can automatically change the screen orientation from portrait to landscape by turning the phone sideways. The auto-rotate feature needs to be enabled for the screen orientation to automatically change. Touch the Home key > > Settings > Display > When device is rotated and select Rotate the contents of the screen. You can also access the screen rotation control by sliding down the status bar twice and touch Auto-rotate/Portrait. Getting to Know the Home Screen The home screen is the starting point for your phone s applications, functions, and menus. You can customize your home screen by adding shortcuts, folders, widgets, and more. 17

20 Status bar Widget Home screen Shortcut Folder Primary shortcuts Extended Home Screen Panels Your home screen is extendable, providing more space for shortcuts, widgets, and more. Simply swipe left or right on the home screen to see the extended panels. You can add or remove home screen panels, or adjust the order of them. To add a new home screen panel: 1. Touch the Home key >, or touch and hold an empty area of the home screen and select WIDGETS. 2. Touch and hold an application icon or a widget and drag it to the right edge of the screen to create a new home screen panel and put the icon or widget on it. No empty home screen panel is allowed to exist. If the icon, widget or folder is the only item on the current home screen panel, the panel will be deleted as you remove the item. 18
21 To adjust the order of a home screen panel: 1. Touch and hold an empty area of the home screen and slide left or right to view the home screen thumbnails. 2. Touch and hold a thumbnail and drag it left or right to the place you need. 19
22 Personalizing Changing the System Language 1. Touch the Home key > > > Language & input > Language. 2. Select the language you need. Setting the Date and Time 1. Touch the Home key > > > Date & time. 2. Set the date, time, time zone, and date/time format. To adjust the date and time automatically, touch to switch on Automatic date & time. To adjust the date and time manually, touch to switch off Automatic date & time, and then touch Set date / Set time to change the date and time. To adjust the time zone automatically, touch to switch on Automatic time zone. To adjust the time zone manually, touch to switch off Automatic time zone and touch Select time zone to set the correct time zone. To adjust the format of time, touch Use 24-hour format. Changing Ringtone and Notification Sound You can customize the default ringtone for incoming calls and the default notification sound. 1. Touch the Home key > > > Sound & notification. 2. Touch Phone ringtone or Default notification ringtone. 3. Select the ringtone you want to use and touch OK. See Set a Ringtone for a Contact for how to assign a special ringtone to an individual contact. 20
23 Turning On/Off System Sounds 1. Touch the Home key > > > Sound & notification > Other sounds. 2. Touch Dial pad tones, Screen locking sounds, Charging sounds, Touch sounds or Vibrate on touch. Adjusting Volume 1. Touch the Home key > > > Sound & notification. 2. Drag the sliders below Media volume, Alarm volume, Ring volume and Notification volume. You can adjust the media volume when a media application is in use by pressing the Volume key. If no media application is active, press the Volume key to adjust ringtone volume (or the earpiece volume during a call). Switching to Silent Mode You can set the phone to silent mode by using one of the following methods. Press the Volume key down to switch off the sound. Swipe down from the top of the screen twice to drag the panel downwards. Touch Do not disturb. Or touch the Home key > > > Sound & notification > Do not disturb. Touch Always to switch off all sounds. Touch Scheduled. Touch Disturb rules and select Total silence to switch off all sounds as scheduled. Set schedule according to your needs. 21
24 Even in the Total silence mode, you phone will send out alarms if you have set clock alarms on. Applying New Wallpapers You can set the wallpaper for the home screen and lock screen. 1. Touch and hold an empty place on the home screen and then touch WALLPAPERS. 2. Slide left or right on the wallpaper panel to select a static wallpaper or a live wallpaper, or touch My photos to choose the picture you want to use as the wallpaper. Pinch the picture apart to zoom in if needed. 3. Touch Set wallpaper. In addition, you can touch the Home key > > > Display > Wallpaper to pick an image from Gallery, Live Wallpapers, Photos or Wallpapers. Changing Screen Brightness 1. Touch the Home key > > > Display > Brightness level. 2. Drag the slider to manually adjust the screen brightness. Your phone can automatically adjust the screen brightness for available light. Touch Adaptive brightness in the Display settings screen to turn the feature on or off. Protecting Your Phone With Screen Locks You can protect your phone by creating a screen lock. When it is enabled, you need to swipe up on the screen, draw a pattern or enter a numeric PIN or password to unlock the phone s screen and keys. 1. Touch the Home key > > > Security > Screen lock. 2. Touch Long press, Pattern, PIN or Password. 22
25 Touch Long press to enable screen lock. You can unlock the screen by long press on the screen. Touch Pattern to create a pattern you must draw to unlock the screen. Touch PIN or Password to set a numeric PIN or a password that you must enter to unlock your screen. You can further protect your phone by requiring your unlock pattern, PIN or password before it starts up. Until the device starts up, it can t receive calls, messages, or notification, including alarms. This helps you to protect data in case your phone is lost or stolen. 3. For Pattern, PIN, or Password lock, select how you want notifications and their contents to show when the phone is locked. Protecting Your Phone With Screen Pinning You can use the screen pinning feature to keep an app in view, so others cannot switch to other apps or access your personal information. Turn On Screen Pinning 1. Touch the Home key > > > Security > Screen pinning. 2. Touch the On/Off switch. 3. If you want to ask for the unlock pattern, PIN or password before unpinning the screen, touch Ask for unlock pattern before unpinning to set one. Pin a Screen 1. Ensure that screen pinning is turned on. 2. Open the app you want to keep in view. 3. Touch the Recent apps key. 4. If there are many app tabs, swipe up to find on the front-most tab. 5. Touch. 23

26 Unpin the Screen To unpin the screen and return to normal use, touch and hold the Recent key. If you have asked for the unlock pattern, PIN or password before unpinning the screen, swipe up on the lock screen and draw the pattern or enter the PIN/password. Fingerprints Capturing a Fingerprint 1. Touch the Home key > > Settings > Security > Fingerprint. 2. Choose your backup screen lock method. And follow the instructions to set. -or- If you have already set the screen lock method, just draw the pattern or input PIN/password. 3. Touch REGISTER in the Add fingerprint message box when it prompts. 4. Press one of your fingers on the fingerprint sensor at the back of your phone. After feeling the slight vibration, raise your finger and then press your finger on the sensor again. You can observe the percentage increased at the bottom of the screen. 24
27 5. Do the step 4 until the percentage becomes 100%. 6. Touch OK when your fingerprint has been registered. 7. You can touch Add fingerprint in the Fingerprint management screen to add more fingerprints. Using a Fingerprint to Wake up or Unlock your Device It is convenient and fast to turn on/unlock the screen by using the fingerprint when the screen is off or locked. 1. Touch the Home key > > Settings > Security > Fingerprint. 2. Slide the switch to the ON position next to Wake up and unlock your phone. 3. If the screen is off or locked, press one of your registered fingers on the fingerprint sensor to quickly turn on/unlock the screen. Using a Fingerprint to Open an App It is convenient and fast to open a specific application by using the fingerprint when the screen is off or locked. 1. Touch the Home key > > Settings > Security > Fingerprint. 2. Touch Quick-open app. 3. Touch Fingerprint1, for instance. 4. Swipe up and down to choose one app. Touch next to the app. You can set more fingerprints to quick-open your desired apps. 5. If the screen is off or locked, press the registered Fingerprint1 on the fingerprint sensor to quickly launch the app. Using a Fingerprint to Snap a Picture It is convenient and fast to take a photo by using the fingerprint when the screen is off or locked. 1. Touch the Home key > > Settings > Security > Fingerprint. 25
28 2. Touch Quick-open app. 3. Touch Fingerprint1, for instance. 4. Touch next to Camera. 5. Touch the Home key > > Settings > Security > Fingerprint. 6. Slide the switch to the ON position next to Take photo. 7. If the screen is off or locked, press the registered Fingerprint1 on the fingerprint sensor to quickly launch the Camera. 8. Raise your finger and press your finger again to shoot a photo. Using a Fingerprint to Answer a Call It is convenient and fast to answer the phone call by using the fingerprint when the phone is powered on. 1. Touch the Home key > > Settings > Security > Fingerprint. 2. Touch Quick-open app. 3. Touch Fingerprint1, for instance. 4. Touch next to Phone. 5. Touch the Home key > > Settings > Security > Fingerprint. 6. Slide the switch to the ON position next to Answer call. 7. When the call comes, just press Fingerprint1 on the fingerprint sensor to quickly answer the call. 26
29 Knowing the Basics Monitoring the Phone Status The status bar at the top of the home screen provides phone and service status icons on the right side. Below are some of the icons you may see. / 3G connected 4G LTE connected Do not disturb mode on (Alarms only or Priority only) Do not disturb mode on (Total silence) Battery low Battery partially drained Battery full Battery charging No signal Signal strength Airplane mode Bluetooth on Vibration mode Connected to a Wi-Fi network Wi-Fi in use Speaker on Alarm set USB tethering on Phone microphone off Wired headset connected 27
30 Managing Notifications Notification Icons The status bar at the top of the home screen provides notification icons on the left. Below are some of the icons you may see. New SMS New MMS New message(s) from the app Call in progress Song playing USB connected New Wi-Fi network detected Downloading data Sending data Tethering or mobile hotspot active Open/Close the Notification Panel Notifications report the arrival of new messages, calendar events, and alarms, as well as ongoing events, such as when you are playing music. You can open the notification panel to view the details of notifications. To open the notification panel, swipe your finger down from the top of the screen. To close the notification panel, swipe your finger up on the screen or touch the Back key. Respond to or Remove a Notification In the notification panel, you can respond to a notification or remove the notifications. The notification panel also supports expandable notifications that let you perform additional actions right from the notification itself. 28
31 To respond to a notification, just touch it. Slide down with one finger to expand certain notifications. You can also swipe two fingers vertically or pinch-zoom to expand or collapse certain notifications. To remove a notification, swipe it left or right. To remove all notifications, touch below all the notifications. To manage notifications you have received, touch and hold a notification to identify the application that created it. You can then touch and enable Treat as priority, Allow peeking, or Hide sensitive content. If you turn off notifications for an app by enabling Hide sensitive content, you may miss its important alerts and updates. The notifications of some apps cannot be turned off. Use Quick Settings The Quick Settings make it convenient to view or change the most common settings for your phone. Open the notification panel and drag the panel downwards to find the following Quick Settings on the screen. Auto-rotate/Portrait: Touch to turn on or off the auto-rotate screen feature. Hotspot: Touch to enable or disable the mobile hotspot feature to create a portable Wi-Fi hotspot. Battery Saver: Touch to enable battery saver to reduce performance and background data. Sound/Slient/Vibrate: Touch to set the phone in various modes. Airplane mode: Touch to turn on or off airplane mode. Flashlight: Touch to turn on or off the flashlight. Sync: Touch to enable or disable the sync feature. Do not disturb:touch to set Do not disturb mode. Bluetooth: Touch to turn on or off Bluetooth. Wi-Fi: Touch to turn on or off Wi-Fi. To open Wi-Fi settings, touch the Wi-Fi network name. 29
32 Data: Touch to enable or disable data access over the mobile network. Location: Touch to turn location services on or off. Brightness: Drag the brightness slider to adjust the screen brightness. Touch AUTO to enable auto-adjustment of the brightness. In the Quick Settings screen, touch at the top to get to the Settings menu. Managing Shortcuts and Widgets Add Shortcuts and Widgets 1. Touch the Home key >. - or - To add widgets, touch and hold an empty area of the home screen and select WIDGETS. 2. Slide to browse the available applications or widgets. 3. Touch and hold a widget or an application icon and drag it to a home screen panel. While holding the item, you can drag it to the right edge of the screen to create a new home screen panel and put the item on it. Move Shortcuts or Widgets 1. Touch and hold a shortcut or widget on the home screen. 2. Drag it to the place you need. Remove Shortcuts or Widgets 1. Touch and hold a shortcut or widget on the home screen. 2. Drag it to (Remove) to remove it. 30
33 Organizing With Folders You can create folders on the home screen and add several shortcuts to a folder. You can move or remove folders the same way as moving or removing shortcuts. 1. Touch and hold a shortcut on the home screen and drag it over another shortcut. 2. Release your finger and a new folder will be created with both shortcuts added into it. 3. To add more shortcuts into the folder, touch and hold each shortcut and drag it over the folder before releasing it. Touch the folder and then touch the name field to rename the folder. Rearranging the Primary Shortcuts The home screen includes a customizable primary shortcuts area at the bottom visible from all home screens. You can keep at most four items in the primary shortcuts area. Drag shortcuts or folders in or out of the area to rearrange the area. Entering Text You can enter text using the onscreen keyboard. Some apps open it automatically. In others, you open it by touching where you want to type. Touch the Back key to hide the onscreen keyboard. You can also enter text by speaking with the Google voice typing feature. Enable or Disable Input Methods 1. Touch the Home key > > > Language & input > Current Keyboard. 2. Touch CHOOSE KEYBOARDS at the bottom. 3. Slide the switches beside the input methods to enable or disable them. 31

34 Some default input methods may not be disabled. Change Input Methods 1. When you use the onscreen keyboard to enter text, the icon appears on the status bar. 2. Open the notification panel and touch Change keyboard. 3. Select the input method you need. The icon appears only when more than one input method is installed and enabled. Android Keyboard (AOSP) The Google Keyboard provides a layout similar to a desktop computer keyboard. When screen auto-rotation is enabled, turn the phone sideways and the keyboard will change from portrait to landscape. The landscape keyboard is not supported in all applications. The Full Layout Touch the alphabetic keys to enter letters. Touch and hold some specific keys to enter associated accented letters or numbers. For example, to enter È, touch and hold available accented letters and number 3 appear. Then slide to choose È. and the As you enter a word, candidates appear above the keyboard. Touch to select the correct one; touch and hold to see more possible options. 32
35 Touch to use uppercase. Double-tap to lock uppercase. This key also changes to indicate the current case you are using: for lowercase, for uppercase, and when locked in uppercase. Touch to delete the text before the cursor. Touch to select numbers and symbols. You can then touch to find more. Touch to enter miniature icons, such as expressions, horoscopes, and animals. Touch to use Google voice typing. Touch and hold to change the input languages or set up the Google keyboard. Touch to change the language. Touch and hold to change keyboard. Google Voice Typing Google Voice typing uses the Google voice recognition service to convert speech to text. 1. Touch to access the voice typing feature when you are using the Google keyboard. Or flick down the status bar when entering text and touch Change keyboard, and then select Google voice typing. 2. When you see the microphone image, speak what you want to type. 3. You can continue entering text to keep it or to delete it. Say "comma," "period," "question mark," "exclamation mark," or "exclamation point" to enter punctuation. Google Pinyin Input Google Pinyin lets you enter Chinese and English with a computer-style keyboard. 1. Touch > Settings > Language & input > Current Keyboard to select Chinese Pinyin 2. Google Pinyin Input. 33

36 3. Touch > Settings > Language & input > Google Pinyin Input > Input > Pinyin scheme to select your desired scheme. 4. Now you can enter Chinese pinyin by using the onscreen keyboard. Input Method Settings Choose the input method settings by touching home screen. > Settings > Language & input from the In the Keyboard & input methods section, you can set the current input method and choose the settings for input methods. Editing Text Move the insertion point: Touch where you want to type. The cursor blinks in the new position, and a tab appears below it. Drag the tab to move the cursor. Select text: Touch and hold or double-tap within the text. The nearest word highlights, with a tab at each end of the selection. Drag the tabs to change the selection. Cut, copy or share: Select the text you want to manipulate. Then touch CUT, COPY or SHARE to cut,copy or share the text. Replace text with the clipboard text: Select the text you want to replace. Then touch PASTE. 34
37 Opening and Switching Apps Open an App 1. Touch the Home key >. 2. Slide up and down on the screen and touch an app to open it. Switch Between Recently Opened Apps 1. Touch the Recent Apps key. The apps you ve used recently are displayed in a series of tabs. Slide up and down to see all the tabs. 2. Touch a tab to open that app. You can swipe a tab sideways or touch X on the tab to remove it from the screen. Touch Clear all to remove all tabs. 35
38 Connecting to Networks and Devices Connecting to Mobile Networks Control Mobile Data Use To enable or disable data access: 1. Touch the Home key > > > Data usage. 2. Touch the Mobile data switch to enable or disable mobile data use. To get data services when roaming: 1. Touch the Home key > > > Cellular network. 2. Touch the Data roaming switch if it is turned off. Data roaming may incur significant roaming charges. Select Preferred Network Type 1. Touch the Home key > > > Cellular network > Preferred network type. 2. Touch the type of network you prefer to connect to. Set Access Point Names To connect to the Internet you can use the default Access Point Names (APN). And if you want to add a new APN, please contact the service provider to get the necessary information. 1. Touch the Home key > > > Cellular network > Access Point Names. 2. Touch. 3. Touch each item to enter the information you get from your service provider. 4. Touch > Save to complete. 36
39 To set the APN to default settings, touch > Reset to default in the APNs screen. Select Network Operator 1. Touch the Home key > > > Cellular network > Network operators. 2. Touch OK. Start searching for all available networks. 3. Touch a network in the network list to register manually. You can also touch Choose automatically to select preferred network automatically. Connecting to Wi-Fi Wi-Fi is a wireless networking technology that can provide Internet access at distances of up to 100 meters, depending on the Wi-Fi router and your surroundings. Turn Wi-Fi On and Connect to a Wi-Fi Network 1. Touch the Home key > > > Wi-Fi. 2. Slide the Wi-Fi switch to the On position to turn on Wi-Fi. 3. Touch a network name to connect to it. 4. If the network is secured, enter the password and touch CONNECT. Your phone automatically connects to previously used Wi-Fi networks when they are in range. Get Notified of Open Networks 1. Touch the Home key > > > Wi-Fi. 2. Slide the Wi-Fi switch to the On position. 3. Touch > Advanced. 4. Slide the Network notification switch. When Wi-Fi is on, you receive notifications in the status bar when your phone detects an open Wi-Fi network. Switch off this option to turn off notifications. 37
40 Add a Wi-Fi Network You can add a Wi-Fi network if the network does not broadcast its name (SSID), or to add a Wi-Fi network when you are out of range. To connect to a secured network, you first need to get the security details from the network's administrator. 1. Touch the Home key > > > Wi-Fi. 2. Slide the Wi-Fi switch to the On position. 3. Touch > Add network. 4. Enter the network SSID (name). If necessary, enter security or other network configuration details. 5. Touch SAVE. Connect to a WPS Network Wi-Fi Protected Setup (WPS) is a feature that makes it easy to add your phone to the access points which support WPS. You can use one of the following methods to connect your phone to a wireless network using WPS. Method one: WPS button (Recommended) 1. Touch the Home key > > > Wi-Fi. 2. Slide the Wi-Fi switch to the On position. 3. Touch > Advanced > WPS Push Button. 4. Press the WPS button on the wireless router and the access point will recognize your phone and add it to the network. Method two: PIN number 1. Touch the Home key > > > Wi-Fi. 2. Slide the Wi-Fi switch to the On position. 3. Touch > Advanced > WPS Pin Entry. 38
41 4. The WPS PIN number displays on the screen. Enter the PIN number into the access point's setup page. After entering the PIN number, your phone automatically finds the access point and configures the connection. For detailed information about the WPS feature of the access point, please refer to its user documents. Forget a Wi-Fi Network You can make your phone forget about the details of a Wi-Fi network that you added - for example, if you don t want the phone to connect to it automatically or if it is a network that you no longer use. 1. Touch the Home key > > > Wi-Fi. 2. Slide the Wi-Fi switch to the On position. 3. Touch the Wi-Fi network name and then touch FORGET. Adjust Advanced Wi-Fi Settings 1. Touch the Home key > > > Wi-Fi. 2. Touch > Advanced to adjust the following settings. Network notification: Get notifications in the status bar when Wi-Fi is on and an open network is available. Scanning always available: Let Google s location service and other apps sacn for networks, even when Wi-Fi is off. Passpoint: Automatically connect to Passpoint-certified Wi-Fi access points. Keep Wi-Fi on during sleep: Set whether to keep Wi-Fi on in sleep mode. Install certificates: Install certificates needed for connecting to certain Wi-Fi networks. Wi-Fi Direct: Use the Wi-Fi Direct feature. See Using Wi-Fi Direct. WPS Push Button: Connect to a WPS network via the push button method. WPS Pin Entry: Connect to a WPS network via the phone PIN method. 39
42 MAC address: Check the MAC address. IP address: Check the phone s IP address. Using Wi-Fi Direct Wi-Fi Direct allows Wi-Fi devices to connect to each other without the need for wireless access points (hotspots). Connect to Another Device via Wi-Fi Direct 1. Touch the Home key > > > Wi-Fi. 2. If Wi-Fi is off, slide the Wi-Fi switch to the On position. 3. Touch > Advanced > Wi-Fi Direct. Your phone will search for other devices enabled with Wi-Fi Direct connections. 4. Touch a device name under Peer devices to connect with it. The other device will receive a connection prompt and need to accept the request for connection. Both devices may need to enter a common PIN. 5. Once connected the device is displayed as Connected in the Peer devices list. Send Data via Wi-Fi Direct 1. Open the appropriate application and select the file or item you want to share. 2. Select the option for sharing via Wi-Fi Direct. The method may vary by application and data type. 3. Touch a device the phone has connected with or wait for it to search for new devices and touch one of them. Receive Data via Wi-Fi Direct When an attempt to transfer data via Wi-Fi Direct is received, you can see a notification in the status bar. Open the notification panel, touch the notification and select Accept to start receiving the data. 40
43 Received files are stored automatically in a dedicated folder (WiFiShare, for instance). You can access them with the File Manager app. Connecting to Bluetooth Devices Bluetooth is a short-range wireless communication technology. Phones or other devices with Bluetooth capabilities can exchange information wirelessly within a distance of about 10 meters (32.8 feet). The Bluetooth devices must be paired before the communication is performed. Turn Bluetooth On/Off 1. Touch the Home key > > > Bluetooth. 2. Slide the Bluetooth switch to the On or Off position. When Bluetooth is on, the Make Your Phone Visible icon will appear in the status bar. In order to work with other phones or devices that have Bluetooth, you need to make your phone visible to them. 1. Touch the Home key > > > Bluetooth. 2. Slide the Bluetooth switch to the On position if Bluetooth is off. 3. Touch your device name on the top of the screen to make your phone visible or invisible. Change the Device Name 1. Touch the Home key > > > Bluetooth. 2. Slide the Bluetooth switch to the On position if Bluetooth is off. 3. Touch > Rename this device. 4. Edit the name and touch RENAME. Pair With Another Bluetooth Device 1. Touch the Home key > > > Bluetooth. 41
44 2. Slide the Bluetooth switch to the On position if Bluetooth is off. Your phone automatically scans for and displays the IDs of all available Bluetooth devices in range. You could touch > Refresh if you want to scan again. 3. Touch the device you want to pair with. 4. Confirm that the Bluetooth passkeys are the same between the two devices and touch PAIR. Alternately, enter a Bluetooth passkey and touch PAIR. Pairing is successfully completed when the other device accepts the connection or the same passkey is entered. The Bluetooth passkey may be fixed for certain devices, such as headsets and hands-free car kits. You can try entering 0000 or 1234 (the most common passkeys), or refer to the documents for that device. Forget a Bluetooth Device You can make your phone forget its pairing connection with another Bluetooth device. To connect to the device again, you need to search it and enter or confirm a passkey again. 1. Touch the Home key > > > Bluetooth and ensure that Bluetooth is turned on. 2. In the list of paired devices, touch the icon beside the Bluetooth device you want to forget. 3. Touch FORGET. Send Data via Bluetooth 1. Open the appropriate application and select the file or item you want to share. 2. Select the option for sharing via Bluetooth. The method may vary by application and data type. 3. Touch a Bluetooth device the phone has paired with or wait for it to search for new devices and touch one of them. 42
45 Receive Data via Bluetooth 1. Turn Bluetooth on before trying to receive data via Bluetooth. 2. Flick down the status bar and touch. 3. Touch ACCEPT to start receiving the data. Depending on your storage setting and whether a microsdxc card is installed, received files are stored automatically in a dedicated folder (Bluetooth, for instance) in the phone storage or microsdxc card. You can access them with the File Manager app. Using the microsd card as portable or internal storage You can use your microsd card as portable storage when your microsd card already has some contents such as your media and other files so that you don't lose them. If your microsd card is new or doesn't have content you want to keep, you can also set it up as an extension of the internal phone storage, and this requires formatting that prevents the microsd card from working with other devices. CAUTION: As part of the internal storage, the microsd card may have data on it that is necessary for some apps to function normally. Therefore, do not remove or replace the card randomly. Set up the microsd card as portable storage When you install a microsd card that has not been used on your phone before, the phone will mount the card as portable storage by default. To remove the microsd card from your phone: If you need to remove the microsd card used as portable storage while the phone is on, you must unmount it first. 1. Touch the Home key > > Settings > Storage. 2. Touch next to the card name in the Portable storage section. 3. When the screen prompts the card is safely ejected, you can now remove it from the phone. 43
46 To erase and format the microsd card: 1. Touch the Home key > > Settings > Storage. 2. Touch the card name in the Portable storage section. 3. Touch Format. 4. Touch ERASE & FORMAT. CAUTION: The formatting procedure erases all the data on the microsd card, after which the files CANNOT be retrieved. Set up the microsd card as internal storage If your microsd card is new or doesn't have content you want to keep, you can format the card and use it as part of internal storage. If you move the microsd card to another device, it ll be formatted before it can be used. 1. Touch the Home key > > Settings > Storage. 2. Touch the card name in the Portable storage section. 3. Touch Format as internal. 4. Touch ERASE & FORMAT. CAUTION: The formatting procedure erases all the data on the microsd card, after which the files CANNOT be retrieved. 5. The phone will prompt you to move your photos, files and other data from the phone storage to the microsd card. Select Move now or Move later and touch NEXT. Follow the onscreen instructions to continue. To move data between the internal storage and the microsd card: With the microsd card as part of the internal storage, you can move your photos, files and other data between the phone storage and the card any time. 1. Touch the Home key > > Settings > Storage. 2. Touch the microsd card name. 44
47 3. Touch > Migrate data. 4. Touch MOVE. Whenever you move data between the phone storage and the microsd card, the destination is used to save new apps and personal data (such as photos and videos) and only the destination is accessible from a computer. To move an app between the internal storage and the microsd card: With the microsd card as part of the internal storage, you can move your apps between the card and the phone storage freely. 1. Touch the Home key > > Settings > Apps. 2. Touch the app you want to move. 3. Touch Storage. 4. Touch CHANGE and select Internal storage or your card name. 5. Touch MOVE. Not all apps can be moved. To remove the microsd card from your phone: If you need to remove the microsd card used as internal storage while the phone is on, you must unmount it first. 1. Touch the Home key > > Settings > Storage. 2. Touch your card name below Device storage. 3. Touch Eject. Before ejecting the card, ensure that you have moved data and apps to the phone storage. 4. Touch EJECT. 5. Touch OK. When the screen prompts the card is safely ejected, you can now remove it from the phone. 45
48 To reformat the microsd card as portable storage: If you no longer want to use your microsd card as internal storage, you can reformat the card as portable storage. Before the formatting, ensure that you have moved data and apps to the phone storage. 1. Touch the Home key > > Settings > Storage. 2. Touch your card name below Device storage. 3. Touch Format as portable. 4. Touch FORMAT. CAUTION: The formatting procedure erases all the data on the microsd card, after which the files CANNOT be retrieved. Connecting to Your Computer via USB You can connect your phone to a computer with a USB cable and transfer music, pictures, and other files in both directions. Your phone stores these files in the phone storage or on a removable microsd card. Connect Your Phone to a Computer via USB 1. Connect your phone to the PC with a USB cable. 2. Slide down to open the notification panel and touch (USB for file transfer). 3. Choose one of the following options: Charging only: Charge your phone via USB. Install driver: Select this option when features (connect to PC software, media device) enabled for the first time, or when they re unavailable. Media device (MTP): Use phone as USB storage and transfer files when it is connected to Windows PC or Mac. 46
49 For Windows XP, please install Media Player 11 (or later version) when you use MTP. Camera (PTP): Use camera software to transfer pictures from phone to PC. Connect with Windows Media Player You can sync music, picture, and video files from the computer to your phone via Windows Media Player on the computer. 1. Connect the phone with your computer via USB. 2. Open the notification panel and touch (USB for file transfer). 3. Touch Media device (MTP). 4. Open Windows Media Player and synchronise music, picture, and video files. Disconnect your phone from the computer To disconnect the phone from the computer, simply unplug the USB cable when you re finished. Sharing Your Mobile Data Connection You can share your phone s data capabilities through tethering or by activating the mobile hotspot feature to create a portable Wi-Fi hotspot. Share Your Mobile Data Connection via USB You can access the Internet on your computer via the USB tethering feature of your phone. The feature needs data connection on a mobile network and may result in data charges. You cannot transfer files between the phone and the PC when the phone is USB tethered. 1. Connect your phone to your computer with a USB cable. 2. Touch the Home key > > > More > Tethering & Mobile Hotspot. 3. Switch on USB tethering. A new network connection will be created on your computer. 47
50 To stop sharing your data connection, switch off USB tethering or disconnect the USB cable. Share Your Mobile Data Connection as a Wi-Fi Hotspot You can share your phone s data connection with other devices by turning your phone into a portable Wi-Fi hotspot. The feature needs data connection on a mobile network and may result in data charges. When the portable Wi-Fi hotspot feature is enabled, you cannot use your phone s applications to access the Internet via its Wi-Fi connection. You still remain connected to the Internet via your mobile data network. 1. Touch the Home key > > > More > Tethering & Mobile Hotspot. 2. Touch Mobile HotSpot. 3. Touch Mobile HotSpot settings > Configure Mobile HotSpot and type Password. Touch SAVE. After a moment, the phone starts broadcasting its Wi-Fi network name (SSID). 4. On another device, locate your phone via Wi-Fi and connect with it to start using the phone s mobile data. To stop sharing your data connection, uncheck Mobile HotSpot. Set Your Wi-Fi Hotspot You can change the name of your phone's Wi-Fi network (SSID), secure your portable Wi-Fi hotspot, and set other options. 1. Touch the Home key > > > More > Tethering & Mobile Hotspot. 2. Touch Mobile HotSpot. 3. Touch Mobile HotSpot settings > Configure Mobile HotSpot. Network name: Enter or edit a network SSID (name) that other devices see when scanning for Wi-Fi networks. 48
51 4. Touch SAVE. Security: Choose a security option: None (not recommended) or WPA2 PSK (other users can access your mobile hotspot only if they enter the correct password). When you select WPA2 PSK, touch the Password field to edit the security password. Password: Edit the security password. Connecting to Virtual Private Networks Virtual private networks (VPNs) allow you to connect to the resources inside a secured local network. VPNs are commonly deployed by corporations, schools, and other institutions to let people access local network resources when not on campus, or when connected to a wireless network. Depending on the type of VPN you are using, you may be required to enter your login credentials or install security certificates before you can connect to your VPN. You can get this information from your network administrator. Add a VPN 1. Touch the Home key > > > More > VPN. 2. Touch + at the top right corner and fill in the information provided by your network administrator. 3. Touch OK. Input unlock pattern, PIN or password as prompts. You must set a lock screen pattern, PIN or password before using VPN. 4. Type Name, Server address, and select Type. Touch SAVE. The VPN is added to the list on the VPN screen. Connect to a VPN 1. Touch the Home key > > > More > VPN. 2. Touch the VPN that you want to connect to. 3. When prompted, enter any requested credentials, and then touch CONNECT. 49
52 Modify a VPN 1. Touch the Home key > > > More > VPN. 2. Touch beside the VPN that you want to modify. 3. Edit the VPN settings and then touch SAVE. Phone Calls You can place calls from the Phone app, the Contacts app, or other apps or widgets that display contact information. Wherever you see a phone number, you can usually touch it to dial. Placing and Ending Calls Place a Call by Dialing 1. Touch the Home key >. 2. Touch and enter the phone number or the contact name with the dialpad. Touch to delete incorrect digits. As you enter the phone number or the contact name, your phone searches for matching information in your contacts. If you see the number and contact you want to call, touch it to place the call immediately. 3. Touch below the keypad to dial. 4. You can also touch the search box at the top of the Phone app screen and enter the phone number or contact name you want to call. Touch the matching contact or Call [number] to place the call. To make an international call, touch and hold the 0 key to enter the plus (+) symbol. Next, enter the country code, followed by the city/area code and then the phone number. 50
53 To redial the last call you made, just touch the Home key > > > and touch again. End a Call During a call, touch on the screen. Answering or Rejecting Calls When you receive a phone call, the incoming call screen opens, displaying the caller ID or the information about the caller that you've entered in the Contacts app. You can answer or reject the call, or reject it with a text message. Answer a Call When you receive a phone call, drag over to answer the call. To silence the ringer before answering the call, press the Volume key. Reject a Call When you receive a phone call, drag over to reject the call. You can also drag over to reject the call and select a preset text message or touch Write your own... to edit one and touch SEND to send to the caller. To edit the preset text response from within the Phone app, touch select Settings > Quick responses. 51 in the top search field and Making a VoWi-Fi Call You can place a VoWi-Fi call in an area with weak or no mobile network coverage. Before turning on this feature, check with your mobile network operator to make sure the VoWi-Fi service is available.
54 1. Touch the Home key > > Settings > More > Wi-Fi Caling. -or- Touch the Home key > > > Settings > Call settings > Wi-Fi Calling. 2. Slide the switch to the On position. When Wi-Fi Calling is On, your phone can route calls via Wi-Fi networks or your operator s mobile network, depending on your Calling preference and which signal is stronger. 3. Touch Wi-Fi Calling > Connection preferences, choose Wi-Fi preferred or Never use Cellular Network based on your needs. 4. Touch the Home key > to place a call. Working With the Call History The call history is a list of all the calls you've placed, received, or missed. It provides a convenient way to redial a number, return a call, or add a number to your contacts. To open the call history, you can touch the Home key > > (in the top search field) > Call History. -or- Touch the Home key >. Touch View full call history. Place a Call From the Call History 1. Open the call history. 2. Touch beside a number to call back. You can touch ALL to view the completed call history or touch MISSED to view the missed call. Add a Number From Call History as a Contact 1. Open the call history. 2. Touch the contact icon in front of a number. 52
55 3. Touch on the contact information tab. 4. To add a new contact, touch at the top. After typing the contact information in the fields, touch to save it. -or- To add the number to an existing contact, touch and touch to save it. 1. Open the call history. 2. Touch the call number you have called. at the top. Touch an existing contact, 3. To create new contact, touch Create new contact below the call number. After typing the contact information in the fields, touch to save it. To add the number to an existing contact, touch Add to a contact below the call number. Touch an existing contact, and touch to save it. Take Other Actions on a Call History Entry Open the call history and touch a number to view more call information. Touch Send Message to quickly send a message to the number. Touch Call details > to delete the entry. Touch Call details > > Edit number before call to edit the number in the dialer before calling it. Touch the contact icon in front of the entry to open the contact information tab from the bottom, where you can send a message, call back, or add the number to contacts. You can touch Calling Your Contacts > Clear call history in the History screen to delete all history records. 1. Touch the Home key >. Your Favorite contacts and frequently called contacts are displayed in the tab. 53
56 2. Touch a contact to place the call. -or- 1. Touch or swipe to the tab to view all your contacts and touch a contact to view the contact information. 2. Touch the number or touch before the number to place the call. Checking Voic If you have set the phone to divert calls to voic , callers can leave voic messages when they cannot reach you. Here s how to check the messages they left. 1. Touch the Home key > > in the tab or the tab. 2. Touch and hold the 1 key in the dialer. If prompted, enter your voic password. 3. Follow the voice prompts to listen to and manage your voic messages. See Set Voic for how to set your voic service. For detailed information, please contact the service provider. Using Options During a Call During a call, you will see a number of onscreen options. Touch an option to select it. During a call, you will see a number of onscreen options. Touch an option to select it. Touch to turn on or off the speaker. Touch to mute or unmute your microphone. Touch to switch to the keypad when you need to enter a code (for example, the PIN for your voic or bank account) during the call. Touch to put the current call on hold. 54
57 Touch to place multi-party calls. Touch to end the current call. Touch to promote the volume. Managing Multi-party Calls When the call waiting and three-way call features are available, you can switch between two calls or set up a conference call. The call waiting and three-way call features need network support and may result in additional charges. Please contact your service provider for more information. Switch Between Current Calls When you re on a call and another call comes in, your phone screen informs you and displays the caller ID. To respond to an incoming call while you re on a call: Drag over to answer the call. (This puts the first caller on hold and answers the second call.) Drag over to reject the call. You can also drag over to reject the call and select a preset text message or edit one to send to the caller. To switch between two calls: Touch or On hold at the right corner the bottom to switch back to the other call. 55
58 Set Up a Conference Call With this feature, you can talk to two people at the same time. 1. Place the first call. 2. Once you have established the connection, touch and dial the second number. (This puts the first caller on hold.) 3. When you re connected to the second party, touch to merge calls. If one of the people you called hangs up during your call, you and the remaining caller stay connected. If you initiated the call and are the first to hang up, all callers are disconnected. To end the conference call, touch. Adjusting Your Call Settings Set contact display options You can set the order of the contacts displayed in the tab of the Phone app. 1. Touch the Home key > > (in the top search field) > Settings > Display options. 2. Touch Sort by or Name format to set the order of the contacts and the format of the contact names. Set sound and vibration Set the sound and vibration for incoming calls as well as dialpad sounds. 1. Touch the Home key > > (in the top search field) > Settings > Sounds and vibration. 2. Touch the following options you want to configure. Touch Phone ringtone to select the ringtone for incoming call notification. Check Also vibrate for calls to enable vibration for incoming call notification. Check Dialpad tones to play sounds when you touch the dialpad keys. 56
59 Edit quick response to rejected callers 1. Touch the Home key > > (in the top search field) > Settings > Quick responses. 2. Touch a text message to edit it. Set voic 1. Touch the Home key > > (in the top search field) > Settings > Call settings. 2. Touch Voic to configure voic settings. Touch Service to select the voic service provider. Your carrier is the default. Touch Setup > Voic number to edit the voic number. Touch Ringtone to select the notification sound for new voic s. Check Vibrate to enable vibration for notification. Use fixed dialling numbers Fixed Dialling Numbers (FDN) allows you to restrict outgoing calls to a limited set of phone numbers. 1. Touch the Home key > > (in the top search field) > Settings > Call settings. 2. Touch Fixed Dialling Numbers and the following options are available. Enable FDN: Input the PIN2 code to enable the FDN feature. Change PIN2: Change the PIN2 code for FDN access. FDN list: Manage the FDN list. The PIN2 code is provided by your carrier. Entering an incorrect PIN2 code more times than allowed can get your nano-sim card locked. Contact the service provider for assistance. Forward incoming calls Call forwarding feature allows you to forward your incoming calls to another phone number. 1. Touch the Home key > > (in the top search field) > Settings > Call settings > Call forwarding. 57
60 2. Touch an available option (Always, When busy, When unanswered, or When unreachable) to enable it. Set caller ID and call waiting 1. Touch the Home key > > (in the top search field) > Settings > Call settings > Additional settings. 2. Touch Caller ID to choose whether your number is displayed when someone receives your outgoing call. Or check Call waiting to get notified of incoming calls during a call. Please contact the service provider to check whether the caller ID and call waiting features are available. Bar certain calls Call barring feature allows you to forbid certain types of calls from your phone. 1. Touch the Home key > > (in the top search field) > Settings > Call settings > Call barring. 2. Set the restriction of specific types of calls from your phone, and set/change your password. Set speed dials You can touch and hold the 1 to 9 keys from the dialler to call the corresponding speed dial number. The number key 1 is reserved to speed dial your voic . To assign a speed dial key: 1. Touch the Home key > > (in the top search field) > Settings > Call settings > Speed dial. 2. Touch a speed dial key. 3. Enter a phone number or select one from the contact list. 4. Touch OK. 58
61 Contacts You can add contacts on your phone and synchronize them with the contacts in your Google account or other accounts that support contact syncing. To see your contacts, touch the Home key >. From there, you can touch the tabs on the top of the screen to quickly switch to Favorite contacts. Checking Contact Details 1. Touch the Home key > and touch the CONTACTS tab to access your contact list. 2. Scroll through the list to view all your contacts. 3. Touch a contact to view its details. If you have a lot of contacts stored, you'll see a slider on the right side of the screen. Drag the slider to the initial letter you need. Adding a New Contact 1. Touch the Home key >. 2. Touch to add a new contact. 3. Enter the contact name, phone numbers, addresses, and other information. 4. Touch to save the contact. Setting Up Your Own Profile You can create your own name card in your phone. 1. Touch the Home key > and touch the CONTACTS tab. 2. Touch Set up my profile. If a profile has already been set up, touch the name and then touch. 59
62 3. Edit your profile information. 4. Touch. Importing, Exporting, and Sharing Contacts You can import/export contacts from/to your nano-sim card, the phone storage, the microsdhc card or your online accounts. This is especially useful when you need to transfer contacts between different devices. You can also quickly share your contacts using Bluetooth, , messages, etc. Import or Export Contacts 1. Touch the Home key >. 2. Touch > Import/Export. 3. Touch the option as needed. Share Contacts 1. Touch the Home key >. 2. Touch Import/Export > Share visible contacts. 3. Choose how to share the contacts such as Bluetooth, Gmail, or Messaging, etc. Options depend on the applications and services installed. 4. Touch JUST ONCE or ALWAYS as needed. Follow the prompts to finish the sharing of contact information. Working With Favorite Contacts In the Favorite contacts tab, you can find your Favorite contacts and frequently contacted contacts. Add a Contact to Favorites You can add the contacts you use frequently to FAVORITES so that you can find them quickly. 1. Touch the Home key > and touch the CONTACTS tab. 60
63 2. Touch a contact and then touch at the top. Remove a Contact From Favorites 1. Touch the Home key > and touch the FAVORITES tab. 2. Touch a Favorite contact and then touch at the top. Searching for a Contact 1. Touch the Home key >. 2. Touch at the top of the screen. 3. Input the contact name or any information the contact has to search for it. The contacts matched will be listed. Editing Contacts Edit Contact Details 1. Touch the Home key >. 2. Touch a contact you need to edit and then touch. 3. Edit the contact and touch. Set a Ringtone for a Contact Assign a special ringtone to a contact, so you know who is calling when you hear the ringtone. 1. Touch the Home key >. 2. Touch a contact you want to set a ringtone for and then touch > Set ringtone. 3. Select a ringtone you like and touch OK. Delete Contacts 1. Touch the Home key > and touch the CONTACTS tab. 61
64 2. Touch the contact name you want to delete and touch. > Delete. 3. Touch OK to confirm. Displaying Contacts 1. Touch the Home key > > > Contacts to display. 2. Select what you want to show as you needed. 3. Touch OK. 62
65 Accounts Adding or Removing Accounts You can add multiple Google accounts and Microsoft Exchange ActiveSync accounts. You may also add other kinds of accounts, depending on the apps installed on your phone. Add an Account 1. Touch the Home key > > > Accounts > Add account. 2. Touch the type of account you want to add. 3. Follow the onscreen steps to enter the information about the account. Most accounts require a username and password, but the details may vary. You may also need to obtain some information from IT support or your system administrator. When the account is successfully added, touch the Home key > > > Accounts to check. The newly-added account is displayed under the corresponding category. Remove an Account Removing an account will delete it and all information associated with it from your phone, such as s and contacts. 1. Touch the Home key > > Settings > Accounts. 2. Touch the account category and then touch the account. 3. Touch > Remove account > REMOVE ACCOUNT. Configuring Account Sync Configure Auto Sync Setting 1. Touch the Home key > > Settings > Accounts. 2. Touch and check or uncheck Auto-sync data to enable or disable the auto sync feature. 63
66 When automatic sync is turned on, changes you make to information on your phone or on the web are automatically synced with each other. When automatic sync is turned off, you need to sync manually to collect s, updates, or other recent information. Sync Manually 1. Touch the Home key > > Settings > Accounts. 2. Touch the account category and then the account you want to sync. 3. Touch > Sync now. Or touch the types of information you want to sync. Change an Account s Sync Settings 1. Touch the Home key > > Settings > Accounts. 2. Touch the account category and then the account. The Sync screen appears, showing a list of information the account can sync. 3. When auto-sync is enabled, switch on items as you need. The types of information switched on on the phone and the web will be kept in auto-sync. 64
67 Touch in the home screen and select . Use it to receive and send s from your webmail or other accounts, using POP3 or IMAP, or access your Exchange ActiveSync account for your corporate needs. Setting Up the First Account You can use the app to add accounts including Microsoft Exchange Active Sync, Gmail, Hotmail, Yahoo, etc. 1. Touch the Home key > > Select an server and enter the address and password. 3. Touch NEXT and follow the onscreen instructions. Checking Your s Your phone can automatically check for new s at the interval you set when setting up the account. You can also check new s manually by dragging down on the message list. To check earlier s for your account, swipe upwards to the bottom of the message list and touch LOAD MORE. Responding to an You can reply to or forward a message that you receive. You can also delete messages and manage them in other ways. Reply to or Forward an 1. Open the you want to reply to or forward from the Inbox. 2. Do the following as you need: To reply to the sender, touch. 65
68 To reply to the sender and all recipients of the original , touch. To forward the to someone else, touch. 3. Edit your message and touch. Mark an as Unread You can return a read to the unread state - for example, to remind yourself to read it again later. You can also mark a batch of s as unread. While reading an , touch Delete an > Mark unread. You can delete an from its folder. You can also delete a batch of s. While reading an , touch > Delete. Writing and Sending an 1. Open your inbox and touch. If you have more than one account added on the phone, touch the sender line to select the account you want to use for sending the message. 2. Enter a contact name or address in the To field. Separate each recipient with a comma. To send a carbon copy or blind carbon copy to other recipients, touch Cc/Bcc field and enter the contact names or addresses. 3. Enter the subject and compose the text. to open the 4. Touch and choose type of attachment to add audio files, images, videos and other types of files as attachments. 5. Touch at the top right of the screen to send the message. 66
69 Adding and Editing Accounts Add an Account After setting up your first account (see Setting Up the First Account), you can add more accounts and manage them separately. 1. Open to get the Inbox screen. 2. Touch > Settings > Add account. 3. Follow the prompts to set up the account as you did with the first one. If you have more than one account added on the phone, touch check the s in your multiple accounts. Edit an Account > Combined view to You can change a number of settings for an account, including how often you check for , how you re notified of new mails, your signature, and details about the servers the account uses to send and receive mails. 1. Open to get the Inbox screen. 2. Touch > Settings and touch the account whose settings you want to change. 3. Make the changes and touch when you finish. Changing General Settings General settings apply to all accounts you add. 1. Open to get the Inbox screen. 2. Touch > Settings > General settings. 3. Make the changes and touch when you finish. 67
70 Messaging You can use Messaging to exchange text messages (SMS) and multimedia messages (MMS). Opening the Messaging Screen Touch the Home key > > Messaging. The Messaging screen opens, where you can create a new message, search for messages, or open an ongoing message thread. Touch to write a new text or multimedia message. Touch an existing message thread to open the conversation you ve had with a certain number. Sending a Message 1. Touch the Home key > >. 2. Enter the recipient(s) and message text. If you want to send a multimedia message, touch to add attachments. 3. Touch or > Send. You can also include addresses as recipients for multimedia messages. Do not add a message subject or any attachment if you want to send a text message. Otherwise you may be charged for a multimedia message. Replying to a Message Messages you receive are appended to existing threads of the same number. If the new message comes from a new number, a new thread is created. 1. In the Messaging screen, touch the thread that has the message you want to reply to. 68
71 2. Type your reply in the Type message field at the bottom. You can touch if you want to reply with an MMS. 3. Touch. Managing the Message Thread To delete the message thread: 1. In the Messaging screen, touch and hold the message threads you want to delete one by one. 2. Touch, and then touch OK. To add to the Contacts: 1. In the Messaging screen, touch icon before the thread you want to add. 2. Touch OK. 3. Touch Create new contact or select the existed contact you desired. Managing the Message To forward the message: 1. In the Messaging screen, touch the thread that has the message you want to forward. 2. Touch the message and then touch Forward in the menu that opens. 3. Enter a recipient for the message and edit the content if you want. 4. Touch. To copy the message: 1. In the Messaging screen, touch the thread that has the message you want to copy. 2. Touch the message and then touch Copy text in the menu that opens. You can paste it to the place you needed. To view the message details: 1. In the Messaging screen, touch the thread that has the message you want to copy. 2. Touch the message and then touch View details in the menu that opens. 69
72 To delete the message: 1. In the Messaging screen, touch the thread that has the message you want to delete. 2. Touch and hold the message and then touch. Changing Message Settings Touch > Settings in the Messaging screen to change the messaging settings. 70
73 Calendar Calendar on the phone works with the web-based Google Calendar service for creating and managing events, meetings, and appointments. It also works with the Microsoft Exchange ActiveSync calendar once you sign into your Exchange account on the phone. To open Calendar, touch in the home screen and select Calendar. Viewing Your Calendars and Events Select Calendar Views 1. Open the Calendar app. 2. Touch > Calendars to display. Check what you want to display. Touch. 3. You can view your calendars in different views. Touch > Day/Week/Month/Agenda to select. All the days with schedules are marked. Swipe vertically to change the month on the month calendar. Touch to return to the current date. View Event Details In Agenda/Day/Week view, touch an event to view its details. In Month view, touch a day to switch to Day view. Then touch an event to view its details. Creating an Event 1. In any Calendar view, touch. You can also touch a spot in Day/Week view twice to add an event to that time block. 2. Enter the event details and touch DONE
74 Touch > Refresh to get the latest calendar views. Searching an Event 1. Swift vertically to find the event you want to edit or delete in Agenda view. Or you can make use of the search tool. Touch > Search. 2. Type or touch to speak what you want to search in the Searching field at the top of the screen. 3. Touch. Editing/Deleting/Sharing/Exporting/Copying an Event 1. View event details (see View Event Details). 2. Do one of the following as you need. To edit the event, touch and edit the event details if you need. Touch DONE to save your changes. To delete the event, touch. Touch to choose Only this event/this and future events/all events if the event belongs to the type of iterative event. Touch OK. To share the event, touch. Touch to choose the sharing method to share the event. To export the event, touch. To copy the event, touch > Copy. Changing Calendar Settings To change the calendar settings, touch > Settings. You can change General settings, which apply to all accounts, or other settings that only apply to specific accounts. 72
75 Browser Use Browser to view web pages and search for information. Opening a Web Page Touch the Home key > on the Internet. or other web browsers to view web pages or search for information The browser also opens when you touch a web link - for example, in an or a text message. 1. Touch the address field at the top and enter the URL of the web page or the words you want to search for. You can touch the microphone icon to search by voice. 2. Touch on the keyboard to open the web page. Customizing the Browsers Open the Browser or the Chrome app and touch the each browser. > Settings to customize the settings for With the customizing options, you can manage privacy-related settings such as passwords saving, browsing data (history) and cookies, accessibility options such as text scaling and forced zooming, bandwidth-related settings and more. 73
76 Camera You can use your phone to take photos and record videos. Photos and videos are stored on the microsdxc card you have installed or in the phone storage. You can copy them to your computer or check them out in the Gallery app. Capturing a Photo 1. Touch the Home key > > Camera. 2. Aim the camera at the subject and make any necessary adjustment. Auto camera mode is used by default. You can pinch or spread on the screen to zoom in or zoom out before taking pictures. 74
77 75
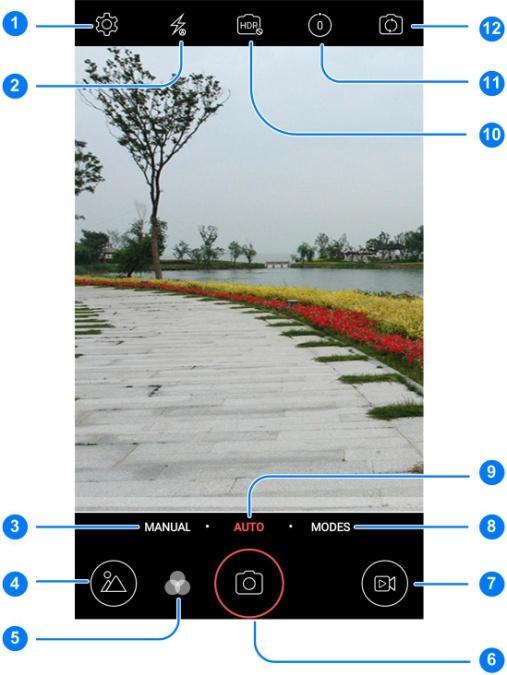
78 Number Function 1 Change the camera/video settings. 2 3 Change flash mode (only available for the back camera). Switch to MANUAL camera mode to adjust aperture (only available for the back camera). 4 View photos and videos you have taken. 5 Select a special effect for pictures and videos. 6 Capture a photo. 7 Record a video. 8 Take a panorama picture, a multi-exposure picture, or manually adjust the settings before taking a picture (only available for the back camera). 9 Switch to auto camera mode (only available for the back camera). 10 Enable High-Dynamic Range (HDR) mode when capturing a photo with high illumination contrast to keep more details in both the bright and the dark areas. Or turn off this feature. 11 Set a time delay before the camera takes a picture automatically after you touch the shutter icon, or turn off this feature. 12 Switch between the front and the back camera. WARNING! Keep a safe distance when using the flash. Do not point the flash toward people or animals eyes. 3. Touch the area where you want the camera to focus, or leave the camera to autofocus on the center of the image. 76
79 In Auto camera mode, when you touch the screen to focus, the exposure bar appears beside the focus point. You can drag up or down to adjust the exposure. 4. Lightly touch. The Volume up key or Volume down key can also be used to take a photo when the Camera app is launched. When you use the front camera, you can also touch or to adjust beauty face or smile detection setting. Recording a Video 1. Touch the Home key > > Camera. 2. Aim the camera at the subject. You can touch any area on the screen that you want the camcorder to focus on before and during recording. You can spread or pinch on the screen to zoom in or out before and during recording. When you touch the screen to focus during recording, the exposure bar appears beside the focus point. You can drag up or down to adjust the exposure. 3. Touch to start recording. While the recording is in progress, touch to pause the recording or touch to save the frame as a separate photo. 4. Touch to stop recording. 77
80 Using Other Camera Modes Besides capturing photos and videos in the traditional way, your camera app offers other powerful and interesting camera modes. Touch MODES to find them all. PANORAMA: Capture panorama pictures. MULTI EXPOSURE: Capture two pictures for collage. SLOW MOTION: Used for recording the moving object via slowing down the speed and prolonging the time at the mean time. Using Manual Camera Mode You can use manual camera mode to adjust more camera options for your photo such as ISO, white balance, exposure, etc. 1. Touch the Home key > > Camera. 2. Touch MODES > MANUAL. 3. Aim the camera at the subject and you can make the following adjustments. Drag to any area on the screen that you want to focus on. Drag to any area on the screen where you want the camera to meter exposure so as to adjust the photo brightness. Touch Touch Touch Touch to adjust shutter speed. to adjust ISO. to adjust overall exposure. to adjust white balance. Touch to set the interval for time lapse pictures or turn off this feature. Touch to adjust the focus manually or turn on auto-focus. 5. Touch the shutter icon to take the photo. 78
81 Customizing Camera/Camcorder Settings Before capturing a photo or a video, you can touch camcorder setting options. to open the following camera and Some camera and video options will change according to different camera modes. CAMERA Picture size: Set the image size for your photo. This option is only available in manual mode or with the front camera. Grid: Set the grid of Nine grids or Golden spiral for reference, or turn off the grid. Gradienter: Turn on or off the gradienter. Shutter tone: Turn on or off the shutter tone. Geo-tagging: Select whether to store the GPS location in your captured photos and videos. Anti-banding: Set the anti-banding value when you take pictures of TV or computer screens to avoid stripes on the screen. Storage location: Touch Save location to change the storage location for captured photos and videos. Restore defaults: Restore default camera and video settings. 79
82 VIDEO Video quality: Set the quality for your video. Time lapse: Set the time interval between each frame when you shot time lapse videos with the back camera. Focus lock when recording: Select whether to lock the focus point on the center of the screen during video recording using the back camera. Geo-tagging: Select whether to store the GPS location in your captured photos and videos. Anti-banding: Available for the back camera. Set the anti-banding value when you record videos of TV or computer screens to avoid stripes on the screen. Storage location: Touch Save location to change the storage location for captured photos and videos. Restore defaults: Restore default camera and camcorder settings. 80
83 Gallery Opening Gallery Touch the Home key > > Gallery to view albums of your pictures and videos. Working With Albums When you open Gallery, all pictures and videos on your phone are displayed in a number of albums. To view album contents: Touch and select view by Album, Date, or Location. Touch an album and swipe left or right to view the pictures and videos it contains. You can view them in the way of Slideshow by touching then touch > Slideshow. To share albums, pictures, or videos:, or you can touch a picuture and 1. Touch and hold an item in the Album view to select an album or after you open an album to select a picture or a video. 2. Touch more items that you want to share. 3. Touch and select how you want to share the items. To delete albums, pictures, or videos: 1. Touch and hold an item in the Albums view to select an album or after you open an album to select a picture or a video. 2. Touch more albums that you want to delete. 3. Touch > OK. 81

84 Working With Pictures Touch a picture in an album to view the picture in full screen. When viewing a picture in full screen, the following features are available. Swipe horizontally to see more pictures or videos. Pinch a picture or video to make it smaller. You'll then see a filmstrip-style view of all your pictures and videos in a row. Swipe left or right to scan through them all. You can delete a picture or video by swiping it up in the filmstrip view. If you accidentally delete one, touch UNDO to retrieve it. Double-tap the picture, or pinch two fingers together or spread them apart to zoom out or in. Touch to edit the picture. Touch and select a method to share the picture. Touch to access more options. You can rename, rotate the picture, set it as the wallpaper or contact photo, check its details, browse the album contents in a slideshow, or print the picture. 82
85 Touch to set the picture as your favorite. Some options may not be available for certain albums or pictures. Retouching Your Pictures You can edit any photos you took and some other pictures in Gallery. 1. Touch while viewing a picture in full screen. 2. Touch the icons such as Photo Editor along the bottom of the screen to edit the picture. Apply various FILTER effects such as Bleach, Vintage to the picture. Apply various NOSTALGIA styles to the picture. Apply CIRCLE or LINE BLUR effects to the picture. Set the ratio to the picture, or make a directional adjustment to the picture. Apply and adjust effects such as EXPOSURE, VIGNETTE, CONTRAST, and SHADOWS on the picture. Doodle on the picture by using the tools of Brush, Eraser, etc. Decorate the picture with FRAME or STICKER. 3. To undo or redo the changes you ve made to the picture, touch at the top right of the screen to check the history records. Touch the one you want to rollback. 4. Touch to save the picture. 83
86 Playing Videos 1. Touch an album in the gallery and then touch the thumbnail of a video. 2. Touch at the centre and select what you want to open with to start playing. Touch the video to view the playback controls.. You can touch > Trim to trim the video and save it as a new video file. 84
87 Music Touch the Home key > > Music to play audio files stored on your phone. Music supports a wide variety of audio formats, so it can play music you purchase from online stores, music you copy from your CD collection, and so on. Copying Music Files to Your Phone Before using Music, you need to copy or download audio files to your phone. Copy From a Computer 1. Connect your phone and the computer with a USB cable. 2. Open the notification panel and touch. 3. Touch Media device (MTP). See Connecting to Your Computer via USB. 4. Copy the music files from the PC and paste them to the phone storage or the microsdxc card. Download From the Internet You can download music files when browsing web pages. Receive via Bluetooth You can receive music files from other devices via Bluetooth. See Receive Data via Bluetooth. Viewing Your Music Library Touch the Home key > > Music and your music library is displayed. All your audio files are cataloged, according to the information stored in the files. Touch All Songs to view all music files on your phone. Touch Artists/Albums to browse music files on your phone organized by the artist or album name. 85
88 Touch Folders to find music files through the folders they are stored in. Touch Favorites to browse music files you have marked as favorites. Touch Playlists to view all music playlists you have created. If an audio file is being played, its name and player controls are displayed at the bottom of the screen. Touch the area to open the playback screen. Setting a Song as the Default Ringtone The song will be used as the ringtone for all incoming calls, except those from contacts to whom you have assigned special ringtones (see Set a Ringtone for a Contact). 1. Touch the Home key > > Music to see the music library. If you are in the playback screen, touch 2. Touch next to a song in any list. 3. In the menu that opens, touch Set as ringtone. to return to the music library. If the song is being played and you re in the playback screen, you can touch ringtone. Playing Music > Set as Touch a song in the music library to listen to it. Touch the bottom of the screen to open the following playback screen. 86

89 Number Function 1 Return to the music library. 2 Album artwork. Swipe left or right to change the song. 3 Check the track information. 4 Progress bar: Drag the progress bar to jump to any part of the track. 5 Turn on or off shuffle. 87
Z982. User Manual and Safety Information
 Z982 User Manual and Safety Information About This Manual Thank you for choosing this mobile device. In order to keep your device in its best condition, please read this manual and keep it for future reference.
ZTE Grand X View2. User Manual
 ZTE Grand X View2 User Manual About This Manual Thank you for choosing this ZTE mobile device. In order to keep your device in its best condition, please read this manual and keep it for future reference.
ZTE K81. User Manual. U.S. Cellular Customer Service
 ZTE K81 User Manual U.S. Cellular Customer Service 1-888-944-9400 About This Manual Thank you for choosing this ZTE mobile device. In order to keep your device in its best condition, please read this manual
User Manual. U.S. Cellular Customer Service
 User Manual U.S. Cellular Customer Service 1-888-944-9400 1 About This Manual Thank you for choosing this ZTE mobile device. In order to keep your device in its best condition, please read this manual
Z837VL EXPLORE NEW HEIGHTS USER MANUAL Z ZTEUSA.COM
 Z837VL EXPLORE NEW HEIGHTS USER MANUAL Z079584508294 ZTEUSA.COM About This Manual Thank you for choosing this ZTE mobile device. In order to keep your device in its best condition, please read this manual
Z899VL READY WHEN YOU ARE USER MANUAL N ZTEUSA.COM
 Z899VL READY WHEN YOU ARE USER MANUAL N58151100005 ZTEUSA.COM About This Manual Thank you for choosing this ZTE mobile device. In order to keep your device in its best condition, please read this manual
About This Manual. Edition Time: July 2017
 USER MANUAL 1 About This Manual Thank you for choosing this ZTE mobile device. In order to keep your device in its best condition, please read this manual and keep it for future reference. Copyright 2017
Visible R2 User Guide
 Visible R2 User Guide BC 1 About This Guide Thank you for choosing this ZTE mobile device. In order to keep your device in its best condition, please read this manual and keep it for future reference.
Z557BL CREATE YOUR OWN PATH USER MANUAL Z ZTEUSA.COM
 Z557BL CREATE YOUR OWN PATH USER MANUAL Z079584509061 ZTEUSA.COM 1 About This Manual Thank you for choosing this ZTE mobile device. In order to keep your device in its best condition, please read this
User Manual U.S. Cellular Customer Service
 User Manual U.S. Cellular Customer Service 1-888-944-9400 1 About This Manual Thank you for choosing this ZTE mobile device. In order to keep your device in its best condition, please read this manual
User manual. Smart prime 7 VFD 600
 User manual Smart prime 7 VFD 600 About this manual Thank you for choosing this mobile device. In order to keep your device in its best condition, please read this manual and keep it for future reference.
Z862VL UNDENIABLY YOU USER MANUAL Z MT ZTEUSA.COM
 Z862VL UNDENIABLY YOU USER MANUAL Z8090195100MT ZTEUSA.COM About This Manual Thank you for choosing this ZTE mobile device. In order to keep your device in its best condition, please read this manual and
About This Manual Copyright 2017 ZTE CORPORATION All rights reserved. Notice Disclaimer
 USER MANUAL 1 About This Manual Thank you for choosing this ZTE mobile device. In order to keep your device in its best condition, please read this manual and keep it for future reference. Copyright 2017
Z917VL SIMPLY REMARKABLE USER MANUAL Z MT ZTEUSA.COM
 Z917VL SIMPLY REMARKABLE USER MANUAL Z8090193300MT ZTEUSA.COM About This Manual Thank you for choosing this ZTE mobile device. In order to keep your device in its best condition, please read this manual
Z861BL CREATE YOUR OWN PATH USER MANUAL Z MT ZTEUSA.COM
 Z861BL CREATE YOUR OWN PATH USER MANUAL Z8090195300MT ZTEUSA.COM About This Manual Thank you for choosing this ZTE mobile device. In order to keep your device in its best condition, please read this manual
ZTE Blade S6 User Manual
 ZTE Blade S6 User Manual Search ZTE Australia on Facebook, Google+ and Twitter to find out more http://www.ztemobiles.com.au 1 About This Manual Thank you for choosing this ZTE mobile device. In order
About This Guide Thank you for choosing this ZTE mobile device. In order to keep your device in its best condition, please read this manual and keep
 User Guide 1 2 About This Guide Thank you for choosing this ZTE mobile device. In order to keep your device in its best condition, please read this manual and keep it for future reference. Copyright Copyright
About This Manual. Copyright. Notice
 User Manual 1 About This Manual Thank you for choosing this ZTE mobile device. In order to keep your device in its best condition, please read this manual and keep it for future reference. Copyright Copyright
Z718TL IMAGINE THE POSSIBILITIES USER MANUAL MT ZTEUSA.COM
 Z718TL IMAGINE THE POSSIBILITIES USER MANUAL 8090200100MT ZTEUSA.COM About This Manual Thank you for choosing this ZTE mobile device. In order to keep your device in its best condition, please read this
Contents 2 CONTENTS. Version No.: R1.0 Edition Time: May 2017
 User Guide 1 Contents Copyright 2017 ZTE CORPORATION. All rights reserved. ZTE, Z835, and the ZTE logos are trademarks of the ZTE Corporation. AT&T, the AT&T logo and all other AT&T marks contained herein
User Manual and Safety Information
 User Manual and Safety Information 1 About This Manual Copyright Copyright 2015 ZTE CORPORATION All rights reserved. Approved Firmware Versions: No part of this publication may be quoted, reproduced, translated
ZTE Overture 3 User Guide
 ZTE Overture 3 User Guide Thank you for choosing this ZTE mobile device. In order to keep your device in its best condition, please read this manual and keep it for future reference. Copyright 2017 ZTE
Z798BL BRIGHT AND BEAUTIFUL USER MANUAL Z MT ZTEUSA.COM
 Z798BL BRIGHT AND BEAUTIFUL USER MANUAL Z8090201600MT ZTEUSA.COM About This Manual Thank you for choosing this ZTE mobile device. In order to keep your device in its best condition, please read this manual
Quick Start Guide U.S. Cellular Customer Service
 Quick Start Guide U.S. Cellular Customer Service 1-888-944-9400 LEGAL INFORMATION Copyright 2017 ZTE CORPORATION. All rights reserved. No part of this publication may be quoted, reproduced, translated
Z828TL USER MANUAL Z ZTEUSA.COM
 Z828TL USER MANUAL Z079584507802 ZTEUSA.COM About This Manual Thank you for choosing this ZTE mobile device. In order to keep your device in its best condition, please read this manual and keep it for
Z819L YOUR WORLD USER MANUAL Z ZTEUSA.COM
 Z819L Navigate YOUR WORLD USER MANUAL Z079584507117 ZTEUSA.COM About This Manual Thank you for choosing this ZTE mobile device. In order to keep your device in its best condition, please read this manual
About This Manual. Copyright. Notice. Disclaimer
 User Manual 1 About This Manual Thank you for choosing this ZTE mobile device. In order to keep your device in its best condition, please read this manual and keep it for future reference. Copyright Copyright
Z353VL TRULY TIMELESS USER MANUAL Z ZTEUSA.COM
 Z353VL TRULY TIMELESS USER MANUAL Z079584508048 ZTEUSA.COM About This Manual Thank you for choosing this ZTE mobile device. In order to keep your device in its best condition, please read this manual and
Z717VL ENERGIZE YOUR JOURNEY USER MANUAL Z MT ZTEUSA.COM
 Z717VL ENERGIZE YOUR JOURNEY USER MANUAL Z8090183600MT ZTEUSA.COM About This Manual Thank you for choosing this ZTE mobile device. In order to keep your device in its best condition, please read this manual
Smart E8. User manual VFD 512
 Smart E8 User manual VFD 512 About this manual Thank you for choosing this mobile device. In order to keep your device in its best condition, please read this manual and keep it for future reference. Copyright
About this manual Thank you for choosing this mobile device. In order to keep your device in its best condition, please read this manual and keep it f
 Smart E8 User manual VFD 511 About this manual Thank you for choosing this mobile device. In order to keep your device in its best condition, please read this manual and keep it for future reference. Copyright
ZTE Blade V6 User Manual
 ZTE Blade V6 User Manual See ztemobiles.com.au for more help Follow ZTE Australia on Facebook, Google+ Twitter and Instagram 1 About This Manual Thank you for choosing this ZTE mobile device. In order
About this manual Thank you for choosing this mobile device. In order to keep your device in its best condition, please read this manual and keep it f
 Smart E8 User manual VFD 513 About this manual Thank you for choosing this mobile device. In order to keep your device in its best condition, please read this manual and keep it for future reference. Copyright
FAQ for KULT Basic. Connections. Settings. Calls. Apps. Media
 FAQ for KULT Basic 1. What do the Icons mean that can be found in notifications bar at the top of my screen? 2. How can I move an item on the home screen? 3. How can I switch between home screens? 4. How
USER MANUAL Z795G.
 USER MANUAL Z795G www.zteusa.com About This Manual Thank you for choosing this ZTE mobile device. In order to keep your device in its best condition, please read this manual and keep it for future reference.
USER MANUAL Z665C.
 USER MANUAL Z665C www.zteusa.com Table of Contents Copyright 2013 ZTE CORPORATION. All rights reserved. No part of this publication may be excerpted, reproduced, translated or utilized in any form or by
USER MANUAL Z932L. Z
 USER MANUAL Z079584505322 www.zteusa.com Z932L About This Manual Thank you for choosing this ZTE mobile device. In order to keep your device in its best condition, please read this manual and keep it for
T - Mobile Concord II User Manual and Safety information
 T-Mobile Concord II User Manual and Safety Information 1 2 T - Mobile Concord II User Manual and Safety information 1 Service If you are a new T-Mobile customer and your service has not yet been activated,
User Manual and Safety Information
 User Manual and Safety Information ZTE Z820 User Manual and Safety information 1 About This Manual LEGAL INFORMATION Copyright 2014 ZTE CORPORATION All rights reserved. Approved Firmware Versions: No part
About This Manual Copyright Copyright 2017 ZTE CORPORATION All rights reserved. Notice Disclaimer
 User guide. 1 2 About This Manual Thank you for choosing this ZTE mobile device. In order to keep your device in its best condition, please read this manual and keep it for future reference. Copyright
Quick Start Guide. U.S. Cellular Customer Service
 Quick Start Guide U.S. Cellular Customer Service 1-888-944-9400 LEGAL INFORMATION Copyright 2014 ZTE CORPORATION. All rights reserved. No part of this publication may be quoted, reproduced, translated
Telstra EASYTOUCH 4G. Mobile Phone User Manual
 Telstra EASYTOUCH 4G Mobile Phone User Manual 1 LEGAL INFORMATION Copyright 2012 ZTE CORPORATION. All rights reserved. No part of this publication may be quoted, reproduced, translated or used in any form
ZTE Open WCDMA/GSM Mobile Phone User Manual
 ZTE Open WCDMA/GSM Mobile Phone User Manual 1 About This Manual Thank you for choosing this ZTE mobile device. In order to keep your device in its best condition, please read this manual and keep it for
NETWORK THE HOME 10 FOLDERS APPS
 NID-7006 NAXA NID Tablet User s Guide Table of Contents GETTING STARTED 4 CONNECTING TO A WIRELESS NETWORK 4 USING THE TOUCHSCREEN 4 USING THE HOME SCREENS 5 USING THE NAVIGATION ICONS 6 USING THE ALL
Optus Blitz ZTE BLADE V7 LITE Quick Start Guide
 Optus Blitz ZTE BLADE V7 LITE Quick Start Guide Search ZTE Australia on Facebook, Google+ and Twitter to keep in touch. ZTE 2016 Ver 1.0 May 2016 Copyright 2016 by ZTE Corporation All rights reserved.
User Guide. Welcome to HUAWEI
 User Guide Welcome to HUAWEI Contents Introduction.................................... 1 Installation..................................... 2 Keys and Functions.................................. 2 Installing
Z233VL FIND YOUR JOY USER MANUAL Z MT ZTEUSA.COM
 Z233VL FIND YOUR JOY USER MANUAL Z8090202700MT ZTEUSA.COM About This Manual Thank you for choosing this ZTE mobile device. In order to keep your device in its best condition, please read this manual and
Basics. screen? CALLS. In call. Missed call. Speakerphone on. Mute your microphone. Make another call. Turn on the speakerphone
 Basics 1. What do the Icons mean that can be found in notifications bar at the top of my screen? CALLS In call Missed call Speakerphone on Mute your microphone Show the dial pad Put a call on hold Make
Get Started. Insert SIM card The phone is a Dual SIM mobile phone allowing you to use the facility of two networks.
 Thank You for Purchasing this Smart mobile device. This device will provide you with high quality mobile communication and entertainment based on SMART and high standards. Content in this manual may differ
This guide describes features that are common to most models. Some features may not be available on your tablet.
 User Guide Copyright 2014 Hewlett-Packard Development Company, L.P. Bluetooth is a trademark owned by its proprietor and used by Hewlett-Packard Company under license. Google, Google Now, Google Play,
Z232TL LIVE IN THE MOMENT USER MANUAL Z MT ZTEUSA.COM
 Z232TL LIVE IN THE MOMENT USER MANUAL Z8090199200MT ZTEUSA.COM About This Manual Thank you for choosing this ZTE mobile device. In order to keep your device in its best condition, please read this manual
For more information concerning accessories, please visit your local Cricket store location or go to
 Clear and Simple Quick Start Guide ZTE Grand X 4 More information On the web Detailed support information, including device specifications and a full user s manual, is available at wwwcricketwirelesscom/support/devices
About This Manual. Copyright. Notice. Disclaimer
 User Manual 1 About This Manual Thank you for choosing this ZTE mobile device. In order to keep your device in its best condition, please read this manual and keep it for future reference. Copyright Copyright
Content. Welcome... 5 Getting Started... 5 Initial setup... 5 Setting a SIM card... 5 Locking and unlocking the screen... 7
 User Guide Content Welcome... 5 Getting Started... 5 Initial setup... 5 Setting a SIM card... 5 Locking and unlocking the screen... 7 Screen and Display... 8 The home screen... 8 Notifications... 11 Managing
FAQ For IDOL 5S. SW: v4e1z+ul
 FAQ For IDOL 5S SW: v4e1z+ul i. Basic Setting 1. How can I set up my Alcatel device when I turn it on for the first time? The first time you turn on the phone, you will see a welcome screen. You can start
Copyright 2012 ZTE CORPORATION.
 Quick Guide LEGAL INFORMATION Copyright 2012 ZTE CORPORATION. All rights reserved. No part of this publication may be quoted, reproduced, translated or used in any form or by any means, electronic or mechanical,
User Manual and Safety Information
 User Manual and Safety Information 1 About This Manual Thank you for choosing this ZTE mobile device. In order to keep your device in its best condition, please read this manual and keep it for future
VEGA. Operation Manual T A B L E T P C. advent vega operation manaul_new.indd 1
 VEGA T A B L E T P C Operation Manual advent vega operation manaul_new.indd 1 advent vega operation manaul_new.indd 2 CONTENTS SETTING UP YOUR TABLET FOR THE FIRST TIME... 4 USING THE DEVICE S BUTTONS
STUDIO 7.0 USER MANUAL
 STUDIO 7.0 USER MANUAL 1 Table of Contents Safety Information... 3 Appearance and Key Functions... 4 Introduction... 5 Call Functions... 6 Notifications Bar... 7 Contacts... 8 Messaging... 9 Internet Browser...
Contents. Get Started Install SIM Card
 Contents Get Started... 2 Install SIM Card... 2 Insert Micro SD card... 2 Charge Mobile Phone... 3 PC-Phone File Transfer... 4 Keys and Parts... 5 Fingerprint... 7 Lock and Unlock the Screen... 9 Notification
HotSpot USER MANUAL. twitter.com/vortexcellular facebook.com/vortexcellular instagram.com/vortexcellular
 HotSpot USER MANUAL www.vortexcellular.com twitter.com/vortexcellular facebook.com/vortexcellular instagram.com/vortexcellular 1 Contents Quick User Guide... 2 1. Power On/Off... 2 2. Turn On /Off Screen...
viii. Bluetooth 36. How can I turn on Bluetooth and pair with another Bluetooth device?
 FAQ For TCL Mobiles i. Basic Setting 1. How can I set up my TCL device when I turn it on for the first time? 2. How can I change the language of the device? 3. How can I check the IMEI number of my TCL
Happy Phone 3G 4.0. User Manual
 Happy Phone 3G 4.0 User Manual 1 Getting Started Overview Indicator Receiver Front Camera Sensor Volume Key Power Key Touch Screen Home Key Hardkey-Menu Hardkey-Back 2 Headset Jack Charging/USB Jack Volume
Dash 4.0. User Manual
 1 Dash 4.0 User Manual Table of Contents Safety Information... 3 Appearance and Key Function... 4 Introduction... 5 Call Functions... 6 Contacts... 7 Messaging... 8 Internet Browser... 9 Bluetooth... 10
LIFE PURE User Manual
 LIFE PURE User Manual 1 Table of Contents Safety Information... 3 Appearance and Key Function... 4 Introduction... 5 Call Functions... 6 Contacts... 7 Messaging... 8 Internet Browser... 9 Bluetooth...
2 Safe 2 Taking a photo before focusing the camera 3 Launching the camera from gallery 3 QR code
 4C User Guide Contents Foreword First-class functions 2 Safe 2 Taking a photo before focusing the camera 3 Launching the camera from gallery 3 QR code Getting started 5 Locking and unlocking the screen
Getting Started. Parts & Functions Handset Status Bar
 Getting Started 1 Parts & Functions... 1-2 Handset... 1-2 Status Bar... 1-4 Memory Card... 1-6 Enabling Automatic Backup... 1-6 Restoring Backed Up Data to Handset... 1-6 Memory Card Installation... 1-6
Studio 5.5. User Manual
 Studio 5.5 User Manual 1 Table of Contents Safety Information... 3 Appearance and Key Function... 4 Introduction... 5 Call Functions... 6 Contacts... 7 Messaging... 8 Internet Browser... 9 Bluetooth...
BEAT 2.0 USER MANUAL
 BEAT 2.0 USER MANUAL FCC ID: 2ADLJBEAT20 The device complies with part 15 of the FCC Rules. Operation is subject to the following two conditions: (1) This device may not cause harmful interference, and
1. Introduction P Package Contents 1.
 1 Contents 1. Introduction ------------------------------------------------------------------------------- P. 3-5 1.1 Package Contents 1.2 Tablet Overview 2. Using the Tablet for the first time ---------------------------------------------------
ZTE N860. User Manual
 ZTE N860 User Manual 1 LEGAL INFORMATION Copyright 2012 ZTE CORPORATION. All rights reserved. No part of this publication may be quoted, reproduced, translated or used in any form or by any means, electronic
December 13, 2010 AUG Android mobile technology platform 2.3. Android 2.3 User s Guide
 December 13, 2010 Android mobile technology platform 2.3 Android 2.3 User s Guide 2 Legal Copyright 2010 Google Inc. All rights reserved. Google, the stylized Google logo, Android, the stylized Android
Contents. Introduction. Getting Started. Navigating your Device. Customizing the Panels. Pure Android Audio. E-Books
 Contents Introduction Getting Started Your Device at a Glance Charging Assembling the Power Adapter Turning On/Off, Unlocking Setting to Sleep and Waking Up Inserting and Removing a microsd Card Connecting
Table of contents. Getting started Phone calls Contacts Entering text Messaging... 36
 Alcatel IDOL 4 Some of the contents in this manual may differ from your phone depending on the software of the phone. Actual color may vary. Your phone is designed to make it easy for you to access a wide
Welcome Getting Started Initial setup Locking and unlocking the screen Screen and Display The home screen...
 User guide. Content Welcome... 1 Getting Started... 1 Initial setup... 1 Locking and unlocking the screen... 1 Screen and Display... 3 The home screen... 3 Notifications... 6 Managing Apps... 9 Downloading
SM-A5000. User Manual. English (HK). 12/2014. Rev.1.3.
. 12/2014. Rev.1.3.") SM-A5000 User Manual English (HK). 12/2014. Rev.1.3 www.samsung.com/hk Table of Contents Read me first Getting started 7 Package contents 8 Device layout 10 Using the SIM or USIM card and battery 16 Using
SM-A5000 User Manual English (HK). 12/2014. Rev.1.3 www.samsung.com/hk Table of Contents Read me first Getting started 7 Package contents 8 Device layout 10 Using the SIM or USIM card and battery 16 Using
ZTE BLADE B125 User Guide
 ZTE BLADE B125 User Guide Visit our Australian website for all your device related information, support and accessories: http://www.ztemobiles.com.au/ Copyrights Copyright 2018 by ZTE Corporation Ver 1.0
IdeaTab S6000. User Guide V1.0. Please read the safety precautions and important notes in the supplied manual before use.
 IdeaTab S6000 User Guide V1.0 Please read the safety precautions and important notes in the supplied manual before use. Chapter 01 IdeaTab S6000 Overview *Specific models only 1-1 IdeaTab Appearance 1-2
Contents. Introduction
 Page 1 of 15 Contents Introduction Getting Started Your Device at a Glance Charging Assembling the Power Adapter Turning On/Off, Unlocking Setting to Sleep and Waking Up Inserting and Removing a microsd
NEO 4.5. User Manual
 1 NEO 4.5 User Manual Table of Contents Safety Information... 3 Appearance and Key Function... 4 Introduction... 5 Call Functions... 6 Contacts... 7 Messaging... 8 Internet Browser... 9 Bluetooth & Wi-Fi...
HTC Desire 526G dual sim. User guide
 HTC Desire 526G dual sim User guide 2 Contents Contents Unboxing HTC Desire 526G dual sim 8 Back cover 9 Dual micro SIM cards 11 Storage card 12 Battery 13 Switching the power on or off 14 Setting up your
<,W,EϬϱ E USER MANUAL
 USER MANUAL GETTING STARTED To get started with the Agora handset, please take both the phone and the battery out of the box. On the rear of the phone you will find a plastic backing cover with a small
User Guide. Usuario. Guía del. User Guide MFL (1.0) ME. This booklet is printed with soy ink. Printed in Mexico
 ME. This booklet is printed with soy ink. Printed in Mexico") This booklet is made from 98% post-consumer recycled paper. This booklet is printed with soy ink. Printed in Mexico User Guide Guía del Usuario User Guide MFL69288301 (1.0) ME Copyright 2015 LG Electronics,
This booklet is made from 98% post-consumer recycled paper. This booklet is printed with soy ink. Printed in Mexico User Guide Guía del Usuario User Guide MFL69288301 (1.0) ME Copyright 2015 LG Electronics,
FAQ For IDOL 5 Basic Setting ii. Home screen iii. Phone call iv. Contact Ringtone & Sounds vi. Message
 FAQ For IDOL 5 i. Basic Setting 1. How can I set up my Alcatel device when I turn it on for the first time? 2. How can I change the language of the device? 3. How can I check the IMEI number of my Alcatel
1. Introduction P Package Contents 1.
 1 Contents 1. Introduction ------------------------------------------------------------------------------- P. 3-5 1.1 Package Contents 1.2 Tablet Overview 2. Using the Tablet for the first time ---------------------------------------------------
Dell Streak 7. User's Manual COMMENT
 Dell Streak 7 User's Manual COMMENT Notes, Cautions, and Warnings NOTE: A NOTE indicates important information that helps you make better use of your device. CAUTION: A CAUTION indicates potential damage
ZTE BLADE A602. User Manual
 ZTE BLADE A602 User Manual 1 LEGAL INFORMATION Copyright 2016 ZTE Corporation. All rights reserved. No part of this publication may be quoted, reproduced, translated or used in any form or by any means,
Some of the contents in this manual may differ from your phone depending on the software of the phone. Actual color may vary. Your phone is designed
 Alcatel PULSEMIXTM Some of the contents in this manual may differ from your phone depending on the software of the phone. Actual color may vary. Your phone is designed to make it easy for you to access
Contents. Introduction. Getting Started. Navigating your Device. Customizing the Panels. Pure Android Audio. E-Books. Browsing the Internet
 Contents Introduction Getting Started Your Device at a Glance Charging Assembling the Power Adapter Turning On/Off, Unlocking Setting to Sleep and Waking Up Connecting to a Computer Navigating your Device
Available applications and services are subject to change at any time.
 Available applications and services are subject to change at any time. Table of Contents Get Started 1 Your Phone at a Glance 1 Set Up Your Phone 2 Set Up Voicemail 3 Support Services 3 Phone Basics 5
DASH 4.5 user manual 1
 DASH 4.5 user manual 1 Table of Contents Safety Information... 3 Appearance and Key Function... 4 Introduction... 4 Call Functions... 6 Contacts... 6 Messaging... 8 Internet Browser... 9 Bluetooth... 10
User Manual. LTE GSM/WCDMA Smartphone. S80 Lite
 User Manual LTE GSM/WCDMA Smartphone S80 Lite 1 Contents Let s get started Getting to know your phone Key definitions Screen control Open and switch applications Home Screen Switch to sleep mode Wake up
QUICK START GUIDE. lgusa.com/optimusu 1. Make a Phone Call/ Send a Message Manage Contacts Customize Your Phone Adjust Sound Settings Set Up Gmail
 Make a Phone Call/ Send a Message Manage Contacts Customize Your Phone Adjust Sound Settings Set Up Gmail QUICK START GUIDE Set Up Email Download an App Manage Settings Use Google Voice Actions Bluetooth
Sprint Flash User Guide
 Sprint Flash User Guide 2012 Sprint. Sprint and the logo are trademarks of Sprint. Other marks are trademarks of their respective owners. Table of Contents Get Started... 1 Your Phone at a Glance... 1
Aero. Quickstart. Important Icons
 Important Icons Icon Description AGPS is available Missed call Outgoing call Silent mode is enabled Vibrate mode is enabled Battery charge level is 60% Battery is charging Icon Description Wi-Fi is in
Contents. Foreword Unboxing your Phone. Getting Started. Screen and Display. Network and Sharing. Security and Backup
 User Guide Contents Foreword Unboxing your Phone Getting Started Screen and Display Network and Sharing Security and Backup Inserting a SIM card and microsd card 2 Charging your device 2 Quick charging
This guide describes features that are common to most models. Some features may not be available on your tablet.
 User Guide Copyright 2013 Hewlett-Packard Development Company, L.P. Bluetooth is a trademark owned by its proprietor and used by Hewlett-Packard Company under license. Google is a trademark of Google Inc.
Get. Started. All you need to know to get going.
 Get Started All you need to know to get going. Special note for Sprint As You Go customers With Sprint As You Go you can free yourself from long-term contracts and enjoy more wireless flexibility. Some
REFERENCE: ASCEND G7 BLANC CODIC:
 TCO MARQUE: HUAWEI REFERENCE: ASCEND G7 BLANC CODIC: 4066731 EN ANGLAIS PROVISOIREMENT G7 User Guide Contents Foreword First-class functions 2 Safe 2 Taking a photo before focusing the camera 3 Launching
Contents. Foreword First-class functions... 2 Easy Key... 2 Safe... 2 Launching the camera from gallery... 3 QR code... 3
 User Guide Contents Foreword... 1 First-class functions... 2 Easy Key... 2 Safe... 2 Launching the camera from gallery... 3 QR code... 3 Getting started... 4 Your phone at a glance... 4 Key functions at