Models: LS6215/LS6215-2/LS User s manual. w w w.v t e c h p h o n e s. c o m
|
|
|
- Maryann Wood
- 5 years ago
- Views:
Transcription
1 Models: LS6215/LS6215-2/LS User s manual w w w.v t e c h p h o n e s. c o m
2 Congratulations on purchasing your new VTech product. Before using this telephone, please read the Important safety instructions on page 35 of this manual. This manual has all the feature operations and troubleshooting necessary to install and operate your new VTech telephone. Please review this manual thoroughly to ensure proper installation and operation of this innovative and feature rich VTech product. For support, shopping, and everything new at VTech, visit our website at In Canada, please visit The ENERGY STAR program ( recognizes and encourages the use of products that save energy and help protect our environment. We are proud to mark this product with the ENERGY STAR label indicating it meets the latest energy efficiency guidelines.
3 Table of contents Getting started...1 Parts checklist...1 Telephone base and charger installation...2 Battery installation and charging...3 Handset layout...4 Telephone base layout...5 Telephone settings...6 Ringer volume...6 Ringer tone...6 Key tone...6 LCD language...7 Set date/time...7 Clear voic ...8 Home area code...8 Telephone operation...9 Make a call...9 Make a predial call...9 Answer a call...9 End a call...9 Speakerphone...9 Volume...9 Mute...10 Ringer mute...10 Call waiting...10 Find handset...10 Chain dialing...11 Multiple handset use...12 Intercom...12 Answer an incoming call during an intercom call...12 Share an outside call...13 Directory...14 Store a directory entry...15 Character chart...16 Search the directory...17 Alphabetical search...17 Dial a directory entry...17 Edit a directory entry...18 Delete from the directory...18 About caller ID...19 Call log...20 Missed calls indicator...20 Review the call log...21 Make a call log entry ready to dial...21 Dial a call log entry...21 Save a call log entry to the directory...22 Delete from the call log...22 Call log display screen messages...23 Redial list...23 Dial a redial entry...23 Delete from redial...23 Appendix...24 Handset display screen messages...24 Handset and telephone base indicators...26 Battery...27 Expand your telephone system...28 Add and register a handset (optional)...28 Replace a handset...29 Troubleshooting...30 Important safety instructions...35 Operating range...36 Maintenance...36 About cordless telephones...37 The RBRC seal...37 Warranty...38 FCC, ACTA and IC regulations...40 Technical specifications...42 Index...43 i
 Telephone base Charger and charger adapter (1 for LS6215-2 and 2 for LS6215-3) Telephone line cord Telephone base power adapter Battery (1")
4 Getting started Parts checklist Your telephone contains the following items. Save your sales receipt and original packaging in the event warranty service is necessary. Handset (1 for LS6215, 2 for LS and 3 for LS6215-3) Telephone base Charger and charger adapter (1 for LS and 2 for LS6215-3) Telephone line cord Telephone base power adapter Battery (1 for LS6215, 2 for LS and 3 for LS6215-3) Battery compartment cover (1 for LS6215, 2 for LS and 3 for LS6215-3) User s manual To purchase replacement batteries or power adapters, visit our website at or call 1 (800) In Canada, go to www. vtechcanada.com or call 1 (800)

5 Getting started Telephone base and charger installation Install the telephone base and charger(s) as shown below. The telephone base is designed for tabletop use only. Make sure that the electrical outlet is not controlled by a wall switch. If you subscribe to digital subscriber line (DSL) high-speed Internet service through your telephone line, you must install a DSL filter between the telephone line cord and the telephone wall jack. The filter prevents noise and caller ID problems caused by DSL interference. Contact your DSL service provider for more information about DSL filters. Telephone base power adapter Electrical outlet not controlled by a wall switch Telephone wall jack If you have DSL high speed Internet service, a DSL filter (not included) is required. Electrical outlet not controlled by a wall switch Charger adapter Telephone line cord Telephone base Charger Use only the power adapters supplied with this product. To order a replacement, visit our website at or call 1 (800) In Canada, go to or call 1 (800) The power adapters are intended to be correctly oriented in a vertical or floor mount position. The prongs are not designed to hold the plug in place if it is plugged into a ceiling or an under-the-table/cabinet outlet. 2


. To keep the battery charged, place it in the telephone base or charger when not in use.")
6 Getting started Battery installation and charging Install the battery as shown below. After installing the battery, you might be able to make and receive short calls. For best performance, charge the handset for at least 16 hours before use. When not in use, place the handset in the telephone base or charger. See page 27 for battery operating times. Battery indicators Battery status Action The screen is blank. The screen shows PLACE IN CHARGER and flashes. The screen shows LOW BATTERY, flashes, and the handset beeps. The screen shows HANDSET X Battery has no charge and the handset cannot be used. Battery has very little charge and the handset cannot be used. Battery has enough charge to be used for a short time. Battery is charged. Charge until the screen shows LOW BATTERY (at least 10 minutes). Charge until the screen shows LOW BATTERY (about four minutes). Charge until the screen shows HANDSET X (about one hour). To keep the battery charged, place it in the telephone base or charger when not in use. If the battery compartment cover is on the handset, press the indentation and slide the cover to remove. Plug the battery connector securely into the socket inside the handset battery compartment, matching the color-coded label. Place the battery with the label THIS SIDE UP facing up and the wires inside the battery compartment. Align the cover flat against the battery compartment, then slide it towards the center of the handset until it clicks into place. Charge the handset by placing it in the telephone base or charger. The CHARGE light is on when the handset charges CHARGE light When the screen shows LOW BATTERY, the backlight is off. If the handset will not be used for a long time, disconnect and remove the battery to prevent possible leakage. To purchase replacement batteries, visit our website at com or call 1 (800) In Canada, go to or call 1 (800)
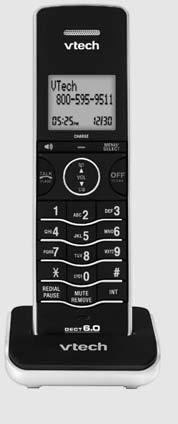
7 Getting started Handset layout CHARGE light On when the handset is charging in the telephone base or charger (page 3). / VOLp (Directory) Press to enter the directory when the telephone is not in use (page 17). While in a menu, press to scroll up. During a call, press to raise the listening volume (page 9). (Speakerphone) Press to switch between speakerphone and handset (page 9). Press to make or answer a call (page 9). During a call, press to receive an incoming call when you receive a call waiting alert (page 10). 1 While reviewing a call log entry, press repeatedly to add or remove 1 in front of the telephone number before dialing or saving it in the directory (page 21). REDIAL/PAUSE Press to review the redial list (page 23). While dialing or entering numbers into the directory, press and hold to insert a dialing pause (page 15). 4 CID / VOL (caller ID) Press to review the call log when the telephone is not in use (page 21). While in a menu, press to scroll down. During a call, press to lower the listening volume (page 9). MENU/SELECT Press to show the menu. While in a menu, press to select an item, or save an entry or setting. OFF/CLEAR During a call, press to hang up (page 9). While the handset is ringing, press to silence the ringer temporarily (page 10). Press and hold while the telephone is not in use to erase the missed calls indicator (page 20). During programming, press to exit without making changes. # Press repeatedly to show other dialing options when reviewing a call log entry (page 21). INT (intercom) Press to initiate an intercom conversation or transfer a call (page 12). MUTE/REMOVE While on a call, press to mute the microphone (page 10). While reviewing the call log, directory or redial list, press to delete an individual entry (page 22, page 18 and page 23 respectively). Press to delete digits when predialing (page 9).
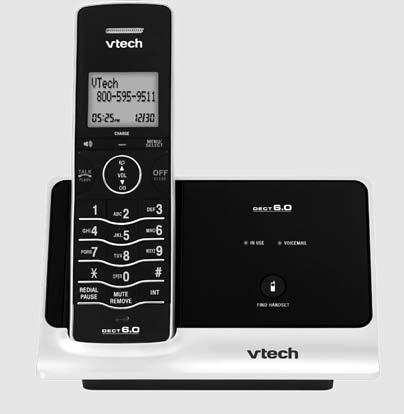
8 Getting started Telephone base layout VOIC light Flashes when you have new voic , a service offered by your telephone company. FIND HANDSET Press to page all system handsets. IN USE light Flashes when there is an incoming call, or another telephone sharing the same line is in use. On when the handset is in use. Clean your telephone only with a dry non-abrasive cloth. Using a dampened cloth or cleaning solvents of any kind might activate the buttons on the telephone base. If you unplug the telephone before cleaning, remember to reset the clock when done. 5
9 Telephone settings Ringer volume You can set the ringer volume or turn the ringer off. 1. Press MENU/SELECT to show the menu when the handset is not in use. 2. Press or to select >RINGER VOLUME, then press MENU/SELECT. 3. Press or to adjust the volume. A sample of each ringer volume plays as you scroll through the choices. 4. Press MENU/SELECT to confirm your selection. >RINGER VOLUME RINGER TONE RINGER VOLUME Setting the volume to the lowest level turns off the ringer. A ringer off icon appears. Ringer tone You can choose from different ringer tones. 1. Press MENU/SELECT to show the menu when the handset is not in use. 2. Press or to select >RINGER TONE, then press MENU/SELECT. 3. Press or to select the desired ringer tone. A sample of each ringer tone plays as you scroll through the choices. 4. Press MENU/SELECT to confirm your selection. >RINGER TONE KEY TONE RINGER TONE 1 If you turn off the ringer volume, you will not hear ringer tone samples. Key tone You can turn the key tone on or off. 1. Press MENU/SELECT to show the menu when the handset is not in use. 2. Press or to select >KEY TONE, then press MENU/SELECT. 3. Press or to choose ON or OFF. 4. Press MENU/SELECT to confirm your selection. >KEY TONE LCD LANGUAGE KEY TONE ON 6
10 Telephone settings LCD language You can select ENGLISH, FRANÇAIS or ESPAÑOL to be used in all screen displays. 1. Press MENU/SELECT to show the menu when the handset is not in use. 2. Press or to select >LCD LANGUAGE, then press MENU/SELECT. 3. Press or to scroll through the choices. 4. Press MENU/SELECT to confirm your selection. >LCD LANGUAGE SET DATE/TIME LCD LANGUAGE ENGLISH Set date/time If you subscribe to caller ID service, the day, month and time are set automatically with each incoming call. To set the date and time manually: Press MENU/SELECT to show the menu when the handset is not in use. Press or to select >SET DATE/TIME, then press MENU/SELECT. Press the dialing keys (0-9) to enter a two-digit number or press or until the screen displays the correct value. Press MENU/SELECT to advance. Repeat step 3 until the date and time are set. >SET DATE/TIME CLR VOIC SET DATE 12/25/08 SET TIME 03:18 AM 7
11 Telephone settings Clear voic If you subscribe to voic service offered by your telephone company, NEW VOIC and appear on the handset, and the VOIC light on the telephone base flashes when you have new voic messages. Contact your local telephone company for more information and assistance about using your voic service. After you have listened to all new voic messages, the indicators on both the handset and telephone base turn off automatically. Use the clear voic feature when the telephone indicates that there is new voic but there is none (for example, when you have accessed your voic while away from home). Clearing the voic waiting indicator only turns off the indicators; it does not delete your voic messages. As long as you have new voic messages, your local telephone company continues to send the signal to turn on the indicators. >CLR VOIC To manually turn off these indicators: HOME AREA CODE 1. Press MENU/SELECT to show the menu when the handset is not in use. 2. Press or to select >CLR VOIC , then TURN OFF press MENU/SELECT. The screen shows TURN OFF INDICATOR? INDICATOR? 3. Press MENU/SELECT to confirm your selection. Your telephone service provider might alert you to new messages with a stutter (broken) dial tone. Contact your service provider for details. Home area code If you dial your local calls using only seven digits (area code not required), you can program your home area code so that when you receive a call within your local area, the telephone number is automatically stored without the area code in the call log. 1. Press MENU/SELECT to show the menu when the handset is not in use. 2. Press or to select >HOME AREA CODE, then press MENU/SELECT. The stored home area code appears with the last digit flashing. 3. Use the dialing keys to enter the desired home area code. 4. Press MUTE/REMOVE to delete a digit. Press and hold MUTE/REMOVE to delete the entire entry. Press MENU/SELECT to confirm. 8 >HOME AREA CODE DIRECTORY HOME AREA CODE 800 If, in the future, your telephone company requires you to dial the area code when making a local call, delete the home area code you have already programmed by pressing MUTE/REMOVE. After you have deleted the programmed home area code, appears.
.")
, press MUTE/REMOVE or OFF/CLEAR to backspace and delete; press and")

12 Telephone operation Make a call 1. Press or. You hear a dial tone. 2. Dial the number. Predial a call 1. Dial the number. 2. Press or. Answer a call Press, or any of the dialing keys (0-9, #, *). The screen shows the elapsed time as you talk (in hours, minutes and seconds). When predialing (preview numbers before dialing), press MUTE/REMOVE or OFF/CLEAR to backspace and delete; press and hold REDIAL/PAUSE to insert a dialing pause (a p appears). End a call Press OFF/CLEAR or put the handset in the telephone base or charger. Speakerphone During a call, press use. to switch between speakerphone and normal handset Volume During a call, press VOL or VOL to adjust the listening volume. 9


13 Telephone operation Mute The mute function allows you to hear the other party but the other party cannot hear you. 1. During a call, press MUTE/REMOVE on the handset. The handset screen shows MUTED for a few seconds and MUTE appears until mute function is turned off. 2. Press MUTE/REMOVE again to resume the conversation. The handset screen temporarily shows MICROPHONE ON. Ringer mute When the telephone is ringing, press OFF/CLEAR or MUTE/REMOVE to temporarily silence the ringer without disconnecting the call. The next call rings normally. PHONE 0:00:00 MUTED MUTE RINGER MUTE Call waiting If you subscribe to call waiting service from your telephone company, you hear an alert tone if there is an incoming call while you are on another call. Press to put your current call on hold and take the new call. Press at any time to switch back and forth between calls. Find handset Use this feature to page all system handsets. 1. Press FIND HANDSET on the telephone base. All idle handsets ring and the screens show ** PAGING **. 2. To end paging, press,, any dialing keys (0-9, #, *), or press FIND HANDSET on the telephone base. 10
14 Telephone operation Chain dialing Use this feature to initiate a dialing sequence from numbers stored in the directory, call log or redial while you are on a call. Chain dialing can be useful if you wish to access other numbers (such as bank account information or access codes) from the directory, call log or redial list. To access a number in the directory while on a call: 1. Press MENU/SELECT twice to select >DIRECTORY. 2. Scroll to the desired entry by pressing or. 3. Press MENU/SELECT to dial the displayed number. To access a number in the call log while on a call: 1. Press MENU/SELECT and then press to highlight >CALL LOG. 2. Press MENU/SELECT to select. 3. Scroll to the desired entry by pressing or. 4. Press MENU/SELECT to dial the displayed number. To access the last number on the redial list while on a call: Press REDIAL/PAUSE to dial. Press REDIAL/PAUSE again within two seconds to cancel the chain dialing. You cannot edit a directory entry while on a call. For more details about the directory, see page 14. You cannot copy a call log entry into the directory while on a call. For more details about call log, see page 20. If you press REDIAL/PAUSE while on a call, you can only view the most recent call, and you cannot erase the entry. For more details about the redial memory, see page 23. Press and hold OFF/CLEAR to exit redial, directory or call log when you are on a call. 11
15 Telephone operation Multiple handset use You can use up to two system handsets at a time on an outside call. If a handset is already on a call and you would like to join the call, press or on another handset to join the call. To end the call, press OFF/CLEAR or place the handset in the telephone base or charger. The call will not be terminated until all handsets hang up. You can buy additional expansion handsets (model LS6205) for this telephone base. You can register up to 12 handsets to the telephone base. The first nine handsets that you register are named HANDSETS 1-9. Use the handset number to intercom and transfer calls. Although the names for handsets appear in their displays as 10-12, when you intercom or transfer to one of them, you must use *0 for HANDSET 10, *1 for HANDSET 11, and *2 for HANDSET 12. Intercom Use the intercom feature for conversation between two system handsets. 1. Press INT on your handset when not in use. If you have a two-handset system, your handset screen shows CALLING OTHER HANDSET. If you have more than two handsets, your screen shows INTERCOM TO:. Use the dialing keys to select the other handset. Your handset screen shows CALLING HANDSET X The other handset rings and its screen shows either OTHER HANDSET IS CALLING or HANDSET X IS CALLING. To answer the intercom call, press,, INT, or any dialing keys (0-9, #, *) on the other handset. Both handsets now show INTERCOM. To end an intercom call, press INT, OFF/CLEAR, or place the handset back in the telephone base or charger. INTERCOM TO: CALLING OTHER HANDSET OTHER HANDSET IS CALLING INTERCOM You can cancel the intercom call before it is answered by pressing OFF/CLEAR or INT on your originating handset. If the other handset does not answer the intercom call within 100 seconds, is in the directory or call log, or is out of range, your originating handset screen shows UNABLE TO CALL TRY AGAIN and returns to idle mode. Press OFF/CLEAR or MUTE/REMOVE on the other handset to temporarily silence the intercom ringer. You can use a maximum of four handsets at a time. When two handsets are used on an intercom call, use two other system handsets for an outside call. Answer an incoming call during an intercom call When you receive an incoming outside call during an intercom call, there is an alert tone. To answer the call, press. The intercom call ends automatically. To end the intercom call without answering the incoming call, press OFF/CLEAR. 12
16 Telephone operation Share an outside call You can call another system handset to join an outside call. That call continues even if you hang up. 1. During a call, press INT. The other handset rings. The outside call is put on hold. If you have a two-handset system, your handset screen shows CALLING OTHER HANDSET. The other handset rings and its screen shows OTHER HANDSET IS CALLING. If you have more than two handsets, your screen shows TRANSFER TO:. Use the dialing keys to select the other handset. Your screen then shows CALLING HANDSET X. The other handset rings and its screen shows HANDSET X IS CALLING. 2. To answer the call on the other handset, press,, INT, or any dialing keys (0-9, #, *). The outside call is still on hold and both handsets now show INTERCOM. You can now have a private conversation between the system handsets. TRANSFER TO: CALLING HANDSET X HANDSET X IS CALLING INTERCOM If you want to cancel an intercom call and reconnect to the outside call before the other handset answers, press, or INT on your originating handset. If the other handset does not answer the intercom call within 100 seconds, is in the directory or call log, or is out of range, your originating handset screen shows UNABLE TO CALL TRY AGAIN and reconnects to the outside call automatically. 3. From this intercom call, you have the following options: You can let the other handset join you on the outside call in a three-way conversation. Press and hold INT on your originating handset. You can transfer the call. Press OFF/CLEAR, or place your handset back in the telephone base or charger. Your screen shows CALL TRANSFERED. The other handset is automatically connected to the outside call. You can alternate between the outside call (OUTSIDE CALL appears on the screen) and the intercom call (INTERCOM appears on the screen). Press INT repeatedly on your originating handset. The other person can leave the intercom call by pressing OFF/CLEAR, or placing the other handset back in the telephone base or charger. The outside call continues with the original system handset. 13
17 Telephone operation Directory The directory can store up to 50 entries with up to 30 digits for each phone number and 15 characters for each name. Directory entries are shared by all system handsets. Any additions, deletions or edits made on one handset affect the directory on all handsets. When there are no records in the directory, the screen shows DIRECTORY EMPTY. When the directory is full and you try to save an entry, the screen shows LIST FULL. If you try to save a number already stored in the directory, the screen shows ALREADY SAVED. If the telephone number in the directory exceeds 15 digits, <* appears in front of the telephone number. Press * to move towards the end of the telephone number or press # to move towards the beginning of the telephone number. ELIZABETH JONES <* #> Only one handset can review the directory at a time. If a handset tries to enter the directory while another handset is already in it, NOT AVAILABLE AT THIS TIME appears. DIRECTORY EMPTY LIST FULL ALREADY SAVED ELIZABETH JONES <* ELIZABETH JONES #> 14
18 Telephone operation Store a directory entry Use the following steps to store an entry in the directory. 1. Press MENU/SELECT when the handset is not in use. 2. Press or to select >DIRECTORY and then press MENU/SELECT. 3. Press or to select >STORE, then press MENU/SELECT. The screen shows ENTER NUMBER. 4. Use the dialing keys to enter the number. 5. Press MUTE/REMOVE to backspace and erase a digit. Press and hold MUTE/REMOVE to erase the entire entry. Press to move the cursor to the left or to the right. Press and hold REDIAL/PAUSE to insert a dialing pause (a p appears). - OR- Copy a number from the redial list by pressing REDIAL/PAUSE and then, or REDIAL/PAUSE to select a number. Press MENU/SELECT to copy the number. Press MENU/SELECT to move to the name. The screen shows ENTER NAME. Use the dialing keys (see page 16) to enter the name. 6. Press MUTE/REMOVE to backspace and erase a character. Press and hold MUTE/REMOVE to erase the entire entry. Press to move the cursor to the left or to the right. 7. Press MENU/SELECT to confirm. >DIRECTORY CALL LOG >STORE REVIEW ENTER NUMBER ENTER NAME 15
19 Telephone operation Character chart Use the dial pad and the chart below to enter a name (up to 15 characters). Each press of a particular key causes the characters to be displayed in the following order: Characters by number of key presses Number key #,, -. & 2 A B C 2 a b c 3 D E F 3 d e f 4 G H I 4 g h i 5 J K L 5 j k l 6 M N O 6 m n o 7 P Q R S 7 p q r s 8 T U V 8 t u v 9 W X Y Z 9 w x y z 0 0 * *?! / ( # space When entering a name in the directory, the first letter of each word is automatically capitalized. 16
20 Telephone operation Search the directory Entries are sorted alphabetically. To search the directory: 1. Press when the handset is not in use. -OR- Press MENU/SELECT when the handset is not in use. Press or to select >DIRECTORY and then press MENU/SELECT twice. 2. Press or to browse. >REVIEW STORE VTECH Alphabetical search To start an alphabetical search: 1. Press when the handset is not in use. -OR- Press MENU/SELECT when the handset is not in use. Press or to select >DIRECTORY and then press MENU/SELECT twice. 2. Use the dialing keys to enter the letters associated with the name. For example, if you have name entries Jenny, Kristen and Linda in your directory, press 5 (JKL) once to find Jenny, twice to find Kristen, or three times to find Linda. If there is no name entry matching your search, the next closest match in alphabetical order appears. If necessary, use or to browse. Dial a directory entry 1. Press when the handset is not in use. -OR- Press MENU/SELECT when the handset is not in use. Press or to select >DIRECTORY and then press MENU/SELECT twice. 2. Press or, or use the alphabetical search to browse. 3. Press or. 17
21 Telephone operation Edit a directory entry Use the following steps to edit an entry in the directory. 1. Press when the handset is not in use. -OR- Press MENU/SELECT when the handset is not in use. Press or to select >DIRECTORY and then press MENU/SELECT twice. Press or, or use the alphabetical search to browse (see page 17) Press MENU/SELECT to select an entry. The screen shows EDIT NUMBER. Use the dialing keys to edit the number. Press MUTE/REMOVE to backspace and erase a digit. Press and hold MUTE/REMOVE to erase the entire entry. Press to move the cursor to the left or to the right. Press and hold REDIAL/PAUSE to insert a dialing pause (a p appears). Press MENU/SELECT to move to the name. The screen shows EDIT NAME. Use the dialing keys (see page 16) to edit the name. Press MUTE/REMOVE to backspace and erase a character. Press and hold MUTE/REMOVE to erase the entire entry. Press to move the cursor to the left or to the right. Press MENU/SELECT to save. EDIT NUMBER _ EDIT NAME VTECH_ Delete from the directory 1. Press when the handset is not in use. -OR- Press MENU/SELECT when the handset is not in use. Press or to select >DIRECTORY and then press MENU/SELECT twice. 2. Press or, or use the alphabetical search to browse. 3. Press MUTE/REMOVE to remove the selected entry. 18
22 Telephone operation About caller ID You can use this telephone with regular caller ID service or combined caller ID with call waiting. You can use the telephone s other features without subscribing to caller ID services. There might be fees for caller ID services and these services might not be available in all areas. Depending on your service, you might see the caller s number or the caller s name and number. The time and date are sent by the telephone company along with the call information. This product can provide caller ID information only if both you and the caller are in areas offering caller ID service and if both telephone companies use compatible equipment. Caller ID with call waiting lets you see the name and telephone number of the caller before answering the telephone, even while on another call. It might be necessary to change your telephone service to use caller ID with call waiting features. Contact your telephone company if: You have both caller ID and call waiting, but as separate services (you might need combined service). You have only caller ID service, or only call waiting service. You do not subscribe to any caller ID or call waiting services, but wish to order them. 19
23 Telephone operation Call log If you subscribe to caller ID service, information about each caller appears after the first or second ring. If you answer a call before the caller information appears on the screen, it will not be saved in the call log. The call log stores up to 50 entries. Each entry has up to 24 digits for the phone number and 15 characters for the name. If the phone number has more than 15 digits, only the last 15 digits appear. If the name has more than 15 characters, only the first 15 characters are shown and saved in the call log. You can review, redial, and copy an entry into the directory. Entries appear in reverse chronological order. When the call log is full, the oldest entry is deleted to make room for new incoming call information. XX MISSED CALL(S) shows when there are new call log entries (including missed and unreviewed calls). CALL LOG EMPTY shows when there are no records in the call log. Only one handset can review the call log at a time. If a handset tries to enter the call log while another handset is already in it, NOT AVAILABLE AT THIS TIME appears. HANDSET X XX MISSED CALLS CALL LOG EMPTY The caller ID information might not be available for every incoming call. The callers might intentionally block their names and/or telephone numbers. For call log entries with numbers between 16 and 24 digits, in order to view the entire number, you must save the entry to the directory (see page 22). If the phone number has more than 24 digits, it is not saved or shown in the call log. Missed calls indicator When there are unreviewed calls in the call log, the handset shows XX MISSED CALL(S). Each time you review a call log entry marked NEW, the number of missed calls decreases by one. When you have reviewed all the missed calls, the missed calls indicator no longer shows. If you do not want to review the missed calls one by one, press and hold OFF/CLEAR to erase the missed calls indicator. All the entries are then considered old and kept in the call log. HANDSET X XX MISSED CALLS VTECH NEW 3:45 AM 1/02 20
24 Telephone operation Review the call log 1. Press CID when the handset is not in use. 2. Press or to browse through the call log. -OR- 1. Press MENU/SELECT when the handset is not in use. 2. Press or to select >CALL LOG, then press MENU/SELECT. 3. Press or to select >REVIEW, then press MENU/SELECT. 4. Press or to browse through the call log. VTECH :45 AM 1/02 >CALL LOG RINGER VOLUME The name (if available), telephone number, date and time of all incoming calls are shown on the screen. You hear a double beep when the list reaches the beginning or end of the call log. Make a call log entry ready to dial Although the call log entries received have 10 digits (the area code plus the seven-digit number), in some areas, you might need to dial only the seven digits, or 1 plus the seven digits, or 1 plus the area code plus the seven digits. You can change the number of digits that you dial from the call log and store to the directory. While reviewing the call log, press # repeatedly to show different dialing options for local and long distance numbers before dialing or saving the telephone number in the directory. Press 1 repeatedly if you need to add or remove 1 in front of the telephone number before dialing or saving it in the directory. When the number is shown in the correct format for dialing, press or to call the number. Dial a call log entry 1. When in the call log, press or to browse. 2. Press or to dial the entry
25 Telephone operation Save a call log entry to the directory 1. When in the call log, press or to browse. 2. Press MENU/SELECT to select an entry. The screen displays EDIT NUMBER. 3. Use the dialing keys to edit the number Press MUTE/REMOVE to backspace and erase a digit. Press and hold MUTE/REMOVE to erase the entire entry. Press to move the cursor to the left or to the right. Press and hold REDIAL/PAUSE to insert a dialing pause (a p appears). Press MENU/SELECT to move to the name. The screen displays EDIT NAME. Use the dialing keys (see page 16) to edit the name. Press MUTE/REMOVE to backspace and erase a character. Press and hold MUTE/REMOVE to erase the entire entry. Press to move the cursor to the left or to the right. Press MENU/SELECT to save. If the entry is already saved in the directory, the handset shows ALREADY SAVED. If there is no caller ID information, the handset shows UNABLE TO SAVE. Delete from the call log To delete one entry: 1. When in the call log, press or to browse. 2. Press MUTE/REMOVE to delete the selected entry. To delete all entries: 1. Press MENU/SELECT when the handset is not in use. 2. Press or to select >CALL LOG, then press MENU/SELECT. 3. Press or to select >DEL ALL CALLS, then press 4. MENU/SELECT. The screen shows DELETE ALL CALLS? Press MENU/SELECT to confirm. EDIT NUMBER _ EDIT NAME VTECH_ DELETE ALL CALLS? 22

26 Telephone operation Call log display screen messages Displays PRIVATE NAME PRIVATE NUMBER PRIVATE CALLER UNKNOWN NAME UNKNOWN NUMBER UNKNOWN CALLER LONG DISTANCE OR L (before the caller s number) When The caller is blocking the name. The caller is blocking the telephone number. The caller is blocking the name and number. This caller s name is unavailable. This caller s number is unavailable. No information is available about this caller. It is a long distance call. Redial list The telephone stores the five most recently dialed numbers. When there are already five entries, the oldest entry is deleted to make room for the new entry. Entries are shown in reverse chronological order. Press REDIAL/PAUSE to browse the redial list. Dial a redial entry 1. Press REDIAL/PAUSE, then, or REDIAL/PAUSE to browse. You hear a double beep when it reaches the beginning or end of the redial list. 2. Press or to dial the number. Delete from redial 1. Press REDIAL/PAUSE, then, or REDIAL/PAUSE to browse. 2. Press MUTE/REMOVE to delete the selected entry. 23
27 Appendix Handset display screen messages ALREADY SAVED CALL LOG EMPTY CALLING HANDSET X (for models with three or more handsets) CALLING OTHER HANDSET (for models with two handsets) CONNECTING... CHARGING DIRECTORY EMPTY ENDED HANDSET X IS CALLING (for models with three or more handsets) OTHER HANDSET IS CALLING (for models with two handsets) INCOMING CALL INT REQUIRES TWO HANDSETS INTERCOM INTERCOM ENDED LINE IN USE LIST FULL LOW BATTERY MICROPHONE ON MUTED NEW VOIC The telephone number entered is already stored in the directory. There are no call log entries. Calling another handset. The cordless handset is searching for the telephone base. The handset with low battery is recharging. There are no directory entries. You have just ended a call. Another system handset is calling. There is an incoming call. Two handsets are required for an intercom call. The handset is on an intercom call. You have just ended an intercom call. A system handset or another telephone on the same line is in use. The directory is full. The battery needs to be recharged. MUTE is turned off and the person on the other end can hear you. You have turned off the handset microphone. The other party cannot hear you but you can hear the other party. There are new voic messages from your telephone company. 24
28 Appendix Handset display screen messages NO LINE NO SIGNAL, CALL ENDED NOT AVAILABLE AT THIS TIME OUTSIDE CALL **PAGING** PHONE PLACE IN CHARGER RINGER MUTE SAVED SPEAKER UNABLE TO CALL TRY AGAIN UNABLE TO SAVE XX MISSED CALLS There is no telephone line connected. Communication between handset and telephone base is lost during a call. One handset is already viewing the call log or directory and another handset attempts to review it. Connected to the external call during call transfer. The cordless handset locator is activated. The handset is on a call. The battery is very low. Place the handset in the telephone base or charger for recharging. The ringer is muted temporarily during an incoming call. Your selection has been saved. The handset speakerphone is in use. You have attempted to make an intercom call, but the handset you are calling is in the directory, in the call log, out of range or on an outside call. You are attempting to save a caller ID entry with no name or number. There are unreviewed calls in your call log. 25
29 Appendix Handset and telephone base indicators Handset lights On when the handset speakerphone is in use. CHARGE On when the handset is charging in the telephone base or charger. Telephone base lights IN USE VOIC Flashes when there is an incoming call or another telephone sharing the same line is in use. On when the handset is in use. Flashes when you have new voic from your telephone company. Handset icons (Battery indicator) SPEAKER Cycles (low, medium, and full) when the handset battery is charging. Flashes when the battery is low and needs charging. Solid when the battery is fully charged. Speakerphone is in use. Handset ringer off. NEW VOIC New voic received from the telephone company. NEW MUTE New call log entries. Microphone is muted. 26
30 Appendix Battery It takes up to 16 hours for the battery to be fully charged. When it is fully charged, you can expect the following performance: Operation While in handset use (talking*) While in speakerphone mode (talking*) Operating time Up to eight hours Up to five hours While not in use (standby**) Up to six days *Operating times vary depending on your actual use and the age of the battery. **Handset is not charging or in use. The battery needs charging when: A new battery is installed in the handset. The handset beeps. A battery is properly installed and the screen is blank. LOW BATTERY or PLACE IN CHARGER shows on the handset screen. CAUTION: To reduce the risk of fire or injury, read and follow these instructions: Use only the battery(ies) provided or equivalent. To order a replacement, visit our website at or call 1 (800) In Canada, go to or call 1 (800) Do not dispose of the battery(ies) in a fire. Check with local waste management codes for special disposal instructions. Do not open or mutilate the battery(ies). Released electrolyte is corrosive and might cause burns or injury to the eyes or skin. The electrolyte might be toxic if swallowed. Exercise care in handling batteries in order not to create a short circuit with conductive materials. Charge the battery(ies) provided with or identified for use with this product only in accordance with the instructions and limitations specified in this manual. Observe proper polarity orientation between the battery and metallic contacts. To prevent fire or shock hazard, do not expose this product to water or any type of moisture. 27

31 Appendix Expand your telephone system The handsets provided with your telephone system are pre-registered. Each handset is assigned a number that shows on the handset display. Additional handsets registered to the telephone system are assigned in sequential order. For instance, if the telephone system already has HANDSET 1 and HANDSET 2, the new registered handset is assigned HANDSET 3. This telephone system accommodates up to 12 handsets. Add and register a handset (optional) You can add new handsets (LS6205, purchased separately) to your telephone system, but each handset must be registered with the telephone base before use. When first purchased, each expansion handset shows NOT REGISTERED. You may need to charge the handset before registering to the telephone base. For more details on battery charging, see the table on page 3. To register a handset: 1. Place the unregistered handset in the telephone base or charger. If PRESS FIND HS 4 SEC ON BASE does not appear on the handset screen after a few seconds, remove the handset and place it in the telephone base or charger again. 2. On the telephone base, press and hold FIND HANDSET for about four seconds (until the red IN USE light on the telephone base turns on) and then release the button. The handset shows PLEASE WAIT... and it takes about 10 seconds to complete the registration. The handset shows HANDSET X REGISTERED (X represents the handset number assigned) and you hear a beep when the registration completes. If the registration fails, the handset shows NOT REGISTERED. To reset the handset, remove the handset from the telephone base and place it back in. Try the registration process again. You cannot register a handset if any other system handset is in use. 28
32 Appendix Replace a handset If you want to replace a handset or re-assign the designated handset number of a registered handset, you must de-register all the handsets and then individually register each handset. To make de-registration easier, read all of the instructions on this page before you begin. To de-register all handsets: 1. Press and hold FIND HANDSET on the telephone base for about 10 seconds (until the IN USE light on the telephone base turns on and starts to flash), then release FIND HANDSET. 2. Press and release FIND HANDSET again. You must press FIND HANDSET while the IN USE light is still flashing. The IN USE light flashes for approximately seven seconds. 3. All system handsets show CONNECTING... The de-registration process takes about 10 seconds to complete. All handsets show NOT REGISTERED when the de-registration completes. If de-registration fails, you might need to reset the telephone and try again. To reset: 1. Pick up the registered handset and then press. 2. Press OFF/CLEAR and place the handset back in the telephone base. -OR- 1. Unplug the power from the telephone base, then plug it back in. You cannot de-register a handset if any system handset is in use. 29
33 Appendix Troubleshooting If you have difficulty with your telephone, please try the suggestions below. For Customer Service, visit our website at or call 1 (800) ; in Canada, call 1 (800) My telephone does not work at all. Make sure the battery is installed and charged correctly (page 3). For optimum daily performance, return the handset to the telephone base or charger after use. Make sure the power adapter is securely plugged into an outlet not controlled by a wall switch. Make sure the telephone line cord is plugged firmly into the telephone base and the telephone wall jack. Unplug the electrical power to the telephone base. Wait for approximately 15 seconds, then plug it back in. Allow up to one minute for the cordless handset and telephone base to synchronize. Charge the battery in the handset for up to 16 hours. If the battery is completely depleted, it can take up to 10 minutes to charge the handset before LOW BATTERY appears on the screen (page 3). Remove and re-insert the battery. If that still does not work, it might be necessary to purchase a new battery. Disconnect the telephone base from the telephone wall jack and plug in a working telephone. If the other telephone does not work, the problem is probably in the wiring or the local service. Call the local telephone company. Low Battery shows on screen. Place the handset in the telephone base or charger for recharging. Remove and re-install the battery and use it until fully depleted, then recharge the handset in the telephone base or charger for up to 16 hours. If the above measures do not correct the problem, replace the battery. The battery does not charge in the handset or the handset battery does not accept charge. Make sure the handset is placed in the telephone base or charger correctly. The CHARGE light on the handset should be on. Remove and reinstall the battery, then charge for up to 16 hours. If the handset is in the telephone base or charger but the CHARGE light on the handset is not on, refer to The charge light is off in this section. If the battery is completely depleted, it can take up to 10 minutes to charge the handset before LOW BATTERY appears on the screen (page 3). Purchase a new battery. Refer to the Battery section (page 27). 30
34 Appendix Troubleshooting The CHARGE light is off. Clean the charging contacts on the handset and telephone base each month with a pencil eraser or a dry non-abrasive fabric. Make sure the power adapter and telephone line cord are plugged in correctly and securely. Unplug the power adapter. Wait for 15 seconds before plugging it back in. Allow up to one minute for the handset and telephone base to reset. There is no dial tone. First, try all the above suggestions. Move the handset closer to the telephone base. It might be out of range. The telephone line cord might be malfunctioning. Install a new telephone line cord. Disconnect the telephone base from the telephone wall jack and connect a different telephone. If there is no dial tone on this telephone either, the problem is in your wiring or local service. Contact your local telephone company. The telephone does not ring when there is an incoming call. Make sure the handset ringer volume is not set to the lowest level (page 6). Make sure the telephone line cord and power adapter are plugged in properly (page 2). The handset might be too far from the telephone base. Move it closer to the telephone base. There might be too many extension phones on the telephone line to allow all of them to ring simultaneously. Unplug some of them. If the other telephones in your home are having the same problem, the problem is in the wiring or local service. Contact the local telephone company (charges might apply). Other electronic products can cause interference to your cordless telephone. Install your telephone as far away as possible from electronic devices such as: wireless routers, radios, cellular telephones, digital telephones, intercoms, room monitors, televisions, VCRs, personal computers, kitchen appliances, and other cordless telephones. Test a working telephone at the telephone wall jack. If another telephone has the same problem, the problem is in the telephone wall jack. Contact your local telephone company (charges might apply). The telephone line cord might be malfunctioning. Install a new telephone line cord. Re-install the battery and place the handset in the telephone base or charger. Wait for the handset to synchronize with the telephone base. Allow up to one minute for this to take place. 31
35 Appendix Troubleshooting I cannot dial out. First, try all the above suggestions. Make sure there is a dial tone before dialing. It is normal if the handset takes a second or two to synchronize with the telephone before producing a dial tone. Wait an extra second before dialing. If the other telephones in your home are having the same problem, the problem is in the wiring or local service. Contact your local telephone company (charges might apply). Eliminate any background noise. Mute the cordless handset before dialing, or dial from another room in your home with less background noise. My handset beeps and is not performing normally. Make sure the power cord is securely plugged into the telephone base. Plug the telephone base into a different working electrical outlet not controlled by a wall switch. Move the handset closer to the telephone base. It might be out of range. Reset the telephone base by unplugging the electrical power to the base. Wait for 15 seconds and plug it back in again. Allow up to one minute for the cordless handset and the telephone base to synchronize. Other electronic products can cause interference to your cordless telephone. Install your telephone as far away from these electronic devices as possible: wireless routers, radios, radio towers, pager towers, cellular telephones, intercoms, room monitors, televisions, personal computers, kitchen appliances and other cordless telephones. There is interference during a telephone conversation. My calls fade out when I am using the cordless handset. The handset might be out of range. Move it closer to the telephone base. If you subscribe to high-speed Internet service (digital subscriber line - DSL) through your telephone lines, you must install a DSL filter between the telephone base and the telephone wall jack. The filter prevents noise and caller ID problems caused by DSL interference. Please contact your DSL service provider for more information about DSL filters. Appliances or other cordless telephones plugged into the same circuit as the telephone base can cause interference. Try moving the appliance or telephone base to another outlet. Other electronic products can cause interference to your cordless telephone. Install your telephone as far away as possible from the following electronic devices: wireless routers, radios, radio towers, pager towers, cellular telephones, digital telephones, intercoms, room monitors, televisions, VCRs, personal computers, kitchen appliances, and other cordless telephones. If your telephone is plugged in with a modem or a surge protector, plug the telephone (or modem/surge protector) into a different location. If this doesn t solve the problem, re-locate your telephone or modem farther apart from each other, or use a different surge protector. 32
36 Appendix Troubleshooting The location of your telephone base can impact the performance of your cordless phone. For better reception, install the telephone base in a centralized location within your home or office, away from walls or other obstructions. In many environments, elevating the telephone base improves overall performance. Disconnect the telephone base from the telephone wall jack and plug in a corded telephone. If calls are still not clear, the problem is probably in the wiring or local service. Contact your local service company (charges might apply). If the other telephones in your home are having the same problem, the problem is in the wiring or local service. Contact the local telephone company (charges might apply). I hear other calls when using the telephone. Disconnect the telephone base from the telephone wall jack. Plug in a different telephone. If you still hear other calls, the problem is probably in the wiring or local service. Call your local telephone company. I hear noise on the cordless handset and the keys do not work. Make sure the telephone line cord is plugged in securely. My caller ID features are not working properly. Caller ID is a subscription service. You must subscribe to this service from your local telephone company for this feature to work on your telephone. The caller might not be calling from an area which supports caller ID. Both you and the caller s telephone companies must use equipment compatible with the caller ID service. The caller ID information shows after the first or second ring. If you subscribe to high-speed Internet service (digital subscriber line - DSL) through your telephone lines, you must install a DSL filter between the telephone base and the telephone wall jack. The filter prevents noise and caller ID problems caused by DSL interference. Contact your DSL service provider for more information about DSL filters. The telephone does not receive caller ID or the telephone does not show caller ID during call waiting. Make sure you subscribe to caller ID with call waiting features provided by the local telephone company. The caller might not be calling from an area which supports caller ID. Both you and the caller s telephone companies must use equipment compatible with caller ID service. If you subscribe to high-speed Internet service (digital subscriber line - DSL) through your telephone lines, you must install a DSL filter between the telephone base and the telephone wall jack. The filter prevents noise and caller ID problems caused by DSL interference. Please contact your DSL service provider for more information about DSL filters. 33
37 Appendix Troubleshooting Caller ID entries do not match the numbers I need to dial. Caller ID service delivers 10 digits (the area code plus the seven-digits number). If you need to dial something other 10 digits, see page 21 for instructions on changing the number. If you dial seven digits for local calls you might want to use the Home area code feature (page 8). CONNECTING... shows in the handset screen. The handset might be out of range. Move it closer to the telephone base. Make sure the power cord is securely plugged into the telephone base. Use a working electrical outlet not controlled by a wall switch. Reset your telephone by unplugging the power adapter from the telephone base. Disconnect the battery from the cordless handset. Wait for 15 seconds, then plug in the power adapter and re-install the battery. Place the handset in the telephone base and allow up to one minute for the handset and telephone base to synchronize. Other electronic products might prevent your handset and telephone base from communicating with each other. Install your telephone base as far away from these electronic devices as possible: wireless routers, radios, cellular telephones, intercoms, room monitors, televisions, personal computers, kitchen appliances and other cordless telephones. Common cure for electronic equipment. If the telephone is not responding normally, put the cordless handset in the telephone base. If it does not respond, try the following (in the order listed): Disconnect the power to the telephone base. Disconnect the battery on the cordless handset. Wait a few minutes before connecting power to the telephone base. Re-install the battery and place the cordless handset in the telephone base or charger. Wait for the cordless handset to synchronize with the telephone base. Allow up to one minute for this to take place. 34
38 Appendix Important safety instructions When using your telephone equipment, basic safety precautions should always be followed to reduce the risk of fire, electric shock and injury, including the following: Read and understand all instructions. Follow all warnings and instructions marked on the product. Unplug this product from the wall outlet before cleaning. Do not use liquid or aerosol cleaners. Use a dry non-abrasive cloth for cleaning. Do not use this product near water. Do not place this product on an unstable table, shelf, stand or other unstable surfaces. Slots and openings in the back or bottom of the telephone base and handset are provided for ventilation. To protect them from overheating, these openings must not be blocked by placing the product on a soft surface such as a bed, sofa or rug. This product should never be placed near or over a radiator or heat register. This product should not be placed in any area where proper ventilation is not provided. This product should be operated only from the type of power source indicated on the marking label. If you are not sure of the type of power supply in your home, consult your dealer or local power company. Do not allow anything to rest on the power cord. Do not install this product where the cord may be walked on. Never push objects of any kind into this product through the slots in the telephone base or handset because they may touch dangerous voltage points or create a short circuit. Never spill liquid of any kind on the product. 10. To reduce the risk of electric shock, do not disassemble this product, but take it to an authorized service facility. Opening or removing parts of the telephone base or handset other than specified access doors may expose you to dangerous voltages or other risks. Incorrect reassembling can cause electric shock when the product is subsequently used. 11. Do not overload wall outlets and extension cords. 12. Unplug this product from the wall outlet and refer servicing to an authorized service facility under the following conditions: A. When the power supply cord or plug is damaged or frayed. B. If liquid has been spilled onto the product. C. If the product has been exposed to rain or water. D. If the product does not operate normally by following the operating instructions. Adjust only those controls that are covered by the operation instructions. Improper adjustment of other controls may result in damage and often requires extensive work by an authorized technician to restore the product to normal operation. E. If the product has been dropped and the telephone base and/or handset has been damaged. F. If the product exhibits a distinct change in performance. 13. Avoid using a telephone (other than cordless) during an electrical storm. There is a remote risk of electric shock from lightning. 14. Do not use the telephone to report a gas leak in the vicinity of the leak. 15. Only put the handset of your telephone next to your ear when it is in normal talk mode. 16. The power adapters are intended to be correctly oriented in a vertical or floor mount position. The prongs are not designed to hold the plug in place if it is plugged into a ceiling or an underthe-table/cabinet outlet. SAVE THESE INSTRUCTIONS 35
39 Appendix Operating range This cordless telephone operates with the maximum power allowed by the Federal Communications Commission (FCC). Even so, this handset and telephone base can communicate over only a certain distance - which can vary with the locations of the telephone base and handset, the weather, and the layout of your home or office. When the handset is out of range, the handset displays CONNECTING... If there is a call while the handset is out of range, it might not ring, or if it does ring, the call might not connect well when you press. Move closer to the telephone base, then press to answer the call. If the handset moves out of range during a telephone conversation, there might be interference. To improve reception, move closer to the telephone base. Maintenance Taking care of your telephone Your cordless telephone contains sophisticated electronic parts, so it must be treated with care. Avoid rough treatment Place the handset down gently. Save the original packing materials to protect your telephone if you ever need to ship it. Avoid water Your telephone can be damaged if it gets wet. Do not use the handset outdoors in the rain, or handle it with wet hands. Do not install the telephone base near a sink, bathtub or shower. Electrical storms Electrical storms can sometimes cause power surges harmful to electronic equipment. For your own safety, take caution when using electrical appliances during storms. Cleaning your telephone Your telephone has a durable plastic casing that should retain its luster for many years. Clean it only with a dry non-abrasive cloth. Do not use dampened cloth or cleaning solvents of any kind. Remember that electrical appliances can cause serious injury if used when you are wet or standing in the water. If the telephone base should fall into the water, DO NOT RETRIEVE IT UNTIL YOU UNPLUG THE POWER CORD AND TELEPHONE LINE CORD FROM THE WALL. Then remove the telephone by the unplugged cords. 36

40 Appendix About cordless telephones Privacy: The same features that make a cordless telephone convenient create some limitations. Telephone calls are transmitted between the telephone base and the cordless handset by radio waves, so there is a possibility that the cordless telephone conversations could be intercepted by radio receiving equipment within range of the cordless handset. For this reason, you should not think of cordless telephone conversations as being as private as those on corded telephones. Electrical power: The telephone base of this cordless telephone must be connected to a working electrical outlet. The electrical outlet should not be controlled by a wall switch. Calls cannot be made from the cordless handset if the telephone base is unplugged or switched off, or if the electrical power is interrupted. Potential TV interference: Some cordless telephones operate at frequencies that may cause interference to televisions and VCRs. To minimize or prevent such interference, do not place the telephone base of the cordless telephone near or on top of a TV or VCR. If interference is experienced, moving the cordless telephone farther away from the TV or VCR often reduces or eliminates the interference. Rechargeable batteries: Exercise care in handling batteries in order not to create a short circuit with conducting material such as rings, bracelets, and keys. The battery or conductor may overheat and cause harm. Observe proper polarity between the battery and the battery charger. Nickel-metal hydride rechargeable batteries: Dispose of these batteries in a safe manner. Do not burn or puncture the battery. Like other batteries of this type, if burned or punctured, they could release caustic material which could cause injury. The RBRC seal The RBRC seal on the nickel-metal hydride battery indicates that VTech Communications, Inc. is voluntarily participating in an industry program to collect and recycle these batteries at the end of their useful lives, when taken out of service within the United States and Canada. The RBRC program provides a convenient alternative to placing used nickel-metal hydride batteries into the trash or municipal waste, which may be illegal in your area. VTech s participation in RBRC makes it easy for you to drop off the spent battery at local retailers participating in the RBRC program or at authorized VTech product service centers. Please call BATTERY TM for information on Ni-MH battery recycling and disposal bans/restrictions in your area. VTech s involvement in this program is part of its commitment to protecting our environment and conserving natural resources. RBRC is a registered trademark of Rechargeable Battery Recycling Corporation. 37
Models: DS6211/DS6211-2/ DS6211-3/DS User s manual. w w w.v t e c h p h o n e s. c o m
 Models: DS6211/DS6211-2/ DS6211-3/DS6211-4 User s manual w w w.v t e c h p h o n e s. c o m Congratulations on purchasing your new VTech product. Before using this telephone, please read the Important
Models: DS6221/DS6221-2/ DS6221-3/DS6221-4/ DS6221-5/DS6222-4/ DS User s manual. w w w.v t e c h p h o n e s. c o m
 Models: DS6221/DS6221-2/ DS6221-3/DS6221-4/ DS6221-5/DS6222-4/ DS6222-5 User s manual w w w.v t e c h p h o n e s. c o m Congratulations on purchasing your new VTech product. Before using this telephone,
Online user s manual. w w w.v t e c h p h o n e s. c o m. Models: CS6114/CS6114-2
 Online user s manual w w w.v t e c h p h o n e s. c o m Models: CS6114/CS6114-2 Congratulations on purchasing your new VTech product. Before using this telephone, please read Important safety instructions
User s manual. w w w. v t e c h p h o n e s. c o m. Models: LS6115-2/ LS6115-3
 User s manual w w w. v t e c h p h o n e s. c o m Models: LS6115-2/ LS6115-3 Congratulations on purchasing your new VTech product. Before using this telephone, please read the Important safety instructions
User s manual. w w w.v t e c h p h o n e s. c o m. Models: CS6419/CS / CS /CS6419-2
 User s manual w w w.v t e c h p h o n e s. c o m Models: CS6419/CS6419-15/ CS6419-16/CS6419-2 BC Congratulations on purchasing your new VTech product. Before using this telephone, please read Important
Cordless Phone. Answering System Caller ID. User s Guide
 User s Guide 43-327 Answering System Caller ID Cordless Phone Thank you for purchasing your new cordless phone from RadioShack. Please read this user s guide before installing, setting up, and using your
User s manual. w w w. v t e c h p h o n e s. c o m. Models: DS6111-2/ DS6111-3/ DS6111-4
 User s manual w w w. v t e c h p h o n e s. c o m Models: DS6111-2/ DS6111-3/ DS6111-4 Congratulations on purchasing your new VTech product. Before using this telephone, please read the Important safety
Models: CS6328-2/CS6328-3/ CS6328-4/CS6328-5/ CS6329/CS6329-2/ CS6329-3/CS6329-4/ CS User s manual. w w w.v t e c h c a n a d a.
 Models: CS6328-2/CS6328-3/ CS6328-4/CS6328-5/ CS6329/CS6329-2/ CS6329-3/CS6329-4/ CS6329-5 User s manual w w w.v t e c h c a n a d a. c o m Congratulations on purchasing your new VTech product. Before
Congratulations Important safety instructions
 Congratulations on purchasing your new VTech product. Before using this telephone, please read the Important safety instructions on page 48 of this manual. This manual has all the feature operations and
Model: DS6151. User s manual. w w w.v t e c h p h o n e s. c o m
 Model: DS65 User s manual w w w.v t e c h p h o n e s. c o m Congratulations on purchasing your new VTech product. Before using this telephone, please read Important safety instructions on page 8 of this
Online user s manual. w w w.v t e c h p h o n e s. c o m. Models: CS6428-2/CS6429/ CS6429-2/CS6429-3/ CS6429-4/CS6429-5
 Online user s manual w w w.v t e c h p h o n e s. c o m Models: CS6428-2/CS6429/ CS6429-2/CS6429-3/ CS6429-4/CS6429-5 Congratulations on purchasing your new VTech product. Before using this telephone,
Models: LS6325/LS6325-2/ LS6325-3/LS6325-4/ LS6325-5/LS6326-4/ LS User s manual. w w w.v t e c h c a n a d a. c o m
 Models: LS6325/LS6325-2/ LS6325-3/LS6325-4/ LS6325-5/LS6326-4/ LS6326-5 User s manual w w w.v t e c h c a n a d a. c o m Congratulations on purchasing your new VTech product. Before using this telephone,
User s manual. Models: CS6519/CS / CS /CS / CS /CS / CS6519-2
 User s manual www.vtechphones.com Models: CS6519/CS6519-14/ CS6519-15/CS6519-16/ CS6519-17/CS6519-19/ CS6519-2 BC Congratulations on purchasing your new VTech product. Before using this telephone, please
Models: CS6120-2/CS6124/ CS Online user s manual. w w w.v t e c h p h o n e s. c o m
 Models: CS6120-2/CS6124/ CS6124-2 Online user s manual w w w.v t e c h p h o n e s. c o m Congratulations on purchasing your new VTech product. Before using this telephone, please read Important safety
Complete user s manual
 Complete user s manual w w w.v t e c h p h o n e s. c o m Models: CS6619/CS6619-15/ CS6619-16/CS6619-2 Congratulations on purchasing your new VTech product. Before using this telephone, please read Important
User s manual. w w w.v t e c h p h o n e s. c o m. Models: CS6428-2/CS6429/ CS /CS6429-2/ CS6429-3/CS6429-4/ CS6429-5
 User s manual w w w.v t e c h p h o n e s. c o m Models: CS6428-2/CS6429/ CS6429-16/CS6429-2/ CS6429-3/CS6429-4/ CS6429-5 BC Congratulations on purchasing your new VTech product. Before using this telephone,
Complete user s manual
 Models: FS6220-2/FS6220-3/ FS6224/FS6224-2/ FS6224-21/FS6224-3 Complete user s manual www.vtechphones.com Congratulations on purchasing your new VTech product. Before using this telephone, please read
Congratulations Important safety instructions
 Congratulations on purchasing your new VTech product. Before using this telephone, please read the Important safety instructions on page 37 of this manual. This manual has all the feature operations and
NEED HELP? Important! Before using this telephone, please read the Important safety instructions on page 36 of this manual.
 Important! Before using this telephone, please read the Important safety instructions on page 36 of this manual. NEED HELP? This manual has all the feature operations and troubleshooting necessary to install
Congratulations Important safety instructions
 Congratulations on purchasing your new VTech product. Before using this telephone, please read the Important safety instructions on page 39 of this manual. This manual has all the feature operations and
Table of contents Getting started 4 Basic operation 12
 Table of contents Getting started 4 Parts check list 4 Installation 5 Choose a location 5 Install handset battery 5 Connect power to base unit/chargers 6 Check battery indicator 7 Check for dial tone 7
Complete user s manual
 Complete user s manual w w w.v t e c h c a n a d a. c o m Models: CS6649/CS6649-2/ CS6649-3 Congratulations on purchasing your new VTech product. Before using this telephone, please read Important safety
NEED HELP? Important! Before using this telephone, please read the Important safety instructions on page 39 of this manual.
 Important! Before using this telephone, please read the Important safety instructions on page 39 of this manual. NEED HELP? This manual has all the feature operations and troubleshooting necessary to install
Model: LS6245. User s manual. w w w.v t e c h p h o n e s. c o m
 Model: LS6245 User s manual w w w.v t e c h p h o n e s. c o m Congratulations on purchasing your new VTech product. Before using this telephone, please read the Important safety instructions on page 90
User s manual. w w w. v t e c h p h o n e s. c o m. Models: CS5121-2/CS CS5122-3/CS5121-4
 User s manual w w w. v t e c h p h o n e s. c o m Models: CS5121-2/CS5121-3 CS5122-3/CS5121-4 Congratulations on purchasing your new VTech product. Before using this telephone, please read the Important
User s manual. Model: / / Need Help? Call our customer service number at BELL (2355)
") User s manual Model: 8025243/ 8025244/8025245 Need Help? Call our customer service number at 1-855-825-BELL (2355) Congratulations on purchasing your new Bell product. Before using this telephone, please
User s manual Model: 8025243/ 8025244/8025245 Need Help? Call our customer service number at 1-855-825-BELL (2355) Congratulations on purchasing your new Bell product. Before using this telephone, please
Congratulations Important safety instructions
 Congratulations on purchasing your new VTech product. Before using this telephone, please read the Important safety instructions on page 38 of this manual. This manual has all the feature operations and
Important! Before using this telephone, please read the Important safety instructions on page 35 of this manual. NEED HELP?
 Important! Before using this telephone, please read the Important safety instructions on page 35 of this manual. NEED HELP? This manual has all the feature operations and troubleshooting you need to install
Congratulations Important safety instructions
 Congratulations on purchasing your new VTech product. Before using this telephone, please read the Important safety instructions on page 32 of this manual. This manual has all the feature operations and
User s manual. w w w. v t e c h p h o n e s. c o m. Models: CS2111 CS2112 CS
 User s manual w w w. v t e c h p h o n e s. c o m Models: CS2111 CS2112 CS2111-11 Congratulations on purchasing your new VTech product. Before using this telephone, please read the Important safety instructions
Compatible with Hearing Aid T-Coil TIA-1083
 Congratulations on purchasing your new VTech product. Before using this telephone, please read the Important safety instructions on page 33 of this manual. This manual has all the feature operations and
Models: DS6321-2/DS6321-3/ DS6321-4/DS6322-3/ DS User s manual. w w w.v t e c h p h o n e s. c o m
 Models: DS6321-2/DS6321-3/ DS6321-4/DS6322-3/ DS6322-4 User s manual w w w.v t e c h p h o n e s. c o m Congratulations on purchasing your new VTech product. Before using this telephone, please read the
LS (LS and IS6100)
") Quick start guide LS6375-3 (LS6325-2 and IS6100) Introduction This quick start guide provides you with the basic installation and use instructions. A limited set of features are described in abbreviated
Quick start guide LS6375-3 (LS6325-2 and IS6100) Introduction This quick start guide provides you with the basic installation and use instructions. A limited set of features are described in abbreviated
Congratulations Important safety instructions
 Congratulations on purchasing your new VTech product. Before using this telephone, please read the Important safety instructions on page 39 of this manual. This manual has all the feature operations and
User s manual. ML17929 Two-line corded telephone with caller ID/call waiting
 User s manual ML17929 Two-line corded telephone with caller ID/call waiting Congratulations on purchasing your new AT&T product. Before using this AT&T product, please read Important safety information
Model: AT User s manual
 Model: AT3211-2 User s manual Getting started Part checklist Your telephone contains the following items. Save your dales receipt and original packaging in the event warranty service is necessary. Charger
Quick start guide. CL84109/CL84209/CL84309 DECT 6.0 corded/cordless telephone/answering system with caller ID/call waiting
 Quick start guide CL84109/CL84209/CL84309 DECT 6.0 corded/cordless telephone/answering system with caller ID/call waiting Installation You must install and charge the battery before using the telephone.
CareLine. Complete user s manual. Models: SN6127/SN w w w.v t e c h p h o n e s. c o m
 CareLine Complete user s manual w w w.v t e c h p h o n e s. c o m Models: SN6127/SN6127-2 BC Congratulations on purchasing your new VTech product. Before using this telephone, please read Important safety
User s manual E5901/E5902B/E5903B 5.8 GHz cordless telephone with caller ID/call waiting
 User s manual E5901/E5902B/E5903B 5.8 GHz cordless telephone with caller ID/call waiting Congratulations on your purchase of this AT&T product. Before using this AT&T product, please read the Important
2.4 GHz Cordless Telephone E2718B
 CHAN User Manual 2.4 GHz Cordless Telephone E2718B with Caller ID & Call Waiting MUTE REDIAL Congratulations on your purchase of this AT&T product. Before using this telephone system, you must read Important
User s manual. EL51103/EL51203/EL51253/ EL51303/EL51353/EL51403/ EL51453/EL51503 DECT 6.0 cordless telephone with caller ID/call waiting TONE TONE
 User s manual EL51103/EL51203/EL51253/ EL51303/EL51353/EL51403/ EL51453/EL51503 DECT 6.0 cordless telephone with caller ID/call waiting TONE TONE Congratulations on purchasing your new AT&T product. Before
CL82100/CL82200/CL82250/ CL82300/CL82350/CL82400/ CL82450/CL82500/CL82550/ CL82600 DECT
 User s manual CL82100/CL82200/CL82250/ CL82300/CL82350/CL82400/ CL82450/CL82500/CL82550/ CL82600 DECT 6.0 cordless telephone/ answering system with caller ID/call waiting Congratulations on your purchase
User s manual. TL32100/TL32200/TL32300 DECT 6.0 cordless telephone/ answering system with caller ID/call waiting
 User s manual TL32100/TL32200/TL32300 DECT 6.0 cordless telephone/ answering system with caller ID/call waiting Congratulations on purchasing your new AT&T product. Before using this AT&T product, please
User s manual SL82208/SL82308/SL82408 DECT 6.0 cordless telephone/answering system with caller ID/call waiting
 User s manual SL82208/SL82308/SL82408 DECT 6.0 cordless telephone/answering system with caller ID/call waiting Model #: Type: Serial #: Purchase date: Place of purchase: Congratulations on your purchase
User's manual TL74108/TL74208/TL74308/ TL74408/TL74258/TL74358/ TL GHz corded/cordless telephone/answering system with caller ID/call
 User's manual TL74108/TL74208/TL74308/ TL74408/TL74258/TL74358/ TL74458 5.8 GHz corded/cordless telephone/answering system with caller ID/call waiting Congratulations on purchasing your new AT&T product.
User s manual. EL52209/EL52259/EL52309/ EL52409/EL52419/EL52459 DECT 6.0 cordless telephone/ answering system with caller ID/call waiting
 User s manual EL52209/EL52259/EL52309/ EL52409/EL52419/EL52459 DECT 6.0 cordless telephone/ answering system with caller ID/call waiting Congratulations on purchasing your new AT&T product. Before using
User s manual TL GHz 2-line corded/cordless telephone/answering system with caller ID/call waiting
 User s manual TL76108 5.8 GHz 2-line corded/cordless telephone/answering system with caller ID/call waiting Congratulations on purchasing your new AT&T product. Before using this AT&T product, please read
User s manual SL82118/SL82218/SL82318/ SL82418/SL82518/SL82558/ SL82658 DECT 6.0 cordless telephone/answering system with caller ID/call waiting
 User s manual SL82118/SL82218/SL82318/ SL82418/SL82518/SL82558/ SL82658 DECT 6.0 cordless telephone/answering system with caller ID/call waiting Congratulations on your purchase of this AT&T product. Before
Table of contents.
 Table of contents Parts checklist 1 Parts checklist for ia5865/ia5870 1 Parts checklist for ia5878/ia5884 2 Parts checklist for ia5882/ia5890 3 Installation 4 Choose location 4 Connect power and telephone
Quick start guide. CL84100/CL84200/ CL84250/CL84300/ CL84350 DECT 6.0 corded/cordless telephone/answering system with caller ID/call waiting
 Quick start guide CL84100/CL84200/ CL84250/CL84300/ CL84350 DECT 6.0 corded/cordless telephone/answering system with caller ID/call waiting Installation You must install and charge the battery before using
E2812B 2.4 GHz cordless telephone/ answering system with caller ID/call waiting
 TONE Quick start guide E2812B 2.4 GHz cordless telephone/ answering system with caller ID/call waiting FLASH CLEAR MUTE DELETE REDIAL PAUSE Installation and setup After installing the battery, you may
User s manual. CL84109/CL84209/CL84309 DECT 6.0 corded/cordless telephone/answering system with caller ID/call waiting
 User s manual CL84109/CL84209/CL84309 DECT 6.0 corded/cordless telephone/answering system with caller ID/call waiting Congratulations on your purchase of this AT&T product. Before using this AT&T product,
Complete user s manual
 Complete user s manual w w w.v t e c h p h o n e s. c o m Models: DS6520-22/DS6521/ DS6521-2/DS6521-3/ DS6522-3/DS6522-32/ DS6522-4 Congratulations on purchasing your new VTech product. Before using this
E2913B/E1113B 2.4 GHz cordless telephone/ answering system with caller ID/call waiting
 User s manual E2913B/E1113B 2.4 GHz cordless telephone/ answering system with caller ID/call waiting FLASH CLEAR TONE MUTE DELETE REDIAL PAUSE INT Congratulations on purchasing your new AT&T product. Before
Quick start guide. MS Line Small Business Deskset
 Quick start guide MS2015 4-Line Small Business Deskset Parts checklist Your telephone package contains the following items. Save your sales receipt and original packaging in the event warranty service
Table of Contents. TABLE OF CONTENTS 1
 Table of Contents GETTING STARTED............................. 3 Before You Begin.............................. 3 Parts Checklist.............................. 3 Installation..................................
ErisStationTM. Wireless Conference Phone. User s manual. business phones.v tec h.c om. Model: VCS704
 ErisStationTM Wireless Conference Phone User s manual business phones.v tec h.c om BC Model: VCS704 Congratulations on purchasing your new VTech product. Before using this product, please read Important
EL42208/EL42308/EL42408/ EL GHz cordless telephone/ answering system with caller ID/call waiting
 User s manual EL42208/EL42308/EL42408/ EL42258 5.8 GHz cordless telephone/ answering system with caller ID/call waiting MENU / SEL TRANSFER MENU / SEL TRANSFER ANNC. RECORD REMOVE Congratulations on purchasing
900 MHz Cordless Answering System with Caller ID/Call Waiting 9357 DRAFT 7/6/01
 9357_book/wc_1ATT 7/6/01 4:10 PM Page ii USER S MANUAL Part 2 900 MHz Cordless Answering System with Caller ID/Call Waiting 9357 DRAFT 7/6/01 Please also read Part 1 Important Product Information AT&T
Quick start guide TL74108/TL74208/TL74308/ TL74408/TL74258/TL74358/ TL GHz corded/cordless telephone/answering system with caller ID/call
 Quick start guide TL74108/TL74208/TL74308/ TL74408/TL74258/TL74358/ TL74458 5.8 GHz corded/cordless telephone/answering system with caller ID/call waiting Installation preparation You must install and
2.4 GHz Cordless Speakerphone 2440 with Caller ID/Call Waiting
 1 USER S MANUAL Part 2 2.4 GHz Cordless Speakerphone 2440 with Caller ID/Call Waiting Please also read Part 1 Important Product Information AT&T and the globe symbol are registered trademarks of AT&T Corp.
User s manual SL87218 DECT 6.0 cordless telephone/answering system with caller ID/call waiting and 411 FREE directory assistance by AT&T
 User s manual SL87218 DECT 6.0 cordless telephone/answering system with caller ID/call waiting and 411 FREE directory assistance by AT&T 1-800-YELLOWPAGES Congratulations on your purchase of this AT&T
Quick start guide SL82118/SL82218/SL82318/ SL82418/SL82518/SL82558/ SL82658 DECT 6.0 cordless telephone/answering system with caller ID/call waiting
 Quick start guide SL82118/SL82218/SL82318/ SL82418/SL82518/SL82558/ SL82658 DECT 6.0 cordless telephone/answering system with caller ID/call waiting Battery installation & charging Install the battery
User s manual CS6719 CS CS CS CS CS CS
 Go to www.vtechphones.com to register your product for enhanced warranty support and the latest VTech product news. CS6719 CS6719-15 CS6719-16 CS6719-17 CS6719-2 CS6719-26 CS6719-27 DECT 6.0 cordless telephone
User s manual CS6719 CS CS CS CS CS CS
 Go to www.vtechphones.com to register your product for enhanced warranty support and the latest VTech product news. CS6719 CS6719-15 CS6719-16 CS6719-17 CS6719-2 CS6719-26 CS6719-27 DECT 6.0 cordless telephone
Table of contents.
 Table of contents Before you begin..................... 4 Parts checklist...................... 4 Installation........................ 5 Installing handset battery................. 5 Telephone base installation...............
Abridged user s manual. CL82311/CL82321 DECT 6.0 cordless telephone/ answering system with caller ID/call waiting
 Abridged user s manual CL82311/CL82321 DECT 6.0 cordless telephone/ answering system with caller ID/call waiting This Abridged user s manual provides you with basic installation and major operation instructions.
User s manual. E GHz cordless telephone/ answering system with caller ID/call waiting
 User s manual E5811 5.8 GHz cordless telephone/ answering system with caller ID/call waiting Congratulations on purchasing your new AT&T product. Before using this AT&T product, please read the Important
User s Guide. Cordless Phone with Answering System and Bluetooth Models: RT802 / RT803 / RT804 / RT803XT / RT804XT / RT805XT
 User s Guide Cordless Phone with Answering System and Bluetooth Models: RT802 / RT803 / RT804 / RT803XT / RT804XT / RT805XT BC Welcome... to your new Motorola Phone! Please retain your original dated sales
User s manual. w w w.v t e c h p h o n e s. c o m. Models: DS6421-2/DS / DS6421-3/DS6421-4
 User s manual w w w.v t e c h p h o n e s. c o m Models: DS6421-2/DS6421-26/ DS6421-3/DS6421-4 BC Congratulations on purchasing your new VTech product. Before using this telephone, please read Important
900 MHz Cordless Telephone/Answering System with Caller ID/Call Waiting 9371 DRAFT 8/14/01
 9371_book_1ATT 8/14/01 10:00 AM Page ii USER S MANUAL Part 2 900 MHz Cordless Telephone/Answering System with Caller ID/Call Waiting 9371 DRAFT 8/14/01 Please also read Part 1 Important Product Information
900 MHz Digital Two-Line Cordless Speakerphone with Answering System 9452 with Caller ID/Call Waiting
 USER S MANUAL Part 2 900 MHz Digital Two-Line Cordless Speakerphone with Answering System 9452 with Caller ID/Call Waiting Please also read Part 1 Important Product Information AT&T and the globe symbol
User s manual TL92220/TL92270/TL92320/ TL92370/TL92420/TL92470 DECT 6.0 cordless telephone/ answering system with BLUETOOTH wireless technology
 User s manual TL92220/TL92270/TL92320/ TL92370/TL92420/TL92470 DECT 6.0 cordless telephone/ answering system with BLUETOOTH wireless technology Congratulations on purchasing your new AT&T product. Before
2.4 GHz Cordless Telephone Answering System 2325/2365 with Caller ID/Call Waiting
 USER S MANUAL Part 2 2.4 GHz Cordless Telephone Answering System 2325/2365 with Caller ID/Call Waiting Please also read Part 1 Important Product Information 2002 Advanced American Telephones. All Rights
User s manual. 993 Two-line speakerphone with caller ID/call waiting
 User s manual 993 Two-line speakerphone with caller ID/call waiting Congratulations on purchasing your new AT&T product Before using this AT&T product, please read the Important product information on
User s manual (Canada version) ML17939/ML17959 Two-line corded telephone/ answering system with caller ID/call waiting
 ML17939/ML17959 Two-line corded telephone/ answering system with caller ID/call waiting") User s manual (Canada version) ML17939/ML17959 Two-line corded telephone/ answering system with caller ID/call waiting Congratulations on purchasing your new AT&T product. Before using this AT&T product,
User s manual (Canada version) ML17939/ML17959 Two-line corded telephone/ answering system with caller ID/call waiting Congratulations on purchasing your new AT&T product. Before using this AT&T product,
User s manual. SynJ SB67108 DECT 6.0 expansion handset for use with AT&T model
 User s manual SynJ SB67108 DECT 6.0 expansion handset for use with AT&T model SynJ SB67118/SB67138 Getting started Congratulations on your purchase of this AT&T product. Before using this AT&T product,
Abridged User s manual VC7151 VC VC VC VC Wireless Monitoring System with Cordless Telephone
 Go to www.vtechphones.com to register your product for enhanced warranty support and the latest VTech product news. VC7151 VC7151-101 VC7151-109 VC7152-201 VC7152-301 Wireless Monitoring System with Cordless
User s manual CS6859 CS CS CS DECT 6.0 cordless telephone
 Go to www.vtechphones.com to register your product for enhanced warranty support and latest VTech product news. CS6859 CS6859-2 CS6859-3 CS6859-4 DECT 6.0 cordless telephone BC User s manual Congratulations
User s manual. SynJ SB67108 DECT 6.0 expansion handset for use with AT&T model
 User s manual SynJ SB67108 DECT 6.0 expansion handset for use with AT&T model SynJ SB67118/SB67138/SB67158 Getting started Congratulations on your purchase of this AT&T product. Before using this AT&T
User s manual CS CS6949 CS CS DECT 6.0 cordless telephone
 Go to www.vtechphones.com to register your product for enhanced warranty support and latest VTech product news. CS6948-3 CS6949 CS6949-2 CS6949-3 DECT 6.0 cordless telephone BC User s manual Congratulations
User s manual SynJ SB67148 DECT line expansion deskset for use with AT&T model SynJ SB67138/SB67158
 User s manual SynJ SB67148 DECT 6.0 4-line expansion deskset for use with AT&T model SynJ SB67138/SB67158 Congratulations on your purchase of this AT&T product. Before using this AT&T product, please read
Complete user s manual. CRL81112/CRL81212 DECT 6.0 cordless telephone with caller ID/call waiting
 Complete user s manual CRL81112/CRL81212 DECT 6.0 cordless telephone with caller ID/call waiting Congratulations on your purchase of this AT&T product. Before using this AT&T product, please read the Important
User Guide. Telstra V580 & V580a. 5.8 GHz Digital Cordless Phone /Integrated Answering Machine
 Telstra V580 & V580a 5.8 GHz Digital Cordless Phone /Integrated Answering Machine User Guide If you have any problems with your phone, refer to the Help section of this User Guide or call TecHelp on 1300
CL2909 Speakerphone with caller ID/call waiting
 Quick start guide CL2909 Speakerphone with caller ID/call waiting Make sure to install four AA alkaline batteries (not included). STOP! See page 2 for easy instructions. If you subscribe to high-speed
Go to for the latest VTech product news. DECT 6.0 cordless telephone. User s manual (Canada version)
") Go to www.vtechcanada.com for the latest VTech product news. CS6919 CS6919-15 CS6919-16 CS6919-17 CS6919-19 CS6919-2 CS6919-25 CS6919-26 CS6919-3 CS6919-4 DECT 6.0 cordless telephone User s manual (Canada
Go to www.vtechcanada.com for the latest VTech product news. CS6919 CS6919-15 CS6919-16 CS6919-17 CS6919-19 CS6919-2 CS6919-25 CS6919-26 CS6919-3 CS6919-4 DECT 6.0 cordless telephone User s manual (Canada
CareLine. Complete user s manual. w w w.v t e c h p h o n e s. c o m. Models: SN1157/SN6146/SN6146-2/ SN6147/SN6147-2
 CareLine Complete user s manual w w w.v t e c h p h o n e s. c o m Models: SN1157/SN6146/SN6146-2/ SN6147/SN6147-2 BC Congratulations on purchasing your new VTech product. Before using this telephone,
Quick start guide. E5812B/E5813B/E5814B/ E1812B/E1813B/E1814B 5.8 GHz cordless telephone/ answering system with caller ID/call waiting
 Quick start guide E5812B/E5813B/E5814B/ E1812B/E1813B/E1814B 5.8 GHz cordless telephone/ answering system with caller ID/call waiting Battery installation & charging After installing the battery, you may
User s manual SynJ SB67148 DECT line expansion deskset for use with AT&T model SynJ SB67118/SB67138
 User s manual SynJ SB67148 DECT 6.0 4-line expansion deskset for use with AT&T model SynJ SB67118/SB67138 Congratulations on your purchase of this AT&T product. Before using this AT&T product, please read
User s manual (Canada version) CS6929 CS CS CS CS DECT 6.0 cordless telephone
 CS6929 CS CS CS CS DECT 6.0 cordless telephone") Go to www.vtechcanada.com for the latest VTech product news. CS6929 CS6929-2 CS6929-26 CS6929-3 CS6929-4 DECT 6.0 cordless telephone User s manual (Canada version) Congratulations on purchasing your new
Go to www.vtechcanada.com for the latest VTech product news. CS6929 CS6929-2 CS6929-26 CS6929-3 CS6929-4 DECT 6.0 cordless telephone User s manual (Canada version) Congratulations on purchasing your new
Table of contents Getting started 4 Basic operation 12
 Table of contents Getting started 4 Parts checklist 4 Installation 5 Choose location 5 Install handset battery 5 Connect power to base unit/chargers 6 Connect to phone line 6 Check battery indicator 7
Quick start guide. TL86109 DECT line corded/cordless telephone/ answering system with
 Quick start guide TL86109 DECT 6.0 2-line corded/cordless telephone/ answering system with BLUETOOTH wireless technology Installation You must install and charge the handset battery before using the cordless
Abridged user s manual. CRL32102/CRL32202/CRL32302/ CRL32352/CRL32452 DECT 6.0 cordless telephone/ answering system with caller ID/call waiting
 Abridged user s manual CRL32102/CRL32202/CRL32302/ CRL32352/CRL32452 DECT 6.0 cordless telephone/ answering system with caller ID/call waiting This Abridged user s manual provides you with basic installation
Quick start guide. CL4939 Big button big display telephone/answering system with caller ID/ call waiting
 Quick start guide CL4939 Big button big display telephone/answering system with caller ID/ call waiting Introduction This quick start guide provides you basic installation and use instructions. A limited
EL GHz cordless telephone/ answering system with caller ID/call waiting
 Quick start guide EL42108 5.8 GHz cordless telephone/ answering system with caller ID/call waiting REMOVE Installation preparation If you subscribe to high-speed Internet service (Digital Subscriber Line
2.4 GHz Corded Cordless Telephone with Caller ID/Call Waiting 1480
 91-5824-70-00_ATT1480_R0 9/15/03 2:47 PM Page ii USER S MANUAL Part 2 2.4 GHz Corded Cordless Telephone with Caller ID/Call Waiting 1480 Please also read Part 1 Important Product Information 2002 Advanced
Quick start guide. CL2939 Big button big display telephone/speakerphone with caller ID/call waiting
 Quick start guide CL2939 Big button big display telephone/speakerphone with caller ID/call waiting This quick start guide provides basic instructions. For additional installation options and complete instructions
2.4 GHz Cordless Telephone E2115
 91-5622-20-00_E2115 CIB_R2.qxd 4/13/2004 10:26 AM Page 1 User Manual (Part 2) 2.4 GHz Cordless Telephone E2115 with Caller ID & Call Waiting 91-5622-20-00_E2115 CIB_R2.qxd 4/13/2004 10:26 AM Page 2 You
User s manual CS6114 CS CS6114-2
 Go to www.vtechphones.com to register your product for enhanced warranty support and the latest VTech product news. CS6114 CS6114-11 CS6114-2 DECT 6.0 cordless telephone BC User s manual Congratulations