POE-FSH8PW. 8 Port 24V Passive POE Web Smart Switch. User s Manual
|
|
|
- Neil Ramsey
- 5 years ago
- Views:
Transcription


1 POE-FSH8PW 8 Port 24V Passive POE Web Smart Switch User s Manual 1


2 Copyright and Disclaimer Copyright & Disclaimer No part of this publication may be reproduced in any form or by any means, whether electronic, mechanical, photocopying, or recording without the written consent of OvisLink Corp. OvisLink Corp. has made the best effort to ensure the accuracy of the information in this user s guide. However, we are not liable for the inaccuracies or errors in this guide. Please use with caution. All information is subject to change without notice All Trademarks are properties of their respective holders. i
3 Copyright and Disclaimer FCC Statement Federal Communication Commission Interference Statement This equipment has been tested and found to comply with the limits for a Class B digital device, pursuant to Part 15 of the FCC Rules. These limits are designed to provide reasonable protection against harmful interference in a residential installation. This equipment generates uses and can radiate radio frequency energy and, if not installed and used in accordance with the instructions, may cause harmful interference to radio communications. However, there is no guarantee that interference will not occur in a particular installation. If this equipment does cause harmful interference to radio or television reception, which can be determined by turning the equipment off and on, the user is encouraged to try to correct the interference by one of the following measures: Reorient or relocate the receiving antenna. Increase the separation between the equipment and receiver. Connect the equipment into an outlet on a circuit different from that to which the receiver is connected. Consult the dealer or an experienced radio/tv technician for help. FCC Caution Any changes or modifications not expressly approved by the party responsible for compliance could void the user's authority to operate this equipment. This device complies with Part 15 of the FCC Rules. Operation is subject to the following two conditions: (1) This device may not cause harmful interference, and (2) this device must accept any interference received, including interference that may cause undesired operation. For product available in the USA/Canada market, only channel 1~11 can be operated. Selection of other channels is not possible. This device and its antenna(s) must not be co-located or operation in conjunction with any other antenna or transmitter. IMPORTANT NOTE FCC Radiation Exposure Statement: This equipment complies with FCC radiation exposure limits set forth for an uncontrolled environment. This equipment should be installed and operated with minimum distance 20cm between the radiator & your body. ii
4 Table of Contents Table of Contents 1. Introduction Overview Guide to the Chapters Quick Setup Installation Steps Installation of the Switch Unpack the Package Hardware Overview Installation Site Preparation Rack Mounting Desktop Installation Cabling Requirements Connecting to Power Reset to Default LED Indicators Comprehensive LEDs LED Table Web Management Setup your computer for Web management Remote Management Get Into the Web management Administrator Authentication Configuration System IP Configuration System Status Load Default Setting Firmware Update Reboot Device Port Management Port Configuration Port Mirroring...24 iii
5 Table of Contents Bandwidth Control Broadcast Storm Control POE VLAN Setting VLAN Mode VLAN Member Multi to 1 Setting Per Port Counter Port QoS Setting Priority Mode Class of Service Configuration Security MAC Address Binding TCP/UDP Filter Trunk Setting Backup/Recovery Miscellaneous Logout...42 Appendix A: Product Specifications...43 Appendix B: Troubleshooting...45 iv

6 1. Introduction 1 1. Introduction 1.1 Overview The POE-FSH8PW is a Power Control Passive POE Switch. It was designed for easy installation and high performance in an environment where traffic is on the network and the number of users increases continuously. It consists of 8 PSE/PoE ports. That can solve the limitation of the power outlet location and offer the system designer a flexible solution to locate the network device everywhere. By the default, the PoE port's power is turned off, you must turn on the power through web management. This switch does not work with 802.3af and 802.3at PoE devices, please make sure your device's PoE port can accept 24V passive PoE power, and 12V passive PoE kit will not work with this switch. The compact rigid desktop size was specifically designed for small to medium workgroups. It can be installed where space is limited; moreover, it provides smooth network migration and easy upgrade to network capacity. The switch does not include the optional rack mount kit, it must be purchased separately. This user s manual will help you to uncover most functions of the POE-FSH8PW with step-by-step instructions presented by high quality illustrations. Thank you for choosing OvisLink s product. 1
7 1. Introduction *Note: This switch does not work with 802.3af and 802.3at PoE devices. It uses 24V passive PoE standard Please make sure your device's PoE port can accept 24V passive PoE power. 1.2 Guide to the Chapters Chapter 1: Introduction and Quick Setup guide. All the essential information including IP Address and Password information are in the Quick Setup section. Chapter 2: Detail installation instruction including how to make Cat. 5 Cable Chapter 3: LED indicators Chapter 4: Detail information on Web management including how to setup remote management. 1.3 Quick Setup This section provides the essential information for experienced users to operate the switch immediately. For detailed installation instruction, please see chapter 2 for more information. Power-On the switch The POE-FSH8PW has a built-in power supply to operate with 100 ~ 240V AC, 50 ~ 60Hz power source. The AC power cord connector is located at the rear of the unit and the On/Off switch is next to the connector. After the Switch is powered on, it will perform self-diagnostic test. This process takes about 5 seconds to complete. LED Table LED Status Description PoE On The POE function is enabled. Off The POE function is disabled. Power On Power is on. Off Power is off. Link/ACT On Port is for connection. Off No connection. Flashing Data is transmitting or receiving 2

8 1. Introduction 1.4 Installation Steps This section lists the installation procedures in steps. Each step s instruction is thoroughly explained in the subsequent sections of following chapter. Step1. Connect your device's passive PoE port to the switch's LAN port Step2. Connect your PC to the switch. Step3. Set your PC's IP address to Step4. Open your web browser and enter " " to get into the switch's web management. Step5. Enter "admin" for username and "airlive" for password. Step6. Go to "Port Management", and then select "PoE". Step7. Turn on the port number where you connect the device. 3

9 1. Introduction Step8. If you want to install the switch on the 19" rack, please install the mounting kit (optional). Step9. Please see Chapter 4 for further configurations. 4
10 2. Installation of the Switch 2 2. Installation of the Switch This chapter provides the detailed instructions for installation of the switch. For concise installation instruction, the previous chapter s Quick Setup section provides all the important information including IP address, password, and LED table for user s reference. 2.1 Unpack the Package Before you begin the installation of POE-FSH8PW Management Switch, make sure that you have all the necessary accessories that come with your package. Follow the steps below to unpack your package contents: 1. Clear out an adequate space to unpack the package carton. 2. Open the package carton and take out the contents carefully. 3. Put back all the shipping materials such as plastic bag, padding and linings into the package carton and save them for future transport need. After unpacking and taking out the entire package contents, you should check whether you have got the following items: POE- FSH8PW One AC Power Cord Quick Install Guide Support CD-ROM (The PDF version of this User s Manual can be found within) If any of these above items is missing or damaged, please contact your local dealer for replacement. *Note: The switch does not include the optional rack mount kit, it must be purchased separately 5
11 2. Installation of the Switch 2.2 Hardware Overview Front Panel The front panel of the web smart switch consists of 8 10/100Base-TX RJ-45 ports. The LED Indicators are also located on the front panel. LED Indicators: Comprehensive LED indicators display the status of the switch and the network (see the LED Indicators chapter below). 100BASE-TX Fast Ethernet PoE Ports (Port 1~8): These ports are PoE enable ports. These PoE ports will be automatically activated when a compatible terminal is identified, and the PoE port will supply power to the connected PoE device. For legacy devices that are not yet compatible, the PoE port will not offer the power to these devices. This feature allows users to freely and safely mix legacy and Power over Ethernet compatible devices on their network. These ports support network speeds of either 10Mbps or 100Mbps, and can operate in halfand full- duplex transfer modes. These ports also support the automatic MDI/MDIX crossover detection function, providing true plug and play capability. Just plug-in the network cable to the hub directly and regardless if the end node is a NIC (Network Interface Card) or switch and hub. Reset: The Reset button is to reset all the setting back to the factory default. *Note: Be sure that you recorded the setting of your device, else all the setting will be erased when pressing the Reset button. 6
12 2. Installation of the Switch The Rear Panel The 3-pronged power plug is placed at the rear panel of the switch right side shown as below. 2.3 Installation Site Preparation You can mount POE-FSH8PW either on desktop or on a 19-inch rack. If you plan to mount the switch on desktop, please choose a steady, level surface in a well-ventilated area that is free from excessive dust. In any case, the installation site chosen for your switch has to comply with the following requirements: The surface where you want to mount the switch must be able to sustain at least 1.5kg. Do not place heavy objects (more than 3kg) on top of the switch. The location must preferably be free from excessive dust, away from heat vent, hot-air exhaust and direct sunlight. The switch should not be placed near large electric motors or other strong electromagnetic sources. As a reference, the strength of the electromagnetic field on site should not exceed the (RFC) standards for IEC 801-3, Level 2(3V/M) field strength. The air temperature in the location should be within a range of 0 to 65 C. The relative humidity in the location should not exceed 90% non-condensing humidity. The distance between the RJ-45 port and the standard network interface should not exceed 100 meters. Adequate space should be allowed in front of all the ports, so that each port is easily accessible for cable connections. Leave at least 10cm(4 inch) of space around the switch to allow heating dissipation 7

13 2. Installation of the Switch 2.4 Rack Mounting The POE-FSH8PW can be mounted on a standard size 19-inch rack, which can in turn be placed in a wiring closet with other equipments. Before you can mount the switch on the rack, first you must attach the mounting brackets on both sides of the switch with screws, and then mount it as a unit on the rack. To mount the unit on a rack, please follow the steps below: Step 1. First, align the holes on the bracket with the holes on both side of the switch. Step 2. Insert screws into the holes and then fasten the bracket on one side of the switch with a screwdriver. Step 3. Repeat Step 1 and 2 to fasten the bracket on the other side of the switch. Step 4. Mount the unit on the rack and align the notches on both brackets with mounting holes on the rack, and then secure the unit with suitable screws. Fastening the brackets on the switch 8


14 2. Installation of the Switch Attaching the Switch to a 19-inch rack 2.5 Desktop Installation The POE-FSH8PW has four rubber pads attached on each corner of its underside. These pads serve as cushioning against vibration and prevent the switch from sliding off its position. They also allow adequate ventilation space when you place the switch on top of another device. Desktop installation The location you choose to install your switch and the way you configure your network may greatly affect its performance. Please see the previous section for installation site preparation. Do not place more than 1.5kg (6.6lbs) of weight on the top of the switch. Leave at least 10cm of space around the switch to allow proper heating dissipation. 9
15 2. Installation of the Switch 2.6 Cabling Requirements For 100BASE-TX ports The 8 RJ-45 station ports require Cat. 5 twisted-pair UTP/STP cable for connection. When configuring within the 10/100 BASE-T cabling architecture, the cable distance should be within 100m. The following table summarizes the cable requirement for 10/100BASE-TX connection: 10BASE-T 100BASE-TX 100 ohm Category 3, 4, 5 UTP/STP cable 100 ohm Category 5 UTP/STP cable Auto MDI/MDI-X function The POE-FSH8PW is equipped with Auto-MDI/MDI-X function, which allows you to use straight-thru cable even when connecting to another switch/hub. Simply use the straight-through cable for all types of 10/100BASE-TX connections, either to a PC or to a networking device such as other hub or switch. Connection Specification 10 /100Base-TX Interface RJ-45 Cable to Use To an end station Straight-through twisted-pair cable To a hub/switch Straight-through twisted-pair cable Maximum Distance 100 meters 2.7 Connecting to Power POE-FSH8PW features a universal auto-select power supply unit, which allows a power connection to a wide range of input voltages from 100 to 50 ~ 60Hz. To establish its power connection, simply plug the female end of the power cord into the power connector on the rear of the switch and the male end of the power cord into a suitable power outlet. Once you have correctly plugged in the power, you can then turn on the Power Switch to activate the switch. 10
16 2. Installation of the Switch 2.8 Reset to Default When you forgot your IP or password, please use the reset button for the factory default setting? Please take the following steps to reset the Web Smart Switch back to the original default: Step 1. Turn on the POE-FSH8PW. Step 2. Press and hold the reset button continuously for 10 seconds and release the reset button. Step 3. The switch will reboot for 5 seconds and the configuration of switch will back to the default setting. Key in the user ID and the password to pass the authentication; the default ID and Password is as below, IP Address: ID: admin Password: airlvie 11
17 3. Installation 3 3. LED Indicators Before connecting any network device to POE-FSH8PW, you should take a few minutes to look over this chapter and get familiar with the front panel LED indicators of your Switch. 3.1 Comprehensive LEDs 3.2 LED Table LED Status Description PoE On The POE function is enabled. Off The POE function is disabled. Power On Power is on. Off Power is off. LINK/ACT On Port is for connection. Off No connection. Flashing Data is transmitting or receiving 12
18 4 4. Web Management The POE-FSH8PW can be configured by web based interface, including administrator, port management, VLAN setting, per port counter, trunk setting, QoS setting, security filter, configuration/ backup/recovery, miscellaneous, log out, and so on. The device based smart switch supports main stream browsers, such as IE 6.0~7.0, Firefox 2.0~3.0, to configure the device function. All functions are illustrated below. 4.1 Setup your computer for Web management The Concept of Subnet Under the TCP/IP environment, network devices must be on the same subnet in order to see each other. This means before you can configure the switch through web browser, your must set your computer to the same subnet as the switch. For two network devices to be on the same subnet, they must have the following 2 criteria: Their IP address must be on the same subnet. For example, if one IP address is The other s IP address must be x (x is any number between 2 and 254) for Class C subnet. To find out the IP address information for your computer. Under WinNT/2000/XP, please open Command Line window and type ipconfig. Under Win9x, please run winipcfg. They must have the same subnet mask. For example, if one machine is The other machine must also set to the same mask. Configure your computer s IP Before accessing the switch through web browser, please follow the instruction below to configure your computer s IP to the same subnet as the switch. If your switch s IP has not been changed, it should have the following factory default value: 13

19 The switch s Default IP IP Address: Subnet Mask: Now if your computer s IP is not in the same subnet as the switch, please follow the steps below to change the computer s IP: STEP 3 STEP 2 STEP 4 STEP 1 Figure 4-1 Manual IP setting Step 1. Double click on the network connection status icon on the task bar. This should bring up a window showing the status of the current network connection. If there is no network status icon on the task bar, please go to the Start -> Settings -> Network -> Local Connection of the task bar s Start menu. Step 2. Clock on the property icon. Step 3. Double click on the Internet Protocol (TCP/IP) 14
20 Step 4. Click on Use the following IP address button and enter the computer s address manually. This IP address must be on the same subnet as the switch but different from the switch s IP. Please make sure the IP is not used by other network device. If the switch s IP address is of factory s default value. We recommend enter the following for computer s IP: IP Address: Subnet Mask: Gateway: Click Ok after finish entering the IP. *Note1: An alternative method is to change the switch s IP to the same subnet as the computer. Please use console-port management to change switch s IP. *Note2: If IP address of the switch is lost, please use console port management to find the switch s IP address. *Note3: The POE-FSH8PW has DHCP client ability. This allows DHCP server (or router) to assign IP automatically. However, we do not recommend turning on the DHCP client because the DHCP server assign the IP randomly. The DHCP client should be used only when connecting directly to Cable Modem (for remote management) whose service provider uses DHCP for IP assignment. Now, you will be able to access the switch by typing in the switch s IP address on the web browser. 4.2 Remote Management In this section, you will learn how to setup your computer and the router for remote web management. Remote management allows MIS to manage a switch from outside of the switch s IP domain or from Internet. Depending on the type of Internet connection you have, there are two ways to setup the switch to be available through Internet. 15

21 Direct Connection to Internet Remote PC If you have a fixed IP xdsl account or cable modem account, and there is no router in the network, you can connect your switch directly to Internet via xdsl modem/cable Modem. However, this method is not recommended as the LAN will be directly exposed to the Internet. Fixed IP: If your ISP has assigned you a fixed IP. Please go to the Switch s IP configuration and enter the IP address, Subnet Mask, and Gateway information offered by your ISP. If your ADSL connection is PPPoE or PPTP type, you have to connect through a router for remote management. Cable Modem: If your Cable service provider uses DHCP for IP assignment, please turn on the DHCP function under IP configuration. Make sure there is no DHCP server in the network. Then the Cable provider will assign the switch with a IP and Gateway. Go to the console port management to find out what IP has been assigned to the switch. When the configuration is finished, the Remote PC can access the switch by typing the switch s IP address on the web browser. 16
 port IP address 201.")
22 Connect through Broadband Router Remote PC Switch IP: If you have an IP sharing router in the network, you can open a virtual server on the router to allow the switch to be managed through Internet. This method is more recommended as the broadband router provides natural fire wall protector from hackers. In the diagram above, the router has the WAN (given by the ISP) port IP address and LAN port address The switch s IP is Please follow the instruction below to setup the router and switch for remote access: On the Switch On the IP setting, set the gateway to Router s LAN port address Please make sure the subnet mask is the same as the router s. On the Router Go to router s Virtual Server setting and open the Web port (TCP Port 80) to the switch s IP address If your router require enter the beginning and ending Port (from PortX to PortX), enter 80 for both. Now the Remote PC will be able to access your switch by entering in the Web browser s address field. 17

23 4.3 Get Into the Web management After you have properly configured the computer and switch s IP, you can get into the web management by the following steps: Step 1. Open the Internet Explorer Step 2. Enter the switch s IP address in the Address field and press enter. Step 3. When prompt for User s name and Password, enter the following information: User s Name: admin Password: airlive You should see the following welcome screen after the process is completed: Menu Bar On the left side of the screen is the Menu bar where you and click to configure management functions. Most configuration functions are under the Administrator menu. We will explain the menu items in the remaining section of this chapter. Top Switch Image The switch s image on the upper portion of the screen gives the quick overview of the port connection status. When a port is plugged in, the switch s image will show a plug on the corresponding port. Click on a port will show the quick port status. 18
24 4.4 Administrator There are many management functions can be set or performed if you click the Administrator on Home Page, including: Authentication Configuration System IP Configuration System Status Load Default Setting Firmware Update Reboot Device In the following sessions, we will talk in detail about the management functions under the Administrator menu Authentication Configuration This page shows authentication configuration information. User can set new Username and Password in this page. 19


25 4.4.2 System IP Configuration This page shows system configuration including the current IP address and sub-net mask and gateway. User can configure the IP settings, Subnet Mask, Gateway as below: IP address: Manually assign the IP address that the network is using. The default IP is Subnet Mask: Assign the subnet mask to the IP address. Gateway: Assign the network gateway for industrial switch. If you change the IP address of this switch and then press Update. It will show update successfully then press Reboot button. It will enter user login screen automatically System Status This page is used to check the status of switch, including Switch MAC address and software version. The comment field allows the network administrator to input an easy-to-remember nickname for this switch. The legal characters are a~z and A~Z, _, -, +, 0 ~9, excluding special character. 20

26 MAC Address: Displays the unique hardware address assigned by manufacturer (default). Number of Ports: Displays number of ports in the switch. Comment: You can type some comment for the switch. System Version: Displays the switch s firmware version. And then click Update button Load Default Setting Configuration Clicking the Load button will make the switch being set to the original configuration. *Note: This change only concerns the switch behavior, excluding the change for user name, password and IP configuration. After Load Default is executed, the all settings will be restored to default setting Firmware Update Before the firmware update procedure is executed, you should enter the password twice and then press Update button. The smart switch will erase the flash memory. There is a self-protection mechanism in the Boot Loader, so the Boot Loader will keep intact. Even though the power is turned off or the cable link fails during the firmware update procedure, the Boot loader will restore the code to firmware update page. 21
27 After pressing Update button, the old web code will be erased. Then you can select the image file and press Update button to update the firmware you need Reboot Device Click Confirm" button to reboot the device. *Note: The reboot is for software base instead of hardware base 4.5 Port Management There are many management functions can be set or performed if you click the Port Management on Home Page, including: Port Configuration Port Mirroring Bandwidth Control Broadcast Storm Control POE In the following sessions, we will talk in detail about the management functions under the Port Management menu. 22

28 4.5.1 Port Configuration In Port Configuration, you can set and view the operation mode for each port. Auto: Enable and Disable. Being set as Enable, the Speed, Duplex mode, Pause, Backpressure, TX Capability and Address Learning are negotiated automatically. When you set it as Disable, you have to assign those items manually. Speed: When the Auto-Negotiation column is set as Disable, users have to set the connection speed to the ports ticked. Duplex: When the Auto-Negotiation column is set as Disable, users have to set the connection mode in Half/Full to the ports ticked. Pause: Flow Control for connection at speed of 10/100Mbps in Full-duplex mode. Backpressure: Flow Control for connection at speed of 10/100Mbps in Half-duplex mode. TX Capability: When the Auto-Negotiation column is set as Disable, users have to set this column as Enable or Disable. Addr. Learning: When the Auto-Negotiation column is set as Disable, users have to set this column as Enable or Disable. Select Port No.: Tick the check boxes beside the port numbers being set. Click "Update" to have the configuration take effect. 23

29 Current Status: Displays current port status. Setting Status: Displays current status. Click "Update" to make the configuration effective Port Mirroring The port mirroring function is accomplished by setting the following items. Destination port: Theoretically it s possible to set more than one destination port in a network. Actually the port mirroring function will lower the network throughput, and therefore it s recommended to set only one destination port in a network. Monitored packets: (1) Disable: means this function is disabled. (2) RX: means copy the incoming packets of the selected source port to the selected destination port. (3) TX: means copy the outgoing packets of the selected source port to the selected destination port. (4) Rx & Tx: means the combination of Rx and Tx. Source port: the traffic source that will be copied to the destination port. Take the following configuration as an example. (a) Source port: Port 1 ~ Port 4. (b) Destination Port: Port 5 ~Port 8. (c) Mirrored packet: Rx. This means all packets received at port 1 ~port 4 will be copied to port 5, port 6, port 7 and port 8.Care should be taken that the more source ports and destination ports is set, the lower network throughput is available for normal traffic. 24
30 4.5.3 Bandwidth Control This page allows the setting of the bandwidth for each port. The TX rate and Rx rate can be filled with the number ranging from 1 to 255. This number should be multiplied by the selected bandwidth resolution to get the actual bandwidth. (a) Low bandwidth for TX 25

31 Example 1: The TX number of the port1~4 is set to 10, 20, 30, 40 respectively, and Speed base is set to low. The real bandwidth comes from the formula of 32Kbps*10, 32Kbps*20, 32Kbps*30 and 32Kbps*40 respectively. After the update button is executed, the real bandwidth will show up in TX fields. (b) High bandwidth for TX Example 2: The TX number of the port1~4 is set to 10, 20, 30, 40 respectively, and Speed base is set to High. The real bandwidth comes from the formula of 512Kbps*10, 512Kbps*20, 512Kbps*30 and 512Kbps*40 respectively. After the update button is executed, the real bandwidth will show up in TX fields. 26
32 (c) Low bandwidth for Rx Example 3: The RX bandwidth number of the port 5~ port 8 is set to 50, 60, 70, 80 respectively, and Speed base is set to low. The real bandwidth comes from the formula of 32Kbps*50, 32Kbps*60, 32Kbps*70 and 32Kbps*80 respectively after the update button is executed, the real bandwidth will show up in RX fields. (d) High bandwidth for RX 27

33 Example 4: The RX bandwidth number of the port 5~ port 8 is set to 50, 60, 70, 80 respectively, and Speed base is set to high. The real bandwidth comes from the formula of 512Kbps*50, 512Kbps*60, 512Kbps*70 and 512Kbps*80 respectively. After the update button is executed, the real bandwidth will show up in RX fields. The limitation of the bandwidth control The actual bandwidth should be less than the cable link speed. For 100Mbps link speed, the bandwidth setting should be less than 196 if the bandwidth is set to high. For 10Mbps link speed, the bandwidth setting should be less than 20 if the bandwidth base is set to high. Setting the bandwidth to 0 will make the switch running at the full speed. The warning message will show up if bandwidth setting is higher than maximum rate (100Mbps). 28

34 4.5.4 Broadcast Storm Control The switch implements a broadcast storm control mechanism. Tick the check boxes to have them beginning to drop incoming broadcast packets if the received broadcast packet counts reach the threshold defined. Each port s broadcast storm protection function can be enabled individually by ticking the check boxes. The broadcast packet is only checked at the selected port and the number of broadcast packets is counted in every time unit. One time unit is 500 us for 10Mbps speed and 5ms for 100Mbps. The excessive broadcast packet will be discarded. For those broadcast packets incoming from the un-selected port, the switch treats it as the normal traffic. Threshold: Type in the threshold in the range between 1 and 63 to limit the maximum byte counts, which a port can send or receive in a period of time. Enable Port: Having ticked the boxes, the port will stop transmitting or receiving data when their sending byte counts or receiving byte counts reach the defined threshold. Click Update to have the configuration take effect. 29
 is a logical network grouping that limits the broadcast domain, which would allow you to isolate network traffic, so only the members of the same VLAN will receive")
35 4.5.5 POE User could know per PoE port out power status in this page and also enable or disable per port. 4.6 VLAN Setting A Virtual LAN (VLAN) is a logical network grouping that limits the broadcast domain, which would allow you to isolate network traffic, so only the members of the same VLAN will receive traffic from the ones of the same VLAN. Basically, creating a VLAN from a switch is logically equivalent of reconnecting a group of network devices to another Layer 2 switch. However, all the network devices are still plugged into the same switch physically. There are many management functions can be set or performed if you click the VLAN Setting on Home Page, including: VLAN Mode VLAN Member Multi to 1 Setting In the following sessions, we will talk in detail about the management functions under the VLAN Setting menu. 30

36 4.6.1 VLAN Mode You may select the VLAN Mode of the switch. Port-based VLAN is for separating traffic only on this single switch. There is no handover of network traffic within VLAN groups to other switches. For the handover to other switches use Tag Based VLAN. In VLAN Mode you can switch from Tag to Port Based VLAN. Port Based VLAN is the default mode. After having switched to Tag Based VLAN Mode, the screen changes. On this screen you can now define and configure your Up- and Downlink ports. These are important since here the handover between the switches of your network takes place. VLAN Mode: Displays VLAN mode: port based/tag based VLAN. Here you can also switch back to Port Based VLAN Mode Add tag means the outgoing packet of the selected port will be inserted a 802.1Q tag. Use this setting for your Up- and Downlink Ports in your VLAN Tagged Network. Original means the outgoing packet of the selected port keep the original packet received at the source port. This is the default setting when starting VLAN configuration. You should change to either Add or Remove Tag. Remove tag means the 802.1Q tag of the outgoing packet of the selected port will not be sent. Use this setting for your Network Connections to PCs. Only packets of the VLAN Group the Port is member of will be sent. 31

37 4.6.2 VLAN Member The ports need to be made member of your VLAN groups. This is for Tag Based and Port Based VLAN Mode. The screen here looks different whether you run Tag Based or Port Based Mode. VLAN Member in Port Based Mode In Port Based Mode you see a matrix of your 8 Ports. Simply select the port on top screen you want to configure, click on Read, and then select or deselect the ports that are on the same VLAN group. In this configuration mode you do not need to worry about defining VLAN groups and VLAN IDs. VLAN Member in Tag Based Mode In Tag Based Mode you need to define and configure your VLAN groups. Since you want the handover to other switches take place smoothly, the VLAN IDs (Numbers) need to be like on the rest of your network. On other switches you may have the chance to configure names. These are just for your reference. Only the numbers are important! There firstly add your VLAN Groups (identified throughout your network by unique and constant numbers). Start with IDs from 100 and up. Keep in mind that some switches use 1 as the default, while others use 4095 or 4096 as default. Starting with 100 gives you enough free room and less compatibility issues. 32

38 So enter 100 in the field right of VID Setting, then select or deselect which ports are member of that group. Your up- and downlink ports need to member of every existing group! Then click on add. The new group with its setting will be displayed at the bottom of the screen. With the PVID Setting you define to which VLAN group incoming traffic belongs. Consider the example that Port 1 is member of group 100 and 101. A simple PC is connected to Port 1. If that PC is now sending out data, with PVID you define if that data is for group 100 or Multi to 1 Setting Multi-to-1 VLAN is used in CPE side of Ethernet-to-the-Home and is exclusive to VLAN setting on VLAN member setting. When VLAN member setting is updated, multi-to-1 setting will be void and vice versa. The disable port means the port which will be excluded in this setting. All ports excluded in this setting are treated as the same VLAN group. The port 5~port 7 of THE DEVICE only forward packets to port 8. The port 8 is set to home. The VLAN and port 5~ port 8 are the member of the VLAN group for multi-to-2 setting. 33

39 4.7 Per Port Counter Port This page provides port counter for each port. There are 4 groups of statistics in total. These 4 categories cannot work simultaneously. Once you change the counter category, the counter will be cleared automatically. Transmit packet& collision: This category shows the packets outgoing from the switch and the count of collision. Receive packet& Transmit packet: This category shows both the received packet count (excluding the incorrect packet) and the transmitted packet count. Receive packet & Drop packet: This category shows the number of received valid packet and the number of dropped packet. Receive packet & CRC packet: This category shows the received correct packet and received CRC error. Refresh: Press Refresh button will aggregate the number of the counter for all ports. Clear: Press clear will clear all counters. 34
 refers to mechanisms in the network software that make the actual determination of which packets have priority.")
40 4.8 QoS Setting Here you can configure QoS policy priority mode and CoS (Class of Service) configuration. QoS (Quality of Service) refers to mechanisms in the network software that make the actual determination of which packets have priority. CoS refers to feature sets, or groups of services, that are assigned to users based on company policy. If a feature set includes priority transmission, then CoS winds up being implemented in QoS functions within the routers and switches in the network. In an enterprise network, class of service (CoS) differentiates high-priority traffic from lower-priority traffic. Tags may be added to the packets to identify such classes, but they do not guarantee delivery as do quality of service (QoS) functions, which are implemented in the network devices. There are many management functions can be set or performed if you click the QoS Setting on Home Page, including: Priority Mode Class of service Configuration In the following sessions, we will talk in detail about the management functions under the QoS Setting menu Priority Mode There are three priority modes available to specify the priority of packets being serviced. Those include First-In-First-Out, All-High-Before-Low, and Weight-Round-Robin. 35
41 First-In-First-Out: Packets are placed into the queue and serviced in the order they were received. All-high-before-low(Strict priority):all packets will be assigned to either high priority queue (Queue 2) or low priority queue (Queue 1). The packet on the low priority queue will not be forwarded until the high priority queue is empty. WRR mode: There are 4 priority queues for Weighted-and-round-robin (WRR) mode. When this mode is selected, the traffic will be forwarded according to the number set in each queue Class of Service Configuration There are 4 types of CoS for this setting; ie, TCP/UDP port, TOS/DS, 802.1p and physical port. The user can select more than one item for each port. Please note that if more than one type of CoS is selected, the switch will arrange the packet to the assigned queue according the following priority: TCP/UDP port the first, ToS/DS the second, 802.1p the third and physical port the last. 36
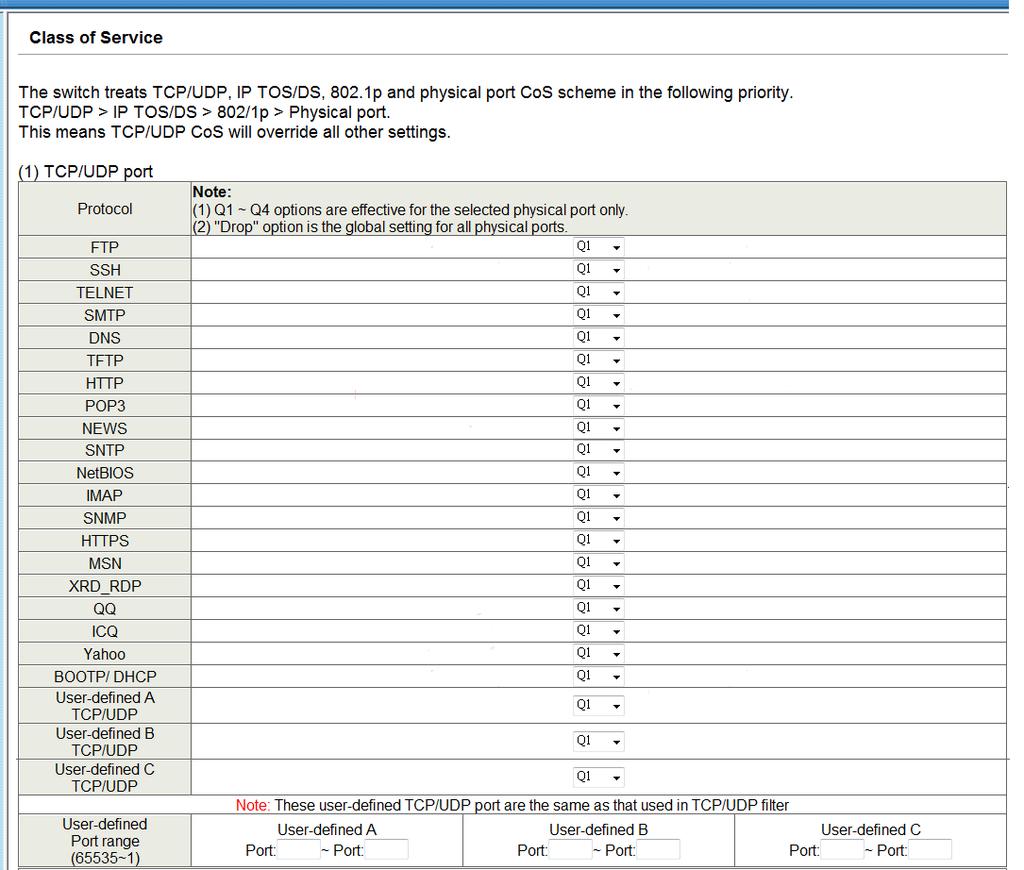
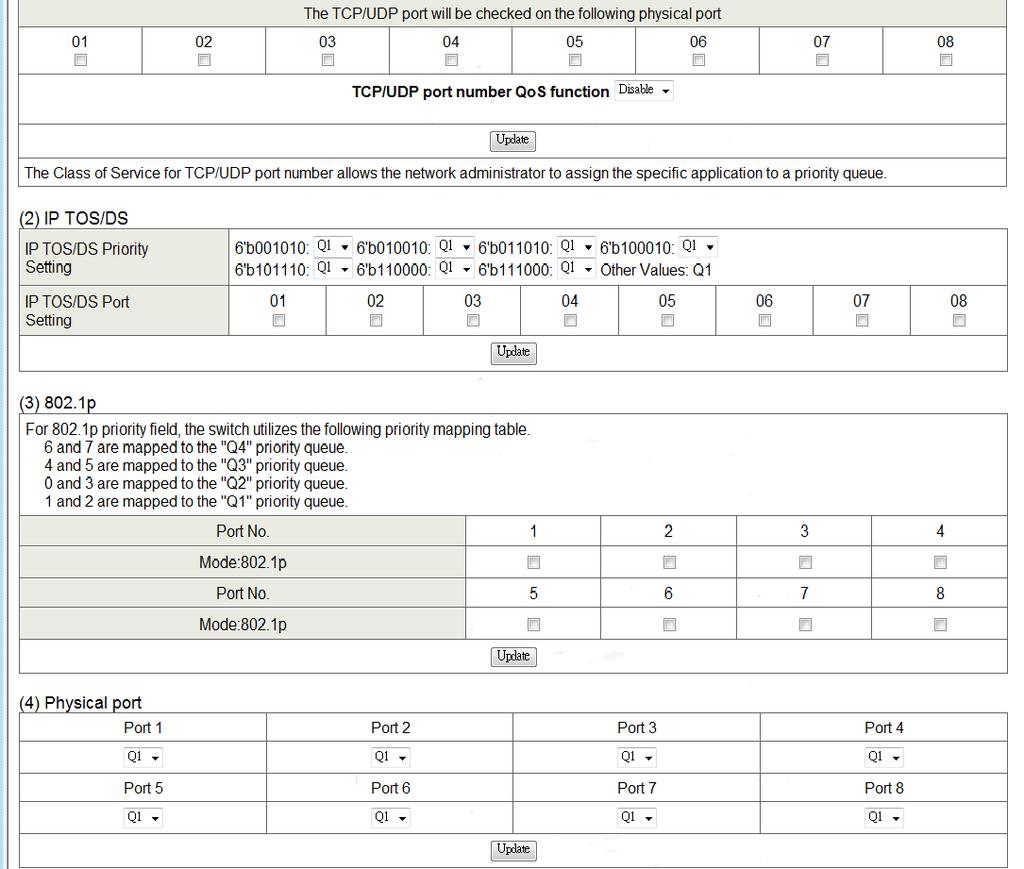
42 37

43 4.9 Security There are many management functions can be set or performed if you click the Security on Home Page, including: MAC Address Binding TCP/UDP Filter In the following sessions, we will talk in detail about the management functions under the Security menu MAC Address Binding This function provides a method for the administrator to specify the relationship between the physical port and the MAC address. Only the packet with specified source MAC address can be forwarded. By specifying the MAC address to each port, the network administrator can prevent the unauthorized user from accessing the switch. Each port can correspond to up to 3 MAC addresses. To activate the port binding function, you should enter the correct MAC address, select the port number, and set the port binding to enable and then press update. Port No: Displays the port number being assigned the MAC addresses. MAC Address: Users can assign up to 3 MAC addresses to the port. Read: Pull down the selection bar to choose a port number and click the read button to show the MAC addresses bound with the port or modify the MAC addresses. Select Port: Pull down the selection menu bar to choose a port number to be set. 38


44 Binding: Enable or disable the binding function. Click Update to have the configuration take effect. * Note: Setting the multicast address to these fields is not allowed. A warning message will show up if you do so TCP/UDP Filter By selecting the TCP/UDP port, the network administrator can optionally block some specific applications. There are two kinds of protocol filter functions. The forward function makes the switch forward the selected protocol and drop other protocols. The deny function makes the switch drop the selected protocol and forward other protocols. The protocol is checked at the selected secure WAN port. And it should be set at the server side. 39

45 4.10 Trunk Setting This page is used to set trunk group for load balance and auto-backup. The smart switch supports two trunk group, each trunk consists of 2~4 ports. Trunk hash algorithm can be selected according to 4 different methods. Port ID: Among the trunk member ports, the packet will be distributed based on the port ID. SA: Among the trunk member ports, the packet will be distributed based on the source MAC address. DA: Among the trunk member ports, the packet will be distributed based on the destination MAC address. DA&SA: Among the trunk member ports, the packet will be distributed based on the XOR calculation result of the source MAC address and the destination MAC address Backup/Recovery This function provides the user with a method to backup/recovery the switch configuration. The user can save configuration file to a specified file. If the user wants to recover the original configuration, which is saved at the specified path, just enter the password and then press the Update button. Finally the original configuration of the switch will be recovered. 40


46 4.12 Miscellaneous Miscellaneous setting is used to configure output queue aging time, VLAN stride and IGMP snooping. Output queue aging: This function is used to avoid the poor utilization of the switch. When a packet is stored in a switch for a long time, it will expire from the allowable time defined by the protocol and become a useless packet. To prevent these packets from wasting the bandwidth, this switch provide an option for the administrator to enable the queue aging function. VLAN Striding: By selecting this function, the switch will forward uni-cast packets to the destination port, no matter whether destination port is in the same VLAN. 41
47 IGMP Snooping: When this function is enabled, the switch will execute IGMP snooping version 1 and version 2 without the intervention of CPU. The IGMP report and leave packets are automatically handled by the switch Logout The administrator has write access for all parameters governing the onboard agent. User should therefore assign a new administrator password as soon as possible, and store it in a safe place. 42
48 Appendix A: Product Specifications A Appendix A: Product Specifications IEEE BaseT Standards IEEE 802.3u 100BaseTX IEEE 802.3x Flow control Interface: 8 x 10/100BaseT(X) with 8 PSE/ Passive PoE Ports Hardware Support AirLive Models Transmission Media LED Indicators Power Input MAC Address: 1K Buffer Memory: 512K bits Method: Store and Forward AP60, G.DUO, AirMax2, AirMax5 10BaseT Cat. 3, 4, 5 UTP/STP 100BaseTX Cat. 5 UTP/STP Port LED: LINK/ACT, PoE ACT/Status Status LED: Power 100~240V/AC, 50~60Hz 24V/DC Per Port Output 30Watt Max Per Port Power Output 8 Ports at Full 15.4 Watt Output Supported Power Pin: 4,5,7,8 Data Pin: 1,2,3,6 43
49 Appendix A: Product Specifications Humidity 10 to 90% RH (non-condensing) Standards Features Filtering/ Forwarding Rates Transmission Media LED Indicators Power Input Power Output IEEE BaseT IEEE 802.3u 100BaseTX IEEE 802.3x Full-duplex and Flow Control Number of Ports: 10/100BaseTX with 8 PSE/PoE port MAC Address: 1K Buffer Memory: 512Mb Transmission Method: Store and Forward 100Mbps port - 148,800pps 10Mbps port - 14,880pps 10BaseT Cat. 3,4,5 UTP/STP 100BaseTX Cat. 5 UTP/STP Per Port: Link/Act, Per Unit: Power 100~240V/AC, 50~60Hz 24V/DC per Port Output 30W Max per Port 8 Ports at Full 15.4 Watt Output Supported Power Consumption 130Watts (Max) Dimensions mm (L x W x H) Weight 1.6 kg Temperature Operating: 0 to 65 Storage: -20 to 90 Certifications FCC Class A, CE 44
50 Appendix: B: Troubleshooting B Appendix B: Troubleshooting This appendix contains specific information to help you identify and solve problems. If your switch does not function properly, please make sure it is set up according to the instructions on the manual. If you suspect your switch is not connected correctly to your network, check the following points before you contact your local dealer for support. Make sure the Power is ON (Check the Power LED). Make sure the cable is connected properly on both ends. Make sure that the maximum cable length between switch and end node does not exceed 100 meters (for 10/100/1000BASE-TX connection). Make sure that the maximum switch-to-hub/switch cable distance does not exceed 100 meters (for 10/100 BASE-TX connection). Verify that the cabling type used is correct. Check the corresponding Link/Act, FDX/Col, and 100M for signs of faulty connection. Check the status of the cable attachment. If the problem persists, try a different cable. Try another port on the Switch. Turn off power supply to the Switch. After a while, turn it on again to see if it resumes to its normal function. If you find out where the problem is but cannot solve it by yourself, or you simply cannot locate what is at fault, please contact your local dealer for technical support. When you forgot your IP or password, please use the reset button for the factory default setting? Please take the following steps to reset the Web Smart Switch back to the original default: 45

51 Appendix B: Troubleshooting Step 1. Turn on the POE Switch Step 2. Press and hold the reset button continuously for 5 seconds and release the reset button. Step 3. The switch will reboot for 20 seconds and the configuration of switch will back to the default setting Key in the user ID and the password to pass the authentication as following, IP: ID: admin Password: airlvie 46
IN-16POEWM. User Manual. 16 Port Fast Ethernet PoE Web Smart Switch. Version V100817
 IN-16POEWM User Manual 16 Port Fast Ethernet PoE Web Smart Switch Version V100817 FCC Warning This Equipment has been tested and found to comply with the limits for a Class-A digital device, pursuant to
AMG9082W-HP260-C User s Manual
 8 x 10/100 PoE+ 802.3at w/ 2 Gigabit Combo Ports RJ45/SFP Fast Ethernet Switch AMG9082W-HP260-C User s Manual www.amgsystems.com FCC Warning This Equipment has been tested and found to comply with the
POE-FSH808PW. 8-Port 24V Passive POE + 2 Gigabit Uplink Web Smart Switch. User s Manual
 POE-FSH808PW 8-Port 24V Passive POE + 2 Gigabit Uplink Web Smart Switch User s Manual 1 Copyright and Disclaimer Copyright & Disclaimer No part of this publication may be reproduced in any form or by any
POE-FSH1008AT. 8-port POE + 2 Combo Gigabit 802.3at Device Guard Web Smart Switch. User s Manual
 POE-FSH1008AT 8-port POE + 2 Combo Gigabit 802.3at Device Guard Web Smart Switch User s Manual Copyright and Disclaimer Copyright & Disclaimer No part of this publication may be reproduced in any form
LevelOne User Manual
 LevelOne User Manual FSW-1671 16-Port 10/100 Rackmount Smart Switch w/8 PoE Ports Ver1.0-0905 FCC Warning This Equipment has been tested and found to comply with the limits for a Class-A digital device,
GEU Port Gigabit Switch
 GEU-0522 5-Port Gigabit Switch Table Of Contents 1. INTRODUCTION... 3 1.1 Product Briefs... 3 1.2 Product Features... 3 1.3 Hardware Introduction... 4 2. CONNECTING THE SWITCH... 5 2.1 Package Contents...
FCC COMPLIANCE STATEMENT
 FCC COMPLIANCE STATEMENT This equipment has been tested and found to comply with the limits of a Class A computing devices, pursuant to Part 15 of the FCC rules. These limits are designed to provide reasonable
GEU-0520 GEU QIG Manual
 GEU-0520 5-Port Gigabit Switch GEU-0820 8-Port Gigabit Switch QIG Manual V1.0-100900 1 FCC Certifications This Equipment has been tested and found to comply with the limits for a Class A digital device,
Please follow the steps to configure this Web Smart switch. Step 1: Use a twisted pair cable to connect this switch to your PC.
 Web Smart Switch Configure Please follow the steps to configure this Web Smart switch. Step 1: Use a twisted pair cable to connect this switch to your PC. Step 2: Set your PC s IP to 192.168.2.xx. Step
8-Port 10M/100M + 2-Port Giga (1GT+1G SFP) Web Managed PoE Switch User Manual
 Web Managed PoE Switch User Manual") 8-Port 10M/100M + 2-Port Giga (1GT+1G SFP) Web Managed PoE Switch User Manual 201309.008. A1 FCC Warning This Equipment has been tested and found to comply with the limits for a Class-A digital device,
8-Port 10M/100M + 2-Port Giga (1GT+1G SFP) Web Managed PoE Switch User Manual 201309.008. A1 FCC Warning This Equipment has been tested and found to comply with the limits for a Class-A digital device,
Hardened Web-Smart High Power PoE Ethernet Switch
 Quick Start Guide This quick start guide describes how to install and use the Hardened Web-Smart High Power PoE (Power over Ethernet) Ethernet Switch. This is the switch of choice for harsh environments
GV-POE2401-V2 24-Port 802.3at Web Management PoE
 GV-POE2401-V2 24-Port 802.3at Web Management PoE Switch Packing List 1. GV-POE2401-V2 x 1 2. AC Power Cord x 1 3. Screw x 8 4. Rack Mount Kit x 1 5. Download Guide x 1 6. GV-POE2401-V2 Installation Guide
MARQUE: TP-LINK REFERENCE: TPL_TLSF1016D CODIC:
 MARQUE: TP-LINK REFERENCE: TPL_TLSF1016D CODIC: 4076656 TL-SF1005D TL-SF1008D TL-SF1016D 10/100Mbps Desktop Switch REV: 1.0.0 1910010004 COPYRIGHT & TRADEMARKS Specifications are subject to change without
LevelOne GES GE with 1 Combo SFP Web Smart Switch User Manual
 LevelOne GES-0852 8 GE with 1 Combo SFP Web Smart Switch User Manual Version 1.0-1109 1 FCC Certifications This Equipment has been tested and found to comply with the limits for a Class A digital device,
24-Port Gigabit Ethernet Switches
 24-Port Gigabit Ethernet Switches User s Manual DOC.140930 FCC Certifications This Equipment has been tested and found to comply with the limits for a Class A digital device, pursuant to part 15 of the
HES-3106-PLUS SERIES
 HES-3106-PLUS SERIES 5 PORTS 10/100/1000BASE-T ETHERNET MANAGED SWITCH WITH 1 PORT 1000BASE-X or 100/1000BASE-X UPLINK User s Guide Version 0.92 Trademarks CTS is a registered trademark of Connection Technology
GV-PoE Switch. Multicam Digital. GV-POE0801 User's Manual
 GV-PoE Switch Multicam Digital GV-POE0801 User's Manual Before attempting to connect or operate this product, please read these instructions carefully and save this manual for future use. POE0801-A 2013
Wireless 11n Smart Repeater AP (1T1R)
") (1T1R) 2014 Table of Contents 1. Introduction...3 1.1 Package contents... 3 1.2 Product Features... 3 1.3 Front Panel Description... 4 1.4 Rear Panel Description... 5 2. Installation...6 2.1 Hardware Installation...
(1T1R) 2014 Table of Contents 1. Introduction...3 1.1 Package contents... 3 1.2 Product Features... 3 1.3 Front Panel Description... 4 1.4 Rear Panel Description... 5 2. Installation...6 2.1 Hardware Installation...
Ether-FSH2400C 24-port 10/100Base-TX Switch
 Ether-FSH2400C 24-port 10/100Base-TX Switch User s Manual FCC STATEMENT This equipment has been tested and found to comply with the limits for a class A device, pursuant to part 15 of the FCC rules. These
User Guide TL-SG1005D TL-SG1008D. 5/8-Port Gigabit Desktop Switch. alarm shop. Rev:
 User Guide TL-SG1005D TL-SG1008D 5/8-Port Gigabit Desktop Switch Rev:2.0.2 7106503707 COPYRIGHT & TRADEMARKS Specifications are subject to change without notice. is a registered trademark of TP-LINK TECHNOLOGIES
FSW-1610TX FSW-2410TX
 LevelOne FSW-1610TX FSW-2410TX 16/24-Port Fast Ethernet Switch User Manual Version 1.1-0609 FCC Warning This equipment has been tested and found to comply with the regulations for a Class A digital device,
5/8 Port Gigabit Ethernet Switch
 5/8 Port Gigabit Ethernet Switch User Manual Certification FCC Statement This equipment has been tested and found to comply with the limits for a Class B digital device, pursuant to part 15 of the FCC
Security SSID Selection: Broadcast SSID:
 69 Security SSID Selection: Broadcast SSID: WMM: Encryption: Select the SSID that the security settings will apply to. If Disabled, then the device will not be broadcasting the SSID. Therefore it will
HES-3109 SERIES 9 PORTS 10/100/1000BASE-T MANAGEMENT ETHERNET SWITCH
 HES-3109 SERIES 9 PORTS 10/100/1000BASE-T MANAGEMENT ETHERNET SWITCH 8 PORTS 10/100/1000BASE-T MANAGEMENT ETHERNET SWITCH WITH 1 PORT 1000BASE-X UPLINK OR 1 PORT 100/1000BASE-X UPLINK 8 PORTS 10/100/1000BASE-T
Micro-Switch/ port 10/100Mbps. Desktop Fast Ethernet Switch. (Auto MDI/MDIX) FEP T- 3 USER S MANUAL
 FEP T- 3 USER S MANUAL") Micro-Switch/24 24 port 10/100Mbps Desktop Fast Ethernet Switch (Auto MDI/MDIX) FEP- 31024T- 3 USER S MANUAL FCC Certifications This Equipment has been tested and found to comply with the limits for a
Micro-Switch/24 24 port 10/100Mbps Desktop Fast Ethernet Switch (Auto MDI/MDIX) FEP- 31024T- 3 USER S MANUAL FCC Certifications This Equipment has been tested and found to comply with the limits for a
GSW-1657 GSW User's Guide. 16/24-port Gigabit Ethernet Switch. Ver
 GSW-1657 GSW-2457 User's Guide 16/24-port Gigabit Ethernet Switch Ver.1.0.0-0803 COPYRIGHT & TRADEMARKS Specifications are subject to change without notice. Level One is a registered trademark of Digital
User Guide TL-SG1024D 24-Port Gigabit Desktop/Rackmount Switch
 User Guide TL-SG1024D 24-Port Gigabit Desktop/Rackmount Switch Rev: 1.0.0 7106503213 COPYRIGHT & TRADEMARKS Specifications are subject to change without notice. is a registered trademark of TP-LINK TECHNOLOGIES
pakedgedevice&software inc.
 pakedgedevice&software inc. SW8-4PB 8 Port Fast Ethernet with 4 Port PoE Switch User Manual Version 2.1 FCC Certifications This Equipment has been tested and found to comply with the limits for a Class
Product names mentioned in this manual may be trademarks or registered trademarks of those products.
 FCC Statement The FCC (Federal Communications Commission) restricts the amount of radio frequency emission and radiation coming from computer equipment. The equipment introduced in this manual has been
User Guide. FSW-1641TX/2441TX 16/24 10/100Base-TX Web Smart Switch. FSW-1641TX 16 port 10/100Base-TX Web Smart Switch
 FSW-1641TX/2441TX 16/24 10/100Base-TX Web Smart Switch User Guide FSW-1641TX 16 port 10/100Base-TX Web Smart Switch FSW-2441TX 24 port 10/100Base-TX Web Smart Switch Contents 1. PRODUCT INTRODUCTION...1
TE100-S16 16-Port 10/100Mbps Fast Ethernet Switch. User s Guide
 TE100-S16 16-Port 10/100Mbps Fast Ethernet Switch User s Guide FCC Warning This equipment has been tested and found to comply with the regulations for a Class A digital device, pursuant to Part 15 of the
TEG-S224TX 26-Port 10/100/1000Mbps Gigabit & Fast Ethernet Switch
 TEG-S224TX 26-Port 10/100/1000Mbps Gigabit & Fast Ethernet Switch with 2 1000BASE-T plus 24 10/100BASE-T ports User s Guide FCC Warning This equipment has been tested and found to comply with the regulations
FWRIII-2105 SERIES. 4 ports 10/100Mbps RJ-45; built-in IEEE802.11n WiFi and 1 port 100Mbps SFP slot uplink Residential Gateway. Residential Gateway
 FWRIII-2105 SERIES 4 ports 10/100Mbps RJ-45; built-in IEEE802.11n WiFi and 1 port 100Mbps SFP slot uplink Residential Gateway 4 ports 10/100Mbps RJ-45; built-in IEEE802.11n WiFi and 1 port 100Mbps SFP
802.11b/g Access Point WL-8000AP
 802.11b/g Access Point WL-8000AP User s Guide - FCC Certifications This equipment has been tested and found to comply with the limits for a Class B digital device, pursuant to Part 15 of the FCC Rules.
IN-16POEGWM. User Manual. 16 Port Gigabit Ethernet + 4 Combo Gigabit SFP PoE Web Smart Switch
 IN-16POEGWM User Manual 16 Port Gigabit Ethernet + 4 Combo Gigabit SFP PoE Web Smart Switch FCC Warning This Equipment has been tested and found to comply with the limits for a Class-A digital device,
VAC 50/60Hz Power Adapter
 DGS-1216T D-Link 16-Port 10/100/1000Mbps + 2 Combo Mini GBIC Gigabit Smart Switch Before Your Begin This Quick Installation Guide gives step-by-step instructions for setting up the D-Link DGS1216T Gigabit
GV-POE Port Gigabit 802.3at Web Management
 GV-POE2411 24-Port Gigabit 802.3at Web Management PoE Switch 24-Port Gigabit Ethernet with 4-Port Combo Gigabit SFP Web Management PoE Switch Packing List Before you start to install, please verify that
EZ Switch EZ Connect N SMCFS1601/SMCFS2401
 EZ Switch EZ Connect N Draft 16/24-Port 11n Wireless Fast Ethernet USB2.0 Adapter Switch SMCFS1601/SMCFS2401 COPYRIGHT & TRADEMARKS Specifications are subject to change without notice. is a registered
TD-8616 ADSL2/2+ Ethernet Modem
 TD-8616 ADSL2/2+ Ethernet Modem Rev: 1.0.1 1910010001 COPYRIGHT & TRADEMARKS Specifications are subject to change without notice. is a registered trademark of TP-LINK TECHNOLOGIES CO., LTD. Other brands
10/100/1000Mbps. Gigabit Ethernet Switch GSW-2401/GSW User's Manual
 10/100/1000Mbps Gigabit Ethernet Switch GSW-2401/GSW-1601 User's Manual Trademarks Copyright PLANET Technology Corp. 2005. Content subjects to revision without prior notice. PLANET is a registered trademark
1. Package contents. 2. Connecting ADSL modem and wireless router
 1. Package contents WL-500W wireless router x 1 Power adapter x 1 Utility CD x 1 RJ45 cable x 1 Quick Start Guide x 1 2. Connecting ADSL modem and wireless router 1) Cable connection Wall power outlet
RANGER SERIES. 150Mbps Wireless Green Broadband Router DG-BR4000NG. 150 Mbps V
 RANGER SERIES 150Mbps Wireless Green Broadband Router DG-BR4000NG N 150 Mbps V1.2 2011-12-15 FCC warning: This equipment has been tested and found to comply with the limits for a class B digital device,
LNP series. 5-port Industrial PoE+ Unmanaged Ethernet Switches 4*10/100Tx (30W/Port) + 1*10/100Tx, 12~36VDC Input.
 + 1*10/100Tx, 12~36VDC Input.") LNP-0500-24 series 5-port Industrial PoE+ Unmanaged Ethernet Switches 4*10/100Tx (30W/Port) + 1*10/100Tx, 12~36VDC Input User Manual FCC Warning This Equipment has been tested and found to comply with
LNP-0500-24 series 5-port Industrial PoE+ Unmanaged Ethernet Switches 4*10/100Tx (30W/Port) + 1*10/100Tx, 12~36VDC Input User Manual FCC Warning This Equipment has been tested and found to comply with
SOHO Access TM Module. User Guide. SAM-SW5U: 5-port 10/100 Ethernet Switch
 SAM-SW5U: 5-port 10/100 Ethernet Switch 1. Introduction The 5 port 10/100BASE-TX Switch is compact and attractively designed for use within Suttle s SOHO Access TM Enclosure. They are ideal solution for
DES P MANUAL WEBSMART SWITCH V1.05
 DES-1100-10P MANUAL WEBSMART SWITCH V1.05 Table of Content Getting Started...3 WEB Configuration...4 Home...4 System...5 Power Over Ethernet...6 LED Power Saving...8 Fundamentals...9 Security...21 Statistics...22
FSW-1609TFX FSW-2409TFX
 LevelOne FSW-1609TFX FSW-2409TFX 16/24-Port Fast Ethernet Switch w/ fiber module slot User Manual Version 1.1-0609 FCC Warning This equipment has been tested and found to comply with the regulations for
FCC Certifications. CE Mark Warning
 FCC Certifications This Equipment has been tested and found to comply with the limits for a Class A digital device, pursuant to part 15 of the FCC Rules. These limits are designed to provide reasonable
802.11a g Dual Band Wireless Access Point. User s Manual
 802.11a+802.11g Dual Band Wireless Access Point User s Manual 0 Chapter 1 Introduction 1.1 Feature Fully interoperable with IEEE 802.11b compliant products. High-Speed data transfer rate up to 11Mbps.
8 Port Gigabit Ethernet Switch User Manual (P/N: 41NE-G3800UD0-A00)
") 8 Port Gigabit Ethernet Switch User Manual (P/N: 41NE-G3800UD0-A00) Certification FCC CE FCC Statement This equipment has been tested and found to comply with the limits for a Class B digital device, pursuant
8 Port Gigabit Ethernet Switch User Manual (P/N: 41NE-G3800UD0-A00) Certification FCC CE FCC Statement This equipment has been tested and found to comply with the limits for a Class B digital device, pursuant
Installation Guide 24-port 10/100 Fast Ethernet Switch with 1 Fiber Connection Model Name: KS-324F
 Installation Guide 24-port 10/100 Fast Ethernet Switch with 1 Fiber Connection Model Name: KS-324F We make no warranties with respect to this documentation and disclaim any implied warranties of merchantability,
4. 4 x Foot Pads 5. Rack-Mount Kit
 Quick Installation Guide GS-7508 8-Port PoE Gigabit Ethernet Switch I I. Product Information I-1. Package Contents 1 2 3 4 5 1. GS-7508 PoE Switch 2. Quick Installation Guide 3. Power Cable 4. 4 x Foot
Alternative B Type Mid-Span Power Sourcing Equipment. User s Guide
 Alternative B Type Mid-Span Power Sourcing Equipment User s Guide REGULATORY STATEMENTS FCC Certifications This equipment has been tested and found to comply with the limits for a Class B digital device,
The RFS-105 / RFS-108 is a high-performance Fast Ethernet switch, with all ports capable of 10 or 100Mbps auto-negotiation operation.
 The RFS-105 / RFS-108 is a high-performance Fast Ethernet switch, with all ports capable of 10 or 100Mbps auto-negotiation operation. Store-and-forward switching mode promises the low latency plus eliminates
Rubber Foot Pads. Rackmount Kit VAC 50/60Hz Power Adapter
 DGS-1248T D-Link Web Smart 48-Port 10/100/1000Mbps + 4 Combo Mini GBIC Gigabit Switch Before Your Begin This Quick Installation Guide gives step-by-step instructions for setting up the D-Link Web Smart
S7055xM / S7075xM Web Smart Managed 5-Port / 7-Port 10/100 Fast Ethernet Switch w/vlan Support Installation Guide
 S7055xM / S7075xM Web Smart Managed 5-Port / 7-Port 10/100 Fast Ethernet Switch w/vlan Support Installation Guide January 2005 VERSITRON, Inc. 83 Albe Drive / Suite C Newark, DE 19702 A050130380 The information
AS1008-P AS1026-P AS2008-P AS2024-P User Manual
 Fast Ethernet and Gigabit Ethernet PoE+ Unmanaged Switches AS1008-P AS1026-P AS2008-P AS2024-P User Manual Version 1.0.0.1 Sep 2017 Contents Compliances and Safety Statements... 3 1. AS1000 Series Product
LevelOne FSW PoE Fast Ethernet Switch User Manual
 LevelOne FSW-0809 4+4 PoE Fast Ethernet Switch User Manual v1.0-0706 Safety FCC Warning This equipment has been tested and found to comply with the regulations for a Class B digital device, pursuant to
10/100/1000Mbps 16/24-port Web Smart Gigabit Ethernet Switch GSW-1600S/GSW-2400S. User s Manual
 10/100/1000Mbps 16/24-port Web Smart Gigabit Ethernet Switch GSW-1600S/GSW-2400S User s Manual Trademarks Copyright PLANET Technology Corp. 2004. Contents subject to which revision without prior notice.
FAST ETHERNET RACKMOUNT WEB-SMART SWITCH USER MANUAL
 FAST ETHERNET RACKMOUNT WEB-SMART SWITCH USER MANUAL MODEL 505093 WITH OPTIONAL GIGABIT PORTS INT-505093-UM-0906-01 TABLE OF CONTENTS section page 1. Introduction & Features...3 2. Hardware Installation...3
5/8-Port Industrial Fast Ethernet Switch ISW-500/ISW-800. User's Manual
 5/8-Port Industrial Fast Ethernet Switch ISW-500/ISW-800 User's Manual Trademarks Copyright PLANET Technology Corp. 2006. Contents subject to which revision without prior notice. PLANET is a registered
Lantech. IPES /100TX with 4 PoE Injectors 24~48VDC Industrial Switch. User Manual
 Lantech IPES-0008-4 8 10/100TX with 4 PoE Injectors 24~48VDC Industrial Switch User Manual V1.00 Jun 2010 FCC Warning This Equipment has been tested and found to comply with the limits for a Class-A digital
ST-POEAF-S16-RM. 16 port PoE switch. User Guide
 ST-POEAF-S16-RM 16 port PoE switch User Guide IMPORTANT This user s guide contains information on the limitations regarding product use and function and information on the limitations as to liability of
CE APPROVED.4 INTRODUCTION.5 PACKAGE CONTENTS. 6 PRE - INSTALLATION CHECKLIST. 6 SYSTEM REQUIREMENTS. 6 FEATURES AND BENEFITS.11 SETUP WIZARD.
 Web Edition Dec. 2002 Contents CE APPROVED...4 INTRODUCTION...5 PACKAGE CONTENTS... 6 PRE - INSTALLATION CHECKLIST... 6 SYSTEM REQUIREMENTS... 6 FEATURES AND BENEFITS... 7 4 - PORT CABLE/XDSL ROUTER...9
16 / 24 Ports Fast Ethernet Switches 19 Rackmount Quick Installation Guide
 16 / 24 Ports Fast Ethernet Switches 19 Rackmount Quick Installation Guide 0 FCC Certifications This Equipment has been tested and found to comply with the limits for a Class A digital device, pursuant
FRG-3105 Series Residential Gateway
 FRG-3105 Series Residential Gateway User s Guide Version 0.90 Revision History Version Date Description 0.90 20170605 First Release 2 Trademarks Contents are subject to revision without prior notice. All
Light Mesh AP. User s Guide. 2009/2/20 v1.0 draft
 Light Mesh AP User s Guide 2009/2/20 v1.0 draft i FCC Certifications This equipment has been tested and found to comply with the limits for a Class B digital device, pursuant to Part 15 of the FCC Rules.
LevelOne. User Manual GSW-1656/GSW /24-Port Gigabit Switch w/ 4-Port SFP. Version
 LevelOne GSW-1656/GSW-2456 16/24-Port Gigabit Switch w/ 4-Port SFP User Manual Version 1.0-0608 FCC Certifications This Equipment has been tested and found to comply with the limits for a Class A digital
Industrial 5-Port Fast Ethernet Switches with SFP Slot and optional 4 PoE PSE Ports. Basic Model: KSD-541 PoE Model: KSD-541-P. Installation Guide
 Industrial 5-Port Fast Ethernet Switches with SFP Slot and optional 4 PoE PSE Ports Basic Model: KSD-541 PoE Model: KSD-541-P Installation Guide DOC.080104-1- (C) 2008 KTI Networks Inc. All rights reserved.
A valid network connection established. Transmitting or receiving data. ACT stands for ACTIVITY.
 Quick Start Guide This quick start guide describes how to install and use the Hardened Web-Smart PoE (Power over Ethernet) Ethernet Switch. Port and LED number will vary on different models. This user's
Gigabit Desktop. manual Models & Model shown: INT / UM
 Gigabit Ethernet Desktop Switch user manual Models 524117 & 524124 Model shown: 524124 INT-524117/524124-UM-0408-01 Thank you for purchasing the INTELLINET NETWORK SOLUTIONS Gigabit Ethernet Desktop Switch,
KGS-510F Web Smart 6-Port Gigabit Ethernet Switch with Fiber Connectivity Installation Guide
 KGS-510F Web Smart 6-Port Gigabit Ethernet Switch with Fiber Connectivity Installation Guide DOC.060118-1- (C) 2005 KTI Networks Inc. All rights reserved. No part of this documentation may be reproduced
GSW User Manual. 4-Port TP + 1-Port SFP Gigabit Ethernet Switch. Ver
 GSW-0508 4-Port TP + 1-Port SFP Gigabit Ethernet Switch User Manual Ver. 1.0.0-0806 1 FCC Certifications This Equipment has been tested and found to comply with the limits for a Class A digital device,
FCC Certifications. CE Mark Warning
 FCC Certifications This Equipment has been tested and found to comply with the limits for a Class A digital device, pursuant to part 15 of the FCC Rules. These limits are designed to provide reasonable
W INSTRUCTION MANUAL: Q7TEH1026G
 INSTRUCTION MANUAL: Q7TEH1026G 1. INTRODUCTION Q7TEH1026G 24+2G Fast Ethernet Switch is specially designed for users who want to have a smooth transition from 100Mbps to 1000Mbps LAN. It provides 24 10/100Mbps
16 Port Nway switch. User s manual
 16 Port Nway switch User s manual FCC Class A Appliance This equipment generates and uses radio frequency energy.if it is not installed and used properly in strict accordance with the manufactures, it
LNP-0602 series. 6-port Industrial PoE+ Unmanaged Ethernet Switches 4*10/100Tx (30W/Port) + 2*100Fx. User Manual
 + 2*100Fx. User Manual") LNP-0602 series 6-port Industrial PoE+ Unmanaged Ethernet Switches 4*10/100Tx (30W/Port) + 2*100Fx User Manual FCC Warning This Equipment has been tested and found to comply with the limits for a Class-A
LNP-0602 series 6-port Industrial PoE+ Unmanaged Ethernet Switches 4*10/100Tx (30W/Port) + 2*100Fx User Manual FCC Warning This Equipment has been tested and found to comply with the limits for a Class-A
SD24GS. 24-Port Web Smart Gigabit Ethernet Switch. User s Manual
 SD24GS 24-Port Web Smart Gigabit Ethernet Switch User s Manual FCC Warning This equipment has been tested and found to comply with the limits for a Class A digital device, pursuant to Part 15 of the FCC
EX17008 and EX17016 Web-Smart Switches
 EX17008 and EX17016 Web-Smart Switches FastFind Links User s Guide Introduction Unpacking and Installation Preparing to Configure the Switch Configuring the Switch All Rights Reserved Dissemination or
LevelOne GSW-2472TGX. 24Fast/2 Gigabit Ethernet combo Web Smart Switch. User`s Manual
 LevelOne GSW-2472TGX 24Fast/2 Gigabit Ethernet combo Web Smart Switch User`s Manual Contents 1. INTRODUCTION...1 Features...1 Software Features...2 Package Contents...3 2. HARDWARE DESCRIPTION...5 Front
Table of Contents... 1 Packing List... 2 FCC Statement... 2 Introduction Product Features... 3 Front Panel... 3 LEDs Installation...
 Table of Contents Table of Contents... 1 Packing List... 2 FCC Statement... 2 Introduction... 3 Product Features... 3 Front Panel... 3 LEDs... 3 Installation... 4 Selecting a Site for the Switch... 4 Connecting
APC-100. IEEE g Wireless USB Adapter. User s Guide v1.0
 APC-100 IEEE 802.11g Wireless USB Adapter User s Guide v1.0 FCC Certifications Federal Communication Commission Interference Statement This equipment has been tested and found to comply with the limits
8-Port 10/100Mbps with 4-Port PoE Web Smart Ethernet Switch FSD-804PS. User s Manual
 8-Port 10/100Mbps with 4-Port PoE Web Smart Ethernet Switch FSD-804PS User s Manual - 1 - Trademarks Disclaimer Copyright PLANET Technology Corp. 2006. Contents subject to revision without prior notice.
User Manual Gemtek WiMAX Modem
 User Manual Gemtek WiMAX Modem WIXS-177 CONTENTS Chapter 1 Overview...1-1 1.1. Indoor CPE... 1-1 1.2. Outdoor CPE... 1-2 Chapter 2 WEB-GUI...2-3 2.1. System Configuration Login... 2-3 2.2. System Logout...
4-port 10/100TX + 1 or 2-port 100FX Industrial Switch. User Manual
 4-port 10/100TX + 1 or 2-port 100FX Industrial Switch User Manual Rev.1.03 Sep-2010 FCC Warning This Equipment has been tested and found to comply with the limits for a Class A digital device, pursuant
AIRNET 54Mb b/g High Power USB Adapter. User s Manual
 AIRNET 54Mb 802.11b/g High Power USB Adapter User s Manual FCC Certifications Federal Communication Commission Interference Statement This equipment has been tested and found to comply with the limits
AM4000D Outdoor CPE User Manual
 AM4000D Outdoor CPE User Manual Page 1 Table of contents 1. OVERVIEW... 4 1.1. USER INTERFACE SPECIFICATION... 4 1.2. LTE INTERFACE SPECIFICATION... 4 2. GETTINGSTARTED... 4 2.1. PACKING LIST AND CPE UNIT...
4 10/100/1000T Mini-GBIC with 4 IEEE 802.3at High Power PoE Industrial Wide Temperature Switch. User Manual SISTP LRT
 4 10/100/1000T + 2 1000 Mini-GBIC with 4 IEEE 802.3at High Power PoE Industrial Wide Temperature Switch User Manual V1.0 September-2013 FCC Warning This Equipment has been tested and found to comply with
Best Connectivity. 5-Port 10/100Mbps Desktop Switch with 4-Port PoE
 NS0098 is a 5 10/100Mbps ports unmanaged switch that requires no configuration and provides 4 PoE (Power over Ethernet) ports. It can automatically detect and supply power with all IEEE 802.3af compliant
LP-SGW2404FP 24 Copper PoE + 4 Fiber Gigabit Managed Switch
 LPSGW2404FP_IG_ENB01W LP-SGW2404FP 24 Copper PoE + 4 Fiber Gigabit Managed Switch REV1.0.0 FCC Statement This equipment has been tested and found to comply with the limits for a Class A digital device,
Switch manual Models &
 Fast Ethernet Web-Smart Switch user manual Models 523813 & 523820 INT-523813/523820-UM-0607-01 introduction Thank you for purchasing the INTELLINET NETWORK SOLUTIONS Fast Ethernet Web-Smart Switch (6 RJ-45
ClearCube F6151 Media Converter Chassis System with 10/100BaseTX to 100BaseFX Converter
 ClearCube FO-065-1200 series 12-Port Media Converter ClearCube F6151 Media Converter Chassis System with 10/100BaseTX to 100BaseFX Converter User s Manual 1 ClearCube Connectivity Systems F6151 Media Converter
User Manual. VDSL2 Router with 11n WiFi. Model:DV2211
 Model:DV2211 User Manual VDSL2 Router with 11n WiFi Model:DV2211 V33 User Manual 1 Model:DV2211 TABLE OF CONTENTS... 1 Device Installation... 4 Power on Router... 4 Factory Reset Button... 5 Network Connections...
USER GUIDE. EZ Switch TM 10/100/ G Port Unmanaged Fast Ethernet Switch SMCFS2601
 USER GUIDE EZ Switch TM 10/100/1000 24+2G Port Unmanaged Fast Ethernet Switch SMCFS2601 EZ Switch TM 10/100/1000 User Guide From SMC s EZ line of low-cost workgroup LAN solutions 20 Mason Irvine, CA 92618
GSW-2453 Gigabit Chassis switch. User Guide
 GSW-2453 Gigabit Chassis switch User Guide Contents 1. INTRODUCTION... 1 Features... 1 Package Contents... 2 Ethernet Switching Technology... 2 2. HARDWARE DESCRIPTION... 4 Physical Dimension... 4 Front
Hardened Web-Smart PoE & High Power PoE Ethernet Switch
 Quick Start Guide This quick start guide describes how to install and use the Hardened Web-Smart PoE (Power over Ethernet) and High Power PoE Ethernet Switch. This is the switch of choice for harsh environments
PowerLine HD. user manual. Model * INT UM
 PowerLine HD Ethernet Adapter user manual Model 503839* * This manual can also be used for the PowerLine HD Ethernet Adapter Starter Kit, Model 503808 INT-503839-UM-0608-01 introduction Thank you for purchasing
24-Port 10/100Mbps + 2-Port. Gigabit Ethernet Switch FGSW User s Manual
 24-Port 10/100Mbps + 2-Port Gigabit Ethernet Switch FGSW-2620 User s Manual Trademarks Copyright PLANET Technology Corp. 2007. Contents subject to revision without prior notice. PLANET is a registered
LevelOne GSW User Manual. 48-Port TP Fast Ethernet and 4-Port TP Gigabit w/ 2-Port shared SFP Web Smart Switch
 LevelOne GSW-5270 48-Port TP Fast Ethernet and 4-Port TP Gigabit w/ 2-Port shared SFP Web Smart Switch User Manual ii Safety FCC Warning This equipment has been tested and found to comply with the regulations
16-SLOT IN-BAND MANAGEMENT CHASSIS
 FCM-CHS2-XX 16-SLOT IN-BAND MANAGEMENT CHASSIS User's Guide. Version 1.6 FCC Warning This equipment has been tested and found to comply with the limits for a Class A digital device, pursuant to Part 15
FCN-3112 Series. 10/100/1000TX to 1000SX SNMP Managed Media Converter. Version 1.0 User Manual
 FCN-3112 Series 10/100/1000TX to 1000SX SNMP Managed Media Converter Version 1.0 User Manual Copyright 2018 Antaira Technologies, LLC. All Rights Reserved This document contains information, which is protected