Wireless Setup Guide (for Windows XP, Windows Vista, Windows 7 and Mac OSx) (3GM2Wn)
|
|
|
- Warren Dawson
- 5 years ago
- Views:
Transcription
")
1 Wireless Setup Guide (for Windows XP, Windows Vista, Windows 7 and Mac OSx) (3GM2Wn)
2 Wireless Setup Guide The following steps will take you through the process of setting up and connecting to your wireless network. You can also use these steps to troubleshoot wireless connection issues. Step 1: Checking Computer Network Settings: You will need to set the network connection on your computer to obtain an IP address automatically. Please follow the instructions appropriate for your operating system below: Below are the instructions for setting Windows XP to obtain an IP address automatically for your ethernet connection: 1. Click on the Start Menu, and go to Control Panel. 2. Click on Network Connections. (If you only see "Network and Internet Connections", open that first, and then click on "Network Connections".) 3. Right click on Local Area Connection and select Properties. 4. Double-click on Internet Protocol. 5. Select "Obtain an IP address automatically", and "Obtain DNS server address automatically". 6. Click OK, and then click OK (or Close ). Below are the instructions for setting Windows Vista to obtain an IP address automatically for your ethernet connection: 1. Click on the Start Menu, and go to Control Panel. 2. Click on Network and Sharing Centre. (If you only see "Network and Internet", open that first, and then click on "Network and Sharing Centre".) 3. Click on Manage network connections (on the lefthandside of the window). 4. Right click on Local Area Connection and select Properties. 5. Double-click on Internet Protocol Version 4 (TCP/IPv4). 6. Select "Obtain an IP address automatically", and "Obtain DNS server address automatically". 7. Click OK, and then click OK again.
3 Below are the instructions for setting Windows 7 to obtain an IP address automatically for your ethernet connection: 1. Click on the Start Menu, and go to Control Panel. 2. Click on Network and Sharing Centre. (If you only see "Network and Internet", open that first, and then click on "Network and Sharing Centre".) 3. Click on Change adapter settings (on the lefthandside of the window). 4. Right click on Local Area Connection and select Properties. 5. Double-click on Internet Protocol Version 4 (TCP/IPv4). 6. Select "Obtain an IP address automatically", and "Obtain DNS server address automatically". 7. Click OK, and then click OK again. Below are the instructions for setting Mac OS X to obtain an IP address automatically for your ethernet connection: 1. Click on the Apple Menu, and go to "System Preferences". 2. Click on "Network". 3. Click on Ethernet or "Built-in Ethernet". 4. Click on the "Configure" drop-down box, and select "Using DHCP" then click "Apply".


 is set to on and SSID Broadcast is set to Enable. 4. The default WiFi Network Name (SSID) will be NetComm Wireless.")
4 Step 2: Configuring your wireless settings: Please ensure that your modem/router is connected to your computer using an ethernet cable before continuing. Troubleshooting Tip After logging into your router, verify the following settings to troubleshoot issues with your wireless connection: - Wireless MAC filtering is disabled. - Your SSID is not hidden. - Confirm your wireless security settings (Make sure you are using the correct wireless security key). - Confirm your selected wireless security is supported by your wireless device. 1. Open you web browser and navigate to the site 2. Use admin for the username and admin for the password. Click on Wireless from the left-hand tab. 3. Please ensure Wireless (WiFi) is set to on and SSID Broadcast is set to Enable. 4. The default WiFi Network Name (SSID) will be NetComm Wireless. You may change this if desired. 5. The default Security Key will be a1b2c3d4e5. You may also change this if desired. 6. Click Save/Apply to implement any changes made.
5 Step 3: Scanning for, and connecting to your Wireless Network: You can now scan for your wireless network and connect to it. Please click the appropriate operating system listed below and follow the steps for operating system specific instructions on how to do this:
6
7 (This page intentionally left blank)


8 1. Click on the Start Menu and then Run. Type: ncpa.cpl <and click OK > You should now see the following window: 2. Right click on Wireless Network Connection and select "Properties". If you cannot see a Wireless Network Connection item, your wireless adapter may not be installed or inserted correctly. Please check this before continuing
9 with steps in this guide.
 Make sure \"Use Windows to configure my wireless network settings\" is TICKED.")
10 3. Click on the "Wireless Networks" tab, as shown below. (If you do not see this tab, you will need to enable and start the Wireless Zero Configuration service. Please refer to the steps at the end of the guide to enable this) Make sure "Use Windows to configure my wireless network settings" is TICKED. This window will list any wireless networks you have previously connected to. If you see an entry matching the SSID you obtained at the start of this guide, you will need to select it and then click "Remove". (Typically, a number of networks will be listed here. This is nothing to worry about. You can delete the other entries too. These are just stored settings and passwords for connecting to the listed networks.) If your SSID is not listed, or you have just removed it, click OK. The window will close and you should now be returned to the Network Connections control panel window.


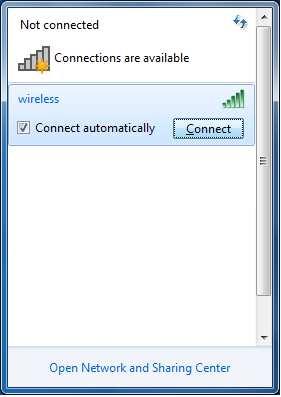
11 4. Right click on Wireless Network Connection and select "View Available Wireless Networks". 5. You should see a network listed with the SSID you obtained at the start of this guide. Select your wireless network and click Connect.
 and click \"Connect\".")

12 6. If you are prompted to enter a Network key (also known as a WEP or WPA key), please type the following into the Network key and Confirm network key sections: a1b2c3d4e5 (all in lowercase) and click "Connect". The default WEP key for most NetComm products is: a1b2c3d4e5 If you have changed this key, you will need to enter this new key instead of the one above. 7. You should now see the following window listing your network with "Connected" showing: (If you do not, you may have entered an incorrect security key, please try following these steps again.) After completing the steps above, you should now be connected to your wireless network and able to surf the internet. Please remember to disconnect your ethernet cable.
13 (This page intentionally left blank)
 3.")
14 1. Click on the Start Menu, and go to Control Panel. 2. Click on Network and Sharing Centre. (If you only see "Network and Internet", open that first, and then click on "Network and Sharing Centre".) 3. You should then see the following window: Click on "Manage wireless networks" on the left-hand side.


15 4. You should then see the following: This window will list any wireless networks you have previously connected to. If you see an entry matching the SSID you obtained at the start of this guide, you will need to select it and then click "Remove". Click OK when prompted to proceed. (Typically, a number of networks will be listed here. This is nothing to worry about. You can delete the other entries too. These are just stored settings and passwords for connecting to the listed networks.) If your SSID is not listed, or you have just removed it, close this window and you should be returned to the "Network and Sharing Center".

16 5. Click on "Manage Network Connections" on the left-hand side. 6. Right-click on "Wireless Network Connection" and select "Connect / Disconnect".
17 If you cannot see a Wireless Network Connection item, your wireless adapter may not be installed or inserted correctly. Please check this before continuing with steps in this guide. 7. You should see a network listed with the SSID you obtained at the start of this guide. Select your wireless network and click Connect.

18 8. If you are prompted to enter a Security key or passphrase (also known as a WEP or WPA key), please type the following into the Security key or passphrase section: a1b2c3d4e5 and click "Connect". The default WEP key for most NetComm products is: a1b2c3d4e5 If you have changed this key, you will need to enter this new key instead of the one above. 9. You should then see the following page while the wireless connection is started:


19 10. You may see a window that asks you to "Select a location for the 'wireless' network". Please select the "Home" location, as shown below: 11. You should then see a window prompting you to save the wireless connection. - Make sure Save this network is TICKED. - Make sure Start this connection automatically is TICKED. - Click Close to complete the wireless connection process.

20 After completing the steps above, you should now be connected to your wireless network and able to surf the internet. Please remember to disconnect your ethernet cable. (This page intentionally left blank)
 3.")
21 1. Click on the Start Menu, and go to Control Panel. 2. Click on Network and Sharing Centre. (If you only see "Network and Internet", open that first, and then click on "Network and Sharing Centre".) 3. You should then see the following window: If it is there, click on "Manage wireless networks" on the left-hand side. If it is not shown, please proceed to Step 5.


22 4. You should then see the following: This window will list any wireless networks you have previously connected to. If you see an entry matching the SSID you obtained at the start of this guide, you will need to select it and then click "Remove". Click Yes when prompted to proceed. (Typically, a number of networks will be listed here. This is nothing to worry about. You can delete the other entries too. These are just stored settings and passwords for connecting to the listed networks.) If your SSID is not listed, or you have just removed it, close this window and you should be returned to the "Network and Sharing Center".
23
24 5. Click on "Change Adapter settings" on the left-hand side. 6. Right-click on "Wireless Network Connection" and select "Connect / Disconnect".

25 If you cannot see a Wireless Network Connection item, your wireless adapter may not be installed or inserted correctly. Please check this before continuing with steps in this guide. 7. You should see a network listed with the SSID you obtained at the start of this guide. Select your wireless network and click Connect.
26


27 8 If you are prompted to enter a Security key or passphrase (also known as a WEP or WPA key), please type the following into the Security key section: a1b2c3d4e5 and click "OK". The default WEP key for most NetComm products is: a1b2c3d4e5 If you have changed this key, you will need to enter this new key instead of the one above. 9 You should then see the following displayed while the wireless connection is started:

28 10 You may then see a window that asks you to "Select a location for the 'wireless' network". Please select the "Home" location, as shown below:

29 11 You may then see a window prompting you to setup a HomeGroup. Click Cancel on this. You can come back and complete setting this up at any time by going to the Network and Sharing Centre and then clicking on the HomeGroup link at the bottom lefthandside of the Network and Sharing Centre window as shown below:

30 12 You can verify your wireless connection by clicking the Wireless Signal indicator in your system tray. After clicking on this, you should see an entry matching the SSID you obtained at the start of this guide with Connected next to it. After completing the steps above, you should now be connected to your wireless network and able to surf the internet. Please remember to disconnect your ethernet cable.
31 (This page intentionally left blank)

32 1. Click on the Airport icon at the top right corner of the screen on the menu bar, as shown below. If you cannot see an Airport icon, your wireless adapter may not be installed or inserted correctly. Please refer to your Mac user guide before continuing with the steps in this guide. 2. In the menu that is displayed, you will see a list of wireless networks in range. You should see a network listed with the SSID you obtained at the start of this guide. Click on this SSID to elect to connect to this network.
33

34 3. If you are prompted to enter a Security key or passphrase (also known as a WEP or WPA key), please type the following into the Security key or passphrase section: a1b2c3d4e5 and click "OK". The default WEP key for most NetComm products is: a1b2c3d4e5 If you have changed this key, you will need to enter this new key instead of the one above. (If you have entered an incorrect wireless security key, a message will appear, and you will be prompted to try entering the correct key again. When you enter the correct wireless security key, this window should disappear.)

35 4. The Airport icon will now have black lines to indicate signal strength. To see if the wireless is connected, click on the Airport icon again. The network that has a TICK next to is the network that you are currently connected to. After completing the steps above, you should now be connected to your wireless network and able to surf the internet. Please remember to disconnect your ethernet cable.
36 (This page intentionally left blank)
37 Enabling Wireless Zero Configuration Some wireless adapters have a 3rd party utility installed which controls the configuration and connection profiles of the wireless adapter. In these cases, it is necessary to enable a service called "Wireless Zero Configuration". The steps to do this are listed below: 1. Click on the Start Menu. Click on Run, and type: services.msc <and then click OK >. 2. Scroll down to the bottom of the list and locate the service called "Wireless Zero Configuration" and double left click on it. 3. Change the "Startup type" to Automatic, and then check the "Service status" below this; - If the Service status is Started, click OK. - If the Service status is Stopped, press the Start button on the lower left side of the window and then wait until the service has started. When it has, click OK. 4. Close the Services window.
Wireless Setup Guide (for Windows XP, Windows Vista, Windows 7 and Mac OSx)
") Wireless Setup Guide (for Windows XP, Windows Vista, Windows 7 and Mac OSx) Wireless Setup Guide The following steps will take you through the process of setting up and connecting to your wireless network.
Wireless Setup Guide (for Windows XP, Windows Vista, Windows 7 and Mac OSx) Wireless Setup Guide The following steps will take you through the process of setting up and connecting to your wireless network.
Wireless Setup Guide (for Windows XP, Windows Vista, Windows 7, Windows 8 and Mac OSx)
") Wireless Setup Guide (for Windows XP, Windows Vista, Windows 7, Windows 8 and Mac OSx) Wireless Setup Guide The following steps will take you through the process of setting up and connecting to your wireless
Wireless Setup Guide (for Windows XP, Windows Vista, Windows 7, Windows 8 and Mac OSx) Wireless Setup Guide The following steps will take you through the process of setting up and connecting to your wireless
Wireless Troubleshooting Guide
 Wireless Troubleshooting Guide NF10WV FAQs Wireless Troubleshooting guide First, check whether your modem/router s Wi-Fi is turned ON or not. Check LED light status for WiFi. If WiFi light is OFF, it means
Wireless Troubleshooting Guide
 Wireless Troubleshooting Guide NF17ACV FAQs Wireless Troubleshooting guide First, check whether your modem/router s Wi-Fi is turned ON or not. Check LED light status for 2.4 GHz and 5 GHz Wi-Fi. If 2.4
Wireless Security Setup Guide
 Wireless Security Setup Guide NF10WV FAQs Wireless Security Overview To guard your home network against attack and prevent unauthorised access, it is very important that you follow this guide to secure
1 Connect a computer and the NF10WV using an Ethernet cable. (A yellow Ethernet cable was provided with your NF10WV).
.") Wireless Setup Guide NF10WV FAQs Wireless Setup guide Login to Web User Interface 1 Connect a computer and the NF10WV using an Ethernet cable. (A yellow Ethernet cable was provided with your NF10WV). 2
Wireless Setup Guide NF10WV FAQs Wireless Setup guide Login to Web User Interface 1 Connect a computer and the NF10WV using an Ethernet cable. (A yellow Ethernet cable was provided with your NF10WV). 2
Wireless Security Setup Guide
 Wireless Security Setup Guide NF17ACV FAQs Wireless Security Overview To guard your home network against attack and prevent unauthorised access, it is very important that you follow this guide to secure
NB16WV-02 VOIP Setup Guide (for Generic)
") NB16WV-02 VOIP Setup Guide (for Generic) Configuring your NB16WV-02 for VOIP Service The following steps will take you through the process of setting up your VOIP connection. Step 1: Checking Computer
NB16WV-02 VOIP Setup Guide (for Generic) Configuring your NB16WV-02 for VOIP Service The following steps will take you through the process of setting up your VOIP connection. Step 1: Checking Computer
Wireless Security Guide (for Windows XP, Windows Vista, Windows 7, Mac OSx)
") Wireless Security Guide (for Windows XP, Windows Vista, Windows 7, Mac OSx) Wireless Security Guide This guide will take you through the process of configuring, changing or checking the wireless security
Wireless Security Guide (for Windows XP, Windows Vista, Windows 7, Mac OSx) Wireless Security Guide This guide will take you through the process of configuring, changing or checking the wireless security
Windows 7. Connecting to the Wireless Network for Internet Access
 Windows 7 Connecting to the Wireless Network for Internet Access Wireless Settings Network Name (SSID) CCCLIBRARY Wireless Mode (network type) Infrastructure IP settings Use DHCP WEP Disabled (DHCP must
NF3ADV VoIP Setup Guide (for Dodo)
") NF3ADV VoIP Setup Guide (for Dodo) Configuring your NF3ADV for Dodo VoIP The following steps will take you through the process of setting up your VoIP connection. This guide assumes that the NF3ADV already
NF3ADV VoIP Setup Guide (for Dodo) Configuring your NF3ADV for Dodo VoIP The following steps will take you through the process of setting up your VoIP connection. This guide assumes that the NF3ADV already
Quick Start Guide. N3G001W 3G Wireless Router
 Quick Start Guide N3G001W 3G Wireless Router Contents Chapter 1. Installation...3 Chapter 2. Setting up your computer...6 Windows XP PCs...6 Windows 2000 PCs...7 Windows Me PCs...7 Windows 95, 98 PCs...8
Wireless Setup Instructions
 Wireless Setup Instructions THESE INSTRUCTIONS ARE VERY IMPORTANT TO SECURE YOUR WIRELESS NETWORK The purpose of this procedure is to "lock" your router so other users can not access your network without
N B9 WM AXX N V OIP Setu p Gu ide (for Internode)
") N B9 WM AXX N V OIP Setu p Gu ide (for Internode) C on figur in g y ou r N B9W MA XXN for In te rn o d e VOIP The following steps will take you through the process of setting up your VOIP connection. Step
N B9 WM AXX N V OIP Setu p Gu ide (for Internode) C on figur in g y ou r N B9W MA XXN for In te rn o d e VOIP The following steps will take you through the process of setting up your VOIP connection. Step
Click on Close button to close Network Connection Details. You are back to the Local Area Connection Status window.
 How to configure EW-7228APn/EW-7416APn as a Repeater to extend wireless range This article can apply on EW-7228APn and EW-7416APn. We used screen shots of EW-7416APn in this instruction. We recommend you
Lab - Configure Wireless Router in Windows
 Introduction In this lab, you will configure and test the wireless settings on a wireless router. Recommended Equipment A computer with Windows installed A Wireless NIC installed An Ethernet NIC installed
Step 1: Checking Computer Network Settings:
 Configuring your 3G18WV for VOIP The following steps will take you through the process of setting up your VOIP connection. Step 1: Checking Computer Network Settings: You will need to connect your computer
Next Generation Control - Wireless Network
 Haas Technical Documentation Next Generation Control - Wireless Network Scan code to get the latest version of this document Translation Available Networking Terms and Responsibilities Networks and operating
Overview. Introduction. Contents. Linksys Wireless-N Range Extender. Front
 User Guide RE2000V2 Linksys Wireless-N Range Extender Introduction This User Guide can help you connect the extender to your network and solve common setup issues. You can find more help from our award-winning,
Figure 5-25: Setup Wizard s Safe Surfing Screen
 4. After the settings have been saved, the Safe Surfing screen will appear. Click the Norton Internet Security Suite button to install the special edition of Norton Internet Security on your computer,
How to upgrade the firmware
 How to upgrade the firmware This document will detail how to update the firmware on DAP-1150. Ensuring the firmware remains up to date can assist with functionality / improved performances as well as adding
Radiolabs Bridge in a Box Setup
 Radiolabs Bridge in a Box Setup This manual will guide you through creating a point-to-point bridge using your Radiolabs equipment. Step 1: Preparing for setup. To set the bridge up, start by unboxing
Lab - Connect to a Router for the First Time
 Introduction In this lab, you will configure basic settings on a wireless router. Recommended Equipment A computer with Windows installed An Ethernet NIC installed Wireless router Ethernet patch cable
Start Here. ADSL2+ Wireless Router Mac User Guide. Connecting your NB9WMAXX
 Start Here This User Guide provides basic instructions for connecting your NB9WMAXX to an Apple Macintosh computer and to the Internet. 1. Ethernet 2. Airport 3. Modem Set-up Before you can use this User
Fix Home Network. Thousands of satisfied users! Easy steps to setup Wireless router with Cable or DSL internet service provider.
 Fix Home Network Thousands of satisfied users! Easy steps to setup Wireless router with Cable or DSL internet service provider. Copyright, Legal Notice and Disclaimer: This publication is protected under
How to set up your wireless network
 How to set up your wireless network There are several steps involved in securing your wireless network. I recommend that you take these steps in order and only change one item at a time. While this may
Wireless Setup Instructions for Windows
 Wireless Setup Instructions for Windows NOTE: For successful wireless setup, you will need to have a network cable for a temporary connection to your wireless router or access point, and you must know
Port Forwarding Setup (NB7)
") Port Forwarding Setup (NB7) Port Forwarding Port forwarding enables programs or devices running on your LAN to communicate with the internet as if they were directly connected. This is most commonly used
Port Forwarding Setup (NB7) Port Forwarding Port forwarding enables programs or devices running on your LAN to communicate with the internet as if they were directly connected. This is most commonly used
Procedure to Upgrade Verizon FiOS Router and Configure Xbox 360 to connect with Microsoft USB WiFi Adapter
 FiOS TV & Internet Verizon DSL FAQ s Wireless Verizon Bundles Verizon Support Procedure to Upgrade Verizon FiOS Router and Configure Xbox 360 to connect with Microsoft USB WiFi Adapter Overview The current
HP Deskjet 6800 series
 HP Deskjet 6800 series Network Guide 網路指南 English English Edition 1 May 2004 Copyright 2004 Hewlett-Packard Development Company, L.P. Notice Reproduction, adaptation, or translation without prior written
Notebook Adapter. Quick Installation Guide WPC300N (EU/LA) Package Contents
 Package Contents") Package Contents Wireless-N Notebook Adapter Setup Wizard CD-ROM User Guide (English only) on CD-ROM Quick Installation 24, GHz Wireless-N Notebook Adapter Wireless Model No. WPC300N (EU/LA) Quick Installation
Package Contents Wireless-N Notebook Adapter Setup Wizard CD-ROM User Guide (English only) on CD-ROM Quick Installation 24, GHz Wireless-N Notebook Adapter Wireless Model No. WPC300N (EU/LA) Quick Installation
Quick Start Guide for Standalone EAP
 Quick Start Guide for Standalone EAP CHAPTERS 1. Determine the Management Method 2. Build the Network Topology 3. Log In to the EAP 4. Edit the SSID 5. Configure and Manage the EAP This guide applies to:
Self Help Guide. APPLIES TO: F1PI241EGau
 APPLIES TO: F1PI241EGau TABLE OF CONTENTS:- Enable Wireless on your Modem/Router 1 Setup Wireless Encryption 3 Wireless Security Information 3 64 Bit WEP 4 128 Bit WEP 6 WPA 8 Connecting to the Wireless
NB16WV VOIP Setup Guide (for GoTalk)
") NB16WV VOIP Setup Guide (for GoTalk) Configuring you r NB16WV for VO IP Service The following steps will take you through the process of setting up your VOIP connection. Step 1: Checking Computer Network
NB16WV VOIP Setup Guide (for GoTalk) Configuring you r NB16WV for VO IP Service The following steps will take you through the process of setting up your VOIP connection. Step 1: Checking Computer Network
QUICK INSTALLATION GUIDE
 QUICK INSTALLATION GUIDE Hi-Gain TM USB Wireless-150N Window Adapter with Range Amplifier Mac OS X Windows XP Windows 7 & Vista START HERE HAWNU2 OVERVIEW Check Package Contents - One Hi-Gain USB Wireless-150N
INFORMATION TECHNOLOGY
 INFORMATION TECHNOLOGY Configuring and connecting a Mac OS X 10.5x (Leopard) to the eduroam (802.1x) Wireless Service NOTE to Mac OSX 10.6x users: This information relates to configuring a Snow Leopard
Learn How to Configure EnGenius Wi-Fi Products for Popular Applications
 Learn How to Configure EnGenius Wi-Fi Products for Popular Applications Operation Modes Access Point (AP) / WDS AP Client Bridge (CB) Repeater WDS Bridge Client Router AP Router Access Point An access
How to setup the range extender by using the
 How to setup the range extender by using the Setup Wizard in CD Disc Thank you for purchasing Edimax Wireless Access Point. We hope this instruction can help you setup the extender to extend your existing
IT Department. Basic WIFI Troubleshooting on ACC SSID. October 2017
 October 2017 IT Department Basic WIFI Troubleshooting on ACC SSID Many times WIFI issues can be solved with a few simple fixes. Some of the most common example are below: Symptom 1 Desired Wireless network
A Connect the Broadband Router
 A CheckPoint FTS Broadband Linksys WRT54G Router Setup V2 A Connect the Broadband Router PRINT THIS DOCUMENT FOR REFERENCE IMPORTANT: Before you begin, disconnect any computers that are connected to your
How to manually set up EW-7228APn to extender wireless range
 How to manually set up EW-7228APn to extender wireless range 1. Find out the IP address of your computer. Have your computer get on Internet as normally, without EW-7228APn turning on. If you use a Windows
simplifying... Wireless Access
 simplifying... Wireless Access Contents Introduction... 1 Android Devices... 1 Apple Devices... 4 ipad, iphone & ipod... 4 Macbook... 6 Windows Devices... 7 Windows 7... 7 Windows Vista... 9 Windows XP...
How to connect your device using eduroam
 How to connect your device using eduroam Banaras Hindu University is now fully covered under eduroam, a service with more than 70,000 member academic institutions worldwide. This service allows authorized
First: Obtain a Linksys "WUSB300N for V11A" adapter kit: it contains the USB wireless
 First: Obtain a Linksys "WUSB300N for V11A" adapter kit: it contains the USB wireless network adapter (with USB extension cable and Windows XP installation CD.) Before plugging in the adapter, verify that
Step 5: Plug the power adaptor into the PWR socket on the back of the modem. Plug the other end of the power adaptor into the wall socket.
 Before you start You will need your username and password from ISP. All devices on your phone line will need to have an ADSL line filter attached to them. This includes Telephones, Fax Machines, and Dial-up
Lab 7.5.1: Basic Wireless Configuration
 Topology Diagram Learning Objectives Configure options in the Linksys Setup tab. Configure options in the Linksys Wireless tab. Configure options in the Linksys Administration tab. Configure options in
Connection to the OS32C
 Connection to the This section describes how to connect a PC with the configuration software and the. The configuration software is connected to the via Ethernet. An Ethernet cable with an M12, 4-pin connector
How to setup EW-7428HCn as a range extender for an existing Wi-Fi network
 How to setup EW-7428HCn as a range extender for an existing Wi-Fi network Thank you for purchasing Edimax EW-7428HCn High Power Ceiling Mount Wireless PoE Range Extender / Access Point. This guide will
Lab Viewing Wireless and Wired NIC Information
 Objectives Part 1: Identify and Work with PC NICs Part 2: Identify and Use the System Tray Network Icons Background / Scenario This lab requires you to determine the availability and status of the network
C-Assist Set up Guide
 C-Assist Set up Guide Wireless connection to and projection from PCs Macs and Mobile Devices CASIO COMPUTER CO., LTD. Contents Heading Wirelessly Connecting your PC/Mac to your Casio Projector Page Process
How to setup WL-WN575A2/WL-WN575A3 Repeater Mode through Ethernet Cable
 How to setup WL-WN575A2/WL-WN575A3 Repeater Mode through Ethernet Cable The following setup procedure is for INITIAL SETUP. If your product has been configured before, we suggest you to RESET the product
Part # Quick-Start Guide. SpeedStream 6500 Residential Gateway
 Part # 007-6510-001 Quick-Start Guide SpeedStream 6500 Residential Gateway Before you begin, Verify that the following items came with your DSL kit: Step 1 > Install Line Filters 1 2 4 5 6 1 SpeedStream
BEFORE INSTALLATION: INSTALLATION:
 QUICK USER GUIDE INFORMATION TECHNOLOGY SERVICES SWINWIFI INSTALLATION GUIDE FOR WINDOWS XP BEFORE INSTALLATION: 1. Download Swinwifi installer to your desktop. You may download it from http://www.swinburne.edu.my/current_students.php.
How to change the GEN4 Wireless Network Name and Password for the NETGEAR N600 Race Car Wireless Router
 The GEN4 Wireless Network default Name and Password for the NETGEAR N600 Race Car Wireless Router are identified on the GEN4 Wireless Network Name (NETGEAR) and Security Key (Password) ID card located
Network Configuration
 Network Configuration Setting up your Home or Office network to allow your DVR to be accessible externally can be kind of tricky, but I will try to explain basic network concepts to allow you to configure
NW611. AC600 WiFi Dual Band USB Adapter with 5dBi Antenna
 NW611 AC600 WiFi Dual Band USB Adapter with 5dBi Antenna Chapter 1: Introduction..3 1.1 Product Features..3 1.2 Package Contents.3 1.3 Indicator Description.3 CHAPTER 2: Quick Installation Guide.4 2.1
User Guide AE6000. Wireless Mini USB Adapter AC580 Dual Band
 User Guide AE6000 Wireless Mini USB Adapter AC580 Dual Band a Contents Product Overview Features 1 Installation Installation 2 Wireless Network Configuration Wi-Fi Protected Setup 3 Wireless network configuration
Quick Setup Guide. for Standalone Omada Access Points. EAP110 / EAP115 / EAP225 / EAP245 / EAP320 / EAP330 / EAP115-Wall
 Quick Setup Guide for Standalone Omada Access Points EAP110 / EAP115 / EAP225 / EAP245 / EAP320 / EAP330 / EAP115-Wall EAP110-Outdoor / EAP225-Outdoor / EAP225-Wall 1910012420 REV1.0.1 May 2018 Omada EAP
How to refresh a Wireless Profile on your computer
 How to refresh a Wireless Profile on your computer This document details how to delete the old Wi-Fi connection profile stored on your computer so it does not conflict with your new Wi-Fi connection When
Wireless Printing Updated 10/30/2008 POLICY. The use of Wireless Networking is not permitted at any site for full client/server networking of Taxwise.
 Updated 10/30/2008 POLICY Tax-Aide Wireless Printing Policy The use of Wireless Networking is not permitted at any site for full client/server networking of Taxwise. Wireless networking, for the purpose
4 Enter an IP address and sub-net mask for the ftp server and. 5 Go to the [System and Maintenance] > [Administrative Tools]
![4 Enter an IP address and sub-net mask for the ftp server and. 5 Go to the [System and Maintenance] > [Administrative Tools]](/thumbs/87/97409897.jpg "4 Enter an IP address and sub-net mask for the ftp server and. 5 Go to the [System and Maintenance] > [Administrative Tools]") $00_WT-4_En.book Page 115 Friday, August 10, 2007 2:02 PM 4 Enter an IP address and sub-net mask for the ftp server and click [OK]. 5 Go to the [System and Maintenance] > [Administrative Tools] control
$00_WT-4_En.book Page 115 Friday, August 10, 2007 2:02 PM 4 Enter an IP address and sub-net mask for the ftp server and click [OK]. 5 Go to the [System and Maintenance] > [Administrative Tools] control
Start Here. Important setup information. Remove all tape and lift display. Locate components
 Start Here 1 Important setup information Wireless or wired network users: you must follow the instructions in this setup guide to be successful adding the HP All-in-One to your network. USB cable users:
High Gain USB Wireless Adapter RNX-AC600HGUBE. User Manual
 RNX-AC600HGUBE User Manual Table of Contents Chapter 1: Introduction....... 03 1.1 Product Features.... 03 1.2 Package Contents...... 03 1.3 Indicator Description... 03 CHAPTER 2: Quick Installation Guide......
STEP 1 GETTING STARTED
 GETTING STARTED STEP 1 Check Package Contents for: 1.) One HMPS2U Wireless Multifunction USB Device Server 2.) Setup CD with Wireless Multifunction USB Device Server Software 3.) One DC 12V/1.5A Power
Wireless USB 600AC USER MANUAL. Dual Band USB Adapter. HNW600ACU Rev
 Wireless USB 600AC Dual Band USB Adapter USER MANUAL HNW600ACU Rev. 2.0 www.hamletcom.com Table of Contents 1. Introduction... 4 1.1 Product Features... 4 1.2 Package contents... 4 2. Wireless USB Adapter
2) INSERT THE SETUP CD
 INSERT THE SETUP CD") 1 2 3 1) POWER UP After you have correctly connected your Range Extender to an available Ethernet port on your Network, please power on the Extender and a PC that is also on the netw ork.. 2) INSERT THE
1 2 3 1) POWER UP After you have correctly connected your Range Extender to an available Ethernet port on your Network, please power on the Extender and a PC that is also on the netw ork.. 2) INSERT THE
NET-DYN USB Dual Band (Mediatek) Installation Guide. This manual is divided into three parts: Windows XP, Windows 7 / 8 / 8.
 Installation Guide. This manual is divided into three parts: Windows XP, Windows 7 / 8 / 8.") Installation Guide NET-DYN USB Dual Band (Mediatek) Installation Guide This manual is divided into three parts: Windows XP, Windows 7 / 8 / 8.1 /10, and Mac 1.Windows XP Please do the following steps to
Installation Guide NET-DYN USB Dual Band (Mediatek) Installation Guide This manual is divided into three parts: Windows XP, Windows 7 / 8 / 8.1 /10, and Mac 1.Windows XP Please do the following steps to
WIRELESS 150N USB 2.0 ADAPTER
 WIRELESS 150N USB 2.0 ADAPTER DN-70440-1 Rev.2 DN-7042-1 Rev.3 Manual DN-70440-1 Rev.2 DN-7042-1 Rev.3 1 / 38 Chapter 1: Introduction..3 1.1 Product Features..3 1.2 Package Contents.3 1.3 Indicator Description.3
Activity Configuring and Securing a Wireless LAN in Packet Tracer
 Activity Configuring and Securing a Wireless LAN in Packet Tracer Objectives: 1. Configure a Wireless Access Point (WAP) local IP address. 2. Configure a WAP with an SSID. 3. Change the administrator s
WI-FI HUB+ TROUBLESHOOTING GUIDE
 WI-FI HUB+ TROUBLESHOOTING GUIDE Overview This guide is here to provide some answers to some commonly asked questions about your Wi-Fi Hub+. Tip: you can connect to your Wi-Fi Hub+ using an Ethernet cable
TCP/IP CONFIGURATION 3-6
 TCP/IP CONFIGURATION 3. Type IPCONFIG /RENEW and press the Enter key. Verify that your IP Address is now 192.168.2.xxx, your Subnet Mask is 255.255.255.0 and your Default Gateway is 192.168.2.1. These
ABS-VAP11N Quick Setup Guide
 ABS-VAP11N Quick Setup Guide SETUP 1. On the PC you will use to configure the ABS-VAP11N bridge: Disable, if present, the Wireless Network Connection (WiFi). Enable the Local Nework Connection (Ethernet)
1. You have a Wireless router from Edimax. We used BR-6258n as example. Your screen may look somewhat different with BR-6258n.
 EDIMAX COMPUTER INC. 2011 Edimax Computer 3350 Scott Blvd., Building #15 Santa Clara, California 95054, USA Phone 408-496-1105 Fax 408-980-1630 www.edimax.us 1 Congratulations on your purchase of the Edimax
WIFI MEDIA PLAYER QUICK SETUP GUIDE
 WIFI MEDIA PLAYER QUICK SETUP GUIDE CONNECTING MEDIA PLAYER TO WIRELESS NETWORK: (*11n Wireless router is highly recommended) Connect the Media Player to TV with supplied A/V or HDMI (Not Supplied) cable.
Quick Start Guide. NP290W Turbo Wireless HomePlug
 Quick Start Guide Turbo Wireless HomePlug Contents Chapter 1 Introduction... 3 1.1 Minimum Requirements... 3 1.2 Typical Turbo Wireless HomePlug Connection... 3 1.3 Package Contents... 3 Chapter 2 Turbo
VR1600v (NBN FTTN & NBN FTTB) Windows 10
 Windows 10") (NBN FTTN & NBN FTTB) Windows 10 IMPORTANT MESSAGE Your modem has already been pre-configured, you do not need to follow each step of the set-up guide but should retain this document in case you need to
(NBN FTTN & NBN FTTB) Windows 10 IMPORTANT MESSAGE Your modem has already been pre-configured, you do not need to follow each step of the set-up guide but should retain this document in case you need to
iconnect625w Copyright Disclaimer Enabling Basic Wireless Security
 iconnect625w Enabling Basic Wireless Security Copyright Copyright 2006 OPEN Networks Pty Ltd. All rights reserved. The content of this manual is subject to change without notice. The information and messages
SETTING UP A NETWORK CONNECTION
 2 Page 2 SETTING UP A NETWORK CONNECTION In order to setup ICE TV or use the FTP service to transmit files to your computer you must first setup a network connection with your router. The connection can
HI-SPEED INTERNET USER GUIDE
 HI-SPEED INTERNET USER GUIDE Wireless Modem Router - 2704N 2014-09 VERSION 1-800-360-8555 TABLE OF CONTENTS 1. Installing Your Wireless Modem Router...4 1.1 Hardware Provided...4 1.2 Connecting Your Modem
Lab: Configure Wireless Security
 16.3.1 Lab: Configure Wireless Security Introduction Print and complete this lab. In this lab, you will configure and test the wireless settings on the Linksys WRT300N. Recommended Equipment Two computers
Murray Bridge High School Connecting to the BYOD Network Mac OS X Version 3 Amended 2/10/2014
 Murray Bridge High School Connecting to the BYOD Network Mac OS X 10.7 10.9 Version 3 Amended 2/10/2014 Use of the Murray Bridge High School BYOD (Bring Your Own Device) facilities and network is subject
NETWORK USER S GUIDE. Multi-Protocol On-board Ethernet Multi-function Print Server and Wireless Ethernet Multi-function Print Server
 Multi-Protocol On-board Ethernet Multi-function Print Server and Wireless Ethernet Multi-function Print Server NETWORK USER S GUIDE This Network User's Guide provides useful information of wired and wireless
The Launch GDS can be updated via a wireless internet connection as well as by USB or cat5 cable.
 LAUNCH Wifi Setup Procedure The Launch GDS can be updated via a wireless internet connection as well as by USB or cat5 cable. If you are in a wifi hotspot or have an open network available simply choose
Nano USB Wireless Adapter RNX-AC600NUB. User Manual
 RNX-AC600NUB User Manual Table of Contents Chapter 1: Introduction....... 03 1.1 Product Features.... 03 1.2 Package Contents...... 03 1.3 Indicator Description... 03 CHAPTER 2: Quick Installation Guide......
Network Guide NPD EN
 NPD4874-02 EN Contents Contents Introduction Notices... 3 About this manual... 3 Caution, Important and Note... 3 Operating System Versions... 3 Network Basics... 4 Wi-Fi (wireless) network... 4 Ethernet
PLEASE READ THESE INSTRUCTIONS BEFORE CONFIGURING OR DEPLOYING YOUR BULLET HIGH SPEED WIRELESS PLATFORM (S)
") Wireless and Beyond www.radiolabs.com Bullet-Backfire Kit W/O2Wind PLEASE READ THESE INSTRUCTIONS BEFORE CONFIGURING OR DEPLOYING YOUR BULLET HIGH SPEED WIRELESS PLATFORM (S) Thank you for purchasing a
Wireless and Beyond www.radiolabs.com Bullet-Backfire Kit W/O2Wind PLEASE READ THESE INSTRUCTIONS BEFORE CONFIGURING OR DEPLOYING YOUR BULLET HIGH SPEED WIRELESS PLATFORM (S) Thank you for purchasing a
Configuring the WT-4 for ftp (Infrastructure Mode)
") En Configuring the WT-4 for ftp (Infrastructure Mode) Mac OS X Introduction This document provides basic instructions on configuring the WT-4 wireless transmitter and a Mac OS X (10.5.2) ftp server for
En Configuring the WT-4 for ftp (Infrastructure Mode) Mac OS X Introduction This document provides basic instructions on configuring the WT-4 wireless transmitter and a Mac OS X (10.5.2) ftp server for
DCP585CW Windows Network Connection Repair Instructions
 Difficulty printing from your PC can occur for various reasons. The most common reason a networked Brother machine may stop printing, is because the connection between the computer and the Brother machine
Table of Contents. Camera Anatomy... pg 1. Package Contents... pg 2. Camera Assembly... pg 3. Account Login... pg 5. Adding a New Camera...
 Table of Contents Camera Anatomy... pg 1 Package Contents... pg 2 Camera Assembly... pg 3 Account Login... pg 5 Adding a New Camera... pg 6 Wireless Configuration... pg 9 WPS Enabled Routers... pg 13 Technical
Part # Quick-Start Guide. SpeedStream 4200 Modem PPPoE Modem Router
 Part # 007-0-00 Quick-Start Guide SpeedStream 00 Modem PPPoE Modem Router Before you begin, Verify that the following items came with your DSL kit: Step > Install Line Filters 7 SpeedStream Device Documentation
Connecting to ehoundnet-fsa
 Connecting to ehoundnet-fsa Encrypted Wi-Fi at Loyola for Faculty, Administrators, Staff, & other Employees Contents Connecting with a Loyola-Issued PC... 2 Connecting with a Non-Loyola Issued PC... 4
Reset the Router's factory defaults by hold the button pressed down for about 10 seconds.
 Indicator Color Status Description Power Green On Power is on. - Off Power is off or the device is down. WLAN Green Blink Data is being transmitted. - Off Radio switch is shut off. Green On Connection
Edith Cowan University Information Technology Services Centre
 Information There are three wireless networks on campus which give you access to the ECU website, the staff intranet, the internet and other ECU resources: ECU This is the easiest to use and safest wireless
Linksys EA-Series Routers
 Routers Table of Contents Table of Contents Product overview EA2700/EA3500 Back view Bottom view EA4500 Top view Back view Setting Up Your EA-Series Router Where to find more help How to set up your router
Wireless USB Port Multi-Functional Printer Server. Model # AMPS240W. User s Manual. Ver. 1A
 Wireless USB 2.0 1-Port Multi-Functional Printer Server Model # AMPS240W User s Manual Ver. 1A Table of Contents 1 Introduction...3 1.1 Package Contents... 3 1.2 System Requirements... 3 2 Multi-Functional
Wi-Fi 300N USER MANUAL. Nano USB Adapter HNWU300NN.
 Wi-Fi 300N Nano USB Adapter USER MANUAL HNWU300NN www.hamletcom.com Table of Contents 1. Introduction... 4! 1.1 Product Features... 4! 1.2 Package contents... 4! 2. Wireless USB Adapter Installation...
Internet and Phone in One Quick Start Guide
 Internet and Phone in One Quick Start Guide Start here! Welcome to BoB2 This guide provides easy, step-by-step instructions on settings up your new hardware and getting online. If you re just here for
QUICK START GUIDE. NetCommWireless. Outdoor Dual Band WiFi N Access Point NP731
 QUICK START GUIDE Outdoor Dual Band WiFi N Access Point NP731 WELCOME Thank you for choosing a NetComm Wireless NP731 Outdoor Dual Band WiFi N Access Point. This guide will help you set up, connect and