Table of Contents. Chapter 1 Introduction Chapter 2 Quick Install... 7
|
|
|
- Beverly Scott
- 6 years ago
- Views:
Transcription

1 AVA-88

2 WELCOME Congratulations on purchasing the AVA-88. The AVA-88 integrates multiple complicated control, automation and internet protocols into one simple plug-and-play device. It is a central controller that integrated and control of all wireless Z-wave devices used for home automation and keeps connect and control of your home easily, no matter where you are. Please take a few minutes to read this guide to set up your AVA-88 and Z-wave network smoothly. Manual version V Avadesign Technology Co. Ltd. 4F.-10, No.351, Sec. 2, Zhongshan Rd., Zhonghe Dist., New Taipei City 23504, Taiwan R.O.C. 1
3 Table of Contents Chapter 1 Introduction Key Features Technical Specifications Hardware Overview Front Panel Back Panel Chapter 2 Quick Install Unpacking The Procedure of Connection Find the IP address of your AVA Setup Wi-Fi for your AVA System Network General Setup Advanced Settings Physical Settings Firewall Settingsb Zwave Logout Initial setup procedure for AVA-88 web configuration Chapter 3 Full web configurations Enter web configure page SetZwave Z-Wave device settings The Z-Wave device configuration Add a Z-Wave device Remove a Z-Wave device Z-Wave Control and Log Topology Door Lock Security Version Information Room Setting Create Room
4 3.3.2 All Rooms Device Setting Scene Setting Create Scene All Scenes Trigger Monitor the Z-Wave Devices Create Trigger Schedule Arrangement for Z-Wave Devices on Schedule Create Schedule Report Camera Camera Setting Camera View Help
5 Chapter 1 Introduction AVA-88 is a central controller that integrated and control of all wireless Z-wave devices used for home automation. It also provides Gateway to connect to Internet. Through Internet you can see all kinds of devices status of your home at any time and any place via your smartphone or PC. You can control the home devices such as lighting, air conditioning, door lock and unlock, you can also receive the alarm message of your home. Energy usage monitors of your home at any time is real-time recording to the cloud host, home alarm messages are immediately delivered to the cloud message monitoring center for the necessary treatment. The AVA-88 controls switches, dimmers, motion sensors, temperature sensors and so on many Z-Wave devices. AVA-88 integrates complicated control, automation and internet protocols into one simple plug-and-play device. It provides an interface that allows you to manage your home easily, whether you are at home or not. 1.1 Key Features Provide one LAN port Router function Provide one USB 2.0 Host port, you can connect Zigbee USB Dongle or USB Hard Disk Provide WiFi IEEE b/g/n Provide compatible Z-Wave Plus communication protocol that connects all kinds of Z-Wave devices that includes window sensors, electric locks, lighting dimmer controls, energy usage monitor, air quality detector, temperature and humidity sensors, fire safety sensors. Provide a service platform to connect to the cloud service. Provide IP-Cam viewing interface Provide free download APP. 1.2 Technical Specifications Technical Specifications Hardware Specifications USB Port USB Host 2.0 x1 Ethernet port RJ-45 10/100Mb, support 1 LAN Physical and Environmental Characteristics Dimensions 137(W) x 101(H) x 30(D) mm Weight 300g Operating Temp. Temp: 0 C~45 C (32 F~113 F) 4
6 & Humidity Power Adaptor outer casing Country of origin Humidity: 10% ~ 90% relative humidity, non-condensing INPUT: AC100V~240V, 50/60Hz OUTPUT: DC 5V, 2.0A Plastic Made in Taiwan Software Specifications Protocol Z-Wave WiFi IEEE b/g/n HA Functions Sense Control Z-Wave Capacity Lighting Control Door Lock Control Sensor Trigger Even Schedule setting Support mobile phone Push Notification Support Devices Place Location User account Management (admin and normal user) Support Remote update software Support 30 Z-Wave notes 1.3 Hardware Overview Front Panel 5


7 1.3.2 Back Panel For Z-Wave LAN port USB port Connect to power supply DC 5V/2A: Connecting to AC adapter. Input AC 100V~240V, 50/60Hz; Output DC 5V 2.0A LAN: RJ-45 socket, complied with Ethernet 10/100base-T. USB: USB 2.0 ports, USB Type A. 6


8 Chapter 2 Quick Install After you ve created your Z-Wave network, you ll need to install your AVA-88. Follow these steps: 2.1 Unpacking Open the carton and unpack the items. Your package should include: AVA-88 main unit x 1 pcs If items are missing or damaged, notify your Avadesign representative. Keep the carton and packing material. 2.2 The Procedure of Connection Step 1: Plug in DC power adapter to AVA-88. Step 2: Connect the Ethernet cable to your AVA-88 LAN port. LAN port Ethernet cable Step 3: Plug in AC power cord to power source. Step 4: AVA-88 begins the boot process automatically. AVA-88 provides three kinds of operational platforms, Web page, Android and ios, for users. Therefore user can configure the AVA-88 by his/her PC or smart phone or tablet. The web configuration guide is available in this manual. The installation guide for smart phone/tablet with Android system or ios system, please refer to other document. 7


9 2.3 Find the IP address of your AVA-88 Please download the Java program file named avacontrolfinderjava from the website of Avadesign Co., Ltd. to your PC. Decompress the file and click it twice by left button of your mouse. Then you will see the IP address listing of all of your AVA-88 as below. avacontrol Finder 2.4 Setup Wi-Fi for your AVA-88 (optional) If you want to use Wi-Fi, please following the setup procedure described as below. Step 1: At first, connect Ethernet cable to LAN port of AVA-88. Step 2: Type the IP address which getting from avacontrol Finder as Sec For example: type of the AVA-88 in the address bar and press Enter. The screen is shown as follows. Step 2-1: Please key in of your AVA-88. Step 2-2: Please input password. The default password is Step 2-3: Click on Login button. The username is root. Please input password: 1234 then click Login button on the screen. After login AVA-88, you will see the login page as shown below. 8
10 Step 3: Click on Network function in the top menu to setup your Wi-Fi network. The detailed is described at Sec Step 4: When Wi-Fi network configure has finished, please take off the Ethernet cable from LAN port of AVA-88. Login page After Login user will see the screen as above, and there are four main categories in the top menu, user can click on each category to extend detail items. System Network Zwave Logout The various configuration menus are explained below. You can select various function listed in the first line of web page display System You can backup or flash firmware in this function. This function also provides reboot the system for you. Backup / Restore You can click on "Generate archive" button on the screen to download a tar archive of the current configuration files. To restore configuration files, you also can upload a previously generated backup archive here. Flash new firmware image You can upload a sys upgrade-compatible image here to replace the running firmware. 9

11 Backup/Flash Firmware Network The network function provides Wi-Fi network configuration for users. Network page Click on Edit button, you can do general setup, or advanced settings, or physical settings and Firewall settings General Setup 10
12 General Setup You can select which protocol you need. AVA-88 provides a protocol listing of static address, DHCP client, unmanaged, PPP, PPtP, PPPoE, PPPoATM, UMTS/GPRS/EV-DO and L2TP for your choice Advanced Settings You can do advanced configuration by clicking on Advanced Settings function. Advanced Settings 11

13 Physical Settings You can create a bridge over specified interface and enables the Spanning Tree Protocol on this bridge. You also can select which interface you needed by clicking the check squares. Physical Settings Firewall Settings Choose the firewall zone you want to assign to this interface by clicking on Firewall Settings function. Select unspecified to remove the interface from the associated zone or fill out create field to define a new zone and attach the interface to it. Firewall Settings 12

14 2.4.3 Zwave You also can do Z-Wave devices setup by clicking on Zwave function. Please refer to Chapter 3 for the detailed description. ZWave home page Logout You can log out the system by clicking on Logout function. 13
15 2.5 Initial setup procedure for AVA-88 web configuration In order to set proper functions for each Z-Wave device, you can follow this flow chart before you start to configure Z-Wave devices for AVA-88. START Add the Z-wave device Function Name in the top menu SetZwave Please refer to section 3.2 Create Room Room Please refer to section 3.3 Create Scene Scene Please refer to section 3.5 Create Trigger Trigger Please refer to section 3.6 Setup Schedule Schedule Please refer to section 3.7 Report Report Please refer to section
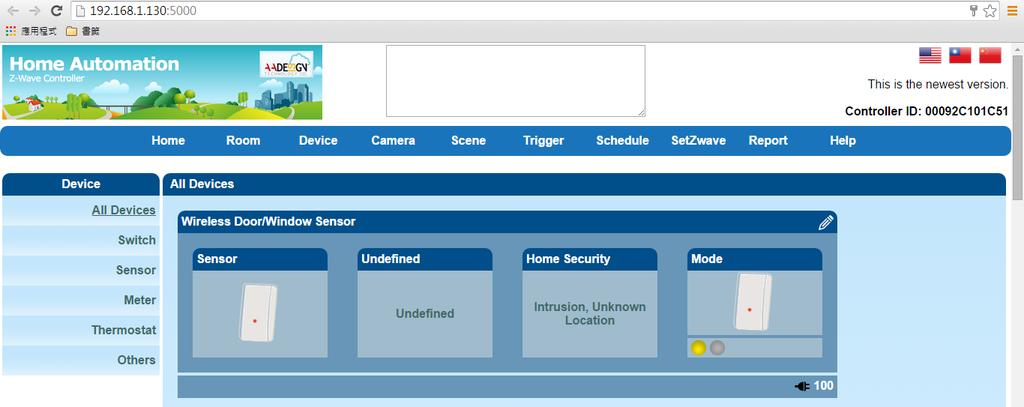
16 Chapter 3 Full web configurations 3.1 Enter web configure page Move the cursor to the IP address of AVA-88 on the screen and click it that as shown the diagram of avacontrol Finder at section 2.3. Then you will enter the web page for configuration as follows. Please input user name and password. Cancel Login Please input with username: admin and password: admin then click Login button on the screen. After login AVA-88, you will see the home page as shown below. Language selection: English, Traditional Chinese, Simplified Chinese This message indicates there is new version of configuration software for you. You can click the Update button to update your software. At right side of home page, you can see the national flag of different country for different language selection. Just click the national flag you will get which language you want. You also can see the orange color button with characters of update. Click Update button to update your configuration software. Finished the update procedure, you will see the screen as shown below. A message of This is the newest version displays on the screen now. 15
17 Update procedure Please click on OK button to update the AVA-88 software. Home Page After Login AVA-88 user will see screen as above, and there are ten main categories, user can click on each category to extend detail items. Home Room Device Camera Scene Trigger Schedule SetZwave Report 16
18 Help The various configuration menus are explained below. You can select various function listed in the first line of Home page display. 3.2 SetZwave - Z-Wave device settings One of main functions of AVA-88 is control and monitoring the room. If you would like to implementation of these efforts require the help of Z-Wave devices in order to complete the task. At first, you need to add the new Z-Wave devices to AVA-88 for control and monitoring the room or remove the Z-wave device which not used The Z-Wave device configuration Add a Z-Wave device You can add the Z-Wave device by clicking on the category of SetZwave in the menu bar. The procedure of adding the Z-wave device is described as follows. Step 1: Enter the "SetZwave" page and select "Device Configuration" SetZwave-Device Configuration Step 1a: Click on SetZwave category of main menu. Step 2: Click on Include New Device button. Step 1b: Click on Device Configuration item. Step 2: Click on the "Include New Device", the screen will appear "Add Device: Waiting for a user action." 17


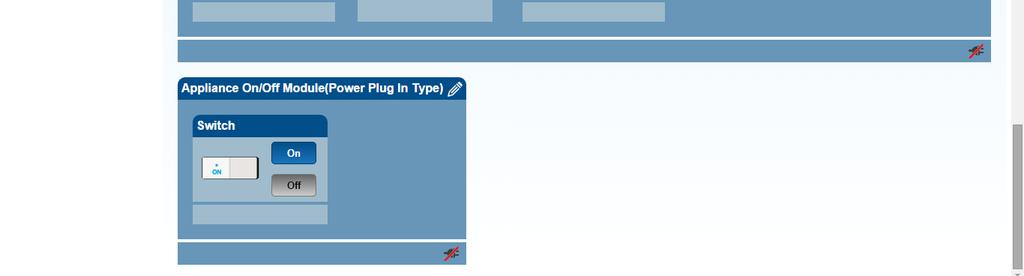
19 Step 3: Press the programming switch button on the Z-Wave device for connection. The location of programming switch button depends on the type of Z-Wave device that you use. Please refer to the user manual of the Z-Wave device. Step 3: Press the programming switch button on the Z-wave device. The Z-wave device was added successfully. Plug-in on/off module p.s. You also can buy these Z-Wave devices such as Plug-in on/off module, Door sensor, PIR sensor, Wireless siren etc. from Avadesign Technology. Step 4: When your Z-Wave device has added successfully, the message of "Add Device: Command has completed successfully" will display on the screen. Step 5: When the new Z-Wave device was found, you can modify the name and room settings as shown below. 18

20 Step 6: Then click "device", the new Z-wave device is ready to use now Remove a Z-Wave device You also can remove the Z-Wave device by clicking on the category of SetZwave in the menu bar. The procedure of removing the Z-wave device is described as follows. Step 1: Enter the "SetZwave" page and select "Device Configuration" SetZwave-Device Configuration Step 1a: Click on SetZwave category of main menu. Step 2: Click on Exclude Device button. Step 1b: Click on Device Configuration item. Step 2: Click on the "Exclude Device", the screen will appear "Remove Device: Waiting for a user action." 19
21 Step 3: Press the programming switch button on the Z-Wave device for removing. The location of programming switch button depends on the type of Z-Wave device that you use. Please refer to the user manual of the Z-Wave device. Step 3: Press the programming switch button on the Z-wave device. Plug-in on/off module The Z-wave device was removed successfully. Step 4: When your Z-Wave device has removed successfully, the message of "Remove Device: Command has completed successfully" will display on the screen. 20


22 3.2.2 Z-Wave Control and Log AVA-88 provides alarm records of all Z-Wave control devices for user as follows. SetZwave-ZwaveControl & Log When you click on Update button, you will see the listing of software version updated. Clicking on the Version button at the end of screen, the system will check the software version of AVA-88 for you automatically. You also can click the reset button to reset the system. Click on Version button to check the version. You can click the Update button to download the newest version for updating. 21


23 You also can click the reset button to reset the system shown as above diagram. Then you can click on OK button to reset the system or Cancel button to quit the reset process Topology The topology diagram shows the connection relationship of AVA-88 and all of Z-wave devices. The small square at row 1 and column 1 represents the AVA-88. The small square at row 1 and column 2 represents a Z-Wave device. Applying the topology diagram, user can decide the control path of AVA-88 and each Z-Wave device. For example, the AVA-88 can control the remote device B indirectly by device A. SetZwave-Topology A B 22

24 3.2.4 Door Lock Security You can select a door lock to add password or modify password. SetZwave-Door Lock Security Select a door lock to add or modify password. Then you will see the listing of user name and password. Clicking on the pen icon to modify the password. You also can click on the X symbol to delete the password. You can click on the Add button to add new password as below. The maximum length of password is 10 digits and you can input numeric 0 ~ 9. 23

25 You can click on the Log button to get the door lock records as below. The maximum number of logs is 5. Please input the record number that equal or less than 5 then click on Search button. The Time button on the right side of screen is used for time setting by manually. You have to input the right date and time by yourself. When you replace the battery of Electric Deadbolt, please remember to modify the date and time here Version Information Clicking on Version Information item, you will get the information of software version. SetZwave-Version Information 24
26 3.3 Room setting AVA-88 can classify and integrate all kinds of Z-Wave devices to do home automation includes room, scene, trigger, schedule and report Create room Create rooms to distribute Z-Wave devices According to the different room in the family, you can distribute the Z-Wave devices to each room. And you can learn which room was invaded or controlled household appliances quickly. Now, you can create a new room by clicking on Create Room item. Then input the room name and click on Add button. Room-Create Room Please input the room name. Then click on Add button to create a new room. You also can change the icon of the room by clicking on Change ICON button. Then you will see some pictures that you can choose for the proper room as below screen. 25


27 Bathroom Bedroom Dining room Kitchen Study room Living room or Meeting room Hallway If you change icon and input meeting room in the field of room name, and click on Add button. Then you will see the meeting room appear on the left side of screen. Congratulation! You have created a meeting room successfully. 26

28 3.3.2 All rooms You can see the device status in each room easily by clicking on All rooms item. 3.4 Device setting You can place the Z-wave device in the right room by selecting device function in the top menu and choosing a device which you want. For example, you create a meeting room at section 3.3, and you would like to place light device in this room. The setting procedure is described as following: Step 1: Select Device function and clicking on All Devices item to show all of the Z-Wave devices on the screen. Step 2: Choose the device that you need and click on the icon of pen to edit the content of device. For example, you place light device in this room. Please refer to the following screen. 27
29 Device-All Devices Step 1 Step 2: Edit 28


30 Step 3: Edit the content of light device. Please input the device name and room name. Then click on Save button to save the configuration. You also can check this node by clicking on Check and Remove button and the message of The node is OK displays on the screen. Step 4: Go back to Room function and click on Meeting room item, then you will see the light device Room-Meeting room Now, you can place another device to other room continuously. For example, you want to place electronic deadbolt in hallway. Please refer to the following screens. 29


31 Then you will find the electronic deadbolt in hallway now. 30
32 3.5 Scene Setting - Control Z-Wave devices You can control and combine a number of Z-Wave devices together and execute a designed operation action by clicking one key only Create Scene Step 1: Select "Scene" function in the top menu on the screen. Then click on Create Scene item. Please input the scene name and click on Add button. Scene-Create Scene Step 2: Now, you can see the scene was created and named as Turn on the light for meeting room. You also can edit the scene name by clicking on the icon of pen. You also can edit the scene name by clicking on the icon of pen. 31


33 Then add controlled Z-Wave devices in this scenario that shown as below. For example: you add a switch of light in this scenario. Add a new device Scrolling menu You can add more controlled Z-Wave devices in this scenario by selecting one device in the scrolling menu and clicking on the icon of plus sign on the screen. Then you will see a new controlled device display on the screen now. Delete a controlled Z-Wave device in this scenario by clicking on the icon of X. You also can delete a controlled Z-Wave device in this scenario by clicking on the icon of X. Then you will see this controlled device disappear on the screen now. Step 3: Setting the proper action for each device. For example: you can turn on the light by clicking on On button. Then you will see the color of light has changed to bright yellow. 32
34 Step 4: You can click on Run button of the scene that has set by yourself. The corresponding Z-Wave device will be used All Scenes You can see all of scenes by clicking on All Scenes item and select the scene that you want to execute. 33

35 3.6 Trigger - Monitor the Z-Wave devices Create Trigger The trigger function is used to monitor the setting of Z-wave devices, when an alarm is triggered to launch. Please refer to the following diagram for alarm setting. Trigger-Create Trigger You also can combine both of trigger and scene functions setting. For example: when people enter the meeting room, the light will be turn on automatically. Input the trigger situation and select a scene by clicking on the scrolling menu. 34
36 Then press the Save button. You will see the screen as below. A new trigger is created and displays on the left of screen. You also can modify the trigger and mode by clicking on Modify button. 3.7 Schedule Arrangement for Z-Wave devices on schedule Create Schedule You can set up a schedule to monitor the security of your home regularly. For example: When nobody at home on Saturday set up to open the Z-Wave device automatically for monitoring. Please click the check square of every week and select the day and time from the scrolling bar. And select the scene that you wanted and input the name of schedule. Then click on Save button to save the configuration of schedule. 35
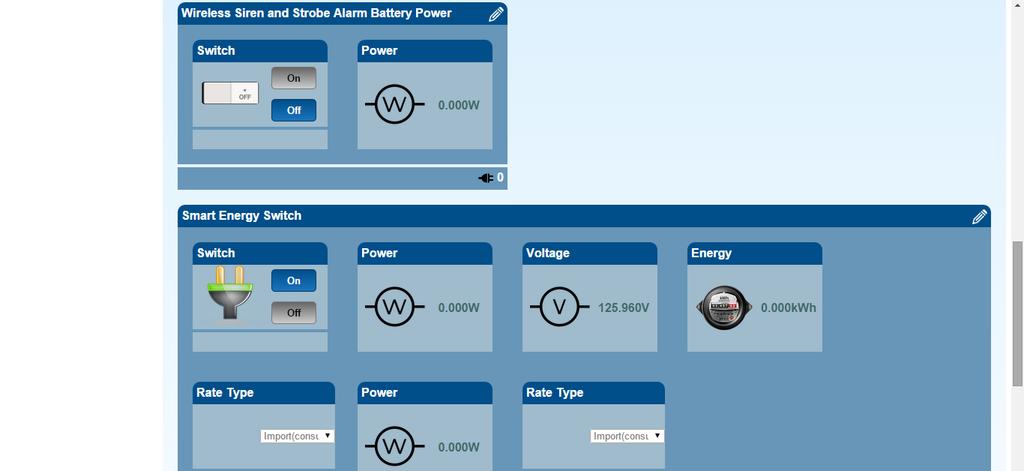
37 Schedule-Create Schedule Now you will find a new schedule of alert on Saturday is created and displayed on the screen. You can decide whether the alarm active or not by clicking on the check square. You also can modify the schedule name by clicking on Modify button. 3.8 Report You can get the power consumption of the Z-Wave device by using the report function. This function requires purchase the Smart Energy Switch device to monitor the amount of current. You can see how much power was used at which time period as shown below. Step 1: At first, select a device and unit. Then input time period. 36


38 Report Step 2: Click on Search button. Please waiting for few seconds, then the result is displayed on the screen. Amount of electricity consumption 37

39 3.9 Camera You can connect and control all of cameras in the house by the function of camera Camera Setting You can add a camera by clicking on the icon of + or remove a camera by clicking on the icon of X or edit and modify the configuration of camera by clicking on the icon of pen as shown below. Camera Camera Setting Add a camera Edit and modify the configuration of camera Remove a camera Add a Camera Please input the camera name, IP address of camera, camera port, camera URL, MJPG URL, camera account and password. Then click on OK button to save the configuration. You also can edit and modify the configuration of camera as shown below. 38


40 Edit and Modify Camera View You can view the real-time image by clicking on Camera View or the camera name. 39


41 3.10 Help The function of help in the top menu on the screen will assist you to understand how to set up and use the AVA-88 by hyperlink to Avadesign company web page to download those documents that you need. 40
SIP IP VIDEO DOOR PHONE.
 SIP IP VIDEO DOOR PHONE www.avadesign.com.tw WELCOME Congratulations on purchasing the V-Bell DP-104 SIP IP Video Door Phone. This door phone is suitable for all your business, and home, door entry communication
Avadesign Technology DP-104. IP Video Door Phone. and APP - 1 -
 DP-104 IP Video Door Phone and APP - 1 - WELCOME Congratulations on purchasing the VBell DP-104 SIP IP Video Door Phone. This door phone is suitable for all your business, and home, door entry communication
Secure Your Way of Life. Now Compa ble With. Home Security Gateway Series. Transforming Your Life
 Secure Your Way of Life Now Compa ble With Home Security Gateway Series Transforming Your Life HSGW Home Security Gateway Series Secure Your Peace of Mind The HSGW is an IP-based multi-functional RF, ZigBee,
Getting Started. Activation Process. G450 Overview
 ntrusion Started G450 Home Control Gateway Getting Getting Started This Home Control Gateway is a controller that supports home automation devices within a Home Control ecosystem. Home automation devices
HOME SECURITY KIT. USER MANUAL SMART PROTECTION WITH THE ALL-IN-ONE SOLUTION. SMART WINDOW SENSOR SMART POWER SOCKET SMART MOTION SENSOR SMART IP CAM
 HOME SECURITY KIT. SMART PROTECTION WITH THE ALL-IN-ONE SOLUTION. SMART WINDOW SENSOR SMART POWER SOCKET SMART IP CAM SMART MOTION SENSOR USER MANUAL SL-900100/900111 HOME SECURITY KIT A/B SHORT INSTRUCTION
Home Automation Gateway HA102
 USER MANUAL Home Automation Gateway HA102 TABLE OF CONTENTS 1. IMPORTANT SAFETY INFORMATION... 4 2. DEVICE DESCRIPTION... 5 3. INSTALLATION OF THE SCHWAIGER GATEWAY... 6 3.1 WIFI CONFIGURATION OF THE
Secure Your Way of Life. Now Compable With. Home Security Gateway Series. Transforming Your Life
 Secure Your Way of Life Now Compable With Home Security Gateway Series Transforming Your Life HSGW Home Security Gateway Series Secure Your Peace of Mind The HSGW is an IP-based multi-functional RF, ZigBee,
INNOV.NET PTY LTD. User guide
 User guide Version1 2016 0 Contents Compatibility... 1 What s in the package?... 1 Setup the RM Pro... 1 Meaning of the LED indicators... 2 Setup e-control on your smartphone... 2 Can I program a remote
Cockpit Main Gateway Ordering Code: CKNOAD1
 Cockpit Main Gateway Ordering Code: CKNOAD1 Table of contents 1. IMPORTANT SAFETY INFORMATION... 4 2. DEVICE DESCRIPTION... 5 3. INSTALATION OF THE COCKPIT GATEWAY... 6 3.1. WIFI CONFIGURATION OF THE
Zavio P5111/ P5116/ P5210 Quick Installation Guide
 86085M2000010 Zavio P5111/ P5116/ P5210 Quick Installation Guide Installation Steps Please follow the installation steps below to set up your P5111 / P5116/ P5210 Day/Night Pan/Tilt IP Camera. Check the
INNOV.NET PTY LTD. User guide
 User guide 0 Contents Compatibility... 1 What s in the package?... 1 Add device... 2 Legend... 2 Meaning of the LED indicators... 2 Setup the RM Mini 3... 3 Setup e-control on your smartphone... 3 How
Z-Wave Home Gateway. FG3200/FG2200 ( Z-Wave Home gateway )
") Z-Wave Home Gateway FG3200/FG2200 ( Z-Wave Home gateway ) Index INDEX... 0 INTRODUCE... 1 PRODUCT DESCRIPTION AND SPECIFICATION... 2 PACKAGE CONTENTS... 3 ICON AND COMMAND CLASSES... 3 CONNECTION:... 7
Z-Wave Home Gateway FG3200/FG2200 ( Z-Wave Home gateway ) Index INDEX... 0 INTRODUCE... 1 PRODUCT DESCRIPTION AND SPECIFICATION... 2 PACKAGE CONTENTS... 3 ICON AND COMMAND CLASSES... 3 CONNECTION:... 7
Getting Started. Gateway Activation Process. Gateway Descriptions
 Intrusion Getting Started G100 Z-Wave gateway Getting Started The G100 is a Z-Wave gateway that supports home automation devices within a Z-Wave ecosystem. Home automation devices are added to the network,
HomeTroller Zee S2 Getting Started Guide
 HomeTroller Zee S2 Getting Started Guide Congratulations on your purchase! Your HomeTroller Zee S2 is ready to put you in control of your home. Please take a few minutes to read through this guide to familiarize
Ctdigi.com. Instruction manual. Production by S & W Technology Labs
 Ctdigi.com Instruction manual Production by S & W Technology Labs I. Install app II. Guard camera Guard camera Introduction Accessory Sensor Scenario Guard 360 Introduction - Catalog - Install app Scenario
Quick Installation Guide
 Quick Installation Guide DL-200 Cellular Data logger V1.2_201610 TABLE OF CONTENTS CHAPTER 1 INTRODUCTION... 4 1.1 CONTENTS LIST... 5 1.2 HARDWARE INSTALLATION... 6 1.2.1 WARNING... 6 1.2.2 SYSTEM REQUIREMENTS...
SVT-WIFI Video Intercom System C
 SVT-WIFI Video Intercom System C User Manual Please read this user manual prior to installing the system, and keep it well for future use. CONTENTS 1. Parts and Functions... 1 2. Terminal Descriptions...
1. Press "Speed Test" to find out your actual uplink and downlink speed.
 ASRock G10 Gaming Router 6.4 QoS Settings QoS Add Gaming Boost web page. Gaming Boost: Enable or disable the Gaming Boost. Bandwidth The router supports Gaming Boost natively, which identifies and intelligently
Secure Your Way of Life. Now Compa ble With. HSVGW-G Series Home Security Voice Gateway Series. Take Smart Living Up a Notch
 Secure Your Way of Life Now Compa ble With HSVGW-G Series Home Security Voice Gateway Series Take Smart Living Up a Notch Home Security Voice Gateway Series Heart of your smart home, now made even better.
HomeTroller S6 Quick-Start Guide
 HomeTroller S6 Quick-Start Guide Congratulations on your purchase! Your HomeTroller S6 is ready to put you in control of your home. Please take a few minutes to read through this guide to familiarize yourself
Installation guide for IP Camera G2
 Installation guide for IP Camera G2 Part I: Mobile Network connection For better experience the convenience that brought by this product, please download mobile phone software before using this product.
3G/4G Wireless N150 Router m2
 NETCOMM LIBERTY SERIES 3G/4G Wireless N150 Router m2 3GM2WN Quick Start Guide The router has been designed to be placed on a desktop. All of the cables exit from the rear for better organization. The LED
V.7. zclock-30w Quick Start Guide
 V.7 zclock-30w Quick Start Guide What this guide does: This guide will help you to quickly configure and set up the zclock30w, and will briefly summarize the steps to configure the unit wirelessly and
Instruction Manual. Wi-Fi Full HD 1080p IP Concealed Junction Box Hidden Camera. V 1.3
 Instruction Manual Wi-Fi Full HD 1080p IP Concealed Junction Box Hidden Camera After Sales Support techsupport@123anfang.com www.yooseecamera.com V 1.3 Hardware Installation 1. Connect the power supply
User Manual. Microdigital IP cameras with built-in Ivideon software
 User Manual Microdigital IP cameras with built-in Ivideon software Table of Contents Introduction to Ivideon... What is Ivideon about?... Why use an IP camera with built-in Ivideon software?... How to
Saviour App User Manual. User Manual to use app. This documents describe the Saviour app functionalities for end user.
 Saviour App User Manual User Manual to use app This documents describe the Saviour app functionalities for end user. Introduction This document describes the Saviour app to use Saviour Indoor, Outdoor
THE SMART WAY TO ANSWER YOUR DOOR USER MANUAL
 THE SMART WAY TO ANSWER YOUR DOOR USER MANUAL IMPORTANT PLEASE READ THIS MANUAL CAREFULLY BEFORE OPERATING THE SYSTEM AND RETAIN FOR FUTURE REFERENCE. All devices, with the exception of the External Siren
Installation Guidelines for KODAK SA101 Alarm System
 Installation Guidelines for KODAK SA101 Alarm System CONTENTS I- Installing the central unit Pages 3-4 II- Home page Page 5 III- Central unit set-up Page 6 IV- Installation and settings: Pages 7-13 cameras
Amcrest 650 TVL DVR Quick Start Guide
 Amcrest 650 TVL DVR Quick Start Guide Version 1.0.2 Revised May 9 th, 2016 Welcome Thank you for purchasing our Amcrest 650 TVL DVR! This quick start guide will help you become familiar with our DVR in
Wireless Network Video Recorder
 LD2R/LD2R500 Wireless Network Video Recorder User Guide Version 1.0 PREFACE Thank you for purchasing the Wireless Network Video Recorder, an IP based device that installed on your network, which can be
Amcrest 960H DVR Quick Start Guide
 Amcrest 960H DVR Quick Start Guide Version 2.0.2 Revised July 22, 2015 Welcome Thank you for purchasing our Amcrest 960H DVR! This quick start guide will help you become familiar with our DVR in a very
Technical Manual Nova: Cabinet Security Management System (CSMS)
") Technical Manual Nova: Cabinet Security Management System (CSMS) KP_nova_TM_160501_EN 1 Publication May, 2016, Keyprocessor BV Paasheuvelweg 20 1105BJ Amsterdam, The Netherlands www.keyprocessor.com/nova
Technical Manual Nova: Cabinet Security Management System (CSMS) KP_nova_TM_160501_EN 1 Publication May, 2016, Keyprocessor BV Paasheuvelweg 20 1105BJ Amsterdam, The Netherlands www.keyprocessor.com/nova
F3102 / F3107 / F3110 / F3115 / F3210 / F3215 PN: 86085K K
 F3102 / F3107 / F3110 / F3115 / F3210 / F3215 86085K3000020 PN: 86085K3000030 Zavio F3102/F3107/F3110/F3115/F3210/F3215 Quick Installation Guide Please follow the installation steps below to set up F3102
Quick Start Guide. GV-Video Server. 1 Introduction. Packing List
 Introduction Quick Start Guide GV-Video Server Welcome to the GV-Video Server Quick Start Guide. In the following sections, you will learn about the basic installations and configurations of the GV-Video
BIPAC-6500 / 6500W (Wireless) Broadband VPN Firewall Router with 4-port 10/100M Switch Quick Start Guide
 Broadband VPN Firewall Router with 4-port 10/100M Switch Quick Start Guide") BIPAC-6500 / 6500W (Wireless) Broadband VPN Firewall Router with 4-port 10/100M Switch Quick Start Guide Billion BIPAC-6500 / 6500W (Wireless) Broadband VPN Firewall Router For more detailed instructions
BIPAC-6500 / 6500W (Wireless) Broadband VPN Firewall Router with 4-port 10/100M Switch Quick Start Guide Billion BIPAC-6500 / 6500W (Wireless) Broadband VPN Firewall Router For more detailed instructions
Table of Contents. Manual Overview
 Table of Contents Manual Overview D-Link reserves the right to revise this publication and to make changes in the content hereof without obligation to notify any person or organization of such revisions
D3D Security Pvt ltd
 D3D Security Pvt ltd Copyright Notice @ 2017 D3D. All right reserved. All text instructions on product information and services are protected by copyright or other intellectual property, any use of the
Secure Your Way of Life. Now Compa ble With. Home Passport Gateway-G Series. The Epitome of Smart Living
 Secure Your Way of Life Now Compa ble With Home Passport Gateway-G Series The Epitome of Smart Living Index Introduction to the HPGW-G Series 1 Features 2 The HPGW-G Comparison Chart 5 Ordering Information
IPC 112N. High Definition Capture Cam. Smart Security Wi-Fi Cam. User Manual
 IPC 112N High Definition Capture Cam Smart Security Wi-Fi Cam User Manual 2009-2018 Sakar International, Inc. All rights reserved. Windows and the Windows logo are registered trademarks of Microsoft Corporation.
G-240WZ-A GPON Residential Gateway. A-240Z-A Ethernet Residential Gateway. Nokia Smart Home user guide
 G-240WZ-A GPON Residential Gateway A-240Z-A Ethernet Residential Gateway Nokia Smart Home user guide Introduction This manual shows you how to setup and manage your Nokia Smart Home. You ll be guided step
Quick Installation Guide
 Quick Installation Guide NEXTAV TM Cloud Hub - Table of Contents Product Features... 1 Ways to Connect... 1 Hardware and Accessories... 2 Product Parameters... 2 Minimum Hardware Requirements... 2 Product
Outdoor User Manual. ios Application Android Application PC Setup
 Outdoor User Manual ios Application Android Application PC Setup Please read all instructions carefully before use to get the most out of your Outdoor Wireless Surveillance Camera. The design and features
User Manual. Rev:
 Default Login Details Login Address: www.mykasda.com Login Password: Set up by users Default Wi-Fi SSID: Kasda xxxx KW6516 (Printed on product label) Default Wi-Fi Password: 12345678 www.kasdanet.com Rev:
User Manual. Wireless IP Camera
 User Manual Wireless IP Camera Introduction Hi. Thank you for purchasing the AUKEY VT-CM1 Wireless Security IP Camera. Please read this user manual carefully and keep it in a safe place for future reference.
SmartCube 300W. Quick Installation Guide. Intelligent 3MP Wireless Cube IPCAM with Temperature and Humidity Sensor
 Setup using Smartphone and router without WPS push button. Please check if your wireless router has "WPS Push Button" shown as an example in the picture below. If it doesn't, please use this guide. If
Hello HT-HS02. HOOTOO E-HOUSE WIFI SMART OUTLET User Manual MADE IN CHINA NORTH AMERICA EUROPE
 HT-HS02 www.hootoo.com NORTH AMERICA E-mail : support@hootoo.com(us) support.ca@hootoo.com(ca) Tel : 1-888-456-8468 Tech Support: 408-627-7503 (Monday-Friday: 9:00 17:00 PST) Address: 2228 Junction Ave,
WELCOME. For customer support or any inquiries, please visit our web site at or contact us at
 WELCOME Congratulations on purchasing the GBF Smart Four Wire Intercom System. Our factory engineers were the first to enable multiple security cameras being monitored through a smart mobile device and
F3102 / F3107 / F3110 / F3115 / F3210 / F3215 PN: 86085K K
 F3102 / F3107 / F3110 / F3115 / F3210 / F3215 0 86085K3000020 PN: 86085K3000020 Zavio F3102/F3107/F3110/F3115/F3210/F3215 Quick Installation Guide Please follow the installation steps below to set up
MARQUE: GARMIN REFERENCE: EX FRS CODIC: NOTICE
 MARQUE: GARMIN REFERENCE: EX3800-100FRS CODIC: 4121198 NOTICE Model EX3800 User Manual May 2015 202-11488-01 350 East Plumeria Drive San Jose, CA 95134 USA Support Thank you for selecting NETGEAR products.
HomeTroller SEL Getting Started Guide
 HomeTroller SEL Getting Started Guide Congratulations on your purchase! Your HomeTroller SEL is ready to put you in control of your home. Please take a few minutes to read through this guide to familiarize
HomeTroller Zee Quick-Start Guide
 HomeTroller Zee Quick-Start Guide Congratulations on your purchase! Your HomeTroller Zee is ready to put you in control of your home. Please take a few minutes to read through this guide to familiarize
1. NVR Connection Diagram Wizard Setup Access System Using Mobile Device Access System Using PC Client Software 5
 1 1. NVR Connection Diagram 2 2. Wizard Setup 3 3. Access System Using Mobile Device 4 4. Access System Using PC Client Software 5 5. Access System Using Internet Explorer 8 6. Recording Setup 9 Motion
User Manual DIR-850L. Wireless AC1200 Dual Band Gigabit Router.
 User Manual DIR-850L Wireless AC1200 Dual Band Gigabit Router USER MANUAL: DIR-850L Wireless AC1200 Dual Band Gigabit Router SYSTEM REQUIREMENTS Network Requirements Web-based Configuration Utility Requirements
Firmware User Manual. Firmware version v1.0. Suitable for Product Series: Touch Panel PC Panel PC Box PC. QD-FW_Manual_v1.0
 1 Firmware User Manual Firmware version v1.0 Suitable for Product Series: Touch Panel PC Panel PC Box PC 2 Contents Features 3 System setup 3 System start up 3 System Settings 4 System Information 9 System
INDEX. Network Power Monitor NPM-R10-SNMP. Innovative Electronics for a Changing World. NPM-R10-SNMP Remote Network Power Monitor
 Innovative Electronics for a Changing World NPM-R10-SNMP Remote Network Power Monitor Optional relay board and GSM module INDEX 1. SYSTEM DESCRIPTION 2. SYSTEM BATTERY CONNECTIONS 3. SERIES CONNECTED BATTERIES
Quick Start Guide HGWIP-818
 TM TM Quick Start Guide HGWIP-818 GIVES PEACE OF MIND WHEREVER YOU ARE ELDERLY Relatives CHILDREN Sleeping/playing PETS Monitoring HOME Surveillance Welcome Thank you for choosing HOMEGUARD. Getting starting
LeFun IP Camera Quick Install Guide
 LeFun IP Camera Quick Install Guide Website: www.lefunsmart.com E-mail: support@lefunsmart.com Catalog 1. Introduction... 2 1.1. Thank you for Choosing LeFun IP Camera... 2 1.2. Introducing LeFun IP Camera...2
Samsung SmartThins Wifi ET-WV525. Samsung SmartTings Wifi Pro ET-WV535. User Manual
 Samsung SmartThins Wifi ET-WV525 Samsung SmartTings Wifi Pro ET-WV535 User Manual English (USA). 02/2018. Rev.1.0 www.samsung.com Table of Contents Getting started 3 Read me first 4 About SAMSUNG Connect
D G
 D7210 0 86085G6000010 Zavio D7210 Quick Installation Guide Please follow the installation steps below to set up your D7210 Dome IP Camera. Check the package contents against the list below. See P.1 Physical
Sentrol Cloud User s Guide Ver. 2.01
 Ver. 2.01 Copyright 2016 Nietzsche Enterprise Co., Ltd. All rights reserved Nietzsche Enterprise reserves the right to make changes and improvements to its products without notice. Contact Information:
JOOAN Wireless Network Camera
 JOOAN Wireless Network Camera Quick Installation Guide Dear Customer, we thank you very much for purchasing this product. Please read this manual carefully and keep it for future reference. 1. Installation
Sygonix Home Starter Kit
 App Instruction Manual Sygonix Home Starter Kit Item No. 1597114 www.conradconnect.de Contents Conrad Connect... 4 Symbols... 4 Core functions... 5 App to device communication... 6 App Installation...
Zavio F3100 / F3105 Quick Installation Guide
 Zavio F3100 / F3105 Quick Installation Guide Please follow the installation steps below to set up F3100 / F3105 IP Camera. Check the package contents against the list below. See P.1 Physical overview.
Amcrest Eco HDCVI DVR Quick Start Guide
 Amcrest Eco HDCVI DVR Quick Start Guide Version 1.0.1 Revised August 13th, 2015 Welcome Thank you for purchasing our Amcrest Eco HDCVI DVR! This quick start guide will help you become familiar with our
HooToo IP Camera User Manual(part two)
") HooToo Inc. HooToo IP Camera User Manual(part two) For Model: HT-IP210P Published by SunvalleyTek Group 2014/9/14 Content 1. IPCamClient (windows software)...3 Set up...3 CAM... 13 Local Setting... 13
HooToo Inc. HooToo IP Camera User Manual(part two) For Model: HT-IP210P Published by SunvalleyTek Group 2014/9/14 Content 1. IPCamClient (windows software)...3 Set up...3 CAM... 13 Local Setting... 13
Quick Start Guide. GV-Video Server
 Quick Start Guide GV-Video Server Thank you for purchasing GV-Video Server. This guide is designed to assist the new user in getting immediate results from the GV-Video Server. For advanced information
Internet User Guide. For the ZTE H298N routers. LAN4 LAN3 LAN2 LAN1 WAN Phone USB2 WAN WLAN WLAN
 Internet User Guide For the ZTE H298N routers Power WAN LAN1 Internet LAN3 LAN2 LAN4 WLAN WPS Phone USB1 Reset WPS USB2 LAN4 LAN3 LAN2 LAN1 WAN Phone On/Off Power WLAN Internet seethelight.co.uk User Guide,
Contents. 2 WiFi user guide
 WiFi user guide Contents Welcome.... 3 What this guide provides... 3 Get to know your Nokia WiFi components... 4 Nokia WiFi Gateway 3........................................................... 4 Nokia
Installing the Linksys app on your Android device via the Google Play Store and Google Play Website
 User Guide Installing the Linksys app on your Android device via the Google Play Store and Google Play Website The Linksys app is a free mobile application that allows you to securely access your home
KB Door Bell Camera Setup Guide
 Knowledge Base Text: Jimmy Wang KB Door Bell Camera Setup Guide Key Features: Replacing to the existing doorbell button, no extra wire needed * 2.1MP 1080P Full HD @30fps with audio 180 panoramic view
HD Pan Tilt IP Camera
 IP Camera User Guide Version 1.0.0.1 HD Pan Tilt IP Camera Page 1 Content 1. Hardware installation... 4 1.1 Hardware connection... 4 1.2 Network connection...5 1.3 WPS setting...5 2. ipad, iphone App introduction...5
Wireless IP Bird Box Camera
 Wireless IP Bird Box Camera Model: 4901-18 Operation and Installation Manual 1 WELCOME... 3 PRODUCT OVERVIEW... 4 HARDWARE INSTALLATION... 4 Attach the External Power Adapter... 4 SMARTPHONE OR TABLET
Page 2 of 7 How do you recognize a successful connection? After successful connection the app will show the Main Dashboard automatically. Main Navigat
 Page 1 of 7 What can you do with the Eaton xcomfort App? With this App you can easily control & visualize your xcomfort Smart Home installation. Which functionality does the App offer? The functions are
HSIP2 User Manual. ios Application Android Application PC Setup
 HSIP2 User Manual ios Application Android Application PC Setup Please read all instructions carefully before use to get the most out of your HSIP2 Wireless Surveillance Camera. The design and features
elan-rf-003 Manual / rev.5 Page 1 of 13
 Page 1 of 13 1. Introduction... 3 2. Installing the elan-rf-003, IP address... 4 3. Logging in to the web interface elan-rf-003... 4 4. Settings... 5 Configuration panel... 6 Description of functions...
HSIP2 User Manual. ios Application Android Application PC Setup
 HSIP2 User Manual ios Application Android Application PC Setup Please read all instructions carefully before use to get the most out of your HSIP2 Wireless Surveillance Camera. The design and features
LonHand series product specification
 LonHand series product specification USR-WIFIIO-83 File Version: V1.4 Jinan USR IOT Technology Limited 1 / 29 tec@usr.cn Content LonHand series product specification... 1 Content... 2 1. Quick start...
Z-Wave FHD IP Camera
 Z-Wave FHD IP Camera Smart Home FHD IP Camera with Z-Wave controller The Z-Wave FHD IP Camera is a Smart Home Solution on a Camera (SoC). This is an IP camera with Z-Wave controller/gateway functions integrated
Smart IP Video Wall PAD High Performance IP Video Wall PAD Solution
 AP-VWP100 Smart IP Video Wall PAD High Performance IP Video Wall PAD Solution Sensor Network Interworking for Sensor Devices AddPac Technology 2015, Sales and Marketing www.addpac.com Contents Smart Home
GV-SNVR1611. Introduction
 GV-SNVR1611 Introduction The GV SNVR1611 is an H.264/H.265 Linux embedded Standalone Network Video Recorder which records video files directly to the internal hard drive, supporting up to 16 channels of
ZAVIO Indoor Box Camera. Quick Installation Guide
 ZAVIO Indoor Box Camera Quick Installation Guide 1 Quick Installation Guide Please follow the installation steps below to set up your IP camera. Check the package contents with the list below. See P.2
Table of Contents Copyright 2018 Xi'an NovaStar Tech Co., Ltd. All Rights Reserved. No part of this document may be copied, reproduced, extracted or t
 Taurus Series Multimedia Players XI'AN NOVASTAR TECH CO.,L Product Version: V1.2.0 Document Number: NS120100212 Table of Contents Copyright 2018 Xi'an NovaStar Tech Co., Ltd. All Rights Reserved. No part
Smart Home System Kit
 Smart Home System Kit IP SECURITY ALARM SERIES More information, please visit the online CD information on the website http//netcam360.com 0 P a g e BRIEF INSTRUCTION 1. Start Infrared box camera a. Install
9" TABLET MODEL: SC-999 USER MANUAL
 9" TABLET MODEL: SC-999 USER MANUAL Preface Thank you for buying the MID. We wish you enjoy using it. Please read and retain all the operating instructions before operating the unit, we do not assume any
SysLINK 500 Family Quick Start Guide
 1 QS002 002 1706. Copyright 2017. Information subject to change without notice. SysLINK 500 Family Quick Start Guide SL 500 What s Included Includes SysSCRIPT Lite IoT (Internet of Things) support Remote
Wireless N Megapixel Network Camera F3101/3106
 Wireless N Megapixel Network Camera F3101/3106 86085L1000020 Package Contents Camera F3101/3106 Network Camera Quick Installation Guide To provide brief product information and quick installation and wireless
Network Video Recorder Quick Operation Guide
 Network Video Recorder Quick Operation Guide UD.6L0202B1351A01 TABLE OF CONTENTS NVR Pre-Installation... 2 NVR Installation... 2 Hard Disk Installation... 2 Front Panels... 6 DS-9500NI-ST/RT Front Panel...
Z-Wave Pan/Tilt IP Camera
 Z-Wave Pan/Tilt IP Camera Smart Home IP Camera with Z-Wave controller The Z-Wave Pan/Tilt IP Camera is a Smart Home Solution on a Camera (SoC). This is an IP camera with Z-Wave controller/gateway functions
F Series Robot Model IP Camera V2.3 User Manual
 F Series Robot Model IP Camera 2010-5 V2.3 User Manual Index 1 INTRODUCTION... 4 2 FUNCTION AND FEATURES... 4 3 APPEARANCE AND INTERFACE... 5 3.1 APPEARANCE... 5 3.2 INTERFACE OF EQUIPMENT... 6 4 NETWORK
IP Camera User Manual
 the world through my eyes R IP Camera User Manual EN App Store Google Play Version:TWS20180723 1Product description 1.1Product Feature 1.2Package Contents 1.3IP Camera Overview 1.4Operating System Requirement
AC600 Multi-Function Dual-Band Wi-Fi Router, Access Point, Range Extender, Wi-Fi Bridge & WISP
 To meet today s high-speed connectivity needs, Edimax has launched the dual-band 802.11ac router with the latest 11ac standard for extraordinary improvements in the speed, reliability and quality of wireless
wificam User's Guide Report Version: Date: November
 User's Guide Report Version: 2.0.3 Date: November 9 2004 3JTech Co., Ltd. 342 Fu-Hsing N. Rd., 2F Taipei, Taiwan Tel: +886-2-2500 6919 e-mail: info@3jtech.com.tw 1 Revision History Version Date Changes
1. Content of the Box
 Shortform Guide Short form Guide Welcome to the Look Home Control and Monitoring system Short form User Guide Please note: Internet access is required as part of the installation process. This guide supports
HD Ovi Digital Clock WiFi Hidden Camera. User s Guide WHEN YOU NEED TO KNOW.
 HD Ovi Digital Clock WiFi Hidden Camera User s Guide WHEN YOU NEED TO KNOW. HD Ovi Digital Clock WiFi Hidden Camera The HD Ovi Digital Clock WiFi Hidden Camera is a fully functional clock, displaying time
Internet User Guide, Technicolor TG589ac 1
 Internet User Guide b TV Ethernet WPS Wireless 5 Gz Wireless 2.4 Gz Internet Broadband Status For the Technicolor TG589ac router @ Internet User Guide, Technicolor TG589ac 1 seethelight.co.uk 0800 331
Key Features. Flexible docking options
 - 1 - GV-OPAL S1 Series GV OPAL S1 Key Features 1/3 progressive scan CMOS Dual streams in H.264 Up to 15 fps at 2560 x 1440, 30 fps at 1920 x 1080 High definition resolution Ease of use 100% wire free
HD 1080 Pro Black Box Security Wi-Fi Camera
 HD 1080 Pro Black Box Security Wi-Fi Camera User Manual Version: Oct, 2017 Content Quick Guide...P2 Overview...P3 Packing List...P3 Product structure...p4 Camera Part Setting...P5 Camera name and password
PRODUCT CATALOG WE MAKE THE FUTURE COME TO LIFE!
 PRODUCT CATALOG WE MAKE THE FUTURE COME TO LIFE! Table of Content X-Brain Features... [ 1 ] Home Cinema... [ 3 ] Premium Live TV... [ 4 ] Smart Home... [ 5 ] Energy Management... [ 8 ] Built-in Router...
IPCAMHD61 User Manual
 IPCAMHD61 User Manual TABLE OF CONTENTS: PRODUCT STRUCTURE DIAGRAM SETUP AN ACCOUNT USERNAME ADD CAMERA TO APP CONNECT TO YOUR NETWORK WEB ACCESS PASSWORDS MOBILE APP LAYOUT CAMERA VIEW PAGE CAMERA RECORDINGS
power port make sure the ac adapter is plugged into the correct port Make sure to include at the beginning.
 Quickstart Guide If you have a blank SD card, you may insert it into the camera. To set up your camera for use on the network, connect the camera's wired network port to a router. Connect the AC adapter