Installation Runbook for Apcera on Mirantis OpenStack
|
|
|
- Avis Hicks
- 6 years ago
- Views:
Transcription

1 Installation Runbook for Apcera on Mirantis OpenStack Application Version 440 MOS Version 7.0 OpenStack Version Application Type Kilo Platform as a Service
2 Content Document History Introduction Target Audience Application overview Joint Reference Architecture Installation & Configuration Apcera on Mirantis OpenStack installation steps... 9 Step 1: Plan your infrastructure resources... 9 OpenStack Compute Node Resources: CPU, RAM, disk... 9 OpenStack Storage Nodes: Disk Capacity...10 Step 2: Define the Network Topology...11 Step 3: Configure VMware Networking...12 Step 4: Download and install Mirantis Fuel on VMware...13 Step 5: Configure a router between the OpenStack Public network and the Internet...13 Step 6: Use Fuel to Install the OpenStack components...14 Create the OpenStack environment in Fuel...14 Configure networking for the Apcera environment...15 Create the virtual machines...17 Create a MAC to network map for each OpenStack node...19 Add Nodes to the OpenStack environment...21 Assign Roles and Configure Interfaces...21 Verify Networking...22 Deploy Changes...23 Step 7: Configure network connectivity to OpenStack...24 Step 8: Open up the Security Groups for test...24 Step 9: Import the Apcera images...25 Step 10: Create an instance of the Apcera Orchestrator...25 Step 11: Verify IP address in Orchestrator...28 Step 12: Set the Instance Flavors in OpenStack
3 Step 13: Create and verify a Floating IP address to Orchestrator...30 Step 14: Obtain, configure and upload the Apcera Orchestrator configuration file into Orchestrator...31 Step 15: Allocate OpenStack Floating IP addresses to the Apcera project...32 Step 16: Run orchestrator init...33 Step 17: Run orchestrator deploy...33 Step 18: Create wildcard DNS entry Testing Test cases...34 Appendix A: Notes on steps related to NAT...35 Step 5: Configure a router between the OpenStack Public network and the Internet...35 Step 7: Configure network connectivity to OpenStack...35 Step 11: Verify IP address in Orchestrator...38 Step 13: Create and verify a Floating IP address to Orchestrator...38 Document History Version Revision Date Description Initial Version 3
4 1 Introduction This runbook provides step-by-step instructions for installing Apcera (Orchestrator 0.2.3, cluster version 440b) in a Proof of Concept (PoC) configuration on a Mirantis OpenStack cluster (version 7.0, Kilo). This configuration offered is for Proof of Concept only. Please note that the most recent instructions for installing Apcera on Mirantis OpenStack can be found at the Apcera website at This document complements those instructions by also providing our step-by-steps on what we did to configure our demonstration lab environment. The installation steps provided in this document are for an Apcera enterprise deployment. For a more automated, streamlined deployment (limited to a single infrastructure implementation and no high availability capability), you can install the Apcera Setup Community Edition, which supports various infrastructure providers, including Mirantis OpenStack. The Apcera Setup Community Edition and installation steps can be found at Target Audience The target audience of this document is devops or IT responsible for installing and administering a Platform as a Service for users. 2 Application overview While Mirantis OpenStack handles provisioning of hardware resources in the form of virtual machine instances, the Apcera platform running in Mirantis OpenStack handles the deployment, orchestration, and governance of your application code in the multi-cloud. Apcera is a Platform-as-a-Service (PaaS) framework that runs and secures business applications on a wide range of Infrastructure-as-a-Service (IaaS) solutions, including Mirantis OpenStack. Apcera manages access to the compute resources business applications need not just on one machine or a few servers on the same infrastructure, but across a cluster of servers that may span both private and public clouds. Apcera simplifies and speeds up hybrid cloud deployment and management by extending policy across environments and enabling applications to be easily and automatically shared, moved and governed from a single control and management plane. Apcera can deploy a diverse set of workloads, including: Applications written in Java, Ruby, PHP, Go, and many other languages. Docker images from the Docker Hub. Bare OS to enable building custom application execution environments. The ideal applications that run on Apcera have the following characteristics: Application state is held externally in a database or cache Requires minimal filesystem based configuration Designed for horizontal scale Has no specific kernel requirements (can run on top of the Ubuntu kernel) With Apcera, HTTP-based and TCP-based applications can run on a variety of underlying base operating systems. 4
.")
5 Apcera encapsulates each of these workloads as a job, addressing but hiding the complexities of each, so it can apply the same orchestration and governance patterns to all of them. The Apcera Orchestrator tool provides a command-line interface to install cluster components based on a cluster configuration file (cluster.conf). The Orchestrator tool is also used to scale and update Apcera and its cluster components. 3 Joint Reference Architecture Since Apcera runs as virtual machine instances in Mirantis OpenStack (and other clouds) it is agnostic to the underlying hardware. The following diagram here is our high-level multi-cloud diagram: Logical diagram (in terms of multiple clouds) Apcera depends on infrastructure to already be allocated. The infrastructure can be in the form of bare metal servers or virtual machines. The Apcera Orchestrator interfaces with a variety of infrastructure APIs, including Mirantis OpenStack, VMware (Workstation, Fusion, or vcenter), Amazon Web Services, or Google Compute. The hardware requirements and network topology of Mirantis OpenStack depend on the architecture of your applications and resource requirements. Apcera components are deployed as virtual machine instances in Mirantis OpenStack but the amounts, resources, and structure depends on your needs. Conceptually, Apcera only needs compute and network resources from the infrastructure. For these reasons, reference architectures for Apcera are logical and start at the layers involving virtual machines. The following is an example diagram of Apcera components deployed in Mirantis OpenStack: 5
 Apcera Instance")
6 Logical diagram (in terms of Mirantis OpenStack instances) Each of the Apcera components can be deployed in different virtual machine instances. However, in our demonstration lab environment, we have a total of 3 virtual machine instances for a minimal configuration: Apcera Orchestrator Apcera Central (and non-im components) Apcera Instance Manager (IM) You should refer to the Apcera documentation and consult with Apcera to plan a deployment for a virtual machine topology including high availability and multi-cloud capability (on-premise, hybrid cloud, public cloud). Assuming all of the above, we are going to describe in this document a demonstration deployment we performed in the lab. The deployment is built inside of a VMware vcenter cluster. The following is a logical diagram showing the network and virtual machines: 6
 on a single 1U server (multicore Xeon CPU, 256GB RAM, SSD-based storage).")
7 Logical network/virtual machine diagram (NAT and DHCP in subnetwork) Note that this topology is okay for testing/proof-of-concept, but not recommended for production. At Apcera, we ran all of these components (minus DNS, vcenter, and the management PC) on a single 1U server (multicore Xeon CPU, 256GB RAM, SSD-based storage). However, the nested virtualization resulted in a magnitude increase in Apcera installation times (from 15 minutes to 2+ hours). We offer this diagram because we expect a majority of companies that have free compute resources have those resources in the form of a VMware cluster, with DHCP on the network. If you already have Mirantis OpenStack installed, after verifying you have enough resources (see Step 1, below), you can skip straight to step 8 and start with the Apcera installation. Other than compute resources, access to Apcera (command line interface (apc), web console, or applications running in Apcera) require access via DNS. For this reason, you should have a DNS server in which you can create wildcard entries (e.g. *.pikachu.buffalo.im). Once you have an IP address for the Apcera cluster, you can create a corresponding wildcard DNS entry. 7

8 Note: We used a virtual router (Vyatta) with NAT (SNAT and DNAT capability) to route between a private network and the corporate network, which has DHCP. If you run Mirantis Fuel with defaults, it will advertise DHCP, which will conflict with any existing DHCP server on the same network. Throughout this document, if we discuss anything specific to NAT for any of the steps, the text for NAT will be in Appendix A: Notes on steps related to NAT. We will reference the Appendix in the step. This next diagram is the same as the previous diagram, without VMware vcenter and the Vyatta router: This might be your minimal topology if you can install OpenStack on bare metal servers and your lab network does not run DHCP. 8
9 4 Installation & Configuration 4.1 Apcera on Mirantis OpenStack installation steps In this section, we describe the steps we took to create a demonstration lab for Apcera on a Mirantis OpenStack (minimal set of components) on VMware vsphere. This setup starts with a VMware vcenter setup with no Mirantis OpenStack or Apcera components yet installed. As we assume you will be configuring as we go through these steps, we may describe some steps as we have done, but may also instruct you to perform some steps. All of the steps in this runbook were run in the Apcera lab. Steps 1-8 is for installing Mirantis OpenStack on VMware, separating the OpenStack network from the corporate network via NAT. If you already have a complete OpenStack configuration with sufficient resources (per Step 1), you can skip to Step 9: Import the Apcera images. The following are the steps we took to build this lab: Step 1: Plan your infrastructure resources Step 2: Define the Network Topology Step 3: Configure VMware Networking Step 4: Download and install Mirantis Fuel on VMware Step 5: Configure a router between the OpenStack Public network and the Internet Step 6: Use Fuel to Install the OpenStack components Step 7: Configure network connectivity to OpenStack Step 8: Open up the Security Groups for test Step 9: Import the Apcera images Step 10: Create an instance of the Apcera Orchestrator Step 11: Verify IP address in Orchestrator Step 12: Set the Instance Flavors in OpenStack Step 13: Create and verify a Floating IP address to Orchestrator Step 14: Obtain, configure and upload the Apcera Orchestrator configuration file into Orchestrator Step 15: Allocate OpenStack Floating IP addresses to the Apcera project Step 16: Run orchestrator-init Step 1: Plan your infrastructure resources If you are able to access and review your Apcera cluster configuration file, you can plan what OpenStack instances are going to be created by Apcera Orchestrator, and therefore can plan ahead what resources (CPU/RAM/disk) are needed by your OpenStack compute and volume machines. OpenStack Compute Node Resources: CPU, RAM, disk Without sufficient CPU core count, RAM, and local disk on the Compute nodes (role assigned in Mirantis Fuel), virtual machine instances will not run and will be reported by OpenStack as Error node(s) and the Apcera Orchestrator workflow will fail to complete. OpenStack will allocate these resources directly from the Compute node(s). In our demonstration lab, we have 1 Compute node. 9
10 The default Apcera Orchestrator configuration file may call for multiples of some nodes. In our demonstration environment, we set all of the counts for each instance type to 1. This table lists the number of instances of each flavor type as well as a summary of total resources needed for the OpenStack Compute node: Flavor ID Counts VCPUs RAM(GB) Root Disk (GB) * TOTALS *= instance_manager flavor created by user We achieved these numbers by reviewing the Apcera Orchestrator configuration file and counting the number of each OpenStack Flavor needed. Note: Your numbers may vary depending on how many of each Flavor type is needed for your environment. By default, OpenStack requires a VCPU to CPU ratio of at least 8:1. Our demonstration environment has 5 CPUs allocated in VMware for the Compute node, which we felt was a conservative number for demonstration purposes. The Apcera Orchestrator will communicate with OpenStack to create virtual machine instances for the Apcera components. Multiple components may reside within any given virtual machine instance. While we are creating a minimal set of components for the Apcera cluster for the demonstration lab, for a production environment, you should work with Apcera to determine the best number of instances for each component type based on your enterprise needs. OpenStack Storage Nodes: Disk Capacity In our copy of the Apcera Orchestrator configuration file, OpenStack volumes are assigned to specific instances. This space is NOT allocated from the Compute node; instead, the disk space for this purpose will be allocated from the OpenStack node(s) with the Storage role. In our demonstration lab, we allocated 800GB of disk space from VMware for the Compute node. In the Orchestrator configuration file, the volumes section defines the volumes, their sizes, and which instances are tagged to use these volumes. In our demonstration lab, 3 volumes of 10GB each are defined, so at least 30GB of data is needed for the OpenStack Storage node. In our demonstration lab, we have a single Cinder storage node with 500GB of disk space allocated from VMware. Without sufficient disk size on the storage node, the Orchestrator workflow will fail during verification of good volume status. For a minimal configuration, you can use the default storage providers (i.e. no need to configure Cinder). 10
11 DNS Server Access to Apcera (command line, web console, and deployed applications) are accessed via name (NOT IP addresses). For this reason, a DNS server with wildcard entry capability is required. Only the client pc needs access to DNS. If you try to access Apcera by IP address you will receive a 404 error. Step 2: Define the Network Topology Even for a minimal demonstration environment, it is important to understand the Mirantis OpenStack network architecture so that you can properly setup your underlying network. In our environment, we have a single ESX server managed by vcenter, with a single NIC. Our network has a DHCP server - this is important to know because Mirantis Fuel has its own DHCP server - having both of these on the same network will conflict. Mirantis OpenStack also has a variety of ways to configure networking. In our environment, we chose the default Neutron with VLAN segmentation networking type when creating our environment in Mirantis Fuel. Instead of using VLAN tagging by OpenStack, we set up multiple VLANs on each network in vcenter. You should review the network architecture described in the Mirantis documentation. The following is a diagram of our topology: Logical diagram (in terms of VMware vcenter) Note that some information will not be known to you until you progress through these configuration steps. For example, since OpenStack allocates IP addresses from the Floating Range of IP addresses 11

12 defined in Fuel, you will not know the IP address of the Apcera Orchestrator instance until it is running in OpenStack. Step 3: Configure VMware Networking Note: This section is only for users who are installing Mirantis OpenStack on top of VMware. Skip this section if this is not applicable. From a VMware point of view, we have 6 networks: 1. Corporate/lab network, routable to the internet 2. OpenStack Admin/PXE ( MOS-internal1, VLAN 701) 3. OpenStack Storage ( MOS-internal2, VLAN 702) 4. OpenStack Management ( MOS-internal3, VLAN 703) 5. OpenStack Private ( MOS-internal4, ALL VLANs) 6. OpenStack Public ( MOS-internal5, ALL VLANs) Our ESX host has 1 NIC. We mapped the corporate network to this NIC, then created a separate internal (no NIC) vswitch for the OpenStack networks. The following is a screenshot of our VMware settings for the Mirantis Fuel virtual machine: 12
13 Step 4: Download and install Mirantis Fuel on VMware Follow the instructions by Mirantis to install Mirantis Fuel. Step 5: Configure a router between the OpenStack Public network and the Internet Please refer to Appendix A: Notes on steps related to NAT if you need to configure a NAT for DHCP separation. 13


14 Step 6: Use Fuel to Install the OpenStack components Create the OpenStack environment in Fuel In Mirantis Fuel, follow the workflow to create an environment for Apcera. The following are the screenshots for the environment we created for the Apcera demonstration lab: 14


15 Configure networking for the Apcera environment In our demonstration lab environment, we configured a separate network for each OpenStack network. Note the Floating IP ranges - we will be allocating addresses from this space for some Apcera components. Also, since we have already segmented our internal network via VLANs in VMware, we did not configure VLAN tagging in Fuel. 15

16 The following is a screenshot of the networking configuration for the Apcera environment from Fuel: 16

17 Create the virtual machines In our demonstration lab, we created 3 virtual machines in VMware for the OpenStack Controller, Compute, and Storage nodes. Each of these virtual machines has network interface on the Admin/PXE network, on which Fuel presents a DHCP/PXE environment to automatically install the OpenStack software. The following are the screenshots from VMware vcenter for the virtual machine settings: 17
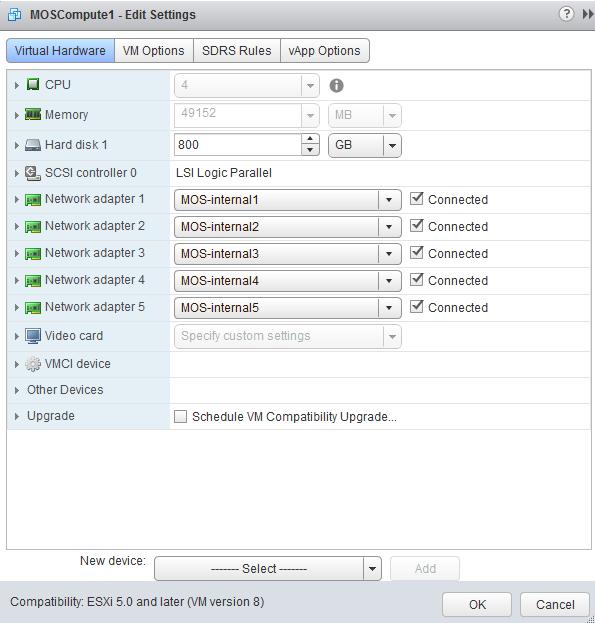
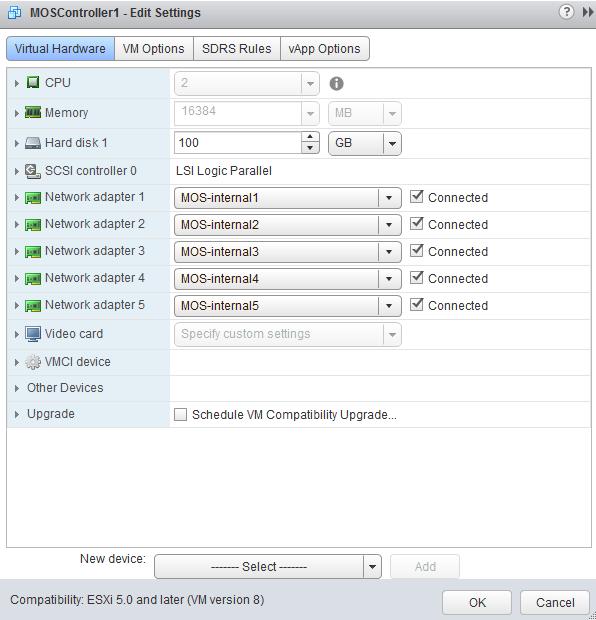
18 18

19 Create a MAC to network map for each OpenStack node In the same Edit Settings interface for each virtual machine in vcenter, expand each network interface to map at least the last few digits of the MAC address to the corresponding OpenStack network. You will need this information again to configure the networks for each node in Fuel. The following is a screenshot showing the first 3 networks for the compute node: 19

20 The following is the full MAC-to-network mapping of our demonstration network: VMware network name OpenStack network name Subnet Controller MAC (last 2 groups) Compute MAC Storage MAC MOS-internal1 Admin/PXE /24 c2:3c 27:bc 17:6b MOS-internal2 Storage /24 bf:0f e3:ba 40:41 MOS-internal3 Management /24 30:ea d4:a1 09:bf MOS-internal4 Private d7:e6 ab:e0 f5:ad MOS-internal5 Public /24 60:ee 37:75 64:7b 20
, you will be ready to add them via Fuel as OpenStack nodes with roles.")
21 Add Nodes to the OpenStack environment Once you power on the virtual machines for the OpenStack nodes, they will automatically be discovered by Fuel (DHCP/PXE) and will have a basic operating system installed. Once this has completed (you can monitor via the VMware console for progress), you will be ready to add them via Fuel as OpenStack nodes with roles. Assign Roles and Configure Interfaces Once the virtual machines have a basic OpenStack operating system installed, you can add them as nodes with roles via Fuel. Note: Do not Deploy Changes yet! You will do this after you have configured and verified networking. The following is a screenshot of the 3 nodes we configured in our demonstration lab: Edit each node to configure the networking. You will use the MAC-to-network mapping in the previous step. The following is a screenshot of the interface configuration for the controller node: 21

22 Verify Networking Back to the Networks tab for the Apcera environment in Fuel, verify networking. Fix any detected network problems. The following is a screenshot of a successful network verification in Fuel: 22

23 Note: We found verification will succeed if routing between Public and the internet allows TCP, but not UDP or ICMP. The Fuel deployment fails at the very end of the workflow when trying to contact NTP servers. We ve quickly worked around this by opening up UDP and ICMP for ingress and egress traffic on the router. Deploy Changes Now you are ready to deploy your OpenStack environment. This will take some time to complete. When this finishes, you will need a bit more networking configuration to get to the OpenStack web interface (Horizon). 23


24 Step 7: Configure network connectivity to OpenStack Mirantis Fuel installs the OpenStack network for web/ssh access on the Public network. When the OpenStack deployment completes, as part of the Success notification on the Fuel web UI, you should see the IP address for OpenStack and that your Controller and Compute nodes are Ready. Please refer to Appendix A: Notes on steps related to NAT to understand how we configured the Vyatta virtual router to NAT into our cluster. If all goes well, you should be ready to login to OpenStack Horizon web UI to continue with the Apcera installation. Step 8: Open up the Security Groups for test The following is a screenshot of the security groups we created to open up everything on the internal network: 24

25 For demo lab only purposes, we have opened up TCP, UDP, and ICMP in both directions for maximum accessibility to the test environment. For production environments, you should work with your security team to define your security groups. From a networking perspective, OpenStack security groups functionality acts as a firewall, controlling which protocols and ports are permitted in the network. Step 9: Import the Apcera images For the latest release of Apcera, import the Apcera Orchestrator and Apcera Base images into the OpenStack image library. Contact your Apcera representative if you do not have access to these images. Step 10: Create an instance of the Apcera Orchestrator As Mirantis Fuel is the deployment orchestrator for Mirantis OpenStack, the Apcera Orchestrator is a virtual machine that installs the Apcera platform. Launch a new instance of the Orchestrator image. You can do this from the Launch Action in Images or in the Instances tab. You will have to fill in some details in the Details and Networking tabs in the Launch workflow. 25
26 In the Details section, fill in the details for these fields: Instance Name Flavor: m1.small Instance Count: 1 Instance Boot Source: Boot from image Image Name: should correspond to the Orchestrator image you uploaded, above While in the Launch interfaces, in the Networking tab add a NetXX network interface to the instance, before you Launch the instance. 26

27 Please see our note above on OpenStack Network Interfaces regarding connectivity with the netxx_ext interface. Click on Launch. The Instances tab will list your new instance and give you the real-time status of the creation and initial configuration. When initial configuration completes successfully, you should see Status: Active and PowerState: Running for the Orchestrator instance. 27

28 Step 11: Verify IP address in Orchestrator For the Orchestrator instance, select Console from the Actions drop down. Please refer to Appendix A: Notes on steps related to NAT to see how we performed NAT to get to the OpenStack UI console, if you are using NAT. Once you can see the console, login to the console if needed (orchestrator/orchestrator) and use ifconfig to verify that the eth0 IP address matches that assigned by OpenStack. 28
 is assigned from the Neutron L3 space defined in Fuel. Since we want Public to be the only network to get to the internet, we need a way to get to Orchestrator from outside.")
29 With the wide open Security Groups settings, you should be able to verify a ping any external address (e.g. google.com). Note that the eth0 IP address ( ) is assigned from the Neutron L3 space defined in Fuel. Since we want Public to be the only network to get to the internet, we need a way to get to Orchestrator from outside. Similarly, your developers will want access to Apcera from outside of the OpenStack cluster. In the next set of steps, we ll associate a Floating IP (assigned from the Public space) to Orchestrator. You will use these same steps to later create access to Apcera. Step 12: Set the Instance Flavors in OpenStack The Apcera Orchestrator will connect to OpenStack to create instances with particular OpenStack Flavors. In a new OpenStack setup, m1.small (ID 2) and m1.medium (ID 3) are already defined. Create a new instance_manager (ID 6) flavor per the Create Flavors section of this document. The Orchestrator configuration file has the various flavors assigned by ID number. In the Apcera Orchestrator configuration file, the flavor variable for each component is synonymous with the flavor ID in OpenStack. OpenStack has a description of node resource templates called flavors. Apcera uses the default m1.medium and m1.small flavors, and one user created one named instance_manager. Note: The configuration file assumes a default list of OpenStack Flavors. If other flavors have already been configured, you may have to edit the flavor ID in Orchestrator configuration file for instance_manager, to match (assumes ID 6). 29
30 Note: At Apcera, we noticed that Mirantis OpenStack 7 defaulted to a longer hash string for Flavor ID. You should be able to change this to an integer for consistency and readability, if you choose. You will have to reference this Flavor ID in the Apcera cluster.conf file. Here is a list of Flavors on our default OpenStack installation used for the Apcera demonstration lab with the added instance_manager flavor: Step 13: Create and verify a Floating IP address to Orchestrator Back to the Instances interface in OpenStack, for your Orchestrator instance, select the Associate Floating IP action. 30

31 In our example, (on Public) will map to the existing address of the Orchestrator. Please refer to Appendix A: Notes on steps related to NAT for our considerations on access to the Apcera Orchestrator via NAT, if you are using NAT. At this point, you should be able to SSH into the Apcera Orchestrator instance. Step 14: Obtain, configure and upload the Apcera Orchestrator configuration file into Orchestrator Note: Apcera trials have already been pre-orchestrated and do not require the Orchestrator; hence, the Orchestrator and Orchestrator configuration file is not included. Please contact your Apcera representative to obtain a copy of the Orchestrator configuration file for OpenStack that matches the versions of Orchestrator and Apcera in your environment. Note: Preferably, you have already obtained the orchestrator configuration file to help you from Step 1. You can edit the Orchestrator configuration file with any standard text editor (note: it s good advice in the Apcera documentation to be careful of Microsoft Windows Notepad - better to use a text editor like vim in this case if you re working in Windows). 31
32 The Orchestrator configuration file contains all of the parameters needed for Orchestrator to create the Apcera cluster on OpenStack. Orchestrator will connect with OpenStack to provision instances that represent the Apcera components. In Project->Compute->Access & Security, Download the OpenStack RC File. The OpenStack RC file contains some of the data we need in the Orchestrator configuration file. Open the RC file with your favorite text editor to get the values for these variables: OS_AUTH_URL (on Public) OS_TENANT_ID (long string) OS_TENANT_NAME (admin) OS_USERNAME (admin) OS_PASSWORD (admin) In the Orchestrator configuration file, set the corresponding variables (lowercase) to the values you obtained from the RC file. In our demonstration lab environment, we also set these variables in the Orchestrator configuration file: preferred_internal_network (net04, from Project->Network->Networks) networks (take the ID of the above network) image (long string, from Admin->Images-> <name of Apcera Base image> -> ID ) floating_ip: You will have to assign IP addresses from the Public Floating IP range manually. In our demo environment, the only existing Instance is Orchestrator, which has already been assigned So we will assign the various machines in the setup. On the config file we used, we assigned Floating IPs to tcp_router ( ), ip_manager ( ), and monitoring ( ). cluster->subnet: set to the Public CIDR ( /24) The components section lists the numbers of each Apcera component. In our demo environment, we set all of these to 1. Upload the file to the Orchestrator using scp (Windows: pscp). Step 15: Allocate OpenStack Floating IP addresses to the Apcera project Allocate the Floating IP addresses from the previous step to the Project in OpenStack. These IP addresses must match those that you defined in the Orchestrator configuration file. 32


33 Note: Having this step here may seem backwards. But if this is the first time you are seeing your orchestrator configuration file, you would not know how many Floating IP addresses are required. OpenStack allocates these addresses from the bottom of the space. You do not get to pick arbitrary addresses in the Floating IP range. If the allocated Floating IPs do not match those in the configuration file, modify the configuration file to match. In our demonstration environment, we set the Floating IP range from to Step 16: Run orchestrator init The orchestrator init command initializes the orchestrator instance in preparation of the Apcera deployment. Step 17: Run orchestrator deploy Finally, you are ready to start the Apcera deployment process. orchestrator-cli deploy update-latest-release --config openstack.conf-sample Starting up processes... done Skipping release upgrade... Applied release is 440b-deploy Loading cluster configuration... done Chef server log file: chef-server log 33
34 Chef client log file: chef-client log Martini log file: martini-debug log Applying update... Executing action: OpenStack: Provision Machine: ID[ e] Config[instance_man Executing action: OpenStack: Create Volume: Tag[nfs-server] Size[10] Executing action: OpenStack: Provision Machine: ID[43c588c8] Config[tcp_router] Executing action: OpenStack: Provision Machine: ID[15fb49c0] Config[ip_manager] Executing action: OpenStack: Create Volume: Tag[graphite-server] Size[10] Executing action: OpenStack: Create Volume: Tag[redis-server] Size[10] ager] The Apcera orchestrator will connect to OpenStack to create additional instances for Apcera components. It will also create volumes and attach those volumes to some Apcera components. Step 18: Create wildcard DNS entry Once this completes, you will need to create a DNS entry to point to the Apcera router. You will use this entry to connect to the Apcera web console. Create a wildcard DNS entry for base_domain (from the Apcera orchestrator configuration file) pointing to the floating IP address chosen for the central floating IP. If everything has been setup properly, you should be able to access your Apcera cluster via DNS entry> (e.g Testing Install the APC command line tool on your local machine to deploy code to the Apcera Platform Test cases Apcera Orchestrator incorporates self-test capabilities thus no extra verification required during or after the Apcera installation process. The simplest way to manually ensure everything works fine is to deploy a sample application to the Apcera Platform. The following tasks/links can be used to help you deploy your first application on the Apcera Platform: Test application deployment Download the Apcera sample application repository. Deploy the sample web application using APC. Verify application deployment. Docker image deployment Deploy a Docker image using APC. 34

35 Appendix A: Notes on steps related to NAT Step 5: Configure a router between the OpenStack Public network and the Internet In our lab environment, we configured a Brocade Vyatta virtual router to route between the OpenStack Public network and the corporate/lab network. As we proceeded through the steps you will read, we discovered the IP addresses for for OpenStack Controller and Apcera Orchestrator and added DNAT entries to Vyatta to be able to connect to these resources from the corporate/lab network. The following is a screenshot of our VMware settings for the Vyatta virtual machine: Step 7: Configure network connectivity to OpenStack 35

36 Since our /16 network is private, we created a DNAT rule on our Vyatta virtual router to be able to connect to the OpenStack web interface from our corporate (corp) network. In our example, the OpenStack web interface is at Note: In our experience, the IP address chosen for the OpenStack web interface is the lowest one in the Public IP (not Floating) range, but you should still refer to this message (see screenshot above) to verify the assigned address. The next three screenshots show the DNAT configuration on the Vyatta router to to allow connectivity from our corporate network to the OpenStack web interface. If you are using different routing infrastructure, configure the equivalent routing components for connecting the Public network to your corp network & internet. 36

37 You will be adding more NAT entries for Apcera and your applications. The IP address for these will be dynamically assigned during VM/application creation. 37
. Click here to show only console is a link to the VNC console. Note that the IP address is OpenStack, but on port 6080.")
38 Step 11: Verify IP address in Orchestrator In our demo setup, our web browser console will not connect because, other than Fuel and Vyatta, OpenStack was configured with a private network, not directly inaccessible from our corporate network (refer to the sad paper icon). Click here to show only console is a link to the VNC console. Note that the IP address is OpenStack, but on port As with the web interface for OpenStack, create a DNAT entry in your router (Vyatta) to get to port Copy and paste the Click here to show only console into a new browser session, and replace the private address with the IP address and port for Vyatta to DNAT to the console. While the parameters in the link changes for each different VM console, the IP and port does not change. The following mapping was used in our demo environment: Corporate: IP: , port 8003 (TCP) OpenStack: IP: , port 6080 Note: If your login session to the OpenStack UI experiences a timeout, you will not be able to connect to the console. Re-login to refresh your session. Step 13: Create and verify a Floating IP address to Orchestrator We did this (create a floating IP address) because the /24 network is not accessible from outside OpenStack. The Floating IP is in the OpenStack Public network space, which is routable to the outside world via the Vyatta router. As with OpenStack and the OpenStack VNC console, a DNAT entry will be needed to access this new Public IP address from outside the cluster. The following mapping was used to DNAT corp to the internal SSH port on the Apcera Orchestrator: Corporate: IP: , port 8004 (TCP) Orchestrator: IP: , port 22 Once this new mapping successfully completes, you should see the new IP address in the Instance entry for the Apcera Orchestrator. If your DNAT has been successfully configured, you should be able to initiate an ssh connection from your corporate network to the Public IP address of the Apcera Orchestrator ( ). 38


39 Note that ifconfig will not show this new Public IP address. After the DNAT with Vyatta from corp to , OpenStack will route the connection to the Orchestrator s IP address. 39
Redhat OpenStack 5.0 and PLUMgrid OpenStack Networking Suite 2.0 Installation Hands-on lab guide
 Redhat OpenStack 5.0 and PLUMgrid OpenStack Networking Suite 2.0 Installation Hands-on lab guide Oded Nahum Principal Systems Engineer PLUMgrid EMEA November 2014 Page 1 Page 2 Table of Contents Table
getting started guide
 Pure commitment. getting started guide Cloud Native Infrastructure version 2.0 Contents Introduction... 3 Intended audience... 3 Logging in to the Cloud Native Infrastructure dashboard... 3 Creating your
Deployment Guide for Nuage Networks VSP
 Page 1 of 29 view online Overview This document discusses the deployment and configuration of Avi Vantage Load Balancer in a Nuage Networks integrated OpenStack platform for a single tenant mode. The following
Deployment Guide for Nuage Networks VSP
 Page 1 of 11 view online Overview This document discusses the deployment and configuration of Avi Vantage Load Balancer in a Nuage Networks integrated OpenStack platform for a single tenant mode. The following
VMware Integrated OpenStack User Guide
 VMware Integrated OpenStack User Guide VMware Integrated OpenStack 3.0 This document supports the version of each product listed and supports all subsequent versions until the document is replaced by a
VMware Integrated OpenStack User Guide. VMware Integrated OpenStack 4.1
 VMware Integrated OpenStack User Guide VMware Integrated OpenStack 4.1 You can find the most up-to-date technical documentation on the VMware website at: https://docs.vmware.com/ If you have comments about
ElasterStack 3.2 User Administration Guide - Advanced Zone
 ElasterStack 3.2 User Administration Guide - Advanced Zone With Advance Zone Configuration TCloud Computing Inc. 6/22/2012 Copyright 2012 by TCloud Computing, Inc. All rights reserved. This document is
Fuel VMware DVS plugin user guide
 Fuel VMware DVS plugin user guide Release 2.0-2.0.0-1 Mirantis Inc. March 03, 2016 CONTENTS 1 Introduction 1 1.1 Key terms, acronyms and abbreviation.................................. 1 1.2 The VMware
INSTALLATION RUNBOOK FOR Iron.io + IronWorker
 INSTALLATION RUNBOOK FOR Iron.io + IronWorker Application Type: Job processing Application Version: 1.0 MOS Version: 8.0 OpenStack version: Liberty Murano package checksum: Glance image checksum (docker):
INSTALLATION RUNBOOK FOR. VNF (virtual firewall) 15.1X49-D30.3. Liberty. Application Type: vsrx Version: MOS Version: 8.0. OpenStack Version:
 15.1X49-D30.3. Liberty. Application Type: vsrx Version: MOS Version: 8.0. OpenStack Version:") INSTALLATION RUNBOOK FOR Juniper vsrx Application Type: vsrx Version: VNF (virtual firewall) 15.1X49-D30.3 MOS Version: 8.0 OpenStack Version: Liberty 1 Introduction 1.1 Target Audience 2 Application Overview
INSTALLATION RUNBOOK FOR Juniper vsrx Application Type: vsrx Version: VNF (virtual firewall) 15.1X49-D30.3 MOS Version: 8.0 OpenStack Version: Liberty 1 Introduction 1.1 Target Audience 2 Application Overview
INSTALLATION RUNBOOK FOR Triliodata + TrilioVault
 INSTALLATION RUNBOOK FOR Triliodata + TrilioVault Application Type: [Backup and disaster recovery] Application Version: [2.1] MOS Version: [7.0] OpenStack version: [Kilo] Content Document History 1 Introduction
Installation runbook for Hedvig + Cinder Driver
 Installation runbook for Hedvig + Cinder Driver Partner Name: Product Name: Product Version: Hedvig Inc. Hedvig Distributed Storage Platform V-1.0.0 MOS Version: Kilo on Ubuntu 14.04 (2015.1.0-7.0) OpenStack
Fuel VMware DVS Plugin Guide
 Fuel VMware DVS Plugin Guide Release 3.0-3.0.0-1 Mirantis Inc. Jul 06, 2016 CONTENTS 1 Overview 1 2 Install and configure VMware DVS plugin for Fuel 4 3 Use VMware DVS plugin for Fuel 11 i CHAPTER ONE
Fuel VMware DVS plugin testing documentation
 Fuel VMware DVS plugin testing documentation Release 3.1-3.1.1-1 Mirantis Inc. Jan 31, 2017 CONTENTS 1 Testing documents 1 Test Plan for VMware DVS plugin version 3.1.1................................
User Workspace Management
 Access the Interface, page 1 User Management Workspace User Types, page 4 Projects (Admin User), page 5 Users (Admin User), page 9 CML Server (Admin User), page 11 Connectivity, page 30 Using the VM Control
Fuel VMware DVS Plugin Guide
 Fuel VMware DVS Plugin Guide Release 3.1-3.1.1-1 Mirantis Inc. Jan 31, 2017 CONTENTS 1 Overview 1 2 Install and configure VMware DVS plugin for Fuel 4 3 Use VMware DVS plugin for Fuel 11 i CHAPTER ONE
Cisco ACI Simulator VM Installation Guide
 Cisco ACI Simulator VM Installation Guide New and Changed Information 2 About the Application Policy Infrastructure Controller 2 About the ACI Simulator Virtual Machine 2 Simulator VM Topology and Connections
Security Gateway for OpenStack
 Security Gateway for OpenStack R77.30 Administration Guide 21 May 2015 Protected 2015 Check Point Software Technologies Ltd. All rights reserved. This product and related documentation are protected by
Contrail Sandbox Tutorial Script
 Contrail Sandbox Tutorial Script Tutorial Flow Login to lab setup Add security rules Add IP address manager Add two networks Add network policy Add two VMs (can t ping) Add network policy to networks (VMs
INSTALLATION RUNBOOK FOR Hitachi Block Storage Driver for OpenStack
 INSTALLATION RUNBOOK FOR Hitachi Block Storage Driver for OpenStack Product Name: Hitachi Block Storage Driver for OpenStack Driver Version: 1.4.10 MOS Version: 7.0 OpenStack Version: Product Type: Kilo
How to Deploy Virtual Test Agents in OpenStack
 How to Deploy Virtual Test Agents in OpenStack Executive Summary This guide explains how to deploy Netrounds Virtual Test Agents (vtas) in OpenStack and how to control these from Netrounds Control Center.
VSEC FOR OPENSTACK R80.10
 16 October 2017 VSEC FOR OPENSTACK R80.10 Administration Guide Protected 2017 Check Point Software Technologies Ltd. All rights reserved. This product and related documentation are protected by copyright
Cisco Modeling Labs OVA Installation
 Prepare for an OVA File Installation, page 1 Download the Cisco Modeling Labs OVA File, page 2 Configure Security and Network Settings, page 2 Deploy the Cisco Modeling Labs OVA, page 12 Edit the Virtual
Ordering and deleting Single-node Trial for VMware vcenter Server on IBM Cloud instances
 Ordering and deleting Single-node Trial for VMware vcenter Server on IBM Cloud instances The Single-node Trial for VMware vcenter Server on IBM Cloud is a single-tenant hosted private cloud that delivers
Installing Cisco APIC-EM on a Virtual Machine
 About the Virtual Machine Installation, page 1 System Requirements Virtual Machine, page 2 Pre-Install Checklists, page 4 Cisco APIC-EM Ports Reference, page 7 Verifying the Cisco ISO Image, page 8 Installing
VMware Integrated OpenStack with Kubernetes Getting Started Guide. VMware Integrated OpenStack 4.0
 VMware Integrated OpenStack with Kubernetes Getting Started Guide VMware Integrated OpenStack 4.0 VMware Integrated OpenStack with Kubernetes Getting Started Guide You can find the most up-to-date technical
Creating Application Containers
 This chapter contains the following sections: General Application Container Creation Process, page 1 Creating Application Container Policies, page 2 About Application Container Templates, page 5 Creating
Creating Application Containers
 This chapter contains the following sections: General Application Container Creation Process, page 1 Creating Application Container Policies, page 3 About Application Container Templates, page 5 Creating
VMware Integrated OpenStack Quick Start Guide
 VMware Integrated OpenStack Quick Start Guide VMware Integrated OpenStack 1.0.1 This document supports the version of each product listed and supports all subsequent versions until the document is replaced
Cisco Virtual Networking Solution for OpenStack
 Data Sheet Cisco Virtual Networking Solution for OpenStack Product Overview Extend enterprise-class networking features to OpenStack cloud environments. A reliable virtual network infrastructure that provides
Installation and Cluster Deployment Guide for VMware
 ONTAP Select 9 Installation and Cluster Deployment Guide for VMware Using ONTAP Select Deploy 2.6 November 2017 215-12636_B0 doccomments@netapp.com Updated for ONTAP Select 9.3 Table of Contents 3 Contents
Cisco Virtual Application Container Services 2.0 Lab v1
 Cisco Virtual Application Container Services 2.0 Lab v1 Last Updated: 02-SEP-2015 About This Solution Cisco Virtual Application Container Services (VACS) enables simplified deployment of Secure Application
Installation runbook for
 Installation runbook for Arista Networks ML2 VLAN driver, L3 plugin integration Partner Name: Product Name: Product Version: Arista Networks Arista EOS EOS-4.14.5 or above MOS Version: Mirantis OpenStack
VNS3 Configuration. ElasticHosts
 VNS3 Configuration ElasticHosts Table of Contents Introduction 3 ElasticHosts Deployment Setup 9 VNS3 Configuration Document Links 23 2 Requirements 3 Requirements You have a ElasticHosts account (For
Pexip Infinity and Google Cloud Platform Deployment Guide
 Pexip Infinity and Google Cloud Platform Deployment Guide Contents Introduction 1 Deployment guidelines 2 Configuring your Google VPC network 4 Obtaining and preparing disk images for GCE Virtual Machines
StorageGRID Webscale 10.3 Software Installation Guide for OpenStack Deployments
 StorageGRID Webscale 10.3 Software Installation Guide for OpenStack Deployments September 2016 215-10818_A0 doccomments@netapp.com Table of Contents 3 Contents Deployment planning and preparation... 5
Table of Contents 1.1. Introduction. Overview of vsphere Integrated Containers 1.2
 Table of Contents Introduction Overview of vsphere Integrated Containers 1.1 1.2 2 Overview of vsphere Integrated Containers This document provides an overview of VMware vsphere Integrated Containers.
Table of Contents 1.1. Overview. Containers, Docker, Registries vsphere Integrated Containers Engine
 Table of Contents Overview Containers, Docker, Registries vsphere Integrated Containers Engine Management Portal Registry Roles and Personas 1.1 1.1.1 1.1.2 1.1.2.1 1.1.2.2 1.1.2.3 1.1.2.4 2 Overview of
Infoblox Installation Guide. vnios for Amazon Web Services
 Infoblox Installation Guide vnios for Amazon Web Services Copyright Statements 2015, Infoblox Inc. All rights reserved. The contents of this document may not be copied or duplicated in any form, in whole
VNS3 Configuration. IaaS Private Cloud Deployments
 VNS3 Configuration IaaS Private Cloud Deployments Table of Contents Requirements 3 Remote Support Operations 12 IaaS Deployment Setup 13 VNS3 Configuration Document Links 19 2 Requirements 3 Requirements
Lab 1: Creating Secure Architectures (Revision)
") Lab 1: Creating Secure Architectures (Revision) A Challenge Our challenge is to setup MyBank Incorp, where each of you will be allocated a network and hosts to configure and get on-line (Figure 1). For
Lab 1: Creating Secure Architectures (Revision) A Challenge Our challenge is to setup MyBank Incorp, where each of you will be allocated a network and hosts to configure and get on-line (Figure 1). For
Baremetal with Apache CloudStack
 Baremetal with Apache CloudStack ApacheCon Europe 2016 Jaydeep Marfatia Cloud, IOT and Analytics Me Director of Product Management Cloud Products Accelerite Background Project lead for open source project
Project Calico v3.1. Overview. Architecture and Key Components
 Project Calico v3.1 Overview Benefits Simplicity. Traditional Software Defined Networks (SDNs) are complex, making them hard to deploy and troubleshoot. Calico removes that complexity, with a simplified
Xen and CloudStack. Ewan Mellor. Director, Engineering, Open-source Cloud Platforms Citrix Systems
 Xen and CloudStack Ewan Mellor Director, Engineering, Open-source Cloud Platforms Citrix Systems Agenda What is CloudStack? Move to the Apache Foundation CloudStack architecture on Xen The future for CloudStack
"Charting the Course... H8Q14S HPE Helion OpenStack. Course Summary
 Course Summary Description This course will take students through an in-depth look at HPE Helion OpenStack V5.0. The course flow is optimized to address the high-level architecture and HPE Helion OpenStack
Red Hat OpenStack Platform 14
 Red Hat OpenStack Platform 14 Quick Start Guide Creating an all-in-one OpenStack cloud for test and proof-of-concept environments Last Updated: 2019-02-11 Red Hat OpenStack Platform 14 Quick Start Guide
UDP Director Virtual Edition Installation and Configuration Guide (for Stealthwatch System v6.9.0)
") UDP Director Virtual Edition Installation and Configuration Guide (for Stealthwatch System v6.9.0) Installation and Configuration Guide: UDP Director VE v6.9.0 2016 Cisco Systems, Inc. All rights reserved.
UDP Director Virtual Edition Installation and Configuration Guide (for Stealthwatch System v6.9.0) Installation and Configuration Guide: UDP Director VE v6.9.0 2016 Cisco Systems, Inc. All rights reserved.
Basic Configuration Installation Guide
 RecoverPoint for VMs 5.1 Basic Configuration Installation Guide P/N 302-003-975 REV 1 July 4, 2017 This document contains information on these topics: Revision History... 2 Overview... 3 Reference architecture...
Build Cloud like Rackspace with OpenStack Ansible
 Build Cloud like Rackspace with OpenStack Ansible https://etherpad.openstack.org/p/osa-workshop-01 Jirayut Nimsaeng DevOps & Cloud Architect 2nd Cloud OpenStack-Container Conference and Workshop 2016 Grand
Simplified CICD with Jenkins and Git on the ZeroStack Platform
 DATA SHEET Simplified CICD with Jenkins and Git on the ZeroStack Platform In the technical article we will walk through an end to end workflow of starting from virtually nothing and establishing a CICD
Deploying the Cisco Tetration Analytics Virtual
 Deploying the Cisco Tetration Analytics Virtual Appliance in the VMware ESXi Environment About, on page 1 Prerequisites for Deploying the Cisco Tetration Analytics Virtual Appliance in the VMware ESXi
Red Hat OpenStack Platform 10 Product Guide
 Red Hat OpenStack Platform 10 Product Guide Overview of Red Hat OpenStack Platform OpenStack Team Red Hat OpenStack Platform 10 Product Guide Overview of Red Hat OpenStack Platform OpenStack Team rhos-docs@redhat.com
Lab 2: Creating Secure Architectures
 Lab 2: Creating Secure Architectures A Challenge Our challenge is to setup MyBank Incorp, where each of you will be allocated a network and hosts to configure and get on-line (Figure 1). For this you will
OpenStack Havana All-in-One lab on VMware Workstation
 OpenStack Havana All-in-One lab on VMware Workstation With all of the popularity of OpenStack in general, and specifically with my other posts on deploying the Rackspace Private Cloud lab on VMware Workstation,
Release Notes for Cisco Application Policy Infrastructure Controller Enterprise Module, Release x
 Release s for Cisco Application Policy Infrastructure Controller Enterprise Module, Release 1.3.3.x First Published: 2017-02-10 Release s for Cisco Application Policy Infrastructure Controller Enterprise
How to Deploy an OVA Virtual Test Agent Image in VMware
 How to Deploy an OVA Virtual Test Agent Image in VMware Executive Summary This guide explains how to start a Netrounds Virtual Test Agent as a vapp on a VMware virtual machine. Table of Contents 1 Netrounds
Deploy ERSPAN with the ExtraHop Discover Appliance and Brocade 5600 vrouter in AWS
 Deploy ERSPAN with the ExtraHop Discover Appliance and Brocade 5600 vrouter in AWS Published: 2018-07-06 This guide explains how to install and con#gure an example environment within Amazon Web Services
IBM Cloud for VMware Solutions NSX Edge Services Gateway Solution Architecture
 IBM Cloud for VMware Solutions NSX Edge Services Gateway Solution Architecture Date: 2017-03-29 Version: 1.0 Copyright IBM Corporation 2017 Page 1 of 16 Table of Contents 1 Introduction... 4 1.1 About
HySecure Quick Start Guide. HySecure 5.0
 HySecure Quick Start Guide HySecure 5.0 Last Updated: 25 May 2017 2012-2017 Propalms Technologies Private Limited. All rights reserved. The information contained in this document represents the current
NSX-T Data Center Migration Coordinator Guide. 5 APR 2019 VMware NSX-T Data Center 2.4
 NSX-T Data Center Migration Coordinator Guide 5 APR 2019 VMware NSX-T Data Center 2.4 You can find the most up-to-date technical documentation on the VMware website at: https://docs.vmware.com/ If you
Building a Big IaaS Cloud. David /
 Building a Big IaaS Cloud David Nalley @ke4qqq ke4qqq@apache.org / david@gnsa.us #whoami Recovering Sysadmin F/LOSS contributor Committer on Apache CloudStack Assumptions You have a need for an IaaS compute
Project Calico v3.2. Overview. Architecture and Key Components. Project Calico provides network security for containers and virtual machine workloads.
 Project Calico v3.2 Overview Benefits Simplicity. Traditional Software Defined Networks (SDNs) are complex, making them hard to deploy and troubleshoot. Calico removes that complexity, with a simplified
Using the vrealize Orchestrator OpenStack Plug-In 2.0. Modified on 19 SEP 2017 vrealize Orchestrator 7.0
 Using the vrealize Orchestrator OpenStack Plug-In 2.0 Modified on 19 SEP 2017 vrealize Orchestrator 7.0 You can find the most up-to-date technical documentation on the VMware website at: https://docs.vmware.com/
Citrix CloudPlatform (powered by Apache CloudStack) Version 4.5 Concepts Guide
 Version 4.5 Concepts Guide") Citrix CloudPlatform (powered by Apache CloudStack) Version 4.5 Concepts Guide Revised January 30, 2015 06:00 pm IST Citrix CloudPlatform Citrix CloudPlatform (powered by Apache CloudStack) Version 4.5
Citrix CloudPlatform (powered by Apache CloudStack) Version 4.5 Concepts Guide Revised January 30, 2015 06:00 pm IST Citrix CloudPlatform Citrix CloudPlatform (powered by Apache CloudStack) Version 4.5
How to Deploy a VHD Virtual Test Agent Image in Azure
 How to Deploy a VHD Virtual Test Agent Image in Azure Executive Summary This guide explains how to deploy a Netrounds Virtual Test Agent as a virtual machine in Microsoft Azure. Table of Contents 1 Netrounds
VMware + OpenStack. Dan Wendlandt Director of Product Management VMware VMware Inc. All rights reserved.
 VMware + OpenStack Dan Wendlandt Director of Product Management OpenStack @ VMware VMware + OpenStack: A Fork in the Road? 2 VMware + OpenStack: Better Together An industry-wide APIs + tool ecosystem that
Cisco Nexus 1000V InterCloud
 Deployment Guide Cisco Nexus 1000V InterCloud Deployment Guide (Draft) June 2013 2013 Cisco and/or its affiliates. All rights reserved. This document is Cisco Public Information. Page 1 of 49 Contents
Service Portal User Guide
 FUJITSU Cloud Service K5 IaaS Service Portal User Guide Version 1.4 FUJITSU LIMITED All Rights Reserved, Copyright FUJITSU LIMITED 2015-2016 K5IA-DC-M-005-001E Preface Purpose of This Manual This manual
Installing and Configuring vcloud Connector
 Installing and Configuring vcloud Connector vcloud Connector 2.6.0 This document supports the version of each product listed and supports all subsequent versions until the document is replaced by a new
Build Nested Openstack. Using Ubuntu as BaseOS on BareMetal
 Build Nested Openstack Using Ubuntu as BaseOS on BareMetal Overview The following slides outline how to setup your BareMetal HOST (a server) in order to run a Openstack installation using FUEL based Deployer.
Quick Start Guide to Compute Canada Cloud Service
 Quick Start Guide to Compute Canada Cloud Service Launching your first instance (VM) Login to the East or West cloud Dashboard SSH key pair Importing an existing key pair Creating a new key pair Launching
VMware Cloud on AWS Getting Started. 18 DEC 2017 VMware Cloud on AWS
 VMware Cloud on AWS Getting Started 18 DEC 2017 VMware Cloud on AWS You can find the most up-to-date technical documentation on the VMware website at: https://docs.vmware.com/ If you have comments about
 Trend Micro Incorporated reserves the right to make changes to this document and to the product described herein without notice. Before installing and using the product, please review the readme files,
CloudEdge SG6000-VM Installation Guide
 Hillstone Networks, Inc. CloudEdge SG6000-VM Installation Guide Version 5.5R1 Copyright 2015Hillstone Networks, Inc.. All rights reserved. Information in this document is subject to change without notice.
Installing and Configuring Devstack Newton for Infoblox Integration
 DEPLOYMENT GUIDE Installing and Configuring Devstack Newton for Infoblox Integration 2017 Infoblox Inc. All rights reserved. Installing and Configuring Devstack Newton for Infoblox Integration Page 1 of
vcloud Air - Virtual Private Cloud OnDemand Networking Guide
 vcloud Air - Virtual Private Cloud OnDemand Networking Guide vcloud Air This document supports the version of each product listed and supports all subsequent versions until the document is replaced by
VMware Identity Manager Cloud Deployment. Modified on 01 OCT 2017 VMware Identity Manager
 VMware Identity Manager Cloud Deployment Modified on 01 OCT 2017 VMware Identity Manager You can find the most up-to-date technical documentation on the VMware Web site at: https://docs.vmware.com/ The
BCS EXIN Foundation Certificate in OpenStack Software Syllabus
 BCS EXIN Foundation Certificate in OpenStack Software Syllabus Version 1.2 April 2017 This qualification is not regulated by the following United Kingdom Regulators - Ofqual, Qualification in Wales, CCEA
VMware Identity Manager Cloud Deployment. DEC 2017 VMware AirWatch 9.2 VMware Identity Manager
 VMware Identity Manager Cloud Deployment DEC 2017 VMware AirWatch 9.2 VMware Identity Manager You can find the most up-to-date technical documentation on the VMware website at: https://docs.vmware.com/
vrealize Operations Management Pack for NSX for vsphere 2.0
 vrealize Operations Management Pack for NSX for vsphere 2.0 This document supports the version of each product listed and supports all subsequent versions until the document is replaced by a new edition.
Microsoft Azure Configuration. Azure Setup for VNS3
 Microsoft Azure Configuration Azure Setup for VNS3 2016 Table of Contents Requirements 3 Create Azure Private VLAN 10 Launch VNS3 Image from Azure Marketplace 15 Deliver and launch VNS3 from Azure 22 VNS3
vrealize Operations Management Pack for NSX for Multi-Hypervisor
 vrealize Operations Management Pack for This document supports the version of each product listed and supports all subsequent versions until the document is replaced by a new edition. To check for more
EdgeConnect for Amazon Web Services (AWS)
") Silver Peak Systems EdgeConnect for Amazon Web Services (AWS) Dinesh Fernando 2-22-2018 Contents EdgeConnect for Amazon Web Services (AWS) Overview... 1 Deploying EC-V Router Mode... 2 Topology... 2 Assumptions
Silver Peak Systems EdgeConnect for Amazon Web Services (AWS) Dinesh Fernando 2-22-2018 Contents EdgeConnect for Amazon Web Services (AWS) Overview... 1 Deploying EC-V Router Mode... 2 Topology... 2 Assumptions
Provisioning Overlay Networks
 This chapter has the following sections: Using Cisco Virtual Topology System, page 1 Creating Overlays, page 2 Creating Network using VMware, page 3 Creating Subnetwork using VMware, page 4 Creating Routers
Introduction and Data Center Topology For Your System
 Introduction and Data Center Topology For Your System This chapter provides an introduction, a data center overview, and VMware vcenter requirements for your system. Introducing Cisco WebEx Meetings Server,
CA Agile Central Administrator Guide. CA Agile Central On-Premises
 CA Agile Central Administrator Guide CA Agile Central On-Premises 2018.1 Table of Contents Overview... 3 Server Requirements...3 Browser Requirements...3 Access Help and WSAPI...4 Time Zone...5 Architectural
Empowering SDN SOFTWARE-BASED NETWORKING & SECURITY FROM VYATTA. Bruno Barba Systems Engineer Mexico & CACE
 Empowering SDN SOFTWARE-BASED NETWORKING & SECURITY FROM VYATTA Bruno Barba Systems Engineer Mexico & CACE bbarba@brocade.com Brocade Who is Vyatta? Leader in software-based networking Founded in 2006
VPN Solutions for Zerto Virtual Replication to Azure. IPSec Configuration Guide
 VPN Solutions for Zerto Virtual Replication to Azure IPSec Configuration Guide VERSION 1.0 AUGUST 2017 Table of Contents 1. Overview... 2 1.1 Use Cases... 2 2. Proofs of Concept and Lab Usage... 2 2.1
Goliath Performance Monitor v11.7 POC Install Guide
 Goliath Performance Monitor v11.7 POC Install Guide Goliath Performance Monitor Proof of Concept Limitations Goliath Performance Monitor Proof of Concepts (POC) will be limited to monitoring 5 Hypervisor
Installation and Cluster Deployment Guide
 ONTAP Select 9 Installation and Cluster Deployment Guide Using ONTAP Select Deploy 2.3 March 2017 215-12086_B0 doccomments@netapp.com Updated for ONTAP Select 9.1 Table of Contents 3 Contents Deciding
Pexip Infinity and Amazon Web Services Deployment Guide
 Pexip Infinity and Amazon Web Services Deployment Guide Contents Introduction 1 Deployment guidelines 2 Configuring AWS security groups 4 Deploying a Management Node in AWS 6 Deploying a Conferencing Node
Installing and Configuring Oracle VM on Oracle Cloud Infrastructure O R A C L E W H I T E P A P E R D E C E M B E R
 Installing and Configuring Oracle VM on Oracle Cloud Infrastructure O R A C L E W H I T E P A P E R D E C E M B E R 2 0 1 7 Disclaimer The following is intended to outline our general product direction.
70-414: Implementing an Advanced Server Infrastructure Course 01 - Creating the Virtualization Infrastructure
 70-414: Implementing an Advanced Server Infrastructure Course 01 - Creating the Virtualization Infrastructure Slide 1 Creating the Virtualization Infrastructure Slide 2 Introducing Microsoft System Center
Hystax Acura. Cloud Migration and Disaster Recovery Solution. Hystax. All rights reserved. 1
 Hystax Acura Cloud Migration and Disaster Recovery Solution Hystax. All rights reserved. 1 www.hystax.com Overview Hystax is a cloud migration and Disaster Recovery company focusing on consistent replication
vcloud Director Administrator's Guide vcloud Director 8.10
 vcloud Director Administrator's Guide vcloud Director 8.10 You can find the most up-to-date technical documentation on the VMware website at: https://docs.vmware.com/ If you have comments about this documentation,
UDP Director Virtual Edition
 UDP Director Virtual Edition (also known as FlowReplicator VE) Installation and Configuration Guide (for StealthWatch System v6.7.0) Installation and Configuration Guide: UDP Director VE v6.7.0 2015 Lancope,
Gnostice StarDocs On-Premises API Virtual Appliance
 Gnostice StarDocs On-Premises API Virtual Appliance Deployment Instructions For VMware vsphere 2 For Oracle VirtualBox 4 For VMware Fusion (on Mac OS) 6 For VMware vsphere Note that the instructions below
vrealize Operations Management Pack for NSX for vsphere 3.5.0
 vrealize Operations Management Pack for NSX for vsphere 3.5.0 This document supports the version of each product listed and supports all subsequent versions until the document is replaced by a new edition.
Exam Name: VMware Certified Associate Network Virtualization
 Vendor: VMware Exam Code: VCAN610 Exam Name: VMware Certified Associate Network Virtualization Version: DEMO QUESTION 1 What is determined when an NSX Administrator creates a Segment ID Pool? A. The range
Installing or Upgrading ANM Virtual Appliance
 CHAPTER 2 This chapter describes how to deploy Cisco ANM Virtual Appliance 4.3 (new installation) and how to upgrade from ANM software version 4.1 or 4.2 to software version 4.3. This chapter includes