Høgskolen i Telemark Telemark University College Department of Electrical Engineering, Information Technology and Cybernetics.
|
|
|
- Marylou Dawson
- 6 years ago
- Views:
Transcription


1 Høgskolen i Telemark Telemark University College Department of Electrical Engineering, Information Technology and Cybernetics Wi- Fi DAQ Hardware Setup Cuong Nguyen, Hans- Petter Halvorsen, Faculty of Technology, Postboks 203, Kjølnes ring 56, N-3901 Porsgrunn, Norway. Tel: Fax:
2 Table of Contents 1 Introduction Necessary Equipment Technical Implementation Step1: Physical Connection Step 2: NI WAP Configuration Step 3: NI WLS Configuration Step 4: Computer Configuration Step 5: Temperature Presentation Summary
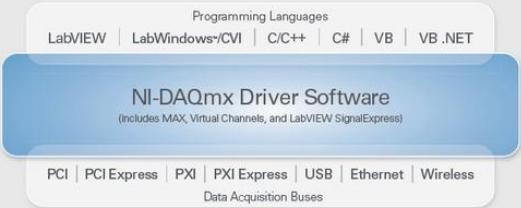
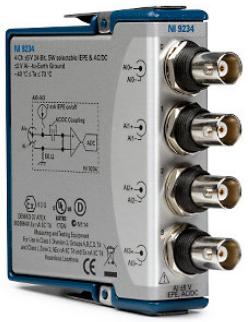
3 1 Introduction This tutorial will go through how to transfer data acquired from a sensor to the computer wirelessly by using a Wi- Fi DAQ system. The data transmission relies on National Instruments technology, where NI WAP will broadcast wireless internet from TUCs LAN. This documentation is created based on experiment by using the following equipment: Hardware Ø Temperature sensor PT- 100 Ø Transducer board Ø Wi- Fi equipment - NI WAP (802.11g/b WAP/Bridge/Client) - NI WLS (802.11g/b C Series Carrier) - NI 9234 (DAQ) Software Ø Windows OS Ø LabVIEW Ø NI- DAQmx (MAX) The data transferring procedure through Wi- Fi (Infrastructure) technology involves mainly five different steps; Step 1: Step 2: Step 3: Step 4: Step 5: Physical devices, setup and connection. Devices: NI- WLS- 9163, NI9234 (DAQ) and connection board shall be physically connected to each other. NI WAP configuration. Set up and configure NI WAP to manage the wireless data communication between the computer and NI WLS device. NI WLS configuration. Set up and configure NI WLS to transmit temperature values to NI WAP Configure your computer to get access to NI WAP Present the temperature value on the computer. Create a LabVIEW application to continuously retrieve and present the value on your computer. The acquired values are originally in Voltage format which needs to be converted into corresponding temperature. 3


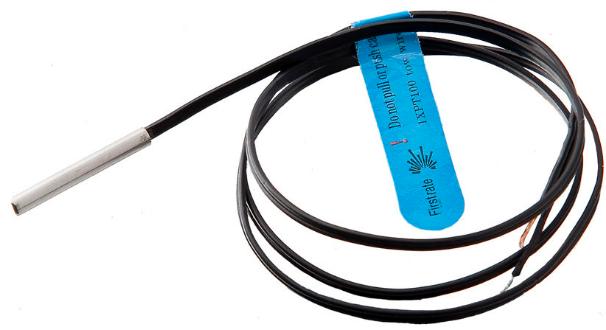
4 4 Introduction 1.1 Necessary Equipment Software NI WAP Hardware NI WLS Temperature sensor: PT- 100 NI WLS Transducer board
 will be presented on the computer screen wirelessly.")
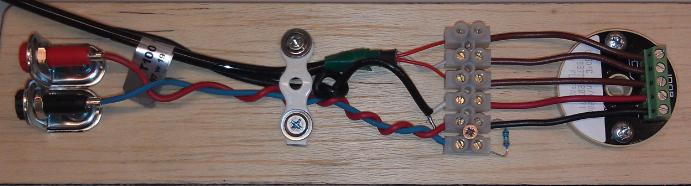
5 2 Technical Implementation This section will explain the data acquiring process in details, which covers all the involving five steps stated above. By following the instructions, as the result temperature values obtained by the temperature sensor (PT- 100) will be presented on the computer screen wirelessly. Wi- Fi (infrastructure) is the technology behind the wireless data transferring procedure. Here we use NI WAP to broad cast wireless network, which is based on TUCs LAN. The wireless network (Eduroam) offered by TUC is heavily encrypted and has a lot of restrictions, by creating our own WAP data transmitted will be more flexible and give us more possibilities. 2.1 Step1: Physical Connection PT- 100 is a temperature sensor based on resistance (Ω) which various in corresponding to the changing in temperature. This element cannot be connected directly to the NI 9234 (DAQ) module because it requires input as Voltage. Due to this reason the two elements can only have communications with each other through the transducer board. Additionally, both of the devices NI 9234 (DAQ) and NI WLS are needed to be attached to each other as one single physical component. Mount NI 9234 (DAQ) and NI WLS together as one physical unit. Ø Just simply slide the two modules together, make sure both of the modules are firmly connected with each other as shown in the figure 2-1. Figure 2-1: NI 9234 and NI WLS attachment PT- 100 sensor and AC to DC switching power supply are already connected to the transducer board. No further actions needed here. To read the temperature value from PT- 100, the NI 9234 (DAQ) needs to be connected to the transducer board. Study figure 2-2 for details. Ø Same colors are connected to each other. 5

6 6 Technical Implementation Ø Attached the coupling wire to any of the pins on the NI 9234 (DAQ). AI0 pin used in this experiment. Figure 2-2: NI 9234 and transducer board connection. Once the connection is established. Ø Simply plug the power supply to the wall outlet. The Transducer board will operate by 24 Voltage DC. 2.2 Step 2: NI WAP Configuration The NI WAP device can be fully configures by using any web browsers. In able for doing any changes on this device, users have to have password access. Once the users manage to log in, then they have fully access to the device without any restrictions. The users are able to set new SSID name, new IP address, change security settings, change passwords and ect. In this particular case all we have to do is just simply establish connection between NI WAP and TUCs LAN with an Ethernet cable in between. By default NI WAP is correctly configured for this purpose. Ø Power up NI WAP and push the reset button for at least five seconds. To make sure the device is configured as default. Ø NI WAP should broadcast internet. Continue from step 3. Logging on to NI WAP Note!! This step is not necessary in this case, if so continue from step 3. However, if you have to configure the device just continue to follow instructions.
.")
7 7 Technical Implementation Ø Connect your computer to NI WAP by using Ethernet cable (straight- through or cross- over cable) Ø In able for different devices to have successful communications to each other, the requirement is that they all have to be in the same subclass (Subnet mask). Therefore we have to change the IP address on your computer so it is in the same subclass as NI WAP Start menu Control Panel View network status and tasks. Figure 2-3: Local Area Connection Ø Local Area Connection Properties Internet Protocol Version 4(TCP/IPv4) Properties Ø Select: Use the following IP address in the pop up window and type in the numbers exactly as illustrated in the figure 2-4 OK. Note! the IP address: X (where X can be any integer from and 254) Figure 2-4: Assign address to Local Area Connection.


8 8 Technical Implementation Ø Open a web browser (Mozilla Firefox or Internet Explorer) from the address bar type: Enter. Ø Fill in User Name and Password. User Name: Admin Password: root Figure 2-5: Logging into NI WAP Now you should be logged on to NI WAP and have full access to the device. Configure NI WAP Ø General Operational Mode Select AP/Bridge Save Ø TCP/IP Addressing Method of obtaining an IP address: Set Manually IP address: Subnet mask: Default gateway: Host name: adv ap Make sure the numbers are identical as shown in figure 2-6 Save & Restart. Figure 2-6: TCP/IP Addressing setting.
 Network name (SSID): WAP Channel number: 3 (any integer 1-13 ) Note!")
9 9 Technical Implementation Ø TCP/IP DHCP Server Functionality: Enabled Default gateway: Subnet mask: Primay DNS server: Make sure your setting is identical to the figure 2-7. Figure 2-7: DHCP Server setting. Ø IEEE Communication Change the SSID name from NI to WAP (SSID can be given by any name) Network name (SSID): WAP Channel number: 3 (any integer 1-13 ) Note!! Channels 1, 4 and 11 are very actively used. To avoid interference or other unexpected problems try to avoid these channels. Ø Save & Restart NI WAP is now fully configured. 2.3 Step 3: NI WLS Configuration NI WLS is used to transmit the temperature data to NI WAP and can be configured by using Measurement & Automation (MAX). MAX is a software which allows users to fully access and configure settings of NI WLS Download and install Measurement & Automation (MAX). Ø Open the link below and follow instructions given in the website to download and install NI- DAQmx 9.6 (MAX). Note!! Choose latest version if available. Set Local Area Connection on your computer to obtain an IP address automatically Ø Start menu Control Panel View network status and tasks.
 Properties Ø Select Obtain an IP address automatically in the pop up window OK.")
10 10 Technical Implementation Figure 2-8: Local Area Connection. Ø Local Area Connection Properties Internet Protocol Version 4(TCP/IPv4) Properties Ø Select Obtain an IP address automatically in the pop up window OK. Ø Connect Ethernet cable from NI WLS to your computer. (Physical connection between your computer and NI WLS is established) Use MAX to detect NI WLS device and do the configuration Ø Start Measurement and Automation (MAX) application by double click on the NI MAX icon on the desktop. Ø Click the arrow (Devices and Interfaces) to view a list of all the DAQ devices. See figure 2-9. Ø Right click on Network Devices click on Find Network NI- DAQmx devices. This will detect any current devices connected to your computer. Figure 2-9: Detecting NI WLS by using MAX.

 Ø Authentication Type: Open (By default NI WAP- 3711 is not encrypted by password, if it does: just type in the security type and")
11 11 Technical Implementation Ø Tick WLS DD (or any NI- DAQmx device that is found) Add Selected Devices. Detect and configure NI WLS Figure 2-10: Add devices to MAX. Ø Click NI WLS WLS DD and create identical as shown on figure Ø Obtain IP Address Through: Static IP Address: Subnet Mask: Gateway: DNS Server: (or leave empty box). Ø Note!! Country should be specified as United State. From experience attempts to set to Norway causes unsuccessful connection. Ø SSID: NI (By default NI WAP broad cast the SSID name as NI) Ø Authentication Type: Open (By default NI WAP is not encrypted by password, if it does: just type in the security type and password) Figure 2-11: NI WLS configuration.


12 12 Technical Implementation Ø Click: Save Settings... Refresh Note!! Press Refresh button several times until you obtain Wired and Wireless is shown Up. Note!! If Wire and Wireless both are not shown as Up, just untick Radio On Save Settings Tick on the Radio On button Save Settings Refresh. Ø Remove the Ethernet cable from NI WLS Click: Refresh Note!! Wired down and Wireless Up (wireless communication between NI WLS and NI WAP is successfully established) Figure 2-12: NI WLS wireless connection. Click: Self- Test (To validate a successful connection). Figure 2-13: Successful communication confirmation. Test to retrieve value wirelessly from NI WLS Ø Click: Test Panels Coupling: DC Acquisition Mode: Continuous

13 13 Technical Implementation Figure 2-14: Result shown in Test Panel. All the obtaining values are presenting only in Voltage DC (1-5V). You are now successfully retrieving data from NI WLS and NI WAP to your computer completely wireless. 2.4 Step 4: Computer Configuration At this moment your NI WAP should be able broadcast internet. Now we shall connect the computer to get access to NI WAP If the connection between your computer and this wireless network is successfully, it should have internet access. Use a web browser to validate a successful connection. As mentioned from previous, wireless network (Eduroam) provided by TUCs is heavily encrypted and causes easily complications. As I discovered that The LAN server at TUC will only allow a certain specific group of IP- addresses, in another word LAN server controls which IP- addresses shall have permission to the provided service. Logically as it is, every computer in the IT- labs in TUC carries a valid IP- number. We need to find out two valid IP- addresses that are accepted by the LAN server of TUC. Once we know the allowable IP- numbers then we will assign our computer with one of the IP- addresses, while the other IP- address will be given to NI WLS device. It is obvious that every device has to have a
 for the laboratory context. IP- address: 128.39.35.239 128.39.35.240 128.39.35.241 128.39.35.226 Subnet mask: 255.255.254.0 Gateway: 128.39.34.")
14 14 Technical Implementation valid IP- address that is accepted by the LAN server in able to utilize the resources broadcasting by the Wireless Access Point. Note! The following IP- addresses are reserved (available) for the laboratory context. IP- address: Subnet mask: Gateway: DNS: Assign your computer with one of the IP- addresses above Ø From your computer Click: Start menu Control Panel View network status and tasks. Figure 2-15: Wireless Network Connection. Ø Wireless Network Connection Properties Internet Protocol Version 4(TCP/IPv4) Properties. Ø Select Use the following IP address in the pop up window Ø Type in the IP- addresses (parameters) above OK, an example is shown in figure IP address: Subnet mask: Defalut gateway: Preferred DNS server:
.")
15 15 Technical Implementation Figure 2-16: Assign address to the laptop. Establish Wireless Network connection from your computer to WAP (in this case NI, which is the SSID name broadcasted by NI WAP- 3711). Follow figure 2-17 to manage the connection. Figure 2-17: Wireless network - Laptop connection.

16 16 Technical Implementation Now your computer should be connected to NI WAP To validate the successful connection, use a web browser and surf to some home pages. Now your computer has access to internet from your own Wireless Access Point in TUC area, and not dependent on Eduroam. 2.5 Step 5: Temperature Presentation We will create a LabVIEW application to display the obtaining values in Voltage and then convert these values into corresponding temperatures. Ø Start LabVIEW and create a New VI. Name this VI (application) and save. Ø In the block diagram: right click to find DAQ Assistant. Follow instructions from figure Figure 2-18: "DAQ Assistant" location.

17 17 Technical Implementation Configure the DAQ Assistant to obtain the Voltage values. Ø Click: Acquire Signals Analog Input Voltage ai0 (depending on which of the pin of NI 9234 were used) Finnish. Ø From pop up Window: Click Device Change to DC OK Ø Make sure your Block Diagram looks like the one illustrated in figure The value is presenting in the Front Panel. Figure 2-19: LabVIEW application to retrieve data from DAQ. Advance: The front panel shown in the previous figure present the value captured from the temperature sensor PT- 100 in Voltage. The value needs to be converted into temperature [ ]. Try to improve the LabVIEW application that shows both in Voltage and degree Celsius as illustrated in figure Tips: Use silver style as layout. Convert from Voltage to Temperature. Temperature [ ] = Voltage * a b (define parameters a & b) 1 [V] = 0 [ ] 5 [V] = 50 [ ]


18 18 Technical Implementation Figure 2-20: Raw and scaled data displayed on LabVIEW front panel. The block diagram of the improved front panel is shown in figure 2-21, where both of the parameters 12,5 are used to convert from Voltage to degree Celcius. Note!! These parameters can only be used for this specific case, where 1-5 Volt are converted to For converting to a scale of 0-100, just simply replace both of the parameters 12,5 with 25. Figure 2-21: Voltage - Temperature scaled procedure in LabVIEW block diagram. If you have reached this far then you have manage to present the environmental temperature by LabVIEW application. The raw value was captured by PT- 100 sensor and transmitted completely wireless in form of Voltage DC, through Wi- Fi (infrastructure) technology.
19 3 Summary This chapter will summarize what have been done to get a successful wireless data transferring by utilizing Wi- Fi (infrastructure) technology, which is implemented on Windows 7 professional OS. The data transmission relies on National Instruments technology, where NI WAP will broadcast internet from TUCs LAN. Five different steps are required to present the raw data into temperature degree ( ). Step 1: Setup and connect all the physical devices together. Step 2: Configure NI WAP In this particular case all we have to do is just simply establish connection between NI WAP and TUCs LAN with an Ethernet cable in between. By default NI WAP is correctly configured for this purpose. Ø Power up NI WAP and push the reset button for at least five seconds. To make sure the device is configured as default. Ø NI WAP should broadcast internet. Step 3: Configure NI WLS NI WLS is used to transmit the temperature value to NI WAP and can be configured by using Measurement & Automation (MAX). MAX is a software which allows users to fully access and configure settings of NI WLS Download and install Measurement & Automation (MAX). Set Local Area Connection on your computer to obtain an IP address automatically. Connect Ethernet cable from NI WLS to your computer. (Physical connection between your computer and NI WLS is established) Use MAX to detect NI WLS device and do the configuration. Ø Obtain IP Address Through: Static IP Address: Subnet Mask: Gateway: Ø DNS Server: (or no input require). Ø Note!! Country should be specified as United State. From experience attempts to set to Norway causes unsuccessful connection. Ø SSID: NI (By default NI WAP broad cast the SSID name as NI) 19
20 20 Summary Ø Authentication Type: Open (By default NI WAP is not encrypted by password, if it does: just type in the security type and password) Ø Click: Save Settings... Refresh Note!! Press Refresh button several times until you obtain Wired and Wireless is shown Up. Note!! If Wire and Wireless both are not shown as Up, just untick Radio On Save Settings Tick on the Radio On button Save Settings Refresh. Ø Remove the Ethernet cable from NI WLS Click: Refresh Note!! Wired down and Wireless Up (wireless communication between NI WLS and NI WAP is successfully established) Click: Self- Test (To validate a successful connection). All the obtaining values are presenting only in Voltage DC (1-5V). You are now successfully retrieving data wirelessly from NI WLS and NI WAP to your computer completely wireless, in addition your NI WLS is broadcasting internet from TUC LAN. Step 4: Configure computer At this moment your NI WAP should be able to broadcast internet. Now we shall connect the computer to get access to NI WAP If the connection between your computer and this wireless network is successfully, it should have internet access. Use a web browser to validate a successful connection. The LAN server at TUC will only allow a certain specific group of IP- addresses, in another word LAN server controls which IP- addresses shall have permission to the provided service. Logically as it is, every computer in the computer labs in TUC carries a valid IP- number. Find out two valid IP- addresses that are accepted by the LAN server of TUC. Once we know the allowable IP- numbers then we will assign our computer with one of the IP- addresses, while the other IP- address will be given to NI WLS device. It is obvious that every device has to have a valid IP- address that is accepted by the LAN server in able to utilize the resources broadcasting by the Wireless Access Point. The following IP- addresses are reserved (available) for the laboratory context. IP- address:
21 21 Summary Subnet mask: Default gateway: Preferred DNS server: Assign your computer with one of the IP- addresses stated above. NOTE!! Since you already assigned to NI WLS- 9163, so you have to choose among the remaining addresses. Establish Wireless Network Connection from your computer to WAP (in this case NI, which is the SSID name broadcasted by NI WAP- 3711). Now your computer should be connected to NI WAP To validate the successful connection, use a web browser and surf to some home pages. Now have access to internet from your own Wireless Access Point in TUC area, and not dependent on Eduroam. Step 5: Temperature presentation on screen We created a LabVIEW application to display the obtaining values in Voltage and then convert these values into corresponding temperatures. ü Start LabVIEW and create a New VI. Name this VI (application) and save. ü In the block diagram: right click to find DAQ Assistant. ü Configure the DAQ Assistant to obtain the Voltage values. ü In the block diagram convert from Voltage to Temperature. ü Focus on the layout in the front panel. Congratulations!! As the final result you have managed to transmit data completely wirelessly by Wi- Fi (infrastructure) technology and by using National Instruments equipments.

22 Telemark University College Faculty of Technology Kjølnes Ring 56 N Porsgrunn, Norway Hans- Petter Halvorsen, M.Sc. Telemark University College Department of Electrical Engineering, Information Technology and Cybernetics E- mail: Blog: Room: B- 237a
Wireless DAQ using ZigBee
 Høgskolen i Telemark Telemark University College Department of Electrical Engineering, Information Technology and Cybernetics Wireless DAQ using ZigBee Cuong Nguyen, Hans- Petter Halvorsen 2013.10.29 Hardware
NI mydaq HANS-PETTER HALVORSEN, Telemark University College Department of Electrical Engineering, Information Technology and Cybernetics
 Telemark University College Department of Electrical Engineering, Information Technology and Cybernetics NI mydaq HANS-PETTER HALVORSEN, 2012.01.20 Faculty of Technology, Postboks 203, Kjølnes ring 56,
Virtual Instruments with LabVIEW
 Telemark University College Department of Electrical Engineering, Information Technology and Cybernetics Virtual Instruments with LabVIEW HANS-PETTER HALVORSEN, 2011.01.04 Faculty of Technology, Postboks
Data Acquisition HANS-PETTER HALVORSEN,
 Telemark University College Department of Electrical Engineering, Information Technology and Cybernetics Data Acquisition HANS-PETTER HALVORSEN, 2011.10.14 Faculty of Technology, Postboks 203, Kjølnes
Datalogging in LabVIEW
 Telemark University College Department of Electrical Engineering, Information Technology and Cybernetics Datalogging in LabVIEW HANS-PETTER HALVORSEN, 2011.01.04 Faculty of Technology, Postboks 203, Kjølnes
NI Vision System HANS- PETTER HALVORSEN,
 Telemark University College Department of Electrical Engineering, Information Technology and Cybernetics NI Vision System HANS- PETTER HALVORSEN, 2013.02.19 Faculty of Technology, Postboks 203, Kjølnes
DAQ in MATLAB HANS-PETTER HALVORSEN,
 Telemark University College Department of Electrical Engineering, Information Technology and Cybernetics DAQ in MATLAB HANS-PETTER HALVORSEN, 2011.06.07 Faculty of Technology, Postboks 203, Kjølnes ring
Wireless DAQ System. In this project you are going to create a Wireless DAQ System, see Figure 1-1. Figure 1-1: Wireless DAQ system
 Høgskolen i Telemark Telemark University College Faculty of Technology, Department of Electrical Engineering, Information Technology and Cybernetics Wireless DAQ System Keywords: Data Communication, Protocols,
Solutions. Discretization HANS-PETTER HALVORSEN,
 Telemark University College Department of Electrical Engineering, Information Technology and Cybernetics Solutions HANS-PETTER HALVORSEN, 2011.08.12 Discretization Faculty of Technology, Postboks 203,
NI USB-TC01 Thermocouple Measurement Device
 Telemark University College Department of Electrical Engineering, Information Technology and Cybernetics NI USB-TC01 Thermocouple Measurement Device HANS- PETTER HALVORSEN, 2013.02.18 Faculty of Technology,
Faculty of Technology, Department of Electrical Engineering, Information Technology and Cybernetics. SCADA System
 Høgskolen i Telemark Telemark University College Faculty of Technology, Department of Electrical Engineering, Information Technology and Cybernetics SCADA System Keywords: Data Communication, protocols,
Control and Simulation in. LabVIEW
 Telemark University College Department of Electrical Engineering, Information Technology and Cybernetics Solutions Control and Simulation in HANS-PETTER HALVORSEN, 2011.08.11 LabVIEW Faculty of Technology,
Laboratory System. 1 Introduction
 Høgskolen i Telemark Telemark University College Faculty of Technology, Department of Electrical Engineering, Information Technology and Cybernetics Laboratory System Keywords: Data Communication, Protocols,
Weather System. In this project you are going to create a Weather System, see Figure 1-1. Figure 1-1: Weather system
 Høgskolen i Telemark Telemark University College Faculty of Technology, Department of Electrical Engineering, Information Technology and Cybernetics Weather System Keywords: Data Communication, Protocols,
BR411AP n Wireless Access Point and Bridge
 BR411AP 802.11n Wireless Access Point and Bridge The BR411AP provides connectivity between Ethernet wired networks and radio-equipped wireless devices. It is an easy, web-based setup for installation and
State Estimation with Observers
 Telemark University College Department of Electrical Engineering, Information Technology and Cybernetics State Estimation with Observers HANS-PETTER HALVORSEN, 2012.08.20 Faculty of Technology, Postboks
Quick Setup Guide. for Standalone Omada Access Points. EAP110 / EAP115 / EAP225 / EAP245 / EAP320 / EAP330 / EAP115-Wall
 Quick Setup Guide for Standalone Omada Access Points EAP110 / EAP115 / EAP225 / EAP245 / EAP320 / EAP330 / EAP115-Wall EAP110-Outdoor / EAP225-Outdoor / EAP225-Wall 1910012420 REV1.0.1 May 2018 Omada EAP
PePWave Mesh Connector User Manual
 PePWave Mesh Connector User Manual Document Rev. 1.0 Jun-07 COPYRIGHT & TRADEMARKS Specifications are subject to change without notice. Copyright 1999-2007 PePWave Ltd. All Rights Reserved. PePWave and
Click on Close button to close Network Connection Details. You are back to the Local Area Connection Status window.
 How to configure EW-7228APn/EW-7416APn as a Repeater to extend wireless range This article can apply on EW-7228APn and EW-7416APn. We used screen shots of EW-7416APn in this instruction. We recommend you
Access Your 34972A Wirelessly with a TRENDnet Travel Router
 M E A S U R E M E N T T I P S Volume 9, Number 4 Access Your 34972A Wirelessly with a TRENDnet Travel Router Sometimes, it is difficult to run LAN wires to a location from which you want to collect data.
QUICK START GUIDE. WK-2x Access Point. WK-2, WK-2-B, WK-2-C / ac Dual Band Access Version 1.1
 QUICK START GUIDE WK-2x Access Point WK-2, WK-2-B, WK-2-C / 802.11ac Dual Band Access Version 1.1 Contents Package Contents 3 WK-2 Mounting Options 4 WK-2-C Mounting 14 Powering Up the Access Point 22
WAP3205 v2. User s Guide. Quick Start Guide. Wireless N300 Access Point. Default Login Details. Version 1.00 Edition 2, 12/2012
 WAP3205 v2 Wireless N300 Access Point Version 1.00 Edition 2, 12/2012 Quick Start Guide User s Guide Default Login Details LAN IP Address http://192.168.1.2 Password 1234 www.zyxel.com Copyright 2012 ZyXEL
WRE6606. User s Guide. Quick Start Guide. Dual-Band Wireless AC1300 Access Point. Default Login Details. Version 1.00 (ABDU.0) Edition 1, 10/2016
 Edition 1, 10/2016") WRE6606 Dual-Band Wireless AC1300 Access Point Version 1.00 (ABDU.0) Edition 1, 10/2016 Quick Start Guide User s Guide Default Login Details Web Address http://zyxelsetup http://dhcp-assigned IP www.zyxel.comhttp://192.168.1.2
WRE6606 Dual-Band Wireless AC1300 Access Point Version 1.00 (ABDU.0) Edition 1, 10/2016 Quick Start Guide User s Guide Default Login Details Web Address http://zyxelsetup http://dhcp-assigned IP www.zyxel.comhttp://192.168.1.2
Radiolabs Bridge in a Box Setup
 Radiolabs Bridge in a Box Setup This manual will guide you through creating a point-to-point bridge using your Radiolabs equipment. Step 1: Preparing for setup. To set the bridge up, start by unboxing
WF-2402 Quick Installation Guide
 WF-2402 Quick Installation Guide Netis 150Mbps Wireless-N Broadband Router 1. Check Your Package Contents The following items should be found in your package: 150Mbps Wireless-N Broadband Router Power
Wireless USB Port Multi-Functional Printer Server. Model # AMPS240W. User s Manual. Ver. 1A
 Wireless USB 2.0 1-Port Multi-Functional Printer Server Model # AMPS240W User s Manual Ver. 1A Table of Contents 1 Introduction...3 1.1 Package Contents... 3 1.2 System Requirements... 3 2 Multi-Functional
Exercise 5: Basic LabVIEW Programming
 Exercise 5: Basic LabVIEW Programming In this exercise we will learn the basic principles in LabVIEW. LabVIEW will be used in later exercises and in the project part, as well in other courses later, so
Add a Wireless Network to an Existing Wired Network using a Wireless Access Point (WAP)
") Add a Wireless Network to an Existing Wired Network using a Wireless Access Point (WAP) Objective A Wireless Access Point (WAP) is a networking device that allows wireless-capable devices to connect to
Add a Wireless Network to an Existing Wired Network using a Wireless Access Point (WAP) Objective A Wireless Access Point (WAP) is a networking device that allows wireless-capable devices to connect to
Quick Start Guide for Standalone EAP
 Quick Start Guide for Standalone EAP CHAPTERS 1. Determine the Management Method 2. Build the Network Topology 3. Log In to the EAP 4. Edit the SSID 5. Configure and Manage the EAP This guide applies to:
Quick Installation Guide
 Quick Installation Guide WAP-PC1750W AC1750 Wall Mount Access Point Version A2.1c, June 22, 2017 I Product Information I-1. Package Contents 1 2 3 4 5 6 7 1. WAP-PC1750W Access Point 2. Antennas x 3 3.
User Manual of 5.8G Outdoor CPE
 User Manual of 5.8G Outdoor CPE Version V1.2 Thank you for purchasing Enterprise High Gain Outdoor CPE. This manual will instruct you how to configure and manage this CPE, enable you to use it in a perfect
Hardware overview. Package contents V-M200, documentation, three antennas, and power supply.
 The HP V-M200 is a Wi-Fi Alliance authorized Wi-Fi CERTIFIED 802.11a/b/g and 802.11n product. The Wi-Fi CERTIFIED Logo is a certification mark of the Wi-Fi Alliance. In HP V-M200 802.11n Access Point Quickstart
F3102 / F3107 / F3110 / F3115 / F3210 / F3215 PN: 86085K K
 F3102 / F3107 / F3110 / F3115 / F3210 / F3215 0 86085K3000020 PN: 86085K3000020 Zavio F3102/F3107/F3110/F3115/F3210/F3215 Quick Installation Guide Please follow the installation steps below to set up
Networking the printer
 Networking the printer General networking Networking overview A network is a collection of devices such as computers, printers, Ethernet hubs, wireless access points, and routers connected together for
How to setup WL-WN575A2/WL-WN575A3 Repeater Mode through Ethernet Cable
 How to setup WL-WN575A2/WL-WN575A3 Repeater Mode through Ethernet Cable The following setup procedure is for INITIAL SETUP. If your product has been configured before, we suggest you to RESET the product
WRE6505 v2. User s Guide. Quick Start Guide. Wireless AC750 Range Extender. Default Login Details. Version 1.00 Edition 1, 10/2016
 WRE6505 v2 Wireless AC750 Range Extender Version 1.00 Edition 1, 10/2016 Quick Start Guide User s Guide Default Login Details Web Address http://zyxelsetup http://dhcp-assigned IP www.zyxel.comhttp://192.168.1.2
Quick Start Guide. NP290W Turbo Wireless HomePlug
 Quick Start Guide Turbo Wireless HomePlug Contents Chapter 1 Introduction... 3 1.1 Minimum Requirements... 3 1.2 Typical Turbo Wireless HomePlug Connection... 3 1.3 Package Contents... 3 Chapter 2 Turbo
WiFi-Repeater User Manual. Quick Installation Guide(Q.I.G.) REV.1.2
 REV.1.2") WiFi-Repeater User Manual Quick Installation Guide(Q.I.G.) REV.1.2 Introduction: The WiFi Repeater is a combined wired/wireless network connection device designed specifically for small business, office,
WiFi-Repeater User Manual Quick Installation Guide(Q.I.G.) REV.1.2 Introduction: The WiFi Repeater is a combined wired/wireless network connection device designed specifically for small business, office,
A Division of Cisco Systems, Inc. GHz 2, g. Wireless-G. User Guide. Access Point WIRELESS WAP54G (EU/LA/UK) Model No.
 Model No.") A Division of Cisco Systems, Inc. GHz 2,4 802.11g WIRELESS Wireless-G Access Point User Guide Model No. WAP54G (EU/LA/UK) Copyright and Trademarks Specifications are subject to change without notice. Linksys
A Division of Cisco Systems, Inc. GHz 2,4 802.11g WIRELESS Wireless-G Access Point User Guide Model No. WAP54G (EU/LA/UK) Copyright and Trademarks Specifications are subject to change without notice. Linksys
Quick Installation Guide DAP N300 Wi-Fi Range Extender
 N300 Wi-Fi Range Extender BEFORE YOU BEGIN Delivery Package Extender (brochure). If any of the items are missing, please contact your reseller. The User Manual and documents are available on D-Link website
AIR HANDLING UNIT CONNCECTION VIA TL-WR802N (AHU, TL-WR802N, smartphone) QUICK LAUNCH GUIDE P0117_AZ_0001
 QUICK LAUNCH GUIDE P0117_AZ_0001") WWW.SALDA.LT AIR HANDLING UNIT CONNCECTION VIA TL-WR802N (AHU, TL-WR802N, smartphone) QUICK LAUNCH GUIDE P0117_AZ_0001 CONTENTS I. CONNECTING THE ROUTER 3 II. TP-LINK WIRELESS N NANO ROUTER RANGE EXTENDER
WWW.SALDA.LT AIR HANDLING UNIT CONNCECTION VIA TL-WR802N (AHU, TL-WR802N, smartphone) QUICK LAUNCH GUIDE P0117_AZ_0001 CONTENTS I. CONNECTING THE ROUTER 3 II. TP-LINK WIRELESS N NANO ROUTER RANGE EXTENDER
Premiertek AP Mbps Wireless-N Broadband Router Quick Installation Guide
 Premiertek AP2402 150Mbps Wireless-N Broadband Router Quick Installation Guide V1.0.8.11 1. Check Your Package Contents The following items should be found in your package: 150Mbps Wireless-N Broadband
Quick Installation Guide TEW-640MB 1.01
 Quick Installation Guide TEW-640MB 1.01 Table of Contents English 1 1. Before You Start 2. Hardware Installation 1 2 3. Configure the TEW-640MB 3 4. Wi-Fi Protected Setup (WPS) Push Button Setup 7 Troubleshooting
Quick Installation Guide TEW-687GA 1.01
 Quick Installation Guide TEW-687GA 1.01 Table of Contents English 1 1. Before You Start 2. Hardware Installation 1 2 3. Configure the TEW-687GA 4 4. Wi-Fi Protected Setup (WPS) Push Button Setup 8 Troubleshooting
WAP6405. User s Guide. Quick Start Guide. 5GHz AC1750 Gigabit Wireless Bridge. Default Login Details. Version 1.00 Edition 1, 06/2016
 WAP6405 5GHz AC1750 Gigabit Wireless Bridge Version 1.00 Edition 1, 06/2016 Quick Start Guide User s Guide Default Login Details LAN IP Address http://192.168.1.2 (AP Mode) http://192.168.1.5 (Repeater
802.11g Wireless Access Point
 802.11g Wireless Access Point WAP-4036 Quick Installation Guide Table of Contents Package Content... 3 Hardware Installation... 4 Initial Configuration... 5 Further Configuration... 8 Package Content 1
Windows Vista Installation Guide
 MFC-8870DW Windows Vista Installation Guide Before you can use the machine, you must set up the hardware and install the driver. Please read the Quick Setup Guide and this Windows Vista Installation Guide
Quick Installation Guide DIR-300NRU. Wireless Router with Built-in 4-port Switch
 DIR-300NRU Wireless Router with Built-in 4-port Switch BEFORE YOU BEGIN Delivery Package Wireless router DIR-300NRU Power adapter Straight-through Ethernet cable (CAT 5E) CD-ROM with User Manual and (brochure)
Rapidlogger Systems. EnGenius ENS202EXT Access Point
 EnGenius ENS202EXT Access Point This tech note describes how to setup the EnGenius Wi-Fi access point and connect it with the Rapidlogger System. This will allow you to wirelessly communicate between your
Quick Installation Guide of Acer WLAN 11b Broadband Router
 Preparation 1 At lease one PC with IEEE802.11b WLAN client installed. 2 One straight-through Category 5 Ethernet cable, used to link WAN interface to xdsl or CM for Internet connection. 3 Acer WLAN 11b
Table of Contents. Page ii
 Table of Contents Chapter 1 Introduction 1 Features... 1 Safety Instructions... 1 Package Contents... 2 Physical Details... 3 Chapter 2 Setup 5 Overview... 5 Using the Windows Wizard... 5 Chapter 3 Web-Based
54Mbps Pocket Wireless Access Point (WL-330g)
") 54Mbps Pocket Wireless Access Point (WL-330g) Copyright 2004 ASUSTeK COMPUTER INC. All Rights Reserved. Contents Conventions... 2 Welcome!... 3 Package contents... 3 System requirements... 3 Device installation...
54Mbps Pocket Wireless Access Point (WL-330g) Copyright 2004 ASUSTeK COMPUTER INC. All Rights Reserved. Contents Conventions... 2 Welcome!... 3 Package contents... 3 System requirements... 3 Device installation...
Please note, instructions in this guide are based on a PC running Windows 7. Please adapt the actions to suit your operating system.
 Please note, instructions in this guide are based on a PC running Windows 7. Please adapt the actions to suit your operating system. Please follow these steps to ensure that any changes made by your previous
Neighborhood HiSpeed Quick Start Guide
 Neighborhood HiSpeed Quick Start Guide Before you begin: Thank you for choosing Neighborhood HiSpeed. We have set up your HiSpeed service on the phone number identified in your Neighborhood Welcome kit.
Lab - Configure a NIC to Use DHCP in Windows
 Introduction In this lab, you will configure an Ethernet NIC to use DHCP to obtain an IP address and test connectivity between two computers. Recommended Equipment Wireless router Two computers running
802.11ac Wireless Access Point Model WAC104
 Point Model WAC104 User Manual October 2016 202-11698-01 350 E. Plumeria Drive San Jose, CA 95134 USA Support Thank you for purchasing this NETGEAR product. You can visit www.netgear.com/support to register
Application Example (Standalone EAP)
") Application Example (Standalone EAP) CHAPTERS 1. Determine the Network Requirements 2. Build the Network Topology 3. Log In to the EAP 4. Configure the EAP 5. Test the Network This guide applies to: EAP225-Outdoor
Application Example (Standalone EAP) CHAPTERS 1. Determine the Network Requirements 2. Build the Network Topology 3. Log In to the EAP 4. Configure the EAP 5. Test the Network This guide applies to: EAP225-Outdoor
Quick Installation Guide DSL-2640U/NRU. ADSL/Ethernet Router with Wi-Fi and Built-in Switch
 DSL-2640U/NRU ADSL/Ethernet Router with Wi-Fi and Built-in Switch BEFORE YOU BEGIN Delivery Package Wireless router DSL-2640U/NRU Power adapter RJ-11 telephone cable Straight-through Ethernet cable (CAT
Quick Installation Guide DSL-2650U/NRU. 3G/ADSL/Ethernet Router with Wi-Fi and Built-in Switch
 DSL-2650U/NRU 3G/ADSL/Ethernet Router with Wi-Fi and Built-in Switch BEFORE YOU BEGIN Delivery Package Router DSL-2650U/NRU Power adapter RJ-11 telephone cable Straight-through Ethernet cable (CAT 5E)
HP Deskjet 6800 series
 HP Deskjet 6800 series Network Guide 網路指南 English English Edition 1 May 2004 Copyright 2004 Hewlett-Packard Development Company, L.P. Notice Reproduction, adaptation, or translation without prior written
123 Manual, LP-1522 Broadband Wireless AP/Router, Point to point/ Point to Multipoint plus Access point installation mode.
 Wireless - Equipment 123 Manual, LP-1522 Broadband Wireless AP/Router, Point to point/ Point to Multipoint plus Access point installation mode. LP1522_M123_ENC02W 123 Manual, LP-1522 Broadband Wireless
Quick Installation Guide DSL-2650U. 3G/ADSL/Ethernet Router with Wi-Fi and Built-in Switch
 DSL-2650U 3G/ADSL/Ethernet Router with Wi-Fi and Built-in Switch BEFORE YOU BEGIN Delivery Package Router DSL-2650U Power adapter DC 12V/1A RJ-11 telephone cable Ethernet cable (CAT 5E) Splitter (brochure).
2) INSERT THE SETUP CD
 INSERT THE SETUP CD") 1 2 3 1) POWER UP After you have correctly connected your Range Extender to an available Ethernet port on your Network, please power on the Extender and a PC that is also on the netw ork.. 2) INSERT THE
1 2 3 1) POWER UP After you have correctly connected your Range Extender to an available Ethernet port on your Network, please power on the Extender and a PC that is also on the netw ork.. 2) INSERT THE
VDSL Router 4 Port Wi-Fi Dual Band (NT3BB-4PVWN-147) Quick Installation Guide
 Quick Installation Guide") VDSL Router 4 Port Wi-Fi Dual Band (NT3BB-4PVWN-147) Quick Installation Guide 1. Packing List The following table lists the items in the product package. Item Quantity VDSL Router 1 Power Adapter 1 RJ
VDSL Router 4 Port Wi-Fi Dual Band (NT3BB-4PVWN-147) Quick Installation Guide 1. Packing List The following table lists the items in the product package. Item Quantity VDSL Router 1 Power Adapter 1 RJ
A Division of Cisco Systems, Inc. GHz 2, g. Wireless-G. User Guide. PCI Adapter WIRELESS. with SpeedBooster WMP54GS (EU/UK/LA) Model No.
 Model No.") A Division of Cisco Systems, Inc. GHz 2,4 802.11g WIRELESS Wireless-G PCI Adapter with SpeedBooster User Guide Model No. WMP54GS (EU/UK/LA) Copyright and Trademarks Specifications are subject to change
A Division of Cisco Systems, Inc. GHz 2,4 802.11g WIRELESS Wireless-G PCI Adapter with SpeedBooster User Guide Model No. WMP54GS (EU/UK/LA) Copyright and Trademarks Specifications are subject to change
NETWORK USER S GUIDE. Multi-Protocol On-board Ethernet Multi-function Print Server and Wireless Ethernet Multi-function Print Server
 Multi-Protocol On-board Ethernet Multi-function Print Server and Wireless Ethernet Multi-function Print Server NETWORK USER S GUIDE This Network User's Guide provides useful information of wired and wireless
LabVIEW Tutorials. T.1 Temperature Measurement and Cold Junction Compensation (CJC) LUMS School of Science and Engineering
 LUMS School of Science and Engineering") LabVIEW Tutorials T.1 Temperature Measurement and Cold Junction Compensation (CJC) LUMS School of Science and Engineering Umer Hassan & Muhammad Sabieh Anwar Introduction: In this tutorial we shall learn
LabVIEW Tutorials T.1 Temperature Measurement and Cold Junction Compensation (CJC) LUMS School of Science and Engineering Umer Hassan & Muhammad Sabieh Anwar Introduction: In this tutorial we shall learn
Configuring the network clients
 3 Configuring the network clients Accessing the wireless router Setting an IP address for wired or wireless clients To access the ASUS Wireless Router, you must have the correct TCP/IP settings on your
User Manual of NC-AC44APP/NC-AC21AP
 User Manual of NC-AC44APP/NC-AC21AP Version V1.0 Thank you for purchasing NC-Link Access Point. This manual will instruct you how to configure and the AP, enable you to use it in a perfect status. Please
Customer Installation Guide NBG-4615 v2 ZyXEL Wireless Router
 Customer Installation Guide NBG-4615 v2 ZyXEL Wireless Router Form #496PTC Rev. 09/2013 Hardware Installation 1. First, connect the DSL modem to the WAN port, located on the back of the NBG-4615 v2, on
Congratulations on purchasing Hawking s HWPS12UG 1-Port Parallel + 2 USB Ports Wireless G Print Server. The Hawking HWPS12UG is a powerful and
 Congratulations on purchasing Hawking s HWPS12UG 1-Port Parallel + 2 USB Ports Wireless G Print Server. The Hawking HWPS12UG is a powerful and convenient network printing solution that will connect your
Lab - Connect to a Router for the First Time
 Introduction In this lab, you will configure basic settings on a wireless router. Recommended Equipment A computer with Windows installed An Ethernet NIC installed Wireless router Ethernet patch cable
Network Camera Firmware Upgrade Quick Guide
 Network Camera Firmware Upgrade Quick Guide 09-2018 / v1.0 1 CONTENTS I Introduction... 3 II How to Upgrade Firmware for Network Camera... 4 III Download App... 11 2 I Introduction To strengthen the security
F3102 / F3107 / F3110 / F3115 / F3210 / F3215 PN: 86085K K
 F3102 / F3107 / F3110 / F3115 / F3210 / F3215 86085K3000020 PN: 86085K3000030 Zavio F3102/F3107/F3110/F3115/F3210/F3215 Quick Installation Guide Please follow the installation steps below to set up F3102
It is a Plug & Play Solution It is a bundle, containing an HP5100S and an NHP5010
 Note: The following Quick Installation Guide has been designed for the Addon NHP5010BD1 bundle, but it can be used for all other bundles. Powerline Adapter (also called Homeplug) is a device that carries
User Guide. 450Mbps/300Mbps Wireless N Access Point TL-WA901ND/TL-WA801ND REV
 User Guide 450Mbps/300Mbps Wireless N Access Point TL-WA901ND/TL-WA801ND REV4.0.0 1910011930 Contents About This Guide...1 Chapter 1. Get to Know About Your Access Point.................... 2 1. 1. Product
Data Acquisition in LabVIEW
 University College of Southeast Norway Data Acquisition in LabVIEW Hans-Petter Halvorsen, 2016.10.28 http://home.hit.no/~hansha Preface This tutorial explains the basic concepts of a Data Acquisition in
Interface WI-FI CODE: INTW. v.1.0. Edition: 2 from Supersedes the: 1 from edition
 Interface WI-FI v.1.0 CODE: EN Edition: 2 from 19.12.2012 Supersedes the: 1 from 07.09.2012 edition CONTENTS 1. General description....3 2. Arrangement of the components....3 3. Installation...4 4. Configuration
Wireless-G VPN Router with RangeBooster. Quick Install Guide
 Wireless-G VPN Router with RangeBooster Quick Install Guide Package Contents * * * * * Wireless-G VPN Router with 2 Fixed Antennae CD-ROM with User Guide and Setup Wizard Network Cable Power Adapter Quick
DI GHz Wireless Router
 This product can be set up using any current web browser, i.e., Internet Explorer 6 or Netscape Navigator 6.2.3. DI-514 2.4GHz Wireless Router Before You Begin 1. If you purchased this router to share
Installing driver over the network
 Installing driver over the network Command- line Definition Description Command- line Definition Description /a or /A /n or /N /nd or /ND Specifies
NETGEAR Trek N300 Travel Router and Range Extender
 Trek N300 Travel Router and Range Extender PR2000 Installation Guide Reset /LAN LAN Contents Get Started........................................... 3 Connect in the Home.................................
Dongle-sized Wireless Print Server. Quick Installation Guide V1.0
 Dongle-sized Wireless Print Server Quick Installation Guide V1.0 1 Before you start, you should prepare the following items: Windows-based computer with print server setup CD Printer Printer cable One
Quick Installation Guide
 Quick Installation Guide DL-200 Cellular Data logger V1.2_201610 TABLE OF CONTENTS CHAPTER 1 INTRODUCTION... 4 1.1 CONTENTS LIST... 5 1.2 HARDWARE INSTALLATION... 6 1.2.1 WARNING... 6 1.2.2 SYSTEM REQUIREMENTS...
AirServer Connect User Guide
 1 Contents Welcome... 3 Unique features... 3 Set up your AirServer Connect... 4 The Home Screen... 5 Navigating Menus... 5 Configuring Basic Settings... 6 Screen Mirroring Methods... 7 Airplay... 7 Mac...
Zavio P5111/ P5116/ P5210 Quick Installation Guide
 86085M2000010 Zavio P5111/ P5116/ P5210 Quick Installation Guide Installation Steps Please follow the installation steps below to set up your P5111 / P5116/ P5210 Day/Night Pan/Tilt IP Camera. Check the
H560N. Quick Start Guide
 H560N Quick Start Guide Wireless Router Package Contents: ZXHN H560N Wireless Router, Power Adapter, Quick Start Guide, Warranty Card This product is a low Low-power product mainly used to extend the Wi-Fi
Shaw Business Hitron Modem (CGNM-2250) Configuration User Guide
 Configuration User Guide") Shaw Business Hitron Modem (CGNM-2250) Configuration User Guide Contents 1. How to Login to your Hitron Modem... 3 2. SmartWiFi and Local Area Network (LAN) set up...4 a. LAN Setting -Private Gateway IP
Shaw Business Hitron Modem (CGNM-2250) Configuration User Guide Contents 1. How to Login to your Hitron Modem... 3 2. SmartWiFi and Local Area Network (LAN) set up...4 a. LAN Setting -Private Gateway IP
Wireless PC Network Settings
 APPENDIX C This appendix provides instructions for changing the TCP/IP and radio card settings in your wireless PC. Choose the instructions appropriate for your operating system. Here is what you will
Package Contents. Preface. Front Panel. Rear Panel
 Quick Installation Guide V2. 0 0 Copyright N otic e This document is protected by USA copyright laws and other laws and is the property of 4 I P N E T, I N C. Y ou may not copy, reproduce, distribute,
Network Name displays the name of the wireless network your machine is connected to (this says network name when not connected to a network).
.") Wireless Connection Tips for the Horizon Memory Craft 15000 Information can be found in the Machine Manual on pages 100-102. Many routers contain a sticker outlining the SSID and Password. You will need
Wireless Connection Tips for the Horizon Memory Craft 15000 Information can be found in the Machine Manual on pages 100-102. Many routers contain a sticker outlining the SSID and Password. You will need
DWL-900AP+ D-Link AirPlus Wireless Access Point
 This product can be set up using any current web browser, i.e., Internet Explorer 5x, Netscape Navigator 4x. DWL-900AP+ D-Link AirPlus Wireless Access Point Before Your Begin 1. It s best to use a computer
Quick Installation Guide TV-IP602WN 1.01
 Quick Installation Guide TV-IP602WN 1.01 Table of Contents English 1 1. Before You Start 1 2. Hardware Installation and Configuration 2 Troubleshooting 8 Wireless Tips 9 Version 03.14.2011 1. Before You
Installing the Driver, Client Utility, and Client Adapter
 CHAPTER 3 Installing the Driver, Client Utility, and Client Adapter This chapter provides installation and configuration instructions for the driver, client utilities, and the client adapter. The following
DWL-2100AP. Check Your Package Contents. This product can be set up using., Internet Explorer 6 or Netscape Navigator
 This product can be set up using any curren ent t web browser owser,, i.e.,., Internet Explorer 6 or Netscape Navigator 6.2.3. DWL-2100AP D-Link AirPlus XtremeG TM 802.11g/108Mbps Wireless Access Poin
MatchPort E Embedded Device Server Demonstration Kit Quick Start Guide
 MatchPort E Embedded Device Server Demonstration Kit Quick Start Guide Part Number 900-486 Revision G May 2013 Copyright and Trademark Warranty Contacts Revisions 2013 Lantronix, Inc. All rights reserved.
Overview. Introduction. Contents. Linksys Wireless-N Range Extender. Front
 User Guide RE2000V2 Linksys Wireless-N Range Extender Introduction This User Guide can help you connect the extender to your network and solve common setup issues. You can find more help from our award-winning,
Zavio F3100 / F3105 Quick Installation Guide
 Zavio F3100 / F3105 Quick Installation Guide Please follow the installation steps below to set up F3100 / F3105 IP Camera. Check the package contents against the list below. See P.1 Physical overview.
DSL-G624T. Wireless ADSL Router. If any of the above items is missing, please contact your reseller. This product can be set up using any
 This product can be set up using any current web browser, i.e., Internet Explorer 6x or Netscape Navigator 7x. DSL-G624T Wireless ADSL Router Before You Begin 1. If you purchased this Router to share your
Hardware overview. Package contents MSM710, documentation, power supply, self-adhesive rubber feet.
 In MSM710 Controller Quickstart This Quickstart applies to both the MSM710 Access Controller (J9328A) and the MSM710 Mobility Controller (J9325A). This Quickstart introduces the HP ProCurve Networking