BEC 7800N n Dual WAN ADSL2+ Firewall Router. User Manual
|
|
|
- Frederick Harrison
- 6 years ago
- Views:
Transcription

1 BEC 7800N n Dual WAN ADSL2+ Firewall Router User Manual Version released 1.02.dr7 Last revised date
2 Table of Contents Chapter 1: Introduction... 1 Introduction to your Router... 1 Features... 2 Chapter 2: Installing the Router...4 Important note for using this router... 4 Package Contents... 5 Device Description... 6 The Front LEDs... 6 The Rear Ports... 7 Cabling... 8 Chapter 3: Basic Installation... 9 Connecting Your Router Network Configuration Factory Default Settings Information from your ISP Chapter 4: Configuration...19 Quick Start Status (Basic Mode) Cofiguration (Basic Mode) WAN Main Port (ADSL) WAN Main Port (EWAN) WLAN Status (Advanced Mode) ADSL ARP DHCP System Log... 46
3 Configuration (Advanced Mode) LAN Ethernet IP Alias Wireless Wireless Security DHCP Server WAN WAN Profile (ADSL) WAN Profile Main Port (EWAN) ADSL Mode System Time Zone Firmware Upgrade Backup / Restore Restart User Management Firewall Packet Filter MAC Filter Block WAN Ping Virtual Server Port Mapping DMZ Advanced Static Route Dynamic DNS VLAN Device Management IGMP... 85
4 TR-069 Client Remote Access Appendix: Product Support & Contact... 87
5 Chapter 1: Introduction Introduction to your Router Thank you for purchasing BEC 7800N Router. Your new router is an all-in-one unit that combines an ADSL modem, ADSL2/2+ router and Ethernet network switch to provide everything you need to get the machines on your network connected to the Internet over an ADSL broadband connection. BEC 7800N router complies with ADSL2+ standards for deployment worldwide and supports downstream rates of up to 24 Mbps and upstream rates of up to 1 Mbps. Designed for small office, home office and residential users, the router enables even faster Internet connections. You can enjoy ADSL services and broadband multimedia applications such as interactive gaming, video streaming and real-time audio much easier and faster than ever before. BEC 7800N supports PPPoA (RFC 2364 PPP (Point-to-Point Protocol) over ATM Adaptation Layer 5), RFC 1483 encapsulation over ATM (bridged or routed), PPP over Ethernet (RFC 2516) to establish a connection with your ISP. Your new router also supports VC-based and LLC-based multiplexing. The perfect solution for connecting a small group of PCs to a high-speed broadband Internet connection, BEC 7800N allows multiple users to have high-speed Internet access simultaneously. Your new router also serves as an Internet firewall, protecting your network from access by outside users. Not only does it provide a natural firewall function with Network Address Translation (NAT), it also provides rich firewall features to secure your network. All incoming data packets are monitored and filtered. You can also configure your new router to block internal users from accessing the Internet. BEC 7800N provides two levels of security support. First, it masks LAN IP addresses making them invisible to outside users on the Internet, so it is much more difficult for a hacker to target a machine on your network. Second, it can block and redirect certain ports to limit the services that outside users can access. To ensure that games and other Internet applications run properly, you can open specific ports for outside users to access internal services on your network. The Integrated DHCP (Dynamic Host Control Protocol) client and server services allow multiple users to get IP addresses automatically when the router boots up. Simply set local machines as a DHCP client to accept a dynamically assigned IP address from the DHCP server and reboot. Each time a local machine is powered up; the router recognizes it and assigns an IP address to instantly connect it to the LAN. For advanced users, Virtual Service (port mapping) functions allow the product to provide limited visibility to local machines with specific services for outside users. For instance, a dedicated web server can be connected to the Internet via the router and then incoming requests for web pages that are received by the router can be rerouted to your dedicated local web server, even though the server now has a different IP address. Virtual Server can also be used to re-task services to multiple servers. For instance, you can set the router to allow separated FTP, Web, and Multiplayer game servers to share the same Internet-visible IP address while still protecting the servers and LAN users from hackers. 1
6 Features Express Internet Access The router complies with ADSL worldwide standards. It supports downstream rate up to 12/24 Mbps with ADSL2/2+, 8Mbps with ADSL. Users enjoy not only high-speed ADSL services but also broadband multimedia applications such as interactive gaming, video streaming and real-time audio much easier and faster than ever. It is compliant with Multi-Mode standard (ANSI T1.413, Issue 2; G.dmt (ITU G.992.1); G.lite (ITU G.992.2); G.hs (ITU G994.1); G.dmt.bis (ITU G.992.3); G.dmt.bis. plus (ITU G.992.5)). EWAN Besides using ADSL to get connected to the Internet, BEC 7800N EWAN port is an alternative WAN port used to connect to Cable Modems, VDSL, fiber optic lines and PON. This alternative, yet faster method of connecting to the internet provides users with more flexibility to get online. Fast Ethernet Switch A 4-port 1000Mbps fast Ethernet switch is built in with automatic switching between MDI and MDI-X. An Ethernet straight or crossover cable can be used directly for auto detection. Multi-Protocol to Establish a Connection It supports PPPoA (RFC PPP over ATM Adaptation Layer 5), RFC 1483 encapsulation over ATM (bridged or routed), PPP over Ethernet (RFC 2516), and IPoA (RFC1577) to establish a connection with the ISP. The product also supports VC-based and LLC-based multiplexing. PPP over Ethernet (PPPoE) BEC 7800N provides an embedded PPPoE client function to establish a connection. You get greater access speed without changing the operation concept, while sharing the same ISP account and paying for one access account. No PPPoE client software is required for the local computer. Automatic Reconnect and Disconnect Timeout (Idle Timer) functions are also provided. Universal Plug and Play (UPnP) and UPnP NAT Traversal This protocol is used to enable simple and robust connectivity among stand-alone devices and PCs from many different vendors. It makes network simple and affordable for users. UPnP architecture leverages TCP/IP and the Web to enable seamless proximity networking in addition to control and data transfer among networked devices. With this feature enabled, users can now connect to Net meeting or MSN Messenger seamlessly. Network Address Translation (NAT) Allows multi-users to access outside resources such as the Internet simultaneously with one IP address/one Internet access account. Many application layer gateway (ALG) are supported 2
7 such as web browser, ICQ, FTP, Telnet, , News, Net2phone, Ping, NetMeeting, IP phone and others. Domain Name System (DNS) Relay It provides an easy way to map the domain name (a friendly name for users such as com) and IP address. When a local machine sets its DNS server with this router s IP address, every DNS conversion request packet from the PC to this router will be forwarded to the real DNS in the outside network. Dynamic Domain Name System (DDNS) The Dynamic DNS service allows you to alias a dynamic IP address to a static hostname. This dynamic IP address is the WAN IP address. For example, to use the service, you must first apply for an account from a DDNS service like More than 5 DDNS servers are supported. Virtual Server Users can specify some services to be visible from outside users. The router can detect incoming service requests and forward either a single port or a range of ports to the specific local computer to handle it. For example, a user can assign a PC in the LAN acting as a WEB server inside and expose it to the outside network. Outside users can browse inside web servers directly while it is protected by NAT. A DMZ host setting is also provided to a local computer exposed to the outside network, Internet. Rich Packet Filtering Not only filters the packet based on IP address, but also based on Port numbers. It will filter packets from the Internet and vice versa, in addition to providing a higher level of security control. Dynamic Host Configuration Protocol (DHCP) Client and Server In the WAN site, the DHCP client can get an IP address from the Internet Service Provider (ISP) automatically. In the LAN site, the DHCP server can allocate a range of client IP addresses and distribute them including IP address, subnet mask as well as DNS IP address to local computers. It provides an easy way to manage the local IP network. Web based GUI It supports web based GUI for configuration and management. It is user-friendly and comes with online help. It also supports remote management capability for remote users to configure and manage this product. Firmware Upgradeable Device can be upgraded to the latest firmware through the WEB based GUI. 3
8 Chapter 2: Installing the Router Important note for using this router 4
 Dual WAN ADSL2+ Firewall Router CD containing the online manual")
 Power adapter Quick Start")
9 Package Contents BEC 7800(N) (802.11n) Dual WAN ADSL2+ Firewall Router CD containing the online manual RJ-11 ADSL/Telephone cable Ethernet (RJ-45) cable Three 2dBi detachable antennas (Wireless model only) Power adapter Quick Start Guide Splitter / Microfilter (Optional) 5
10 Device Description The Front LEDs LED 1 Internet 2 DSL 3 Wireless / WPS 4 EWAN 5 Ethernet port 1X 4X (RJ-45 connector) 6 Power Meaning Lit orange when WAN port fails to get IP address. Flash green when WAN port gets IP address successfully and when data is transmitted. Lit Green when the device is successfully connected to an ADSL DSLAM. ( line sync ). Lit green when a wireless connection is established. Lit orange when WPS is enabled. Flash green when data is sent / received. Lit orange when connected to a broadband connection device. Lit orange for 10/100Mbps. Blinking when data is Transmitted / Received. Lit orange when one of LAN ports is connected to an Ethernet device. Lit green when the speed of transmission hits 1000Mbps; Lit orange when the speed of transmission hits 10/100Mbps. Blink when data is being Transmitted / Received. When the device is booting, green light will lit while orange light will flash. When the system is ready, it will lit green. While the system is rebooting or during firmware upgrade, the LED light will flash green. Lit orange when the device fails to boot or when the device is in emergency mode. 6
11 The Rear Ports Port Meaning 1 Power Switch Power ON/OFF switch. 2 Power Connect it with the supplied power adapter. 3 RESET Press more than 1 second to restore the device to its default mode. 4 WPS Push WPS button to trigger Wi-Fi Protected Setup function. 5 Giga Ethernet Connect to a PC or an office/home network of 10Mbps, 100Mbps or 1000Mbps using the provided RJ-45 Ethernet cables. 6 EWAN WAN 10/100Mbps Ethernet port (with auto crossover support). Connect Cable Modem, VDSL, and Fiber Modem or PON optic lines with your RJ-45 cable. 7 DSL Connect this port to the ADSL/telephone network with the RJ-11 cable (telephone) provided. 8 Antenna Connect the detachable antenna to this port. 7
12 Cabling One of the most common causes of problem is bad cabling or ADSL line(s). Make sure that all connected devices are turned on. On the front panel of your router is a bank of LEDs. Verify that the LAN Link and ADSL line LEDs are lit. If they are not, verify if you are using the proper cables. Make sure that all devices (e.g. telephones, fax machines, analogue modems) connected to the same telephone line as your router have a line filter connected between them and the wall outlet (unless you are using a Central Splitter or Central Filter installed by a qualified and licensed electrician), and that all line filters are correctly installed in a right way. If line filter is not installed and connected properly, it may cause problem to your ADSL connection or may result in frequent disconnections. 8
13 Chapter 3: Basic Installation The router can be configured through your web browser. A web browser is included as a standard application in the following operating systems: Linux, Mac OS, Windows 98/NT/2000/XP/Me/Vista, etc. The product provides an easy and user-friendly interface for configuration. Please check your PC network components. The TCP/IP protocol stack and Ethernet network adapter must be installed. If not, please refer to your Windows-related or other operating system manuals. There are ways to connect the router, either through an external repeater hub or connect directly to your PCs. However, make sure that your PCs have an Ethernet interface installed properly prior to connecting the router device. You ought to configure your PCs to obtain an IP address through a DHCP server or a fixed IP address that must be in the same subnet as the router. The default IP address of the router is and the subnet mask is (i.e. any attached PC must be in the same subnet, and have an IP address in the range of to ). The best and easiest way is to configure the PC to get an IP address automatically from the router using DHCP. If you encounter any problem accessing the router web interface it is advisable to uninstall your firewall program on your PCs, as they can cause problems accessing the IP address of the router. Users should make their own decisions on what is best to protect their network. Please follow the following steps to configure your PC network environment. 9


14 Connecting Your Router Users will not be able to connect to the internet through EWAN if DSL is already connected to the internet. Only one connection type (EWAN or DSL) is allowed to connect to the internet at one time. ADSL Router Mode Broadband Router Mode 10


15 Network Configuration Configuring PC in Windows Vista 1. Go to Start. Click on Network. 2. Then click on Network and Sharing Center at the top bar. 3. When the Network and Sharing Center window pops up, select and click on Manage network connections on the left window column. 4. Select the Local Area Connection, and right click the icon to select Properties. 11


16 5. Select Internet Protocol Version 4 (TCP/IPv4) then click Properties. 6. In the TCP/IPv4 properties window, select the Obtain an IP address automatically and Obtain DNS Server address automatically radio buttons. Then click OK to exit the setting. 7. Click OK again in the Local Area Connection Properties window to apply the new configuration. 12
17 Configuring PC in Windows XP 1. Go to Start > Control Panel (in Classic View). In the Control Panel, double-click on Network Connections 2. Double-click Local Area Connection. 3. In the Local Area Connection Status window, click Properties. 4. Select Internet Protocol (TCP/IP) and click Properties. 5. Select the Obtain an IP address automatically and the Obtain DNS server address automatically radio buttons. 6. Click OK to finish the configuration. 13


18 Configuring PC in Windows Go to Start > Settings > Control Panel. In the Control Panel, double-click on Network and Dial-up Connections. 2. Double-click Local Area Connection. 3. In the Local Area Connection Status window click Properties. 4. Select Internet Protocol (TCP/IP) and click Properties. 5. Select the Obtain an IP address automatically and the Obtain DNS server address automatically radio buttons. 6. Click OK to finish the configuration. 14
19 Configuring PC in Windows 95/98/Me 1. Go to Start > Settings > Control Panel. In the Control Panel, double-click on Network and choose the Configuration tab. 2. Select TCP/IP > NE2000 Compatible, or the name of your Network Interface Card (NIC) in your PC. 3. Select the Obtain an IP address automatically radio button. 4. Then select the DNS Configurationtab. 5. Select the Disable DNS radio button and click OK to finish the configuration. 15
20 Configuring PC in Windows NT Go to Start > Settings > Control Panel. In the Control Panel, double-click on Network and choose the Protocols tab. 2. Select TCP/IP Protocol and click Properties. 3. Select the Obtain an IP address from a DHCP server radio button and click OK. 16
21 Factory Default Settings Before configuring your router, you need to know the following default settings. Web Interface (Username and Password) Username: admin Password: admin The default username and password are admin and admin respectively. Device LAN IP settings IP Address: Subnet Mask: ISP setting in WAN site PPPoE DHCP server DHCP server is enabled. Start IP Address: IP pool counts: 100 LAN and WAN Port Addresses The parameters of LAN and WAN ports are pre-set in the factory. The default values are shown in the tale. LAN Port IP address Subnet Mask DHCP server function Enabled IP addresses for distribution to PCs 100 IP addresses continuing from through WAN Port The PPPoE function is enabled to automatically get the WAN port configuration from the ISP. 17
22 Information from your ISP Before configuring this device, you have to check with your ISP (Internet Service Provider) to find out what kind of service is provided such as DHCP (Obtain an IP Address Automatically, Static IP (Fixed IP Address) or PPPoE. Gather the information as illustrated in the following table and keep it for reference. PPPoE(RFC2516) VPI/VCI, VC / LLC-based multiplexing, Username, Password, Service Name, and Domain Name System (DNS) IP address (it can be automatically assigned by your ISP when you connect or be set manually). PPPoA(RFC2684) VPI/VCI, VC / LLC-based multiplexing, Username, Password and Domain Name System (DNS) IP address (it can be automatically assigned by your ISP when you connect or be set manually). MPoA(RFC1483/ RFC2684) IPoA(RFC1577) VPI/VCI, VC / LLC-based multiplexing, IP address, Subnet mask, Gateway address, and Domain Name System (DNS) IP address (it is a fixed IP address). VPI/VCI, VC / LLC-based multiplexing, IP address, Subnet mask, Gateway address, and Domain Name System (DNS) IP address (it is a fixed IP address). Pure Bridge VPI/VCI, VC / LLC-based multiplexing to use Bridged Mode. 18


23 Chapter 4: Configuration Open your web browser, enter the IP address of your router, which by default is , and click Go, a login window prompt will appear. The default username and password are admin and admin respectively. Congratulations! You are now successfully logon to the BEC 7800N Firewall Router! If the authentication succeeds, the homepage Device Info - Summary will appear on the screen. 19
24 Quick Start Step 1: Select WAN port connect mode from the connect mode drop down menu. There are two types of connect mode to choose from: ADSL or EWAN Step 2: After selecting the connect mode, press Continue to move on to the next configuring page. There are 5 types of connection protocols available under ADSL connect mode while there are 2 types of connection protocols available for EWAN connect mode. Each type of connection mode is described in the following sections of ADSL Connect mode and EWAN Connect mode. 20

25 Step 3: After finishing configuring the WAN port connection, you may proceed to configure the Wireless setting. There are 4 types of security mode: WPA-PSK, WPA2-PSK, WPA/WPA2 Preshared Key & WEP. Please refer to the Wireless Setting Mode section for detail description of each security mode. Step 4: After finishing configuring the WAN connection, press Continue to finish the QuickStart. 21
26 ADSL Connect Mode For ADSL connect mode there are 5 types of connection protocols: PPPoE, PPPoA, IPoA, MPoA and Pure Bridge. PPPoE VPI/VCI: Enter the information provided by your ISP. Username: Enter the username provided by your ISP. You can input up to 256 alphanumeric characters (case sensitive). This is in the format of username@ispname instead of simply username. Password: Enter the password provided by your ISP. You can input up to 32 alphanumeric characters (case sensitive). Service Name: This item is for identification purposes. If it is required, your ISP will provide you the necessary information. Maximum input is 32 alphanumeric characters. Encapsulation method: Select the encapsulation format. Select the one provided by your ISP. Authentication method: Default is Auto. Please consult your ISP on whether to use Chap, Pap or MSCHAP. IP Address: Your WAN IP address. Leave the IP address as to enable the device to automatically obtain an IP address from your ISP. 22
27 PPPoA VPI/VCI: Enter the information provided by your ISP. Username: Enter the username provided by your ISP. You can input up to 256 alphanumeric characters (case sensitive). This is in the format of instead of simply username. Password: Enter the password provided by your ISP. You can input up to 32 alphanumeric characters (case sensitive). Encapsulation method: Select the encapsulation format. Select the one provided by your ISP. Authentication method: Default is Auto. Please consult your ISP on whether to use Chap, Pap or MSCHAP. IP Address: Your WAN IP address. Leave the IP address as to enable the device to automatically obtain an IP address from your ISP. 23
28 IPoA Connection VPI/VCI: Enter the VPI and VCI information provided by your ISP. Encapsulation method: Select the encapsulation format. Select the one provided by your ISP. IP Address: IPOA WAN IP address can only set fix IP address. If the IP is set to (auto IP detect), both netmask and gateway may be left blank. Netmask: User can change it to others such as Type the netmask assigned to you by your ISP (if given). Gateway: Enter the IP address of the default gateway. 24
, both netmask and gateway may be left blank. Netmask: User can change it to others such as 255.255.255.128.")
29 MPoA Connection VPI/VCI: Enter the VPI and VCI information provided by your ISP. Encapsulation method: Select the encapsulation format. Select the one provided by your ISP. IP Address: Your WAN IP address. If the IP is set to (auto IP detect), both netmask and gateway may be left blank. Netmask: User can change it to others such as Type the netmask assigned to you by your ISP (if given). Gateway: Enter the IP address of the default gateway. Pure Bridge connection VPI/VCI: Enter the VPI and VCI information provided by your ISP. Encapsulation method: Select the encapsulation format. Select the one provided by your ISP. 25
30 EWAN Connect Mode PPPoE connection Username: Enter the username provided by your ISP. You can input up to 256 alphanumeric characters (case sensitive). This is in the format of instead of simply username. Password: Enter the password provided by your ISP. You can input up to 32 alphanumeric characters (case sensitive). Service Name: This item is for identification purposes. If it is required, your ISP will provide you the necessary information. Maximum input is 32 alphanumeric characters. IP Address: Your WAN IP address. Leave the IP address as to enable the device to automatically obtain an IP address from your ISP. Authentication Protocol: Default is Auto. Please consult your ISP on whether to use Chap, Pap or MSCHAP. 26
31 Obtain an IP Address Automatically Select this protocol enables the device to automatically retrieve IP address. Fixed IP Address IP Address: Your WAN IP address. Leave the IP address as to enable the device to automatically obtain an IP address from your ISP. Netmask: User can change it to others such as Type the netmask assigned to you by your ISP (if given). Gateway: Enter the IP address of the default gateway. 27
 to be distinguished from another.")
32 Wireless Setting Mode WPA-PSK / WPA2-PSK WLAN Service: Default setting is set to Enable. If you want to use wireless, you can select Enable. ESSID: The ESSID is the unique name of a wireless access point (AP) to be distinguished from another. For security propose, change to a unique ID name to the AP which is already built-in to the router s wireless interface. It is case sensitive and must not excess 32 characters. Make sure your wireless clients have exactly the ESSID as the device, in order to get connected to your network. Channel ID: Select the channel ID that you would like to use. Security Mode: You can disable or enable with WPA or WEP for protecting wireless network. The default mode of wireless security is Disable. WPA Shared Key: The key for network authentication. The input format is in character style and key size should be in the range between 8 and 63 characters. 28
33 WPA/WPA2 Pre-shared Key WLAN Service: Default setting is set to Enable. If you want to use wireless, you can select Enable. ESSID: The ESSID is the unique name of a wireless access point (AP) to be distinguished from another. For security propose, change to a unique ID name to the AP which is already built-in to the router s wireless interface. It is case sensitive and must not excess 32 characters. Make sure your wireless clients have exactly the ESSID as the device, in order to get connected to your network. Channel ID: Select the channel ID that you would like to use. Security Mode: You can disable or enable with WPA or WEP for protecting wireless network. The default mode of wireless security is Disable. WPA Shared Key: The key for network authentication. The input format is in character style and key size should be in the range between 8 and 63 characters. 29
 to be distinguished from another.")
34 WEP WLAN Service: Default setting is set to Enable. If you want to use wireless, you can select Enable. ESSID: The ESSID is the unique name of a wireless access point (AP) to be distinguished from another. For security propose, change to a unique ID name to the AP which is already built-in to the router s wireless interface. It is case sensitive and must not excess 32 characters. Make sure your wireless clients have exactly the ESSID as the device, in order to get connected to your network. Channel ID: Select the channel ID that you would like to use. Security Mode: You can disable or enable with WPA or WEP for protecting wireless network. The default mode of wireless security is Disable. Default Used WEP Key: Select the encryption key ID; please refer to Key (1~4) below. Key (1-4): Enter the key to encrypt wireless data. To allow encrypted data transmission, the WEP Encryption Key values on all wireless stations must be the same as the router. There are four keys for your selection. The input format is in HEX style, 10 and 26 HEX codes are required for WEP64 and WEP128 respectively. 30

35 Status (Basic Mode) 31
 PPPoE Connection (ADSL) PPPoE (PPP over Ethernet) provides access control in a manner similar to dial-up services using PPP. VPI/VCI: Enter the information provided by your ISP.")
36 Cofiguration (Basic Mode) A WAN (Wide Area Network) is an outside connection to another network or the Internet. There are two items within the WAN section: WAN Profile and ADSL Mode. WAN Main Port (ADSL) PPPoE Connection (ADSL) PPPoE (PPP over Ethernet) provides access control in a manner similar to dial-up services using PPP. VPI/VCI: Enter the information provided by your ISP. Username: Enter the username provided by your ISP. You can input up to 256 alphanumeric characters (case sensitive). This is in the format of username@ispname instead of simply username. Password: Enter the password provided by your ISP. You can input up to 32 alphanumeric characters (case sensitive). Service Name: This item is for identification purposes. If it is required, your ISP will provide you the necessary information. Maximum input is 32 alphanumeric characters. Encap. method: Select the encapsulation format. Select the one provided by your ISP. Auth. Protocol: Default is Auto. Please consult your ISP on whether to use Chap, Pap or MSCHAP. PPP IP Address( :Auto): Your WAN IP address. Leave this at to obtain automatically an IP address from your ISP. 32

37 PPPoA Connection (ADSL) PPPoA stands for Point to Point Protocol over ATM Adaptation Layer 5 (AAL5). It provides access control and billing functionality in a manner similar to dial-up services using PPP. VPI/VCI: Enter the information provided by your ISP. Username: Enter the username provided by your ISP. You can input up to 256 alphanumeric characters (case sensitive). This is in the format of username@ispname instead of simply username. Password: Enter the password provided by your ISP. You can input up to 32 alphanumeric characters (case sensitive). Encap. method: Select the encapsulation format. Select the one provided by your ISP. Auth. Protocol: Default is Auto. Please consult your ISP on whether to use Chap, Pap or MSCHAP. PPP IP Address( :Auto): Your WAN IP address. Leave the IP address as to enable the device to automatically obtain an IP address from your ISP. 33
38 MPoA Connection (ADSL) VPI/VCI: Enter the VPI and VCI information provided by your ISP. Encap. method: Select the encapsulation format. Select the one provided by your ISP. IP Address: Your WAN IP address. If the IP is set to (auto IP detect), both netmask and gateway may be left blank. Netmask: User can change it to others such as Type the netmask assigned to you by your ISP (if given). Gateway: Enter the IP address of the default gateway. 34
, both netmask and gateway may be left blank. Netmask: User can change it to others such as 255.255.255.128.")
39 IPoA Connections (ADSL) VPI/VCI: Enter the VPI and VCI information provided by your ISP. Encap. method: Select the encapsulation format. Select the one provided by your ISP. IP Address: Your WAN IP address. If the IP is set to (auto IP detect), both netmask and gateway may be left blank. Netmask: User can change it to others such as Type the netmask assigned to you by your ISP (if given). Gateway: Enter the IP address of the default gateway. 35

40 Pure Bridge Connections (ADSL) VPI/VCI: Enter the VPI and VCI information provided by your ISP. Encap. method: Select the encapsulation format. Select the one provided by your ISP. 36
41 WAN Main Port (EWAN) Besides using ADSL to get connected to the Internet, Ethernet port 1 of BEC 7800N can be used as an althernative to connect to Cable Modems, VDSL and fiber optic lines. This alternative not only provides faster connection to the Internet, it also provides users with more flexibility to get online. PPPoE (EWAN) Username: Enter the username provided by your ISP. You can input up to 256 alphanumeric characters (case sensitive). This is in the format of username@ispname instead of simply username. Password: Enter the password provided by your ISP. You can input up to 32 alphanumeric characters (case sensitive). Service Name: This item is for identification purposes. If it is required, your ISP will provide you the necessary information. Maximum input is 32 alphanumeric characters. Auth. method: Default is Auto. Please consult your ISP on whether to use Chap, Pap or MSCHAP. PPP IP Address ( :Auto): Your WAN IP address. Leave the IP address as to enable the device to automatically obtain an IP address from your ISP. 37
 IP Address: Your WAN IP address. Leave the IP address as 0.")

42 Obtain IP Address Automatically (EWAN) Select this protocol enables the device to automatically retrieve IP address. Fixed IP Address (EWAN) IP Address: Your WAN IP address. Leave the IP address as to enable the device to automatically obtain an IP address from your ISP. Netmask: User can change it to others such as Type the netmask assigned to you by your ISP (if given). Gateway: Enter the IP address of the default gateway. 38
 to be distinguished from another.")
43 WLAN WPA / WPA2 / WPA/WPA2 Pre-Shared Key Wireless Parameters WLAN Service: Default setting is set to Enable. If you do not have any wireless, select Disable. ESSID: The ESSID is the unique name of a wireless access point (AP) to be distinguished from another. For security purpose, change the default wlan-ap to a unique ID name to the AP already built-in to the router s wireless interface. It is case sensitive and must not excess 32 characters. Make sure your wireless clients have exactly the ESSID as the device, in order to get connected to your network. Hide ESSID: This function enables the router to become invisible on the network. Thus, any clients using the wireless setting to search for available or specific router on the network will not be able to discover the router whose Hide ESSID function is set to enabled. The default setting is disabled. Regulation Domain: There are seven Regulation Domains for you to choose from, including North America (N.America), Europe, France, etc. The Channel ID will be different based on this setting. Channel ID: Select the wireless connection channel ID that you would like to use. Note: Wireless performance may degrade if the selected channel ID is already being occupied by other AP(s). Security Parameters Security Mode: You can disable or enable with WPA or WEP for protecting wireless network. The default mode of wireless security is Disable. WPA Shared Key: The key for network authentication. The input format is in character style and key size should be in the range between 8 and 63 characters. 39
44 Group Key Renewal: The period of renewal time for changing the security key automatically between wireless client and Access Point (AP). Default value is 3600 seconds. 40
 to be distinguished from another.")
45 WEP Parameters WLAN Service: Default setting is set to Enable. If you do not have any wireless, select Disable. ESSID: The ESSID is the unique name of a wireless access point (AP) to be distinguished from another. For security purpose, change the default wlan-ap to a unique ID name to the AP already built-in to the router s wireless interface. It is case sensitive and must not excess 32 characters. Make sure your wireless clients have exactly the ESSID as the device, in order to get connected to your network. Hide ESSID: This function enables the router to become invisible on the network. Thus, any clients using the wireless setting to search for available or specific router on the network will not be able to discover the router whose Hide ESSID function is set to enabled. The default setting is disabled. Regulation Domain: There are seven Regulation Domains for you to choose from, including North America (N.America), Europe, France, etc. The Channel ID will be different based on this setting. Channel ID: Select the wireless connection channel ID that you would like to use. Note: Wireless performance may degrade if the selected channel ID is already being occupied by other AP(s). Security Parameters 41
46 Security Mode: You can disable or enable with WPA or WEP for protecting wireless network. The default mode of wireless security is Disable. WEP Authentication: To prevent unauthorized wireless stations from accessing data transmitted over the network, the router offers secure data encryption, known as WEP. If you require high security for transmissions, there are two options to select from: Open System, Shared key or both. Default Used WEP Key: Select the encryption key ID; please refer to Key (1~4) below. Passphrase: This is used to generate WEP keys automatically based upon the input string and a pre-defined algorithm in WEP64 or WEP128. Key (1-4): Enter the key to encrypt wireless data. To allow encrypted data transmission, the WEP Encryption Key values on all wireless stations must be the same as the router. There are four keys for your selection. The input format is in HEX style, 10 and 26 HEX codes are required for WEP64 and WEP128 respectively. 42

47 Status (Advanced Mode) 43
: This shows the noise margin for upstream rate. Noise Margin (Downstream): This shows the noise margin for downstream rate.")
48 ADSL DSP Firmware Version: DSP code version. DMT Status: Current DMT Status. Operational Mode: Display the ADSL state when the connect mode is set to AUTO. Upstream: Upstream rate. Downstream: Downstream rate. Noise Margin (Upstream): This shows the noise margin for upstream rate. Noise Margin (Downstream): This shows the noise margin for downstream rate. Attenuation (Upstream): This is attenuation of signal in upstream. Attenuation (Downstream): This is attenuation of signal in downstream. 44

 that this IP address connects to. DHCP IP Address: Click to access the DHCP server configuration page.")
49 ARP This table shows the mapping of Internet (IP) addresses to Ethernet (MAC) addresses. This is useful in determining the MAC address of the network interface of your PCs that use the router s Firewall MAC Address Filter function. See the Firewall section of this manual for more information on this feature. IP Address: Shows the IP Address of internal host that join this network as well as the external IP. MAC Address: The MAC address of internal host. Interface: The interface name (on the router) that this IP address connects to. DHCP IP Address: Click to access the DHCP server configuration page. MAC Address: The MAC Address of internal dhcp client host. Client Host Name: The Host Name of internal dhcp client. Register Information: Shows the information provided during registration. 45

50 System Log Display all the system logs that have been recorded up to the present time. 46
51 Configuration (Advanced Mode) LAN A Local Area Network (LAN) is a shared communication system network where many computers are connected. This type of network is area defined and is usually limited to a confined region within a building or just within the same storey of a building. There are 3 items within the LAN section: Ethernet, IP Alias, Wireless, Wireless Security and DHCP Server. Ethernet The router supports more than one Ethernet IP addresses in the LAN, and with distinct LAN subnets through which you can access the Internet at the same time. Users usually only have one subnet in their LAN. The default IP address for the router is IP Address: The default IP on this router. Netmask: The default subnet mask on this router. RIP: RIP v1, RIP v2, RIP v1+v2 and RIP v2 Multicast. IP Alias This function allows the addition of more than 1 IP address to the network interface. This further allows user to assign each IP address with specified functions. IP Address: Enter the IP address to be added to the network. Netmask: Specify a subnet mask for the IP to be added. 47

52 Wireless Parameters WLAN Service: Default setting is set to Enable. If you do not have any wireless, select Disable. Mode: The default setting is b+g+n (Mixed mode). If you do not know or have both 11g and 11b devices in your network, then keep the default in mixed mode. From the drop-down manual, you can select g if you have only 11g card. If you have only 11b card, then select b. And if you have 11n card, you can select n. ESSID: The ESSID is the unique name of a wireless access point (AP) to be distinguished from another. For security purpose, change the default wlan-ap to a unique ID name to the AP already built-in to the router s wireless interface. It is case sensitive and must not excess 32 characters. Make sure your wireless clients have exactly the ESSID as the device, in order to get connected to your network. Hide ESSID: This function enables the router to become invisible on the network. Thus, any clients using the wireless setting to search for available or specific router on the network will not be able to discover the router whose Hide ESSID function is set to enabled. The default setting is disabled. Regulation Domain: There are seven Regulation Domains for you to choose from, including North America (N.America), Europe, France, etc. The Channel ID will be different based on this setting. Channel ID: Select the wireless connection channel ID that you would like to use. 48
53 Note: Wireless performance may degrade if select channel ID is already being occupied by other AP(s). 49
54 Channel width: Select either 20 MHz or 20/40 MHz for the channel bandwidth. The higher the bandwidth the better the performance will be. TX PowerLevel: It is a function that enhances the wireless transmitting signal strength. User may adjust this power level from minimum 0 up to maximum 100. Note: The Power Level maybe different in each access network user premises environment and choose the most suitable level for your network. AP MAC Address: It is a unique hardware address of the Access Point. AP Firmware Version: The Access Point firmware version. Wireless Distribution System (WDS) It is a wireless access point mode that enables wireless link and communication with other access point. It is easy to be installed simply to define peer s MAC address of the connected AP. WDS takes advantages of cost saving and flexibility which no extra wireless client device is required to bridge between two access points and extending an existing wired or wireless infrastructure network to create a larger network. It can connect up to 4 wireless APs for extending cover range at the same time. In addition, WDS also enhances its link connection security mode. Key encryption must be the same for both access points and the channel. WDS Service: The default setting is Disabled. Check Enable radio button to activate this function. 1. Peer WDS MAC Address: It is the associated AP s MAC Address. It is important that your peer s AP must include your MAC address in order to acknowledge and communicate with each other. 2. Peer WDS MAC Address: It is the second associated AP s MAC Address. 3. Peer WDS MAC Address: It is the third associated AP s MAC Address. 4. Peer WDS MAC Address: It is the fourth associated AP s MAC Address. Note: For MAC Address, Semicolon ( : ) must be included. 50

55 Wireless Security You can disable or enable with WPA or WEP for protecting wireless network. The default mode of wireless security is disabled. WPA / WPA2 / WPA/WPA2 Pre-Shared Key Security Mode: You can disable or enable with WPA or WEP for protecting wireless network. The default mode of wireless security is Disable. WPA Algorithms: There are 3 types of the WPA-PSK, WPA-PSK, WPA2-PSK & WPA/WPA2-PSK. The WPA-PSK adapts the TKIP (Temporal Key Integrity Protocol) encrypted algorithms, which incorporates Message Integrity Code (MIC) to provide protection against hackers. The WPA2- PSK adapts CCMP (Cipher Block Chaining Message Authentication Code Protocol) of the AES (Advanced Encryption Security) algorithms. WPA Shared Key: The key for network authentication. The input format is in character style and key size should be in the range between 8 and 63 characters. Group Key Renewal: The period of renewal time for changing the security key automatically between wireless client and Access Point (AP). Default value is 3600 seconds. 51

56 WEP WEP Authentication: To prevent unauthorized wireless stations from accessing data transmitted over the network, the router offers secure data encryption, known as WEP. If you require high security for transmissions, there are two options to select from: Open System, Shared key or both. Default Used WEP Key: Select the encryption key ID; please refer to Key (1~4) below. Passphrase: This is used to generate WEP keys automatically based upon the input string and a pre-defined algorithm in WEP64 or WEP128. Key (1-4): Enter the key to encrypt wireless data. To allow encrypted data transmission, the WEP Encryption Key values on all wireless stations must be the same as the router. There are four keys for your selection. The input format is in HEX style, 10 and 26 HEX codes are required for WEP64 and WEP128 respectively. 52

57 DHCP Server DHCP allows networked devices to obtain information on the parameter of IP, Netmask, Gateway as well as DNS through the Ethernet Address of the device. If you check the DHCP Relay you must enter the IP address of the DHCP server that assigns an IP address to the DHCP client in the LAN. Use this function only if advised to do so by your network administrator or ISP. Click Apply to enable this function. 53

58 WAN A WAN (Wide Area Network) is a computer network that covers a broad geographical area (eg. Internet) that is used to connect LAN and other types of network systems. There are two items within the WAN section: WAN Profile and ADSL Mode. WAN Profile (ADSL) PPPoE Connection (ADSL) PPPoE (PPP over Ethernet) provides access control in a manner similar to dial-up services using PPP. Description: A given name for the connection. VPI/VCI: Enter the information provided by your ISP. Encap. method: Select the encapsulation format. Select the one provided by your ISP. Username: Enter the username provided by your ISP. You can input up to 256 alphanumeric characters (case sensitive). This is in the format of username@ispname instead of simply username. Password: Enter the password provided by your ISP. You can input up to 32 alphanumeric characters (case sensitive). Service Name: This item is for identification purposes. If it is required, your ISP will provide you the necessary information. Maximum input is 32 alphanumeric characters. NAT: The NAT (Network Address Translation) feature allows multiple users to access the Internet through a single IP account by sharing a single IP address. If users on your LAN have their own public IP addresses to access the Internet, NAT function can be disabled. IP ( :Auto): Your WAN IP address. Leave the IP address as to enable the device to automatically obtain an IP address from your ISP. 54
59 Auth. Protocol: Default is Auto. Please consult your ISP on whether to use Chap, Pap or MSCHAP. Connection: Click on Always on to establish a PPPoE session during start up and to automatically re-establish the PPPoE session when disconnected by the ISP. You may uncheck the item to disable this function. Idle Timeout: Auto-disconnect the broadband firewall gateway when there is no activity on the line for a predetermined period of time. MTU: Control the maximum Ethernet packet size your PC will send. MAC Spoofing: This option is required by some service Providers. You must fill the MAC address specified by your service provider when this information is required. The default setting is set to disable. 55
60 PPPoA Connection (ADSL) PPPoA stands for Point to Point Protocol over ATM Adaptation Layer 5 (AAL5). It provides access control and billing functions in a manner similar to dial-up services using PPP. Description: A given name for the connection. VPI/VCI: Enter the information provided by your ISP. Encap. method: Select the encapsulation format. Select the one provided by your ISP. Username: Enter the username provided by your ISP. You can input up to 256 alphanumeric characters (case sensitive). This is in the format of username@ispname instead of simply username. Password: Enter the password provided by your ISP. You can input up to 32 alphanumeric characters (case sensitive). NAT: The NAT (Network Address Translation) feature allows multiple users to access the Internet through a single IP account by sharing a single IP address. If users on your LAN have their own public IP addresses to access the Internet, NAT function can be disabled. IP ( :Auto): Your WAN IP address. Leave the IP address as to enable the device to automatically obtain an IP address from your ISP. Auth. Protocol: Default is Auto. Please consult your ISP on whether to use Chap, Pap or MSCHAP. Connection: Click on Always on to establish a PPPoE session during start up and to automatically re-establish the PPPoE session when disconnected by the ISP. You may uncheck the item to disable this function. Idle Timeout: Auto-disconnect the broadband firewall gateway when there is no activity on the line for a predetermined period of time. MTU: Control the maximum Ethernet packet size your PC will send. 56
 feature allows multiple users to access the Internet through a single ISP account by sharing a single IP address.")
61 MPoA Connection (ADSL) Description: A given name for the connection. VPI/VCI: Enter the VPI and VCI information provided by your ISP. Encap. method: Select the encapsulation format. Select the one provided by your ISP. NAT: The NAT (Network Address Translation) feature allows multiple users to access the Internet through a single ISP account by sharing a single IP address. If users on your LAN have their own public IP addresses to access the Internet, NAT function can be disabled. MAC Spoofing: This option is required by some service Providers. You must fill the MAC address specified by your service provider when this information is required. The default setting is set to disable. IP Address: Your WAN IP address. If the IP is set to (auto IP detect), both netmask and gateway can be left blank. Netmask: User can change it to other such as Type the netmask assigned to you by your ISP (if given) Gateway: Enter the IP address of the default gateway. Obtain DNS Automatically: Select this check box to activate DNS. Primary DNS/ Secondary DNS: Enter the IP addresses of the DNS servers. The DNS servers are passed to the DHCP clients along with the IP address and the netmask. 57
62 IPoA Connections (ADSL) Description: A given name for the connection. VPI/VCI: Enter the VPI and VCI information provided by your ISP. Encap. method: Select the encapsulation format. Select the one provided by your ISP. NAT: The NAT (Network Address Translation) feature allows multiple users to access the Internet through a single ISP account by sharing a single IP address. If users on your LAN have their own public IP addresses to access the Internet, NAT function can be disabled. IP Address: Your WAN IP address. If the IP is set to (auto IP detect), both netmask and gateway can be left blank. Netmask: User can change it to other such as Type the netmask assigned to you by your ISP (if given) Gateway: Enter the IP address of the default gateway. Obtain DNS Automatically: Select this check box to activate DNS. Primary DNS/ Secondary DNS: Enter the IP addresses of the DNS servers. The DNS servers are passed to the DHCP clients along with the IP address and the netmask. 58

63 Pure Bridge Connections (ADSL) Description: A given name for the connection. VPI/VCI: Enter the VPI and VCI information provided by your ISP. Encap. method: Select the encapsulation format. Select the one provided by your ISP. 59
 Username: Enter the username provided by your ISP.")
64 WAN Profile Main Port (EWAN) Besides using ADSL to connect to the Internet, BEC 7800 Ethernet port 1 is also an alternative to connect to Cable Modems, VDSL and fiber optic lines. This alternative provides users with faster connection & flexibility to connect to the Internet. PPPoE (EWAN) Username: Enter the username provided by your ISP. You can input up to 256 alphanumeric characters (case sensitive). This is in the format of username@ispname instead of simply username. Password: Enter the password provided by your ISP. You can input up to 32 alphanumeric characters (case sensitive). Service Name: This item is for identification purposes. If it is required, your ISP will provide you the necessary information. Maximum input is 32 alphanumeric characters. NAT: The NAT (Network Address Translation) feature allows multiple users to access the Internet through a single IP account by sharing the single IP address. If users on your LAN have their own public IP addresses to access the Internet, NAT function can be disabled. IP ( :Auto): Your WAN IP address. Leave the IP address as to enable the device to automatically obtain an IP address from your ISP. Auth. Protocol: Default is Auto. Please consult your ISP on whether to use Chap, Pap or MSCHAP. Connection: Click on Always on to establish a PPPoE session during start up and to automatically re-establish the PPPoE session when disconnected by the ISP. You may uncheck the item to disable this function. Idle Timeout: Auto-disconnect the broadband firewall gateway when there is no activity on the line for a predetermined period of time. MTU: Control the maximum Ethernet packet size your PC will send. MAC Spoofing: This option is required by some service Providers. You must fill the MAC address 60
65 specified by your service provider when this information is required. The default setting is set to disable. 61

66 Obtain an IP Address Automatically NAT: The NAT (Network Address Translation) feature allows multiple users to access the Internet through a single IP account by sharing the single IP address. If users on your LAN have their own public IP addresses to access the Internet, NAT function can be disabled. MAC Spoofing: This option is required by some service Providers. You must fill the MAC address specified by your service provider when this information is required. The default setting is set to disable. Obtain DNS: Select this check box to activate DNS. Primary DNS/ Secondary DNS: Enter the IP addresses of the DNS servers. The DNS servers are passed to the DHCP clients along with the IP address and the netmask. 62

67 Fixed IP Address NAT: The NAT (Network Address Translation) feature allows multiple users to access the Internet through a single IP account by sharing the single IP address. If users on your LAN have their own public IP addresses to access the Internet, NAT function can be disabled. MAC Spoofing: This option is required by some service Providers. You must fill the MAC address specified by your service provider when this information is required. The default setting is set to disable. IP Address: Your WAN IP address. Leave the IP address as to enable the device to automatically obtain an IP address from your ISP. Netmask: User can change it to others such as Type the netmask assigned to you by your ISP (if given) Gateway: Enter the IP address of the default gateway. Obtain DNS: Select this check box to activate DNS. Primary DNS/ Secondary DNS: Enter the IP addresses of the DNS servers. The DNS servers are passed to the DHCP clients along with the IP address and the netmask. 63

68 ADSL Mode ADSL Mode: There are 2 modes Annex L and Annex M that user can select for this connection. Modulator: There are 5 modes ADSL2, ADSL2+, G.Lite:, T1.413 and G.DMT that user can select for this connection. 64
 to get the most current time from an SNTP server outside your network.")
69 System There are five items within the System section: Time Zone, Firmware Upgrade, Backup/ Restore, Restart and User Management. Time Zone The router does not have a real time clock on board; instead, it uses the Simple Network Time Protocol (SNTP) to get the most current time from an SNTP server outside your network. Choose your local time zone from the drop down menu. To apply the selected local time zone, click Enable and click the Apply button. After a successful connection to the Internet, the router will retrieve the correct local time from the SNTP server you have specified. If you prefer to specify an SNTP server other than those in the drop-down list, simply enter its IP address in their appropriate blanks provided as shown above. Your ISP may also provide an SNTP server for you to use. Resync Period (in minutes) is the periodic interval the router will wait before it re-synchronizes the router s time with that of the specified SNTP server. In order to avoid unnecessarily increasing the load on your specified SNTP server you should keep the poll interval as high as possible at the absolute minimum every few hours or even days. The default value is set at 1440 minutes. 65

70 Firmware Upgrade Your router s firmware is the software that allows it to operate and provides all its functionality. Think of your router as a dedicated computer, and the firmware as the software that runs in your router. Thus, by upgrading the newly improved version of the firmware allows you the advantage to use newly integrated features. Factory Default Settings: If select this setting, the device will reboot to restore the parameters of all its applications to its default values. Current Settings: If select this setting, the device will reboot and retain the customized settings of all applications. Click on Browse to select the new firmware image file you have downloaded to your PC. Once the correct file is selected, click Upgrade to update the firmware to your router. 66

71 Backup / Restore These functions allow you to save a backup of the current configuration of your router to a defined location on your PC, or to restore a previously saved configuration. This is useful if you wish to experiment with different settings, knowing that you have a backup in hand in case any mistakes occur. It is advisable that you backup your router configuration before making any changes to your router configuration. Press Backup Settings to select where on your local PC you want to store your setting file. You may also want to change the name of the file when saving if you wish to keep multiple backups. Press Browse to select a file from your PC to restore. You should only restore your router setting that has been generated by the Backup function which is created with the current version of the router firmware. Settings files saved to your PC should not be manually edited in any way. Select the settings files you wish to use, and press Update Settings to load the setting into the router. 67

72 Restart There are 2 options for you to choose from before restarting the your 7800N device. You can either choose to restart your device to restore it to the Factory Default Settings or to restart the device with your current settings applied. Restarting your device to Factory Default Setting will be useful especially after you have accidentally changed your settings that may result in undesirable outcome. After selecting the type of setting you want the device to restart with, click the Restart button to initiate the process. After restarting, please wait several minutes to let the selected setting applied to the system. User Management In order to prevent unauthorized access to your router configuration interface, it requires all users to login with a username and password. Therefore only system administrator can access the system. It is highly recommended that you change your password upon receiving your router. The default password is admin. To change your password, simply enter the old password in the Old Password blank. Then enter your new password in the New Password and Confirm Password blanks provided. When this is done, press Apply to save changes. 68
 to / from the Internet. This configuration program allows you to set up different filter rules for different users based on their IP addresses or their network Port number.")
73 Firewall Packet Filter Packet filtering enables you to configure your router to block specified internal/external users (IP address) from Internet access, or you can disable specific service requests (Port number) to / from the Internet. This configuration program allows you to set up different filter rules for different users based on their IP addresses or their network Port number. The relationship among all filters is or operation, which means that the router checks these different filter rules one by one, starting from the first rule. As long as one of the rules is satisfied, the specified action will be taken. Rule Name: User defined description for entry identification. The maximum name length is 32 characters, and then can choose an application that they want from the listbox. Source IP address / Source Subnet Mask: This is an Address-Filter used to allow or block traffic to/from particular IP address(es). Enter the IP & subnet mask you want to filter. If you leave empty, it means any IP address. Destination IP address / Destination Subnet Mask: This is an Address-Filter used to allow or block traffic to/from particular IP address(es). Enter the IP & subnet mask you want to filter. If you leave empty, it means any IP address. Source Port: This Port or Port Range defines the ports allowed by the Remote/WAN to connect to the application. Default is set from range 0 ~ It is recommended that only advance user is to configure this feature. Destination Port: This is the Port or Port Range that defines the port of the application. Protocol: Specify the packet type (TCP, UDP, TCP/UDP) that the rule applies to. Select TCP if you wish to search for the connection-based application service on the remote server using the port number. Or select UDP if you want to search for the connectionless application service on the remote server using the port number. Direction: Determine whether the rule is for outgoing packets or for incoming packets. Add: Click this button to add a new packet filter rule and the added rule will appear at the bottom table. 69
74 Edit: Check the Rule No. you wish to edit, and then click Edit. Delete: Check the Rule No. you wish to delete, and then click Delete. 70
75 MAC Filter A MAC (Media Access Control) address is the unique network hardware identifier for each PC on your network s interface (i.e. its Network Interface Card or Ethernet card). Using your router s MAC Address Filter function, you can configure the network to block specific machines from accessing your LAN. To filter a specific MAC address, enter the MAC address in the blank provided then press Add. The format of MAC address-- could be: xx:xx:xx:xx:xx:xx or xx-xx-xx-xx-xx-xx Block WAN Ping This feature is to be enabled when you want the public WAN IP address on your router not to respond to any ping command. To activate the Block WAN PING feature, check the Enable box then click the Apply button. This feature is disabled by default. 71
76 Virtual Server Virtual Server allows you to direct incoming traffic from WAN side (identified by Protocol and External port) to the Internal server with private IP address on the LAN side. The Internal port is required only if the external port needs to be converted to a different port number used by the server on the LAN side. In TCP and UDP networks a port is a 16-bit number used to identify which application program (usually a server) incoming connections should be delivered to. Some ports have numbers that are pre-assigned to them by the IANA (the Internet Assigned Numbers Authority), and these are referred to as well-known ports. Servers follow the well-known port assignments so clients can locate them. If you wish to run a server on your network that can be accessed from the WAN (i.e. from other machines on the Internet that are outside your local network), or any application that can accept incoming connections (e.g. Peer-to-peer/P2P software such as instant messaging applications and P2P file-sharing applications) and are using NAT (Network Address Translation), then you need to configure your router to forward these incoming connection attempts using specific ports to the PC on your network running the application. You also need to use port forwarding if you wish to host an online game server. Examples of well-known and registered port numbers are shown below, for further information, please see IANA s website at: Well-known and Registered Ports Port Number Protocol Description 20 TCP FTP Data 21 TCP FTP Control 22 TCP & UDP SSH Remote Login Protocol 23 TCP TElnet 25 TCP SMTP (simple Mail Transfer Protocol) 53 TCP & UDP DNS (Domain Name Server) 69 UDP TFTP (Trivial File Transfer Protocol) 80 TCP World Wide Web HTTP 110 TCP POP3 (Post Office Protocol version 3) 119 TCP NEWS (Network News Transfer Protocol) 123 UDP NTP (Network Time Protocol) 161 TCP SNMP 443 TCP & UDP HTTPS 1503 TCP T TCP H TCP ICQ 7070 UDP Real Audio 72

77 Port Mapping Application: Select the service you wish to configure. Protocol: A protocol is automatically applied when an Application is selected from the listbox or you may select a protocol type which you want. External Port & Internal Port: Enter the public port number & range you wish to configure. Internal IP Address: Enter the IP address of a specific internal server to which requests from the specified port is forwarded. Add: Click to add a new virtual server rule. Click again and the next figure appears. Edit: Check the Edit radio button to display the parameter of the selected application, then after changing the parameters click the Edit/Delete button to apply the changes. Delete: To remove a port mapping application, check the Remove box of the selected application then click the Edit/Delete button. Since NAT acts as a natural Internet firewall, your router protects your network from accessed by outside users, as all incoming connection attempts point to your router unless you specifically create Virtual Server entries to forward those ports to a PC on your network. When your router needs to allow outside users to access internal servers, e.g. a web server, FTP server, server or game server, the router can act as a virtual server. You can set up a local server with a specific port number for the service to use, e.g. web/http (port 80), FTP (port 21), Telnet (port 23), SMTP (port 25), or POP3 (port 110). When an incoming access request the router for a specified port is received, it is forwarded to the corresponding internal server. For example, if you set the port number 80 (Web/HTTP) to be mapped to the IP Address , then all incoming HTTP requests from outside users are forwarded to the local server (PC) with the IP address of If the port is not listed as a predefined application, you need to add it manually. In addition to specifying the port number used, you also need to specify the protocol used. The protocol is determined by a particular application. Most applications use TCP or UDP, however you may also specify other protocols using the drop-down Protocol menu. Setting the protocol to all causes all incoming connection attempts using all protocols on all port numbers to be forwarded to the specified IP address. 73

78 DMZ The DMZ Host is a local computer exposed to the Internet. When setting a particular internal IP address as the DMZ Host, all incoming packets that do not use a port number which is already used by any other Virtual Server entries will first be checked by the Firewall and NAT algorithms before it is passed to the DMZ host. 74


79 Advanced Static Route Enter the destination network address, subnet mask, gateway AND/OR the available WAN interface, then click Add to add a new entry to the routing table. Dynamic DNS The Dynamic DNS function lets you alias a dynamic IP address to a static hostname, so if your ISP does not assign you a static IP address you can still use a domain name. This is especially useful when hosting servers via your ADSL connection, so that anyone wishing to connect to you may use your domain name, rather than the dynamic IP address which is assigned to you by ISP. You need to first register and establish an account with the Dynamic DNS provider using their website, for example Dynamic DNS Server: Select the DDNS service you have registered an account with. Wildcard: When enabled, you allow the system to lookup on domain names that do not exist to have MX records synthesized for them. Domain Name, Username and Password: Enter your registered domain name and your username and password for this service. Period: Enter the length of the period in the blank, you can set the period unit in day (d), hour (H) or month (M). 75

80 VLAN VLAN (Virtual Local Area Network) is a group of devices on different physical LAN segments that can communicate with each other as if they were all on the same physical LAN segment. 76

81 Device Management The Device Management advanced configuration settings allow you to control your router s security options and device monitoring features. UPnP offers peer-to-peer network connectivity for PCs and other network devices, along with the feature to control data transfer between devices. UPnP offers many advantages for users running NAT routers through UPnP NAT Traversal, and on supported systems. By letting the application control the required settings and removing the need for the user to control the advanced configuration of their device will make tasks such as port forwarding become easier. Both user s Operating System and its relevant applications must support UPnP in addition to the router. Windows XP and Windows Me have a native built-in support for UPnP (when the component is installed). Windows 98 users may have to install the Internet Connection Sharing client from Windows XP in order to support UpnP feature. Windows 2000 does not support UPnP. 77

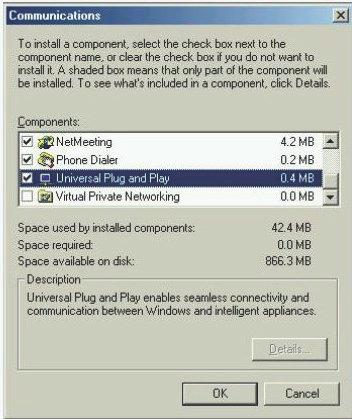
82 Installing UPnP in Windows Example Follow the steps below to install the UPnP in Windows Me. Step 1: Click Start and Control Panel. Double-click Add/Remove Programs. Step 2: Click on the Windows Setup tab and select Communication in the Components selection box. Click Details. Step 3: In the Communications window, select the Universal Plug and Play check box in the Components selection box. 78
83 79


84 Step 4: Click OK to go back to the Add/Remove Programs Properties window. Click Next. Step 5: Restart the computer when prompted. Follow the steps below to install the UPnP in Windows XP. Step 1: Click Start and Control Panel. Step 2: Double-click Network Connections. Step 3: In the Network Connections window, click Advanced in the main menu and select Optional Networking Components. Step 4: When the Windows Optional Networking Components Wizard window appears, select Networking Service in the Components selection box and click Details. Step 5: In the Networking Services window, select the Universal Plug and Play check box. Step 6: Click OK to go back to the Windows Optional Networking Component Wizard window and click Next. 80


85 Auto-discover Your UPnP-enabled Network Device Step 1: Click start and Control Panel. Double-click Network Connections. An icon displays under Internet Gateway. Step 2: Right-click the icon and select Properties. Step 3: In the Internet Connection Properties window, click Settings to see the port mappings that were automatically created. 81


86 Step 4: You may edit or delete the port mappings or click Add to manually add port mappings. Step 5: Select Show icon in notification area when connected option and click OK. An icon displays in the system tray. 82
87 Step 6: Double-click on the icon to display your current Internet connection status. 83


88 Web Configurator Easy Access With UPnP, you can access web-based configuration for the BEC 7800 without first finding out the IP address of the router. This helps if you do not know the router s IP address. Follow the steps below to access web configuration. Step 1: Click Start and then Control Panel. Step 2: Double-click Network Connections. Step 3: Select My Network Places under Other Places. Step 4: An icon describing each UPnP-enabled device shows under Local Network. Step 5: Right-click on the icon of your BEC 7800 and select Invoke. The web configuration login screen displays. Step 6: Right-click on the icon of your BEC 7800 and select Properties. A properties window displays basic information about the BEC

89 IGMP IGMP, known as Internet Group Management Protocol, is used to manage hosts from multicast group. IGMP Proxy: Accepting multicast packet. Default is set to Disable. IGMP Snooping: Allowing switched Ethernet / Wireless to check and make correct forwarding decisions. Default is set to Disable. TR-069 Client Please contact you ISP for the information of TR069. Inform: You may enable or disable the periodic inform feature. Inform Interval: Enter the length of the periodic inform interval (unit: seconds). ACS URL: Enter the ACS URL address. ACS User Name: Enter the ACS server login name. ACS Password: Enter the ACS server login password. Connection Request Authentication: Check off to enable connection request authentication feature. 85
BiPAC 7800(N) (802.11n) Dual WAN ADSL2+ Firewall Router. User Manual
 (802.11n) Dual WAN ADSL2+ Firewall Router. User Manual") BiPAC 7800(N) (802.11n) Dual WAN ADSL2+ Firewall Router User Manual Version released: 1.05 Last revised on September 1 2010 Table of Contents Chapter 1: Introduction...1 Introduction to your Router...1
BiPAC 7800(N) (802.11n) Dual WAN ADSL2+ Firewall Router User Manual Version released: 1.05 Last revised on September 1 2010 Table of Contents Chapter 1: Introduction...1 Introduction to your Router...1
Last revision: BEC 7300N draft ADSL2+ Firewall Router. User Manual
 Last revision:03-10-2008 BEC 7300N 802.11 draft ADSL2+ Firewall Router User Manual 2 Table of Contents Chapter 1... 4 1.1 Introducing the BEC 7300N... 4 1.2 Features... 6 1.3 Applications of the BEC 7300N...
BiPAC 7202 / 7202GR2. (802.11g) ADSL2+ Router. User s Manual
 ADSL2+ Router. User s Manual") BiPAC 7202 / 7202GR2 (802.11g) ADSL2+ Router User s Manual Chapter 1... 1 1.1 Introducing the BiPAC 7202 Series... 1 1.2 Features... 3 1.3 Applications of the BiPAC 7202 Series... 6 Chapter 2... 7 2.1
BiPAC 7202 / 7202GR2 (802.11g) ADSL2+ Router User s Manual Chapter 1... 1 1.1 Introducing the BiPAC 7202 Series... 1 1.2 Features... 3 1.3 Applications of the BiPAC 7202 Series... 6 Chapter 2... 7 2.1
BiPAC 7300W Wireless-N ADSL2+ Firewall Router User Manual
 BiPAC 7300W Wireless-N ADSL2+ Firewall Router User Manual Version Released: 1.02 (FW: v2.01.rc1) Last Revised on April 14, 2010 Table of Contents Chapter 1... 1 1.1 Introducing the BiPAC 7300W... 1 1.2
ADSL User Manual. Wireless-N BROADBAND ROUTER : Introduction
 ADSL User Manual 1 : Introduction The ADSL is a communication terminal, which integrates ADSL access, broadband SOHO router, WLAN and VoIP service. This device can provide high data transmission, downstream
BiPAC 7800GZ(L) 3G/ wireless-g ADSL2+ (VPN) Firewall Router. User Manual
 3G/ wireless-g ADSL2+ (VPN) Firewall Router. User Manual") BiPAC 7800GZ(L) 3G/ wireless-g ADSL2+ (VPN) Firewall Router User Manual Version released: 1.05 Last revised date: 09-15-2010 Table of Contents Chapter 1: Introduction... 1 Introduction to your Router...
BiPAC 7800GZ(L) 3G/ wireless-g ADSL2+ (VPN) Firewall Router User Manual Version released: 1.05 Last revised date: 09-15-2010 Table of Contents Chapter 1: Introduction... 1 Introduction to your Router...
Page 1. Billion 810VGTX Router
 Page 1 Billion 810VGTX Router Table of Contents CHAPTER 1: INTRODUCTION...3 Introduction to your Router...3 Features...3 CHAPTER 2: INSTALLING THE ROUTER...6 Package Contents...6 Device Description...7
BIPAC 7402G g ADSL VPN Firewall Router. User s Manual
 BIPAC 7402G 802.11g ADSL VPN Firewall Router User s Manual Table of Contents CHAPTER 1: INTRODUCTION... 1 INTRODUCTION TO YOUR BIPAC 7402G ROUTER... 1 FEATURES... 1 BIPAC 7402G ADSL ROUTER APPLICATION...
DSL-G804V Wireless ADSL Router User s Guide
 DSL-G804V Wireless ADSL Router User s Guide (March 2005) ii TABLE OF CONTENTS About This User s Guide... v Before You Start... v Installation Requirements... v INTRODUCTION... 1 Router Description and
BiPAC 7402G g ADSL2+ VPN Firewall Router User s Manual Version Release 5.07
 BiPAC 7402G 802.11g ADSL2+ VPN Firewall Router User s Manual Version Release 5.07 Last Revision Date: 11-13-2006 Table of Contents CHAPTER 1: INTRODUCTION... 3 INTRODUCTION TO YOUR ROUTER... 3 FEATURES...
Content 1 OVERVIEW HARDWARE DESCRIPTION HARDWARE INSTALLATION PC CONFIGURATION GUIDE... 5 WEB-BASED MANAGEMENT GUIDE...
 Content 1 OVERVIEW...1 1.1FEATURES...1 1.2 PACKETCONTENTS...3 1.3 SYSTEM REQUIREMENTS... 1.4 FACTORY DEFAULTS...4 1.5 WARNINGS AND CAUTIONS...4 2 HARDWARE DESCRIPTION... 6 3 HARDWARE INSTALLATION...8 4
BiPAC ADSL USB Modem. User s Manual
 BiPAC 7001 ADSL USB Modem User s Manual Chapter 1... 1 1.1 Introducing the BiPAC 7001... 1 1.2 Features of the BiPAC 7001... 1 1.3 Installing Billion ADSL USB Modem... 2 Chapter 2... 3 2.1 Important note
LevelOne. User Manual FBR ADSL2+ Modem Router w/ QoS V2.0
 LevelOne User Manual FBR-1461 ADSL2+ Modem Router w/ QoS V2.0 Table of Contents CHAPTER 1 - INTRODUCTION... 5 Introducing the FBR-1461... 5 Features... 7 Installation Diagram of the FBR-1461... 10 CHAPTER
BiPAC 7404V(G)OX/V(G)PX
OX/V(G)PX") BiPAC 7404V(G)OX/V(G)PX 3G/VoIP/(802.11g) ADSL2+ (VPN) Firewall Router User Manual Version release: 1.16 (FW: 6.03) Last Revised Date: 09-30-2010 Table of Contents Chapter 1: Introduction...1 Chapter 2:
BiPAC 7404V(G)OX/V(G)PX 3G/VoIP/(802.11g) ADSL2+ (VPN) Firewall Router User Manual Version release: 1.16 (FW: 6.03) Last Revised Date: 09-30-2010 Table of Contents Chapter 1: Introduction...1 Chapter 2:
WebShare 242W Wireless ADSL2+ Router A02-RA242-W54
 WebShare 242W Wireless ADSL2+ Router A02-RA242-W54 USER S MANUAL A02-RA242-W54_ME01 Company certified ISO 9001:2000 Where solutions begin Copyright The Atlantis Land logo is a registered trademark of
BiPAC 7402VL/VGL/VGP
 BiPAC 7402VL/VGL/VGP VoIP/(802.11g) ADSL2+ Router User s Manual Version Release 2.01 Table of Contents CHAPTER 1: INTRODUCTION... 3 INTRODUCTION TO YOUR ROUTER... 3 MODELS... 3 FEATURES... 3 CHAPTER 2:
HRDSL742 / HRDSL742W
 HRDSL742 / HRDSL742W (Wireless) ADSL VPN Firewall Router User s Manual Version Release 1.54c Table of Contents CHAPTER 1: INTRODUCTION...1 INTRODUCTION TO YOUR (WIRELESS) ADSL ROUTER...1 FEATURES...1
BIPAC-7500G g ADSL VPN Firewall Router with 3DES Accelerator User s Manual Version Release 1.10e
 BIPAC-7500G 802.11g ADSL VPN Firewall Router with 3DES Accelerator User s Manual Version Release 1.10e Table of Contents CHAPTER 1: INTRODUCTION...1 INTRODUCTION TO YOUR BIPAC-7500G ROUTER... 1 FEATURES...
TW-EA530. ADSL 2+ Modem and Router Integrated 3G-modem 4 x 10/100 Mbps Switch Firewall 54 Mbps WLAN Access Point (802.11b+g)
") TW-EA530 ADSL 2+ Modem and Router Integrated 3G-modem 4 x 10/100 Mbps Switch Firewall 54 Mbps WLAN Access Point (802.11b+g) Note! The default encryption key of wireless network is device MAC address. The
TW-EA530 ADSL 2+ Modem and Router Integrated 3G-modem 4 x 10/100 Mbps Switch Firewall 54 Mbps WLAN Access Point (802.11b+g) Note! The default encryption key of wireless network is device MAC address. The
BiPAC 7402VGO VoIP/802.11g ADSL2+ VPN Firewall Router User s Manual Version Release 2.02
 BiPAC 7402VGO VoIP/802.11g ADSL2+ VPN Firewall Router User s Manual Version Release 2.02 Table of Contents CHAPTER 1: INTRODUCTION... 3 INTRODUCTION TO YOUR ROUTER... 3 FEATURES... 3 CHAPTER 2: INSTALLING
WebShare 243WM Wireless MIMO ADSL2+ Router A02-RA243-W54M
 WebShare 243WM Wireless MIMO ADSL2+ Router A02-RA243-W54M USER S MANUAL A02-RA243-W54M_ME01 Company certified ISO 9001:2000 Where solutions begin Copyright The Atlantis Land logo is a registered trademark
802.11N Wireless ADSL Router
 802.11N Wireless ADSL Router Pre-N Wireless Access Point ADSL Modem NAT Router WPS 4-Port Switching Hub User's Guide Table of Contents CHAPTER 1 INTRODUCTION...1 Wireless ADSL Router Features...1 Package
IP806GA/GB Wireless ADSL Router
 IP806GA/GB Wireless ADSL Router 802.11g/802.11b Wireless Access Point ADSL Modem NAT Router 4-Port Switching Hub User's Guide Table of Contents CHAPTER 1 INTRODUCTION... 1 Wireless ADSL Router Features...
BiPAC 8200M. BiPAC 8200N
 BiPAC 8200M VDSL2 Modem BiPAC 8200N Wireless-N VDSL2 Firewall Router Quick Start Guide Billion BiPAC 8200M VDSL2 Modem/ BiPAC 8200N Wireless-N VDSL2 Firewall Router PLEASE READ THE QUICK START GUIDE
802.11N Wireless Broadband Router
 802.11N Wireless Broadband Router Pre-N Wireless Access Point Broadband Internet Access WPS 4-Port Switching Hub User's Guide Table of Contents CHAPTER 1 INTRODUCTION... 1 Wireless Router Features... 1
BIPAC-741 GE V2.0 ADSL Firewall Router with 4-port 10/100M switch
 BIPAC-741 GE V2.0 ADSL Firewall Router with 4-port 10/100M switch User s Manual Table of Contents CHAPTER 1... 1 INTRODUCTION... 1 1.1 An Overview of BIPAC-741 GE V2.0... 1 1.2 Package Contents... 2 1.3
ADSL modem DC-214/216
 ADSL modem DC-214/216 full manual Please, visit www.sitecom.com for support, drivers and manualsi 1. INTRODUCTION... 3 1.2 Package Contents... 3 1.3 The DC214/216ADSL Modem Features... 3 1.4 PHYSICAL DETAILS...
User Manual DIR-615. Wireless Router with Built-in 4-port Switch
 DIR-615 Wireless Router with Built-in 4-port Switch December 2011 Contents Chapter 1. Introduction...4 Contents and Audience...4 Conventions...4 Document Structure...4 Chapter 2. Overview...5 General Information...5
CHAPTER 7 ADVANCED ADMINISTRATION PC
 ii Table of Contents CHAPTER 1 INTRODUCTION... 1 Broadband ADSL Router Features... 1 Package Contents... 3 Physical Details... 4 CHAPTER 2 INSTALLATION... 6 Requirements... 6 Procedure... 6 CHAPTER 3 SETUP...
KD216 VDSL Router User Manual
 KD216 VDSL Router NOTICE This document contains proprietary information protected by copyright, and this Manual and all the accompanying hardware, software, and documentation are copyrighted. All rights
D810R ADSL2+ Router User Guide
 Copyright Statement is the registered trademark of Shenzhen Tenda Technology Co., Ltd. Other trademark or trade name mentioned herein are the trademark or registered trademark of the company. Copyright
BIPAC-8500/8520 SHDSL VPN
 BIPAC-8500/8520 SHDSL VPN Firewall Bridge / Router User s Manual Version Release 1.54c Table of Contents CHAPTER 1: INTRODUCTION...1 INTRODUCTION TO YOUR BIPAC-8500/8520 ROUTER... 1 FEATURES... 1 BIPAC-8500
BiPAC 8500/8520. BiPAC 8501/8521
 Billion BiPAC SHDSL/SHDSL.bis (VPN) Firewall Bridge/ Router BiPAC 8500/8520 SHDSL VPN Firewall Bridge/ Router BiPAC 8501/8521 SHDSL.bis (VPN) Firewall Bridge/Router User Manual Last revision 11-08-08 Billion
LevelOne WBR User s Manual. 11g Wireless ADSL VPN Router. Ver
 LevelOne WBR-3407 11g Wireless ADSL VPN Router User s Manual Ver 1.00-0510 Table of Contents CHAPTER 1 INTRODUCTION... 1 Wireless ADSL Router Features... 1 Package Contents... 5 Physical Details... 6 CHAPTER
BiPAC 6200NXL 3.75G Wireless-NBroadband Router User Manual
 BiPAC 6200NXL 3.75G Wireless-NBroadband Router User Manual Version release: 1.02i.r1 Last revised: 2010-9-27 Table of Contents Chapter 1: Introduction... 1 Introduction to your Router... 1 Features...
ALL500VDSL2. WLAN N VDSL Router. User s Manual
 ALL500VDSL2 WLAN N VDSL Router User s Manual NOTICE This document contains proprietary information protected by copyright, and this Manual and all the accompanying hardware, software, and documentation
LevelOne FBR User s Manual. 1W, 4L 10/100 Mbps ADSL Router. Ver
 LevelOne FBR-1416 1W, 4L 10/100 Mbps ADSL Router User s Manual Ver 1.00-0510 Table of Contents CHAPTER 1 INTRODUCTION... 1 FBR-1416 Features... 1 Package Contents... 3 Physical Details... 3 CHAPTER 2
LevelOne. User Manual. 11g Wireless ADSL2+ Modem Router WBR Ver. 1.0
 LevelOne User Manual WBR-3601 11g Wireless ADSL2+ Modem Router Ver. 1.0 Table of Contents Product Overview... 3 Product Description... 3 Specification... 4 LED Meaning... 6 Back Panel Connectors... 7 Factory
KX/3G ADSL2+ ROUTER MAIN FEATURES
 The KORTEX 3G/ADSL2+, a dual-wan 3G / ADSL2+ firewall router integrated with the 802.11g wireless access point and 4-port switch, is a cutting-edge networking product for SOHO and office users. Uniquely,
ADSL VPN/Firewall Router
 ADE-4200 / ADW-4200 ADSL VPN/Firewall Router User s Manual Copyright Copyright (C) 2003 PLANET Technology Corp. All rights reserved. The products and programs described in this User s Manual are licensed
BIPAC-5100 / 5100W (Wireless) ADSL Router
 ADSL Router") BIPAC-5100 / 5100W (Wireless) ADSL Router Quick Start Guide Billion BIPAC-5100 / 5100W ADSL Router For more detailed instructions on configuring and using the (Wireless) ADSL Firewall Router, please refer
BIPAC-5100 / 5100W (Wireless) ADSL Router Quick Start Guide Billion BIPAC-5100 / 5100W ADSL Router For more detailed instructions on configuring and using the (Wireless) ADSL Firewall Router, please refer
BiPAC 7800(N) (802.11n) Dual WAN ADSL2+ Firewall Router. Quick Start Guide
 (802.11n) Dual WAN ADSL2+ Firewall Router. Quick Start Guide") BiPAC 7800(N) (802.11n) Dual WAN ADSL2+ Firewall Router Quick Start Guide Billion BiPAC 7800(N) (802.11n) Dual WAN ADSL2+ Firewall Router PLEASE READ THE QUICK START GUIDE AND FOLLOW THE STEPS CAREFULLY.
BiPAC 7800(N) (802.11n) Dual WAN ADSL2+ Firewall Router Quick Start Guide Billion BiPAC 7800(N) (802.11n) Dual WAN ADSL2+ Firewall Router PLEASE READ THE QUICK START GUIDE AND FOLLOW THE STEPS CAREFULLY.
CHAPTER 7 ADVANCED ADMINISTRATION PC
 Table of Contents CHAPTER 1 INTRODUCTION... 1 54Mbps 802.11g ADSL Firewall Modem Router Features... 2 Package Contents... 4 Physical Details... 5 CHAPTER 2 INSTALLATION... 7 Requirements... 7 Procedure...
IP819VGA g ADSL VoIP Gateway
 IP819VGA 802.11g ADSL VoIP Gateway 802.11g/802.11b Access Point ADSL Modem NAT Router VoIP Gateway User's Guide Table of Contents CHAPTER 1 INTRODUCTION... 1 802.11g ADSL VoIP Gateway Features... 1 Package
LevelOne User Manual WBR g Wireless ADSL2+ Router
 LevelOne User Manual WBR-3600 11g Wireless ADSL2+ Router V1.0.1-0809 1 FCC Statement This equipment has been tested and found to comply with the limits for a Class B digital device, pursuant to Part 15
Table of Contents. DSL-504T User s Manual. Table of Contents. Table of Contents...2. Package Contents...4. Installation Overview...
 Table of Contents Table of Contents Table of Contents...2 Package Contents...4 Installation Overview...5 Installation Requirements...6 Information you will need from your ADSL service provider...8 Information
User Manual DSL-2600U. ADSL/Ethernet Router with Wi-Fi
 DSL-2600U ADSL/Ethernet Router with Wi-Fi July 2012 Contents Chapter 1. Introduction...4 Contents and Audience...4 Conventions...4 Document Structure...4 Chapter 2. Overview...5 General Information...5
myguard 7500GL g Security ADSL Router User s Manual Version Release 1.54c
 myguard 7500GL 802.11g Security ADSL Router User s Manual Version Release 1.54c Table of Contents CHAPTER 1: INTRODUCTION...1 INTRODUCTION TO YOUR MYGUARD 7500GL... 1 FEATURES... 1 MYGUARD 7500GL APPLICATION...
Gnet BB005x ADSL modem/router *Configuration and Installation Guide*
 Gnet BB005x ADSL modem/router *Configuration and Installation Guide* TABLE OF CONTENTS Chapter 1: Introduction...3 General...3 Features Overview...3 About this manual...3 Chapter 2: General Connectivity...5
RX3041. User's Manual
 RX3041 User's Manual Table of Contents 1 Introduction... 2 1.1 Features and Benefits... 3 1.2 Package Contents... 3 1.3 Finding Your Way Around... 4 1.4 System Requirements... 6 1.5 Installation Instruction...
Quick Installation Guide DSL-2650U/NRU. 3G/ADSL/Ethernet Router with Wi-Fi and Built-in Switch
 DSL-2650U/NRU 3G/ADSL/Ethernet Router with Wi-Fi and Built-in Switch BEFORE YOU BEGIN Delivery Package Router DSL-2650U/NRU Power adapter RJ-11 telephone cable Straight-through Ethernet cable (CAT 5E)
Quick Installation Guide DSL-2640U/NRU. ADSL/Ethernet Router with Wi-Fi and Built-in Switch
 DSL-2640U/NRU ADSL/Ethernet Router with Wi-Fi and Built-in Switch BEFORE YOU BEGIN Delivery Package Wireless router DSL-2640U/NRU Power adapter RJ-11 telephone cable Straight-through Ethernet cable (CAT
MIMO Wireless Broadband Route r User s Manual 1
 MIMO Wireless Broadband Router User s Manual 1 Introduction...4 Features...4 Minimum Requirements...4 Package Content...4 Note...4 Get to know the Broadband Router...5 Back Panel...5 Front Panel...6 Setup
I-Fly Wireless Router ADSL
 I-Fly Wireless Router ADSL Manual (V1.00) COPYRIGHT The Atlantis Land logo is a registered trademark of Atlants Land SpA. All other names mentioned mat be trademarks or registered trademarks of their
User Manual DIR-615. Wireless N 300 Home Router
 DIR-615 Wireless N 300 Home Router April 2013 Contents Chapter 1. Introduction...5 Contents and Audience...5 Conventions...5 Document Structure...5 Chapter 2. Overview...6 General Information...6 Specifications...7
Wireless Broadband Router
 LW6005A-R2 Wireless Broadband Router Manual 1 Introduction... 4 Features... 4 Minimum Requirements... 4 Package Content... 4 Note... 4 Get to know the Broadband Router... 5 Back Panel... 5 Front Panel...
BEC 8920AC Ultimum The Ultimate Residential Gateway with ac VDSL2/ADSL2+/Bonded/FTTH Quick Start Guide
 BEC 8920AC Ultimum The Ultimate Residential Gateway with 802.11ac VDSL2/ADSL2+/Bonded/FTTH Quick Start Guide BEC 8920AC The Ultimate Residential Gateway w/ 802.11ac PLEASE READ THE QUICK START GUIDE AND
FOUR-PORT ADSL ROUTER. KD319RI ADSL Router User Manual
 FOUR-PORT ADSL ROUTER KD319RI ADSL Router User Manual NOTICE This document contains proprietary information protected by copyright, and this Manual and all the accompanying hardware, software, and documentation
User Manual. WLAN ADSL2+ Router
 User Manual WLAN ADSL2+ Router INDEX 1.0 About This Manual... 1 1.1 Document Objectives... 1 1.2 Product Overview... 1 1.3 Product Description... 1 2.0 Specification... 2 2.1 LED Meaning... 3 2.2 Connectors...
OV504R6. Quick Start Guide
 OV504R6 Quick Start Guide 1 Overview The router is a highly ADSL2/2+ Integrated Access Device and can support ADSL link with downstream up to 24 Mbps and upstream up to 1 Mbps. It is designed to provide
I-Storm USB ADSL modem A01-AU1
 I-Storm USB ADSL modem A01-AU1 Manual for Linux and Mac OS 9/X A01-AU1_ME01 SOMMARIO Chapter 1...1 1.1 I-Storm USB ADSL Modem Features...1 1.2 Package Contents...1 1.3 The Front LEDs...2 1.4 Information
DRG600-WIFI USER GUIDE
 DRG600-WIFI USER GUIDE P/N: DFB601CW Copyright 2008. All Rights Reserved. Printed May 15, 2008 All trademarks and trade names are the properties of their respective owners. Page 2 of 104 Contents INTRODUCTION...
ZXV10 W300 Wireless ADSL Router. Quick Installation Manual ZTE CORPORATION
 ZXV10 W300 Wireless ADSL Router Quick Installation Manual ZTE CORPORATION 1 ZXV10 W300 Wireless ADSL Router Quick Installation Manual Manual version 20060810-R1.0 Product version Copyright 2005 ZTE CORPORATION
Network your computers and share your ADSL Internet access
 ADSL Modem with wireless Pre-N Router Network your computers and share your ADSL Internet access User Manual F5D8630-4A Table of Contents 1 Introduction........................................1 Benefits
Table of Contents. D-Link DSL-526B User Manual 1
 1 : Table of Contents PACKAGE CONTENTS... 2 SYSTEM REQUIREMENTS... 2 FEATURES... 3 HARDWARE OVERVIEW... 4 Connections... 4 LEDs... 5 INSTALLATION... 6 BEFORE YOU BEGIN... 6 INSTALLATION NOTES... 7
BIPAC 5102 Series. (802.11g) ADSL2+ Modem/Router. User s Manual
 ADSL2+ Modem/Router. User s Manual") BIPAC 5102 Series (802.11g) ADSL2+ Modem/Router User s Manual Chapter 1... 1 1.1 Introducing the BIPAC 5102 Series... 1 1.2 Features of the BIPAC 5102 Series... 3 1.3 Applications for the BIPAC 5102 Series...
BIPAC 5102 Series (802.11g) ADSL2+ Modem/Router User s Manual Chapter 1... 1 1.1 Introducing the BIPAC 5102 Series... 1 1.2 Features of the BIPAC 5102 Series... 3 1.3 Applications for the BIPAC 5102 Series...
Atrie DB108-E ADSL MODEM. User Manual V1.1
 Atrie DB108-E ADSL MODEM User Manual V1.1 CONTENTS 1.OVERVIEW...4 1.1 ABOUT ADSL...4 1.2 ABOUT ADSL2/2+...4 1.3 FEATURES...4 2 SPECIFICATION...5 2.1 INTERFACE INTRODUCTION...5 2.1.1 Indicator and Interface...5
User Manual. WLAN ADSL2+ Router
 User Manual WLAN ADSL2+ Router INDEX 1.0 About This Manual... 1 1.1 Document Objectives... 1 1.2 Product Overview... 1 1.3 Product Description... 1 2.0 Specification... 2 2.1 LED Meaning... 3 2.2 Back
Wireless b/g/n 150Mbps AP Router
 Wireless 802.11b/g/n 150Mbps AP Router User Manual V1.2 2009-11-30 Package Contents The following items should be found in your package: One Wireless 802.11b/g/n 150Mbps Broadband Router One DC 9v power
Introduction... 3 Features... 3 Minimum Requirements... 3 Package Content... 3 Note... 3 Get to know the Broadband Router... 4 Back Panel...
 Introduction... 3 Features... 3 Minimum Requirements... 3 Package Content... 3 Note... 3 Get to know the Broadband Router... 4 Back Panel... 4 Front Panel... 5 Setup Diagram... 6 Getting started... 7 Chapter
IP806GA/GB Wireless ADSL Router
 IP806GA/GB Wireless ADSL Router 802.11g/802.11b Wireless Access Point ADSL Modem NAT Router 4-Port Switching Hub User's Guide DECLARATION OF CON FORMITY This device complies with Part 15 of the FCC Rules.
Broadband High-Speed DSL Modem User Manual
 Broadband High-Speed DSL Modem User Manual Model DM200 September 2017 202-11621-03 350 E. Plumeria Drive San Jose, CA 95134 USA Support Thank you for purchasing this NETGEAR product. You can visit www.netgear.com/support
TABLE OF CONTENT 1. ABOUT THIS GUIDE Overview of the User s Guide INTRODUCTION Overview Features...
 TABLE OF CONTENT 1. ABOUT THIS GUIDE... 3 1.1 Overview of the User s Guide... 3 2. INTRODUCTION... 3 2.1 Overview... 3 2.2 Features... 3 2.3 Panel Layout... 4 2.3.1 Front Panel... 4 2.3.2 Rear Panel...
DVA-G3340S High-Speed 2.4 GHz Wireless ADSL VOIP Router. Manual
 DVA-G3340S High-Speed 2.4 GHz Wireless ADSL VOIP Router Manual Contents Package Contents...4 Introduction...5 Features...8 Using the Web Interface...9 Home > Wizard...9 Home > Wireless...10 Home > Wireless
BIPAC-6500 / 6500W (Wireless) Broadband VPN Firewall Router with 4-port 10/100M Switch Quick Start Guide
 Broadband VPN Firewall Router with 4-port 10/100M Switch Quick Start Guide") BIPAC-6500 / 6500W (Wireless) Broadband VPN Firewall Router with 4-port 10/100M Switch Quick Start Guide Billion BIPAC-6500 / 6500W (Wireless) Broadband VPN Firewall Router For more detailed instructions
BIPAC-6500 / 6500W (Wireless) Broadband VPN Firewall Router with 4-port 10/100M Switch Quick Start Guide Billion BIPAC-6500 / 6500W (Wireless) Broadband VPN Firewall Router For more detailed instructions
300M Wireless-N Broadband Router User Manual
 300M Wireless-N Broadband Router Model No.: ib-wrb314n User Manual Ver.: 1.0.0 Contents...Error! Bookmark not defined. Chapter 1 Product Overview... 3 Package Contents 3 Conventions....4 Panel Overview...
User s Guide DSL-2401HN2-E1C
 User s Guide DSL-2401HN2-E1C 1st Edition, Mar,2017 IMPORTANT! READ CAREFULLY BEFORE USE. KEEP THIS GUIDE FOR FUTURE REFERENCE. Graphics in this book may differ slightly from the product due to differences
WIRELESS ADSL2+ ROUTER
 WIRELESS ADSL2+ ROUTER USER MANUAL www.hamletcom.com Dear Customer, thanks for choosing an Hamlet product. Please carefully follow the instructions for its use and maintenance and, once this item has run
Table of Contents. D-Link DSL-2540U User Manual 1
 Table of Contents D-Link DSL-2540U User Manual 1 Table of Contents PACKAGE CONTENTS...3 SYSTEM REQUIREMENTS...3 FEATURES...4 HARDWARE OVERVIEW...6 Connections...6 LEDs...7 INSTALLATION...8 BEFORE YOU BEGIN...8
Quick Installation Guide DSL-2650U. 3G/ADSL/Ethernet Router with Wi-Fi and Built-in Switch
 DSL-2650U 3G/ADSL/Ethernet Router with Wi-Fi and Built-in Switch BEFORE YOU BEGIN Delivery Package Router DSL-2650U Power adapter DC 12V/1A RJ-11 telephone cable Ethernet cable (CAT 5E) Splitter (brochure).
BiPAC 3100SN Wireless-N Wall Plug Ethernet Access Point User Manual
 BiPAC 3100SN Wireless-N Wall Plug Ethernet Access Point User Manual FW version 1.05-c Last revised on Jun 2010 Safety Warnings 1. Do not use the adapter in high humidity or high temperature environment.
BiPAC 6404VP/VGP. VoIP/(802.11g) Broadband Firewall Router. Quick Start Guide
 Broadband Firewall Router. Quick Start Guide") BiPAC 6404VP/VGP VoIP/(802.11g) Broadband Firewall Router Quick Start Guide VoIP/(802.11g) Broadband Firewall Router For more detailed instructions on configuring and using the VoIP/(802.11g) Broadband
BiPAC 6404VP/VGP VoIP/(802.11g) Broadband Firewall Router Quick Start Guide VoIP/(802.11g) Broadband Firewall Router For more detailed instructions on configuring and using the VoIP/(802.11g) Broadband
GHz 2, g. Wireless-G. User Guide. ADSL Home Gateway WIRELESS WAG200G (EU) Model No.
 Model No.") GHz 2,4 802.11g WIRELESS Wireless-G ADSL Home Gateway User Guide Model No. WAG200G (EU) Copyright and Trademarks Specifications are subject to change without notice. Linksys is a registered trademark or
GHz 2,4 802.11g WIRELESS Wireless-G ADSL Home Gateway User Guide Model No. WAG200G (EU) Copyright and Trademarks Specifications are subject to change without notice. Linksys is a registered trademark or
11g Wireless Broadband Router
 LevelOne WBR-3408 User Manual 11g Wireless Broadband Router (Roteador banda-larga sem fio- Wireless G) Ver. 3.000 Safety FCC WARNING This equipment may generate or use radio frequency energy. Changes or
Smart Energy Gateway User Manual
 Smart Energy Gateway User Manual Version release: 1.03.ha.ds13 Last revised: 2012-08-25 Table of Contents Chapter 1: Introduction... 1 Introduction to your Router... 1 Features... 2 Chapter 2: Product
BiPAC 7401V(G)PX. 3G/ VoIP/ (802.11g) ADSL2+ Firewall Router. Quick Start Guide
PX. 3G/ VoIP/ (802.11g) ADSL2+ Firewall Router. Quick Start Guide") BiPAC 7401V(G)PX 3G/ VoIP/ (802.11g) ADSL2+ Firewall Router Quick Start Guide Quick Start Guide Billion BiPAC 7401V(G)PX 3G/ VoIP/ (802.11g) ADSL2+ Firewall Router PLEASE READ THE QUICK START GUIDE AND
BiPAC 7401V(G)PX 3G/ VoIP/ (802.11g) ADSL2+ Firewall Router Quick Start Guide Quick Start Guide Billion BiPAC 7401V(G)PX 3G/ VoIP/ (802.11g) ADSL2+ Firewall Router PLEASE READ THE QUICK START GUIDE AND
4 PORTS + WIRELESS ADSL2+ Router DB120-WL. User Manual V 1.1
 4 PORTS + WIRELESS ADSL2+ Router DB120-WL User Manual V 1.1 CONTENTS 1.OVERVIEW...3 1.1 ABOUT ADSL...3 1.2 ABOUT ADSL2/2+...3 1.3 FEATURES...3 2 SPECIFICATION...4 2.1 INTERFACE INTRODUCTION...4 2.1.1 INDICATOR
BiPAC 7800VDP(O)X. Dual-band Wireless-N VoIP ADSL2+ (VPN) Router. Quick Start Guide
X. Dual-band Wireless-N VoIP ADSL2+ (VPN) Router. Quick Start Guide") BiPAC 7800VDP(O)X Dual-band Wireless-N VoIP ADSL2+ (VPN) Router Quick Start Guide Billion BiPAC 7800VDP(O)X Dual-band Wireless-N VoIP ADSL2+ (VPN) Router PLEASE READ THE QUICK START GUIDE AND FOLLOW THE
BiPAC 7800VDP(O)X Dual-band Wireless-N VoIP ADSL2+ (VPN) Router Quick Start Guide Billion BiPAC 7800VDP(O)X Dual-band Wireless-N VoIP ADSL2+ (VPN) Router PLEASE READ THE QUICK START GUIDE AND FOLLOW THE
FOUR-PORT ADSL ROUTER. KD319EUI ADSL Router User Manual
 FOUR-PORT KD319EUI ADSL Router User Manual NOTICE This document contains proprietary information protected by copyright, and this Manual and all the accompanying hardware, software, and documentation are
RANGER SERIES. 150Mbps Wireless Green Broadband Router DG-BR4000NG. 150 Mbps V
 RANGER SERIES 150Mbps Wireless Green Broadband Router DG-BR4000NG N 150 Mbps V1.2 2011-12-15 FCC warning: This equipment has been tested and found to comply with the limits for a class B digital device,
NWAR3600 ADSL 11n Gateway. User s Manual. Version 0.1
 NWAR3600 ADSL 11n Gateway User s Manual Version 0.1 Copyright 2008 Table of Contents 1. INTRODUCTION... 4 1.1 FEATURES... 4 1.2 SYSTEM REQUIREMENTS... 4 2. INSTALLATION... 5 FRONT PANEL... 5 REAR PANEL...
4-Ethernet Ports Router & WLAN (802.11n 1x1)ADSL2/2+
ADSL2/2+") IFICATION PRODUCT: 4-Ethernet Ports Router & WLAN (802.11n 1x1)ADSL2/2+ MODEL NO: i1-4pwifi-01 Copyright by i1. All rights reserved. 1 Contents 1 PRODUCT OVERVIEW... 3 1.1 INTRODUCTION... 3 1.2 PRODUCT
IFICATION PRODUCT: 4-Ethernet Ports Router & WLAN (802.11n 1x1)ADSL2/2+ MODEL NO: i1-4pwifi-01 Copyright by i1. All rights reserved. 1 Contents 1 PRODUCT OVERVIEW... 3 1.1 INTRODUCTION... 3 1.2 PRODUCT
A Division of Cisco Systems, Inc. ADSL Modem. User Guide WIRED AM200. Model No.
 A Division of Cisco Systems, Inc. WIRED User Guide Model No. AM200 Copyright and Trademarks Specifications are subject to change without notice. Linksys is a registered trademark or trademark of Cisco
KW5262 VDSL VOIP Gateway
 KW5262 VDSL VOIP Gateway Ultra-high Data Rate at Up to 100Mbps With up to 100Mbps* for downstream and upstream bandwidths, the KW5262 offers higher data transfer rates and provides higher bandwidth than
FOUR-PORT ADSL ROUTER. KD319MUI ADSL Router User Manual
 FOUR-PORT ADSL ROUTER KD319MUI ADSL Router User Manual NOTICE This document contains proprietary information protected by copyright, and this Manual and all the accompanying hardware, software, and documentation
Security SSID Selection: Broadcast SSID:
 69 Security SSID Selection: Broadcast SSID: WMM: Encryption: Select the SSID that the security settings will apply to. If Disabled, then the device will not be broadcasting the SSID. Therefore it will
WIRELESS ADSL2+ ROUTER
 WIRELESS ADSL2+ ROUTER USER MANUAL HRDSL512W-REV2.0 www.hamletcom.com Dear Customer, thanks for choosing an Hamlet product. Please carefully follow the instructions for its use and maintenance and, once
BIPAC-74x GE Series Router
 BIPAC-74x GE Series Router 741 GE, 741 GE V2 and 743 GE User s Manual Table of Contents CHAPTER 1: INTRODUCTION...1 INTRODUCTION TO YOUR BIPAC-74X GE SERIES ROUTER... 1 SUPPORT... 1 FEATURES... 1 BIPAC-74X
Introduction... 3 Features... 3 Minimum Requirements... 3 Package Content... 3 Note... 3 Get to know the Broadband Router... 4 Back Panel...
 Introduction... 3 Features... 3 Minimum Requirements... 3 Package Content... 3 Note... 3 Get to know the Broadband Router... 4 Back Panel... 4 Front Panel... 5 Setup Diagram... 6 Getting started... 7 Chapter
RTA1335 ADSL Router. User s Manual. Rev: /7/11
 RTA1335 ADSL Router User s Manual Rev: 1.1 2005/7/11 No part of this publication may be reproduced in any form by any means without the prior written permission. Other trademarks or brand names mentioned