802.11n Wireless Access Point. ver.1.0
|
|
|
- Jerome Short
- 5 years ago
- Views:
Transcription
1 802.11n Wireless Access Point User Manual ver.1.0 WLn-501
2 COPYRIGHT Copyright 2005/2006 by this company. All rights reserved. No part of this publication may be reproduced, transmitted, transcribed, stored in a retrieval system, or translated into any language or computer language, in any form or by any means, electronic, mechanical, magnetic, optical, chemical, manual or otherwise, without the prior written permission of this company This company makes no representations or warranties, either expressed or implied, with respect to the contents hereof and specifically disclaims any warranties, merchantability or fitness for any particular purpose. Any software described in this manual is sold or licensed "as is". Should the programs prove defective following their purchase, the buyer (and not this company, its distributor, or its dealer) assumes the entire cost of all necessary servicing, repair, and any incidental or consequential damages resulting from any defect in the software. Further, this company reserves the right to revise this publication and to make changes from time to time in the contents thereof without obligation to notify any person of such revision or changes. 1
3 C A T A L O G Chapter I: Product Information Product Introduction Safety Information System Requirements Package Contents Familiar with your new wireless access point...9 Chapter II: System and Network Setup Setup Network Connection between Wireless Access Point and your Computer Connecting to wireless access point by web browser Windows 95/98/Me IP address setup Windows 2000 IP address setup Windows XP IP address setup Windows Vista IP address setup Connecting to Web Management Interface View System Status and Information Select an Operating Mode for Wireless Access Point AP Mode AP Bridge-Point to Point Mode AP Bridge-Point to Multi-Point Mode AP Bridge-WDS Mode WPS Setting Advanced Wireless Settings Wireless Security (Data Encryption) Disable Security WEP WPA Pre-shared Key WPA RADIUS x Authentication Radius Server MAC Filtering System Utilities Change Password IP Address of the Wireless Access Point DHCP Server
4 Chapter III: Advanced Configuration Configuration Backup and Restore Firmware Upgrade System Reset...65 Chapter IV: Appendix Hardware Specification Troubleshooting Glossary FCC Statement
5 Chapter I: Product Information 1-1 Product Introduction Thank you for purchasing this wireless access point! With this high cost-efficiency wireless access point, computers and wireless devices which are compatible with Draft-N wireless network standard can connect to existing wired Ethernet network via this wireless access point, at the speed of 300Mbps. Easy install procedures allows any computer users to setup a network environment in very short time - within minutes, even inexperienced users. Just follow the instructions given in this user manual, you can complete the setup procedure and release the power of this access point all by yourself! This access point is also capable to operate in Wireless Bridge mode. You can use it to expand the scope of your network wirelessly! When you want to build connection between two wired networks, you can use this function to establish connection by a pair or more wireless access point, to connect all networks together. Other features of this access point including: Compatible with IEEE b/g/Draft-N wireless network standard - works with other b/g/Draft-N wireless access points. High speed wireless network, six times faster than conventional g wireless network (300Mbps) Allow wireless devices to connect to existing wired network and share Internet and other network resources. Five wired Ethernet LAN ports (10/100M) Supports DHCP server function. Supports wireless data encryption (WEP/WPA). Supports MAC address filtering (Only allow specific wireless device of your choice to connect to this access point). 4
6 Supports RADIUS server, only allow users listed in your authorization server to use wireless network. Supports WPS (Wi-Fi Protected Setup), simplifies wireless client setup procedures. Even inexperienced user can setup wireless network without network technician s help! Easy to use web-based GUI (Graphical User Interface) for network configuration and management purposes. Remote management function allows configuration and upgrades from a remote computer (over the Internet) Auto MDI / MDI-X function for all wired Ethernet ports. Three high-gain antenna (antenna angle adjustable). 5
7 1-2 Safety Information In order to keep the safety of users and your properties, please follow the following safety instructions: 1. This access point is designed for indoor use only; DO NOT place this access point outdoor. 2. DO NOT put this access point at or near hot or humid places, like kitchen or bathroom. Also, do not left this access point in the car in summer. 3. DO NOT pull any connected cable with force; disconnect it from the access point first. 4. If you want to place this access point at high places or hang on the wall, please make sure the access point is firmly secured. Falling from high places would damage the access point and its accessories, and warranty will be void. 5. Accessories of this access point, like antenna and power supply, are danger to small children under 3 years old. They may put the small parts in their nose or month and it could cause serious damage to them. KEEP THIS ACCESS POINT OUT THE REACH OF CHILDREN! 6. The access point will become hot when being used for long time (This is normal and is not a malfunction), DO NOT put this access point on paper, cloth, or other flammable materials. 7. There s no user-serviceable part inside the access point. If you found that the access point is not working properly, please contact your dealer of purchase and ask for help. DO NOT disassemble the access point, warranty will be void. 8. If the access point falls into water when it s powered, DO NOT use your hand to pick it up. Switch the electrical power off before you do anything, or contact an experienced electrical technician for help. 9. If you smell something strange or even see some smoke coming out from the access point or power supply, remove the power supply or switch the electrical power off immediately, and call dealer of purchase for help. 6
8 1-3 System Requirements Computer or network devices with wired or wireless network interface card. Web browser (Microsoft Internet Explorer 4.0 or above, Netscape Navigator 4.7 or above, Opera web browser, or Safari web browser). An available AC power socket ( V, 50/60Hz) 7
.. 1 User manual (1 pcs). 2 A/C power adapter (1 pcs).")
9 1-4 Package Contents Before you starting to use this access point, please check if there s anything missing in the package, and contact your dealer of purchase to claim for missing items: Wireless Access point (main body, 1 pcs).. 1 User manual (1 pcs). 2 A/C power adapter (1 pcs)
10 1-5 Familiar with your new wireless access point Front Panel LED Name Light Status Description PWR ON Access point is switched on and correctly powered WLAN LAN 10/100M 1-5 LAN LNK/ACT On Off Flashing On Off Wireless network is switched on Wireless network is switched off Wireless LAN activity (transferring data) LAN port is running at 100Mbps LAN port is running at 10Mbps On LAN port is connected Off LAN port is not connected 1-5 Flashing LAN activity (transferring data) 9
11 Back Panel Item Name Description Antenna A to C Antenna A, B and C Power Power connector, connects to A/C power adapter Reset / WPS Reset the router to factory default settings (clear all settings) or start WPS function. Press and hold this button for 2 seconds to activate WPS function; press and hold this button for more than 20 seconds to clear all settings. LAN 1-5 Local Area Network (LAN) ports 1 to 5 10
12 Chapter II: System and Network Setup 2-1 Setup Network Connection between Wireless Access Point and your Computer. Please follow the following instruction to build the network connection between your new wireless access point and your computers, network devices: 1. Connect all your computers, network devices (network-enabled consumer devices other than computers, like game console, or switch / hub) to the LAN port of the access point by Ethernet cable. 2. Connect the A/C power adapter to the wall socket, and then connect it to the Power socket of the access point. 3. Please check all LEDs on the front panel. PWR LED should be steadily on, LAN LEDs should be on if the computer / network device connected to the respective port of the access point is powered on and correctly connected. If PWD LED is not on, or any LED you expected is not on, please recheck the cabling, or jump to 4-2 Troubleshooting for possible reasons and solution. 11
13 2-2 Connecting to wireless access point by web browser After the network connection is built, the next step you should do is setup the access point with proper network parameters, so it can work properly in your network environment. Before you can connect to the access point and start configuration procedures, your computer must be able to get an IP address automatically (use dynamic IP address). If it s set to use static IP address, or you re unsure, please follow the following instructions to configure your computer to use dynamic IP address: If the operating system of your computer is. Windows 95/98/Me - please go to section Windows please go to section Windows XP - please go to section Windows Vista please go to section Windows 95/98/Me IP address setup 1. Click Start button (it should be located at lower-left corner of your computer), then click control panel. Double-click Network icon, and Network window will appear. Select TCP/IP, then click Properties. 12

14 2. Select Specify an IP address, then input the following settings in respective field: IP address: Subnet Mask: click OK when finish. 13

15 2-2-2 Windows 2000 IP address setup 1. Click Start button (it should be located at lower-left corner of your computer), then click control panel. Double-click Network and Dial-up Connections icon, double click Local Area Connection, and Local Area Connection Properties window will appear. Select Internet Protocol (TCP/IP), then click Properties 14

16 2. Select Use the following IP address, then input the following settings in respective field: IP address: Subnet Mask: click OK when finish. 15

17 2-2-3 Windows XP IP address setup 1. Click Start button (it should be located at lower-left corner of your computer), then click control panel. Double-click Network and Internet Connections icon, click Network Connections, and then double-click Local Area Connection, Local Area Connection Status window will appear, and then click Properties 16

18 2. Select Use the following IP address, then input the following settings in respective field: IP address: Subnet Mask: click OK when finish. 17

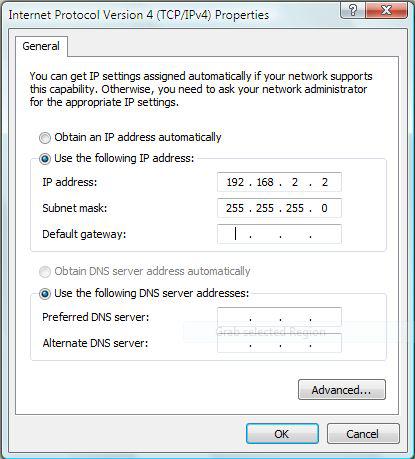
19 2-2-4 Windows Vista IP address setup 1. Click Start button (it should be located at lower-left corner of your computer), then click control panel. Click View Network Status and Tasks, then click Manage Network Connections..Right-click Local Area Netwrok, then select Properties. Local Area Connection Properties window will appear, select Internet Protocol Version 4 (TCP / IPv4), and then click Properties 18

20 2. Select Use the following IP address, then input the following settings in respective field: IP address: Subnet Mask: click OK when finish. 19
21 20

22 2-2-5 Connecting to Web Management Interface All functions and settings of this access point must be configured via web management interface. Please start your web browser, and input in address bar, then press Enter key. The following message should be shown: Please input user name and password in the field respectively, default user name is admin, and default password is 1234, then press OK button, and you can see the web management interface of this access point: 21
23 NOTE: If you can t see the web management interface, and you re being prompted to input user name and password again, it means you didn t input username and password correctly. Please retype user name and password again. If you re certain about the user name and password you type are correct, please go to 4-2 Troubleshooting (page 67) to perform a factory reset, to set the password back to default value. TIP: This page shows the four major setting categories: QuickSetup, General Setup, Status, and Tools. You can find the shortcut which leads to these setting categories at the upper-right corner of every page, and you can jump to another category directly by clicking the link, and don t have to go back to the first page. 22
24 2-3 View System Status and Information After you connected to the access point by web browser, the first thing you see is Status and Information page. All system and network related information of this access point will be displayed here. These information are very helpful when you want to know the detailed information of your access point, and when you try to fix the communication problem between this access point and other wired / wireless computer / devices. You can click Home on the left, and the system status and information will be displayed, as shown below: Here are descriptions of every items: Up time Hardware Version Runtime Code Version Displays the total passed time since the wireless access point is powered. Displays hardware version. This information is helpful when you need online help from the dealer of purchase. Displays current firmware version. If you want to perform firmware upgrade, this number will help 23
25 Mode ESSID Channel Number Security BSSID Associated Clients IP Address Subnet Mask Default Gateway MAC address you to determine if you need such upgrade. Displays current wireless operating mode (see next chapter) Displays current ESSID (the name used to identify this wireless access point) Displays current wireless channel number Displays current wireless security setting Displays current BSSID (a set of unique identification name of this access point, can not be modified by user) Displays the number of connected wireless client Displays the IP address of this wireless access point Displays the net mask of IP address Displays the IP address of default gateway Displays the MAC address of LAN interface 24

26 2-4 Select an Operating Mode for Wireless Access Point This access point can be operated in different modes; you can click Basic Setting on the left of web management interface to select a operating mode you want to meet different needs: You can click Mode dropdown menu to select operating mode, and there are 4 operating modes available: AP AP Bridge-Point to Point AP Bridge-Point to Multi-Point Access point mode, allows wireless clients to connect to access point and exchange data with computers connected to wired Ethernet ports of access point. Establish wireless connection with another wireless access point using the same mode, and link the wired network which these two wireless access points connected to together. Only one access point can be connected in this mode. Establish wireless connection with other wireless access points using the same mode, and link the 25
27 AP Bridge-WDS wired network which these wireless access points connected to together. Up to 4 access points can be connected in this mode. This mode is similar to AP Bridge to Multi-Point, but access point is not work in bridge-dedicated mode, and will be able to accept wireless clients while the access point is working as a wireless bridge. Please select one wireless operating mode, for detailed descriptions of every operating mode, please refer to chapter to listed below. 26

28 2-4-1 AP Mode This is the most common mode. When in AP mode, this access point acts as a bridge between b/g/Draft-N wireless devices and wired Ethernet network, and exchange data between them. When you select AP, the following options will be displayed: Here are descriptions of every setup items: Band Please select the wireless band you wish to use. By selecting different band setting, you ll be able to allow or deny the wireless client of a certain band. If you select 2.4GHz (B), 2.4GHz (N), or 2.4GHz (G), only wireless clients using the wireless band you select (802.11b, Draft-N, or g) will be able to connect to this access point. If you select 2.4GHz (B+G), then only wireless clients using b and g band will be able to connect to this access point. ESSID If you want to allow b, g, and Draft-N clients to connect to this access point, select 2.4GHz (B+G+N). Please input the ESSID (the name used to identify 27
29 Channel Number Associated Clients this wireless access point) here. You can input up to 32 alphanumerical characters. PLEASE NOTE THAT ESSID IS CASE SENSITIVE. Please select a channel number you wish to use. If you know a certain channel number is being used by other a wireless access points nearby, please refrain from using the same channel number Click Show Active Clients button and a new popup window will appear, which contains the information about all wireless clients connected to this access point. You can click Refresh button in popup window to keep information up-to-date After you finish with setting, please click Apply, and the following message will be displayed: When you see this message, the settings you made is successfully save., You can click Continue button to back to previous page and continue on other setting items, or click Apply button to restart the wireless access point and the changes will take effect after about 30 seconds. 28

30 2-4-2 AP Bridge-Point to Point Mode In this mode, this wireless access point will connect to another wireless access point which uses the same mode, and all wired Ethernet clients of both wireless access points will be connected together. You can use this mode to connect a network to another network which is physically isolated. Please note that when you set your access point to this mode, it will not accept regular wireless clients anymore. When you select AP Bridge-Point to Point, the following options will be displayed: Here are descriptions of every setup items: Band Please select the wireless band you wish to use. By selecting different band setting, you ll be able to allow or deny the wireless client of a certain band. If you select 2.4GHz (B), 2.4GHz (N), or 2.4GHz (G), only wireless clients using the wireless band you select (802.11b, Draft-N, or g) will be able to connect to this access point. 29
31 If you select 2.4GHz (B+G), then only wireless clients using b and g band will be able to connect to this access point. Channel Number MAC address 1 Set Security If you want to allow b, g, and Draft-N clients to connect to this access point, select 2.4GHz (B+G+N). Please select a channel number you wish to use. The channel number must be same with another wireless access point you wish to connect Please input the MAC address of the wireless access point you wish to connect Click this button to select an encryption mode for this wireless link, a new popup window will appear. Please refer to chapter 2-7 for detailed descriptions. After you finish with setting, please click Apply, and the following message will be displayed: When you see this message, the settings you made is successfully saved, You can click Continue button to back to previous page and continue on other setting items, or click Apply button to restart the wireless access point and the changes will take effect after about 30 seconds. 30

32 2-4-3 AP Bridge-Point to Multi-Point Mode In this mode, this wireless access point will connect to up to four wireless access points which uses the same mode, and all wired Ethernet clients of every wireless access points will be connected together. You can use this mode to connect a network to other networks which is physically isolated. Please note that when you set your access point to this mode, it will not accept regular wireless clients anymore. When you select AP Bridge-Point to Multi-Point, the following options will be displayed: Here are descriptions of every setup items: Band Please select the wireless band you wish to use. By selecting different band setting, you ll be able to allow or deny the wireless client of a certain band. If you select 2.4GHz (B), 2.4GHz (N), or 2.4GHz (G), only wireless clients using the wireless band you select (802.11b, Draft-N, or g) 31
33 will be able to connect to this access point. If you select 2.4GHz (B+G), then only wireless clients using b and g band will be able to connect to this access point. Channel Number MAC address 1-4 Set Security If you want to allow b, g, and Draft-N clients to connect to this access point, select 2.4GHz (B+G+N). Please select a channel number you wish to use. The channel number must be same with another wireless access point you wish to connect Please input the MAC address of the wireless access point you wish to connect Click this button to select an encryption mode for this wireless link, a new popup window will appear. Please refer to chapter 2-7 for detailed descriptions. After you finish with setting, please click Apply, and the following message will be displayed: When you see this message, the settings you made is successfully save., You can click Continue button to back to previous page and continue on other setting items, or click Apply button to restart the wireless access point and the changes will take effect after about 30 seconds. 32

34 2-4-4 AP Bridge-WDS Mode In this mode, this wireless access point will connect to up to four wireless access points which uses the same mode, and all wired Ethernet clients of every wireless access points will be connected together. You can use this mode to connect a network to other networks which is physically isolated. When you use this mode, this access point is still able to accept wireless clients. When you select AP Bridge-WDS, the following options will be displayed: Here are descriptions of every setup items: Band Please select the wireless band you wish to use. By selecting different band setting, you ll be able to allow or deny the wireless client of a certain band. If you select 2.4GHz (B), 2.4GHz (N), or 2.4GHz 33
35 (G), only wireless clients using the wireless band you select (802.11b, Draft-N, or g) will be able to connect to this access point. If you select 2.4GHz (B+G), then only wireless clients using b and g band will be able to connect to this access point. ESSID Channel Number Associated Clients MAC address 1-4 Set Security If you want to allow b, g, and Draft-N clients to connect to this access point, select 2.4GHz (B+G+N). Please input the ESSID (the name used to identify this wireless access point) here. You can input up to 32 alphanumerical characters. PLEASE NOTE THAT ESSID IS CASE SENSITIVE. Please select a channel number you wish to use. The channel number must be same with another wireless access point you wish to connect Click Show Active Clients button and a new popup window will appear, which contains the information about all wireless clients connected to this access point. You can click Refresh button in popup window to keep information up-to-date Please input the MAC address of the wireless access point you wish to connect Click this button to select an encryption mode for this wireless link, a new popup window will appear. Please refer to chapter 2-7 for detailed descriptions. After you finish with setting, please click Apply, and the following message will be displayed: 34
36 When you see this message, the settings you made is successfully save., You can click Continue button to back to previous page and continue on other setting items, or click Apply button to restart the wireless access point and the changes will take effect after about 30 seconds. 35
37 2-5 WPS Setting WPS (Wi-Fi Protected Setup) provides a new way to configure wireless clients; for conventional wireless access points, users have to setup data encryption options manually, and repeat encryption settings on every wireless client by using special configure software, so the data transferred over air is protected by data encryption mechanism. This is generally considered as a boring job when one has a great amount of wireless clients to set. When using WPS, the procedure is much simpler! You can just press a button on wireless network card (software or physical button), or input a special number (called as PIN number) in the setup menu of this access point, the access point and wireless client will cooperate to setup an encrypted wireless connection. The whole setup procedure will be completed in less than 1 minute, even inexperienced users can setup the encrypted wireless connection with the help of network technician! Note: WPS function of this access point will not work for those wireless clients do not support WPS. To use WPS function to set encrypted connection between this access point and WPS-enabled wireless client by WPS, click WPS Setting on the left of web management menu, and the following information will be displayed: 36

38 Here are descriptions of every setup items: Enable WPS Wi-Fi Protected Setup Information Check this box to enable or disable WPS function All information related to WPS will be displayed here, they re helpful when you re setting up connections by WPS. They are: WPS Status: Displays WPS status. If data encryption settings of this access point has never been set, unconfigured message will be displayed her. (see chapter 2-7 for detailed information); if data encryption settings has been set before, Configured message will be displayed here. Self PinCode: Displays the PIN code of this access point. You ll need this number when requested by the wireless client s setup software. SSID: Displays the SSID (ESSID) of this access point. Authentication Mode: Displays the authentication mode of this access point. 37
39 Start PBC Start PIN Passphrase Key: Displays the WPA passphrase here, all characters will be replaced by asterisk for security reason. If encryption is not set on this access point, nothing will be displayed here. Click this button to start PBC type WPS setup (PBC stands for Push Button Configuration Click this button to start PIN type WPS setup, the PIN number of wireless client must be inputted in the field located at the left of Start PIN button. This access point also provides a hardware PBC button for WPS setup. You can press and hold Reset/WPS button for 2 seconds to use PBC type WPS setup, the hardware button s function is the same as Start PBC software button described above. Do not press and hold Reset/WPS button for longer than 20 seconds, or this will reset the access point and remove all settings inside! NOTE: When you re using PBC type WPS setup, you must press PBC button (hardware or software) of wireless client within 90 seconds; if you didn t press PBC button of wireless client within this time period, please press PBC button (hardware or software) of this access point again. 38

40 2-6 Advanced Wireless Settings This wireless access point has many advanced wireless features and can be configured by yourself. Please note that all settings listed here are for experienced users only, if you re not sure about the meaning and function of these settings, please don t modify them, or the wireless performance will be reduced. You can click Advanced Setting on the left to enter advanced settings menu, and the following message will be displayed: Here are descriptions of every setup items: Fragment Threshold RTS Threshold Beacon Interval Set the Fragment threshold of wireless radio. Do not modify default value if you don t know what it is, default value is 2346 Set the RTS threshold of wireless radio. Do not modify default value if you don t know what it is, default value is 2347 Set the beacon interval of wireless radio. Do not 39
41 DTIM Period Data Rate N Data Rate Channel Width Preamble Type Broadcast ESSID CTS Protect Tx Power modify default value if you don t know what it is, default value is 100 Set the DTIM period of wireless radio. Do not modify default value if you don t know what it is, default value is 3 Set the wireless data transfer rate to a certain value. Since most of wireless devices will negotiate with each other and pick a proper data transfer rate automatically, it s not necessary to change this value unless you know what will happen after modification. Set the data rate of Draft-N clients, available options are MCS 0 to MCS 15, it s safe to set this option to Auto and it s not necessary to change this value unless you know what will happen after modification. Select wireless channel width (bandwidth taken by wireless signals of this access point). It s suggested to select Auto 20/40MHz. Do not change to 20 MHz unless you know what it is. Set the type of preamble of wireless radio, Do not modify default value if you don t know what it is, default setting is Short Preamble. Decide if the wireless access point will broadcast its own ESSID or not. You can hide the ESSID of your wireless access point (set the option to Disable ), so only people those who know the ESSID of your wireless access point can get connected. Enabling this setting will reduce the chance of radio signal collisions between b and g wireless access points. It s recommended to set this option to Auto or Always. However, if you set to None, your wireless access point should be able to work fine, too. You can set the output power of wireless radio. Unless you re using this wireless access point in a really big space, you may not have to set output 40
42 power to 100%. This will enhance security (malicious / unknown users in distance will not be able to reach your wireless access point). After you finish with setting, please click Apply, and the following message will be displayed: When you see this message, the settings you made is successfully save., You can click Continue button to back to previous page and continue on other setting items, or click Apply button to restart the wireless access point and the changes will take effect after about 30 seconds. 41
.")
43 2-7 Wireless Security (Data Encryption) This wireless access point provides many types of wireless security (wireless data encryption). When you use data encryption, data transferred by radio signals in the air will become unreadable for those people who don t know correct encryption key (encryption password). There are two ways to set wireless security: 1. Click Security on the left of web management interface. 2. Click Set Security button when the wireless operating mode you selected is AP Bridge-Point to Point, AP Bridge-Point to Multi-Point, or AP Bridge-WDS. 42

44 There are four types of security level you can select: Disable (no security - data encryption disabled), WEP, WPA Pre-shared Key, and WPA Radius. Please refer to the following chapters for detailed instructions. Please remember it s very important to set wireless security settings properly! Without a proper setting, hackers and intruders may gain access to your local network and do something bad to your computers and servers, which could cause serious problem. There are several things you can do to improve wireless security: 1. Always enable data encryption. Only disable it when you want to open your wireless access point to the public. 2. Never use simple words as encryption password. Use the random combination of symbols, numbers, and alphabets will greatly improve security. 3. Use WPA when possible - it's much safer than WEP. 4. Change encryption password when you ve used it for too long time. 43
45 2-7-1 Disable Security When you select Disable, wireless encryption is disabled. As mentioned before, you should only select this when you know what you re doing. After you finish with setting, please click Apply, and the following message will be displayed: When you see this message, the settings you made is successfully save, You can click Continue button to back to previous page and continue on other setting items, or click Apply button to restart the wireless access point and the changes will take effect after about 30 seconds. 44
.")
46 2-7-2 WEP WEP (Wired Equivalent Privacy) is a common encryption mode, it s safe enough for home and personal use. But if you need higher level of security, please consider using WPA encryption (see next chapter). However, some wireless clients don t support WPA, but only support WEP, so WEP is still a good choice for you if you have such kind of client in your network environment. When you select WEP as encryption type, the following messages will be displayed: Here are descriptions of every setup items: Key Length Key Format There are two types of WEP key length: 64-bit and 128-bit. Using 128-bit is safer than 64-bit, but will reduce some data transfer performance. There are two types of key format: ASCII and Hex. When you select a key format, the number of characters of key will be displayed. For example, if you select 64-bit as key length, and Hex as key format, you ll see the message at the right of Key 45
47 Default Tx Key Encryption Key 1 to 4 Enable 802.1x Authentication Format is Hex (10 characters), which means the length of WEP key is 10 characters. You can set up to four sets of WEP key, and you can decide which key is being used by default here. If you don t know which one you should use, select Key 1. Input WEP key characters here, the number of characters must be the same as the number displayed at Key Format field. You can use any alphanumerical characters (0-9, a-z, and A-Z) if you select ASCII key format, and if you select Hex as key format, you can use characters 0-9, a-f, and A-F. You must enter at least one encryption key here, and if you entered multiple WEP keys, they should not be same with each other. Check this box to enable 802.1x user authentication. Please refer to chapter for detailed instructions. After you finish with setting, please click Apply, and the following message will be displayed: When you see this message, the settings you made is successfully save., You can click Continue button to back to previous page and continue on other setting items, or click Apply button to restart the wireless access point and the changes will take effect after about 30 seconds. 46

48 2-7-3 WPA Pre-shared Key WPA Pre-shared key is the safest encryption method currently, and it s recommended to use this encryption method to ensure the safety of your data. When you select WPA pre-shared key as encryption type, the following messages will be displayed: Here are descriptions of every setup items: WPA Unicast Cipher Suite Pre-shared Key Format Pre-shared Key You can select WPA encryption type here. AES is safer than TKIP, but not every wireless client supports it. Please refer to the specification of your wireless client to decide which encryption type you should use. Please select the format of pre-shared key here, available options are Passphrase (8 to 63 alphanumerical characters) and Hex (64 hexadecimal characters 0 to 9 and a to f). Please input pre-shared key according to the key format you selected here. For security reason, don t use simple words). After you finish with setting, please click Apply, and the following message will be displayed: 47
49 When you see this message, the settings you made is successfully save., You can click Continue button to back to previous page and continue on other setting items, or click Apply button to restart the wireless access point and the changes will take effect after about 30 seconds. 48

50 2-7-4 WPA RADIUS WPA Radius is the combination of WPA encryption method and RADIUS user authentication. If you have a RADIUS authentication server, you can check the identify of every wireless clients by user database. When you select WPA RADIUS as encryption type, the following messages will be displayed: Here are descriptions of every setup items: WPA Unicast Cipher Suite Use internal MD5 RADIUS Server RADIUS Server IP address RADIUS Server Port RADIUS Server Password You can select WPA encryption type here. AES is safer than TKIP, but not every wireless client supports it. Please refer to the specification of your wireless client to decide which encryption type you should use. Uses built-in RADIUS Server (refer to chapter 2-8) instead of external RADIUS server. If you check this box, the value in following three fields will be ignored. Please input the IP address of RADIUS authentication server here. Please input the port number of RADIUS authentication server here. Default value is Please input the password of RADIUS authentication server here. 49
51 After you finish with setting, please click Apply, and the following message will be displayed: When you see this message, the settings you made is successfully save., You can click Continue button to back to previous page and continue on other setting items, or click Apply button to restart the wireless access point and the changes will take effect after about 30 seconds. 50

52 x Authentication You can enable 802.1x user identification (based on RADIUS user authentication server) by checking Enable 802.1x Authentication box when you select Disable or WEP as encryption type, and the following message will be displayed: Here are descriptions of every setup items: Use internal MD5 RADIUS Server Enable 802.1x Authentication RADIUS Server IP address RADIUS Server Port RADIUS Server Password Uses built-in RADIUS Server (refer to next chapter) instead of external RADIUS server. If you check this box, the value of internal RADIUS server fields will be ignored. Enable or disable the use of 802.1x user authentication. Please input the IP address of RADIUS authentication server here. Please input the port number of RADIUS authentication server here. Default value is Please input the password of RADIUS authentication server here. After you finish with setting, please click Apply, and the following message will be displayed: 51
53 When you see this message, the settings you made is successfully save., You can click Continue button to back to previous page and continue on other setting items, or click Apply button to restart the wireless access point and the changes will take effect after about 30 seconds. 52

54 2-8 Radius Server Comparing to other wireless security measures, radius server provides user-based authentication. If your wireless client supports 802.1x user authentication, you can use the Radius Server function to use the internal mini radius server to improve security and wireless user control. The internal radius server only supports 96 users and 16 IP addresses. If the number of user and/or IP address you need is more than this, please use external radius server. To setup internal radius server, click Raidus Server on the left of web management interface, and the following information will be displayed: Here are descriptions of every setup items: 53
55 Enable Radius Server User Profile Authentication Client Check this box to enable internal radius server function. You can add or delete radius user here. Please input username, password, re-type password in corresponding field, and click Add button to add the user to radius server database. You can click Reset to clear the text you typed in above three fields. All current radius users will be listed here. If you want to delete one or more users, check Select box of that user, and click Delete Selected button; you can click Delete All button to delete all users in radius server database. You can also click Reset button to uncheck all Select boxes. You can add allowed radius client IP address here. Please input client IP, secret key, re-type secret key in corresponding field, and click Add button to add the IP address to radius server database. You can click Reset to clear the text you typed in above three fields. All current IP addresses will be listed here. If you want to delete one or more addresses, check Select box of that address, and click Delete Selected button; you can click Delete All button to delete all addresses in radius server database. You can also click Reset button to uncheck all Select boxes. After you finish with setting, please click Apply, and the following message will be displayed: 54
56 When you see this message, the settings you made is successfully save., You can click Continue button to back to previous page and continue on other setting items, or click Apply button to restart the wireless access point and the changes will take effect after about 30 seconds. 55

57 2-9 MAC Filtering Another security measure you can use to keep hackers and intruders away is MAC filtering. You can pre-define a so-called white-list, which contains MAC addresses of the wireless clients you trust. All other wireless client with the MAC address which is not in your list will be denied by this wireless access point. To setup MAC filtering, please click MAC Filtering on the left of web management interface, and the following messages will be displayed: Address filtering table (1) This page contains 2 parts of MAC filtering information. All allowed MAC addresses will be listed in upper part (1), and you can add new MAC addresses by components in lower part (2). Add new entry here (2) Here are descriptions of every setup items: Select Delete Selected Delete All Reset Enable Wireless Check this box to select one or more MAC address(es) to delete. Click this button to delete all selected MAC address(es). Delete all MAC address entries. Uncheck all selected MAC address entries. Check this box to enable MAC address restriction, 56
58 Access Control MAC address Comment Add Clear if unchecked, no restriction will be enforced (any wireless client with proper encryption setting will be able to connect to this wireless access point). Input MAC address allowed to use this wireless access point here. You don t have to add colon (:) or hyphen (-) by yourself, just input 0 to 9 and a to f here, like or aabbccddeeff. You can input any text here as the comment of this MAC address, like ROOM 2A Computer or anything. You can input up to 16 alphanumerical characters here. This is optional and you can leave it blank, however, it s recommended to use this field to write a comment for every MAC addresses as a memory aid. This is optional. When you finish inputting MAC address and (optional) Comment, click this button to add the MAC address to the list. Remove all characters in MAC address and Comments field. After you finish with setting, please click Apply, and the following message will be displayed: When you see this message, the settings you made is successfully save., You can click Continue button to back to previous page and continue on other setting items, or click Apply button to restart the wireless access point and the changes will take effect after about 30 seconds. 57

59 2-10 System Utilities This access point provides some control functions include password, IP address management, and DHCP server function. Please click System Utility on the left of web management interface to access these functions. Below are detailed descriptions of every control function Change Password You can change the password used to enter the web configuration menu of this wireless access point. Please click System Utility on the left, and the following message will be displayed: Please input current password in Current Password field, then input new password in both New Password and Re-Enter Password field. After you finish, please go to the bottom of this page and click Apply, and the following message will be displayed: When you see this message, the settings you made is successfully save., You can click Continue button to back to previous page and continue on other setting items, or click Apply button to restart the wireless access point and the changes will take effect after about 30 seconds. 58

60 IP Address of the Wireless Access Point You can change the IP address of this wireless access point, so it can become a part of your local network. Please remember this address, you will not be able to connect the configuration menu of this wireless access point if you forget it. Default IP address is: / Subnet Mask , you can press and hold Reset button to change the IP address back to default value if you forget the IP address you set. To change IP address, please click System Utility on the left, and the following message will be displayed: Please input IP address and Subnet Mask in corresponding field, and you can input the IP address of gateway in Gateway Address field, if you need to manage this wireless access point from other network (like Internet). If you want to activate the DHCP server function of this wireless access point, please select Enabled in DHCP Server option, and see next chapter for detailed instructions; if you don t want to use DHCP server function of this wireless access point, or there s another DHCP server on the network this access point connects to, please select Disable. 59
61 After you finish, please go to the bottom of this page and click Apply, and the following message will be displayed: When you see this message, the settings you made is successfully save., You can click Continue button to back to previous page and continue on other setting items, or click Apply button to restart the wireless access point and the changes will take effect after about 30 seconds. 60

62 DHCP Server This wireless access point is capable to act as a DHCP server for your network, and it s disabled by default. If you want to activate this function, please click System Utility on the left, and the following message will be displayed: NOTE: Please remember to select Enable in DHCP Server option as described in last chapter, or all DHCP-related fields will be grayed out, and you will not be able to input any DHCP parameter. Here are descriptions of every setup items: Default Gateway IP Domain Name Server IP Start IP End IP Domain Name Lease Time Please input the IP address of default gateway of your network here. If not set, the IP address of this wireless access point will be provided to client. Please input the IP address of domain name server (DNS) here. If not set, the IP address of this wireless access point will be provided to client. Please input the start IP address of the IP range. Please input the end IP address of the IP range. If you wish, you can also optionally input the domain name for your network. This is optional. Please choose a lease time (the duration that every computer can keep a specific IP address) of every 61
63 IP address assigned by this access point from dropdown menu. After you finish, please click Apply, and the following message will be displayed: When you see this message, the settings you made is successfully save., You can click Continue button to back to previous page and continue on other setting items, or click Apply button to restart the wireless access point and the changes will take effect after about 30 seconds. 62

64 Chapter III: Advanced Configuration 3-1 Configuration Backup and Restore You can backup all configurations of this access point to a file, so you can make several copied of access point configuration for security reason. To backup or restore access point configuration, please follow the following instructions: Please click Configuration Tool on the left of web management interface, and the following message will be displayed on your web browser: Here are descriptions of every buttons: Backup Settings Restore Settings Restore to Factory Default Press Save... button, and you ll be prompted to download the configuration as a file, default filename is default.bin, you can please save it as another filename for different versions, and keep it in a safe place. Press Browse to pick a previously-saved configuration file from your computer, and then click Upload to transfer the configuration file to access point. After the configuration is uploaded, the access point s configuration will be replaced by the file you just uploaded. Click this button to remove all settings you made, and restore the configuration of this access point back to factory default settings. 63

65 3-2 Firmware Upgrade If there are new firmware of this wireless access point available, you can upload the firmware to the access point to change the firmware with new one, to get extra functions or problem fix. To perform firmware upgrade, please click Upgrade on the left of web management interface, and the following message will be displayed: Click Browse button first, you ll be prompted to provide the filename of firmware upgrade file. Please download the latest firmware file from our website, and use it to upgrade your access point. After a firmware upgrade file is selected, click Apply button, and the access point will start firmware upgrade procedure automatically. The procedure may take several minutes, please be patient. NOTE: Never interrupt the upgrade procedure by closing the web browser or physically disconnect your computer from access point. If the firmware you uploaded is corrupt, the firmware upgrade will fail, and you may have to return this access point to the dealer of purchase to ask for help. (Warranty voids if you interrupted the 64


66 3-3 System Reset When you think the access point is not working properly, you can use this function to restart the access point, this may help and solve the problem. This function is useful when the access point is far from you or unreachable. However, if the access point is not responding, you may have to switch it off by unplug the power plug and plug it back again after 10 seconds. To reset your access point, please click Reset on the left, and the following message will be displayed: Please click Apply, and a popup message will ask you again, to make sure you really want to reset the access point: Click OK to reset the access point, or click Cancel to abort. Please remember all connections between wireless client and this access point will be disconnected. 65
150Mbps WLAN Access Point
 User s Manual 150Mbps WLAN Access Point Model No.: SP918NL http://www.micronet.info Contents Chapter 1 Introduction 1-1 Product Introduction...1 1-2 Safety Information...1 1-3 System Requirements...3 1-4
DG-WA3000NP. 300Mbp s Wireless LAN Access Point with PoE. User Manual
 DG-WA3000NP 300Mbp s Wireless LAN Access Point with PoE User Manual V1.0 2012-03-17 As our products undergo continuous development the specifications are subject to change without prior notice COPYRIGHT
Wireless-N Access Point
 Wireless-N Access Point User s Manual Version 1.0 (April, 2008) COPYRIGHT Copyright 2008/2009 by this company. All rights reserved. No part of this publication may be reproduced, transmitted, transcribed,
Federal Communication Commission Interference Statement
 COPYRIGHT Copyright 2008/2009 by this company. All rights reserved. No part of this publication may be reproduced, transmitted, transcribed, stored in a retrieval system, or translated into any language
User Guide. NP740N 11n Wireless Broadband Router
 User Guide NP740N 11n Wireless Broadband Router www.netcomm.com.au Contents CHAPTER I: PRODUCT INFORMATION...5 1-1 Introduction...5 1-2 Safety Information...6 1-3 System Requirements...6 1-4 Package Contents...6
WIRELESS-N ACCESS POINT USER MANUAL
 WIRELESS-N ACCESS POINT USER MANUAL MODELS: 524704 524728 524735 Shown: Model 524728 INT-524704/524728/524735-UM-0809-01 Federal Communications Commission Interference Statement FCC Part 15 This equipment
Conceptronic 150N Wireless LAN Broadband Router User s Manual Version: 2.0
 Conceptronic 150N Wireless LAN Broadband Router User s Manual Version: 2.0 Contents CHAPTER I: PRODUCT INFORMATION 1-1. Introduction and safety information 1-2. Safety Information 1-3. Package Contents
Introduction. This product complies with the following European Union regulations: This product can be used safely in the countries listed below:
 WLX-2005 Introduction Thank you for purchasing the Sitecom WLX-2005 Wi-Fi Access Point N300. It complies with wireless 802.11b/g/n standards and can create a Wi-Fi network with data transmission rates
Linux Open Source Code Certain Edimax products include software code developed by third parties, software code
 English COPYRIGHT Copyright by Edimax Technology Co, LTD. all rights reserved. No part of this publication may be reproduced, transmitted, transcribed, stored in a retrieval system, or translated into
WIRELESS 300N OUTDOOR POE ACCESS POINT USER MANUAL
 WIRELESS 300N OUTDOOR POE ACCESS POINT USER MANUAL MODEL 524711 INT-524711-UM-1209-02 Federal Communications Commission Interference Statement FCC Part 15 This equipment has been tested and found to comply
Wi-Fi homeplug LN-554. User Manual
 Wi-Fi homeplug LN-554 User Manual Table of Contents Introduction... 3 Package Contents... 4 Cautions... 5 Product Layout... 6 Connecting the Homeplug... 8 Configuring the device...11 Addendum: Declaration
3G-6408n User Manual
 3G-6408n User Manual 05-2012 / v1.0 COPYRIGHT Copyright Edimax Technology Co., Ltd. all rights reserved. No part of this publication may be reproduced, transmitted, transcribed, stored in a retrieval system,
IP IP
 Table of Contents Chapter I Product Introduction... 4 1-1 Package Contents... 4 1-2 Safety Instructions... 5 1-3 System Requirements... 7 1-4 Highlights of this Wireless Projector Server... 8 1-5 Familiar
EW-7438RPn Mini User Manual
 EW-7438RPn Mini User Manual 04-2015 / v1.1 CONTENTS I. Product Information... 1 I-1. Package Contents... 1 I-2. System Requirements... 1 I-3. LED Status... 1 I-4. Hardware Overview... 3 I-5. Safety Information...
Introduction. This product complies with the following European Union regulations: This product can be used safely in the countries listed below:
 WLX-2006 Introduction Thank you for purchasing the Sitecom WLX-2006 Wall Mount Range Extender N300. With this product you can easily double the signal coverage of your Wi-Fi network for better Wi-Fi quality
BR-6428HPn User Manual
 BR-6428HPn User Manual 05-2012 / v1.0 COPYRIGHT Copyright Edimax Technology Co., Ltd. all rights reserved. No part of this publication may be reproduced, transmitted, transcribed, stored in a retrieval
COPYRIGHT LIMITED WARRANTY
 COPYRIGHT Copyright 2008/2009 by Hawking Technologies, Inc. All rights reserved. No part of this publication may be reproduced, transmitted, transcribed, stored in a retrieval system, or translated into
COPYRIGHT. Linux Open Source Code Certain Edimax products include software codes developed by third parties, which are
 COPYRIGHT Copyright Edimax Technology Co., Ltd. all rights reserved. No part of this publication may be reproduced, transmitted, transcribed, stored in a retrieval system, or translated into any language
Introduction. This product complies with the following European Union regulations: This product can be used safely in the countries listed below:
 WLX-5100 Introduction Thank you for purchasing the Sitecom WLX-5100 Wi-Fi range extender Dualband AC750. With this product you can easily double the signal coverage of your Wi-Fi network for better Wi-Fi
EW-7478AC User Manual
 EW-7478AC User Manual 03-2016 / v1.0 CONTENTS I. Product Information...1 I-1. Package Contents... 1 I-2. System Requirements... 1 I-3. LED Status... 2 I-4. Switch... 3 I-5. WPS Setup... 5 I-6. WPS Button
User s Manual. 11N Wireless LAN Broadband Router. Model No.: SP916GN.
 User s Manual 11N Wireless LAN Broadband Router Model No.: SP916GN http://www.micronet.info Table of Contents Chapter 1 Introduction... 1 1.1 Package Contents... 1 1.2 Key Features... 1 1.3 Safety Information...
DG-WR3001N. 300Mbps Wireless Repeater. User Manual
 DG-WR3001N 300Mbps Wireless Repeater User Manual V1.1 2012-07-09 As our products undergo continuous development the specifications are subject to change without prior notice COPYRIGHT Copyright 2012 by
802.11n Wireless AP Router. ver.1.0
 802.11n Wireless AP Router User Manual ver.1.0 WLn-401 COPYRIGHT Copyright 2008 by PheeNet. All rights reserved. No part of this publication may be reproduced, transmitted, transcribed, stored in a retrieval
USER S MANUAL. Wireless-AC Multifunction Extender. website
 Wireless-AC Multifunction Extender HW7ACW website www.hawkingtech.com e-mail techsupport@hawkingtech.com USER S MANUAL COPYRIGHT 2015 HAWKING TECHNOLOGIES,INC. ALL RIGHTS RESERVED. COPYRIGHT Copyright
300N Wireless LAN Concurrent Dual Band Gigabit Router
 300N Wireless LAN Concurrent Dual Band Gigabit Router User s Manual Version: 1.0 (December, 2010) COPYRIGHT Copyright 2010/2011 by this company. All rights reserved. No part of this publication may be
Wireless g AP. User s Manual
 Wireless 802.11g AP User s Manual Version 1.8 User s Guide 0 Copyright Statement No part of this publication may be reproduced, stored in a retrieval system, or transmitted in any form or by any means,
Chapter 1 Introduction
 Copyright Statement is the registered trademark of Zonet Technology Inc. All the products and product names mentioned herein are the trademarks or registered trademarks of their respective holders. Copyright
USER S MANUAL. Hi-Gain Wireless-AC Multi-Function Access Point/Bridge. website
 Hi-Gain Wireless-AC Multi-Function Access Point/Bridge HW7ACB website www.hawkingtech.com e-mail techsupport@hawkingtech.com USER S MANUAL COPYRIGHT 2014 HAWKING TECHNOLOGIES,INC. ALL RIGHTS RESERVED.
Wireless LAN Access Point
 Wireless LAN Access Point IEEE 802.11b 11Mbps User s Manual Table of Contents Chapter 1 Introduction... 1 1.1 Package Contents... 2 1.2 Features... 2 1.3 Specifications... 2 1.4 Physical Description...
DG-HR1160M Portable Power Bank 3G Router User Manual
 DG-HR1160M Portable Power Bank 3G Router User Manual V1.0 2013-11-14 As our products undergo continuous development the specifications are subject to change without prior notice COPYRIGHT Copyright 2013
NW611. AC600 WiFi Dual Band USB Adapter with 5dBi Antenna
 NW611 AC600 WiFi Dual Band USB Adapter with 5dBi Antenna Chapter 1: Introduction..3 1.1 Product Features..3 1.2 Package Contents.3 1.3 Indicator Description.3 CHAPTER 2: Quick Installation Guide.4 2.1
CWA-854HT 54 Mbps Wireless-G High Transmission Access Point User s Guide
 CWA-854HT 54 Mbps Wireless-G High Transmission Access Point User s Guide May 2006 Version 1.00 1 Table of Contents Table of Contents... 2 List of Figures... 4 List of Tables... 6 Chapter 1. Introduction...
1. Product Information WN250R. Wireless b/g/n 1T1R 150 Mbps Router. User s Manual. 1 AirLive WN-250R User s Manual
 1. Product Information WN250R Wireless b/g/n 1T1R 150 Mbps Router User s Manual 1 AirLive WN-250R User s Manual Copyright and Disclaimer Copyright Copyright 2010/2011 by this company. All rights reserved.
High Gain USB Wireless Adapter RNX-AC600HGUBE. User Manual
 RNX-AC600HGUBE User Manual Table of Contents Chapter 1: Introduction....... 03 1.1 Product Features.... 03 1.2 Package Contents...... 03 1.3 Indicator Description... 03 CHAPTER 2: Quick Installation Guide......
7. Server Configuration Introduction Search for All Available MFP Server Status of MFP Server
 Copyright by Edimax Technology Co, LTD. all rights reserved. No part of this publication may be reproduced, transmitted, transcribed, stored in a retrieval system, or translated into any language or computer
Table of Contents. Chapter 1Introduction Package Contents Features Specifications Physical Description...
 Table of Contents Chapter 1Introduction... 3 1.1 Package Contents... 3 1.2 Features... 3 1.3 Specifications... 3 1.4 Physical Description... 4 Chapter 2Wireless LAN Access Point Connection... 5 Chapter
WiFi-Repeater User Manual. Quick Installation Guide(Q.I.G.) REV.1.2
 REV.1.2") WiFi-Repeater User Manual Quick Installation Guide(Q.I.G.) REV.1.2 Introduction: The WiFi Repeater is a combined wired/wireless network connection device designed specifically for small business, office,
WiFi-Repeater User Manual Quick Installation Guide(Q.I.G.) REV.1.2 Introduction: The WiFi Repeater is a combined wired/wireless network connection device designed specifically for small business, office,
Nano USB Wireless Adapter RNX-AC600NUB. User Manual
 RNX-AC600NUB User Manual Table of Contents Chapter 1: Introduction....... 03 1.1 Product Features.... 03 1.2 Package Contents...... 03 1.3 Indicator Description... 03 CHAPTER 2: Quick Installation Guide......
MIMO Wireless Broadband Route r User s Manual 1
 MIMO Wireless Broadband Router User s Manual 1 Introduction...4 Features...4 Minimum Requirements...4 Package Content...4 Note...4 Get to know the Broadband Router...5 Back Panel...5 Front Panel...6 Setup
WIRELESS 450N DUAL-BAND GIGABIT ROUTER USER MANUAL
 WIRELESS 450N DUAL-BAND GIGABIT ROUTER USER MANUAL MODEL 524988 INT-524988-UM-0811-02 Thank you for purchasing the INTELLINET NETWORK SOLUTIONS Wireless 450N Dual-Band Gigabit Router, Model 524988. The
WIRELESS 150N USB 2.0 ADAPTER
 WIRELESS 150N USB 2.0 ADAPTER DN-70440-1 Rev.2 DN-7042-1 Rev.3 Manual DN-70440-1 Rev.2 DN-7042-1 Rev.3 1 / 38 Chapter 1: Introduction..3 1.1 Product Features..3 1.2 Package Contents.3 1.3 Indicator Description.3
WAP3205 v2. User s Guide. Quick Start Guide. Wireless N300 Access Point. Default Login Details. Version 1.00 Edition 2, 12/2012
 WAP3205 v2 Wireless N300 Access Point Version 1.00 Edition 2, 12/2012 Quick Start Guide User s Guide Default Login Details LAN IP Address http://192.168.1.2 Password 1234 www.zyxel.com Copyright 2012 ZyXEL
Wireless Broadband Router
 LW6005A-R2 Wireless Broadband Router Manual 1 Introduction... 4 Features... 4 Minimum Requirements... 4 Package Content... 4 Note... 4 Get to know the Broadband Router... 5 Back Panel... 5 Front Panel...
CV-7428nS User Manual
 CV-7428nS User Manual 09-2012 / v1.0 1 COPYRIGHT Copyright Edimax Technology Co., Ltd. all rights reserved. No part of this publication may be reproduced, transmitted, transcribed, stored in a retrieval
Chapter 1 Introduction
 Copyright Statement is the registered trademark of Zonet Technology Inc. All the products and product names mentioned herein are the trademarks or registered trademarks of their respective holders. Copyright
WIRELESS 150N USB 2.0 ADAPTER
 WIRELESS 150N USB 2.0 ADAPTER Manual DN-7042-1 Rev.3 Chapter 1. Introduction Thank you for purchasing the wireless 802.11b/g/n USB adapter! This adapter is mini size design and you are able to plug it
Wireless N Broadband Router
 . Wireless N Broadband Router User s Manual Version: 1.0 (August, 2009) COPYRIGHT Copyright 2009/2010 by this company. All rights reserved. No part of this publication may be reproduced, transmitted, transcribed,
COPYRIGHT. Linux Open Source Code Certain Edimax products include software codes developed by third parties, which are
 COPYRIGHT Copyright Edimax Technology Co., Ltd. all rights reserved. No part of this publication may be reproduced, transmitted, transcribed, stored in a retrieval system, or translated into any language
Version /01/2013. User Manual. DAP-1665 Wireless AC1200 Dual Band Access Point DAP-1665
 Version 1.0 10/01/2013 User Manual DAP-1665 Wireless AC1200 Dual Band Access Point DAP-1665 Table of Contents Product Overview... 4 Package Contents... 4 System Requirements... 5 Introduction... 6 Features...
WRE2206. User s Guide. Quick Start Guide. Wireless N300 Range Extender. Default Details. Version 1.00 Edition 1, 01/2015
 WRE2206 Wireless N300 Range Extender Version 1.00 Edition 1, 01/2015 Quick Start Guide User s Guide Default Details Web Address http://zyxelsetup OR http://192.168.1.2 www.zyxel.com User Name admin Password
User Guide. 450Mbps/300Mbps Wireless N Access Point TL-WA901ND/TL-WA801ND REV
 User Guide 450Mbps/300Mbps Wireless N Access Point TL-WA901ND/TL-WA801ND REV4.0.0 1910011930 Contents About This Guide...1 Chapter 1. Get to Know About Your Access Point.................... 2 1. 1. Product
Wireless 11n Smart Repeater AP (1T1R)
") (1T1R) 2014 Table of Contents 1. Introduction...3 1.1 Package contents... 3 1.2 Product Features... 3 1.3 Front Panel Description... 4 1.4 Rear Panel Description... 5 2. Installation...6 2.1 Hardware Installation...
(1T1R) 2014 Table of Contents 1. Introduction...3 1.1 Package contents... 3 1.2 Product Features... 3 1.3 Front Panel Description... 4 1.4 Rear Panel Description... 5 2. Installation...6 2.1 Hardware Installation...
Wireless LAN Access Point
 Wireless LAN Access Point IEEE 802.11b/g 54Mbps 501903 User s Manual Table of Contents Chapter 1 Introduction... 1 1.1 Package Contents... 2 1.2 Features... 2 1.3 Specifications... 2 1.4 Physical Description...
WF-2402 Quick Installation Guide
 WF-2402 Quick Installation Guide Netis 150Mbps Wireless-N Broadband Router 1. Check Your Package Contents The following items should be found in your package: 150Mbps Wireless-N Broadband Router Power
BR-6504N IEEE802.11b/g/n Draft 2.0 Wireless Broadband Router User s Manual Version (April, 2007)
") BR-6504N IEEE802.11b/g/n Draft 2.0 Wireless Broadband Router User s Manual Version 1.0.4 (April, 2007) 0 1 2 Copyright by Edimax Technology Co, LTD. all rights reserved. No part of this publication may
BR-6504N IEEE802.11b/g/n Draft 2.0 Wireless Broadband Router User s Manual Version 1.0.4 (April, 2007) 0 1 2 Copyright by Edimax Technology Co, LTD. all rights reserved. No part of this publication may
WL556E Portable Wireless-N Repeater
 WL556E Portable Wireless-N Repeater Table of Contents About the Device...3 Minimum System Requirements...4 Package Contents...4 Device Overview...5 Front Panel...5 Bottom Panel...6 Configuring the Device...
AC 1200 Wireless Router User s Manual
 AC 1200 Wireless Router User s Manual Version A1.0, November 05, 2014 261097-013 1 Preface This manual provides information related to the installation and operation of this device. The individual reading
Wireless USB Port Multi-Functional Printer Server. Model # AMPS240W. User s Manual. Ver. 1A
 Wireless USB 2.0 1-Port Multi-Functional Printer Server Model # AMPS240W User s Manual Ver. 1A Table of Contents 1 Introduction...3 1.1 Package Contents... 3 1.2 System Requirements... 3 2 Multi-Functional
Wireless LAN Access Point
 Wireless LAN Access Point IEEE 802.11b/g 54Mbps User s Manual Table of Contents Chapter 1 Introduction... 1 1.1 Package Contents... 2 1.2 Features... 2 1.3 Specifications... 2 1.4 Physical Description...
EW-7612PIn V2 User Manual
 EW-7612PIn V2 User Manual 11-2011 / v1.0 I COPYRIGHT Copyright Edimax Technology Co., Ltd. all rights reserved. No part of this publication may be reproduced, transmitted, transcribed, stored in a retrieval
DG-WR3001NE DIGISOL 300MBPS WALL MOUNT WIRELESS REPEATER. User Manual
 DG-WR3001NE DIGISOL 300MBPS WALL MOUNT WIRELESS REPEATER User Manual V1.0 2018-04-17 As our products undergo continuous development the specifications are subject to change without prior notice 1 COPYRIGHT
RANGER SERIES. 150Mbps Wireless Green Broadband Router DG-BR4000NG. 150 Mbps V
 RANGER SERIES 150Mbps Wireless Green Broadband Router DG-BR4000NG N 150 Mbps V1.2 2011-12-15 FCC warning: This equipment has been tested and found to comply with the limits for a class B digital device,
LevelOne. User Manual. WAP Mbps PoE Wireless AP V3.0.0
 LevelOne WAP-0005 108Mbps PoE Wireless AP User Manual V3.0.0 i TABLE OF CONTENTS CHAPTER 1 INTRODUCTION... 1 FIGURE 1: WIRELESS ACCESS POINT... 1 FEATURES OF YOUR WIRELESS ACCESS POINT... 1 Security Features...
WRE6505 v2. User s Guide. Quick Start Guide. Wireless AC750 Range Extender. Default Login Details. Version 1.00 Edition 1, 10/2016
 WRE6505 v2 Wireless AC750 Range Extender Version 1.00 Edition 1, 10/2016 Quick Start Guide User s Guide Default Login Details Web Address http://zyxelsetup http://dhcp-assigned IP www.zyxel.comhttp://192.168.1.2
750AC WIRELESS DUAL-BAND ROUTER USER MANUAL MODEL
 750AC WIRELESS DUAL-BAND ROUTER USER MANUAL MODEL 525541 manhattan-products.com MAN-525541-UM-0314-01-0 COPYRIGHT Copyright 2014 IC Intracom. All rights reserved. No part of this publication may be reproduced,
WL-5420AP. User s Guide
 WL-5420AP User s Guide Table of contents INTRODUCTION... 1 About the Operation Modes...2 LED Indicators...5 Solid...5 Ports on the Rear Panel...7 GETTING CONNECTED... 8 WPA AP -CONFIGURATION VIA WEB...
Table of Contents. Chapter 1 Product Overview Features Package Contents LED Indicator and Panel Description...
 Copyright Statement is the registered trademark of Monoprice. All the products and product names mentioned herein are the trademarks or registered trademarks of their respective holders. Copyright of the
802.11N Wireless Broadband Router
 802.11N Wireless Broadband Router Pre-N Wireless Access Point Broadband Internet Access WPS 4-Port Switching Hub User's Guide Table of Contents CHAPTER 1 INTRODUCTION... 1 Wireless Router Features... 1
Security SSID Selection: Broadcast SSID:
 69 Security SSID Selection: Broadcast SSID: WMM: Encryption: Select the SSID that the security settings will apply to. If Disabled, then the device will not be broadcasting the SSID. Therefore it will
Wireless b/g/n 150Mbps AP Router
 Wireless 802.11b/g/n 150Mbps AP Router User Manual V1.2 2009-11-30 Package Contents The following items should be found in your package: One Wireless 802.11b/g/n 150Mbps Broadband Router One DC 9v power
Wireless-N CardBus Adapter Quick Installation Guide
 Wireless-N CardBus Adapter Quick Installation Guide Introducing the Wireless-N CardBus Adapter The Wireless-N CardBus Adapter is designed to add 802.11n wireless network to your notebook computer for fast
Wireless Access Point
 802.11g / 802.11b / WPA Wireless Access Point User's Guide TABLE OF CONTENTS CHAPTER 1 INTRODUCTION... 1 Features of your Wireless Access Point... 1 Package Contents... 4 Physical Details... 4 CHAPTER
WL580E. DUAL BAND WALL PLUGGED 300Mbps WIRELESS-N REPEATER
 WL580E DUAL BAND WALL PLUGGED 300Mbps WIRELESS-N REPEATER Copyright 2014 All rights reserved. No part of this document may be reproduced, republished, or retransmitted in any form or by any means whatsoever,
AirCruiser G Wireless Router GN-BR01G
 AirCruiser G Wireless Router GN-BR01G User s Guide i Contents Chapter 1 Introduction... 1 Overview...1 Features...1 Package Contents...2 AirCruiser G Wireless Router Rear Panel...2 AirCruiser G Wireless
WRE6606. User s Guide. Quick Start Guide. Dual-Band Wireless AC1300 Access Point. Default Login Details. Version 1.00 (ABDU.0) Edition 1, 10/2016
 Edition 1, 10/2016") WRE6606 Dual-Band Wireless AC1300 Access Point Version 1.00 (ABDU.0) Edition 1, 10/2016 Quick Start Guide User s Guide Default Login Details Web Address http://zyxelsetup http://dhcp-assigned IP www.zyxel.comhttp://192.168.1.2
WRE6606 Dual-Band Wireless AC1300 Access Point Version 1.00 (ABDU.0) Edition 1, 10/2016 Quick Start Guide User s Guide Default Login Details Web Address http://zyxelsetup http://dhcp-assigned IP www.zyxel.comhttp://192.168.1.2
11Mbps Wireless LAN Smart Station Adapter
 11Mbps Wireless LAN Smart Station Adapter Quick Start Guide Version 1.6 The next-generation wireless LAN device 11Mbps Wireless LAN Smart Station adapter, brings Ethernet-like performance to the wireless
CE MARK WARNING LIMITED WARRANTY
 CE MARK WARNING This is a Class B product. In a domestic environment, this product may cause radio interference, in which case the user may be required to take adequate measures. LIMITED WARRANTY Hawking
3.3.2 Example to Add Profile in Profile Step 1: Click Add in Profile function
 Network Type: There are two types, infrastructure and 802.11 Ad-Hoc mode. Under Ad-Hoc mode, user can also choose the preamble type, the available preamble type includes auto and long. In addition to that
Premiertek AP Mbps Wireless-N Broadband Router Quick Installation Guide
 Premiertek AP2402 150Mbps Wireless-N Broadband Router Quick Installation Guide V1.0.8.11 1. Check Your Package Contents The following items should be found in your package: 150Mbps Wireless-N Broadband
Notice according to GNU/GPL-Version 2
 Copyright by Edimax Technology Co, LTD. all rights reserved. No part of this publication may be reproduced, transmitted, transcribed, stored in a retrieval system, or translated into any language or computer
Introduction... 3 Features... 3 Minimum Requirements... 3 Package Content... 3 Note... 3 Get to know the Broadband Router... 4 Back Panel...
 Introduction... 3 Features... 3 Minimum Requirements... 3 Package Content... 3 Note... 3 Get to know the Broadband Router... 4 Back Panel... 4 Front Panel... 5 Setup Diagram... 6 Getting started... 7 Chapter
Version 1.00 May 02, User Manual. Wi-Fi AC600 Dual Band Mini Router DIR-516
 Version 1.00 May 02, 2014 User Manual Wi-Fi AC600 Dual Band Mini Router DIR-516 Preface D-Link reserves the right to revise this publication and to make changes in the content hereof without obligation
Wireless USB 600AC USER MANUAL. Dual Band USB Adapter. HNW600ACU Rev
 Wireless USB 600AC Dual Band USB Adapter USER MANUAL HNW600ACU Rev. 2.0 www.hamletcom.com Table of Contents 1. Introduction... 4 1.1 Product Features... 4 1.2 Package contents... 4 2. Wireless USB Adapter
802.11a g Dual Band Wireless Access Point. User s Manual
 802.11a+802.11g Dual Band Wireless Access Point User s Manual 0 Chapter 1 Introduction 1.1 Feature Fully interoperable with IEEE 802.11b compliant products. High-Speed data transfer rate up to 11Mbps.
DG-BR1000Nu. 150Mbps Wireless Micro Broadband Router. User Manual
 DG-BR1000Nu 150Mbps Wireless Micro Broadband Router User Manual V1.1 2012-07-04 As our products undergo continuous development the specifications are subject to change without prior notice COPYRIGHT Copyright
CAP1750. User Manual / v1.1
 CAP1750 User Manual 12-2015 / v1.1 CONTENTS I. Product Information...2 I-1. Package Contents... 2 I-2. System Requirements... 3 I-3. Hardware Overview... 3 I-4. LED Status... 4 I-5. Reset... 4 I-6. Safety
802.11ac Wireless Access Point Model WAC104
 Point Model WAC104 User Manual October 2016 202-11698-01 350 E. Plumeria Drive San Jose, CA 95134 USA Support Thank you for purchasing this NETGEAR product. You can visit www.netgear.com/support to register
Wi-Fi 300N USER MANUAL. Nano USB Adapter HNWU300NN.
 Wi-Fi 300N Nano USB Adapter USER MANUAL HNWU300NN www.hamletcom.com Table of Contents 1. Introduction... 4! 1.1 Product Features... 4! 1.2 Package contents... 4! 2. Wireless USB Adapter Installation...
Table of Contents. Page ii
 Table of Contents Chapter 1 Introduction 1 Features... 1 Safety Instructions... 1 Package Contents... 2 Physical Details... 3 Chapter 2 Setup 5 Overview... 5 Using the Windows Wizard... 5 Chapter 3 Web-Based
LevelOne User Manual WNC-0600USB N_One Wireless USB Adapter
 LevelOne User Manual WNC-0600USB N_One Wireless USB Adapter V2.0.0-0712 i Safety FCC WARNING This equipment has been tested and found to comply with the limits for a Class B digital device, pursuant to
A Division of Cisco Systems, Inc. GHz g. Wireless-G. User Guide. Access Point WIRELESS. WAP54G v2. Model No.
 A Division of Cisco Systems, Inc. GHz 2.4 802.11g WIRELESS Wireless-G Access Point User Guide Model No. WAP54G v2 Copyright and Trademarks Specifications are subject to change without notice. Linksys is
Federal Communication Commission Interference Statement
 Federal Communication Commission Interference Statement This equipment has been tested and found to comply with the limits for a Class B digital device, pursuant to Part 15 of the FCC Rules. These limits
User Guide. 300Mbps Wireless N Access Point TL-WA801ND REV
 User Guide 300Mbps Wireless N Access Point TL-WA801ND REV5.0.0 1910012077 Contents About This Guide...1 Chapter 1. Get to Know About Your Access Point.................... 2 1. 1. Product Overview............................................................3
150Mbps WI-FI BROADBAND 3G HOME ROUTER WITH USB PORT
 RANGER SERIES 150Mbps WI-FI BROADBAND 3G HOME ROUTER WITH USB PORT DG-HR1420 1 V1.0 2014-09-24 2 The following items should be present in your package: DG-HR1420 Wireless Broadband Home Router Power adapter
DG-HR Mbps Wireless Broadband Home Router User Manual
 DG-HR3400 300Mbps Wireless Broadband Home Router User Manual V2.0 2014-12-26 As our products undergo continuous development the specifications are subject to change without prior notice COPYRIGHT Copyright
DG-BR4313NG. 300Mbps Wireless Green 3G Broadband Router. User Manual
 DG-BR4313NG 300Mbps Wireless Green 3G Broadband Router User Manual V1.0 2012-11-12 As our products undergo continuous development the specifications are subject to change without prior notice COPYRIGHT
WAP6405. User s Guide. Quick Start Guide. 5GHz AC1750 Gigabit Wireless Bridge. Default Login Details. Version 1.00 Edition 1, 06/2016
 WAP6405 5GHz AC1750 Gigabit Wireless Bridge Version 1.00 Edition 1, 06/2016 Quick Start Guide User s Guide Default Login Details LAN IP Address http://192.168.1.2 (AP Mode) http://192.168.1.5 (Repeater
GET STARTED AC 1200 High Power Dual Band Wi-Fi Range Extender
 GET STARTED AC 1200 High Power Dual Band Wi-Fi Range Extender Overview 01 Package Contents... 01 Front Panel... 02 LED Descriptions... 03 Using as an Extender 04 Connects to a WIFI network... 04 Acts as
High Power Wireless N. 600mW Smart Repeater LP 9698SR
 High Power Wireless N 600mW Smart Repeater LP 9698SR INTRODUCTION...4 GETTING STARTED...5 Package Contents...5 LED Indicators...6 Back Panel Description...7 SETUP GUIDE...8 Find a Setup Location...8 Connect
DG-BR4000N/E. 150Mbps Wireless Broadband Router. User Manual
 DG-BR4000N/E 150Mbps Wireless Broadband Router User Manual V1.0 2012-08-22 As our products undergo continuous development the specifications are subject to change without prior notice COPYRIGHT DG-BR4000N/E