Introduction... 3 Package Contents... 4 VPN100 LEDs... 5 Connecting your VPN Installing USB drivers... 7
|
|
|
- Baldric Armstrong
- 5 years ago
- Views:
Transcription
1
2 Contents Introduction... 3 Package Contents... 4 VPN100 LEDs... 5 Connecting your VPN Installing USB drivers... 7 Configuring the VPN Using the Web-based User Interface... 9 Choices when Travelling Connecting to an office LAN (Ethernet connection) Connecting to a Hotel / Airport Ethernet (LAN) port Connecting directly to an ADSL Internet modem Connecting directly to an Optus Cable Internet modem Connecting directly to a Telstra Cable Heartbeat Modem Starting / Terminating your VPN session Enabling / Disabling your firewall Page 2 VPN100 Traveller s Guide
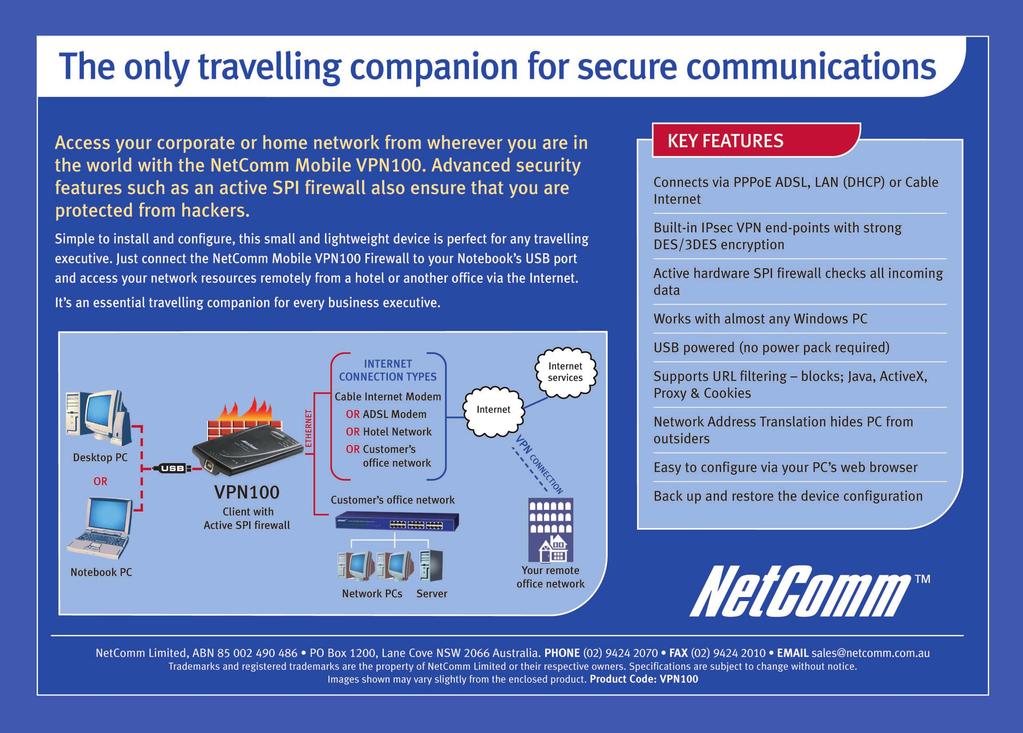
3 Introduction The VPN100 will perform three main functions when used to connect your PC, these functions are described below: Internet - Provide a Network/Internet connection The VPN100 will provide a safe Network/Internet connection to: An Office Ethernet LAN and the Internet The Internet via an ADSL modem The Internet via an Cable Internet modem Firewall - Prevent Hacker attacks and Network Viruses. Another use for the VPN100 is simply to protect you from viruses and trojans when sharing files with a local network which you can t trust (such as downloading a file from a customer s local server when out on-site). Of course at the same time you can use that network s Internet connection to Surf or connect to your Remote Office VPN. The Hardware Firewall will protect your PC from Hacker attacks coming from the local network or from the Internet. This protection is part of the VPN100 hardware and therefore does not slow down your PC s performance. VPN - access your office network from anywhere The Built-in VPN end points can be pre-configured (usually by your company s Network Administrator) to connect to your Company s IPsec VPN service via the Internet. This will allow you to access your Company s Office resources from anywhere whilst maintaining data integrity and security. The VPN100 always connects to your computer via the USB socket and USB Cable. The Ethernet socket is intended to be connected to the Internet or an Un-trusted Network. If you connect your computer to the VPN100 via the Ethernet socket, the VPN100 will not work. VPN100 Traveller s Guide Page 3
 Package Contents Note and this Traveller s Guide NetComm Driver")

4 Package Contents The following items should be contained in your NetComm Personal Firewall VPN Adaptor Package: NetComm Personal Firewall VPN Adaptor (VPN100) Package Contents Note and this Traveller s Guide NetComm Driver CD-ROM (including drivers and additional user guide) Etherent Network Cable (RJ-45) USB Connection Cable Check the contents of your package and, if any parts are missing or damaged, please contact your Dealer. Page 4 VPN100 Traveller s Guide
5 VPN100 LEDs The following figure shows the top view of the NetComm VPN100. The LEDs on the top indicate the status of the unit. LED Colour Description Session Orange The Session LED indicates a successful VPN Tunnel has been established between two endpoints. Diag Red The Diag LED lights up when the Adapter goes through its selfdiagnosis mode during every boot-up. It will turn off upon successful completion of the diagnosis. Link/Act Green The Link/Act LED serves two purposes. If the LED is continuously lit, the Adapter is successfully connected. If the LED is flickering, the Adapter is actively sending or receiving data. Full/Col Green The Full/Col LED also serves two purposes. If this LED is lit up continuously, the connection is running in Full Duplex mode. If the LED flickers, the connection is experiencing collisions. If this LED flickers too often, there may be a problem with your connection. See Appendix A: Troubleshooting if you encounter this problem. 100 Orange The 100 LED lights up when a successful 100Mbps connection is made. If this LED does not light up, then your connection speed is 10 Mbps. USB Green The USB LED lights up when the Adapter is connected to a PC and powered on. VPN100 Traveller s Guide Page 5
6 Connecting your VPN Before you begin, make sure that all of your hardware is powered off, including the Adapter, PCs, cable or DSL modem, and/or Router. 2. Connect one end of the USB cable to the USB port on the Adapter and the other end of the USB cable to a USB port on your PC. 3. Connect one end of an Ethernet cable to the Ethernet port on the Adapter, and the other end to an Ethernet port (LAN port) on a Network. If you are not using a Router, you can connect it directly to a Cable or DSL modem. If the PC is powered up: The USB LED will light up green as soon as the Adapter is connected correctly to the PC. The Diag LED will light up red for a few seconds when the Adapter goes through its self-diagnostic test. This LED will turn off when the self-test is complete. 4. Turn on the PC, cable or DSL modem and/or Router. 5. If this is the first time you have connected the VPN100 Adapter to this computer, you will be prompted to install drivers by Windows. Refer to the following section and follow the instructions for the version of Windows you are using. Page 6 VPN100 Traveller s Guide


 is selected and click on Next>. 3.")
7 Installing USB drivers The following section details the driver installation instructions for Windows XP. For other operating systems, please refer to the User Guide on the CD-ROM Windows XP 1. Insert the NetComm Driver CD-ROM in your CD-ROM drive and turn on your computer. 2. When prompted by the Found New Hardware Wizard confirm that Install the software automatically (Recommended) is selected and click on Next>. 3. The Found New Hardware Wizard will search for the correct driver. 4. Select the NetComm Personal USB VPN/Firewall and click on Next>. VPN100 Traveller s Guide Page 7


8 5. If prompted, click on Continue Anyway to proceed with the installation. 6. Windows will install the driver on your system. 7. Click on Finish to complete the installation. 8. Windows XP will advise that a new network device has been installed. Page 8 VPN100 Traveller s Guide
9 Configuring the VPN100 Using the Web-based User Interface The NetComm VPN100 uses a Web-based User Interface for configuration. Start your web browser and type in the browser s address box and press Enter. This address is the factory default IP Address of your NetComm VPN100. You should check if it has been changed by your Network Administrator. The Username and Password Required prompt box will appear. Leave the User Name empty and type admin (default password) for the Password. Click OK. The setup screen will load. This password should be changed via the Administration page immediately. The password can be reset by restoring the factory defaults with the Reset button. When making changes to the settings, click on the Apply button before moving to another page. The router will reboot and refresh the screen in five seconds. Continue the session by selecting more menu items. This log-in process will only be required when you are changing the connection type, configuring other options or when you are Connecting / Disconnecting VPN tunnels in the VPN100. The VPN100 factory defaults have the WAN connection type set as Obtain IP Automatically (known as DHCP). You may not need to configure anything if this is the mode that suits your connection situation. There are three sets of Username & Passwords described in this guide: The Admin password which allows you to access your VPN100 to make configuration changes to it. This password belongs to the VPN100 and will always be the same unless you change it. The PPP or Heartbeat Username & Password which authenticates you with your ISP. (Only required when using PPP or Heartbeat connection types.) This password belongs to the ISP and it will depend upon your account with the ISP. Hotel or Airport Username & Passwords are some times issued when you are accessing the Internet via a paid service. This username and password is likely to be different for every different paid service you use. VPN100 Traveller s Guide Page 9
10 Choices when Travelling If this is the first time you are using the VPN100, you will need to install the correct USB drivers for your operating system before choosing your connection type. Refer to the Installing USB Drivers section. When you are travelling you may need to change the configuration of the VPN100 to suit the type of connection you wish to use. The main connection types are: DHCP Ethernet Connection or Obtain IP automatically A Static IP Ethernet Connection or Static IP A directly connected ADSL modem or PPPoE service A PPTP Ethernet service or PPTP service A directly connected Telstra Cable modem or Heartbeat To help you choose the type of connection you may need to use for your location please see the following scenarios and follow the instructions given. Page 10 VPN100 Traveller s Guide
 port on the wall or a Network Switch.")
11 Connecting to an office LAN (Ethernet connection) Often when you are visiting a Client s office you will need to connect back to your company s office network to retrieve a file or check your . Most commonly, the connection provided is an Ethernet (LAN) port on the wall or a Network Switch. When connecting in this way you can access the local office, the Internet (presuming the local office has an Internet connection) and your Companies office (presuming you have a VPN server / Gateway at your remote office). Ask the Local Network Administrator It is advisable to speak to the Local Network Administrator of the client s office to see if there are any restrictions (such as MAC / IP filtering or lack of VPN pass-through) on the network that may block access to local resources and more importantly access to the Internet. You will also need to enquire if the LAN supports DHCP, and what IP address you should use if it does not. DHCP or Static? Most modern office networks run a DHCP server that will automatically allocate your VPN100 with the correct IP address settings this is the easiest way to connect and you should try this setting first. Alternatively you should ask the Local Network Administrator for Static IP address settings to allow you to connect to the local network. Once you have decided your connection method please refer to one of the two options as follows: In its factory default mode the VPN100 is already set to use DHCP. VPN100 Traveller s Guide Page 11
12 Option 1 - Using DHCP (follow these steps if the Local Network supports DHCP) If the office uses DHCP follow the steps below to configure your connection: 1. Join your VPN100 to your computer s USB socket with the USB cable. 2. Use the Ethernet cable provided to connect the VPN100 to an Ethernet port provided by the office you are visiting. Check that the Link/Act light on the VPN100 is now lit. 3. Log in to your VPN100 by typing the Device IP address into the location bar of your web browser. The Default IP address is When prompted for the Username and Password, enter them as previously set by the owner of the VPN100. The defaults are admin for username and admin for password. 5. In the Onepage setup screen, click the down arrow of the WAN connection type box and choose Obtain an IP Automatically. Then click Apply at the bottom of the page. Page 12 VPN100 Traveller s Guide
13 6. Your VPN100 will reboot ( and your connection will be lost temporarily). Once the reboot is completed you can choose Status Monitor from the menu to view the IP address you have obtained via DHCP. If your Public IP address is shown as then you have not been automatically assigned an IP address. Speak to the local network administrator for further advice. 7. Your computer should now be able to view the Local Network as well as access the Internet via the local network s Internet connection. If you have a VPN tunnel pre-configured you should also be able to enable that tunnel to connect through the Internet to your company s office network. Option 2 - Using Static IP (follow these steps if the Local Network does not support DHCP) 1. Consult your local Network Administrator and ask them for the following settings: Static IP Address Subnet Mask Gateway DNS DNS 2 (optional) 2. Join your VPN100 to your computer s USB socket with the USB cable. 3. Use the Ethernet cable provided to connect the VPN100 to an Ethernet port provided by the office you are visiting. Check that the Link/Act light on the VPN100 is now lit. 4. Log in to your VPN100 by typing the Device IP address into the location bar of your web browser. The Default IP address is When prompted for the Username and Password, enter them as previously set by the owner of the VPN100. The defaults are admin for Username and admin for password. VPN100 Traveller s Guide Page 13
, Subnet Mask, Gateway (Default Gateawy), DNS1.")
14 6. In the Onepage setup screen, click the down arrow of the WAN connection type box and choose Static IP. Enter the details as supplied by the Local Network Administrator, i.e. Static IP Address (WAN), Subnet Mask, Gateway (Default Gateawy), DNS1. Then click Apply at the bottom of the page. Page 14 VPN100 Traveller s Guide

15 Connecting to a Hotel / Airport Ethernet (LAN) port Often when you are visiting Hotels or Airports you will need to connect back to your office network to retrieve a file or check your . Most commonly, the connection provided is an Ethernet port on the wall or a Network Switch. When connecting in this method using the VPN100 you can access the Internet (and run a VPN tunnel to your office) whilst remaining shielded (firewalled) from other people on the Hotel / Airport Network. VPN100 Traveller s Guide Page 15

16 Hotel / Airport Username & Password Because most Airport / Hotel Internet services are Pay for time type services you may need to also complete an extra log-in screen with a username and password that is given to you when you purchase your internet access. This log-in screen can only be accessed after you have chosen your VPN100 connection method. The Hotel / Airport log-in screen may look something like the screen below: Follow the steps below to configure your connection; 1. Join your VPN100 to your computer s USB socket with the USB cable. 2. Use the Ethernet cable provided to connect the VPN100 to an Ethernet port provided by the Hotel / Airport you are visiting. Check that the Link/Act light on the VPN100 is now lit. 3. Log into your VPN100 by typing the Device IP address into the location bar of your web browser. The Default IP address is Page 16 VPN100 Traveller s Guide
17 4. When prompted for Username and Password enter them as previously set by the owner of the VPN100. The defaults are admin for username and admin for password. 5. In the Onepage setup screen, click the down arrow of the WAN connection type box and choose Obtain an IP Automatically. Then click Apply at the bottom of the page. 6. Your VPN 100 will reboot (your connection will be lost temporarily). Once the reboot is completed you can choose Status Monitor from the menu to view the IP address you have obtained via DHCP. If your Public IP address is shown as then you have not been automatically assigned an IP address, speak to the Hotel / Airport operator for further advice. 7. Your computer should now be able to browse the Internet via the Hotel / Airport Internet connection. If you find that when browsing your are presented with another (different) login screen (such as shown above) then you may need to enter a Username and Password issued by the Hotel / Airport before being allowed access to the Internet. Once you have done this you should not only be able to access the Internet but you should also be able to enable your pre-configured VPN tunnel. VPN100 Traveller s Guide Page 17

18 Connecting directly to an ADSL Internet modem When using your VPN100 at home with an ADSL Internet service the best way to connect is by plugging the VPN100 Ethernet port directly into the Ethernet port of an ADSL modem. In this scenario the ADSL modem should be in Bridged mode not Routed mode. If you wish to use your VPN100 with an ADSL Router (or ADSL Gateway) which shares the ADSL connection with more than one computer then you should treat the connection as an Office LAN and follow the instructions for Connecting to an Office LAN Follow the steps below to configure your connection; 1. Turn on your ADSL modem, with an enabled ADSL line connected to your ADSL modem. 2. Join your VPN100 to your computer s USB socket with the USB cable. 3. Use the Ethernet cable provided to connect the VPN100 to the Ethernet port of your ADSL modem. Check that the Link/Act light on the VPN100 is now lit. 4. Log into your VPN100 by typing the Device IP address into the location bar of your web browser. The Default IP address is When prompted for the Username and Password, enter them as previously set by the owner of the VPN100. The defaults are admin for Username and admin for password. Page 18 VPN100 Traveller s Guide
.")
19 6. In the Onepage setup screen, click the down arrow of the WAN connection type box and choose PPPoE. 7. The screen will change briefly, type in your PPP username and password as given to you by your ISP (please note this is NOT the same as your Admin password used to log in to the VPN100). Then click Apply at the bottom of the page. If you select PPPoE, you will no longer need to use any ISP supplied PPPoE software on your computer to connect to the Internet (the VPN100 does this for you) 8. Your VPN100 will reboot (and your connection will be lost temporarily). Once the reboot is completed you can choose Status Monitor from the menu to view the IP address you have obtained via DHCP. If your Public IP address is shown as then you have not been automatically assigned an IP address, speak to the local network administrator for further advice. 9. Your computer should now be connected to the Internet via your ADSL modem. If you have a VPN tunnel pre-configured you should also be able to enable that tunnel to connect through the Internet to your company s office network. VPN100 Traveller s Guide Page 19
20 Connecting directly to an Optus Cable Internet modem When using your VPN100 at home with an Optus Cable Internet service the best way to connect is by plugging the VPN100 Ethernet port directly into the Ethernet port of your Optus Cable modem. The Optus cable system does not require a username and password and it uses DHCP to assign you a Public IP address. If you wish to use your VPN100 with an existing Broadband Router, which shares the Optus Cable connection with more than one computer, then you should treat the connection as an Office Network and follow the instructions for Connecting to an Office LAN. Follow the steps below to configure your connection: 1. Turn on your Optus Cable modem, ensure the Cable modem is connected to the Cable network and has Cable Sync. 2. Join your VPN100 to your computer s USB socket with the USB cable. 3. Use the Ethernet cable provided to connect the VPN100 to the Ethernet port of your Cable modem. Check that the Link/Act light on the VPN100 is now lit. 4. Log into your VPN100 by typing the Device IP address into the location bar of your web browser. The Default IP address is Page 20 VPN100 Traveller s Guide

21 5. When prompted for the Username and Password, enter them as previously set by the owner of the VPN100. The defaults are admin for Username and admin for password. 6. In the Onepage setup screen, click the down arrow of the WAN connection type box and choose Obtain an IP Automatically. Then click Apply at the bottom of the page. 7. Your VPN 100 will reboot (and your connection will be lost temporarily). Once the reboot has completed you can choose Status Monitor from the menu to view the IP address you have obtained via DHCP. If your Public IP address is shown as then you have not been automatically assigned an IP address, speak to the local network administrator for further advice. 8. Your computer should now be able to view the Local network as well as access the Internet via the local network s internet connection. If you have a VPN tunnel pre-configured you should also be able to enable that tunnel to connect through the Internet to your company s office network. VPN100 Traveller s Guide Page 21
22 Connecting directly to a Telstra Cable Heartbeat Modem When using your VPN100 at home with a Telstra Cable Internet service the best way to connect is by plugging the VPN100 Ethernet port directly into the Ethernet port of a Telstra Cable modem. If you wish to use your VPN100 with an existing Broadband Router, which shares the Telstra cable connection with more than one computer, then you should treat the connection as an Office Network and follow the instructions for Connecting to an Office LAN. Follow the steps below to configure your connection: 1. Turn on your Telstra Cable modem. 2. Join your VPN100 to your computer s USB socket with the USB cable. 3. Use the Ethernet cable provided to connect the VPN100 to the Ethernet port of your Telstra Cable modem. Check that the Link/Act light on the VPN100 is now lit. 4. Log in to your VPN100 by typing the Device IP address into the location bar of your web browser. The Default IP address is When prompted for the Username and Password enter them as previously set by the owner of the VPN100. The defaults are admin for Username and admin for password. Page 22 VPN100 Traveller s Guide
. 8.")
23 6. In the Onepage setup screen, click the down arrow of the WAN connection type box and choose Heartbeat. 7. The screen will change briefly. Type in your Heartbeat username and password as given to you by your ISP (please note this is NOT the same as your Admin password used to log into the VPN100). 8. Type in the Heartbeat Server number as provided by your ISP. Then click Apply at the bottom of the page. At the time of printing the Telstra cable service was changing. If Option 1 does not work as a valid HBS number please try option 2 for your state. In the future you may not be required to specify the actual Heartbeat Server IP address at all in this case the HBS field will not be visable in the VPN100 configuration screen. STATE OPTION 1 OPTION 2 NSW VIC QLD WA SA VPN100 Traveller s Guide Page 23
24 9. Your VPN100 will reboot (and your connection will be lost temporarily). Once the reboot is completed you can choose Status Monitor from the menu to view the IP address you have obtained via the Cable connection. If your Public IP address is shown as then you have not been automatically assigned an IP address, speak to your ISP for further advice. 10. Your computer should now be connected to the Internet via the Telstra Cable Internet connection. If you have a VPN tunnel pre-configured you should also be able to enable that tunnel to connect through the Internet to your company s office network. Page 24 VPN100 Traveller s Guide

25 Starting / Terminating your VPN session The VPN100 can be configured with up to five VPN tunnels that will allow you to securely connect to remote offices. The VPN tunnels can be configured to connect automatically when there is an Internet connection, but most often you will want to start them manually. This guide does not detail how to configure the VPN tunnels. It presumes your VPN tunnels have already been correctly configured to connect to your desired network. For more information please refer to the User guide. To Start your VPN Session 1. Connect your VPN100 via one of the methods suggested and confirm you have access to the Internet (e.g. check you can load a web page). 2. Log into your VPN100 by typing the Device IP address into the location bar of your web browser. The Default IP address is When prompted for Username and Password enter them as previously set by the owner of the VPN100. The defaults are admin for Username and admin for password. 4. From the left hand menu choose VPN, when the VPN page loads choose the tunnel you wish to start. VPN100 Traveller s Guide Page 25
 and check the bottom of the page for the Status.")
26 5. Ensure the tunnel is enabled. 6. Scroll down to the bottom of the page and click Connect (if you had to enable the tunnel first click Apply then click Connect ) 7. After a few seconds the tunnel should have been connected. Check this by refreshing your browser screen (select VPN from the left hand menu again) and check the bottom of the page for the Status. Alternatively you can click the Summary button or check that the session LED is now lit on the VPN If the VPN tunnel status is connected you can now start accessing resources on the remote network. To Terminate a VPN Session 1. Follow steps 1 to 4 from the previous section (but chose the tunnel you wish to Terminate instead of Start ) 2. Once you have chosen the tunnel, scroll to the bottom of the page and click Disconnect. When the page refreshes the tunnel status should now be Disconnected. You can double check by clicking the Summary button to see which tunnels are connected and which have been disconnected. If the Advanced settings of your VPN Tunnel are set to Keep Alive then the VPN tunnel will be created whenever you have an internet connection. Choosing Disconnect for this tunnel will only disconnect the tunnel temporarily. You must disable the keep alive option if you do not wish this tunnel to continue automatically. Page 26 VPN100 Traveller s Guide
27 Enabling / Disabling your firewall The VPN100 is equipped with an Active Firewall which helps protect against Hacker attacks. However, sometimes you may need to turn off the active firewall to allow more sensitive Internet / Network applications to work through the VPN100. If you do disable the Active component of the firewall, the NAT process will still be in place to offer moderate security. To disable the Active Firewall 1. Connect your VPN100 via one of the methods suggested and confirm you have access to the Internet (e.g. check you can load a web page). 2. Log into your VPN100 by typing the Device IP address into the location bar of your web browser. The Default IP address is When prompted for the Username and Password, enter them as previously set by the owner of the VPN100. The defaults are admin for Username and admin for password. 4. From the left hand menu choose Firewall 5. When the Firewall page loads choose Disable and click Apply at the bottom of the page. You Firewall is now disabled. You should re-enable your firewall when you have finished using the application that does not work through a firewall. VPN100 Traveller s Guide Page 27
28
Conceptronic C100BRS4H Quick Installation Guide. Congratulations on the purchase of your Conceptronic 4-ports Broadband Router.
 Conceptronic C100BRS4H Quick Installation Guide Congratulations on the purchase of your Conceptronic 4-ports Broadband Router. The enclosed Hardware Installation Guide gives you a step-by-step explanation
LevelOne Broadband Routers
 LevelOne Broadband Routers FBR-1100TX FBR-1400TX FBR-1401TX FBR-1700TX User's Guide TABLE OF CONTENTS CHAPTER 1 INTRODUCTION... 1 Features of your LevelOne Broadband Router... 1 Package Contents... 4
CHAPTER 7 ADVANCED ADMINISTRATION PC
 ii Table of Contents CHAPTER 1 INTRODUCTION... 1 Broadband ADSL Router Features... 1 Package Contents... 3 Physical Details... 4 CHAPTER 2 INSTALLATION... 6 Requirements... 6 Procedure... 6 CHAPTER 3 SETUP...
LevelOne FBR User s Manual. 1W, 4L 10/100 Mbps ADSL Router. Ver
 LevelOne FBR-1416 1W, 4L 10/100 Mbps ADSL Router User s Manual Ver 1.00-0510 Table of Contents CHAPTER 1 INTRODUCTION... 1 FBR-1416 Features... 1 Package Contents... 3 Physical Details... 3 CHAPTER 2
Contents. Cable/DSL Firewall Router
 Contents Default Settings & Facts... 3 NetComm Cable/DSL Firewall Router Quick Start... 4 One page setup for Telstra Bigpond Cable... 4 One page setup for Optus Cable... 5 One page setup for most ADSL
IP806GA/GB Wireless ADSL Router
 IP806GA/GB Wireless ADSL Router 802.11g/802.11b Wireless Access Point ADSL Modem NAT Router 4-Port Switching Hub User's Guide Table of Contents CHAPTER 1 INTRODUCTION... 1 Wireless ADSL Router Features...
Downloaded from manuals search engine
 Table of Contents CHAPTER 1 INTRODUCTION... 1 Broadband Router Features... 1 Package Contents... 3 Physical Details... 4 CHAPTER 2 INSTALLATION... 6 Requirements... 6 Procedure... 6 CHAPTER 3 SETUP...
Broadband Router DC-202. User's Guide
 Broadband Router DC-202 User's Guide Table of Contents CHAPTER 1 INTRODUCTION... 1 Broadband Router Features... 1 Package Contents... 3 Physical Details...3 CHAPTER 2 INSTALLATION... 5 Requirements...
Multi-Homing Broadband Router. User Manual
 Multi-Homing Broadband Router User Manual 1 Introduction... 4 Features... 4 Minimum Requirements... 4 Package Content... 4 Note... 4 Get to know the Broadband Router... 5 Back Panel... 5 Front Panel...
RX3041. User's Manual
 RX3041 User's Manual Table of Contents 1 Introduction... 2 1.1 Features and Benefits... 3 1.2 Package Contents... 3 1.3 Finding Your Way Around... 4 1.4 System Requirements... 6 1.5 Installation Instruction...
Mega 100WR ADSL 2+ Router - Easy Start
 Mega 100WR ADSL 2+ Router - Easy Start Mega 100WR ADSL 2+ Router - Easy Start Chapter 1 Introduction Thank you for purchasing a Mega 100WR Router. This Easy start guide is a complete guide to configuring
Broadband Router. with 2 Phone Ports WIRED. Installation and Troubleshooting Guide RT31P2. A Division of Cisco Systems, Inc. Model No.
 A Division of Cisco Systems, Inc. Broadband Router with 2 Phone Ports WIRED Installation and Troubleshooting Guide Model No. RT31P2 Copyright and Trademarks Specifications are subject to change without
DSL/CABLE ROUTER with PRINT SERVER
 USER S MANUAL DSL/CABLE ROUTER with PRINT SERVER MODEL No:SP888BP http://www.micronet.info 1 Content Table CHAPTER 0:INTRODUCTION... 4 FEATURES... 4 MINIMUM REQUIREMENTS... 4 PACKAGE CONTENT... 4 GET TO
BIPAC-6500 / 6500W (Wireless) Broadband VPN Firewall Router with 4-port 10/100M Switch Quick Start Guide
 Broadband VPN Firewall Router with 4-port 10/100M Switch Quick Start Guide") BIPAC-6500 / 6500W (Wireless) Broadband VPN Firewall Router with 4-port 10/100M Switch Quick Start Guide Billion BIPAC-6500 / 6500W (Wireless) Broadband VPN Firewall Router For more detailed instructions
BIPAC-6500 / 6500W (Wireless) Broadband VPN Firewall Router with 4-port 10/100M Switch Quick Start Guide Billion BIPAC-6500 / 6500W (Wireless) Broadband VPN Firewall Router For more detailed instructions
LevelOne. User's Guide. Broadband Router FBR-1402TX FBR-1403TX
 LevelOne Broadband Router FBR-1402TX FBR-1403TX User's Guide Table of Contents CHAPTER 1 INTRODUCTION... 1 LevelOne Broadband Router Features... 1 Package Contents... 3 Physical Details...4 CHAPTER 2 INSTALLATION...
Broadband Router DC 202
 Broadband Router DC 202 Full Manual Table of Contents DC-202 xdsl/cable Broadband router REQUIREMENTS...4 INTRODUCTION...4 DC-202 Features...4 Internet Access Features...4 Advanced Internet Functions...5
SoHo 401 VPN. Shared Broadband Internet Access VPN Gateway 3-Port Switching Hub, DMZ Port. Quick Install Guide
 SoHo 401 VPN Shared Broadband Internet Access VPN Gateway 3-Port Switching Hub, DMZ Port Quick Install Guide i This guide covers only the most common situations. Please refer to the full User Manual on
BiPAC 7800VDP(O)X. Dual-band Wireless-N VoIP ADSL2+ (VPN) Router. Quick Start Guide
X. Dual-band Wireless-N VoIP ADSL2+ (VPN) Router. Quick Start Guide") BiPAC 7800VDP(O)X Dual-band Wireless-N VoIP ADSL2+ (VPN) Router Quick Start Guide Billion BiPAC 7800VDP(O)X Dual-band Wireless-N VoIP ADSL2+ (VPN) Router PLEASE READ THE QUICK START GUIDE AND FOLLOW THE
BiPAC 7800VDP(O)X Dual-band Wireless-N VoIP ADSL2+ (VPN) Router Quick Start Guide Billion BiPAC 7800VDP(O)X Dual-band Wireless-N VoIP ADSL2+ (VPN) Router PLEASE READ THE QUICK START GUIDE AND FOLLOW THE
Instant Broadband Series. Cable/DSL Routers. Use this guide to install the following products:
 Instant Broadband Series Cable/DSL Routers Use this guide to install the following products: BEFSR41 ver. 2 BEFSRU31 BEFSR11 ver. 2 EtherFast Cable/DSL Router with 4-Port Switch EtherFast Cable/DSL Router
English version. Introduction. Contents of the box. LW050/LW050UK Sweex Wireless Broadband Router 54 Mbps
 LW050/LW050UK Sweex Wireless Broadband Router 54 Mbps Introduction First of all, many thanks for purchasing this Sweex Wireless Broadband Router 54 Mbps. The Sweex Wireless Broadband Router 54 Mbps enables
Quick Installation Guide of Acer WLAN 11b Broadband Router
 Preparation 1 At lease one PC with IEEE802.11b WLAN client installed. 2 One straight-through Category 5 Ethernet cable, used to link WAN interface to xdsl or CM for Internet connection. 3 Acer WLAN 11b
Notice according to GNU/GPL-Version 2
 Copyright by Edimax Technology Co, LTD. all rights reserved. No part of this publication may be reproduced, transmitted, transcribed, stored in a retrieval system, or translated into any language or computer
Instant Broadband Series. Cable/DSLRouters. Use this guide to install the following products:
 Instant Broadband Series Cable/DSLRouters Use this guide to install the following products: BEFSR41 ver. 2 EtherFast Cable/DSL Router with 10/100 4-Port Switch BEFSRU31 EtherFast Cable/DSL Router with
LevelOne WBR User s Manual. 11g Wireless ADSL VPN Router. Ver
 LevelOne WBR-3407 11g Wireless ADSL VPN Router User s Manual Ver 1.00-0510 Table of Contents CHAPTER 1 INTRODUCTION... 1 Wireless ADSL Router Features... 1 Package Contents... 5 Physical Details... 6 CHAPTER
BIPAC Broadband Firewall Router. Quick Start Guide
 BIPAC 6600 Broadband Firewall Router Quick Start Guide Billion BIPAC 6600 Broadband Firewall Router For more detailed instructions on configuring and using the Broadband Firewall Router, please refer
Broadband Router. User s Manual
 Broadband Router User s Manual 1 Introduction... 4 Features... 4 Minimum Requirements... 4 Package Content... 4 Note... 4 Get to know the Broadband Router... 5 Back Panel... 5 Front Panel... 6 Setup Diagram...7
BiPAC 7800DX(L) Dual-Band Wireless-N 3G/4G LTE (VPN) ADSL2+ Router. Quick Start Guide
 Dual-Band Wireless-N 3G/4G LTE (VPN) ADSL2+ Router. Quick Start Guide") BiPAC 7800DX(L) Dual-Band Wireless-N 3G/4G LTE (VPN) ADSL2+ Router Quick Start Guide Quick Start Guide Billion BiPAC 7800DX(L) Dual-Band Wireless-N 3G/4G LTE (VPN) ADSL2+ Router PLEASE READ THE QUICK START
BiPAC 7800DX(L) Dual-Band Wireless-N 3G/4G LTE (VPN) ADSL2+ Router Quick Start Guide Quick Start Guide Billion BiPAC 7800DX(L) Dual-Band Wireless-N 3G/4G LTE (VPN) ADSL2+ Router PLEASE READ THE QUICK START
USER GUIDE. Wireless-G Broadband Router. Model No: WRT54G2 V1
 USER GUIDE Wireless-G Broadband Router Model No: WRT54G2 V1 About This Guide About This Guide Icon Descriptions While reading through the User Guide you may see various icons that call attention to specific
Multi-Function Wireless Router. User's Guide. Wireless Access Point Broadband Internet Access. 4-Port Switching Hub
 Multi-Function Wireless Router Wireless Access Point Broadband Internet Access 4-Port Switching Hub User's Guide Table of Contents CHAPTER 1 INTRODUCTION... 1 Wireless Router Features... 1 Package Contents...
Gigabit SSL VPN Security Router SG-4800
 Gigabit SSL VPN Security Router SG-4800 Quick Installation Guide Table of Contents 1. Package Contents... 3 2. Hardware Installation... 4 2.1 Safety Instruction... 4 2.2 Front panel... 4 2.3 LED & Button
MIMO Wireless Broadband Route r User s Manual 1
 MIMO Wireless Broadband Router User s Manual 1 Introduction...4 Features...4 Minimum Requirements...4 Package Content...4 Note...4 Get to know the Broadband Router...5 Back Panel...5 Front Panel...6 Setup
2. The next screen will tell you to press the lighted Cisco logo on the Router. After you have pressed the logo, click the Next button to continue.
 2. The next screen will tell you to press the lighted Cisco logo on the Router. After you have pressed the logo, click the Next button to continue. To exit the Wireless Setup Wizard, click the Exit button.
Wireless Broadband Router
 LW6005A-R2 Wireless Broadband Router Manual 1 Introduction... 4 Features... 4 Minimum Requirements... 4 Package Content... 4 Note... 4 Get to know the Broadband Router... 5 Back Panel... 5 Front Panel...
ADSL Modem. User Guide AM300. Model No. WIRED
 WIRED User Guide Model No. AM300 Copyright and Trademarks Specifications are subject to change without notice. Linksys is a registered trademark or trademark of Cisco Systems, Inc. and/or its affiliates
A Division of Cisco Systems, Inc. Broadband Router. with 2 Phone Ports. User Guide WIRED RT41P2-AT. Model No.
 A Division of Cisco Systems, Inc. WIRED Broadband Router with 2 Phone Ports User Guide Model No. RT41P2-AT Copyright and Trademarks Specifications are subject to change without notice. Linksys is a registered
Introduction... 3 Features... 3 Minimum Requirements... 3 Package Content... 3 Note... 3 Get to know the Broadband Router... 4 Back Panel...
 Introduction... 3 Features... 3 Minimum Requirements... 3 Package Content... 3 Note... 3 Get to know the Broadband Router... 4 Back Panel... 4 Front Panel... 5 Setup Diagram... 6 Getting started... 7 Chapter
Figure 4-6: The Router with the Internet Connection is connected through the Internet Port
 8. Connect a standard Ethernet network cable to the Broadband Router s Internet port. Then, connect the other end of the Ethernet cable to one of the numbered Ethernet ports on your other router. Figure
LevelOne FBR-1405TX. User s Manual. 1-PORT BROADBAND ROUTER W/4 LAN Port
 LevelOne FBR-1405TX 1-PORT BROADBAND ROUTER W/4 LAN Port User s Manual 1 Introduction... 4 Features... 4 Minimum Requirements...4 Package Content... 4 Note...4 Get to know the Broadband Router... 5 Back
BiPAC 7402R2. ADSL2+ VPN Firewall Router. Quick Start Guide
 BiPAC 7402R2 ADSL2+ VPN Firewall Router Quick Start Guide Billion BiPAC 7402R2 ADSL2+ VPN Firewall Router For more detailed instructions on configuring and using the ADSL2+ VPN Firewall Router, please
Introduction... 3 Features... 3 Minimum Requirements... 3 Package Content... 3 Note... 3 Get to know the Broadband Router... 4 Back Panel...
 Introduction... 3 Features... 3 Minimum Requirements... 3 Package Content... 3 Note... 3 Get to know the Broadband Router... 4 Back Panel... 4 Front Panel... 5 Setup Diagram... 6 Getting started... 7 Chapter
DVG-2001S VoIP Terminal Adapter
 This product can be set up using any current web browser, i.e., Internet Explorer 6 or Netscape Navigator 6.2.3. DVG-2001S VoIP Terminal Adapter Before You Begin 1. If you purchased this VoIP Terminal
The Administration Tab - Diagnostics
 The Administration Tab - Diagnostics The diagnostic tests (Ping and Traceroute) allow you to check the connections of your network components. Ping Test. The Ping test will check the status of a connection.
Installation Procedure Red Hat 7 with Netscape 6
 Installation Procedure Red Hat 7 with Netscape 6 Pre-installation Requirements Before proceeding with the installation of a WatchGuard SOHO unit, you must have the following: A computer with a 10BaseT
A Division of Cisco Systems, Inc. EtherFast Cable/DSL VPN Router. with 4-Port 10/100 Switch. User Guide WIRED. BEFVP41 v2. Model No.
 A Division of Cisco Systems, Inc. WIRED EtherFast Cable/DSL VPN Router with 4-Port 10/100 Switch User Guide Model No. BEFVP41 v2 Copyright and Trademarks Linksys is a registered trademark or trademark
BiPAC 7404VNOX BiPAC 7404VNPX
 BiPAC 7404VNOX BiPAC 7404VNPX 3G/ VoIP/ 802.11n ADSL2+ (VPN) Firewall Router Quick Start Guide Billion BiPAC 7404VNOX/7404VNPX 3G/VoIP/802.11n ADSL2+ (VPN) Firewall Router PLEASE READ THE QUICK START
3G/4G Wireless N150 Router m2
 NETCOMM LIBERTY SERIES 3G/4G Wireless N150 Router m2 3GM2WN Quick Start Guide The router has been designed to be placed on a desktop. All of the cables exit from the rear for better organization. The LED
Table of Contents. CRA-200 Analog Telephone Adapter 2 x Ethernet Port + 2 x VoIP Line. Quick Installation Guide. CRA-200 Quick Installation Guide
 CRA-200 Analog Telephone Adapter 2 x Ethernet Port + 2 x VoIP Line Quick Installation Guide Table of Contents VoIP ATA Package Contents... 2 Checklist... 2 IMPORTANT SAFETY INSTRUCTIONS... 3 Connecting
BiPAC 8501 R3/ 8521 R3
 BiPAC 8501 R3/ 851 R3 SHDSL.bis Firewall Bridge/ Router Quick Start Guide Quick Start Guide Billion BiPAC 8501 R3/ 851 R3 SHDSL.bis Firewall Bridge/Router For more detailed instructions on configuring
Dynalink RTA020 ADSL Router Quick Set Up Guide
 Important Dynalink RTA020 ADSL Router Quick Set Up Guide This Guide is intended to get you started quickly. We have pre-configured the router for the Telecom ADSL network. All you need is to follow through
TPL-111BR. Powerline g Wireless Router Quick Installation Guide. Guide d'installation rapide du Routeur Powerline sans fil 11g 54 Mbps
 TPL-111BR Powerline 802.11g Wireless Router Quick Installation Guide Guide d'installation rapide du Routeur Powerline sans fil 11g 54 Mbps Anleitung zur Schnellinstallation des Drahtloser 54 MBit/s 11g
LKR Port Broadband Router. User's Manual. Revision C
 LKR-604 4-Port Broadband Router User's Manual Revision C 1 Contents 1 Introduction... 4 1.1 Features... 4 1.2 Package Contents... 4 1.3 Finding Your Way Around... 5 1.3.1 Front Panel... 5 1.3.2 Rear Panel
Multi-Function Wireless A/P Router User s Guide
 Multi-Function Wireless A/P Router User s Guide Model CNWR-811P Wireless Access Point Router W / Printer Sharing TABLE OF CONTENTS CHAPTER 1 INTRODUCTION...1 CNWR-811P Features...1 Package Contents...3
Wireless-G Router User s Guide
 Wireless-G Router User s Guide 1 Table of Contents Chapter 1: Introduction Installing Your Router System Requirements Installation Instructions Chapter 2: Preparing Your Network Preparing Your Network
AirCruiser G Wireless Router GN-BR01G
 AirCruiser G Wireless Router GN-BR01G User s Guide i Contents Chapter 1 Introduction... 1 Overview...1 Features...1 Package Contents...2 AirCruiser G Wireless Router Rear Panel...2 AirCruiser G Wireless
ADSL Router Quick Setup Guide
 ADSL Router Quick Setup Guide RTA300 Important This Guide is intended to get you started quickly. The factory default profile of this Router is customised for New Zealand users. Please follow through the
TZ 170 Quick Start Guide
 COMPREHENSIVE INTERNET SECURITY S o n i c WALL Internet Security Ap p l i a n c e s TZ 170 Quick Start Guide Quick Start Installation Thank you for purchasing a SonicWALL Internet security appliance. The
Please note, instructions in this guide are based on a PC running Windows 7. Please adapt the actions to suit your operating system.
 Please note, instructions in this guide are based on a PC running Windows 7. Please adapt the actions to suit your operating system. Please follow these steps to ensure that any changes made by your previous
UIP1869V User Interface Guide
 UIP1869V User Interface Guide (Firmware version 0.1.8 and later) Table of Contents Opening the UIP1869V's Configuration Utility... 3 Connecting to Your Broadband Modem... 5 Setting up with DHCP... 5 Updating
ZyWALL 10W. Internet Security Gateway. Quick Start Guide Version 3.62 December 2003
 Internet Security Gateway Quick Start Guide Version 3.62 December 2003 Introducing the ZyWALL The is the ideal secure gateway for all data passing between the Internet and the LAN. By integrating NAT,
BiPAC 6404VP/VGP. VoIP/(802.11g) Broadband Firewall Router. Quick Start Guide
 Broadband Firewall Router. Quick Start Guide") BiPAC 6404VP/VGP VoIP/(802.11g) Broadband Firewall Router Quick Start Guide VoIP/(802.11g) Broadband Firewall Router For more detailed instructions on configuring and using the VoIP/(802.11g) Broadband
BiPAC 6404VP/VGP VoIP/(802.11g) Broadband Firewall Router Quick Start Guide VoIP/(802.11g) Broadband Firewall Router For more detailed instructions on configuring and using the VoIP/(802.11g) Broadband
Cable/DSL Gateway Router plus 4-port Switch
 Cable/DSL Gateway Router plus 4-port Switch The revision date for this guide is April 26, 2002 Version 1.0 The information in this guide may change without notice. The manufacturer assumes no responsibility
802.11N Wireless Broadband Router
 802.11N Wireless Broadband Router Pre-N Wireless Access Point Broadband Internet Access WPS 4-Port Switching Hub User's Guide Table of Contents CHAPTER 1 INTRODUCTION... 1 Wireless Router Features... 1
MANUAL. EM Cable and DSL Router
 MANUAL EM4420 - Cable and DSL Router WWW.EMINENT-ONLINE.COM 2 ENGLISH EM4420 - Cable and DSL Router Warnings and points of attention Opening a product and/or products may cause serious injuries! Always
Contents. NP5540 Wireless 11G Firewall Router
 Contents Quick Start Section Default Settings & Facts... 4 NetComm Wireless Firewall Router Quick Start... 5 One page setup for Telstra Bigpond Cable... 6 One page setup for Optus Cable... 7 One page setup
A Division of Cisco Systems, Inc. Broadband Router. with QoS. User Guide WIRED RT042. Model No.
 A Division of Cisco Systems, Inc. WIRED Broadband Router with QoS User Guide Model No. RT042 Copyright and Trademarks Linksys is a registered trademark or trademark of Cisco Systems, Inc. and/or its affiliates
A Connect the Broadband Router
 A CheckPoint FTS Broadband Linksys WRT54G Router Setup V2 A Connect the Broadband Router PRINT THIS DOCUMENT FOR REFERENCE IMPORTANT: Before you begin, disconnect any computers that are connected to your
Appliance Manual. 2.4 Web-Based Manager-Basic Settings.. 14
 Appliance Manual 1. Introduction.. 3 1.1 Product Specifications..... 3 1.2 Benefits and Key Features.. 4 1.3 Physical Parts and Panel of the SA..... 7 1.4 Packing List... 9 2. Quick Installation........
4-Port Router. Share your broadband Internet connection. E Wired. Ethernet. Ethernet. User Manual. F5D5231-4_uk
 4-Port Router Share your broadband Internet connection User Manual E Wired Ethernet Ethernet 10/100 Mbps F5D5231-4_uk Table of Contents 1 Introduction............................................. 1 Benefits
Installation Procedure Red Hat 7 with Netscape 6
 Installation Procedure Red Hat 7 with Netscape 6 Printer Friendly Version [ PDF 285K ] Before You Begin Before proceeding with the installation of a SOHO 6 appliance, you must have the following: A computer
I-Storm USB ADSL modem A01-AU1
 I-Storm USB ADSL modem A01-AU1 Manual for Linux and Mac OS 9/X A01-AU1_ME01 SOMMARIO Chapter 1...1 1.1 I-Storm USB ADSL Modem Features...1 1.2 Package Contents...1 1.3 The Front LEDs...2 1.4 Information
UTM Content Security Gateway CS-2001
 UTM Content Security Gateway CS-2001 Quick Installation Guide Table of Contents 1. Package Contents... 3 2. Setup the UTM Content Security Gateway... 4 3. Hardware Installation... 5 4. Basic System Configuration...
Please use only wired network connections to configure the Router.
 Note Please use only wired network connections to configure the Router. Power down all of your network devices, including your computer(s) and the Modem Router. If you currently use a modem, disconnect
WHG311 V1.03. Secure WLAN Controller
 WHG311 V1.03 Secure WLAN Controller Copyright Notice This document is protected by USA copyright laws and other laws and is the property of 4IPNET, INC. You may not copy, reproduce, distribute, publish,
w w w.apc.com APC 3-in-1 Wireless Mobile Router User s Manual
 w w w.apc.com APC 3-in-1 Wireless Mobile Router User s Manual 990-2149 Copyright 2005 American Power Conversion. All rights reserved. American Power Conversion and TravelPower are registered trademarks
4-Port Broadband user manual Model
 4-Port Broadband Router user manual Model 524537 INT-524537-UM-0309-02 introduction Thank you for purchasing the INTELLINET NETWORK SOLUTIONS 4-Port Broadband Router, Model 524537. Combining a router,
A Division of Cisco Systems, Inc. ADSL Modem. User Guide WIRED AM200. Model No.
 A Division of Cisco Systems, Inc. WIRED User Guide Model No. AM200 Copyright and Trademarks Specifications are subject to change without notice. Linksys is a registered trademark or trademark of Cisco
Advanced User Manual. WiFi/3G/USB Mobile Router.
 Advanced User Manual WiFi/3G/USB Mobile Router www.scoutantenne.com ed. 01-2017 TABLE OF CONTENTS INTRODUCTION... 3 HARDWARE DESCRIPTION... 4 INITIAL CONFIGURATION... 6 CONNECTION TYPE: USB WIRELESS ADAPTER...
A Division of Cisco Systems, Inc. GHz Mbps. Wireless-G. User Guide. VPN Broadband Router WIRELESS WRV54G. Model No.
 A Division of Cisco Systems, Inc. GHz 2.4 54Mbps WIRELESS Wireless-G VPN Broadband Router User Guide Model No. WRV54G Copyright and Trademarks Specifications are subject to change without notice. Instant
BIPAC-5100 / 5100W (Wireless) ADSL Router
 ADSL Router") BIPAC-5100 / 5100W (Wireless) ADSL Router Quick Start Guide Billion BIPAC-5100 / 5100W ADSL Router For more detailed instructions on configuring and using the (Wireless) ADSL Firewall Router, please refer
BIPAC-5100 / 5100W (Wireless) ADSL Router Quick Start Guide Billion BIPAC-5100 / 5100W ADSL Router For more detailed instructions on configuring and using the (Wireless) ADSL Firewall Router, please refer
Get to know your Modem 1. Modem Technical Overview 3
 User Manual Get to know your Modem 1 Modem Technical Overview 3 Managing your Modem Settings How to view your Modem settings 5 Understanding the front page 6 Changing your Modem login password 7 Upgrading
BiPAC 8200M. BiPAC 8200N
 BiPAC 8200M VDSL2 Modem BiPAC 8200N Wireless-N VDSL2 Firewall Router Quick Start Guide Billion BiPAC 8200M VDSL2 Modem/ BiPAC 8200N Wireless-N VDSL2 Firewall Router PLEASE READ THE QUICK START GUIDE
VG422R. User s Manual. Rev , 5
 VG422R User s Manual Rev 1.0 2003, 5 CONGRATULATIONS ON YOUR PURCHASE OF VG422R... 1 THIS PACKAGE CONTAINS... 1 CONFIRM THAT YOU MEET INSTALLATION REQUIREMENTS... 1 1. INSTALLATION GUIDE... 2 1.1. HARDWARE
Content 1 OVERVIEW HARDWARE DESCRIPTION HARDWARE INSTALLATION PC CONFIGURATION GUIDE... 5 WEB-BASED MANAGEMENT GUIDE...
 Content 1 OVERVIEW...1 1.1FEATURES...1 1.2 PACKETCONTENTS...3 1.3 SYSTEM REQUIREMENTS... 1.4 FACTORY DEFAULTS...4 1.5 WARNINGS AND CAUTIONS...4 2 HARDWARE DESCRIPTION... 6 3 HARDWARE INSTALLATION...8 4
Quick Installation Guide
 Quick Installation Guide DL-200 Cellular Data logger V1.2_201610 TABLE OF CONTENTS CHAPTER 1 INTRODUCTION... 4 1.1 CONTENTS LIST... 5 1.2 HARDWARE INSTALLATION... 6 1.2.1 WARNING... 6 1.2.2 SYSTEM REQUIREMENTS...
ADSL2+ 4-Port Modem Router Quick Setup Guide RTA1335
 ADSL2+ 4-Port Modem Router Quick Setup Guide RTA1335 Important This Guide is intended to get you started quickly. We have made the factory default setting of this router suitable for New Zealand 1. All
Gigaset Router / en / A31008-E105-B / cover_front_router.fm / s Be inspired
 s Be inspired Table of Contents Table of Contents Safety precautions........................... 3 The Gigaset Router........................... 3 Features and Benefits..................................................
BiPAC 7401V(G)PX. 3G/ VoIP/ (802.11g) ADSL2+ Firewall Router. Quick Start Guide
PX. 3G/ VoIP/ (802.11g) ADSL2+ Firewall Router. Quick Start Guide") BiPAC 7401V(G)PX 3G/ VoIP/ (802.11g) ADSL2+ Firewall Router Quick Start Guide Quick Start Guide Billion BiPAC 7401V(G)PX 3G/ VoIP/ (802.11g) ADSL2+ Firewall Router PLEASE READ THE QUICK START GUIDE AND
BiPAC 7401V(G)PX 3G/ VoIP/ (802.11g) ADSL2+ Firewall Router Quick Start Guide Quick Start Guide Billion BiPAC 7401V(G)PX 3G/ VoIP/ (802.11g) ADSL2+ Firewall Router PLEASE READ THE QUICK START GUIDE AND
WIRELESS ROUTER N150. User Manual. F9K1009v1 8820zb01125 Rev.B00
 WIRELESS ROUTER N150 User Manual F9K1009v1 8820zb01125 Rev.B00 TABLE OF CONTENTS Getting Started... 1 What s in the Box...1 Initial Setup...1 How to Set It UP...2 Adding Computers to Your Network...3 Manually
Quick Installation Guide DSL-2540U. ADSL Annex B/Ethernet Router with Built-in Switch
 ADSL Annex B/Ethernet Router with Built-in Switch BEFORE YOU BEGIN Delivery Package Router Power adapter DC 12V/0.5A RJ-11 telephone cable Ethernet cable (CAT 5E) Splitter CD-ROM with User Manual and (brochure).
ZyWALL 70. Internet Security Appliance. Quick Start Guide Version 3.62 December 2003
 ZyWALL 70 Internet Security Appliance Quick Start Guide Version 3.62 December 2003 Introducing the ZyWALL The ZyWALL 70 is the ideal secure gateway for all data passing between the Internet and the LAN.
DSL-G624T. Wireless ADSL Router. If any of the above items is missing, please contact your reseller. This product can be set up using any
 This product can be set up using any current web browser, i.e., Internet Explorer 6x or Netscape Navigator 7x. DSL-G624T Wireless ADSL Router Before You Begin 1. If you purchased this Router to share your
CE APPROVED.4 INTRODUCTION.5 PACKAGE CONTENTS. 6 PRE - INSTALLATION CHECKLIST. 6 SYSTEM REQUIREMENTS. 6 FEATURES AND BENEFITS.11 SETUP WIZARD.
 Web Edition Dec. 2002 Contents CE APPROVED...4 INTRODUCTION...5 PACKAGE CONTENTS... 6 PRE - INSTALLATION CHECKLIST... 6 SYSTEM REQUIREMENTS... 6 FEATURES AND BENEFITS... 7 4 - PORT CABLE/XDSL ROUTER...9
Installation Procedure Windows 2000 with Internet Explorer 5.x & 6.0
 Installation Procedure Windows 2000 with Internet Explorer 5.x & 6.0 Printer Friendly Version [ PDF 266K ] Before You Begin Before proceeding with the installation of a SOHO 6 appliance, you must have
Installation with a DSL Connection.
 www.voicelift.com Support@VoiceLift.com Office: 1.866.237.3001 Fax: 321.632.7632 Installation with a DSL Connection. DSL connections can be more challenging since most DSL modems are also routers and supply
EtherFast Cable/DSL VPN Router with 4-Port 10/100 Switch
 Instant Broadband Series EtherFast Cable/DSL VPN Router with 4-Port 10/100 Switch Use this guide to install: BEFVP41 User Guide COPYRIGHT & TRADEMARKS Copyright 2003 Linksys, All Rights Reserved. Instant
WNAP 3G MOBILE ROUTER. Quick Installation Guide
 WNAP 3G MOBILE ROUTER Quick Installation Guide To avoid users without access right through your WNAP 3G Mobile Router, it is suggested to change WLAN SSID and password and admin password for web configuration
EH-2101W. User Manual. Broadband Wireless Gateway. WiFi Compliant Wireless Access Point. Broadband Internet Access. 4-Port Switching Hub.
 EH-2101W Broadband Wireless Gateway WiFi Compliant Wireless Access Point Broadband Internet Access 4-Port Switching Hub Dial-in RAS Print Server User Manual i TABLE OF CONTENTS CHAPTER 1 INTRODUCTION...
A Division of Cisco Systems, Inc. GHz g. Wireless-G. User Guide. Broadband Router WIRELESS WRT54G. Model No.
 A Division of Cisco Systems, Inc. GHz 2.4 802.11g WIRELESS Wireless-G Broadband Router User Guide Model No. WRT54G Copyright and Trademarks Specifications are subject to change without notice. Linksys
BiPAC 6404VGP R3. VoIP/ g Broadband Firewall Router. Quick Start Guide
 BiPAC 6404VGP R3 VoIP/ 802.11g Broadband Firewall Router Quick Start Guide Quick Start Guide Billion BiPAC 6404VGP R3 VoIP/ 802.11g Broadband Firewall Router PLEASE READ THE QUICK START GUIDE AND FOLLOW
Connecting the DI-804V Broadband Router to your network
 Before you begin Make sure that any existing Firewall Software/Devices are disabled and/or shutdown before beginning installation of your new D-Link DI-804V Broadband Router. Contents of Package DI-804V