MD-BSL15W / SPRING-LOADED TWIN-ARM. For ( cm) LCD desktop computer. User Manual
|
|
|
- Phoebe Harrison
- 5 years ago
- Views:
Transcription
1 MD-BSL15W / SPRING-LOADED TWIN-ARM MONITOR mount For ( cm) LCD desktop computer User Manual
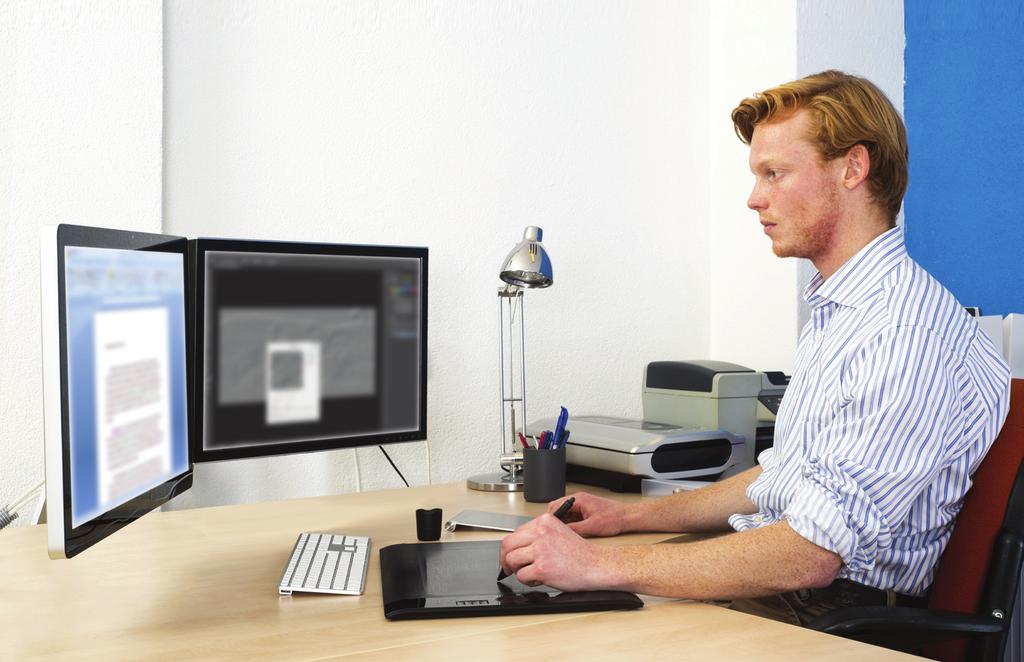
2 Thank you for choosing Gabor. The Gabor MD-BSL15W mounts two ( cm) LCD computer monitors side by side. It attaches to the edge of your desk via a built-in clamp, freeing up valuable desk space and enabling personalized monitor placement for improved safety and comfort over conventional monitor stands. The MD-BSL15W s arms incorporate an internal mechanical spring system, which is safer than the gas springs found in similar products. These springloaded arms function as a counterbalance to support your monitors in any position. Multiple points of articulation provide a full range of motion, making it easy to adjust your monitors height, tilt, swivel, and roll. 2 Welcome

3 Welcome 3
4 Overview Shaft cap Mounting Arm (x2) VESA mount Support bracket Set screw Mounting pegs Mounting socket Shaft Locking collar Cable guides Clamp Clamp screws Clamp locking knob Tools Required For Installation Phillips screwdriver 4 Overview
5 Also Included M4x12A(x8) A Supplied Parts & Hardware A B C D (8) M4 12 screws (8) M4 30 screws S=3mm (x1) (2) M6 25 screws 3 mm hex key M4 A B A A x8 E F G H M4x12 (x8) M4x30 (x8) M4x30 (x8) 5 mm hex key S=3mm (x1) (8) Spacers S=5mm (x1) Cable clip (2) Protective caps S=5mm (x1) I Shaft cap J User manual M6 M4x12 Spacers/ (x8) Hex Keys M4x30 (x8) Protective Caps Cable clip 13X5.5X16.5 (x8) (x1) M4x12 (x8) M4x30 (x8) B D x1 F x8 13X5.5X16.5 (x1) H x2 A C x2 (x8) S=3mm (x1) S=5mm (x1) M4x12 (x8) M4x30 (x8) M6x25 (x2) E x1 I x1 (x1) S=3mm (x1) S=5mm (x2) (x2) M6x25 (x2) B x8 G x1 S=3mm (x1) S=5mm (x1) 13X5.5X16.5 (x8) B B (Installed in shaft) (x1) 13X5.5X16.5 (x8) M6x25 (x2) (x1) (x2) Overview 5
6 Product Specifications Monitor display size: ( cm) Maximum load capacity (per arm): 17 lb. (7.8 kg) VESA standards: 75 75, Tilt: -90 /+85 Swivel: 180 Roll: 360 Installation: Clamp fits desk edges up to 2.6 (6.5 cm) thick Arm width (extended): 28.7 (73 cm) Arm pivot: Max (73 cm) / (31c m) / (0-35 cm) Arm height adjustment Angle: ±45 Range: (0 35 cm) Shaft height: 12.2 (31 cm) Weight: 8.25 lb. (3.7 kg) 6 Specifications
7 Safety Warnings 1 Please read and follow these instructions 7 Do not exceed the maximum load capacity. and keep this manual in a safe place Clean this product with only a soft, dry cloth. Keep this product away from children. Make sure everything is secure before proceeding. Make sure that this product is intact and that there are no missing parts. To avoid damage to this product, be careful not to overtighten or improperly thread any of the threaded fittings. 8 9 Do not install this product on an unsteady structure or one that is prone to vibration, has a chance of being impacted, or is susceptible to other movements. Reinforce the structure as necessary before installing this product. Mounting surfaces should be sturdy and flat. Do not install this product on a weak, uneven surface. 10 All photos are for illustrative purposes only. Safety Warnings 7
8 Available separately are two dedicated accessories for this mounting system, the MWD-E8W extension arm and the MW-C wall mount. The MWD-E8W extension arm adds 10 (25.4 cm) of length and an additional point of articulation to provide greater freedom for positioning your monitor. The MW-C wall mount offers an alternative mounting option for your MD-BSL15W dual-monitor setup. MWD-E8W MW-C Getting Started Decide where you want to place your monitors. When using a dual-monitor setup like this one, position your primary monitor directly in front of you, and your secondary monitor to the side. You shouldn t need to turn your head to look at your primary monitor. Both monitors should be at eye level, approximately at an arm s length away. If you have to strain to look at either monitor, readjust its position. 8 Getting Started
9 Attaching the Shaft The MD-BSL15W easily attaches to most desk edges up to 2.6 (6.5 cm) thick, even if your desk is nearly flush against a wall. Before attaching the shaft to your desk, determine whether you have enough room to fit the entire clamp behind your desk. If you have enough clearance to attach the clamp without removing the bottom part of it, skip to Clearance on this page. If your desk is close to a wall or you don t have enough clearance to fit the entire clamp behind your desk, you can remove the bottom part of the clamp. If this is the case, skip to Limited Clearance on page 10. Clearance 1. Loosen the clamp locking knob until you can fit the clamp over the edge of your desk. 2. Fit the clamp over the edge of your desk, and tighten the clamp locking knob until the shaft is securely mounted to your desk. Continue with Adjusting the Support Bracket on page 11. Installation Instructions 9
10 Limited Clearance 1. Use the included 5 mm hex key to remove the clamp screws. 2. Fit the top part of the clamp behind your desk. 3. Underneath your desk, align the screw holes in the top and bottom parts of the clamp. Note: It may help to unscrew the clamp locking knob first. 4. Reinsert the clamp screws and use the included 5 mm hex key to fasten them until fully tightened. 5. Tighten the clamp locking knob until the shaft is securely mounted to your desk. Continue with Adjusting the Support Bracket on page Installation Instructions
11 Adjusting the Support Bracket 1. Rotate the locking collar to loosen it, and then slide the collar to the approximate height at which you want to mount your monitors. 2. Lock the collar in place by rotating it until fully tightened. 3. Slide the support bracket along the shaft so it rests on the locking collar, and use the included 3 mm hex key to fasten the set screw until fully tightened. 4. Insert the shaft cap into the top of the shaft. Installation Instructions 11
12 Attaching Your Monitor to the VESA Mounts: Before attaching your monitor to the VESA mount, you may need to detach your monitor s built-in stand. For information on how to do this, consult your monitor s user manual. Depending on how the back of your monitor is configured, you can use one of two methods to install the VESA mount onto your monitor: flush or recessed. If your monitor s VESA mounting holes are flush with the rest of the monitor, use the Flush Installation instructions below. If your monitor s VESA mounting holes are in a recessed area of the monitor, use the Recessed Installation instructions on page Installation Instructions
13 Flush Installation Note: Before starting, make sure the VESA mount, mounting arm, and monitor are facing the proper direction. 1. Carefully place your monitor facedown on a flat surface. Tip: To avoid scratching the screen, place your monitor on a soft cloth such as a towel. 2. Align the mounting holes in the VESA mount with the corresponding mounting holes in your monitor. 3. Insert four of the M4 12 screws (the smallest of the included screws) into the VESA mount and use a Phillips-head screwdriver to fasten them until fully tightened. Repeat these or the other set of installation steps as necessary for your second monitor and continue to Mounting the Arms on page 15. Installation Instructions 13
14 Recessed Installation Note: Before starting, make sure the VESA mount, mounting arm, and monitor are facing the proper direction. 1. Carefully place your monitor facedown on a flat surface. Tip: To avoid scratching the screen, place your monitor on a soft cloth such as a towel. 2. Place four of the included spacers on each of your monitor s four VESA mounting holes. 3. Align the mounting holes in the VESA mount with the four spacers. 4. Insert four of the included M4 30 screws into the VESA mount and use a Phillips-head screwdriver to fasten them until fully tightened Tip: Thread each of the screws by hand before fastening them with the screwdriver. Repeat these or the other set of installation steps as necessary for your second monitor, and continue to Mounting the Arms on page Installation Instructions
15 Mounting the Arms 1. Lift the arm/monitor assembly and mount it onto one of the mounting pegs on the aluminum bracket. 2. Insert one of the included M6 25 screws through the bottom of the mounting arm socket, and hold the screw in place so it protrudes from the screw hole. 3. Thread one of the included protective caps onto the screw as much as possible, and then push the cap into the socket. 4. Use a short Phillips-head screwdriver to fasten the screw until fully tightened. 5. Insert your monitor cable into the cable M6x25 guides on the underside of the mounting arm. B Repeat these steps for the other monitor/arm assembly, and use the included cable clip to secure your monitor cables to the shaft. Installation Instructions 15
16 Adjusting Tension and Articulation Note: To avoid damage, make sure to hold your monitor steady when making any adjustments Arm Tension Important! The arm tension is preset for lighter monitors. To avoid damage, do not continue to loosen the screw if it s already loose. To prevent your monitors from drooping, you can adjust the tension of the mechanical spring in the mounting arms. Use the included 5 mm hex key to adjust tension. Rotate clockwise to increase tension for heavier monitors, and counterclockwise to reduce tension for lighter monitors. S / (0-35 cm) 16 Installation Instructions
17 Arm Swivel You can adjust the arms (horizontal) swivel action via the set screws on the rear of the mounting sockets. Position the arms as desired and use the included 3 mm hex key to fasten the set screws until fully tightened. Monitor Tilt and Swivel You can adjust the (vertical) tilt and (horizontal) swivel action of your monitors for optimal viewing comfort. Position your monitors as desired and use the 5 mm hex key to fasten the set screws until fully tightened. Installation Instructions 17
18 Customer Support For more information or to arrange service, visit or call Customer Service at Product warranty is provided by the Gradus Group. Gabor is a registered trademark of the Gradus Group Gradus Group LLC. All Rights Reserved. ONE-YEAR LIMITED WARRANTY: This GABOR product is warranted to the original purchaser to be free from defects in materials and workmanship under normal consumer use for a period of one (1) year from the original purchase date or thirty (30) days after replacement, whichever occurs later. The warranty provider s responsibility with respect to this limited warranty shall be limited solely to repair or replacement, at the provider s discretion, of any product that fails during normal use of this product in its intended manner and in its intended environment. Inoperability of the product or part(s) shall be determined by the warranty provider. If the product has been discontinued, the warranty provider reserves the right to replace it with a model of equivalent quality and function. This warranty does not cover damage or defect caused by misuse, neglect, accident, alteration, abuse, improper installation or maintenance. EXCEPT AS PROVIDED HEREIN, THE WARRANTY PROVIDER MAKES NEITHER ANY EXPRESS WARRANTIES NOR ANY IMPLIED WARRANTIES, INCLUDING BUT NOT LIMITED TO ANY IMPLIED WARRANY OF MERCHANTABILITY OR FITNESS FOR A PARTICULAR PURPOSE. This warranty provides you with specific legal rights, and you may also have additional rights that vary from state to state. To obtain warranty coverage, contact the Gabor Customer Service Department to obtain a return merchandise authorization ( RMA ) number, and return the defective product to Gabor along with the RMA number and proof of purchase. Shipment of the defective product is at the purchaser s own risk and expense. 18 Customer Support / Warranty

19 Customer Support / Warranty 19

20
MD-BD13B / DUAL SEGMENT TWIN-ARM. For (33-69 cm) LCD desktop computer monitors. User Manual
 LCD desktop computer monitors. User Manual") MD-BD13B / DUAL SEGMENT TWIN-ARM MONITOR mount For 13 27 (33-69 cm) LCD desktop computer monitors User Manual Thank you for choosing Gabor. The Gabor MD-BD13B mounts two 13 27 (33 69 cm) LCD computer monitors
MD-BD13B / DUAL SEGMENT TWIN-ARM MONITOR mount For 13 27 (33-69 cm) LCD desktop computer monitors User Manual Thank you for choosing Gabor. The Gabor MD-BD13B mounts two 13 27 (33 69 cm) LCD computer monitors
DUAL-ARM MONITOR MOUNT For in. ( cm) desktop computer monitors
 desktop computer monitors") LeviTouch DM-502 DUAL-ARM MONITOR MOUNT For 15 27 in. (38.1 68.6 cm) desktop computer monitors User Manual Thank you for choosing Gabor. The Gabor Dual-Arm Desktop Mount can securely support two monitors
LeviTouch DM-502 DUAL-ARM MONITOR MOUNT For 15 27 in. (38.1 68.6 cm) desktop computer monitors User Manual Thank you for choosing Gabor. The Gabor Dual-Arm Desktop Mount can securely support two monitors
with External Springs
 Two-Section Broadcast Arm with External Springs Owner s Manual Introduction Thank you for choosing the Auray two-section broadcast arm with external springs. This versatile and sturdy broadcast arm is
Universal Tablet Holder
 Universal Tablet Holder 1 Thank you for choosing Auray. The Auray Universal Tablet Holder mounts your tablet onto a microphone stand s shaft or threaded mount for hands-free viewing while onstage or in
NBS-2X NIMBUS STABILIZER QUICK-START GUIDE
 NBS-2X NIMBUS STABILIZER QUICK-START GUIDE PREC AUTIONS Please read and follow these instructions and keep this manual in a safe place. Keep this product away from children. Make sure everything is secure
3-Lamp Fluorescent Ring Light 19" INSTRUCTIONS
 3-Lamp Fluorescent Ring Light 19" INSTRUCTIONS Introduction Thank you for choosing Impact. The Impact 3-Lamp Fluorescent Ring Light 19" is a continuous light for photography and video. It casts a soft,
RS-600AF-V2 RS-850AF-V2. Camera. Track Slider. with Adjustable Feet
 RS-600AF-V RS-850AF-V Camera Track Slider with Adjustable Feet Warnings Please read and follow these instructions, and keep this manual in a safe place. Handle the unit with care. The camera sliding rail
RS-600AF RS-850AF RS-1200AF. Camera. Track Slider. With Adjustable Feet
 Camera Track Slider With Adjustable Feet RS-600AF RS-850AF RS-00AF Congratulations on your purchase of the Revo Camera Track Slider. Revo s camera track slider is a sturdy, portable, and lightweight mini
GH-30. Gimbal Head. You re on steady ground
 GH-30 Gimbal Head You re on steady ground 1 INTRODUCTION Thank You for choosing Oben! The Oben GH-30 is a gimbal-type tripod head designed to balance a lens along its vertical and horizontal axes. The
PV Series. Owner s Manual. Photo Tripod
 PV Series Owner s Manual Photo Tripod Thank you for choosing Magnus. Congratulations on the purchase of your new Magnus tripod. This tripod features an adjustable center column for smooth and precise camera
RAS REFLECTOR ADAPTER FOR SPEEDLIGHT
 RAS REFLECTOR ADAPTER FOR SPEEDLIGHT INTRODUCTION Thank you for choosing the Raya Reflector Adapter for Speedlight. This kit enables you to securely mount flashes of all sizes to a softbox using its built-in
ACCELERATOR LENS ADAPTER
 ACCELERATOR LENS ADAPTER User Manual LAG-NEX-CEF Canon EF Lens to Sony E-Mount THANK YOU FOR CHOOSING VELLO The Vello Accelerator AF Lens Adapter is for attaching full-frame Canon EF lenses to Sony s E-mount.
ACCELERATOR LENS ADAPTER
 ACCELERATOR LENS ADAPTER User Manual LAG-MFT-NF Nikon F-Mount to Micro Four Thirds THANK YOU FOR CHOOSING VELLO The Vello Accelerator Lens Adapter is for attaching Nikon F-Mount lenses to Micro Four Thirds
AUTOFOCUS LENS ADAPTER
 AUTOFOCUS LENS ADAPTER User Manual LAE-SE-CEF Canon EF/EF-S Lens to Sony E-mount THANK YOU FOR CHOOSING VELLO The Vello Autofocus Lens Adapter allows for attachment of Canon EF and EF-S lenses to Sony
Pro Isolation Chamber for Recording Microphones
 Pro Isolation Chamber for Recording Microphones 1 Thank you for choosing Auray. The Auray is a lightweight and compact isolation chamber that is specifically designed for recording or broadcasting in acoustically
FH M AIRCRAFT ALUMINUM FILTER HOLDER. for Nikon 14-24mm f/2.8 G AF-S lens. User Manual
 FH-150-14M AIRCRAFT ALUMINUM FILTER HOLDER for Nikon 14-24mm f/2.8 G AF-S lens User Manual 1 Thank you for choosing Sensei Pro The FH-150-14M filter holder allows the use of standard 150 mm (5.9") 2 mm
RAPID LENS CHANGER. User Manual
 RAPID LENS CHANGER User Manual THANK YOU FOR CHOOSING VELLO The Vello Rapid Lens Changer offers speed, convenience, and flexibility to make you more efficient in the field. Freeing you from a bulky camera
OptiView 250 OV-250 LCD VIEWFINDER USER MANUAL
 OptiView 250 OV-250 LCD VIEWFINDER USER MANUAL INTRODUCTION Thank you for choosing the Elvid OptiView 250. This LCD viewfinder provides 3 magnification for 3.0 and 3.2 LCD screens. It features a tripod
LED-200P. Mobile LED Light Set. User Manual
 LED-200P Mobile LED Light Set User Manual 2 Welcome Thank you for choosing Xuma. The LED-200P is a compact, durable, and versatile LED light set that is as useful at home as it is on the go. A variety
FLEXIBLE MACRO BRACKET WITH ARCA-STYLE MOUNT. User Manual
 FLEXIBLE MACRO BRACKET WITH ARCA-STYLE MOUNT User Manual THANK YOU FOR CHOOSING VELLO The Vello CB-900 Flexible Macro Bracket with Arca-Style Mount is designed for DSLR and mirrorless cameras, as well
AUTO LENS ADAPTER. User Manual. LAE-SE-NF Nikon F-Mount to Sony E-mount Camera
 AUTO LENS ADAPTER User Manual LAE-SE-NF Nikon F-Mount to Sony E-mount Camera THANK YOU FOR CHOOSING VELLO The Vello LAE-SE-NF Auto Lens Adapter is designed to attach Nikon F-Mount lenses to Sony s full-frame
Shoulder Support System
 SR-500 Video Shoulder Support System Thank you for choosing Revo and congratulations on your purchase of the Revo SR-500 Video Shoulder Support System. The Revo Video Shoulder Support System is a lightweight,
MACROFIER Reverse Mount and Extension Tube with Automatic Functionality for Canon EOS Lenses. User Manual
 MACROFIER Reverse Mount and Extension Tube with Automatic Functionality for Canon EOS Lenses User Manual THANK YOU FOR CHOOSING VELLO Thank you for choosing the Vello Macrofier. This unique accessory allows
SpectroLED ESSENTIAL 240 LIGHT USER MANUAL
 SpectroLED ESSENTIAL 240 LIGHT USER MANUAL INTRODUCTION The SpectroLED Essential 240 Bi-Color LED and 240 Daylight LED lights have a sturdy, high-quality housing that s designed for use in the studio or
BG-S6. Designed for the Sony a9 and a7 III Series Mirrorless Cameras
 BG-S6 BATTERY GRIP Designed for the Sony a9 and a7 III Series Mirrorless Cameras Thank you for choosing Vello. The Vello BG-S6 is designed for the Sony a9 and a7 III Series mirrorless cameras. It accepts
STEREO MINI SHOTGUN MICROPHONE
 SMS-45A MIRRORLESS & DSLR STEREO MINI SHOTGUN MICROPHONE PRODUCT MANUAL THANK YOU FOR CHOOSING POLSEN. The Polsen SMS-45A Mini Shotgun Microphone is a compact, lightweight, and durable directional stereo
OptiView 100 OV-100 LCD VIEWFINDER USER MANUAL
 OptiView 100 OV-100 LCD VIEWFINDER USER MANUAL Thank you for choosing Elvid. The Elvid OptiView 100 is a viewfinder that blocks out bright light so you can see the image on your LCD screen in greater detail.
Auto Lens Adapter. Four Thirds Lens to Micro Four Thirds Camera
 Auto Lens Adapter User Manual LAE-MFT-FT Four Thirds Lens to Micro Four Thirds Camera INTRODUCTION Thank you for purchasing the Vello LAE-MFT-FT Auto Lens Adapter - Four Thirds Lens to Micro Four Thirds
Fabric Rain Cover RC-FC500 RC-FC500B. for Canon and select Nikon DSLRs. Fits lenses from 7 14 long and lens diameters of
 RC-FC500 RC-FC500B Fabric Rain Cover for Canon and select Nikon DSLRs Fits lenses from 7 14 long and lens diameters of 4 4.5 User Manual Thank you for choosing Ruggard. Designed for use with longer lenses,
FREEWAVE STRYKER LIGHTNING/MOTION TRIGGER. User Manual
 FREEWAVE STRYKER LIGHTNING/MOTION TRIGGER User Manual THANK YOU FOR CHOOSING VELLO The Vello FreeWave Stryker for Canon and Nikon is a 2-in-1 solution for intense light and infrared (IR) image triggering.
USB-10PCHV2, USB-10PCHSV2 User Manual
 USB-10PCHV2, USB-10PCHSV2 User Manual Thank you for choosing Xcellon. Xcellon Powered USB Hubs expand your computer s USB 3.0 port into ten ports. Seven USB 3.0 ports deliver SuperSpeed USB transfer rates
Windows Touch Pen. User Manual
 Windows Touch Pen User Manual Xcellon Windows Touch Pens WTP-10 WTP-20 Thank you for choosing Xcellon. The Xcellon Windows Touch Pen turns your computer monitor into a virtual touch screen, so you can
BG-N13. Designed For The Nikon D5300 SLR Camera
 BG-N13 BATTERY GRIP Designed For The Nikon D5300 SLR Camera Introduction Thank you for choosing Vello, and congratulations on your new BG-N13 battery grip purchase. Enjoy the many benefits that a battery
Monitor Mount with Articulating Arm and Laptop Riser
 Monitor Mount with Articulating Arm and Laptop Riser ARMUNONB *actual product may vary from photos FR: Guide de l utilisateur - fr.startech.com DE: Bedienungsanleitung - de.startech.com ES: Guía del usuario
USER S GUIDE. Table of Contents: Introduction... 3 Overview...4 Precautions... 5 Installing Batteries...6 Mounting the MS-77
 USER S GUIDE Table of Contents: Introduction... 3 Overview...4 Precautions... 5 Installing Batteries...6 Mounting the MS-77 and Turning It On...7-9 Using the Gain Boost...10 The Windscreen...10 Replacing
Square Sun BI-COLOR SOFT LED FLOOD USER MANUAL
 Square Sun BI-COLOR SOFT LED FLOOD USER MANUAL Square Sun INTRODUCTION THANK YOU FOR CHOOSING GENARAY The Genaray Square Sun LED light fixture provides photographers and videographers with ultra-bright
Escort LED LIGHTS USER MANUAL
 Escort LED LIGHTS USER MANUAL Escort INTRODUCTION THANK YOU FOR CHOOSING GENARAY The Escort series of LED light fixtures provides photographers and videographers with flicker-free continuous light. They
DX-M. Owner s Manual. Photo Tripod
 DX-M Owner s Manual Photo Tripod Thank you for choosing Magnus. Congratulations on the purchase of your new Magnus tripod. This tripod features a rapid center column that detaches to serve as an adjustable
PSL-C / PSL-N / PSL-R PowerSlave Transmitter / Receiver INSTRUCTIONS
 PSL-C / PSL-N / PSL-R PowerSlave Transmitter / Receiver INSTRUCTIONS Table of Contents Introduction...3 Key Features...4 Precautions...5 Overview...6 Contents Include...8 Compatible Devices...10 Battery
Desk Mount Articulating Dual Monitor Arm with Cable Management & Height Adjust
 Desk Mount Articulating Dual Monitor Arm with Cable Management & Height Adjust ARMDUAL *actual product may vary from photos DE: Bedienungsanleitung - de.startech.com FR: Guide de l'utilisateur - fr.startech.com
Quick Installation Guide
 Full Motion Dual Monitor Arm, Pole Mount Quick Installation Guide Please Review the entire Quick Installation Guide prior to installation. If you have any questions regarding the compatibility of this
Articulating TV/Monitor Clamp/Grommet Desk Mount Model: DE640S (Hydro Series)
") Articulating TV/Monitor Clamp/Grommet Desk Mount Model: DE640S (Hydro Series) Instruction Manual Images may be different from actual product Disclaimer It is Dyconn s intention to have all the correct
Articulating TV/Monitor Clamp/Grommet Desk Mount Model: DE640S (Hydro Series) Instruction Manual Images may be different from actual product Disclaimer It is Dyconn s intention to have all the correct
Light as soft as a cloud.
 Light as soft as a cloud. As part of Luxli s Softi series, the LED Ring Light with Camera Mount provides soft, flattering light without harsh shadows. Control the intensity when illuminating your subject
Quick Installation Guide
 Full Motion Dual Monitor Arm, Pole Mount Quick Installation Guide Please Review the entire Quick Installation Guide prior to installation. If you have any questions regarding the compatibility of this
TIMER REMOTE WITH VIDEO
 TIMER REMOTE WITH VIDEO TRS-0 COMPATIBLE WITH SONY CAMERAS WITH A MULTI-TERMINAL USER MANUAL PRECAUTIONS Please read and follow these instructions, and keep this manual in a safe place. There are no user-serviceable
RC-ZH5. Owner s Manual. Remote Control for Zoom H5 REC L R VOLUME. Remote Control for Zoom H5
 RC-ZH5 Remote Control for Zoom H5 Owner s Manual REC L R VOLUME Remote Control for Zoom H5 Introduction Thank you for choosing Auray. The Auray RC-ZH5 is a wired remote control for the Zoom H5 Handy Recorder.
SpectroLED STUDIO 800/1200 LED LIGHT USER MANUAL
 SpectroLED STUDIO 800/1200 LED LIGHT USER MANUAL SpectroLED INTRODUCTION THANK YOU FOR CHOOSING GENARAY The Genaray SpectroLED Studio Lights provide bright, continuous light with flicker-free dimming for
BG-N19-2. Designed for the Nikon D850 DSLR Camera
 BG-N19-2 BATTERY GRIP Designed for the Nikon D850 DSLR Camera Thank you for choosing Vello. The Vello BG-N19-2 is compatible with the Nikon D850 DSLR, and it accepts one Nikon EN-EL15a rechargeable battery
VM-260 FLEXIBLE MACRO FLASH. User s Manual
 Inspiration strikes VM-260 FLEXIBLE MACRO FLASH User s Manual Copyright 2017 Gradus Group. Bolt and other names of Bolt products are trademarks of Gradus Group. Other product and corporate names mentioned
Desk Mount Articulating Dual Monitor Arm with Cable Management & Height Adjust
 Desk Mount Articulating Dual Monitor Arm with Cable Management & Height Adjust ARMDUAL *actual product may vary from photos DE: Bedienungsanleitung - de.startech.com FR: Guide de l'utilisateur - fr.startech.com
Quick Installation Guide
 Full Motion Single Monitor Arm, Pole Mount Quick Installation Guide Please Review the entire Quick Installation Guide prior to installation. If you have any questions regarding the compatibility of this
FIVE-BAY RAID SYSTEM FOR 3.5 SATA HARD-DISK DRIVES
 DRD-501 FIVE-BAY RAID SYSTEM FOR 3.5 SATA HARD-DISK DRIVES USER MANUAL Thank you for choosing Xcellon. The Xcellon DRD-501 Five-Bay RAID System is a convenient solution for large-data storage needs, housing
Dual TV/Monitor Desk Mount Stand (Duplex Series) Model: DE9E2S-S
 Model: DE9E2S-S") Dual TV/Monitor Desk Mount Stand (Duplex Series) Model: DE9E2S-S Instruction Manual Images may different from actual product Disclaimer It is Dyconn s intention to have all the correct information represented
Dual TV/Monitor Desk Mount Stand (Duplex Series) Model: DE9E2S-S Instruction Manual Images may different from actual product Disclaimer It is Dyconn s intention to have all the correct information represented
-22 MICROPHONE KIT PRODUCT MANUAL. GoPro PRODUCTION
 -22 GoPro PRODUCTION MICROPHONE KIT PRODUCT MANUAL 1 THANK YOU FOR CHOOSING POLSEN. The Polsen GPMK-22 is a kit that includes a stereo microphone and a shotgun microphone designed for use with GoPro HERO4,
FREEWAVE FUSION USER MANUAL
 FREEWAVE FUSION USER MANUAL 2 INTRODUCTION Thank you for choosing the Vello FreeWave Fusion Wireless Shutter/Flash/Grouping Remote. This device triggers off-camera lights remotely from up to 300 feet away.
BG-C9. Designed for the Canon 5D Mark III, 5DS, and 5DS R SLR Cameras
 BG-C9 BATTERY GRIP Designed for the Canon 5D Mark III, 5DS, and 5DS R SLR Cameras Introduction Thank you for choosing Vello and congratulations on your new BG-C9 battery grip purchase. Enjoy the many benefits
TAKAMA FLIP-ZIP INTRODUCTION. KEY FEATURES (Illustration - 1) MULTI-FUNCTIONAL TRIPOD MONOPOD KIT. Thanks for choosing Takama!
 MULTI-FUNCTIONAL TRIPOD MONOPOD KIT. Thanks for choosing Takama!") FLIP-ZIP TAKP4H58 TAKAMA FLIP-ZIP MULTI-FUNCTIONAL TRIPOD MONOPOD KIT INTRODUCTION Thanks for choosing Takama! The perfect hybrid accessory for photo and video cameras, this unique tripod will bring stability
FLIP-ZIP TAKP4H58 TAKAMA FLIP-ZIP MULTI-FUNCTIONAL TRIPOD MONOPOD KIT INTRODUCTION Thanks for choosing Takama! The perfect hybrid accessory for photo and video cameras, this unique tripod will bring stability
CONTENDER LED FRESNEL SPOT FOCUSING LIGHT USER MANUAL
 CONTENDER LED FRESNEL SPOT FOCUSING LIGHT USER MANUAL Contender INTRODUCTION THANK YOU FOR CHOOSING GENARAY The Genaray Contender is a compact and versatile light that s ideal for still and tabletop photography,
Thank you for choosing Xcellon.
 1 Thank you for choosing Xcellon. The Xcellon WPM-20R is a handheld wireless controller that provides users with the flexibility to move around freely while presenting a PowerPoint or Keynote slideshow.
Thank you for choosing Xcellon.
 User Manual Thank you for choosing Xcellon. The Xcellon HDD-1312 Hard Drive Dock is the most convenient way to access data on an internal SATA-type drive. Inserting your drive into the dock allows you
BG-N2. Designed For The Nikon D80 And D90 Cameras
 BG-N2 BATTERY GRIP Designed For The Nikon D80 And D90 Cameras Introduction Thank you for choosing Vello and congratulations on your new BG-N2 battery grip purchase. Enjoy the many benefits that a battery
Thank you for choosing Xcellon.
 User Manual Thank you for choosing Xcellon. The Xcellon USB-EC Ethernet adapter adds a Gigabit Ethernet port to your USB-C -supported Mac or PC. It provides secure and reliable Internet access via a wired
Owner s Manual Dual Vertical Flat Screen Desk or Clamp Mount
 Owner s Manual Dual Vertical Flat Screen Desk or Clamp Mount MODEL: DDR1527SDC CAUTION: DO NOT EXCEED MAXIMUM LISTED WEIGHT CAPACITY. SERIOUS INJURY OR PROPERTY DAMAGE MAY OCCUR! 75 x 75 100 x 100 27 MAX
TV Brackets by equip The perfect solution to securely mount your TV
 TV Brackets by equip The perfect solution to securely mount your TV No matter what s the size, if you want your TV in a fix position or want it to tilt, we have the solution you re been looking for. intro
3500 Series Tripod Kit
 3500 Series Tripod Kit You re on steady ground 1 INTRODUCTION Thank You for choosing Oben! This versatile and durable Oben tripod and ballhead is a compact and lightweight kit that sets up quickly, folds
EVOLVE1-M MONITOR ARM
 EVOLVE1-M MONITOR ARM EVOLVE1-M Rev A 2/17 Model EVOLVE1-M-SLV Model EVOLVE1-M-BLK Model EVOLVE1-M-WHT ASSEMBLY AND ADJUSTMENT EVOLVE1-M MONITOR ARM PARTS AND TOOLS PLEASE REVIEW these instructions before
2 x Dynamic Arms on 135 Post with C-Clamp
 Installation Guide AWMS-2-D13-C 2 x Dynamic Arms on 135 Post with C-Clamp COMPONENT CHECKLIST RANGE A AWM-LC Post Clamp B AWM-AD Dynamic Arm (x2) C AWM-P13 135 Post D AWM-FC C-Clamp CONTENTS C-Clamp Page
Installation Guide Philips MP20/30/40/50/60/70 IntelliVue M-Series Arm Rail Mount Kit
 Installation Guide Philips MP20/30/40/50/60/70 IntelliVue M-Series Arm Rail Mount Kit The purpose of this guide is to: 1. Describe attachment of Table Top Mount to Mounting Adapter on Arm (page 2). 2.
Desk Stand for Dual Monitors
 Desk Stand for Dual Monitors ARMBARDUO *actual product may vary from photos FR: Guide de l utilisateur - fr.startech.com DE: Bedienungsanleitung - de.startech.com ES: Guía del usuario - es.startech.com
BG-N10. Designed for the Nikon D600 and D610 SLR Camera
 BG-N10 BATTERY GRIP Designed for the Nikon D600 and D610 SLR Camera Introduction Thank you for choosing Vello and congratulations on your new BG-N10 battery grip purchase. Enjoy the many benefits that
Desk Stand for Dual Monitors
 Desk Stand for Dual Monitors ARMBARDUO *actual product may vary from photos FR: Guide de l utilisateur - fr.startech.com DE: Bedienungsanleitung - de.startech.com ES: Guía del usuario - es.startech.com
Extra Large Full Motion TV Mount for Televisions
 8008981 TV Size Range: 47 ~ 84 Maximum Weight Capacity: 60 kg/132 lbs Maximum Mounting Pattern: 800 mm x 600 mm (31.4 x 23.6 ) Distance to the Wall: 5.5-45 cm Extra Large Full Motion TV Mount for 47-84
Universal Desktop and Monitor Stand
 Universal Desktop and Monitor Stand Installation Instructions Kit P/N: 114-6013 Kit Contents Kit Contents: (1) Stand Assembly (1) VESA Monitor Bracket (1) Bottom Bracket (1) Top Bracket (1) Clamp Bracket
Desk Mount Articulating Monitor Arm with Cable Management and Gas Spring Height Adjust
 Desk Mount Articulating Monitor Arm with Cable Management and Gas Spring Height Adjust ARMPIVOTE DE: Bedienungsanleitung - de.startech.com FR: Guide de l'utilisateur - fr.startech.com ES: Guía del usuario
USB-FC-110 LYNX USB FOCUS CONTROLLER USER MANUAL
 USB-FC-110 LYNX USB FOCUS CONTROLLER USER MANUAL 2 INTRODUCTION Thank you for choosing the Elvid Lynx USB Focus Controller. The Elvid Lynx gives you remote control over focus and exposure (including shutter
Articulated Freestanding Dual Monitor Desk Stand - 13" to 27" Installation Instructions
 Articulated Freestanding Dual Monitor Desk Stand - 13" to 27" Installation Instructions 04-1019A 1 Unpacking Carefully remove the contents and lay them out on cardboard or other protective surface Check
TV & Office Solutions by equip solutions with a high value of benefit
 TV & Office Solutions by equip solutions with a high value of benefit The brand equip stands for a product development driven by quality management and continuous adjustments to the requirements of the
Sit-Stand Monitor Arm
 Sit-Stand Monitor Arm Product ID: ARMSTSCP1 This sit-stand monitor arm transforms your desk or tabletop into an ergonomic workstation. The monitor arm features a keyboard tray and easy height adjustment
IR SELFIE TRIGGER PLUS INFRARED REMOTE SHUTTER CONTROL. User Manual COMPLIANCE FCC. operation. that may cause undesired. including interference
 FCC COMPLIANCE This device complies with Part 15 of the FCC Rules. Operation is subject to the following two conditions: 1. This device may not cause harmful interference. 2. This device must accept any
CLIMB2 DUAL MONITOR SIT/STAND WORKSTATION
 CLIMB2 DUAL MONITOR SIT/STAND WORKSTATION CLIMB2 Rev A 3/17 Model CLIMB2-SLV ASSEMBLY AND ADJUSTMENT CLIMB2 PARTS AND TOOLS PLEASE REVIEW these instructions before beginning the assembly and adjustment
FREEWAVE FUSION BASIC WIRELESS FLASH/SHUTTER REMOTE TRIGGER. User Manual
 FREEWAVE FUSION BASIC WIRELESS FLASH/SHUTTER REMOTE TRIGGER User Manual THANK YOU FOR CHOOSING VELLO The Vello FreeWave Fusion Basic is your passport to a new world of photography. It expands your photographic
FREEWAVE PLUS USER MANUAL
 FREEWAVE PLUS USER MANUAL 2 INTRODUCTION Thank you for choosing the Vello FreeWave Plus Wireless Remote Shutter Release. This device triggers your camera in either wired or wireless mode, allowing you
Articulated Freestanding Triple Monitor Desk Stand - 13" to 27" Installation Instructions
 Articulated Freestanding Triple Monitor Desk Stand - 13" to 27" Installation Instructions 04-1020A 1 Unpacking Carefully remove the contents and lay them out on cardboard or other protective surface Check
SAVE THESE INSTRUCTIONS
 and Height Mounts Assembly, Installation and Operating Instructions Model Nos. QL, QLA, ARM250, QLM6 and QLAM6 NOTE: Check all parts for shipping damage. In case of shipping damage, DO NOT use. Contact
FREEWAVE FUSION BASIC 2.4 GHz WIRELESS FLASH/SHUTTER REMOTE TRIGGER. User Manual
 FREEWAVE FUSION BASIC 2.4 GHz WIRELESS FLASH/SHUTTER REMOTE TRIGGER User Manual THANK YOU FOR CHOOSING VELLO The Vello FreeWave Fusion Basic 2.4 GHz is your passport to a new world of photography. It expands
BG-N11 BATTERY GRIP. Designed for the Nikon D7100 SLR Camera
 BG-N11 BATTERY GRIP Designed for the Nikon D7100 SLR Camera Introduction Thank you for choosing Vello and congratulations on your new BG-N11 battery grip purchase. Enjoy the many benefits that a battery
CTT Section Carbon-Fiber Tabletop Tripod. You re on steady ground 1
 CTT-1000 3-Section Carbon-Fiber Tabletop Tripod You re on steady ground 1 INTRODUCTION Thank you for choosing Oben! The Oben CTT tripod is a sturdy and high-quality carbon-fiber tabletop tripod that provides
Create a more ergonomic dual-monitor setup
 Dual Monitor Mount with Built-in 2-port USB and Audio Pass-Through StarTech ID: ARMSLIMDUO Enhance productivity and free up valuable space with the ARMSLIMDUO dual-monitor mount. Two independent arms make
Wall. No opening (Example: LA-030-W)
") Thank you very much for choosing an EIZO product. Please read this User s Manual carefully to familiarize yourself with safe and effective usage procedures. Please retain this manual for future reference.
Thank you very much for choosing an EIZO product. Please read this User s Manual carefully to familiarize yourself with safe and effective usage procedures. Please retain this manual for future reference.
WIRELESS SHUTTERBOSS. User Manual
 WIRELESS SHUTTERBOSS User Manual INTRODUCTION Thank you for choosing the Vello Wireless ShutterBoss. It has a range of up to 250 feet on 99 channels over the reliable FSK modulated 2.4 GHz frequency. But
Desk-Mount Dual Monitor Arm - Full Motion - Articulating
 Desk-Mount Dual Monitor Arm - Full Motion - Articulating Product ID: ARMSLIMDUO Enhance productivity and free up valuable space with the ARMSLIMDUO Dual-Monitor Arm. Two independent arms make it easy to
FREEWAVE CAPTAIN TTL TRIGGER USER MANUAL
 FREEWAVE CAPTAIN TTL TRIGGER USER MANUAL TABLE OF CONTENTS Introduction...3 Features...4 Compatible devices...5 Precautions...6-7 Box contents...8-9 Overview... 10-11 Installing the batteries & turning
CL6 USER S GUIDE. Table of Contents: Introduction Overview Precautions...4. Replacing the Battery in. Specifications...
 USER S GUIDE Table of Contents: Introduction... 2 Overview... 3 Precautions...4 CL6 Replacing the Battery in the Power Supply...5 Specifications...6 CL6 Connector and Kit Option...7 Warranty...8 Thank
ASSEMBLY AND ADJUSTMENT
 EDGE-WALL MONITOR ARM EDGE-WALL Rev A 2/17 Model EDGE-WALL-SLV ASSEMBLY AND ADJUSTMENT EDGE-WALL MONITOR ARM PLEASE REVIEW these instructions before beginning the installation. Check that all parts and
Quad Monitor Desk Stand - 13" to 24" Installation Instructions
 Quad Monitor Desk Stand - 13" to 24" Installation Instructions 04-0885A 1 Unpacking Carefully remove the contents and lay out on cardboard or other protective surface Check package contents against the
BLUETOOTH SHUTTERBOSS. User Manual
 BLUETOOTH SHUTTERBOSS User Manual THANK YOU FOR CHOOSING VELLO The Vello Bluetooth ShutterBoss Advanced Intervalometer represents the new generation of wireless triggering. Utilizing the power of Bluetooth
Vortex Series 2-leg Desk Assembly Guide
 ELECTRIC HEIGHT-ADJUSTED SIT TO STAND DESK Vortex Series 2-leg Desk Assembly Guide For desk with underframe Model No. AL4628-XX REV-1509A Table of Contents IMPORTANT SAFETY INSTRUCTIONS... 3 CAUTION, USE
PREFACE. Thank you for choosing Zen Space Desks. We hope your desk helps you find your zen when being used. Zen Space Desks Team
 INSTRUCTION MANUAL PREFACE We are thrilled that you have chosen Zen Space. Congratulations, you have selected one of the most advanced and sophisticated Power Adjustable Workstations available today. Our
Desk-Mount Dual Monitor Arm - Full Motion - Articulating - Stackable - Tool-less Assembly
 Desk-Mount Dual Monitor Arm - Full Motion - Articulating - Stackable - Tool-less Assembly Product ID: ARMDUAL30 The ARMDUAL30 Dual-Monitor Arm lets you customize your workspace like never before. Increase
Table of Contents: TOPIC: Safe Operation: READ THIS FIRST Page: 3 Warranty 4 Specifications 4 Installation 5-7 Operating Instructions 8 Parts Diagram
 INSTALLATION & OPERATIONS MANUAL FlexArm B-19 FlexArm Inc. Division of Midwest Specialties, Inc. 851 Industrial Drive Wapakoneta, Ohio 45895 419-738-8147 Book Part No 360740 12/2014 1 Table of Contents: