English. Quick Guide
|
|
|
- Philomena Hawkins
- 5 years ago
- Views:
Transcription

1 English Quick Guide Specification Product Overview Button and Indicator light Unpacking Accessory Checklist Important Safety Notes Extruder module installation Accessory installation XYZware operation Print Wi-Fi setup

 PLA/ Tough PLA/ PETG 1.75 mm 0.4 mm 150 x 150 x 150 mm 0.1/0./0./0.4mm USB.0/ WiFi XYZware/XYZmaker.")
, mf Indicator signals Status Action Solid green Flashing green Solid red Flashing red Solid orange Flashing orange Pulsing orange")
 - - Press the button to return to printing status, refer to instructions in software to")

2 Product Overview 1 Guide tube Print bed Feed module 7 Filament holder 4 5 Filament Function button / status indicator Extruder module Power connector USB port Power switch Specification Dimensions Weight Print Technology Print Material Filament Diameter Nozzle Diameter Print Dimension Print Resolution Connectivity Print Software File Format 400 x x mm 8 KG Fuse Filament Fabrication (FFF) PLA/ Tough PLA/ PETG 1.75 mm 0.4 mm 150 x 150 x 150 mm 0.1/0./0./0.4mm USB.0/ WiFi XYZware/XYZmaker.stl, XYZ Format (.w), mf Indicator signals Status Action Solid green Flashing green Solid red Flashing red Solid orange Flashing orange Pulsing orange Standby/Ready to print Receiving data General error Critical error Printing Paused Button and Indicator light Job complete (printing complete / printing cancellation complete) - - Press the button to return to printing status, refer to instructions in software to fix the issue. Refer to instructions in the software to solve the issue or reboot the Mini. To pause the print, press the button once. To cancel the print, press and hold the button for 5 seconds. To resume the print, press the button once. To return to Ready to print, press the button once. If the printer encounters issues, please refer to the XYZware screen troubleshooting instruction to fix the issues. - -


3 Unpacking Before using this printer, remove all fixed materials from the extruder module and print bed. Switching on the printer without removing these fixed materials may damage the machine. Be sure to remove the 4 clips from the shafts as illustrated on the right. Notes Keep original packaging materials in case you need to send your unit back for repair during the warranty period. If other packing materials are used instead, the printer may become damaged during transportation. In such a situation, XYZprinting reserves the right to charge a repair fee. Accessory Checklist 1. Quick Guide, Warranty Card. Power Adapter. Power Cord 4. USB Wire 5. Extruder Module. Scraper 7. Guide Tube 8. Bundled Filament 9. Filament Spool Ring 10. Bed Tape X pcs Only replace 11. Cleaning Brush 1. Cleaning Wire x Leveling tool 15. PET Protection cover 1. Feeding Tube Grip X1 1. Feeding Path Cleaning Wire Important Safety Notes (installed on the filament spool) the reusable tape when it is worn. (For replacing and installing the Feeding Tube Grip, please watch the tutorial video on XYZprinting official website) Do not use the printer in dusty high humidity or outdoor environments. Place the printer on a stable and even surface to avoid it falling and causing serious injury. Do not put your hand into the machine during operation to avoid collision risk due to movement of the machine or to avoid burn due to high temperature. --


4 NOTE: To unload the extruder module, first detach the heating bus and press the black disengage button. Installing the Extruder module 1 Make sure that the printer is powered off. Place the extruder module that the fitting pin is secured the proper location. Insert the black ribbon connector to complete the installation. Installing the Accessories 1. Install the guide tube 1 Ensure that the guide tube has been tightly inserted into the port. Feed the guide tube through the slot at the top of the printer to the extruder module. Ensure that the guide tube is properly inserted into the feed port of the extruder module to complete the installation. -4-


 Keep the side cover")


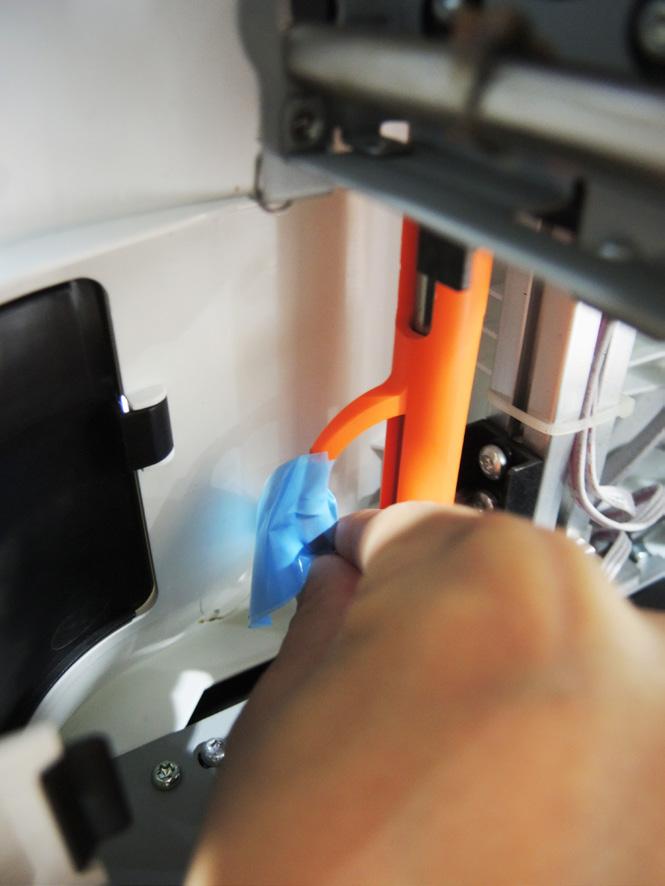
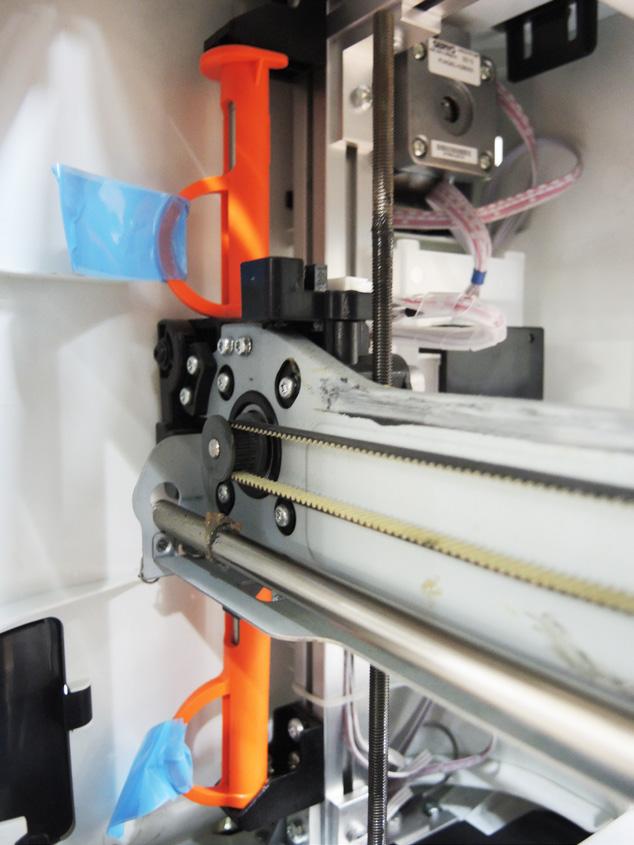
5 .Installing the Filament spool ring (please refer to this step if the axle ring is not installed on the spool) 1 Use a phillips Separate the spool Retrieve the 4 Install the sensor 5 Feed both parts of screwdriver to ring from both filament spool and chip. Note the the spool ring loosen the securing screws of the filament spool ring. sides of the spool. chip. orientation of the sensor chip on the spool ring. through the center hole of the spool and assemble them together. Use a phillips screwdriver to tighten and secure the spool ring to complete the installation..installing the filament 1 Remove the side cover by pressing down Lower the filament spool Place the assembled 4 Take the tip of the 5 firmly at the center on the left side of the holder on the left side of filament spool (with filament and cover and pushing aside the cover. (pay the printer until horizontal. the spool ring) on insert it into the attention to where you apply your force to the spool holder. feeding hole. ensure proper dismantling) Keep the side cover securely for future use. Press the release arm and push the filament all the way to the bottom so that the front end of the filament is completely inserted into the extruder module. Handy tips The filament will load better when the tip of the filament is cut at a 45 angle. When the printer is not in use, raise the filament spool holder and close the side cover


6 XYZware operation After completing the hardware installation, download XYZware from the XYZprinting official website and install it on your computer. Before launching XYZware, connect the printer to your computer using the supplied USB cable and turn it on. For an optimal user experience, we recommend following the instructions below: Print 1 Open XYZware Import D file Open Functions panel Click Import and select the file to print. Handy tips Registration via XYZware before your first print is strongly recommended. When registered with XYZprinting, you will receive latest technical supports and updates. To register, simply click "Register Now". Before you start printing, please attach the bed tape to the print bed. The print bed tape is reusable, and can be replaced worn. 4 Load filament 5 Close Functions panel Print If the room you are printing in is below 5 / 77, for greater adhesion, apply glue to the bed tape. After printing has started, check if the first layer is stuck to the print bed. Good base layer is one of the keys to successful printing. - -


7 7 The printing status, including the printing progress, 8 When done, "Printing Complete" 9 After the print has finished, elapsed time, and remaining time, will be shown while will be shown on screen. use a scraper to remove the printing. You can pause or cancel the printing task in this printed object. window. Wi-Fi setup Pre-setup 1. The network printing function is only available when the printer and the computer are both connected to the same wireless network.. Before connecting the printer, your wireless network settings need to be adjusted. For more information, refer to the instruction manual of your wireless router.. The wireless network's channel width needs to be set to 0 MHz for the printer to connect to it wirelessly. Refer to the vendor instruction manual for more information. 4. The Mini supports WEP, WPA, and WPA security encryption standards. Wireless pass word information will be requested when setting up the printer connection. Setting up Wi-Fi 1 Connect the printer to your computer with the USB cable, and open "XYZware". Click the "Printer Monitor" button on the lower right corner on the screen, open "Operation Function". Select the "Printer Monitor" icon to open the Wi-Fi connection settings. WEP WPA WPA - 7 -


8 4 In the "Printer Monitor" window, select My 5 Printer > Scan to search for the connected printer. Select the USB COM port, click Connect > Establish printer connection. Click "Wireless Setting" to view wireless print settings. 7 Enter the printer name, then press the Scan 8 Use the pull-down menu to view a list of 9 button. Wi-Fi connections available in the area, and select the Wi-Fi connection that you wish to connect to. Wait for the printer to obtain the correct information, provide the wireless password and press Start wireless connection

9 10 Update the printer connection method. 11 XYZware will use the USB connection to 1 Once the connection method has been changed from update the printer settings. USB to Wi-Fi, you can unplug the USB cable and continue with the printing process. OK Note: Name the printer and wireless network with the alphanumeric characters only. If no connection is detected within 90 seconds, the printer will time-out. If this is the case, check that the configuration process is correct and try again. Confirm your wireless network's security key on the router's wireless settings page. The recommended wireless connection distance between your printer and the wireless networking device needs to be within 10 meters. The connection quality, will depend on the power of your networking device, and the environment you are connecting the two devices in. For more information, please refer to your networking device's instruction manual
da Vinci 1.0 Pro Quick Guide
 US da Vinci 1.0 Pro Quick Guide Product Description Print Parameters Description Support Details Product Model: da Vinci 1.0 Professional da Vinci 1.0 Pro Product Description Product Overview Cartridge
da Vinci Jr.1.0 April 2016 da Vinci Junior 1.0w 3D Printer da Vinci Jr.1.0w Quick Guide HD23F1JW0N1
 da Vinci Junior 1.0w 3D Printer w Quick Guide P 1 Product Overview A: Filament movement area B: Feed module C: Detector D: Extruder E: Filament F: Print bed G G: SD card port (Storage format: FAT32) H:
da Vinci Super Quick Guide da Vinci Super Safety Precautions Product instructions Unboxing and Installation Product specification
 September. 2017 da Vinci Super Quick Guide ENG Safety Precautions Product instructions Unboxing and Installation Product specification Function Operation and Instructions Setting Print Supporting information
Dreamer Series User Manual
 Dreamer Series User Manual Welcome to the world of the Dreamer. To ensure that you have the best possible user experience, it s important that you follow this user manual. Let s get started! In Parts I
da Vinci Super User manual da Vinci Super Safety Precautions Product instructions Unboxing and Installation Product specification
 _V1 da Vinci Super User manual ENG Safety Precautions Product instructions Unboxing and Installation Product specification Touch Screen Menu, Functionsand Messages Function Operation and Instructions Setting
da Vinci 1.1 Plus Quick Guide
 ENG da Vinci 1.1 Plus Quick Guide Product Manual XYZware Print Bed Leveling and Product Specification Support Details 02-08 09 10-11 12 P 1 Product Overview Cartridge Slot Remove the packaging supports
Product User Manual. IdeaWerk 3D Printer WT150
 Product User Manual IdeaWerk 3D Printer WT150 Contents Contents 1. Unpack and checking... 1 1.1 Check the Machine... 1 1.2 Check the Accessories... 3 2. Brief Introduction... 3 2.1 Precautions and Safety...
Dremel Idea Builder 3D40. Various infill options are available from Simplify 3D software. Varies dependent on the infill and size of your object.
 Guide for Dremel Printing General information The Dremel Idea Builder 3D printer extrudes PLA plastic along a tool path to create layers much like our higher end Dimension. The Dremel however does not
USER MANUAL Resolution 0.02mm Speed 300mm/second Software: Wanhao Maker
 1 Duplicator 5S & 5S MINI Desktop 3D Printers USER MANUAL Resolution 0.02mm Speed 300mm/second Software: Wanhao Maker 2014/2015 Wanhao USA 3 Table of Contents Welcome 1 Printer Specifications 2 Unboxing
Instruction Manual. RS 3D Printer
 Instruction Manual RS 3D Printer 1) GENERAL This instruction manual contains important information regarding the installation, operation, maintenance and storage for RS 3D Printer. Please read these instructions
RJ-2030/2050/2140/2150
 LBF85700 Unpacking Your Printer Check that the package contains the following before using your printer: RJ-030/050/40/50 Quick Setup Guide English Printer Rechargeable Li-ion Battery Belt Clip Thank you
RJ-2030/2050/2140/2150
 Printed in China LBF85400 Package Contents Check that the package contains the following before using your printer: RJ-030/050/40/50 Quick Setup Guide English Printer Rechargeable Li-ion Battery Belt Clip
Garage Door Control Button. What s inside: Quickstart Guide Model No. WGO x Garage Door Control Button
 Add-On Device Quickstart Guide 1 Garage Door Control Button Quickstart Guide Model No. WGO2001 What s inside: 1x Garage Door Control Button 1x Power Adapter 2x U-fork Wires Mounting Accessories and Double-sided
Replacing the TFM coupler
 Repair manual Replacing the TFM coupler Instructions The TFM coupler is a key component of the hot end. It allows filament to flow smoothly through it from the Bowden tube and towards the nozzle. The coupler
DIY PRINTER INSTALLATION AND OPERATION INSTRUCTION
 CTC DIY I3 PRINTER INSTALLATION AND OPERATION INSTRUCTIONS Thank you for buying and using DIY 3D printer produced by CTC Please read the installation and operation instruction carefully before use Company
M2 3D Printer V4 M2 3D Printer
 M2 3D Printer V4 Contents 2 Important Safeguards 3 Welcome 4 M2 Features 6 Other products included with your printer 7 Set up 9 Slicing.STL or.obj files 10 Maintenance and Support 11 Warranty 12 About
Label Printer QL-810W/820NWB. Quick Setup Guide (English)
") Label Printer QL-810W/820NWB Quick Setup Guide (English) Label Printer QL-810W/820NWB Printed in China D00RPG001 Quick Setup Guide (English) Available Manuals Product Safety Guide This guide provides safety
Label Printer QL-810W/820NWB Quick Setup Guide (English) Label Printer QL-810W/820NWB Printed in China D00RPG001 Quick Setup Guide (English) Available Manuals Product Safety Guide This guide provides safety
Runtime Environment: Relative Humidity: 30%~90% Temperature Ranges : 5 ~35
 Product Data sheet IdeaWerk 3D Printer ENGLISH Runtime Environment: Relative Humidity: 30%~90% Temperature Ranges : 5 ~35 Technical Parameters: 1. Electrical Parameters Power Input: AC 100-240V 47/ 63Hz
Quick Start Guide. including AutoMaker. Version 1.0
 Quick Start Guide including AutoMaker Version 1.0 NOT FOR MEDICAL USE Version 1.0 Welcome Package Contents Check your product package for the following items. 2m USB A-B Cable IEC C5 Power Cable Robox
PrismJET DTx Quick Start Guide
 PrismJET DTx Quick Start Guide The following items are included in an accessory kit for your printer: USB Cable 110V Power Cord JetPRO 13/JetCUT Setup DVD User Guide CD Phillips Screwdriver Unpacking the
QL-1110NWB. Applications for Use with Computers. Applications for Use with Mobile Devices. Quick Setup Guide (English) NOTE
 NOTE") D00ZC6001 QL-1110NWB Quick Setup Guide (English) Thank you for purchasing the QL-1110NWB Label Printer! Read the Product Safety Guide first, then read this Quick Setup Guide for the correct setup procedure.
D00ZC6001 QL-1110NWB Quick Setup Guide (English) Thank you for purchasing the QL-1110NWB Label Printer! Read the Product Safety Guide first, then read this Quick Setup Guide for the correct setup procedure.
Congratulations on the purchase of your new Clover Mini
 Congratulations on the purchase of your new Clover Mini Set Up the Hardware What s included The white USB cord provided can be used to plug into the Hub and connected to other accessories (such as the
VJ-1618 INSTALLATION MANUAL
 Please read this manual before using Thank you for purchasing a MUTOH product. This manual explains the steps for unpacking, mounting and basic installation before using the MUTOH Full-color inkjet printer
Networking the printer
 Networking the printer General networking Networking overview A network is a collection of devices such as computers, printers, Ethernet hubs, wireless access points, and routers connected together for
UP! Quick Start Guide
 Personal Portable 3D Printer UP! www.pp3dp.com 1. Assemble Printer Open the box, take out the printer and accessories. Assemble the parts contained in the box as following procedure: 1. Unscrew the M4
MONARCH 9416 XL QUICK REFERENCE
 MONARCH 9416 XL QUICK REFERENCE This Quick Reference contains ribbon loading, supply loading, and general care, maintenance, and troubleshooting procedures for the 9416 XL Thermal Direct and 9416 XL Thermal
Setup Guide. Confirming the Installation Space. Installation space (W x D x H) 70.5 x 66.3 x 61.5 inches (1790 x 1684 x 1560 mm) 23.
 70.5 x 66.3 x 61.5 inches (1790 x 1684 x 1560 mm) 23.") Introductory Information Setup Guide ENGLISH Read this manual before attempting to operate the printer. Keep this manual in a handy location for future reference. Caution Instructions in this Setup Guide
Introductory Information Setup Guide ENGLISH Read this manual before attempting to operate the printer. Keep this manual in a handy location for future reference. Caution Instructions in this Setup Guide
User Manual V 0.1. Download the full user manual at
 User Manual V 0.1 Download the full user manual at www.afinia.com/support Index Chapter 1 Product Description Chapter 2 Prepare for Your First 3D Print Chapter 3 Machine Settings Chapter 4 Print Settings
VJ-1614 INSTALLATION MANUAL
 VJ-6 INSTALLATION MANUAL Please read this manual before using Thank you for purchasing a MUTOH product. This manual explains the steps for unpacking, mounting and basic installation before using the MUTOH
3D BIO-PRINTER. USER MANUAL Version D Cultures
 3D BIO-PRINTER 3D Cultures USER MANUAL Version 2.0 Product pictures are for reference only. Color(s), size, parts, and interface may vary. Preheating is not recommend with the use of cells. This manual
VJ-1604 INSTALLATION MANUAL
 Please read this manual before using Thank you for purchasing a MUTOH product. This manual explains the steps for unpacking, mounting and basic installation before using the MUTOH Full-color inkjet printer
SHENZHEN GETECH TECHNOLOGY CO., LTD. Geeetech A10 3D Printer. User Manual (V2.0)
") Geeetech A10 3D Printer User Manual (V2.0) 1 Content 1 Attention... 3 1.1 Safety instruction... 3 1.2 Factory test before delivery... 3 2 Printer display... 4 3 Assembling... 7 3.1 Assembling the main
Geeetech A10 3D Printer User Manual (V2.0) 1 Content 1 Attention... 3 1.1 Safety instruction... 3 1.2 Factory test before delivery... 3 2 Printer display... 4 3 Assembling... 7 3.1 Assembling the main
Z-Truck (Vertical Moving) Z-truck Flag. Y-Truck (Horizontal Moving) FIGURE 1: VIEW OF THE Z-TRUCK. Flexshaft Assembly
 Z-truck Flag. Y-Truck (Horizontal Moving) FIGURE 1: VIEW OF THE Z-TRUCK. Flexshaft Assembly") Replacing the LCD Cable To remove and replace the LCD Cable you will need the following tools: #2 Phillips screwdriver (magnetic tip preferred) Socket wrench with 10mm socket Removing the Side Panel 1.
Replacing the LCD Cable To remove and replace the LCD Cable you will need the following tools: #2 Phillips screwdriver (magnetic tip preferred) Socket wrench with 10mm socket Removing the Side Panel 1.
PowerSpec Ultra 3D Printer Start-up Guide Table of Contents
 PowerSpec Ultra 3D Printer Start-up Guide Table of Contents 1 What's Included in the Box?...Page 3 2 Un-boxing.Page 4 3 Initial Hardware Installation Page 6 4 Software Instruction.Page 8 5 Filament Page
ColorMaxLP Label Roll Rewinder
 ColorMaxLP Label Roll Rewinder 5/2017 INSTALLATION/OPERATOR MANUAL Included: Rewinder Base plate Power supply Power Cord Thumb screws Assembly instructions 1. Install base plate Lift front of printer and
VJ-1624 INSTALLATION MANUAL
 VJ-6 INSTALLATION MANUAL Please read this manual before using Thank you for purchasing a MUTOH product. This manual explains the steps for unpacking, mounting and basic installation before using the MUTOH
da Vinci Jr.1.0 V1 January 2015 da Vinci Junior 1.0 3D Printer User Manual P 1
 da Vinci Junior 1.0 3D Printer User Manual P 1 The purpose of this user manual is to help users understand and use the da Vinci Junior 1.0 3D printer correctly. It contains the operating instructions,
ASTRO UW-1C and RW-1C LABEL PRINTER UNWINDER & WINDER
 ASTRO UW-1C and RW-1C LABEL PRINTER UNWINDER & WINDER OPERATOR MANUAL ASTRO MACHINE CORP. 630 Lively Blvd. Elk Grove Village, IL 60007 Phone: (847) 364-6363 Fax: (847) 364-9898 www.astromachine.com SAFETY
Quick Install Guide. Model: PLC-223W, PLC-233W
 Quick Install Guide Model: PLC-223W, PLC-233W This installation guide provides basic instructions for installing the PLC-213W/ PLC-223W/PLC-233W indoor wireless IP camera on your network. By following
INSPECTION TOOL. Inspection Video Camera with Color LCD Monitor. EU Environmental Protection. Model: 8802LE,8803LE. Model: 8802LE,8803LE
 INSPECTION TOOL Inspection Video Camera with Color LCD Monitor Model: 8802LE,8803LE EU Environmental Protection Waste electrical products should not be disposed of with household waste. Please recycle
Quick Start Guide. LabelWriter
 Quick Start Guide LabelWriter 450 Duo Copyright 2010 Sanford, L.P. All rights reserved. Revised 12/10. No part of this document or the software may be reproduced or transmitted in any form or by any means,
ENJOY Introduction. Software Installation* Hardware. Calibration Settings. Print test. Appendex. Install print S/W Driver Install
 Quick Start Manual 1 ENJOY Introduction C O N T E N T S 6 5 Appendex 4 Print test 3 2 Hardware Calibration Settings Software Installation* Install print S/W Driver Install Hardware Intro Cable installation
Peel & Present Option Rev.C
 Peel & Present Option 92-2479-01 Rev.C Contents of the Peel & Present Kit This kit contains the following items: Peel and Present Mechanism Assist Roller Bushing Follow the steps below to install these
REMOVE COVERS. 1. Remove three screws from the Side Panel (L). 2. Slide the Side Panel (L) backward, and raise it to remove from the printer.
. 2. Slide the Side Panel (L) backward, and raise it to remove from the printer.") REMOVE COVERS 1. Remove three screws from the Side Panel (L). 2. Slide the Side Panel (L) backward, and raise it to remove from the printer. 3. Fully open the Top Cover. 4. Release the tab on the right
REMOVE COVERS 1. Remove three screws from the Side Panel (L). 2. Slide the Side Panel (L) backward, and raise it to remove from the printer. 3. Fully open the Top Cover. 4. Release the tab on the right
2 1.1 Safety using methods Definition of warning symbols Standard accessories Installation...
 Table of Contents 1 Satety precautions... 2 1.1 Safety using methods...2 1.2 Definition of warning symbols...2 2 Standard accessories......6 3 Installation... 7 3.2 Leg frame... 7 3.3 Installation and
INSPECTION TOOL. Wireless Inspection Camera with Recordable Monitor. EU Environmental Protection. Model: 8802AL, 8803AL. Model: 8802AL, 8803AL
 TM TM INSPECTION TOOL Wireless Inspection Camera with Recordable Monitor Model: 8802AL, 8803AL EU Environmental Protection Waste electrical products should not be disposed of with household waste. Please
Océ User manual. Océ CS2024. Quick Start Guide
 Océ User manual Océ CS2024 Quick Start Guide Océ Technologies B.V. Copyright 2005, Océ-Technologies B.V. Venlo, The Netherlands. All rights reserved. No part of this work may be reproduced, copied, adapted,
VJ-1304 INSTALLATION MANUAL
 Please read this manual before using Thank you for purchasing a MUTOH product. This manual explains the steps for unpacking, mounting and basic installation before using the MUTOH Full-color inkjet printer
XPS 15 2-in-1. Service Manual. Computer Model: XPS Regulatory Model: P73F Regulatory Type: P73F001
 XPS 15 2-in-1 Service Manual Computer Model: XPS 15-9575 Regulatory Model: P73F Regulatory Type: P73F001 Notes, cautions, and warnings NOTE: A NOTE indicates important information that helps you make better
MUTOH EUROPE N.V. Tel.:32-(0) Fax:32-(0)
 Fax:32-(0)") MUTOH INDUSTRIES LTD. Tel.:8-(0)-570-00 Fax:8-(0)-570-00 E-mail:ibd@mutoh.co.jp http://www.mutoh.co.jp MUTOH AMERICA INC. Tel.:-80-968-777 Fax:-80-968-7990 E-mail:sales@mutoh.com http://www.mutoh.com MUTOH
MUTOH INDUSTRIES LTD. Tel.:8-(0)-570-00 Fax:8-(0)-570-00 E-mail:ibd@mutoh.co.jp http://www.mutoh.co.jp MUTOH AMERICA INC. Tel.:-80-968-777 Fax:-80-968-7990 E-mail:sales@mutoh.com http://www.mutoh.com MUTOH
ZHEJIANG FLASHFORGE 3D TECHNOLOGY CO., LTD. Creator Pro Start-up Guide
 www.ff3dp.com ZHEJIANG FLASHFORGE 3D TECHNOLOGY CO., LTD. Creator Pro Start-up Guide www.ff3dp.com Contents 1 What's Included in the Box? 2 2 Un-boxing 2 3 Initial Hardware Installation 6 4 Software Installation
Xi4 Quick Reference Guide
 Xi4 Quick Reference Guide Use this guide to operate your printer on a daily basis. For more detailed information, refer to the User Guide. Printer Components Figure shows the components inside the media
Quickstart Guide Kora Pro 3D PC Printer
 Quickstart Guide Kora Pro 3D PC Printer 1 Rev001/01/2018 Kora Pro PC General Precautions and Advice Only use original accessories from or approved by the manufacturer Always read the manual before initial
SERIES 1 USER MANUAL TYPE A MACHINES
 SERIES 1 USER MANUAL TYPE A MACHINES Type A Machines Inc. 2014 Type A Machines Inc. This document is licenced by Creative Commons Attribution-NonCommercial-ShareAlike (CC BY-NC-SA) Users are free to remix,
Vacuum Tubes Power Supply Unit. for WA7 and WA7d Fireflies. Owner s Manual. Please review this manual before operating your WOO AUDIO product.
 WOO AUDIO WA7tp Vacuum Tubes Power Supply Unit for WA7 and WA7d Fireflies Owner s Manual Please review this manual before operating your WOO AUDIO product. Inc. All rights reserved. www.wooaudio.com Rev
DeltaMaker 3D Printer Getting Started
 DeltaMaker 3D Printer Getting Started Last Updated: December 2014 Table of Contents TABLE OF CONTENTS 2 WELCOME 3 SECTION 1: UNPACKING/SETUP 4 REMOVING THE PRINTER FROM THE BOX 4 INSTALLING THE FILAMENT
QUICK SETUP GUIDE EMX. Package Contents. Before You Begin. Mounting a Zero U EMX
 QUICK SETUP GUIDE EMX Thank you for purchasing the EMX rack management system and asset management strips (asset strips). This product provides a rack management solution that integrates both asset management
MiR Bluetooth Box. Technical Documentation
 MiR Bluetooth Box Technical Documentation Version 1.2 Software release 1.5 Release date: 11.04.2016 Table of contents 1 Introduktion...3 1.1 Feedback signal...3 1.2 Indication of relays states...3 2 Dimensions...3
Personal 3D Printer. Quick Start Guide. See Inside for Use and Safety Information
 EKOCYCLE TM Personal 3D Printer Quick Start Guide See Inside for Use and Safety Information The USB Mass Storage Device Contains the User Guide and Quick Start Guide in other Languages Congratulations
GEEETECH. Me Creator2 printers contain heated moving parts. Never reach inside the printer while it is in operation or before it has cooled down.
 ME CREATOR 2 SAFETY INSTRUCTION Do read all the instructions and cautionary markings in this manual before operating your Me Creator. Me Creator2 printers contain heated moving parts. Never reach inside
SHENZHEN GETECH TECHNOLOGY CO LTD. Geeetech A10M 3D Printer. User Manual (v2.0)
") Geeetech A10M 3D Printer User Manual (v2.0) 1 Content 1 Attention... 3 1.1 Safety instructions... 3 1.2 Factory test before delivery... 3 2 Printer display... 4 3 Assembling... 7 3.1 Assembling the main
Geeetech A10M 3D Printer User Manual (v2.0) 1 Content 1 Attention... 3 1.1 Safety instructions... 3 1.2 Factory test before delivery... 3 2 Printer display... 4 3 Assembling... 7 3.1 Assembling the main
Tabletop Paper Collator FC-10
 OPERATION MANUAL for Tabletop Paper Collator FC-10 - Connected Use - A PRODUCT OF CORPORATION The Leader in Paper Handling Equipment 1-800-223-2508 www.mbmcorp.com APRIL.25.2005 0 1 Safety Instructions
The Nureva Span ideation system. Installation guide. Single panoramic system
 The Nureva Span ideation system Installation guide Single panoramic system Important SAFETY WARNINGS Prior to the installation of this product, the installation instructions should be completely read and
Inspiron Service Manual. 2-in-1. Computer Model: Inspiron Regulatory Model: P69G Regulatory Type: P69G001
 Inspiron 13 5000 2-in-1 Service Manual Computer Model: Inspiron 13-5378 Regulatory Model: P69G Regulatory Type: P69G001 Notes, cautions, and warnings NOTE: A NOTE indicates important information that helps
EM4594 Mini Wifi Repeater with WPS
 EM4594 Mini Wifi Repeater with WPS EM4594 Mini Wifi Repeater with WPS 2 ENGLISH Table of contents 1.0 Introduction... 2 1.1 Packing contents... 2 1.2 Device Overview... 3 2.0 Where to place the EM4594
300 Series Cube Wireless HD Surveillance Camera with Microphone. Installation Manual. Important! Ensure your NVR has the latest firmware!
 300 Series Cube Wireless HD Surveillance Camera with Microphone Installation Manual Important! Ensure your NVR has the latest firmware! Read this page before you go to the job site! 2 For maximum control
MAKERGEAR USER GUIDE. V4 Rev. E Made in the USA since 2009
 MAKERGEAR USER GUIDE M2 V4 Rev. E Made in the USA since 2009 Contents 1 - Welcome 2 - Warning & Important Safeguards 4 - What's Included 5 - Set Up 8 - Slicing.STL or.obj Files 10 - Changing Filament 11
QUICK REFERENCE. Using the Battery
 QUICK REFERENCE This Quick Reference contains supply loading information and general care and maintenance procedures for the Monarch Sierra Sport4 9493 printer. For more detailed information, refer to
Geeetech Aluminum Prusa I3. User Manual
 Geeetech Aluminum Prusa I3 User Manual 1 Safety Instructions Building the printer will require a certain amount of physical dexterity, common sense and a thorough understanding of what you are doing. We
MONOPRICE. MP Mini Delta 3D Printer. User's Manual P/N 21666
 MONOPRICE MP Mini Delta 3D Printer P/N 21666 User's Manual CONTENTS SAFETY WARNINGS AND GUIDELINES... 3 INTRODUCTION... 4 FEATURES... 4 CUSTOMER SERVICE... 5 PACKAGE CONTENTS... 5 PRODUCT OVERVIEW... 6
Getting Started. Read Me First. series. Photo Printer
 Photo Printer series Getting Started Read Me First Make sure to read this manual before using the printer. Please keep it in hand for future reference. Symbols Used in This Document Instructions including
Auto-Cutter (JM98901) User's Manual
 User's Manual") Auto-Cutter (JM98901) User's Manual -2- Contents Notice 3 SAFETY SIGNS that must be strictly observed! 5 1. Function 7 2. Main specifications of auto-cutter 7 3. Checking items inside the accessory box
Auto-Cutter (JM98901) User's Manual -2- Contents Notice 3 SAFETY SIGNS that must be strictly observed! 5 1. Function 7 2. Main specifications of auto-cutter 7 3. Checking items inside the accessory box
Quick Install Guide. For Covert IP Camera Series. Model: PLC-128PW, PLC-129PW
 Quick Install Guide For Covert IP Camera Series Model: PLC-128PW, PLC-129PW This installation guide provides basic instructions for installing the PLC-128PW and PLC-129PW covert IP camera on your network.
3D Prototyping X1 3D Printer. User Manual V1.3
 3D Printer User Manual V1.3 COPYRIGHT This document is copyrighted and contains proprietary information that is the property of 3D Prototyping Pty Ltd. The user does not have the right to copy, reproduce,
CANADIAN D.O.C. WARNING
 Each product and program carries a respective written warranty, the only warranty on which the customer can rely. Avery Dennison Corp. reserves the right to make changes in the product, the programs, and
Label Printer Quick Setup Guide QL-800
 Label Printer Quick Setup Guide QL-800 QL-800 Quick Setup Guide (English) Label Printer QL-800 Printed in China D00RPE001 Quick Setup Guide (English) Thank you for purchasing the QL-800! Read the Product
Copyright 2013 Esselte Leitz GmbH & Co. KG. All rights reserved.
 Copyright 2013 Esselte Leitz GmbH & Co. KG. All rights reserved. Mac, ipad, AirPrint, and OS X are trademarks of Apple Inc., registered in the U.S. and other countries. Google and Google Cloud Print are
Select Mini 3D Printer V2
 Select Mini 3D Printer V2 P/N 15365, 21711, 21872, 24166 User's Manual CONTENTS SAFETY WARNINGS AND GUIDELINES... 3 INTRODUCTION... 4 FEATURES... 4 CUSTOMER SERVICE... 5 PACKAGE CONTENTS... 5 PRODUCT OVERVIEW...
RECO Smart Cam. Quick Start Guide
 RECO Smart Cam Quick Start Guide E11074 / Revised Edition V2 / November 2015 NOTE: The screenshots in this Quick Start Guide are for reference only. 2 Hardware Micro USB port MicroSD card slot GPS port
MX-8000 User Manual MX Rev
 MX-8000 Rev. 070202 Greeting Thank you for purchasing PAITEC USA products. This manual is prepared to provide guidelines on how to properly operate and maintain MX-8000. Copyright Any of the contents should
Ender 3 Series 3D Printer Quick Start Guide
 Ender 3 Series 3D Printer Quick Start Guide This guide is for the Ender 3 Series of 3D printers. Select the correct input voltage to match your local mains (220V or 110V) Because of software/hardware upgrades
CLIQ.mini Installation and Setup Guide
 CLIQ.mini Installation and Setup Guide Last modified: 04/06/18 Description The Clare Controls CLIQ.mini controller provides all device management services, supports all Clare user interface services, and
All your entertainment in one place
 Quick Start Guide What s inside Step 1. Unpack the box Important Tips Step 2. Connect to your Broadband Modem Step 3. Connect to your TV Antenna Step 4. Connect to your TV Step 5. Power up your Fetch Mighty
Safety precautions This chapter describes safety measures in using the printer. Please read carefully before using the printer.
 サトー取説 _E 04.8.17 6:21 PM ページ a Safety precautions This chapter describes safety measures in using the printer. Please read carefully before using the printer. About the pictograms This instruction manual
ZT400 Series Quick Reference Guide
 ZT400 Series Quick Reference Guide Use this guide to operate your printer on a daily basis. For more detailed information, refer to the User Guide. Printer Components Figure 1 shows the components inside
TOSHIBA Potable Printer B-EP4DL SERIES. Maintenance Manual. Document No. EO Original Sep., 2008 (Revised ) PRINTED IN JAPAN
 PRINTED IN JAPAN") TOSHIBA Potable Printer B-EP4DL SERIES Maintenance Manual Original Sep., 2008 (Revised ) Document No. EO18-33023 PRINTED IN JAPAN WARNING! Follow all manual instructions. Failure to do so could create
TOSHIBA Potable Printer B-EP4DL SERIES Maintenance Manual Original Sep., 2008 (Revised ) Document No. EO18-33023 PRINTED IN JAPAN WARNING! Follow all manual instructions. Failure to do so could create
Written By: Patrick. Disassembly to clean dust from the fan and heat sink. HP Pavilion G6 disassembly for cleaning
 HP Pavilion G6 disassembly for cleaning Disassembly to clean dust from the fan and heat sink. Written By: Patrick ifixit CC BY-NC-SA www.ifixit.com Page 1 of 11 INTRODUCTION Disassembly to clean dust from
Inspiron 22. Service Manual Series. Regulatory Model: W17B Regulatory Type: W17B001
 Inspiron 22 3000 Series Service Manual Regulatory Model: W17B Regulatory Type: W17B001 Notes, cautions, and warnings NOTE: A NOTE indicates important information that helps you make better use of your
Section 1: Installing the Printhead and Ink Cartridges
 Section 1: Installing the Printhead and Ink Cartridges 1: Turn the printer on, if necessary. 2: Lift the access door and wait for the carriage to move to the access position. NOTE: Your printer may look
imac Intel 21.5" EMC 2389 Stand Replacement
 imac Intel 21.5" EMC 2389 Stand Replacement Replace a broken or cosmetically unappealing stand on the imac 2389 21.5 Written By: Aaron Cooke ifixit CC BY-NC-SA www.ifixit.com Page 1 of 30 INTRODUCTION
Wi-Fi Endoscope Camera User Manual
 Wi-Fi Endoscope Camera User Manual Contents Contents General Information Manual Notes Storage and transport Information on disposal Overview 5 Description 5 Applications 5 Safety 5 Technical Data 6 Functions
HP UPS R/T3000 G2. Overview. Precautions. Kit contents. Installation Instructions
 HP UPS R/T3000 G2 Installation Instructions Overview The HP UPS R/T3000 G2 features a 2U rack-mount with convertible tower design and offers power protection for loads up to a maximum of 3300 VA/3000 W
Table of Contents. Unpacking and Inspection Setup Loading the Media Mount the Printer on the Wall... 16
 WPL25/WHC25 Table of Contents Unpacking and Inspection... 1 Setup... 5 Loading the Media... 6 Mount the Printer on the Wall... 16 LED and Button Functions... 17 Troubleshooting... 18 Unpacking and Inspection
Upgrade Instructions. P/N Revision A. October Printer Terminal Holder * *
 Upgrade Instructions P/N 96-08-0 Revision A October 000 480 Printer Terminal Holder P/N 96-08-0 Revision A *96080* Instructions This terminal holder connects the INTERMEC R 600 Series and 700 Series Computers
ZT400 Series Quick Reference Guide
 ZT400 Series Quick Reference Guide Use this guide to operate your printer on a daily basis. For more detailed information, refer to the User Guide. Printer Components Figure 1 shows the components inside
Removal and Installation8
 8 Screw Types 8-4 Top Cover Assembly 8-5 Left Hand Cover 8-6 Right Hand Cover 8-10 Front Panel Assembly 8-14 Left Rear Cover 8-15 Right Rear Cover 8-16 Extension Cover (60" Model only) 8-17 Media Lever
Table of Contents. Page ii
 Table of Contents Chapter 1 Introduction 1 Features... 1 Safety Instructions... 1 Package Contents... 2 Physical Details... 3 Chapter 2 Setup 5 Overview... 5 Using the Windows Wizard... 5 Chapter 3 Web-Based
Be sure to read the attached "TO ENSURE SAFE AND CORRECT USE" prior to use. Otherwise, it may cause an unexpected accident or fire.
 FCX4000 SERIES CUTTING PLOTTER SETUP MANUAL MANUAL NO. FCX4000-UM-8M1 Preface Thank you for choosing this product. Carefully keep this manual in a handy location for quick reference as necessity prior
think big, print huge
 think big, print huge quick start guide Table of Contents a Receiving and uncrating 5 b bed level & z home 11 c Loading filament 19 d SOFTWARE 23 e Setup 23 f preparing a print 26 g printing on gigabot
N900 Wireless Dual Band Gigabit Router
 Trademarks NETGEAR, the NETGEAR logo, and Connect with Innovation are trademarks and/or registered trademarks of NETGEAR, Inc. and/or its subsidiaries in the United States and/or other countries. Information