USER S GUIDE. Documentation Version 1.2.6
|
|
|
- Morgan Ralph Houston
- 5 years ago
- Views:
Transcription
1 Documentation version USER S GUIDE
2 INTRODUCTION 2 INTRODUCTION


3 INTRODUCTION / 3 INTRODUCTION Objective: Provide a visual guide of the different steps to set-up and get started using the MicroDelta Rework 3D printer. Authors of this document : emotion Tech Hugo FLYE Anthony BERNA Photographics credits : Pictures and 3D representations made by emotion Tech : Sources : Licence : MicroDelta Rework : CC BY-NC-SA 4.0 This document : CC BY-NC-SA Update: Last update : 09/10/2017 Links : You can find more informations on the following links : emotion Tech s website : RepRap community : RepRap
4 INTRODUCTION 4 SUMMARY INTRODUCTION 2 SUMMARY 4 SOFTWARE INSTALLATION 5 A. Software installation on Mac OS 6 PREPARATION 7 A. Files to copy on the TF card 8 B. Connecting your printer to Repetier-Host 9 C. Printer s settings 11 D. Slicing settings 13 E. Motion test 15 F. Heating test 16 G. Charging filament 17 H. Extrusion test 18 I. Calibration process using command lines 19 APPENDIX 27 Mounting of the spool holder 28 Spring filament pressure adjustment 30 Printing a 3D model 33 PID calculation 36 To go further 37 Maintenance 38 Recommandations 38 Restore the TF card 39 PRINTING 22 A. Spool Holder Print 23
5 SOFTWARE INSTALLATION / 5 SOFTWARE INSTALLATION
6 SOFTWARE INSTALLATION 6 Software installation on Mac OS Objective : Install the necessary software to use the MicroDelta Rework on a Mac operating system computer. 1 ) Dowload the latest version of Repetier-Host from the support section of emotion Tech s website ( Support / MicroDelta Rework / Software / Mac / 2 ) Find all the necessary informations for the installation on the following link : Note: the version of Repetier for Mac OS X is less developed than those on Windows / Linux. Therefore the use of a virtual machine is advised to take advantage of the latest updates and added options. However, we will guide you through this documentation for the installation of the official version of Repetier for Mac OS X.
7 PREPARATION / 7 PREPARATION
 Go to the emotion Tech s website support section, then go to «MicroDelta Rework / Software / Configuration» and download the corresponding configuration files to your MicroDelta Rework depending")
8 PREPARATION 8 Files to copy on the TF card Objective : copy the required files in the emotronic s TF card. 1 ) Go to the emotion Tech s website support section, then go to «MicroDelta Rework / Software / Configuration» and download the corresponding configuration files to your MicroDelta Rework depending on it s version and options. 2 ) Connect your printer to the computer 3 ) Once downloaded, unzip the file and copy all its content in the emotronic s TF card. Note: TF card is usually automatically detected and its content displayed once you connect your 3D printer to you computer. The TF card generally appears as drive «NO NAME» but this can vary depending on your hardware. Mac OS X : what you should have on the TF card after this step 4 ) Press the «Reset» button on the 3D printer (located on one side of the lower plate). 5 ) Check that the device has been properly recognized by your operation system.
 Go to «Config» then «Printer Settings». 3 ) Check that all the parameters correspond to those on the image below.")
9 PREPARATION / 9 Connecting your printer to Repetier-Host 1 ) Run Repetier-Host software. 2 ) Go to «Config» then «Printer Settings». 3 ) Check that all the parameters correspond to those on the image below. Select the COM port assigned to your MicroDelta Rework.
 Check on the bottom of the screen that the extruder")


10 PREPARATION 10 4 ) Click on Connect. 5 ) Check on the bottom of the screen that the extruder s temperature is consistent (logical value) and the printer s status is «Idle» as shown below: This one should change color, becomes green when connected : If you have a Heated Bed, its temperature will be displayed next to the extruder s.


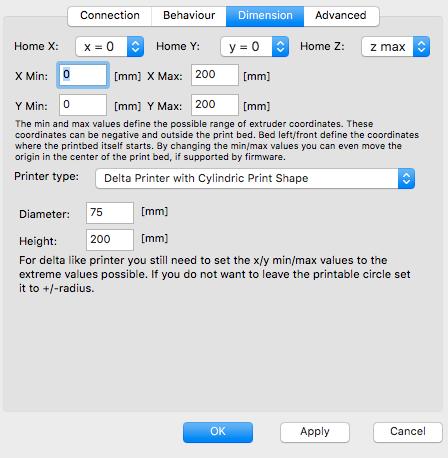
11 PREPARATION / 11 Printer s Settings A manual set-up of the printer is required. Please follow the following steps:
12 PREPARATION


13 PREPARATION / 13 Slicing Settings Go to the slicer tab, and click on the «Configuration» button. Make sure to modify you Slic3r configuration values in respect with the following figures. Save
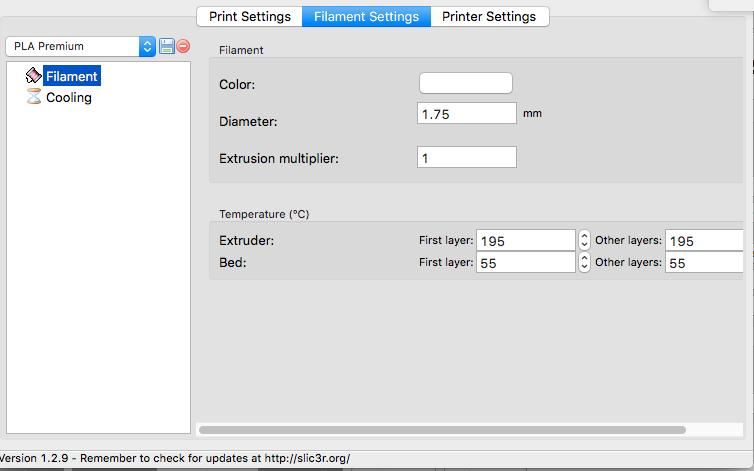
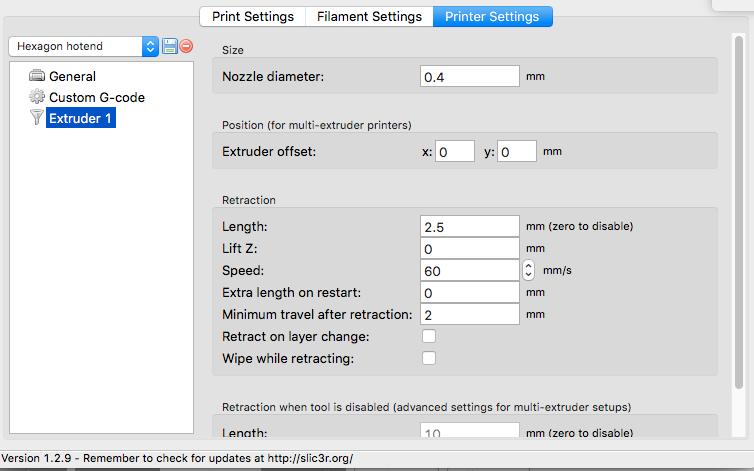
14 PREPARATION 14 Save Save
. Keep a finger on the «Reset» button in case of a malfunction.")
15 PREPARATION / 15 Motion test 1 ) Go to the «Print Panel» tab and click on the «Home All» (This should initialize your printer = move all axes to origin). Keep a finger on the «Reset» button in case of a malfunction. 2 ) Make sure that EVERY slider moves up till hitting its coresponding endstop.
16 PREPARATION 16 Heating Test 1 ) Go to «Print Panel» tab, click on «Heat on» (Extruder heater activation) as shown below: 2 ) Check that the target temperature is reached : 195 If the target temperature is not reached or the actual temperature varies greatly around the target temperature, perform a PID calculation (see appendix).
 Disengage the extruder Disengage by")
17 PREPARATION / 17 Charging filament 1 ) Cut the tip of the filament with a certain angle to make its insertion in the extruder easier 4 ) If you encounter a hard point while inserting the filament, engage the extruder and turn the drive wheel until the filament gets to the nozzle, melted filament should start coming out Filament Filament tip Drive wheel 2 ) Disengage the extruder Disengage by pushing here 3 ) Insert the filament in the extruder s inlet and push it as far as possible 5 ) Tighten the spring strongly by turning the knurled screw. Note: if the knurled screw is not tight enough, the filament will be badly driven inlet Knurled screw
18 PREPARATION 18 Extrusion test 1 ) In the «Print panel» tab, perform a extrusion of 50mm ) Verify that melted filament comes out of the nozzle regularly. If this is not the case, adjust accordingly the tension exerted on the filament from extruder, and this by turning the Knurled Screw of the extruder.
 Mount the calibration module on the printer s core and plug the jack connector on the emotronic board 4 ) Start the calibration using G32 command, it wil probe 3 points of the bed.")
19 PREPARATION / 19 Calibration process using command lines On mac OS computers the calibration processs must be done using Gcode commands, here s how to do this: 1 ) Make sure the printhead is at room temperature. 2 ) Mount the calibration module on the printer s core and plug the jack connector on the emotronic board 4 ) Start the calibration using G32 command, it wil probe 3 points of the bed. G32 3 ) Go to «Print Panel» tab. Home or initialize your printer using the G28 command. G28

 Home or initialize your printer G31 6 ) When done, save the grid values")
20 PREPARATION 20 5 ) When done, start the full bed calibration using G31 command, this will probe multiple points of the bed to optimize the first calibration. This is known as grid compensation strategy. Maximum Z height 8 ) Home or initialize your printer G31 6 ) When done, save the grid values using M374 command. M374 7 ) Remove and unplug the calibration module. Homing


21 PREPARATION / 21 9 ) Place a paper on the bed 10 ) Move the printhead down using the commands shown below in the manual control tab. Once the printhead is close enough from the paper, move the printhead down slowly by jogging down of 0,1mm at a time, repeat until the printhead touches the paper and holds it from moving. The calibration process is meant to be done once and not before every print. In some cases, the calibration could become unaccurate, after disassembling and reassembling structural parts of you printer per example, you should then calibrate again your printer. In case of troubles during the calibration process : Calibration may not be performed correctly. Usually, this comes from the fact that it resides some mechanicals plays on the machine. In this case, it will then be necessary to review the mounting of the printer so as to ensure that everything is tight and without play (smooth rods, ball joints, belts, pulleys, etc.). 11 ) Set the maximum Z height using the M306 Z0 command 12 ) Save using M500 M500
22 PREPARATION 22 Precise adjustment of the maximum height Objective : refine the height adjustment of the nozzle relative to the heatbed. Description : if the material hangs too much or not hangs well enough to the 3dBedFix coating, you may need to adjust the nozzle height. In the case the material doesn t hang well to the coating, please send the following GCODE command lines in the dedicated input field of the «Manual Control» tab : Input field for sending GCODE command Send G1 Z0 M306 Z0.1 M500 In the case where the material hangs too much to the coating and is difficult to unhook : G1 Z0.1 M306 Z0 M500 In both cases, the value «0.1» can be changed as necessary. You will then be able to launch an impression and check the following points of details : - material that does not hangs well to the 3dBedFix = nozzle too far from the 3dBedFix (adjust height) - material that hangs too much on the 3dBedFix = nozzle too close to the coating (adjust height)
23 PRINTING / 23 PRINTING

24 PRINTING 24 Spool Holder print You are about to start your first print. You will be print the spool holder, which will be mounted on the top plate of the MicroDelta Rework. 1 ) Load the Gcode called «spool_holder.gcode» from the TF card.
 and start heating the")
25 PRINTING / 25 2 ) Click on «Run» to start the print. Print will begin, your printer will initialize (homing) and start heating the extruder and eventualy the Heat bed.
26 PRINTING 26 CONGRATULATIONS! You successfully printed your first object! Go to the «Appendix» to find explanations about mounting the spool holder.
27 Appendix / 27 Appendix
28 Appendix 28 Mounting of the spool holder Objective : mount the spool holder on the top plate M3x8mm screw Printed spool holder part Thrust bearing

29 Appendix / 29 Result

30 Appendix 30 Spring filament pressure adjustment (emostruder) Objective : adjust the pressure exerted by the spring on the filament so that the drive is optimal and does not cause abnormalities. Description : depending on the type of filament used (PLA, G-FIL, ABS, etc.) and especially its hardness, it will be necessary to adjust the spring pressure so that the driving wheel does not mark the filament too much and does not block in its passage to the nozzle. This method ensures that the filament drive is operational while exerting pressure on the filament as low as possible. 1 ) Relieve the spring pressure completely by unscrewing the horizontal knurled screw of the emostruder 2 ) In the Repetier-Host software, with the 3D printer connected and turned on, from the «Manual control» tab, ask for a target temperature dedicated to the used filament and wait until it is reached ) If some filament is already engaged in the machine, remove it and cut it off to an healthy base not marked by the driving wheel. (with the end of the new filament bevelled in the winding direction of the spool or sample provided)
 At the same time, observe the filament coming out of the nozzle and check that the extrusion is continuous and homogeneous at a speed corresponding to the")
31 Appendix / 31 4 ) Engage the new unmarked filament to the nozzle. 5 ) Always in the «Manual Control» tab of Repetier-Host, ask for one or more slow extrusions of 100 mm. 100 Click the button to extrude 6 ) At the same time, observe the filament coming out of the nozzle and check that the extrusion is continuous and homogeneous at a speed corresponding to the speed of the driving wheel.
32 Appendix 32 7 ) If the filament does not come out of the nozzle: tighten the screw a little more until it is homogeneous.
 Download a 3D part, we suggest you the emotion Tech s keyring : https://data.emotion-tech.com/ftp/ressources_3d_emotion_tech/porte_clef_emotion-tech.")
33 Appendix / 33 Printing a 3D model 2 ) Import your model on Repetier-Host : In the «Object placement» tab, click on «Add STL file» Select your desired 3D model file and open Prerequisite : Fully calibrated 3D printer 1 ) Download a 3D part, we suggest you the emotion Tech s keyring : List of the objects your added Virtual representation of the objet on the print surface

34 Appendix 34 2 ) You can edit your object with many options : 3 ) Slice your object with the pre-configured Slic3r profile : In the «Slicer» tab, select «Slice with Slic3r». When done click on «Slice with CuraEngine»
35 Appendix / 35 4 ) When slicing is done, a virtualization of the printed object is generated, only one thing left is to click on «Print» button.
36 Appendix 36 To go further On regular basis updates for your MicroDelta Rework are uploaded on our website. You can find them in the «Support» section of the site, under «MicroDelta Rework / improvements.» Do not hesitate to regularly check that folder to keep your printer up-to-date.
37 Appendix / 37 PID calculation Preamble : The PID values are necessary for the temperature control of the heating elements. If you find that the target temperature is difficult to reach or the actual temperature varies a lot around the target temperature, it may be useful to recalculate the PID values. By GCODE commands : 1 ) Make sure the print head temperature is at room temperature. 2 ) Disable the secondary fans. 3 ) In the «Manual control» tab, use the input field for sending GCODE commands : Send the following command : M303 E0 S250 C8 Details : E0 = extruder number 1 S250 = target temperature at 250 C C8 = 8 cycles of regulations around the target temperature Once the command is sent, Repetier-Host logs will show you the progress of the calculation. When the calculation is finished, the new values P, I and D are indicated in the logs. 4 ) Send the following GCODE command to save : M500 If you have the LCD screen : In the menu of the screen is integrated an option to directly calculate the PID. Just go to the «Calibrate / PID hotend» menu.
38 Appendix 38 Maintenance A monthly maintenance of the 3D printer is recommended. Below are some recommendations: Using a brush, dedust the following: Emotronic board All the fans to ensure a good airflow Cold part of the printhead - To clean the printhead follow the guide dedicated to the Hexagon hotend on the following link: - Clean the teeth of the drive wheel using a sharp ended tool like a needle tip, the end of tweezers or a cutter blade. - Check & tighten the screws of the 3D printer. - Lubricate the various mechanical transmission elements with multipurpose grease. Recommandations Turning off your 3D printer : After printing, if you want to turn off the machine, wait until the print head cools down to room temperature to ensure that the print head doesnt get clugged. Transport : If the printer has to be transported by car or another mean of transport in which it could be subject to vibration, it is recommended to unplug all the motors from the emotronic board to avoid damaging it. Troubleshooting : A FAQ on the MicroDelta Rework is available on our website in the «Support» section, please refer to it to troubleshoot your printer, most problems could be solved through this tool!

 Remove the TF card by pressing it, you will hear a click indicating that the card is no longer locked and can be removed without damage to the")
 Then read this TF card with an external drive on your computer (very useful because the formatting is too long by USB")
39 Appendix / 39 Restore the TF card Objective : prepare the files of the TF card again in order to eliminate the corrupted files and defective cells. Description : for various reasons, the files present in the TF card and / or the cells of this card can be damaged. You will find through this procedure how to restore the TF card and the necessary files to MicroDelta Rework. 1 ) Remove the TF card by pressing it, you will hear a click indicating that the card is no longer locked and can be removed without damage to the reader. Press to eject and pull 2 ) Then read this TF card with an external drive on your computer (very useful because the formatting is too long by USB cable). 3 ) Perform a formatting of the TF card in MS-DOS FAT format using the tool named «Disk Utility». Click the «Erase» button Select the Micro TF card Make sure that options are configured as shown Click on «Erase»
 Go inside the firmware folder, select all the files and finally copy them to the root of the TF card.")
40 Appendix 40 4 ) Download the latest firmware on our website «reprap-3d-printer.com» in the support section, in the tree dedicated to your machine. Firmware for heating bed with or without LCD Firmware without heating bed with or without LCD 5 ) Go inside the firmware folder, select all the files and finally copy them to the root of the TF card. 6 ) Eject the TF card (right click on the TF card then «Eject»). Click here 7 ) Disconnect the Micro TF card reader from the computer.
41 Appendix / 41 9 ) Insert the TF card into the emotronic drive. Press to the click (the card is locked) 10 ) Press the «Reset» button located on the lower metal part to take into account the new firmware. 11 ) In the TF card, make sure that the «firmware.bin» file is changed to «firmware.cur». 12 ) On the emotronic board, between the USB connector and the auto-leveling sensor connector, make sure that: - LED1 remains on - LED2 and LED3 flash continuously - LED4 remains on LEDs LED1 LED2 LED3 LED4 From there, the emotronic card should be recognized by the Device Manager and the contents of the TF card should be displayed in the Files Explorer. It will then only remain to realize again the calibration of the 3D printer.
42 Appendix 42 Thank you for choosing us!
USER S GUIDE. Documentation Version 1.2.7
 Documentation version 1.2.7 USER S GUIDE INTRODUCTION 2 INTRODUCTION INTRODUCTION / 3 INTRODUCTION Objective : Provide a visual guide of the different steps to set-up and get started using the MicroDelta
USER S GUIDE. Documentation Version 1.0.0
 Documentation version 1.0.0 tt USER S GUIDE INTRODUCTION 2 INTRODUCTION INTRODUCTION / 3 INTRODUCTION Target : Provide a visual guide of the different steps required to use an I3 Metal Motion 3D printer.
Documentation version Prusa i3 Rework USER GUIDE REV 1.5. Document Version 1.1.8
 Documentation version 1.1.8 Prusa i3 Rework USER GUIDE REV 1.5 2 INTRODUCTION Target : Prupose a visual guide of the differents steps to build and use a Prusa i3 Rework. Authors of this document : emotion
Geeetech Aluminum Prusa I3. User Manual
 Geeetech Aluminum Prusa I3 User Manual 1 Safety Instructions Building the printer will require a certain amount of physical dexterity, common sense and a thorough understanding of what you are doing. We
GEEETECH. Me Creator2 printers contain heated moving parts. Never reach inside the printer while it is in operation or before it has cooled down.
 ME CREATOR 2 SAFETY INSTRUCTION Do read all the instructions and cautionary markings in this manual before operating your Me Creator. Me Creator2 printers contain heated moving parts. Never reach inside
M2 3D Printer V4 M2 3D Printer
 M2 3D Printer V4 Contents 2 Important Safeguards 3 Welcome 4 M2 Features 6 Other products included with your printer 7 Set up 9 Slicing.STL or.obj files 10 Maintenance and Support 11 Warranty 12 About
ENJOY Introduction. Software Installation* Hardware. Calibration Settings. Print test. Appendex. Install print S/W Driver Install
 Quick Start Manual 1 ENJOY Introduction C O N T E N T S 6 5 Appendex 4 Print test 3 2 Hardware Calibration Settings Software Installation* Install print S/W Driver Install Hardware Intro Cable installation
Portabee GO. Mobile 3D Printer. Portabee 3D. Romscraj. Software & Support. Manufacturing & Engineering.
 Portabee GO Mobile 3D Printer Portabee 3D Software & Support http://portabee3d.com support@portabee3d.com Romscraj Manufacturing & Engineering http://romscraj.com contact@romscraj.com A. Software Package
Geeetech Duplicator 5 3D printer. User Manual
 Geeetech Duplicator 5 3D printer User Manual Contents Safety Instructions... 4 1.Software Resources... 5 1.1 Repetier-Host... 5 1.2 Driver... 5 1.3 Arduino IDE... 6 2.Connect the Printer... 6 3.Printer
Geeetech Rostock mini G2 & G2s pro Quick Starter Manual
 Geeetech Rostock mini G2 & G2s pro Quick Starter Manual Please DO NOT rush to start your first printing after assembly, as this is a DIY kit, some parameters of the printer may be different from each other,
Panowin F1. User Manual
 Panowin F1 User Manual 1 PANOWIN TECHNOLOGIES CO.,LTD. WARNING power outlet. CAUTION: In case of emergency unplug the Panowin F1 from the WARNING: Carefully monitor the Panowin F1 during operation. Do
Written By: Jakub Dolezal
 5. Preflight check Written By: Jakub Dolezal 2018 manual.prusa3d.com/ Page 1 of 17 Step 1 P.I.N.D.A. adjustment (part 1) Ensure the printer is turned off and not plugged in. Note your extruder is slightly
Written By: Josef Prusa
 6. Preflight check The last things you should check before the first print Written By: Josef Prusa 2018 manual.prusa3d.com/ Page 1 of 13 Step 1 P.I.N.D.A. adjustment, phase 1 Ensure the printer is turned
USING YOUR BIGBOT. 1/18/2017 V0.1
 USING YOUR BIGBOT www.bigbot-3d.com 1/18/2017 V0.1 FOREWORD: YOUR PRINTER IS REPRAP, WHICH STANDS FOR "REPLICATING RAPID PROTOTYPERS". THIS MEANS IT CAN PRINT THE PARTS THAT ARE CUSTOM FOR THIS MACHINE,
DeltaMaker 3D Printer Getting Started
 DeltaMaker 3D Printer Getting Started Last Updated: December 2014 Table of Contents TABLE OF CONTENTS 2 WELCOME 3 SECTION 1: UNPACKING/SETUP 4 REMOVING THE PRINTER FROM THE BOX 4 INSTALLING THE FILAMENT
SeeMeCNC Guides. Configuring Artemis
 SeeMeCNC Guides Configuring Artemis Configuring your Artemis printer. Connecting it to your network and getting everything dialed in for successful printing. Written By: SeeMeCNC 2018 seemecnc.dozuki.com/
Instruction Manual. RS 3D Printer
 Instruction Manual RS 3D Printer 1) GENERAL This instruction manual contains important information regarding the installation, operation, maintenance and storage for RS 3D Printer. Please read these instructions
M2 3D Printer V4 Rev. D
 M2 3D Printer V4 Rev. D Contents 2 Important Safeguards 3 Welcome 4 M2 Features 6 Other products included with your printer 7 Set up 9 Slicing.STL or.obj files 10 Maintenance and Support 11 Warranty 12
A GUIDE TO GETTING STARTED
 Florida Public Library Printing A GUIDE TO GETTING STARTED Prepared for the Florida Public Library by Robert Persing Table of Contents Section-A. Download the software... 3 Section-B. Install the software...
3d Printing with the Prusa I3 Operation & Printing via a USB Cable
 3d Printing with the Prusa I3 Operation & Printing via a USB Cable Instructions for: Prusa I3 Printer Set-up Slic3r Software Use Pronterface Software Use Prusa I3 - Parts Identification Prusa I3 Printer
SOFTWARE SETUP Pronterface...2 Cura BED CALIBRATION Using Pronterface...11 Using LCD...13
 USER MANUAL TABLE OF CONTENTS SOFTWARE SETUP Pronterface...2 Cura 15.04...3 BED CALIBRATION Using Pronterface...11 Using LCD...13 LOAD/UNLOAD FILAMENT Using LCD (extruder 0 only)...14 Using PRONTERFACE...15
SHENZHEN GETECH TECHNOLOGY CO., LTD. Geeetech A10 3D Printer. User Manual (V2.0)
") Geeetech A10 3D Printer User Manual (V2.0) 1 Content 1 Attention... 3 1.1 Safety instruction... 3 1.2 Factory test before delivery... 3 2 Printer display... 4 3 Assembling... 7 3.1 Assembling the main
Geeetech A10 3D Printer User Manual (V2.0) 1 Content 1 Attention... 3 1.1 Safety instruction... 3 1.2 Factory test before delivery... 3 2 Printer display... 4 3 Assembling... 7 3.1 Assembling the main
USER MANUAL Resolution 0.02mm Speed 300mm/second Software: Wanhao Maker
 1 Duplicator 5S & 5S MINI Desktop 3D Printers USER MANUAL Resolution 0.02mm Speed 300mm/second Software: Wanhao Maker 2014/2015 Wanhao USA 3 Table of Contents Welcome 1 Printer Specifications 2 Unboxing
MAKERGEAR USER GUIDE. V4 Rev. E Made in the USA since 2009
 MAKERGEAR USER GUIDE M2 V4 Rev. E Made in the USA since 2009 Contents 1 - Welcome 2 - Warning & Important Safeguards 4 - What's Included 5 - Set Up 8 - Slicing.STL or.obj Files 10 - Changing Filament 11
Dreamer Series User Manual
 Dreamer Series User Manual Welcome to the world of the Dreamer. To ensure that you have the best possible user experience, it s important that you follow this user manual. Let s get started! In Parts I
English. Quick Guide
 English Quick Guide Specification Product Overview Button and Indicator light Unpacking Accessory Checklist Important Safety Notes Extruder module installation Accessory installation XYZware operation
Please carefully read the safety instructions before get started.
 Safety Instructions Please carefully read the safety instructions before get started. ANYCUBIC 3D printer generates high temperature. Do not reach inside of the printer during operation. Allow time for
SHENZHEN GETECH TECHNOLOGY CO LTD. Geeetech A10M 3D Printer. User Manual (v2.0)
") Geeetech A10M 3D Printer User Manual (v2.0) 1 Content 1 Attention... 3 1.1 Safety instructions... 3 1.2 Factory test before delivery... 3 2 Printer display... 4 3 Assembling... 7 3.1 Assembling the main
Geeetech A10M 3D Printer User Manual (v2.0) 1 Content 1 Attention... 3 1.1 Safety instructions... 3 1.2 Factory test before delivery... 3 2 Printer display... 4 3 Assembling... 7 3.1 Assembling the main
JGAURORA 3D PRINTER MODEL: A-4 USER GUIDE
 JGAURORA 3D PRINTER MODEL: A-4 USER GUIDE 1 Contents 1. Preface...3 1.1 Introduction...3 1.2 Safety matters... 3 1.3 Filament requirements...3 1.4 Environmental requirements...3 2. About A-4... 4 2.1 Basic
QUICK START GUIDE ENTER AN ENVIRONMENT OF PROFESSIONAL 3D PRINTING
 QUICK START GUIDE ENTER AN ENVIRONMENT OF PROFESSIONAL 3D PRINTING MEET THE ZORTRAX M200 Zortrax M200 3D printer transforms virtual projects into three-dimensional reality. It is used to prototype and
Model: 3-Axis High Quality Self-Assembled 3D Printer Kit. Panowin F1
 ESTIMATE No.: Client: Telephone: E-mail: Address: City, State: Contact: Cell-Phone: Fax: Zip Code: Country: Panowin Technologies Co., Ltd. Model: 3-Axis High Quality Self-Assembled 3D Printer Kit Panowin
Removal and Installation8
 8 Screw Types 8-4 Top Cover Assembly 8-5 Left Hand Cover 8-6 Right Hand Cover 8-10 Front Panel Assembly 8-14 Left Rear Cover 8-15 Right Rear Cover 8-16 Extension Cover (60" Model only) 8-17 Media Lever
Geeetech A10M. Desktop 3D Printer USER MANUAL
 Geeetech A10M Desktop 3D Printer USER MANUAL Terms Please be advised of the following terms (the Terms ) regarding this User Manual (this Manual ): All information in this Manual is subject to change at
User Guide. M2 V4 Rev. E. Made in the USA since 2009
 jk User Guide M2 V4 Rev. E Made in the USA since 2009 Contents 1 Welcome 2 Warning & Important Safeguards 4 What's Included 5 Set Up 8 Slicing.STL or.obj Files 10 Changing Filament 11 M2 Features 15 What's
Operation Instruction
 JGAURORA 3D Printer Model:Z-603S Operation Instruction www.jgaurora3d.com Read it carefully before printing and keep it properly. - 0 - - 1 - Z- 603S model is designed FDM 3d printer by Shenzhen Aurora
Complete kit assembly step
 BQ 3D printer Prusa i3 Hephestos Complete kit assembly step Prusa present an evolution of i3, the most popular 3D printer RepRap community. In our advanced version, Hephestos Find significant improvements:
Repetier-Host Documentation
 Repetier-Host Documentation Installation Prerequisites Before you start with the installation, you should check if your computer meets the requirements. Currently available computers should have no problems
3D BIO-PRINTER. USER MANUAL Version D Cultures
 3D BIO-PRINTER 3D Cultures USER MANUAL Version 2.0 Product pictures are for reference only. Color(s), size, parts, and interface may vary. Preheating is not recommend with the use of cells. This manual
Repetier-Host Documentation for use with Kora Pro 3D PC
 Repetier-Host Documentation for use with Kora Pro 3D PC Installation Prerequisites Before you start with the installation, you should check if your computer meets the requirements. Currently available
Repetier-Host Documentation
 Repetier-Host Documentation Installation Prerequisites Before you start with the installation, you should check if your computer meets the requirements. Currently available computers should have no problems
Micro USB Dock for Circuit Playground
 Micro USB Dock for Circuit Playground Created by Ruiz Brothers Last updated on 2017-12-07 04:25:47 AM UTC Guide Contents Guide Contents Overview Parts, Tools & Components USB DIY Connector Shell - Type
da Vinci 1.0 Pro Quick Guide
 US da Vinci 1.0 Pro Quick Guide Product Description Print Parameters Description Support Details Product Model: da Vinci 1.0 Professional da Vinci 1.0 Pro Product Description Product Overview Cartridge
SeeMeCNC Guides 2 INTO 1 DUAL FILAMENT FEED ADAPTER INSTALL
 SeeMeCNC Guides 2 INTO 1 DUAL FILAMENT FEED ADAPTER INSTALL These are still in development - Be ready to troubleshoot firmware/software configuration for your setup when purchasing these adapters. Written
ideamaker Manual
 ideamaker Manual Using ideamaker... 2 Basic information... 2 What is ideamaker?... 2 Where to download ideamaker?... 2 Install ideamaker... 3 Let s Print!... 6 How to use ideamaker?... 23 Interface...
Cura (Documentation for version )
") Cura (Documentation for version 15.04.06) Getting Started Installation To start the installation of Cura, download it first. After downloading, open the installer and run the installation wizard to complete
Cura (Documentation for version 15.04.06) Getting Started Installation To start the installation of Cura, download it first. After downloading, open the installer and run the installation wizard to complete
Software Manual. Revision 1.3
 Software Manual Revision 1.3 Copyright 2015 by Kudo3D. This material may be distributed only subject to the terms and conditions set forth in the Creative Commons Attribution-NonCommercial-NoDerivatives
Geeetech A10. Desktop 3D Printer USER MANUAL
 Geeetech A10 Desktop 3D Printer USER MANUAL Terms Please be advised of the following terms (the Terms ) regarding this User Manual (this Manual ): All information in this Manual is subject to change at
da Vinci Super Quick Guide da Vinci Super Safety Precautions Product instructions Unboxing and Installation Product specification
 September. 2017 da Vinci Super Quick Guide ENG Safety Precautions Product instructions Unboxing and Installation Product specification Function Operation and Instructions Setting Print Supporting information
Easy use of Repetier-Host software
 Easy use of Repetier-Host software Examples base on version Repetier-Host 1.06 1. Repetier-Host overview Repetier Host is an easy to use software for 3D printing. The main functions include manual debugging
DIY PRINTER INSTALLATION AND OPERATION INSTRUCTION
 CTC DIY I3 PRINTER INSTALLATION AND OPERATION INSTRUCTIONS Thank you for buying and using DIY 3D printer produced by CTC Please read the installation and operation instruction carefully before use Company
Portal Delta Pro 3D printer
 Portal Delta Pro 3D printer User s Manual v1.0 Welcome to the world of 3D printing! Thank you for your purchase of the Mass Portal 3D printer we hope that it will serve you well and even exceed your expectations.
Cura - DUET Dual Extrusion Setup
 SeeMeCNC Guides Written By: SeeMeCNC 2018 seemecnc.dozuki.com/ Page 1 of 15 INTRODUCTION Please note that dual extrusion is for advanced users. You should have some advanced knowledge on some G-Code and
Product User Manual. IdeaWerk 3D Printer WT150
 Product User Manual IdeaWerk 3D Printer WT150 Contents Contents 1. Unpack and checking... 1 1.1 Check the Machine... 1 1.2 Check the Accessories... 3 2. Brief Introduction... 3 2.1 Precautions and Safety...
Quickstart Guide Kora Pro 3D PC Printer
 Quickstart Guide Kora Pro 3D PC Printer 1 Rev001/01/2018 Kora Pro PC General Precautions and Advice Only use original accessories from or approved by the manufacturer Always read the manual before initial
3D Printing Getting Started!
 ARCHITECTURE & LANDSCAPE ARCHITECTURE 3D Printing Getting Started! White filament is free to students for academic use. Where do I buy filament? NORTH DAKOTA STATE UNIVERSITY www.makerbot.com/store www.ultimachine.com/pla
PROGRESS REVIEW 1. Astha Prasad. Team F / ADD_IN. Teammates: Daniel Berman, Nikhil Baheti, Ihsane Debbache ILR #2. October 22 nd, 2015
 PROGRESS REVIEW 1 Astha Prasad Team F / ADD_IN Teammates: Daniel Berman, Nikhil Baheti, Ihsane Debbache ILR #2 October 22 nd, 2015 Individual Progress For this week, my work was mostly focused on two parts:
Simple Instructions for 808 HD Car Key Micro Camera (#16)
") 808 #16 Manual R2 1 of 6 Simple Instructions for 808 HD Car Key Micro Camera (#16) Thank you for your purchase of our 808 Car Key Micro-camera (#16). If this is the first time you are using a product of
808 #16 Manual R2 1 of 6 Simple Instructions for 808 HD Car Key Micro Camera (#16) Thank you for your purchase of our 808 Car Key Micro-camera (#16). If this is the first time you are using a product of
XD10. High Resolution Desktop 3D Printer
 XD10 High Resolution Desktop 3D EXTRUSION Single-feed Bowden tube All-metal hotend and feeder Extrusion temperature up to 300 C Included nozzle: 0.2 mm BUILD CHAMBER Enclosed, illuminated chamber Build
Portable Qi Charger. Created by Ruiz Brothers. Last updated on :20:38 AM UTC
 Portable Qi Charger Created by Ruiz Brothers Last updated on 2017-12-05 01:20:38 AM UTC Guide Contents Guide Contents Overview Prerequisite Guides Parts, Tool & Supplies Universal Qi Wireless Charging
Well Link Industries Limited
 Well Link Industries Limited 3D Printing 3D printing is no longer a science fiction. It helps to change from prosthetics and regenerative medicine to structures in space. In 2013, second term State of
SAFETY WARNINGS AND GUIDELINES... 4 INTRODUCTION... 5 FEATURES... 5 CUSTOMER SERVICE... 5 PACKAGE CONTENTS... 6 PRODUCT OVERVIEW Front View...
 CONTENTS SAFETY WARNINGS AND GUIDELINES... 4 INTRODUCTION... 5 FEATURES... 5 CUSTOMER SERVICE... 5 PACKAGE CONTENTS... 6 PRODUCT OVERVIEW... 7 Front View... 7 Rear View... 8 Bed Assembly... 9 Front and
Rev.1. Spare parts price list for representatives for Cosmic 48R & 48RX
 Spare parts price list for representatives for Cosmic 48R & 48RX 1 Spare parts price list for representatives for Cosmic 48R & 48RX Drw. no. Ref. no. Part no. Description Unit Date: Apr. 23, 2015 Used
Quick Start Guide. including AutoMaker. Version 1.0
 Quick Start Guide including AutoMaker Version 1.0 NOT FOR MEDICAL USE Version 1.0 Welcome Package Contents Check your product package for the following items. 2m USB A-B Cable IEC C5 Power Cable Robox
3D Prototyping X1 3D Printer. User Manual V1.3
 3D Printer User Manual V1.3 COPYRIGHT This document is copyrighted and contains proprietary information that is the property of 3D Prototyping Pty Ltd. The user does not have the right to copy, reproduce,
300 DIY 3D PRINTER KIT
 300 DIY 3D PRINTER KIT 1. VERSIONS...2 2. FIRST CHECKS BEFORE TURNING B2X300 ON...3 2.1 PARALLELISM BETWEEN LINEAR GUIDES IN Z...3 2.2 PARALLELISM BETWEEN LINEAR GUIDES IN Z AND TRAPEZOIDAL THREADED RODS...4
Simple Instructions for 808 HD Car Key Micro Camera (#16)
") Simple Instructions for 808 HD Car Key Micro Camera (#16) Thank you for your purchase of our 808 Car Key Micro-camera (#16). If this is the first time you are using a product of this kind, please follow
Simple Instructions for 808 HD Car Key Micro Camera (#16) Thank you for your purchase of our 808 Car Key Micro-camera (#16). If this is the first time you are using a product of this kind, please follow
Please always refer to for an updated version of this 3D printing handbook (PDF download).
.") Please always refer to http://www.prusa3d.com/drivers/ for an updated version of this 3D printing handbook (PDF download). Translated versions of the handbook are available at: Czech: www.prusa3d.cz/ovladace/
Please always refer to http://www.prusa3d.com/drivers/ for an updated version of this 3D printing handbook (PDF download). Translated versions of the handbook are available at: Czech: www.prusa3d.cz/ovladace/
Technical Support: CUBE USER MANUAL
 CUBE THE DESKTOP 3D PRINTER USER MANUAL 2012-12-05 1 Contents 1 Installing software...3 1.1 Installing Python... 3 1.2 Installing ReplicatorG... 5 2 Pre-print checks...9 2.1 Power up...9 2.2 Connect to
Printing via the SD Card. SeeMeCNC Guides. Written By: JJ Johnson seemecnc.dozuki.com Page 1 of 7
 SeeMeCNC Guides Printing via the SD Card Written By: JJ Johnson 2017 seemecnc.dozuki.com Page 1 of 7 INTRODUCTION Printing via the SD card reader on your printer is a much more stable solution compared
Titan Aero Repetier Configuration
 Titan Aero Repetier Configuration Set up your Repetier Firmware to support your new Titan Aero. Written By: Gabe S. 2017 e3d-online.dozuki.com/ Page 1 of 12 Step 1 Download Marlin First things first: you're
User Guide ADIMLab-gantry 3D printer
 User Guide ADIMLab-gantry 3D printer Version V1.3.2 1 Contents 一 Overview... 4 二 Thanks and Commitment... 6 三 What is 3D Printer... 7 3.1 3D printing steps... 7 3.2 3D Modeling... 7 3.3 Slice output 3D
HP Pavilion dv7-6c90us Cooling fan Replacement
 HP Pavilion dv7-6c90us Cooling fan Replacement This guide will walk you through the process of replacing the cooling fan in an HP Pavilion dv7 laptop. Written By: Angelina Clayton ifixit CC BY-NC-SA www.ifixit.com
- Software KISSlicer Guide - [Z] ArrayZ C4C 3D Printer
![- Software KISSlicer Guide - [Z] ArrayZ C4C 3D Printer](/thumbs/92/108197208.jpg "- Software KISSlicer Guide - [Z] ArrayZ C4C 3D Printer") - Software KISSlicer Guide - ArrayZ C4C 3D Printer Software KISSlicer Guide We are suggesting customers using Kisslicer software as a 3D model slicing program, ArrayZ C4C 3D Printer has many feature is
- Software KISSlicer Guide - ArrayZ C4C 3D Printer Software KISSlicer Guide We are suggesting customers using Kisslicer software as a 3D model slicing program, ArrayZ C4C 3D Printer has many feature is
Series 1. User Manual. Type A Machines
 Series 1 User Manual Type A Machines Type A Machines Inc. 2013 Type A Machines Inc. This document is licenced by Creative Commons Attribution-NonCommercial-ShareAlike (CC BY-NC-SA) Users are free to remix,
4. Using Cura to Set Up Your Auto-Leveling Probe and Create Your First Print
 4. Using Cura to Set Up Your Auto-Leveling Probe and Create Your First Print Give a short summary. Written By: Printrbot Support INTRODUCTION Outline what you are going to teach someone how to do. 2015
D300 Professional Desktop 3D Printer
 D300 Professional Desktop 3D Printer - Multiple hotend options - Advanced software - Enclosed chamber - Built to order AUTOMATION READY Automatic calibration Multiple hotend options Controlled chamber
Slic3r User Guide. By Lorenzo Cantini (Kent s Strapper) and Ivan Bortolin Translation by Linda Anticoli 10/08/2012
 and Ivan Bortolin Translation by Linda Anticoli 10/08/2012") Slic3r User Guide By Lorenzo Cantini (Kent s Strapper) and Ivan Bortolin Translation by Linda Anticoli 10/08/2012 2 Contents Overview i 1 Installation and first run 1 1.1 Installation........................................
Slic3r User Guide By Lorenzo Cantini (Kent s Strapper) and Ivan Bortolin Translation by Linda Anticoli 10/08/2012 2 Contents Overview i 1 Installation and first run 1 1.1 Installation........................................
Hydra Super-S LCM. 4-Bay RAID Storage Enclosure (3.5 SATA HDD) User Manual July 30, v1.2
 User Manual July 30, v1.2") 4-Bay RAID Storage Enclosure (3.5 SATA HDD) User Manual July 30, 2009 - v1.2 EN Introduction 1 Introduction 1.1 System Requirements 1.1.1 PC Requirements Minimum Intel Pentium III CPU 500MHz, 128MB RAM
4-Bay RAID Storage Enclosure (3.5 SATA HDD) User Manual July 30, 2009 - v1.2 EN Introduction 1 Introduction 1.1 System Requirements 1.1.1 PC Requirements Minimum Intel Pentium III CPU 500MHz, 128MB RAM
Multi-Mount for Mac Pro " to 5.25" Drive Bay Converter Bracket. Assembly & Installation Manual
 Multi-Mount for Mac Pro 2009-2010 3.5" to 5.25" Drive Bay Converter Bracket Assembly & Installation Manual Introduction 1 INTRODUCTION 1.1 System Requirements 1.1.1 Computer Requirements 1.1.2 Hard Drive
SIMPLEST Bltouch/3Dtouch guide for Creality CR-10/CR- 10s/Ender 2/Ender 3 printers created by Danny Walmsley.
 SIMPLEST Bltouch/3Dtouch guide for Creality CR-10/CR- 10s/Ender 2/Ender 3 printers created by Danny Walmsley. The aim of this guide is to bring auto bed leveling to the masses by making it simple and affordable
Next Generation 3D Printer
 Next Generation 3D Printer By Fahad Alahmari, Sebastian Arevalo, Brad Evans, Tomas Garcia, Benjamin Gouveia and Jake Work Team 11 Midpoint Report Document Submitted towards partial fulfillment of the requirements
User Manual V 0.1. Download the full user manual at
 User Manual V 0.1 Download the full user manual at www.afinia.com/support Index Chapter 1 Product Description Chapter 2 Prepare for Your First 3D Print Chapter 3 Machine Settings Chapter 4 Print Settings
Select Mini 3D Printer V2
 Select Mini 3D Printer V2 P/N 15365, 21711, 21872, 24166 User's Manual CONTENTS SAFETY WARNINGS AND GUIDELINES... 3 INTRODUCTION... 4 FEATURES... 4 CUSTOMER SERVICE... 5 PACKAGE CONTENTS... 5 PRODUCT OVERVIEW...
Taurus Super-S LCM. Dual-Bay RAID Storage Enclosure for two 3.5 Serial ATA Hard Drives. User Manual July 27, v1.2
 Dual-Bay RAID Storage Enclosure for two 3.5 Serial ATA Hard Drives User Manual July 27, 2009 - v1.2 EN Introduction 1 Introduction 1.1 System Requirements 1.1.1 PC Requirements Minimum Intel Pentium III
TOC DX1-K Operations Manual
 TOC DX1-K Operations Manual - 1 - General Description The TOC DX1-K is a single channel wireless lens control system. The system can be used on most broadcast or cinema lenses. The TOC DX1-K includes a
think big, print huge
 think big, print huge quick start guide Table of Contents a Receiving and uncrating 5 b bed level & z home 11 c Loading filament 19 d SOFTWARE 23 e Setup 23 f preparing a print 26 g printing on gigabot
Sony NEX-7 Screen Replacement
 Sony NEX-7 Screen Replacement If your camera's screen is broken or non functioning, this guide will show you how you can replace the screen. Written By: Jay Miley ifixit CC BY-NC-SA www.ifixit.com Page
MONOPRICE. MP Mini Delta 3D Printer. User's Manual P/N 21666
 MONOPRICE MP Mini Delta 3D Printer P/N 21666 User's Manual CONTENTS SAFETY WARNINGS AND GUIDELINES... 3 INTRODUCTION... 4 FEATURES... 4 CUSTOMER SERVICE... 5 PACKAGE CONTENTS... 5 PRODUCT OVERVIEW... 6
UP! Quick Start Guide
 Personal Portable 3D Printer UP! www.pp3dp.com 1. Assemble Printer Open the box, take out the printer and accessories. Assemble the parts contained in the box as following procedure: 1. Unscrew the M4
USER GUIDE RADDS. December 2014 Version Max3dshop
 USER GUIDE RADDS December 2014 Version 1.01 Max3dshop http://max3dshop.org USER GUIDE ATTRIBUTION-NONCOMMERCIAL-SHAREALIKE 3.0 UNPORTED (CC BY-NC-SA 3.0) 2 1 TABLE OF CONTENTS USER GUIDE 2 Introduction...
Ender 3 Series 3D Printer Quick Start Guide
 Ender 3 Series 3D Printer Quick Start Guide This guide is for the Ender 3 Series of 3D printers. Select the correct input voltage to match your local mains (220V or 110V) Because of software/hardware upgrades
CraftBot USER MANUAL THE ULTIMATE 3D PRINTER
 1 USER MANUAL 2 THE ULTIMATE 3D PRINTER 2 TABLE OF CONTENTS INTRODUCTION 3 IMPORTANT 4 WARNINGS 4 CAUTION! 5 CONTENTS OF THE BOX 5 INTRODUCING THE CRAFTBOT 3D PRINTER 6 UNPACKING THE CRAFTBOT PRINTER 7
da Vinci Jr.1.0 April 2016 da Vinci Junior 1.0w 3D Printer da Vinci Jr.1.0w Quick Guide HD23F1JW0N1
 da Vinci Junior 1.0w 3D Printer w Quick Guide P 1 Product Overview A: Filament movement area B: Feed module C: Detector D: Extruder E: Filament F: Print bed G G: SD card port (Storage format: FAT32) H:
TROUBLESHOOTING GUIDE
 TROUBLESHOOTING GUIDE YOU SHOULDN'T ENCOUNTER many problems when using your Vector 3 printer, however, occasionally things can go wrong. Before contacting Customer Services, please consult this list of
Huawei P9 Display Assembly with Frame Replacement
 Huawei P9 Display Assembly with Frame Replacement Replace the display assembly including the frame in your Huawei P9 smartphone. Written By: Dominik Schnabelrauch ifixit CC BY-NC-SA www.ifixit.com Page
User Guide Dreamer Desktop 3D Printer
 User Guide Dreamer Desktop 3D Printer Dreamer User Guide www.ff3dp.com 1 Dreamer User Guide www.ff3dp.com 2 CONTENTS WELCOME TO FLASHFORGE DREAMER A. How to use this manual B. The FlashForge Experience
TT230SM THERMAL TRANSFER PRINTER USER S MANUAL
 TT230SM THERMAL TRANSFER PRINTER USER S MANUAL Operations Overview Unpacking and Inspection This printer has been specially packaged to withstand damage during shipping. Please carefully inspect the packaging
Replacing the TFM coupler
 Repair manual Replacing the TFM coupler Instructions The TFM coupler is a key component of the hot end. It allows filament to flow smoothly through it from the Bowden tube and towards the nozzle. The coupler
Multi-Mount for Mac Pro to 5.25 Drive Bay Converter Bracket. Assembly & Installation Manual
 Multi-Mount for Mac Pro 2009-2010 3.5 to 5.25 Drive Bay Converter Bracket Assembly & Installation Manual 1 INTRODUCTION 1.1 System Requirements 1.1.1 Computer Requirements 1.1.2 Hard Drive Requirements
Sony Xperia Z3 Compact Teardown
 Sony Xperia Z3 Compact Teardown Complete Sony Xperia Z3 Compact teardown. Written By: Sophia ifixit CC BY-NC-SA www.ifixit.com Page 1 of 11 INTRODUCTION Complete teardown of the Sony Xperia Z3 Compact.