Module 003: Introduction to the Arduino/RedBoard
|
|
|
- Deborah Porter
- 5 years ago
- Views:
Transcription
 or a clone manufactured by Sparkfun called the RedBoard (for obvious reasons). The RedBoard is a clone.")

1 Name/NetID: Points: /5 Module 003: Introduction to the Arduino/RedBoard Module Outline In this module you will be introduced to the microcontroller board included in your kit. You bought either An Arduino Uno (or other Arduino board) or a clone manufactured by Sparkfun called the RedBoard (for obvious reasons). The RedBoard is a clone. This means that the it behaves identically to the popular Arduino Uno. All of the inputs and outputs have the same function, the inputs and outputs behave electrically the same and it is programmed in the same way. Arduino Hardware The figure below shows a visual comparison of the Arduino Uno to the Sparkfun RedBoard. Price is often the reason for choosing a clone over the original, but the Arduinos are typically made of better parts and the microprocessor is in a socket so it can be removed for embedded applications. An in-depth comparison is found at the Sparkfun webpage Figure 1: Arduino compared to Sparkfun s RedBoard Introduction to the Arduino/RedBoard

2 In the margin is the figure that Sparkfun uses to highlight the parts of the board that most users need to know about to use the board effectively. Most of the listed parts are those directly accessible to the casual user. Hardware Interface Pins to External Circuitry Digital Pins Analog Pins Power Pins Pins that can be configured as inputs or outputs. Digital means that the voltage measured can only have two values 0V or 5V. Some of the pins have additional functionality described in a later portion of the lab. Pins that input a continuous voltage that the onboard processor digitizes which means that the voltage range 0-5V is mapped onto integer values of Pins that can be used to power the Arduino board and can source a regulated 3.3V and 5V. Several GND pins are provided. Reset Button Useful Board Features This button interrupts the program running on the board and restarts it from the beginning. USB Connector This is a mini USB port that is used to connect the board to a USB port on a computer. This is the interface by which the programs loaded into the microcontroller are downloaded. Power is also provided through this port. Pin 13 LED An LED that is connected to pin 13 if the LED is on then the voltage at pin 13 is 5V if it is off the voltage is 0V. This a useful debugging feature. But only 1??? Serial LEDs The serial LEDs indicate the traffic on the receive and transmit pins. The computer and many other devices communicate to the board serially. As you upload programs to the board or communicate to the serial port using coded statements you can see the traffic as these pins flicker when data is being transmitted and received. Barrel Jack Connector This jack is used to connect a battery to provide power to the board so that the board can be disconnected from the computer. Power LED Indicates that the board has power. However, you are not the casual user. So let s look at the board as an engineer would when assessing the proper hardware to use in a design project.
3 The Embedded Processor Most engineering products, even the humble light bulb, now comes with a computer of some sort embedded in the hardware. From the comfort of your bed, you can remotely turn on and off your lights. Household appliances like your oven and refrigerator have not had hardware switches on them for decades. Nearly everything has a computer in it. How did the engineers who designed and built these products develop them to include these ubiquitous digital devices? The design procedure of the analog part of products has a long history and much shared knowledge. Each sub-circuit in the design usually serves one purpose a voltage regulator, a filter, a mixer If the design engineer decides that a digital interface or other digital circuitry would benefit the design it is likely that a microprocessor will be embedded in the product. The presence of the microprocessor introduces a new level of complexity and possible enhancements to almost any project. It has many inputs and outputs that can provide control based on environmental inputs from sensors as well as complex decision-making functions. As an engineer how do you begin to assess the role of a microprocessor in a design and how to address the hardware and software issues associated with your design. Where do you begin? For this lab we have made one decision for you (though you are really welcome to use any processor you wish) by pushing the Arduino boards. The Arduino product line (see for a clickable list) has been embraced by the hobby community because of the simple, robust design and availability of approachable software support products for programming and controlling the products. The Arduino Uno board is powered by the ATMega328P microprocessor. The figure below shows how this processor fits into the taxonomy of commonly used microprocessors. As you enter into your own design projects in the future you will become more familiar with the different types of processors and will know what all the designations mean. Eventually, you will be able to choose for yourself. The ATMega328 is produced Atmel Semiconductors. The processor uses an architecture based on a word length of 8-bits, it runs at a clock speed of 16Mhz, the memory is embedded onboard the processor itself, and it follows the more elegant RISC approach. The Reduced Instruction Set (RiSC pronounced risk ) processor uses a simple architecture based on a few wellchosen assembly level instructions. Thereby, relying on speed and flexibility to gain functionality. Other processors have a very complex set of assembly level instructions, often associated with a complicated architectural structure.
4 Research online or in the library the distinction between the Princeton and Harvard architectures.

5 Evaluation vs. Development In the parlance of electrical and computer engineers, the Arduino Uno is a development board and the Sparkfun RedBoard is an evaluation board. The evaluation boards are usually cheaper and used to test the suitability of a particular microprocessor for a given application. The board provides an interface so that the microprocessor can be programmed easily, and interfaced quickly to external hardware for fast proto-typing. The development board can also be used to evaluate the microprocessor, but has the additional feature that once the hardware and software design are stabilized, the processor chip can be removed and embedded in a more permanent proto-type. The board can then be used as a way to program changes to the processor chip that can be removed and re-inserted. The Arduino fulfills the role of a development board. If you look at the header pins (the black strips that give access to the signals and power available on the board. All of the input/output pins are connected DIRECTLY to the processor chip. With very few pieces of external circuitry notably the voltage regulator and the clock you can embed a fully programmed ATMega328P microprocessor into your hardware project. Hardware Reference The figure below summarizes the functionality of the Arduino Uno s interface. As stated in the title, it is the definitive summary of the pinouts of the board and how they are connected to the microprocessor chip itself (sub-figure in the upper left corner). Once you learn to interpret the labeling properly, it will become the only hardware reference you need. The initial reaction to this figure is horror until it becomes clear that each pin on the board is connected directly to the processor chip and that some of the processor pins (and hence the pins on the board) can have several uses. For example, pins 0-13, as labeled on the board itself, and echoed in the pink boxes are digital input/output (I/O) pins. This means that you the programmer must specify in your code whether these pins are to be used as input pins or output pins. You will come to understand this better as you work with the board. The secret to understanding this diagram resides in the legend at the bottom (shown at right). The color of each pin label indicates its functionality and how the pin is referenced in different circumstances.
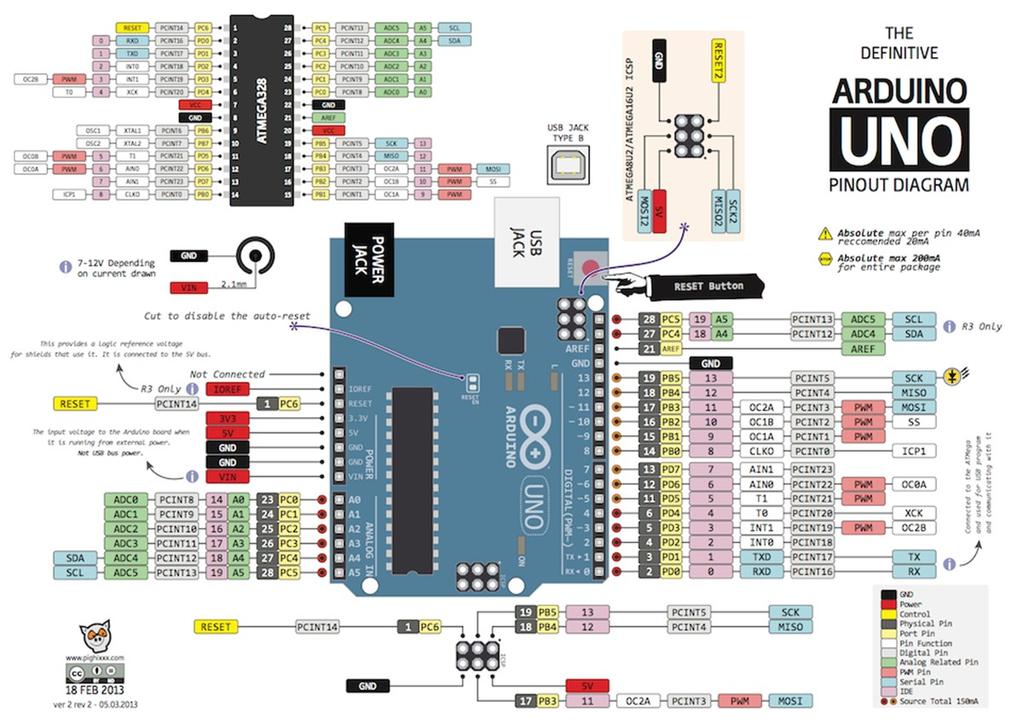
6
7 Look at the labels in the grey boxes. These are the numbers of the physical pins on the microprocessor chip (ATMega328) that are directly connected to an interface point on one of the headers at the edge of the board. Which physical pin numbers are associated with the pins that are capable of providing a PWM signal? NOTE: you can get this information both from the diagram of the board layout and the smaller one of the microprocessor layout. If you interface to the board through the Arduino Integrated Development Environment (IDE) the C- like language used by most casual users of the Arduino, the only pins designations that you will use are those in the pink boxes and those written on the board itself. How are the pins, labeled ANALOG IN on the board, identified when programming with the Arduino IDE?
8 The other pin labels are associated with functionality for the more advanced user. For example, the yellow labels show the pin names used when identifying the pins as ports. In this case, the processor is programmed at a lower level (assembly) where the inputs and outputs can be read and manipulated more quickly using the port designations rather than the designations used in the Arduino IDE. For the observant, there are also rules of thumb for the amount of current that can be drawn from each pin and the entire processor chip. What are these suggested limits? Note: more current can be drawn from the battery through the Vin pin which is drawn directly from the battery completely bypassing the processor so there is a separate set of board level current limits. The light blue labels are associated with the pins that can be configured to serve as a serial communication interface to and from a connected computer or other hardware with a serial interface. The XBee, a tiny board that transmits and receives signals wirelessly, uses the serial lines to communicate to the processors on both ends. Do some research to find out what this means. One type of serial connection is the protocol and hardware interface used by the USB ports on most modern computers.

. MATLAB is an IDE.")
9 Programming the Arduino Board Arduino Development Environment C-like programming environment The Arduino development environment is the interface that you will use to tell the board what to do. A free program named Arduino along with some driver software is available to you and has been embraced by a large community. Most projects that you find on the web come with accompanying software written for this interface. This type of interface is commonly designated by the acronym IDE (Integrated Development Environment). MATLAB is an IDE. There are several resources available to guide you through downloading the software onto your own computer. Sparkfun Tutorial: Arduino Tutorial: Judy Culkin s Graphic Novel Turorial: Washington DC s Hackerspace Tutorial: In the lab, all of the computers have the Arduino software installed but it is recommended that you also have a copy on your own computer so you can work from home. Arduino Libraries Many users have written libraries for the Arduino boards. A Library in this context is a group of function written and stored in a zipped file that is downloadable. To have the library contents available inside the Development environment simple run the Arduino program. Find the menu item Sketch and inside the drop-down menu at the very top should be an item Add Library Clicking on this item will bring up a window asking for the library file you wish to include. There is an enormous Arduino community and many free libraries.
10 Assembly Language Programming Code can be written in C or C++ and using the appropriate assembler convert the code to something that will run on the Arduino. Or you can write assembly code directly using an IDE like AVRDude that can be downloaded from the web.

11 Uploading and Running code through the Arduino IDE Build the simple circuit below. D
12 From the physical diagram draw a schematic of the circuit. Rather than draw the Arduino you may simply label the signals connected to the Arduino one connection is made to the GND pin (black wire) on the board and the other is made to the digital I/O Pin 13 (red wire). Designate on the schematic the points labeled A, B, C, D, and E. To make the LED blink you need to have a program running on the Arduino board that raises and lowers the voltage on Pin 13. Run the Arduino program on your computer. Open up a pre-written file containing code that will blink the LED. To find the program navigate through the menus File > Examples > 01.Basics > Blink and a window will open up with the software needed to blink the LED by using the Digital Pin 13 as an output. Insert the cable in your kit between the computer and the board. The mini USB side is connected to the adapter on the board while the other end goes into any available USB port on the computer. Upload the program to the board by clicking the upload button (labeled 2 in the diagram below). NOTE: Common reasons for this step to fail are: i) the Arduino does not know which of the many boards you are using or ii) the COM port (USB port on the computer side that you plugged the board into) is incorrect. Both problems can be addressed by looking in the Tools option in the menu bar.

13 The IDE interface
14 Look at the Arduino Code and all of the lovingly written comments that explain how to build the circuit, connect it to the processor board, run the 'sketch', and a short explanation of the structure of the code. Please read them below is a condensed version without the comments so you can see more clearly the code structure. Using the information in the comments or on the Arduino website explain the function of the setup and loop portions of the code. Congratulations!! You are ready to start using the Arduino in a project!
Module 3B: Arduino as Power Supply
 Name/NetID: Teammate/NetID: Module 3B: Laboratory Outline As you work on through the labs during the semester and some of the modules you may want to continue experimenting at home. Luckily the microprocessor
Freeduino USB 1.0. Arduino Compatible Development Board Starter Guide. 1. Overview
 Freeduino USB 1.0 Arduino Compatible Development Board Starter Guide 1. Overview 1 Arduino is an open source embedded development platform consisting of a simple development board based on Atmel s AVR
Goal: We want to build an autonomous vehicle (robot)
") Goal: We want to build an autonomous vehicle (robot) This means it will have to think for itself, its going to need a brain Our robot s brain will be a tiny computer called a microcontroller Specifically
Goal: We want to build an autonomous vehicle (robot) This means it will have to think for itself, its going to need a brain Our robot s brain will be a tiny computer called a microcontroller Specifically
RedBoard Hookup Guide
 Page 1 of 11 RedBoard Hookup Guide CONTRIBUTORS: JIMB0 Introduction The Redboard is an Arduino-compatible development platform that enables quick-and-easy project prototyping. It can interact with real-world
Arduino Dock 2. The Hardware
 Arduino Dock 2 The Arduino Dock 2 is our supercharged version of an Arduino Uno R3 board. These two boards share the same microcontroller, the ATmel ATmega328P microcontroller (MCU), and have identical
keyestudio Keyestudio MEGA 2560 R3 Board
 Keyestudio MEGA 2560 R3 Board Introduction: Keyestudio Mega 2560 R3 is a microcontroller board based on the ATMEGA2560-16AU, fully compatible with ARDUINO MEGA 2560 REV3. It has 54 digital input/output
TA0297 WEMOS D1 R2 WIFI ARDUINO DEVELOPMENT BOARD ESP8266
 TA0297 WEMOS D1 R2 WIFI ARDUINO DEVELOPMENT BOARD ESP8266 Contents 1. Overview TA0297... 3 2. Getting started:... 3 2.1. What is WeMos D1 R2 Wifi Arduino Development Board?... 3 2.2. What is IDUINO UNO?...
Adafruit Metro Mini. Created by lady ada. Last updated on :12:28 PM UTC
 Adafruit Metro Mini Created by lady ada Last updated on 2018-01-24 08:12:28 PM UTC Guide Contents Guide Contents Overview Pinouts USB & Serial converter Microcontroller & Crystal LEDs Power Pins & Regulators
ARDUINO MINI 05 Code: A000087
 ARDUINO MINI 05 Code: A000087 The Arduino Mini is a very compact version of the Arduino Nano without an on board USB to Serial connection The Arduino Mini 05 is a small microcontroller board originally
ARDUINO UNO REV3 Code: A000066
 ARDUINO UNO REV3 Code: A000066 The UNO is the best board to get started with electronics and coding. If this is your first experience tinkering with the platform, the UNO is the most robust board you can
IDUINO for maker s life. User Manual. For IDUINO development Board.
 User Manual For IDUINO development Board 1.Overview 1.1 what is Arduino? Arduino is an open-source prototyping platform based on easy-to-use hardware and software. Arduino boards are able to read inputs
ARDUINO UNO REV3 SMD Code: A The board everybody gets started with, based on the ATmega328 (SMD).
.") ARDUINO UNO REV3 SMD Code: A000073 The board everybody gets started with, based on the ATmega328 (SMD). The Arduino Uno SMD R3 is a microcontroller board based on the ATmega328. It has 14 digital input/output
ARDUINO UNO REV3 SMD Code: A000073 The board everybody gets started with, based on the ATmega328 (SMD). The Arduino Uno SMD R3 is a microcontroller board based on the ATmega328. It has 14 digital input/output
Lesson 5 Arduino Prototype Development Platforms. Chapter-8 L05: "Internet of Things ", Raj Kamal, Publs.: McGraw-Hill Education
 Lesson 5 Arduino Prototype Development Platforms 1 Arduino Boards, Modules And Shields Popular AVR MCU based products Each board has clear markings on the connection pins, sockets and in-circuit connections
IDUINO for maker s life. User Manual. For IDUINO Mega2560 Board(ST1026)
") User Manual For IDUINO Mega2560 Board(ST1026) 1.Overview 1.1 what is Arduino? Arduino is an open-source prototyping platform based on easy-to-use hardware and software. Arduino boards are able to read
User Manual For IDUINO Mega2560 Board(ST1026) 1.Overview 1.1 what is Arduino? Arduino is an open-source prototyping platform based on easy-to-use hardware and software. Arduino boards are able to read
Arduino Uno. Arduino Uno R3 Front. Arduino Uno R2 Front
 Arduino Uno Arduino Uno R3 Front Arduino Uno R2 Front Arduino Uno SMD Arduino Uno R3 Back Arduino Uno Front Arduino Uno Back Overview The Arduino Uno is a microcontroller board based on the ATmega328 (datasheet).
ARDUINO LEONARDO ETH Code: A000022
 ARDUINO LEONARDO ETH Code: A000022 All the fun of a Leonardo, plus an Ethernet port to extend your project to the IoT world. You can control sensors and actuators via the internet as a client or server.
University of Hull Department of Computer Science C4DI Interfacing with Arduinos
 Introduction Welcome to our Arduino hardware sessions. University of Hull Department of Computer Science C4DI Interfacing with Arduinos Vsn. 1.0 Rob Miles 2014 Please follow the instructions carefully.
Building your own special-purpose embedded system gadget.
 Bare-duino Building your own special-purpose embedded system gadget. Saves a little money. You can configure the hardware exactly the way that you want. Plus, it s fun! bare-duino 1 Arduino Uno reset I/O
ARDUINO LEONARDO WITH HEADERS Code: A000057
 ARDUINO LEONARDO WITH HEADERS Code: A000057 Similar to an Arduino UNO, can be recognized by computer as a mouse or keyboard. The Arduino Leonardo is a microcontroller board based on the ATmega32u4 (datasheet).
Omega MP. Multi-Programming Shield for Atmel Microcontrollers. User Manual
 Omega MP Multi-Programming Shield for Atmel Microcontrollers User Manual Ω - Omega MCU Systems Copyright 2012 Contents Introduction...2 Omega MP main features:...2 Getting Started...3 Assumptions...3 1.
ARDUINO MICRO WITHOUT HEADERS Code: A000093
 ARDUINO MICRO WITHOUT HEADERS Code: A000093 Arduino Micro is the smallest board of the family, easy to integrate it in everyday objects to make them interactive. The Micro is based on the ATmega32U4 microcontroller
ARDUINO MEGA 2560 REV3 Code: A000067
 ARDUINO MEGA 2560 REV3 Code: A000067 The MEGA 2560 is designed for more complex projects. With 54 digital I/O pins, 16 analog inputs and a larger space for your sketch it is the recommended board for 3D
Digital Pins and Constants
 Lesson Lesson : Digital Pins and Constants Digital Pins and Constants The Big Idea: This lesson is the first step toward learning to connect the Arduino to its surrounding world. You will connect lights
Prototyping & Engineering Electronics Kits Basic Kit Guide
 Prototyping & Engineering Electronics Kits Basic Kit Guide odysseyboard.com Please refer to www.odysseyboard.com for a PDF updated version of this guide. Guide version 1.0, February, 2018. Copyright Odyssey
Lab 01 Arduino 程式設計實驗. Essential Arduino Programming and Digital Signal Process
 Lab 01 Arduino 程式設計實驗 Essential Arduino Programming and Digital Signal Process Arduino Arduino is an open-source electronics prototyping platform based on flexible, easy-to-use hardware and software. It's
Note. The above image and many others are courtesy of - this is a wonderful resource for designing circuits.
 Robotics and Electronics Unit 2. Arduino Objectives. Students will understand the basic characteristics of an Arduino Uno microcontroller. understand the basic structure of an Arduino program. know how
Halloween Pumpkinusing. Wednesday, October 17, 12
 Halloween Pumpkinusing Blink LED 1 What you will need: 1 MSP-EXP430G2 1 3 x 2 Breadboard 3 560 Ohm Resistors 3 LED s (in Red Color Range) 3 Male to female jumper wires 1 Double AA BatteryPack 2 AA Batteries
TA0139 USER MANUAL ARDUINO 2 WHEEL DRIVE WIRELESS BLUETOOTH ROBOT KIT
 TA0139 USER MANUAL ARDUINO 2 WHEEL DRIVE WIRELESS BLUETOOTH ROBOT KIT I Contents Overview TA0139... 1 Getting started: Arduino 2 Wheel Drive Wireless Bluetooth Robot Kit using Arduino UNO... 1 2.1. What
Atmel Microprocessor Programming With AVRISPmkii
 Atmel Microprocessor Programming With AVRISPmkii Purpose EE 400D - Senior Design Part of Electronics & Control Division Technical Training Series by Nicholas Lombardo October 13, 2015 The purpose of this
Alessandra de Vitis. Arduino
 Alessandra de Vitis Arduino Arduino types Alessandra de Vitis 2 Interfacing Interfacing represents the link between devices that operate with different physical quantities. Interface board or simply or
EL Sequencer/Escudo Dos Hookup Guide
 Page 1 of 15 EL Sequencer/Escudo Dos Hookup Guide Introduction The SparkFun EL Sequencer is an Arduino-comptabile microcontroller, with circuitry for controlling up to eight strands of electroluminescent
Arduino ADK Rev.3 Board A000069
 Arduino ADK Rev.3 Board A000069 Overview The Arduino ADK is a microcontroller board based on the ATmega2560 (datasheet). It has a USB host interface to connect with Android based phones, based on the MAX3421e
Thank you for purchasing the RGB Multi-MCU base and driver board from SuperTech-IT and TheLEDCube.com
 CONGRATULATIONS Thank you for purchasing the RGB Multi-MCU base and driver board from SuperTech-IT and TheLEDCube.com In this document, MCU means Microcontroller such as the PIC32, ATmega328P, prototype
ARDUINO BOARD LINE UP
 Technical Specifications Pinout Diagrams Technical Comparison Board Name Processor Operating/Input Voltage CPU Speed Analog In/Out Digital IO/PWM USB UART 101 Intel Curie 3.3 V/ 7-12V 32MHz 6/0 14/4 Regular
Microcontrollers for Ham Radio
 Microcontrollers for Ham Radio MARTIN BUEHRING - KB4MG MAT T PESCH KK4NLK TOM PERRY KN4LSE What is a Microcontroller? A micro-controller is a small computer on a single integrated circuit containing a
ARDUINO MEGA ADK REV3 Code: A000069
 ARDUINO MEGA ADK REV3 Code: A000069 OVERVIEW The Arduino MEGA ADK is a microcontroller board based on the ATmega2560. It has a USB host interface to connect with Android based phones, based on the MAX3421e
Arduino Micro Breadboard Laboratory Interface Processor (Micro BLIP) User Manual
 User Manual") Arduino Micro Breadboard Laboratory Interface Processor (Micro BLIP) MicroBLIP circuit board v2.0 Operating System v2.0.0 1/22/2019 User Manual 2 1 Setup and Operation 1.1 Introduction For the past ten
Arduino Micro Breadboard Laboratory Interface Processor (Micro BLIP) MicroBLIP circuit board v2.0 Operating System v2.0.0 1/22/2019 User Manual 2 1 Setup and Operation 1.1 Introduction For the past ten
CEIBO FE-5111 Development System
 CEIBO FE-5111 Development System Development System for Atmel W&M T89C5111 Microcontrollers FEATURES Emulates Atmel W&M T89C5111 4K Code Memory Real-Time Emulation and Trace Frequency up to 33MHz/5V ISP
8051 Intermidiate Development Board. Product Manual. Contents. 1) Overview 2) Features 3) Using the board 4) Troubleshooting and getting help
 Overview 2) Features 3) Using the board 4) Troubleshooting and getting help") 8051 Intermidiate Development Board Product Manual Contents 1) Overview 2) Features 3) Using the board 4) Troubleshooting and getting help 1. Overview 2. Features The board is built on a high quality FR-4(1.6
8051 Intermidiate Development Board Product Manual Contents 1) Overview 2) Features 3) Using the board 4) Troubleshooting and getting help 1. Overview 2. Features The board is built on a high quality FR-4(1.6
Breeze Board. Type A. User Manual.
 Breeze Board Type A User Manual www.dizzy.co.za Contents Introduction... 3 Overview Top... 4 Overview Bottom... 5 Getting Started (Amicus Compiler)... 6 Power Circuitry... 7 USB... 8 Microcontroller...
HYDRA-X10. Power Application Controllers TM. PAC HYDRA-X User s Guide. Copyright 2014 Active-Semi, Inc.
 HYDRA-X10 Power Application Controllers TM PAC5210 - HYDRA-X User s Guide www.active-semi.com Copyright 2014 Active-Semi, Inc. CONTENTS Contents...2 Overview...3 HYDRA-X10 Body Resources...5 Header Descriptions...5
Counter & LED (LED Blink)
") 1 T.R.E. Meeting #1 Counter & LED (LED Blink) September 17, 2017 Contact Info for Today s Lesson: President Ryan Muller mullerr@vt.edu 610-573-1890 Learning Objectives: Learn how to use the basics of Arduino
1 T.R.E. Meeting #1 Counter & LED (LED Blink) September 17, 2017 Contact Info for Today s Lesson: President Ryan Muller mullerr@vt.edu 610-573-1890 Learning Objectives: Learn how to use the basics of Arduino
AT42QT101X Capacitive Touch Breakout Hookup Guide
 Page 1 of 10 AT42QT101X Capacitive Touch Breakout Hookup Guide Introduction If you need to add user input without using a button, then a capacitive touch interface might be the answer. The AT42QT1010 and
ARDUINO M0 PRO Code: A000111
 ARDUINO M0 PRO Code: A000111 The Arduino M0 Pro is an Arduino M0 with a step by step debugger With the new Arduino M0 Pro board, the more creative individual will have the potential to create one s most
Sanguino TSB. Introduction: Features:
 Sanguino TSB Introduction: Atmega644 is being used as CNC machine driver for a while. In 2012, Kristian Sloth Lauszus from Denmark developed a hardware add-on of Atmega644 for the popular Arduino IDE and
AVR Intermediate Development Board. Product Manual. Contents. 1) Overview 2) Features 3) Using the board 4) Troubleshooting and getting help
 Overview 2) Features 3) Using the board 4) Troubleshooting and getting help") AVR Intermediate Development Board Product Manual Contents 1) Overview 2) Features 3) Using the board 4) Troubleshooting and getting help 1. Overview 2. Features The board is built on a high quality FR-4(1.6
AVR Intermediate Development Board Product Manual Contents 1) Overview 2) Features 3) Using the board 4) Troubleshooting and getting help 1. Overview 2. Features The board is built on a high quality FR-4(1.6
IME-100 Interdisciplinary Design and Manufacturing
 IME-100 Interdisciplinary Design and Manufacturing Introduction Arduino and Programming Topics: 1. Introduction to Microprocessors/Microcontrollers 2. Introduction to Arduino 3. Arduino Programming Basics
ARDUINO YÚN Code: A000008
 ARDUINO YÚN Code: A000008 Arduino YÚN is the perfect board to use when designing connected devices and, more in general, Internet of Things projects. It combines the power of Linux with the ease of use
ROBOTLINKING THE POWER SUPPLY LEARNING KIT TUTORIAL
 ROBOTLINKING THE POWER SUPPLY LEARNING KIT TUTORIAL 1 Preface About RobotLinking RobotLinking is a technology company focused on 3D Printer, Raspberry Pi and Arduino open source community development.
AT42QT1010 Capacitive Touch Breakout Hookup Guide
 Page 1 of 7 AT42QT1010 Capacitive Touch Breakout Hookup Guide Introduction If you need to add user input without using a button, then a capacitive touch interface might be the answer. The AT42QT1010 Capacitive
Building and using JasperMIDI
 Building and using JasperMIDI Table of Contents Introduction... Bill Of Materials... 2 Building Choices... 3 Construction... 4 Installing in a Jasper enclosure... 5 Standalone use... 6 Using JasperMIDI...
Procedure: Determine the polarity of the LED. Use the following image to help:
 Section 2: Lab Activity Section 2.1 Getting started: LED Blink Purpose: To understand how to upload a program to the Arduino and to understand the function of each line of code in a simple program. This
How to Use an Arduino
 How to Use an Arduino By Vivian Law Introduction The first microcontroller, TMS-1802-NC, was built in 1971 by Texas Instruments. It owed its existence to the innovation and versatility of silicon and the
BILLING AND CONTROLLING OF INDIVIDUAL LOADS OF A COMPOSITE SYSTEM USING SIMPLE ANDROID APPLICATION
 BILLING AND CONTROLLING OF INDIVIDUAL LOADS OF A COMPOSITE SYSTEM USING SIMPLE ANDROID APPLICATION K.RAJASEKHARA REDDY, H.O.D, SREC, NANDYAL 13X51A0228, 13X51A0210, 13X51A0233 P.PUNARVI, I.DHANASREE, M.SAICHARITHA
Lab 2.2 Ohm s Law and Introduction to Arduinos
 Lab 2.2 Ohm s Law and Introduction to Arduinos Objectives: Get experience using an Arduino Learn to use a multimeter to measure Potential units of volts (V) Current units of amps (A) Resistance units of
HYDRA-X23/X23S. Power Application Controllers. PAC HYDRA-X User s Guide. Copyright 2014 Active-Semi, Inc.
 HYDRA-X23/X23S Power Application Controllers PAC5223 - HYDRA-X User s Guide www.active-semi.com Copyright 2014 Active-Semi, Inc. CONTENTS Contents...2 Overview...3 HYDRA-X23/X23S Body Resources...5 Header
Hardware Overview and Features
 Hardware Overview and Features Don t snap apart your LilyPad ProtoSnap Plus until you're ready to use the pieces in a project. If you leave the pieces attached to the board, you'll be able to prototype
PIC Dev 14 Through hole PCB Assembly and Test Lab 1
 Name Lab Day Lab Time PIC Dev 14 Through hole PCB Assembly and Test Lab 1 Introduction: The Pic Dev 14 is a simple 8-bit Microchip Pic microcontroller breakout board for learning and experimenting with
Arduino 05: Digital I/O. Jeffrey A. Meunier University of Connecticut
 Arduino 05: Digital I/O Jeffrey A. Meunier jeffm@engr.uconn.edu University of Connecticut About: How to use this document I designed this tutorial to be tall and narrow so that you can read it on one side
Rapid40i PIC Prototyping PCB User Manual
 Description This is a PCB designed to facilitate the rapid prototyping of a device based on a 40 pin Microchip PIC microcontroller. To allow users to focus on their application, we take care of key housekeeping
Propeller Activity Board (#32910)
") Web Site: www.parallax.com Forums: forums.parallax.com Sales: sales@parallax.com Technical: support@parallax.com Office: (916) 624-8333 Fax: (916) 624-8003 Sales: (888) 512-1024 Tech Support: (888) 997-8267
Web Site: www.parallax.com Forums: forums.parallax.com Sales: sales@parallax.com Technical: support@parallax.com Office: (916) 624-8333 Fax: (916) 624-8003 Sales: (888) 512-1024 Tech Support: (888) 997-8267
Introducting Itsy Bitsy 32u4
 Introducting Itsy Bitsy 32u4 Created by lady ada Last updated on 2018-01-03 05:47:20 AM UTC Guide Contents Guide Contents Overview Pinouts Which do you have? Power Pins Adafruit Pro Trinket LiIon/LiPoly
Adafruit 1-Wire Thermocouple Amplifier - MAX31850K
 Adafruit 1-Wire Thermocouple Amplifier - MAX31850K Created by lady ada Last updated on 2018-08-22 03:40:09 PM UTC Guide Contents Guide Contents Overview Pinouts Power Pins Address Pins Data Pin Themocouple
Adafruit USB Power Gauge Mini-Kit
 Adafruit USB Power Gauge Mini-Kit Created by Bill Earl Last updated on 2017-07-14 11:55:04 PM UTC Guide Contents Guide Contents Overview Assembly Basic Assembly Solder the female connector. Solder the
One Grove Base Shield board this allows you to connect various Grove units (below) to your Seeeduino board; Nine Grove Grove units, consisting of:
 to your Seeeduino board; Nine Grove Grove units, consisting of:") GROVE - Starter Kit V1.0b Introduction The Grove system is a modular, safe and easy to use group of items that allow you to minimise the effort required to get started with microcontroller-based experimentation
GROVE - Starter Kit V1.0b Introduction The Grove system is a modular, safe and easy to use group of items that allow you to minimise the effort required to get started with microcontroller-based experimentation
PIC Dev 14 Surface Mount PCB Assembly and Test Lab 1
 Name Lab Day Lab Time PIC Dev 14 Surface Mount PCB Assembly and Test Lab 1 Introduction: The Pic Dev 14 SMD is a simple 8-bit Microchip Pic microcontroller breakout board for learning and experimenting
Familiarity with data types, data structures, as well as standard program design, development, and debugging techniques.
 EE 472 Lab 1 (Individual) Introduction to C and the Lab Environment University of Washington - Department of Electrical Engineering Introduction: This lab has two main purposes. The first is to introduce
Pg 3. Specifications. Hardware Required
 1 NodeMCU Dev Board is based on widely explored esp8266 System on Chip from Express if. It combined features of WIFI access point and station + microcontroller and uses simple LUA based programming language.
Getting Started with STK200 Dragon
 Getting Started with STK200 Dragon Introduction This guide is designed to get you up and running with main software and hardware. As you work through it, there could be lots of details you do not understand,
AXE Stack 18. BASIC-Programmable Microcontroller Kit. An inexpensive introduction to microcontroller technology for all ability levels
 Ltd AXE Stack 18 BASIC-Programmable Microcontroller Kit a division of An inexpensive introduction to microcontroller technology for all ability levels Free Windows interface software Programmable in BASIC
AlphaBot2 robot building kit for Arduino
 AlphaBot2 robot building kit for Arduino SKU 110060864 Description This AlphaBot2 robot kit is designed to use with an Arduino compatible board UNO PLUS. It features rich common robot functions including
ARDUINO YÚN MINI Code: A000108
 ARDUINO YÚN MINI Code: A000108 The Arduino Yún Mini is a compact version of the Arduino YUN OVERVIEW: Arduino Yún Mini is a breadboard PCB developed with ATmega 32u4 MCU and QCA MIPS 24K SoC CPU operating
User Manual Rev. 0. Freescale Semiconductor Inc. FRDMKL02ZUM
 FRDM-KL02Z User Manual Rev. 0 Freescale Semiconductor Inc. FRDMKL02ZUM 1. Overview The Freescale Freedom development platform is an evaluation and development tool ideal for rapid prototyping of microcontroller-based
Build the Machine Science XBoard, with a programmable microcontroller.
 Build the Machine Science XBoard, with a programmable microcontroller. Site: icode Course: Machine Science Guides Book: Assembling the XBoard Printed by: Guest User Date: Monday, May 24, 2010, 10:46 AM
Power Supply, Arduino MEGA 2560, and Stepper Motors Connections
 Power Supply, Arduino MEGA 2560, and Stepper Motors Connections By: Maram Sulimani Abstract: Arduino MEGA 2560 is required for this project to control the movement of the 3D printer axis and its extruder.
USER MANUAL ARDUINO I/O EXPANSION SHIELD
 USER MANUAL ARDUINO I/O EXPANSION SHIELD Description: Sometimes Arduino Uno users run short of pins because there s a lot of projects that requires more than 20 signal pins. The only option they are left
Si4703 FM Radio Receiver Hookup Guide
 Page 1 of 5 Si4703 FM Radio Receiver Hookup Guide Introduction This breakout board enables you to tune in to FM radio stations, using the Si4703 FM tuner chip from Silicon Laboratories. This IC also works
ARDUINO PRIMO. Code: A000135
 ARDUINO PRIMO Code: A000135 Primo combines the processing power from the Nordic nrf52 processor, an Espressif ESP8266 for WiFi, as well as several onboard sensors and a battery charger. The nrf52 includes
An FTDI connection: The ATtiny microcontrollers don t have a hardware UART External Crystal header pins for an optional crystal
 Getting Started with the T-Board The T-Board modules were designed to speed up your AVR prototyping. This guide will show you just how quickly you can get up and running with the Hello World for microcontrollers
GE-INTERNATIONAL JOURNAL OF ENGINEERING RESEARCH VOLUME -3, ISSUE -5 (May 2015) IF ISSN: ( )
 IF ISSN: ( )") DESIGN AND IMPLEMENTATION OF MICROCONTROLLER BASED SPEED DATA LOGGER Kriti Jain *, Prem Chand #, Saad Shamsi #, Dimple Taneja #, Rahul Yadav #, Sanjeev Yadav # *Assistant Professor, ECE Department, Amity
DESIGN AND IMPLEMENTATION OF MICROCONTROLLER BASED SPEED DATA LOGGER Kriti Jain *, Prem Chand #, Saad Shamsi #, Dimple Taneja #, Rahul Yadav #, Sanjeev Yadav # *Assistant Professor, ECE Department, Amity
Experiment 4.A. Speed and Position Control. ECEN 2270 Electronics Design Laboratory 1
 .A Speed and Position Control Electronics Design Laboratory 1 Procedures 4.A.0 4.A.1 4.A.2 4.A.3 4.A.4 Turn in your Pre-Lab before doing anything else Speed controller for second wheel Test Arduino Connect
ESPixelStick V2 Assembly and Usage
 ESPixelStick V2 Assembly and Usage OVERVIEW The ESPixelStick is a wireless (802.11g/n) pixel controller that interfaces as a standard sacn / E1.31 controller and supports a variety of pixel types. It also
Elektor Uno R4 Installation & Test
 Elektor Uno R4 Installation & Test Prerequisites Elektor Uno R4 USB-A to micro-b cable Computer with Windows (XP or later), Linux or OSX (10.7 or later) Arduino IDE 1.6.7 or higher (not 1.6.8) We highly
LilyPad ProtoSnap Plus Hookup Guide
 Page 1 of 16 LilyPad ProtoSnap Plus Hookup Guide Introduction The LilyPad ProtoSnap Plus is a sewable electronics prototyping board that you can use to learn circuits and programming, then break apart
Rapid28iXL PIC Prototyping PCB User Manual
 Description Features This is a PCB designed to facilitate the rapid prototyping of a device based on a 28 pin Microchip PIC microcontroller. To allow users to focus on their application, we take care of
LinkIt ONE. Introduction. Specifications
 LinkIt ONE Introduction The LinkIt ONE development board is an open source, high performance board for prototyping Wearables and IoT devices. It's based on the world s leading SoC for Wearables, MediaTek
Exen Mini. Setup Guide - V1. nerdonic.com
 nerdonic. Exen Mini Setup Guide - V1 01 Exen Mini - Pinout SWCLK SWDIO RESET 3.3V GND POWER LED SWD HEADER PROGRAMMABLE LED 8 / PA06 3.3-20V INPUT REGULATED TO 3.3V 3.3-20V 3.3V INPUT OR REGULATED 3.3V
How to use the Zduino LEE Module with the Trainer Board
 How to use the Zduino LEE Module with the Trainer Board Note: If you are going to use the Arduino/Zduino module for this distance training workshop, please download the Arduino software: 1. Connections
ESPino - Specifications
 ESPino - Specifications Summary Microcontroller ESP8266 (32-bit RISC) WiFi 802.11 (station, access point, P2P) Operating Voltage 3.3V Input Voltage 4.4-15V Digital I/O Pins 9 Analog Input Pins 1 (10-bit
Rapid40iXL PIC Prototyping PCB User Manual
 Description This is a PCB designed to facilitate the rapid prototyping of a device based on a 40 pin Microchip PIC microcontroller. To allow users to focus on their application, we take care of key housekeeping
Adafruit 1-Wire Thermocouple Amplifier - MAX31850K
 Adafruit 1-Wire Thermocouple Amplifier - MAX31850K Created by lady ada Last updated on 2015-04-09 03:45:15 PM EDT Guide Contents Guide Contents Overview Pinouts Power Pins Address Pins Data Pin Themocouple
Web Site: Forums: forums.parallax.com Sales: Technical:
 Web Site: www.parallax.com Forums: forums.parallax.com Sales: sales@parallax.com Technical: support@parallax.com Office: (916) 624-8333 Fax: (916) 624-8003 Sales: (888) 512-1024 Tech Support: (888) 997-8267
Manual. Specifications. Contents. Options
 Page 1 ATE-501: USB Input Controller - 8 Inputs The ATE-500/600 series is a range of modular I/O controllers. It uses small standardized boards which allows you to configure the system to your requirements.
Manual 601: : USB/RS232. Specifications. Contents. Options
 Page 1 ATE-601 601: : USB/RS232 I/O Controller - 8 Inputs, 4/8 Relays The ATE-500/600 series is a range of modular I/O controllers. It uses small standardized boards which allows you to configure the system
Vector 3D printer complete wire list including extruder PWA listing
 Vector 3D printer complete wire list including extruder PWA listing Conventions Pin numbering for connectors It is normal practice in print circuit board (PCB) layout to denote pin 1 of a PCB mounted connector
An open-source hardware+software project. For design files and additional documentation, please visit:
 An open-source hardware+software project. For design files and additional documentation, please visit: http://www.evilmadscientist.com/go/diavolino Support: http://www.evilmadscientist.com/forum/ Distributed
Welcome to Apollo. For more information, please visit the website and select Apollo. Default Code
 Welcome to Apollo For more information, please visit the website and select Apollo Arduino Pins Default Code D49 LED Digital Pins digitalwrite digitalread pinmode Analog Pins analogread digitalread D33
REQUIRED MATERIALS Epiphany-DAQ board Wire Jumpers Switch LED Resistors Breadboard Multimeter (if needed)
") Page 1/6 Lab 1: Intro to Microcontroller Development, 06-Jan-16 OBJECTIVES This lab will introduce you to the concept of developing with a microcontroller while focusing on the use of General Purpose Input/Output
Page 1/6 Lab 1: Intro to Microcontroller Development, 06-Jan-16 OBJECTIVES This lab will introduce you to the concept of developing with a microcontroller while focusing on the use of General Purpose Input/Output
STEPD StepDuino Quickstart Guide
 STEPD StepDuino Quickstart Guide The Freetronics StepDuino is Arduino Uno compatible, uses the ATmega328P Microcontroller and works with most Arduino software. The StepDuino can be powered automatically
Serial Basic Hookup Guide
 Page 1 of 7 Serial Basic Hookup Guide Introduction The Serial Basic is an easy to use USB to Serial adapter based on the CH340G IC from WCH. It works with 5V and 3.3V systems and should auto install on