Media Cart Connection Guide
|
|
|
- Ross Parks
- 5 years ago
- Views:
Transcription
1 Media Cart Connection Guide

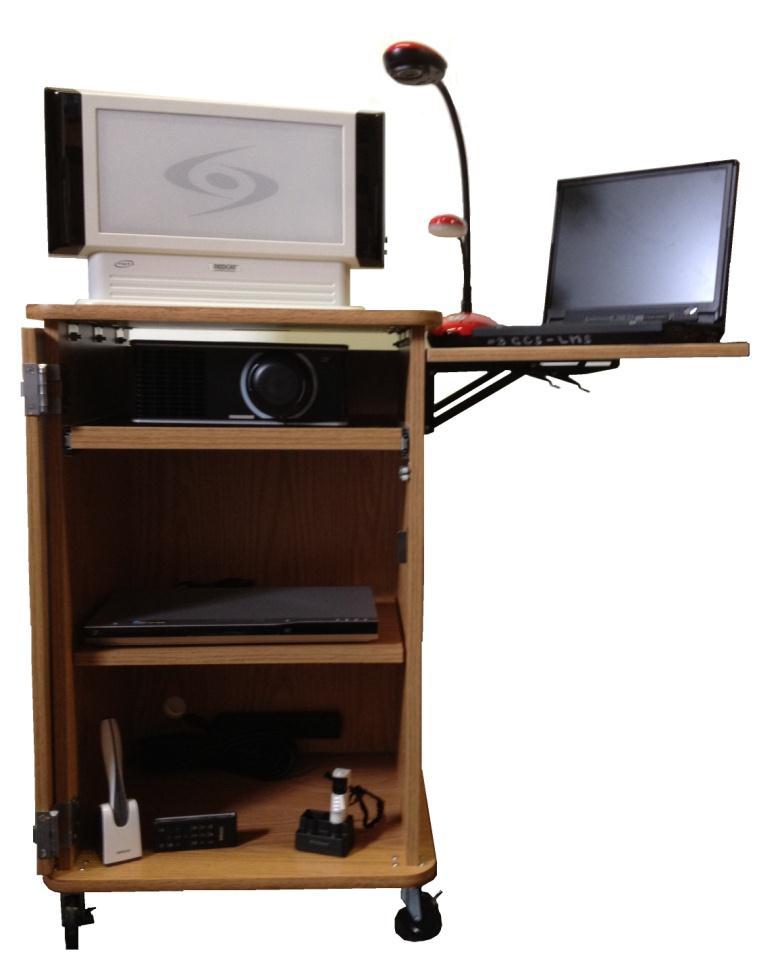
2 Standard Media Cart
3 Standard Media Cart Equipment Projector Projector manufacturers and model types may vary. The projector is an integral part of the mobile media cart. Depending on the make and model of your projector, you may have more than one input option for displaying images from your source equipment. We will cover the different connection options and selection options to display images from multiple sources later in this guide. Document Camera Document Camera model types may vary Most media carts will be equipped with a Document Camera. As with the projector, there are multiple connection possibilities for displaying images from your Document Camera. Please see the Connections section of this guide for setup information.
4 Optional Equipment Mobile Devices In nearly every case, the media cart will be connected to a PC, whether it s a desktop, laptop or another mobile device. It is standard policy for GCS Technology Services AV Team to provide onsite connection assistance to media cart installations only when a mobile device is involved. Due to safety / code regulations, GCS Technology Services AV Team will not connect a cart mounted projector to a desktop computer. Mobile Devices, with their availability to be physically located on or in the cart, are ideal for such installations. If you only have desktop computers for a media cart installation, please utilize this guide for assistance in connecting your carts in the classroom. DVD Player DVD Player manufacturer and model may vary A DVD Player can add another display option to your media cart installation. However, with the addition of a DVD Player, a source for audio must be considered. The next piece of equipment is a typical option for providing sound and audio amplification to a media cart. Lightspeed Redcat Audio Enhancement System With this audio enhancement system from Lightspeed, you will have multiple input options to provide an audio outlet for your laptop and DVD player. With the added benefit of a built in wireless microphone system, you can amplify your voice as well as other audio sources.
5 Connections Projector On the rear of your projector you will have either a single VGA In port or two VGA In ports. They should look something like this: An example of a dual VGA connection might look like this: If you have a single VGA connection, you will have to make sure that your projector is set up with an In Line connection. This type of connection allows you to have your computer or mobile device and your document camera both connected to the single VGA port on the rear of your projector. The next section details how to complete this type of installation.
6 In Line Connection Instructions Step 1 Connect the VGA splitter to the rear of the desktop PC. This splitter allows you to have the image from your PC displayed through the projector and on your PC monitor simultaneously. Your splitter configuration will most likely be one of three possibilities, depending on what was purchased for your school. If you are using a mobile device located on or in the cart, then you will not need a splitter. USB powered VGA Splitter Y Cable VGA Splitter AC Powered VGA Splitter

7 Media Cart VGA Cable The cable that runs from your PC to the media cart will be a VGA cable between ten and twenty five feet, again depending on what was purchased by your school. In the case of a mobile device located in or on the cart, you will only need a three to five foot VGA cable. This cable will be a standard male to male connection with ends that resemble the following image. It is important to note that the pins on these cables can be damaged if improperly treated. Step 2 Connect the other end of the media cart VGA cable to the VGA In port on the document camera. If you have a Lumens document camera model 162 or earlier, you will have a DVI Out / VGA In port on the side of the device.

8 In this case you will need a DVI to VGA adapter which will look similar to the following image. Step 3 Your media cart should include another VGA cable of approximately three to five feet in length. This cable will connect the document camera to the projector. The document camera will have a VGA Out port similar to this image. Connect one end of the short VGA cable to this port and the other end to the VGA In port on your projector. At this point you should be able to power on the projector and view an image from your PC or mobile device. The document camera acts as a pass through for the signal from the PC when powered off. When you turn on the document camera, the image from the PC or mobile device should be interrupted by the image from the document camera. This is the basic principal of the In Line configuration, allowing two devices to share one connection point on the projector. The next section of this guide details the connection instructions for a projector that has multiple VGA In ports.
9 Multiple VGA In Connection Instructions Step 1 Connect the VGA splitter to the rear of the desktop PC. This splitter allows you to have the image from your PC displayed through the projector and on your PC monitor simultaneously. Your splitter configuration will most likely be one of three possibilities, depending on what was purchased for your school. If you are using a mobile device located on or in the cart, then you will not need a splitter. USB powered VGA Splitter Y Cable VGA Splitter AC Powered VGA Splitter
10 Media Cart VGA Cable The cable that runs from your PC to the media cart will be a VGA cable between ten and twenty five feet, again depending on what was purchased by your school. In the case of a mobile device located in or on the cart, you will only need a three to five foot VGA cable. This cable will be a standard male to male connection with ends that resemble the following image. It is important to note that the pins on these cables can be damaged if improperly treated. Step 2 Connect the VGA cable to one of the VGA In ports on the rear of the projector. You can choose to connect the cable to either of the available ports since you will be switching sources via the remote that came with the projector, or using the projector control panel. Step 3 Connect one end of the shorter VGA cable to the VGA Out port located on the document camera.


11 Connect the other end of the VGA cable to the available VGA In port on the rear of the projector. At this point you should be able to power on the projector and the document camera and toggle between images on those two devices by changing the Source input on the projector. In order to change image sources you should be looking for a button on the remote or located on the projector itself. This button should be labeled either Input, Source or Computer 1 / 2. In some cases, when you use this function, the projector will scan through all available input sources to find any and all active signals. If this occurs, then let the projector complete its scan and you should see either your document camera or your PC or mobile device. Interactive Projector Connections InFocus Projector with Interactive Functions If you have an InFocus interactive projector on your media cart then you will also need to connect the USB cable (included with the projector) to the PC or mobile device that you are displaying through the projector. The cable that comes with the InFocus projector is twelve feet in length. If you are using a mobile device located on or in the cart, then this will not be an issue. If you are connecting your InFocus projector to a desktop PC then the length of the cable will be a limiting factor in the placement of the cart in the classroom. The USB cable which provides the interactive functionality of the projector has two different ends. One end of the cable is a standard USB to PC which goes to the computer and looks like the image below. This cable plugs into any standard USB port located on the PC.

.")

12 The other end is a Mini USB which goes to the rear of the InFocus projector. The port on the rear of the InFocus projector is displayed below. Once the connection is made with the USB cable, you should have interactivity between the projector and the PC via the InFocus Wand (included with the projector). Document Camera To connect your document camera to your projector you will have to use either the In Line method or the Multiple VGA In connection method. See the previous section for details on these connection methods.


13 Optional Equipment Connections Mobile Device or Laptop Computer In order to connect a mobile device such as a laptop computer you will need to follow the instructions for connecting a PC. These instructions were covered earlier in this guide. When connecting a mobile device you will not need a splitter, however you will have to use either the In Line connection method or the Multiple VGA In connection method. Please refer to those sections in this guide for instructions. DVD Player In order to view movies or images from a DVD disc through your projector, you have to utilize the video and audio connections located on the rear of the DVD player. These connection ports are color coded and the cable that is used to make this connection is also color coded. The rear of the DVD player should look something like the image below. The cable needed to make the audio and video connections will look like this.


14 Make sure that you connect one end of this cable to the Line Out color coded RCA ports on the rear of the DVD player. The yellow end of the cable will go to the Video In port on the rear of the projector as shown. The red and white ends of the cable will go to the Audio In ports on the rear of the Lightspeed Redcat Audio Enhancement System. Lightspeed Redcat Audio Enhancement System The Lightspeed Redcat series of amplifiers provide a mobile platform for audio enhancement. This includes voice amplification through the wireless microphone or audio amplification through two different types of input sources. You can play audio from your mobile device or your DVD player by connecting the provided cables. See the DVD player section for connection methods with this type of device.


15 To connect your mobile device, such as a laptop, you need a standard audio cable like the one pictured below. Locate the Headphone Jack or Audio Out on the side or rear of your mobile device and plug one end of the audio cable in. The other end of the cable goes into the Computer port on the rear of the Lightspeed Redcat amplifier.
16 For instructions on how to use these devices, please refer to the printed material that comes with each device. You can also check online for product documents at either the manufacturers website or by following the GCS Audio Visual link. Use the following procedure for locating product documents on the GCS website. With your web browser, go to the Guilford County Schools Homepage at Click on the District tab and scroll all the way to the bottom. Select the Technology Services link. Select the Training Modules & User Guides link located in the About GCS section of the page. Look for your device listed in the AV Equipment & Software section.
TouchLink Touchpanel User Manual
 TouchLink Touchpanel User Manual Introduction This guide will help presenters use the Extron-based presentation equipment by focusing on the TouchLink Touchpanel. It will provide detailed information about
INSTRUCTIONS FOR USE OF AUDIO/VISUAL EQUIPMENT
 Bute Computer Classroom Audio/Visual Equipment Instructions When you first approach the control panel, a sensor wakes it up and lights up the welcome screen. To start the system, tap the welcome screen.
Smart Classroom Instructions
 Smart Classroom Instructions Projector 1) Point Epson Remote at projector on ceiling. Press power button once. NOTE: Projector will take 30 seconds to power up. 2) Set video switch to desired device -
More information, including a printable version of these instructions, is available at our website.
 If you need immediate assistance or further instructions, please contact The Center for Instructional Services at extension 7121. To report a problem please visit our website at www.cis.tcu.edu and click
SPC USER CONTROL GUIDE
 SPC USER CONTROL GUIDE 12-1135 2.0 10/17/2016 CONTENTS Equipment...3 Podium-Top Connections...3 Displays / Projectors...3 Audio...3 Cameras...3 Miscellaneous...3 Powering Up the Presentation System...3
INSTRUCTIONS FOR USE OF AUDIO/VISUAL EQUIPMENT
 BMS Seminar Room 1.13 Audio/Visual Equipment Instructions When you first approach the control panel, a sensor wakes it up and lights up the welcome screen. To start the system, tap the welcome screen,
Joyce 126 AV System Instructions
 Joyce 126 AV System Instructions Before you use the AV Cart Under no circumstances should the AV cart be moved. Moving the cart will likely result in the disconnection and probable damage to plugs, cables
Classroom Equipment Guide
 Classroom Equipment Guide General Help Help Center 412.268.457 (HELP) advisor@andrew.cmu.edu Classroom Help Media Technology 412.268.8855 mediatech@andrew.cmu.edu Cluster Help Cluster Services 412.268.8776
There are four (4) portable projectors available for use. They are as follows: Zoom and focus adjustments are made through the lens
 portable projectors available for use. They are as follows: Zoom and focus adjustments are made through the lens") Using a Portable Projector Caveat: The A/V storage cabinet is kept locked. Keys are held by the Principal, Cheryl, the Office, RPC and Tech. Please make sure that any equipment you use is put back from
Using a Portable Projector Caveat: The A/V storage cabinet is kept locked. Keys are held by the Principal, Cheryl, the Office, RPC and Tech. Please make sure that any equipment you use is put back from
Multimedia Classroom Guide
 Multimedia Classroom Guide Technical Support Should you encounter technical problems please contact Help Desk at 250-852-6800 Multimedia classrooms are equipped with a ceiling mount LCD projector. Inputs
More information, including a printable version of these instructions, is available at our website. INSTRUCTION INDEX
 If you need immediate assistance or further instructions, please contact The Center for Instructional Services at extension 7121. To report a problem please visit our website at www.cis.tcu.edu and click
Classroom Podium Guide SoC Support
 Classroom Podium Guide SoC Support socsupport@miami.edu (305) 812-9444 TABLE OF CONTENTS Click the desired section to jump to that page. 1 Basic controls... 3 1.1 System overview... 3 1.2 Turning on the
Technology Instructions
 Technology Instructions for General Purpose Classrooms Texas Tech University IT Help Central Classroom Technology Services 806. 742. 5381 General-Purpose Classroom Technology Instructions Starting the
Instructions for use of Audio/visual equipment
 School of Modern Languages Multimedia Centre 1&2 Audio/Visual Equipment Instructions When you first approach the control panel, a sensor wakes it up and lights up the welcome screen. To use the video projection
Frequently Asked Questions. Instructor
 1 Frequently Asked Questions Instructor 2 Frequently Asked Questions Instructors Content Network logins and using Portal functions (Pages 4-7) 1Q. How do I connect to Wi-Fi on campus? 2Q. How do I log
Page 1. Arrakis Systems 6604 Powell St. Loveland, CO
 Page 1 REVISION 1.0 27 February 2014 Page 2 NEW~WAVE QUICK START GUIDE Congratulations on your purchase of the New~Wave automation system! This quick start guide is to help get you setup quickly and easily.
School Dude Help Desk System User Directions
 User Directions To get started: Click on School Dude link located on the Staff menu on the Mosinee School District homepage. (see screenshot below) THIS MESSAGE MAY APPEAR AFTER CLICKING THE SCHOOL DUDE
Stereo applications using the OutCast System
 OUTCAST-S #1 Using the OutCast with the (ipod connected to the dock). ipod OutCast Wireless Speaker The OutCast wireless speaker plays both audio channels (Right and Left). It can control the ipod navigation
The port replicator may have features that are not supported by your computer.
 Please refer to the product label for the HP product number and serial number. This is useful information if you ever need to contact technical support. Getting Started This section identifies the visible
Southwest Community Education. Computer and AV Setup Guide
 Southwest Community Education Computer and AV Setup Guide Authored by Carl Schroedl 8/19/2009 Contents Before You Start... 3 About this Guide... 3 Getting Help... 3 AV Kit Inventory... 4 Equipment Setup...
ILLINOIS HALL A/V INSTRUCTIONS
 ILLINOIS HALL A/V INSTRUCTIONS /VIDEO EQUIPMENT KEY To access the audio/video equipment in this classroom, you need to rent a C390A key from the Instructional Media Center in Daniels Hall, room 111. A/V
Dell Latitude in-1
 Dell Latitude 7390 2-in-1 Quick Start Guide Language: ENGLISH Regulatory Model: P29S series Regulatory Type: P29S002 Warnings WARNING: A WARNING indicates a potential for property damage, personal injury,
425 Prescott Street Greensboro, NC P
 Approved Hardware October 2, 2018 Procedure Schools or departments desiring to purchase technology hardware: 1. Contact Technology Services (Kristie Shumate, shumatk@gcsnc.com) 2. Technology Services will
The only warranties for Hewlett-Packard products and services are set forth in the express statements accompanying such products and services.
 Getting Started The only warranties for Hewlett-Packard products and services are set forth in the express statements accompanying such products and services. Nothing herein should be construed as constituting
Lakeshore Teacher Desk Guide
 Lakeshore Teacher Desk Guide Friends- Welcome Back to School. It has been a busy Summer in the District and TPC Technologies has been proud to be a part of your updated Classroom Technology. While there
More information, including a printable version of these instructions, is available at our website.
 If you need immediate assistance or further instructions, please contact The Center for Instructional Services at extension 7121. To report a problem please visit our website at www.cis.tcu.edu and click
Rooms 210, 220, 230, 260, 270 User A/V Instruction Manual
 Rooms 210, 220, 230, 260, 270 User A/V Instruction Manual This manual provides instruction on the following tasks: Project the Podium Computer on the Screen Project an HDMI Laptop on the Screen Project
AV Guide for Mayes Center (232 Rosenau Hall)
") AV Guide for Mayes Center (232 Rosenau Hall) AV Services: (919) 966-6536, Rosenau 233 Table of Contents (click on a topic to skip to that section) Getting Started... 2 To Display the Room Computer... 4
AV Guide for Mayes Center (232 Rosenau Hall) AV Services: (919) 966-6536, Rosenau 233 Table of Contents (click on a topic to skip to that section) Getting Started... 2 To Display the Room Computer... 4
How to use A/V Podium Equipment at Niagara College
 How to use A/V Podium Equipment at Niagara College Table of Contents Which Podium are you using?... 3 Meeting Room / Small Classroom... 7 What each control does... 8 External / Laptop Connections... 9
Evans Field House 128
 Evans Field House 128 Screen Computer Monitor Projector Located in rear of room. Document Camera Orientation Smart Classroom Quick Start Guide Sympodium Computer Monitor Tech Help Phone 1 Document Camera
USING THE TIERED CLASSROOM MULTIMEDIA EQUIPMENT Rooms
 USING THE TIERED CLASSROOM MULTIMEDIA EQUIPMENT Rooms 0005 0030 0035 EQUIPMENT OVERVIEW Most functions in this room are controlled by the touchscreen AMX controller. To connect your laptop, there is a
GT Mini Installation Guide. 30 March 2015
 GT Mini Installation Guide 30 March 2015 Contents About the codec 4 The connectors 4 Using the correct HDMI and DVI cables 5 About the touchscreen controller 6 About the camera 7 Installing GT Mini 8 Pre-requisites
Classroom Technology: Rike 206
 Classroom Technology: Rike 206 03/29/2018 Scan QR code for more Classsroom resources! ACCESS THE WINDOWS DESKTOP Login to the Classroom Workstation Press CTRL+ALT+DEL to open the login screen Enter your
District Equipment Choices 1/05/18 Device Tech Specs DESKTOPS
 District Equipment Choices 1/05/18 Device Tech Specs DESKTOPS Cost (NO TAX) Parts Warranty Recommended Use Wireless Access OptiPlex 5050 Small Form Factor ** Quote #8181 i5-qc, 8GB RAM, 256GB Solid State
Contents. Basic Operation Quick Setup Touchscreen Remote Control External Speakers Trouble Shooting... 8
 2 Contents Basic Operation... 3 Quick Setup... 4 Touchscreen Remote Control... 5 External Speakers... 7 Trouble Shooting... 8 3 Basic Operation The Classic has been design to be as user friendly as possible.
Main Library Meeting Room Use
 Main Library Meeting Room Use Occupancy: Meeting Room A: 100 Meeting Room B: 50 Meeting Room C: 50 Combined A, B & C: 300 Conference Room: 20 Tables: 50 (2x5 ), 4 (3 ), and 16 round (6 ) Chairs: 290 This
CommBox Interactive Classic 4K User Manual. Revision: 5
 CommBox Interactive Classic 4K User Manual Revision: 5 Table of Contents 1 Preparations 4 1.1 Parts List 4 1.2 Control Lights & Buttons 4 1.2.1 Light indicators 4 1.2.2 Control buttons 4 1.3 Input/Output
Smart Classroom Quick Start Guide
 DuSable 348 Projector Screen Computer Monitor Document Camera Orientation Smart Classroom Quick Start Guide 2. Turn on Monitor Power. Tech Help Phone Laptop Cables Sympodium Computer Monitor Document Camera
Frequently Asked Questions: Students. Network logins and using Portal functions. 1Q. How do I connect to Wi-Fi on campus?
 1 Frequently Asked Questions: Students Network logins and using Portal functions 1Q. How do I connect to Wi-Fi on campus? A. Select Woodbury-Wireless after clicking on your computer s Wi-Fi network connection
CLASSROOM TECHNOLOGY GUIDE
 CLASSROOM TECHNOLOGY GUIDE SED 30 RWU Information Technology 401-254-6363 option 2 mediatech@rwu.edu In the Samsung display rooms you will find a Samsung display, Room PC, Document camera, AirMedia, DVD/Bluray
Classroom Technology Touch Panel
 Classroom Technology Touch Panel 03/29/2018 Scan QR code for more Classsroom resources! ACCESS THE WINDOWS DESKTOP Login to the Classroom Workstation Press CTRL+ALT+DEL to open the login screen Enter your
P age 1 of 14. Table of Contents
 The Canisius College Media Center Presents The Equipment Guide Table of Contents P age 1 of 14 Topic 1: Overview of the Penfold Commons (pages 2 & 3) Topic 2: Pre-Event Equipment Check (page 4) Topic 3:
Classroom Technology: MH201, 203, 205
 Classroom Technology: MH201, 203, 205 3/29/2018 Scan QR code for more Classsroom resources! ACCESS THE WINDOWS DESKTOP Login to the Classroom Workstation Press CTRL+ALT+DEL to open the login screen Enter
Updated Chrome browser requirements. See Basic client requirements. Updated ipad app storage requirements. See ipad client requirements.
 What's new What's new This topic details the latest updates to MySciLEARN system requirements. 4/20/17 Updated Chrome browser requirements. See Basic client requirements. Updated ipad app storage requirements.
Multimedia Rack User MANUAL for the Red Room
 Multimedia Rack User MANUAL for the Red Room Video Switch Audio Mixer VCR Player DVD Player AV Receiver Computer Wireless microphone s 1. Unlock and Open the Rack. 2. Projector is placed on an appropriate
ZOTAC ZBOX. User s Manual
 User s Manual ZOTAC ZBOX No part of this manual, including the products and software described in it, may be reproduced, transmitted, transcribed, stored in a retrieval system, or translated into any language
Increase your productivity with multiple monitors
 Multi Monitor Adapter and Splitter - Mini DisplayPort to 2x DisplayPort MST Hub StarTech ID: MSTMDP122DP This MST hub lets you connect two DisplayPort monitors to your Mini DisplayPort computer. MST works
Technology Instructions
 Technology Instructions for General Purpose Classrooms Texas Tech University IT Help Central Classroom Technology Services 806. 742. 5381 General-Purpose Classroom Technology Instructions Starting the
HVG400. Installation Guide
 HVG400 Installation Guide September 2013 Trademarks & Copyright Trademarks All trademarks mentioned in this manual are the sole property of their respective manufacturers. Copyright Ltd., Jerusalem, Israel
Video Conversions. VHS and VHS-C to DVD < 30 minutes $ min.-1 hour $ hours $ hours $48.00
 Bays Media Service Rates Dec. 2017 Video Conversions 8mm, Super 8mm, & 16mm Film Conversion (Minimum charge of $25.00 for 50 foot roll) < 1000 feet $0.50/foot 1001-2000 feet $0.47/foot 2001-5000 feet $0.45/foot
Mini DisplayPort to DisplayPort Multi-Monitor Splitter - 2-Port MST Hub
 Mini DisplayPort to DisplayPort Multi-Monitor Splitter - 2-Port MST Hub Product ID: MSTMDP122DP This MST hub lets you connect two DisplayPort monitors to your Mini DisplayPort computer. MST works on any
USB 3.0 Dual Head Docking Station
 Introduction USB 3.0 Dual Head Docking Station Installation Guide The USB 3.0 Dual Head Docking Station is a unique design for a computer that has extra connectivity demands. Features and Benefits Adds
CLASSROOM TECHNOLOGY GUIDE
 CLASSROOM TECHNOLOGY GUIDE MNS 200 RWU Classroom and Event Support 401-254-6363 option 2 mediatech@rwu.edu Lecture halls are found throughout the Roger Williams campus. In this room you will find a Room
BACK TO BASICS PART I. Hardware & it s Associated Terminology
 BACK TO BASICS PART I Hardware & it s Associated Terminology INTRODUCTION The purpose of this session is to review computer hardware & its associated terminology WHY? Everyone on the same page Better understanding
Smart Classroom Quick Start Guide
 DuSable 228 Screen Computer Monitor Projector Document Camera Orientation Smart Classroom Quick Start Guide Sympodium Computer Monitor Tech Help Phone Laptop Cables 1. Unlock Cabinet. Cabinet Lock 1 Document
KZ-VRC HD Network Control System -- An Integrated Device Control & Management through Network
 KZ-VRC HD Network Control System -- An Integrated Device Control & Management through Network Features All-in-1 Smart Integration Integrated with HDMI Switch, Network Control, Wireless Microphone, Power
If you don't have a VGA monitor cable handy, here's a good one from Amazon.
 Connecting a Windows laptop to a TV Scenario 1: TV has a PC input on it 1. Look for the VGA connector on the back of your TV. It may also be labeled PC or RGB. 2. Connect VGA monitor cable from PC to TV
SECTION 12.0c CONSTRUCTION SYSTEMS AND ASSEMBLIES STANDARDS AND GUIDELINES ADDENDUM C: CLASSROOMS AND AUDITORIA BEST PRACTICES
 SECTION 12.0c CONSTRUCTION SYSTEMS AND ASSEMBLIES STANDARDS AND GUIDELINES ADDENDUM C: CLASSROOMS AND AUDITORIA BEST PRACTICES INTRODUCTION The following list of classroom and auditorium features was compiled
BANQUET ROOM AUDIO VIDEO USERS GUIDE
 BANQUET ROOM AUDIO VIDEO USERS GUIDE The 50" plasma TV/MONITOR in the BANQUET ROOM is available to all groups and individuals who reserve the BANQUET ROOM. If, after reading the section of this document
with and -The quickest way to bring together audio/video media with interactive lesson planning.
 with and -The quickest way to bring together audio/video media with interactive lesson planning. This guide is meant for new AVRover owners to quickly get up to speed on the controls and functions within
Redcat Access. Classroom Audio System User Manual
 Redcat Access Classroom Audio System User Manual TABLE OF CONTENTS SECTION 1: 4 Important Safety Instructions Overview 5 System Components and Unpacking 7 Optional Components 8 Redcat Access: Front Panel
Stylish connectivity for your MacBook with USB-C
 Aluminum Travel A/V Adapter: 4-in-1 USB-C to VGA, DVI, HDMI or mdp - 4K StarTech ID: CDPVGDVHDMDP This 4-in-1 travel adapter offers a portable solution for connecting your USB-C computer to a VGA, DVI,
QuizXpress 6 Quick start guide
 2018 QuizXpress 6 Quick start guide Game Show Crew 2018 11/1/2018 0 QuizXpress quick start guide Thank you for purchasing QuizXpress! This quick start guide will provide you with some tips to get you started
Aspire E1-771G / E1-771 / E1-731G / E1-731
 Aspire E-77G / E-77 / E-7G / E-7 Quick Guide Product registration When using your product for the first time, it is recommended that you immediately register it. This will give you access to some useful
Classroom Technology: KL 272. Scan QR code for more Classsroom resources!
 Classroom Technology: KL 272 Scan QR code for more Classsroom resources! ACCESS THE WINDOWS DESKTOP Login to the Classroom Workstation Press CTRL+ALT+DEL to open the login screen Enter your UD Username
TECH SUPPORT NOTES. Help Desk: x4357 For priority support, please use the classroom phone. At the end of class:
 COLLINS CLASSROOM CENTER TECH SUPPORT Help Desk: x4357 For priority support, please use the classroom phone. NOTES At the end of class: Turn off the projector. Log off the teaching station. Turn off the
RootsTech Family Discovery Day TECHNICAL GUIDELINES OCTOBER 2014 UPDATE
 RootsTech Family Discovery Day TECHNICAL GUIDELINES OCTOBER 2014 UPDATE 1. Overview The content for your local family discovery day will be provided from the RootsTech conference, an annual family history
Touch Screen 1001 Michael Hooker Research Center Gillings School of Global Public Health AV Services, (919) , Rosenau 233
 , Rosenau 233") Touch Screen 1001 Michael Hooker Research Center Gillings School of Global Public Health AV Services, (919) 966-6536, Rosenau 233 Getting Started: The room s Touch Screen Controller (located on the table)
Touch Screen 1001 Michael Hooker Research Center Gillings School of Global Public Health AV Services, (919) 966-6536, Rosenau 233 Getting Started: The room s Touch Screen Controller (located on the table)
with and -The quickest way to bring together audio/video media with interactive lesson planning.
 with and -The quickest way to bring together audio/video media with interactive lesson planning. This guide is meant for new AVRover owners to quickly get up to speed on the controls and functions within
This guide will help you with many of the basics of operation for your Epson 485wi BrightLink Projector with interactive functionality.
 This guide will help you with many of the basics of operation for your Epson 485wi BrightLink Projector with interactive functionality. If you need further assistance with questions, you can refer to the
Introduction to Using the Canon VIXIA HFM31
 Introduction to Using the Canon VIXIA HFM31 Video Formats and Approximate Record Times Memory è Recording Mode ê MXP (High- quality) 24 Mbps 1920 x 1080 resolution; 30 fps FXP (High- quality) 17 Mbps 1920
By Dr. Samaher Hussein Ali
 Department of Information Networks The University of Babylon LECTURE NOTES ON Evolving Technology of Laptops By Dr. Samaher Hussein Ali College of Information Technology, University of Babylon, Iraq Samaher@itnet.uobabylon.edu.iq
Quick Reference Guide For
 Quick Reference Guide For GPS Navigation Model : VTG43/ VTG43A 1.Rear-view mirror 2.GPS navigation system 3.Bluetooth hands free system 4.Media center 5.Rear view visual system (with AV-IN) Clip the clamp
Portable Entertainment Accessories P-1 Item #: Remote Control
 Portable Entertainment Accessories P-1 Item #: 191201 Remote Control Compatible with mini, 3G, 4G and photo Functions include play, pause, forward/backward, and volume LED lights illuminate perimeter and
Electronic Equipment Manual For 3110, 3202, 3220, 3224, & 3228 River Building
 Electronic Equipment Manual For 3110, 3202, 3220, 3224, & 3228 River Building For further information, please visit our website at: http://www.carleton.ca/ims/ 2 TABLE OF CONTENTS: Topic Page # Starting
USER S GUIDE. For the Audio Visual Equipment
 USER S GUIDE For the Audio Visual Equipment OLLI Multi-Media System Page 1 Introduction This user guide is a brief introduction to the components of the audio visual cart, and it includes a section on
CLASSROOM TECHNOLOGY GUIDE
 CLASSROOM TECHNOLOGY GUIDE ARCH 202 RWU Classroom and Event Support 401-254-6363 option 2 mediatech@rwu.edu Roger Williams black box classrooms are located throughout campus. These rooms have an Epson
comm IPC-6AUR (Membrane) Version 2.1
 Version 2.1") IPC-6AUR (Membrane) Version 2.1 Thank you for purchasing our COMM Integrated Control Switches! COMM Integrated Control Switches (IPC Series) - Designed to control your Audiovisual Equipment in the most
IPC-6AUR (Membrane) Version 2.1 Thank you for purchasing our COMM Integrated Control Switches! COMM Integrated Control Switches (IPC Series) - Designed to control your Audiovisual Equipment in the most
Aspire E1-572 / E1-570 / E1-532 / E1-530
 Aspire E1-57 / E1-570 / E1-53 / E1-530 Quick Guide Product registration When using your product for the first time, it is recommended that you immediately register it. This will give you access to some
CONFERENCE ROOM TECHNOLOGY USER GUIDE
 CONFERENCE ROOM 1 Turn on desktop computer COMPUTER SOURCE 2MEDIA cord available for laptops 2. The Building can be CONTROL PANEL Turn TV monitor off Press LCD Off. HDTV Monitor Select the computer you
Manual Version DC
 Manual Version DC20060609-1 2 Table of Contents Cart Setup...4 Laptop Instructions...6 AMX Panel Command Flow...7 AMX Panel Verification Page...8 Source Selection...9 VCR Controls...10 Laptop...11 Presenter
USB Capture Plus User Manual
 USB Capture Plus User Manual Revised on 17/08/2017 Content 1 Function of the Interfaces... 1 1.1 USB Capture HDMI Plus... 1 1.2 USB Capture SDI Plus... 1 1.3 USB Capture DVI Plus... 2 2 Status of the Indicator
ZOTAC ZBOX User s Manual
 ZOTAC ZBOX User s Manual No part of this manual, including the products and software described in it, may be reproduced, transmitted, transcribed, stored in a retrieval system, or translated into any language
Room Classroom Technology Updated March 4, 2019
 Room 31-101 Classroom Technology Updated March 4, 2019 Table of Contents TURN CLASSROOM LIGHTS ON/OFF...2 EQUIPMENT LOCATION...2 LOGIN TO THE COMPUTER...2 Unsuccessful Login...3 TURN ON AND CONTROL THE
PT Teleprompter
 Features you need, Prices you want. PT2100 8 Teleprompter User Guide 3903 Stoney Brook Dr. Houston TX 77063 Tel: 1.713.272.8822 Fax: 1.713.995.4994 www.ikancorp.com support@ikancorp.com 2009 ikan Corporation.
Mini DisplayPort to DisplayPort Multi-Monitor Splitter - 3-Port MST Hub
 Mini DisplayPort to DisplayPort Multi-Monitor Splitter - 3-Port MST Hub Product ID: MSTMDP123DP This MST hub lets you connect three DisplayPort monitors to your Mini DisplayPort computer. MST works on
Conference Room Features and Operations
 Conference Room Features and Operations Introduction The Rio Texas Communications Department has equipped our conference rooms with equipment and software to make presentations and video conferences as
TECH SUPPORT NOTES. Help Desk: x4357 For priority support, please use the classroom phone. At the end of class:
 SCIENCE BUILDING TECH SUPPORT Help Desk: x4357 For priority support, please use the classroom phone. NOTES At the end of class: Turn off the projector. Log off the teaching station. Turn off the room lights.
Juno Price List. Call Toll Free at or contact us at .audiologyshop.com to order. Effective April 3, 2018 JN-SYS-BT JN-IR JN-TE-BT
 Juno List Effective April 3, 2018 NOTE: Freight not included. All prices in USD SYSTEMS JN-SYS-BT JN-IR JN-TE-BT JN-SM-BT JN-CT-BT Juno System with Bluetooth ITR-01 Juno Tower Receiver ITM-02 Pendant Microphone
Electronic Equipment Manual For 2104, 2202, & 3101Canal Building
 Electronic Equipment Manual For 2104, 2202, & 3101Canal Building For further information, please visit our website at: http://www.carleton.ca/ims/ 2 TABLE OF CONTENTS: Topic Page # Turning the Data Projector
QUICK GUIDE. Classroom Technology. Start. Locate the Touch Panel on the lectern (If the screen is black, firmly touch the screen to activate)
") Classroom Technology QUICK GUIDE 1 Start Locate the Touch Panel on the lectern (If the screen is black, firmly touch the screen to activate) Select a Source Select the source that you would like to display
Classroom Technology QUICK GUIDE 1 Start Locate the Touch Panel on the lectern (If the screen is black, firmly touch the screen to activate) Select a Source Select the source that you would like to display
ZOTAC ZBOX nano. User s Manual
 User s Manual ZOTAC ZBOX nano No part of this manual, including the products and software described in it, may be reproduced, transmitted, transcribed, stored in a retrieval system, or translated into
Knight Library 106 Browsing Room
 1 Knight Library 106 Browsing Room Technology Tutorial 1. Turn the projector on a. In the upper right-hand corner of the touch panel, press the power button to wake the screen. b. Then, select the Projector
.5 Multimedia Classroom
 .5 Multimedia Classroom User s Guide Technology Services I.T.S. Campus Table of Contents Overview... 3 Training and Technical Support... 3 Operating the Projector... 4 Turn the power on... 4 Turn the power
SYSTEM REQUIREMENTS. Macintosh with native USB port, OS 9.1, OS X Windows with USB port 98SE, ME, 2000, XP
 Congratulations, you ve purchased one of the most unique products available for your computer PowerWave. PowerWave is an extremely flexible USB digital desktop audio interface/amplifier capable of dozens
For immediate assistance, call A/V Services at
 Projector basics... 1-3 Common D201 pitfalls and how to avoid them... 4-11 Students cannot always see each other or the instructor (using the slide advancer)... 4 Students cannot always hear the instructor
HDMI and DVI/VGA Dual-Monitor Docking Station for Laptops - USB 3.0
 HDMI and DVI/VGA Dual-Monitor Docking Station for Laptops - USB 3.0 Product ID: USB3SDOCKHDV The USB3SDOCKHDV Dual Video Universal USB 3.0 Laptop Docking Station with Audio and Ethernet lets you add dual
Increase your productivity with multiple monitors
 USB-C to DisplayPort Multi-Monitor Splitter - 2-Port MST Hub StarTech ID: MSTCDP122DP This MST hub lets you connect two DisplayPort monitors to your USB-C computer. MST works on any Windows device with
Use the Extron control panel on the top of the podium to: 1. Turn the projector on and off. The projector takes some time to warm up after powering
 Use the Extron control panel on the top of the podium to: 1. Turn the projector on and off. The projector takes some time to warm up after powering on, and to cool down after powering off. To show or hide
CLASSROOM TECHNOLOGY GUIDE
 CLASSROOM TECHNOLOGY GUIDE LAW 279 RWU Classroom and Event Support 401-254-6363 option 2 mediatech@rwu.edu Roger Williams black box classrooms are located throughout the campus. These rooms have an Epson