LA2250RTPW Touch Screen LCD Monitor USER S GUIDE
|
|
|
- Helena Murphy
- 5 years ago
- Views:
Transcription
1 LA2250RTPW Touch Screen LCD Monitor USER S GUIDE
2 The information contained in this document is subject to change without notice. This document contains proprietary information that is protected by copyright. All rights are reserved. No part of this document may be reproduced,translated to another language or stored in a retrieval system, or transmitted by any means, electronic, mechanical, photocopying, recording, or otherwise, without prior written permission. Windows is a registered trademark of Microsoft, Inc. Other brand or product names are trademarks of their respective holders. The test results show that this device meets the FCC rules. Those limits are set to protect residential areas from the devices with harmful emission. This device will produce, use and radiate radio frequency energy. In addition, failure to follow the user s manual to install or use this device might produce harmful interference with radio communication. Not withstanding the foregoing, it does not guarantee that this type of harmful interference does not occur in some special installations. The interference caused by this device to the reception of radio or television signals may be verifi ed by turning it on and off. Any changes or modifi cations to this TFT LCD would void the user s authority to operate this device. Important Recycle Instructions: Lamp(s) inside this product contains mercury. This product may contain other electronic waste that can be hazardous if not disposed of properly. Recycle or dispose in accordance with local, state, or federal laws. For more information, contact the Electronic Industries Alliance at For lamp specifi c disposal information check For more information on how to recycle your product, please visit
3 Table of Contents Usage Notice Precautions... 1 Introduction About LA2250RTPW... 2 Touch Screen for LA2250RTPW... 2 Package Overview... 3 Installation Product Overview... 4 Front View... 4 Bottom View... 4 Attaching the L-Brackets... 5 Side Mount for Your Monitor... 6 VESA Mount for Your Monitor... 8 Connecting the Display (Figure 10.1)... 9 (Figure 10.1)...10 User Controls Back Panel Controls...11 How to Use the OSD Menus...12 On-Screen Display Menus...13 Appendix Troubleshooting...14 Warning Signal...15 No Signal...15 Going to Sleep...15 Out of Range...15 Product Dimensions...16 Compatibility Modes...17 Touch Screen Driver Installation...18 LA2250RTPW Calibration Instruction...19 LA2250RTPW Install Instruction...21
4 Usage Notice! Warning - To prevent the risk of fire or shock hazards, do not expose this product to rain or moisture.! Warning - Please do not open or disassemble the product as this may cause electric shock. Precautions Follow all warnings, precautions and maintenance as recommended in this user s manual to maximize the life of your unit. Do: Turn off the product before cleaning. Touch screen surface may be cleaned using a soft clean cloth moistened with mild window glass commercial cleaners or 50/50 mixture of water and isopropyl alcohol. Use a soft cloth moistened with mild detergent to clean the display housing. Use only high quality and safety approved AC/DC adapter. Disconnect the power plug from AC outlet if the product is not going to be used for an extended period of time. Don t: Do not touch the LCD Display screen surface with sharp or hard objects. Do not use abrasive cleaners, waxes or solvents for your cleaning. Do not operate the product under the following conditions: - Extremely hot, cold or humid environment. - Areas susceptible to excessive dust and dirt. - Near any appliance generating a strong magnetic fi eld. - In direct sunlight. 1
5 Introduction About LA2250RTPW The LA2250RTPW is a 21.5" fl at panel screen with an active matrix, thin-fi lm transistor (TFT) liquid crystal display (LCD). Features include: Direct Analog signal input Direct Digital signal input Active matrix TFT LCD technology 1920 x 1080 resolution 21.5" viewable display area - 16:9 aspect ratio ~ 82.3 KHz horizontal scan 56 ~ 75 Hz high refresh rate mm x mm pixel pitch Auto adjustment function Multilingual OSD user control 100 mm VESA mount Touch screen with USB controller Touch Screen for LA2250RTPW Projected Capactive touch screen for fi nger input only Surface: Glare treatment Interface: USB controller Durability: 250 million touches at a single point Hardness of surface: 7H Transmittance: 90±5% Driver: Windows 7, VISTA 64/32 bits, XP, 2000, XP Embedded Express, Linux, Apple Mac OS 2
6 Package Overview LCD Display Power Cord VGA Signal Cable DC Power Supply DVI-D Cable USB Cable ( A to B ) Bracket Landing Strip Screw (Quantity 4) 3
7 Installation Product Overview Front View Bottom View DVI DC IN VGA RJ-11 USB 4
8 Attaching the L-Brackets Depending on your mounting scheme, you may use the L-brackets to mount your displays onto your wall or device. Find a suitable location for attaching L-brackets. A. The left and right sides B. The top and bottom Bracket Bracket OR Bracket Bracket Note: You will need a screwdriver to attach the L-brackets. Your kiosk touch monitor includes two L-brackets and four screws (M4x8). This equipment is intended to be mounted in accordance with the proper hardware and the installation instructions supplied with the product. Use of mounting brackets or screws other than those specifi ed in the installation instructions may cause a hazard. 5
9 Side Mount For Your Monitor This monitor can be mounted to a wooden or concrete wall with 4 screws and a pair brackets on the opposite sides (see page 5) OR mm 1.6 mm 33.0 mm 6
10 Customer -Supplied Panel Material Recommendations 1. Wooden wall: Ø4.5mm thru holes for M4 screws w/nuts, or no thru holes, screws for wood 4mm. 2. Sheet metal: concealed head threaded studs M4 w/nuts. RECOMMENDED CUSTOMER PANEL CUT-OUT M mm mm mm 4-R mm mm mm IMPORTANT! The wall mounting instructions are for qualifi ed wall-mounting personnel only!! Warning! Please select the proper screws! The distance between the back cover surface and the bottom of the screw hole is 8 mm. Please use four M4 screws diameter with proper length to mount your monitor. Please note: the mounting stand must be able to support at least 13.2 lbs (6Kg). 7
11 VESA Mount for Your Monitor This monitor conforms to the VESA Flat Panel Mounting Physical Mounting Interface standard which defi nes a physical mounting interface for fl at panel monitors, and corresponding with the standards of fl at panel monitor mounting devices, such as wall and table arms. The VESA mounting interface is located on the back of your monitor. To mount the monitor on a UL certifi ed swing arm or other mounting fi xture, follow the instructions included with the mounting fi xture to be used mm Slots(X6) mm VESA Mounting Interface! Warning! Please select the proper screws! The distance between the back cover surface and the bottom of the screw hole is 8 mm. Please use four M4 screws diameter with proper length to mount your monitor. Please note: the mounting stand must be able to support at least 17.6 lbs (8Kg). 8
12 Connecting the Display (Figure 10.1) To setup this display, please refer to the following fi gure and procedures. 1. Be sure all equipment is turned off. 2. Connect the DC plug to the power connector on the monitor and the other end into an electrical outlet (10.1). 3. Connect the D-SUB or DVI cable from the display s D-SUB or DVI input connector to the D-SUB or DVI connector of your host computer and tighten the screws (10.1). 4. Connect the USB cable from the USB port of your display to the USB port (10.1) of your computer. 5. Confi gure the touch screen. Refer to the Touch Screen Driver Installation section on page Once the touch screen is confi gured, the monitor is ready for use.! Notice! To ensure the LCD display works well with your computer, please configure the display mode of your graphics card to make it less than or equal to 1920 x 1080 resolution and make sure the timing of the display mode is compatible with the LCD display. We have listed the compatible Video Modes of your LCD display in the appendix (on page 17) for your reference. External power supplies applicable for LA2250RTPW: 1. Lite-On/PA FSP/FSP050-DBAB1 9
13 (Figure 10.1) (Optional) 10
14 User Controls Back Panel Controls Icon Key Name Menu Up Down Select Power Key OSD Menu off status Menu on status Menu appear Menu disappear/return to main item Brightness Main item select up/adjust up Contrast Main item select down/adjust down Enter/Select sub-item function Power On/Off 11
15 How to Use the OSD Menus Icon Key Name Menu Up Down Select Power 1. Press the MENU button to pop up the on-screen menu and press Up or Down button to select among the fi ve functions in the main menus. 2. Choose the adjustment items by pressing the Enter button. 3. Adjust the value of the adjustment items by pressing the Up or Down button. 4. With the OSD menu on screen, press Menu button to return main menu or exit OSD. 5. The OSD menu will automatically close, if you have left it idle for a pre-set time. 6. To Lock the OSD / Power menu buttons, please follow the instructions below. (Please note: the monitor has to be turned ON with a valid signal pre-set) (a.) Press Menu key, the OSD menu will pops upon display. (b.) Press and hold the Menu key again with the OSD menu on the screen, the OSD menu will disappear. Then press the Power key 1 time while the menu key is still being pressed. The Lock/Unlock menu will appear for 3 seconds. (c.) Use the Enter key to select OSD or Power setting then set at Lock by pushing the UP or Down button. (d.) When the UP or Down button is released, the previous setting will be saved and exit the Lock/Unlock menu automatically. 7. To Unlock the OSD / Power menu buttons, please follow the instructions below. (Please note: the monitor has to be turned ON with a valid signal pre-set) (a.) Press and hold the Menu key then press the Power key simultaneously, the Lock/ Unlock menu will appear for 3 seconds. (b.) Use the Enter key to select OSD or Power setting then set at Unlock by pushing the UP or Down button. (c.) When the UP or Down button is released, the previous setting will be saved and exit the Lock/Unlock menu automatically. Please note: a. When the OSD Lock function is selected, this indicates that all the buttons except power button are now disabled. b. When the Power Lock function is selected, this indicates that the power key is disabled; user can not to turn off the monitor by Power key. 12
16 On-Screen Display Menus Main OSD Menu: ITEM Contrast Brightness Auto Adjust Left/Right Up/Down Horizontal size Fine OSD Left/Right OSD Up/Down OSD Time out OSD Language Factory Reset RGB CONTENT The monitor luminance level control. The monitor backlight level control. Fine-tune the image to full screen automatically. Moving screen image horizontal position to left or right. Moving screen image vertical position to up or down. The screen image horizontal dot clock adjustment. The screen image pixel phase adjustment. Moving OSD menu horizontal position to left or right. Moving OSD menu vertical position to up or down. OSD auto-disappear time selection. OSD menu language selection. ( English, French, Japanese, Deutsch, Spanish, Italian, Traditional Chinese and Simplifi ed Chinese) Factory default value restored. Color temperature selection. (9300K, 6500K, 5500K, 7500K, User) 13
17 Appendix Troubleshooting If you are experiencing trouble with the LCD display, refer to the following. If the problem persists, please contact your sales representative or our service center. Problem: No image appears on screen. Check that all the I/O and power connectors are correctly and well connected described in the "Installation" section. Make sure the pins of the connectors are not crooked or broken. Problem: Partial Image or incorrectly displayed image. Check to see if the resolution of your computer is higher than that of the LCD display. Reconfi gure the resolution of your computer to make it less than or equal to 1920 x Problem: Image has vertical flickering line bars. Use "HORIZONTAL SIZE" to make an adjustment. Check and reconfi gure the display mode of the vertical refresh rate of your graphic card to make it compatible with the LCD display. Problem: Image is unstable and flickering Use "FINE" to make an adjustment. Problem: Image is scrolling Check and make sure the VGA signal cable (or adapter) is securely connected. Check and reconfi gure the display mode of the vertical refresh rate of your graphics card to make it compatible with the LCD display. Problem: Vague image (characters and graphics) Use HORIZONTAL SIZE to make an adjustment. If this problem still exists, use FINE to make an adjustment. 14
18 Warning Signal If you see warning messages on your LCD screen, this means that the LCD display cannot receive a clean signal from the computer graphics card. Below are the three kinds of warning signals you may receive. Please check the cable connections or contact your sales representative or our service center for more information. No Signal This message means that the LCD display has been powered on but it cannot receive any signal from the computer graphics card. Check all the power switches, power cables, and VGA/DVI signal cable. Going to Sleep The LCD display will enter power saving mode when experiencing a sudden signal disconnecting problem. The monitor can be activated by pressing any keyboard, triggering the mouse or touching the screen. Out of Range This message means that the signal of the computer graphic card is not compatible with the LCD display. When the signal is not included in the Video Modes list we have listed in the Appendices of this manual, the LCD monitor will display this message. 15
19 Product Dimensions mm mm 23.6 mm 46.0 mm mm mm Front View Side View mm mm mm mm Back View 16
20 Compatibility Modes Mode Resolution H-Frequency(khz) V-Frequency(hz) IBM VGA 720X IBM VGA 640X Apple MacII 640X VESA VGA 640X VESA VGA 640X VESA VGA 800X VESA VGA 800X VESA VGA 800X VESA VGA 800X Apple Mac 832X VESA XGA 1024X VESA XGA 1024X VESA XGA 1024X VESA SXGA 1280X VESA SXGA 1280X VESA SXGA 1152X VESA SXGA 1280X WXGA+ 1440X WXGA+ 1440X WSXGA+ 1680X WSXGA+ 1680X1050 (VGA only) VESA WXGA 1280X WSXGA+ 1920X
21 Touch Screen Driver Installation The LA2250RTPW is available with USB connection. The touch driver is avaliable online for these operating systems: Windows 7, VISTA 64/32 bits, XP, 2000, XP Embedded (Express only), Linux, Apple Mac OS. Please Note: 1. The LA2250RTPW is Microsoft Windows HID (Human Interface Device) compatible if you use the USB touch screen interface. No additional software driver is required for general operation of the touch screen. 2. For LA2250RTPW, the system requires 15 seconds for Windows 7 to install/uninstall the touch driver while turning power on/off or plugging/unplugging USB cable. 18


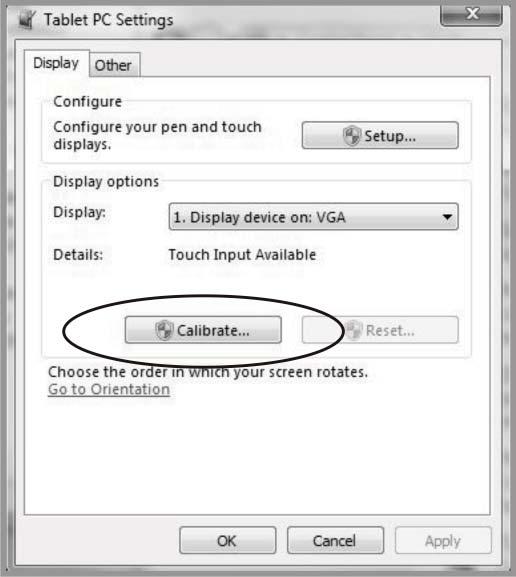
22 LA2250RTPW Calibration Instruction: Calibrating the touch screen in Windows 7: 1. Tap the Start button, Control Panel and then Hardware and Sound. 2. Under Tablet PC Settings, tap Calibrate the screen for pen or touch input. 3. On the Display tab, under Display options, tap Calibrate and then Yes to allow the program to make changes. 4. Follow the on-screen instructions to calibrate the touch screen. 19

23 20
24 LA2250RTPW Install Instruction: If you are using a PC running Windows 7, VISTA, XP, 2000, follow the instructions below: 1. Power on the PC. 2. Be sure the USB cable is connected from the PC to the LCD display. 3. Download the driver online and execute. 4. Follow the step-by-step instructions as shown on the pop-up windows. If you are using a PC running Windows XP Embedded, follow the instructions below: Express: 1. Power on the computer. 2. Make sure that the USB cable is connected to the computer. 3. Be sure that your EWF is disabled. If your EWF is enabled, please disable the EWF by using the EWF Manager command. 4. Once the EWF is disabled, download the driver online and execute. 5. Click on the XP driver at and follow the step-by-step instructions as shown on the pop-up windows. If you are using a PC running Linux or Apple Mac OS, follow the instructions below: 1. Power on the computer. 2. Make sure that the USB cable is connected to the computer. 3. Download the driver online at and execute. 4. Follow the step-by-step instructions found in the folder fi le of the driver. 21
25 Planar Systems, Inc. Customer Service 24x7 Online Technical Support: NW Compton Drive Beaverton, OR Tel: PLANAR1 ( ) or outside the United States. Hours: 24 hours a day, 7 days a week 2011 Planar Systems, Inc. 7/11 Planar is a registered trademark of Planar Systems, Inc. Other brands and names are the property of their respective owners. Technical information in this document is subject to change without notice A 22
USER s GUIDE K21A Series Touch Screen LCD Monitors
 USER s GUIDE K21A Series Touch Screen LCD Monitors Rev.A The information contained in this document is subject to change without notice. This document contains proprietary information that is protected
PT2245PW Touch Screen Edge-Lit LED LCD Monitor USER S GUIDE.
 PT2245PW Touch Screen Edge-Lit LED LCD Monitor USER S GUIDE www.planar.com The information contained in this document is subject to change without notice. This document contains proprietary information
User Guide PCT Multi Touch Monitor Display OF17T100-A1-PCT
 User Guide PCT Multi Touch Monitor Display OF17T100-A1-PCT American Industrial Systems - OF17T100-A1-PCT User Guide Page 1 The information contained in this document is subject to change without notice.
User Guide Widescreen PCT Multi Touch Monitor Display DTW15T100-A1-PCT
 User Guide Widescreen PCT Multi Touch Monitor Display DTW15T100-A1-PCT American Industrial Systems - DTW15T100-A1-PCT User Guide Page 1 The information contained in this document is subject to change without
The information contained in this document is subject to change without notice. This document contains proprietary information that is protected by
 The information contained in this document is subject to change without notice. This document contains proprietary information that is protected by copyright. All rights are reserved. No part of this document
Glancetron GT15-Wide USER s GUIDE
 Glancetron GT15-Wide USER s GUIDE Touch Screen LCD Monitors Rev.A www.glancetron.com The information contained in this document is subject to change without notice. This document contains proprietary information
LA1950RTR / LA1950RTC LA1950RTS / LA1950R Touch Screen LCD Monitor
 LA1950RTR / LA1950RTC LA1950RTS / LA1950R Touch Screen LCD Monitor USER S GUIDE www.planartouch.com The information contained in this document is subject to change without notice. This document contains
PT1945R / PT1945RW Touch Screen LCD Monitor USER S GUIDE
 PT1945R / PT1945RW Touch Screen LCD Monitor USER S GUIDE www.planartouch.com The information contained in this document is subject to change without notice. This document contains proprietary information
PT1745R / PT1745P Touch Screen Monitor USER S GUIDE
 PT1745R / PT1745P Touch Screen Monitor USER S GUIDE www.planar.com The information contained in this document is subject to change without notice. This document contains proprietary information that is
PT2275SW Touch Screen LCD Monitor USER S GUIDE
 PT2275SW Touch Screen LCD Monitor USER S GUIDE www.planartouch.com The information contained in this document is subject to change without notice. This document contains proprietary information that is
PT1700MX / PT1785P Touch Screen Monitor USER S GUIDE
 PT1700MX / PT1785P Touch Screen Monitor USER S GUIDE www.planar.com The information contained in this document is subject to change without notice. This document contains proprietary information that is
PT1510MX Touchscreen LCD Monitors USER S GUIDE
 PT1510MX Touchscreen LCD Monitors USER S GUIDE www.planar.com Important Recycle Instruction: LCD Lamp(s) inside this product contain mercury. This product may contain other electronic waste that can be
USER s GUIDE Toccare AIO Touch POS Systems
 USER s GUIDE Toccare AIO Touch POS Systems 2011 JULY, Rev.B The information contained in this document is subject to change without notice. This document contains proprietary information that is protected
LA1710R, LA1710RTR, LA1710RTS and LA1710RTC USER S GUIDE.
 LA1710R, LA1710RTR, LA1710RTS and LA1710RTC USER S GUIDE www.planar.com The information contained in this document is subject to change without notice. This document contains proprietary information that
LA1500R, LA1500RTR and LA1500RTC USER S GUIDE.
 LA1500R, LA1500RTR and LA1500RTC USER S GUIDE www.planar.com The information contained in this document is subject to change without notice. This document contains proprietary information that is protected
USER MANUAL 10 Multi-Touch Panel PC
 Rev 1.0 May, 2013 USER MANUAL 10 Multi-Touch Panel PC IPW10ID3S-H1-PoE-PCT American Industrial Systems, Inc. http://www.aispro.com Quick solution for: Room Booking Schedule Access Control Room Information
PL1500M LCD Monitor USER'S GUIDE.
 PL1500M LCD Monitor USER'S GUIDE www.planar.com Content Operation Instructions...1 Safety Precautions...2 First Setup...3 Front View of the Product...4 Rear View of the Product...5 Quick Installation...6
Prestigio P371 Users manual
 Prestigio P371 Users manual 1. IMPORTANT INFORMATION WARNING: TO PREVENT FIRE OR SHOCK HAZARD, DO NOT EXPOSE THIS MONITOR TO LIQUIDS OR MOISTURE. HIGH VOLTAGE EXISTS ON THIS MONITOR. DO NOT REMOVE THE
Table of Contents. Federal Communications Commission (FCC) Statement...2
 Statement...2") Contents Table of Contents Federal Communications Commission (FCC) Statement...2 Important Safety Instructions...3 Chapter 1 Introduction Features...6 Package Contents...7 Front View and Controls...8 Installing
Contents Table of Contents Federal Communications Commission (FCC) Statement...2 Important Safety Instructions...3 Chapter 1 Introduction Features...6 Package Contents...7 Front View and Controls...8 Installing
Do not place the monitor near a heat source, such as a space heater or exhaust vent, nor in direct sunlight.
 Table of Contents Precautions... 2 Notice... 2 Installation... 2 Warning on power connection... 2 Maintenance... 3 Transportation... 3 Wall mounting... 5 Getting Started... 7 Package Contents... 7 Setup...
LevelOne. KVM-0115/KVM / 17-inch LCD KVM Rack Console. User Manual. Version
 LevelOne KVM-0115/KVM-0117 15 / 17-inch LCD KVM Rack Console User Manual Version 1.0-1305 1 SAFETY INSTRUCTIONS 1. Please read these safety instructions carefully. 2. Please keep this User Manual for later
Warning! It will cause malfunction if the monitor is operating with unspecified power supply adaptor or incorrect power voltage. Do not expose this
 User Manual / Installation Guide Model No. P150VR/P150VG Warning! It will cause malfunction if the monitor is operating with unspecified power supply adaptor or incorrect power voltage. Do not expose this
TFT-LCD VIDEO MONITOR USER MANUAL
 TFT-LCD VIDEO MONITOR USER MANUAL V151, V172, V191 Video Series www.viewera.com Rev 2.0 Table of Contents EMC Compliance......2 Important Precautions...3 1. Introduction 1.1 General..4 1.2 Features....4
QIT600F1 USER'S GUIDE
 QIT600F1 USER'S GUIDE 1 IMPORTANT SAFEGUARDS Warnings: 1. Read all of these instructions. Save these instructions for later use, please. 2. Unplug this monitor from the wall outlet before cleaning. Do
LevelOne KVM User Manual. 17 Modularized KVM Console V
 LevelOne KVM-0217 17 Modularized KVM Console User Manual V1.0.0-0708 SAFETY INSTRUCTIONS 1. Please read these safety instructions carefully. 2. Please keep this User Manual for later reference. 3. Please
ENG. LCD Monitor Series Prestigio P TFT Active Matrix LCD Panel User s Manual. Prestigio P1910 1
 LCD Monitor Series Prestigio P1910 19.0 TFT Active Matrix LCD Panel User s Manual Prestigio P1910 1 I. Federal Communications Commission (FCC) Statement: This Equipment has been tested and found to comply
Toll Free: Tel: Fax:
 Toll Free: 1-888-865-6888 Tel: 510-226-8368 Fax: 510-226-8968 Email: sales@rackmountmart.com User Manual LCDK 1070 DVI-D KVM Legal Information First English printing, October 2002 Information in this document
PANEL6100 & PANEL6100L INDUSTRIAL TFT LCD MONITOR User s Manual
 PANEL6100 & PANEL6100L 10.4 INDUSTRIAL TFT LCD MONITOR User s Manual Disclaimers The information in this manual has been carefully checked and is believed to be accurate. Axiomtek Co., Ltd. assumes no
TABLE OF CONTENTS ADJUSTING YOUR LCD MONITOR
 TABLE OF CONTENTS ADJUSTING YOUR LCD MONITOR -------------- 2 General safety precautions. 2 Unpacking your monitor 5 Viewing angle 6 How to open the back cover 6 Connecting your monitor 7 User controls
1. Introduction Features Checking List Installation Install the Pedestal Connect Your Monitor to Computer...
 E27M5G 27 " W User Manual M Series L E D B A C K L I G H T M o n i to r Content F.C.C STATEMENT IMPORTANT SAFEGUARDS 1. Introduction 6 1.1 Features...6 1.2 Checking List...6 2. Installation 7 2.1 Install
LM-XX37-26 Touch Monitor User Manual One World Touch, LLC
 LM-XX37-26 Touch Monitor User Manual One World Touch, LLC Please retain this manual for future reference 1 Table of Contents Chapter 1 Introduction...3 Chapter 2 Product Views...4 2.1 Front View...4 2.2
Nexio. NEXIO Co.,Ltd. NIO150SA Desktop Touch Monitor. LCD Monitor User Guide.
 Nexio NEXIO Co.,Ltd. www.inexio.co.kr NIO150SA Desktop Touch Monitor VGA, DVI, Composite, S-video & Audio supported LCD Monitor User Guide Please see the following page for the latest enhancements. Revised
dedicated KVM switch and rackmount screen technology User Manual CV-1201D DVI-D KVM Designed and manufactured by Austin Hughes
 dedicated KVM switch and rackmount screen technology User Manual CV-1201D DVI-D KVM Designed and manufactured by Austin Hughes 751 Legal Information First English printing, October 2002 Information in
Prestigio P199 User s Manual. Front View (1) Back View (2)
 Back View (2)") Prestigio P199 User s Manual Safety Instructions 1. Please read these safety instructions carefully. 2. Please keep this User s Manual for later reference. 3. Please disconnect this equipment from connecter
Prestigio P199 User s Manual Safety Instructions 1. Please read these safety instructions carefully. 2. Please keep this User s Manual for later reference. 3. Please disconnect this equipment from connecter
User Manual LKS-CD17DR LKS-CD19DR. 17 LCD Dual Rail Console Drawer with Modular KVM Switch. 19 LCD Dual Rail Console Drawer with Modular KVM Switch
 User Manual LKS-CD17DR 17 LCD Dual Rail Console Drawer with Modular KVM Switch LKS-CD19DR 19 LCD Dual Rail Console Drawer with Modular KVM Switch Rev 2.0 Packing List The complete LKS-CD17DR / CD19DR dual
User Manual. Rack Mount Display Monitor RMP-161-F17A. 6U 17.3 inch Rack Mount Display Monitor. Options : - AV, S-video input - Touchscreen
 User Manual Rack Mount Display Monitor RMP-161-F17A 6U 17.3 inch Rack Mount Display Monitor Options : - AV, S-video input - Touchscreen Contents < Part. 1 > RMP-161-F17A 1.1 Package Content 1.2 Structure
User Manual LKS-CD17SR 17 LCD Single Rail Console Drawer with Modular KVM Switch
 User Manual LKS-CD17SR 17 LCD Single Rail Console Drawer with Modular KVM Switch LKS-CD19SR 19 LCD Single Rail Console Drawer with Modular KVM Switch Rev 2.0 Packing List ServerLink LKS-CD17SR / CD19SR
PANEL 6122-O/P 12.1 INDUSTRIAL TFT LCD MONITOR
 PANEL 6122-O/P 12.1 INDUSTRIAL TFT LCD MONITOR User s Manual Disclaimers The information in this manual has been carefully checked and is believed to be accurate. AXIOMTEK Co., Ltd. assumes no responsibility
Multi-touch Touch-Screen. Installation Guide
 Multi-touch Touch-Screen Installation Guide Table of Contents Read before use...3 Safety and troubleshooting information...4 Installing Software...8 Connecting Cables... 13 Calibrating the Touch Screen...
15 TFT-LCD Monitor Operation Manual
 15 TFT-LCD Monitor Operation Manual Introduction This unit is an open panel LCD monitor. The VESA plug & play system allows the monitor to automatically adjust itself to the match the frequency of the
USER S MANUAL. VIO-100/MX100 Series VIO-200/MX100 Series Industrial Touch Monitors
 USER S MANUAL VIO-00/MX00 Series VIO-200/MX00 Series Industrial Touch Monitors Table of Contents Prefaces.. 04 Revision..... 04 Disclaimer....... 04 Copyright Notice.. 04 Trademarks Acknowledgment.....
LCD monitor $ *- & 86 LR60441
 LCD monitor B286HK MHL USB 2 USB Acer LCD Monitor Quick Start Guide (QSG) Important safety instructions Please read the following instructions carefully. 1. To clean the LCD monitor screen: Turn off the
USER MANUAL. User Manual 17 / 19 LCD. NVP117 / NVP119 1U LCD Console Drawer. Options : - AV / DVI-D / HDMI / Audio - Full Range KVM - DC power
 USER MANUAL 17 / 19 LCD NVP117 / NVP119 1U LCD Console Drawer Options : - AV / DVI-D / HDMI / Audio - Full Range KVM - DC power Contents < Part. 1 > NVP117 / NVP119 1.1 Package Content 1.2 Structure Diagram
PREFACE. FCC Compliance Statement
 FCC Compliance Statement PREFACE This device complies with part 15 of the FCC Rules. Operation is subjected to the following two conditions: 1. This device may not cause harmful interference, and 2. This
Unicorn 15 / 17 / 19 / 19W Single Rail Console with Modular KVM Switch User Manual
 Unicorn 15 / 17 / 19 / 19W Single Rail Console with Modular KVM Switch User Manual Rev 4.0 Packing List Unicorn series User Manual The complete Unicorn 15 / 17 / 19 single rail console with modular KVM
User Manual. Rack Mount Display Monitor - 4K RMP-161-4K17. 7U 17.3 inch Rack Mount Display Monitor
 User Manual Rack Mount Display Monitor - 4K RMP-161-4K17 7U 17.3 inch Rack Mount Display Monitor Options : - DC 9~36V power input - Touchscreen - AR hardness glass Contents < Part. 1 > RMB-17W-4K 1.1 Package
DKP-115/117/119-Fe Single Rail Console with Modular KVM Switch User Manual
 DKP-115/117/119-Fe Single Rail Console with Modular KVM Switch User Manual Rev 1.0 DKP-115/117/119-Fe User Manual I Packing List The complete DKP-115 / 117 / 119-Fe single rail console with modular KVM
OWC Mercury Helios 2 ASSEMBLY MANUAL & USER GUIDE
 OWC Mercury Helios 2 ASSEMBLY MANUAL & USER GUIDE TABLE OF CONTENTS 1. INTRODUCTION...1 1.1 MINIMUM SYSTEM REQUIREMENTS 1.1.1 Apple Mac Requirements 1.1.2 PC Requirements 1.1.3 Supported PCIe Cards 1.2
MultiPlex 15 Touch Screen. User s Manual
 MultiPlex 5 Touch Screen User s Manual Preface Precautions. READ INSTRUCTIONS: All the safety and operating instructions should be read before the LCD monitor is operated.. RETAIN INSTRUCTIONS: The safety
dedicated KVM switch and rackmount screen technology User Manual CV-801 PS/2 DB-15 KVM Designed and manufactured by Austin Hughes
 dedicated KVM switch and rackmount screen technology User Manual PS/2 DB-15 KVM Designed and manufactured by Austin Hughes 751 Legal Information First English printing, October 2002 Information in this
1 Introduction and Package Contents
 1 Introduction and Package Contents Introduction Congratulations on your purchase. You can expect only the sharpest and most brilliant color images from this monitor. Featuring easy to use OSD controls
Mercury Helios ASSEMBLY MANUAL & USER GUIDE
 Mercury Helios ASSEMBLY MANUAL & USER GUIDE TABLE OF CONTENTS INTRODUCTION...1 1.1 MINIMUM SYSTEM REQUIREMENTS 1.1.1 Apple Mac Requirements 1.1.2 PC Requirements 1.1.3 Supported PCIe Cards NOTE: Boot Camp
Gemini 15 / 17 / 19 / 19W Dual Rail Console with Modular KVM Switch User Manual
 Gemini 15 / 17 / 19 / 19W Dual Rail Console with Modular KVM Switch User Manual Rev 2.0 Packing List The complete Gemini 15 / 17 / 19 / 19 wide-screen package consists of: One 1U 19 rack mount console
AOC MONITOR USER`S GUIDE V22+ SAFETY INTRODUCTION.2 SETUP.4 ADJUSTING...7 DRIVER INSTALLATION GUIDE.. 10 PRODUCT INFORMATION.16 TROUBLESHOOT...
 AOC MONITOR USER`S GUIDE V22+ SAFETY INTRODUCTION.2 SETUP.4 ADJUSTING......7 DRIVER INSTALLATION GUIDE.. 10 PRODUCT INFORMATION.16 TROUBLESHOOT......17 Page١ SAFETY INTRODUCTION The following subsections
AerMonitor AM Aer Monitor User's Manual. Version-0.1
 AerMonitor AM-1015 Aer Monitor User's Manual Version-0.1 AerMonitor AM-1015 Copyright Notice This document is copyrighted, 2013. All rights are reserved. Firich Enterprise Co., Ltd reserves the right to
Digital Photo Picture Frame With Built-in Weather Station. User s Manual
 Digital Photo Picture Frame With Built-in Weather Station User s Manual 20070731 Important Safety Instructions CAUTION: These servicing instructions are for use by qualifi ed service personnel only. To
User Manual. 1U LCD Keyboard Drawer. KwikDraw - A Series. Manual. IT and Instrumentation for industry. - With KVM options - 15", 17, 19 screen size
 User Manual 1U LCD Keyboard Drawer KwikDraw - A Series - With KVM options - 15", 17, 19 screen size 1.1 Important Safeguards Please read all of these instructions carefully before you use the device. Save
User Manual. FPM-7181W Series. 18.5" Industrial Monitor with Projected Capacitive Touchscreen, Direct-VGA and DVI Ports
 User Manual FPM-7181W Series 18.5" Industrial Monitor with Projected Capacitive Touchscreen, Direct-VGA and DVI Ports Copyright The documentation and the software included with this product are copyrighted
1. REMOTE SENSOR 2. A/V IN JACK 4. DC 12V IN 5. TFT-LCD SCREEN 6. EARPHONE JACK 7. SPEAKER 9. TV/AV BUTTON 13. ROD ANTENNA 14.
 1 2 WARNINGS The exclamation point within the triangle is a warning sign alerting the user of important instructions accompanying the product. The lightening flash with arrowhead symbol within the triangle
KSR Series. Single Rail LCD Console with Single Port KVM Switch User Manual. Rev 1.0
 KSR Series Single Rail LCD Console with Single Port KVM Switch User Manual Rev 1.0 Packing List KSR Series User Manual The complete KSR-11501 / 11701/ 11701HD / 11901 package consist of: One 1U 19 rack
Vertiv Local Rack Access 18.5" LED LCD Console
 Vertiv Local Rack Access 18.5" LED LCD Console With Integrated Keyboard, Touchpad and Dual USB 2.0 Ports Installer/User Guide Technical Support Site If you encounter any installation or operational issues
COT220-APK01. 22" Open-Frame Monitor with 4mm/6mm. Dust proof SAW Touchscreens. DongGuan CJTOUCH Electronic Co., Ltd. PUBLISHED DATE:
 COT220-APK01 22" Open-Frame Monitor with 4mm/6mm Dust proof SAW Touchscreens DongGuan CJTOUCH Electronic Co., Ltd. PUBLISHED DATE:2013-03-28-1 - REVISION HISTORY VERSION DATE MODEL PAGE DESCRIPTION AUTHOR
9.2 TFT LCD COLOR MONITORING SYSTEM With 2 Indoor/Outdoor Color Cameras
 INSTRUCTION MANUAL 9.2 TFT LCD COLOR MONITORING SYSTEM With 2 Indoor/Outdoor Color Cameras MODEL: LCD0935 Copyright 2009 Wisecomm. All Rights Reserved. 1. IMPORTANT SAFETY PRECAUTIONS To prevent fire or
USER MANUAL. NVP2415 / 2417 / / 17 / 19 LCD 2U Rackmount TFT LCD Keyboard Drawer
 USER MANUAL NVP2415 / 2417 / 2419 15 / 17 / 19 LCD 2U Rackmount TFT LCD Keyboard Drawer Table of Contents 1. Table of Contents P.1 2. Introduction P.2 3. Features P.2 4. Package Contents P.3 5. Optional
7 Digital Photo Frame
 7 Digital Photo Frame Instruction manual L7DPF17 12 month manufacturer's warranty -------------------------------------------------------------------------- --------------------------------------------------------------------------
VFD Customer Display Installation 27
 Aegis Series TABLE OF CONTENTS Features 3 Specifications 4 Physical Diagrams 5 What comes with Aegis 7 Switch and Controls 8 OSD Settings 9 Installation 19 External Power Adapter 21 MCR Installation 22
Under the Table Interconnect Solutions
 Under the Table Interconnect Solutions Welcome! We greatly appreciate your purchase of a UT Series. We are sure you will find it reliable and simple to use. Superior performance for the right price, backed
KDR Series Dual Rail LCD Console with Single Port KVM Switch User Manual
 KDR Series Dual Rail LCD Console with Single Port KVM Switch User Manual Rev 1.0 Packing List KDR Series User Manual The complete KDR-11501 / 11701 / 11901 package consist of: One 1U 19 rack mount console
Folding Rackmount Console
 Folding Rackmount Console 15 Folding LCD Rackmount Console 17 Folding LCD Rackmount Console 19 Folding LCD Rackmount Console RACKCONS1501 RACKCONS1701 RACKCONS1901 Instruction Manual Actual product may
AOC MONITOR USER`S GUIDE. 2236Vwa SAFETY INTRODUCTION.2 SETUP.5 ADJUSTING... 9 DRIVER INSTALLATION GUIDE...16 PRODUCT INFORMATION..
 AOC MONITOR USER`S GUIDE 2236Vwa SAFETY INTRODUCTION.2 SETUP.5 ADJUSTING.... 9 DRIVER INSTALLATION GUIDE...16 PRODUCT INFORMATION..24 TROUBLESHOOT.......26 Page١ SAFETY INTRODUCTION The following subsections
USER MANUAL. NVP1615 / 1617 / / 17 / 19 LCD 1U Rackmount TFT LCD Keyboard Drawer
 USER MANUAL NVP1615 / 1617 / 1619 15 / 17 / 19 LCD 1U Rackmount TFT LCD Keyboard Drawer Table of Contents 1. Table of Contents P.1 2. Introduction P.2 3. Features P.2 4. Package Contents P.3 5. Optional
ADP-1XX4. 15, 17, and 19 Steel Enclosure Industrial Display. User Manual. Oct V1.0
 ADP-1XX4 15, 17, and 19 Steel Enclosure Industrial Display User Manual Release Date Revision Oct. 2017 V1.0 2017 Aplex Technology, Inc. All Rights Reserved. Published in Taiwan Aplex Technology, Inc. 15F-1,
Cube Camera with Fixed Lens Hardware Manual D11, D12. Ver. 2013/05/17
 Cube Camera with Fixed Lens D11, D12 Ver. 2013/05/17 Table of Contents Precautions 3 Safety Instructions... 5 Introduction 6 List of Models... 6 Features and Benefits... 7 Package Contents... 8 Physical
1519L Multifunction 15-inch Desktop Touchmonitor
 1519L Multifunction 15-inch Desktop Touchmonitor The 1519L is a wide-screen display that is easier to use and incorporate into more environments than traditional desktop touchmonitors. It allows extra
Folding Rackmount Console
 RACKCONS2001 Instruction Manual Folding Rackmount Console 1U 20.1 Folding LCD Rackmount Console - USB and PS/2 FCC Compliance Statement This equipment has been tested and found to comply with the limits
User Manual - KVM Rear Kit Version
 dedicated KVM switch and rackmount screen technology User Manual - KVM Rear Kit Version for LCD Console Drawer PS/2 DB-15 KVM - 801 back Designed and manufactured by Austin Hughes 751 Legal Information
PNP415/417 POP 'N PLUG WITH CUSTOM TABLETOP SURFACE USER'S GUIDE
 PNP415 PNP417 with tabletop cutout installed. MANUAL PART NUMBER: 400-0427-002 PNP415/417 POP 'N PLUG WITH CUSTOM TABLETOP SURFACE USER'S GUIDE TABLE OF CONTENTS Page PRECAUTIONS / SAFETY WARNINGS... 2
User Manual. Combo DB-15 2-console KVM. Combo DB-15 2-console KVM. Combo DB-15 KVM. dedicated KVM switch and rackmount screen technology
 dedicated KVM switch and rackmount screen technology User Manual Combo DB-15 2-console KVM KVM-IP8 / KVM-IP16 Combo DB-15 2-console KVM KVM-08R / KVM-16R Combo DB-15 KVM KVM-S8 / KVM-S16 751 Legal Information
1U Short-Depth Rackmount Console with 19 Display For KVM Switch or Server
 WARRANTY REGISTRATION: register online today for a chance to win a FREE Tripp Lite product www.tripplite.com/warranty Owner s Manual 1U Short-Depth Rackmount Console with 19 Display For KVM Switch or Server
KEYBOARD and MOUSE TO FIBER OPTIC TRANSMITTER USER S GUIDE
 SPECIAL APPLICATION MANUAL PART NUMBER: 400-0399-001 KEYBOARD and MOUSE TO FIBER OPTIC TRANSMITTER USER S GUIDE TABLE OF CONTENTS Page PRECAUTIONS / SAFETY WARNINGS... 2 GENERAL... 2 INSTALLATION... 2
1029 INSTALLATION MANUAL
 1029 INSTALLATION MANUAL 2 Table of Contents Features 03 Specifications 04 Quick Start..05 Remote Control.07 Capacitive Touch..10 Hardware Installation 11 1029CNH / 1029CNV / 1029TNH / 1029TNV Models Additional
The monitor is a 17-inch (17 inches viewable) intelligent micro-processor based monitor.
 intelligent micro-processor based monitor.") Introduction The Monitor has an active matrix TFT (Thin-Film Transistor) LCD (Liquid Crystal Display). This monitor is designed for use in small working areas or for those who need more working space on
Introduction The Monitor has an active matrix TFT (Thin-Film Transistor) LCD (Liquid Crystal Display). This monitor is designed for use in small working areas or for those who need more working space on
SPECIAL APPLICATION MANUAL PART NUMBER: TNP121UL. Tilt N Plug Jr. Table Top Interconnect Box USER'S GUIDE
 MANUAL PART NUMBER: 400-0429-001 TNP121UL Tilt N Plug Jr. Table Top Interconnect Box USER'S GUIDE INTRODUCTION Your purchase of the UL Listed TNP121UL, Tilt N Plug Jr. Interconnect Box is greatly appreciated.
For your safety and protection of the E-bot, please read and abide by the following important safety precautions.
 2 P age Safety Precautions For your safety and protection of the E-bot, please read and abide by the following important safety precautions. 1) Do not plug the AC adapter into a faulty electrical outlet.
DS-1H05 Ethernet-over-Coax Extender. User Manual
 DS-1H05 Ethernet-over-Coax Extender User Manual Thank you for purchasing our product. If there is any question or request, please do not hesitate to contact dealer. This manual is applicable to DS-1H05-T,
Industrial Rack-mount LCD KVM Drawer. User Manual. 8 -Port KVM Drawer 16-Port KVM Drawer
 Industrial Rack-mount LCD KVM Drawer User Manual 8 -Port KVM Drawer 16-Port KVM Drawer TABLE OF CONTENTS 4 Packing Contents 4 Safety Instructions 6 Introduction 6 Feature 8 Specification 10 Panel Description
FPM-5151G/5171G/ 5191G Series
 用户手册 FPM-5151G/5171G/ 5191G Series 15" XGA/17" SXGA/19" SXGA Industrial Monitor with Resistive Touchscreen, Direct-VGA, DVI Ports and DC12-30V Inputs Copyright The documentation and the software included
CP MultiTouch Controller
 CP450-010 MultiTouch Controller Welcome! We greatly appreciate your purchase of the CP450. We are sure you will find it reliable and simple to use. Superior performance for the right price, backed by solid
700TSU INSTALLATION MANUAL
 M 700TSU INSTALLATION MANUAL 2 Table of Contents Features...03 Specifications...04 Quick-Start...05 Remote Control...07 Hardware Installation...10 Software Installation...14 Touch Screen Driver Installation
Installation Manual. Model: HILU Ultra HD Interactive Flat Panel Display
 Installation Manual Model: HILU750 '' Ultra HD Interactive Flat Panel Display QUICK SETUP GUIDE For further information, see the User Manual. Please contact HITACHI directly if you have questions on the
AOC MONITOR USER`S GUIDE 2036S SAFETY INTRODUCTION.2 SETUP.7 ADJUSTING...11 DRIVER INSTALLATION GUIDE.. 19 PRODUCT INFORMATION.26 TROUBLESHOOT...
 AOC MONITOR USER`S GUIDE 2036S SAFETY INTRODUCTION.2 SETUP.7 ADJUSTING.....11 DRIVER INSTALLATION GUIDE.. 19 PRODUCT INFORMATION.26 TROUBLESHOOT......28-1 - SAFETY INTRODUCTION FCC Notice FCC Class B Radio
BenQ FP591. LCD Color Monitor. 15.0" (38.1cm) LCD Panel Size. User's Manual
 LCD Panel Size. User's Manual") BenQ FP591 LCD Color Monitor 15.0" (38.1cm) LCD Panel Size User's Manual Copyright Disclaimer Safety Instructions Copyright 2002 by BENQ Corporation (formerly Acer Communications & Multimedia Inc.). All
BenQ FP591 LCD Color Monitor 15.0" (38.1cm) LCD Panel Size User's Manual Copyright Disclaimer Safety Instructions Copyright 2002 by BENQ Corporation (formerly Acer Communications & Multimedia Inc.). All
Powergate³ User. Instruction manual and user s guide
 Powergate³ User Instruction manual and user s guide This manual explains features and provides basic information about how to set up and operate the Powergate³ User, including instructions on how to install
V-Switch 3 User Guide
 V-Switch 3 User Guide Instruction manual and user s guide This manual explains features and provides basic information about how to set up and operate the V-Switch 3 User, including instructions on how
Jinyoung Contech Co., Ltd.
 To: Jinyoung Contech Co., Ltd. #501, 222-12 MARIOTOWER, GURO3-DONG, GURO-KU, SEOUL, KOREA TEL : 82-2-890-6400 FAX : 82-2-890-6406 HOME PAGE : http://www.jyct.com/ Issued Date : Oct 26, 2003 Page : 8pages
5.6 Color Rear View Safety System Installation & Operation. RV56 (Includes MO56 monitor & CA56 camera)
") 5.6 Color Rear View Safety System Installation & Operation RV56 (Includes MO56 monitor & CA56 camera) FOR MORE INFORMATION WWW.STRATEGICVISTA.COM BEFORE OPERATING THIS SYSTEM, PLEASE READ THIS MANUAL THOROUGHLY
5.6 Color Rear View Safety System Installation & Operation RV56 (Includes MO56 monitor & CA56 camera) FOR MORE INFORMATION WWW.STRATEGICVISTA.COM BEFORE OPERATING THIS SYSTEM, PLEASE READ THIS MANUAL THOROUGHLY
IR Varifocal IP66 Weatherproof Cameras
 IR Varifocal IP66 Weatherproof Cameras Products: CFC6067VF, CFC6067VF2 Please read this manual before using your camera, and always follow the instructions for safety and proper use. Save this manual for
USER'S MANUAL DoubleSight DS-279W LCD MONITOR
 (877) TWO - LCDS Part No. 90-X-DS279W-EUEX0 Made in Korea USER'S MANUAL DoubleSight DS-279W LCD MONITOR For the latest updates and more information, visit our website at www.doublesight.com Specifications
Daily use. indicating that the loud speakers
 BeoLab 8002 Guide WARNING: To reduce the risk of fire or electric shock, do not expose this appliance to rain or moisture. Do not expose this equipment to dripping or splashing and ensure that no objects