Documentation version Prusa i3 Rework USER GUIDE REV 1.5. Document Version 1.1.8
|
|
|
- Anis Houston
- 6 years ago
- Views:
Transcription
1 Documentation version Prusa i3 Rework USER GUIDE REV 1.5


2 2 INTRODUCTION Target : Prupose a visual guide of the differents steps to build and use a Prusa i3 Rework. Authors of this document : emotion Tech Hugo FLYE Quentin CESVET Anthony BERNA Photographics Credits : Pictures and 3D représentations made by emotion Tech Sources : Licences : Prusa i3 : GPL 3.0 This document : CC BY-NC-SA Update : Last update : 01/12/2015 Links : You can found more informations on the following links : RepRap community : Repetier-Host software : 3D models database : RepRap
3 / 3 SUMMARY INTRODUCTION 2 Summary 3 Driver and the firmware installation 4 ANNEX 24 Adaptation of the Start G-code 25 Printing of a piece with Repetier Host 27 GCODE commands 37 Transfer of the firmware from Arduino 7 Connection to Repetier-Host 8 Configuration and preset 11 Checking endstop 13 Invert motor s direction 15 Fan checking 15 HEATED PARTS CHECKING 16 Extruder 16 USING Z SENSOR 18 Balancing Z motors 19 Checking the sensor 20 Z-Axis calibration 21 Auto-Leveling 23
. Check if the board is identified by your computer.")

4 4 Driver and the firmware installation First : Install the Arduino software (Start the file.exe) of the USB drive (provided) or download it on the official website of Arduino. After that, the RAMPS board must be connected on the Arduino board. Connect USB (do not connect the power supply). Check if the board is identified by your computer. You can to push on «Windows + Pause» -or go to your compute setup-, and on «Device manager» on the left. The Arduino Mega 2560 board must appeared in the device list. If it is not regognized, please install drivers manually by doing a right-click on it. Arduino s drivers is in the Arduino «drivers» folder. Note : If Windows 8 or higher is installed on your PC, you should deactivated automatic control of unsigned drivers. It s possible to find process about this on the web. System panel of Windows Device manager Read the COM port of your Arduino board (Arduino Mega 2560)


5 / 5 Run the Arduino software from the office. Arduino IDE launching Selecting the card
6 6
 the")

7 / 7 Transfer of the firmware from Arduino Open Arduino (file/open) the file of your USB drive: Prusa i3 Rework 1.5, and «Marlin.ino». Next, Click on Upload.

 communication.")
8 8 Connection to Repetier-Host Connect the RAMPS board to the power supply 12v and respect polarity. Before to begin this tutorial, you have to get: The electronic and mechanic parts (see the assembly instructions); The board need to be identified by your computer; The firmware is download. First we are going to settle the host software (Repetier host) communication. Interface of Repetier-Host and open of Printer settings
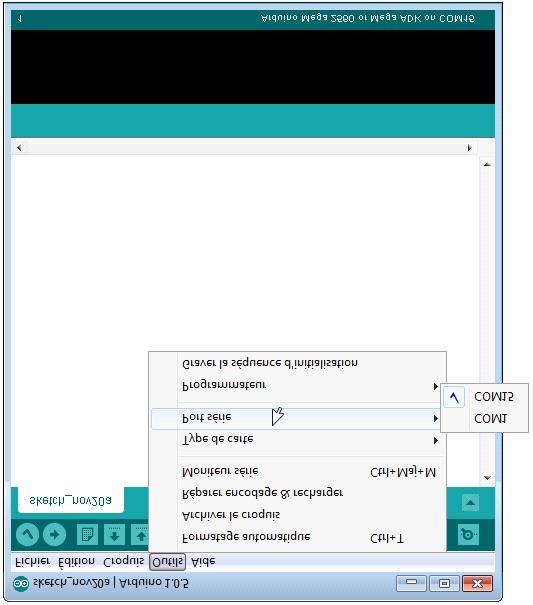
9 / 9 Choice of the COM port

10 10 Connect Repetier to your 3D printer by pushing on the button «Connect» Connexion à l'imprimante Check the message «idle» at the Bottom of the page. If you have waiting commands, it means that you have connection problem with your printer. Check the COM port and push on Reset button or reconnect the USB wiring.

11 / 11 Configuration and preset Let start to a material checking on your machine. Manual moving of axis Push your carriage X and Y to the center of their axis, -if you feel resistance don t force! -, You only need to unlocking your motors : Unblocking motors Unblocking of motors
12 12 For Z axis, move up the extruder for at least 20 mm above the PCB heatbed by turning the two couplers at the same time. Be sure that axis X stay horizontal to not damage plastic piece. Now you are ready to move safely.

13 / 13 Checking endstop To know if your endstop is functional, connect them and check that the red LED switch on when you do a contact. Emergency stop button
14 14 Press the X homing and check the X carriage stop to move after touching the endstop X. If there is a problem you can press on the emergency stop button to stop motors. Repeat the operation for Y axis. For Z axis, we will explain the prober in the fifth parts («using of the paper»). X and Y homing Moving command axis
15 / 15 Invert motor s direction Disconnect Repetier Host and all power sources (power supply 12V and USB).Then invert your motor plug on the RAMPS card. Reconnect your machine. Repeat the operation for Y and Z axis. For Z axis the positive direction means a vertical rise. Fan checking The extruder has two fans. One cool the extruder body and other one cool the piece. The first is above is activate when you connect the 12V supply. The second will be activated automatically or through the manual control interface (see below). Activate support fan If a fan does not work, check the polarity.
. Use manual commands to extrude 10 mm: Note : extruder s temperature will progressively increase to the targeted temperature (here 200 C).")
16 16 PCB heatbed and cartridge heater checking Launch the heating of the cartridge heater: Extrusion Check if the motor turn in the good direction (do not set up the filament). Use manual commands to extrude 10 mm: Note : extruder s temperature will progressively increase to the targeted temperature (here 200 C). 10 mm extrusion
17 / 17 If it is necessary, invert the direction connection of the motor connector on RAMPS board. Launch the heating according to the sort of plastic filament: Push Cut the filament extremely beveled to insert easily your filament in the extruder For PLA : from 200 to 210 and 50 for the PCB heatbed (Cover the glass plate with Polyimide for a better adhesion) For ABS : from 230 to 250 and 90 for the PCB heatbed, (spread ABS juice*, on the glass plate cover of polyamide, with a brush to have a better adhesion) * ABS juice: Dissolve ABS filament in some acetone to obtain a liquid mixture. For instance : In a glass, pour 10 cl of acetone and add 10cm of ABS filament, thicken with more filament if the adhesion is not sufficient. Insert plastic filament 1.75 mm in the extruder by pushing on the Extrudeur Idler (fixed on a spring) to free access to the filament. When you have reach the temperature, use manual command to extrude. Check that your hotend have no leak, if it is, it means that you had not well build or tighten your extruder. Check also that the drive wheel well train the filament continuously and without slippage. In a first time, you can re-tighten the spring.
18 18 Using Z Sensor The inductive sensor will allow you to automatically palpate 4 calibration points to correct mounting imperfections. This only detects metals (detection ~ 1mm for non-ferrous metals (aluminum,...) and ~ 3mm for ferrous metals (steel, cast iron,...). Caution: use of a glass plate is prohibited with the use of the bed of aluminum. Position the inductive sensor slightly above the nozzle. approximately 0,5 mm environ

19 / 19 Step 2 : checking sensor operation View the feedback (logs) : This button displays Repetier s logs Press this button to make visible the log Visibility button Position a metal object in your sensor and type «M119» in the command prompt of «manual control» tab. Type of response expected in the logs: Information returned by the machine (log visibility) Note: on some sensor model, the indicator light remains on power supply and not sign detection. Reporting endstop status x_min: open x_max: open y_min: open y_max: open z_min: TRIGGERED z_max: open inductive sensor This command allow you to check operation of printer s sensors. Note: try the M119 command when you do not have a metal part to recover the «open» mention in z_min. If you do not have feedback of your inductive sensor, check the orientation of the sensor connector and a possible false contact on RAMPS card + adapter board + inductive sensor.
20 20 Step 2 : Balancing Z motors To reduce the correction of the auto-leveling, it is highly advisable to balance the height difference between the two Z motors. With the power supply off, push the X carriage to the endstop and turn the coupler until your heating nozzle touches the bed: Left : Then, right : Step 3 : Adjusting motor power In manual control, make some upward and downward movement. If you find that motors struggle to move, adjust the potentiometer of the Z axis stepstick so that the movements are fluid and without missteps.

21 / 21 Step 4 : Z-Axis calibrating What is the target? To properly calculate the correction of the auto-leveling we need to determine the difference of our printhead with the heating bed when palpated with our sensor. Note: This difference is therefore a negative value beacause it will lower the heating head of measurement recorded up to get the point Z = Initialize all axes by clicking the house icon Paper * 2 - Position a sheet of paper under the heating head 3 - Turn off the motor power 4 - Turn right and left coupler identically until lightly block the paper. Note * : standard sheet of paper (80 grs) Paper *

22 Type the «G92 Z0» command to set the point Z = 0 of your printer 6 - Using the arrows, move your Z axis 30mm upward, so you will be at Z = Type the «G30» command to perform a probe and detect your metal bed 8 - Here is a typical example of a response in your logs: Note: For this example, we just measure a difference of 0.49mm from our printhead 9 - To set the value of the specified gap type the following command : In our previous example : M851 Z-0.49 Note: Replacing «-0.49» with the value you received without forget to mention the «-» sign Type the «M500» command to save permanently in the memory of your machine. Note: At any time you can use the «M851» command to retrieve the last saved value and modify it to adjust the height of the first print layer. The proper height of the nozzle corresponds to the fact that the top of the molten plastic strand either at the same level as the bottom of the nozzle. This is illustrated by the following scheme:
23 / 23 Auto-leveling The «G29» command launches probe of four calibration points. It is strongly recommended to do an initialization of the machine in the manual control before this command (or type the command «G28»). G29 The «M500» command save the calibration in the memory of your printer: M500
24 ANNEX 24 ANNEX


25 ANNEX / 25 Adaptation of the Start G-code Go in the tab «Slicer» and select the slicer «Slic3r». Next click on «configuration», and go in the tab «Printer Settings», click on «Custom G-code». After that, write in «Start G-code» the command below :
26 ANNEX 26 Copy paste the following sequence : G91 ; using relative distance G1 Z20 ; go to position Z 20 G90 ; absolute positioning G28 ; X, Y and Z homing G29 ; Auto leveling M500; save to EEPROM


27 ANNEX / 27 Printing of a piece with Repetier Host First you need to choice a piece for print. We suggest you to start with a simple object like this «Y Idler». Otherwise you can find a simple piece on thingiverse (small piece without any difficulties cube or something else-). Functionalities for the placement

28 ANNEX 28 Select the tab «Slicer» and do the follow actions : Note: We will only detail the main parameter of slicing.
29 ANNEX / 29 Infill settings

30 ANNEX 30 Speed settings Saving of «Filament Settings»

31 ANNEX / Filament settings Saving of «Filament Settings»

32 ANNEX 32 Extruder settings Saving of «Printer Settings»

.")
33 ANNEX / 33 Slice : The slice transform a virtual polygonal meshed body into machine coordinates, It take several seconds (depend of the size and the complexity of the piece). You can follow the progression of the slice.

34 ANNEX 34 When the slice is finished, you are automatically send on preview s tab.

35 ANNEX / 35 Piece drawn in machines path


36 ANNEX 36 Now you can start the print : Congratulation for your first print!!
37 ANNEX / 37 Ccommandes GCODE G1 : linear motion (ex : G1 X100 Y100 F3000) G28 : back to home (ex : G28 X Y) M500 : save l EEPROM M851 : define «Z Probe Height» value (ex : M851 Z-0.49) M999 : restart printer G29 : inductive probe at actual place G30 : inductive probe at plate s corners M110 : Set the current Line Number M17 : Enable/Power all stepper motors M410 : Quickstop. Abort all planned moves, stopping the printer. M24 : Start/resume SD print Note : all Marlin s GCODE at
38 ANNEX 38 CONGRATULATION! Your first print is a success!
39 ANNEX / 39 Thank you for choosing Prusa i3 Rework rev
USER S GUIDE. Documentation Version 1.2.6
 Documentation version 1.2.6 USER S GUIDE INTRODUCTION 2 INTRODUCTION INTRODUCTION / 3 INTRODUCTION Objective: Provide a visual guide of the different steps to set-up and get started using the MicroDelta
USER S GUIDE. Documentation Version 1.0.0
 Documentation version 1.0.0 tt USER S GUIDE INTRODUCTION 2 INTRODUCTION INTRODUCTION / 3 INTRODUCTION Target : Provide a visual guide of the different steps required to use an I3 Metal Motion 3D printer.
Geeetech Aluminum Prusa I3. User Manual
 Geeetech Aluminum Prusa I3 User Manual 1 Safety Instructions Building the printer will require a certain amount of physical dexterity, common sense and a thorough understanding of what you are doing. We
Geeetech Duplicator 5 3D printer. User Manual
 Geeetech Duplicator 5 3D printer User Manual Contents Safety Instructions... 4 1.Software Resources... 5 1.1 Repetier-Host... 5 1.2 Driver... 5 1.3 Arduino IDE... 6 2.Connect the Printer... 6 3.Printer
Geeetech Rostock mini G2 & G2s pro Quick Starter Manual
 Geeetech Rostock mini G2 & G2s pro Quick Starter Manual Please DO NOT rush to start your first printing after assembly, as this is a DIY kit, some parameters of the printer may be different from each other,
USER S GUIDE. Documentation Version 1.2.7
 Documentation version 1.2.7 USER S GUIDE INTRODUCTION 2 INTRODUCTION INTRODUCTION / 3 INTRODUCTION Objective : Provide a visual guide of the different steps to set-up and get started using the MicroDelta
ENJOY Introduction. Software Installation* Hardware. Calibration Settings. Print test. Appendex. Install print S/W Driver Install
 Quick Start Manual 1 ENJOY Introduction C O N T E N T S 6 5 Appendex 4 Print test 3 2 Hardware Calibration Settings Software Installation* Install print S/W Driver Install Hardware Intro Cable installation
3d Printing with the Prusa I3 Operation & Printing via a USB Cable
 3d Printing with the Prusa I3 Operation & Printing via a USB Cable Instructions for: Prusa I3 Printer Set-up Slic3r Software Use Pronterface Software Use Prusa I3 - Parts Identification Prusa I3 Printer
Geeetech A10. Desktop 3D Printer USER MANUAL
 Geeetech A10 Desktop 3D Printer USER MANUAL Terms Please be advised of the following terms (the Terms ) regarding this User Manual (this Manual ): All information in this Manual is subject to change at
Cura - DUET Dual Extrusion Setup
 SeeMeCNC Guides Written By: SeeMeCNC 2018 seemecnc.dozuki.com/ Page 1 of 15 INTRODUCTION Please note that dual extrusion is for advanced users. You should have some advanced knowledge on some G-Code and
Easy use of Repetier-Host software
 Easy use of Repetier-Host software Examples base on version Repetier-Host 1.06 1. Repetier-Host overview Repetier Host is an easy to use software for 3D printing. The main functions include manual debugging
ideamaker Manual
 ideamaker Manual Using ideamaker... 2 Basic information... 2 What is ideamaker?... 2 Where to download ideamaker?... 2 Install ideamaker... 3 Let s Print!... 6 How to use ideamaker?... 23 Interface...
USING YOUR BIGBOT. 1/18/2017 V0.1
 USING YOUR BIGBOT www.bigbot-3d.com 1/18/2017 V0.1 FOREWORD: YOUR PRINTER IS REPRAP, WHICH STANDS FOR "REPLICATING RAPID PROTOTYPERS". THIS MEANS IT CAN PRINT THE PARTS THAT ARE CUSTOM FOR THIS MACHINE,
Repetier-Host Documentation
 Repetier-Host Documentation Installation Prerequisites Before you start with the installation, you should check if your computer meets the requirements. Currently available computers should have no problems
Repetier-Host Documentation for use with Kora Pro 3D PC
 Repetier-Host Documentation for use with Kora Pro 3D PC Installation Prerequisites Before you start with the installation, you should check if your computer meets the requirements. Currently available
Repetier-Host Documentation
 Repetier-Host Documentation Installation Prerequisites Before you start with the installation, you should check if your computer meets the requirements. Currently available computers should have no problems
Technical Support: CUBE USER MANUAL
 CUBE THE DESKTOP 3D PRINTER USER MANUAL 2012-12-05 1 Contents 1 Installing software...3 1.1 Installing Python... 3 1.2 Installing ReplicatorG... 5 2 Pre-print checks...9 2.1 Power up...9 2.2 Connect to
MEGATRONICS V3.0 QUICK START GUIDE
 MEGATRONICS V3.0 QUICK START GUIDE Thank you for purchasing the Megatronics v3.0! This small guide will answer the basic questions on how to connect the board to your 3D printer. For more information visit
Written By: Josef Prusa
 6. Preflight check The last things you should check before the first print Written By: Josef Prusa 2018 manual.prusa3d.com/ Page 1 of 13 Step 1 P.I.N.D.A. adjustment, phase 1 Ensure the printer is turned
SOFTWARE SETUP Pronterface...2 Cura BED CALIBRATION Using Pronterface...11 Using LCD...13
 USER MANUAL TABLE OF CONTENTS SOFTWARE SETUP Pronterface...2 Cura 15.04...3 BED CALIBRATION Using Pronterface...11 Using LCD...13 LOAD/UNLOAD FILAMENT Using LCD (extruder 0 only)...14 Using PRONTERFACE...15
4. Using Cura to Set Up Your Auto-Leveling Probe and Create Your First Print
 4. Using Cura to Set Up Your Auto-Leveling Probe and Create Your First Print Give a short summary. Written By: Printrbot Support INTRODUCTION Outline what you are going to teach someone how to do. 2015
BASIC MARLIN FIRMWARE CONFIGURATION USER GUIDE FOR THE SMARTRAP 3D PRINTER WITH LCD
 INTRODUCTION: This is a basic user guide on how to verify and/or modify the settings in the Marlin firmware for use with the RepRap SmartRap 3D printer. There are several settings not covered in this manual
da Vinci Jr.1.0 April 2016 da Vinci Junior 1.0w 3D Printer da Vinci Jr.1.0w Quick Guide HD23F1JW0N1
 da Vinci Junior 1.0w 3D Printer w Quick Guide P 1 Product Overview A: Filament movement area B: Feed module C: Detector D: Extruder E: Filament F: Print bed G G: SD card port (Storage format: FAT32) H:
A GUIDE TO GETTING STARTED
 Florida Public Library Printing A GUIDE TO GETTING STARTED Prepared for the Florida Public Library by Robert Persing Table of Contents Section-A. Download the software... 3 Section-B. Install the software...
3D SYSTEMS University Cube 3D Printer
 3D SYSTEMS University Cube 3D Printer Lesson Troubleshooting Machine Issues Revision date: 10/20/13 1 1 2016 年 6 月 14 日 Table of Contents Slide 3 Temperature Errors Slide 5 File Read Errors Slide 7 Filament
3-7. Set Materials (Touch Screen) Set Materials (Software) Material Weight adjustment (grams) Current material weight. Increase.
 Set Materials (Software) Material Weight adjustment (grams) Current material weight. Increase.") Set Materials (Touch Screen) 3-7 Decrease Material Weight adjustment (grams) Increase Current material weight Save current settings Stop extrusion and heating Back withdraw material change material extrude
Set Materials (Touch Screen) 3-7 Decrease Material Weight adjustment (grams) Increase Current material weight Save current settings Stop extrusion and heating Back withdraw material change material extrude
GEEETECH. Me Creator2 printers contain heated moving parts. Never reach inside the printer while it is in operation or before it has cooled down.
 ME CREATOR 2 SAFETY INSTRUCTION Do read all the instructions and cautionary markings in this manual before operating your Me Creator. Me Creator2 printers contain heated moving parts. Never reach inside
M2 3D Printer V4 Rev. D
 M2 3D Printer V4 Rev. D Contents 2 Important Safeguards 3 Welcome 4 M2 Features 6 Other products included with your printer 7 Set up 9 Slicing.STL or.obj files 10 Maintenance and Support 11 Warranty 12
Geeetech A10M. Desktop 3D Printer USER MANUAL
 Geeetech A10M Desktop 3D Printer USER MANUAL Terms Please be advised of the following terms (the Terms ) regarding this User Manual (this Manual ): All information in this Manual is subject to change at
Titan Aero Repetier Configuration
 Titan Aero Repetier Configuration Set up your Repetier Firmware to support your new Titan Aero. Written By: Gabe S. 2017 e3d-online.dozuki.com/ Page 1 of 12 Step 1 Download Marlin First things first: you're
Complete kit assembly step
 BQ 3D printer Prusa i3 Hephestos Complete kit assembly step Prusa present an evolution of i3, the most popular 3D printer RepRap community. In our advanced version, Hephestos Find significant improvements:
Makeblock Constructor I 3D Printer Kit. 2. 3D Printer Wiring Guide
 2. 3D Printer Wiring Guide 1 Content 2.1. Parts Required... 3 2.2 preparation... 7 2.2.1 Add heat sinks on the top of stepper motor driver chip... 7 2.2.2 Plug the jumper cap into corresponding position...
SIMPLEST Bltouch/3Dtouch guide for Creality CR-10/CR- 10s/Ender 2/Ender 3 printers V2 created by Danny Walmsley.
 SIMPLEST Bltouch/3Dtouch guide for Creality CR-10/CR- 10s/Ender 2/Ender 3 printers V2 created by Danny Walmsley. The aim of this guide is to bring auto bed leveling to the masses by making it simple and
The following illustration demonstrates what you would see when the print jet nozzles are properly leveled.
 INF Printing Verify the Print Jet Nozzle Level Leveling the print jet nozzles is very important to ensure quality prints especially after replacing a print jet, an extruder assembly or the print pad. The
DIY PRINTER INSTALLATION AND OPERATION INSTRUCTION
 CTC DIY I3 PRINTER INSTALLATION AND OPERATION INSTRUCTIONS Thank you for buying and using DIY 3D printer produced by CTC Please read the installation and operation instruction carefully before use Company
M2 3D Printer V4 M2 3D Printer
 M2 3D Printer V4 Contents 2 Important Safeguards 3 Welcome 4 M2 Features 6 Other products included with your printer 7 Set up 9 Slicing.STL or.obj files 10 Maintenance and Support 11 Warranty 12 About
SIMPLEST Bltouch/3Dtouch guide for Creality CR-10/CR- 10s/Ender 2/Ender 3 printers created by Danny Walmsley.
 SIMPLEST Bltouch/3Dtouch guide for Creality CR-10/CR- 10s/Ender 2/Ender 3 printers created by Danny Walmsley. The aim of this guide is to bring auto bed leveling to the masses by making it simple and affordable
Software Manual. Revision 1.3
 Software Manual Revision 1.3 Copyright 2015 by Kudo3D. This material may be distributed only subject to the terms and conditions set forth in the Creative Commons Attribution-NonCommercial-NoDerivatives
USER GUIDE RADDS. December 2014 Version Max3dshop
 USER GUIDE RADDS December 2014 Version 1.01 Max3dshop http://max3dshop.org USER GUIDE ATTRIBUTION-NONCOMMERCIAL-SHAREALIKE 3.0 UNPORTED (CC BY-NC-SA 3.0) 2 1 TABLE OF CONTENTS USER GUIDE 2 Introduction...
DeltaMaker 3D Printer Getting Started
 DeltaMaker 3D Printer Getting Started Last Updated: December 2014 Table of Contents TABLE OF CONTENTS 2 WELCOME 3 SECTION 1: UNPACKING/SETUP 4 REMOVING THE PRINTER FROM THE BOX 4 INSTALLING THE FILAMENT
PowerSpec Ultra 3D Printer Start-up Guide Table of Contents
 PowerSpec Ultra 3D Printer Start-up Guide Table of Contents 1 What's Included in the Box?...Page 3 2 Un-boxing.Page 4 3 Initial Hardware Installation Page 6 4 Software Instruction.Page 8 5 Filament Page
think big, print huge
 think big, print huge quick start guide Table of Contents a Receiving and uncrating 5 b bed level & z home 11 c Loading filament 19 d SOFTWARE 23 e Setup 23 f preparing a print 26 g printing on gigabot
PROGRESS REVIEW 1. Astha Prasad. Team F / ADD_IN. Teammates: Daniel Berman, Nikhil Baheti, Ihsane Debbache ILR #2. October 22 nd, 2015
 PROGRESS REVIEW 1 Astha Prasad Team F / ADD_IN Teammates: Daniel Berman, Nikhil Baheti, Ihsane Debbache ILR #2 October 22 nd, 2015 Individual Progress For this week, my work was mostly focused on two parts:
Interface Solution for Mac OS X and BoXZY
 This guide will get you started with BoXZY and OS X Written By: BoXZY 2017 boxzy.dozuki.com Page 1 of 10 INTRODUCTION # Install the operating software for BoXZY # Configure the BoXZY settings in the user
- Software KISSlicer Guide - [Z] ArrayZ C4C 3D Printer
![- Software KISSlicer Guide - [Z] ArrayZ C4C 3D Printer](/thumbs/92/108197208.jpg "- Software KISSlicer Guide - [Z] ArrayZ C4C 3D Printer") - Software KISSlicer Guide - ArrayZ C4C 3D Printer Software KISSlicer Guide We are suggesting customers using Kisslicer software as a 3D model slicing program, ArrayZ C4C 3D Printer has many feature is
- Software KISSlicer Guide - ArrayZ C4C 3D Printer Software KISSlicer Guide We are suggesting customers using Kisslicer software as a 3D model slicing program, ArrayZ C4C 3D Printer has many feature is
SeeMeCNC Guides 2 INTO 1 DUAL FILAMENT FEED ADAPTER INSTALL
 SeeMeCNC Guides 2 INTO 1 DUAL FILAMENT FEED ADAPTER INSTALL These are still in development - Be ready to troubleshoot firmware/software configuration for your setup when purchasing these adapters. Written
3D SYSTEMS University CubeX 3D Printer
 3D SYSTEMS University CubeX 3D Printer Lesson Leveling the Print Pad and Print Tips, Setting the Z-Gap Revision date: 10/22/13 1 1 2016 年 6 月 14 日 Objectives After completing this lesson you will: Be able
Panowin F1. User Manual
 Panowin F1 User Manual 1 PANOWIN TECHNOLOGIES CO.,LTD. WARNING power outlet. CAUTION: In case of emergency unplug the Panowin F1 from the WARNING: Carefully monitor the Panowin F1 during operation. Do
Cura (Documentation for version )
") Cura (Documentation for version 15.04.06) Getting Started Installation To start the installation of Cura, download it first. After downloading, open the installer and run the installation wizard to complete
Cura (Documentation for version 15.04.06) Getting Started Installation To start the installation of Cura, download it first. After downloading, open the installer and run the installation wizard to complete
ideamaker Manual
 ideamaker Manual www.raise3d.com 1 Using ideamaker... 3 1.1 What is ideamaker?... 3 1.2 Where to download ideamaker?... 3 2 Install ideamaker... 4 3 Let s Print!... 9 3.1 Import.STL files... 9 3.2 Slice
SHENZHEN GETECH TECHNOLOGY CO., LTD. Geeetech A10 3D Printer. User Manual (V2.0)
") Geeetech A10 3D Printer User Manual (V2.0) 1 Content 1 Attention... 3 1.1 Safety instruction... 3 1.2 Factory test before delivery... 3 2 Printer display... 4 3 Assembling... 7 3.1 Assembling the main
Geeetech A10 3D Printer User Manual (V2.0) 1 Content 1 Attention... 3 1.1 Safety instruction... 3 1.2 Factory test before delivery... 3 2 Printer display... 4 3 Assembling... 7 3.1 Assembling the main
E3 CNC Router Troubleshooting Guide
 Simple Cost Effective Designs. E3 CNC Router Troubleshooting Guide The purpose of this document is to give those new to CNC routing is a quick reference for the common issues of getting the E3 CNC router
300 DIY 3D PRINTER KIT
 300 DIY 3D PRINTER KIT 1. VERSIONS...2 2. FIRST CHECKS BEFORE TURNING B2X300 ON...3 2.1 PARALLELISM BETWEEN LINEAR GUIDES IN Z...3 2.2 PARALLELISM BETWEEN LINEAR GUIDES IN Z AND TRAPEZOIDAL THREADED RODS...4
Written By: Jakub Dolezal
 5. Preflight check Written By: Jakub Dolezal 2018 manual.prusa3d.com/ Page 1 of 17 Step 1 P.I.N.D.A. adjustment (part 1) Ensure the printer is turned off and not plugged in. Note your extruder is slightly
Dreamer Series User Manual
 Dreamer Series User Manual Welcome to the world of the Dreamer. To ensure that you have the best possible user experience, it s important that you follow this user manual. Let s get started! In Parts I
Users Manual of GT2560
 Users Manual of GT2560 Rev A+ Compiler: kris.mao Date: Jan04, 2016 Reviewer: Alina, Le mon Date: Jan04, 2016 Approver: Linda.Fan Date: Jan13, 2016-1 - Contents Copyright Declaration... 3 Technical Support...
ideamaker Manual
 ideamaker Manual www.raise3d.com 1 Using ideamaker... 3 1.1 What is ideamaker?... 3 1.2 Where to download ideamaker?... 3 2 Install ideamaker... 4 3 Let s Print!... 9 3.1 Import.STL files... 9 3.2 Slice
Certification Guide. Brownsburg Public Library
 Certification Guide Brownsburg Public Library 1 st Maker Space, LLC and Brownsburg Public Library have partnered to increase understanding and access to 3D printing and design technology. Brownsburg Public
User Guide ADIMLab-gantry 3D printer
 User Guide ADIMLab-gantry 3D printer Version V1.3.2 1 Contents 一 Overview... 4 二 Thanks and Commitment... 6 三 What is 3D Printer... 7 3.1 3D printing steps... 7 3.2 3D Modeling... 7 3.3 Slice output 3D
Rich Cattell s Marlin Branch delta calibration for newbies
 Rich Cattell s Marlin Branch delta calibration for newbies Credits Rich Cattell (and contributors) for making this version of auto calibration possible Ira Nana, Minnow blog, and others in google groups
E3 CNC Router Troubleshooting Guide
 Simple Cost Effective Designs. E3 CNC Router Troubleshooting Guide The purpose of this document is to give those new to CNC routing is a quick reference for the common issues of getting the E3 CNC router
Mr Beam Shield - Instructions. #01 laser driver #02 power source #03 axes & motors #04 miscellaneous #05 safety #06 usage & appendix
 Mr Beam Shield - Instructions #01 laser driver #02 power source #03 axes & motors #04 miscellaneous #05 safety #06 usage & appendix front back What is it? The Mr Beam Shield was developed within the Kickstarter
ZHEJIANG FLASHFORGE 3D TECHNOLOGY CO., LTD. Creator Pro Start-up Guide
 www.ff3dp.com ZHEJIANG FLASHFORGE 3D TECHNOLOGY CO., LTD. Creator Pro Start-up Guide www.ff3dp.com Contents 1 What's Included in the Box? 2 2 Un-boxing 2 3 Initial Hardware Installation 6 4 Software Installation
Portal Delta Pro 3D printer
 Portal Delta Pro 3D printer User s Manual v1.0 Welcome to the world of 3D printing! Thank you for your purchase of the Mass Portal 3D printer we hope that it will serve you well and even exceed your expectations.
May Project Plan v2
 May 14-06 Project Plan v2 ANDREW SPEER CHENG SONG KYLE LICHTENBERG ROSS FRIEDMAN JAKE MEYER 10/10/2013 May 14-06 Page 1 Problem Statement Our client, Dr. Tom Daniels, wants to repurpose an old 3-axis positioning
Well Link Industries Limited
 Well Link Industries Limited 3D Printing 3D printing is no longer a science fiction. It helps to change from prosthetics and regenerative medicine to structures in space. In 2013, second term State of
Please carefully read the safety instructions before get started.
 Safety Instructions Please carefully read the safety instructions before get started. ANYCUBIC 3D printer generates high temperature. Do not reach inside of the printer during operation. Allow time for
Bondtech QR Installation guide for the BCN3D Sigma
 Bondtech QR Installation guide for the BCN3D Sigma 1 Contents Introduction... 3 List of tool required... 3 Mechanical & Electrical Installation... 4 Adjustment of steps/mm...12 Change Log: 1) Added comment
SHENZHEN GETECH TECHNOLOGY CO LTD. Geeetech A10M 3D Printer. User Manual (v2.0)
") Geeetech A10M 3D Printer User Manual (v2.0) 1 Content 1 Attention... 3 1.1 Safety instructions... 3 1.2 Factory test before delivery... 3 2 Printer display... 4 3 Assembling... 7 3.1 Assembling the main
Geeetech A10M 3D Printer User Manual (v2.0) 1 Content 1 Attention... 3 1.1 Safety instructions... 3 1.2 Factory test before delivery... 3 2 Printer display... 4 3 Assembling... 7 3.1 Assembling the main
Dremel Digilab 3D Slicer Software
 Dremel Digilab 3D Slicer Software Dremel Digilab 3D Slicer prepares your model for 3D printing. For novices, it makes it easy to get great results. For experts, there are over 200 settings to adjust to
Agenda. Breaking the Ice Physical Setup Walkthrough of REPETREL First Print
 T1 Training Session Agenda Breaking the Ice Physical Setup Walkthrough of REPETREL First Print Breaking the Ice SYSTEM 30M ENGINE Breaking the Ice Protected build environment Slightly larger build area
SeeMeCNC Guides. Configuring Artemis
 SeeMeCNC Guides Configuring Artemis Configuring your Artemis printer. Connecting it to your network and getting everything dialed in for successful printing. Written By: SeeMeCNC 2018 seemecnc.dozuki.com/
3D Printing Getting Started!
 ARCHITECTURE & LANDSCAPE ARCHITECTURE 3D Printing Getting Started! White filament is free to students for academic use. Where do I buy filament? NORTH DAKOTA STATE UNIVERSITY www.makerbot.com/store www.ultimachine.com/pla
Quickstart Guide Kora Pro 3D PC Printer
 Quickstart Guide Kora Pro 3D PC Printer 1 Rev001/01/2018 Kora Pro PC General Precautions and Advice Only use original accessories from or approved by the manufacturer Always read the manual before initial
Select Mini 3D Printer V2
 Select Mini 3D Printer V2 P/N 15365, 21711, 21872, 24166 User's Manual CONTENTS SAFETY WARNINGS AND GUIDELINES... 3 INTRODUCTION... 4 FEATURES... 4 CUSTOMER SERVICE... 5 PACKAGE CONTENTS... 5 PRODUCT OVERVIEW...
D300 Professional Desktop 3D Printer
 D300 Professional Desktop 3D Printer - Multiple hotend options - Advanced software - Enclosed chamber - Built to order AUTOMATION READY Automatic calibration Multiple hotend options Controlled chamber
USER MANUAL Resolution 0.02mm Speed 300mm/second Software: Wanhao Maker
 1 Duplicator 5S & 5S MINI Desktop 3D Printers USER MANUAL Resolution 0.02mm Speed 300mm/second Software: Wanhao Maker 2014/2015 Wanhao USA 3 Table of Contents Welcome 1 Printer Specifications 2 Unboxing
SeeMeCNC Guides. Step 5: Installing the Firmware. This guide will show you how to install the firmware on your Rostock MAX v3 3D printer.
 SeeMeCNC Guides Step 5: Installing the Firmware This guide will show you how to install the firmware on your Rostock MAX v3 3D printer. Written By: geneb 2016 seemecnc.dozuki.com Page 1 of 7 Step 1 Download
4A. Electronics assembly (newer version)
") 4A. Electronics assembly (newer version) Written By: Jakub Dolezal 2017 manual.prusa3d.com/ Page 1 of 11 Step 1 Proper order of the Extruders Following the previous chapter, you have to connect extruder
4A. Electronics assembly (newer version) Written By: Jakub Dolezal 2017 manual.prusa3d.com/ Page 1 of 11 Step 1 Proper order of the Extruders Following the previous chapter, you have to connect extruder
MIDI SPACE TO CREATE QUICK START GUIDE. Safety & Components. STEP 1 Unpacking & Setup. STEP 2 Loading & Unloading Filament
 WWW.KORA.CO.UK SPACE TO CREATE MIDI QUICK START GUIDE Safety & Components STEP 1 Unpacking & Setup STEP 2 Loading & Unloading Filament STEP 3 Preparation & Printing STEP 4 Switching the Printer Off STEP
Replacing the TFM coupler
 Repair manual Replacing the TFM coupler Instructions The TFM coupler is a key component of the hot end. It allows filament to flow smoothly through it from the Bowden tube and towards the nozzle. The coupler
UP! Quick Start Guide
 Personal Portable 3D Printer UP! www.pp3dp.com 1. Assemble Printer Open the box, take out the printer and accessories. Assemble the parts contained in the box as following procedure: 1. Unscrew the M4
MKS-BASE. MKS BASE is a feature rich all-in-one electronics solution for Reprap and other CNC
 MKS-BASE Overview MKS BASE is a feature rich all-in-one electronics solution for Reprap and other CNC devices. It features an onboard ATmega2560. Its five motor outputs are powered by A4982 stepper drivers.
CubePro. INF Printing Best Practices. Introduction. Copyright. Compliance. INF Printing Best Practices
 INF Printing Best Practices CubePro INF Printing Best Practices Introduction Printing with Infinity Rinse-Away (INF) is an exciting endeavor for the 3D printing enthusiast. Now, you can utilize supports
Portabee GO. Mobile 3D Printer. Portabee 3D. Romscraj. Software & Support. Manufacturing & Engineering.
 Portabee GO Mobile 3D Printer Portabee 3D Software & Support http://portabee3d.com support@portabee3d.com Romscraj Manufacturing & Engineering http://romscraj.com contact@romscraj.com A. Software Package
INSTALLING THE WINDOWS-BASED DRIVER NOTICE!
 INSTALLING THE WINDOWS-BASED DRIVER NOTICE! Keep the machine and the computer unconnected until you carry out this installation operation. Failure to follow the correct procedure may make installation
Developer Guide V1.0.3 Sep. 2017
 Developer Guide V1.0.3 Sep. 2017 1 / 31 Contents SAFETY INSTRUCTIONS... 3 GENERAL INFORMATION... 4 1.SOURCE FILE... 4 2.REFERENCE FRAME... 4 3.COORDINATE... 5 4.MOUNTING... 6 5. BUTTONS & INDICATOR LIGHTS...
Witbox. User Manual. Witbox
 User Manual Welcome Thank you for choosing bq. This manual will help you use your new 3D printer correctly. Welcome to the world of! How to use this manual To ensure you use your correctly, read this manual
2014 Simplify3D. Quick Start Guide
 Quick Start Guide Preparation Installing Simplify3D Software 3 The Configuration Assistant 4 The Interface Layout 5 3D Printing Workflow Import Process Settings Preview Print! Import 7 Process Settings
TROUBLESHOOTING GUIDE
 TROUBLESHOOTING GUIDE YOU SHOULDN'T ENCOUNTER many problems when using your Vector 3 printer, however, occasionally things can go wrong. Before contacting Customer Services, please consult this list of
Printing via the SD Card. SeeMeCNC Guides. Written By: JJ Johnson seemecnc.dozuki.com Page 1 of 7
 SeeMeCNC Guides Printing via the SD Card Written By: JJ Johnson 2017 seemecnc.dozuki.com Page 1 of 7 INTRODUCTION Printing via the SD card reader on your printer is a much more stable solution compared
Math and Science for Sub- Saharan Africa (MS4SSA)
") Sub- Saharan Africa () Project-Based Learning: Introduction 3D Printing / Solid Modeling M.G. Zebaze Kana UNESCO HQ, Paris Introduction 3D Printing / Solid Modeling 1.Background and introduction 2. Overview
Sub- Saharan Africa () Project-Based Learning: Introduction 3D Printing / Solid Modeling M.G. Zebaze Kana UNESCO HQ, Paris Introduction 3D Printing / Solid Modeling 1.Background and introduction 2. Overview
MAKERGEAR USER GUIDE. V4 Rev. E Made in the USA since 2009
 MAKERGEAR USER GUIDE M2 V4 Rev. E Made in the USA since 2009 Contents 1 - Welcome 2 - Warning & Important Safeguards 4 - What's Included 5 - Set Up 8 - Slicing.STL or.obj Files 10 - Changing Filament 11
JGAURORA 3D PRINTER MODEL: A-4 USER GUIDE
 JGAURORA 3D PRINTER MODEL: A-4 USER GUIDE 1 Contents 1. Preface...3 1.1 Introduction...3 1.2 Safety matters... 3 1.3 Filament requirements...3 1.4 Environmental requirements...3 2. About A-4... 4 2.1 Basic
Slic3r User Guide. By Lorenzo Cantini (Kent s Strapper) and Ivan Bortolin Translation by Linda Anticoli 10/08/2012
 and Ivan Bortolin Translation by Linda Anticoli 10/08/2012") Slic3r User Guide By Lorenzo Cantini (Kent s Strapper) and Ivan Bortolin Translation by Linda Anticoli 10/08/2012 2 Contents Overview i 1 Installation and first run 1 1.1 Installation........................................
Slic3r User Guide By Lorenzo Cantini (Kent s Strapper) and Ivan Bortolin Translation by Linda Anticoli 10/08/2012 2 Contents Overview i 1 Installation and first run 1 1.1 Installation........................................
Instruction Manual. RS 3D Printer
 Instruction Manual RS 3D Printer 1) GENERAL This instruction manual contains important information regarding the installation, operation, maintenance and storage for RS 3D Printer. Please read these instructions
Developer Guide V1.0.4 Oct. 2017
 Developer Guide V1.0.4 Oct. 2017 1 / 34 Contents SAFETY INSTRUCTIONS... 3 GENERAL INFORMATION... 4 1.SOURCE FILE... 4 2.REFERENCE FRAME... 4 3.COORDINATE... 5 4.MOUNTING... 6 5. BUTTONS & INDICATOR LIGHTS...
User Manual V 0.1. Download the full user manual at
 User Manual V 0.1 Download the full user manual at www.afinia.com/support Index Chapter 1 Product Description Chapter 2 Prepare for Your First 3D Print Chapter 3 Machine Settings Chapter 4 Print Settings
User Guide Dreamer Desktop 3D Printer
 User Guide Dreamer Desktop 3D Printer Dreamer User Guide www.ff3dp.com 1 Dreamer User Guide www.ff3dp.com 2 CONTENTS WELCOME TO FLASHFORGE DREAMER A. How to use this manual B. The FlashForge Experience
XD10. High Resolution Desktop 3D Printer
 XD10 High Resolution Desktop 3D EXTRUSION Single-feed Bowden tube All-metal hotend and feeder Extrusion temperature up to 300 C Included nozzle: 0.2 mm BUILD CHAMBER Enclosed, illuminated chamber Build