The HP CLJ 3000/3600/3800 Toner Cartridge
|
|
|
- Christal Malone
- 6 years ago
- Views:
Transcription
. The stated speed is for both black and color pages except for the 3000 series where the monochrome pages run at 30ppm and color at 15ppm.")


1 The HP CLJ 3000/3600/3800 Toner Cartridge By Mike Josiah and the Technical Staff at Summit Technologies First released in October 2005, the HP-3600 series of color laser printers are based on a 17/22 ppm engine (depending on the machine). The stated speed is for both black and color pages except for the 3000 series where the monochrome pages run at 30ppm and color at 15ppm. These engines have a standard resolution of 600 Dpi (3600 DPI with imageret). The 3600 cartridges are an all in one type containing the Supply drum and waste. Like the CLJ-2600 these machines use an in-line, or single pass system. All four cartridges are stacked on top of one another and each color develops its own image which is transferred to the paper by the transfer belt. This type of system is faster, and allows for a higher quality print. The 3000 series cartridges use a different plastic shell from the 3600/3800 which prevents them from being used in those machines. The only difference between the 3600 and 3800 color cartridges besides the toner load is the chip. Figures A & B show the difference between the CLJ 3000 black cartridge and the CLJ 3600 black cartridge. All three series of machines in this engine have cartridges that use HP s new ColorSphere toner. This is a new more vibrant toner and is the second generation of chemical toner for HP. The chips in these cartridges work the same as most other HP color cartridges, the chip does not need to be changed in order for the cartridge to work. The toner low circuitry will be disabled, but after the user presses the SELECT button, the cartridge will work. The display will then alternate from READY to Unauthorized Supply in Use. The chips in these machines are similar in size to the HP-2600 in that they are very small. Figure A The printers based on the 3600 engine are the: HP Color LaserJet 3000n HP Color LaserJet 3000dn HP Color LaserJet 3000dtn HP Color LaserJet 3600 HP Color LaserJet 3600n HP Color LaserJet 3600dn HP Color LaserJet 3800 HP Color LaserJet 3800n Figure B HP Color LaserJet 3800dn HP Color LaserJet 3800dtn 1
2 The cartridges used in the 3000 machines are the: Q7560A (Black) 6,500 pages at 5% $ List Q7561A (Cyan) 3,500 pages at 5% $ List Q7563A (Magenta) 3,500 pages at 5% $ List Q7562A (Yellow) 3,500 pages at 5% $ List The cartridges used in the 3600 machines are the: Q6470A (Black) 6,000 pages at 5% $ List Q6471A (Cyan) 4,000 pages at 5% $ List Q6473A (Magenta) 4,000 pages at 5% $ List Q6472A (Yellow) 4,000 pages at 5% $ List Cartridges used in the 3800 machines are the: Q6470A (Black) 6,000 pages at 5% $ List Q7581A (Cyan) 6,000 pages at 5% $ List Q7583A (Magenta) 6,000 pages at 5% $ List Q7582A (Yellow) 6,000 pages at 5% $ List The black cartridge Q6470A is used in both the 3600 and 3800 machines. As you can see from these prices (Current as of June 2006), these are very profitable cartridges to remanufacture. The basic workings of these cartridges is similar to the 2600 series, but some advances have been made. Because of that we are including the cartridge theory here. If you are familiar with the 2600 theory, you will notice that the material here is very similar, these engines just work faster. HP-3600 Color Printing Theory The Color toner cartridge printing process happens in s series of stages or steps. For the purpose of this article, we will call them stages. Figure 1 shows the basic layout of the cartridges and how they relate to one-another and the printer. Figure 2 shows the cartridge parts layout. In the first stage, a Pre-exposure LED baths the drum surface and eliminates any residual charges on the drum surface, the Primary Charge Roller (PCR) then places a uniform negative DC voltage on the OPC drum surface. The amount of the negative DC voltage placed on the drum is controlled by the printer s intensity setting. This is a new system for HP. 2


3 In past machines the PCR both erased and charged the drum. Now the PCR only charges it. In theory, this should lead to fewer back grounding problems, but only time will tell. See Figure 3 Figure 2 Figure 1 Figure 3 3


4 In the second stage, the laser beam is fired onto a rotating mirror (called the scanner). As the mirror rotates, the beam is reflected into a set of focusing lenses. The beam then strikes the drums surface, reducing the negative charge and leaving a latent electrostatic image on the drum. The areas where the laser did not strike the drum will retain the higher negative charge. See Figure 4 Each color cartridge has its own laser but shares the scanner unit with another color. See Figure 5. While this is incredibly complicated, it cuts down on the parts needed per machine, and keeps the cost down. If you ever have a machine that has a scanner problem it will affect 2 color cartridges. Figure 4 Figure 5 The third or developing stage is where the toner is developed on the drum by the developing section (or supply chamber), which contains the toner particles. The development stage is actually made up of two steps: toner charging, and the actual development. In the toner charging stage, the toner stirring blade turns inside the hopper. As it turns, friction causes a negative potential to develop on the toner. In addition, a foam feed roller brings the toner to the developer roller and also places a negative charge on the toner. These two charges ensure a uniform charge on the toner. Once the toner is properly charged, the toner will coat the developer roller. The toner is also held onto the developer roller by another negative DC bias voltage. This voltage is controlled by the printer s intensity setting, and causes either more or less toner to be attracted by the developer roller. This in turn will either increase or decrease the print density. 4
5 The developer roller also has an AC bias signal placed on it which makes the jump from the developer roller to the drum easier. The amount of toner on the developer roller is controlled by the doctor blade, which uses pressure to keep the amount of toner on the roller constant. Attached to the Dr. Blade is what is called a developing sheet (orange Mylar type film). This sheet improves the print quality, and helps prevent toner scatter. As the laser exposed areas of the OPC Drum approach the developer roller, the toner particles are attracted to the drum s surface due to the opposite voltage potentials of the toner, and laser exposed areas of the OPC drum. See Fig. 6 The fourth stage is the transfer stage. This is where there are some large differences from monochrome printers. The first step in the transfer stage is where the transfer roller (which is located directly opposite each OPC drum), places a positive DC bias charge on the back of the ETB or transfer belt. Each toner cartridge has a separate transfer charge roller. At the same time, the paper is moving between the OPC drum and the ETB. As the ETB passes the transfer charging roller, the positive charge is picked up through the ETB, and draws the negatively charged toner off the drum onto the paper. This process is repeated for each color cartridge. As the toner piles onto the paper, the positive charge on the paper weakens as the paper runs through each cartridge. For this reason, the charge is increased on the transfer charging roller for each successive color. See also Figure 6 Figure 6 The paper separates from the ETB belt as the belt reaches the top of its path and turns back down to start the process again. The static charge on the back of the paper is decreased with static charge eliminator. This helps stabilize the paper feed, and also prevents toner flares (spots) under low temperature and low humidity conditions. See Figure 7 Figure 7 In the fifth stage, the image is then fused onto the paper by the fuser assembly. The fuser Assembly is comprised of the upper heating assembly and lower pressure roller. The lower pressure roller presses the page up into the upper heating assembly which then melts the toner into the paper. The upper heating assembly consists of a flexible sleeve with a ceramic heating coil inside. This type of fuser affords instant on fusing with little to no wait time, and low power consumption. See Figure 8 5
6 Figure 8 OPC Drum Cleaning: The drum is cleaned after the image is transferred to the paper by the wiper blade. This part is fairly standard; the wiper blade scrapes the toner off the drum, and the recovery blade guides it into the waste chamber. These cartridges use a transfer plate to move the waste toner into the back of the cartridge. Printer Calibration: At the start of all this is the calibration cycle. The printer will calibrate itself whenever the printer is turned on, when a new toner cartridge is installed, after 48 hours of run time, and at 150 page intervals. Calibration consists of a solid block and halftone of each color being printed to the ETB. As the printed areas get to the top of the belt, a sensor will detect them, measure the density, and adjust the printer accordingly. All of the calibration time settings are user controllable. There are also physical calibrations of the gear train, and various rollers. Toner Low Detection: The last thing that needs to be discussed before getting to the actual remanufacturing is the toner level detection. The 3600 printers determine cartridge life by a number of different ways. It counts the number of OPC drum rotations, and actual amount of toner left. The amount of toner is also determined by an optical sensor that reads through a set of clear plastic lenses mounted on the supply chamber. Each of these measurements is written to the chip. Taking test prints, cartridge troubleshooting as well as minor printer troubleshooting will be covered at the end of this article. Required Tools 1) Toner approved vacuum. 2) A small screw driver (Common Style) 3) A Phillips head screwdriver 4) Spring Hook 6

 Lint free Cloths 1) Remove the two covers over the hinge pins with a")


7 Supplies Required 3000/3600/3800 Dedicated Color Toner New replacement chip New Long Life 3600 Drum New Wiper Blade New PCR [Optional] New Doctor Blade [Optional] Silicon caulk (Phenoseal/GE 100% silicon caulk works best) Conductive Grease Cotton Swabs Shipping Lock(s) Lint free Cloths 1) Remove the two covers over the hinge pins with a sharp sturdy razor knife. Shave the top off, and dig out around the pin until you can grasp it with your flush cutting wire cutters. Only cut deep enough so that you can remove the pin. If too deep a hole is made, the hinge pin may not fit properly, and allow the two halves to move away from each other. See Figures 9, 9A, 10 & 11 Figure 9 Figure 9A Figure 10 Figure 11 7
 Separate the two halves.")

 Remove the drum cover by prying up the spring assembly, and pulling the")
 With the wire cutters, carefully pry the pin out from the internal")
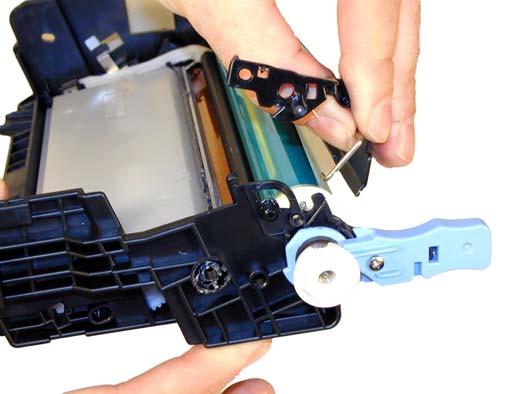
8 2) Remove the 2 springs, one from each side. See Figures 12 & 13 Figure 12 Figure 13 3) Separate the two halves. See Figure 14 4) On the waste chamber non-gear side remove the small Phillips head screw, and blue handle. See Figure 15 Figure 14 Figure 15 5) Remove the spring so it does not get lost. See Figure 16 6) Remove the drum cover by prying up the spring assembly, and pulling the metal bars out of their slots. Be careful not to lose the spring! See Figures 17 & 18 7) With the wire cutters, carefully pry the pin out from the internal drum hub. There is no need to remove the pin from the external drum drive gear. This pin is in tight and is hard to remove. Take your time, and pry not pull the pin out. See Figure 19 8


9 Figure 16 Figure 17 Figure 18 Figure 19 9
 Remove the drum.")

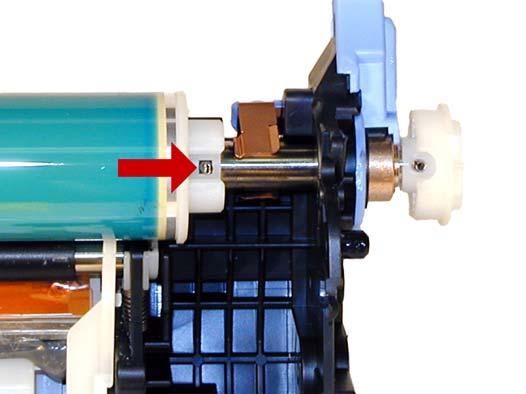
10 8) Pull the drum axle out from the cartridge. Be careful of the drum as it will come loose. See Figure 20 9) Remove the drum. See Figure 21 Figure 20 Figure 21 10) On the PCR, note the heavy coating of conductive grease on both sides of the roller. Normally this is only on one side. For these cartridges it needs to be on both. See Figure 22. Figure 22


11 11) Pry up the tails of the white plastic PCR holders from the cartridge. Lift up both holders, and remove the PCR. See Figures 23 & 24 Figure 23 Figure 24 12) With a sharp razor knife, slide the blade along the base plastic of the orange film assembly. Remove the assembly. This must be removed to get access to the wiper blade screws. According to HP, this film assembly helps prevent toner scatter. See Figures 25 & 26. Figure 25 Figure 26 13) Remove both screws from the wiper blade. See Figure 27 Figure 27
 Dump out and vacuum any remaining toner from the hopper.")

12 14) Take the razor knife again and slide the blade along the back edge of the wiper blade. Keep the blade along the metal so the grey sealing material is separated from the blade. Remove the blade. See Figures 28 & 29 Figure 28 15) Dump out and vacuum any remaining toner from the hopper. You will notice that the waste chamber is actually a separate white plastic part that looks like it is held in by two Figure 29 clips, and can be removed. That is not the case. The chamber is glued/welded in place. The waste toner must be removed from the wiper blade opening. Try to keep the toner from getting on the grey wiper blade seal. 16) Check the grey wiper blade seal, if it is sticky, it can be re-used. If it is not, and you cleaned it with alcohol, it must be removed, and replaced with a good silicon sealer. (See supplies needed at start of article). See Figure 30 17) Lubricate the new wiper blade with your preferred lubricant. Install the blade and 2 screws. Make sure the wiper blade seal (which ever type you are using) seals along the back edge of the blade and around the sides. See Figure 31 Figure 30 Figure 31


13 Figure 33 Figure 32 18) Install new double sided tape on the back of the orange film assembly. Install the assembly on the wiper blade in the same location is was removed from. See Figure 32 19) Clean off the old conductive grease from the PCR ends, and clean the PCR. Coat both ends of the PCR with new conductive grease. Place the white plastic holders on the shaft, and install the PCR and holders in the cartridge. Make sure the tails of the holders snap into place (If they come out easily, they are not in place). See Figures 33, 34, & 35 Figure 34 Figure 35
 Slide the drum axle in from the gear side.")


14 20) Install the drum in the cartridge, large hub side to the copper contact side. See Figure 36 21) Slide the drum axle in from the gear side. Make sure you do not damage the copper drum contacts. Both tabs must be in contact with the axle. See Figure 37 22) Align the drum hub and axle so that the holes line up. Insert the metal pin. Make sure the pin is centered on the axle. Figure 36 Figure 37 If the pin sticks out too far on one side, there is a plastic block on the waste chamber that will stop the drum from turning. Spin the drum a few rotations to make sure everything is OK. See Figures 38 & 39 Figure 38 Figure 39


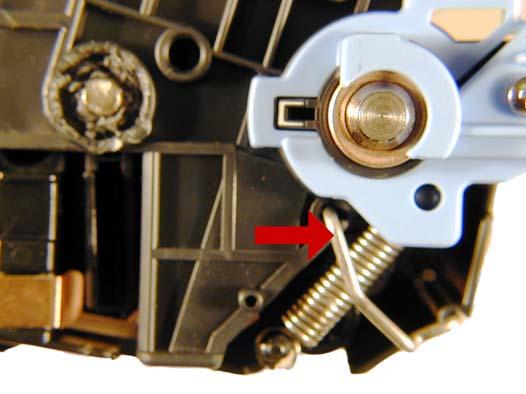
15 23) On the non-gear side, install the spring on the post. See Figure 40 24) Install the blue handle and screw. See Figure 41 25) Place the waste chamber aside. Figure 40 Figure 41 26) On the contact side of the toner supply, remove the 2 screws and end cap. See Figures 42 & 43 Figure 42 Figure 43


16 27) Slide the developer roller out from the cartridge. There is no need to remove the gear side end cap or gears. See Figures 44 & 45 Figure 44 Figure 45 28) Remove the two screws on the doctor blade. See Figure 46 29) On the back edge of the doctor blade, slide a sharp razor knife along the back edge of the blade separating the grey sealing material from the blade. Carefully lift the blade off the cartridge. Be careful not to bend the blade! If the blade does not lift off easily, there may be some sealing material under the blade and you need to run the knife under the blade as well. See Figures 47 & 48 Figure 46 Figure 47
 Vacuum the feed roller clean.")
 These cartridges do not have a fill plug and")
 When a seal becomes available you will need to install it now. 34) Check the grey sealing material to see if it is sticky.")
17 30) Vacuum out any remaining toner from the hopper. We don t recommend dumping it out as the toner will get all over the hopper. It is hard to clean off. 31) Vacuum the feed roller clean. Until new felt seals are available for the developer roller, we do not recommend that the feed rollers be removed. Re-using old seals that have been removed may cause leaks See Figure 49 Figure 48 Figure 49 32) These cartridges do not have a fill plug and must be filled through the developer roller opening. Fill the hopper with the correct amount of dedicated 3600 toner. See Figure 50 33) When a seal becomes available you will need to install it now. 34) Check the grey sealing material to see if it is sticky. If not, clean it with alcohol. If that does not work, remove the material, and replace it with a good quality silicon caulk. See Figure 51 Figure 50 Figure 51
 Wipe the developer roller down with a clean lint free cloth.")
18 35) Take the Dr. Blade and check to see if it is bent in any way. If it is, replace it. This can happen sometimes when the blade is removed. Install the doctor blade and two screws. Make sure the blade is sealed at the back edge. See Figures 52 & 53 Figure 52 Figure 53 36) Wipe the developer roller down with a clean lint free cloth. We do not recommend that any chemicals be used at this time. Testing is still on going to see what if anything can be used. Install the cleaned developer roller in the hopper keyed end first. Spin it until it is fully seated in the drive gear. See Figures 54 & 55 Figure 54 Figure 55 37) Clean the old conductive grease from the contact end cap, and replace with new. Use the same amount of grease that you removed. If too much is used, it can attract toner dust and actually insulate the contact instead of enhance it.. Install the contact end cap and two screws. See Figure 56 38) Place the supply chamber onto the waste chamber. See Figure 57

 Install the drum cover.")

19 Figure 56 Figure 57 39) Align the two halves and install the hinge pins, short pin to the non-gear side, and long pin to the gear side. See Figures 58 & 59 Figure 58 Figure 59 40) Install the springs on each side of the cartridge. See Figures 60 & 61 41) Install the drum cover. Set the spring in the holder as shown. Snap the holder in place and install the metal bar into the proper holes on each side. See Figures 62, 63 & 64 42) Release the tail of the spring so that the cover closes properly. See Figure 65


20 Figure 60 Figure 61 Figure 62 Figure 63 Figure 64 Figure 65


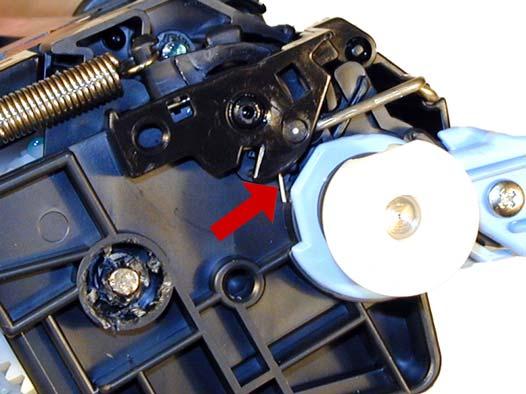
21 43) Install the shipping locks on each side of the cartridge. If the cartridge is to be used right away, they are not necessary, but if the cartridge might sit on s shelf for a while, they should be installed. They keep the developer roller from getting a flat spot, which will cause horizontal voids in the print. See Figures 66 & 67 Figure 66 Figure 67 44) Clean the two clear plastic Toner low lenses on the supply chamber. See Figures 68 & 69 44) Replace the chip on the cartridge. Be sure to use the correct color chip for your cartridge. See Figure 70 Figure 68 Figure 69

22 Figure 70 Taking Test Prints Demo Press the MENU button on the printer Press the down arrow until INFORMATION appears on the display. Press SELECT. Press the down arrow until PRINT DEMO appears on the display. Press SELECT. Configuration Press the MENU button on the printer Press the down arrow until INFORMATION appears on the display. Press SELECT. Press the down arrow until CONFIG REPORT appears on the display. Press SELECT. Supplies Status Press the MENU button on the printer Press the down arrow until INFORMATION appears on the display. Press SELECT. Press the down arrow until PRINT SUPPLIES STATUS PAGE appears on the display. Press SELECT.
23 Usage (CLJ 3000 and 3800 series only) Press the MENU button on the printer Press the down arrow until INFORMATION appears on the display. Press SELECT. Press the down arrow until PRINT USAGE PAGE appears on the display. Press SELECT (This page shows a page count for each size page printed, # of one sided pages and duplexed pages, and the average percentage of coverage for each color.) Repetitive Defect Chart: Developer Roller Sleeve 27mm Primary Charge Roller 27mm Registration Roller (inside) 35mm Registration Roller (outside) 36mm (Marks on back of page) Transfer Rollers 44mm (Marks on back of page) Fuser Sleeve 75mm OPC Drum 76mm Fuser Pressure Roller 79mm (Marks on back of page) Cartridge Troubleshooting: Primary Charge Roller (PCR); The primary charge roller if dirty will show on the test print as vertical gray streaks down the page, or as a gray background throughout the page. If there is any physical damage, it will repeat at intervals of 27mm. A Dirty PCR Connection will result in dark black horizontal bars across the page, or as shading throughout the page. A Scratched Drum will show up as a very thin, perfectly straight line that runs from the top to the bottom of the test page. A Chipped Drum will result in a dot or series of dots that repeat at 76mm intervals A Damaged Developer Roller Sleeve will either leave a mark or a blank spot (depending on the type of damage) at intervals of 27mm.
24 A Light Damaged Drum will show up as a shaded area on the test print that should be white. Again this will repeat at intervals of 76mm. A Bad Wiper Blade will result in vertical gray lines down the page, or as shading across the entire page. In either case there will be a film of toner on the drum surface. Some of the more common Printer Error Messages: 10.XX.YY Supply Memory Error: Chip cannot be read or cartridge is not properly installed For XX = 00 Bad Chip For YY = 00 Black cartridge For YY = 01 Cyan cartridge For YY = 02 Magenta cartridge For YY = 03 Yellow cartridge YY Cartridges not engaged For YY = 00 Black cartridge For YY = 01 Cyan cartridge For YY = 02 Magenta cartridge For YY = 03 Yellow cartridge YY Remove shipping locks from all cartridges: At least one cartridge still has a shipping lock installed 50.X Fuser Error For X = 1 Low Fuser Temp. For X = 2 Slow Fuser For X = 3 High Fuser Temp. For X = 4 Faulty Fuser. For X = 7 Fuser pressure release mechanism failure. For X = 8 Low fuser temperature (sub thermistor). For X = 9 high fuser temperature (sub thermistor).
25 51.2X Printer Error For X = 0 Black Scanner error For X = 1 Cyan Scanner error For X = 2 Yellow Scanner error For X = 3 Magenta Scanner error Calibrate Now Press the MENU button on the printer Press the down arrow until CONFIGURE DEVICE appears on the display. Press SELECT. Press the down arrow until PRINT QUALITY appears on the display. Press SELECT Press the down arrow until FULL CALIBRATE NOW appears on the display. Press the SELECT to start the calibration.
HP ENTERPRISE M552/M553 SERIES TONER CARTRIDGE REMANUFACTURING INSTRUCTIONS
 HP ENTERPRISE M552/M553 SERIES TONER CARTRIDGE REMANUFACTURING INSTRUCTIONS HP ENTERPRISE M552/553 (508A/X) TONER CARTRIDGE REMANUFACTURING THE HP ENTERPRISE M552/M553 SERIES TONER CARTRIDGES By Mike Josiah
CARTRIDGE REMANUFACTURING INSTRUCTIONS XEROX PHASER 6180 TONER CARTRIDGE
 XEROX PHASER 6180 CARTRIDGE REMANUFACTURING INSTRUCTIONS XEROX PHASER 6180 TONER CARTRIDGE REMANUFACTURING THE XEROX PHASER 6180 TONER CARTRIDGES By Mike Josiah and the Technical Staff at UniNet First
THE HP 4700/4730 AND CP4005 BLACK AND COLOR TONER CARTRIDGES
 THE HP 4700/4730 AND CP4005 BLACK AND COLOR TONER CARTRIDGES DOC# 0385 By Mike Josiah and the Technical Staff at Summit Technologies HP 4700/4730 AND CP4005 TONER CARTRIDGE REMANUFACTURING INSTRUCTIONS
COLOR LASERJET CP5225 TONER CARTRIDGE REMANUFACTURING INSTRUCTIONS
 HP COLOR LASERJET CP5225 TONER CARTRIDGE REMANUFACTURING INSTRUCTIONS HP CP5225 TONER CARTRIDGE REMANUFACTURING THE HP COLOR LASERJET ENTERPRISE CP5225 SERIES TONER CARTRIDGES By Mike Josiah and the Technical
HP LASERJET ENTERPRISE CP TONER CARTRIDGE REMANUFACTURING INSTRUCTIONS
 HP LASERJET ENTERPRISE CP4025 4520 TONER CARTRIDGE REMANUFACTURING INSTRUCTIONS HP CP4025 4520 TONER CARTRIDGE REMANUFACTURING THE HP LASERJET ENTERPRISE CP4025/4520 SERIES TONER CARTRIDGES By Mike Josiah
THE XEROX PHASER 7400 TONER & DRUM CARTRIDGES
 THE XEROX PHASER 7400 TONER & DRUM CARTRIDGES DOC# 0403 By Mike Josiah and the technical staff at Summit Technologies a Division of Uninet Imaging. XEROX PHASER 7400 TONER & DRUM CARTRIDGE REMANUFACTURING
CARTRIDGE REMANUFACTURING INSTRUCTIONS TONER CARTRIDGE DRUM CARTRIDGE
 XEROX PHASER 7400 CARTRIDGE REMANUFACTURING INSTRUCTIONS TONER CARTRIDGE DRUM CARTRIDGE REMANUFACTURING THE XEROX PHASER 7400 TONER & DRUM CARTRIDGES By Mike Josiah and the Technical Staff at UniNet The
THE HP CLJ 1500/2500/2550 DRUM/TRANSFER UNIT
 THE HP CLJ 1500/2500/2550 DRUM/TRANSFER UNIT DOC# 0313 By Mike Josiah and the Technical Staff at Summit Technologies HP CLJ 1500/2500/2550 DRUM/TRANSFER UNIT REMANUFACTURING INSTRUCTIONS Page 1 Remanufacturing
COLOR LASERJET CP3525 TONER CARTRIDGE REMANUFACTURING INSTRUCTIONS
 HP COLOR LASERJET CP3525 TONER CARTRIDGE REMANUFACTURING INSTRUCTIONS HP CP3525 TONER & DRUM CARTRIDGE REMANUFACTURING THE HP CP3525 BLACK & COLOR TONER CARTRIDGES By Mike Josiah and the Technical Staff
LASERJET P3015 TONER CARTRIDGE REMANUFACTURING INSTRUCTIONS LASERJET P3015 TONER CARTRIDGE
 HP LASERJET P3015 TONER CARTRIDGE REMANUFACTURING INSTRUCTIONS HP LASERJET P3015 TONER CARTRIDGE 2010 UniNet Imaging Inc. All trademark names and artwork are property of their respective owners. Product
HP ENTERPRISE M552/M553 SERIES TONER CARTRIDGE PRINTING THEORY
 HP ENTERPRISE M552/M553 SERIES TONER CARTRIDGE PRINTING THEORY HP ENTERPRISE M552/553 (508A/X) TONER CARTRIDGE HP ENTERPRISE M552/M553 SERIES TONER CARTRIDGE PRINTING THEORY By Mike Josiah and the Technical
XEROX PHASER 5500 TONER & DRUM CARTRIDGE REMANUFACTURING INSTRUCTIONS
 XEROX PHASER 5500 TONER & DRUM CARTRIDGE REMANUFACTURING INSTRUCTIONS XEROX PHASER 5500 TONER CARTRIDGE XEROX PHASER 5500 DRUM CARTRIDGE REMANUFACTURING THE XEROX PHASER 5500 TONER & DRUM CARTRIDGES By
CARTRIDGE REMANUFACTURING INSTRUCTIONS
 Absolute COLOR Absolute BLACK Unidrums Unirollers Uniparts Unicoatings HP P3005 CARTRIDGE REMANUFACTURING INSTRUCTIONS HP P3005 MONOCHROME LASER PRINTER HP P3005 TONER CARTRIDGE Summit Technologies is
HP ENTERPRISE FLOW MFP M630
 HP ENTERPRISE FLOW MFP M630 TONER CARTRIDGE REMANUFACTURING INSTRUCTIONS HP CF281A & CF281X TONER CARTRIDGES REMANUFACTURING THE HP ENTERPRISE FLOW MFP M630 TONER CARTRIDGES By Mike Josiah and the Technical
THE HP LASERJET M5025 / M5035 TONER CARTRIDGE
 THE HP LASERJET M5025 / M5035 TONER CARTRIDGE DOC# 0384 By Mike Josiah and the Technical Staff at Summit Technologies HP LJ M5025 / M5035 TONER CARTRIDGE REMANUFACTURING INSTRUCTIONS Page 1 Remanufacturing
THE HP P2015 TONER CARTRIDGE
 THE HP P2015 TONER CARTRIDGE DOC# 0379 By Mike Josiah and the Technical Staff at Summit Technologies HP LASERJET P2015 TONER CARTRIDGE REMANUFACTURING INSTRUCTIONS Page 1 Remanufacturing the HP P2015 Toner
HP P4014 P4015 P4045 CARTRIDGE REMANUFACTURING INSTRUCTIONS
 HP P4014 P4015 P4045 CARTRIDGE REMANUFACTURING INSTRUCTIONS CC364A TONER CARTRIDGE CC364X TONER CARTRIDGE 95 Orville Drive, Bohemia, New York 11716 USA Ph +1 631 590 1040 Fx +1 888 791 9188 sales@summitechnologies.com
HP LASERJET PRO 200 M TONER CARTRIDGE REMANUFACTURING INSTRUCTIONS
 HP LASERJET PRO 200 M251 276 TONER CARTRIDGE REMANUFACTURING INSTRUCTIONS HP PRO 200 M251 TONER CARTRIDGE REMANUFACTURING THE HP LASERJET PRO 200 M251/276 BLACK & COLOR TONER CARTRIDGES By Mike Josiah
HP LASERJET PRO TONER CARTRIDGE REMANUFACTURING INSTRUCTIONS
 HP LASERJET PRO 300 400 TONER CARTRIDGE REMANUFACTURING INSTRUCTIONS HP LASERJET PRO 300/400 TONER CARTRIDGE REMANUFACTURING THE HP LASERJET PRO 300/400 BLACK & COLOR TONER CARTRIDGES By Mike Josiah and
OKIDATA B2500 MFP TONER CARTRIDGE REMANUFACTURING INSTRUCTIONS OKIDATA B2500 MFP TONER CARTRIDGE
 OKIDATA B2500 MFP TONER CARTRIDGE REMANUFACTURING INSTRUCTIONS OKIDATA B2500 MFP TONER CARTRIDGE REMANUFACTURING THE OKIDATA B2500 MFP SERIES TONER CARTRIDGE By Mike Josiah and the Technical Staff at UniNet
CANON IMAGECLASS MF (128)
") CANON IMAGECLASS MF4420 4450 4570 (128) TONER CARTRIDGE REMANUFACTURING INSTRUCTIONS CANON IMAGECLASS MF4570 SERIES (128) TONER CARTRIDGE REMANUFACTURING THE CANON IMAGECLASS MF4570 SERIES (128) TONER
CANON IMAGECLASS MF4420 4450 4570 (128) TONER CARTRIDGE REMANUFACTURING INSTRUCTIONS CANON IMAGECLASS MF4570 SERIES (128) TONER CARTRIDGE REMANUFACTURING THE CANON IMAGECLASS MF4570 SERIES (128) TONER
TONER CARTRIDGE REMANUFACTURING INSTRUCTIONS HP 2400 TONER CARTRIDGES (Q6511A / Q6511X)
") HP 2400 2420 2430 TONER CARTRIDGE REMANUFACTURING INSTRUCTIONS HP 2400 TONER CARTRIDGES (Q6511A / Q6511X) REMANUFACTURING THE HP LASERJET 2400 TONER CARTRIDGES By Mike Josiah and the Technical Staff at
HP 2400 2420 2430 TONER CARTRIDGE REMANUFACTURING INSTRUCTIONS HP 2400 TONER CARTRIDGES (Q6511A / Q6511X) REMANUFACTURING THE HP LASERJET 2400 TONER CARTRIDGES By Mike Josiah and the Technical Staff at
HP LASERJET ENTERPRISE 600 MFP 4555
 HP LASERJET ENTERPRISE 600 MFP 4555 TONER CARTRIDGE REMANUFACTURING INSTRUCTIONS HP LASERJET ENTERPRISE 600/MFP 4555 TONER CARTRIDGE REMANUFACTURING THE HP LASERJET ENTERPRISE 600/MFP 4555 TONER CARTRIDGES
BROTHER HL TN TONER CARTRIDGE REMANUFACTURING INSTRUCTIONS
 BROTHER HL-2240 2270 TN420 450 TONER CARTRIDGE REMANUFACTURING INSTRUCTIONS BROTHER TN450 TONER CARTRIDGE REMANUFACTURING THE BROTHER HL-2240/2270 SERIES TN420/450 TONER CARTRIDGES By Mike Josiah and the
SAMSUNG ML TONER CARTRIDGE REMANUFACTURING INSTRUCTIONS
 SAMSUNG ML-3050 3051 TONER CARTRIDGE REMANUFACTURING INSTRUCTIONS SAMSUNG ML-3050 TONER CARTRIDGE REMANUFACTURING THE SAMSUNG ML-3050/3051 TONER CARTRIDGES By Mike Josiah and the Technical Staff at UniNet
BROTHER HL 4040 TN-110 TN-115 CARTRIDGE REMANUFACTURING INSTRUCTIONS
 BROTHER HL 4040 TN-110 TN-115 CARTRIDGE REMANUFACTURING INSTRUCTIONS BROTHER HL 4040 COLOR LASER PRINTER TN-110 REMANUFACTURING THE BROTHER HL 4040 SERIES S TN-110/TN-115 COLOR S By Mike Josiah The Brother
TONER CARTRIDGE REMANUFACTURING INSTRUCTIONS HP LASERJET P1102 TONER CARTRIDGE
 HP LASERJET P1102 TONER CARTRIDGE REMANUFACTURING INSTRUCTIONS HP LASERJET P1102 TONER CARTRIDGE REMANUFACTURING THE HP LASERJET P1102 SERIES TONER CARTRIDGE (CE285A) By Mike Josiah and the Technical Staff
PRO MFP M125 SERIES CF283A TONER CARTRIDGE REMANUFACTURING INSTRUCTIONS
 HP PRO MFP M125 SERIES CF283A TONER CARTRIDGE REMANUFACTURING INSTRUCTIONS HP CF283A TONER CARTRIDGE REMANUFACTURING THE HP LASERJET PRO MFP M125 SERIES CF283A TONER CARTRIDGE By Mike Josiah and the Technical
SAMSUNG ML 1630 CARTRIDGE REMANUFACTURING INSTRUCTIONS
 SAMSUNG ML 1630 CARTRIDGE REMANUFACTURING INSTRUCTIONS SAMSUNG ML 1630 LASER PRINTER TONER CARTRIDGE Remanufacturing the Samsung ML-1630 Toner Cartridge By Mike Josiah First released in October 2007, Samsung
Technical Guide. Remanufacturing the HP Colour LaserJet Enterprise M552 and M553 series black and colour toner cartridges
 Technical Guide Remanufacturing the HP Colour LaserJet Enterprise M552 and M553 series black and colour toner cartridges Remanufacturing the HP Colour LaserJet Enterprise M552 and M553 series black and
Samsung FS-5000, Xerox P8e Toner Cartridges DOC-0272
 http://www.summitechnologies.com/docs/0272/0272.asp Page 1 of 9 Home New Arrivals! Company Info Publications Special Features Contact Us Overview Required Tools Disassembly Remove OPC Drum Cleaning the
THE SAMSUNG ML-2850/2851ND TONER CARTRIDGE
 SAMSUNG ML-2850/2851ND CARTRIDGE REMANUFACTURING INSTRUCTIONS THE SAMSUNG ML-2850/2851ND TONER CARTRIDGE DOC# 0440 By Mike Josiah and the technical staff at Summit Technologies a distributor of Summit
Remanufacturing the HP LaserJet 4350mfp Toner Cartridges By Mike Josiah and the technical staff at Summit Laser Products
 SUMMIT TECHNOLOGIES Remanufacturing the HP LaserJet 4350mfp Toner Cartridges By Mike Josiah and the technical staff at Summit Laser Products First introduced in January 2005, the HP LaserJet 4345 engine
LASERJET P1006 SERIES CARTRIDGE REMANUFACTURING INSTRUCTIONS
 HP LASERJET P1006 SERIES CARTRIDGE REMANUFACTURING INSTRUCTIONS HP P1006 SERIES TONER CARTRIDGE REMANUFACTURING THE HP LASERJET P1006 SERIES TONER CARTRIDGE CB435A By Mike Josiah and the Technical Staff
Samsung ML-6060 Toner Cartridges DOC-0283
 Page 1 of 8 Home New Arrivals! Company Info Publications Special Features Contact Us Overview Required Tools Required Supplies Disassembly Common Cartridge Problems Printing Test Pages Printing a Cleaning
HP P1505 CARTRIDGE REMANUFACTURING INSTRUCTIONS
 HP P1505 CARTRIDGE REMANUFACTURING INSTRUCTIONS HP P1505 LASER PRINTER Remanufacturing the HP LaserJet P1505 Series Toner Cartridge CB436A By Mike Josiah In November 2007, Hewlett Packard released the
HL-5300 SERIES TN650 TONER CARTRIDGE REMANUFACTURING INSTRUCTIONS
 BROTHER HL-5300 SERIES TN650 TONER CARTRIDGE REMANUFACTURING INSTRUCTIONS BROTHER TN650 TONER CARTRIDGE REMANUFACTURING THE BROTHER HL-5300 SERIES / TN650 TONER CARTRIDGES By Mike Josiah and the Technical
Remanufacturing the Lexmark W812 Toner Cartridges
 Publications Dealer Catalog #23 Catalog Update Chips Comprehensive Chip List Lexmark Chip Cross Reference Reset Box Information Samsung Reset Box Compatibility MasterSet USB Installation Software MasterSet
E120 TONER & DRUM CARTRIDGE REMANUFACTURING INSTRUCTIONS
 LEXMARK E120 TONER & DRUM CARTRIDGE REMANUFACTURING INSTRUCTIONS LEXMARK E120 TONER & DRUM CARTRIDGE CARTRIDGE COVER REMANUFACTURING THE LEXMARK E120 TONER & DRUM CARTRIDGE By Mike Josiah and the Technical
CARTRIDGE REMANUFACTURING INSTRUCTIONS LASERJET 2600 TONER CARTRIDGE
 HP LASERJET 2600 CARTRIDGE REMANUFACTURING INSTRUCTIONS HP LASERJET 2600 TONER CARTRIDGE REMANUFACTURING THE HP LASERJET 2600 BLACK & COLOR TONER CARTRIDGES By the Technical Staff at UniNet First released
BROTHER HL 2170W TN 360 TONER CARTRIDGE REMANUFACTURING INSTRUCTIONS
 BROTHER HL 2170W TN 360 TONER CARTRIDGE REMANUFACTURING INSTRUCTIONS BROTHER HL 2170W PRINTER TN-360 UNINET IMAGING BROTHER INC. HL INC. 2170W BROTHER TN-360 1240/1650 DISASSEMBLING REMANUFACTURING THE
Ricoh 2000L Type 1135/1435 Toner Cartridges DOC-0297
 Home New Arrivals! Company Info Publications Special Features Contact Us Overview Required Tools Required Supplies Disassembly Printing a Test Page Page Counts Cleaning the Scanner Fax Error Messages Common
Remanufacturing the Xerox DC-212/214 Toner Cartridge
 Publications Dealer Catalog #23 Catalog Update Chips Comprehensive Chip List Lexmark Chip Cross Reference Reset Box Information Samsung Reset Box Compatibility MasterSet USB Installation Software MasterSet
LEXMARK X CARTRIDGE REMANUFACTURING INSTRUCTIONS
 LEXMARK X340 342 CARTRIDGE REMANUFACTURING INSTRUCTIONS TONER CARTRIDGE DRUM CARTRIDGE REMANUFACTURING THE LEXMARK X340/342N TONER & DRUM CARTRIDGE By Mike Josiah and the Technical Staff at UniNet Introduced
TONER CARTRIDGE REMANUFACTURING INSTRUCTIONS HP LASERJET 4600 TONER CARTRIDGE
 HP LASERJET 4600 TONER CARTRIDGE REMANUFACTURING INSTRUCTIONS HP LASERJET 4600 TONER CARTRIDGE REMANUFACTURING THE HP LASERJET 4600 TONER CARTRIDGE By Javier Gonzalez and the Technical Staff at UniNet
ML MLT-D104S TONER CARTRIDGE REMANUFACTURING INSTRUCTIONS
 SAMSUNG ML-1660 1665 MLT-D104S TONER CARTRIDGE REMANUFACTURING INSTRUCTIONS SAMSUNG MLT-D104S TONER CARTRIDGE REMANUFACTURING THE SAMSUNG ML-1660/1665 MLT-D104S TONER CARTRIDGE By Enrique Stura and the
Brother TN-700 Toner Cartridges DOC-0325
 Home New Arrivals! Company Info Publications Special Features Contact Us Overview Required Tools Materials Needed Disassembly Running Test Pages Changing Printer Density Error Messages Brother TN-700 Toner
Remanufacturing the HP LJ-1012 Toner Cartridges DOC-0334
 Home New Arrivals! Company Info Publications Special Features Contact Us Overview Required Tools Materials Needed Disassembly Trouble Shooting Running Test Pages Running Cleaning Pages Printer Troubleshooting
BROTHER HL-L2300 SERIES TN630/660 TONER CARTRIDGE REMANUFACTURING INSTRUCTIONS
 BROTHER HL-L2300 SERIES TN630/660 TONER CARTRIDGE REMANUFACTURING INSTRUCTIONS BROTHER TN660 TONER CARTRIDGE REMANUFACTURING THE BROTHER HL-L2300 SERIES TN630/660 TONER CARTRIDGE By Mike Josiah and the
Samsung ML-6000 Toner Cartridges DOC-0308
 Summit Laser Products - Samsung ML-6000 Toner Cartridges http://www.summitechnologies.com/docs/0308/0308.asp Page 1 of 12 Home New Arrivals! Company Info Publications Special Features Contact Us Overview
LEXMARK E250/350/450 DRUM UNIT REMANUFACTURING INSTRUCTIONS
 LEXMARK E250/350/450 DRUM UNIT REMANUFACTURING INSTRUCTIONS LEXMARK E450 LASER PRINTER DRUM UNIT REMANUFACTURING THE LEXMARK E250/350/450 DRUM UNIT By Mike Josiah SUPPLIES REQUIRED New replacement drum
HP 2300 LASERJET PRINTER
 AbsoluteCOLOR AbsoluteBLACK UniDrums UniRollers UniParts UniCoatings AbsoluteCOLOR AbsoluteBLACK UniDrums UniRollers UniParts UniCoatings HP 2300 REMANUFACTURING INSTRUCTIONS HP 2300 LASERJET PRINTER HP
Remanufacturing the Brother HL-1240 OPC (Drum) Cartridge (DR-400, DR-6000)
 Cartridge (DR-400, DR-6000)") Remanufacturing the Brother HL-1240 OPC (Drum) Cartridge (DR-400, DR-6000) These instructions cover the recycling of the Brother DR-400 OPC cartridge used in laser printers and plain paper fax machines
Remanufacturing the Brother HL-1240 OPC (Drum) Cartridge (DR-400, DR-6000) These instructions cover the recycling of the Brother DR-400 OPC cartridge used in laser printers and plain paper fax machines
DELL 1125 MFP TONER & DRUM CARTRIDGE REMANUFACTURING INSTRUCTIONS DELL 1125 MFP TONER & DRUM CARTRIDGES
 DELL 1125 MFP TONER & DRUM CARTRIDGE REMANUFACTURING INSTRUCTIONS DELL 1125 MFP TONER & DRUM CARTRIDGES REMANUFACTURING THE DELL 1125 MFP TONER & DRUM CARTRIDGES The Dell 1125 MFP machine was introduced
Manual for Remanufacture of CF400A_201A_X Cartridge Destined for HP Color Laserjet Pro M 252_MFP 277
 Manual for Remanufacture of CF400A_201A_X Cartridge Destined for HP Color Laserjet Pro M 252_MFP 277 The cartridge has been remanufactured with the use of a new type of toner called "ColorSphere 3" and
HP LASERJET PRO M102 (CF217A) TONER CARTRIDGE REMANUFACTURING INSTRUCTIONS
 TONER CARTRIDGE REMANUFACTURING INSTRUCTIONS") HP LASERJET PRO M102 (CF217A) TONER CARTRIDGE REMANUFACTURING INSTRUCTIONS HP CF217A TONER CARTRIDGE REMANUFACTURING THE HP LASERJET PRO M102 (CF217A) TONER CARTRIDGE By Mike Josiah and the Technical Staff
HP LASERJET PRO M102 (CF217A) TONER CARTRIDGE REMANUFACTURING INSTRUCTIONS HP CF217A TONER CARTRIDGE REMANUFACTURING THE HP LASERJET PRO M102 (CF217A) TONER CARTRIDGE By Mike Josiah and the Technical Staff
TONER & DRUM CARTRIDGE REMANUFACTURING INSTRUCTIONS LEXMARK MS/MX TONER & DRUM UNIT
 LEXMARK MS/MX SERIES TONER & DRUM CARTRIDGE REMANUFACTURING INSTRUCTIONS LEXMARK MS/MX TONER & DRUM UNIT REMANUFACTURING THE LEXMARK MS/MX SERIES TONER & DRUM CARTRIDGES By Mike Josiah and the Technical
HP LaserJet P3015 TECHNICAL INSTRUCTIONS
 IMAGING CORPORATION HP LaserJet P3015 TECHNICAL INSTRUCTIONS HPP3015TECH Technical Instructions Supplies Tools 1 CORPORATE LOS ANGELES, USA US 1 800 394.9900 Int l +1 818 837.8100 FAX 1 800 394.9910 Int
BROTHER HL-L2300 SERIES DR630 DRUM CARTRIDGE REMANUFACTURING INSTRUCTIONS
 BROTHER HL-L2300 SERIES DR630 DRUM CARTRIDGE REMANUFACTURING INSTRUCTIONS BROTHER DR660 DRUM CARTRIDGE REMANUFACTURING THE BROTHER HL-L2300 SERIES DR630 DRUM CARTRIDGE By Mike Josiah and the Technical
HP 1300 Remanufacturing Instructions Oasis Imaging Products, Inc. Technical Support: ext 110
 HP 1300 Remanufacturing Instructions Oasis Imaging Products, Inc. Technical Support:882-322-8992 ext 110 Reference Information: Q2613A Q2613X OEM Yields: 13A 2500 pages @ 5% 13X 4000 pages @ 5% Materials
Minolta SP-6 Toner Cartridge DOC-0229
 Home New Arrivals! Company Info Publications Special Features Contact Us Overview Required Tools Required Supplies Prepare Work Area Disassembly Instructions Cleaning the Waste Chamber Cleaning the Supply
SAMSUNG PROXPRESS M4580
 SAMSUNG PROXPRESS M4580 TONER CARTRIDGE REMANUFACTURING INSTRUCTIONS SAMSUNG MLT-D303E TONER CARTRIDGE REMANUFACTURING THE SAMSUNG PROXPRESS M4580 TONER CARTRIDGE By Mike Josiah and the Technical Staff
Fuji-Xerox XP-8/16 Toner Cartridges DOC-0263
 Home New Arrivals! Company Info Publications Special Features Contact Us Overview Supplies Required Tools Requred Disassembly Trouble Shooting Recommended Supplies Fuji-Xerox XP-8/16 Toner Cartridges DOC-0263
HP-5000 Toner Cartridges DOC-0248
 Home New Arrivals! Company Info Publications Special Features Contact Us Overview Required Tools Required Supplies Prepare Work Area Disassembly Remove OPC Drum Filling the Hopper Re-assemble the Toner
SAMSUNG ML-2165W (MLT-D101S) TONER CARTRIDGE REMANUFACTURING INSTRUCTIONS
 TONER CARTRIDGE REMANUFACTURING INSTRUCTIONS") SAMSUNG ML-2165W (MLT-D101S) TONER CARTRIDGE REMANUFACTURING INSTRUCTIONS SAMSUNG MLT-D101S TONER CARTRIDGE REMANUFACTURING THE SAMSUNG ML-2165W (MLT-D101S) TONER CARTRIDGE By Enrique Stura, Daniel Reyes,
SAMSUNG ML-2165W (MLT-D101S) TONER CARTRIDGE REMANUFACTURING INSTRUCTIONS SAMSUNG MLT-D101S TONER CARTRIDGE REMANUFACTURING THE SAMSUNG ML-2165W (MLT-D101S) TONER CARTRIDGE By Enrique Stura, Daniel Reyes,
Canon LBP-BX Toner Cartridges DOC-0204
 Home New Arrivals! Company Info Publications Special Features Contact Us Canon LBP-BX Toner Cartridges DOC-0204 Overview Required Tools Required Supplies Prepare Work Area Disassembly Separate Debris Cavity
Canon PC-Mini Style Toner Cartridges DOC-0210
 Home New Arrivals! Company Info Publications Special Features Contact Us Overview Required Tools Required Supplies Prepare Work Area Disassembly Separate Debris Cavity, Drum and Toner Supply Remove Photoconductive
Troubleshooting. Chapter contents
 Troubleshooting To better help our customers - this HP Laserjet 1600 series troubleshooting page is simply a guide / additional information for your convenience, as you search for assistance in repairing
REMANUFACTURING INSTRUCTIONS
 REMANUFACTURING INSTRUCTIONS Brother HL-4140CN/4150CDN/4570CDW/4570CDW/ DCP-9050/9055/9270CDN MFC-9460/9465CDN/9560/9970/9970CDW Brother HL-L8250/8350CDW/8350CDWT/9200, DCP-L8400 MFC-L8600/8650/8850/9550
II. Monochrome Image Quality Problems
 I. Introduction Summary of Assumptions of This Document II. Monochrome Image Quality Problems Blank Print... 1 Light Print... 2 Backgrounding... 3 Black Print (edge to edge)... 4 Fine Vertical (black)
6 Removal and replacement
 6 Removal and replacement This chapter contains information about the following topics: Removal and replacement strategy User-replaceable parts Covers and external components Main assemblies Motors and
Remanufacturing Instructions HP 1012 Toner Cartridge
 For, please call ext 110 OEM Reference Information: Part Number: Q2612A Page Yield: 2,000 pages @ 5% toner coverage Oasis Products: H1TN10120 Fig. 1 1. Remove the two screws located on the geared end of
HP CP6015/CM6030/CM6040MFP Remove and Shake Black or Color Cartridges" or " , " Error Messages
 HP CP6015/CM6030/CM6040MFP Remove and Shake Black or Color Cartridges" or "10.91.00, 10.91.99" Error Messages Issue The control panel on the HP Color LaserJet CM6030/CM6040 MFP displays the error message
Printers and Scanners
 Printers and Scanners Printer Types Dot Matrix An impact printer that transfers characters by striking a pattern (from a matrix) through an inked ribbon and onto paper. The most common number of pins on
LaserJet Printer Demo PQTS TEAM
 LaserJet Printer Demo PQTS TEAM 2013-09-16 Background LaserJet as a brand name identifies the line of dry electrophotography (DEP) laser marketed by the American computer company Hewlett-Packard (HP).
Removal and Installation8
 8 Screw Types 8-4 Top Cover Assembly 8-5 Left Hand Cover 8-6 Right Hand Cover 8-10 Front Panel Assembly 8-14 Left Rear Cover 8-15 Right Rear Cover 8-16 Extension Cover (60" Model only) 8-17 Media Lever
5 Theory of operation
 5 Theory of operation Chapter contents Introduction............................................96 Basic operation.........................................97 Image formation........................................98
4.7. Image quality problems and solutions
 4.7. Image quality problems and solutions Print-quality defects can be attributed to printer components, consumables, media, internal software, external software applications and environmental conditions.
EDGE The Laser Printer Tech Quarterly from Liberty Parts Team Winter 2013
 SERVICE EDGE The Laser Printer Tech Quarterly from Liberty Parts Team Winter 2013 OUR LATEST PRINTER DISCOVERIES CLJ 3000 series: Looping (and Hanging) initialization LJ 4200: (Mostly) Blank pages LJ 9000
Solving paper feed problems
 Solving paper feed problems Use the following table to solve problems related to moving paper or documents through the product. Table 13. Solving paper feed problems Problem Cause Solution Pages are coming
LASERJET ENTERPRISE M604, M605, M606
 LASERJET ENTERPRISE M604, M605, M606 Maintenance kit replacement manual M604n M604dn M605x M605n M605dn M606x M606dn Conventions used in this guide TIP: Tips provide helpful hints or shortcuts. NOTE: Notes
5 Theory of operation
 5 Theory of operation Basic operation Engine-control system Laser/scanner system Image-formation system Pickup, feed, and delivery system Jam detection Optional paper feeder ENWW 103 Basic operation The
To connect the AC adapter:
 Replacing the AC Adapter Replacing the AC Adapter 3 Plug the power cord into a wall outlet. The power indicator turns on. To connect the AC adapter: Connect the power cord to the AC adapter. Power indicator
The goal of the article to analyze and evaluate this modest personal printer. First
 LEXMARK E120: THE "DISPOSABLE" PERSONAL PRINTER By VLADIMIR KAMENOV Eng. Vladimir Kamenov, PhD Vladimir Kamenov, PhD, is a specialist in maintenance of various models of Toshiba copiers. He holds a master
K Service Source. StyleWriter
 K Service Source StyleWriter K Service Source Basics StyleWriter Basics Introduction - 1 Introduction The StyleWriter is a serial bubble jet ink-on-demand printer. The StyleWriter prints up to 1/3 page
The User may not distribute, share, and otherwise convey the copyrighted documents to any other persons, corporations or individuals.
 LICENSE AGREEMENT Static Control Components, Inc. (Static Control) grants this limited license to the person, firm or corporation (hereinafter "User") downloading electronically or by printing this file
1 Theory of operation
 1 Theory of operation Basic operation Engine-control system Laser/scanner system Image-formation system Pickup, feed, and delivery system Jam detection Optional paper feeder ENWW 1 Basic operation The
MB280 / MB290 SERVICE MANUAL
 MB280 / MB290 TABLE OF CONTENTS 1. DETAILED SECTION DESCRIPTIONS...1-1 1.1 COMPONENT LAYOUT... 1-1 1.1.1 MECHANICAL COMPONENTS... 1-1 1.2 PRINTING... 1-2 1.2.1 PRINTING PROCESSES AROUND THE DRUM... 1-2
Technical Instructions Printers OEM Info Tools 1
 ML1710TECH Technical Instructions Printers OEM Info Tools 1 CORPORATE LOS ANGELES, USA US 1 800 394.9900 Int l +1 818 837.8100 FAX 1 800 394.9910 Int l +1 818 838.7047 ATLANTA, USA US 1 877 676.4223 Int
ScanPartner 600C Image Scanner. User s Manual
 ScanPartner 600C Image Scanner User s Manual Version 1.0 (Doc. No. 250-0062-0) Table of Contents 1. INTRODUCTION 3-4 2. INSTALLATION AND CONNECTIONS. 5-13 2.1 Shipping Bracket 5 2.1.1 Removing the Shipping
GOD OF WAR -GHOST OF SPARTA.cso. The print quality was poor See Improving and adjust them as necessary, such as.
 GOD OF WAR -GHOST OF SPARTA.cso. The print quality was poor See Improving and adjust them as necessary, such as. GOD OF WAR -GHOST OF SPARTA.cso >>>DOWNLOAD LINK
Chapter 11: Printers. IT Essentials v6.0. ITE v6.0 1
 Chapter 11: Printers IT Essentials v6.0 ITE v6.0 1 Chapter 11 - Sections & Objectives 11.1 Common Printer Features Explain the purpose and characteristics of different types of printers. 11.2 Installing
MONARCH 9416 XL QUICK REFERENCE
 MONARCH 9416 XL QUICK REFERENCE This Quick Reference contains ribbon loading, supply loading, and general care, maintenance, and troubleshooting procedures for the 9416 XL Thermal Direct and 9416 XL Thermal
Gateway Profile 4 service guide
 Gateway Profile 4 service guide Customizing Troubleshooting Contents Replacing Components in Your Gateway Profile 4.................. 1 About this guide.....................................................
Xerox 5018, 5028, 5034 OPC Copier Cartridges DOC-0221
 Home New Arrivals! Company Info Publications Special Features Contact Us Overview Required Tools Required Supplies Prepare Work Area Disassembly Clean the Corona Wire Assembly Cleaning the Waste Chamber
Image Formation System
 Image Formation System Overview Features High image quality is supported. Charge control and the parts for image formation process are optimized. High durability drum E drum is adopted. Primary charging
5 Theory of operation
 5 Theory of operation This chapter provides information about the following topics: Basic operation Internal components Formatter system Engine control system Laser/scanner system Image formation system
HP LaserJet P3005 Series printers Service Manual
 HP LaserJet P3005 Series printers Service Manual HP LaserJet P3005 Series printers Service Manual Table of contents 1 Device information Chapter contents... 1 Device configurations... 2 Features... 3 Walkaround...
Fuser. Figure Remove the fuser assembly (1 of 2) 184 Chapter 5 Removal and replacement ENWW
 184 Chapter 5 Removal and replacement ENWW") Fuser 1. Remove the following assemblies. Scanner assembly. For the HP LaserJet 3015, see Scanner assembly. For the LaserJet 3020 and 3030, see Scanner assembly. Left cover. See Printer side covers. Rear
Fuser 1. Remove the following assemblies. Scanner assembly. For the HP LaserJet 3015, see Scanner assembly. For the LaserJet 3020 and 3030, see Scanner assembly. Left cover. See Printer side covers. Rear
7 Problem solving. Basic problem solving. Status-light patterns. Fatal error secondary messages. Accessory error secondary messages
 7 Problem solving Basic problem solving Status-light patterns Fatal error secondary messages Accessory error secondary messages Media problemsolving Printed page is different from what appeared on screen