Dionysos. Preamplifier. by Thrax Audio. Operating Manual. Manual issued 05/03/2012 CAUTION
|
|
|
- Dwayne Howard
- 6 years ago
- Views:
Transcription
1
2 Dionysos Preamplifier by Thrax Audio Operating Manual Manual issued 05/03/2012 CAUTION THE UNIT CONTAINS NO USER SERVICEABLE PARTS. DO NOT REMOVE THE COVERS. LETHAL VOLTAGES ARE PRESENT WITHIN THE CHASSIS. NEVER OPERATE THE PREAMPLIFIER WITH THE CHASSIS COVERS REMOVED. DO NOT OPERATE THE UNIT IF WET OR NEAR WATER. THE PREAMPLIFIER IS FAIRLY HEAVY. BE SURE TO USE PROPER LIFTING TECHNIQUES TO AVOID BACK STRAIN AND INJURY. BE CERTAIN TO INSTALL IT IN A SECURE LOCATION FROM WHICH IT CAN NOT FALL OR TIP OVER. TIME SPENT FAMILIARIZING YOURSELF WITH THIS MANUAL WILL BE WELL REWARDED.
3 CONTENTS 1. Important Safety Instructions Introduction Specification Unpacking and Installation - Unpacking Installation Front Panel Back Panel - AC Fuse Inputs Outputs Tape output Remote Control Operation
4 IMPORTANT SAFETY INSTRUCTIONS READ ALL INSTRUCTIONS: All the safety and operating instructions of your Thrax Audio equipment should be read before power is applied to the equipment. RETAIN OWNER'S MANUAL: These safety and operating instructions should be retained for future reference. HEED WARNING: All warnings on the unit and in the operating instructions should be adhered to. FOLLOW INSTRUCTIONS: All operating and use instructions should be followed. CLEANING: Unplug the unit from the wall outlet and leave for at least 30 min. - make sure the unit is not hot before you start cleaning. Use dry or damp soft cloth to clean the surfaces. Do not use corrosive, abrasive or spray for cleaning. VENTILATION: Do not block any ventilation openings. Do not install near any heat sources such as radiators, heat registers, stoves, or other apparatus (including amplifiers). The unit should not be installed in a built-in location such as a bookcase or rack unless proper ventilation is provided. GROUNDING: Do not defeat the safety purpose of the grounding-type plug. A grounding-type plug has two blades and a third grounding prong. The third prong is provided for your safety. If the provided plug does not fit into your outlet, consult an electrician for replacement of the obsolete outlet. POWER CORD PROTECTION: Protect the power cord from being walked on or pinched particularly at plugs, convenience receptacles and the point where they exit from the apparatus. LIGHTNING: Unplug this apparatus during lightning storms or when unused for long periods of time. SERVICING: Refer all servicing to qualified service personnel. Servicing is required when the apparatus has been damaged in any way, such as if the power-supply cord or plug is damaged, liquid has been spilled inside the appliance or it has been exposed to moisture, the appliance does not operate normally, or has been dropped. DO NOT OPEN THE CABINET: There are no user serviceable components inside this product. Opening the cabinet may present a shock hazard, and any modification to the product will void your warranty. WARNING: To reduce the risk of fire or electric shock, do not expose this apparatus to rain or moisture. 3
5 INTRODUCTION The Dionysos preamplifier is the world s finest audio preamplifier and an absolutely unique component. It s unusual topology, premium parts, and flexibility make it a pleasure to hear and operate. Dionysos has a single gain stage executed with zero feedback using a triode type vacum tube. It is transformer coupled eliminating ground loops and isolating the attenuator and amplification stage from the influences of the outside world (other components). Features 6 inputs 4 unbalanced on RCA (independent switching ground) and 2 balanced on XLR, 4 outputs 2 unbalanced and 2 balanced (allowing bi - amping), 32 position stepped volume control, Phase switch normal/inverted, Tape out (switchable), Programmable Home Theatre (HT) bypass with preset volume on each input, Low impedance floating outputs (allowing long cables). Inside you get Power supply with a C core gapped transformer with symmetrical field canceling windings. Tube rectified choke input for the cleanest power, followed by military paper in oil reservoir capacitors. Each channel has a constant current fed shunt regulator with extra low noise tube reference. The amplification stage is a single indirectly heated triode with grounded cathode, loaded with a transformer. Microprocessor controlled relays take care of attenuation, phase and input selection trough a multi tap transformer for volume control. The case is machined from plates of different thickness aircraft grade aluminum. 4
6 SPECIFICATION Inputs - 4 pair unbalanced RCA connectors - 2 pair balanced XLR connectors Output - 2 pair unbalanced RCA connectors - 2 pair balanced XLR connectors - 1 pair unbalanced RCA connectors tape out Attenuation steps Volume Control Range - Minimum gain dB - Maximum gain db Power supply or 230 V Power consumption W Dimensions W x 400D x 120H mm Weight Kg Finish..... Black or Silver anodized aluminum Tube compliment : - 1 x 6H6П amplification - 1 х 6Ц4П rectifier 5
7 UNPACKING AND INSTALLATION This section describes the unpacking and installation procedures for your new component. Unpacking All Thrax Audio shipping boxes have been specially designed to protect their contents and special care has been taken to prevent damage under normal shipping conditions. Mishandling should be evident upon inspection of the shipping container. Carefully remove your new component from its packing and examine it closely for signs of shipping damage. We strongly recommend saving all original packing to protect your component from damage should you wish to store it or ship it at a later date. Installation BE CERTAIN TO INSTALL the Unit IN A SECURE LOCATION FROM WHICH IT CAN NOT FALL OR TIP OVER. Provide adequate ventilation - the chassis will become warm in normal use. Do not operate on carpet or any other surface that might block air flow. Do not allow the chassis to touch any metal parts, such as the frame of an equipment rack. This might create a parallel ground path that could degrade the sound of your system. Connect the input and output cables. Input connection is via single ended RCA jacks or XLR jacks (which can be from balanced or unbalanced sources). Output can be on RCA or XLR jacks, and can be set for balanced or unbalanced loads, with or without ground connection at the preamplifier. IMPORTANT: READ THE SECTIONS INPUTS & OUTPUTS. The unit should be operated only from the type of power source indicated on the marking label. If you are not sure of the type of power supplied to your home, consult your unit dealer or local power company. Connect the power supply to the power source indicated on the rear panel. Avoid power conditioners that float the ground pin. ALWAYS connect power cord to component before plugging it into an AC outlet, and make sure that unit s power switch is set to the off position before making the final connection. For best performance, try to route the power cord away from signal cables. Pay close attention to power quality, and be aware that different power cords can alter the sound. 6
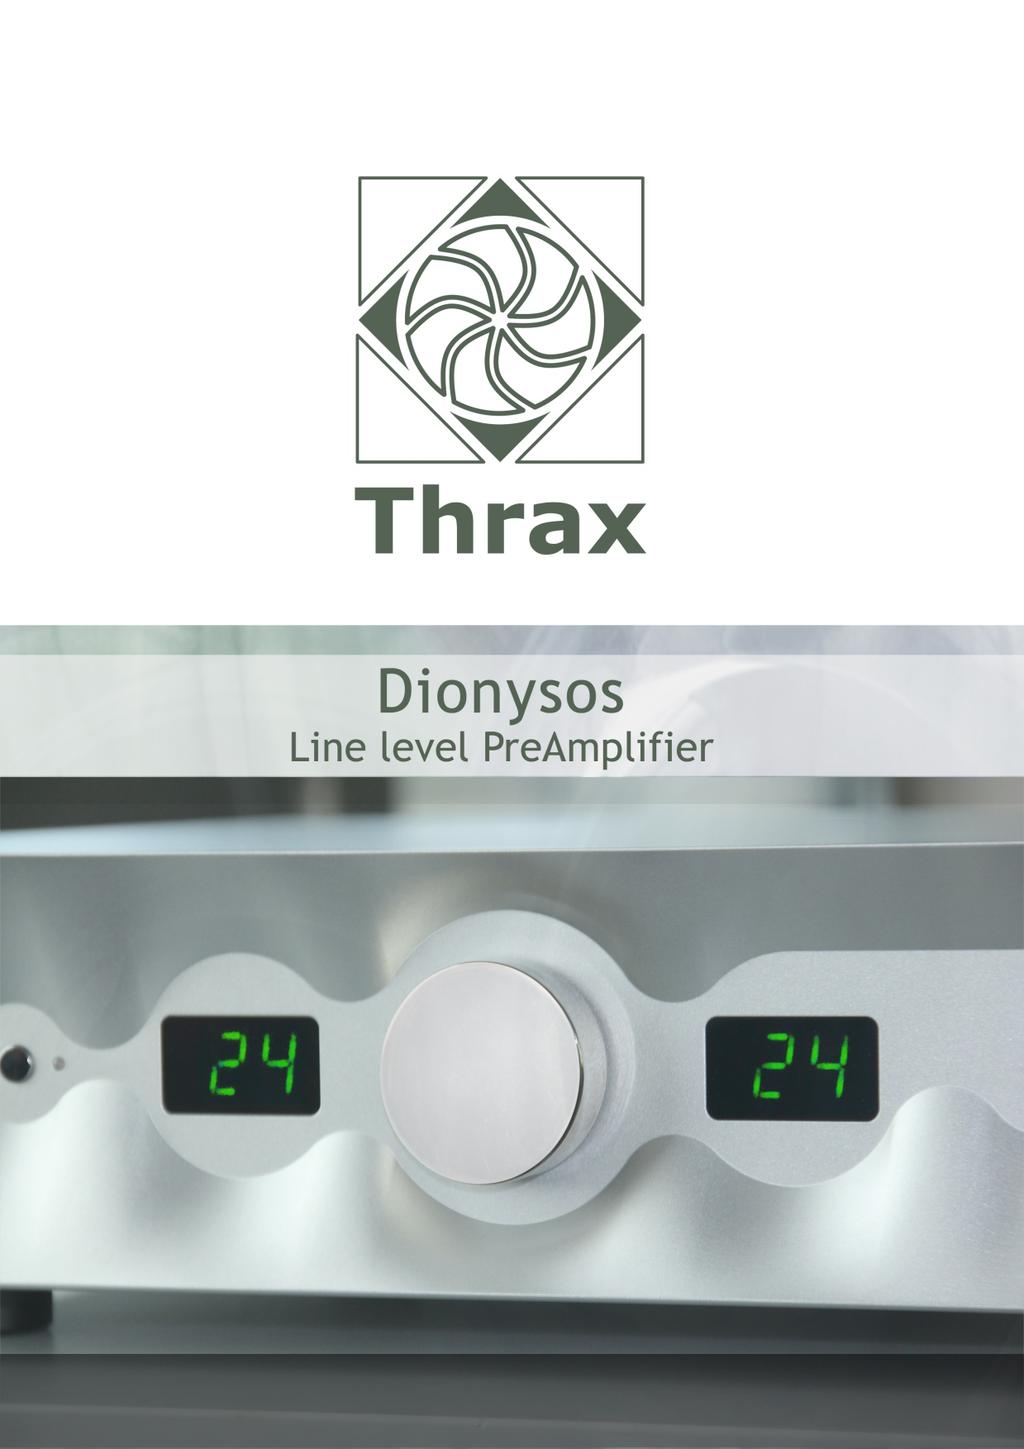
8 FRONT PANEL Although most of the front panel controls (Volume, Power, Mute) are self explanatory, Thrax Audio has outfitted this unit with several advanced features which bear further description: Figure 1 ON/OFF Button Switches the unit ON and OFF. See OPERATION SECTION for details. TAPE Button The TAPE button toggles between tape Output ON and OFF. See TAPE OUTPUT section for detailed information on how the tape output functions. When the LED next to the tape button is ON the tape output is switched on. MUTE Button This button toggles between mute and normal volume modes. When the LED next to the mute button is ON the system is muted. The mute button on the remote also toggles mute mode. Adjusting volume via the remote control or the volume knob resets the preamplifier to not muted mode. Left Channel Volume Display This numeric display shows the current volume level of the left channel. In Mute Mode the display reads double dashes The lowest volume level. (level 1) -46 db attenuation - Unity Gain... (level 24) 0 db attenuation - The highest volume level... (level 32) +18 db of gain Volume Knob Not much to say - it s a volume knob. Turn it clockwise to increase the volume level and vice verse. 7
9 FRONT PANEL Right Channel Volume Display This numeric led displays the current volume of the right channel. In Mute Mode the display reads double dashes The lowest volume leve l. (level 1) -46 db attenuation. - Unity Gain... (level 24) 0 db attenuation - The highest volume level... (level 32) +18 db of gain Just to the right of the Right channel numeric display are the source select functions: Input Select Previous Button Each button press changes the selected source to the next lower source. If this button is pressed while source 1 is selected the source wraps around to source 6. The current source is indicated via a row of LED's just above the source buttons. LEDs may illuminate in 3 different colors Green, Red and Amber. For details see Home Theater (HT) Level Set and Phase Button. Phase Button Each button press inverts the phase. Green source LED indicates 00 phase. Red source LED indicates 1800 phase. Phase change works in Home Theatre mode also despite of source LED is illuminated amber for showing HT mode. Phase settings for each input are saved in non volatile memory so even after a power outage this programming will remain stored. Input Select Next Button Each button press changes the selected source to the next higher source. If this button is pressed while source 6 is selected the source wraps around to source 1. The current source is indicated via a row of LED's just above the source buttons. Source LED's Above the source/phase buttons are a row of 6 LED's. They indicate the selected source number. The left most LED is source 1 and the right most led is source 6. - Green = Normal phase - Red = Inverted phase - Amber = Home Theatre 8
10 BACK PANEL Figure 2 AC Fuse There are fuses located in the IEC power connector on the back panel. For 220 volt operation a 1.0 ampere fuse is used. For 110 volt operation the fuse should be 2.0 amperes. If power does not come on, contact your authorized service representative. Inputs 4 pairs of RCA jacks accommodate unbalanced line level sources. These are labeled 1, 2, 3 and 4. Each pair of RCA jack is GND/FLOAT switchable (see Fig. 2). For unbalanced sources, you will normally use the RCA GND setting. You may also choose RCA FLOAT if it is necessary to break a ground loop. Inputs 5 and 6 can accept a balanced signal on XLR connectors. Note: not all sources with XLR connectors are balanced. Many are unbalanced, with pin 2 or pin 3 tied to ground. The preamplifier accepts such sources. Outputs Two sets of RCA output jacks are provided as main outputs to power amplifiers. These sets are equal and are parallel connected internally. In addition, two pair of XLR jacks can be used to drive a power amplifier. Again, these sets are equal and are parallel connected internally. The output selection is set by the RCA/XLR switch (see Fig. 2). Incorrect setting will result in either excessive buzz, or cause gross distortion of frequency response and output. Do not connect an unbalanced load with pin 3 hot to the XLR connectors. For power amplifiers with RCA input jacks, you will normally use the RCA GND setting. You may also choose RCA FLOAT if it is necessary to break a ground loop. 9
11 BACK PANEL TAPE Output There is a set of TAPE output connectors on the back of the preamplifier (see Fig. 2). These can be used to feed a Tape Deck or CD Recorder input jack. These output jacks are switched ON and OFF via a button on the front panel (the TAPE button as you might expect, see Fig. 1). When the LED next to the button is on, the TAPE output jacks are buffered straight from the currently selected input jack at unity gain, just as if you plugged your source directly into your recorder. NOTE: This is a bit different than a traditional tape loop. We have chosen this method over a tape loop because the traditional tape loop introduces additional contacts to the main signal path all the time - even when the tape function is not used. We prefer to keep the main signal path as clean as we can and only add features around that main signal path. These switched tape outputs can also be used to feed a headphone amp with its own built in volume control. 10

12 REMOTE CONTROL The remote control allows for wireless adjustment of Source Select, MUTE, PHASE, BALLANCE and VOLUME. The remote wand is powered by two AAA batteries. These should be of the alkaline type. You will need to install them in the wand before using the remote. Since batteries can leak, they should be removed from the wand if it is not going to be used for an extended period of time. Remote Handset Functions On/off button This button switches the unit ON / OFF, when in stand-by mode. Phase button This button inverts the source phase Mute (center of volume/balance grid): This button toggle between mute and normal volume modes. When the mute LED is on the system is muted. The mute will be canceled when the volume is adjusted by the remote handset or by the volume knob on the front of the pre-amp. Volume Up / Down The volume up and down buttons step the volume up or down 1 step (about 2db) per button press or if held down they continuously adjust volume. Mute Balance Left / Right Figure 3 On/off Phase Volume UP / Down Source Select Balance Left / Right The Balance Left / Right buttons step the volume levels to adjust the balance. This adjustment moves the sound to the right or left side by 1 volume step per button press (or if held down continuously balance will progressively move in the desired direction). A sliding / alternating balance method is implemented to move balance from left or right and vice verse. This way the overall volume level of the system is maintained. Also you can slide balance over to one side and then slide it back to the original volume by pressing the opposite balance button. Source Select Buttons The buttons labeled 1 through 6 on the bottom portion of the remote handset directly access each of the 6 source inputs on the preamplifier. These direct buttons (rather than next/prev) are used to make sure that macro functions programmed into a (user supplied) advanced programmable handset function repeatedly. 11
13 OPERATION For initial power up press the main switch located on the back panel. Red LED on the front panel next to the ON/OFF button (see Fig. 1) indicates the unit is now in STANDBY mode. To switch the preamplifier on press the ON/OFF button on the front panel or the ON/OFF button on the remote control. The red LED indicator blinks for approx 30 sec. whilst the unit warms up. When ready, the red light turns to green, mute is automatically engaged, and the last active source will be automatically selected. The front panel display will be on while the unit is executing a command and then turns off after a short timeout period. To turn the preamplifier off press the ON/OFF button. All the amplifier circuitry will be turned off for minimum power consumption leaving only a small STANDBY circuit running. However if you are not going to use the amplifier for a long period we recommend turning it off, using the power switch on the back panel, to save power. As with all high fidelity products, the sound characteristic changes somewhat as it warms up. Best sound will be achieved after about 15 minutes of operation. Any time that the Dionysos Preamplifier has not been used for a few weeks the sound may be different. This is also normal for high resolution audio equipment. Optimum sound should return after a few hours of operation, preferably with an audio signal. Note that although your Thrax Audio System has been run for 72 hours at the factory, it will continue to break in for approximately 150 hours. Also be aware that many components display the need for a new break in period after being transported in unheated cargo aircraft. Home Theater (HT) Level Set The Mute button on the front panel (see Fig. 1) is used to program the currently selected input to lock on any volume level. Press and hold this button for 5 sec. programs the currently selected input to the current volume level. Pressing the button again for 5 sec. unlocks the volume setting. The status of each input is shown via that inputs LED on the front panel: For normal (unlocked) mode the LED is green or red in case the phase is inverted. For lock (HT) mode the led will turn amber. The HT mode of each input is saved in non volatile memory so even after a power outage this programming is stored inside the preamplifier. Most often this is used to program an input connected to a home theater processor so that the input will jump to the pre-set level when that input is selected. Each time that source is selected the level will jump to the programmed level and you use the HT processors level control to set the volume - which also controls the other channels such as rear channels, etc... 12
14 OPERATION If your HT processor already had its levels set for the same amplifiers directly connected to the HT Processor then using level 24 (unity gain) on the preamplifier will maintain proper surround channel vs main channel levels. If you are installing the processor new or making other changes in the system then you should set the preamplifier to an HT mode for that processor input BEFORE you set your surround levels. That way the system levels will be correct each time that input is selected. The volume could simply be set manually to the same level each time you use that input. The HT feature is just a handy way to make the level jump automatically to the same volume each time that input is selected. NOTE: In some systems switching to an unused input will cause a small amount of hum at the speakers. This is because with no input connected the signal path is hanging in the breeze picking up whatever noise is floating by. For unused inputs HT mode can be engaged and set to volume level 1 or mute. Then when selected the level is so low that there will be no hum. 13
15
16 NOTES
Ares. Modular Audiophile System. by Thrax Audio. Operating Manual. Manual issued 15/03/2018 CAUTION
 Ares Modular Audiophile System by Thrax Audio Operating Manual Manual issued 15/03/2018 CAUTION THE UNIT CONTAINS NO USER SERVICEABLE PARTS. DO NOT REMOVE THE COVERS. LETHAL VOLTAGES ARE PRESENT WITHIN
Maximinus. Audio DAC. by Thrax Audio. Owner s Manual. Manual issued 15/01/2014 CAUTION
 Maximinus Audio DAC by Thrax Audio Owner s Manual Manual issued 15/01/2014 CAUTION THE UNIT CONTAINS NO USER SERVICEABLE PARTS. DO NOT REMOVE THE COVERS. LETHAL VOLTAGES ARE PRESENT WITHIN THE CHASSIS.
Spartacus. Mono Power Amplifier. by Thrax Audio. Owner s Manual. Manual issued 05/03/2012 CAUTION
 Spartacus Mono Power Amplifier by Thrax Audio Owner s Manual Manual issued 05/03/2012 CAUTION THE UNIT CONTAINS NO USER SERVICEABLE PARTS. DO NOT REMOVE THE COVERS. LETHAL VOLTAGES ARE PRESENT WITHIN THE
MODEL 805 USER MANUAL
 MODEL 805 USER MANUAL All Rights Reserved Page 1 of 12 UNPACKING & INSPECTION Save all packing materials they are required for returns and warranty service. Inspect the 805 and packing materials for any
BS 287 DUAL CHANNEL POWER SUPPLY. User Manual. January 2017 V1.0
 BS 287 DUAL CHANNEL POWER SUPPLY User Manual January 2017 V1.0 Table of contents 1.0 SAFETY INSTRUCTIONS... 3 2.0 GENERAL DESCRIPTION PS 289... 4 3.0 MECHANICAL INSTALLATION... 5 4.0 MAINS POWER & SAFETY
BS 181 SINGLE CHANNEL POWER SUPPLY USER MANUAL
 BS 181 SINGLE CHANNEL POWER SUPPLY USER MANUAL August 2016 This product is designed and manufactured by: ASL Intercom B.V. Zonnebaan 42 3542 EG Utrecht The Netherlands Phone: +31 (0)30 2411901 Fax: +31
OWNER S MANUAL CD-2 V 1.3
 OWNER S MANUAL CD-2 V 1.3 2 TABLE OF CONTENTS WARNINGS... 3 ACCESSORIES... 4 REMOTE CONTROL... 5 FRONT PANEL... 6 REAR PANEL... 7 MENU SYSTEM... 8 NOTES OF IMPORTANCE... 10 CONNECTORS... 11 TECHNICAL SPECIFICATIONS...
BS 181 SINGLE CHANNEL POWER SUPPLY USER MANUAL
 BS 181 SINGLE CHANNEL POWER SUPPLY USER MANUAL Issue 2011 ASL Intercom BV DESIGNED & MANUFACTURED BY: ASL Intercom B.V. Zonnebaan 42 3542 EG Utrecht The Netherlands Tel: +31 (0)30 2411901 Fax: +31 (0)30
PS 289 DUAL CHANNEL POWER SUPPLY USER MANUAL
 PS 289 DUAL CHANNEL POWER SUPPLY USER MANUAL August 2016 This product is designed and manufactured by: ASL Intercom B.V. Zonnebaan 42 3542 EG Utrecht The Netherlands Phone: +31 (0)30 2411901 Fax: + 31
Kogan Bluetooth Karaoke System with Dual Microphones KAKAR2MICA
 Kogan Bluetooth Karaoke System with Dual Microphones KAKAR2MICA K TABLE OF CONTENTS SAFETY & WARNINGS...1 IMPORTANT SAFETY INSTRUCTIONS...1 AC CONNECTION...2 LOCATION OF CONTROLS...3 ASSEMBLY AND CONNECTIONS...4
U-300 Unity Amplifier User s guide
 U-300 Unity Amplifier User s guide U-300 Unity Amplifier User s guide Specifications: Contents: Output: 2 x 300 W/8 Ohm, 2 x 600 W/4 Ohm SPECIFICATIONS Page 2 Distortion:
PORTABLE WIRELESS PA SYSTEM WITH LITHIUM -ION RECHARGEABLE BATTERY AWP6042 OWNER S MANUAL. Handheld Microphone Headset Transmitter
 PORTABLE WIRELESS PA SYSTEM WITH LITHIUM -ION RECHARGEABLE BATTERY AWP6042 OWNER S MANUAL X1 Headset Microphone AWX6042H VHF Wireless Headset Transmitter Handheld Microphone Headset Transmitter Thank you
YST-SW20 SUBWOOFER SYSTEM OWNER S MANUAL. Active Servo Technology
 CAUTION SUBWOOFER SYSTEM Active Servo RISK OF ELECTRIC SHOCK DO NOT OPEN CAUTION: TO REDUCE THE RISK OF ELECTRIC SHOCK DO NOT REMOVE COVER (OR BACK). NO USER-SERVICEABLE PARTS SIDE. REFER SERVICG TO QUALIFIED
SUBWOOFER SYSTEM YST-MSW10
 ACTIVE SERVO PROCESSING SUBWOOFER SYSTEM YST-MSW10 Active Servo SUBWOOFER SYSTEM YST-MSW10 Active Servo HIGH CUT HIGH LOW OWNER S MANUAL MANUAL DE INSTRUCCIONES CAUTION RISK OF ELECTRIC SHOCK DO NPT OPEN
C-300 Preamplifier User s guide
 C-300 Preamplifier User s guide C-300 Preamplifier User s guide Specifications: Contents: Output: Max 7.5Vrms unbalanced (RCA) or 15Vrms balanced (XLR) SPECIFICATIONS Page 2 Phono: istortion, line stage:
FOOT CONTROLLER FCV100
 CV NORM OUTPUT2 OUTPUT1 MIN VOL 0 10 User Manual FOOT CONTROLLER FCV100 Ultra-Flexible Dual-Mode Foot Pedal for Volume and Modulation Control 2 FOOT CONTROLLER FCV100 User Manual Table of Contents Thank
PREMIUMAUDIOVIDEOLIGHTINGANDPOWERPRODUCTS
 FACTOR ELECTRONICS PREMIUMAUDIOVIDEOLIGHTINGANDPOWERPRODUCTS V-RVC Owners Manual IMPORTANT NOTE: THIS OWNER'S MANUAL IS PROVIDED AS AN INSTALLATION AND OPERATING AID. FACTOR ELECTRONICS DOES NOT ASSUME
U-150 Integrated Amplifier User s guide
 U-150 Integrated Amplifier User s guide U-150 Integrated Amplifier User s guide Specifications: Contents: Output: Phono: Line: Digital: Volume control: Dimensions: Weight: 2 300W/8 Ohm, 2 600W/4 Ohm Distortion:
1/4 Guitar / Mic input
 1/4 Guitar / Mic input Important Safety Instructions 1) Read these instructions All the safety and operating instructions should be read before this product is operated. 2) Keep these instructions The
User s Guide. Digital Whole Home Audio Distribution System
 User s Guide Digital Whole Home Audio Distribution System Document Number 62R00-1 Rev A October, 2006 Copyright 2006 Home Automation, Inc. All Rights Reserved Precautions Exposure to extremely high noise
OPERATING INSTRUCTIONS PA AMPLIFIER P-1812
 OPERATING INSTRUCTIONS PA AMPLIFIER P-1812 Please follow the instructions in this manual to obtain the optimum results from this unit. We also recommend that you keep this manual handy for future reference.
M-PWR User Instructions. Audiolab M-PWR english manual.in :29:02
 M-PWR User Instructions Audiolab M-PWR english manual.in1 1 2013-3-11 12:29:02 1: Important Safety Information Page 1 AVIS: RISQUE DE CHOC ELECTRIQUE-NE PAS OUVRIR WARNING: SHOCK HAZARD-DO NOT OPEB This
Beresford Capella Headphone amplifier
 Beresford Capella Headphone Amplifier Owner s Reference manual REV 1.7 Introduction The Capella is a high end headphone amplifier designed for audiophile listening. It can accept audio signals from an
PS8 - II. Professional Power Sequencer. User s Manual
 PS8 - II Professional Power Sequencer User s Manual IMPORTANT SAFETY INSTRUCTIONS READ FIRST This symbol, whenever it appears, alerts you to the presence of uninsulated dangerous voltage inside the enclosure.
BS 217 DUAL CHANNEL MASTER STATION USER MANUAL
 BS 217 DUAL CHANNEL MASTER STATION USER MANUAL August 2016 This product is designed and manufactured by: ASL Intercom B.V. Zonnebaan 42 3542 EG Utrecht The Netherlands Phone: +31 (0)30 2411901 Fax: +31
SOUNDSTICKS WIRELESS. Setup Guide. Downloaded from
 SOUNDSTICKS WIRELESS Setup Guide English Japanese Simplified Chinese 2 SOUNDSTICKS WIRELESS 1. Read these instructions. 2. Keep these instructions. 3. Heed all warnings. 4. Follow all instructions. 5.
Users Manual. Pronomic TAS-18 Active Touring System
 Users Manual Pronomic TAS-18 Active Touring System Version 01/2012 IMPORTANT SAFETY INSTRUCTIONS The apparatus shall not be exposed to dripping or splashing and that no objects filled with liquids, such
Instruction Manual. 5.1 Channel Cinema System with Remote Wirless and Glossy MODEL:LS 250
 Instruction Manual 5.1 Channel Cinema System with Remote Wirless and Glossy MODEL:LS 250 Wireless-Rear Speaker Read this manual carefully to get the excellent acoustics from this unit. SAFETY INFORMATION
FOOT CONTROLLER FCV100. Quick Start Guide. Ultra-Flexible Dual-Mode Foot Pedal for Volume and Modulation Control
 CV NORM OUTPUT2 OUTPUT1 MIN VOL 0 10 Quick Start Guide (Check Out behringer.com for Full Manual) FOOT CONTROLLER FCV100 Ultra-Flexible Dual-Mode Foot Pedal for Volume and Modulation Control 2 FOOT CONTROLLER
Owner s Manual. MOON Series 320 S. Power Supply
 Owner s Manual MOON Series 320 S Power Supply Important Safety Instructions 1. Read these instructions. 2. Keep these instructions. 3. Heed all warnings. 4. Follow all instructions. 5. Do not use this
PS 680 SIX CHANNEL POWER SUPPLY WITH AUX MATRIX USER MANUAL
 PS 680 SIX CHANNEL POWER SUPPLY WITH AUX MATRIX USER MANUAL Issue 2010 ASL Intercom BV DESIGNED AND MANUFACTURED BY: ASL INTERCOM B.V. ZONNEBAAN 42 3542 EG UTRECHT THE NETHERLANDS PHONE: +31 (0)30 2411901
PREMIUMAUDIOVIDEOANDPOWERPRODUCTS V-RVC-PRO. Owners Manual
 PREMIUMAUDIOVIDEOANDPOWERPRODUCTS V-RVC-PRO Owners Manual IMPORTANT NOTE: THIS OWNER'S MANUAL IS PROVIDED AS AN INSTALLATION AND OPERATING AID. FACTOR ELECTRONICS DOES NOT ASSUME ANY RESPONSIBILITY AS
User s Guide. Digital Whole Home Audio Distribution System. Includes 8 audio source inputs and 8 amplified audio zones
 User s Guide Digital Whole Home Audio Distribution System FEATURES Includes 8 audio source inputs and 8 amplified audio zones Hi-Fi2 SYSTEM Optional Hi-Fi2 Expansion Kit adds 8 more zones (16 total) Super
USB 2.0 SR. Extender over one CAT-5 Cable. User Manual EXT-USB2.0-SR. Version A1
 USB 2.0 SR Extender over one CAT-5 Cable EXT-USB2.0-SR User Manual Version A1 Important Safety Instructions 1. Read these instructions. 2. Keep these instructions. 3. Heed all warnings. 4. Follow all instructions.
VOICE-ACTIVATED INTERCOM SYSTEM
 VOICE-ACTIVATED INTERCOM SYSTEM Owner s Manual For Wireless Intercom Model WHI-4CUPG EXPLANATION OF GRAPHIC WARNING SYMBOLS This symbol is intended to alert the user to the presence of un-insulated dangerous
Important Safety Instructions
 Important Safety Instructions The lightning flash with the arrowhead symbol within an equilateral triangle is intended to alert the user to the presence of dangerous voltage inside the product that may
Blonde On Blonde OWNER S MANUAL SWR SCOTTSDALE, AZ USA
 Blonde On Blonde OWNER S MANUAL SWR SCOTTSDALE, AZ USA IMPORTANT SAFETY INSTRUCTIONS CAUTION: TO REDUCE RISK OF ELECTRIC SHOCK, DO NOT REMOVE THE COVER OR BACK. NO USER-SERVICEABLE PARTS INSIDE. PLEASE
USER S MANUAL. Dual Channel 15 Band EQ USB. 19" DIGITAL (482mm) DS-EQ215 PARAMETER OUT EQUALIZER ESCAPE
 DS-EQ215 PARAMETER OUT EQUALIZER ESCAPE") DS-EQ215 USER S MANUAL IN PARAMETER DS-EQ215 OUT EQUALIZER ESCAPE Dual Channel 15 Band EQ 19" DIGITAL (482mm) USB Contents Introduction...1 Safety Instructions... 2 Getting Started with Front Panel Controls...
DS-EQ215 USER S MANUAL IN PARAMETER DS-EQ215 OUT EQUALIZER ESCAPE Dual Channel 15 Band EQ 19" DIGITAL (482mm) USB Contents Introduction...1 Safety Instructions... 2 Getting Started with Front Panel Controls...
DPR-34+ GB Revision 2
 DPR-34+ GB Revision 2 1. 2. 3. 4. 5. 6. 7. 8. 9. Important Safety Instructions Read these instructions. Keep these instructions. Heed all warnings. Follow all instructions. Do not use this apparatus near
DPR-39. GB Revision 1
 DPR-39 GB Revision 1 Important Safety Instructions 1. Read these instructions. 2. Keep these instructions. 3. Heed all warnings. 4. Follow all instructions. 5. Do not use this apparatus near water. 6.
RIO R22 & R44. Quick Start Guide for all variants
 RIO R22 & R44 Quick Start Guide for all variants Important Safety Information 1. READ THESE INSTRUCTIONS All the safety and operating instructions should be read before the product is operated. 2. KEEP
820S Evolution Series
 820S Evolution Series Power Supply Owner s Manual 820S Evolution Series Owner s Manual Important Safety Instructions 1. Read these instructions. 2. Keep these instructions. 3. Heed all warnings. 4. Follow
IA1000. Integrated Amplifier with USB / SD Inputs IA1000. QUESTIONS/COMMENTS CALL or
 Integrated Amplifier with USB / SD Inputs QUESTIONS/COMMENTS CALL 888-842-6277 or email info@tpro.com WARNING! CAUTION: TO REDUCE THE RISK OF ELECTRIC SHOCK, DO NOT REMOVE THE COVER OF THIS UNIT. THERE
Audio. one CAT-5 EXT-DVI-1CAT5-SR. User Manual. Release A2
 Audio DVI 3GSDI ELR Lite Embedder Extender over one CAT-5 EXT-DVI-1CAT5-SR User Manual Release A2 DVI ELR Lite Extender over one CAT-5 Important Safety Instructions 1. Read these instructions. 2. Keep
Universal Docking Station with 2.4GHz Wireless Speakers for iphone/ipod
 IMPORTANT SAFETY INSTRUCTIONS When used in the directed manner, this unit has been designed and manufactured to ensure your personal safety. However, improper use can result in potential electrical shock
BASIC PA AMPLIFIER A-1031 A-1061 A-1121 OPERATING INSTRUCTIONS TABLE OF CONTENTS
 OPERATING INSTRUCTIONS BASIC PA AMPLIFIER A-1031 A-1061 A-1121 Please follow the instructions in this manual to obtain the optimum results from this unit. We also recommend that you keep this manual handy
DUAL LASER PACK & CONTROLLER USERS MANUAL
 DUAL LASER PACK & CONTROLLER USERS MANUAL www.venuelightingeffects.com 89.0 Venue PP laser Instr.indd 5//08 6:09:5 PM SAFETY INFORMATION Never operate this unit if it has a damaged cord or plug. Keep the
OWNER S MANUAL GEQ 131/ 131LF GEQ 215/ 215LF GEQ 231. Single Channel 31 Band Graphic Equalizer. 2 Channel 15 Band Graphic Equalizer
 20 25 31.5 40 50 63 80 0 125 160 200 250 315 400 500 630 800 1K 1.25K 1.6K 2K 2.5K 3.15K 4K 5K 6.3K 8K K 12.5K 16K 20K +12 +6 +3 0-3 GEQ 131LF 5 31 BAND GRAPHIC EQUALIZER 15 40 60 7K 15K 22K BYPASS RANGE
PCM60A 100W MAX P.A. AMPLIFIER.
 PCM60A 100W MAX P.A. AMPLIFIER www.pyleaudio.com IMPORTANT SAFETY INSTRUCTIONS 1. Read Instructions All the safety and operating instructions should be read before the appliance is operated. 2. Retain
2 Mic/1-Guitar in, 2 Line out recording USB Interface. User manual
 2 Mic/1-Guitar in, 2 Line out recording USB Interface User manual Important Safety Instructions 1. Read this manual thoroughly before using this unit. 2. Keep this manual for future reference. 3. Take
CANARY AUDIO CA-430. Vacuum Tube MM/MC Phono Preamplifier OWNER S MANUAL. Handcrafted in California MADE IN USA
 CANARY AUDIO Vacuum Tube MM/MC Phono Preamplifier Handcrafted in California CA-430 OWNER S MANUAL MADE IN USA Dear Customer: Please allow us to take this opportunity to thank you for purchasing this CANARY
C ookie User Manual BC
 Cookie User Manual BC Cookie Please follow the instruction in this guide to enjoy the best sound. Cookie User Manual Hold "O" button to power on and off Press "O" button to play/pause music (for compatible
Integrated Amplifier with USB / SD Inputs IA1200
 Integrated Amplifier with USB / SD Inputs WARNING! CAUTION: TO REDUCE THE RISK OF ELECTRIC SHOCK, DO NOT REMOVE THE COVER OF THIS UNIT. THERE ARE NOUSER-SERVICEABLE PARTS INSIDE. REFER ALL SERVICING TO
USER MANUAL GOLDMUND MIMESIS 27.8 Preamplifier
 USER MANUAL GOLDMUND MIMESIS 27.8 Preamplifier INTRODUCTION Thank you for purchasing the Goldmund MIMESIS 27.8 preamplifier. You have acquired one of the best preamplifier ever made for professional and
INFORMATION AMPLIFIER TA-102 OPERATING INSTRUCTIONS TABLE OF CONTENTS
 OPERATING INSTRUCTIONS INFORMATION AMPLIFIER TA-102 INFORMATION AMPLIFIER TA-102 MIC AUX POWER TABLE OF CONTENTS 1. SAFETY PRECAUTIONS... 2 2. GENERAL DESCRIPTION... 4 3. EACH PART NAME AND FUNCTIONS Top
CR6S Stereo Micro Crush
 1 THANK YOU! Thank you for choosing Orange. You are now a member of the Legendary British Guitar Amplifier owners club! Since 1968 when the company was founded, Orange has been a pioneering force in the
BLUETOOTH CLOCK RADIO
 BLUETOOTH CLOCK RADIO SCR1989BT OPERATING INSTRUCTIONS Please read and follow this instruction manual carefully before using the unit and retain it for future reference SYLVANIA is a registered trademark
CANARY AUDIO. Vacuum Tube Compact Disc Player CD-100 OWNER S MANUAL. Handcrafted in California MADE IN USA
 CANARY AUDIO Vacuum Tube Compact Disc Player Handcrafted in California CD-100 OWNER S MANUAL MADE IN USA Dear Customer: Please allow us to take this opportunity to thank you for purchasing this CANARY
Sonata. Vacuum Tube Integrated Amplifier. Owner s Manual
 Sonata Vacuum Tube Integrated Amplifier Owner s Manual Dear Customer, We at WLM would like to take this opportunity to thank you for purchasing the Sonata vacuum tube integrated amplifier! The Sonata was
a35.2 integrated amplifier a35.2
 a35.2 integrated amplifier user s manual phones input rec. monitor volume on/off a35.2 integrated amplifier http://www.musichallaudio.com Congratulations On Your Purchase You have selected a state of
Always there to help you. Register your product and get support at SPA1330. Question? Contact Philips.
 Always there to help you Register your product and get support at www.philips.com/welcome Question? Contact Philips SPA1330 User manual Contents 1 Important 2 Safety 2 Notice 3 English 2 Your multimedia
Magnum Dynalab MD 301 HYBRID INTEGRATED AMPLIFIER INSTRUCTION MANUAL
 Magnum Dynalab MD 301 HYBRID INTEGRATED AMPLIFIER INSTRUCTION MANUAL - 2- TABLE OF CONTENTS TABLE OF CONTENTS DEAR VALUED CUSTOMER... 2 DEAR VALUED CUSTOMER... 3 UNPACKING YOUR MD 301 HYBRID INTEGRATED
PRE116/126. User Manual.
 PRE116/126 User Manual www.audac.eu ADDITIONAL INFORMATION This manual is put together with much care, and is as complete as could be on the publication date. However, updates on the specifications, functionality
THANK YOU! Crush PiX 20L. Thank you for choosing Orange. You are now a member of the Legendary British Guitar Amplifier owners club!
 1 THANK YOU! Thank you for choosing Orange. You are now a member of the Legendary British Guitar Amplifier owners club! Since 168 when the company was founded, Orange has been a pioneering force in the
Table of Contents. Federal Communications Commission (FCC) Statement...2
 Statement...2") Contents Table of Contents Federal Communications Commission (FCC) Statement...2 Important Safety Instructions...3 Chapter 1 Introduction Features...6 Package Contents...7 Front View and Controls...8 Installing
Contents Table of Contents Federal Communications Commission (FCC) Statement...2 Important Safety Instructions...3 Chapter 1 Introduction Features...6 Package Contents...7 Front View and Controls...8 Installing
Thank you for your purchase of the Supa-Charger! Features Include:
 Owner s Manual Thank you for your purchase of the Supa-Charger! The Supa-Charger is a High Performance Pedal Power Supply that will power any battery operated effect devices that require 9, 12 or 16 volts.
IMPORTANT! USER MANUAL. LPU192CD Hi-Fi Turntable Stereo System WARRANTY INFORMATION INSIDE. PLEASE READ.
 LPU192CD Hi-Fi Turntable Stereo System USER MANUAL IMPORTANT! WARRANTY INFORMATION INSIDE. PLEASE READ Trademark of TEAC Corporation JAPAN www.teac.com.au 1 1 Read these Instructions. 2 Keep these Instructions.
KILBURN - PORTABLE ACTIVE STEREO SPEAKER USER MANUAL
 KILBURN - PORTABLE ACTIVE STEREO SPEAKER USER MANUAL Apple TV, Airport Express, iphone, ipod, ipod Classic, ipod Nano, ipod Shuffle, ipod Touch, ipad and Safari are trademarks of Apple Inc., registered
DI8E Operating Manual
 DI8E Operating Manual August 2012 SAFETY INSTRUCTIONS CAUTION: To reduce the risk of electrical shock, do not remove the cover or rear personnel only. WARNING: to rain or moisture. DETAILED SAFETY INSTRUCTIONS:
1:4 3GSDI Splitter. User Manual EXT-3GSDI-144. Release A5
 1:4 3GSDI Splitter EXT-3GSDI-144 User Manual Release A5 Important Safety Instructions 1. Read these instructions. 2. Keep these instructions. 3. Heed all warnings. 4. Follow all instructions. 5. Do not
PREMIUMAUDIOVIDEOANDPOWERPRODUCTS COMM-2 Two-Way Active Horn Speaker / Microphone System
 PREMIUMAUDIOVIDEOANDPOWERPRODUCTS COMM-2 Two-Way Active Horn Speaker / Microphone System Please read the terms of use below before using this product: This product has the ability to collect audio which
music hall a70.2 integrated amplifier music hall
 music hall a70.2 integrated amplifier music hall http://www.musichallaudio.com Congratulations on Your Purchase You have selected a state-of-the-art integrated amplifier. Each component chosen for assembly
Plug-in wireless speaker
 JBL Soundfly BT Plug-in wireless speaker Quick Setup Guide Welcome Thank you for purchasing the JBL Soundfly BT plug-in wireless speaker. Soundfly BT will fill your room with sound from your portable Bluetooth-enabled
THANK YOU FOR BUYING HEIMDALL A CLINT HI-FI STREAMING ADAPTER
 ENGLISH THANK YOU FOR BUYING HEIMDALL A CLINT HI-FI STREAMING ADAPTER Welcome to the world of Clint Asgard. Designed and developed with elegance and simplicity by Danish designer Phillip Bodum. Our Asgard
What s in the Box. Table of Contents
 Table of Contents 1. What s in the Box 2. Warning 2. Overview 3. Quick Start Guide 4. Rear Panel 5. Front Panel 5. DC trigger 5. Logo trim tool 6. Troubleshooting Guide 7. Warranty and Service 8. Contact
Introduction. Specifications. Network
 Introduction When it comes to control hardware, it is necessary to provide an easy yet powerful interface for the personnel in charge. XPanel Touch is created with this purpose in mind. The menu names
Amplified subwoofer - 12" - 400W RMS
 Amplified subwoofer - 12" - 400W RMS USER GUIDE 10078 - June 2013 - Version 1.0 1 - Safety information Important safety information This unit is intended for indoor use only. Do not use it in a wet, or
THANK YOU FOR CHOOSING ORANGE
 Manual V1.0 OB1-300 & OB1-500 MANUAL INTRODUCTION THANK YOU FOR CHOOSING ORANGE Ever since the founding of the company in 1968, Orange has been a pioneering force in the guitar amplification industry.
WARNING! CAUTION: TO REDUCE THE RISK OF ELECTRIC SHOCK, DO NOT REMOVE THE COVER OF THIS UNIT. THERE ARE NO USER
 PTA44BT 4 Channel Audio Amplifier Multi-Source 1/4 Audio/Microphone inputs MP3/USB/SD Readers/ FM radio, Built-in Wireless BT Audio Streaming (500 Watts) WARNING! CAUTION: TO REDUCE THE RISK OF ELECTRIC
OLi POWA-5 Active Monitors
 Active Monitors User Manual : English Contents Important Information... 3 Front & Rear Panels... 4 Remote Control... 5 Connecting Your Speakers... 6 Bluetooth Function... 7 Use with ipod / MP3... 8 Use
FOR FURTHER INFORMATION CONTACT: Music Hall 108 Station Road Great Neck, NY Tel: Fax:
 Guarantee This entitles you to have the music hall ph25.2 repaired or replaced, at our discretion, free of charge for one year after purchase, at any authorized music hall dealer, provided the unit was
TA12 full-rangespeaker. user manual
 TA12 full-rangespeaker user manual Musikhaus Thomann e.k. Treppendorf 30 96138 Burgebrach Germany Telephone: +49 (0) 9546 9223-0 email: info@thomann.de Internet: www.thomann.de 30.11.2011 Table of contents
OUTPUT2 OUTPUT1 MIN VOL CV NORM. Quick Start Guide FCV100. Ultra-Flexible Dual-Mode Foot Pedal for Volume and Modulation Control
 CV NORM OUTPUT2 OUTPUT1 MIN VOL 0 10 Quick Start Guide FCV100 Ultra-Flexible Dual-Mode Foot Pedal for Volume and Modulation Control 2 FCV100 User Manual Table of Contents Thank you... 2 Important Safety
Owner s Manual. MOON Evolution Series HDS-8. Reference HDMI 1.3a Switcher
 Owner s Manual MOON Evolution Series HDS-8 Reference HDMI 1.3a Switcher Important Safety Instructions 1. Read these instructions. 2. Keep these instructions. 3. Heed all warnings. 4. Follow all instructions.
HRS-1S. Half Rack Analog Stereo Audio Speaker Monitor. User Guide. Part Number , Revision E
 HRS-1S Half Rack Analog Stereo Audio Speaker Monitor User Guide Part Number 821535, Revision E 2012 Wohler Technologies, Inc. and PANORAMA. All rights reserved. This publication is protected by federal
CPD SERIES OPERATING MANUAL AND USER GUIDE. Professional Power Amplifier.
 CPD SERIES Professional Power Amplifier OPERATING MANUAL AND USER GUIDE www.wharfedalepro.com TABLE OF CONTENTS TABLE OF CONTENTS... 1 IMPORTANT WARNINGS & SAFETY INSTRUCTIONS... 2 INTRODUCTION... 3 ABOUT
Zphono Phono Preamplifier
 Zphono Phono Preamplifier Zphono Phono Preamplifier Owner s Guide IMPORTANT SAFETY INSTRUCTIONS The lightning flash with the arrowhead symbol within an equilateral triangle is intended to alert the user
DVI Detective. User Manual EXT-DVI-EDIDN. Release A3
 DVI Detective EXT-DVI-EDIDN User Manual Release A3 Important Safety Instructions 1. Read these instructions. 2. Keep these instructions. 3. Heed all warnings. 4. Follow all instructions. 5. Do not use
DVI ELR Extender over one CAT5
 DVI ELR Extender over one CAT5 EXT-DVI-1CAT5-ELR User Manual Important Safety Instructions 1 Read these instructions 2 Keep these instructions 3 Heed all warnings 4 Follow all instructions 5 Do not use
PLTT21BT CLASSICAL TURNTABLE WITH USB PLAYER, BLUETOOTH INSTRUCTIONS MANUAL
 PLTT21BT CLASSICAL TURNTABLE WITH USB PLAYER, BLUETOOTH INSTRUCTIONS MANUAL CAUTION TO PREVENT FIRE OR SHOCK HAZARD, DO NOT USE THIS PLUG WITH AN EXTENSION CORD, RECEPTACLE OR OTHER OUTLET UNLESS THE BLADES
3. This unit should not be exposed to dripping, splashing or excessive moisture or objects filled with liquid.
 Before using your new speaker system please review all information and instruction found in this user manual for the safety of the operator and optimum device performance. Caution: To reduce the risk of
HP-101 HEADPHONE AMPLIFIER
 HP-101 HEADPHONE AMPLIFIER User s Guide Before using your headphone amplifier, please read this User s Guide thoroughly and keep it for future reference. IMPORTANT Safety Instructions Please read these
THANK YOU! OR100. Thank you for choosing Orange. You are now a member of the Legendary British Guitar Amplifier owners club!
 1 THANK YOU! Thank you for choosing Orange. You are now a member of the Legendary British Guitar Amplifier owners club! Since 1968 when the company was founded, Orange has been a pioneering force in the
IMPORTANT SAFETY INSTRUCTIONS
 IMPORTANT SAFETY INSTRUCTIONS When using this electronic device, basic precautions should always be taken, including the following: 1. Read all instructions before using the product. 2. Do not use this
DVI KVM. Extra Long Range Extender Over One CAT5. User Manual EXT-DVIKVM-ELR. Release A8
 DVI KVM Extra Long Range Extender Over One CAT5 EXT-DVIKVM-ELR User Manual Release A8 Important Safety Instructions 1 Read these instructions 2 Keep these instructions 3 Heed all warnings 4 Follow all
P75 Dual Source Power Amplifier Installation Manual
 P75 Dual Source Power Amplifier Installation Manual SAFETY INSTRUCTIONS CAUTION: TO REDUCE THE RISK OF ELECTRIC SHOCK, DO NOT REMOVE THE COVER. NO USER- SERVICEABLE PARTS INSIDE. REFER SERVICING TO QUALIFIED
DAB A d a pt e r 3+ Dear Customer,
 Dear Customer, Quality has always been our driving force and founding Argon Audio is a natural extension of this philosophy. We have 20 years' experience in creating and specifying high quality products,
Various regulation agencies require us to bring the following information to your attention. Please read carefully.
 1 We would like to take this opportunity to thank you for selecting the CDA825 CD-player. We at Copland wish you many enjoyable hours in the company of fine music. Please read this owners manual before
APT20. User Manual.
 APT20 User Manual www.audac.eu 2 Index Introduction 5 Precautions 6 Safety requirements 6 Caution servicing 6 EC Declaration of conformity 7 Waste of Electrical and Electronic Equipment (WEEE) 7 Caution
IMPORTANT SAFETY INSTRUCTIONS. 7) Do not block any ventilation openings. Install in accordance with the manufacturer s instructions.
 Do not block any ventilation openings. Install in accordance with the manufacturer s instructions.") TEDDY stage monitor IMPORTANT SAFETY INSTRUCTIONS THE LIGHTNING FLASH WITH ARROWHEAD SYMBOL, WITHIN AN EQUILATERAL TRIANGLE, IS INTENDED TO ALERT THE USER TO THE PRESENCE OF UNINSULATED DANGEROUS VOLTAGE
TEDDY stage monitor IMPORTANT SAFETY INSTRUCTIONS THE LIGHTNING FLASH WITH ARROWHEAD SYMBOL, WITHIN AN EQUILATERAL TRIANGLE, IS INTENDED TO ALERT THE USER TO THE PRESENCE OF UNINSULATED DANGEROUS VOLTAGE