Copyright White Box Robotics Inc. and Frontline Robotics Inc
|
|
|
- Horace Hawkins
- 6 years ago
- Views:
Transcription

1
2 Disclaimer Working with electronics and installing the plastics will require care and patience. PROPER GROUNDING PROCEDURES before handling the electronics. Touching the robot chassis (which is common grounded throughout) and at the same time touching something that is grounded in your home/office like metal pipes or the kitchen tap. It is also expected that, working in a small area inside the unit that you perform careful and safe handling of the hardware so as not to cause short circuits. We ask that you make sure you give yourself enough working area and time for installation so as not to damage either the plastics or the electronics. Liability In no event will White Box Robotics, Inc. or Frontline Robotics, Inc. be liable for any damage, including loss of data or profits, cost of cover, or other incidental, consequential or indirect damages arising from the installation maintenance, use, performance, failure or interruption of White Box Robotics, Inc. or Frontline Robotics Inc. products, whatever the cause and on any theory of liability. This limitation applies even if White Box Robotics, Inc. or Frontline Robotics Inc. has been advised of the possibility of such damage.


3 Unpacking the Robot The following image shows how the PC-BOT should have arrived in the shipping box. STEP 1 Un-packing the robot Remove the peripheral equipment wrapped in bubble wrap.


4 STEP 2 Un-packing the robot cont. Carefully remove the side and front/back supporting foam.


5 STEP 3 - Un-packing the robot cont. Reach into the box and grab the handles on the PC-BOT. They are somewhat hidden from above. Lift the robot straight up and out of the box. WARNING! This robot is heavy. People with back problems should not attempt to lift this robot. Always use proper lifting technique when lifting heavy items. Keep you knees bent and your back straight and lift gently. The following image shows where the handles are located, you ll have to feel for them when the robot is in the box. There are two handles front and back.


6 STEP 1 Charging the robot batteries Setting-up the robot Now that the robot is out of the box, you should plug the charger in to charge the batteries. The charger connector is found behind the left rear vent door on the back of the robot. Flip the door open as shown in the above picture.


7 Unpack the charger and plug the charger jack into the lower connector on the robot labeled Charger. The charger LED will first be GREEN after the AC cord is plugged into the wall. It will then change to ORANGE when it is charging the batteries on the PC-BOT. It will then switch back to GREEN when the batteries are fully charged (it typically takes hours to charge the batteries from the autoshutoff point). Charging and shutdown If the battery level goes below 11.2V the robot will auto-shutdown. Either while you are running the robot, and especially when you are finished with it for the day, PLEASE REMEMBER TO RE- CHARGE THE BATTERIES.


8 STEP 2 Removing the head panel The head and front/back torso body panels are attached with ball studs and sockets. This allows for easy removal of the panels without tools. Windows XP Home CD can be found under the head panel. Gently remove the head by grabbing under the separation (between the head and torso plastics) and pulling straight up.


9 STEP 3 Removing the body panels The torso body panels are removed in the same way as shown, except pulled backwards or forwards depending on the torso body panel. You can use your thumbs to leaver while pulling on the body panels with your finger tips. Both body panels are removed in the same way.
 and Charger jack on the left side, and on the")

10 STEP 4 Plug in the monitor, keyboard and mouse When viewing the back of the robot, you will see the External Power Supply jack (power supply not included) and Charger jack on the left side, and on the right side the back panel of the Mini-ITX. Plug the monitor, keyboard and mouse into the Mini-ITX back panel in order to setup Windows. You will also need an Ethernet connection to be able to register Windows.


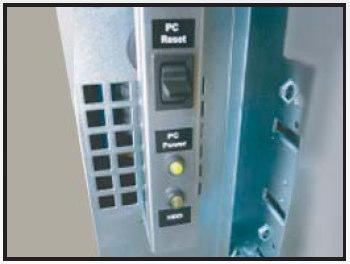
11 STEP 5 Start your system Switch on the Main Power switch (RED) AND M3 Power switch (GREEN) on the front of the robot. WAIT 5 seconds and the M2-ATX Power Supply will cycle the power to the PC automatically. The M3 Power switch is used to turn on the M3 Controller. If this switch is OFF, the M3 will not be able to drive the motors or read the sensors. When the battery voltage drops to 11.2V (i.e. when the batteries need recharging, the M2-ATX will cycle the power to the PC again to auto-shutdown before the power is cut (45 seconds later) and the batteries are protected from total discharge. This is the same as the user pushing the PC ON switch on the CPU and shutting down the computer.
12

13 On the other side of the front of the robot, you can still use the PC ON and PC Reset switch just like on a regular computer.


14 As with other PCs, you may control the behaviour of the PC Power button from the Windows Control Panel. It is recommended to configure the power button to Shutdown, your robot s PC should already be set in this way when you receive it. Note: If your Control Panel is set to Category Viesw (the default), access Start ->Control Panel -> Performance and Maintenance -> Power Options. If your Control Panel is set to Classic View, access Start -> Control Panel -> Power Options. Then select the Advanced tab. NOTE: If the robot is sitting on a desk, it might be advisable to turn the M3 Switch OFF so that the robot cannot drive off the table.

15 STEP 6 Connecting and Installing Peripheral Devices After Windows in registered and running, install the drivers for the Wireless USB Network Adapter included in the box. You can connect the Wireless device to the USB board mounted on the head. In this location the head can still be placed back on the robot and not interfere with the Wireless USB Network Adapter or its antennae. You can also install the drivers for the web camera using the included CD.
16 Getting Started Software Your 914 PC-BOT comes with Windows XP Home Edition, and you can use it just like any other PC. While you still have a keyboard, mouse, and monitor connected to your robot, you will want to do the following in order to set it up for "headless" (remote) operation: Windows Setup: Turn off the Windows Firewall, so that a remote BRIAN GUI can connect via TCP/IP to your robot's BRIAN service. Configure your wireless network settings. The recommended configuration is to use a WEP or WPA encrypted wireless network, using a firewall/router box attached to your cable/dsl modem. A Linksys Wireless-G Broadband Router (model number WRT54GS), or any similar product, will work fine. You may wish to configure your robot's PC to participate in your Windows workgroup, which will allow you to use file sharing between the robot and other computers, allow the robot to access networked printers, etc. Run Windows Update to install any critical service patches. You can connect the robot to the internet either using your wireless LAN, or you can plug an Ethernet cable into the robot's PC chassis. You may find it convenient to add a "remote desktop" product such as Microsoft Remote Desktop (requires upgrade to Windows XP Professional Edition ), or there is a shareware product called RealVNC ( This way you won't have to keep hooking up the keyboard/mouse/monitor when you want to access your robot's PC. BRIAN GUI Setup: The BRIAN GUI comes preinstalled on your robot, you will see a shortcut to it on the robot's Windows desktop. To install the BRIAN GUI on another computer, download BRIAN GUI setup at: Copy this to any other PC that you want to use to control your robot. Run the "setup.exe", after unzipping the file, to install the BRIAN GUI on your remote PC.


17 Installing the BRIAN_GUI (on another computer) You can install this GUI on client computers in order to control the robot remotely. This installer will create a shortcut on the Desktop which will run the following BRIAN_GUI application.

18 Running the BRIAN GUI First run the GUI from the robot directly. Double click the shortcut on the desktop or open the GUI application in the folder it was installed in. As this GUI is being run from the robot locally, the Robot Name 'localhost' is used to access it. Note: DON'T forget the Connection Port # Push the Connect button and you should hear that a connection was established if your speaker is turned ON. Push the Disconnect button to break your connection to the robot. Warning! BE CAREFUL as the robot is possibly tethered to the monitor, keyboard, mouse and charger so driving the robot now would be possibly dangerous. It is best to put the robot on the blocks so that the wheels can spin freely and it will not drive off with everything attached.

19 Running the BRIAN GUI continued... If you are running the application from a client computer, in other words remotely, then the robot will need to be connected to your LAN using either a wireless link or Ethernet. The name of the robot (i.e., the robot computer) will need to be used by the client computer when trying to connect to it. So for the default robot, we use the name WBR-ROBOT. This name can be found and changed under 'System Properties'.

20 Running the BRIAN GUI continued... Now if the GUI is run from the client computer, you can refer to your robot by its "Windows" name (you may need to configure your robot computer and your client computer to both participate in the same Windows workgroup.) Again remember that Port # should be used.

21 Sample Applications Telepresence can be performed using various combinations of programs. One easy example is shown below. To set it up you'll need: The BRIAN GUI running, press the "Drive" button to get the controller window shown on the left. You can drive with a real joystick, a virtual joystick, or the button controls shown in the picture below. You can run the BRIAN GUI on a remote client computer, or use a "remote desktop" application to access the GUI that is preinstalled on the robot. Any "remote desktop" application will allow you to run programs such as the Logitech "QuickCapture" application shown below (this application is included on your webcam's install CD.) You can view the video through the remote desktop, and use it to drive your robot around:

22 Sample Applications continued... Open the "Settings" tab and UN-check the 'Sensor Assisted Driving' check box. Now autonomous patrolling can be turned on using the BRIAN GUI, go to the "Behaviors" tab and press "Patrol Autonomous": You will need to keep an eye on your robot and be ready to press the red "Stop" button until you have properly configured your robot's IR sensors, speed, velocity, acceleration, etc. to your robot's environment. You may even change the positions of the 8 IR sensors that are provided. Consult the BRIAN Developer's Guide for details, and please see our forums at:

23 BRIAN M3 Robotic Service BRIAN runs as a Windows service. It will start up every time you boot the robot's PC. This is can be changed from inside the Control Panel, on the Services list you will find "BRIAN M3 Robotic Service". From this screen you can turn off the BRIAN service and/or prevent it from automatically starting: Note: If your Control Panel is set to "Category View" (the default), access Start -> Control Panel -> Performance and Maintenance. If your Control Panel is set to "Classic View", access Start -> Control Panel. Then double-click on "Administrative Tools" and then "Services".
24 Reference Documents and Links White Box Robotics Webpage: The Official Enthusiast Site for the 914 PC-BOT: Support Documents (Quick Start Guides, Basic Unit Computer Installation, Plastics Assembly, etc.) BRIAN & PC-BOT Setup software: Technical Specifications Wiring and Power: WiringPowerv1.1.pdf I/O Board Block Diagram: Bot_Tech_Spec-IOBoardBlockDiagramv1.1.pdf Infra-red Sensors:
HOME THEATER PC CHASSIS
 HOME THEATER PC CHASSIS Model: HTPC 280 BAV4 & SAV4 Color: Black & Silver Quick Installation Guide (U.S. & Canada Only) Version 1.0 DISCLAIMER No warranty or representation, either expressed or implied,
HOME THEATER PC CHASSIS
 HOME THEATER PC CHASSIS Model: HTPC 400 BA & SA Color: Black & Silver Quick Installation Guide (U.S. & Canada Only) Version 1.0 DISCLAIMER No warranty or representation, either expressed or implied, is
Start Here. Important setup information. Remove all tape and lift display. Locate components
 Start Here 1 Important setup information Wireless or wired network users: you must follow the instructions in this setup guide to be successful adding the HP All-in-One to your network. USB cable users:
imac Intel 27" Retina 5K Display CPU Replacement
 imac Intel 27" Retina 5K Display CPU Replacement Replace or upgrade the CPU in your imac Intel 27" Retina 5K Display. Written By: Sam Lionheart ifixit CC BY-NC-SA www.ifixit.com Page 1 of 36 INTRODUCTION
Replacing the Gateway M275 Keyboard
 Replacing the Gateway M275 Keyboard This package includes a replacement keyboard for your Gateway M275 notebook and these printed instructions. Tools you need You need a small Phillips screwdriver and
G-MAX TM. ATX Series User s Manual
 Copyright Notice Copyright 2001 Gigabyte Technology. All Rights Reserved. No part of this documentation, including but not limited to the products and software described in it, may be reproduced, transmitted,
FCC COMPLICANCE STATEMENT
 FCC COMPLICANCE STATEMENT For Users in the USA This equipment has been tested and found to comply with the limits for a Class B digital device, pursuant to Part 15 of FCC Rules. These rules are designed
Chapter 2 Working Inside Desktop Computers and Laptops
 Chapter 2 Working Inside Desktop Computers and Laptops TRUEFALSE 1. When disassembling a computer, it's okay to stack circuit boards on top of each other as long as you follow ESD protection rules. (A)
Replacing the Gateway M305 Optical Drive
 Replacing the Gateway M305 Optical Drive This package includes an optical drive, such as a CD or DVD drive, for your Gateway M305 notebook and these printed instructions. Installing a replacement drive
Upgrading and Servicing Guide
 Upgrading and Servicing Guide Copyright Information The only warranties for Hewlett-Packard products and services are set forth in the express statements accompanying such products and services. Nothing
imac Intel 27" EMC 2639 Hard Drive
 imac Intel 27" EMC 2639 Hard Drive Replacement Replace the Hard Drive in your imac Intel 27" EMC 2639. Written By: Walter Galan ifixit CC BY-NC-SA www.ifixit.com Page 1 of 26 INTRODUCTION Replacing the
Ioline 300/350HF System
 Quick Start Guide Ioline 300/350HF System User Notice Trademarks Ioline is a trademark of Ioline Corporation. Other product names, logos, designs, titles, words or phrases mentioned within this publication
HARMONi G3. Quick Start Guide for HARMONi G3. imac Processor/FireWire Upgrade
 HARMONi G3 imac Processor/FireWire Upgrade imac and Operating System Compatibility The HARMONi G3 imac processor/firewire upgrade is compatible only with imac 233, 266, and 333 MHz models (Revisions A-D);
Procedure to Upgrade from B&W Maintenance Panel to TIB Color Touchscreen Door in a Working Maxum or Maxum II Analyzer Equipped With a SYSCON2
 Procedure to Upgrade from B&W Maintenance Panel to TIB Color Touchscreen Door in a Working Maxum or Maxum II Analyzer Equipped With a SYSCON2 Difficulty Level: High Estimated time to execute: 3 Hours Revision
Replacing the Gateway 200ARC Keyboard
 Replacing the Gateway 200ARC Keyboard Replacing the Gateway 200ARC Keyboard This package includes a replacement keyboard for your Gateway 200ARC notebook and these printed instructions. Tools you need
Tablet PC User Manual
 Tablet PC User Manual Please read all instructions carefully before use to get the most out of your Time2Touch Tablet PC. The design and features are subject to change without notice. Contents Important
imac Intel 27" Retina 5K Display SATA Cable
 imac Intel 27" Retina 5K Display SATA Cable Replacement Written By: Dozuki System 2017 guides.crucial.com Page 1 of 32 INTRODUCTION Use this guide to replace the SATA cable on the back of the logic board
Upgrading and Servicing Guide
 Upgrading and Servicing Guide The information in this document is subject to change without notice. Hewlett-Packard Company makes no warranty of any kind with regard to this material, including, but not
Home Theater PC Chassis
 Home Theater PC Chassis Model: HTPC 300 BA & SA Color: Black & Silver Quick Installation Guide (U.S. & Canada Only) Version 1.0 DISCLAIMER No warranty or representation, either expressed or implied, is
Upgrading a 2U CHP to an i7 Quad Core SBC
 Upgrading a 2U CHP to an i7 Quad Core SBC 1. Parts required: i7 SBC Slim line SATA DVD drive Combined SATA data and power cable for slim-line optical drive Serial port ribbon cable - 9way D male to 10
PIX 515/515E. PIX 515/515E Product Overview CHAPTER
 CHAPTER 4 PIX 515/515E This chapter describes how to install the PIX 515/515E, and includes the following sections: PIX 515/515E Product Overview Installing a PIX 515/515E PIX 515/515E Feature Licenses
This is a learning module for a specific Learning Outcome as stipulated in the HSP that is :
 1. What is it? This is a learning module for a specific Learning Outcome as stipulated in the HSP that is : Ä Ä Ä 2.4.1 Personal Computer (PC) Assembling 2.4.2 Hard disk partitioning and formatting 2.4.3
INFORMATION AND COMMUNICATION TECHNOLOGY
 INFORMATION AND COMMUNICATION TECHNOLOGY LEARNING MODULE COMPUTER SYSTEM MODULE 2.4 Pusat Perkembangan Kurikulum Kementerian Pelajaran Malaysia 2006 1. What is it? This is a learning module for a specific
Upgrading and Servicing Guide
 Upgrading and Servicing Guide Copyright Information The only warranties for Hewlett-Packard products and services are set forth in the express statements accompanying such products and services. Nothing
Secured Series: Hub Plus Kit Single Door Controller Package Installation Manual
 Secured Series: Hub Plus Kit Single Door Controller Package Installation Manual This package is designed to simplify the connections to our Secured Series Hub Plus Controller. This will translate into
Networking the printer
 Networking the printer General networking Networking overview A network is a collection of devices such as computers, printers, Ethernet hubs, wireless access points, and routers connected together for
FlyTV MCE Installation Guide Animation Technologies Inc.
 FlyTV MCE Installation Guide Animation Technologies Inc. www.lifeview.com Ver: 1.0 Copyright and Trademark Notice Copyright 2005 by Animation Technologies Inc. All rights reserved. Specifications and
Replacing the Gateway M405 Keyboard
 Replacing the Gateway M405 Keyboard This package includes a replacement keyboard for your Gateway M405 notebook and these printed instructions. Tools you need You need a small Phillips and a small flat-blade
WL556E Portable Wireless-N Repeater
 WL556E Portable Wireless-N Repeater Table of Contents About the Device...3 Minimum System Requirements...4 Package Contents...4 Device Overview...5 Front Panel...5 Bottom Panel...6 Configuring the Device...
Dell Inspiron XPS and Inspiron 9100 Service Manual
 Dell Inspiron XPS and Inspiron 9100 Service Manual Dell Inspiron XPS and Inspiron 9100 Service Manual Before You Begin Memory Module, Mini PCI Card, and Devices System Components Subwoofer Bluetooth Card
Simple Instructions for 808 HD Car Key Micro Camera (#16)
") 808 #16 Manual R2 1 of 6 Simple Instructions for 808 HD Car Key Micro Camera (#16) Thank you for your purchase of our 808 Car Key Micro-camera (#16). If this is the first time you are using a product of
808 #16 Manual R2 1 of 6 Simple Instructions for 808 HD Car Key Micro Camera (#16) Thank you for your purchase of our 808 Car Key Micro-camera (#16). If this is the first time you are using a product of
Introduction. Basic Troubleshooting Tips. Computer Basics What are some troubleshooting techniques? What are Some Troubleshooting Techniques?
 Computer Basics What are some troubleshooting techniues? Introduction What are Some Troubleshooting Techniues? The computer goes blank before the Word document was saved. The browser window freezes for
To connect the AC adapter:
 Replacing the AC Adapter Replacing the AC Adapter 3 Plug the power cord into a wall outlet. The power indicator turns on. To connect the AC adapter: Connect the power cord to the AC adapter. Power indicator
MAKE SURE TO TURN OFF YOUR TRS-80 BEFORE ATTACHING NEWKEY/80 KEYBOARD RIBBON CABLE AND POWER CABLE.
 NEWKEY/80 User's Guide v1.4 TRS80 Keyboard Adapter 12/10/2018 Plaid Vest Software, LLC. www.plaidvest.com/newkey80 IMPORTANT NOTE: MAKE SURE TO TURN OFF YOUR TRS-80 BEFORE ATTACHING NEWKEY/80 KEYBOARD
AWS DeepRacer Getting Started Guide
 AWS DeepRacer Getting Started Guide 1 Getting Started Guide Contents What s in the box Assemble your car Get connected Test drive Autonomous model management 2 What s in the box 1 2 6 8 9 5 11 10 4 7 3
imac Intel 21.5" EMC 2389 Stand Replacement
 imac Intel 21.5" EMC 2389 Stand Replacement Replace a broken or cosmetically unappealing stand on the imac 2389 21.5 Written By: Aaron Cooke ifixit CC BY-NC-SA www.ifixit.com Page 1 of 30 INTRODUCTION
M101M4 Tablet PC Quick Start Guide V1.0
 M101M4 Tablet PC Quick Start Guide V1.0 Please read these instructions carefully before using this product, and save this manual for future use. Getting Started Congratulations on purchasing this rugged
Colorful Technology Website:
 Colorful Technology Website: http://www.colorful.cn Thanks for purchasing our based on Intel B250 Chipset motherboard. The motherboard C.B250A-BTC PLUS V20 based on Intel B250 Express Chipset, support
Installation and Operation Back-UPS BR1000G-IN / BR1500G-IN
 Installation and Operation Back-UPS BR1000G-IN / BR1500G-IN Important Safety Information Read the instructions carefully to become familiar with the equipment before trying to install, operate, service
Tablet PC User Manual
 Tablet PC User Manual Please read all instructions carefully before use to get the most out of your Time2Touch Tablet PC. The design and features are subject to change without notice. Contents Important
Simple Instructions for 808 HD Car Key Micro Camera (#16)
") Simple Instructions for 808 HD Car Key Micro Camera (#16) Thank you for your purchase of our 808 Car Key Micro-camera (#16). If this is the first time you are using a product of this kind, please follow
Simple Instructions for 808 HD Car Key Micro Camera (#16) Thank you for your purchase of our 808 Car Key Micro-camera (#16). If this is the first time you are using a product of this kind, please follow
2440 Wireless SmartCart
 2440 Wireless SmartCart Ross Technologies Group, LLC At a Glance Cost Effective, Printing On Demand Sturdy, Dependable, Functional Design Safe & Easy to Operate Quick assembly without special tools Universal
VGo App User Guide v VGo App User Guide. Copyright VGo Communications, Inc. All rights reserved. Page 1
 VGo App User Guide Copyright 2011-12 VGo Communications, Inc. All rights reserved. Page 1 Introduction...3 Network and Computer Requirements for VGo App Users...4 Downloading the VGo App... 5 Launching
ENCORE /ST G4. Processor Upgrade Card for Power Mac G4 AGP Graphics. Quick Start Guide for Encore/ST G4
 ENCORE /ST G4 Processor Upgrade Card for Power Mac G4 AGP Graphics Quick Start Guide for G4 Power Mac and Operating System Compatibility This G4 processor upgrade is compatible only with Power Mac G4 AGP
Removal and Installation8
 8 Screw Types 8-4 Top Cover Assembly 8-5 Left Hand Cover 8-6 Right Hand Cover 8-10 Front Panel Assembly 8-14 Left Rear Cover 8-15 Right Rear Cover 8-16 Extension Cover (60" Model only) 8-17 Media Lever
ipad Mini Wi-Fi Front Facing Camera Replacement
 ipad Mini Wi-Fi Front Facing Camera Replacement Replace the Front Facing Camera in your ipad Mini Wi-Fi. Written By: Andrew Optimus Goldberg ifixit CC BY-NC-SA www.ifixit.com Page 1 of 42 INTRODUCTION
Wireless Networked Autonomous Mobile Robot with HAWK Animated Head System. Sputnik 3. Quick Start Guide
 Wireless Networked Autonomous Mobile Robot with HAWK Animated Head System Sputnik 3 Quick Start Guide Copyright 2009, WARNINGS Do NOT power on the robot before reading and fully understanding the operation
Samsung Galaxy Tab Speaker
 Samsung Galaxy Tab 2 10.1 Speaker Replacement This guide will show you how to replace a broken speaker in your tablet. Written By: Matthew Weeman ifixit CC BY-NC-SA www.ifixit.com Page 1 of 11 INTRODUCTION
Setup and Activation Guide for the TravelNet Data/Voice Terminal
 Setting up your Carrier Account. Setup and Activation Guide for the TravelNet Data/Voice Terminal Your TravelNet-DV requires both a data plan for internet service and a voice plan for analog phone service.
Samsung Galaxy Tab Motherboard
 Samsung Galaxy Tab 2 10.1 Motherboard Replacement This guide will show you how to replace the motherboard of your tablet. Written By: Gabriel Rodarte ifixit CC BY-NC-SA www.ifixit.com Page 1 of 13 INTRODUCTION
Dolphin ebase. Communication Cradle for the Dolphin 9700 Mobile Computer. User s Guide
 Dolphin ebase Communication Cradle for the Dolphin 9700 Mobile Computer User s Guide Introduction The Ethernet Base (ebase) enables a single Dolphin 9700 computer to communicate with a host device over
Specifications. What s Inside The box
 Tablet of Contents Specifications.1 What s inside the box 1 Tablet Parts 2 Getting started...2 Connecting to the Internet..6 Task Bar..8 Install and Uninstall 9 Camera.10 HDMI.11 Trouble Shooting 11 Warranty..13
VGo App Full User Guide Windows PC & Apple Mac
 VGo App Full User Guide Windows PC & Apple Mac Copyright 2011-14 VGo Communications, Inc. All rights reserved. Page 1 Introduction...3 Network and Computer Requirements for VGo App Users...5 Broadband
Quick Start Guide ONLY for Encore/ST G4 Duet 1.8 GHz
 Quick Start Guide ONLY for Encore/ST G4 Duet 1.8 GHz Power Mac and Operating System Compatibility This Encore/ST G4 Duet processor upgrade card is compatible only with Power Mac G4 AGP Graphics, Gigabit
Power Xpert Meter 2000 Gateway Card Kit
 Quick Start Guide IL02601011E Rev. 2 December 2011 PXM 2250 PXM 2260 IQ 250 IQ 260 Power Xpert Meter 2000 Gateway Card Kit Table of Contents Remove the Meter From Service.... 2 Disconnect Power Connections,
Power Xpert Meter 2000 Gateway Card Kit
 Quick Start Guide IL02601011E PXM 2250 PXM 2260 IQ 250 IQ 260 Power Xpert Meter 2000 Gateway Card Kit Table of Contents Remove the Meter From Service... 2 Disconnect Power Connections, CTs, and Modbus....
Welcome to Wi-Power Digital Phone Service
 WELCOME to Welcome to Wi-Power Service Thank you for choosing Wi-Power Service! This booklet includes important information to better acquaint yourself with Wi-Power Service. Features: Wi-Power Service
Upgrading and Servicing Guide
 Upgrading and Servicing Guide The information in this document is subject to change without notice. Hewlett-Packard Company makes no warranty of any kind with regard to this material, including, but not
Handbuch. DAVIDE Mini PC GRAFENTHAL
 Handbuch GRAFENTHAL DAVIDE Mini PC GRAFENTHAL GmbH von-monschaw-straße 3 47574 Goch info@grafenthal.de www.grafenthal.de Copyright 2017 GRAFENTHAL GmbH, Alle Rechte vorbehalten. GRAFENTHAL ist eine eingetragene
Coletor de Dados Honeywell Dolphin 60s
 Coletor de Dados Honeywell Dolphin 60s O Dolphin 60s Scanphone combina os recursos de um smartphone tradicional agregando os valores da computação móvel resistente, somado ao leitor de códigos de barras
HANDBOOK FOR THE MOBYL DATA CENTER 22
 HANDBOOK FOR THE MOBYL DATA CENTER 22 1 For support contact us at support@addc.net www.addc.net 516.673.4444 1983 Marcus Ave. Suite 104 Lake Success, NY 11042 HANDBOOK FOR THE MOBYL DATA CENTER 22 TABLE
BEST Generic Kit Notes GMKR00002 Revision 7; August 2011
 GMKR00002 Revision 7; August 2011 1.0 Introduction This document is for information only. Although it is consistent with the rules, please see the Generic Game Rules document for the official rules. All
Upgrading and Servicing Guide
 Upgrading and Servicing Guide The only warranties for Hewlett-Packard products and services are set forth in the express statements accompanying such products and services. Nothing herein should be construed
Upgrading and Servicing Guide
 Upgrading and Servicing Guide The only warranties for Hewlett-Packard products and services are set forth in the express statements accompanying such products and services. Nothing herein should be construed
Mini-102MG ( MFP Server) Quick Installation Guide. User's Manual Version : Mini-102MG_QIG_EU-A_V1
 Quick Installation Guide. User's Manual Version : Mini-102MG_QIG_EU-A_V1") Mini-102MG ( MFP Server) Quick Installation Guide User's Manual Version : Mini-102MG_QIG_EU-A_V1 1. Product Introduction Thank you for purchasing and using our 802.11b/802.11g Wireless LAN MFP server.
Mini-102MG ( MFP Server) Quick Installation Guide User's Manual Version : Mini-102MG_QIG_EU-A_V1 1. Product Introduction Thank you for purchasing and using our 802.11b/802.11g Wireless LAN MFP server.
TABLE OF CONTENTS COPYRIGHT INTRODUCTION...3 PRODUCT OVERVIEW...3 COMPONENTS AND FEATURES...3 HARDWARE INSTALLATION
 TABLE OF CONTENTS COPYRIGHT...2 1. INTRODUCTION...3 PRODUCT OVERVIEW...3 COMPONENTS AND FEATURES...3 HARDWARE INSTALLATION...3 2. MFP SERVER INSTALLATION...5 PREPARATION...5 CONFIGURATION SOLUTION TABLE...5
ENCORE /ST G4 DUET. Dual Processor Upgrade Card for Power Mac G4 AGP Graphics. Quick Start Guide for Encore/ST G4 Duet
 ENCORE /ST G4 DUET Dual Processor Upgrade Card for Power Mac G4 AGP Graphics Quick Start Guide for Encore/ST G4 Duet Power Mac and Operating System Compatibility This Encore/ST G4 Duet processor upgrade
Dell Inspiron N5110 Service Manual
 Dell Inspiron N5110 Service Manual Regulatory model: P17F Regulatory type: P17F001 Notes, Cautions, and Warnings NOTE: A NOTE indicates important information that helps you make better use of your computer.
Assembly Instructions
 Assembly Instructions Flat Screen Garage End User & IT Computer Cable Management May 2013 nylon zip-tie #2 (for computer wires) rear-access beam door (open) Figure 1 nylon zip-tie #1 (for #1 motor control
HP Pavilion dv7-6c90us Cooling fan Replacement
 HP Pavilion dv7-6c90us Cooling fan Replacement This guide will walk you through the process of replacing the cooling fan in an HP Pavilion dv7 laptop. Written By: Angelina Clayton ifixit CC BY-NC-SA www.ifixit.com
SPECIAL INSTRUCTIONS FOR CAPACITORS COMPACT GENERATORS
 SPECIAL INSTRUCTIONS FOR CAPACITORS COMPACT GENERATORS (WITH CAPACITOR CHARGER BOARD A3517-02) The process depends on Generator and System configuration. This document applies to installation of Capacitors
Dell XPS L702X Service Manual
 Dell XPS L702X Service Manual Regulatory model: P09E series Regulatory type: P09E002 Notes, Cautions, and Warnings NOTE: A NOTE indicates important information that helps you make better use of your computer.
imac Intel 27" EMC 2546 SSD Replacement
 imac Intel 27" EMC 2546 SSD Replacement Remove your imac's SSD, or the SSD portion of your imac's Fusion Drive. Written By: Dozuki System 2017 guides.crucial.com Page 1 of 33 INTRODUCTION If your imac
Installation Manual Crescendo /L2 Processor Upgrade Cards 2000 Sonnet Technologies, Inc. All rights reserved.
 Installation Manual Installation Manual Crescendo /L2 Processor Upgrade Cards 2000 Sonnet Technologies, Inc. All rights reserved. Sonnet Technologies, Inc. 15 Whatney Irvine, California 92618-2808 USA
Wireless Networked Autonomous Mobile Robot with Dual High Resolution Pan-Tilt-Zoom Camera. Sputnik 2
 Wireless Networked Autonomous Mobile Robot with Dual High Resolution Pan-Tilt-Zoom Camera Sputnik 2 Quick Start Guide WARNINGS Do NOT power on the robot before reading and fully understanding the operation
Using GIGABYTE Notebook for the First Time
 P57 V.0 Congratulations on your purchase of the GIGABYTE Notebook. This manual will help you to get started with setting up your notebook. The final product configuration depends on the model at the point
Written By: Walter Galan
 imac Intel 21.5" EMC 2428 CPU Replacement Replace the CPU in your imac Intel 21.5" EMC 2428. Written By: Walter Galan ifixit CC BY-NC-SA www.ifixit.com Page 1 of 33 INTRODUCTION Use this guide to upgrade
imac Intel 21.5" EMC 2544 Hard Drive
 imac Intel 21.5" EMC 2544 Hard Drive Replacement Replace the Hard Drive in your imac Intel 21.5" EMC 2544. Written By: Sam Lionheart ifixit CC BY-NC-SA www.ifixit.com Page 1 of 19 INTRODUCTION Use this
imac Intel 21.5" EMC 2638 RAM Replacement
 imac Intel 21.5" EMC 2638 RAM Replacement Replace the RAM in your imac Intel 21.5" EMC 2638. Written By: Walter Galan ifixit CC BY-NC-SA www.ifixit.com Page 1 of 33 INTRODUCTION Use this guide to replace
Longshine Technologie Europe GmbH
 Longshine Technologie Europe GmbH www.longshine.de TABLE OF CONTENTS COPYRIGHT...2 1. INTRODUCTION...3 PRODUCT OVERVIEW...3 COMPONENTS AND FEATURES...3 HARDWARE INSTALLATION...3 2. MFP SERVER INSTALLATION...5
Lenovo IdeaPad Flex 10
 Lenovo IdeaPad Flex 10 User Guide Read the safety notices and important tips in the included manuals before using your computer. Notes Before using the product, be sure to read Lenovo Safety and General
Huddle Hub One / Huddle Hub One+ Installation Guide. Product version 1.21 Manual version 01
 Huddle Hub One / Huddle Hub One+ Installation Guide Product version 1.21 Manual version 01 HUDDLE ROOM TECHNOLOGY SRL ( HRT ) PROVIDES THIS MANUAL AS IS WITHOUT WARRANTY OF ANY KIND, EITHER EXPRESS OR
54Mbps Pocket Wireless Access Point (WL-330g)
") 54Mbps Pocket Wireless Access Point (WL-330g) Copyright 2004 ASUSTeK COMPUTER INC. All Rights Reserved. Contents Conventions... 2 Welcome!... 3 Package contents... 3 System requirements... 3 Device installation...
54Mbps Pocket Wireless Access Point (WL-330g) Copyright 2004 ASUSTeK COMPUTER INC. All Rights Reserved. Contents Conventions... 2 Welcome!... 3 Package contents... 3 System requirements... 3 Device installation...
READ ME FIRST Windows 95/98/Me/2000
 READ ME FIRST Windows 95/98/Me/2000 *DSL Equipment Installation Guide: Efficient Networks 5260 *Digital Subscriber Line Part Number: 52609x02 Version 1.2-A Table of Contents Follow Steps 1 through 8 to
ASSAN ESC PC Interface Software User s Guide
 ASSAN ESC PC Interface Software User s Guide Dear customer, Welcome to use ASSAN ESC PC Connector and Interface Software. It allows of the Electronic Speed Controller programming in the desktop PC and
Installing Sentor. Hardware Installation
 Remote base site monitoring and control Installing Sentor Hardware Installation Copyright 2000 Sentor Monitoring Systems Pty Ltd Contents: 1 Introduction... 1 2 Sentor GUI... 2 3 ST3000 Controller... 3
Canon Powershot A70 Button Flex Assembly Replacement
 Canon Powershot A70 Button Flex Assembly Replacement Written By: Brian ifixit CC BY-NC-SA www.ifixit.com Page 1 of 15 INTRODUCTION This guide will walk through the process of removing the button flex assembly
Installing MacBook Pro 17" Unibody Dual Hard Drive
 Installing MacBook Pro 17" Unibody Dual Hard Drive Written By: Dozuki System 2017 guides.crucial.com Page 1 of 13 INTRODUCTION There are many benefits to adding a second hard drive to your laptop such
Wireless (WiFi g), Dual 5DOF Arm and 1DOF Grippers, Internet Remote Monitoring Robot. Scout 2
, Dual 5DOF Arm and 1DOF Grippers, Internet Remote Monitoring Robot. Scout 2") Wireless (WiFi 802.11g), Dual 5DOF Arm and 1DOF Grippers, Internet Remote Monitoring Robot Scout 2 Quick Start Guide WARNINGS Do NOT power on the robot before reading and fully understanding the operation
Wireless (WiFi 802.11g), Dual 5DOF Arm and 1DOF Grippers, Internet Remote Monitoring Robot Scout 2 Quick Start Guide WARNINGS Do NOT power on the robot before reading and fully understanding the operation
Gateway Profile 4 service guide
 Gateway Profile 4 service guide Customizing Troubleshooting Contents Replacing Components in Your Gateway Profile 4.................. 1 About this guide.....................................................
Power Xpert Meter 2000 Gateway Card Kit
 Quick Start Guide IL02601011E PXM 2250 PXM 2260 IQ 250 IQ 260 Power Xpert Meter 2000 Gateway Card Kit Table of Contents Remove the Meter From Service.... 2 Disconnect Power Connections, CTs, and Modbus....
Part Number: 92P1476. h Battery pack. h Computer
 Part Number: 92P1476 Thank you for purchasing the IBM ThinkPad T Series computer. Match the items on this list with the items in the box. If any item is missing or damaged, please contact your place of
Label Printer QL-810W/820NWB. Quick Setup Guide (English)
") Label Printer QL-810W/820NWB Quick Setup Guide (English) Label Printer QL-810W/820NWB Printed in China D00RPG001 Quick Setup Guide (English) Available Manuals Product Safety Guide This guide provides safety
Label Printer QL-810W/820NWB Quick Setup Guide (English) Label Printer QL-810W/820NWB Printed in China D00RPG001 Quick Setup Guide (English) Available Manuals Product Safety Guide This guide provides safety
ViZion DR + Wireless Install Guide
 1 ViZion DR + Wireless Install Guide 1. Open the DR panel box. 2. Put aside the three cables from the top layer of Styrofoam for storage. These cables are only required for potential troubleshooting scenarios.
Chapter 1: Introduction
 Chapter 1: Introduction Welcome Thank you for choosing the Linksys Wireless-G Broadband Router with SpeedBooster. The Wireless-G Broadband Router with SpeedBooster will allow you to network wirelessly
FSXThrottle All Quadrants (all models) Notes*
 Notes*") FSXThrottle All Quadrants (all models) Notes* * Please note that not all features and options described or listed in these notes may apply to your model. Table of Contents Introduction:...3 Our Commitment:...3
FSXThrottle All Quadrants (all models) Notes* * Please note that not all features and options described or listed in these notes may apply to your model. Table of Contents Introduction:...3 Our Commitment:...3
For your safety and protection of the E-bot, please read and abide by the following important safety precautions.
 2 P age Safety Precautions For your safety and protection of the E-bot, please read and abide by the following important safety precautions. 1) Do not plug the AC adapter into a faulty electrical outlet.
Scout. Quick Start Guide. WiFi Mobile Robot Development Platform with Multi-DOF Gripping Arms
 WiFi Mobile Robot Development Platform with Multi-DOF Gripping Arms Scout Quick Start Guide Copyright 2001-2010, WARNINGS Do NOT power on the robot before reading and fully understanding the operation
Serial ATA Hot Swap Drive Cage Upgrade Kit for: Intel Server Chassis SC5200 Intel Server Chassis SC5250-E
 Serial ATA Hot Swap Drive Cage Upgrade Kit for: Intel Server Chassis SC5200 Intel Server Chassis SC5250-E A Guide for Technically Qualified Assemblers of Intel Identified Subassemblies/Products Order Number:
logic table of contents: squarebot logic subsystem 7.1 parts & assembly concepts to understand 7 subsystems interfaces 7 logic subsystem inventory 7
 logic table of contents: squarebot logic subsystem 7.1 parts & assembly concepts to understand 7 subsystems interfaces 7 logic subsystem inventory 7 7 1 The Vex Micro Controller coordinates the flow of