PEDSCAN rev. C. standalone micro MIDI controller USER MANUAL
|
|
|
- Frank Lester
- 6 years ago
- Views:
Transcription
1 PEDSCAN rev. C standalone micro MIDI controller USER MANUAL Roman Sowa 2016
2
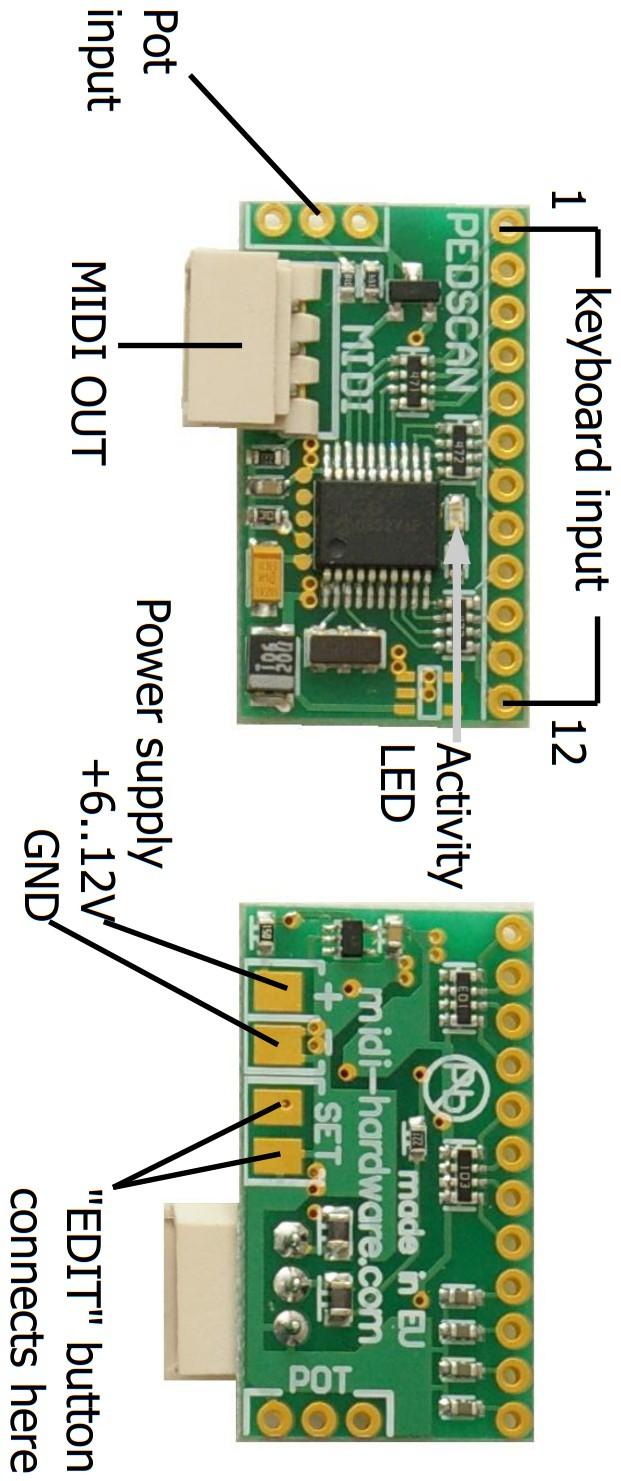
3 1 Overview This little board is standalone controller for 32 keys and 1 potentiometer or external voltage input. Contact closing or potentiometer movement is converted into MIDI. This board is most usable when no more than 32 keys are needed, like organ pedals, but it can also work as MIDI parameter pedal, Pitch Bend, Program Change dial etc. scans 32 contacts organized in diode matrix 1 analog input for potentiometer, or external voltage user defined MIDI channel separately for each keyboard split and pot user defined MIDI event separately for each split of the keyboard and the pot user defined transposition independent for both keyboard splits all settings stored in nonvolatile memory activity LED for visible indication of MIDI traffic works with 5 to 20V DC power supply, about 1mA current consumption depending the value of pot used. auto-power-off feature for battery powered
4 system, years of standby operation on a single 9V battery or better 4x AA. 2 Power supply Recommended power supply range is between 5.5 and 12V DC. It is possible to run this board from lower voltage, but MIDI reception is not guaranteed then. Current consumption is about 1mA so it can be used with batteries for many hours. Connecting power in reverse will permanently damage the board, and will void the warranty. When using potentiometer, additional current will add to overall current drain. If e.g. 10k pot is used, current consumption will rise by 0.5mA. Potentiometer does not cause additional current draw when in power-off mode. Power input is located at the bottom, at 2 rectangular solder pads as shown above. Positive terminal (+) is closer to the edge, while negative terminal (-) is closer to 2 other similar looking rectangular pads. Use thin stranded wires to connect the power. This is delicate device and power pads may get damaged by soldering them multiple times. Try to do it right the first time.
5 2.1 Auto power off This board uses the auto-power-off. It means it can be connected to a battery pack without power switch, and in longer periods of no use it will preserve the battery energy. After last key was released, it waits about 20 minutes and then enters the low power mode. Then it draws minimal current (about 10uA), small enough not to significantly affect battery life. It goes back to normal full speed mode after any note is played, or potentiometer moved. After a short delay of 16ms (0.016s, not noticeable by most people) it plays MIDI note that was pressed on keyboard. This can be described as increased keyboard latency for the first note played after quitting the low-power mode. During normal operation the keyboard latency is less than 3ms. It is also possible to wake it up by turning the potentiometer if it is installed. The board wakes after maximum delay of 1s after the pot was moved in low power mode. After another 4 hours of idle, the boards enters power-off mode, further reducing current down to less than 5uA. This is comparable to selfdischarge rate of typical alkaline AAA batteries, so if PEDSCAN is not used for long periods of
6 time, you don't need to bother taking the power off. In this state it does not react to potentiometer movement at all, and to wake it up you must play any note and keep the key pressed for at least half a second. A MIDI note will play, and PEDSCAN is fully up again. 3 Connecting keyboard Keyboard switches are connected via diode matrix organized in 8 rows and 4 columns. The board itself is only a matrix driver and can be used with bare contact only if it's to be used as monophonic keyboard, or some kind of selector (like Program Change buttons). If the board will be used polyphonic, with possibility of more than 1 key pressed at any time, proper diode matrix is required, otherwise you'll get more notes on MIDI than you'd expect.
7 3.1 What is a "diode matrix"? PEDSCAN can be used if the keyboard has scanning diode matrix", that's special kind of very simple circuit, made of diodes forming electric XY array of 8 rows and 4 columns. It's easy to make the matrix on your own, if you know how to solder, and follow electrical schematic. It works best if it's built directly on contacts, then the overall length of wires used is the shortest. That also improves keyboard performance. The schematics on the right show compatible diode matrix. Wire numbers at the top (from 12 down to 1) must match the PEDSCAN board pinout.

8 4 Connecting potentiometer Pot input can be used as continuous controller for things like volume, modulation etc. Usually this input connects to a potentiometer, but it's possible to use it as analog input with range of 0..+5V. Applying voltage of 0V makes PEDSCAN generate CC with lowest value, while +5V generates highest possible value of assigned MIDI parameter. This input is fully user configurable in terms of controller type and MIDI channel. Potentiometer must be linear taper (not audio) in range 5-50k, preferably 20k. The picture above shows how to connect the potentiometer, and which side corresponds to maximum MIDI value, and which side to minimum. Other values of potentiometer are of course possible, but using pot lower than 10k may double PEDSCAN's current consumption, important in battery powered unit. Values higher than 50k will exhibit nonlinear function. i.e. when the pot is in the center position, resulting
9 MIDI parameter value will not be half of maximum, but slightly more. The bigger pot value, the more non-linear position/value behavior is apparent. Connections longer than 20cm must be made with shielded cable, just like you'd normally do with a microphone. 4.1 Analog input update rate The analog input of PEDSCAN translates input voltages, or potentiometer position into MIDI. Actual pot position is updated via MIDI every time it changes. The update is however not immediate - this is common to any MIDI knob box. The fastest response for potentiometer movement is about 2.5ms. It means that when you constantly move the pot, PEDSCAN will update MIDI every 2.5ms. This is faster than enough for most of uses. In some instruments, either hardware, or virtual, some problem may occur when there is a lot of MIDI traffic. It is also sometimes desirable to limit MIDI traffic e.g. to minimize the size of MIDI file recorded on a sequencer. It is possible to change this setting using command "#98n", where "n" determines update rate according to the table
10 below. Default factory setting is 9.5ms. See chapter 5 for general info about using numeric commands. setup sequence #9 80 #9 81 #9 82 #9 83 #9 84 #9 85 #9 86 #9 87 #9 88 #9 89 minimum response [ms] update rate [Hz] Bit resolution of analog input Usually all MIDI parameters have 128 possible levels, determined by 7 bit nature of standard MIDI values. In some cases it may be useful to reduce the number of possible levels, or in another words - number of information bits. In case you want to use MIDI channel rotary selector, described in chapter , it's better to reduce resolution to 4 bits, and have 16 levels in full pot rotation. In some software synthesizers you can select its parameters using only a fraction of the full CC range. And in organ emulators it's also desirable to have only a few steps in full pedal travel if used for crescendo.
11 Bit resolution is user adjustable in a similar way as update rate described above. It is done by using command #96x, where "x" is desired bit resolution. For example #967 makes the pot input 7-bits wide (128 levels), this is default mode of operation, and e.g. #963 turns it to 3- bit resolution, allowing for only 8 levels per full pot rotation.
12 5 MIDI settings and special functions All settings are performed from connected keyboard. There is one special input on the board (2 pads marked on first page as SET/EDIT button input) for entering the EDIT mode, and all parameters can be changed then. In this manual EDIT button is referred as "#". To change any settings, you have to enter new value of given parameter. To do so, use lowest 10 keys of the keyboard as numeric entry. Lowest key is digit "0", while 10th key is digit "9". As a general rule, any change on a controller requires selecting this controller first before making change. For example, if you want to change MIDI channel of potentiometer, move it a bit, and go into MIDI channel settings mode. Or to change the split point first play a note on the keyboard, and enter split-point change mode. It helps to add a sticker over lowest 10 keys with numbers if musical keyboard is used. In this chapter, describing how to set all parameters, whenever # sign is mentioned, it means the "SET/EDIT" key, connected to 2 pads at the bottom side of the board, marked "SET".
13 5.1 Transposition of keyboards Transposition of keyboards connected to PEDSCAN is unlimited, that means any key can generate any MIDI note from range of over 10 octaves. There are two ways of using it. Typical one is by selecting new middle C position. First you have to select the keyboard by playing any note. Enter # then 1" on the keyboard. Now, whatever key you press, it will become the new position of the middle C MIDI note afterwards. You can select new position of middle C note anywhere between 3rd and top key of the keyboard. Another option is to use lowest 2 keys of the keyboard, or in another words numbers "0" and "1". It doesn't matter if keyboard starts with key C or F or whatever, those are always two lowest keys. The 1st one shifts the keyboard one semitone down with each sequence (#10), the 2nd shifts the keyboard one semitone up (#11). This is useful when you want to shift the keyboard in range not available by the first method. Both methods require first selecting the keyboard by playing a note, then entering "# 1", and selecting transposition.
14 5.2 MIDI event assignment for keyboard and analog input MIDI event assigned to potentiometer or keyboard split can be easily changed. To perform this, turn a bit the knob, or play a key on the keyboard split you want to assign, and then select the controller type by entering # then 2 and then appropriate number from the list described later in this chapter. You need to enter 2 or 3 digits for each input controller depending on entered number. Possible MIDI event codes are from number 000 to 149. Standard setting for keyboard is: "# 2 131" - single notes, and for analog input: "# 2 007" - that's MIDI volume. This is factory default. Possible settings described as follows Control Change - #2 CC where "CC" means any MIDI Control Change number in range from "000" till "127". Numbers above 127 are used to generate MIDI events other than Control Change, or turn them into other functions, what is described next.
15 5.2.2 Pitch Bend - #2128 The potentiometer will work then as pitch bender. If assigned to a keyboard, each key will set pitch bender in 1/128 steps across the keyboard. Range can be adjusted with transposition settings Program Change - #2129 Although this is rather unusual usage, pot will then generate MIDI Program Change messages with every move. Program Change can be also entered from the keyboard, by using sequence "# 4 <number>" this is described in chapter 5.4. If assigned to a keyboard, pressing each key will generate MIDI Program Change message with different patch number. Starting number can be adjusted with transposition setting. This is useful for organ emulators, where bank of Program Change buttons can be used to work as pistons (sets of registers) Channel After Touch - #2130 Turning pot will cause Channel After Touch messages to be sent out. If assigned to a
16 keyboard, each key will set After Touch in 1/128 steps across the keyboard. Range can be adjusted with transposition settings Standard keyboard action single notes - #2131 Whenever MIDI event 131 is assigned to a keyboard, it works as typical MIDI keyboard, playing MIDI notes. It is also possible to generate notes played in glissando, when this event is assigned to a pot. Select the pot to be edited, enter "# 2 131". This knob becomes then a note generator resembling quantized Theremin. Move the knob and a series of notes will be played. There's only one note played at a time (with velocity set like described later) and it is released just before new note is about to play. Whole knob slow rotation plays 128 notes from entire MIDI range Note on - #2132 This mode is somehow similar to the mode described above, but only "note-on" messages are generated, that means whenever you move this pot, new notes will be played, and they will stay on forever unless proper note-off message
17 will be issued by another means. If assigned to a keyboard, only note-on messages will be sent. It will work like with constantly depressed sustain pedal Note off - #2133 This is like "note-on" mode described above, but instead it sends out only note-off messages. It can be used to mute part of notes already played, or as some kind of panic button slow full rotation mutes all notes in assigned channel. If assigned to a keyboard, it will send only noteoffs, so it may be used to quiet some notes played earlier One-touch Patch Recall - #2134 Keyboard in this mode serves as an array of favorite patches buttons. Each key recalls Program Change (or in another words - selects a patch/preset) that was earlier programmed. There's 32 memory locations, as many as keys. For example you can program key 1 to send Program Change 37, key 2 as PC#76, key 3 as PC#20 etc. Assigning Program Change numbers to a specific key is described in paragraph Favorite Patches.
18 5.2.9 CC keyboard - #2135 This feature has no effect on a pot, i.e. the pot will not send any MIDI if it has been assigned this way. For keyboard in this mode you can use contacts as toggle switches selecting min/max values of range of CCs. All keys have assigned increasing numbers of MIDI Continuous Controller. Pressed key sends CC with max value (127), while key release generates the same CC but with minimum value (0). CCs are ordered just like there would be MIDI notes, i.e. typically they start from CC#36 at the lowest key, next key is CC#37 etc. Use transposition settings to set different starting CC MIDI channel selector for all controls - #2136 To use this feature with potentiometer you should first reduce its resolution to 4 or less bits (see chapter 4.2). In case of keyboard, first 16 keys work like MIDI channel selector for all controllers. After one of the keys is hit, notes played on the other split are played on changed channel. Individual channel settings for every keyboard split and potentiometer described in chapter 5.3 work together with this setting. For
19 example if one split was set to channel 3, and you change the channel using this feature to +4 (by hitting 5th key), resulting channel is 7 (3+4). If all controllers are set to channel 1, then all 16 keys assigned to this feature are direct channel selectors from 1 to Small Transposer - #2137 Select the pot, enter "# 2 137". Turning pot will shift all notes played on both splits by number of semitones determined by pot position. In the middle it gives no shift, and full rotation has range from -4 to +4 semitones. It's most useful when pot is replaced by 9-position switch with 8 resistors of equal value connected between switch leads. Assigning this to a keyboard is unusable Big Transposer - #2138 Turning pot will shift all notes played on both splits by number of semitones determined by pot position. In the middle it gives no shift, and full rotation has range from -8 to +8 semitones. Assigning this to a keyboard is unusable.
20 Velocity - #2139 Position of the pot in this mode determines velocity parameter of all MIDI notes generated by this board. If assigned to a keyboard, each key will set velocity of all notes in 1/128 steps across the keyboard. Range can be adjusted with transposition settings Native Instruments B4 chorus/vibrato - #2140 Position of this pot will be then reflected in B4 as "chorus/vibrato" switch position. It has only 6 positions, and appropriate command will be sent to B4 every time the potentiometer crosses each position representing another switch position MidiTzer stops control - #2141 When assigned to a keyboard, each key becomes specific stop controller. When a key is pressed, MIDI controller 81 (51H) is sent, and when it is released, MIDI controller 80 (50H). Value of the controller is determined by the button pressed. This is default way of controlling stops in MidiTzer organ software.
21 Ahlborn Archive module stops control - #2142 When assigned to a keyboard, each key becomes specific stop controller in Ahlborn Archive organ sound-module. When a key is pressed, MIDI controller 73 (49H) is sent, and when it is released, MIDI controller 74 (4AH). Value of the controller is determined by the button pressed. This is default way of controlling stops in Ahlborn Archive module Ahlborn Organs stops control - #2143 When assigned to a keyboard, each key becomes specific stop controller in Ahlborn Organs. When a key is pressed, MIDI controller 70 (46H) is sent with bit 6 of the value set, and when it is released, the same MIDI controller but with bit 6 of the value cleared. Other bits of the value are determined by the button pressed. In another words, pressing the button sends CC 70 with value range 0-63, and releasing a button - CC 70 with value range This is default way of controlling stops in Ahlborn Organs.
22 Ahlborn Common Functions - #2146 This is yet another mode customized for Ahlborn sound modules. It is useful for common functions, namely: general cancel, tutti, reeds cancel, etc. It sends MIDI controller 71 (47H) with value determining what Ahlborn parameter is changed, and if it is on or off, according to Ahlborn Archive modules MIDI implementation One time Velocity setup - #2149 This is similar to velocity settings described in , but in addition, it saves last used velocity settings in nonvolatile memory. This should be used only during installation, when you want to set default velocity of notes after each power up. For expression and frequent usage, control the velocity by assigning #2139 instead.
23 5.3 MIDI Channel Channel of each keyboard split and potentiometer can be set individually. To change MIDI channel of the potentiometer select it by simply turning a bit. Then select the MIDI channel with the following sequence: "# 3 <channel number>". The channel number must be in range Channels from 2 to 9 require only 1 key stroke, while 1 needs to be entered as 2 digits namely "01". Channel 10 and above of course need 2 keystrokes too. To change MIDI channel of the keyboard, first select it by playing a note, and enter mentioned sequence with channel number. 5.4 Program Change This device allows to send Program Change MIDI messages, or in another words change patches. Three ways are available. Two were mentioned in Knob Assignment chapter, where you could program the potentiometer to act like 128-position patch rotary switch, or use keyboard assigned to Program Change to have an array of single touch patch select buttons.
24 To change the patch/program on the keyboard directly to specific number, play any note and enter the sequence: "# 4 <program number>". The Program Change MIDI message is sent directly after last digit of entered patch number. This may happen after 2nd or 3rd digit. You only need to enter 2 digit, when the patch number is in range Programs lower than 13 require 3 digits, with 0s in front, for example 012, or 003. Obviously, programs with numbers higher than 99 also need 3 digits. The range of Program Change is from 000 to Keyboard split It is possible to split keyboard into 2 independent parts. The split point can be anywhere on the keyboard, and both parts can work with independently adjusted MIDI channel, type of event and starting note (transposition) or range of other controllers if something else than notes is assigned to a keyboard. To set up the split point, you have to select the keyboard by playing a note in it, and then enter sequence # 5 followed by stroke of the key that you want to be the last one of the lower part.
25 Since then lower part remains on the same channel that was used for whole keyboard, while upper part takes new settings, which by default is 1 MIDI channel higher. To change MIDI channel, type of event, transposition, or send a Program Change for split part, follow directions described before, regarding non-split keyboard, but now changes are made to this split part, which was selected by playing a note prior entering the edit mode (pressing SET ). 5.6 Favorite patches: one-touchpatch-recall programming Whenever a MIDI program/patch/instrument selected from this controller is often used, it is worth to memorize for fast recall in the future. There can be 32 such favorite patches, selected for each key in PEDSCAN matrix. To select a patch, first you need to turn the keyboard in "one-touch patch recall" mode, described in chapter Then each contact of the keyboard becomes a patch select button. To memorize any patch for recall in this way, you have to first select this patch in any way
26 possible either by entering # 4 <patch number>, or by turning Program Change knob if one is assigned. Then simply press "# 6", followed by the key where the patch should be stored and it's done. Next time whenever you press that key you just programmed, the MIDI Program Change message will be sent, setting the patch number that was programmed into that switch. It is more logical to set a split first, to have a number of notes, and the rest as Program Change buttons. For example to have 13 keys and 19 Program Changes, use the following commands: #5, 13th key, then any key in top split, followed by #2134 (chapter ). Then you may select the MIDI channel for Program Change split by using #3 and channel number (chapter 5.3.) e.g #301 for channel 1, the same as default channel of the notes in lower split.

27 MIDECO board described here is a product of: "MIDI-hardware" Roman Sowa, ul. Azotowa 15B, Chorzów, Poland phone , info@midimplant.com 2016, Roman Sowa made in Poland, EU
StepPolyArp Unit. Step Polyphonic Arpeggiator / Sequencer App & Audio Unit MIDI effect for ios
 StepPolyArp Unit Step Polyphonic Arpeggiator / Sequencer App & Audio Unit MIDI effect for ios Presentation... 1 Application setup... 2 MIDI connections between ios applications... 2 MIDI over WiFi on macos...
This Guide is available as a PDF file.
 This Guide is available as a PDF file. In the previous post, I looked at the inside of the Alesis Vortex. This time, I examine the messages coming out of the Vortex and look at the programming of the different
Roland Boutique JP-08 FAQ
 Q&A I cannot transmit the data using a micro USB cable........................................................ 2 When I put the JP-08 in Dual mode, the UPPER part is no longer heard; why is this?...............................
Chaos Culture. MIDI Modulators / Multiclip Note preview 1.6. Edited by Jason Cowling
 Chaos Culture Introduction... 2 Important stuff... 2 Setup... 3 Editing clips... 4 Using the editor... 5 Modulators... 8 Settings... 9 Work$ow settings... 10 Performance... 13 Future updates... 13 1.8.99
GETTING STARTED GUIDE. Features of the SP6
 GETTING STARTED GUIDE This Getting Started Guide will give you a quick overview of the SP6. A full manual with additional information is available from www.kurzweil.com. Features of the SP6 FlashPlay technology
Frame Editor 2 Manual
 Chaos Culture Frame Editor 2 Manual Setup... 2 Editing clips... 2 Editing basics... 4 Managing colors... 6 Using effects... 7 Descriptions of the effects... 9 Fixed velocity... 9 Random velocity... 9 Rotate...
PSQ-1684 Operation Manual
 PSQ-1684 Operation Manual Version 3.0.0 1 Table of Contents Table of Contents Introduction Quick Start Main Clock Section Run Sync & Rate Shuffle Reset CV Reset CV Run Chaining PSQs Pulse Section Generator
CV.OCD USER MANUAL. CV.OCD has four assignable continuous analog CV outputs and twelve assignable gate/trigger outputs. MIDI-TO-CV
 six4pix.com/cvocd CV.OCD USER MANUAL Introduction CV.OCD is a device which converts MIDI signals to the Control Voltage (CV) and Trigger/Gate signals which are used to control traditional analog synthesizers.
MKE. User's Guide (Version 2) Universal Midi Keyboard Electronics
 Universal Midi Keyboard Electronics") MKE Universal Midi Keyboard Electronics User's Guide (Version 2) 2012 by Doepfer Musikelektronik GmbH Geigerstr. 13 82166 Graefelfing Germany Phone: #49 89 89809510 Fax: #49 89 89809511 Web Site: www.doepfer.de
MKE Universal Midi Keyboard Electronics User's Guide (Version 2) 2012 by Doepfer Musikelektronik GmbH Geigerstr. 13 82166 Graefelfing Germany Phone: #49 89 89809510 Fax: #49 89 89809511 Web Site: www.doepfer.de
THE ARTISAN MICRO-MIDI CONTROL SYSTEM
 THE ARTISAN MICRO-MIDI CONTROL SYSTEM Introducing the Artisan Micro-MIDI Control System March 16, 2007 Artisan Instruments, Inc. 6450 NE 183 Kenmore, WA 98028 (425) 486-6555 artisan@interserv.com sales@artisan-instruments.com
Written by Jered Flickinger Copyright 2013 Future Retro
 Written by Jered Flickinger Copyright 2013 Future Retro www.future-retro.com TABLE OF CONTENTS 1 INTRODUCTION - Overview - Precautions - Disclaimer - Warranty 2 CONNECTIONS - MIDI In - MIDI Thru - MIDI
User Guide. English. Manual Version 1.0
 User Guide English Manual Version 1.0 Table of Contents (Click a chapter/section to skip to it.) Introduction... 5 Box Contents... 5 Support... 5 About This User Guide... 5 Initial Setup... 6 1. Software/Driver
Editor v User's Manual.
 Editor v. 1.00 User's Manual www.genuinesoundware.com - 1/42 Welcome to the user's manual for the GSi DMC-122 Editor. This application for Windows and OS X operating systems lets you configure every aspect
Chaos Culture. Multiclip Editor / Multiclip Note preview 1.5. Edited by Jason Cowling
 Chaos Culture Introduction... 2 Important stuff... 2 Setup... 3 Editing clips... 4 Using the editor... 5 Settings... 9 Workflow settings... 10 Performance... 13 Future updates... 13 Editor 1.6.61 / Note
Axiom. User Guide. English
 Axiom User Guide Table of Contents.......................................................................... 3 Introduction...................................................................... 3 What
Procussion operation manual Basic Operation 15 BASIC OPERATION
 Basic Operation 15 BASIC OPERATION 16 Main Controls 17 BASIC OPERATION MAIN CONTROLS MIDI ACTIVITY EDIT MENU SELECT CURSOR CONTROL VOLUME CONTROL I/O MASTER EDIT ENTER C01 Vol127 Pan=K CURSOR DATA VOLUME
Model ver OWNER S MANUAL Rev CHD Elektroservis
 Model 8-431 ver. 1.1 OWNER S MANUAL Rev. 2 7 2018 CHD Elektroservis Contents page 1 INTRODUCTION..................................................................... 3 1.1 INTERFACE FUNCTIONS.............................................................
Midi2Org 64 and 32. An electronic board for automating a musical instrument. User Manual
 Midi2Org 64 and 32 An electronic board for automating a musical instrument User Manual Orgautomatech Christian Blanchard 113 rue Champommier 79000 Niort FRANCE 33(0)9 63 45 61 45 chris@orgautomatech.fr
MIDI Expression User Manual
 MIDI Expression User Manual Quattro io Updated 03/01/2018 Table of Contents Introduction...3 Routing and Effects...17 Features...3 MIDI Effects Processor...17 Pedal Sensing Technology...3 Routing...17
User Manual. Manual Sections. Download a PDF version of the manual here: carbon-manual.pdf
 CARBON User Manual Download a PDF version of the manual here: carbon-manual.pdf Manual Sections Introduction Precautions Getting Started User Interface Sequencer Song Mode Arpeggiator Loading and Saving
INSTRUCTIONS FOR MIDI INTERFACE
 INSTRUCTIONS FOR MIDI INTERFACE MICROMOOG USING THE MIDI INTERFACE - - - When you turn on the synthesiser for the first time, you will be in omni-on mode for receive (all channels). When you select a receive
Documentation Addendum (Covers changes up to OS v1.20)
") Fusion Documentation Addendum (Covers changes up to OS v1.20) This page is intentionally left blank. About this Addendum: The Fusion s operating system is upgradeable and allows us to add features and
Fusion Documentation Addendum (Covers changes up to OS v1.20) This page is intentionally left blank. About this Addendum: The Fusion s operating system is upgradeable and allows us to add features and
MIDI for Jitter. The message types are:
 Controlling Jitter with Commercial Devices It's fun to build arduino contraptions to make our Jitter projects interactive, but sometimes the best option is to buy a controller. There is an amazing variety
LS2403K Control Panel Installation Manual
 LS2403K Control Panel Installation Manual This Manual covers all functions and options available in the Syndyne Organ Resource Control System, Model LS2403K. Your system may have been setup by the installer
DOEPFER. Midi Master Keyboard LMK2+ User's Guide. USB-Version
 DOEPFER Midi Master Keyboard LMK2+ User's Guide USB-Version LMK2+/USB User's Guide INDEX 1 Power Supply 2 Midi Connection 3 USB Connection 4 Connection of External Pedal and Foot Controller 5 Controls
User Manual for the Devil Fish MIDI In system V1.0.4
 User Manual for the Devil Fish MIDI In system V1.0.4 Robin Whittle 7 February 2016 www.firstpr.com.au/rwi/dfish/ (There are separate manuals for the V1.0.0 to V1.0.3 MIDI In systems and for the MIDI In
Worlde TUNA MINI MIDI Controller User s Manual
 HANGZHOU WORLDE DIGITAL PIANO CO.,LTD WEBSITE: WWW.WORLDE.COM.CN EMAIL:SALES@WORLDE.COM.CN TEL:86 571 88730848 Worlde TUNA MINI MIDI Controller User s Manual -1- Contents 1. INTRODUCTION... 3 2. FEATURES...
FRONT PANEL OVERVIEW...1 REAR PANEL OVERVIEW...3 HOOKUP DIAGRAM...4 DISPLAYING INFORMATION...6
 TABLE OF CONTENTS FRONT PANEL OVERVIEW...1 REAR PANEL OVERVIEW...3 HOOKUP DIAGRAM...4 DISPLAYING INFORMATION...6 OCTAVE AND TRANSPOSITION...6 NOTE...6 NOTE AFTERTOUCH (Channel Pressure)...6 CONTROL CHANGE...6
MIDIPLUS Co, Ltd.
 MIDIPLUS Co, Ltd. http://www.midiplus.com.tw CONTENTS Preface... 1 What s in the Box?... 1 O62 Keyboard Overview... 1 Chapter 1:Quick Start... 2 1.1 O62 Overview... 2 1.1.1 Front panel Overview... 2 1.1.2
Something you should know before using the MIDI Functions
 Preface Congratulations on purchasing the MIDIPLUS-61 master MIDI controller keyboard. It is one of the finest products made of its kind after users of resaerch into what customers require form a MIDI
Main Features. 8 Assignable Knobs Deliver Real-time Control of Your Musical Software
 Table of Contents Main Features... 3 Preparation... 4 Using a Wireless Connection... 4 Using a USB Connection... 5 Software setup... 6 Functions and Operation of Controls... 7 Keyboard... 8 Touchpad...
DOEPFER. Midi Bass Pedal Electronic Kit MBP25. User's Guide
 DOEPFER Midi Bass Pedal Electronic Kit MBP25 User's Guide 2008 by Doepfer Musikelektronik GmbH Geigerstr. 13 82166 Graefelfing Deutschland / Germany Phone: + 49 89 89809510 Fax: + 49 89 89809511 Web Site:
MIDIPLUS ORIGIN 37. Owner's Manual
 MIDIPLUS ORIGIN 37 Owner's Manual Preface Congratulations on purchasing the MIDIPLUS ORIGIN 37 master MIDI controller keyboard. It is one of the finest products of its kind, made after etensive research
Midi2Org_16. An electronic board for automating a musical instrument. User Manual
 Midi2Org_16 An electronic board for automating a musical instrument User Manual Orgautomatech Christian Blanchard 113 rue Champommier 79000 Niort FRANCE 33(0)9 63 45 61 45 chris@orgautomatech.fr N Siret
Specifications. It s the sound.
 This guide will help you hook up the Artis/Artis7 to your sound system and MIDI system, give you a quick overview, and show you how to start playing music with the Artis. A full manual for the Artis can
MIDI CPU Firmware V User Manual
 MIDI CPU Firmware V..2 MIDI CPU Firmware Version.2 User Manual Updated 23-5-3 Additional documentation available at: http://highlyliquid.com/support/ 23 Sonarcana LLC Page / 55 MIDI CPU Firmware V..2 Table
AUDIO AMPLIFIER PROJECT
 Intro to Electronics 110 - Audio Amplifier Project AUDIO AMPLIFIER PROJECT In this project, you will learn how to master a device by studying all the parts and building it with a partner. Our test subject:
mkc64u Universal USB-MIDI keyboard encoder * user s guide *
 mkc64u Universal USB-MIDI keyboard encoder * user s guide *. What is this? mkc64u is the USB-MIDI-successor of our best-selling unit mkc64x and covers its entire functionality, adding better performance
WORLDE EASYKEY MIDI CONTROLLER USER S MANUAL
 WORLDE EASYKEY MIDI CONTROLLER USER S MANUAL Contents Introduction... 3 Features... 3 Setup... 5 Making detailed settings... 5 Global... 5 Keyboard operation in Edit mode... 6 Specifications... 7 Introduction
QuantiChord. MIDI Chord Quantizer App & Audio Unit MIDI effect for ios
 QuantiChord MIDI Chord Quantizer App & Audio Unit MIDI effect for ios Presentation... 1 Application setup... 2 MIDI connections between ios applications... 2 MIDI over WiFi on macos... 3 MIDI over USB
SPECIAL PERFORMANCE FEATURES
 -73-88 SPECIAL PERFORMANCE FEATURES Special Performance Features 1 SPECIAL PERFORMANCE FEATURES TRANSPOSE (Key Select) This feature allows you to shift the musical key of the entire instrument. This is
QUICKSTART GUIDE ENGLISH
 QUICKSTART GUIDE ENGLISH WWW.AKAIPRO.COM BOX CONTENTS LPK25 USB cable Software CD SOFTWARE CD Safety Instructions & Warranty Information PC Users: To install the Akai Professional LPK25 Editor, open the
MainStage 2. Exploring MainStage
 MainStage 2 Exploring MainStage KKApple Inc. Copyright 2011 Apple Inc. All rights reserved. Your rights to the software are governed by the accompanying software license agreement. The owner or authorized
Slow by FrozenPlain 1 Version 1.0 AMBIENT PADS AND SOUNDSCAPES
 Slow by FrozenPlain 1 AMBIENT PADS AND SOUNDSCAPES WWW.FROZENPLAIN.COM Slow by FrozenPlain 2 1 - WHAT IS SLOW? Slow is a library of ambient pads and soundscapes. It features a finely picked selection of
Q170 MIDI Gates. Q170 MIDI Gates Specifications. Aug 23, 2018
 Aug 23, 2018 The MIDI Gates module produces gate signals from a stream of MIDI messages, either from a keyboard, a DAW or any MIDI source. Each of the 8 outputs can be programmed for one or more MIDI note
Pro Tools Setup for Impact LX+
 Pro Tools Setup and Troubleshooting: Impact LX+ Pro Tools Setup for Impact LX+ First you will need to set the Impact LX+ keyboard to USB Port Setup Mode 3 1. Hold 'Shift/Mute' and press the 'Patch>' button
Building and using JasperMIDI
 Building and using JasperMIDI Table of Contents Introduction... Bill Of Materials... 2 Building Choices... 3 Construction... 4 Installing in a Jasper enclosure... 5 Standalone use... 6 Using JasperMIDI...
EM-1 Main Features. EasyStart CONTENTS
 EasyStart EM-1 Main Features Pattern performance with emphasis on realtime operation All functions are right on the surface, with no menus or pages to slow you down! Familiar 16-step key interface to build
FM 4/100 USB Software for OSX
 FM 4/100 USB Software for OSX JLCooper makes no warranties, express or implied, regarding this software s fitness for a particular purpose, and in no event shall JLCooper Electronics be liable for incidental
TECHNICAL CHARACTERISTICS:
 Irelcome to the world of the Fatar Studio Series Keyboard Controllers. Congradulations on purchasing the ST-610 Plus, one of the finest master keyboard controllers in the world today. The Studio-610 Plus
KARMA Motif Using the Remote Mode S70/S90 XS
 KARMA Motif Using the Remote Mode S70/S90 XS Revision 07-Oct-2014 by Stephen Kay www.karma-lab.com Overview Note: the use of S90 XS in this document refers to either an S70 XS or an S90 XS. The information
MIDILECTOR / MIDILECTOR-R
 MIDILECTOR / MIDILECTOR-R Midi file reader on SD card User manual Orgautomatech Christian Blanchard 113 rue Champommier 79000 Niort FRANCE 33(0)9 63 41 45 chris@orgautomatech.fr SIRET 399 479 138 00022
Power Up Programming Overview
 Power Up Programming Overview After installation and wiring of the generic Input and Output cards, it is necessary to program the CPU card from the wiring pin lists to make each instrument unique. This
User Guide. Manual Version 1.0
 User Guide Manual Version 1.0 Table of Contents Introduction... 3 System Requirements and Product Support... 3 Installation... 3 Windows... 3 Mac OS X... 3 Quick Start... 4 Operation... 5 Global Controls...
Bram Bos Quick Setup & Automation Guide version 1.0.7
 Rozeta Sequencer Suite Bram Bos Quick Setup & Automation Guide version 1.0.7 Version history 1.0.6 January 15, 2018 Initial publication 1.0.7 January 26, 2018 Updated with Automation specs What are MIDI
nativekontrol PXT-Live Plus User Manual Version 1.0.8
 nativekontrol PXT-Live Plus User Manual Version 1.0.8 1 CHANGES IN THIS VERSION 2 GENERAL OVERVIEW 3 SETUP 3.1 Live Settings 3.2 UserPlusPreferences 4 GLOBAL CONTROLS 4.1 Touch Strip 5 PLUS MATRIX MODES
INSTALLATION. UNDERSCORE is a sample library for Native Instruments Kontakt 5.3 and later. It will NOT work with the free Kontakt Player.
 INSTALLATION UNDERSCORE is a sample library for Native Instruments Kontakt 5.3 and later. It will NOT work with the free Kontakt Player. Before loading any of the instruments in the Instruments folder,
KARMA Motif Getting Started
 KARMA Motif Getting Started Revision 07-Oct-2014 by Stephen Kay www.karma-lab.com Prerequisites Please perform the steps in the Installation and First Launch tutorial before beginning this one. Note: the
Grandstage 88/73 MIDI Guide
 Grandstage 88/73 MIDI Guide E 1 Table of contents MIDI settings----------------------------------------------------------------------------------------2 About MIDI--------------------------------------------------------------------------------------------2
OPERATION MANUAL VST / AU
 OPERATION MANUAL VST / AU This manual is under construction. If you want to help to improve it contact: info@audiorealism.se Introduction AudioRealism Bass Line 3 (ABL3) is an emulation of a classic pattern
Kameleono. User Guide Ver 2.1
 Kameleono Ver 2.1 Table of Contents Overview...4 MIDI Processing Chart...5 Kameleono Inputs...5 Kameleono Core...5 Kameleono Output...5 Getting Started...6 Installing...6 Manual installation on Windows...6
MIDI Player Pro v1.3.0 basic users guide By Hans Petter Selasky, November 2015
 MIDI Player Pro v1.3.0 basic users guide By Hans Petter Selasky, November 2015 1. Device configuration Before you can start using MIDI Player Pro you need to select the «Config» tab and press the «DEV»
STAGE INTERCOM KIT 1.1 SPECIFICATION. General: The lower section is a small power amplifier designed to drive headphones or a small 8ohm speaker.
 STAGE INTERCOM KIT Version 2.1.1 - March 2018 - EduTek Ltd 1.0 DESCRIPTION This intercom module comprises of two separate circuits sharing the same supply. The upper section is a pre-amplifier designed
Manual Main PCB Small-MIDI 4
 Index PARTLIST MAIN PCB... 2 INTRODUCTION... 3 GENERAL... 3 THE CIRCUIT... 3 ASSEMBLY KIT... 4 ASSEMBLY OF THE PCB... 4 An important tip...... 4 ASSEMBLY... 4 THE CONNECTORS... 4 Power supply J1... 4 IDC
Description - model 225e MIDI Decoder / Preset Manager
 Description - model 225e MIDI Decoder / Preset Manager The 225e MIDI decoder translates incoming MIDI messages into analog voltages and pulses. These control signals appear on three kinds of "busses" for
TWO-VOICE PRO. Quickstart Guide. Version 1.0 October 2015 MARION SYSTEMS CORPORATION Moraga Road Suite i-394 Moraga, CA USA
 TWO-VOICE PRO Quickstart Guide Version 1.0 October 2015 MARION SYSTEMS CORPORATION 1480 Moraga Road Suite i-394 Moraga, CA 94556 USA Two-Voice Pro QuickStart Guide 1 This equipment has been tested and
GUIDE TO ASSEMBLY OF ERICA SYNTHS MIDI-CV MODULE
 GUIDE TO ASSEMBLY OF ERICA SYNTHS MIDI-CV MODULE If you are reading this, most probably, you are about to build Erica Synths DIY MIDI-CV module. This module is mm deep, skiff friendly, has solid mechanical
MIDIPLUS Co, Ltd.
 MIDIPLUS Co, Ltd. http://www.midiplus.com.tw Preface Congratulations on purchasing the MIDIPLUS Classic 25/49 master MIDI controller keyboard. It is one of the finest products of its kind, made after etensive
Robotics/Electronics Review for the Final Exam
 Robotics/Electronics Review for the Final Exam Unit 1 Review. 1. The battery is 12V, R1 is 400 ohms, and the current through R1 is 20 ma. How many ohms is R2? ohms What is the voltage drop across R1? V
User Guide. English ( 3 16 ) Appendix English ( )
 Appendix English ( )") User Guide English ( 3 16 ) Appendix English ( 17 19 ) USB SUSTAIN C17 POWER ON OFF User Guide (English) Box Contents Oxygen 25 USB Cable Ableton Live Lite Software Download Card Quickstart Guide Safety
User Guide English ( 3 16 ) Appendix English ( 17 19 ) USB SUSTAIN C17 POWER ON OFF User Guide (English) Box Contents Oxygen 25 USB Cable Ableton Live Lite Software Download Card Quickstart Guide Safety
Table of Contents Control Description... 4 Basic Connections... 5 Features... 6 Software Flow Chart... 7 Menu Flow Chart... 8 Menu Notes...
 2 Table of Contents Control Description... 4 Basic Connections... 5 Features... 6 Software Flow Chart... 7 Menu Flow Chart... 8 Menu Notes... 9 Preset Section... 10 Performance Control Section... 11 3P
Digital Camera Controller
 SHUTTERBUG PRO Digital Camera Controller ShutterBug Pro is a tiny accessory that helps take digital or film camera snapshots. It is ideal for photographers that need to remotely snap photos or to time
Digitakt OS 1.07 Release Information
 Digitakt OS 1.07 Release Information Elektron Music Machines March 9, 2018 How to upgrade: Upgrading from within the OS Select SYSTEM in the SETTINGS menu, and then select OS UPGRADE. Send the SysEx firmware
MIDI CPU Hardware Rev K. User Manual
 MIDI CPU Hardware Revision K User Manual Updated 2010-09-08 Additional documentation available at: http://highlyliquid.com/support/ Page 1 / 18 Table of Contents 1.0 Important Safety Information...2 2.0
Virtual Grand Piano. 1. Introduction Objective Background
 Virtual Grand Piano Team 64 - Zhi Lu, Jeongsub Lee and Hammad Khan ECE 445 Project Proposal - Spring 2018 TA: Mickey Zhang 1. Introduction 1.1. Objective Digital pianos currently available in the market
SPECTRE MANUAL. Sample Program Extended Content Transmission Remote Editor by Waldorf
 Sample Program Extended Content Transmission Remote Editor by Waldorf Preface Spectre for Sledge is a tool for creating and transferring Sample Content from a computer to Sledge 2.0, that has the additional
High Power (15W + 15W) Stereo Amplifier
 Stereo Amplifier") High Power (15W + 15W) Stereo Amplifier Build Instructions Issue 1.0 Build Instructions Before you put any components in the board or pick up the soldering iron, just take a look at the Printed Circuit
High Power (15W + 15W) Stereo Amplifier Build Instructions Issue 1.0 Build Instructions Before you put any components in the board or pick up the soldering iron, just take a look at the Printed Circuit
Gotharman s DIY demoon
 Gotharman s DIY demoon Assembly Manual Index Introduction 3 Mainboard Connections 4 Control Panel 5 Assembling The Full Kit 6 Assembling demoon From Mainboard Only 16 Mounting DIY demoon In A Box 18 Troubleshooting
DER OTO. With this firmware revision, you can use your Biscuit as a standard one (Revision 1.2) or as Der OTO.
 or as Der OTO.") User Manual Rev 2.3 February 2012 1 DER OTO PRESENTATION Der OTO is the new Biscuit firmware (revision 2) and turns your Biscuit into a monophonic synth. You can play Der OTO with a standard MIDI keyboard,
User Manual Rev 2.3 February 2012 1 DER OTO PRESENTATION Der OTO is the new Biscuit firmware (revision 2) and turns your Biscuit into a monophonic synth. You can play Der OTO with a standard MIDI keyboard,
User Guide Version 1.0.0
 obotic ean C R E A T I V E User Guide Version 1.0.0 Contents Introduction... 3 Getting Started... 4 Loading a Combinator Patch... 5 The Front Panel... 6 On/Off... 6 The Display... 6 Reset... 7 Keys...
DELUXE STEREO AMPLIFIER KIT
 ESSENTIAL INFORMATION BUILD INSTRUCTIONS CHECKING YOUR PCB & FAULT-FINDING MECHANICAL DETAILS HOW THE KIT WORKS CREATE YOUR OWN SPEAKER DOCK WITH THIS DELUXE STEREO AMPLIFIER KIT Version 2.0 Build Instructions
Midi Madness 3. Owner s Manual V3.0.2-RC1
 Midi Madness 3 Owner s Manual V3.0.2-RC1 Table of Contents Table of Contents... 2 Introduction... 3 Installation... 3 Registering... 4 Probability Concept... 4 Using Midi Madness... 6 The User Interface
GETTING STARTED GUIDE. Specifications
 SE GETTING STARTED GUIDE This guide will help you hook up the Forte SE to your sound system and MIDI system, give you a quick overview, and show you how to start playing music with the Forte SE. A full
MS8400 INSTALLATION MANUAL
 MS8400 INSTALLATION MANUAL THIS MANUAL COVERS THE INSTALLATION OF THE MS8400 PIPE ORGAN CONTROL SYSTEM. FOR CONFIGU- RATION OF THE MS8400, SEE THE MS8400 CONFIGURATION MANUAL. ADDITIONAL DOCUMENTATION
Cheap Control Systems. Cheap Twelve Channel (C12C) Servo Controller Version 1.0 OVERVIEW
 Servo Controller Version 1.0 OVERVIEW") Cheap Control Systems Cheap Twelve Channel (C12C) Servo Controller Version 1.0 The Cheap Twelve Channel (C12C) Servo Controller is a low cost embedded controller that allows a Sony Playstation 2 (PS2)
Cheap Control Systems Cheap Twelve Channel (C12C) Servo Controller Version 1.0 The Cheap Twelve Channel (C12C) Servo Controller is a low cost embedded controller that allows a Sony Playstation 2 (PS2)
An Intelligent Musical Instrument. By David Zicarelli, Joel Chadabe, John Offenhartz, and Antony Widoff
 M An Intelligent Musical Instrument By David Zicarelli, Joel Chadabe, John Offenhartz, and Antony Widoff Version 2.7 Manual by Richard Lainhart, Joel Chadabe, and David Zicarelli Cycling 74 379A Clementina
J74 Volca Control - Instructions and FAQ
 J74 Volca Control - Instructions and FAQ http://www.fabriziopoce.com/vc_faq.html [1] - What do I need to make use of the VolcaControl devices (VKeys, VBeats, VBass)? You need the Volca unit or units, a
I2-61 Black Edition. Owner's Manual
 I2-61 Black Edition Owner's Manual 1 2 Preface Congratulations on purchasing the Miditech i2-61 Black Edition master MIDI controller keyboard. It is one of the finest products of its kind, made after etensive
Preface. What s in the Box? BK492 Keyboard Overview
 CONTENTS Preface... 1 What s in the Box?... 1 BK492 Keyboard Overview... 1 Chapter 1:Quick Start... 2 1.1 BK492 Overview... 2 1.1.1 Front panel Overview... 2 1.1.3 Controllers description... 3 1.2 Minimum
PSP Rhythm User s Manual
 PSP Rhythm User s Manual Introduction pg. 02 Main Menu pg. 03 Button Icon Legend pg. 03 User Interface pg. 04 Pattern View pg. 05 Track View pg. 07 Wave View pg. 09 Effects View pg. 11 Song View pg. 14
Mono/Fury. VST Software Synthesizer. Version by Björn Full Bucket Music
 Mono/Fury VST Software Synthesizer Version 1.1 2010-2016 by Björn Arlt @ Full Bucket Music http://www.fullbucket.de/music VST is a trademark of Steinberg Media Technologies GmbH Mono/Poly is a registered
Digitakt OS 1.06 Release Information
 Digitakt OS 1.06 Release Information Elektron Music Machines February 12, 2018 How to upgrade: Upgrading from within the OS Select SYSTEM in the SETTINGS menu, and then select OS UPGRADE. Send the SysEx
Scythe Synthesizer for iphone
 Scythe Synthesizer for iphone http://www.bitmaskstudio.com/ https://twitter.com/bitmaskstudio Scythe is a polyphonic wavetable synthesizer which can load custom sounds and has a Wavetable Creator tool.
Editor User Guide. Manual Version 1.0
 Editor User Guide Manual Version 1.0 Table of Contents User Guide... 4 Introduction... 4 Support... 4 Installation... 4 Windows... 4 macos... 4 Setup... 5 Features... 6 Graphical Interface... 6 Operation...
Information for LumaxNET board
 Information for LumaxNET board Table of contents 1 Operating instructions...2 1.1 Function overview...2 1.2 Audio controlled mode...2 1.3 DMX controlled mode...2 1.4 Demo mode...3 1.5 SD card mode...4
USER S GUIDE for the. Polyglot. by the staff of Buchla USA V1.3 4/5/ Buchla USA
 USER S GUIDE for the Polyglot by the staff of Buchla USA V1.3 4/5/18 2018 Buchla USA Polyglot 40HP Eurorack active adaptor: The Polyglot is for adapting cables, converting voltage ranges, and powering
Mark Schutzer December 9, 2007 (updated fix for older rev B and C ProCabs)
") Turning on radio ProCabs / PowerCabs Mark Schutzer December 9, 2007 (updated fix for older rev B and C ProCabs) Overview This paper will look into and explain why radio ProCabs / PowerCabs are hard to
Turning on radio ProCabs / PowerCabs Mark Schutzer December 9, 2007 (updated fix for older rev B and C ProCabs) Overview This paper will look into and explain why radio ProCabs / PowerCabs are hard to
for ipad Version 1.2.2
 for ipad Version 1.2.2 Overview CoreMIDI Scale/Chord Remapper Arpeggiator Patch OSC1 Sync/Ring OSC2 Sync/Ring OSC3 Filter 1 Filter 2 LP, BP, HP LP, BP, HP AMP Pan Saturator EQ Delay 1 Pan Filter Delay
MIDI. Bome's Mouse Keyboard. Mouse Keyboard MIDI Yoke /MIDI-OX
 Godbersen MIDI Material (MidiYoke.doc,15.10.2007) 1/6 MIDI Mouse Keyboard MIDI Yoke /MIDI-OX Bome's Mouse Keyboard V2.00 beta 6 OVERVIEW This program primarily simulates a MIDI keyboard which you can play
FORM2. Analog Audio Circuit. Digital Audio Circuit. Expression Functions. Programming. Programs
 FORM2 FORM2 is a programmable effect pedal built around the Spin FV-1 digital signal processor (DSP). The pedal is made up of a DSP core, a "wrapper" consisting of an analog dry/wet mixer with various