QRM+ Tutorials. QNAP s Remote Server Management Solution. rev
|
|
|
- Tyler Reynard May
- 6 years ago
- Views:
Transcription

1 QRM+ QNAP s Remote Server Management Solution Tutorials rev
2 Table of contents How to use QRM+ to manage your devices?... 4 Browser support Device Discovery Start Scan Stop scanning Resetting Steps to add the device to QRM Add device to QRM+ during the scan Scan History Main Dashboard Add Widget Delete all widgets in the Dashboard Refresh all widgets in the Dashboard Select the layout mode Export as PDF file current view QRM+ provides both real-time and historical data presentation Device Management Device List Note Network Topology Single Device Management QRMAgent Single Device Dashboard Add Widget Delete all widgets in the QRMAgent Single Device Dashboard Refresh all widgets information in the Dashboard Select the layout mode Tools - Browse Device Tools - ping Tools traceroute Tools - Remote Desktop Tools - Power Control IPMI Single Device Dashboard Add Widget Delete all widgets in the IPMI Single Device Dashboard Refresh all widgets in the IPMI Single Device Dashboard Select the layout mode Tools - Power Control IPMI KVM Remote Desktop KVM Dashboard Add Widget Delete Widget Layout mode Launch KVM Remote Desktop KVM Manager Add Device
3 6.2 Remove Device Start Recording Stop Recording KVM Playback Select Device Select Date Playback Control Playback speed selection Alert Configuration Add Alert Delete Alert Enable Alert Disable Alert Edit Alert Logs Alerts Log IPMI Events Log Historic Data Log System Log Settings User Management Notification Settings Application Settings QRMAgent information
4 How to use QRM+ to manage your devices? QRM+ is a centralized remote device management solution from QNAP designed for IT teams, home users, production line managers, or anyone who wants to monitor and manage computer devices (such as: computers, servers, etc). QRM+ is a web-based solution that provides basic device management capabilities such as device discovery, mapping, monitoring, or management of all critical computing devices on the network, such as servers, computers, embedded computers, or compact computers. Centralized management of QRM+ improves the manageability of IT infrastructure and computer equipment, and reduces the time required to troubleshoot and analyze system resource performance. Browser support QRM+ supports most modern web browsers. For the best user experience, we recommend using the latest version of Google Chrome. QRM+ also supports the latest versions of: Safari Microsoft Edge Firefox Requirements for installing QRM+ Supported hardware: QNAP NAS that support QTS (or later): TS-x53B, TVS-x73, TS-x85 QNAP NAS that support QTS (or later): SS-x53, TES-x85U, TS-x53U, TS-x53A, TS-x51U, TS-x51A, TS-x51+, TS-x51, TS-x80, TVS-x63+, TVS-x63, TS-x63U, TS-x70, TS-X89U, TVS-x71, TVS-x82, TVS-x82T, TVS-x82ST, X51, X53, X63, X70, X70U, X71, X80, X80U, X82, X82T, X82ST, X82U,TS-x79 Pro, TS-x79U-RP, TS-ECx79U-RP, TS-ECx79U-SAS-RP, SS-ECx79U-SAS-RP IEI QGW Series that support QTS (or later): TANK-860-QGW, TANK-760-QGW The NAS/QGW must have at least 4GB RAM. Container Station and QRMAgentPack must be installed before using QRM+. 4

5 Installing Container Station, QRMAgentPack and QRM+: Step 1: Open the App Center, go to "Recommended" and download "QRM+". Container Station and QRMAgentPack will be automatically downloaded as well. Separately installing Container Station, QRMAgentPack and QRM+: Step 1: Open the App Center and search for "Container Station". If you have not installed Container Station then an "+ Install" button will appear. Click the "+ Install button". 5
6 Step 2: Open Container Station and follow the installation wizard. After selecting a folder to store images and containers, click Start Now. Step 3: Return to the App Center and search for "QRMAgentPack". If you have not installed QRMAgentPack then an "+ Install" button will appear. Click the "+ Install button". 6

7 Step 4: Return to the App Center and search for "QRM+". An app called "QRM+ " will be listed. If you have not installed QRM+ then an "+ Install" button will appear. Click the "+ Install button". 7
8 1. Device Discovery With QRM+, you can use the Device Discovery feature to discover the network you're in. Device Discovery allow users to discover computer devices on the current network based on the scan range they set up and quickly incorporate them into QRM+ Management.On the Device Discovery page, users can start scan, stop scan, reset, query scan history, filter scan results, add devices, generate scan result reports, and send current view as . QRM+ supports the following two search types: 1. IP range 2. Subnet 1.1 Start Scan If the user clicks the "Start Scan" button, QRM+ will start scanning all the devices within the IP range or in the subnet.during the scan, discovered devices are placed in order from the top down, and the user can add the discovered device to QRM+ without waiting for the scan to finish. Details are described in the section "Adding a Device to a QRM+ During Scan". To scan a specific IP range, follow the steps below: Step 1: Select the IP range Step 2: Enter the starting IP address Step 3: Enter the ending IP address Step 4: Click "Start Scan" 8

9 To scan a specific subnet range, follow the steps below: Step 1: Set the subnet Step 2: Enter the CIDR, default is 24 Step 3: Click "Start Scan" Note: QRM+ uses ICMP protocol to search for devices within a specified IP address range. If the target device does not allow ICMP requests, QRM+ will not be able to find the target device.to support QRM+ search, enable ICMP requests on the target device. 9

10 Note: MS Windows firewall rules will also affect QRM+ and treat target device as unsupported device. To solve the problem, go to Control Panel> System & Security> Windows Firewall. Click the "Advanced Settings" button to set up (as shown below). 10
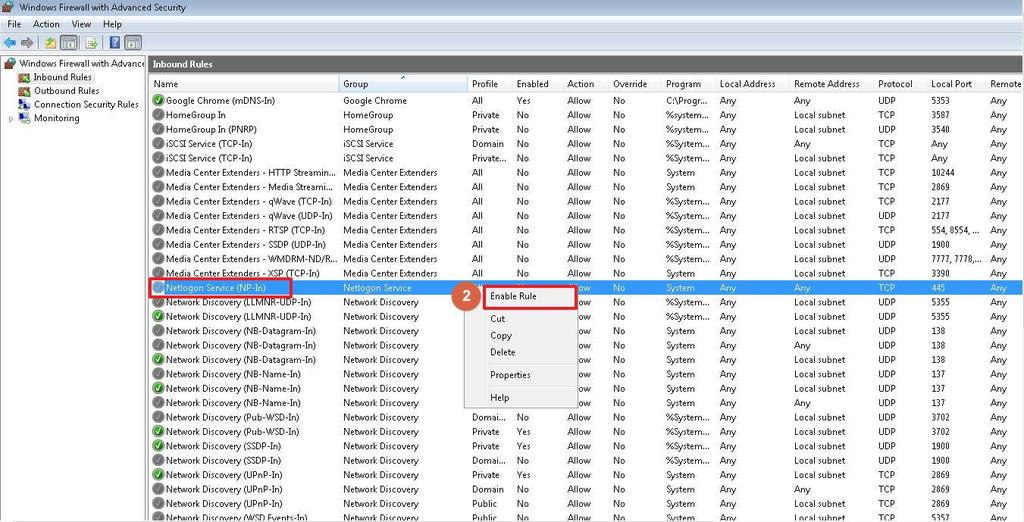
11 11
12 1.2 Stop scanning During a scan, the user can click the Stop Scan button to stop the scan. 1.3 Resetting The user can reset the settings after the scan is completed or after having clicked on the scan history.when the Reset button is clicked, the contents of the table on the right side of the screen will be cleared. 12
13 1.4 Steps to add the device to QRM+ Users can select a device from the list of discovered devices and click "Add Device to QRM+" button to add one or more devices to QRM+. Different types of devices have different add methods: 1. Users of IPMI device must provide administrator account and password to allow QRM+ to establish IPMI connection. After successful installation, QRM+ will be able to monitor and manage the device. 2. Users of Linux device must provide administrator account and password to allow QRM+ to install the QRMAgent on the remote device. After successful installation, QRM+ will be able to monitor and manage the device. 3. Users of MS Windows device must download QRMAgent to the machine to be installed and extract the QRMAgent archive on the machine to run the installation program. After successful installation, QRM+ will be able to monitor and manage the device. Step 1: Select the device you want to add from the list of discovered devices, you can select multiple devices. Step 2: Click the "Add device to QRM+" button. 13
 have different installation methods: Step 4-1: If Windows device is selected in")

14 Step 3: Select the devices to be added in the device list screen. Step 4: Different device types (Windows device, Linux device, or IPMI device) have different installation methods: Step 4-1: If Windows device is selected in Step 3, a QRMAgent download window will be displayed. Click "Download Windows QRMAgent" button to download the installation package. If you have enforced secure connections in your QTS settings and want to install QRMAgent on a device with a 64-bit version of Windows XP or Windows Server 2003, follow these steps: Go to "Control Panel" > "Internet Options" > "Advanced" and ensure that "Use TLS 1.0" is enabled. 14

15 Step 4-1-1:Users can select the appropriate QRMAgent installation package. Step 4-1-2:Copy the installation package to the device to be managed. 15


16 Step 4-1-3:Unzip the installer, right click on the installer and select "Run as administrator". Step 4-1-4:Click "Yes" to allow the installer to make changes to your device. 16

17 Step 4-1-5:Click "Next". Step 4-1-6:Choose the IP address and click "Next". 17


18 Step 4-1-7:Enter the Username and Password of QRM+. Step 4-1-8:If 2-step Verification is enabled then you must enter the security code. 18


19 Step 4-1-9:The QRMAgentService will be installed. Step :Click "Finish" and you will see the installation status in the device list. 19

20 Step 4-2: If IPMI device is selected in Step 3, you must enter the administrator's User ID and Password then click "OK". 20


21 Step 4-3:If Linux device is selected in Step 3, you will be prompted to download QRMAgent for Linux. Click "Download" next to "Download Linux QRMAgent". 步驟 4-3-1:After the QRMAgent installation package has been downloaded, copy it to the Linux device to be managed. 21


22 步驟 4-3-2:In the Linux shell, unzip the QRMAgent installation package. Use the following command to run the QRMAgent installation program: sudo bash InstallUbuntuQRMAgent.sh <Client IP Address> 步驟 4-3-3:Enter the QRM+ Username and Password. 步驟 4-3-4:Confirm your sign in with 2-step Verification (if enabled). 22

23 步驟 4-3-5:The installation process will be displayed. 步驟 4-3-6:You will see the device status in the list. 23
24 1.5 Add device to QRM+ during the scan Step 1: During the scanning process, select the device to be added as labeled 1 and click the button "Add device to QRM+" as labeled 2. Step 2: Refer to "Add device to QRM+ Step 3" 1.6 Scan History QRM+ maintains a scan history. Users can view the last 5 scans in the history pane of the left column and select the device to install in QRM+ from the list of discovered devices. Just follow the "Add device to QRM+" tutorial step by step. 24

25 2. Main Dashboard The Main Dashboard is the main page of QRM+. In the Main Dashboard, you can add multiple widgets to monitor the health of your device or server. This page allows users to add, remove, reorganize, choose layout, export as PDF, current view and update widgets. Note: Devices need to be added to QRM+ before they can be monitored using gadgets in the dashboard 2.1 Add Widget Watch the video Users can add gadgets to the dashboard to continuously monitor the health of the device or server. The following information can be monitored: 1. CPU Usage 2. Memory Usage 3. Disk Usage 4. Network Usage 5. Health Status 6. IPMI system information and more Users can customize their own Master Dashboard to monitor multiple devices at the same time. Setup steps: Step 1: Go to the Dashboard page and click the "Add Widget" button Step 2: Select the type of data you want to monitor: Step 2-1: Select the data type you want to monitor in the left column. There are six types: CPU usage, memory usage, disk usage, network usage, health status and IPMI system information. Step 2-2: Select the method of data presentation that matches your needs Step 2-3: Click "Next" 25


26 Step 3: After selecting the device you want to monitor, click "Next" 26

27 Step 4: After selecting the type of chart, click the "Add Widget" button to complete the operation Step 5: When the setup is complete, the widget will be added to the last position in the Dashboard 27
28 2.2 Delete all widgets in the Dashboard Watch the video Setup steps: Go to the Dashboard page and click the "Delete All Widgets" button 2.3 Refresh all widgets in the Dashboard Setup steps: Go to the Dashboard page and click the Refresh Widgets button 28

29 2.4 Select the layout mode Watch the video User can adjust the layout of the Main Dashboard according to their requirements. QRM+ Main Dashboard provides: 1 column display 2 columns display 3 columns display After selecting one of the three layout modes, all widgets will be adjusted accordingly. Setup steps: Step 1: Go to the Dashboard page and click the Layout Mode button 29
30 Step 2: Select "1 column", "2 columns" or "3 columns" 2.5 Export as PDF file Watch the video You can export view from the current dashboard as PDF files and download them to your local computer. Setup steps: Step 1: Go to the Dashboard page and click the Export as PDF File button 30

31 Step 2: Showing "Generating View as PDF" Step 3: Download the view to the local computer 31
32 2.6 current view Watch the video You can export the view from your current dashboard as PDF files and them to a custom address.(note: This function requires SMTP-related settings to be set up in the "Settings" page) Setup steps: Step 1: Go to the Dashboard page and click the " current view" button Step 2: After entering the mail address, click the "Send" button 32
33 Step 3: When "Sending ..." message appears, the mail is being sent in the background 2.7 QRM+ provides both real-time and historical data presentation 1. Real-time Data Widget: Updates your data every 10 seconds after you have added the widget Hours Data Widget: displays historical data trends of the last 24 hours at any time, updated once every 60 seconds. Note: All widgets can be dragged and moved within the Main Dashboard. 33

34 3. Device Management 3.1 Device List The Device Management page provides a list of all the devices currently managed by QRM+, along with their brief information and associated status. Users can quickly find the device and find out their current status using the Device Management page. Device Name: Device Name not only differentiates the different devices, through different light colors, it also shows its current connection status with QRM+. Status : Users will know whether the device is currently being monitored by QRM+ by looking at the Status column. For a non-ipmi device, additional QRMAgent must be installed for it to be monitored via QRM+. Add Device: Users can add devices to QRM+ management via the Add Device feature Add Device steps Step 1: Click the "Add Device" button Step 2: Choose how you want to add the device 1. Quickly add the specified device 2. Search the network to help you find the install method 34


35 Step 3-1: Select "Quickly add the specified device" and click the "Next" button Step 3-1-1: Select "Windows Device", and click the "Next" button 35

36 Step 3-1-2: Click the "Download Windows QRMAgent" button to download the installation package Step 3-1-3: Copy the installation package to the device you want to manage. After decompressing and running the installation program, you can check the installation status in the device list Refer to " Steps to add the device to QRM+" to know installation instructions. 36
37 Step 3-2-1: Select "Linux Device", and click the "Next" button Step 3-2-2: You can view the progress of installation or press the "Finish" button to go to the device list page. Subsequent results of installation status will also be displayed in the device list screen. Refer to " Steps to add the device to QRM+" to know installation instructions. Step 3-3-1: Select "IPMI Device", and click the "Next" button Step 3-3-2: Enter information about the target device 1. Enter the target device IP address 2. Enter the account number 3. Enter the password 4. After confirming the password, press the "Next" button 37

38 Step 3-3-3: You can view the progress of installation or press the "Finish" button to go to the device list page. Subsequent results of installation status will also be displayed in the device list screen. Refer to " Steps to add the device to QRM+" to know installation instructions. Remove Device: Users can use the Remove Device function to remove devices from the list of QRM+ managed devices, and remove the related data as well. Reinstall: If a user's device fails during installation due to an unexpected error, such as a sudden network interruption, the user can click the "Reinstall" button to quickly reinstall it. Modify remote management account: If a user's device fails to install due to a wrong password, the user can click the "Modify Remote 38
.")
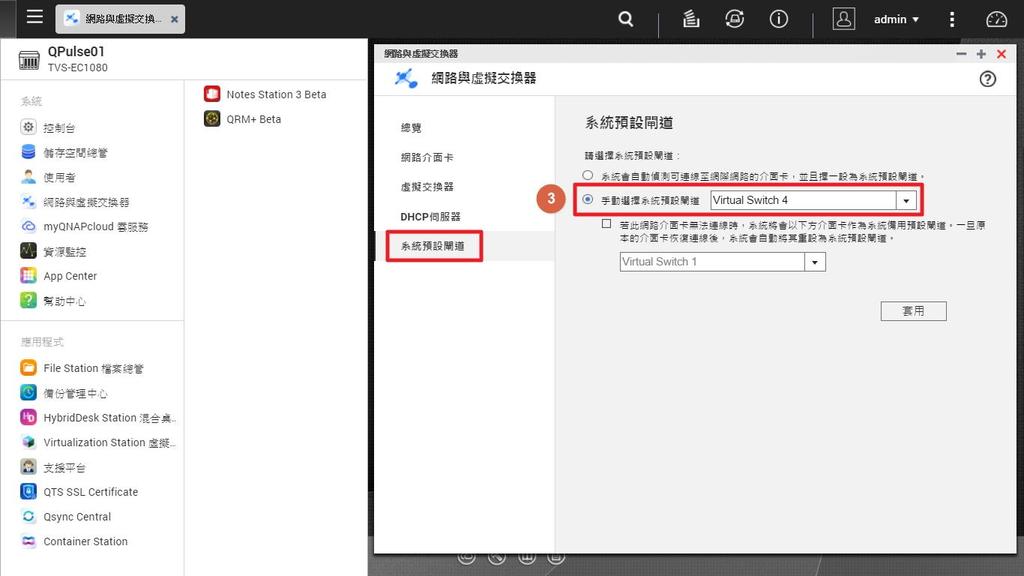
39 Management Account" to quickly re-set the account password. Power Control: You can power control the remote unit, such as performing power-on, power-off, restart, and power cycling (only applicable to IPMI devices). Note If all devices show turned off, the default gateway may have changed. Confirm the network settings on the NAS. Step 1: Log in to QTS and open "Network & Virtual Switch". Step 2: Check the network ports that can reach the Internet. Step 3: Manually select the network port that can reach the Internet. 39

40 40
41 3.2 Network Topology QRM+ provides visual network topology to quickly present the managed device's network structure, automatically groups devices based on device information, and changes status icons according to the current real-time status. 1. My network shows different subnet groups 2. Dynamic Groups will automatically sub-group according to subnet, operating system and other information 3. Device Name 4. IP address of the device 5. Current status of the managed device (Power On, Power Down, or network outage) 6. Device Discovery 41
42 4. Single Device Management QRM+ currently supports two types of device management: Type 1: QRMAgent management Type 2: IPMI protocol management Monitoring and management functions of QRMAgent single device page is described below 4.1 QRMAgent Single Device Dashboard QRMAgent Single Device Dashboard provides detailed information about a specific managed device, including: 1. QRMAgent version 2. Device Information 3. Operating system information 4. Network information In QRMAgent Single Device Dashboard, users can add or remove widgets, select layout modes, and use the tools in the tool set to manage QRMAgent devices. 4.2 Add Widget Watch the video Users can add multiple widgets to customize QRMAgent Single Device Dashboard to monitor CPU usage, memory usage, disk usage, network usage and more, there are also multiple chart types at the user's disposition. Setup steps: Step 1: Go to QRMAgent Single Device Dashboard page and click the "Add Widget" button 42

 3.")
43 Step 2: Complete the settings of data type and data range to be monitored: 1. Select the type of data you want to monitor. There are four types: CPU usage, memory usage, disk usage, and network usage. 2. Select the data range (real-time data or last 24 hours of historical data) 3. Click "Next" Step 3: Complete the chart type setting 1. Select the type of chart 2. Click the "Add Widget" button to complete the operation 43
44 Step 4: When the setup is complete, the widget will be added to the last position in the Dashboard 44

45 4.3 Delete all widgets in the QRMAgent Single Device Dashboard Watch the video Setup steps: Go to the QRMAgent Single Device Dashboard page and click the "Delete All Widgets" button 4.4 Refresh all widgets information in the Dashboard Setup steps: Go to the Single Device Dashboard page and click the "Refresh" button 45
46 4.5 Select the layout mode Watch the video Users can customize the layout of QRMAgent Single Device Dashboard, and the widgets will rearrange themselves accordingly. 1 column display 2 columns display 3 columns display Setup steps: Step 1: Go to QRMAgent Single Device Dashboard page and Click the "Select Layout" button Step 2: Select "1 column", "2 columns" or "3 columns" 46
47 4.6 Tools - Browse Device Watch the video The IP address of this device is used as URL to open a new browser tab. If the device is currently Power Down or is not a web server, it will not be able to connect and a connection error message will be displayed. Setup steps: Step 1: Go to QRMAgent Single Device Dashboard page and click the "Tools" button Step 2: Select "Browse Device" 47
48 4.7 Tools - ping Watch the video QRM+ provides Ping monitoring function to test whether a packet can reach a specific device through IP protocol and to view the connection status of QRM+ with the device Setup steps: Step 1: Go to QRMAgent Single Device Dashboard page and click the "Tools" button Step 2: Select "Ping" Step 3: A window pops up and displays the Ping command execution result Step 4: Click the Ping Device button to Ping again 48
49 4.8 Tools traceroute Watch the video QRM+ provides Tracerout monitoring, which displays the IP addresses of the routers throughout the IP network in a new window. Setup steps: Step 1: Go to QRMAgent Single Device Dashboard page and click the "Tools" button Step 2: Select "Traceroute" Step 3: A window pops up and displays the Traceroute command execution result 49
50 4.9 Tools - Remote Desktop Watch the video - RDP Watch the video - VNC Watch the video - SSH QRM+ provides integrated remote desktop functionality, you can select the appropriate remote access method according to different device types: 1. Windows device: RDP or VNC remote desktop 2. Linux device: VNC remote desktop or SSH connection (no need to install SSH client program) 3. IPMI device: KVM over IP remote computer management program Note: The remote device must enable the option to allow users to connect to the computer Setup steps: Step 1: Go to QRMAgent Single Device Dashboard page and click the "Tools" button Step 2: Select "Remote Desktop" Step 3: Select the appropriate remote access method according to different device types 1. Windows device: RDP or VNC Remote Desktop (users need to install VNC server program on Windows device) 2. Linux device: VNC remote desktop or SSH connection (no need to install SSH client program) 3. IPMI device: KVM over IP remote computer management program 50
51 Step 4: A security check window will pop up, asking the user to enter the remote device account number and password Step 5: Select the "Apply" button, or click the "Reset" button to re-enter Step 6: The browser opens a new page to display the remote desktop. If the connection is successful, the remote desktop will be displayed. If the connection fails, an error message will be displayed and the user can try to reconnect. Displays the remote desktop screen upon successful RDP connection 51


52 Displays the remote desktop screen upon successful VNC connection 52


53 Displays the remote desktop screen upon successful SSH connection Displays the remote desktop screen upon successful KVM connection If the connection fails, an error message will be displayed and the user can try to reconnect. 53

54 Step 7: Press CTRL + SHIFT + ALT in the new browser tab to open the on-screen keypad 4.10 Tools - Power Control Watch the video There are two control modes for device power control via QRMAgent: 1. Power Off 2. Restart Setup steps: Step 1: Go to QRMAgent Single Device Dashboard page and click the "Tools" button Step 2: Select "Power Control" Step 3: Select "Power Off" or "Restart" 54

55 Monitoring and management functions of IPMI single device page is described below 4.11 IPMI Single Device Dashboard IPMI Single Device Dashboard provides detailed information about a managed device, including: 1. IPMI version 2. Device Information 3. Network information 4. Remote Snapshot In IPMI Single Device Dashboard, users can add or remove widgets, select layout modes, and use the tools in the tool set to manage IPMI devices Add Widget Users can add multiple widgets to monitor IPMI devices, which can assist in displaying data of the IPMI server's internal sensors Setup steps: Step 1: Go to IPMI Single Device Dashboard page and click the "Add Widget" button Step 2: Select the widget type, there are four types in total, including IPMI Monitor (All Parameters) 1. IPMI Monitor (All Parameters) 2. IPMI Monitor (Single Parameter - Live) 3. IPMI Monitor (Multiple Parameters - Live) 4. IPMI Monitor (Single Parameter / 24H) 55


56 Step 3: Click "Next" Step 4: Select the type of sensor to be monitored in the IPMI device Step 5: Click "Next" Step 6: Select the type of chart Step 7: Click the "Add Widget" button to complete the operation 56
57 Step 8: When the setup is complete, the widget will be added to the last position in the Dashboard 4.13 Delete all widgets in the IPMI Single Device Dashboard Setup steps: Go to the IPMI Single Device Dashboard page and click the "Delete All Widgets" button 57
58 4.14 Refresh all widgets in the IPMI Single Device Dashboard Setup steps: Go to the IPMI Single Device Dashboard page and click the "Refresh" button 58

59 4.15 Select the layout mode Users can customize the layout of IPMI Single Device Dashboard, and the widgets will re-arrange themselves accordingly. 1 column display 2 columns display 3 columns display Setup steps: Step 1: Go to IPMI Single Device Dashboard page and Click the "Select Layout" button Step 2: Select "1 column", "2 columns" or "3 columns" 59
60 4.16 Tools - Power Control There are four power control modes for IPMI devices: 1. Power On 2. Power Down 3. Restart 4. Power Cycle Setup steps: Step 1: Go to IPMI Single Device Dashboard page and click the "Tools" button Step 2: Select "Power Control" Step 3: Select "Power On", "Power Down", "Restart", or "Power Cycle" 4.17 IPMI KVM Remote Desktop The IPMI KVM feature allows the user to monitor and operate the remote IPMI device on the desktop. (Note: IPMI KVM currently only supports Supermicro and IEI Technology Inc. models) Setup steps: Step 1: Go to IPMI Single Device Dashboard page and click the "Tools" button Step 2: Select "Remote Desktop" Step 3: Select "IPMI KVM" 60

61 Step 4: When finished, the browser will open a new window to display the desktop screen of the remote IPMI device 61
62 5. KVM Dashboard KVM Dashboard provides centralized remote monitoring, where each widget represents an IPMI KVM device that can be set up for remote control and monitoring. 5.1 Add Widget Watch the video You can add KVM widget to the KVM Dashboard Setup steps: Step 1: Complete the steps to add a new device in the "KVM Manager" section, then click the "Add KVM Widget" button Step 2: Select the IPMI device you want to set up the KVM widget, and click the "Add" button. The new KVM widget will be displayed in the last position of the KVM Dashboard 62

63 5.2 Delete Widget Watch the video You can delete KVM widgets from the KVM Dashboard Setup steps: Go to the KVM Dashboard, click the Settings button at the top right of the KVM widget, and select "Delete". 5.3 Layout mode Users can customize the KVM Dashboard layout Setup steps: Go to the KVM Dashboard page, click on the "Select layout" button and select "1 Column", "2 Columns" or "3 Columns" 63
64 5.4 Launch KVM Remote Desktop Watch the video The dashboard periodically updates the screens of currently monitored devices. Users can launch a KVM Remote Desktop in a new tab for remote control and screen monitoring Setup steps: Go to the KVM Dashboard, click Settings on the KVM widget that needs to be controlled remotely, and select "Launch KVM Session" Note: IPMI KVM currently only supports Supermicro and IEI Technology Inc. models 64

65 6. KVM Manager KVM Manager can help manage IPMI devices that support KVM functionality, add or delete IPMI devices, and set whether or not to enable video playback. 6.1 Add Device Watch the video KVM devices that are not yet managed need to be added to the list of KVM managed devices to enable remote control, video playback, and KVM dashboard monitoring Setup steps: Step 1: Go to the KVM Manager page and click the "Add" button 65
66 Step 2: Select the IPMI device for which you want to have the KVM management function, then click the "Add" button to complete the configuration. 66
67 6.2 Remove Device Watch the video Removing the device will remove the device from the management list, and the removed device will not be able to be remotely controlled, played back, or monitored through the KVM Dashboard, and its associated video files and associated KVM dashboard will be removed as well 6.3 Start Recording Watch the video Start Recording will record the screen activities of the remote managed device and save the file for future playback. 67

68 6.4 Stop Recording Watch the video Stop Recording will stop the remote video recording and saving to file function, but it does not affect the already saved video files, and such files can still be played back. Note: IPMI KVM currently only supports Supermicro and IEI Technology Inc. models 68

69 7. KVM Playback KVM Playback can play user-recorded videos and a user can quickly search a playback device based on time interval 7.1 Select Device Watch the video A user can select the IPMI device that needs playback from the list of KVM devices on the left 7.2 Select Date Users can retrieve the video file by specifying the date, if there is a video file, the playback progress bar will be marked with a yellow bar 7.3 Playback Control The user can perform basic operations such as play back, pause or stop the video 7.4 Playback speed selection Users can decide the playback speed, making it more convenient in retrieving video files 69

70 8. Alert Configuration In QRM+, you can set different alert configurations for different device types. When the set alert condition is met, an alert will appear in the upper right notification window of QRM+ management page, so that administrators will know the current situation and solve the problem immediately; you can set up SMTP in advanced settings / notification settings, and set up notification policy for alert to be sent via to administrators to facilitate problem solving.on this page, users can add, delete, edit, deactivate, and enable alert configurations. 8.1 Add Alert Users can click the Add Alert button to add a new alert, the alert type is either QRM+ alert or IPMI event notification Setup steps: Step 1: Enter the Alert Configuration page and click the "Add Alert" button 70
 3.")
71 Step 2: In the Add Alert window, complete the alert type setting: 1. Set Alert Name 2. Set Alert Type (either QRM+ Alert or IPMI event notification.there are four types of QRM+ alerts: CPU usage, memory usage, power status, and disk usage) 3. Click the Select Device button Step 3: Select the device you want to set the alert, you can select one or multiple devices, then click the OK button 71
72 Step 4: Click the Save button to complete the new alert (Note: If the Save button is grayed out, it means that there are errors in alert name, alert type, or selected device) 8.2 Delete Alert Users can click the "Delete Alert" button to remove one or more alerts at once. Setup steps: Step 1: Enter the Alert Configuration page and select the alert configuration you want to delete Step 2: Click the "Delete Alert" button Step 3: Click the "OK" button to complete the operation 8.3 Enable Alert Users can click the "Enable Alert" button to enable one or more alerts at once. Setup steps: Step 1: Enter the Alert Configuration page and select the alert configuration you want to enable Step 2: Click the "Enable Alert" button to complete the operation 72

73 8.4 Disable Alert Users can click the "Disable Alert" button to disable one or more alerts at once. Setup steps: Step 1: Enter the Alert Configuration page and select the alert configuration you want to disable Step 2: Click the "Disable Alert" button to disable the alert 8.5 Edit Alert The user can click the Edit Alert button to edit the alert. Only one alert can be edited at a time. Setup steps: Step 1: Enter the Alert Configuration page, select the alert you want to edit, and click the "Edit Alert" button Step 2: Edit the item you want to modify (please note: the alert type can not be modified) Step 3: Click the "Save" button to finish editing 73
74 9. Logs QRM+ provides four types of logs: Alerts log, IPMI event log, history log, and system log. This page is an advanced application. The user sets the corresponding alert type on the Alert Configuration page. Once an event occurs, you will be able to view the results in the Alert Log or IPMI Event Logs on the Logs page (the alert log generation time needs to be set in the Alert Notification setting in the Settings / Notification Settings; IPMI Event Log is once per minute). 9.1 Alerts Log QRM+ Alerts Log page displays alerts for all Windows or Linux devices. Users need to select QRM+ Alerts from the Add Alert page and add one of the four types : CPU usage, memory usage, power status, or disk usage. Once an event occurs, you will be able to view the details of the alert on this page after the event has lasted for 5 minutes. The basic steps are: Step 1: Select Alerts Log in the Logs page Step 2: View the alert info, including the Hostname, IP address, Device Tag, On Time and Off Time, etc. Step 3: View the current number of alerts Step 4: Click the "Refresh" button at any time to get the latest alert message 74

75 The Alerts Log has advanced search features: Step 1: Click the "Advanced Search" button on the Alerts Log page Step 2: Click Select Device and select a device (can only select one) Step 3: Click the "Apply" button to search for all alerts on the target device QRM+ provides Log Retention Settings feature, which can be set for periodic viewing.the default alert log retention period is 1 week. Logs older than one week will be deleted by the system. Users can adjust the length of period according to their needs. 75

76 9.2 IPMI Events Log IPMI Events Log shows all IPMI event history, on this page, the user can view all IPMI historical events.note: QRM+ does not proactively generate these events. These events are generated by IPMI BMC. QRM+ only periodically retrieves these events and at the same time clears the events from IPMI BMC memory. Setup steps: Step 1: Select "IPMI Events" in the Alerts Configuration / Add Alert page Step 2: Select the target device Step 3: Save the alert After adding the IPMI alert, users can view all IPMI events in the Logs / IPMI Events log and click the Refresh button to obtain the latest IPMI Events. IPMI Events log provides advanced search capabilities to allow a user to select a specific device to view their events: Step 1: Select the target device Step 2: Select Sensor Type (optional) 76

77 Step 3: Select IPMI Metric Name (optional) Step 4: Select Period (optional) Step 5: Click the Apply button to filter out the IPMI events that the user needs to retrieve QRM+ provides Log Retention Settings feature, which can be set for periodic viewing.the default IPMI events log retention period is 1 week. Logs older than one week will be deleted by the system. Users can adjust the length of period according to their needs. 77
78 9.3 Historic Data Log QRM+ provides historical data obtained by a specific sensor type of a specific device over a specific time frame.for example, a user can select a device, set the period as one day or one week, select the sensor type as CPU usage, then QRM+ will present the CPU Utilization as a line chart.this feature is useful for analyzing the values of different sensor types over a specific time frame in order to take actions for improvement. To display the historical data as a line chart in QRM+, follow the steps below: Step 1: Click what is indicated by Label 1 Step 2: Click what is indicated by Label 2, select the target device (required) Step 3: Click what is indicated by Label 3, select Metric Name (required) Step 4: Click what is indicated by Label 4, select the Period (required) Step 5: Click what is indicated by Label 5 to complete the operation The line chart for a specific device is shown below 78


79 QRM+ provides Log Retention Settings feature, which can be set for periodic viewing.the default Historic Data Log retention period is 1 week. Logs older than one week will be deleted by the system. Users can adjust the length of period according to their needs. 79


80 9.4 System Log System Log shows the messages, alerts, errors, and other events logged by QRM+ as well as the user's activities. How to access the System Log: In the Logs page, select "System Log" System Log provides advanced search options that allow users to search according to different alert types: Step 1: Select the alert type Step 2: After selecting the period, press "Apply" to complete the operation 80

81 10. Settings The Settings page contains the system user account and permissions management, only user with administrator permissions can enter this page User Management User Management provides the functions for setting up user permissions, adding or deleting users. QRM+ account must be bundled with a QTS account. Only QTS accounts can be added as QRM+ accounts. If a QTS account is deleted, the associated QRM+ will become unavailable. Add User: Watch the video Step 1: Select "User Management" from the Settings page and click the "Add" button Step 2: After select the user and the permissions that you want to add, click "Add User" to finish. Deleting Users: Watch the video Select "User Management" in the Settings page, select the user you want to delete and click the 81


82 "Delete" button Editing Permissions Watch the video Step 1: Select "User Management" from the Settings page, select the user you want to edit and click the "Edit" button Step 2: Select the permission level you want to change from the drop-down menu and click the "Save" button to complete the operation 82

83 10.2 Notification Settings The notification settings allow users to be notified immediately when an event occurs, thus improving emergency response capabilities. Detailed setup instructions are as follows: 1. The list of accounts that need to be notified 2. SMTP type 3. SMTP server location 4. SMTP server port 5. account 6. password 7. Secure connection mode 8. How long after an alert condition has lasted before sending an alert 9. Whether to enable sent Agent alert and IPMI event alert 10. Time interval for sending repeat alerts 10.3 Application Settings Application Settings let users adjust the system log files and video retention settings according to their needs, users can also adjust real-time data and automatic device scan period based on performance. 83

84 1. Alert log retention period 2. IPMI Events Log retention period 3. KVM video file retention period 4. Historical data log retention period 5. System logs retention period 6. Device scan and automatic refresh period 7. Real-time data automatic refresh period 10.4 QRMAgent information Select "QRMAgent Repository" in the Settings page to list the currently supported operating system platforms and their Agent versions. 84
VMware vrealize Operations for Horizon Administration
 VMware vrealize Operations for Horizon Administration vrealize Operations for Horizon 6.3 This document supports the version of each product listed and supports all subsequent versions until the document
User Guide. Pharos Control Software
 User Guide Pharos Control Software 1910012155 REV 2.0.1 April 2017 COPYRIGHT & TRADEMARKS Specifications are subject to change without notice. is a registered trademark of TP-Link Technologies Co., Ltd.
VMware vrealize Operations for Horizon Administration
 VMware vrealize Operations for Horizon Administration vrealize Operations for Horizon 6.2 This document supports the version of each product listed and supports all subsequent versions until the document
This guide details the deployment and initial configuration necessary to maximize the value of JetAdvantage Insights.
 HP JetAdvantage Insights Deployment Guide This guide details the deployment and initial configuration necessary to maximize the value of JetAdvantage Insights. 1. Overview HP JetAdvantage Insights provides
ElasterStack 3.2 User Administration Guide - Advanced Zone
 ElasterStack 3.2 User Administration Guide - Advanced Zone With Advance Zone Configuration TCloud Computing Inc. 6/22/2012 Copyright 2012 by TCloud Computing, Inc. All rights reserved. This document is
VMware vrealize Operations for Horizon Administration. 20 SEP 2018 VMware vrealize Operations for Horizon 6.6
 VMware vrealize Operations for Horizon Administration 20 SEP 2018 VMware vrealize Operations for Horizon 6.6 You can find the most up-to-date technical documentation on the VMware website at: https://docs.vmware.com/
VMware vrealize Operations for Horizon Administration. Modified on 3 JUL 2018 VMware vrealize Operations for Horizon 6.4
 VMware vrealize Operations for Horizon Administration Modified on 3 JUL 2018 VMware vrealize Operations for Horizon 6.4 You can find the most up-to-date technical documentation on the VMware website at:
NovaBACKUP CMon v19.0
 June 2017 NovaBACKUP CMon v19.0 User Manual Features and specifications are subject to change without notice. The information provided herein is provided for informational and planning purposes only. 2017
CA Agile Central Administrator Guide. CA Agile Central On-Premises
 CA Agile Central Administrator Guide CA Agile Central On-Premises 2018.1 Table of Contents Overview... 3 Server Requirements...3 Browser Requirements...3 Access Help and WSAPI...4 Time Zone...5 Architectural
Freshservice Discovery Probe User Guide
 Freshservice Discovery Probe User Guide 1. What is Freshservice Discovery Probe? 1.1 What details does Probe fetch? 1.2 How does Probe fetch the information? 2. What are the minimum system requirements
vrealize Suite Lifecycle Manager 1.0 Installation and Management vrealize Suite 2017
 vrealize Suite Lifecycle Manager 1.0 Installation and Management vrealize Suite 2017 vrealize Suite Lifecycle Manager 1.0 Installation and Management You can find the most up-to-date technical documentation
DIGIOP ELEMENTS V8.7 NVR Software-only Installation Guide
 DIGIOP ELEMENTS V8.7 NVR Software-only Installation Guide About this installation guide Use this document as a guide to install your DIGIOP ELEMENTS NVR software system. It includes procedures to install
SLS-ENVR2016 Network Video Recorder V2.2.2 Quick Setup Guide
 SLS-ENVR2016 Network Video Recorder V2.2.2 Quick Setup Guide The SLS-ENVR2016 series NVR is an intelligent and compact appliance that provides a network interface to monitor, record and playback video
SLS-ENVR16 Network Video Recorder V2.1.5 Quick Setup Guide
 SLS-ENVR16 Network Video Recorder V2.1.5 Quick Setup Guide The SLS-ENVR16 series NVR is an intelligent and compact appliance that provides a network interface to monitor, record and playback video from
Configuring GNS3 for CCNA Security Exam (for Windows) Software Requirements to Run GNS3
 Software Requirements to Run GNS3") Configuring GNS3 for CCNA Security Exam (for Windows) Software Requirements to Run GNS3 From Cisco s website, here are the minimum requirements for CCP 2.7 and CCP 2.8: The following info comes from many
Configuring GNS3 for CCNA Security Exam (for Windows) Software Requirements to Run GNS3 From Cisco s website, here are the minimum requirements for CCP 2.7 and CCP 2.8: The following info comes from many
Agent and Agent Browser. Updated Friday, January 26, Autotask Corporation
 Agent and Agent Browser Updated Friday, January 26, 2018 2018 Autotask Corporation Table of Contents Table of Contents 2 The AEM Agent and Agent Browser 3 AEM Agent 5 Privacy Mode 9 Agent Browser 11 Agent
NMS300 Network Management System Application
 NMS300 Network Management System Application Quick Start Guide October 2013 202-11288-02 350 East Plumeria Drive San Jose, CA 95134 USA Support Thank you for purchasing this NETGEAR product. After installing
vrealize Suite Lifecycle Manager 1.1 Installation, Upgrade, and Management vrealize Suite 2017
 vrealize Suite Lifecycle Manager 1.1 Installation, Upgrade, and Management vrealize Suite 2017 You can find the most up-to-date technical documentation on the VMware website at: https://docs.vmware.com/
DIGIOP ELEMENTS V8.1 Software-only Installation Guide
 DIGIOP ELEMENTS V8.1 Software-only Installation Guide About this installation guide Use this document as a guide to install your DIGIOP ELEMENTS software system. It includes procedures to install your
VMware vrealize Operations for Horizon Administration
 VMware vrealize Operations for Horizon Administration vrealize Operations for Horizon 6.4 vrealize Operations Manager 6.4 This document supports the version of each product listed and supports all subsequent
Pure Storage FlashArray Management Pack for VMware vrealize Operations Manager User Guide. (Version with Purity 4.9.
 Pure Storage FlashArray Management Pack for VMware vrealize Operations Manager User Guide (Version 1.0.139 with Purity 4.9.x or higher) Sunday, November 27, 2016 16:13 Pure Storage FlashArray Management
vcenter Operations Manager for Horizon View Administration
 vcenter Operations Manager for Horizon View Administration vcenter Operations Manager for Horizon View 1.5 vcenter Operations Manager for Horizon View 1.5.1 This document supports the version of each product
CA Agile Central Installation Guide On-Premises release
 CA Agile Central Installation Guide On-Premises release 2016.2 Agile Central to Go 2017.1 rallysupport@rallydev.com www.rallydev.com 2017 CA Technologies (c) 2017 CA Technologies Version 2016.2 (c) Table
KYOCERA Net Admin User Guide
 KYOCERA Net Admin User Guide Legal Notes Unauthorized reproduction of all or part of this guide is prohibited. The information in this guide is subject to change without notice. We cannot be held liable
Amazon AppStream 2.0: SOLIDWORKS Deployment Guide
 2018 Amazon AppStream 2.0: SOLIDWORKS Deployment Guide Build an Amazon AppStream 2.0 environment to stream SOLIDWORKS to your users June 2018 https://aws.amazon.com/appstream2/ 1 Welcome This guide describes
SLS-ENVR16 Network Video Recorder V2.1 Quick Setup Guide
 SLS-ENVR16 Network Video Recorder V2.1 Quick Setup Guide The SLS-ENVR16 series NVR is an intelligent and compact appliance that provides a network interface to monitor, record and playback video from up
NetBrain Technologies Inc. NetBrain Consultant Edition. Quick Start Guide
 NetBrain Technologies Inc. NetBrain Consultant Edition Quick Start Guide Content 1. Install NetBrain Workstation CE System... 3 1.1 Install and Activate NetBrain Gateway Server... 5 1.2 Install Workstation...
Online Help StruxureWare Data Center Expert
 Online Help StruxureWare Data Center Expert Version 7.2.7 What's New in StruxureWare Data Center Expert 7.2.x Learn more about the new features available in the StruxureWare Data Center Expert 7.2.x release.
Evaluation Guide for SNMPc v7.0
 Evaluation Guide for SNMPc v7.0 Introduction Thank you for downloading the SNMPc evaluation, in order to allow you to evaluate the product quickly and easily we have prepared this short guide. The purpose
SLS-ENVR4 Network Video Recorder V2.1 Quick Setup Guide
 SLS-ENVR4 Network Video Recorder V2.1 Quick Setup Guide The SLS-ENVR4 series NVR is an intelligent and compact appliance that provides a network interface to monitor, record and playback video from up
NetBrain POC Walk-Through
 NetBrain POC Walk-Through For OE 4.1 Dynamic Documentation Visual Troubleshooting NetBrain Technologies, Inc. 2004-2013. All rights reserved +1.800.605.7964 support@netbraintech.com www.netbraintech.com
Easy Setup Guide. Cisco FindIT Network Probe. You can easily set up your FindIT Network Probe in this step-by-step guide.
 Cisco FindIT Network Probe Easy Setup Guide You can easily set up your FindIT Network Probe in this step-by-step guide. 1 5 System Requirements Installing Probe Configuring Probe Using Probe Connecting
DMS Local. User Manual. For Projector Management V 1.01
 DMS Local User Manual For Projector Management V 1.01 2 Copyright Copyright Copyright 2018 BenQ Corporation. All rights reserved. No part of this publication may be reproduced, transmitted, transcribed,
NetBrain OE System Quick Start Guide
 NetBrain Technologies Inc. NetBrain OE System Quick Start Guide For Operator Edition Administrators Table of Contents 1. Install NetBrain OE System... 3 1.1 Install Gateway Server... 4 1.2 Install Network
Redhat OpenStack 5.0 and PLUMgrid OpenStack Networking Suite 2.0 Installation Hands-on lab guide
 Redhat OpenStack 5.0 and PLUMgrid OpenStack Networking Suite 2.0 Installation Hands-on lab guide Oded Nahum Principal Systems Engineer PLUMgrid EMEA November 2014 Page 1 Page 2 Table of Contents Table
ForeScout Extended Module for IBM BigFix
 Version 1.1 Table of Contents About BigFix Integration... 4 Use Cases... 4 Additional BigFix Documentation... 4 About this Module... 4 About Support for Dual Stack Environments... 5 Concepts, Components,
Transport Gateway Installation / Registration / Configuration
 CHAPTER 4 Transport Gateway Installation / Registration / Configuration This chapter covers the following areas: Transport Gateway requirements. Security Considerations When Using a Transport Gateway.
ForeScout Extended Module for IBM BigFix
 ForeScout Extended Module for IBM BigFix Version 1.0.0 Table of Contents About this Integration... 4 Use Cases... 4 Additional BigFix Documentation... 4 About this Module... 4 Concepts, Components, Considerations...
Cisco Unified Serviceability
 Cisco Unified Serviceability Introduction, page 1 Installation, page 5 Introduction This document uses the following abbreviations to identify administration differences for these Cisco products: Unified
EMCO Ping Monitor Enterprise 6. Copyright EMCO. All rights reserved.
 Copyright 2001-2017 EMCO. All rights reserved. Company web site: emcosoftware.com Support e-mail: support@emcosoftware.com Table of Contents Chapter... 1: Introduction 4 Chapter... 2: Getting Started 6
Acronis Monitoring Service
 Acronis Monitoring Service PRODUCT DOCUMENTATION Table of contents 1 About the Acronis Monitoring Service...4 2 Software Requirements...4 3 Understanding basic concepts...5 4 Getting started...7 4.1 Setting
Transport Gateway Installation / Registration / Configuration
 CHAPTER 2 Transport Gateway Installation / Registration / Configuration This chapter covers the following areas: Transport Gateway requirements. Security Considerations When Using a Transport Gateway.
VMware Validated Design Monitoring and Alerting Guide
 VMware Validated Design Monitoring and Alerting Guide VMware Validated Design for Software- Defined Data Center 2.0 This document supports the version of each product listed and supports all subsequent
Detector Service Delivery System (SDS) Version 3.0
 Version 3.0") Detector Service Delivery System (SDS) Version 3.0 Detecting and Responding to IT Security Policy Violations Quick Start Guide 2018 RapidFire Tools, Inc. All rights reserved. V20180112 Contents Overview
Detector Service Delivery System (SDS) Version 3.0 Detecting and Responding to IT Security Policy Violations Quick Start Guide 2018 RapidFire Tools, Inc. All rights reserved. V20180112 Contents Overview
Version /20/2012. User Manual. AP Manager II Lite Business Class Networking
 Version 1.0 12/20/2012 User Manual AP Manager II Lite Business Class Networking Table of Contents Table of Contents Product Overview... 1 Minimum System Requirements... 2 Access Point Requirements... 2
NetBrain Enterprise Server 5.0 Edition 4 Steps to Setup NetBrain
 Overview The NetBrain system has four components: Customer License Server, Workspace Server, Network Server and Workstation. Customer License Server manages workspaces and license Workspace Server holds
ZENworks 2017 Audit Management Reference. December 2016
 ZENworks 2017 Audit Management Reference December 2016 Legal Notice For information about legal notices, trademarks, disclaimers, warranties, export and other use restrictions, U.S. Government rights,
Sun VirtualBox Installation Tutorial
 Sun VirtualBox Installation Tutorial Installing Linux Mint 5 LTS Guest OS By Dennis Berry Welcome to the world of virtualization and Linux. This tutorial is intended to help users who are new to the world
D-View 7 Software Release Notes
 Server Version: V1.3.0.7 Probe Version: V1.0.6.0 Published: 2017/08/18 These release notes include important information about D-Link D-View 7 Network Management Software. Please verify that these release
Tyler Dashboard. User Guide Version 6.0. For more information, visit
 Tyler Dashboard User Guide Version 6.0 For more information, visit www.tylertech.com. TABLE OF CONTENTS Tyler Dashboard... 4 Tyler Dashboard Features... 4 Browse... 5 Page... 5 Dashboard... 5 Views...
Device Manager. Managing Devices CHAPTER
 2 CHAPTER This chapter describes how to perform routine device management tasks using the Administrator Console. It provides information on managing the devices within your Cisco VXC Manager environment.
Privileged Access Access Console User Guide 17.1
 Privileged Access Access Console User Guide 17.1 2017 Bomgar Corporation. All rights reserved worldwide. BOMGAR and the BOMGAR logo are trademarks of Bomgar Corporation; other trademarks shown are the
Version 4.1 June Xerox Device Agent (XDA) Lite User Guide
 Lite User Guide") Version 4.1 June 2013 Xerox Device Agent (XDA) Lite User Guide 2008-2013 Xerox Corporation. All rights reserved. Xerox and Xerox and Design are trademarks of Xerox Corporation in the US and/or other countries.
Version 4.1 June 2013 Xerox Device Agent (XDA) Lite User Guide 2008-2013 Xerox Corporation. All rights reserved. Xerox and Xerox and Design are trademarks of Xerox Corporation in the US and/or other countries.
QUICK INSTALLATION GUIDE Minder 4.2
 QUICK INSTALLATION GUIDE Minder 4.2 1 Minder 4.2 Contents 1. Introducing MindArray Minder... 4 1.1 Gain Visibility into Server, Application, Virtualization and Network Infrastructure... 4 1.2. Why Minder?...
High Availability Enabling SSL Database Migration Auto Backup and Auto Update Mail Server and Proxy Settings Support...
 Quick Start Guide Table of Contents Overview... 4 Deployment... 4 System Requirements... 4 Installation... 6 Working with AD360... 8 Starting AD360... 8 Launching AD360 client... 9 Stopping AD360... 9
MagicInfo Premium Server
 MagicInfo Premium Server Quick Start Guide This guide has been designed for your convenient and efficient use of MagicInfo-i Premium Edition. Refer to the MagicInfo Premium Server user guide for further
Veeam ONE. Version 8.0. User Guide for VMware vsphere Environments
 Veeam ONE Version 8.0 User Guide for VMware vsphere Environments July, 2015 2015 Veeam Software. All rights reserved. All trademarks are the property of their respective owners. No part of this publication
AppPulse Active. User Guide March 2016
 AppPulse Active User Guide March 2016 Legal Notices Warranty The only warranties for Hewlett Packard Enterprise products and services are set forth in the express warranty statements accompanying such
IsItUp Quick Start Manual
 IsItUp - When you need to know the status of your network Taro Software Inc. Website: www.tarosoft.com Telephone: 703-405-4697 Postal address: 8829 110th Lane, Seminole Fl, 33772 Electronic mail: Contact1@tarosoft.com
Kaseya 2. Quick Start Guide. for VSA 6.3
 Kaseya 2 LiveConnect, Portal Access and Quick View Quick Start Guide for VSA 6.3 September 24, 2013 Agreement The purchase and use of all Software and Services is subject to the Agreement as defined in
WebAnalyzer Plus Getting Started Guide
 WebAnalyzer Plus Getting Started Guide www.manageengine.com/web-analytics Contents 1 Introduction 4 2 3 4 5 WebAnalyzer Plus Overview Getting Started System Requirements Installation Starting and Accessing
Epson Device Admin User s Guide NPD EN
 Epson Device Admin User s Guide NPD5817-00 EN About this Manual About this Manual Marks and Symbols! Caution: Instructions that must be followed carefully to avoid bodily injury. c Important: Instructions
Privileged Remote Access 18.3 Access Console User Guide
 Privileged Remote Access 18.3 Access Console User Guide 2003-2019 BeyondTrust Corporation. All Rights Reserved. BEYONDTRUST, its logo, and JUMP are trademarks of BeyondTrust Corporation. Other trademarks
KRAMER ELECTRONICS LTD. USER GUIDE
 KRAMER ELECTRONICS LTD. USER GUIDE MODEL: Kramer Site-CTRL Room Controller Guide Software Version 2.0.0.x Intended for Kramer Technical Personnel or External System Integrators. To check that you have
Kaseya 2. Quick Start Guide. for Network Monitor 4.1
 Kaseya 2 Router Monitor Quick Start Guide for Network Monitor 4.1 June 5, 2012 About Kaseya Kaseya is a global provider of IT automation software for IT Solution Providers and Public and Private Sector
MyQ 7 Basic Installation Guide
 MyQ 7 Basic Installation Guide REVISION 4 MyQ Server 7.1+ July 2018 Copyright 2006-2018 MyQ spol. s r.o. All Rights Reserved. Table of Content 1. Basic Information 1 1.1. About this Guide 1 1.2. About
SSRS 2016 for WITS. Web Portal User Guide. Applies to: WITS Version 18.0+
 SSRS 2016 for WITS Web Portal User Guide Applies to: WITS Version 18.0+ Microsoft SQL Server Reporting Services (SSRS) 2016 Last Updated June 1, 2017 Microsoft SQL Server 2016 Report Builder 3.0 Version
WhatsConnected v3.5 User Guide
 WhatsConnected v3.5 User Guide Contents Table of Contents Welcome to WhatsConnected Finding more information and updates... 5 Installing and Configuring WhatsConnected System requirements... 6 Installation
The Cisco HCM-F Administrative Interface
 CHAPTER 5 This chapter contains information on the following topics: Overview of Cisco HCM-F Administrative Interface, page 5-1 Browser Support, page 5-2 Login and Logout, page 5-4 Online Help, page 5-5
Forescout. eyeextend for IBM BigFix. Configuration Guide. Version 1.2
 Forescout Version 1.2 Contact Information Forescout Technologies, Inc. 190 West Tasman Drive San Jose, CA 95134 USA https://www.forescout.com/support/ Toll-Free (US): 1.866.377.8771 Tel (Intl): 1.408.213.3191
Calendar & Buttons Dashboard Menu Features My Profile My Favorites Watch List Adding a New Request...
 remitview User Guide 1 TABLE OF CONTENTS INTRODUCTION... 3 Calendar & Buttons... 3 GETTING STARTED.... 5 Dashboard.... 7 Menu Features... 8 PROFILE.... 10 My Profile... 10 My Favorites... 12 Watch List...
IT Essentials v6.0 Windows 10 Software Labs
 IT Essentials v6.0 Windows 10 Software Labs 5.2.1.7 Install Windows 10... 1 5.2.1.10 Check for Updates in Windows 10... 10 5.2.4.7 Create a Partition in Windows 10... 16 6.1.1.5 Task Manager in Windows
MyQ Basic Installation Guide
 MyQ Basic Installation Guide REVISION 1 MyQ Server 7.2+ September 2018 Copyright 2006-2018 MyQ spol. s r.o. All Rights Reserved. Table of Content 1. Basic Information 1 1.1. About this Guide 1 1.2. About
Remote Desktop Services
 Remote Desktop Services AMERICAN INSTITUTES FOR RESEARCH AIR REMOTE DESKTOP SERVICES (RDS) GUIDE Overview Welcome to! can be accessed from a Windows computer, a Mac, and even a mobile device; such as an
vcloud Director User's Guide
 vcloud Director 8.0 This document supports the version of each product listed and supports all subsequent versions until the document is replaced by a new edition. To check for more recent editions of
Dell EMC OpenManage Mobile. Version 3.0 User s Guide (Android)
") Dell EMC OpenManage Mobile Version 3.0 User s Guide (Android) Notes, cautions, and warnings NOTE: A NOTE indicates important information that helps you make better use of your product. CAUTION: A CAUTION
Dell EMC OpenManage Mobile Version 3.0 User s Guide (Android) Notes, cautions, and warnings NOTE: A NOTE indicates important information that helps you make better use of your product. CAUTION: A CAUTION
MIB Browser Version 10 User Guide
 MIB Browser Version 10 User Guide The ireasoning MIB browser is a powerful and easy-to-use tool powered by ireasoning SNMP API. MIB browser is an indispensable tool for engineers to manage SNMP enabled
VMware vrealize Operations for Horizon Installation. VMware vrealize Operations for Horizon 6.5
 VMware vrealize Operations for Horizon Installation VMware vrealize Operations for Horizon 6.5 You can find the most up-to-date technical documentation on the VMware website at: https://docs.vmware.com/
VMware vrealize Operations for Horizon Installation
 VMware vrealize Operations for Horizon Installation vrealize Operations for Horizon 6.4 Installation vrealize Operations for Horizon 6.4 This document supports the version of each product listed and supports
Industrial HiVision Quick Start Guide
 Industrial HiVision Quick Start Guide v1.0 August 2011 1 Contents INTRODUCTION...3 INSTALLATION...4 GETTING STARTED...13 NETWORK HIERARCHY...17 DEVICE DISCOVERY...28 TOPOLOGY DISCOVERY...39 STATUS DISPLAY...48
vcenter Server Appliance Configuration Update 1 Modified on 04 OCT 2017 VMware vsphere 6.5 VMware ESXi 6.5 vcenter Server 6.5
 Update 1 Modified on 04 OCT 2017 VMware vsphere 6.5 VMware ESXi 6.5 vcenter Server 6.5 You can find the most up-to-date technical documentation on the VMware Web site at: https://docs.vmware.com/ The VMware
Widgets for SAP BusinessObjects Business Intelligence Platform User Guide SAP BusinessObjects Business Intelligence platform 4.1 Support Package 2
 Widgets for SAP BusinessObjects Business Intelligence Platform User Guide SAP BusinessObjects Business Intelligence platform 4.1 Support Package 2 Copyright 2013 SAP AG or an SAP affiliate company. All
Oct 2007 Version 1.01
 Oct 2007 Version 1.01 Table of Contents Introduction...4 System Requirement...4 Getting Started...4 Installing the Smart WLAN Manager...5 Discovering the Switch and AP...9 Understanding the Screen Layout...12
vcenter Server Appliance Configuration Modified on 17 APR 2018 VMware vsphere 6.7 VMware ESXi 6.7 vcenter Server 6.7
 vcenter Server Appliance Configuration Modified on 17 APR 2018 VMware vsphere 6.7 VMware ESXi 6.7 vcenter Server 6.7 You can find the most up-to-date technical documentation on the VMware website at: https://docs.vmware.com/
Student Guide. Document Version: This guide documents features available in NETLAB+ VE version and later.
 Student Guide Document Version: 2018-02-15 This guide documents features available in NETLAB+ VE version 18.1.0 and later. Copyright 2018 Network Development Group, Inc. www.netdevgroup.com NETLAB Academy
Table of Contents HOL-1701-CHG-5
 Table of Contents Lab Overview: vrealize Operations Application Monitoring: Challenge Lab... 2 Lab Overview... 3 Lab Guidance... 5 Module 1 - Configuring a Custom Application (15 minutes)... 10 Introduction...
ASUS Control Center User Guide
 v1.0 ASUS Control Center User Guide E13251 August 2017 Copyright 2017 ASUSTeK COMPUTER INC. All Rights Reserved. No part of this manual, including the products and software described in it, may be reproduced,
Central Management Software. Cam Viewer 3 Lite. User Manual
 Central Management Software Cam Viewer 3 Lite User Manual Version 1.0.0 Table of Contents 1. System Requirement...4 2. Software Installation...5 3. Configuration Wizard...9 3.1 Channel...10 3.1.1 Adding
The Python Mini-Degree Development Environment Guide
 The Python Mini-Degree Development Environment Guide By Zenva Welcome! We are happy to welcome you to the premiere Python development program available on the web The Python Mini-Degree by Zenva. This
Galileo V2.6. Administration Guide. April 2015
 Galileo V2.6 Administration Guide April 2015 Condrey Corporation makes no representations or warranties with respect to the contents or use of this documentation, and specifically disclaims any express
Getting Started Guide. Version 4.4
 C i s co EnergyWise Management Getting Started Guide Version 4.4 Contents Introduction to Cisco EnergyWise Management...4 Setup & Installation...5 System Requirements (Single Server Installation)...5 Installation...6
VMware Validated Design Monitoring and Alerting Guide
 VMware Validated Design Monitoring and Alerting Guide VMware Validated Design for Software- Defined Data Center 3.0 This document supports the version of each product listed and supports all subsequent
Introduction 3 Account Access 3 Getting Acquainted 3 Home Tab (Dashboard) 3 Recordings Tab 4 Recorded Calls 5 Calls In Progress 7
 3 Recordings Tab 4 Recorded Calls 5 Calls In Progress 7") Contents Introduction 3 Account Access 3 Getting Acquainted 3 Home Tab (Dashboard) 3 Recordings Tab 4 Recorded Calls 5 Calls In Progress 7 2 P age Introduction This guide provides information about the
Contents Introduction 3 Account Access 3 Getting Acquainted 3 Home Tab (Dashboard) 3 Recordings Tab 4 Recorded Calls 5 Calls In Progress 7 2 P age Introduction This guide provides information about the
HP LeftHand SAN Solutions
 HP LeftHand SAN Solutions Support Document Installation Manuals VSA 8.0 Quick Start - Demo Version Legal Notices Warranty The only warranties for HP products and services are set forth in the express warranty
Privileged Remote Access Access Console User Guide 18.3
 Privileged Remote Access Access Console User Guide 18.3 2003-2018 BeyondTrust, Inc. All Rights Reserved. BEYONDTRUST, its logo, and JUMP are trademarks of BeyondTrust, Inc. Other trademarks are the property
3M Clean-Trace Hygiene Monitoring and Management System
 User Manual Supplement Number: TB. 378178 Effective Date: November 2018 Supersedes: (New) Technology Platform: 3M Clean-Trace Hygiene Monitoring and Management System Originating Location: St. Paul, MN
Storage Systems Storage Systems Copyright 2018 Stone Computers Ltd. All Rights Reserved. 2
 Storage Systems Copyright 2018 Stone Computers Ltd. All Rights Reserved. 2 Dothill Storage Systems Copyright 2018 Stone Computers Ltd. All Rights Reserved. 3 Connecting to a Dothill Storage System' Management
docalpha Installation Guide
 ARTSYL DOCALPHA INSTALLATION GUIDE 1. docalpha Architecture Overview... 2 1.1. docalpha Server Components... 4 1.2. docalpha Production Environment Stations Overview... 4 1.3. docalpha Setup & Administration
Web Dashboard. User Manual. October Revision
 Web Dashboard User Manual October Revision This is the official user manual on using justsamit web dashboard to perform reporting and administrative tasks. This manual describes each section of reporting
BIG-IP Analytics: Implementations. Version 13.1
 BIG-IP Analytics: Implementations Version 13.1 Table of Contents Table of Contents Setting Up Application Statistics Collection...5 What is Analytics?...5 About HTTP Analytics profiles... 5 Overview: