Lab-3: LCDs Serial Communication Analog Inputs Temperature Measurement System
|
|
|
- Linette Murphy
- 5 years ago
- Views:
Transcription


1 Mechatronics Engineering and Automation Faculty of Engineering, Ain Shams University MCT-151, Spring 2015 Lab-3: LCDs Serial Communication Analog Inputs Temperature Measurement System Ahmed Okasha
2 Understanding LCD LCD (Liquid Crystal Display) screen is an electronic display module and find a wide range of applications. A 16x2 LCD display is very basic module and is very commonly used in various devices and circuits. These modules are preferred over seven segments and other multi segment LEDs. The reasons being: LCDs are economical; easily programmable; have no limitation of displaying special & even custom characters (unlike in seven segments), animations and so on. A 16x2 LCD means it can display 16 characters per line and there are 2 such lines. In this LCD each character is displayed in 5x7 pixel matrix. This LCD has two registers, namely, Command and Data.
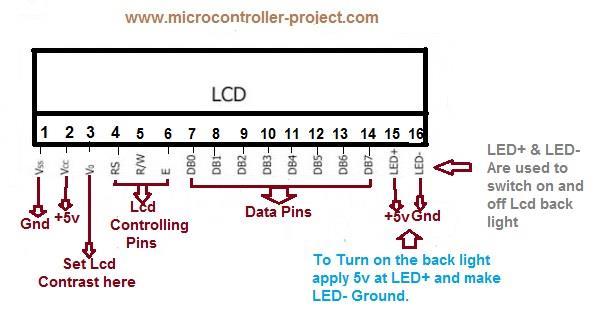
3 Understanding LCD pins
 Vcc 3 Contrast adjustment; through a variable resistor V EE 4 Selects command register when low; and data register when Register high Select 5 Low to write to the register; High to read from the")
4 Understanding LCD pins Pin No Function Name 1 Ground (0V) Ground 2 Supply voltage; 5V (4.7V 5.3V) Vcc 3 Contrast adjustment; through a variable resistor V EE 4 Selects command register when low; and data register when Register high Select 5 Low to write to the register; High to read from the register Read/write 6 Sends data to data pins when a high to low pulse is given Enable 7 DB0 8 DB1 9 DB2 10 DB3 8-bit data pins 11 DB4 12 DB5 13 DB6 14 DB7 15 Backlight V CC (5V) Led+ 16 Backlight Ground (0V) Led-
5 LCD Registers The command register stores the command instructions given to the LCD. A command is an instruction given to LCD to do a predefined task like initializing it, clearing its screen, setting the cursor position, controlling display etc. The data register stores the data to be displayed on the LCD. The data is the ASCII value of the character to be displayed on the LCD. Click to learn more about internal structure of a LCD. Why only 4 data bit not 8? The idea of 4 bit communication is introduced to save pins of a microcontroller. You may think that 4 bit mode will be slower than 8 bit. But the speed difference is only minimal.
6 Understanding the example code #include <LiquidCrystal.h> LiquidCrystal lcd(12, 11, 5, 4, 3, 2); // include the library code: // initialize the library with the numbers of the interface pins void setup() { lcd.begin(16, 2); lcd.print("hello, world!"); // set up the LCD's number of columns and rows // Print a message to the LCD. } void loop() { lcd.setcursor(0, 1); lcd.print(millis() / 1000); // set the cursor to column 0, line 1, note: line 1 is the second row, since counting begins with 0): // print the number of seconds since reset: }
: Serial. It communicates on digital pins 0 (RX) and 1 (TX) as well as with the computer via USB.")
7 Serial Communication Serial data transfer is when we transfer data one bit at a time, one right after the other. Used for communication between the Arduino board and a computer or other devices. All Arduino boards have at least one serial port (also known as a UART or USART): Serial. It communicates on digital pins 0 (RX) and 1 (TX) as well as with the computer via USB. Thus, if you use these functions, you cannot also use pins 0 and 1 for digital input or output.

8 Serial Communication When you Compile/Verify what you're really doing is turning the sketch into binary data (ones and zeros). When you Upload it to the Arduino, the bits are shoved out one at a time through the USB cable to the Arduino where they are stored in the main chip.
9 Notes library name procedure name (input values) Serial begin (9600) Baud rate: 9600 bps, this is how fast the connection can read and write bits on the wire. TO show the serial monitor: Tools>>serial monitor Baud rate match up! If you ever find that you're getting a whole lot of garbage instead of proper text, make sure that you have the correct baud rate selected in the drop down menu of the Serial Monitor. Note that this communication baud rate is indepedent of the upload process, which is fixed at bps.
10 Example /* * Hello World! * * This is the Hello World! for Arduino. * It shows how to send data to the computer */ void setup() // run once, when the sketch starts { Serial.begin(9600); // set up Serial library at 9600 bps } void loop() // run over and over again { } Serial.println("Hello world!"); // prints hello with ending line break delay(1000);

11 Example Go to Tools>> Serial Monitor

12 Analog Inputs Arduino UNO has 6 analog inputs pins to deal with a wide variety of analog sensors such as Potentiometers, LDRs, pressure sensor, etc.
13 How to read from analog pins? analogread(pin): Reads the value from the specified analog pin. The Arduino board contains a 6 channel,10-bit analog to digital converter. This means that it will map input voltages between 0 and 5 volts into integer values between 0 and This yields a resolution between readings of: 5 volts / 1024 units or,.0049 volts (4.9 mv) per unit.
14 Analog Sensor Examples Potentiometer Photo-resistor LM35 Temperature sensor


15 Potentiometer Your pot has a circular 'track' that acts as a resistor, in our case it's a 10 kω resistor. However, the difference with a pot, is that there is also a middle connection called the 'slider'. This connection is rotated when you turn the pot. So if you connect one end of the pot to 5V and the other to GND, then the voltage at the slider will vary between 0 and 5V as you turn it.
16 Example: int val = 0; // variable to store the value read void setup() { Serial.begin(9600); } // setup serial void loop() { val = analogread(analogpin); Serial.println(val); } // read the input pin //Serial print

17 Photocell/Photoresistor/LDR The photocell used is of a type called a light dependent resistor, sometimes called an LDR. As the name suggests, these components act just like a resistor, except that the resistance changes in response to how much light is falling on them. This one has a resistance of about 50 kω in near darkness and 500 Ω in bright light. To convert this varying value of resistance into something we can measure on an Arduino's analog input, it need to be converted into a voltage.
18 Interfacing LDR to Arduino The simplest way to do that is to combine it with a fixed resistor. The resistor and photocell together behave rather like a pot. When the light is very bright, then the resistance of the photocell is very low compared with the fixed value resistor, and so it is as if the pot were turned to maximum. When the photocell is in dull light the resistance becomes greater than the fixed 1kΩ resistor and it is as if the pot were being turned towards GND.
19 LM35 The LM35 is an integrated circuit analog sensor that can be used to measure temperature with an electrical output proportional to the temperature (in o C)
20 LM35 sensitivity equation The analog value read from LM35 is converted to a digital value in the range of (0-1023). LM35 sensitivity: Output Voltage (Vin) mv Sensitivity = = 10 = 0.01 V Input Temperature (T) C C This means: For Vin = 1023 (5V) T = 5 = 500 C C Vin T =? T = Vin The value read from the sensor 0.01

21 Temperature measurement system Using the same LCD Hardware, expand your work to integrate the temperature sensor LM35, and make the necessary change to read from the sensor, convert the read value using the proper conversion, and display the reading on the LCD
22 References
Electronic Brick Starter Kit
 Electronic Brick Starter Kit Getting Started Guide v1.0 by Introduction Hello and thank you for purchasing the Electronic Brick Starter Pack from Little Bird Electronics. We hope that you will find learning
Workshop Arduino English starters workshop 2
 Workshop Arduino English starters workshop 2 We advice to finish part 1 of this workshop before following this one. There are a set of assignments in this workshop that can be taken individually. First
EK307 Lab: Microcontrollers
 EK307 Lab: Microcontrollers Laboratory Goal: Program a microcontroller to perform a variety of digital tasks. Learning Objectives: Learn how to program and use the Atmega 323 microcontroller Suggested
Eng.mohammed Albhaisi. Lab#3 : arduino to proteus simulation. for simulate Arduino program that you wrote you have to have these programs :
 Lab#3 : arduino to proteus simulation for simulate Arduino program that you wrote you have to have these programs : 1-Arduino C 2-proteus 3- Virtual Serial Port Driver 4-Arduino library to proteus You
Objectives: Learn how to input and output analogue values Be able to see what the Arduino is thinking by sending numbers to the screen
 Objectives: Learn how to input and output analogue values Be able to see what the Arduino is thinking by sending numbers to the screen By the end of this session: You will know how to write a program to
Serial.begin ( ); Serial.println( ); analogread ( ); map ( );
; Serial.println( ); analogread ( ); map ( );") Control and Serial.begin ( ); Serial.println( ); analogread ( ); map ( ); A system output can be changed through the use of knobs, motion, or environmental conditions. Many electronic systems in our world
Control and Serial.begin ( ); Serial.println( ); analogread ( ); map ( ); A system output can be changed through the use of knobs, motion, or environmental conditions. Many electronic systems in our world
EXPERIMENT 7 Please visit https://www.arduino.cc/en/reference/homepage to learn all features of arduino before you start the experiments
 EXPERIMENT 7 Please visit https://www.arduino.cc/en/reference/homepage to learn all features of arduino before you start the experiments TEMPERATURE MEASUREMENT AND CONTROL USING LM35 Purpose: To measure
cs281: Introduction to Computer Systems Lab03 K-Map Simplification for an LED-based Circuit Decimal Input LED Result LED3 LED2 LED1 LED3 LED2 1, 2
 cs28: Introduction to Computer Systems Lab3 K-Map Simplification for an LED-based Circuit Overview In this lab, we will build a more complex combinational circuit than the mux or sum bit of a full adder
keyestudio Keyestudio MEGA 2560 R3 Board
 Keyestudio MEGA 2560 R3 Board Introduction: Keyestudio Mega 2560 R3 is a microcontroller board based on the ATMEGA2560-16AU, fully compatible with ARDUINO MEGA 2560 REV3. It has 54 digital input/output
FUNCTIONS USED IN CODING pinmode()
") FUNCTIONS USED IN CODING pinmode() Configures the specified pin to behave either as an input or an output. See the description of digital pins for details on the functionality of the pins. As of Arduino
FUNCTIONS USED IN CODING pinmode() Configures the specified pin to behave either as an input or an output. See the description of digital pins for details on the functionality of the pins. As of Arduino
Potentiometers. Showcase your project!
 Potentiometers Showcase your project! 1 week 05 Sensor 2: Photocells and Force Sensors Analog input and Processing 2 Photocell Force Sensitive Resistor Photocell Force Sensitive Resistor 3 Photocell Force
Schedule. Sanford Bernhardt, Sangster, Kumfer, Michalaka. 3:10-5:00 Workshop: Build a speedometer 5:15-7:30 Dinner and Symposium: Group 2
 Schedule 8:00-11:00 Workshop: Arduino Fundamentals 11:00-12:00 Workshop: Build a follower robot 1:30-3:00 Symposium: Group 1 Sanford Bernhardt, Sangster, Kumfer, Michalaka 3:10-5:00 Workshop: Build a speedometer
Liquid Crystal Displays
 Liquid Crystal Displays Let s investigate another popular method of displaying text and symbols, the LCD (Liquid Crystal Display). LCDs are the displays typically used in calculators and alarm clocks.
Laboratory 3 Working with the LCD shield and the interrupt system
 Laboratory 3 Working with the LCD shield and the interrupt system 1. Working with the LCD shield The shields are PCBs (Printed Circuit Boards) that can be placed over the Arduino boards, extending their
Project 24 LCD Temperature Display
 Project 24 LCD Temperature Display This project is a simple demonstration of using an LCD to present useful information to the user in this case, the temperature from an analog temperature sensor. You
LCD KeyPad Shield For Arduino SKU: DFR0009
 LCD KeyPad Shield For Arduino SKU: DFR0009 1602 LCD Keypad Shield For Arduino Contents 1 Introduction 2 Specification 3 Pinout 4 Library Explanation o 4.1 Function Explanation 5 Tutorial o 5.1 Example
FUNCTIONS For controlling the Arduino board and performing computations.
 d i g i t a l R e a d ( ) [Digital I/O] Reads the value from a specified digital pin, either HIGH or LOW. digitalread(pin) pin: the number of the digital pin you want to read HIGH or LOW Sets pin 13 to
8:1 Serial Port Expander
 8:1 Serial Port Expander V 1.3 This is an evolving document check back for updates. Features Expand a single UART (RX / TX) serial port into 8 additional serial ports On-board LEDs indicate which channel
Lab 01 Arduino 程式設計實驗. Essential Arduino Programming and Digital Signal Process
 Lab 01 Arduino 程式設計實驗 Essential Arduino Programming and Digital Signal Process Arduino Arduino is an open-source electronics prototyping platform based on flexible, easy-to-use hardware and software. It's
IME-100 ECE. Lab 4. Electrical and Computer Engineering Department Kettering University. G. Tewolde, IME100-ECE,
 IME-100 ECE Lab 4 Electrical and Computer Engineering Department Kettering University 4-1 1. Laboratory Computers Getting Started i. Log-in with User Name: Kettering Student (no password required) ii.
Arduino 101 AN INTRODUCTION TO ARDUINO BY WOMEN IN ENGINEERING FT T I NA A ND AW E S O ME ME NTO R S
 Arduino 101 AN INTRODUCTION TO ARDUINO BY WOMEN IN ENGINEERING FT T I NA A ND AW E S O ME ME NTO R S Overview Motivation Circuit Design and Arduino Architecture Projects Blink the LED Switch Night Lamp
SWITCH 10 KILOHM RESISTOR 220 OHM RESISTOR POTENTIOMETER LCD SCREEN INGREDIENTS
 11 SWITCH 10 KILOHM RESISTOR 220 OHM RESISTOR POTENTIOMETER LCD SCREEN INGREDIENTS 115 CRYSTAL BALL CREATE A CRYSTAL BALL TO TELL YOUR FUTURE Discover: LCD displays, switch/case statements, random() Time:
How to Use an Arduino
 How to Use an Arduino By Vivian Law Introduction The first microcontroller, TMS-1802-NC, was built in 1971 by Texas Instruments. It owed its existence to the innovation and versatility of silicon and the
Laboratory 5 Communication Interfaces
 Laboratory 5 Communication Interfaces Embedded electronics refers to the interconnection of circuits (micro-processors or other integrated circuits) with the goal of creating a unified system. In order
CPEG300 Embedded System Design. Lecture Interface with Peripheral Devices
 CPEG300 Embedded System Design Lecture 0 805 Interface with Peripheral Devices Hamad Bin Khalifa University, Spring 208 Typical Devices for an Electronics System Power generation PWM control Input devices
Arduino Programming Part 6: LCD Panel Output
 Arduino Programming Part 6: LCD Panel Output EAS 199B, Winter 2013 Gerald Recktenwald Portland State University gerry@me.pdx.edu Goals Use the 20x4 character LCD display for output Overview of assembly
Module 1: Crash Prevention Lesson 3: Weather Information systems Programming Activity Using Arduino Teacher Resource Grade 6-8 Time Required
 Module 1: Crash Prevention Lesson 3: Weather Information systems Programming Activity Using Arduino Teacher Resource Grade 6-8 Time Required Weather Information Systems is a 120 minute lesson plan (90
Required Materials. Optional Materials. Preparation
 Module 1: Crash Prevention Lesson 3: Weather Information systems Programming Activity Using Arduino Teacher Resource Grade 9-12 Time Required: 3 60 minute sessions or 3 hours Required Materials Computers
MAE106 Laboratory Exercises Lab # 1 - Laboratory tools
 MAE106 Laboratory Exercises Lab # 1 - Laboratory tools University of California, Irvine Department of Mechanical and Aerospace Engineering Goals To learn how to use the oscilloscope, function generator,
STEPD StepDuino Quickstart Guide
 STEPD StepDuino Quickstart Guide The Freetronics StepDuino is Arduino Uno compatible, uses the ATmega328P Microcontroller and works with most Arduino software. The StepDuino can be powered automatically
This tutorial will show you how to take temperature readings using the Freetronics temperature sensor and an Arduino Uno.
 This tutorial will show you how to take temperature readings using the Freetronics temperature sensor and an Arduino Uno. Note that there are two different module types: the temperature sensor module and
Note. The above image and many others are courtesy of - this is a wonderful resource for designing circuits.
 Robotics and Electronics Unit 2. Arduino Objectives. Students will understand the basic characteristics of an Arduino Uno microcontroller. understand the basic structure of an Arduino program. know how
Experiment 10 Fall 2012
 10/30/12 Experiment 10 Fall 2012 Experiment 10 Fall 2012 Electronic Multi-Meter - A Voltage, Temperature, and Light Meter Due: Week 11 Lab Sessions (11/06/2012) For the voltage, light and temperature gauges
LDR_Light_Switch1 -- Overview
 LDR_Light_Switch1 -- Overview OBJECTIVES After performing this lab exercise, learner will be able to: Understand the functionality of Light Dependent Resistor (LDR) Use LDR (Light Dependent Resistor) to
University of Portland EE 271 Electrical Circuits Laboratory. Experiment: Arduino
 University of Portland EE 271 Electrical Circuits Laboratory Experiment: Arduino I. Objective The objective of this experiment is to learn how to use the Arduino microcontroller to monitor switches and
ARDUINO LEONARDO WITH HEADERS Code: A000057
 ARDUINO LEONARDO WITH HEADERS Code: A000057 Similar to an Arduino UNO, can be recognized by computer as a mouse or keyboard. The Arduino Leonardo is a microcontroller board based on the ATmega32u4 (datasheet).
Digital Pins and Constants
 Lesson Lesson : Digital Pins and Constants Digital Pins and Constants The Big Idea: This lesson is the first step toward learning to connect the Arduino to its surrounding world. You will connect lights
Introduction to Arduino
 Introduction to Arduino Paco Abad May 20 th, 2011 WGM #21 Outline What is Arduino? Where to start Types Shields Alternatives Know your board Installing and using the IDE Digital output Serial communication
TN-192. Bar Graph shows analog trends on a dot-matrix character LCD module. Introduction. LCD Module Basics. Custom Characters
 Mark Durgin - SCIDYNE Corporation TN-192 Bar Graph shows analog trends on a dot-matrix character LCD module Introduction Dot-Matrix character LCD (Liquid Crystal Display) modules are excellent at conveying
Lab 2.2 Ohm s Law and Introduction to Arduinos
 Lab 2.2 Ohm s Law and Introduction to Arduinos Objectives: Get experience using an Arduino Learn to use a multimeter to measure Potential units of volts (V) Current units of amps (A) Resistance units of
Contents. List of Figures. TermDriver Datasheet 1. 1 Overview 2. 2 Features 2. 3 Installation with Arduino 3
 TermDriver Datasheet 1 Contents 1 Overview 2 2 Features 2 3 Installation with Arduino 3 4 Operation 4 4.1 ANSI escape codes......................... 5 4.2 High-resolution modes........................
melabs Serial LCD Firmware Version 1.0 2/7/07
 melabs Serial LCD Firmware Version 1.0 2/7/07 The melabs Serial LCD (SLCD) can display serial data from either asynchronous RS232-style or synchronous I 2 C input. A range of baud rates from 2400 to 57,600
3.The circuit board is composed of 4 sets which are 16x2 LCD Shield, 3 pieces of Switch, 2
 Part Number : Product Name : FK-FA1416 MULTI-FUNCTION 16x2 LCD SHIELD This is the experimental board of Multi-Function 16x2 LCD Shield as the fundamental programming about the digits, alphabets and symbols.
LAMPIRAN I (LISTING PROGRAM)
") LAMPIRAN I (LISTING PROGRAM) #include LiquidCrystal lcd(8, 9, 4, 5, 6, 7); const int numreadings = 10; int readings[numreadings]; // the readings from the analog input int readindex =
LAMPIRAN I (LISTING PROGRAM) #include LiquidCrystal lcd(8, 9, 4, 5, 6, 7); const int numreadings = 10; int readings[numreadings]; // the readings from the analog input int readindex =
Pridgen Vermeer Robotics ATmega128 Revision 0
 Features: 6x 8-bit I/O Ports 4x A/D Inputs 6x PWM Headers 2x RS 232 Terminals Power Bus LCD Header (4-bit mode) Smart Power Connecter Power Switch Header Power LED Debug LED Note: Some pins have multiple
ARDUINO. By Kiran Tiwari BCT 2072 CoTS.
 ARDUINO By Kiran Tiwari BCT 2072 CoTS www.kirantiwari.com.np SO What is an Arduino? WELL!! Arduino is an open-source prototyping platform based on easy-to-use hardware and software. Why Arduino? Simplifies
Lab 4 LCDs and Accelerometers
 University of Pennsylvania Department of Electrical and Systems Engineering ESE 111 Intro to Electrical/Computer/Systems Engineering Lab 4 LCDs and Accelerometers Introduction: In this lab, will learn
EMBEDDED HARDWARE DESIGN. Tutorial Interfacing LCD with Microcontroller /I
 EMBEDDED HARDWARE DESIGN Tutorial Interfacing LCD with Microcontroller 2009-10/I LCD (Liquid Crystal Display) has become very popular option for displaying in Embedded Applications. Since they are very
CTEC 1802 Embedded Programming Labs
 CTEC 1802 Embedded Programming Labs This document is intended to get you started using the Arduino and our I/O board in the laboratory - and at home! Many of the lab sessions this year will involve 'embedded
melabs Serial LCD Firmware Version 1.1 3/5/07
 melabs Serial LCD Firmware Version 1.1 3/5/07 The melabs Serial LCD (SLCD) can display serial data from either asynchronous RS232-style or synchronous I 2 C input. A range of baud rates from 2400 to 57,600
Introduction 1. Liquid crystal display (16 characters by 2 rows) Contrast dial: turn the dial to adjust the contrast of the display (see page 5)
 Contrast dial: turn the dial to adjust the contrast of the display (see page 5)") Welcome to the GENIE Serial LCD module. Introduction 1 The GENIE Serial LCD module allows GENIE-based projects to display messages on a 16 character by 2 row liquid crystal display (LCD). This worksheet
Welcome to the GENIE Serial LCD module. Introduction 1 The GENIE Serial LCD module allows GENIE-based projects to display messages on a 16 character by 2 row liquid crystal display (LCD). This worksheet
Designed & Developed By: Ms. Jasleen Kaur, PhD Scholar, CSE. Computer Science & Engineering Department
 Design & Development of IOT application using Intel based Galileo Gen2 board A Practical Approach (Experimental Manual For B.Tech & M.Tech Students) For SoC and Embedded systems in association with Intel
Analog Input. Sure sure, but how to make a varying voltage? With a potentiometer. Or just pot.
 Analog Input Sure sure, but how to make a varying voltage? With a potentiometer. Or just pot. +5V measure gnd Color coding: red goes to power, blue to ground, purple to measure here (it s a mix, see?)
What s inside the kit
 What s inside the kit 1 set Jumper Wires 5 pcs Tact Switch 1 pc Photoresistor 1 pc 400 Points Breadboard 1 pc Potentiometer 1 pc LCD 5 pcs 5mm Red LED 5 pcs 5mm Green LED 5 pcs 5mm Yellow LED 30 pcs Resistors
Robotics/Electronics Review for the Final Exam
 Robotics/Electronics Review for the Final Exam Unit 1 Review. 1. The battery is 12V, R1 is 400 ohms, and the current through R1 is 20 ma. How many ohms is R2? ohms What is the voltage drop across R1? V
Adapted from a lab originally written by Simon Hastings and Bill Ashmanskas
 Physics 364 Arduino Lab 1 Adapted from a lab originally written by Simon Hastings and Bill Ashmanskas Vithayathil/Kroll Introduction Last revised: 2014-11-12 This lab introduces you to an electronic development
The Big Idea: Background: About Serial
 Lesson 6 Lesson 6: Serial Serial Input Input The Big Idea: Information coming into an Arduino sketch is called input. This lesson focuses on text in the form of characters that come from the user via the
Developement of Multi Interface Board for Educational Trainer Kit
 Journal of Engineering Technology Vol. 2(1): 1-5, 2012 ISSN 2231-8798 2012UniKLBMI Developement of Multi Interface Board for Educational Trainer Kit M.R. Abdullah, Z. Zaharudin, Z. Mahmoodin, Z. Zainuddin
Lab 8: Sensor Characterization Lab (Analog)
") Objectives Lab 8: Sensor Characterization Lab (Analog) This lab introduces the methods and importance for characterizing sensors. Students will learn about how the Arduino interprets an analog signal.
Objectives Lab 8: Sensor Characterization Lab (Analog) This lab introduces the methods and importance for characterizing sensors. Students will learn about how the Arduino interprets an analog signal.
Contents. List of Figures. SPIDriver Datasheet 1. 1 Overview 2. 2 Features 2. 3 Installation with Arduino 3
 SPIDriver Datasheet 1 Contents 1 Overview 2 2 Features 2 3 Installation with Arduino 3 4 Operation 4 4.1 ANSI escape codes......................... 5 4.2 High-resolution modes........................ 6
Arduino: LCD Diagrams & Code Brown County Library
 Arduino: LCD Diagrams & Code Project 01: Hello, World! Components needed: Arduino Uno board breadboard 16 jumper wires 16x2 LCD screen 10k potentiometer /* LCD 01 : Hello World! Source: Code adapted from
Blinking an LED 1 PARTS: Circuit 2 LED. Wire. 330Ω Resistor
 Circuit PIN 3 RedBoard Blinking an LED LED (Light-Emitting Diode) Resistor (33 ohm) (Orange-Orange-Brown) LEDs (light-emitting diodes) are small, powerful lights that are used in many different applications.
Physical Computing Self-Quiz
 Physical Computing Self-Quiz The following are questions you should be able to answer without reference to outside material by the middle of the semester in Introduction to Physical Computing. Try to answer
8051 Intermidiate Development Board. Product Manual. Contents. 1) Overview 2) Features 3) Using the board 4) Troubleshooting and getting help
 Overview 2) Features 3) Using the board 4) Troubleshooting and getting help") 8051 Intermidiate Development Board Product Manual Contents 1) Overview 2) Features 3) Using the board 4) Troubleshooting and getting help 1. Overview 2. Features The board is built on a high quality FR-4(1.6
8051 Intermidiate Development Board Product Manual Contents 1) Overview 2) Features 3) Using the board 4) Troubleshooting and getting help 1. Overview 2. Features The board is built on a high quality FR-4(1.6
Introduction to Arduino. Wilson Wingston Sharon
 Introduction to Arduino Wilson Wingston Sharon cto@workshopindia.com Physical computing Developing solutions that implement a software to interact with elements in the physical universe. 1. Sensors convert
ARDUINO LEONARDO ETH Code: A000022
 ARDUINO LEONARDO ETH Code: A000022 All the fun of a Leonardo, plus an Ethernet port to extend your project to the IoT world. You can control sensors and actuators via the internet as a client or server.
Thursday, September 15, electronic components
 electronic components a desktop computer relatively complex inside: screen (CRT) disk drive backup battery power supply connectors for: keyboard printer n more! Thursday, September 15, 2011 integrated
Lab 2 - Powering the Fubarino. Fubarino,, Intro to Serial, Functions and Variables
 Lab 2 - Powering the Fubarino Fubarino,, Intro to Serial, Functions and Variables Part 1 - Powering the Fubarino SD The Fubarino SD is a 56 pin device. Each pin on a chipkit device falls broadly into one
Arduino Prof. Dr. Magdy M. Abdelhameed
 Course Code: MDP 454, Course Name:, Second Semester 2014 Arduino What is Arduino? Microcontroller Platform Okay but what s a Microcontroller? Tiny, self-contained computers in an IC Often contain peripherals
Lab 3 XBees and LCDs and Accelerometers, Oh My! Part 1: Wireless Communication Using XBee Modules and the Arduino
 University of Pennsylvania Department of Electrical and Systems Engineering ESE 205 Electrical Circuits and Systems Laboratory I Lab 3 XBees and LCDs and Accelerometers, Oh My! Introduction: In the first
StenBOT Robot Kit. Stensat Group LLC, Copyright 2018
 StenBOT Robot Kit 1 Stensat Group LLC, Copyright 2018 Legal Stuff Stensat Group LLC assumes no responsibility and/or liability for the use of the kit and documentation. There is a 90 day warranty for the
Device: LDP This document Version: 1.0. Date: July Description: 80x08 1R1G LED Display Panel
 Device: LDP-8008 This document Version: 1.0 Date: July 2010 Description: 80x08 1R1G LED Display Panel Table of Contents Introduction... 3 Nomenclature... 3 Connections... 3 Power... 3 Pinouts... 4 Controlling
GUIDE TO SP STARTER SHIELD (V3.0)
") OVERVIEW: The SP Starter shield provides a complete learning platform for beginners and newbies. The board is equipped with loads of sensors and components like relays, user button, LED, IR Remote and
OVERVIEW: The SP Starter shield provides a complete learning platform for beginners and newbies. The board is equipped with loads of sensors and components like relays, user button, LED, IR Remote and
User Manual. ESP8266 Wifi Shield
 User Manual Of ESP8266 Wifi Shield Description The shield is designed based on esp8266 by Espressif Systems, pin-compatible with Arduino UNO/Mega2560 DevBorad. Which can be used as two independent part,
Downloaded from Elcodis.com electronic components distributor
 CONTENTS LV24-33A KEY FEATURES 4 CONNECTING THE SYSTEM 5 INTRODUCTION 6 Switches and Jumpers 7 MCU Sockets 8 Power Supply 10 On-board USB 2.0 Programmer 11 RS-232 Communication Circuit 12 LEDs 14 Push
Lab 5: LCD and A/D: Digital Voltmeter
 Page 1/5 OBJECTIVES Learn how to use C (as an alternative to Assembly) in your programs. Learn how to control and interface an LCD panel to a microprocessor. Learn how to use analog-to-digital conversion
ARDUINO MICRO WITHOUT HEADERS Code: A000093
 ARDUINO MICRO WITHOUT HEADERS Code: A000093 Arduino Micro is the smallest board of the family, easy to integrate it in everyday objects to make them interactive. The Micro is based on the ATmega32U4 microcontroller
Laboratory 1 Introduction to the Arduino boards
 Laboratory 1 Introduction to the Arduino boards The set of Arduino development tools include µc (microcontroller) boards, accessories (peripheral modules, components etc.) and open source software tools
Prototyping & Engineering Electronics Kits Basic Kit Guide
 Prototyping & Engineering Electronics Kits Basic Kit Guide odysseyboard.com Please refer to www.odysseyboard.com for a PDF updated version of this guide. Guide version 1.0, February, 2018. Copyright Odyssey
ARDUINO M0 PRO Code: A000111
 ARDUINO M0 PRO Code: A000111 The Arduino M0 Pro is an Arduino M0 with a step by step debugger With the new Arduino M0 Pro board, the more creative individual will have the potential to create one s most
ARDUINO EXPERIMENTS ARDUINO EXPERIMENTS
 ARDUINO EXPERIMENTS IR OBSTACLE SENSOR... 3 OVERVIEW... 3 OBJECTIVE OF THE EXPERIMENT... 3 EXPERIMENTAL SETUP... 3 IR SENSOR ARDUINO CODE... 4 ARDUINO IDE SERIAL MONITOR... 5 GAS SENSOR... 6 OVERVIEW...
SC1602LC 16x2 Large Characters RS232 LCD Module. User s Manual. Large Viewing Area 99mm x 24mm. Large Character Size. 4.84mm x 9.66mm.
 Large Viewing Area 99mm x 24mm Large Character Size 4.84mm x 9.66mm Features 16x2 Large Characters LCD RS232 Interface Simple Serial Command Wide Range Voltage Operation ( 9-15V ) 8 User s Defined Characters
Arduino. (Digital-to-Analog Converter D/A D2A) (Digital to Analog Conversion) 3. (Analog to Digital conversion)
 (Digital to Analog Conversion) 3. (Analog to Digital conversion)") Arduino 1. 2. (Digital to Analog Conversion) 3. (Analog to Digital conversion) 1 2 Analog to Digital Converter (ADC) (Digital-to-Analog Converter D/A D2A) Digital to Analog Converter (DAC) 3 4 DAC Binary
Arduino 1. 2. (Digital to Analog Conversion) 3. (Analog to Digital conversion) 1 2 Analog to Digital Converter (ADC) (Digital-to-Analog Converter D/A D2A) Digital to Analog Converter (DAC) 3 4 DAC Binary
REQUIRED MATERIALS Epiphany-DAQ board Wire Jumpers IR Rangefinder Sensor LED Resistors Breadboard Multimeter (if needed)
") Page 1/5 Lab 2: Intro to ADC and USART January 18, 2016 OBJECTIVES This lab will further introduce you to the concept of developing with a microcontroller. Focus will be placed on the use of the Analog
Page 1/5 Lab 2: Intro to ADC and USART January 18, 2016 OBJECTIVES This lab will further introduce you to the concept of developing with a microcontroller. Focus will be placed on the use of the Analog
ENGG1015: Lab 7. In Search of Light
 ENGG0: Lab 7 In Search of Light st Semester 202-3 $ ' The goal of this lab is to complete the basic construction of the last stage of your project a light tracker. By doing so, you will learn to use an
Earthshine Design Arduino Starters Kit Manual - A Complete Beginners Guide to the Arduino. Project 13. Serial Temperature Sensor
 Project 13 Serial Temperature Sensor 75 Project 13 - Serial Temperature Sensor Now we are going to make use of the Temperature Sensor in your kit, the LM35DT. You will need just one component. What you
The Atmel ATmega328P Microcontroller
 Ming Hsieh Department of Electrical Engineering EE 459Lx - Embedded Systems Design Laboratory 1 Introduction The Atmel ATmega328P Microcontroller by Allan G. Weber This document is a short introduction
LDR_Light_Switch2 -- Overview
 LDR_Light_Switch2 -- Overview OBJECTIVES After performing this lab exercise, learner will be able to: Use LDR (Light Dependent Resistor) to measure the light intensity variation in terms of voltage at
Alessandra de Vitis. Arduino
 Alessandra de Vitis Arduino Arduino types Alessandra de Vitis 2 Interfacing Interfacing represents the link between devices that operate with different physical quantities. Interface board or simply or
DEV-1 HamStack Development Board
 Sierra Radio Systems DEV-1 HamStack Development Board Reference Manual Version 1.0 Contents Introduction Hardware Compiler overview Program structure Code examples Sample projects For more information,
Lab 5: LCD and A/D: Digital Voltmeter
 Page 1/5 OBJECTIVES Learn how to use C (as an alternative to Assembly) in your programs. Learn how to control and interface an LCD panel to a microprocessor. Learn how to use analog-to-digital conversion
GOOD MORNING SUNSHINE
 Item 11: Good Morning Sunshine Monday, 15 October 2018 12:30 PM GOOD MORNING SUNSHINE EXPLORE WALT: definition and decomposition of complex problems in terms of functional and non-functional requirements
Bill of Materials: Turn Off the Lights Reminder PART NO
 Turn Off the Lights Reminder PART NO. 2209650 Have you ever woke up early in the morning to find out that the kids (or adults) in your home forgot to turn off the lights? I've had that happen a number
Goal: We want to build an autonomous vehicle (robot)
") Goal: We want to build an autonomous vehicle (robot) This means it will have to think for itself, its going to need a brain Our robot s brain will be a tiny computer called a microcontroller Specifically
Goal: We want to build an autonomous vehicle (robot) This means it will have to think for itself, its going to need a brain Our robot s brain will be a tiny computer called a microcontroller Specifically
CARTOOINO Projects Book
 1 CARTOOINO Projects Book Acknowledgement Acknowledgement This Cartooino Projects Book is a cartoon based adaptation of the Arduino Projects Book. The Cartooino Project Book was developed by the GreenLab
Lab 2 - Powering the Fubarino, Intro to Serial, Functions and Variables
 Lab 2 - Powering the Fubarino, Intro to Serial, Functions and Variables Part 1 - Powering the Fubarino SD The Fubarino SD is a 56 pin device. Each pin on a chipkit device falls broadly into one of 9 categories:
SPDM Level 2 Smart Electronics Unit, Level 2
 SPDM Level 2 Smart Electronics Unit, Level 2 Evidence Folder John Johns Form 3b RSA Tipton 1.1 describe the purpose of circuit components and symbols. The candidate can describe the purpose of a range
CORTESIA ELECTRONICCA
 Connect with I2C The first option we'll show is how to use the i2c interface on the backpack. We'll be showing how to connect with an Arduino, for other microcontrollers please see our MCP23008 library
Arduino UNO R3 ESP8266 Web Server Serial Port WiFi Shield ESP13
 Arduino UNO R3 ESP8266 Web Server Serial Port WiFi Shield ESP13 1. Pin Explanation G: GND 5V: 5V Power Output D:connecting to digital port(d2-d13)of arduino control board 1 Control Switch: to control the
LDR_Light_Switch5 -- Overview
 LDR_Light_Switch5 -- Overview OBJECTIVES After performing this lab exercise, learner will be able to: Interface LDR and pushbutton with Arduino to make light controlled switch Program Arduino board to: