JGAURORA 3D PRINTER MODEL: A-4 USER GUIDE
|
|
|
- Piers Martin
- 5 years ago
- Views:
Transcription


1 JGAURORA 3D PRINTER MODEL: A-4 USER GUIDE 1
2 Contents 1. Preface Introduction Safety matters Filament requirements Environmental requirements About A Basic reference Views of A Nozzle exploded view Tool box lists About JGcreat software Software installation JGcreat introduction Basic printing Control menu introduction Main menu introduction Platform leveling Filament loading Filament replacement notes First printing Common problems and solutions D printer maintenance Daily maintenance Basic maintenance Transmission components maintenance Supports and service
3 1. Preface ----3D Printer User Guide I.1 Introduction The JGAURORA A-4 User Guide is designed for the A-4 users to start their printing journey with JGAURORA A-4. Even if you are familiar with earlier JGAURORA machines or 3D printing technology, we still recommend that you read through this guide, as there is lots of important information about the A-4 for you to get a better 3D experience. 1.2 Security matters 1) During printing, the temperature of nozzle part can be up to 250. To ensure safety, it is forbidden to touch the nozzle and build plate directly with hand. 2) during the running of the machine, it is forbidden to extend the hand into the machine to prevent the clip. 3) Always use the A-4 with a properly grounded outlet. Do not modify A-4 plug. 4) When the A-4 continuously work over 96 hours, it should be stop for 1-3 hours to restart. 5) Do not remove the models with force, and we recommend that you should wear protective glasses. 1.3 Filament requirements Do not abuse the filament. Please make sure you use the JGAURORA filament or the filament from the brands accepted by JGAURORA. If you won t use the A-4 in a long time, to avoid damp and affect print quality, you should remove the filament from the A-4 and sealed it. At the same time, to avoid filament knot, we should make its leading end fixed into the hole of filament tray. All polymers degrade with time. Do not unpack until filament is needed. Filament should be stored at room temperature:15-30 and in dry conditions. 1.4 Environmental requirements The printing temperature should between 5~40, humidity: 20%~50%, only in this range can the 3D printer work normally. 3
4 2. About A D Printer User Guide 2.1 Basic reference Model number: A-4 Layer thickness: 0.1~0.3mm Printing speed: 10~150mm/s XY axis positional accuracy: 0.015mm Z axis positional accuracy: mm Nozzle temperature: room temperature to 250 Nozzle diameter: 0.4mm Support material: PLA /TPU Software: JGcreat Filament diameter: 1.75mm AC Input: AC110~220V, 0.4A Print Technology: FDM(Fused Deposition Modeling) Device weight: 17kg Package size: 500*510*530mm Number of extruder: single Build volume: 150*140*140mm Platform material: special magnetic plate LCD display: 4.3 color IPS Touch Screen Connectivity: USB cable/ USB stick Support Formats: STL, OBJ, G-Code Machine dimension: 432*395*418mm OS: Windows, Linux, Mac 2.2 Views of A
5 1. Touch screen 2. LED light switch 3. Extruder 4. Build plate 5. Filament cartridge 6. USB cable input 7. USB stick input 8. Z-axis guide rod 9. Power Switch 10. Power input ----3D Printer User Guide 2.3 Nozzle exploded view 1.Extrusion board 2. Bearing 3. Square fan 4. Driven shaft 5. Squeezing screw 6. Nozzle heating part 7. Extrusion spring 8. Stepper motor 9. Extrusion gear 10. Heat Sink 11. Extruder fixing plate 12. Extruder PCB board fixing plate 13. Extruder PCB board 14. Extruder cover 15. Flexible flat cable 16. Thermocouple 17. Thermistor 18. Flexible flat cable pressing plate 19. Wind guide 20. Turbofan 21. Shifting pressing plate 5

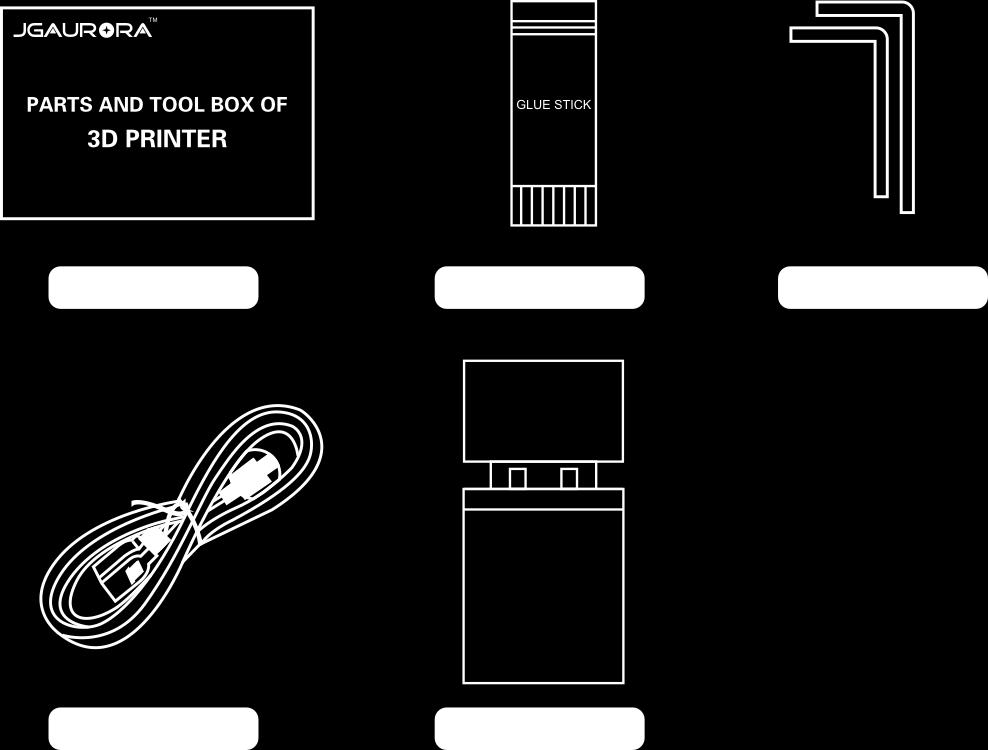
6 2.4 Tool box lists 6


 Click the")
7 3. About JGcreat software 3.1 Software installation Copy the files in USB stick to your PC, double click the software installation icon, and enter the software installation interface, the installed process is as the picture shown: Double click Choose where you want to install press Next (N) Press Next(N) Click the choice,press Install (I) Press Repair (R) 7
")

 Double click to open")
8 Press Next(N) Press Finish Press Next(N) Choose the box as pic,press Finish(F) After clicking the Finish icon, the installation of software is completed. 3.2 JGcreat introduction 1) Open the software(jgcreat) Double click to open the JGcreat 8

: ----3D")
9 2) Choose the language you prefer(english as a example): ----3D Printer User Guide 9


10 3) Add printer ----3D Printer User Guide choose A-4, then press Add Printer 4) Load 3d file and slice it Load a 3d file of stl or obj, select the appropriate print quality, the lower right corner of the software shows "Slicing", that is to generate Gcode code. Choose the print quality you prefer 10
 Copy the G-code to the USB stick, insert it to USB port on the")

11 After slicing is completed, the lower right corner of the software shows "Save the file" D Printer User Guide 5) Copy the G-code to the USB stick, insert it to USB port on the A-4 printer, and then select the file of gcode to print through touching screen. Note: How to operate the JGcreat software, pls refer to the file of Instructions of JGcreat in the USB stick. 11
12 4. Basic printing 4.1 Control menu introction Pause/Start In Filament menu Out Filament Choose the Back Printing menu printing file Model printing menu Stop menu CONFIRM PLA option CANCEL Preheating menu Custom extruder temp. setting Back Setting menu Extruder temp. setting Fan speed setting All(back home) Back X(back home) Y(back home) Main menu Z(back home) Move menu X-axis go left/right Y-axis go forward /back Z-axis go up/down E-axis feed/retract filament Back Language Wifi pairing Set menu Remove USB Default Back 12


13 4.2 Main menu introduction WIFI Extruder temp. USB Stick connected Firmware Info. Print menu Preheat menu Move menu Setting menu 4.3 Platform leveling Press the MOVE button, then press All, the extruder part moves to home. Press All 13


14 After back to home, move the extruder part through the moving shafts according to the directions as shown in the diagram, Prepare a piece of A4 paper as a reference, place it on the platform, move the nozzle to the A4 paper and make some withdrawaling of A4 paper, if the A4 paper is too loose to withdrawal, then clockwise the rotary nut; if the A4 paper is too tight, then anti-clockwise it. Step 1: Move to Right backward Step 2: Move to Left backward Step 3: Move to Left forward Step 4: Move to Right forward Note: Any question, pls refer to the video of Platfrom Leveling in SD card. 4.4 Filament loading Press the "Preheat" option, enter into "Preheat menu", select a corresponding material. This User Guide take PLA as an example. Select PLA(200) 14


15 In the process of preheating, firstly we open the top cover and install the filament tray to the stand, shown as pic: Load filament though the guide tube till stretch out from other end. Install the filament tray to the stand. Note: Load filament in the direction of clockwise. Press the pressing screw on the left side of nozzle, insert the straight filament with the other hand. When the temp. up to 200, click Move -- E+ button, till filament spill out. Filament spill out from the nozzle. Filament loading finished. 15

16 4.5 Filament replacement notes 1) In the process of model printing, when the filament is almost used up, pls follow the following steps for refueling: a: Click Pause on the interface of A-4, then the X axis will go back to the home. b: Click the "E-" button, and take off the tray after the filament is returned. c: Install the a new roll of filament, click the "E+" button, untill feeding finished. d: Click the BACK button, and enter the model print mode, and then click Start button to restore the printing. 2) When filament replacing, you are adviced to preheat the printer first, and then press the pressing screw with one hand, while push the filament down about 5-10CM with the other hand, then quickly pull it up. Pls do not pull it out savagely, otherwise, which will cause irreparable damage to the nozzle. 4.6 First printing 1) Model loading: Select and load the 3d file you want to print, or drag it directly into the software window. Click Open File 2) G-code save: After the 3d file slicing is finished, click Save to File button in the lower right corner to save, and then name it, copy it to the USB stick. Save the file 16


17 3) Insert the USB STICK into the USB port on the A-4, and then click "PRINT" on the "main menu", choose the 3d file of gcode. Click "START", the A-4 will preheat automatically, then the temp. of nozzle will reach the printing temperature you setted in the software, model printing begin until it is finished. Select the file you prefer to print. Click PRINT Note: when printing, if the first 1/2 layers can not be attached to the platform, please stop printing and re-leveling the gap between the platform and the nozzle. 17
18 5. Common problems and solutions ----3D Printer User Guide Item No. Problems description Reason Solution 1 Filament break at the extruder up end a. Forget to replace the filament which has used up b. Filament was oxy-genated. c. Filament was plugging in the throat. a. Replace flament in time. b. Seal the filament off when printing finished. c. Clean the throat, deal with it according to the video in USB stick. 2 Slip Filament is too thin Cut the thin filament 3 Temp. Is unusual Broken temp.sensor Change a new one 4 Different shape as STL Screw is loose Check and Lock the screws 5 The model is warped The hot bed is not at a level Adjust hot bed 6 G-code gerating failed Wrong setting or wrong save path Choose the right machine type and change the right path 7 Software Installation failed Different OS Reset OS Notes: When re-start to print, please re-leveling the platform, to avoid damage to the nozzle and platform. 18
19 6. 3D printer maintenance ----3D Printer User Guide 1. Daily maintenance 1) Before using the machine to print, make sure that every safety protection measure are in good condition. 2) Regularly clean and maintain the equipment, try to clean the surface of the nozzle, hot bed, moving parts and other parts neatly, so as to prevent wear caused by excessive dust. 3) After each repair and maintenance, it is necessary to install the disassembled parts back to their original places, so as to avoid mechanical failures caused by missing and wrong loading. 2. Basic maintenance 1) Every day before opening the 3D printer, it is necessary to do some inspection carefully: whether the nozzle is blocked or damaged, the connection line of each part is normal, whether the guideway or optical axis is lack of oil, and whether the platform is calibrated and adjusted equally. when found rentate in nozzle, you need to immediately clean up; when parts or lines are damaged or aging, you should promptly replace them; add lubricating oil regularly to the rail or the optical axis; in the calibration process, if found the screw nut is loose, you should use six angle wrench, screwdriver, wrench and other tools to tighten it. 2) In the printing process of 3D printer,not only the design of each print model can not exceed the actual print range of the device, but also can not allow the machine to work in the too high temperature and too much load. Otherwise, it not only can not print the qualified product, but also damage the machine because the overload work. 3) In order to make you use print better, please pull out the print materials within the remaining extrusion head after finishing the printing work, and sealed well printed materials to prevent material becom damp and then break in the nozzle, finally cause nozzle clogging. 3. Transmission components maintenance When your machine is running, the noise becomes larger and the vibration becomes larger while moving. Then you need to clean the rail stains and add some lubricating oil to reduce the friction. specific Methods: first with a clean dust cloth to clean the grease or dust on moving parts, then drop 3-5ml (about 5-8 drops) lubricating oil, thirdly paint respectively that to the machine or rail axis, and move the moving parts to and fro, so that oil lubricate guide rail and polish rod. 19


20 7. Supports and service ----3D Printer User Guide 1. This product of A-4 implement the relevant regulations corresponding to the "Warranty Card". 2. If this A-4 is out of order, please don't repair it by yourself immediately, pls contact the after-sale service center or our support team firstly. Shenzhen Aurora Technology Co., Ltd Headquarter Address: 5F Building 1 Longquan Technology Park, Tongsheng community, Dalang street Longhua district, Shenzhen, China Company homepage: Tel of after sales service center/support team: / of support: support@zgew3d.com or after-sales@3derwo.com Official website Official Facebook 20
Operation Instruction
 JGAURORA 3D Printer Model:Z-603S Operation Instruction www.jgaurora3d.com Read it carefully before printing and keep it properly. - 0 - - 1 - Z- 603S model is designed FDM 3d printer by Shenzhen Aurora
Ender 3 Series 3D Printer Quick Start Guide
 Ender 3 Series 3D Printer Quick Start Guide This guide is for the Ender 3 Series of 3D printers. Select the correct input voltage to match your local mains (220V or 110V) Because of software/hardware upgrades
Dreamer Series User Manual
 Dreamer Series User Manual Welcome to the world of the Dreamer. To ensure that you have the best possible user experience, it s important that you follow this user manual. Let s get started! In Parts I
Product User Manual. IdeaWerk 3D Printer WT150
 Product User Manual IdeaWerk 3D Printer WT150 Contents Contents 1. Unpack and checking... 1 1.1 Check the Machine... 1 1.2 Check the Accessories... 3 2. Brief Introduction... 3 2.1 Precautions and Safety...
DIY PRINTER INSTALLATION AND OPERATION INSTRUCTION
 CTC DIY I3 PRINTER INSTALLATION AND OPERATION INSTRUCTIONS Thank you for buying and using DIY 3D printer produced by CTC Please read the installation and operation instruction carefully before use Company
SHENZHEN GETECH TECHNOLOGY CO., LTD. Geeetech A10 3D Printer. User Manual (V2.0)
") Geeetech A10 3D Printer User Manual (V2.0) 1 Content 1 Attention... 3 1.1 Safety instruction... 3 1.2 Factory test before delivery... 3 2 Printer display... 4 3 Assembling... 7 3.1 Assembling the main
Geeetech A10 3D Printer User Manual (V2.0) 1 Content 1 Attention... 3 1.1 Safety instruction... 3 1.2 Factory test before delivery... 3 2 Printer display... 4 3 Assembling... 7 3.1 Assembling the main
ENJOY Introduction. Software Installation* Hardware. Calibration Settings. Print test. Appendex. Install print S/W Driver Install
 Quick Start Manual 1 ENJOY Introduction C O N T E N T S 6 5 Appendex 4 Print test 3 2 Hardware Calibration Settings Software Installation* Install print S/W Driver Install Hardware Intro Cable installation
Instruction Manual. RS 3D Printer
 Instruction Manual RS 3D Printer 1) GENERAL This instruction manual contains important information regarding the installation, operation, maintenance and storage for RS 3D Printer. Please read these instructions
Geeetech Duplicator 5 3D printer. User Manual
 Geeetech Duplicator 5 3D printer User Manual Contents Safety Instructions... 4 1.Software Resources... 5 1.1 Repetier-Host... 5 1.2 Driver... 5 1.3 Arduino IDE... 6 2.Connect the Printer... 6 3.Printer
Portabee GO. Mobile 3D Printer. Portabee 3D. Romscraj. Software & Support. Manufacturing & Engineering.
 Portabee GO Mobile 3D Printer Portabee 3D Software & Support http://portabee3d.com support@portabee3d.com Romscraj Manufacturing & Engineering http://romscraj.com contact@romscraj.com A. Software Package
Model: 3-Axis High Quality Self-Assembled 3D Printer Kit. Panowin F1
 ESTIMATE No.: Client: Telephone: E-mail: Address: City, State: Contact: Cell-Phone: Fax: Zip Code: Country: Panowin Technologies Co., Ltd. Model: 3-Axis High Quality Self-Assembled 3D Printer Kit Panowin
DIY PRINTER INSTALLATION AND OPERATION INSTRUCTION
 CTC DIY PRINTER INSTALLATION AND OPERATION INSTRUCTION Thank you for buying and using DIY 3D printer produced by CTC Please read the installation and operation instruction carefully before use Company
da Vinci 1.0 Pro Quick Guide
 US da Vinci 1.0 Pro Quick Guide Product Description Print Parameters Description Support Details Product Model: da Vinci 1.0 Professional da Vinci 1.0 Pro Product Description Product Overview Cartridge
SHENZHEN GETECH TECHNOLOGY CO LTD. Geeetech A10M 3D Printer. User Manual (v2.0)
") Geeetech A10M 3D Printer User Manual (v2.0) 1 Content 1 Attention... 3 1.1 Safety instructions... 3 1.2 Factory test before delivery... 3 2 Printer display... 4 3 Assembling... 7 3.1 Assembling the main
Geeetech A10M 3D Printer User Manual (v2.0) 1 Content 1 Attention... 3 1.1 Safety instructions... 3 1.2 Factory test before delivery... 3 2 Printer display... 4 3 Assembling... 7 3.1 Assembling the main
USING YOUR BIGBOT. 1/18/2017 V0.1
 USING YOUR BIGBOT www.bigbot-3d.com 1/18/2017 V0.1 FOREWORD: YOUR PRINTER IS REPRAP, WHICH STANDS FOR "REPLICATING RAPID PROTOTYPERS". THIS MEANS IT CAN PRINT THE PARTS THAT ARE CUSTOM FOR THIS MACHINE,
Geeetech Aluminum Prusa I3. User Manual
 Geeetech Aluminum Prusa I3 User Manual 1 Safety Instructions Building the printer will require a certain amount of physical dexterity, common sense and a thorough understanding of what you are doing. We
3D Prototyping X1 3D Printer. User Manual V1.3
 3D Printer User Manual V1.3 COPYRIGHT This document is copyrighted and contains proprietary information that is the property of 3D Prototyping Pty Ltd. The user does not have the right to copy, reproduce,
Runtime Environment: Relative Humidity: 30%~90% Temperature Ranges : 5 ~35
 Product Data sheet IdeaWerk 3D Printer ENGLISH Runtime Environment: Relative Humidity: 30%~90% Temperature Ranges : 5 ~35 Technical Parameters: 1. Electrical Parameters Power Input: AC 100-240V 47/ 63Hz
think big, print huge
 think big, print huge quick start guide Table of Contents a Receiving and uncrating 5 b bed level & z home 11 c Loading filament 19 d SOFTWARE 23 e Setup 23 f preparing a print 26 g printing on gigabot
ideamaker Manual
 ideamaker Manual Using ideamaker... 2 Basic information... 2 What is ideamaker?... 2 Where to download ideamaker?... 2 Install ideamaker... 3 Let s Print!... 6 How to use ideamaker?... 23 Interface...
GEEETECH. Me Creator2 printers contain heated moving parts. Never reach inside the printer while it is in operation or before it has cooled down.
 ME CREATOR 2 SAFETY INSTRUCTION Do read all the instructions and cautionary markings in this manual before operating your Me Creator. Me Creator2 printers contain heated moving parts. Never reach inside
Geeetech A10M. Desktop 3D Printer USER MANUAL
 Geeetech A10M Desktop 3D Printer USER MANUAL Terms Please be advised of the following terms (the Terms ) regarding this User Manual (this Manual ): All information in this Manual is subject to change at
USER MANUAL Resolution 0.02mm Speed 300mm/second Software: Wanhao Maker
 1 Duplicator 5S & 5S MINI Desktop 3D Printers USER MANUAL Resolution 0.02mm Speed 300mm/second Software: Wanhao Maker 2014/2015 Wanhao USA 3 Table of Contents Welcome 1 Printer Specifications 2 Unboxing
QUICK START GUIDE ENTER AN ENVIRONMENT OF PROFESSIONAL 3D PRINTING
 QUICK START GUIDE ENTER AN ENVIRONMENT OF PROFESSIONAL 3D PRINTING MEET THE ZORTRAX M200 Zortrax M200 3D printer transforms virtual projects into three-dimensional reality. It is used to prototype and
da Vinci Jr.1.0 April 2016 da Vinci Junior 1.0w 3D Printer da Vinci Jr.1.0w Quick Guide HD23F1JW0N1
 da Vinci Junior 1.0w 3D Printer w Quick Guide P 1 Product Overview A: Filament movement area B: Feed module C: Detector D: Extruder E: Filament F: Print bed G G: SD card port (Storage format: FAT32) H:
3D SYSTEMS University Cube 3D Printer
 3D SYSTEMS University Cube 3D Printer Lesson Troubleshooting Machine Issues Revision date: 10/20/13 1 1 2016 年 6 月 14 日 Table of Contents Slide 3 Temperature Errors Slide 5 File Read Errors Slide 7 Filament
Quickstart Guide Kora Pro 3D PC Printer
 Quickstart Guide Kora Pro 3D PC Printer 1 Rev001/01/2018 Kora Pro PC General Precautions and Advice Only use original accessories from or approved by the manufacturer Always read the manual before initial
Cura (Documentation for version )
") Cura (Documentation for version 15.04.06) Getting Started Installation To start the installation of Cura, download it first. After downloading, open the installer and run the installation wizard to complete
Cura (Documentation for version 15.04.06) Getting Started Installation To start the installation of Cura, download it first. After downloading, open the installer and run the installation wizard to complete
Geeetech A10. Desktop 3D Printer USER MANUAL
 Geeetech A10 Desktop 3D Printer USER MANUAL Terms Please be advised of the following terms (the Terms ) regarding this User Manual (this Manual ): All information in this Manual is subject to change at
3-7. Set Materials (Touch Screen) Set Materials (Software) Material Weight adjustment (grams) Current material weight. Increase.
 Set Materials (Software) Material Weight adjustment (grams) Current material weight. Increase.") Set Materials (Touch Screen) 3-7 Decrease Material Weight adjustment (grams) Increase Current material weight Save current settings Stop extrusion and heating Back withdraw material change material extrude
Set Materials (Touch Screen) 3-7 Decrease Material Weight adjustment (grams) Increase Current material weight Save current settings Stop extrusion and heating Back withdraw material change material extrude
Panowin F1. User Manual
 Panowin F1 User Manual 1 PANOWIN TECHNOLOGIES CO.,LTD. WARNING power outlet. CAUTION: In case of emergency unplug the Panowin F1 from the WARNING: Carefully monitor the Panowin F1 during operation. Do
DOT MATRIX PRINTER SP6000 SERIES
 DOT MATRIX PRINTER SP6000 SERIES Hardware Manual < Approval: CEL > Trademark acknowledgments SP6000 : Star Micronics Co., Ltd. Notice All rights reserved. Reproduction of any part of this manual in any
3D BIO-PRINTER. USER MANUAL Version D Cultures
 3D BIO-PRINTER 3D Cultures USER MANUAL Version 2.0 Product pictures are for reference only. Color(s), size, parts, and interface may vary. Preheating is not recommend with the use of cells. This manual
V1.0. UP300 User Manual. Tiertime Corporation Copyright Tiertime All rights reserved
 V1.0 UP300 User Manual Tiertime Corporation Copyright Tiertime 2018. All rights reserved 1. SAFETY AND PRINTING ENVIRONMENT 2 1.1 SAFETY PRECAUTIONS 2 1.2 PRINTING ENVIRONMENT 3 1.3 ONE YEAR WARRANTY 3
M2 3D Printer V4 M2 3D Printer
 M2 3D Printer V4 Contents 2 Important Safeguards 3 Welcome 4 M2 Features 6 Other products included with your printer 7 Set up 9 Slicing.STL or.obj files 10 Maintenance and Support 11 Warranty 12 About
da Vinci Super Quick Guide da Vinci Super Safety Precautions Product instructions Unboxing and Installation Product specification
 September. 2017 da Vinci Super Quick Guide ENG Safety Precautions Product instructions Unboxing and Installation Product specification Function Operation and Instructions Setting Print Supporting information
English. Quick Guide
 English Quick Guide Specification Product Overview Button and Indicator light Unpacking Accessory Checklist Important Safety Notes Extruder module installation Accessory installation XYZware operation
JanusRAID SA-6692J Hardware User Manual
 JanusRAID SA-6692J Hardware User Manual 42-30000-5067 SATA II JBOD enclosure Version 1.1 SA-6692J SATA II JBOD enclosure Hardware User Manual Table of Contents Preface... i Chapter 1 System Requirements
ZHEJIANG FLASHFORGE 3D TECHNOLOGY CO., LTD. Creator Pro Start-up Guide
 www.ff3dp.com ZHEJIANG FLASHFORGE 3D TECHNOLOGY CO., LTD. Creator Pro Start-up Guide www.ff3dp.com Contents 1 What's Included in the Box? 2 2 Un-boxing 2 3 Initial Hardware Installation 6 4 Software Installation
Cutter Option Installation Instructions
 This kit includes the parts and documentation necessary to install the cutter option on the Zebra XiII, XiIII, and XiIIIPlus-Series printers. NOTE: The Cutter Option is not available for the 96XiIII. Adding
Video measuring machine
 1 YVM-T series Video measuring machine Instruction for users 2 Content 1.Instrument use 3 2.Specification 4 3.Structure & Principle 5 4.Unpacking & Installation 6 5.Measuring method 7 6.Equipment maintenance
Please carefully read the safety instructions before get started.
 Safety Instructions Please carefully read the safety instructions before get started. ANYCUBIC 3D printer generates high temperature. Do not reach inside of the printer during operation. Allow time for
Contents. Ⅵ. Maintenance Ⅶ. Maintenance Service Provision... 69
 0 Contents INTRODUCTION... 2 A. Security Considerations... 3 B. Product Details... 4 1.Specifications... 4 2.Machine parts... 4 3.Exploded drawing... 5 4.Tool List... 6 C. Cura Software... 9 1.Installation
MultiTherm Shaker. Operations Manual Item: H5000-H and H5000-HC
 MultiTherm Shaker Operations Manual Item: H5000-H and H5000-HC Foreword Thank you for purchasing a MultiTherm Shaker. This operations manual contains instructions for the care of this Instrument. In order
Replacing the TFM coupler
 Repair manual Replacing the TFM coupler Instructions The TFM coupler is a key component of the hot end. It allows filament to flow smoothly through it from the Bowden tube and towards the nozzle. The coupler
USER S GUIDE. Documentation Version 1.2.6
 Documentation version 1.2.6 USER S GUIDE INTRODUCTION 2 INTRODUCTION INTRODUCTION / 3 INTRODUCTION Objective: Provide a visual guide of the different steps to set-up and get started using the MicroDelta
MAKERGEAR USER GUIDE. V4 Rev. E Made in the USA since 2009
 MAKERGEAR USER GUIDE M2 V4 Rev. E Made in the USA since 2009 Contents 1 - Welcome 2 - Warning & Important Safeguards 4 - What's Included 5 - Set Up 8 - Slicing.STL or.obj Files 10 - Changing Filament 11
C-pan arm USERS INSTRUCTIONS
 C-pan arm USERS INSTRUCTIONS Designed 1 of 12 and made in Denmark Thanks for purchasing a 9.Solutions product. With great passion, we design our products to be as versatile as possible. We hope that our
Well Link Industries Limited
 Well Link Industries Limited 3D Printing 3D printing is no longer a science fiction. It helps to change from prosthetics and regenerative medicine to structures in space. In 2013, second term State of
MostFun Sail Getting Started V Chengdu MostFun S&T Co.,Ltd.
 MostFun Sail Getting Started V0.96.3 Chengdu MostFun S&T Co.,Ltd. Catalog Product introduction... 2 Parameter...2 The first use of the machine...3 Unboxing... 3 Driver installation... 5 Installing driver
USER S GUIDE. Documentation Version 1.0.0
 Documentation version 1.0.0 tt USER S GUIDE INTRODUCTION 2 INTRODUCTION INTRODUCTION / 3 INTRODUCTION Target : Provide a visual guide of the different steps required to use an I3 Metal Motion 3D printer.
Select Mini 3D Printer V2
 Select Mini 3D Printer V2 P/N 15365, 21711, 21872, 24166 User's Manual CONTENTS SAFETY WARNINGS AND GUIDELINES... 3 INTRODUCTION... 4 FEATURES... 4 CUSTOMER SERVICE... 5 PACKAGE CONTENTS... 5 PRODUCT OVERVIEW...
Portal Delta Pro 3D printer
 Portal Delta Pro 3D printer User s Manual v1.0 Welcome to the world of 3D printing! Thank you for your purchase of the Mass Portal 3D printer we hope that it will serve you well and even exceed your expectations.
DeltaMaker 3D Printer Getting Started
 DeltaMaker 3D Printer Getting Started Last Updated: December 2014 Table of Contents TABLE OF CONTENTS 2 WELCOME 3 SECTION 1: UNPACKING/SETUP 4 REMOVING THE PRINTER FROM THE BOX 4 INSTALLING THE FILAMENT
PowerSpec Ultra 3D Printer Start-up Guide Table of Contents
 PowerSpec Ultra 3D Printer Start-up Guide Table of Contents 1 What's Included in the Box?...Page 3 2 Un-boxing.Page 4 3 Initial Hardware Installation Page 6 4 Software Instruction.Page 8 5 Filament Page
4. Using Cura to Set Up Your Auto-Leveling Probe and Create Your First Print
 4. Using Cura to Set Up Your Auto-Leveling Probe and Create Your First Print Give a short summary. Written By: Printrbot Support INTRODUCTION Outline what you are going to teach someone how to do. 2015
3d Printing with the Prusa I3 Operation & Printing via a USB Cable
 3d Printing with the Prusa I3 Operation & Printing via a USB Cable Instructions for: Prusa I3 Printer Set-up Slic3r Software Use Pronterface Software Use Prusa I3 - Parts Identification Prusa I3 Printer
Removal and Installation 8
 Removal and Installation 8 8 Introduction 8-2 Service Calibration Guide to Removal and Installation 8-4 Window 8-8 Covers and Trims 8-12 Rear Tray 8-31 Rear Cover 8-32 Media Lever 8-33 Media Lever Position
Technical Support: CUBE USER MANUAL
 CUBE THE DESKTOP 3D PRINTER USER MANUAL 2012-12-05 1 Contents 1 Installing software...3 1.1 Installing Python... 3 1.2 Installing ReplicatorG... 5 2 Pre-print checks...9 2.1 Power up...9 2.2 Connect to
UP! Quick Start Guide
 Personal Portable 3D Printer UP! www.pp3dp.com 1. Assemble Printer Open the box, take out the printer and accessories. Assemble the parts contained in the box as following procedure: 1. Unscrew the M4
ideamaker Manual
 ideamaker Manual www.raise3d.com 1 Using ideamaker... 3 1.1 What is ideamaker?... 3 1.2 Where to download ideamaker?... 3 2 Install ideamaker... 4 3 Let s Print!... 9 3.1 Import.STL files... 9 3.2 Slice
Cura - DUET Dual Extrusion Setup
 SeeMeCNC Guides Written By: SeeMeCNC 2018 seemecnc.dozuki.com/ Page 1 of 15 INTRODUCTION Please note that dual extrusion is for advanced users. You should have some advanced knowledge on some G-Code and
VJ-1304 INSTALLATION MANUAL
 Please read this manual before using Thank you for purchasing a MUTOH product. This manual explains the steps for unpacking, mounting and basic installation before using the MUTOH Full-color inkjet printer
MUTOH EUROPE N.V. Tel.:32-(0) Fax:32-(0)
 Fax:32-(0)") MUTOH INDUSTRIES LTD. Tel.:8-(0)-570-00 Fax:8-(0)-570-00 E-mail:ibd@mutoh.co.jp http://www.mutoh.co.jp MUTOH AMERICA INC. Tel.:-80-968-777 Fax:-80-968-7990 E-mail:sales@mutoh.com http://www.mutoh.com MUTOH
MUTOH INDUSTRIES LTD. Tel.:8-(0)-570-00 Fax:8-(0)-570-00 E-mail:ibd@mutoh.co.jp http://www.mutoh.co.jp MUTOH AMERICA INC. Tel.:-80-968-777 Fax:-80-968-7990 E-mail:sales@mutoh.com http://www.mutoh.com MUTOH
M2 3D Printer V4 Rev. D
 M2 3D Printer V4 Rev. D Contents 2 Important Safeguards 3 Welcome 4 M2 Features 6 Other products included with your printer 7 Set up 9 Slicing.STL or.obj files 10 Maintenance and Support 11 Warranty 12
2 1.1 Safety using methods Definition of warning symbols Standard accessories Installation...
 Table of Contents 1 Satety precautions... 2 1.1 Safety using methods...2 1.2 Definition of warning symbols...2 2 Standard accessories......6 3 Installation... 7 3.2 Leg frame... 7 3.3 Installation and
Warnings & Guidelines:
 Please read the following instructions and warnings carefully. Keep this instruction manual for future reference. Tools required (for wall mouting Camera only): Screwdriver and Drill (not included) For
CAMERA ASSEMBLY. Removal/Replacement of the Camera Box Assembly APR-CA. Install Camera Assembly. Remove Camera Assembly
 CAMERA ASSEMBLY Removal/Replacement of the Camera Box Assembly APR-CA REQUIRED TOOLS: 9/64 hex key Small flat-tip screwdriver Remove Camera Assembly camera 1. Locate the camera assembly underneath the
Software Manual. Revision 1.3
 Software Manual Revision 1.3 Copyright 2015 by Kudo3D. This material may be distributed only subject to the terms and conditions set forth in the Creative Commons Attribution-NonCommercial-NoDerivatives
Select Mini Pro 3D Printer
 Select Mini Pro 3D Printer P/N 33012 User's Manual CONTENTS SAFETY WARNINGS AND GUIDELINES... 3 INTRODUCTION... 4 FEATURES... 4 CUSTOMER SERVICE... 5 PACKAGE CONTENTS... 5 PRODUCT OVERVIEW... 6 SETUP...
E3 CNC Router Troubleshooting Guide
 Simple Cost Effective Designs. E3 CNC Router Troubleshooting Guide The purpose of this document is to give those new to CNC routing is a quick reference for the common issues of getting the E3 CNC router
QIT600F1 USER'S GUIDE
 QIT600F1 USER'S GUIDE 1 IMPORTANT SAFEGUARDS Warnings: 1. Read all of these instructions. Save these instructions for later use, please. 2. Unplug this monitor from the wall outlet before cleaning. Do
E3 CNC Router Troubleshooting Guide
 Simple Cost Effective Designs. E3 CNC Router Troubleshooting Guide The purpose of this document is to give those new to CNC routing is a quick reference for the common issues of getting the E3 CNC router
ideamaker Manual
 ideamaker Manual www.raise3d.com 1 Using ideamaker... 3 1.1 What is ideamaker?... 3 1.2 Where to download ideamaker?... 3 2 Install ideamaker... 4 3 Let s Print!... 9 3.1 Import.STL files... 9 3.2 Slice
VJ-1604 INSTALLATION MANUAL
 Please read this manual before using Thank you for purchasing a MUTOH product. This manual explains the steps for unpacking, mounting and basic installation before using the MUTOH Full-color inkjet printer
SAFETY WARNINGS AND GUIDELINES... 4 INTRODUCTION... 5 FEATURES... 5 CUSTOMER SERVICE... 5 PACKAGE CONTENTS... 6 PRODUCT OVERVIEW Front View...
 CONTENTS SAFETY WARNINGS AND GUIDELINES... 4 INTRODUCTION... 5 FEATURES... 5 CUSTOMER SERVICE... 5 PACKAGE CONTENTS... 6 PRODUCT OVERVIEW... 7 Front View... 7 Rear View... 8 Bed Assembly... 9 Front and
CraftBot USER MANUAL THE ULTIMATE 3D PRINTER
 1 USER MANUAL 2 THE ULTIMATE 3D PRINTER 2 TABLE OF CONTENTS INTRODUCTION 3 IMPORTANT 4 WARNINGS 4 CAUTION! 5 CONTENTS OF THE BOX 5 INTRODUCING THE CRAFTBOT 3D PRINTER 6 UNPACKING THE CRAFTBOT PRINTER 7
Overview. Faced with the growing needs of the 3D. printing market, but also to give. consumers a better print experience,
 Overview Faced with the growing needs of the 3D printing market, but also to give consumers a better print experience, JGaurora staff, after two years effort, finally launched the sixth generation Phantom
Operation Manual WARNING. Be sure to read this Operation Manual before use. Universal Space Amusement Equipment Ltd.
 WARNING Be sure to read this Operation Manual before use. Universal Space Amusement Equipment Ltd. CONTENTS 1. The company..2 2. Specifications.. 3 3. Package Contents..5 4. Installation, Fix and Transport..6
User Guide Creator Pro Desktop 3D Printer
 www.ff3dp.com User Guide Creator Pro Desktop 3D Printer i 1 www.ff3dp.com Contents Acknowledgment...3 Commitment... 4 PRECAUTIONS...5 Chapter 1: What s in the Box?...6 Chapter 2: Unpacking...7 Chapter
3D Printers User Guide. M Series
 3D Printers User Guide M Series Table of Contents Introduction 3 Intended Use of Zortrax Printers 3 General Safety Information 4 Warning and Safety Labels on Zortrax Devices 6 Learn More About Zortrax
Manual for MantraJet 1100 CD/DVD auto-printer
 Manual for MantraJet 1100 CD/DVD auto-printer Rev 1.03 September 7, 2010 Table of contents Specifications...3 Unpacking MantraJet 1100...4 Quick installation reference MantraJet 1100...7 Installation of
SOFTWARE SETUP Pronterface...2 Cura BED CALIBRATION Using Pronterface...11 Using LCD...13
 USER MANUAL TABLE OF CONTENTS SOFTWARE SETUP Pronterface...2 Cura 15.04...3 BED CALIBRATION Using Pronterface...11 Using LCD...13 LOAD/UNLOAD FILAMENT Using LCD (extruder 0 only)...14 Using PRONTERFACE...15
Calibration and Maintenance
 Epson DX5 X 1 Printhead Calibration and Maintenance 31 st Jan., 2013 Version V3.0 1 Contents Chapter 1: Computer Requirement...3 Chapter 2:Installation...4 Chapter 3:Characteristic...5 Chapter 4:Board
VJ-1614 INSTALLATION MANUAL
 VJ-6 INSTALLATION MANUAL Please read this manual before using Thank you for purchasing a MUTOH product. This manual explains the steps for unpacking, mounting and basic installation before using the MUTOH
KM-4800w. Installation Guide
 KM-4800w Installation Guide TABLE OF CONTENTS page 1 Installation Requirements 2 2 Unpacking 3 2. 1 Unpacking 3 2. 2 Confirmation of Accessories 5 3 Leveling the Machine 7 4 Setup of the Roll Deck 9 5
H Manual Stretch Wrap Machine uline.com FILM ROLL CAPACITY TECHNICAL DATA ELECTRICAL SPECIFICATIONS TURNTABLE SPECIFICATIONS
 H-2304 Manual Stretch Wrap Machine 1-800-295-5510 uline.com SYSTEM SpecificationS IMPORTANT! Read this manual thoroughly and familiarize yourself with ALL controls and operating features. Keep this manual
TOP - 1. Instruction Manual. Version 1.0 Produced in Jan. 2004
 Version 1.0 Produced in Jan. 2004 Instruction Manual LCD monitor IV-08MP Thank you for purchasing the SHARP IV-08MP LCD monitor. Read this introductory instruction manual carefully to thoroughly familiarize
Einstart 3D Printer. User Manual V2.1
 Einstart 3D Printer User Manual V2.1 1 COPYRIGHT This document is copyrighted and contains proprietary information that is the property of Hangzhou Shining 3D Tech Co., Ltd.The user does not have the right
Removal and Installation8
 8 Screw Types 8-4 Top Cover Assembly 8-5 Left Hand Cover 8-6 Right Hand Cover 8-10 Front Panel Assembly 8-14 Left Rear Cover 8-15 Right Rear Cover 8-16 Extension Cover (60" Model only) 8-17 Media Lever
Written By: Jakub Dolezal
 5. Preflight check Written By: Jakub Dolezal 2018 manual.prusa3d.com/ Page 1 of 17 Step 1 P.I.N.D.A. adjustment (part 1) Ensure the printer is turned off and not plugged in. Note your extruder is slightly
VJ-1618 INSTALLATION MANUAL
 Please read this manual before using Thank you for purchasing a MUTOH product. This manual explains the steps for unpacking, mounting and basic installation before using the MUTOH Full-color inkjet printer
SERIES 1 USER MANUAL TYPE A MACHINES
 SERIES 1 USER MANUAL TYPE A MACHINES Type A Machines Inc. 2014 Type A Machines Inc. This document is licenced by Creative Commons Attribution-NonCommercial-ShareAlike (CC BY-NC-SA) Users are free to remix,
Agenda. Breaking the Ice Physical Setup Walkthrough of REPETREL First Print
 T1 Training Session Agenda Breaking the Ice Physical Setup Walkthrough of REPETREL First Print Breaking the Ice SYSTEM 30M ENGINE Breaking the Ice Protected build environment Slightly larger build area
SuperPremiumElectronics.com
 Must read this before installation Important instructions about your CISS system HP10/11 1. If your printer is brand new you must first install the original cartridges that came with your printer. The
Written By: Josef Prusa
 6. Preflight check The last things you should check before the first print Written By: Josef Prusa 2018 manual.prusa3d.com/ Page 1 of 13 Step 1 P.I.N.D.A. adjustment, phase 1 Ensure the printer is turned
Peel & Present Option Rev.C
 Peel & Present Option 92-2479-01 Rev.C Contents of the Peel & Present Kit This kit contains the following items: Peel and Present Mechanism Assist Roller Bushing Follow the steps below to install these
July Manual 10-slide disk outdoor viewer
 Ing. J. de Wijs. Populierstraat 44, 4131 AR Vianen, the Netherlands Tel/Fax. +31 (0)347-372242 e-mail: info@dewijs-3d.com Website: www.dewijs-3d.com Design and production of stereoscopic instruments. July
SeeMeCNC Guides 2 INTO 1 DUAL FILAMENT FEED ADAPTER INSTALL
 SeeMeCNC Guides 2 INTO 1 DUAL FILAMENT FEED ADAPTER INSTALL These are still in development - Be ready to troubleshoot firmware/software configuration for your setup when purchasing these adapters. Written
OMM200 and OMM200T. Metallurgical Microscope
 OMM200 and OMM200T Metallurgical Microscope Instruction Manual (Please read the manual carefully before using the microscope) Contents Safety ----------------------------------------------------------------------------