Daisy Chain HD System
|
|
|
- Gavin Johnson
- 5 years ago
- Views:
Transcription


1 Daisy Chain HD System GTB-HD-DCS GTB-HD-DCSP GTB-HD-DCR User Manual
2
3 ASKING FOR ASSISTANCE Technical Support: Telephone (818) (800) Fax (818) Technical Support Hours: 8:00 AM to 5:00 PM Monday through Friday, Pacific Time Write To: Gefen, LLC. c/o Customer Service Nordhoff St Chatsworth, CA Notice Gefen, LLC reserves the right to make changes in the hardware, packaging, and any accompanying documentation without prior written notice. Daisy Chain HD System is a trademark of Gefen, LLC HDMI, the HDMI logo, and High-Definition Multimedia Interface are trademarks or registered trademarks of HDMI Licensing in the United States and other countries Gefen, LLC. All rights reserved. All trademarks are the property of their respective owners. Rev A1
4 CONTENTS INTRODUCTION...1 Operating Notes...2 Features...3 Package Includes...3 Sender Unit Layout...4 Sender Unit Descriptions...5 Splitter Unit Layout...6 Splitter Unit Descriptions...7 Receiver Unit Layout...8 Receiver Unit Descriptions...9 CONNECTING THE DAISY CHAIN HD SYSTEM...10 Daisy-Chaining using Splitters and Receivers...10 Connecting Directly to the Receiver Unit...10 Wiring Diagram...11 OPERATING THE DAISY CHAIN HD SYSTEM...12 Connection Depth...12 Connecting two CAT-5 cables to each Splitter unit...12 Connecting a single CAT-5 cable to each Splitter unit...12 LED Link Indicators...13 EDID Management...14 The default EDID...14 Using the External EDID...14 EDID Programming Procedure...15 How the EDID is applied...16 Controlling the source using IR...17 Controlling devices using RS Broadcast vs. Unicast Mode...17 Determining the current Mode...18 Reading the Mode Information...18 Default settings for the Daisy Chain HD System...19 Configuring Broadcast and Unicast Modes...19 RS-232 SERIAL INTERFACE...25 NETWORK CABLE WIRING DIAGRAM...26 SURFACE MOUNTING INSTRUCTIONS...27 SPECIFICATIONS...28 WARRANTY...29
5 INTRODUCTION Congratulations on your purchase of the Daisy Chain HD System. Your complete satisfaction is very important to us. About Gefen We specialize in total integration for your home theater, while also focusing on going above and beyond customer expectations to ensure you get the most from your hardware. We invite you to explore our distinct product line. Please visit for the latest offerings in High-Definition signal solutions or call us between the hours of 8:00 am and 5:00 pm Monday-Friday, Pacific Standard Time for assistance with your A/V needs. We ll be happy to assist you. The GefenToolBox Daisy Chain HD System New technology using Video Over IP techniques allows the Daisy Chain HD system to connect up to 100 displays using CAT-5 cables in a daisy chain mode going from one display to the next. The system utilizes three modules: The Sender, which connects to the HD source, the Splitter module, which connects to the Sender unit using a CAT5 cable and the Receiver, which connects to the display. The Splitter unit also has an HDMI output connector. The Sender, Receiver, and Splitter simplify extension of HDMI and control signals to create an elaborate network of displays with the ability to route IR control back from each display location to the source. RS-232 commands can also be distributed over this daisy-chained network to execute commands such as turning all displays on or off. Each CAT-5e cable between the source, splitter, and receiver units can be up to 330 (100 meters). Up to 100 Hi-Def displays at resolutions up to 1080p Full HD and 1920 x 1200 (WUXGA) are supported. A low-latency of less than a frame assures that all displays reproduce audio and video in perfect sync. This easy-to-install and easy-to-expand system is a great fit for Digital Signage applications and also for commercial, entertainment solutions (such as in bars, restaurants, and stores) that play back the same content using multiple screens. How It Works Connect a computer or other Hi-Def source to the Sender unit s HDMI input. If IR control of the source device is required, connect an IR emitter to the Sender unit s IR Out port and attach it to the IR sensor window of the source. Connect a CAT-5e cable from the Sender unit to the Splitter or Receiver unit. Connect an HDTV display to the HDMI output of the Splitter or Receiver unit. If IR is used, connect a Gefen IR Extender module to the IR Ext port on the Receiver or Splitter units and place it in a location that has a line-of-sight access from the display location. To control the source, simply point the IR remote to the IR Extender module. If using the Splitter unit, and the HDMI needs to be routed to more displays, connect up to two CAT-5e cables from the Splitter unit to additional Splitters or Receiver units for branching out. 1
6 INTRODUCTION READ THESE NOTES BEFORE INSTALLING OR OPERATING THE DAISY CHAIN HD SYSTEM CAT-5e or CAT-6 cables should not exceed 330 feet (100 meters). Shielded (STP) CAT-5 or CAT-6 is recommended. However, unshielded (UTP) CAT-5 or CAT-6 is acceptable, depending on cable quality, but is not the top choice. Care should always be given to keep these cables away from power lines and other electromagnetic interference sources. NOTE: Shielded cable has an advantage by providing immunity to Electromagnetic Interference (EMI) from cell phones and A/C motors. If RS-232-control of the displays from the source side is needed, connect a computer to the Sender unit s RS-232 port, and connect the RS-232 ports of each Splitter or Receiver unit to the displays. 2
7 INTRODUCTION HDMI Features Supported Resolutions up to 1080p Full HD and 1920 x 1200 (WUXGA) 12-bit Deep Color x.v. Color LPCM 7.1 Audio, Dolby TrueHD, Dolby Digital Plus, and DTS-HD Master Audio 3DTV pass-through Lip Sync pass-through Features Extend, split, and daisy-chain HDMI, IR, and RS-232 using CAT-5e cables Each CAT-5e (or better) cable run up to 330 feet (100 meters) Guaranteed latency of less than one frame (16.7 to 20 ms) assures synchronized A/V output from all displays Supports up to 100 HDTV displays Field-upgradable firmware Locking power supply connectors Wall or under-shelf mountable HDCP-compliant Package Includes (GTB-HD-DCS) (1) Daisy Chain HD System - Sender unit (1) 6 ft. HDMI cable (M-M) (1) 6 ft. DB-9 cable (M-F) (1) Single Infrared Emitter (1) 5V DC Locking Power Supply (1) Quick Start Guide Package Includes (GTB-HD-DCSP) (1) Daisy Chain HD System - Splitter unit (1) 6 ft. HDMI cable (M-M) (1) 6 ft. DB-9 cable (M-F) (1) IR Extender (1) 5V DC Locking Power Supply (1) Quick Start Guide Package Includes (GTB-HD-DCR) (1) Daisy Chain HD System - Receiver unit (1) 6 ft. HDMI cable (M-M) (1) 6 ft. DB-9 cable (M-F) (1) IR Extender (1) 5V DC Locking Power Supply (1) Quick Start Guide 3

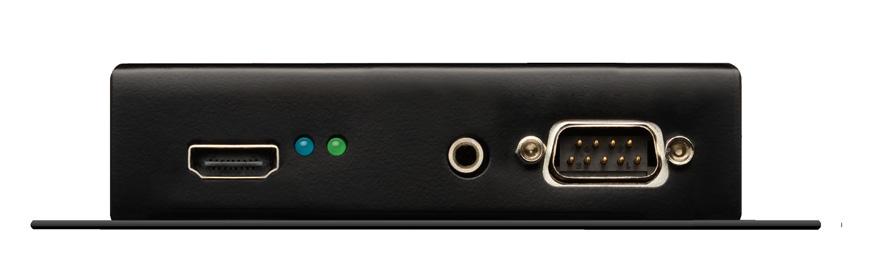
8 INTRODUCTION Sender Unit Layout 6 7 Back 6 7 Top Front 5 4
9 INTRODUCTION Sender Unit Descriptions 1 HDMI In Connect a Hi-Def source to this HDMI port using an HDMI cable. 2 Pwr This LED indicator will glow bright blue when the included locking power supply is connected to the power receptacle. 3 Link This LED indicator will glow bright green when a valid link exists between the Sender unit and a Receiver unit. 4 IR Out Connect the included IR Emitter from this jack to the source device. This feature will provide IR control of the source from the viewing location. 5 RS-232 Connect an RS-232 cable from this DB-9 connector to the RS-232 control device. See page 25 for details on the RS-232 interface. 6 Link Out Connect a CAT-5e (or better) cable up to 330 feet (100 meters) from this jack to a Receiver (GTB-HD-DCR) or Splitter (GTB-HD-DCSP) unit. 7 5V DC Connect the included 5V DC locking power supply to this connector and plug the AC power cord into an available electrical outlet. Only use the power supply shipped with this unit. 5


10 INTRODUCTION Splitter Unit Layout 6 7 Back 6 7 Top Front 6
11 INTRODUCTION Splitter Unit Descriptions 1 HDMI Out Connect an HDTV display to this HDMI port using an HDMI cable. 2 Pwr This LED indicator will glow bright blue when the included locking power supply is connected to the power receptacle. 3 Link This LED indicator will glow bright green when a valid link exists between the Sender unit and a Receiver unit. 4 IR Ext Connect the included IR Extender to this jack. The IR Extender provides an IR sensor in order to control the source device from the viewing location. 5 RS-232 Connect an RS-232 cable from this DB-9 connector to an RS-232 device. See page 25 for more information. 6 Link (Out A, Out B, In) Connect a CAT-5e (or better) cable up to 330 feet (100 meters) from the Out A and/or Out B jack to another Splitter unit or a Receiver unit. Connect a CAT-5e (or better) cable, up to 330 feet (100 meters), between the In jack and a Sender unit. 7 5V DC Connect the included 5V DC locking power supply to this connector and plug the AC power cord into an available electrical outlet. Only use the power supply shipped with this unit. 7
12 INTRODUCTION Receiver Unit Layout 7 8 Back 7 8 Top Front 8 6
13 INTRODUCTION Receiver Unit Descriptions 1 HDMI Out Connect an HDTV display (or other HDMI device such as an A/V splitter or switcher) to this HDMI port using an HDMI cable. 2 Pwr This LED indicator will glow bright red when the included locking power supply is connected to the power receptacle. 3 Link This LED indicator will glow bright green when a valid link exists between the Sender unit and a Receiver unit. 4 EDID Press and hold this button for two seconds to retrieve and store the downstream EDID in the Sender unit. 5 IR Ext Connect the included IR Extender to this jack. The IR Extender provides an IR sensor in order to control the source device from the viewing location. 6 RS-232 Connect an RS-232 cable from this DB-9 connector to an RS-232 device. See page 25 for more information. 7 Link Out Connect a CAT-5e (or better) cable up to 330 feet (100 meters) from this jack to a Sender (GTB-HD-DCS) or Splitter (GTB-HD-DCSP) unit. 8 5V DC Connect the included 5V DC locking power supply to this connector and plug the AC power cord into an available electrical outlet. Only use the power supply shipped with this unit. 9
14 CONNECTING THE DAISY CHAIN HD SYSTEM 1. Connect a Hi-Def source to the Sender unit using the included HDMI cable. The Daisy Chain HD System can be connected in two ways: Daisy-Chaining using Splitters Connect a CAT-5 cable, up to 330 feet (100 meters) from the Link Out jack on the Sender unit directly to the Link In jack on a Splitter unit. Daisy-chain additional Splitter units, if desired, by connecting a CAT-5 cable (up to 330 feet) between the Out A and Link In jacks on each Splitter unit. After all Splitter units have been connected, connect a CAT-5 cable (up to 330 feet) between the Out B jack on each Splitter unit and the Link In jack on each Receiver unit. to Hi-Def source Up to 330 feet (100 Meters) Sender Splitter Splitter Up to 330 feet (100 Meters) Receiver to HDTV Display (or other HDMI device) (to additional Splitter or Receiver) Receiver (up to 100 HDMI outputs) Connecting Directly to the Receiver unit Connect a CAT-5 cable, up to 330 feet (100 meters) from the Link Out jack on the Sender unit directly to the Link In jack on the Receiver unit. Refer to the illustration on the opposite page. NOTE: If terminating network cables in the field, please adhere to the TIA/EIA568B specification (see page 26 for details). 2. Connect an HDTV display (or other HDMI A/V device) to the HDMI Out port on the Receiver unit(s) using an HDMI cable. 10
15 CONNECTING THE DAISY CHAIN HD SYSTEM to Hi-Def source Sender Up to 330 feet (100 Meters) Receiver to HDTV Display (or other HDMI device) 3. Additional displays can be connected to the Splitter units (if used) by connecting an HDMI cable between the HDMI Out port and each HDTV display. 4. Connect an IR Emitter (Gefen part no. EXT-RMT-EXTIRC) to the IR Ext jack on the Receiver unit(s). 5. Connect an IR Extender (Gefen part no. EXT-IREMIT) from the IR Out jack on the Sender unit to the Hi-Def source. 6. Use the included RS-232 cable to connect the RS-232 controller to the RS-232 port on the Sender unit. RS-232 devices can be connected to RS-232 ports on the Splitter or Receiver unit(s). 7. Connect the 5V DC locking power supplies to the Sender, Receiver, and/or Splitter unit(s). Do not overtighten the locking connectors. Plug the two (2) AC power cords from the power supplies to available electrical outlets. Wiring Diagram IR Emitter HDMI CABLE CAT-5 CABLE RS 232 CABLE IR (Up To 330 feet) DVD Player Sender Up to 330 feet (100 Meters) Local Display Splitter Local Display Splitter SCREEN Splitter Receiver IR Extender Projector Receiver RS-232 Controller IR Extender (to additional Splitter or Receiver) Receiver IR Extender Switcher GTB-HD-DCS GTB-HD-DCR GTB-HD-DCRP HD Display* * Up to 100 HDMI outputs 11
16 OPERATING THE DAISY CHAIN HD SYSTEM Connection Depth The maximum number of levels of Splitter and/or Receiver units that can be connected within the Daisy Chain HD System is dependent upon how each unit in the system is connected. This number is referred to as the depth. For example, the most elementary system consists of only a single Sender unit and has a depth of 1. If a Splitter (or Receiver) unit is attached to the Sender unit, then the depth becomes 2. If another Splitter unit is added, then the depth becomes 3. This process continues, until a maximum depth is reached. Connecting two CAT-5 cables to each Splitter unit If both CAT-5 jacks on each Splitter unit are used to connect to additional Splitter units (denoted by Sx) in the system, then the maximum depth is Tx Depth 2 3 Sx Sx Sx... Sx Sx 10 Rx Rx Rx Rx Connecting a single CAT-5 cable to each Splitter unit If only a single CAT-5 cable is used to connect to another Splitter unit (denoted by Sx) in the system, then the maximum depth is Tx Depth 2 3 Sx Sx... Sx 30 Rx 12
17 OPERATING THE DAISY CHAIN HD SYSTEM LED Link Indicators The Link LED indicators on the Sender, Splitter, and Receiver unit provide basic information on the current status of the Daisy Chain HD System. 1 2 Condition Power connected to Sender, Splitter, and/or Receiver CAT-5 cable connected (or not connected) to Splitter(s) / Receiver(s). Source is not connected to the Sender unit. Power connected to Sender, Splitter, and/or Receiver. CAT-5 cable connected to Splitter(s) / Receiver(s) Source is connected to Sender unit. Link LED Status Link LED slowly blinks three times, then pauses, then repeats the cycle. This applies to all units in the system. Link LED flashes rapidly on each unit that is connected to the Sender unit, indicating that A/V data is being transmitted. If any of the Splitter or Receiver units within the group exhibit the behavior of Condition 1, even when the source is connected to the Sender unit, then check the CAT-5 cable for defects or loose connections. 13
18 OPERATING THE DAISY CHAIN HD SYSTEM EDID Management The default EDID The Sender unit contains a default EDID which supports the following: Color Depths Audio Sampling Rates Resolutions / Timings 16 / 20 / 24 bit 32 / 44 / 48 khz 640 x 72 Hz 720 x 60 Hz 720 x 60 Hz 720 x 50 Hz 720 x 50 Hz 1280 x 50 Hz 1280 x 60 Hz 1440 x 60 Hz 1440 x 50 Hz 1920 x 50 Hz 1920 x 60 Hz 1920 x 50 Hz 1920 x 60 Hz The default EDID is used when connecting the Daisy Chain HD System out-of-the-box. Using the External EDID The Daisy Chain HD System has an EDID button on the front panel of the Receiver unit and Splitter units allowing the EDID of the display (or other device connected to the Receiver / Splitter unit) to be stored in the Sender unit. Once the Sender unit is programmed with another EDID, the default EDID cannot be restored. When programming an EDID, it is critical to consider the capabilities of each display and/or A/V device in the system. Therefore, the EDID of the display and/or A/V device that is compatible with all other devices in the system should be used. See the next page for information on programming an EDID. 14

. 2.")

19 OPERATING THE DAISY CHAIN HD SYSTEM EDID Programming Procedure NOTE: Before programming the EDID, a Sender and at least one Receiver must be connected using CAT-5 cable. 1. Make sure that the display (or other A/V device) is connected to the Receiver unit and that all other Receiver / Splitter connections have been made (see pages ). 2. Select the Receiver that is connected to the display (or other A/V device) that has an EDID that is most compatible with all devices in the system. 3. Use a paperclip or other small pointed object to depress the EDID button on the front of the Receiver unit. 4. Release the EDID button when the following message appears on the display: Handle EDID NOW 5. Once the EDID has been successfully updated, the following message will be displayed. 15
20 OPERATING THE DAISY CHAIN HD SYSTEM EDID has been updated OK If the EDID is identical to the EDID that was just programmed, EDID the same as host will be displayed on the screen. How the EDID is applied The programmed EDID will be used by all other displays (or other A/V devices) in the system. For example, in the illustration below, the EDID button was pressed on Receiver A. Therefore, the EDID from Local Display A will now be used by Local Display B as well as any other devices (nodes C and D) connected in the system. to Hi-Def source Sender Local Display B Splitter A Splitter B Receiver A D C EDID data Local Display A Alternatively, pressing the EDID button on Splitter A will copy the EDID of Local Display B to the Sender unit. The EDID from Local Display B will now be used throughout the system. 16

 Receiver 1 2 3 4 5 6 7 8 9 0 _ IR remote control (for Hi-Def source)")


21 TV SAT DVD? OPERATING THE DAISY CHAIN HD SYSTEM Controlling the source using IR The Hi-Def source can be controlled from the viewing location by connecting an IR Extender (Gefen part no. EXT-RMT-EXTIRC) to each Receiver unit. Refer to the illustration below. Hi-Def source Sender Splitter IR Data Splitter IR Extender to HDTV Display (or other HDMI device) Receiver _ IR remote control (for Hi-Def source) Since the Daisy Chain HD System can only accommodate one Hi-Def source, the IR commands from the IR remote control can be sent from any Receiver (at any location) in the system. Controlling devices using RS-232 Multiple RS-232 devices can be connected throughout the Daisy Chain HD System. RS-232 control-based devices, such as the Gefen 4x1 HD Switcher w/ Audio Decoding (Gefen part no. GTV-AUDDEC-N), can be connected to the Splitter and/or Receiver units. The Daisy Chain HD System provides both Unicast and Broadcast modes. Broadcast vs. Unicast Mode Broadcast mode allows all RS-232 devices that are connected to each Splitter and/or Receiver unit to receive the same RS-232 command at the same time. By default, the Daisy Chain HD System is set to broadcast mode. Unicast mode provides specific control of each RS-232 device in the system, regardless of where the device (Splitter or Receiver) is connected within the system. 17
22 OPERATING THE DAISY CHAIN HD SYSTEM Determining the current Mode The EDID switch on the Daisy Chain HD System has two functions: 1) Fetch the downstream EDID and store it in the Sender unit. 2) Display the current mode (broadcast or unicast) of the system. 1. Make sure that a display is connected to the Splitter or Receiver unit that is to be queried. 2. Quickly press and release the EDID button on the Splitter or Receiver unit. 3. After releasing the EDID button, a message similar to the following information will be shown in the upper-left corner of the display. V ID: 4 0 DEPTH: 3 HD Audio socat5: Broadcast H: C: 9600 Reading the Mode Information The first line of the status message is the firmware version. The second line tells us the ID of the unit to which the display is connected. The depth information is also provided. It is important to understand that the ID and depth do not tell us whether the unit we are looking at is a Splitter or a Receiver unit. However, it does provide us with enough information on where this unit (Splitter or Receiver) is located within the system. Together, the ID and depth provide us with the full ID of this unit. The third line tells us that HD (High-Definition) audio has been detected. Finally, the forth line tells us that the unit we are looking at is in Broadcast mode. The baud rates of the host (H) and client (C) are also displayed. The information displayed here will vary depending upon the current settings of the Splitter or Receiver unit. 4. Quickly press and release the EDID button on the (Splitter / Receiver) unit to dismiss the information from the screen. 18
23 OPERATING THE DAISY CHAIN HD SYSTEM Default Settings for the Daisy Chain HD System When the Daisy Chain HD System is unpacked from the box, the unit will be in Broadcast Mode and will be set to a baud rate of Therefore, if multiple RS-232 devices (e.g. displays, etc) will be controlled at 9600, then placing the Daisy Chain HD System in configuration mode will not be necessary. To change baud rates or switch between broadcast and unicast mode, see the examples below. Configuring Broadcast and Unicast Mode In this next section we are going to provide two examples which illustrate how to switch between unicast and broadcast modes and how to change the baud rate. In both examples, an RS-232 cable must be connected between the Sender unit and the computer (host). The Gefen 4x1 HD Switcher w/ Audio Decoding (Gefen part no GTV-AUDDEC-N) will be used as the RS-232 device (client) to illustrate each example. Example - Broadcast Mode 1. Launch a terminal-emulation program (e.g. HyperTerminal, etc) and configure the serial port using the settings provided on page 25. Make sure that the terminal baud rate is set to In order to change the baud rates and/or switch between unicast and broadcast mode, the system must be placed in configuration mode. 2. Enter configuration mode by pressing the following key combinations: [CTRL] + C, [CTRL] + X, [CTRL] + Z TIP: The equivalent hex codes for each of these key combinations can also be used to place the system in configuration mode. [CTRL] + C = 0x03 [CTRL] + X = 0x18 [CTRL] + Z = 0x1A The following information will be displayed in the terminal window: [Press Enter, then Set baudrate as to enter CMD mode send msg0 [8100] Since we already set the (host) baud rate in Step 1, we can ignore this portion of the message. 3. Press the [ENTER] key to display the command prompt. boot# 19
24 OPERATING THE DAISY CHAIN HD SYSTEM 4. Type the following at the boot# prompt: socat5 b socat5 b Sets the Sender unit baud rate to This baud rate can be changed if necessary. b sets the system to broadcast mode. Sets the Receiver / Splitter unit(s) baud rate to This baud rate is required by the GTV-AUDDEC-N. 5. Press the [ENTER] key. The following information will be displayed in the terminal window: Baudrate H[115200] C[19200] id0[0] id1[0] depth [0] send msg0 [8100] speed [115200] save Un-Protected 1 sectors Erasing Flash.... done Erased 1 sectors Writing to Flash... done Protected 1 sectors 6. The Daisy Chain HD System is now in broadcast mode. RS-232 commands can now be sent from the RS-232 controller (computer) to all RS-232 devices connected to the system. It is important to understand that, because we are in broadcast mode, all RS-232 clients must be able to work at the same baud rate. The diagram on the next page illustrates how RS-232 commands (black arrows) from the computer (RS-232 controller) are distributed throughout the system. In this example, a 4x1 HD Switcher w/ Audio Decoding has been connected to a Splitter and a Receiver within the system. Each of these units will receive the same RS-232 command. 20
25 OPERATING THE DAISY CHAIN HD SYSTEM Diagram showing RS-232 control using Broadcast Mode to Hi-Def source Sender Display Splitter GTV-AUDDEC-N RS-232 device (GTV-AUDDEC-N) RS-232 controller (Computer) Receiver Display GTV-AUDDEC-N RS-232 device (GTV-AUDDEC-N) Example - Unicast Mode 1. Launch a terminal-emulation program (e.g. HyperTerminal, etc) and configure the serial port using the settings provided on page 25. Make sure that the terminal baud rate is set to Enter configuration mode by pressing the following key combinations: [CTRL] + C, [CTRL] + X, [CTRL] + Z TIP: The equivalent hex codes for each of these key combinations can also be used to place the system in configuration mode. [CTRL] + C = 0x03 [CTRL] + X = 0x18 [CTRL] + Z = 0x1A 3. The following information will be displayed in the terminal window: [Press Enter, then Set baudrate as to enter CMD mode send msg0 [8100] Since we already set the (host) baud rate in Step 1, we can ignore this portion of the message. 4. Press the [ENTER] key to display the command prompt. boot# 21
26 OPERATING THE DAISY CHAIN HD SYSTEM Before setting unicast mode, it is important to identify the RS-232 device in the system with which the computer will be communicating. We will use the same setup as before. However, this time we wish to talk to the RS-232 device connected to the Receiver unit (highlighted in yellow). to Hi-Def source Sender Display Splitter GTV-AUDDEC-N RS-232 device (GTV-AUDDEC-N) RS-232 controller (Computer) Receiver Display GTV-AUDDEC-N RS-232 device (GTV-AUDDEC-N) 5. Quickly press and release the EDID button on the Receiver unit to obtain its information. V ID: 4 0 DEPTH: 3 HD Audio Host exit socat5 Temporarily From the example above, we need to know the ID of the Receiver and where it is located within the system in order to communicate with it. In this case, the Receiver we want to talk to is (ID + Depth). This value is specified as part of the command line. 6. Type the following at the boot# prompt: socat5 u
27 OPERATING THE DAISY CHAIN HD SYSTEM socat5 u Sets the Sender unit baud rate to This baud rate can be changed if necessary. Selects the Splitter or Receiver in the system that we want to talk to. u sets the system to unicast mode. Sets the Receiver / Splitter unit(s) baud rate to This baud rate is required by the GTV-AUDDEC-N. One distinct difference in typing the command line for unicast mode, is that the ID and depth of the unit must be specified. In broadcast mode, all units receive the same RS-232 data and specifying a particular device is unnecessary. 7. Press the [ENTER] key. The following information will be displayed in the terminal window: Baudrate H[115200] C[19200] id0[4] id1[0] depth [3] send msg0 [8100] speed [115200] save Un-Protected 1 sectors Erasing Flash.... done Erased 1 sectors Writing to Flash... done Protected 1 sectors 8. The Daisy Chain HD System is now in unicast extender mode. Quickly press and release the EDID button the Receiver unit, twice to refresh the information on the display. The message Unicast Is Me indicates that the Splitter or Receiver unit, to which the display is connected, has been successfully assigned to receive RS-232 data. If we looked at another display which was connected to a different Splitter or Receiver in the system, we would see the following message, indicating that the unit cannot receive RS-232 data: socat5: Unicast Not Me 23
 from the computer (RS-232 controller) is distributed to the")
28 OPERATING THE DAISY CHAIN HD SYSTEM V ID: 4 0 DEPTH: 3 HD Audio socat5: Unicast Is Me H: C: The diagram below illustrates how RS-232 commands (black arrows) from the computer (RS-232 controller) is distributed to the device that was specified as part of the command line in Step 6. The depth of each unit in the system is indicated by the numbers in red. Note that the computer can only communicate with the RS-232 device that is connected to the Receiver unit (depth = 3). The RS-232 device connected to the Splitter (depth = 2) is ignored. Diagram showing RS-232 control using Unicast Mode to Hi-Def source Sender Display RS-232 controller (Computer) 1 2 GTV-AUDDEC-N Splitter 3 RS-232 device (GTV-AUDDEC-N) Receiver GTV-AUDDEC-N RS-232 device (GTV-AUDDEC-N) Display 10. In order to communicate with a different RS-232 device, repeat Steps
29 RS-232 SERIAL INTERFACE DE-9 Connector (Sender / Splitter / Receiver) Host Sender unit DCD 1 1 DCD RXD 2 2 RXD TXD 3 3 TXD DTR 4 4 DTR GND 5 5 GND DSR 6 6 DSR RTS 7 7 RTS CTS 8 8 CTS R1 9 9 R1 Splitter / Receiver unit Client DCD 1 1 DCD RXD 2 2 RXD TXD 3 3 TXD DTR 4 4 DTR GND 5 5 GND DSR 6 6 DSR RTS 7 7 RTS CTS 8 8 CTS R1 9 9 R1 Only TXD, RXD, and GND are used. RS-232 Settings Baud rate Data bits... 8 Parity bits... None Stop bits...1 Flow Control... None 25


30 NETWORK CABLE WIRING DIAGRAM Gefen recommends the TIA/EIA-568-B wiring option. Please adhere to the table below when field terminating cable for use with Gefen products. Pin Color 1 Orange / White 2 Orange 3 Green / White 4 Blue 5 Blue / White 6 Green 7 Brown / White 8 Brown CAT-5, CAT-5e, and CAT-6 cabling comes in stranded and solid core types. Gefen recommends using solid core cabling. CAT-6a cable is also recommended. It is recommended to use one continuous run from one end to the other. In some cases, connecting through a patch might not work. 26
31 SURFACE MOUNTING INSTRUCTIONS The GefenToolbox Daisy Chain HD System should be mounted vertically on a wall or inside / outside a cabinet with wood / drywall screws as shown in the diagram above. There should be an inch or two of clearance between the edges of the unit and any walls or vertical surfaces to allow for enough clearance for connection and disconnection of the HDMI cable. For installation on a drywall surface, use a #6 drywall screw. When installing, it is recommended to use the center hole on a stud. 27
32 SPECIFICATIONS Maximum Pixel Clock MHz Video Input Connector (Sender)...(1) HDMI Type A 19-pin, female Video Output Connector (Receiver/Splitter)...(1) HDMI Type A 19-pin, female IR Out connector (Sender)...(1) 3.5mm mini-mono jack IR Extender connector (Receiver/Splitter)...(1) 3.5mm mini-stereo jack RS-232 Connector (Sender/Splitter/Receiver)...(1) DB-9, female Link Input connector (Receiver/Splitter)...(1) RJ-45, shielded Link Output connector (Sender)...(1) RJ-45, shielded Link Output connector (Splitter)...(2) RJ-45, shielded Power Indicator (Sender/Splitter/Receiver)...(1) LED, blue Link Indicator (Sender/Splitter/Receiver)...(1) LED, green Power Supply (Sender/Splitter/Receiver)...5V DC, locking Power Consumption (Sender / Splitter / Receiver)...10W (max.) Dimensions (W x H x D) (Sender/Receiver) x 1.1 x 4.5 (132mm x 28mm x 113mm) Dimensions (W x H x D) (Splitter) x 1.1 x 5 (132mm x 28mm x 128mm) Shipping Weight: Sender/Receiver...2 lbs (0.91 kg) Splitter lbs (1 kg) 28
33 WARRANTY Gefen warrants the equipment it manufactures to be free from defects in material and workmanship. If equipment fails because of such defects and Gefen is notified within two (2) years from the date of shipment, Gefen will, at its option, repair or replace the equipment, provided that the equipment has not been subjected to mechanical, electrical, or other abuse or modifications. Equipment that fails under conditions other than those covered will be repaired at the current price of parts and labor in effect at the time of repair. Such repairs are warranted for ninety (90) days from the day of reshipment to the Buyer. This warranty is in lieu of all other warranties expressed or implied, including without limitation, any implied warranty or merchantability or fitness for any particular purpose, all of which are expressly disclaimed. 1. Proof of sale may be required in order to claim warranty. 2. Customers outside the US are responsible for shipping charges to and from Gefen. 3. Copper cables are limited to a 30 day warranty and cables must be in their original condition. The information in this manual has been carefully checked and is believed to be accurate. However, Gefen assumes no responsibility for any inaccuracies that may be contained in this manual. In no event will Gefen be liable for direct, indirect, special, incidental, or consequential damages resulting from any defect or omission in this manual, even if advised of the possibility of such damages. The technical information contained herein regarding the features and specifications is subject to change without notice. For the latest warranty coverage information, refer to the Warranty and Return Policy under the Support section of the Gefen Web site at PRODUCT REGISTRATION Please register your product online by visiting the Register Product page under the Support section of the Gefen Web site. 29
34 Rev A Nordhoff St., Chatsworth CA fax: Pb This product uses UL or CE listed power supplies.
Gefen. Extender for HDMI 3DTV GTB-HDMI-3DTV GTB-HDMI-3DTV-BLK. User Manual
 Gefen Extender for HDMI 3DTV GTB-HDMI-3DTV GTB-HDMI-3DTV-BLK User Manual ASKING FOR ASSISTANCE Technical Support: Telephone (818) 772-9100 (800) 545-6900 Fax (818) 772-9120 Technical Support Hours: 8:00
DVIKVM Extra Long Range Extender
 DVIKVM Extra Long Range Extender GTB-DVIKVM-ELR GTB-DVIKVM-ELR-BLK User Manual www.gefentoolbox.com ASKING FOR ASSISTANCE Technical Support: Telephone (818) 772-9100 Fax (818) 772-9120 Technical Support
HDKVM ELR extension for HDMI and USB Over One CAT5
 HDKVM ELR extension for HDMI and USB Over One CAT5 EXT-HDKVM-ELR User Manual ASKING FOR ASSISTANCE Technical Support: Telephone (818) 772-9100 (800) 545-6900 Fax (818) 772-9120 Technical Support Hours:
DVI Extra Long Range Extender
 DVI Extra Long Range Extender EXT-DVI-ELR User Manual www.gefen.com ASKING FOR ASSISTANCE Technical Support: Telephone (818) 772-9100 (800) 545-6900 Fax (818) 772-9120 Technical Support Hours: 8:00 AM
DVI Extra Long Range Extender
 DVI Extra Long Range Extender EXT-DVI-ELR User Manual www.gefen.com ASKING FOR ASSISTANCE Technical Support: Telephone (818) 772-9100 (800) 545-6900 Fax (818) 772-9120 Technical Support Hours: 8:00 AM
USB 2.0 LR 4-Port Extender
 USB 2.0 LR 4-Port Extender GTB-USB2.0-4LR User Manual www.gefentoolbox.com ASKING FOR ASSISTANCE Technical Support: Telephone (818) 772-9100 (800) 545-6900 Fax (818) 772-9120 Technical Support Hours:
2x2 Switcher for HDMI 1.3
 2x2 Switcher for HDMI 1.3 EXT-HDMI1.3-242 User Manual www.gefen.com ASKING FOR ASSISTANCE Technical Support: Telephone (818) 772-9100 (800) 545-6900 Fax (818) 772-9120 Technical Support Hours: 8:00 AM
EXT-HDMI1.3-1FO User Manual
 EXT-HDMI1.3-1FO User Manual www.gefen.com ASKING FOR ASSISTANCE Technical Support: Telephone (818) 772-9100 (800) 545-6900 Fax (818) 772-9120 Technical Support Hours: 8:00 AM to 5:00 PM Monday through
Dual-Link DVI over 2CAT6 Extender
 Dual-Link DVI over 2CAT6 Extender EXT-DVI-2CAT6DL User Manual Technical Support: Telephone (818) 772-9100 (800) 545-6900 Fax (818) 772-9120 Technical Support Hours: 8:00 AM to 5:00 PM (PST) Monday thru
1:8 DVI Distribution Amplifier
 1:8 DVI Distribution Amplifier EXT-DVI-148 User Manual www.gefen.com ASKING FOR ASSISTANCE Technical Support: Telephone (818) 772-9100 (800) 545-6900 Fax (818) 772-9120 Technical Support Hours: 8:00 AM
2x Dual Link DVIKVM Extender Over CAT-6a
 2x Dual Link DVIKVM Extender Over CAT-6a EXT-2DVI-DLKVM-CAT6 User Manual www.gefen.com ASKING FOR ASSISTANCE Technical Support: Telephone (818) 772-9100 (800) 545-6900 Fax (818) 772-9120 Technical Support
1:4 Splitter for DisplayPort
 1:4 Splitter for DisplayPort EXT-DP-144 User Manual www.gefen.com ASKING FOR ASSISTANCE Technical Support: Telephone (818) 772-9100 (800) 545-6900 Fax (818) 772-9120 Technical Support Hours: 8:00 AM to
DVI FM1500 Optical Extender with Recordable EDID. GEF-DVI-FM1500 User Manual.
 DVI FM1500 Optical Extender with Recordable EDID GEF-DVI-FM1500 User Manual www.gefenpro.com ASKING FOR ASSISTANCE Technical Support: Telephone (818) 772-9100 (800) 545-6900 Fax (818) 772-9120 Technical
DisplayPort Booster. EXT-DP-141B User Manual.
 DisplayPort Booster EXT-DP-141B User Manual www.gefen.com ASKING FOR ASSISTANCE Technical Support: Telephone (818) 772-9100 (800) 545-6900 Fax (818) 772-9120 Technical Support Hours: 8:00 AM to 5:00 PM
CAT5-1600A Extender. EXT-CAT5-1600A. User Manual
 CAT5-1600A Extender EXT-CAT5-1600A User Manual www.gefen.com ASKING FOR ASSISTANCE Technical Support: Telephone (818) 772-9100 (800) 545-6900 Fax (818) 772-9120 Technical Support Hours: 8:00 AM to 5:00
USB 2.0 LR Extender. EXT-USB2.0-LR User Manual.
 USB 2.0 LR Extender EXT-USB2.0-LR User Manual www.gefen.com ASKING FOR ASSISTANCE Technical Support: Telephone (818) 772-9100 (800) 545-6900 Fax (818) 772-9120 Technical Support Hours: 8:00 AM to 5:00
EXT-DVI-3600HD User Manual
 EXT-DVI-3600HD User Manual www.gefen.com ASKING FOR ASSISTANCE Technical Support: Telephone (818) 772-9100 (800) 545-6900 Fax (818) 772-9120 Technical Support Hours: 8:00 AM to 5:00 PM Monday through
DVI Extender 1FO. EXT-DVI-CP-FM10 User Manual.
 DVI Extender 1FO EXT-DVI-CP-FM10 User Manual www.gefen.com ASKING FOR ASSISTANCE Technical Support: Telephone (818) 772-9100 (800) 545-6900 Fax (818) 772-9120 Technical Support Hours: 8:00 AM to 5:00
Audio. one CAT-5 EXT-DVI-1CAT5-SR. User Manual. Release A2
 Audio DVI 3GSDI ELR Lite Embedder Extender over one CAT-5 EXT-DVI-1CAT5-SR User Manual Release A2 DVI ELR Lite Extender over one CAT-5 Important Safety Instructions 1. Read these instructions. 2. Keep
4x4 Matrix for HDMI 1.3
 4x4 Matrix for HDMI 1.3 EXT-HDMI1.3-444 User Manual www.gefen.com ASKING FOR ASSISTANCE Technical Support: Telephone (818) 772-9100 (800) 545-6900 Fax (818) 772-9120 Technical Support Hours: 8:00 AM to
DVI ELR Extender over one CAT5
 DVI ELR Extender over one CAT5 EXT-DVI-1CAT5-ELR User Manual Release A3 Important Safety Instructions 1. Read these instructions. 2. Keep these instructions. 3. Heed all warnings. 4. Follow all instructions.
Matrix for HDMI 1.3 EXT-HDMI User Manual. Release A6
 Matrix for HDMI 1.3 EXT-HDMI1.3-444 User Manual Release A6 4x4 Matrix for HDMI 1.3 Important Safety Instructions 1. Read these instructions. 2. Keep these instructions. 3. Heed all warnings. 4. Follow
Splitter for HDMI 1.3 with Digital Audio
 Splitter for HDMI 1.3 with Digital Audio Audio 3GSDI Embedder EXT-HDMI1.3-142D User Manual Release B4 1:2 Splitter for HDMI 1.3 with Digital Audio Important Safety Instructions 1. Read these instructions.
EXT-DVI-CAT5-4X User Manual
 EXT-DVI-CAT5-4X User Manual www.gefen.com ASKING FOR ASSISTANCE Technical Support: Telephone (818) 772-9100 (800) 545-6900 Fax (818) 772-9120 Technical Support Hours: 8:00 AM to 5:00 PM Monday thru Friday.
Mini USB-2 Extender EXT-USB-MINI2N USER MANUAL
 Mini USB-2 Extender EXT-USB-MINI2N USER MANUAL Congratulations on your purchase of the Mini USB-2 Extender. Your complete satisfaction is very important to us. Gefen Gefen delivers innovative, progressive
CAT5-1600A Extender. EXT-CAT5-1600A User Manual.
 CAT5-1600A Extender EXT-CAT5-1600A User Manual www.gefen.com ASKING FOR ASSISTANCE Technical Support: Telephone (818) 772-9100 (800) 545-6900 Fax (818) 772-9120 Technical Support Hours: 8:00 AM to 5:00
1080P. Wireless for HDMI Multi-Room Solution GTV-WHD-1080P-LR-BLK. User Manual. gefentv.com
 1080P Wireless for HDMI Multi-Room Solution GTV-WHD-1080P-LR-BLK User Manual gefentv.com ASKING FOR ASSISTANCE Technical Support: Telephone (818) 772-9100 (800) 545-6900 Fax (818) 772-9120 Technical Support
EXT-DVI-CP-FM10 User Manual
 EXT-DVI-CP-FM10 User Manual www.gefen.com ASKING FOR ASSISTANCE Technical Support: Telephone (818) 772-9100 (800) 545-6900 Fax (818) 772-9120 Technical Support Hours: 8:00 AM to 5:00 PM Monday through
Splitter for HDMI with Ultra HD 4K x 2K support
 1 : 2 SOURCE DISPLAYS Splitter for HDMI with Ultra HD 4K x 2K support GTB-HD4K2K-142-BLK User Manual Release A3 1:2 Splitter for HDMI 4K x 2K Important Safety Instructions 1. Read these instructions. 2.
EXT-DVI-FM1000P User Manual
 EXT-DVI-FM1000P User Manual www.gefen.com ASKING FOR ASSISTANCE Technical Support: Telephone (818) 772-9100 (800) 545-6900 Fax (818) 772-9120 Technical Support Hours: 8:00 AM to 5:00 PM Monday through
EXT-DVIKVM-241DL User Manual
 EXT-DVIKVM-241DL User Manual www.gefen.com ASKING FOR ASSISTANCE Technical Support: Telephone (818) 772-9100 (800) 545-6900 Fax (818) 772-9120 Technical Support Hours: 8:00 AM to 5:00 PM Monday thru Friday.
Matrix for HDMI 1.3 EXT-HDMI User Manual. Release A7
 Matrix for HDMI 1.3 EXT-HDMI1.3-444 User Manual Release A7 4x4 Matrix for HDMI 1.3 Important Safety Instructions 1. Read these instructions. 2. Keep these instructions. 3. Heed all warnings. 4. Follow
Rev A4.
 DVI FM500 Extender EXT-DVI-FM500 User Manual www.gefen.com ASKING FOR ASSISTANCE Rev A4 Technical Support: Telephone (818) 772-9100 (800) 545-6900 Fax (818) 772-9120 Technical Support Hours: 8:00 AM to
Dual Link DVI Extender
 2x Dual Link DVI Extender EXT-2DVI-CATDL User Manual Release A4 2x Dual Link DVI Extender Important Safety Instructions 1. Read these instructions. 2. Keep these instructions. 3. Heed all warnings. 4.
Extender for 1.3 over one CAT-6. EXT-HDMI1.3-1CAT6 User Manual
 Extender for 1.3 over one CAT-6 EXT-HDMI1.3-1CAT6 User Manual www.gefen.com Technical Support: Telephone (818) 772-9100 (800) 545-6900 Fax (818) 772-9120 Technical Support Hours: 8:00 AM to 5:00 PM Monday
DVI FM GEF-DVI-FM2000 User Manual
 DVI FM 2000 GEF-DVI-FM2000 User Manual ASKING FOR ASSISTANCE Technical Support: Telephone (818) 772-9100 (800) 545-6900 Fax (818) 772-9120 Technical Support Hours: 8:00 AM to 5:00 PM Monday thru Friday,
1080P. Extender for HDMI ELR with POL over CAT5. GEF-HDCAT5-ELRPOL User Manual.
 1080P Extender for HDMI ELR with POL over CAT5 GEF-HDCAT5-ELRPOL User Manual www.gefenpro.com ASKING FOR ASSISTANCE Technical Support: Telephone (818) 772-9100 (800) 545-6900 Fax (818) 772-9120 Technical
4x1 Switcher for HDMI 1.3
 4x1 Switcher for HDMI 1.3 EXT-HDMI1.3-441 USER MANUAL www.gefen.com ASKING FOR ASSISTANCE Technical Support: Telephone (818) 772-9100 (800) 545-6900 Fax (818) 772-9120 Technical Support Hours: 8:00 AM
1:4 Splitter for HDMI 1.3. EXT-HDMI User Manual
 1:4 Splitter for HDMI 1.3 EXT-HDMI1.3-144 User Manual INTRODUCTION Congratulations on your purchase of the 1:4 Splitter For HDMI 1.3. Your complete satisfaction is very important to us. Gefen Gefen delivers
4K Ultra HD ELR-POL Extender w/ RS-232, Ethernet and 2-way IR
 4K Ultra HD ELR-POL Extender w/ RS-232, Ethernet and 2-way IR EXT-UHD-CAT5-ELRPOL User Manual Important Safety Instructions 1. Read these instructions. 2. Keep these instructions. 3. Heed all warnings.
Switcher for HDMI 1.3
 Switcher for HDMI 1.3 Audio 3GSDI Embedder EXT-HDMI1.3-442 User Manual Release B6 4x2 Switcher for HDMI 1.3 Important Safety Instructions 1. Read these instructions. 2. Keep these instructions. 3. Heed
Gefen. 4x2 Matrix for HDMI. GTB-MHDMI GTB-MHDMI BLK. User Manual
 Gefen 4x2 Matrix for HDMI GTB-MHDMI1.3-442 GTB-MHDMI1.3-442-BLK User Manual www.gefentoolbox.com ASKING FOR ASSISTANCE Technical Support: Telephone (818) 772-9100 (800) 545-6900 Fax (818) 772-9120 Technical
Power Rack 58. EXT-PS5-8R User Manual.
 Power Rack 58 EXT-PS5-8R User Manual www.gefen.com ASKING FOR ASSISTANCE Technical Support: Telephone (818) 772-9100 (800) 545-6900 Fax (818) 772-9120 Technical Support Hours: 8:00 AM to 5:00 PM Monday
4x4 DVI Dual Link Matrix
 4x4 DVI Dual Link Matrix EXT-DVI-444DL User Manual www.gefen.com ASKING FOR ASSISTANCE Technical Support: Telephone (818) 772-9100 (800) 545-6900 Fax (818) 772-9120 Technical Support Hours: 8:00 AM to
HDMI ELR with POL 2 over CAT5
 1080P Extender for HDMI ELR with POL 2 over CAT5 GEF-HDCAT5-ELRPOL2 User Manual www.gefenpro.com ASKING FOR ASSISTANCE Technical Support: Telephone (818) 772-9100 (800) 545-6900 Fax (818) 772-9120 Technical
1:2 DVI SL/DL Splitter EXT-DVI-142DL
 1:2 DVI SL/DL Splitter EXT-DVI-142DL USER MANUAL www.gefen.com ASKING FOR ASSISTANCE Technical Support: Telephone (818) 772-9100 (800) 545-6900 Fax (818) 772-9120 Technical Support Hours: 8:00 AM to 5:00
Extender for HDMI 1.3 over One Fiber with IR
 Extender for HDMI 1.3 over One Fiber with IR EXT-HDMI1.3-1FO User Manual www.gefen.com ASKING FOR ASSISTANCE Technical Support: Telephone (818) 772-9100 (800) 545-6900 Fax (818) 772-9120 Technical Support
DVI FM1000 Extender. EXT-DVI-FM-1000 User Manual.
 DVI FM1000 Extender EXT-DVI-FM-1000 User Manual www.gefen.com ASKING FOR ASSISTANCE Technical Support: Telephone (818) 772-9100 (800) 545-6900 Fax (818) 772-9120 Technical Support Hours: 8:00 AM to 5:00
ASKING FOR ASSISTANCE
 www.gefen.com Technical Support: Telephone (818) 772-9100 (800) 545-6900 Fax (818) 772-9120 Technical Support Hours: 8:00 AM to 5:00 PM Monday thru Friday PST Write To: Gefen, LLC. c/o Customer Service
DVI ELR Extender over one CAT5
 DVI ELR Extender over one CAT5 EXT-DVI-1CAT5-ELR User Manual Important Safety Instructions 1 Read these instructions 2 Keep these instructions 3 Heed all warnings 4 Follow all instructions 5 Do not use
HDMI 1.3 to 3GSDI Converter
 HDMI 1.3 to 3GSDI Converter EXT-HDMI1.3-2-3GSDI User Manual www.gefen.com ASKING FOR ASSISTANCE Technical Support: Telephone (818) 772-9100 (800) 545-6900 Fax (818) 772-9120 Technical Support Hours: 8:00
DVI Detective Plus. EXT-DVI-EDIDP User Manual
 DVI Detective Plus EXT-DVI-EDIDP User Manual ASKING FOR ASSISTANCE Technical Support: Telephone (818) 772-9100 (800) 545-6900 Fax (818) 772-9120 Technical Support Hours: 8:00 AM to 5:00 PM Monday thru
DVI Detective Plus. EXT-DVI-EDIDP User Manual
 DVI Detective Plus EXT-DVI-EDIDP User Manual INTRODUCTION Congratulations on your purchase of the DVI Detective Plus. Your complete satisfaction is very important to us. Gefen Gefen delivers innovative,
Audio. HD over IP. w/ RS-232 and 2-way IR EXT-HD2IRS-LAN-TX EXT-HD2IRS-LAN-RX. User Manual. Release A2
 Audio 3GSDI Embedder HD over IP w/ RS-232 and 2-way IR EXT-HD2IRS-LAN-TX EXT-HD2IRS-LAN-RX User Manual Release A2 Important Safety Instructions 1. Read these instructions. 2. Keep these instructions. 3.
VGA Audio Extender EXT-VGA-AUDIO-141 USER MANUAL.
 VGA Audio Extender EXT-VGA-AUDIO-141 USER MANUAL www.gefen.com ASKING FOR ASSISTANCE Technical Support: Telephone (818) 772-9100 (800) 545-6900 Fax (818) 772-9120 Technical Support Hours: 8:00 AM to 5:00
Digital Audio Extender
 Digital Audio Extender USER MANUAL www.gefen.com Technical Support: Telephone (818) 772-9100 (800) 545-6900 Fax (818) 772-9120 Technical Support Hours: 8:00 AM to 5:00 PM Monday thru Friday. Write To:
DVI Detective. User Manual EXT-DVI-EDIDN. Release A3
 DVI Detective EXT-DVI-EDIDN User Manual Release A3 Important Safety Instructions 1. Read these instructions. 2. Keep these instructions. 3. Heed all warnings. 4. Follow all instructions. 5. Do not use
CAT EXT-CAT USER MANUAL.
 CAT5 500 EXT-CAT5-500 USER MANUAL www.gefen.com Technical Support: Telephone (88) 772-900 (800) 545-6900 Fax (88) 772-920 Technical Support Hours: 8:00 AM to 5:00 PM Monday thru Friday. Write To: Gefen
HDMI 1.3 GTB-MHDMI
 Gefen 4x4 Matrix for HDMI 1.3 GTB-MHDMI1.3-444 User s Manual www.gefentoolbox.com ASKING FOR ASSISTANCE Technical Support: Telephone (818) 772-9100 (800) 545-6900 Fax (818) 772-9120 Technical Support Hours:
CAT U S E R M A N U A L
 CAT5 7500 U S E R M A N U A L www.gefen.com ASKING FOR ASSISTANCE Technical Support: Telephone (818) 884-6294 (800) 545-6900 Fax (818) 884-3108 Technical Support Hours: 8:00 AM to 5:00 PM Monday thru
HDMI to 3GSDI Converter
 HDMI to 3GSDI Converter EXT-HD-3G-C User Manual Release A2 Important Safety Instructions 1. Read these instructions. 2. Keep these instructions. 3. Heed all warnings. 4. Follow all instructions. 5. Do
USB 400 FO. EXT-USB-400FON. User Manual
 USB 400 FO EXT-USB-400FON User Manual www.gefen.com Technical Support: Telephone (818) 772-9100 (800) 545-6900 Fax (818) 772-9120 Technical Support Hours: 8:00 AM to 5:00 PM PST Monday thru Friday, Pacific
1:3 Splitter for HDMI 1.3
 1:3 Splitter for HDMI 1.3 EXT-HDMI1.3-143 User Manual www.gefen.com ASKING FOR ASSISTANCE Technical Support: Telephone (818) 772-9100 (800) 545-6900 Fax (818) 772-9120 Technical Support Hours: 8:00 AM
VGA Extender SR USER MANUAL.
 VGA Extender SR USER MANUAL www.gefen.com ASKING FOR ASSISTANCE Technical Support: Telephone (818) 772-9100 (800) 545-6900 Fax (818) 772-9120 Technical Support Hours: 8:00 AM to 5:00 PM Monday thru Friday.
DVI KVM. Extra Long Range Extender Over One CAT5. User Manual EXT-DVIKVM-ELR. Release A8
 DVI KVM Extra Long Range Extender Over One CAT5 EXT-DVIKVM-ELR User Manual Release A8 Important Safety Instructions 1 Read these instructions 2 Keep these instructions 3 Heed all warnings 4 Follow all
Switch Between Two HDMI Sources On One Display
 Switch Between Two HDMI Sources On One Display EXT-HDMI-241N Easily Switch Between Two HDMI Devices Using One HDMI Display The 2x1 HDMI Switcher enables effortless HDMI source switching using a single
4x2 Switcher for HDMI 1.3
 4x2 Switcher for HDMI 1.3 EXT-HDMI1.3-442 User Manual www.gefen.com ASKING FOR ASSISTANCE Technical Support: Telephone (818) 772-9100 (800) 545-6900 Fax (818) 772-9120 Technical Support Hours: 8:00 AM
VGA RS-232 Extender USER MANUAL.
 VGA RS-232 Extender USER MANUAL www.gefen.com ASKING FOR ASSISTANCE Technical Support: Telephone (818) 884-6294 (800) 545-6900 Fax (818) 884-3108 Technical Support Hours: 9:00 AM to 5:00 PM Monday thru
1:8 Splitter for HDMI 1.3 GTB-MHDMI
 1:8 Splitter for HDMI 1.3 GTB-MHDMI1.3-148 User Manual www.gefentoolbox.com ASKING FOR ASSISTANCE Technical Support: Telephone (818) 772-9100 (800) 545-6900 Fax (818) 772-9120 Technical Support Hours:
4x4 DVI Matrix. en.com EXT-DVI-444N USER MANUAL
 4x4 DVI Matrix EXT-DVI-444N USER MANUAL www.gefen.com www.gefen.com en.com ASKING FOR ASSISTANCE Technical Support: Telephone (818) 772-9100 (800) 545-6900 Fax (818) 772-9120 Technical Support Hours: 8:00
Mini USB Extender USER MANUAL.
 Mini USB Extender USER MANUAL www.gefen.com ASKING FOR ASSISTANCE Technical Support: Telephone (818) 772-9100 (800) 545-6900 Fax (818) 772-9120 Technical Support Hours: 8:00 AM to 5:00 PM Monday thru Friday.
1:4 DVI Splitter EXT-DVI-144N
 1:4 DVI Splitter EXT-DVI-144N USER MANUAL INTRODUCTION Gefen s 1:4 DVI Distribution is a distribution hub that sends the same DVI graphics source to up to four DVI digital displays (flat panels or projectors).
DVI RS-232 Extender USER MANUAL.
 DVI RS-232 Extender USER MANUAL www.gefen.com ASKING FOR ASSISTANCE Technical Support: Telephone (818) 772-9100 (800) 545-6900 Fax (818) 772-9120 Technical Support Hours: 8:00 AM to 5:00 PM Monday thru
Audio. one CAT-5 EXT-DVI-1CAT5-SR. User Manual. Release A2
 Audio DVI 3GSDI ELR Lite Embedder Extender over one CAT-5 EXT-DVI-1CAT5-SR User Manual Release A2 DVI ELR Lite Extender over one CAT-5 Important Safety Instructions 1. Read these instructions. 2. Keep
ASKING FOR ASSISTANCE
 ASKING FOR ASSISTANCE Technical Support: Telephone (88) 77-900 (800) 545-6900 Fax (88) 77-90 Technical Support Hours: 8:00 am to 5:00 pm Monday to Friday Write to: Gefen, Inc. c/o Customer Service 0600
Technical Support: Telephone (818) (800) Fax (818) Technical Support Hours: 8:00 AM to 5:00 PM Monday thru Friday. ASKING F
 (800) Fax (818) Technical Support Hours: 8:00 AM to 5:00 PM Monday thru Friday. ASKING F") DVI Dual Link Booster USER MANUAL www.gefen.com Technical Support: Telephone (818) 772-9100 (800) 545-6900 Fax (818) 772-9120 Technical Support Hours: 8:00 AM to 5:00 PM Monday thru Friday. ASKING FOR
DVI Dual Link Booster USER MANUAL www.gefen.com Technical Support: Telephone (818) 772-9100 (800) 545-6900 Fax (818) 772-9120 Technical Support Hours: 8:00 AM to 5:00 PM Monday thru Friday. ASKING FOR
1:4 3GSDI Splitter. User Manual EXT-3GSDI-144. Release A5
 1:4 3GSDI Splitter EXT-3GSDI-144 User Manual Release A5 Important Safety Instructions 1. Read these instructions. 2. Keep these instructions. 3. Heed all warnings. 4. Follow all instructions. 5. Do not
CAT USER MANUAL.
 CAT5 5500 USER MANUAL www.gefen.com Technical Support: Telephone (88) 772-900 (800) 545-6900 Fax (88) 772-920 Technical Support Hours: 8:00 AM to 5:00 PM Monday thru Friday. Write To: Gefen Inc. c/o Customer
Cat5 5500HD EXT-CAT5-5500HD USER MANUAL.
 Cat5 5500HD EXT-CAT5-5500HD USER MANUAL www.gefen.com ASKING FOR ASSISTANCE Technical Support: Telephone (818) 772-9100 (800) 545-6900 Fax (818) 772-9120 Technical Support Hours: 8:00 AM to 5:00 PM Monday
3x1 Switcher For x 1.3
 3x1 Switcher For x 1.3 EXT-HDMI1.3-341 User Manual www.gefen.com ASKING FOR ASSISTANCE Technical Support: Telephone (818) 772-9100 (800) 545-6900 Fax (818) 772-9120 Technical Support Hours: 8:00 AM to
Gefen TV CR Speaker. GTV-CR-2SP - GTV-CR-3SP - GTV-CR-5SP. User Manual
 Gefen TV CR Speaker GTV-CR-2SP - GTV-CR-3SP - GTV-CR-5SP User Manual www.gefentv.com ASKING FOR ASSISTANCE Technical Support: Telephone (818) 772-9100 (800) 545-6900 Fax (818) 772-9120 Technical Support
USB Switcher USER MANUAL.
 USB Switcher USER MANUAL www.gefen.com Technical Support: Telephone (818) 772-9100 (800) 545-6900 Fax (818) 772-9120 Technical Support Hours: 8:00 AM to 5:00 PM Monday through Friday. Write To: Gefen Inc.
TABLE OF CONTENTS. Introduction Operation Notes Installation Front Panel Layout Front Panel Function Description...
 USB 241 USER MANUAL TABLE OF CONTENTS Introduction... 1 Operation Notes... 3 Installation... 5 Front Panel Layout... 6 Front Panel Function Description... 7 Back Panel Layout... 8 Back Panel Function Description...
Digital Audio Extender
 Digital Audio Extender USER MANUAL www.gefen.com Technical Support: Telephone (818) 884-6294 (800) 545-6900 Fax (818) 884-3108 Technical Support Hours: 9:00 AM to 5:00 PM Monday thru Friday. Write To:
CAT USER MANUAL.
 CAT5 500 USER MANUAL www.gefen.com Technical Support: Telephone (88) 884-694 (800) 545-6900 Fax (88) 884-08 Technical Support Hours: 9:00 AM to 5:00 PM Monday thru Friday. Write To: Gefen Inc. C/O Customer
GTV-HDMI1.3-CAT6. User Manual.
 Extender for 1.3 over CAT6 GTV-HDMI1.3-CAT6 User Manual www.gefentv.com Technical Support: Telephone (818) 772-9100 (800) 545-6900 Fax (818) 772-9120 Technical Support Hours: 8:00 AM to 5:00 PM Monday
1:4 Gefen TV Splitter. GTV-HDMI User Manual
 1:4 Gefen TV Splitter GTV-HDMI1.3-144 User Manual www.gefentv.com Technical Support: Telephone (818) 772-9100 (800) 545-6900 Fax (818) 772-9120 Technical Support Hours: 8:00 AM to 5:00 PM Monday thru Friday
CAT USER MANUAL.
 CAT5 000 USER MANUAL www.gefen.com Technical Support: Telephone (88) 884-6294 (800) 545-6900 Fax (88) 884-308 Technical Support Hours: 9:00 AM to 5:00 PM Monday thru Friday. Write To: Gefen Inc. C/O Customer
2X2 DVI DL Switcher EXT-DVI-422DL. User Manual
 2X2 DVI DL Switcher EXT-DVI-422DL User Manual INTRODUCTION Thank you for purchasing Gefen s 2x2 DVI DL Switcher. The 2x2 DVI DL Switcher switches DVI, USB 2.0 and Audio between any combination of two computers.
Extender for 1.3 over one CAT-6. EXT-HDMI1.3-1CAT6 User Manual
 Extender for 1.3 over one CAT-6 EXT-HDMI1.3-1CAT6 User Manual www.gefen.com Technical Support: Telephone (818) 772-9100 (800) 545-6900 Fax (818) 772-9120 Technical Support Hours: 8:00 AM to 5:00 PM Monday
2x1 DVI DL Switcher USER MANUAL.
 2x1 DVI DL Switcher USER MANUAL www.gefen.com Technical Support: Telephone (818) 772-9100 (800) 545-6900 Fax (818) 772-9120 Technical Support Hours: 8:00 AM to 5:00 PM Monday thru Friday. Write To: Gefen
4x1 DVI Switcher. EXT-DVI-441N User Manual.
 4x1 DVI Switcher EXT-DVI-441N User Manual www.gefen.com ASKING FOR ASSISTANCE Technical Support: Telephone (818) 772-9100 (800) 545-6900 Fax (818) 772-9120 Technical Support Hours: 8:00 AM to 5:00 PM Monday
Cat5 5500HD USER MANUAL.
 Cat5 5500HD USER MANUAL www.gefen.com ASKING FOR ASSISTANCE Technical Support: Telephone (818) 772-9100 (800) 545-6900 Fax (818) 772-9120 Technical Support Hours: 8:00 AM to 5:00 PM Monday thru Friday.
4x2 DVI Switcher USER MANUAL.
 4x2 DVI Switcher USER MANUAL www.gefen.com ASKING FOR ASSISTANCE Technical Support: Telephone (818) 772-9100 (800) 545-6900 Fax (818) 772-9120 Technical Support Hours: 8:00 AM to 5:00 PM Monday thru Friday.
ASKING FOR ASSISTANCE
 ASKING FOR ASSISTANCE Technical Support Telephone (818) 772-9100 (800) 545-6900 Fax (818) 772-9120 Technical Support Hours 800 AM to 500 PM Monday thru Friday. Write To Gefen LLC c/o Customer Service 20600
4X2 Switcher for 1.3. EXT-HDMI User Manual.
 4X2 Switcher for 1.3 EXT-HDMI1.3-442 User Manual www.gefen.com Technical Support: Telephone (818) 772-9100 (800) 545-6900 Fax (818) 772-9120 Technical Support Hours: 8:00 AM to 5:00 PM Monday thru Friday.
8x1 DVI KVM DL Switcher
 8x1 DVI KVM DL Switcher EXT-DVIKVM-841DL User Manual www.gefen.com ASKING FOR ASSISTANCE Technical Support: Telephone (818) 772-9100 (800) 545-6900 Fax (818) 772-9120 Technical Support Hours: 8:00 AM
CAT5 9500HD EXT-CAT5-9500HD USER MANUAL.
 CAT5 9500HD EXT-CAT5-9500HD USER MANUAL www.gefen.com ASKING FOR ASSISTANCE Technical Support: Telephone (88) 772-900 (800) 545-6900 Fax (88) 772-920 Technical Support Hours: 8:00 AM to 5:00 PM Monday
HD Mini Pattern Signal Generator GTV-HD-MPSG User Manual
 HD Mini Pattern Signal Generator GTV-HD-MPSG User Manual www.gefentv.com ASKING FOR ASSISTANCE Technical Support: Telephone (818) 772-9100 (800) 545-6900 Fax (818) 772-9120 Technical Support Hours: 8:00
CAT5 5000HD USER MANUAL.
 CAT5 5000HD USER MANUAL www.gefen.com Technical Support: Telephone (818) 772-9100 (800) 545-6900 Fax (818) 772-9120 Technical Support Hours: 8:00 AM to 5:00 PM Monday thru Friday. Write To: Gefen Inc.