INSTRUCTIONS FOR USE The Classic
|
|
|
- Constance Tate
- 5 years ago
- Views:
Transcription

1 INSTRUCTIONS FOR USE The Classic
2 2
 TONEARM REST AND REMOVABLE TRANSPORT LOCK (11) CARBON / ALUMINIUM TONEARM TUBE (12) HEADSHELL WITH FINGER LIFT (13) TONEARM FLANGE (14) ANTI-SKATING STUB WITH ANTI-SKATING ADJUSTMENT SCALE")
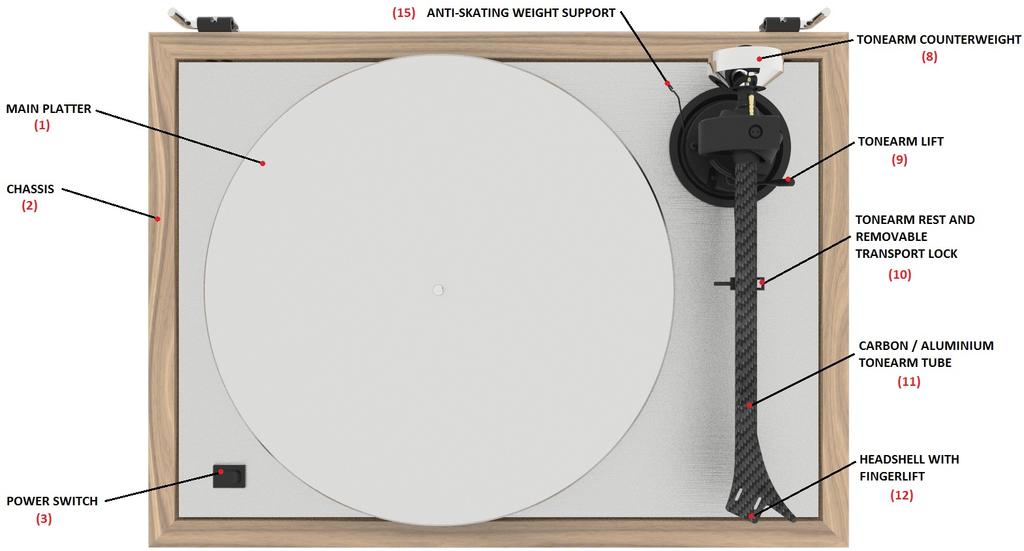
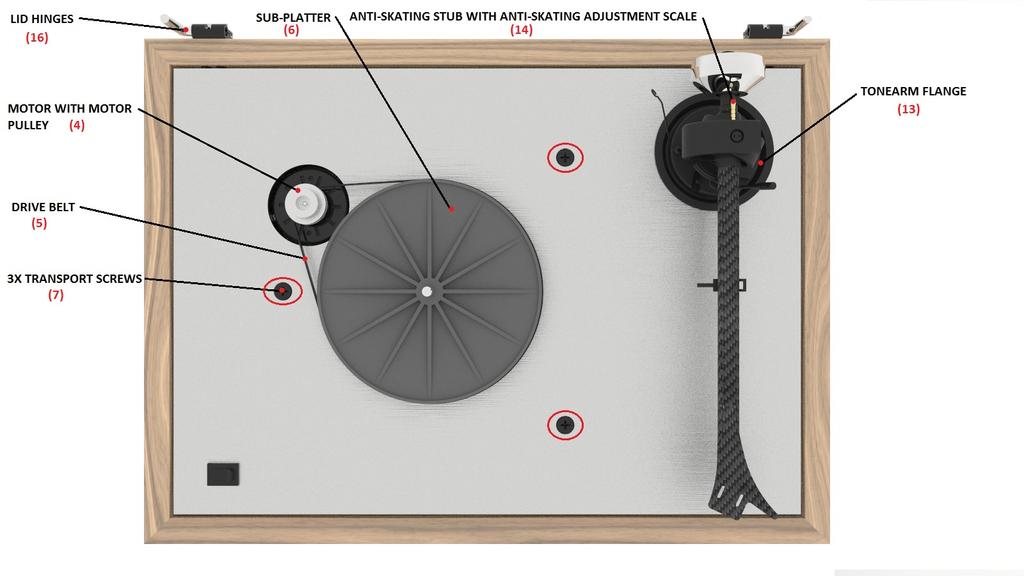
3 Controls, features and connections (1) MAIN PLATTER (2) CHASSIS (3) POWER SWITCH (4) MOTOR WITH MOTOR PULLEY (5) DRIVE BELT (6) SUB-PLATTER (7) TRANSPORT SCREWS (8) TONEARM COUNTERWEIGHT (9) TONEARM LIFT (10) TONEARM REST AND REMOVABLE TRANSPORT LOCK (11) CARBON / ALUMINIUM TONEARM TUBE (12) HEADSHELL WITH FINGER LIFT (13) TONEARM FLANGE (14) ANTI-SKATING STUB WITH ANTI-SKATING ADJUSTMENT SCALE (15) ANTI-SKATING WEIGHT SUPPORT (16) LID HINGES (17) LID (18) HINGE FASTENERS (19) PHONO OUTPUT SOCKET (20) POWER SUPPLY SOCKET The Classic 3
 Allen key 2mm (7) Allen key 3mm (8) Counterweight no.")
4 Turntable accessories (1) Instruction for use (2) Cartridge alignment protractor (not shown) (3) White cotton gloves (4) Anti-skating weight (5) Allen key 1.5mm (6) Allen key 2mm (7) Allen key 3mm (8) Counterweight no. 183 for cartridges with weight between 7-14g (9) Single adaptor (10) Hook tool (11) Stylus Pressure Gauge (12) Connect IT E RCA (not shown) (13) Cloth (not shown) (14) Power supply (not shown) 4
5 CONTENTS TURNTABLE OVERVIEW 2-3 ACCESSORIES OVERVIEW 4 SETUP AND INSTALLATION 1. TRANSPORT CREWS 7 2. MOUNTING AND CONNECTING THE CARTRIDGE 8 3. CARTRIDGE DOWNFORCE ADJUSTMENT 8 4. ANTI-SKATING FORCE ADJUSTMENT 9 5. CONNECTION TO TH AMPLIFIER 9 6. MAINS POWER CONNECTION FITTING THE LID SWITCHING ON AND OFF CHANGING REPLAY SPEED ADJUSTING THE VERTICAL TRACKING ANGLE (VTA) ADJUSTING THE AZIMUTH USEFUL TIPS MAINTENANCE AND CLEANING 11 TECHNICAL SPECIFICATIONS 12 WARRANTY, SERVICE 13 PACKAGING 14 5
6 Dear music lover, thank you for purchasing a Pro-Ject Audio Systems record player. In order to achieve maximum performance and reliability, please study these instructions carefully. Warning of a hazard for the user, the unit or possible misuse Important notice The following instructions for adjusting the cartridge are provided in case the cartridge is replaced by a different model at a later date. During assembling and adjustment small parts could be lost if they are not carefully placed in a suitable receptacle. Before starting assembly make yourself acquainted with the parts listed above which are correspondingly numbered in the technical drawings above. Separately packed items are marked with an asterisk *. Safety instructions The power supply is used to connect and disconnect the unit from the mains. Make sure that the plug is easily accessible at all times. Hold the plug when unplugging the power cord. Never handle the power cord while your hands are wet or damp. Avoid letting liquids enter the device. Never place any item containing liquid, like a flower vase, on or near the device. Never spill any liquid on the device. Never place any naked flame sources, like lighted candles, on or near the device. The product shall not be used in damp or wet locations, next to a bathtub, sink, swimming pool or any other similar conditions. Keep plastic bags away from children to prevent any risk of suffocation. The turntable was shipped partially disassembled in order to avoid damage to sensitive parts. Please check immediately to make sure that neither the packaging nor the device was damaged in transit. 6
 from the upper part of the chassis before")
7 SETUP AND INSTALLATION 1. TRANSPORT SCREWS Remove the three transport screws (7) from the upper part of the chassis before installing the sub-platter (6), the drive belt (5) and the platter (1). 7
8 2. MOUNTING AND CONNECTING THE CARTRIDGE All cartridges with half inch mounting holes can be mounted. Leave the needle's protection cover on, fit the cartridge to the headshell by using the supplied screws by passing one screw through each slot in the headshell (12). Do not tighten the nuts yet. Connect the tonearm wires with the cartridge pins as follows: white left channel positive (L+) red right channel positive (R+) green right channel return (R -) blue left channel return (L -) The full sound quality of the record player can only be achieved if the cartridge is adjusted correctly. Particular tools like the Pro-Ject Audio Systems alignment tool are required to accomplish this job properly. If you are not well acquainted with the adjustment of cartridges, please call for the willing help of your Pro-Ject Audio Systems dealer. Please note: adjusting a cartridge and tonearm calls for the greatest care in order to avoid damaging the cartridge or tonearm bearings. Ask your local dealer for help if you are unsure in any of the necessary steps and precautions which must be taken. 3. CARTRIDGE DOWNFORCE ADJUSTMENT The counterweight (8) supplied is suitable for cartridges weighing between 7-14g (counterweight no. 183). Adjust the downforce prior to setting the anti-skating force. Place counterweight (8) halfway along the counterweight support rod at rear of arm, being sure to have the securing screw uppermost. With the power off, and the platter static, place the stylus pressure gauge (13) onto the platter. To set the recommended 18mN downforce (1mN = 0,1g / 0,1 Pond), place the tip of the stylus exactly in-between the two points marked 15mN and 20mN. If the stylus gauge becomes level, then the correct pressure has been achieved. However if the there is insufficient or excessive pressure the gauge will either not move or tilt down. To adjust the amount of pressure, carefully move the counterweight (8) along the support rod, until the stylus pressure is sufficient to raise the pressure gauge to the level position. Moving the counterweight (8) away from the cartridge will reduce pressure and towards will increase pressure. Please note: It is advised to remove stylus tip from gauge whilst making adjustments to avoid damage to stylus. 8
 10-14mN 1 st from bearing rings 15-19mN 2 nd \" \" \" 20mN and bigger 3 rd \" \" \" 5.")
 on your amplifier.")

9 4. ANTI-SKATING FORCE ADJUSTMENT Put the anti-skating thread hook over the anti-skating adjustment scale. The anti-skating force must be adjusted corresponding to the downforce as follows: Downforce Groove in the stub (15) 10-14mN 1 st from bearing rings 15-19mN 2 nd " " " 20mN and bigger 3 rd " " " 5. CONNECTION TO THE AMPLIFIER The record player has gold plated female RCA phono sockets (19) so you can substitute the interconnect cables supplied with higher quality cables such as the Pro-Ject Connect it C/CC/Si interconnect cables for connection to the amplifier if you wish. Use the Phono input (sometimes labelled gram, disc or RIAA) on your amplifier. Make sure that the phono input offers correct matching and amplification for the type of cartridge used. Line inputs (like CD, Tuner, Tape or Video) are not suitable. Take care about connecting the left and right channel correctly. The RIGHT CHANNEL is usually marked RED, the LEFT CHANNEL BLACK or WHITE. Check the manual of your amplifier for relevant information. An earthing wire may be connected to the screw terminal between the sockets if you encounter humming problems. If your amplifier does not have an input suitable for phono cartridges, a separate phono amplifier stage for MM or MC cartridges is required. It has to be connected between record player and a free line level input of the amplifier. For detailed product information regarding Pro-Ject Audio Systems interconnect cables and phono amplifiers please visit our website: 9

10 6. MAINS POWER CONNECTION The turntable is supplied with a power supply suitable for your country's mains supply. Check the label before connecting to ensure compliance with the mains rating in your house. Connect the low voltage plug from the power supply to the socket (20) on the rear of the record player before connecting the power supply to the mains. 7. FITTING THE LID Fit the lid (dust cover 17) carefully over the hinge prongs and adjust the screws (18) until the lid stays open where you want it to without being too stiff to open or close. 8. SWITCHING ON AND OFF Pressing the power switch (3) alternately starts or stops the motor. 9. CHANGING REPLAY SPEED To play records at 45 r.p.m., put the drive belt (5) over the larger diameter part of the motor pulley (4) using the accessory tool provided (10 accessories list). To revert to 33 r.p.m. repeat the proceedings using the smaller step on the pulley. 10. ADJUSTING THE VERTICAL TRACKING ANGLE (VTA) Put a record on the platter. When the needle is lowered into the record groove and the tonearm is not resting on the lift arm, the tube of the tonearm should be parallel to the surface of the record. If it is not, loosen both hexagon screws in the tonearm base just enough to allow vertical movement of the arm pillar without force and slide the arm up or down until it is parallel. Retighten the hexagon screws without applying excessive force (which would deform the arm pillar) finger tight is quite sufficient. 10

11 11. ADJUSTING THE AZIMUTH The cartridge needle must be vertical in the record groove in order to trace the groove wall modulations correctly. A small screw at the bearing end of the arm allows incorrect azimuth to be corrected. Slacken off the screw just enough to be able to revolve the arm tube without applying force. Note! Do not remove this screw completely! 12. USEFUL TIPS The lid is not only a dust cover but also a resonant structure likely to be excited by and to pass into the plinth the acoustic energy emanating from your loudspeakers during replay. Therefore it is recommended to remove the lid for achieving a better sound quality. The record player should be positioned on a lowresonance surface, like wood or multiple layer ply board to avoid structural vibrations disturbing replay. 13. MAINTENANCE AND CLEANING Your record player requires little or no regular maintenance. Remove dust with a slightly moistened antistatic cloth. Never use a dry cloth because this will create static electricity which attracts even more dust! Antistatic cleaning fluids are available at specialized stores but must be applied sparingly to avoid damage to rubber parts. It is recommended to fit the needle cover before cleaning or maintenance to avoid damage. If the player is not used over a long period of time, the drive belt should be removed to prevent unequal stretching. Always disconnect the record player from the mains power supply as a precaution before maintenance! 11
12 TECHNICAL SPECIFICATIONS Pro-Ject THE CLASSIC with Pro-Ject 9 Carbon/Alu sandwich tonearm Nominal speeds 33/45 r.p.m. Speed variance 33: ±0,15 % 45: ±0,12 % Wow and flutter 33: ±0,11 % 45: ±0,10 % Signal to noise 70dB Effective tonearm mass 13,5g Effective tonearm length 9 " (230mm) Overhang 18mm Power consumption 5W/ >0,5W standby mode Outboard power supply 15V/ 1,6 A DC, universal power supply Dimensions (W x H x D) 462 x 131 x 351mm, dust cover open 462 x 423 x 390mm Weight 10,2 kg Technical specifications MM-Cartridge Ortofon 2M Silver Frequency range Hz Channel separation 23dB/1kHz Output voltage 4mV Recommended load impedance 47kohms/amplifier connection MM-input Compliance/stylus type 20µm/mN elliptical Recommended tracking force 18mN Weight 7,2g 12
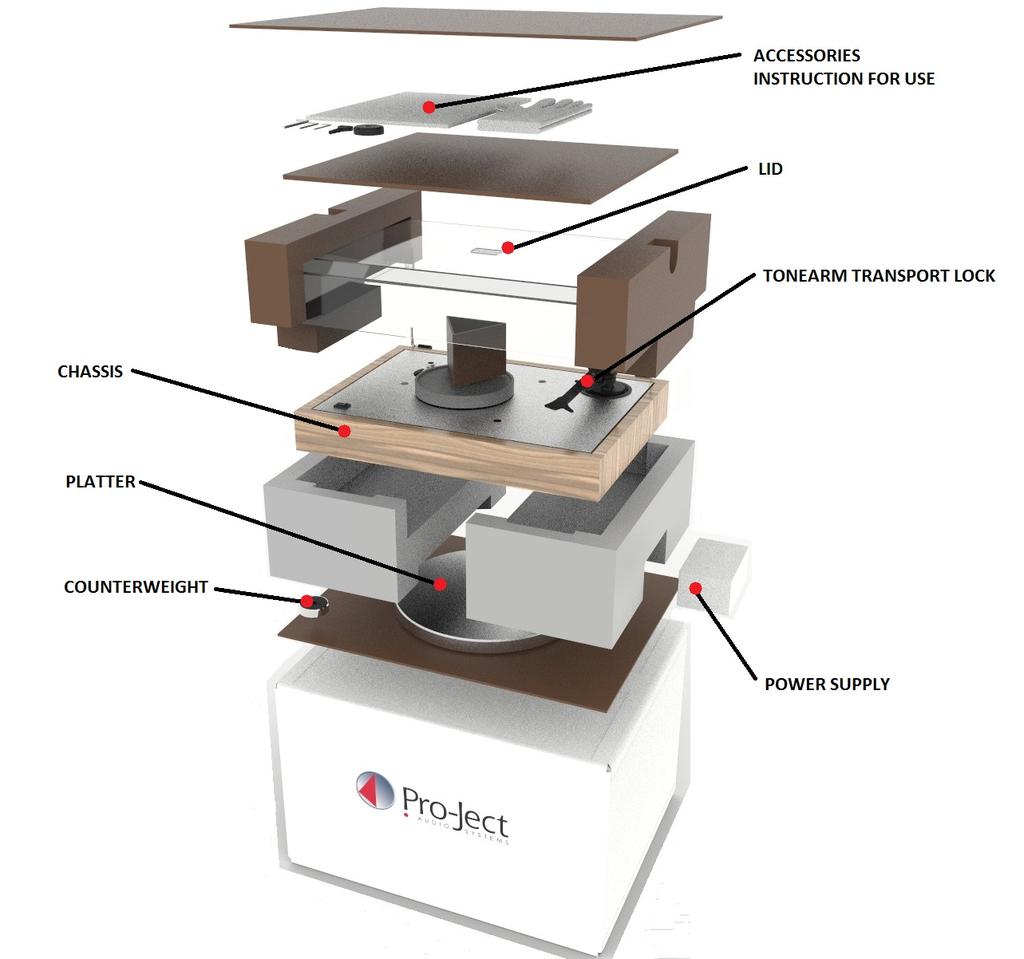
13 Potential incorrect use and fault conditions Pro-Ject turntables are manufactured to the highest standards and undergo strict quality controls before leaving the factory. Faults that may possibly occur are not necessarily due to material or production faults but can sometimes be caused by incorrect use or unfortunate circumstances. Therefore the following list of common fault symptoms is included. The platter doesn't turn although the unit is switched on: The unit is not connected to the mains power supply. No mains at the socket. Drive belt is not fitted or has slipped off. No signal through one or other channel or both channels: No signal contact from the cartridge to the internal tonearm wiring or from that to the arm lead or from that to the phono box or between that and the amplifier. This could be due to a faulty plug, broken wire or solder joint or simply loose plug/socket connection. Phono input not selected at amplifier. Amplifier is not switched on. Amplifier or speakers are defective or muted. No connection to the loudspeakers. Strong hum on phono input: No earth connection from cartridge or arm or arm cable to amplifier, or earth loop. Distorted or inconsistent sound from one or both channels: Record player is connected to wrong input of amplifier, or MM/MC switch incorrectly set. Needle or cantilever damaged. Wrong r.p.m., drive belt overstretched or dirty, platter bearing without oil, dirty or damaged. Service Should you encounter a problem which you are not able to alleviate or identify despite the above information, please contact your dealer for further advice. Only when the problem cannot be resolved there should the unit be sent to the responsible distributor in your country. Guarantee repairs will only be affected if the unit is returned correctly packaged. For this reason we recommend keeping the original packaging. Never return a record player without making sure that is it safely disassembled and correctly packaged in the original packaging according to the diagrams on the last page of this user guide. Please remove these parts and pack them separately: lid, counterweight, anti-skating weight, platter and belt. Fit the cartridge protection cap. Insert the transport screws for the sub-chassis, the transport lock for the tonearm prior to carefully packaging the record player. Warranty The manufacturer accepts no responsibility for damage caused by not adhering to these instructions for use and/or by transportation without the original packaging. Modification or change to any part of the product by unauthorized persons, release the manufacturer from any liability over and above the lawful rights of the customer. Pro-Ject Audio Systems is a Registered Trademark of H. Lichtenegger. This guide was produced by: Pro-Ject Audio Systems Copyright All rights reserved. The information was correct at the time of going to press. The manufacturer reserves the right to make changes to the technical specification without prior notice as deemed necessary to uphold the ongoing process of technical development. 13
14 14
INSTRUCTIONS FOR USE. Pro-Ject Primary E
 INSTRUCTIONS FOR USE Pro-Ject Primary E 2 Pro-Ject Audio Systems Pro-Ject Primary E/ Pro-Ject 8.6E Revision 2018.04.03 Primary E Controls, features and connections (1) Power switch (2) Stepped drive pulley
INSTRUCTIONS FOR USE VT-E BT L
 INSTRUCTIONS FOR USE VT-E BT L 2 Mounting kit for wall mount VT-E BT L Controls, features and connections (1) Power switch (2) Motor with motor pulley (3) Platter (4) Drive belt (5) Chassis (6) Screwable
INSTRUCTIONS FOR USE. The Classic SB Superpack
 INSTRUCTIONS FOR USE The Classic SB Superpack 2 The Classic SB Superpack Controls, features and connections (1) MAIN PLATTER WITH PRO-JECT LEATHER IT (2) CHASSIS (3) RECORD CLAMP (4) SPEED CONTROL (5)
Downloaded from INSTRUCTIONS FOR USE Pro-Ject Elemental
 INSTRUCTIONS FOR USE Pro-Ject Elemental Controls, features and connections 1 Power switch 2/22 Stepped drive pulley and drive belt * 3 Platter with felt mat * 4 Tonearm counterweight 5 Tonearm lift lever
INSTRUCTIONS FOR USE Pro-Ject Essential II
 INSTRUCTIONS FOR USE Pro-Ject Essential II 12 14 14 10 22 4 30 0 5 4a 9 2 8 3 66 6 5 7 1 11 14 13 Controls, features and connections 1 Power switch 2/22 Stepped drive pulley and drive belt * 3 Platter
INSTRUCTIONS FOR USE Pro-Ject 1 Anniversary
 INSTRUCTIONS FOR USE Pro-Ject 1 Anniversary 13 2 PRO-JECT 1 Anniversary Controls, features and connections 1 Motor transportation screw (marked red) 2 Stepped drive pulley 3 Drive belt * 3a Hook * 4 Hub
INSTRUCTIONS FOR USE Pro-Ject 2 Xperience DC Acryl
 INSTRUCTIONS FOR USE Pro-Ject 2 Xperience DC Acryl 2 Pro-Ject Audio Systems Pro-Ject 2Xperience DC Acryl Revision 2015.08.10 Pro-Ject 2 Xperience DC Acryl Controls, features and connections 1 Motor transport
INSTRUCTIONS FOR USE. Pro-Ject Jukebox E
 INSTRUCTIONS FOR USE Pro-Ject Jukebox E 2 Jukebox E Controls, features and connections (1) TURNTABLE MOTOR SWITCH (2) AMPLIFIER ON/OFF SWITCH (3) REMOTE CONTROL (4) INPUT SELECTOR, VOLUME CONTROL (5) PLATTER
INSTRUCTIONS FOR USE Pro-Ject Debut RecordMaster
 INSTRUCTIONS FOR USE Pro-Ject Debut RecordMaster ) 2 Pro-Ject Debut RecordMaster Controls, features and connections 1 Motor brackets with Ortofon pads 2 Stepped drive pulley 3 Drive belt * 3a Hook * 4
INSTRUCTIONS FOR USE. Pro-Ject Juke Box
 INSTRUCTIONS FOR USE Pro-Ject Juke Box 11 11 1 2 3 16 6 30 0 5 6a 17 15 9a 4 5 8 18 7 9 21 20 20a 3a 23 IN MP3 IN 1 IN 2 SELECTOR 22 10 11 12 14a 13 13a 14 IN MP3 IN 1 IN 2 16V 21V= 2 PRO-JECT JUKE BOX
INSTRUCTIONS FOR USE Pro-Ject Debut Carbon DC Phono USB
 INSTRUCTIONS FOR USE Pro-Ject Debut Carbon DC Phono USB 11 13 11 21 2 1 3 16 6 30 0 5 6a 17 15 9a 1 4 5 8 18 9 7 19 20 17 9a 22 23 3a 10 11 12 14 2 Pro-Ject Debut Carbon DC Phono USB Controls, features
INSTRUCTIONS FOR USE Pro-Ject Juke Box Esprit
 INSTRUCTIONS FOR USE Pro-Ject Juke Box Esprit 11 11 1 2 3 16 6 30 0 5 6a 17 15 9a 4 5 8 18 7 9 21 20 20a 3a 23 1 2 22 10 11 12 14a 13 13a 14 OUT IN 1 IN 2 16V 21V= 2 Pro-Ject Juke Box Esprit Controls,
INSTRUCTIONS FOR USE Pro-Ject Debut Carbon RecordMaster HiRes
 INSTRUCTIONS FOR USE Pro-Ject Debut Carbon RecordMaster HiRes ) 2 Pro-Ject Debut Carbon RecordMaster HiRes Controls, features and connections 1 Motor brackets with Ortofon pads 2 Stepped drive pulley 3
C 558 Turntable ENGLISH. Owner s Manual
 C 558 Turntable Owner s Manual IMPORTANT SAFETY INSTRUCTIONS PRECAUTIONS Read the Operating Instructions carefully and completely before operating the unit. Be sure to keep the Operating Instructions for
INSTRUCTIONS FOR USE Pro-Ject Phono Box DS2 USB
 INSTRUCTIONS FOR USE Pro-Ject Phono Box DS2 USB Dear music lover, thank you for purchasing this Pro-Ject Audio phono amplifier. In order to achieve maximum performance and reliability you should study
INSTRUCTIONS FOR USE Pro-Ject Stereo Box DS
 INSTRUCTIONS FOR USE Pro-Ject Stereo Box DS Dear music lover, thank you for purchasing a PRO-JECT AUDIO amplifier. In order to achieve maximum performance and reliability you should study these instructions
INSTRUCTIONS FOR USE Pro-Ject Stereo Box S2 BT
 INSTRUCTIONS FOR USE Pro-Ject Stereo Box S2 BT Dear music lover, thank you for purchasing this integrated amplifier from Pro-Ject Audio Systems. In order to achieve maximum performance and reliability
INSTRUCTIONS FOR USE CROSLEY C10
 INSTRUCTIONS FOR USE CROSLEY C10 ENGLISH IMPORTANT SAFETY INSTRUCTION PLEASE READ CAREFULLY ALL THE FOLLOWING IMPORTANT SAFEGUARDS THAT ARE APPLICABLE TO YOUR EQUIPMENT 1. Read Instructions - All the
Setup and Instruction Manual
 Setup and Instruction Manual NOMAD SPECIFICATIONS: Type Motor Belt drive (manual turntable) 24 VAC Synchronous AC Motor Turntable Platter Diameter Turntable Speeds Wow and Flutter Rumble Machined MDF 11.81"
INSTRUCTIONS FOR USE Pro-Ject MaiA DS2
 INSTRUCTIONS FOR USE Pro-Ject MaiA DS2 Dear music lover, Thank you for purchasing an integrated amplifier from Pro-Ject Audio Systems. In order to achieve maximum performance and reliability you should
INSTRUCTIONS FOR USE Pro-Ject MaiA CD
 INSTRUCTIONS FOR USE Pro-Ject MaiA CD Dear music lover, thank you for purchasing a Pro-Ject Audio Systems MaiA CD player. In order to achieve maximum performance and reliability you should study these
INSTRUCTIONS FOR USE Pro-Ject Pre Box RS digital
 INSTRUCTIONS FOR USE Pro-Ject Pre Box RS digital Dear music lover, thank you for purchasing this Pro-Ject Audio Systems preamplifier. In order to achieve maximum performance and reliability you should
INSTRUCTIONS FOR USE Pro-Ject CD Box DS2T
 INSTRUCTIONS FOR USE Pro-Ject CD Box DS2T Dear music lover, thank you for purchasing a Pro-Ject Audio Systems CD player. In order to achieve maximum performance and reliability you should study these instructions
INSTRUCTIONS FOR USE Pro-Ject Remote Box S2
 INSTRUCTIONS FOR USE Pro-Ject Remote Box S2 Dear music lover, Thank you for purchasing a Pro-Ject Audio Systems Remote Box S2. In order to achieve maximum performance and reliability you should study these
INSTRUCTIONS FOR USE Pro-Ject Pre Box S2 Digital
 INSTRUCTIONS FOR USE Pro-Ject Pre Box S2 Digital Dear music lover, thank you for purchasing a Pro-Ject Audio Systems preamplifier. In order to achieve maximum performance and reliability you should study
INSTRUCTIONS FOR USE Pro-Ject Dock Box S Fi
 INSTRUCTIONS FOR USE Pro-Ject Dock Box S Fi Dear music lover, thank you for purchasing a PRO-JECT AUDIO docking station Dock Box. In order to achieve maximum performance and reliability you should study
Stereo Turntable System
 3-866-873-15(1) Stereo Turntable System Operating Instructions OWNER S RECORD The model and serial numbers are located at the rear. Record the serial number in the space provided below. Refer to them whenever
INSTRUCTIONS FOR USE Pro-Ject DAC Box DS2 Ultra
 INSTRUCTIONS FOR USE Pro-Ject DAC Box DS2 Ultra Dear music lover, thank you for purchasing this Pro-Ject Audio DAC Box DS2 Ultra. In order to achieve maximum performance and reliability you should study
INSTRUCTIONS FOR USE Pro-Ject Pre Box S2 Digital
 INSTRUCTIONS FOR USE Pro-Ject Pre Box S2 Digital Dear music lover, thank you for purchasing a Pro-Ject Audio Systems preamplifier. In order to achieve maximum performance and reliability you should study
INSTRUCTIONS FOR USE Pro-Ject Pre Box DS2 Digital
 INSTRUCTIONS FOR USE Pro-Ject Pre Box DS2 Digital Dear music lover, thank you for purchasing this Pro-Ject Audio Systems preamplifier. In order to achieve maximum performance and reliability you should
INSTRUCTIONS FOR USE Pro-Ject CD Box
 INSTRUCTIONS FOR USE Pro-Ject CD Box Dear music lover, thank you for purchasing a PRO-JECT AUDIO CD Box. In order to achieve maximum performance reliability you should study these instructions for use
Pro-Ject CD Box RS. User s manual
 Pro-Ject CD Box RS User s manual Dear music lover, thank you for purchasing a PRO-JECT AUDIO CD Box RS. In order to achieve maximum performance and reliability you should study these instructions for use
INSTRUCTIONS FOR USE Pro-Ject DAC Box S USB
 INSTRUCTIONS FOR USE Pro-Ject DAC Box S USB Dear music lover, thank you for purchasing a PRO-JECT AUDIO DAC Box S USB. In order to achieve maximum performance and reliability you should study these instructions
AT-LP60X. User Manual Automatic Belt-Drive Turntable
 AT-LP60X User Manual Automatic Belt-Drive Turntable Introduction Thank you for purchasing this Audio-Technica product. Read through this user manual before using the product to ensure its correct use.
Contents Preparations Connections Playback and recording Tips Appendix DP-450USB TURNTABLE. Owner s Manual
 DP-450USB TURNTABLE Owner s Manual 1 Accessories 4 Features 5 Part names and functions 7 7 10 Preparations Assembly 12 Mounting the turntable 13 Mounting the counterweight 14 Mounting the head shell with
Stereo Turntable System
 3-864-750-12(1) Stereo Turntable System Operating Instructions PS-LX350H 1998 by Sony Corporation 1 WARNING To prevent fire or shock hazard, do not expose the unit to rain or moisture. For the customers
Stereo - Amplifier. User s Manual
 Stereo - Amplifier User s Manual User's Manual Audionet is proud to welcome you in the world of German high-end! Your Audionet SAM (= Stereo AMplifier) is designed for natural and audiophile music reproduction
DUAL MONO POWER AMPLIFIER INSTRUCTIONS FOR USE
 A3.2 CR DUAL MONO POWER AMPLIFIER C R MUSICAL FIDELITY A3.2 DUAL MONO POWER AMPLIFIER POWER INSTRUCTIONS FOR USE Thank you for purchasing the Musical Fidelity A3.2 CR Power Amplifier. Used properly and
ASSEMBLY FEATURES. Please check to make sure the following items are included with the main unit in the carton:
 ASSEMBLY Please check to make sure the following items are included with the main unit in the carton: () Operating instructions (2) Platter (3) Slip mat () Counterweignt (5) 5 rpm adaptor (6) AC cord (7)
CANARY AUDIO CA-430. Vacuum Tube MM/MC Phono Preamplifier OWNER S MANUAL. Handcrafted in California MADE IN USA
 CANARY AUDIO Vacuum Tube MM/MC Phono Preamplifier Handcrafted in California CA-430 OWNER S MANUAL MADE IN USA Dear Customer: Please allow us to take this opportunity to thank you for purchasing this CANARY
IMPORTANT SAFETY INSTRUCTIONS
 SAFETY INSTRUCTIONS WARNING: TO PREVENT FIRE OR SHOCK HAZARD, DO NOT EXPOSE THIS APPLIANCE TO RAIN OR MOISTURE. IMPORTANT SAFETY INSTRUCTIONS 1. Read instructions - All the safety and operating instructions
The Oyster Series Phono Cartridges by SUMIKO Fifth St. Berkeley. CA Tel: Fax:
 The Oyster Series Phono Cartridges by SUMIKO 2431 Fifth St. Berkeley. CA 94710. Tel:510.843.4500. Fax:510.843.7120. www.sumikoaudio.net Thank you for your purchase of a Sumiko Oyster Series phono cartridge.
AT-LP120XUSB. User Manual Direct-Drive Turntable
 AT-LP120XUSB User Manual Direct-Drive Turntable Introduction Thank you for purchasing this Audio-Technica product. Before using the product, read through this user manual to ensure that you will use the
TN-400BT Analog Turntable with Bluetooth
 TN-400BT Analog Turntable with Bluetooth Analog turntable with Bluetooth aptx transmitter that streams music from LP Records wirelessly Main Features High-quality Bluetooth aptx wireless audio transmission
IMPORTANT SAFETY INSTRUCTIONS
 SAFETY INSTRUCTIONS WARNING: TO PREVENT FIRE OR SHOCK HAZARD, DO NOT EXPOSE THIS APPLIANCE TO RAIN OR MOISTURE. IMPORTANT SAFETY INSTRUCTIONS 1. Read instructions - All the safety and operating instructions
Model: PTTC4U. Multifunction Turntable With MP3 Recording, USB-to-PC, Cassette Playback
 Model: PTTC4U Multifunction Turntable With MP3 Recording, USB-to-PC, Cassette Playback Read instructions carefully before use and store in a safe place for future reference. IMPORTANT SAFETY INSTRUCTIONS
Dear user. You will find actual information about our products on Seite 1 / 6
 User manual THALES EASY Dear user Thank you for using the THALES EASY. This tonearm is designed differently than all other tonearms. If you follow this manual accurately the most precise analogue playback
CONTENTS & INSTALLATION
 I NTRODUCTION Thank you for buying this Linn product. As with all our products, the Linn PRETEK preamplifier was designed and manufactured to outperform the competition. You will find that it is capable
Turntable player with USB/SD/PC recording function. Model no: TT620 User s Manual
 Turntable player with USB/SD/PC recording function Model no: TT620 User s Manual READ THIS INSTRUCTION CAREFULLY BEFORE USE AND STORE IN A SAFE PLACE FOR FUTURE REFERENCE 1 Features Two-built-in stereo
TT1910 Direct-Drive Turntable OWNER S MANUAL
 Professional Disc Jockey Products TT1910 Direct-Drive Turntable OWNER S MANUAL NUMARK INDUSTRIES 11 Helmsman Road, North Kingstown, RI 02852 http://www.numark.com CAUTION RISK OF ELECTRIC SHOCK DO NOT
C-pan arm USERS INSTRUCTIONS
 C-pan arm USERS INSTRUCTIONS Designed 1 of 12 and made in Denmark Thanks for purchasing a 9.Solutions product. With great passion, we design our products to be as versatile as possible. We hope that our
AT-LP140XP AT-LP140XP. User Manual Direct-Drive Professional Turntable
 AT-LP140XP AT-LP140XP User Manual Direct-Drive Professional Turntable Introduction Thank you for purchasing this Audio-Technica product. Before using the product, read through this user manual to ensure
A good hi-fi works well enough to deliver these benefits. It also helps you appreciate music you never thought you would.
 M USIC is very important for people. It stimulates the imagination, helps them relax, can change their mood, and of course provides entertainment and pleasure. A good hi-fi works well enough to deliver
Various regulation agencies require us to bring the following information to your attention. Please read carefully.
 1 We would like to take this opportunity to thank you for selecting the CDA825 CD-player. We at Copland wish you many enjoyable hours in the company of fine music. Please read this owners manual before
CANARY AUDIO. Vacuum Tube Compact Disc Player CD-100 OWNER S MANUAL. Handcrafted in California MADE IN USA
 CANARY AUDIO Vacuum Tube Compact Disc Player Handcrafted in California CD-100 OWNER S MANUAL MADE IN USA Dear Customer: Please allow us to take this opportunity to thank you for purchasing this CANARY
music hall a70.2 integrated amplifier music hall
 music hall a70.2 integrated amplifier music hall http://www.musichallaudio.com Congratulations on Your Purchase You have selected a state-of-the-art integrated amplifier. Each component chosen for assembly
RTT98 VINTAGE TURNTABLE
 RTT98 VINTAGE TURNTABLE WARNING: TO PREVENT FIRE OR SHOCK HAZARD, DO NOT EXPOSE THIS APPLIANCE TO RAIN OR MOISTURE. DO NOT REMOVE COVER. PILOT LAMPS SOLDERED IN PLACE. NO USER SERVICEABLE PARTS INSIDE.
POWER AMPLIFIER INSTRUCTIONS FOR USE
 INTRODUCTION A3 CR POWER AMPLIFIER INSTRUCTIONS FOR USE Thank you for purchasing the Musical Fidelity A3 CR power amplifier. Used properly and carefully, it should give you many years of outstanding musical
Leader in Audio Engineering KRC-HR PREAMPLIFIER
 Leader in Audio Engineering KRC-HR PREAMPLIFIER OWNER S REFERENCE TABLE OF CONTENTS 2 3 4 5 INTRODUCTION UNPACKING THEATER-THROUGHPUT SETUP BASIC INSTALLATION 6 INPUT/OUTPUT CONNECTIONS 7 8 9 10 11 12
Performance in Technology Purity in Design
 Performance in Technology Purity in Design A perfect balance of technology and design, the sleek contemporary lines of the AT-LP5 turntable grace any room in the home while delivering performance features
USER MANUAL ENGLISH. itube 452. Amplifier 2 x 45Watt FATMAN. TLAudio
 USER MANUAL ENGLISH itube 452 Amplifier 2 x 45Watt FATMAN by TLAudio Contents Page Safety Instructions....................3 Amplifier Connection Diagram...........4 Amplifier Connections.................5
ple420p 4KHz 6KHz 15KH power in-dash 4 band parametric equalizer
 power 4KHz 6KHz 15KH owner s manual in-dash 4 band parametric equalizer www.pyleaudio.com congratulations... for choosing Pyle Audio, and congratulations on joining a select group of dedicated enthusiasts
MXA2080. Stereo Power Amplifier. Owner s Manual
 MXA2080 Stereo Power Amplifier Owner s Manual CONTENTS Introduction 2 Installation and Safety 2 Power Inlet 3 Smart My-Link Input/output 3 Line Input 3 Line Output 3 Loudspeaker Output 3 Remote Trigger
Outdoor PTZ. Mounting on the Ceiling Using Pendant Mount. Installation Guide. For Models: I93, I94, I95, I96, KCM /12/03
 Outdoor PTZ Mounting on the Ceiling Using Pendant Mount For Models: I93, I94, I95, I96, KCM-8211 2013/12/03 Table of Contents Mounting Solutions... 3 Straight Tube Installation Procedures... 4 Step 1:
Always there to help you. Register your product and get support at DS1600/12. Question? Contact Philips.
 Always there to help you Register your product and get support at www.philips.com/support Question? Contact Philips DS1600/12 User manual Contents 1 Important 2 Safety 2 Notice 2 2 Your Docking Speaker
High-torque Professinal turntable system
 High-torque Professinal turntable system OPERATING INSTRUCTION 6259 - Version 3.0 October 2012 English TT-2930 - High-torque Professinal turntable system 1 - Safety Instructions Important Safety Information
USB Turntable. Installation & User's Guide. Item number All brand names and trademarks are the property of their respective owners.
 USB Turntable Item number 62904201 Installation & User's Guide All brand names and trademarks are the property of their respective owners. R R 1 Precautions Safety Information CAUTION 1.In order to shut
Instruction Manual CTT939
 Instruction Manual CTT939 Table of contents Disposal information... 2 Accessories included... 3 Overview of controls... 3 Preparation for use... 4 Installing the counter weight... 4 Connections... 4 Further
SUBWOOFER SYSTEM YST-MSW10
 ACTIVE SERVO PROCESSING SUBWOOFER SYSTEM YST-MSW10 Active Servo SUBWOOFER SYSTEM YST-MSW10 Active Servo HIGH CUT HIGH LOW OWNER S MANUAL MANUAL DE INSTRUCCIONES CAUTION RISK OF ELECTRIC SHOCK DO NPT OPEN
YST-SW20 SUBWOOFER SYSTEM OWNER S MANUAL. Active Servo Technology
 CAUTION SUBWOOFER SYSTEM Active Servo RISK OF ELECTRIC SHOCK DO NOT OPEN CAUTION: TO REDUCE THE RISK OF ELECTRIC SHOCK DO NOT REMOVE COVER (OR BACK). NO USER-SERVICEABLE PARTS SIDE. REFER SERVICG TO QUALIFIED
MA V 30W Mixer Amplifier Order code: CRAM02 MA V 60W Mixer Amplifier Order code: CRAM03 USER MANUAL
 www.cleveracoustics.co.uk MA 130 100V 30W Mixer Amplifier Order code: CRAM02 MA 160 100V 60W Mixer Amplifier Order code: CRAM03 USER MANUAL WARNING FOR YOUR OWN SAFETY, PLEASE READ THIS USER MANUAL CAREFULLY
Always there to help you. Register your product and get support at DS1600. Question? Contact Philips.
 Always there to help you Register your product and get support at www.philips.com/support Question? Contact Philips DS1600 User manual Contents 1 Important 2 Safety 2 Notice 2 2 Your Docking Speaker 4
OPERATING INSTRUCTIONS
 GPO EMPIRE OPERATING INSTRUCTIONS PLEASE READ THIS USER MANUAL COMPLETELY BEFORE OPERATING THIS UNIT AND RETAIN THIS BOOKLET FOR FUTURE REFERENCE. CONTENT CONTENT.2 IMPORTANT SAFETY INSTRUCTION FOR AUDIO
FOR FURTHER INFORMATION CONTACT: Music Hall 108 Station Road Great Neck, NY Tel: Fax:
 Guarantee This entitles you to have the music hall ph25.2 repaired or replaced, at our discretion, free of charge for one year after purchase, at any authorized music hall dealer, provided the unit was
impact INSTRUCTIONS VS-LCD Series Flash lighting equipment and accessories
 impact lighting equipment and accessories VS-LCD Series Flash INSTRUCTIONS Congratulations on your purchase of the Impact VS-LCD Series Studio Strobe. This light incorporates numerous advanced features,
Gateway Profile 4 service guide
 Gateway Profile 4 service guide Customizing Troubleshooting Contents Replacing Components in Your Gateway Profile 4.................. 1 About this guide.....................................................
QUICKSTART GUIDE ENGLISH ( 2 5 ) GUÍA DE INICIO RÁPIDO ESPAÑOL ( 6 10 ) GUIDE D'UTILISATION RAPIDE FRANÇAIS ( ) GUIDA RAPIDA ITALIANO ( )
 GUÍA DE INICIO RÁPIDO ESPAÑOL ( 6 10 ) GUIDE D'UTILISATION RAPIDE FRANÇAIS ( ) GUIDA RAPIDA ITALIANO ( )") QUICKSTART GUIDE ENGLISH ( 2 5 ) GUÍA DE INICIO RÁPIDO ESPAÑOL ( 6 10 ) GUIDE D'UTILISATION RAPIDE FRANÇAIS ( 11 15 ) GUIDA RAPIDA ITALIANO ( 16 20 ) KURZANLEITUNG DEUTSCH ( 21 25 ) SNELSTARTGIDS NEDERLANDS
QUICKSTART GUIDE ENGLISH ( 2 5 ) GUÍA DE INICIO RÁPIDO ESPAÑOL ( 6 10 ) GUIDE D'UTILISATION RAPIDE FRANÇAIS ( 11 15 ) GUIDA RAPIDA ITALIANO ( 16 20 ) KURZANLEITUNG DEUTSCH ( 21 25 ) SNELSTARTGIDS NEDERLANDS
Speaker Selectors Models SSW-L4 EX and SSW-L6 EX. User Manual. SSW-L4 EX (bottom) and SSW-L6 EX (top)
 and SSW-L6 EX (top)") Speaker Selectors Models SSW-L4 EX and SSW-L6 EX User Manual SSW-L4 EX (bottom) and SSW-L6 EX (top) Table of Contents Important Safety Precautions...2 What s Included...2 Introduction... 3 Front Panel...
Speaker Selectors Models SSW-L4 EX and SSW-L6 EX User Manual SSW-L4 EX (bottom) and SSW-L6 EX (top) Table of Contents Important Safety Precautions...2 What s Included...2 Introduction... 3 Front Panel...
Removal and Installation8
 8 Screw Types 8-4 Top Cover Assembly 8-5 Left Hand Cover 8-6 Right Hand Cover 8-10 Front Panel Assembly 8-14 Left Rear Cover 8-15 Right Rear Cover 8-16 Extension Cover (60" Model only) 8-17 Media Lever
GH-30. Gimbal Head. You re on steady ground
 GH-30 Gimbal Head You re on steady ground 1 INTRODUCTION Thank You for choosing Oben! The Oben GH-30 is a gimbal-type tripod head designed to balance a lens along its vertical and horizontal axes. The
OLi POWA-5 Active Monitors
 Active Monitors User Manual : English Contents Important Information... 3 Front & Rear Panels... 4 Remote Control... 5 Connecting Your Speakers... 6 Bluetooth Function... 7 Use with ipod / MP3... 8 Use
INFORMATION AMPLIFIER TA-102 OPERATING INSTRUCTIONS TABLE OF CONTENTS
 OPERATING INSTRUCTIONS INFORMATION AMPLIFIER TA-102 INFORMATION AMPLIFIER TA-102 MIC AUX POWER TABLE OF CONTENTS 1. SAFETY PRECAUTIONS... 2 2. GENERAL DESCRIPTION... 4 3. EACH PART NAME AND FUNCTIONS Top
Stereo Turntable System
 4-585-834-13 (1) Stereo Turntable System Operating Instructions Getting Started Listening to a Vinyl Record Recording a Vinyl Record Maintenance Additional Information PS-HX500 Owner s Record The model
CONTENTS IMPORTANT SAFETY INSTRUCTIONS.. 3 PRECAUTIONS.. 4 BEFORE USE.. 5 TURNTABLE PARTS. 5 LISTENING TO A RECORD. 5
 1 CONTENTS IMPORTANT SAFETY INSTRUCTIONS.. 3 PRECAUTIONS.. 4 BEFORE USE.. 5 TURNTABLE PARTS. 5 LISTENING TO A RECORD. 5 HOW to REPLACE the TURNTABLE STYLUS (NEEDLE)... 6 RECORD YOUR VINYL to PC using WINDOWS
MODEL: CH196B/R. 3-Speed Stereo Turntable With Built-in Speakers
 MODEL: CH196B/R 3-Speed Stereo Turntable With Built-in Speakers WARNINGS To reduce the risk of fire or electric shock, do not expose this appliance to rain or moisture. To reduce the risk of electric shock,
Ares. Modular Audiophile System. by Thrax Audio. Operating Manual. Manual issued 15/03/2018 CAUTION
 Ares Modular Audiophile System by Thrax Audio Operating Manual Manual issued 15/03/2018 CAUTION THE UNIT CONTAINS NO USER SERVICEABLE PARTS. DO NOT REMOVE THE COVERS. LETHAL VOLTAGES ARE PRESENT WITHIN
CPA 40 Two Channel Amplifier
 www.cleveracoustics.co.uk CPA 40 Two Channel Amplifier Order code: CRAM01 USER MANUAL WARNING FOR YOUR OWN SAFETY, PLEASE READ THIS USER MANUAL CAREFULLY BEFORE YOUR INITIAL START-UP! CAUTION! Keep this
EMC1UP. ReferenceCD Player. Owner smanual ENG
 EMC1UP ReferenceCD Player Owner smanual ENG Unpacking the EMC 1UP Immediately upon receipt of the EMC 1UP CD player, inspect the carton for possible damage during shipment. The carton and packaging have
APPENDIX 1. Tangential Cartridge geometry adjustment
 APPENDIX 1 Tangential Cartridge geometry adjustment Once the cartridge has been mounted, it is necessary to ensure that the cartridge is tangential to the record grooves in order to minimize tracking distortion
Model : PVTTBT6 Retro Belt-Drive Bluetooth Turntable with USB-to-PC Connection
 Model : PVTTBT6 Retro Belt-Drive Bluetooth Turntable with USB-to-PC Connection TURNTABLE PARTS 1. 45 RPM Adaptor 2. Lift Lever 3. Speed Control Selection 4. Function Selection Knob 5. Tone(Needle) arm
Zphono Phono Preamplifier
 Zphono Phono Preamplifier Zphono Phono Preamplifier Owner s Guide IMPORTANT SAFETY INSTRUCTIONS The lightning flash with the arrowhead symbol within an equilateral triangle is intended to alert the user
HP4 headphone amplifier. user manual
 HP4 headphone amplifier user manual Musikhaus Thomann Thomann GmbH Hans-Thomann-Straße 1 96138 Burgebrach Germany Telephone: +49 (0) 9546 9223-0 E-mail: info@thomann.de Internet: www.thomann.de 03.11.2015,
Primare A20 Integrated Amplifier User Guide
 > Primare A20 Integrated Amplifier User Guide i > Preface COPYRIGHT AND ACKNOWLEDGMENTS Copyright 2000 Primare Systems AB. All rights reserved. Primare Systems AB Idavägen 17D SE-352 46 Växjö Sweden The
QIT600F1 USER'S GUIDE
 QIT600F1 USER'S GUIDE 1 IMPORTANT SAFEGUARDS Warnings: 1. Read all of these instructions. Save these instructions for later use, please. 2. Unplug this monitor from the wall outlet before cleaning. Do
CANARY AUDIO. Vacuum Tube Compact Disc Player CD-200 OWNER S MANUAL. Handcrafted in California MADE IN USA
 CANARY AUDIO Vacuum Tube Compact Disc Player Handcrafted in California CD-200 OWNER S MANUAL MADE IN USA Dear Customer: Please allow us to take this opportunity to thank you for purchasing this CANARY
Whisper-Ride
 11/16/2007 LR (1) CAUTION: Before you begin any of the installation procedures on page 3, read and follow the warnings and safety instructions on this page. WARNING! THIS IS NOT A TOY! WARNING! CHILDREN
AT-LP60XBT AT-LP60XBT. User Manual Automatic Wireless Turntable
 User Manual Automatic Wireless Turntable Introduction Thank you for purchasing this Audio-Technica product. Read through this user manual before using the product to ensure its correct use. Also, keep
Orchestra Orchestra reference
 Orchestra Orchestra reference Integrated amplifier Owner's Manual Table of contents Introduction Warning Unpacking and checking Description Installation instruction Tube position How to match your amplifier
Model 2460-KIT. Screw Terminal Connector Kit. Description / September 2014 *P * 1
 Keithley Instruments 28775 Aurora Road Cleveland, Ohio 44139 1-800-935-5595 http://www.keithley.com Model 2460-KIT Screw Terminal Connector Kit Description The Model 2460-KIT Screw Terminal Connector Kit
MANUAL CASPIAN RPP / CASPIAN RPM / CASPIAN VSC & VSC 2S
 CASPIAN RPP / CASPIAN RPM / CASPIAN VSC & VSC 2S Congratulations on the purchase of your Roksan Caspian product. Your audio component is designed and manufactured to the highest specifications and rigorously