IBM WebSphere Adapter for Oracle E-Business Suite Quick Start Tutorials
|
|
|
- Laurel Barrett
- 6 years ago
- Views:
Transcription
1 IBM WebSphere Adapter for Oracle E-Business Suite Quick Start Tutorials
2 Note: Before using this information and the product it supports, read the information in the "Notices" section, at the end of this document. This edition applies to version 7, release 5, modification 0 of IBM WebSphere Adapter for Oracle E-Business Suite and to all subsequent releases and modifications, until otherwise indicated in new editions. Copyright International Business Machines Corporation US Government Users Restricted Rights Use, duplication or disclosure restricted by GSA ADP Schedule Contract with IBM Corp.
3 Chapter 1. Introduction...6 Learning Objectives... 6 Audience... 6 Software prerequisites... 6 Chapter 2. Preparing to test the tutorials...8 Database and applications user account requirements... 8 Sample files... 9 Chapter 3. Tutorial 1: Sending outbound data to the Oracle database 10 Preparing for outbound processing Creating the project Configuring the module for outbound processing Deploying the module for testing Testing the Create operation Testing the Retrieve operation Clearing the sample content Chapter 4. Tutorial 2: Receiving inbound data from the database 55 Preparing for inbound processing Setup within Oracle E-Business Suite Creating the project Configuring the module for inbound processing Creating an inbound component Deploying the module for testing Testing the assembled adapter application Clearing the sample content Chapter 5. Tutorial 3: Calling an Oracle E-Business Suite API for outbound processing...92 Creating the project Configuring the module for outbound processing for API Calls Deploying the module for testing
4 Testing the assembled adapter application Clearing the sample content Chapter 6. Tutorial 4: Importing customer data using the Business Event System and workflow Preparing for outbound processing Setup within Oracle E-Business Suite Creating the project Configuring the module for outbound processing Deploying the module for testing Testing the Create Operation Clearing the sample content Chapter 7. Tutorial 5: Executing the external service wizard for the Adapter for Oracle E-Business Suite Preparing for outbound processing Creating the project Configuring the module for outbound processing Verify the generated artifacts Clearing the sample content Chapter 8. Tutorial 6: Error handling support for Oracle Interface Tables 189 Creating the project Configuring the module for outbound processing Deploying the module for testing Testing the assembled adapter application Clearing the sample content Chapter 9. Tutorial 7: Using a Wrapper stored procedure to call a stored procedure that returns PL/SQL Record Creating the project Configuring the module for outbound processing for API Calls with PL/SQL Record parameter Deploying the module for testing
5 Testing the assembled adapter application Clearing the sample content Chapter 10. Tutorial 8: Integration with Oracle XML Gateway via Web Services 240 Creating the project Configuring the module for outbound processing Deploying the module for testing Testing the assembled adapter application Clearing the sample content Chapter 11. Tutorial 9: Integration with Oracle though Advanced Queue 265 Creating the project Configuring the module for outbound processing Deploying the module for testing Testing the assembled adapter application Clearing the sample content Chapter 12. Troubleshooting Chapter 13. Viewing the sample adapter artifacts Notices...294
6 Chapter 1. Introduction WebSphere Adapter for Oracle E-Business Suite is a solution that uses existing WebSphere components to enable bidirectional communication between Oracle E-Business Suite and the WebSphere Business Integration system. This solution uses WebSphere Adapter for Oracle E-Business Suite to interact with the underlying database components in Oracle E-Business Suite to process data to and from the external sources. Learning Objectives After completing the tutorial, you should be able to perform the following tasks: Create an adapter project in IBM Integration Designer. Discover services and associated business objects from the Enterprise Information system (EIS), and add these services and business objects to your adapter project. Create a deployable module that you install on IBM Process Server or WebSphere Enterprise Service Bus. Test the module and validate the results. Audience These scenario based tutorials are meant to help integration developers who design, assemble, test, and deploy business integration solutions. Software prerequisites Before you test these tutorials, you must install the following applications:
7 IBM Integration Designer version 7.5 IBM Process Server version 7.5 WebSphere Adapter for Oracle E-Business Suite JDBC driver for Oracle
8 Chapter 2. Preparing to test the tutorials Database and applications user account requirements To use the samples, you must use a database account that gives you access to the artifacts needed to run the sample content, and use an Oracle E-Business Suite account that allows you to perform the responsibilities of the Workflow Administrator for Web Applications, System Administrator, and Receivables Manager. For the purposes of these samples, the user account that is used to run all the scripts is assumed to be the APPS user for the Oracle database. This user has the following rights: Change and create content in the applications (APPS) schema Add and remove data from tables Run the required executable code in the APPS schema Check with your Oracle database administrator to determine the account that will be used to run the sample content. If you want to choose a different user account, work with your database administrator to ensure that the user has the required access to run the sample content. Oracle E-Business Suite requires you to have an account with access to the following responsibilities: Workflow Administrator Web Applications System Administrator Receivables Manager Note: If the Oracle E-Business Suite account that you are using does not have access to these responsibilities, they can be added on later. To change the responsibilities assigned to the account you want to use, log onto an account that has System Administrator responsibility access and go to the Security->User->Define menu option. For specific information about changing user responsibilities, refer to Oracle Applications documents.
9 Sample files These sample files are included in the sample script directory. Filename Description ibm_websphere_event_table_create.sql Event table creation script ibm_websphere_events_s.sql ibm_customer_event_pkg.pls ibm_customer_event_key_s.sql ibm_submit_request.sql raise_inbound_event.sql Event ID sequence creation script Package creation script for the procedures used in the customer object i l Event Key sequence creation script SQL script to insert a special procedure to be called after event entries have been made to the interface tables to move the data to the base tables SQL script to raise the customer inbound event ibm_create_synonyms.sql SQL script to create the synonym names used in creating business bj t f th l IMPCUST.wft Workflow file used in Sample 4 Table 1. Sample files
10 Chapter 3. Tutorial 1: Sending outbound data to the Oracle database With WebSphere Adapter for Oracle E-Business Suite, you can create data in an Oracle application and retrieve data from the application. In this scenario, you use the WebSphere Adapter for Oracle E-Business Suite as the integration method to create a customer record in the Oracle E-Business Suite Financials database and to retrieve that customer information from the Financials database. About this task This scenario demonstrates how to set up information flows between Oracle E-Business Suite and IBM Process Server or WebSphere Enterprise Service Bus for outbound requests, regardless of the Oracle E-Business Suite module you use; for example, you can use any Oracle Financials module such as Payables, General Ledger or Receivables. Preparing for outbound processing You must run SQL script files to prepare for outbound processing. You need to create synonyms which will save your time later while you generate business objects from the Oracle database. You also need to insert artifacts into the Oracle E-Business Suite before you can process objects using the database tables. Procedure 1. Create synonyms Open the SQL*Plus tool (or similar program for processing SQL statements). Log on to SQL*Plus using a database account that has been granted database administrator (DBA) access. Run the SQL script ibm_create_synonyms.sql from the sample script directory. For example:
11 While running the external service wizard, if the size of the Oracle database and the number of the database artifacts are large, the search process takes a long time. Creating or using the synonyms helps to make the search faster. 2. Insert artifacts into Oracle E-Business Suite Before you process business objects, run the SQL script in the file ibm_submit_request.sql file. This creates a stored procedure called IBM_WEBSPHERE_CUSTOMER_IMP into the Oracle APPS schema. This procedure is used to move the customer data from the Oracle interface tables to the base tables. You will use the interface tables when you construct the Create business object. Creating the project For creating and deploying a module to communicate with an Oracle E-Business Suite application, you need to start the external service wizard in IBM Integration Designer. The wizard creates an Adapter for Oracle E-Business Suite project, which is used to organize the files associated with the adapter. Procedure 1. Review the information in Configuring the module for deployment in the WebSphere Adapter for Oracle E-Business Suite User Guide. 2. Perform the Creating the project task in the WebSphere Adapter for Oracle E-Business Suite User Guide. Follow the steps in this section to set up the project in your workspace on IBM Integration Designer. Configuring the module for outbound processing You must create the necessary business objects to process data into Oracle E-Business Suite. To accomplish this, use the external service wizard in IBM Integration Designer for WebSphere Adapter for Oracle E-Business Suite. First, you initialize the wizard by configuring values of the properties that enable the adapter to set up a communication channel to a specific database. Then, run a query to discover business objects. Finally, you must specify the operations and other properties for the selected business objects.
12 Setting connection properties for the external service wizard Set the values of the connection properties for your database instance. These properties enable the external service wizard in the WebSphere Adapter for Oracle E-Business Suite to connect to the Oracle database for discovering objects and for creating the service description. Before you begin This task is performed within the external service wizard, which you already started for the tasks under Creating the project. Procedure 1. Switch to the Business Integration Perspective in IBM Integration Designer by selecting the menu: Window -> Open Perspective -> Business Integration 2. Start the WebSphere Adapter for Oracle E-Business Suite External Service wizard by selecting: File-> New > External Service.
13 3. In the Available Types tree view, select Adapters -> Oracle E-Business Suite, and then click Next.
14 4. Select the CWYOE_OracleEBS in the IBM WebSphere Adapter for Oracle E-Business Suite (IBM: ) node, and then click Next.
15 5. In the Locate the Required Files and Libraries window, next to the top panel for Oracle JDBC driver JAR files, click Add. Browse to the location of the external JDBC driver, select the driver JAR file, and then click Open.
16 The Oracle JDBC driver that the wizard needs to add to your project is the external JAR file that is provided with your database, which you can obtain from your database administrator or from the Web site of the Oracle database. Click Next.
17 6. In the Select the Processing Direction window, click Outbound and click Next.
18 7. In the Specify the Discovery Properties window, in the left pane, select your database vendor, driver, and version. Enter the information for your database as described in the following table. The table lists the properties required for the database and their descriptions. Property System ID Host name Description The database name. System ID is used along with host name and port number to generate the Database URL that is used to connect to the database. The host name or IP address of the database server. Host name is used along with the database name and port number to generate the Database
19 URL that is used to connect to the database Port number JDBC driver class name User name Password The port number along with the database name and host name generates the Database URL that is used to connect to the database. The class name of the JDBC driver that is used to connect to the database. The database account you are using. It is used during the discovery process. Later in the wizard, you can specify a different name and password to use at run time. The password for the account you are using. Table 2. Connection properties for the external service wizard
20 Results The wizard uses the connection properties to connect to the database. Create operation business object selection and linking This sample uses one set of primary and child business objects to populate customer data into the Oracle E-Business Suite interface tables. The Create operation is used to post new customer data and update existing customer data. You must configure five business objects for the Create operation. Business objects in the database tables The Customer Profile object is the primary object, and the rest of the objects are structured as child business objects. You link the business objects by setting the application-specific information foreign key relationship between the parent and child objects. For more information about the nature of business objects and about setting the application-specific information values, refer to the Business objects section of WebSphere Adapter for Oracle E-Business Suite User Guide. The following table lists the database tables for the Accounts Receivable (AR) schema including the table name, suggested synonym, and a brief description of the information that each object contains. Note: For more information about the table data, refer to your documentation for Oracle Applications, particularly the section of the Receivables user guide that describes the customer interface. Table name Synonym Description AR.RA_CUSTOMER_PROFILES_INT_ALL IBM_C_CUST_PROFILE Customer Profile interface table, which contains high-level customer AR.RA_CUSTOMERS_INTERFACE_ALL IBM_C_CUST_INTERFACE Primary table for customers, as well as customer addresses AR.RA_CONTACT_PHONES_INT_ALL IBM_C_CONTACTS Contact and phone information AR.RA_CUST_PAY_METHOD_INT_ALL IBM_C_PAY_METHODS ArIbm_C_Pay_Methods Payment methods associated with the customer
21 AR.RA_CUSTOMER_BANKS_INT_ALL IBM_C_CUST_BANKS Banks associated with the customer Table 3. Database tables for the AR schema Next, you will select business objects by running a query on the AR schema. Selecting business objects and services After setting connection properties, run a query to search for database objects. Browse the metadata tree of discovered objects to understand the structure of the objects in the Oracle database and select the objects that you want to include in the service description. About this task For this sample, you run a query on the accounts receivable (AR) schema, and select synonyms that represent data in the Oracle E-Business Suite interface tables, and you will also run a query on other accounts receivable (APPS) schema, and select the stored procedure that the business object will represent. Procedure 1. Specify filter properties a. In the Find Objects in the Enterprise System window, click Edit Query. b. In the Specify the Query Properties window, type AR in the Schema name or pattern field to display the accounts receivable (AR) schema. c. Select the Prompt for additional configuration settings when adding business object check box, and click OK. Now, whenever you select one of the discovered objects for import, you are prompted to enter application-specific information for the object.
22 2. Run the metadata query a. Display objects discovered by the query Click Run Query. The AR schema and data elements of the schema are displayed. b. Select the object for import Expand the AR schema. Expand Synonyms - Nicknames. Highlight the synonym IBM_C_CUST_PROFILE, and click > (the Add icon) to select this object to be imported.

23 c. Add business object application-specific information 3. In the Specify the Configuration Properties for IBM_C_CUST_PROFILE window a. Click Add to select the primary key for the table related to IBM_C_CUST_PROFILE. b. Select REQUEST_ID, and then click OK. c. Click Add to select and configure a stored procedure that will be associated with this synonym. d. In the Add window, select AfterCreateSP, and then click OK.

24 e. In the AfterCreateSP area of the Specify the Configuration Properties for IBM_C_CUST_PROFILE window, set the following values: a. Click Select button besides the Schema name field. Then, the Select Value window is open. b. In the Select Value window, input schema name or pattern as filter, and select the matching schema name in the below search results list. c. Click OK. d. Type IBM_WEBSPHERE_CUSTOMER_IMP in the Stored procedure name or pattern field.

25 e. Select IBM_WEBSPHERE_CUSTOMER_IMP from the Stored procedure name list. f. Click OK. The selected object is displayed in the Selected objects pane. In this sample, you process data using Oracle s built-in interface and base tables. Only the Create operation is necessary to post both new
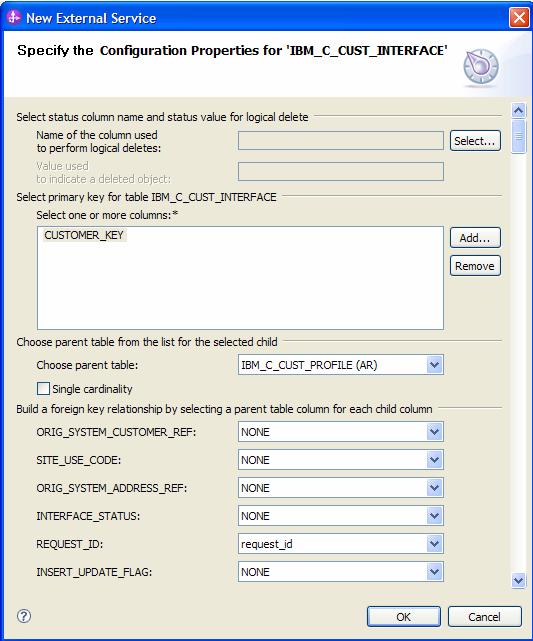
26 customer data and updates to existing customer data. As part of calling the Create operation of the object, the stored procedure IBM_WEBSPHERE_CUSTOMER_IMP is run using the AfterCreateASI value for the object to process. This stored procedure moves the data from the interface to the base tables. 4. Select another object for import and link child object to parent In the Find Objects in the Enterprise System window, highlight the synonym IBM_C_CUST_INTERFACE, and click > (the Add icon) to select this object to be imported. In the Specify the Configuration Properties for IBM_C_CUST_INTERFACE window a. Click Add to select the primary key. b. Select CUSTOMER_KEY and click OK. c. Set the parent for the table related to IBM_C_CUST_INTERFACE by selecting IBM_C_CUST_PROFILE. d. Under Build a foreign key relationship by selecting a parent table column for each child column, link the child to the parent s attributes by selecting request_id as the foreign key attribute value in the REQUEST_ID field. e. Check Parent object owns child object (cascade delete) and click OK.
27
28 Note: The previous screen is long, so the screen is split into two screenshots as above. 5. Select remaining synonyms Repeat above steps for each of the remaining synonyms in the following table. The primary key is specified for each synonym and the foreign key is the same as the IBM_C_CUST_INTERFACE table, which is request_id as the foreign key attribute value in the REQUEST_ID field. Synonym IBM_C_CONTACTS IBM_C_CUST_BANKS IBM_C_PAY_METHODS Primary Key CONTACT_KEY BANK_ACCOUNT_NUM ORG_ID Table 4. Remaining synonyms to select for import and to link to the parent object

29 When you are finished, click Next. Retrieve operation business object selection and linking This sample uses a second set of objects to retrieve customer data directly from the Oracle E-Business Suite base tables. Because the Retrieve operation does not modify the values in the base tables, you can retrieve the data from those tables directly. You do not have to use interface tables. You must configure the business objects for the Retrieve operation. Base tables for the Accounts Receivable schema The following table lists the base tables for the Accounts Receivable (AR) schema, including the table name, suggested
30 synonym, and description. The next section shows a diagram of the relationship of the business objects that you configure for the Retrieve operation. Table name Synonym Description AR.HZ_CUST_ACCOUNTS IBM_R_CUST_ACCOUNTS Customer number, type, and other customer information. AR.HZ_CUSTOMER_PROFILES IBM_R_CUST_PROFILES ArIbm_R_Cust_Profiles High-level profile information for the customer. AR.HZ_PARTIES IBM_R_PARTIES Customer name and if it is a person, not a business, the person s details. AR.HZ_PARTY_SITES IBM_R_PARTY_SITES Links between customers address IDs and address location IDs. AR.HZ_CUST_ACCT_SITES_ALL IBM_R_ACCT_SITES Address IDs. AR.HZ_CUST_SITE_USES_ALL IBM_R_SITE_USES Customer business address purposes (BILL_TO, SHIP_TO, etc.). AR.HZ_LOCATIONS IBM_R_LOCATIONS Address details. AR.HZ_CONTACT_POINTS IBM_R_CONTACTS_SITES Contact and phone details. The table is listed twice because both sites and customers (PARTY_SITES and PARTIES) use the same table for contact details. AR.HZ_CONTACT_POINTS IBM_R_CONTACTS_CUSTOMER Contact and phone details. The table is listed twice because both sites and customers (PARTY_SITES and PARTIES) use the same table for contact details. Table 5. Base tables for the AR schema Relationship of the business objects
31 For the Retrieve operation to succeed, the links connecting the customer object to its child objects must match those in the Oracle database. Selecting and linking business objects for Retrieve After you have run a query on the Accounts Receivable (AR) schema, you must select synonyms that represent data in the Oracle E-Business Suite base tables. You also configure the objects in a parent and child hierarchy. Before you begin You have already set connection properties, specified filter properties, and run the query to display discovered objects. Procedure 1. Select the object for import In the Find Objects in the Enterprise System window, after you have expanded the AR schema and expanded Synonyms - Nicknames, highlight the synonym IBM_R_CUST_ACCOUNTS and click > (the Add icon) to select the object to be imported. 2. Add business object application-specific information In the Specify the Configuration Properties for IBM_R_CUST_ACCOUNTS window, click Add to select the primary key for the table related to IBM_R_CUST_ACCOUNTS. Select CUST_ACCOUNT_ID and click OK.

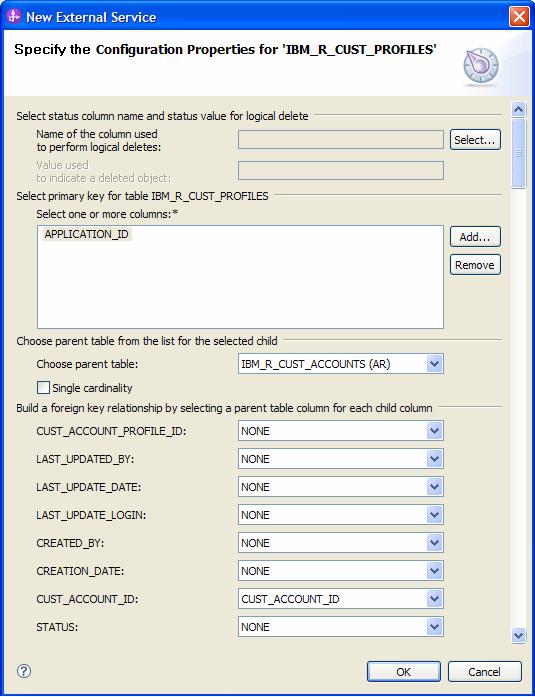
32 3. Select another object for import and link child object to parent a. Highlight the synonym IBM_R_CUST_PROFILES and click > (the Add icon). b. In the Specify the Configuration Properties for IBM_R_CUST_PROFILES window, click Add to select the primary key for the table related to IBM_R_CUST_PROFILES. Select APPLICATION_ID and click OK. c. Set the parent for the table related to IBM_R_CUST_PROFILES by selecting IBM_R_CUST_ACCOUNTS. d. Under the Build a foreign key relationship by selecting a parent table column for each child column section, link the child to the parent s attributes by selecting a foreign key attribute and a foreign key value for that attribute. For the foreign key attribute CUST_ACCOUNT_ID, select the foreign key attribute value CUST_ACCOUNT_ID. Check Parent object owns child object (cascade delete) and click OK.
33

34 Note: The previous screen is long, so the screen is split into two screenshots as above. 4. Select remaining synonyms Repeat step 3 for each of the remaining synonyms in the order the synonyms are presented in the following table. Use the primary key, parent, foreign key attribute, and foreign key attribute value shown for each synonym in the table. When you are finished, click Next. Synonym Primary key Parent Foreign key attribute Foreign key attribute value IBM_R_PARTIES party_id IBM_R_CUST_ACCOUNTS party_id party_id IBM_R_ACCT_SITES IBM_R_PARTY_SITES party_site_id and cust_acct_site_i d location_id and party_site_id IBM_R_CUST_ACCOUNTS cust_account_id cust_account_id IBM_R_ACCT_SITES party_site_id party_site_id IBM_R_SITE_USES application_id IBM_R_ACCT_SITES cust_acct_site_id cust_acct_site_id

35 IBM_R_LOCATIONS address_key IBM_R_PARTY_SITES location_id location_id IBM_R_CONTACTS_SITES application_id IBM_R_PARTY_SITES owner_table_id party_site_id IBM_R_CONTACTS_CUSTOMER application_id IBM_R_PARTIES owner_table_id party_id Table 6. Objects requiring foreign key values and child objects Configuring the selected objects After you have selected database objects and added their primary key, you can specify operations and other properties that apply to the selected business objects. Procedure
36 1. Select operations In the Configure Composite Properties window of the external service wizard, the Operations pane lists the operations that the adapter supports for the outbound service type. Remove the following operations by highlighting them and clicking Remove: Update Delete RetrieveAll ApplyChanges Exists The following operations remain: Create Retrieve 2. Leave the default values for these fields: Maximum records for RetrieveAll operation Business object namespace Folder Generate a business graph for each business object 3. Click Next.
37 What to do next? Next, you will specify deployment information to use at run time and information for saving the service as a module. Setting deployment properties and generating the service Use the external service wizard to configure the properties the adapter uses to set up a communication channel to a specific database for outbound processing. Then create a business integration module where all of the artifacts and property values can be saved. Procedure 1. Set configuration property values a. Uncheck Using an existing JAAS alias (recommended). b. Check Using security properties from the managed connection factory.
38 The fields are initialized with the connection information you specified when you started the wizard. You can edit the existing values for User name and Password as required. Properties User name Password Values The database account you are using The password for the account you are using Table 7. Database system connection information c. Clear the Join global transaction check box. d. In the Specify the Service Generation and Deployment Properties window, in the Deploy connector project field, ensure that this option is selected: With module for use by single application. e. In the Deploy connector project field, ensure that this option is selected: Specify local database connection information. f. Click Advanced button, check Set Auto Commit on database connection under Additional connection configuration. g. Click Next.
39 2. Create a module a. In the Specify the Location Properties window, click New next to the Module field.

40 b. In the Integration Project window, confirm that Create a module project is selected and click Next. c. In the Module window, type Oracle_Outbound, and click Finish. d. In the Specify the Location Properties window, click Finish. Results This module will hold all of the generated artifacts. Saving the module You must save the business integration module for inbound processing that contains the artifacts and property values you created. Procedure 1. In the Business Integration view, click the Oracle_Outbound module. 2. Select File > Save. Note: If the option to Save is not available (gray), then the module has already been saved.
41 Deploying the module for testing To test the adapter application, you need to install the module for outbound processing in the IBM Integration Designer integration test client. Before you begin The module that contains an Oracle database import file is produced by running the external service wizard. Procedure 1. In IBM Integration Designer, click the Servers tab to open the Servers view. 2. If your server is not displayed in the Servers view, right-click the Servers view and select New Server. Select your IBM Process Server or WebSphere Enterprise Service Bus. Click Next, and then click Finish. 3. If your IBM Process Server or WebSphere Enterprise Service Bus is not running, right-click the name of the server and select Start. The Status changes to Started. 4. Right-click the name of your IBM Process Server or WebSphere Enterprise Service Bus, and select Add and remove projects. 5. From the Available Projects list on the left, select the Oracle_OutboundApp module, and click Add. Click Finish.
42 What to do next Next, you can test the assembled application in the integration test client. Testing the Create operation After you have deployed your outbound processing application to IBM Process Server or WebSphere Enterprise Service Bus, test the assembled adapter application using the IBM Integration Designer integration test client. You test the Create operation first, and then test the Retrieve operation. About this task To test the Create operation, create a customer entry that has two addresses and one phone number. Procedure
43 1. Select the module to test In IBM Integration Designer, go to the Business Integration view of the Business Integration perspective. Right-click the Oracle_Outbound module, and select Test > Test Module. 2. Leave the default value for verb. The value may be different from the one shown in the Set the test values table below. 3. Set the test values In the Oracle_Outbound_Test window, use the arrows to set the test values shown in the following table. Item Configuration Module Component Interface Operation Test value Default Module Test Oracle_Outbound OracleOutboundInterface OracleOutboundInterface createaribm_c_cust_profilebg Table 8. Test values for the Create operation Note: The test values for Component and Interface may include a number, for example, OracleOutboundInterface1. IBM Integration Designer appends numbers so that each name in the workspace is unique. 4. Set attribute values for the input business object Set the attribute values for the Customer Profile object, which is the top-level object ArIbm_C_Cust_Profile. Because this example uses two addresses and one contact, you also need to set values for two child objects of the Addresses type (Aribm_C_Cust_Interfaceobj) and one child object of the Contacts type (Aribm_C_Contactsobj). The following tables provide the values for each object and indicate any restrictions, such as whether the value has to be unique. a. Create and record unique ID values. Oracle requires ID values for outbound processing. These values uniquely identify the records inserted into the Oracle E-Business Suite and are required for successful retrieval of the corresponding inserted data. The ID values are used in multiple objects, so you need
44 to write down the values you will use to be able to enter them consistently for the different objects. For each of the following five values, create unique string values. CustomerReference# AddressReference#1 AddressReference#2 TelephoneReference# CustomerName Note: For more information on required values and other allowed values for data in the Oracle interface tables, refer to your documentation for Oracle Applications, specifically the Oracle Receivables User Guide. b. In the Events window, under Initial request parameters, click the Value column across from the name of each attribute whose value you need to set, and enter the value from the following tables.

45 Important: To set a value for an attribute to <null>, right-click the value field for the attribute. Select Set to and scroll down to select <null>. To add a child object, right-click the attribute of the appropriate type and choose Add Elements. Enter the number of elements you are adding for each attribute. In this sample, enter 2 when you add elements for the attribute ArIbm_C_Cust_Interfaceobj because there are two child objects of that type (two addresses), and enter 1 when you add elements for the attribute ArIBM_C_Contactsobj because there is one child object of that type (one contact). Attribute Value Notes
46 Insert_update_flag Orig_system_customer_ref Customer_profile_class_name Credit_hold I CustomerReference # DEFAULT N Use the value you recorded. The value must be unique. Last_updated_by -1 Last_update_date :00:00 Creation_date :00:00 Today s date and time. Does not have to be exact. Today s date and time. Does not have to be exact. Created_by -1 Org_id 204 Table 9. Values for the top-level object The following table lists the values for the first element for the Address attribute. Attribute Value Notes Orig_system_customer_ref CustomerReference# Use the value that you recorded. The value must be unique. Site_use_code BILL_TO Orig_system_address_ref AddressReference#1 Use the value that you recorded. The value must be unique.
47 Insert_update_flag I Customer_name CustomerName Use the value that you recorded. The value must be unique. Customer_number Customer_status Primary_site_use_flag Location <null> A Y <null> Address1 Test Address 1 You have the option of using your own address information. Address2 Address3 Address4 City State Province County <null> <null> <null> San Mateo CA <null> San Mateo Postal_code country Customer_category_code US CUSTOMER Last_updated_by -1 Last_update_date :00:00 Today s date and time. Does not have to be exact. Created_by -1 Creation_date :00:00 Today s date and time. Does not
48 have to be exact. Org_id 204 Customer_name_phonetic CustomerName Use the value that you recorded. Table 10. Values for the first element for the Address attribute The following table lists the values for the second element for the Address attribute. Attribute Value Notes Orig_system_customer_ref CustomerReference# Use the value that you recorded. The value must be unique. Site_use_code SHIP_TO Orig_system_address_ref AddressReference#2 Use the value that you recorded. The value must be unique. Insert_update_flag I Customer_name CustomerName Use the value that you recorded. The value must be unique. Customer_number Customer_status Primary_site_use_flag Location <null> A Y <null> Address1 Test Address 2 You have the option of using your
49 own address information. Address2 Address3 Address4 City State Province County <null> <null> <null> San Mateo CA <null> San Mateo Postal_code country Customer_category_code US CUSTOMER Last_updated_by -1 Last_update_date :00:00 Today s date and time. Does not have to be exact. Created_by -1 Creation_date :00:00 Today s date and time. Does not have to be exact. Org_id 204 Customer_name_phonetic CustomerName Use the value that you recorded. Table 11. Values for the second element for the Address attribute The following table lists the values for an element for the Contacts attribute. Attribute Value Notes Orig_system_contact_ref <null>
50 Orig_system_telephone_ref TelephoneReference# Use the value that you recorded. The value must be unique. Orig_system_customer_ref CustomerReference# Use the value that you recorded. The value must be unique. Orig_system_address_ref AddressReference#1 Use the value that you recorded. The value must be unique. Insert_update_flag Contact_first_name Contact_last_name Contact_title Contact_job_title I <null> <null> <null> <null> Telephone You have the option of using your own phone number. Telephone_extension 1234 Use <null> if you don t have one. Telephone_type FAX Telephone_area_code 650 Last_update_date :00:00 Today s date and time. Does not have to be exact. Last_updated_by -1 Creation_date :00:00 Today s date and time. Does not have to be exact. Created_by -1 _address <null> Org_id 204 contact_point_type PHONE The value for CONTACT_POINT_TYP E must be , PHONE, or TLX. Table 12. Values for an element for the Contacts attribute

51 5. In the left pane below Events, click Continue. From the Deployment Location window, select the name of the server where your application will be deployed, and click Finish. The Starting the Integration Test Client window is displayed briefly. 6. Verify that the customer data has been imported properly Choose one of the following two methods to verify the customer data. a. Start the SQL*Plus tool, or a similar program for processing SQL commands. Run this query: SQL> select cust_account_id from ar.hz_cust_accounts where to_char(creation_date, YY/MM/DD ) = creation_date; where creation_date is today s date or the date you inserted for the top-level object from the customer screen in Accounts Receivables module of Oracle E-Business Suite. For example, SQL> select cust_account_id from ar.hz_cust_accounts where to_char(creation_date, YY/MM/DD ) = 09/08/27 ; Write down the cust_account_id value from this query. You will use this number when you test the Retrieve operation. b. Optionally, you can open a database editor, and connect to the Oracle database you are using for this sample.
52 Find the row of your inserted customer by looking at the creation_date attribute (it should be today s date or the date you inserted for the top-level object). Write down the value for cust_account_id. You will need this number when you test the Retrieve operation. What to do next Next you will test the Retrieve operation. Testing the Retrieve operation After you have tested the Create operation and verified that the imported customer is in the Oracle E-Business Suite base tables, test the Retrieve operation. Before you begin You must have the customer_account_id value from the SQL query you ran after verifying that the customer data had been imported properly when you tested the Create operation. About this task You test the assembled adapter application using the IBM Integration Designer integration test client. Procedure 1. Select the module to test In the Business Integration perspective of IBM Integration Designer, right-click the Oracle_Outbound module and select Test > Test Module. 2. Leave the default value for verb. 3. Set the test values In the Oracle_Outbound_Test window, use the arrows to set the test values, which are provided in the following table: Item Module Component Interface Test value Oracle_Outbound OracleOutboundInterface OracleOutboundInterface

53 Operation retrievearibm_r_cust_accountsbg Table 13. Test values for the Retrieve operation Note: The test values for Component and Interface may include a number, for example, OracleOutboundInterface1. IBM Integration Designer appends numbers so that each name in the workspace is unique. 4. Set the attribute value for the input business object a. In the Events window, under Initial request parameters, click the Value column across from cust_account_id in the Name column. Set the value to match the cust_account_id value from the SQL query you ran in Testing the Create operation. b. Do not change the default settings for the remaining values.
54 c. In the left pane, below Events, click Continue. From the Deployment Location window, select the name of the server where the object will be deployed, and click Finish. The Starting the Integration Test Client window is displayed as the object is being processed. 5. Verify that the returned object matches the customer information that was imported into the Oracle interface tables. Clearing the sample content After you have tested the application, clear the sample content to return the data to its original state. You must deactivate the customer in Oracle E-Business Suite, and run SQL commands to delete the stored procedure. Procedure 1. Use the SQL*Plus tool, or a similar program for processing SQL commands, to log onto the database and run commands to clear artifacts from the database. Consult your database administrator if you need help performing this task.
55 Chapter 4. Tutorial 2: Receiving inbound data from the database In this sample, you use the event system within Oracle E-Business Suite to populate an event table with customer events, and you also use the WebSphere Adapter for Oracle E-Business Suite to poll for events and retrieve customer data. By performing this scenario, you can see how to set up information flows between Oracle E-Business Suite and IBM Process Server or WebSphere Enterprise Service Bus for inbound events. Preparing for inbound processing Perform the setup steps needed to prepare your environment for inbound processing. One step inserts stored procedures into Oracle E-Business Suite, and another step increases the efficiency of database searches performed by the external service wizard. An optional step enables the Oracle database and the runtime environment to maintain identical data about the inactive customers. Modifying the delete operation This task is optional. In this sample application, WebSphere Adapter for Oracle E-Business Suite is set to pass a Delete operation to the runtime environment for customer objects that are identified as inactive by event data sent from Oracle. If you do not want the adapter to pass a Delete operation for an inactive customer, modify a SQL script to change the operation from Delete to Update. About this task This task is necessary only if you want to change the operation that the WebSphere Adapter for Oracle E-Business Suite performs on customer records that have become inactive in the Oracle database. With Oracle E-Business Suite, you can make a customer inactive and modify data for an inactive customer, but you cannot delete customer data from the base tables. When the
56 stored procedure used for inbound processing receives the event data from Oracle indicating that a customer has become inactive, it sets the operation to delete for the customer object and then posts that information to the events table used by the WebSphere Adapter for Oracle E-Business Suite. The adapter uses that information to process the object and pass it to IBM Process Server or WebSphere Enterprise Service Bus. However, if you want to keep the customer object in the runtime environment rather than deleting it, edit the sample SQL package to change the operation that the adapter reads from the event table. Procedure 1. Access the samples files, and open the ibm_customer_event_pkg.pls file in a text editor. 2. (Options)Remove the following statement from the script: IF v_status <> A THEN v_object_function := Delete ; END IF; 3. Save the script. 4. Run the script using the SQL* Plus tool or a similar tool for processing SQL statements. Inserting artifacts into Oracle E-Business Suite Run four SQL scripts to insert the artifacts into the Oracle database for performing the sample. These artifacts include tables, stored procedures, an event package, triggers, and sequences. About this task In inbound processing, the Business Event System in Oracle E-Business Suite is used to identify changes to the customer table and to route key information of the modified customers to the WebSphere Adapter for Oracle E-Business Suite event table. The scripts in this task must be run to populate the Oracle database with the artifacts necessary for running this sample. Procedure Run the following four SQL scripts from the sample script directory in the listed order. ibm_websphere_event_table_create.sql ibm_websphere_events_s.sql ibm_customer_event_key_s.sql
57 ibm_customer_event_pkg.pls For example, Results These scripts place stored procedures and other artifacts into the Oracle Accounts Receivable (AR) schema. Creating synonyms Create synonyms to increase the efficiency of database searches performed with the external service wizard. You create synonyms by running a SQL script. About this task The size of the database and the number of database artifacts in the Oracle database can lengthen the process of searching through large lists when running the external service wizard to generate objects. Creating the synonyms make the search quicker. In addition, the synonyms help resolve an issue related to the Oracle database driver. The issue is documented in IBM technote Procedure 1. Open the SQL*Plus tool (or similar program for processing SQL statements). 2. Run the script ibm_create_synonyms.sql. For example, enter: lecontent\ibm_create_synonyms.sql; Setup within Oracle E-Business Suite This sample application uses the Oracle E-Business Suite Business Event System, a mechanism to process data based on events, subscriptions, and actions you define. Before you can use the Business Event System, you must complete some setup tasks within Oracle. These include creating a custom event, creating a subscription for the event, and creating a concurrent program for the event. Creating a custom event The built-in Business Event System (BES) in Oracle E-Business Suite requires events, subscriptions, and a concurrent program to
58 process data. When you create a custom event, you satisfy one of the requirements of the Business Event System mechanism. About this task This is the first setup step performed within Oracle E-Business Suite to enable the Business Event System to detect and pass changes in data to the WebSphere Adapter for Oracle E-Business Suite event table. Procedure 1. Access your Oracle E-Business Suite application instance as the user SYSADMIN. 2. Use the responsibility for Workflow Administrator Web Applications. 3. Select the Business Events menu option, and navigate to the page where you can create a new business event. 4. Create a new business event, and enter or select all of the following information: Field Name Display name Status Owner Name Owner Tag Value ibm.apps.ar.customer.create IBM Create Customer Event Enabled JTF JTF Table 14. Business event values 5. Save the event definition. Note: For specific information about using the Oracle interface, refer to your documentation for Oracle Applications. Creating a subscription for the custom event After you create a custom event, you must create a subscription for the Business Event System to use with the event. Procedure 1. Access the Subscriptions menu. 2. Navigate to the page where you can create a new subscription.
59 3. Create the subscription, entering information from the following table: Field System Source Type Event Filter Value The name of your Oracle instance Local ibm.apps.ar.customer.create Phase 10 Status Rule Data Action Type On Error Enabled Message Custom Stop and Rollback Table 15. Subscription values 4. Navigate to the next section, where you can enter additional information about the subscription, and enter the information presented in the following table. Field PL/SQL Rule Function Priority Owner Name Owner Tag Value ibm_websphere_pkg.rule_function Normal JTF JTF Table 16. Additional subscription values 5. Save the subscription. Note: For specific information about using the Oracle interface, refer to your documentation for Oracle Applications. Creating the concurrent program The Oracle E-Business Suite Business Event System requires a concurrent program to process data based on events, subscriptions, and actions that you define. After you create a custom event and a subscription, you must create a concurrent
60 program. To do this, create a program executable, define properties for it, and grant permissions to it. Creating the concurrent program executable: The concurrent program is required to define actions for the Business Event System. The first task you must perform to create the concurrent program is to create a program executable for it. Then, you define properties for it and grant permissions to it. Before you begin Make sure you are using the System Administrator responsibility. Procedure 1. Select the Concurrent: Program > Executable menu option. 2. Enter or select the following information in the form: Field Executable Short Name Application Execution Method Execution File Name Value IBMCUSTOMEREVENT IBMCUSTOMEREVENT Receivables PL/SQL Stored Procedure IBM_WEBSPHERE_PKG.RAISE_CUSTOMER_EVENT Table 17. Concurrent program executable values 3. Save the program executable definition. Note: For specific information about using the Oracle interface, refer to your documentation for Oracle Applications. Defining properties of the concurrent program: After you have created the program executable for the concurrent program, you must define properties for the concurrent program. This is the second of three tasks you must complete to make the concurrent program ready for use by the Business Event System. Procedure 1. Select the Concurrent: Program > Define menu option. 2. Enter the following information:
61 Field Program Short Name Applications Description Executable Value IBM Raise Customer Event IBMCUSTOMEREVENT Receivables IBM Raise Customer Event IBMCUSTOMEREVENT Table 18. Concurrent program definition values 3. Save the concurrent program properties definition. Note: For specific information about using the Oracle interface, refer to your documentation for Oracle Applications. Enabling the concurrent program: After you have created a program executable and defined properties for the concurrent program, you must grant permissions to it that enable it to direct the actions of the Business Event System. This is the final procedure you must complete to make the concurrent program ready for use by the Business Event System. Procedure 1. Select the Security > Responsibility > Request menu option. 2. Change the form into Enter Query mode. 3. In the group field, specify: Receivables All 4. Run the query. 5. Navigate to the Requests (details) section and click the New button to add a new request in the details. 6. In the name field, specify: IBM Raise Customer Event 7. Save your changes. Note: For specific information about using the Oracle interface, refer to your documentation for Oracle Applications. Results The Business Event System is set up for processing customer events.
62 Creating the project For creating and deploying a module to communicate with an Oracle E-Business Suite application, you need to start the external service wizard in IBM Integration Designer. The wizard creates a WebSphere Adapter for Oracle E-Business Suite project, which is used to organize the files associated with the adapter. Procedure 1. Review the information in Configuring the module for deployment in the WebSphere Adapters: Adapter for Oracle E-Business Suite User Guide. 2. Perform the task Creating the project in the WebSphere Adapter for Oracle E-Business Suite User Guide. Follow the steps in this section to set up the project in your workspace on IBM Integration Designer. Configuring the module for inbound processing To process data sent from Oracle E-Business Suite to IBM Process Server or WebSphere Enterprise Service Bus, you must create business objects. To do this, use the external service wizard in WebSphere Adapter for Oracle E-Business Suite. First, you initialize the wizard by configuring values of the properties that enable the adapter to set up a communication channel to a specific database. Then, run a query to discover business objects. Finally, specify the values of the connection properties for the export file. Setting connection properties for the external service wizard Set values of the connection properties for your database instance. These properties enable the external service wizard in the Adapter for Oracle E-Business Suite to connect to the Oracle database for discovering objects and for creating the service description. Before you begin This task is performed within the external service wizard, which you already started for the tasks under Creating the project. Procedure
63 1. Switch to the Business Integration Perspective in IBM Integration Designer by choosing from the menu: Window -> Open Perspective -> Business Integration. 2. Start the WebSphere Adapter for Oracle E-Business Suite External Service wizard by choosing: File-> New > External Service.
64 3. In the Available Types tree view, select Adapters -> Oracle E-Business Suite, and then click Next.
65 4. Select the CWYOE_OracleEBS in the IBM WebSphere Adapter for Oracle E-Business Suite (IBM: ) node, and then click Next.
66 5. In the Locate the Required Files and Libraries window, next to the top panel for Oracle JDBC driver JAR files, click Add. Browse to the location of the external Oracle JDBC driver, select the driver JAR file, and click Open.
67 The Oracle JDBC driver that the wizard needs to add to your project is the external JAR file that is provided with your database, which you can obtain from your database administrator or from the Web site for the database, then click Next.
68 6. In the Select the Processing Direction window, click Inbound and click Next.

69 7. In the Specify the Discovery Properties window, in the left pane, select your database vendor, driver, and version. Enter the information for your database that is shown in the following table. The table lists the properties required for the sample and their descriptions. Property System ID Host name Port number Description The database name. System ID is used along with host name and port number to generate the Database URL that is used to connect to the database. The host name or IP address of the database server. Host name is used along with database name and port number to generate the Database URL that is used to connect to the database The port number along with the

70 database name and host name generates the Database URL that is used to connect to the database. JDBC driver class name User name Password The class name of the JDBC driver that is used to connect to the database. The database account you are using. It is used during the discovery process. Later in the wizard, you can specify a different name and password to use at run time. The password for the account you are using. Table 19. Connection properties for the external service wizard Results
71 The wizard uses the connection properties to connect to the database. Business object selection and linking For this sample for inbound processing you select the same objects and create the same object hierarchy as is used to perform the Retrieve operation in Sample 1. When you select business objects and services, you import the objects and set the application-specific information, such as the foreign key relationship between the parent and child objects. Operations for the business objects For this sample, the adapter supports the Create, Update, and Delete operations for customer data that is modified in Oracle E-Business Suite. When the concurrent program is run, it compares the date of its last run to the created and modified dates in the customer table. The following table shows what operations are assigned under what conditions. Operation A Create operation is assigned to the customer entry An Update operation is assigned to the customer entry A Delete operation is assigned to the customer entry Condition If the creation date of a customer is later than the last run date of the concurrent program If the creation date is prior to the last run date of the concurrent program If the Status of the customer is not Active (having an A in the status column) Table 20. How operations are assigned Base tables for the Accounts Receivable schema The following table lists the base tables for the Accounts Receivable (AR) schema, including the table name, suggested synonym, and description. The next section shows a diagram of the relationship of the business objects that you configure for inbound processing. Table name Synonym Description AR.HZ_CUST_ACCOUNTS IBM_R_CUST_ACCOUNTS Customer number, type, and other customer information. AR.HZ_CUSTOMER_PROFILES IBM_R_CUST_PROFILES High-level profile
72 information for the customer. AR.HZ_PARTIES IBM_R_PARTIES Customer name and if it is a person, not a business, the person s details. AR.HZ_PARTY_SITES IBM_R_PARTY_SITES Links between customer s address IDs and address location IDs. AR.HZ_CUST_ACCT_SITES_ALL IBM_R_ACCT_SITES Address IDs. AR.HZ_CUST_SITE_USES_ALL IBM_R_SITE_USES Customer business address purposes (BILL_TO, SHIP_TO, etc.). AR.HZ_LOCATIONS IBM_R_LOCATIONS Address details. AR.HZ_CONTACT_POINTS IBM_R_CONTACTS_SITES Contact and phone details. The table is listed twice because both sites and customers (PARTY_SITE S and PARTIES) use the same table for contact details. AR.HZ_CONTACT_POINTS IBM_R_CONTACTS_CUSTOMER Contact and phone details. The table is listed twice because both sites and customers (PARTY_SITE S and PARTIES) use the same table for contact
73 details. Table 21. Base tables for the AR schema Relationship of the business objects For inbound processing to succeed, the links connecting the customer object to its child objects must match those in the Oracle database. Selecting business objects and services After configuring connection properties, run a query for database objects. You can browse the metadata tree structure to understand the structure of the objects in the Oracle database, and select objects needed for the service description. Link the parent and child objects. About this task For this sample, you run a query on the Accounts Receivable (AR) schema and select synonyms that represent the data in the Oracle E-Business Suite base tables. Procedure 1. Specify filter properties a. In the Find Objects in the Enterprise System window, click Edit Query. b. In the Specify the Query Properties window, type AR in the Schema name or pattern field to display the accounts receivable (AR) schema. c. Select the check box Prompt for additional configuration settings when adding business object, and click OK. Now, whenever you select one of the discovered objects for import, you are prompted to enter application-specific information for the object.
74 2. Run the metadata query a. Display objects discovered by the query Click Run Query. The AR schema and data elements of the schema are displayed. b. Select the object for import Expand the AR schema. Expand Synonyms - Nicknames. Highlight the synonym IBM_R_CUST_ACCOUNTS, and click > (the Add icon) to select this object to be imported. c. Add business object application-specific information In the Specify the Configuration Properties for IBM_R_CUST_ACCOUNTS window, click Add to select the primary key for the table related to IBM_R_CUST_ACCOUNTS. Select CUST_ACCOUNT_ID and click OK.
75 d. Select another object for import and link child object to parent In the Find Objects in the Enterprise System window, highlight the synonym IBM_R_CUST_PROFILES, and click > (the Add icon) to select this object to be imported. In the Specify the Configuration Properties for IBM_R_CUST_PROFILES window, click Add to select the primary key. Select APPLICATION_ID and click OK. Set the parent for the table related to IBM_R_CUST_PROFILES by selecting IBM_R_CUST_ACCOUNTS.

76 Under Build a foreign key relationship by selecting a parent table column for each child column, link the child to the parent s attributes by selecting a foreign key attribute and a foreign key value for that attribute. For the foreign key attribute CUST_ACCOUNT_ID, select the foreign key attribute value CUST_ACCOUNT_ID. Check Parent object owns child object (cascade delete) and click OK.

77 e. Select remaining synonyms Repeat step 2d for each of the remaining synonyms in the order the synonyms are presented in the following table. Use the primary key, parent, foreign key attribute, and foreign key attribute value shown for each synonym in the table. Synonym Primary key Parent Foreign key attribute Foreign key attribute value IBM_R_PARTIES party_id IBM_R_CUST_ACCOUNTS party_id party_id IBM_R_ACCT_SITES IBM_R_PARTY_SITES party_site_id and cust_acct_site_id location_id and party_site_id IBM_R_CUST_ACCOUNTS cust_account_id cust_account_id IBM_R_ACCT_SITES party_site_id party_site_id IBM_R_SITE_USES application_id IBM_R_ACCT_SITES cust_acct_site_id cust_acct_site_id

78 IBM_R_LOCATIONS address_key IBM_R_PARTY_SITES location_id location_id IBM_R_CONTACTS_SITES application_id IBM_R_PARTY_SITES owner_table_id party_site_id IBM_R_CONTACTS_CUTOMER application_id IBM_R_PARTIES owner_table_id party_id Table 22. Objects requiring foreign key values and child objects Configuring the selected objects After you have selected database objects and added their primary key, you can specify operations and other properties that apply to the selected business objects. Procedure 1. Select operations
79 In the Configure Composite Properties window of the external service wizard, the Operations pane lists the operations that the adapter supports for the inbound service type. Do not change the list of operations. The following operations are displayed: Create Update Delete 2. Leave the default values for these fields: Business object namespace Folder Generate a business graph for each business object 3. Click Next.

80 What to do next Next, you will specify deployment information to use at run time and information for saving the service as a module. Setting deployment properties and generating the service Configure the activation specification and resource adapter properties that the adapter uses to set up a communication channel to a specific database for inbound processing. Then create a business integration module that contains all of the artifacts and property values. About this task Use the external service wizard to configure the properties. Procedure 1. Set configuration property values
81 a. Click Using security properties from the managed connection factory. Set the values of the required security properties as shown in the following table. The fields are initialized with the connection information you specified when you started the wizard. You can edit the existing values for User name, as required. You must type your Password. Properties User name Password Values The database account you are using The password for the account you are using Table 23. Database system connection information b. In the Specify the Service Generation and Deployment Properties window, in the Deploy connector project field, ensure that this option is selected: With module for use by single application. c. In the Deploy connector project field, ensure that this option is selected: Specify database connection information. d. Click Advanced to see all of the properties under Connection properties, Database system connection information. For inbound processing, the property fields are displayed for the activation specification and resource adapter properties. e. Expand Event configuration, in the Event table name field change the default value to IBM_WEBSPHERE_EVENTS.

82
83 f. Click Next. 2. Create a module a. In the Specify the Location Properties window, click New next to the Module field. b. In the Integration Project window, confirm that Create a module project is selected and click Next. c. In the Module window, type Oracle_Inbound, and click Finish. d. In the Specify the Location Properties window, click Finish. Results This module will hold all of the generated artifacts. Saving the module You must save the business integration module for inbound processing that contains the artifacts and property values you created. Procedure 1. In the Business Integration view, click the Oracle_Inbound module.
84 2. Select File > Save. Note: If the option to Save is inactive (grey), then the module has already been saved. Creating an inbound component Because this sample is a stand-alone application, it is not wired to a processing export as a production application would be. Therefore, before you can deploy the project, you must create a component that will pick up inbound events, retrieve data, and display the retrieved data on the administrative console where you can review it. Creating the component Use the Assembly Editor within IBM Integration Designer to create a new component. You must do this so that the inbound sample application has an export that can perceive events, and retrieve and process data. This procedure is required because the sample application must be deployed in a test environment. Procedure 1. Open the Assembly Diagram From the Business Integration view within IBM Integration Designer, expand the Oracle_Inbound module. Double-click Assembly Diagram. This opens the Assembly Diagram for the OracleInboundInterface component. 2. On the left side of the Assembly Diagram, expand Components and click Untyped Component. 3. To create the new Untyped component, click on the Assembly Diagram background. The new component is displayed in the Assembly Diagram as Component1. 4. Hover over the right side of the OracleInboundInterface component until a yellow wire is displayed. Click on the wire and drag it to the left side of Component1. 5. In the Add Wire dialog box, click OK. What to do next Next, define the implementation of the new inbound component. Defining the implementation
85 To enable the component to retrieve objects posted to the event store in the Adapter for Oracle E-Business Suite and print them to the administrative console, add code that defines the behavior of the new inbound component. Procedure 1. Right click Component1 in the Assembly Diagram for OracleInboundInterface. 2. Click Generate Implementation Java. 3. In the Generate Implementation window, confirm that default package is selected, and click OK. 4. The Component1Impl.java window is displayed, where you can insert custom code. At the top, add to the rest of the import statement: import com.ibm.j2ca.base.adapterboutil; Replace the default sections of the implementation with code that directs the component to retrieve objects posted to the event store and to print them to the administrative console. Use the code in the next section, titled Java code for inbound component implementation. 5. After adding the custom code, select File Save to save the component code. Close the Component1Impl.java window. 6. Select File Save to save the Assembly Diagram. Java code for inbound component implementation Custom Java code replaces default code in the inbound component. Three code blocks are provided that enable printing to the administrative console: code for printing a created object, an updated object, and a deleted object. Insert the following code blocks in the appropriate empty methods in the inbound component, For example, for the first method block, locate: public void createaribm_r_cust_accountsbg( DataObject createaribmrcustaccountsbginput{} Then replace the empty method with the first code block. After you have inserted all three code blocks, return to the previous section of this user guide to save the component code and the assembly diagram. Code for printing a created object
86 public void createaribm_r_cust_accountsbg( DataObject createaribmrcustaccountsbginput) { System.out.println("End point for createaribm_r_cust_accountsbg "); int i = createaribmrcustaccountsbginput.gettype().getproperties().si ze()-1; DataObject dataobj = createaribmrcustaccountsbginput.getdataobject(i); System.out.println("Data object to be traced: " + dataobj.gettype().getname()); try { String xmlstring = AdapterBOUtil.serializeDataObject(dataObj); System.out.println(xmlString); } catch(exception e) { System.out.println("Error in tracing the data object"); } } Code for printing an updated object public void updatearibm_r_cust_accountsbg( DataObject updatearibmrcustaccountsbginput) { System.out.println("End point for updatearibm_r_cust_accountsbg "); int i = updatearibmrcustaccountsbginput.gettype().getproperties().si ze()-1; DataObject dataobj = updatearibmrcustaccountsbginput.getdataobject(i); System.out.println("Data object to be traced: " + dataobj.gettype().getname()); try {
87 String xmlstring = AdapterBOUtil.serializeDataObject(dataObj); System.out.println(xmlString); } catch(exception e) { System.out.println("Error in tracing the data object"); } } Code for printing a deleted object public void deletearibm_r_cust_accountsbg( DataObject deletearibmrcustaccountsbginput) { System.out.println("End point for deletearibm_r_cust_accountsbg "); int i = deletearibmrcustaccountsbginput.gettype().getproperties().si ze()-1; DataObject dataobj = deletearibmrcustaccountsbginput.getdataobject(i); System.out.println("Data object to be traced: " + dataobj.gettype().getname()); try { String xmlstring = AdapterBOUtil.serializeDataObject(dataObj); System.out.println(xmlString); } catch(exception e) { System.out.println("Error in tracing the data object"); } } Important: Return to the previous section of the user guide, titled Defining the implementation, to perform the steps to save the component code and the assembly diagram.
88 Deploying the module for testing To test the adapter application, you need to install the module for outbound processing in the IBM Integration Designer integration test client. Before you begin The module that contains an Oracle database export file is produced by running the external service wizard. Procedure 1. In IBM Integration Designer, click the Servers tab to open the Servers view. 2. If your server is not displayed in the Servers view, right-click the Servers view and select New Server. Select your IBM Process Server or WebSphere Enterprise Service Bus. Click Next and click Finish. 3. If your IBM Process Server or WebSphere Enterprise Service Bus is not running, right-click the name of the server and select Start. The Status changes to Started. 4. Right-click the name of your IBM Process Server or WebSphere Enterprise Service Bus, and select Add and remove projects. 5. From the Available Projects list on the left, select the Oracle_InboundApp module, and click Add. 6. Click Finish. What to do next Next, you can test the assembled application in the integration test client. Testing the assembled adapter application Test the generated service to verify that it produces the expected results. You complete three tasks to test this sample. In Oracle Receivables, you create a customer record. Then you run the concurrent program to raise the customer object event for the
89 Create operation. Finally, in IBM Integration Designer, you use the test client to verify that the event has been processed. Starting the test client for the module to retrieve the event In IBM Integration Designer, start the test client to begin the process of testing the module to verify that the inbound event has been processed and received. Procedure 1. Select the module to test In IBM Integration Designer, go to the Business Integration view of the Business Integration perspective. 2. Right-click the Oracle_Inbound module, and select Test > Attach. The Oracle_Inbound_Test window is displayed 3. Click the IBM Integration Designer Console view, the test window displays the event in this view. What to do next Next, you will set up a customer record to test the assembled application. Creating a customer to test the assembled adapter application Set up a customer record in Oracle Receivables to test the inbound processing scenario. Before you begin Start the test client before you create the customer record. Procedure 1. Log on to your Oracle Applications instance as an Oracle E-Business Suite user. 2. Select the Receivables Manager responsibility. If this responsibility is not available in the responsibilities list, you must add it with user-defined security. 3. Select the Customers->Standard menu option. 4. In the Customer window, click the Create button to create a new customer. 5. In the Create Organization window, enter or select all required information to create a customer record. Type Organization Name (customer name) Select Country value if it is not defined Type Address, City, and County
90 Select State value Type Postal Code (fields in yellow background are required fields) Set Bill TO in the Purpose selection 6. Click Apply and Save to save the customer s information. Note: For specific information about using the Oracle interface, refer to your documentation for Oracle Applications. What to do next Next, you must run the concurrent program to process the customer event. Running the concurrent program to test the sample Run the concurrent program within Oracle to process the customer event and ensure that it works as you expect. Before you begin You must have created a customer record in Oracle Receivables before performing this task. Procedure 1. Use the Home link to return to the Receivables Manager responsibility. 2. Click the Control: Requests menu option -> Run. 3. When the Submit a New Request dialog box is displayed, confirm that the button for Single Request is selected, and then click OK. 4. In the Submit Request window, select IBM Raise Customer Event from the Name field list and submit the request. 5. If an option to submit another request appears, click No. 6. Select View -> Requests from the main menu. 7. In the Find Requests window, click Find. 8. After the concurrent request completes with normal status, navigate to where you can view the process log. The log screen shows the event details, including the customer ID and event key, for the customer that was created. For example: Raising event for customer id: 1234 Event Key: If the concurrent request does not complete with normal status, view the log file to check the errors. For example, a spelling mistake could have been made when the concurrent program
91 was created. Resolve the error and rerun the concurrent program. For information about errors, refer to your documentation for Oracle Applications. 9. The test window displays the event in the IBM Integration Designer Console view. Verify that the returned object matches the customer information that you entered when you created the customer record. Clearing the sample content After you have tested the application, clear the sample content to return the data to its original state. You must deactivate the customer in Oracle E-Business Suite, and run SQL commands to delete the stored procedure. Procedure 1. Use the SQL*Plus tool, or a similar program for processing SQL commands, to log on to the database and run commands to clear artifacts from the database. Consult your database administrator if you need help performing this task. Remove the following artifacts: IBM_CUSTOMER_EVENT_KEY_S IBM_WEBSPHERE_PKG IBM_WEBSPHERE_EVENTS To remove tables, run the Drop command.
92 Chapter 5. Tutorial 3: Calling an Oracle E-Business Suite API for outbound processing The adapter can call directly any Oracle E-Business Suite API that uses simple data parameters. Follow the steps in this sample to call an API that creates a concurrent program executable for outbound processing. By performing this scenario, you can see how to structure simple data API calls between the adapter and an Oracle E-Business Suite database. Creating the project For creating and deploying a module to communicate with an Oracle E-Business Suite application, you need to start the external service wizard in IBM Integration Designer. The wizard creates an Adapter for Oracle E-Business Suite project, which is used to organize the files associated with the adapter. Procedure 1. Review the information in Configuring the module for deployment in the WebSphere Adapter for Oracle E-Business Suite User Guide. 2. Perform the task Creating the project in the WebSphere Adapter for Oracle E-Business Suite User Guide. Follow the steps in this section to set up the project in your workspace on IBM Integration Designer. Configuring the module for outbound processing for API Calls To configure the module, create a business object that represents the stored procedure API call. Use the external service wizard in IBM Integration Designer for WebSphere Adapter for Oracle
93 E-Business Suite to perform the steps necessary to complete this task. About this task First, you configure the values of the properties that enable the adapter to set up a communication channel to a specific database. Then, run a query to discover business objects. Finally, you must specify operations and other properties that apply to the selected business object. Setting connection properties for the external service wizard Set values of the connection properties for your database instance. These properties enable the external service wizard in the Adapter for Oracle E-Business Suite to connect to the Oracle database for discovering objects and for creating the service description. Before you begin This task is performed within the external service wizard, which you already started for the tasks under Creating the project. Procedure 1. Switch to the Business Integration Perspective in IBM Integration Designer by choosing from the menu: Window -> Open Perspective -> Business Integration.
94 2. Start the External Service wizard in WebSphere Adapter for Oracle E-Business Suite by choosing: File-> New > External Service.
95 3. In the Available Types tree view, select Adapters -> Oracle E-Business Suite, and then click Next.
96 4. Select the CWYOE_OracleEBS in the IBM WebSphere Adapter for Oracle E-Business Suite (IBM: ) Node and click Next.
97 5. In the Locate the Required Files and Libraries window, next to the top panel for Oracle JDBC driver JAR files, click Add. Browse to the location of the external JDBC driver, select the driver JAR file, and click Open.
98 The JDBC driver that the wizard needs to add to your project is the external JAR file that is provided with your database, which you can obtain from your database administrator or from the Web site for the database, and then click Next.
99 6. In the Select the Processing Direction window, click Outbound, and then click Next.
100 7. In the Specify the Discovery Properties window, in the left pane, select your database vendor, driver, and version. 8. Enter the information for your database that is shown in the following table. The table lists the properties required for the sample and their descriptions. Property System ID Description The database name. System ID is used along with host name and port number to generate the Database URL that is used to connect to the database. Host name The host name or IP address of the database server. Host name is used along with database name and port number to generate the Database URL that is used to connect to the database.
101 Port number JDBC driver class name User name Password The port number along with the database name and host name generates the Database URL that is used to connect to the database. The class name of the JDBC driver that is used to connect to the database. The database account you are using. It is used during the discovery process. Later in the wizard, you can specify a different name and password to use at run time. The password for the account you are using. Table 24. Connection properties for the external service wizard Click Next. Results
102 The wizard uses the connection properties to connect to the database. Selecting business objects and services After setting connection properties, run a query to search for the database objects. Browse the metadata tree of the discovered objects to understand the structure of the objects in the Oracle database and select the objects that you want to include in the service description. About this task For this sample, you run a query on the accounts receivable (APPS) schema, and select the stored procedure that the business object will represent. Procedure 1. Specify filter properties a. In the Find Objects in the Enterprise System window, click Edit Query. b. In the Specify the Query Properties window, type APPS in the Schema name pattern field to display the accounts receivable (APPS) schema. c. Select the check box Prompt for additional configuration settings when adding business object, and click OK. Now, whenever you select one of the discovered objects for import, you are prompted to enter application-specific information for the object.
103 2. Run the metadata query a. Display objects discovered by the query Click Run Query. The APPS schema and data elements of the schema are displayed. b. Select the object for import Expand the APPS schema. Click Stored Procedures but do not expand the node because the search process will take a longer time if the list of objects is large. Use a filter to help you locate and select the stored procedure.

104 Click the Filter icon in the Discovered objects pane. In the Filter Properties for Stored Procedures window, in the Object name or pattern field, type EXECUTABLE and click OK.
105 Note: The addition of the Catalog Filter property in the Filter Properties for Stored Procedure window allows users to filter the returned Stored Procedures by Catalog (or Package) name. Previously, users were only able to filter by the stored procedure name by specifying the Object name or pattern filter. In this version, both filters have been performance-enhanced and will reduce the time taken to discover the stored procedures. Expand the Stored Procedures node. The adapter returns a list of stored procedures that matches the filter criteria. Select EXECUTABLE(FND_PROGRAM) from the list of stored procedures. Click > (the Add icon).
106 From the Specify the Configuration Properties for EXECUTABLE(FND_PROGRAM) window, click OK. The stored procedure is added to the Selected objects pane. Click Next.

107 Configuring the selected objects After you have selected database objects and added their primary key, you can specify operations and other properties that apply to the selected business objects. Procedure 1. In the Configure Composite Properties window of the external service wizard, leave the default values for these fields: Maximum records for RetrieveAll operation Business object namespace Folder Generate a business graph for each business object 2. Click Next.

108 Setting deployment properties and generating the service Use the external service wizard to configure the properties the adapter uses to set up a communication channel to a specific database for outbound processing. Then create a business integration module where all of the artifacts and property values can be saved. Procedure 1. Set configuration property values a. Click Using security properties from the managed connection factory. Set the values of the required security properties as shown in the following table. The fields are initialized with the connection information you specified when you started the wizard. You can edit the existing values for User name, as required. You must type your Password.
109 Properties User name Password Values The database account you are using The password for the account you are using Table 25. Database system connection information b. In the Specify the Service Generation and Deployment Properties, in the Deploy connector project field, ensure that the With module for use by single application option is selected. c. Clear the Join global transaction check box. d. In the Deploy connector project field, ensure that this option is selected: Specify local database connection information. e. Click Advanced button, check Set Auto Commit on database connection under Additional connection configuration.
110 f. Click Next. 2. Create a module a. In the Specify the Location Properties window, click New next to the Module field.

111 b. In the Integration Project window, confirm that Create a module project is selected and click Next. c. In the Module window, type Oracle_API, and click Finish. d. In the Specify the Location Properties window, click Finish. Results This module will hold all the generated artifacts. Saving the module You must save the business integration module for outbound processing that contains the artifacts and property values you created. Procedure 1. In the Business Integration view, click the Oracle_API module. 2. Select File > Save. Note: If the option to Save is unavailable (gray), then the module has already been saved.
112 Deploying the module for testing To test the adapter application, you need to install the module for outbound processing in the IBM Integration Designer integration test client. Before you begin The module that contains an Oracle database import file is produced by running the external service wizard. Procedure 1. In IBM Integration Designer, click the Servers tab to open the Servers view. 2. If your server is not displayed in the Servers view, right-click the Servers view and select New -> Server. Select your IBM Process Server or WebSphere Enterprise Service Bus. Click Next and click Finish. 3. If your IBM Process Server or WebSphere Enterprise Service Bus is not running, right-click the name of the server, and then select Start. The Status entry changes to Started. 4. Right-click the name of your IBM Process Server or WebSphere Enterprise Service Bus, and select Add and remove projects. 5. From the Available Projects list on the left, select the Oracle_APIApp module and click Add.

113 6. Click Finish. Testing the assembled adapter application Test the generated service to verify that it produces the expected results. Use the test client in IBM Integration Designer to set test values and run the service. Then in Oracle E-Business Suite, check to see that the service has run properly. Testing in the IBM Integration Designer test client Now that you have deployed your outbound processing module to the runtime environment, you can test the assembled application using the IBM Integration Designer integration test client. After testing in the test client, verify your results in Oracle E-Business Suite. Procedure 1. Select the module to test
114 In IBM Integration Designer, go to the Business Integration view of the Business Integration perspective. Right-click the Oracle_API module, and select Test -> Test Module. 2. Leave the default value for verb. 3. Set the test values In the Oracle_API_Test window, use the arrows to set the test values shown in the following table. Item Configuration Module Component Interface Operation Test value Default Module Test Oracle_API OracleOutboundInterface OracleOutboundInterface executeappsfnd_programu46executablebg Table 26. Test values Note: The test values for Component and Interface may include a number, for example, OracleOutboundInterface1. IBM Integration Designer appends numbers so that each name in the workspace is unique. 4. Set attribute values for the input business object: Important: To set a value for an attribute to <null>, right-click the value field for the attribute. Select Set to and scroll down to select <null>. The following table lists the values for the Fnd_ProgramU46Executable stored procedure attributes. Attribute executable Value IBMSAMPLENAME This value must be unique each time the sample is run. application short_name AR IBMSAMPLENAME This value must be unique each time the sample is run. description Concurrent Program Executable Definition

115 execution_method execution_file_name subroutine_name icon_name language_code execution_file_path PL/SQL Stored Procedure TEST_PACKAGE.TEST_PROCEDURE <null> <null> US <null> Table 27. Attribute values for the input business object 5. In the left pane below Events, click Continue. 6. In the Deployment Location window, select the name of your IBM Process Server or WebSphere Enterprise Service Bus and click Finish. The Starting the Integration Client window is displayed briefly. What to do next Next, you can verify the results in Oracle E-Business Suite. Verifying the test results in Oracle E-Business Suite After running the test in the IBM Integration Designer integration test client, verify that the concurrent program has been created in Oracle E-Business Suite. Procedure 1. Log on to Oracle E-Business Suite and select the System Administration responsibility. 2. Select the Concurrent: Program menu option.

116 3. From the Concurrent Program window, click Create Program button. 4. From the Create Concurrent Program, type IBMSAMPLENAME in the Name field of Executable tab. 5. Run the query. The executable details are displayed. These details should match the input that was provided to create the concurrent program executable. Clearing the sample content After testing and verifying your test results, clear the sample content to return the data to its original state in Oracle E-Business Suite. About this task You need to remove the executable program. You can locate it just as you did in the previous section when you verified the test results. Procedure
117 1. Log on to Oracle E-Business Suite and select the System Administration responsibility. 2. Select the Concurrent: Program menu option. 3. From the Concurrent Program window, type IBMSAMPLENAME in the Short Name field. 4. Run the query. 5. After the query has run, click Edit and then click Delete. 6. Save your changes.
118 Chapter 6. Tutorial 4: Importing customer data using the Business Event System and workflow WebSphere Adapter for Oracle E-Business Suite sends an outbound request to Oracle E-Business Suite to create customer data in Oracle s custom event table. From that event, the Oracle Business Event System triggers a workflow that creates the customer record in Oracle E-Business Suite. The workflow also handles errors during this process. About this task During outbound processing, WebSphere Adapter for Oracle E-Business Suite uses a Create operation to insert customer data into the custom event table. A stored procedure is invoked that creates a custom event in the Business Event System. The Business Event System has a built-in subscription to this event. It builds a workflow that creates a customer record in Oracle E-Business Suite. Preparing for outbound processing Perform the setup steps needed to prepare your environment for outbound processing. One step inserts stored procedures into Oracle E-Business Suite, while another step creates a custom workflow for receiving the customer event. Inserting artifacts into Oracle E-Business Suite Run four SQL scripts to insert the artifacts into the Oracle database for performing the sample. These artifacts include tables, stored procedures, an event package, triggers, and sequences. About this task
119 For this outbound processing sample, the Business Event System in Oracle E-Business Suite is used to create a business event that triggers a workflow. A custom event table is created in Oracle E-Business Suite, then the Adapter for Oracle E-Business Suite is used to populate data in this custom event table. A stored procedure is used to create a custom event in the database, which triggers the workflow. The scripts in this task must be run to populate the Oracle database with the artifacts necessary for running this sample. Procedure 1. Open the SQL*Plus tool (or similar program for processing SQL statements). Log on to SQL*Plus using a database account that has been granted database administrator (DBA) rights. This sample uses the Oracle Applications database APPS schema. 2. Run the following four SQL scripts from the sample script directory in the listed order. ibm_websphere_event_table_create.sql ibm_websphere_events_s.sql ibm_customer_event_key_s.sql ibm_customer_event_pkg.pls For example, SQL>@C:\ibm\ibm_webshere_event_table_create.sql; Results These scripts place stored procedures and other artifacts into the Oracle Applications (APPS) schema. Creating the workflow A workflow must be created in Oracle E-Business Suite to receive the customer data from the outbound Create operation. The workflow creates the customer record in the database and also handles the errors. Procedure 1. Open the Oracle Workflow Builder and click the File > Open menu option.


120 2. Provide the filename of the workflow scripts. Browse to locate the IMPCUST.wft file from the samples directory. 3. Click OK to load the workflow scripts into the workflow builder.


121 4. Click the menu option File > Save as to provide the information to save the workflow in the database. a. Click Database and provide the following information, which you can obtain from your database administrator: Field User Password Connect Value APPS The password for the user of the APPS database The database connect string Table 28. Database information b. Click OK to save the workflow in the APPS schema. Setup within Oracle E-Business Suite This sample application uses the Oracle E-Business Suite Business Event System, a mechanism to process data based on
122 the events, subscriptions, and actions you define. Before you can use the Business Event System, you must complete some setup tasks within Oracle. These include creating custom events and creating subscriptions for those events. Creating a custom event The Oracle E-Business Suite built-in Business Event System (BES) requires events and subscriptions. When you create a custom event, you satisfy one of the requirements of the Business Event System mechanism. About this task This setup step performed within Oracle E-Business Suite enables the Business Event System to detect an event. Procedure 1. Access your Oracle E-Business Suite application instance as the SYSADMIN user. 2. Use the responsibility for Workflow Administrator Web Applications. 3. Select the Business Events menu option, and navigate to the page where you can create a new business event. 4. Create a new business event, and type in or select all of the following information: Field Name Display name Description Status Value ibm.apps.ar.customer.inbound IBM Customer Inbound Event IBM Customer Inbound Event Enabled Owner Name An owner name recognized by Oracle E-Business Suite Owner Tag An owner tag recognized by Oracle E-Business Suite Table 29. Business event values

123 5. Save the event definition. Note: For specific information about using the Oracle interface, refer to your documentation for Oracle Applications. Creating a subscription for the custom event After you create a custom event, you must create a subscription for the Business Event System to use with the event. During outbound processing, the Business Event System raises the event, which identifies it to the Oracle event manager. The Oracle event manager initiates subscriptions related to the event. A subscription identifies what action to take, such as launching a workflow and populating a table with information from the event. Procedure 1. Access the Subscriptions menu. 2. Navigate to the page where you can create a new subscription. 3. Create the subscription, typing in information from the following table: Field System Source Type Event Filter Value The name of your Oracle instance Local ibm.apps.ar.customer.inbound

124 Phase 10 Status Rule Data Action Type On Error Enabled Message Launch Workflow Stop and Rollback Table 30. Subscription values 4. Navigate to the next section, where you can add information about the subscription by typing in the information presented in the following table. Field Workflow Type Workflow Process Priority Value IMPCUST IMPORT_CUSTOMER High
 Table 31. Additional subscription values 5. Save the subscription.")
125 Owner Name Owner Tag An owner name recognized by Oracle E-Business Suite (the same name you used for the custom event) An owner tag recognized by Oracle E-Business Suite (the same tag you used for the custom event) Table 31. Additional subscription values 5. Save the subscription. Note: For specific information about using the Oracle interface, refer to your documentation for Oracle Applications. Creating an error event The Oracle E-Business Suite built-in Business Event System (BES) requires events and subscriptions to process data. In this task, you create an error event to enable the workflow to handle errors
126 occurring during the creation of the customer record in the database. About this task This setup step is performed within Oracle E-Business Suite to enable the Business Event System to detect an error event. Procedure 1. Access your Oracle E-Business Suite application instance as the SYSADMIN user. 2. Use the responsibility for Workflow Administrator Web Applications. 3. Select the Business Events menu option, and navigate to the page where you can create a new business event. 4. Create a new business event, and type in or select all of the following information: Field Name Display name Description Status Owner Name Owner Tag Value ibm.apps.ar.customer.error IBM Error Event For Customer Import IBM Error Event For Customer Import Enabled An owner tag recognized by Oracle E-Business Suite An owner tag recognized by Oracle E-Business Suite Table 32. Business event values

127 5. Save the event definition. Note: For specific information about using the Oracle interface, refer to your documentation for Oracle Applications. Creating a subscription for the error event After you create an error event, you must create a subscription for the Business Event System to use with the event. The subscription tells what action to take for the error event. Procedure 1. Access the Subscriptions menu. 2. Navigate to the page where you can create a new subscription. 3. Create the subscription, typing information from the following table: Field System Source Type Event Filter Value The name of your Oracle instance Local ibm.apps.ar.customer.error Phase 10 Status Enabled
128 Rule Data Action Type On Error Message Custom Stop and Rollback Table 33. Subscription values 4. Navigate to the next section, where you can add information about the subscription, and type in the information presented in the following table. Field PL/SQL Rule Function Out Agent Value IBM_WEBSPHERE_PKG.RULE_FUNCTION WF_JMS_OUT Note: This is optional. Enter the value only if the event information needs to be populated
 An owner tag recognized")
129 into the JMS queue. Priority Owner Name Owner Tag Normal An owner name recognized by Oracle E-Business Suite (the same name you used for the error event) An owner tag recognized by Oracle E-Business Suite (the same tag you used for the error event) Table 34. Additional subscription values 5. Save the subscription.
130 Note: For specific information about using the Oracle interface, refer to your documentation for Oracle Applications. Creating the project For creating and deploying a module to communicate with an Oracle E-Business Suite application, you need to start the external service wizard in IBM Integration Designer. The wizard creates an Adapter for Oracle E-Business Suite project, which is used to organize the files associated with the adapter. Procedure 1. Review the information in Configuring the module for deployment in the WebSphere Adapter for Oracle E-Business Suite User Guide. 2. Perform the task Creating the project in the WebSphere Adapter for Oracle E-Business Suite User Guide. Follow the steps in this section to set up the project in your workspace on IBM Integration Designer. Configuring the module for outbound processing You must create the business objects necessary to process data into Oracle E-Business Suite. To accomplish this, use the external service wizard in IBM Integration Designer for WebSphere Adapter for Oracle E-Business Suite. First, you initialize the wizard by configuring values of the properties that enable the adapter to set up a communication channel to a specific database. Then, run a query to discover business objects. Finally, you must specify the operations and other properties for the selected business objects. Setting connection properties for the external service wizard Set values of the connection properties for your database instance. These properties enable the external service wizard in the Adapter for Oracle E-Business Suite to connect to the Oracle database for discovering objects and for creating the service description. Before you begin
131 This task is performed within the external service wizard, which you already started for the tasks under Creating the project. About this task First, the adapter needs a copy of certain files from the database to be able to communicate with it. These JAR files include the JDBC driver and any native system library files that are needed. You can obtain the necessary files for your database software and operating system from your database administrator or from the database software Web site. Procedure 1. Switch to the Business Integration Perspective in IBM Integration Designer by choosing from the menu: Window -> Open Perspective -> Business Integration. 2. Start the WebSphere Adapter for Oracle E-Business Suite External Service wizard by choosing: File-> New > External Service.
132 3. In the Available Types tree view, select Adapters -> Oracle E-Business Suite, and then click Next.
133 4. Select the CWYOE_OracleEBS in the IBM WebSphere Adapter for Oracle E-Business Suite (IBM: ) Node, and click Next.
134 5. In the Locate the Required Files and Libraries window, next to the top panel for Oracle JDBC driver JAR files, click Add. Browse to the location of the external JDBC driver, select the driver JAR file, and click Open.
135 The JDBC driver that the wizard needs to add to your project is the external JAR file that is provided with your database, which you can obtain from your database administrator or from the Web site for the database, then click Next.
136 6. In the Select the Processing Direction window, click Outbound and click Next.
137 7. In the Specify the Discovery Properties window, in the left pane, select your database vendor, driver, and version. 8. Enter the information for your database that is shown in the following table. The table lists the properties required for the sample and their descriptions. Property System ID Description The database name. System ID is used along with host name and port number to generate the Database URL that is used to connect to the database.
138 Host name The host name or IP address of the database server. Host name is used along with database name and port number to generate the Database URL that is used to connect to the database. Port number The port number, which, along with database name and host name, generates the Database URL that is used to connect to the database. JDBC driver class name User name Password The class name of the JDBC driver that is used to connect to the database. The database account you are using. It is used during the discovery process. Later in the wizard, you can specify a different name and password to use at run time. The password for the account you are using. Table 35. Connection properties for the external service wizard
139 Click Next. Results The wizard uses the connection properties to connect to the database. Selecting business objects and services After setting connection properties, run a query to search for database objects. Browse the metadata tree of discovered objects to understand the structure of the objects in the Oracle database and select objects that you want to include in the service description. About this task For this sample, you run a query on the accounts receivable (AR) schema, and select tables that represent data in the Oracle E-Business Suite interface tables. Procedure 1. Specify filter properties a. In the Find Objects in the Enterprise System window, click Edit Query. b. In the Specify the Query Properties window, type AR in the Schema name pattern field to display the accounts receivable (AR) schema. c. Select the Prompt for additional configuration settings when adding business object check box, and click OK. Now, whenever you select one of the discovered objects for import, you are prompted to enter application-specific information for the object.
 to select this object to be imported.")
140 2. Run the metadata query a. Display objects discovered by the query Click Run Query. The AR schema and data elements of the schema are displayed. b. Select the object for import Expand the AR schema. Expand Tables. Highlight the table RA_CUSTOMERS_INTERFACE_ALL, and click > (the Add icon) to select this object to be imported.

141 c. Add business object application-specific information In the Specify the Configuration Properties for RA_CUSTOMERS_INTERFACE_ALL window, click Add to select the primary key for the table. Select REQUEST_ID and click OK.

142 After a delay, the selected object is displayed in the Selected objects pane. d. Select remaining tables Repeat steps 2b and 2c for each of the remaining database tables listed in the following table. The primary key is specified for each table. Table AR.RA_CUSTOMER_PROFILES_INT_ALL AR.RA_CONTACT_PHONES_INT_ALL Primary Key REQUEST_ID REQUEST_ID Table 36. Remaining tables to select for import and their primary key

143 When you are finished, click Next. Configuring the selected objects After you have selected database objects and added their primary key, you can specify operations and other properties that apply to the selected business objects. Procedure 1. Select operations In the Configure Composite Properties window of the external service wizard, the Operations pane lists the operations that the adapter supports for the outbound service type. To remove the following operations, highlight them and clicking Remove. Update Delete RetrieveAll ApplyChanges

144 Exists The following operations remain: Create Retrieve 2. Leave the default values for these fields: Maximum records for RetrieveAll operation Business object namespace Folder Generate a business graph for each business object 3. Click Next. What to do next? Next, you will specify deployment information to use at run time and information for saving the service as a module. Setting deployment properties and generating the service
145 Use the external service wizard to configure the properties that the adapter uses to set up a communication channel to a specific database for outbound processing. Then create a business integration module where all of the artifacts and property values can be saved. Procedure 1. Set configuration property values a. Clear the Using an existing JAAS alias (recommended) check box. b. Check Using security properties from the managed connection factory. The fields are initialized with the connection information you specified when you started the wizard. You can edit the existing values for User name and Password as required. Properties User name Password Values The database account you are using The password for the account you are using Table 37. Database system connection information c. Clear the Join global transaction check box. d. In the Specify the Service Generation and Deployment Properties window, in the Deploy connector project field, ensure that this option is selected: With module for use by single application. Click Advanced button, check Set Auto Commit on database connection under Additional connection configuration. e. Click Next.

146 2. Create a module a. In the Specify the Location Properties window, click New next to the Module field.
147 b. In the Integration Project window, confirm that Create a module project is selected and click Next. c. In the Module window, type TestBESWorkFlow, and click Finish. d. In the Specify the Location Properties window, click Finish. Results This module will hold all of the generated artifacts. Saving the module Save the business integration module for outbound processing that contains the artifacts and property values you created. Procedure 1. In the Business Integration view, click the TestBESWorkFlow module. 2. Select File > Save. Note: If the option to Save is unavailable (gray), then the module has already been saved.
148 Deploying the module for testing To test the adapter application, you need to install the module for outbound processing in the IBM Integration Designer integration test client. Before you begin The module that contains an Oracle database import file is produced by running the external service wizard. Procedure 1. In IBM Integration Designer, click the Servers tab to open the Servers view. 2. If your server is not displayed in the Servers view, right-click the Servers view and select New -> Server. Select your IBM Process Server or WebSphere Enterprise Service Bus. Click Next, and then click Finish. 3. If your IBM Process Server or WebSphere Enterprise Service Bus is not running, right-click the name of it and select Start. The Status entry changes to Started. 4. Right-click the name of your IBM Process Server or WebSphere Enterprise Service Bus, and select Add and remove projects. 5. From the Available Projects list on the left, select the TestBESWorkFlow module, and then click Add. Click Finish.

149 What to do next Next, you can test the assembled application in the integration test client. Testing the Create Operation After you have deployed your outbound processing application to IBM Process Server or WebSphere Enterprise Service Bus, test the assembled application using the IBM Integration Designer integration test client. About this task To test the Create operation, you enter customer data into three database tables. Procedure 1. Select the module to test
150 In IBM Integration Designer, go to the Business Integration view of the Business Integration perspective. Right-click the TestBESWorkFlow module, and then select Test -> Test Module. 2. Leave the default value for verb. 3. Set the test values In the TestBESWorkFlow_Test window, use the arrows to set the test values shown in the following table. You set the test values three times, once for each Create operation listed. Item Configuration Module Component Interface Operation (select one operation at a time) Test value Default Module Test TestBESWorkFlow OracleOutboundInterface OracleOutboundInterface createarra_customers_interface_allbg createarra_customer_profiles_int_allbg createarra_contact_phones_int_allbg Table 38. Test values for the Create operation Note: The test values for Component and Interface may include a number, for example, OracleOutboundInterface1. IBM Integration Designer appends numbers so that each name in the workspace is unique. 4. Set attribute values for the input business object Set the attribute values for the three tables you selected during object discovery with the external service wizard. The tables are ArRa_Customers_Interface_AllBG ArRa_Customer_Profiles_Int_AllBG ArRa_Contact_Phones_Int_AllBG The following tables provide the values for each object and indicate any restrictions, such as whether the value has to be unique. a. Create and record unique ID values. Oracle requires ID values for outbound processing. These values uniquely identify the records inserted into Oracle E-Business Suite and are required for successful retrieval of the corresponding inserted data. The ID values are used
151 in multiple objects, so you need to write down the values you use so that they can be used consistently for different objects. For each of the following values, create unique string values. CustomerReference# AddressReference#1 TelephoneReference# CustomerName Note: For more information on required values and other allowed values for data in the Oracle interface tables, refer to your documentation for Oracle Applications, specifically the Oracle Receivables User Guide. b. In the Events window, under Initial request parameters, click the Value column across from the name of each attribute whose value you need to set, and enter the value from the following tables.

152 Important: To set a value for an attribute to <null>, right-click the value field for the attribute. Select Set to and scroll down to select <null>. The following table lists the values for the ArRa_Customers_Interface_All table attributes. Attribute Value Notes Orig_system_customer_ref CustomerReference# Use the value that you recorded. The value must be unique. Site_use_code BILL_TO Orig_system_address_ref AddressReference#1 Use the value that you recorded. The
153 value must be unique. Insert_update_flag I Customer_name CustomerName Use the value that you recorded. The value must be unique. Customer_number Customer_status Primary_site_use_flag Location <null> A Y <null> Address1 Test Address You have the option of using your own address information. Address2 Address3 Address4 City State Province County <null> <null> <null> San Mateo CA <null> San Mateo Postal_code country Customer_category_code US CUSTOMER Last_updated_by -1 Last_update_date :00:00 Today s date and time. Does not have to be exact. Use Date format yyyy-mm-dd hh:mm:ss Created_by -1 Creation_date :00:00 Today s date and time. Does not have to be exact. Use Date format
154 yyyy-mm-dd hh:mm:ss Org_id 204 Customer_name_phonetic CustomerName Use the value that you recorded. Table 39. Values for the ArRa_Customers_Interface_All table attributes The following table lists the values for the ArRa_Customer_Profiles_Int_All table attributes. Attribute Value Notes Orig_system_customer_ref CustomerReference# Use the value that you recorded. The value must be unique. Insert_update_flag Customer_profile_class_na me Credit_hold I DEFAULT N Last_updated_by -1 Last_update_date :00:00 Today s date and time. Does not have to be exact. Use Date format yyyy-mm-dd hh:mm:ss Created_by -1 Creation_date :00:00 Today s date and time. Does not have to be exact. Use Date format yyyy-mm-dd hh:mm:ss Org_id 204 Table 40. Values for the ArRa_Customer_Profiles_Int_All table attributes The following table lists the values for the ArRa_ Contact_Phones_Int_All table attributes. Attribute Value Notes Orig_system_contact_ref <null>
155 Orig_system_telephone_ref TelephoneReference# Use the value that you recorded. The value must be unique. Orig_system_customer_ref CustomerReference# Use the value that you recorded. The value must be unique. Orig_system_address_ref AddressReference#1 Use the value that you recorded. The value must be unique. Insert_update_flag Contact_first_name Contact_last_name I <null> <null> Contact_title <null> Contact_title should exist in ar_lookups, where lookup_type=conta ct_title Contact_job_title <null> Telephone You have the option of using your own phone number. Telephone_extension Use <null> if you don t have one. Telephone_type FAX Telephone_type should exist in ar_lookups, where lookup_type=phone _line_type Telephone_area_code 407 Last_update_date :00:00 Use the system date and time. Use Date format yyyy-mm-dd hh:mm:ss Last_updated_by -1 Creation_date :00:00 Use the system date and time. Use Date format yyyy-mm-dd hh:mm:ss Created_by -1

156 _address <null> Org_id 204 contact_point_type PHONE The value for CONTACT_POINT_T YPE must be , PHONE, or TLX. Table 41. Values for the ArRa_Contact_Phones_Int_All table attributes 5. In the left pane below Events, click Continue. From the Deployment Location window, select the name of the server where your application will be deployed, and click Finish. The Starting the Integration Test Client window is displayed briefly. 6. Start the SQL*Plus tool, or a similar program for processing SQL commands. Run the raise_inbound_event.sql script. For example, SQL>@c:\ibm\raise_inbound_event.sql; The script accepts the value: Customer Reference. 7. Verify the results of the workflow to import the customer data. a. Log on to Oracle E-Business Suite as the System Administrator user and select the Workflow Administrator Web Applications responsibility. b. Select the Administrator Workflow >Status Monitor menu option. c. For the Type Internal Name field, type in IMPCUST and click Go.


157 d. At the screen showing the results of workflows, select the workflow process that you just ran and select the Status Diagram view. e. A Java applet window displays the workflow diagram with the completion path. f. If the interface program ends with an error or cannot import the customer object because of data errors, the workflow process raises an error event and shows the diagram for an import error event. When the customer object fails in the interface, run the following SQL statement to review the error event record in the event table:
158 select * from ibm_websphere_events where object_key = <customer reference> and object_function = Error ; What to do next Next, you return the data to its original state by clearing the sample content. Clearing the sample content After you have tested the workflow to import the customer object, clear the sample content to return the data to its original state. To do this, you must deactivate the customer in Oracle E-Business Suite, and then run SQL commands to delete the stored procedure. Procedure 1. Use the SQL*Plus tool, or a similar program for processing SQL commands, to log onto the database and run commands to clear artifacts from the database. Consult your database administrator if you need help performing this task.
159 Chapter 7. Tutorial 5: Executing the external service wizard for the Adapter for Oracle E-Business Suite With the WebSphere Adapter for Oracle E-Business Suite, you can create data in an Oracle application and retrieve data from the application. In this scenario, you use the WebSphere Adapter for Oracle E-Business Suite with improved performance to discover tables and stored procedures in the Receivables module. About this task This scenario teaches you how to set up information flows with improved performance between Oracle E-Business Suite and IBM Process Server or WebSphere Enterprise Service Bus for outbound requests, regardless of the Oracle E-Business Suite module you use. For example, you could use Payables or General Ledger, rather than Receivables. Preparing for outbound processing You must run SQL script files to prepare for outbound processing. You need to create synonyms which will save your time later while you generate business objects from the Oracle database. You also need to insert artifacts into the Oracle E-Business Suite before you can process objects using the database tables. Procedure 1. Create synonyms Open the SQL*Plus tool (or similar program for processing SQL statements). Log on to SQL*Plus using a database account that has been granted database administrator (DBA) rights. Run the SQL script ibm_create_synonyms.sql from the sample script directory.
160 For example: The size of the database and the number of database artifacts in the Oracle database can lengthen the process of searching through large lists when running the external service wizard to generate objects. Creating the synonyms helps to make the search quicker. In addition, the synonyms help to resolve an issue related to the Oracle database driver. The issue is documented in IBM Technote Refer to Related information in the Reference section for a link to WebSphere Adapters Technotes. 2. Insert artifacts into Oracle E-Business Suite Before you process business objects, run the SQL script in the file ibm_submit_request.sql. This places a stored procedure called IBM_WEBSPHERE_CUSTOMER_IMP into the Oracle APPS schema. This procedure is used to move customer data from the Oracle interface tables to the base tables. You will use the interface tables when you construct the Create business object. Creating the project For creating and deploying a module to communicate with an Oracle E-Business Suite application, you need to start the external service wizard in IBM Integration Designer. The wizard creates an Adapter for Oracle E-Business Suite project, which is used to organize the files associated with the adapter. Procedure 1. Review the information in Configuring the module for deployment in the WebSphere Adapters: Adapter for Oracle E-Business Suite User Guide. 2. Perform the task Creating the project in the WebSphere Adapters: Adapter for Oracle E-Business Suite User Guide. Follow the steps in this section to set up the project in your workspace on IBM Integration Designer. Configuring the module for outbound processing
161 You must create the business objects necessary to process data into Oracle E-Business Suite. To accomplish this, use the external service wizard in IBM Integration Designer for WebSphere Adapter for Oracle E-Business Suite. First, you initialize the wizard by configuring values of the properties that enable the adapter to set up a communication channel to a specific database. Then, run a query to discover business objects. Finally, you must specify the operations and other properties for the selected business objects. Setting connection properties for the external service wizard Set values of the connection properties for your database instance. These properties enable the external service wizard in the Adapter for Oracle E-Business Suite to connect to the Oracle database for discovering objects and for creating the service description. Before you begin This task is performed within the external service wizard, which you already started for the tasks under Creating the project. Procedure 1. Switch to the Business Integration Perspective in IBM Integration Designer by choosing from the menu: Window -> Open Perspective -> Business Integration.
162 2. Start the External Service wizard in WebSphere Adapter for Oracle E-Business Suite by choosing: File-> New > External Service.
163 3. In the Available Types tree view, select Adapters -> Oracle E-Business Suite, and then click Next.
164 4. Select the CWYOE_OracleEBS in the IBM WebSphere Adapter for Oracle E-Business Suite (IBM: ) node, and then click Next.
165 5. In the Locate the Required Files and Libraries window, next to the top panel for Oracle JDBC driver JAR files, click Add. Browse to the location of the external JDBC driver, select the driver JAR file, and then click Open.
166 The JDBC driver that the wizard needs to add to your project is the external JAR file that is provided with your database, which you can obtain from your database administrator or from the Web site for the database, then click Next.
167 6. In the Select the Processing Direction window, click Outbound, and then click Next.
168 7. In the Specify the Discovery Properties window, in the left pane, select your database vendor, driver, and version. 8. Enter the information for your database that is shown in the following table. The table lists the properties required for the sample and their descriptions. Property System ID Host name Description The database name. System ID is used along with host name and port number to generate the Database URL that is used to connect to the database. The host name or IP address of the database server. Host name is used along with database name and port number to generate the Database URL
169 that is used to connect to the database Port number JDBC driver class name User name Password The port number along with the database name and host name generates the Database URL that is used to connect to the database. The class name of the JDBC driver that is used to connect to the database. The database account you are using. It is used during the discovery process. Later in the wizard, you can specify a different name and password to use at run time. The password for the account you are using. Table 42. Connection properties for the external service wizard Click Next.
170 Results The wizard uses the connection properties to connect to the database. Create operation business object selection and linking In this sample, you will execute the external service wizard for Oracle E-Business Suite with improved performance Business objects in the database tables The following table lists the database tables for the Accounts Receivable (AR) schema including the table name, suggested synonym, and a brief description of the information that each object contains. Note: For more information about the table data, refer to your documentation for Oracle Applications, particularly the section of the Receivables user guide that describes the customer interface. Table name Synonym Description AR.RA_CUSTOMER_PROFILES_INT_ALL ArIbm_C_Cust_Profile Customer Profile interface table, which contains high-level information about the customer Table 43. Database table for the AR schema Next you will select business objects by running a query on the AR and APPS schema. Selecting business objects and services After setting connection properties, run queries to search for database objects. Browse the metadata tree of discovered objects to understand the structure of the objects in the Oracle database and select objects that you want to include in the service description. About this task For this sample, first, you run a query on the accounts receivable (APPS) schema, and select the stored procedure that the business object will represent. Then, you run a query on the accounts receivable (AR) schema, and select synonyms that represent data in the Oracle E-Business Suite interface tables. Procedure I: Importing Stored Procedures 1. Specify filter properties a. In the Find Objects in the Enterprise System window, click Edit Query.
171 b. In the Specify the Query Properties window, type APPS in the Schema name pattern field to display the accounts receivable (APPS) schema. c. Select the check box Prompt for additional configuration settings when adding business object, and click OK. Now, whenever you select one of the discovered objects for import, you are prompted to enter application-specific information for the object. 2. Run the metadata query a. Display objects discovered by the query Click Run Query. The APPS schema and data elements of the schema are displayed. b. Select the object for import

172 Expand the APPS schema. Click Stored Procedures but do not expand the node. Note: If you try to expand the Stored Procedures node without using a filter, an error message will be popup. In earlier versions of the adapter, you could expand the Stored Procedures node directly. The adapter would take a long time to query all Stored Procedures, most of which are not what customer really wants. Then use a filter to help you locate and select the stored procedure.
173 Click the Filter icon in the Discovered objects pane. In the Filter Properties for Stored Procedures window, in the Object Name Filter field, type EXECUTABLE, and then click OK.
174 Note: The addition of the Catalog Filter property in the Filter Properties for Stored Procedure window allows users to filter the returned Stored Procedures by Catalog (or Package) name. Previously, users were only able to filter by the stored procedure name by specifying the Object name or pattern filter. In this version, both filters have been performance-enhanced and will reduce the time taken to discover the stored procedures. Expand the Stored Procedures node. The adapter returns a list of stored procedures. Select EXECUTABLE(FND_PROGRAM) from the list of stored procedures. Click > (the Add icon). In the previous version, the adapter will take a long time to query and display the details of the selected Stored Procedure. You can notice a significant time gain in this section.

175 From the Specify the Configuration Properties for EXECUTABLE(FND_PROGRAM) window, click OK. The stored procedure is added to the Selected objects pane.
176 Procedure II: Importing Tables and adding Stored Procedures to them 1. Specify filter properties a. In the Find Objects in the Enterprise System window, click Edit Query. b. In the Specify the Query Properties window, type AR in the Schema name or pattern field to display the accounts receivable (AR) schema. c. Select the check box Prompt for additional configuration settings when adding business object, and click OK. Now, whenever you select one of the discovered objects for import, you are prompted to enter application-specific information for the object.
177 2. Run the metadata query a. Display objects discovered by the query Click Run Query. The AR schema and data elements of the schema are displayed. b. Select the object for import Expand the AR schema. Expand Synonyms - Nicknames. Highlight the synonym IBM_C_CUST_PROFILE, and click > (the Add icon) to select this object to be imported.
178 c. Add business object application-specific information In the Specify the Configuration Properties for IBM_C_CUST_PROFILE window, click Add to select the primary key for the table related to IBM_C_CUST_PROFILE. Select REQUEST_ID and click OK. Click Add to select and configure a stored procedure that will be associated with this synonym. In the Add window, select AfterCreateSP and click OK. In the AfterCreateSP pane, set the following values: a. Click Select button besides the Schema name field. Then, the Select Value window is open.

179 b. In the Select Value window, input schema name or pattern as filter, and select the matching schema name in the below search results list. c. Click OK. Note: Previously, there was one input field Schema name or pattern for users to set the schema name filter directly before selecting Stored Procedure. There was also a Select button besides the Schema name field. Users can use it to open a filtering window to select specific schema name in it. To avoid confusion, in the current version, the Schema name or pattern input field is removed. You just need use the Select
180 button besides the Schema name field to select matching schema name. The schema name is required before selecting the Stored Procedures, since using the exact schema name as filter parameter can improve the performance of querying the Stored Procedures. d. Type IBM_WEBSPHERE_CUSTOMER_IMP in the Stored procedure name or pattern field. e. Select IBM_WEBSPHERE_CUSTOMER_IMP from the Stored procedure name list. Note: There are several changes here in order to save selecting Stored Procedures time. Previously, when setting the value of Stored procedure name or pattern field, as long as users input each character, the cursor focus moves away. It may take a long time until you can input other characters again. In this version, the cursor focus does not move away anymore. This has enhanced the user experience. Previously, after setting the value of Stored procedure name or pattern field, it used to take a very long time to return the matching stored procedure. This has been enhanced. Previously, after selecting IBM_WEBSPHERE_CUSTOMER_IMP from the Stored procedure name list, users have to wait for a very long time until the adapter retrieves all the stored procedures. In this version, the time is much less than before. Click OK.

181 The selected object is displayed in the Selected objects pane. In this sample, you process data using Oracle s built-in interface and base tables. Only the Create operation is necessary to post both new customer data and updates to existing customer data. As part of calling the Create operation of the object, the stored procedure IBM_WEBSPHERE_CUSTOMER_IMP is run using the AfterCreateASI value for the object to process. This stored procedure moves the data from the interface to the base tables.

182 Configuring the selected objects After you have selected database objects and added their primary key, you can specify operations and other properties that apply to the selected business objects. Procedure 1. Select operations In the Configure Composite Properties window of the external service wizard, the Operations pane lists the operations that the adapter supports for the outbound service type. The following are the supported operations: Create Update Delete

183 Retrieve RetrieveAll ApplyChanges Exists Execute 2. Leave the default values for these fields: Maximum records for RetrieveAll operation Business object namespace Folder Generate a business graph for each business object 3. Click Next. What to do next?
184 Next, you will specify deployment information to use at run time and information for saving the service as a module. Setting deployment properties and generating the service Use the external service wizard to configure the properties the adapter uses to set up a communication channel to a specific database for outbound processing. Then, create a business integration module where all of the artifacts and property values can be saved. Procedure 1. Set configuration property values a. Click Using security properties from the managed connection factory. Set the values of the required security properties as shown in the following table. The fields are initialized with the connection information you specified when you started the wizard. You can edit the existing values for User name, as required. You must type your Password. Properties User name Password Values The database account you are using The password for the account you are using Table 44. Database system connection information b. In the Specify the Service Generation and Deployment Properties window, in the Deploy connector project field, ensure that the With module for use by single application option is selected. c. Clear the Join global transaction check box. d. In the Deploy connector project field, ensure that this option is selected: Specify local database connection information. e. Click Advanced to see all of the properties under Connection properties, Database system connection information. For outbound processing, the property fields are displayed for the managed connection factory and resource adapter properties. f. Click Next.

185 2. Create a module

186 a. In the Specify the Location Properties window, click New to the Module field. b. In the Integration Project window, confirm that Create a module project is selected and click Next. c. In the Module window, type Oracle_Outbound, and click Finish. d. In the Specify the Location Properties window, click Finish. Results This module will hold all of the generated artifacts. Saving the module You must save the business integration module for inbound processing that contains the artifacts and property values you created.
, then the module has already been saved.")
187 Procedure 1. In the Business Integration view, click the Oracle_Outbound module. 2. Select File > Save. Note: If the option to Save is unavailable (gray), then the module has already been saved. Verify the generated artifacts Switch to Business Integration perspective and verify if all the generated artifacts and services descriptions are correct.
188 Clearing the sample content After you have tested the application, clear the sample content to return the data to its original state. You must run SQL commands to delete the stored procedure. Procedure Use the SQL*Plus tool, or a similar program for processing SQL commands, to log on to the database and run commands to clear artifacts from the database. Consult your database administrator if you need help performing this task. Remove the following artifacts: IBM_CREATE_SYNONYMS IBM_SUBMIT_REQUEST To remove tables, run the Drop command.
189 Chapter 8. Tutorial 6: Error handling support for Oracle Interface Tables Oracle does not allow us to manually modify data in the base tables. So interface tables are populated with the required data and then a stored procedure is invoked to transfer the data from these tables to the base tables after validation. Any errors that result from the stored procedure call leave the data in the interface tables with error codes. These can be retrieved using a Custom Query on the interface tables. This scenario illustrates how the error handling is supported. The scenario also uses the Outbound Scenario 1 to demonstrate the error handling during creation of new customers. About this task Follow the instructions in Scenario 1 until the section of deploying the module for testing. Once the application is published, we need to generate the error. Use the same data that was used in the testing the Create operation section. Do not create any child business object, and specify an X for the Insert_Update_Flag. This should generate the error in the interface table. We can now proceed with building the custom query business object that will retrieve these errors from the interface tables. Creating the project For creating and deploying a module to communicate with an Oracle E-Business Suite application, you need to start the external service wizard in IBM Integration Designer. The wizard creates an Adapter for Oracle E-Business Suite project, which is used to organize the files associated with the adapter. Procedure
190 1. Review the information in Configuring the module for deployment in the WebSphere Adapter for Oracle E-Business Suite User Guide. 2. Perform the task Creating the project in the WebSphere Adapter for Oracle E-Business Suite User Guide. Follow the steps in this section to set up the project in your workspace on IBM Integration Designer. Configuring the module for outbound processing You must create the business objects necessary to process data into Oracle E-Business Suite. To accomplish this, use the external service wizard in IBM Integration Designer for WebSphere Adapter for Oracle E-Business Suite. First, you initialize the wizard by configuring values of the properties that enable the adapter to set up a communication channel to a specific database. Then, run a query to discover business objects. Finally, you must specify the operations and other properties for the selected business objects. Setting connection properties for the external service wizard Set values of the connection properties for your database instance. These properties enable the external service wizard in the Adapter for Oracle E-Business Suite to connect to the Oracle database for discovering objects and for creating the service description. Before you begin This task is performed within the external service wizard, which you already started for the tasks under Creating the project. Procedure 1. Switch to the Business Integration Perspective in IBM Integration Designer by choosing from the menu: Window -> Open Perspective -> Business Integration.
191 2. Start the WebSphere Adapter for Oracle E-Business Suite External Service wizard by choosing: File-> New > External Service.
192 3. In the Available Types tree view, select Adapters -> Oracle E-Business Suite, and then click Next.
193 4. Select the CWYOE_OracleEBS in the IBM WebSphere Adapter for Oracle E-Business Suite (IBM: ) node, and then click Next.
194 5. In the Locate the Required Files and Libraries window, next to the top panel for Oracle JDBC driver JAR files, click Add. Browse to the location of the external JDBC driver, select the driver JAR file, and click Open.
195 The Oracle JDBC driver that the wizard needs to add to your project is the external JAR file that is provided with your database, which you can obtain from your database administrator or from the Web site for the database. Click Next.
196 6. In the Select the Processing Direction window, click Outbound, and then click Next.
197 7. In the Specify the Discovery Properties window, in the left pane, select your database vendor, driver, and version. Enter the information for your database that is shown in the following table. The table lists the properties required for the sample and their descriptions. Property System ID Host name Description The database name. System ID is used along with host name and port number to generate the Database URL that is used to connect to the database. The host name or IP address of the database server. Host name is used along with database name and port number to generate the Database URL

198 that is used to connect to the database Port number JDBC driver class name User name Password The port number, which, along with database name and host name, generates the Database URL that is used to connect to the database. The class name of the JDBC driver that is used to connect to the database. The database account you are using. It is used during the discovery process. Later in the wizard, you can specify a different name and password to use at run time. The password for the account you are using. Table 45. Connection properties for the external service wizard
199 Results The wizard uses the connection properties to connect to the database. Selecting business objects and services After setting connection properties, run a query to search for database objects. Browse the metadata tree of discovered objects to understand the structure of the objects in the Oracle database and select objects that you want to include in the service description. About this task For this sample, you build the custom query business object that will retrieve error records from the interface table. Procedure 1. Specify filter properties a. In the Find Objects in the Enterprise System window, click Edit Query. b. Check Create a query business object to build user-defined Select statements. c. Click OK.

200 2. Run the metadata query a. Display objects discovered by the query b. Click Run Query. c. Select the object for import d. Expand Query Statements. Highlight Select Statement 1, and click > (the Add icon) to select this object to be imported.

201 e. Add business object application-specific information f. In the Specify the Configuration Properties for Select Statement 1 window, type ErrorQueryBO in the Name of the business object field, type select * from AR.RA_CUSTOMER_PROFILES_INT_ALL where INTERFACE_STATUS is NOT NULL in the Select statement field. Click the Validate button, you should see a Validation was Successful message. Click OK.

202 g. Click Next.

203 Configuring the selected objects After selecting the query business object, you can specify other properties that apply to the selected query business object. Procedure 1. Leave the default values for these fields: Maximum records for RetrieveAll operation Business object namespace Folder Generate a business graph for each business object 2. Click Next.

204 What to do next? Next, you will specify deployment information to use at run time and information for saving the service as a module. Setting deployment properties and generating the service Use the external service wizard to configure the properties the adapter uses to set up a communication channel to a specific database for outbound processing. Then create a business integration module where all of the artifacts and property values can be saved. Procedure 1. Set configuration property values a. Clear the Using an existing JAAS alias (recommended) radio buttion. b. Check Using security properties from the managed connection factory. The fields are initialized with the connection information you specified when you started the wizard. You can edit the existing values for User name and Password as required.
205 Properties User name Password Values The database account you are using The password for the account you are using Table 46. Database system connection information c. Clear the Join global transaction check box. d. In the Specify the Service Generation and Deployment Properties window, in the Deploy connector project field, ensure that the With module for use by single application option is selected. e. Click Advanced to see all the other properties. For outbound processing, the property fields are displayed for the connection retry settings and resource adapter properties. f. Click Next.

206 2. Create a module

207 a. In the Specify the Location Properties window, click New to the Module field. b. In the Integration Project window, confirm that Create a module project is selected and click Next. c. In the Module window, type TestErrorHandling, and click Finish. d. In the Specify the Location Properties window, click Finish. Results This module will hold all the generated artifacts. Saving the module You must save the business integration module for inbound processing that contains the artifacts and property values you created. Procedure 1. In the Business Integration view, click the TestErrorHandling module.
208 2. Select File > Save. Note: If the option to Save is unavailable (gray), then the module has already been saved. Deploying the module for testing To test the adapter application, you need to install the module for outbound processing in the IBM Integration Designer integration test client. Before you begin The module that contains an Oracle database import file is produced by running the external service wizard. Procedure 1. In IBM Integration Designer, click the Servers tab to open the Servers view. 2. If your server is not displayed in the Servers view, right-click the Servers view and select New Server. Select your IBM Process Server or WebSphere Enterprise Service Bus. Click Next and click Finish. 3. If your IBM Process Server or WebSphere Enterprise Service Bus is not running, right-click the name of it and select Start. The Status changes to Started. 4. Right-click the name of your IBM Process Server or WebSphere Enterprise Service Bus, and select Add and remove projects. 5. From the Available Projects list on the left, select the TestErrorHandlingApp module, and click Add. Click Finish.
209 What to do next Next, you can test the assembled application in the integration test client. Testing the assembled adapter application After you have deployed your outbound processing application to IBM Process Server or WebSphere Enterprise Service Bus, test the assembled adapter application using the IBM Integration Designer integration test client. About this task You use this custom query to get the error code from interface tables. Procedure 1. Select the module to test

210 In IBM Integration Designer, go to the Business Integration view of the Business Integration perspective. Right-click the TestErrorHandling module, and select Test > Test Module. 2. Unset the verb. 3. In the left pane below Events, click Continue. From the Deployment Location window, select the name of the server where your application will be deployed, and click Finish. The Starting the Integration Test Client window is displayed briefly. 4. The results will be displayed as below.

211 The interface_status field shows the error code J8 that is generated for the record in the interface table. The description for this code is J8 INSERT_UPDATE_FLAG has an invalid value which is what we tested with. Clearing the sample content After you have tested the application, clear the sample content to return the data to its original state. You must deactivate the customer in Oracle E-Business Suite. Procedure 1. Use the SQL*Plus tool, or a similar program for processing SQL commands, to log onto the database and run commands to clear artifacts from the database. Consult your database administrator if you need help performing this task.
212 Chapter 9. Tutorial 7: Using a Wrapper stored procedure to call a stored procedure that returns PL/SQL Record The adapter can call directly any Oracle E-Business Suite API that uses PL/SQL Record data parameters. Follow the steps in this sample to call an API that retrieves the information about the flexfields for outbound processing. By performing this scenario, you learn how to structure the PL/SQL Record data API calls between the adapter and an Oracle E-Business Suite database. Creating the project For creating and deploying a module to communicate with an Oracle E-Business Suite application, you need to start the external service wizard in IBM Integration Designer. The wizard creates an Adapter for Oracle E-Business Suite project, which is used to organize the files associated with the adapter. Procedure 1. Review the information in Configuring the module for deployment in the WebSphere Adapter for Oracle E-Business Suite User Guide. 2. Perform the Creating the project task in the WebSphere Adapter for Oracle E-Business Suite User Guide. Follow the steps in this section to set up the project in your workspace on IBM Integration Designer. Configuring the module for outbound processing for API Calls with PL/SQL Record parameter
213 To configure the module, create a business object that represents the stored procedure API call. Use the external service wizard in IBM Integration Designer for WebSphere Adapter for Oracle E-Business Suite to perform the steps necessary to complete this task. About this task First, you configure the values of the properties that enable the adapter to set up a communication channel to a specific database. Then, run a query to discover business objects. Finally, you must specify operations and other properties that apply to the selected business object. Setting connection properties for the external service wizard Set values of the connection properties for your database instance. These properties enable the external service wizard in the WebSphere Adapter for Oracle E-Business Suite to connect to the Oracle E-Business Suite for discovering objects and for creating the service description. Before you begin This task is performed within the external service wizard, which you already started for the tasks under Creating the project. Procedure 1. Switch to the Business Integration Perspective in IBM Integration Designer by choosing from the menu: Window -> Open Perspective -> Business Integration.
214 2. Start the External Service wizard for WebSphere Adapter for Oracle E-Business Suite by choosing: File-> New > External Service.
215 3. In the Available Types tree view, select Adapters -> Oracle E-Business Suite, and then click Next.
216 4. Select the CWYOE_OracleEBS in the IBM WebSphere Adapter for Oracle E-Business Suite (IBM: ) node, and then click Next.
217 5. In the Locate the Required Files and Libraries window, next to the top panel for Oracle JDBC driver JAR files, click Add. Browse to the location of the external JDBC driver, select the driver JAR file, and then click Open.
218 The JDBC driver that the wizard needs to add to your project is the external JAR file that is provided with your database, which you can obtain from your database administrator or from the Web site for the database, then click Next.
219 6. In the Select the Processing Direction window, click Outbound, and then click Next.
220 7. In the Specify the Discovery Properties window, in the left pane, select your database vendor, driver, and version. 8. Enter the information for your database that is shown in the following table. The table lists the properties required for the sample and their descriptions. Property System ID Description The database name. System ID is used along with host name and port number to generate the Database URL that is used to connect to the database. Host name The host name or IP address of the database server. Host name is used along with database name and port number to generate the Database URL that is used to connect to the database.

221 Port number JDBC driver class name User name Password The port number along with the database name and host name generates the Database URL that is used to connect to the database. The class name of the JDBC driver that is used to connect to the database. The database account you are using. It is used during the discovery process. Later in the wizard, you can specify a different name and password to use at run time. The password for the account you are using. Table 47. Connection properties for the external service wizard Click Next. Results
222 The wizard uses the connection properties to connect to the database. Selecting business objects and services After setting connection properties, run a query to search for database objects. Browse the metadata tree of discovered objects to understand the structure of the objects in the Oracle database and select the objects that you want to include in the service description. About this task For this sample, you run a query on the accounts receivable (APPS) schema, and select the stored procedure that the business object represents. Procedure 1. Specify filter properties a. In the Find Objects in the Enterprise System window, click Edit Query. b. In the Specify the Query Properties window, type APPS in the Schema name pattern field to display the accounts receivable (APPS) schema. c. Select the check box Prompt for additional configuration settings when adding business object, and then click OK. Now, whenever you select one of the discovered objects for import, you are prompted to enter application-specific information for the object.
223 2. Run the metadata query a. Display objects discovered by the query Click Run Query. The APPS schema and data elements of the schema are displayed. b. Select the object for import Expand the APPS schema. Click Stored Procedures but do not expand the node because the retrieval takes longer time if the list is large. Use a filter to help you locate and select the stored procedure.
224 Click the Filter icon in the Discovered objects pane. In the Filter Properties for Stored Procedures window, in the Object name or pattern field, type GET_FLEXFIELD, and then click OK.

225 Note: The addition of the Catalog Filter property in the Filter Properties for Stored Procedure window allows the users to filter the returned Stored Procedures by Catalog (or Package) name. Previously, users were only able to filter by the stored procedure name by specifying the Object name or pattern filter. In this version, both filters have been performance-enhanced and will reduce the time taken to discover the stored procedures. Expand the Stored Procedures node. The adapter returns a list of stored procedures. Select GET_FLEXFIELD(FND_DFLEX) from the list of stored procedures. Click > (the Add icon).
226
227 Note: In the previous versions of WebSphere Adapter for Oracle E-Business Suite, the PL/SQL RECORD data type was not supported as the Oracle JDBC thin driver did not support some of the complex data types such as the Record data type. Now, WebSphere Adapter for Oracle E-Business Suite creates a Wrapper SP/SF which converts the RECORD data type to the OBJECT data type that is supported by the JDBC driver. Here, the parameter FLEXFIELD, FLEXINFO in the original Stored procedure GET_FLEXFIELD(FND_DFLEX) are both PL/SQL Record type. The WebSphere Adapter for Oracle E-Business Suite creates a Wrapper Stored procedure which contains the OBJECT type parameters FLEXFIELD_, FLEXINFO_ corresponding to the original PL/SQL Record type parameters. From the Specify the Configuration Properties for GET_FLEXFIELD(FND_DFLEX) window, click OK. The stored procedure is added to the Selected objects pane. Click Next.
228 Configuring the selected objects After selecting the database objects and adding their primary key, you can specify operations and other properties that apply to the selected business objects. Procedure 1. In the Configure Composite Properties window of the external service wizard, leave the default values for these fields: Maximum records for RetrieveAll operation Business object namespace Folder Generate a business graph for each business object 2. Click Next.
229 Setting deployment properties and generating the service Use the external service wizard to configure the properties the adapter uses to set up a communication channel to a specific database for outbound processing. Then create a business integration module where all of the artifacts and property values can be saved. Procedure 1. Set configuration property values a. Click Using security properties from the managed connection factory. Set the values of the required security properties as shown in the following table. The fields are initialized with the connection information you specified when you started the wizard. You can edit the existing values for User name, as required. You must type your Password.
230 Properties User name Password Values The database account you are using The password for the account you are using Table 48. Database system connection information b. In the Specify the Service Generation and Deployment Properties window, in the Deploy connector project field, ensure that the With module for use by single application option is selected. c. Uncheck Join global transaction. d. In the Deploy connector project field, ensure that this option is selected: Specify local database connection information. e. Click Advanced to see all of the properties under Connection properties, Database system connection information. For outbound processing, the property fields are displayed for the managed connection factory and resource adapter properties.

231 f. Click Next. 2. Create a module a. In the Specify the Location Properties window, click New next to the Module field.

232 b. In the Integration Project window, confirm that Create a module project is selected, and then click Next. c. In the Module window, type Oracle_API_With_Record, and then click Finish. d. In the Specify the Location Properties window, click Finish. Results This module will hold all of the generated artifacts. Saving the module You must save the business integration module for outbound processing that contains the artifacts and property values you created. Procedure 1. In the Business Integration view, click the Oracle_API_With_Record module. 2. Select File > Save. Note: If the option to Save is unavailable (gray), then the module has already been saved.
233 Deploying the module for testing To test the adapter application, you need to install the module for outbound processing in the IBM Integration Designer integration test client. Before you begin The module that contains an Oracle database import file is produced by running the external service wizard. Procedure 1. In IBM Integration Designer, click the Servers tab to open the Servers view. 2. If your server is not displayed in the Servers view, right-click the Servers view and select New -> Server. Select your IBM Process Server or WebSphere Enterprise Service Bus. Click Next, and then click Finish. 3. If your IBM Process Server or WebSphere Enterprise Service Bus is not running, right-click the name of the server, and then click Start. The Status entry changes to Started. 4. Right-click the name of your IBM Process Server or WebSphere Enterprise Service Bus, and select Add and remove projects. 5. From the Available Projects list on the left, select the Oracle_API_With_RecordApp module, and then click Add.
234 6. Click Finish. Testing the assembled adapter application Test the generated service to verify that it produces the expected results. Use the test client in IBM Integration Designer to set test values and run the service. Then in Oracle E-Business Suite, check to see that the service has run properly. Testing in the IBM Integration Designer test client Now that you have deployed your outbound processing module to the runtime environment, you can test the assembled application using the IBM Integration Designer integration test client. After testing in the test client, verify your results in Oracle E-Business Suite. Procedure 1. Select the module to test
235 In IBM Integration Designer, go to the Business Integration view of the Business Integration perspective. Right-click the Oracle_API_With_Record module, and select Test -> Test Module. 2. Leave the default value for verb. 3. Set the test values In the Oracle_API_ With_Record Test window, use the arrows to set the test values shown in the following table. Item Configuration Module Component Interface Operation Test value Default Module Test Oracle_API_With_Record OracleOutboundInterface OracleOutboundInterface executeappsfnd_dflexu46get_flexfieldbg Table 49. Test values Note: The test values for Component and Interface may include a number, for example, OracleOutboundInterface1. IBM Integration Designer appends numbers so that each name in the workspace is unique. 4. Set attribute values for the input business object: Important: To set a value for an attribute to <null>, right-click the value field for the attribute. Select Set to and scroll down to select <null>. The following table lists the values for the Fnd_DflexU46get_Flexfield stored procedure attributes. Attribute appl_short_name flexfield_name Value ONT OE_HEADER_ATTRIBUTES Table 50. Attribute values for the input business object Note: Please notice there are two parameters called " flexfield_name" one is input and the other is output. Please input flexfield_name which is next to appl_short_name.


236 5. In the left pane below Events, click Continue. 6. In the Deployment Location window, select the name of your IBM Process Server or WebSphere Enterprise Service Bus and then click Finish. The Starting the Integration Client window is displayed briefly. What to do next Next, you can verify the results in Oracle E-Business Suite. Verifying the test results in Oracle E-Business Suite After running the test in the IBM Integration Designer integration test client, verify that the concurrent program has been created in Oracle E-Business Suite. Procedure

237 1. Log on to Oracle E-Business Suite and select the Receivables Manager responsibility. 2. Select the Setup : Financials : Flexfields : Descriptive: Register menu option. 3. From the Oracle Applications window, click View->Query By Example->Enter. 4. From the Descriptive Flexfields window, type Order Management in the Application field and OE_HEADER_ATTRIBUTES in the Name field. 5. From the Oracle Applications window, click View->Query By Example->Run.

238 The descriptive flexfield details are displayed. These details should match the returned object in the IBM Integration Designer test client. Clearing the sample content After testing and verifying your test results, clear the sample content to return the data to its original state in Oracle E-Business Suite. About this task You need to remove the executable program. You can locate it just as you did in the previous section when you verified the test results. Procedure
239 1. Log on to Oracle E-Business Suite and select the System Administration responsibility. 2. Select the Concurrent: Program menu option. 3. From the Concurrent Program window, type IBMSAMPLENAME in the Short Name field. 4. Run the query. 5. After the query has run, click Edit, and then click Delete. 6. Save your changes.
240 Chapter 10. Tutorial 8: Integration with Oracle XML Gateway via Web Services Oracle XML Gateway is a set of services that allows easy integration with the Oracle E-Business Suite to support XML messaging. This scenario illustrates how to integrate with Oracle XML Gateway via Web Services using WebSphere Adapter for Oracle E-Business Suite. About this task This scenario demonstrates how to set up connection between Oracle E-Business Suite and WebSphere Adapter for Oracle E-Business Suite, how to discover XML Gateway interface metadata information, and how to send outbound request to Oracle XML Gateway. Creating the project For creating and deploying a module to communicate with an Oracle E-Business Suite application, you need to start the external service wizard in IBM Integration Designer. The wizard creates an Adapter for Oracle E-Business Suite project, which is used to organize the files associated with the adapter. Procedure 1. Review the information in Configuring the module for deployment in the WebSphere Adapter for Oracle E-Business Suite User Guide. 2. Perform the task Creating the project in the WebSphere Adapter for Oracle E-Business Suite User Guide. Follow the steps in this section to set up the project in your workspace on IBM Integration Designer. Configuring the module for outbound processing
241 You must create the business objects necessary to process data into Oracle E-Business Suite. To accomplish this, use the external service wizard in IBM Integration Designer for WebSphere Adapter for Oracle E-Business Suite. First, you initialize the wizard by configuring values of the properties that enable the adapter to set up a communication channel to a specific Oracle E-Business Suite instance. Then, run a query to discover business objects of Oracle XML Gateway interface. Finally, you must specify other properties for the selected business objects. Setting connection properties for the external service wizard Set values of the connection properties for your Oracle E-Business Suite instance. These properties enable the external service wizard in the Adapter for Oracle E-Business Suite to connect to the Oracle E-Business Suite for discovering objects and for creating the service description. Before you begin This task is performed within the external service wizard, which you already started for the tasks under Creating the project. Procedure 1. Switch to the Business Integration Perspective in IBM Integration Designer by choosing from the menu: Window -> Open Perspective -> Business Integration.
242 2. Start the WebSphere Adapter for Oracle E-Business Suite External Service wizard by choosing: File-> New > External Service.
243 3. In the Available Types tree view, select Adapters -> Oracle E-Business Suite, and then click Next.
244 4. Select the CWYOE_OracleEBS in the IBM WebSphere Adapter for Oracle E-Business Suite (IBM: ) node, and then click Next.
245 5. In the Locate the Required Files and Libraries window, next to the top panel for Oracle JDBC driver JAR files, click Add. Browse to the location of the external JDBC driver, select the driver JAR file, and click Open.
246 The Oracle JDBC driver that the wizard needs to add to your project is the external JAR file that is provided with your database, which you can obtain from your database administrator or from the Web site for the database. Click Next.
247 6. In the Select the Processing Direction window, click Outbound, and then click Next.
248 7. In the Specify the Discovery Properties window, in the left pane, select interface type, transport, and version. Enter the information for your Oracle E-Business Suite instance that is shown in the following table. The table lists the properties required for the sample and their descriptions. Property Host name Port number User name Description Fully qualified host name or IP address of the system where the Oracle E-Business Suite is installed. Port number to connect to the Oracle E-Business Suite service. The user name used to connect to the system.

249 Password The password used to connect to the system. Table 51. Connection properties for the external service wizard Results The wizard uses the connection properties to connect to Oracle E-Business Suite. Selecting business objects and services After setting connection properties, run a query to search for XML Gateway interfaces. Browse the metadata tree of discovered interfaces, understand the interface metadata information and select interfaces that you want to include in the service description. About this task

250 For this sample, you select to access Oracle seeded XML Gateway interface. Procedure 1. Specify the query properties a. In the Find Objects in the Enterprise System window, click Edit Query. b. Check Oracle seeded XML Gateway interface. c. Click OK. 2. Run the metadata query a. Click Run Query. b. Display XML Gateway interfaces discovered by the query. c. Expand XML Gateway -> Order Management(ont), select interface INBOUND: Process Purchase Order XML Transaction(ONT_3A4R_OAG72_IN), and click > (the Add icon) to select this interface to be imported.
 window, specify the DTD information for the XML Gateway interface")
251 d. In the Specify the Configuration Properties for INBOUND: Process Purchase Order XML Transaction(ONT_3A4R_OAG72_IN) window, specify the DTD information for the XML Gateway interface payload. Click OK.

252 e. Click Next.

253 Configuring the selected objects After selecting the XML Gateway interface, you can specify other properties that apply to the selected interface. Procedure 1. Leave the default values for these fields: Folder Generate a business graph for each business object 2. Click Next.

254 What to do next? Next, you will specify deployment information to use at run time and information for saving the service as a module. Setting deployment properties and generating the service Use the external service wizard to configure the properties the adapter uses to set up a communication channel to a specific Oracle E-Business Suite instance for outbound processing. Then create a business integration module where all of the artifacts and property values can be saved. Procedure 1. Set configuration property values a. Clear the Using an existing JAAS alias (recommended) radio buttion. b. Check Using security properties from the managed connection factory. The fields are initialized with the connection information you specified when you started the wizard. You can edit the existing values for User name and Password as required.
255 Properties User name Password Values The user name used to connect to the system. The password used to connect to the system. Table 52. Oracle E-Business Suite system connection information c. Clear Join the global transaction check box. d. Click Advanced to see all the other properties. e. Click Next.

256 2. Create a module a. In the Specify the Location Properties window, click New to the Module field.

257 b. In the Select a Business Integration Project Type window, select Module and click Next. c. In the Create a Module window, type XgwWSIntegration, and click Finish. d. In the Specify the Location Properties window, click Finish. Results This module will hold all the generated artifacts. Saving the module You must save the business integration module for outbound processing that contains the artifacts and property values you created. Procedure 1. In the Business Integration view, click the XgwWSIntegration module. 2. Select File > Save.
258 Note: If the option to Save is unavailable (gray), then the module has already been saved. Deploying the module for testing To test the adapter application, you need to install the module for outbound processing in the IBM Integration Designer integration test client. Before you begin The module that contains an Oracle E-Business Suite import file is produced by running the external service wizard. Procedure 1. In IBM Integration Designer, click the Servers tab to open the Servers view. 2. If your server is not displayed in the Servers view, right-click the Servers view and select New Server. Select your IBM Process Server or WebSphere Enterprise Service Bus. Click Next and click Finish. 3. If your IBM Process Server or WebSphere Enterprise Service Bus is not running, right-click the name of it and select Start. The Status changes to Started. 4. Right-click the name of your IBM Process Server or WebSphere Enterprise Service Bus, and select Add and remove projects. 5. From the Available project list on the left, select the XgwWSIntegration module, and click Add. Click Finish.

259 What to do next Next, you can test the assembled application in the integration test client. Testing the assembled adapter application After you have deployed your outbound processing application to IBM Process Server or WebSphere Enterprise Service Bus, test the assembled adapter application using the IBM Integration Designer integration test client. About this task You use this custom query to get the error code from interface tables. Procedure 1. Select the module to test

260 In IBM Integration Designer, go to the Business Integration view of the Business Integration perspective. Right-click the XgwWSIntegration module, and select Test > Test Modules. 2. Unset the verb. 3. In the left pane below Events, click Continue. From the Select a Deployment Location window, select the name of the server where your application will be deployed, and click Finish. 4. The results will be displayed as below.

 responsibility. c.")
261 The ResponseCode* 200 means the outbound request has been sent to Oracle XML Gateway successfully. 5. Import the outbound data a. Logon to the Oracle E-Business Suite administration console using the operations/welcome account. b. Select Order Management Super User, Vision Operations (USA) responsibility. c. Select Orders, Returns : Import Orders -> Order Import Request menu options. d. Fill in the value fields and Click OK. e. In the Order Import Request window, click Submit.


262 f. Select Order, Returns -> Quick Order Organizer menu option. g. In the Find Orders/Quotes window, fill in the value fields and Click Find. h. In the Order Organizer window, Click Open. i. The Order data sent out from test client has become system data in Oracle E-Business Suite Order system.

263 Clearing the sample content After you have tested the application, clear the sample content to return the data to its original state. You must deactivate the order data created in Oracle E-Business Suite. Procedure 1. Find out the created order in Oracle E-Business Suite, and select Cancel action.
264
265 Chapter 11. Tutorial 9: Integration with Oracle though Advanced Queue Oracle advanced queue is a service that allows easy integration with the Oracle E-Business Suite. This scenario illustrates how to integrate with Oracle through advanced queue using WebSphere Adapter for Oracle E-Business Suite. About this task This scenario demonstrates how to set up connection between Oracle E-Business Suite and WebSphere Adapter for Oracle E-Business Suite, how to discover advanced queue interface metadata information, and how to send outbound request to Oracle E-Business Suite. Creating the project For creating and deploying a module to communicate with an Oracle E-Business Suite application, you need to start the external service wizard in IBM Integration Designer. The wizard creates an Adapter for Oracle E-Business Suite project, which is used to organize the files associated with the adapter. Procedure 1. Review the information in Configuring the module for deployment in the WebSphere Adapter for Oracle E-Business Suite User Guide. 2. Perform the task Creating the project in the WebSphere Adapter for Oracle E-Business Suite User Guide. Follow the steps in this section to set up the project in your workspace on IBM Integration Designer. Configuring the module for outbound processing
266 You must create the business objects necessary to process the data into Oracle E-Business Suite. To accomplish this, use the external service wizard in IBM Integration Designer for WebSphere Adapter for Oracle E-Business Suite. First, you initialize the wizard by configuring values for the properties that enable the adapter to set up a communication channel to a specific Oracle E-Business Suite instance. Then, run a query to discover business objects of Oracle XML Gateway interface. Finally, you must specify other properties for the selected business objects. Setting connection properties for the external service wizard Set values of the connection properties for your Oracle E-Business Suite instance. These properties enable the external service wizard in WebSphere Adapter for Oracle E-Business Suite to connect to the Oracle E-Business Suite for discovering objects and for creating the service description. Before you begin This task is performed within the external service wizard, which started for the tasks under Creating the project. Procedure 1. Switch to the Business Integration Perspective in IBM Integration Designer by choosing from the menu: Window -> Open Perspective -> Business Integration.

267 2. Start the WebSphere Adapter for Oracle E-Business Suite External Service wizard by choosing: File-> New > External Service.

268 3. In the Available Types tree view, select Adapters -> Oracle E-Business Suite, and then click Next.

269 4. Select the CWYOE_OracleEBS in the IBM WebSphere Adapter for Oracle E-Business Suite (IBM: ) node, and then click Next.

270 5. In the Locate the Required Files and Libraries window, next to the top panel for Oracle JDBC driver JAR files, click Add. Browse to the location of the external JDBC driver, select the driver JAR file, and click Open.

271 The Oracle JDBC driver that the wizard needs to add to your project is the external JAR file that is provided with your database, which you can obtain from your database administrator or from the Web site for the database. Click Next.

272 6. In the Select the Processing Direction window, click Outbound, and then click Next.
273 7. In the Specify the Discovery Properties window, in the left pane, select interface type, transport, and version. Enter the information for your Oracle E-Business Suite instance that is shown in the following table. Property System ID Description The database name. System ID is used along with host name and port number to generate the Database URL that is used to connect to the database. Host name The host name or IP address of the database server. Host name is used along with the database name and port number to generate the Database URL that is used to connect to the database.

274 Port number JDBC driver class name The port number along with the database name and host name generates the Database URL that is used to connect to the database. The class name of the JDBC driver that is used to connect to the database. User name Password The database account you are using. It is used during the discovery process. Later in the wizard, you can specify a different The password for the account you are using. Table 53. Connection properties for the external service wizard Results

275 The wizard uses the connection properties to connect to Oracle E-Business Suite. Selecting business objects and services After setting connection properties, run a query to search for advanced queue interfaces. Browse the metadata tree of discovered interfaces, understand the interface metadata information and select interfaces that you want to include in the service description. About this task For this sample, you select to access Oracle seeded Advanced queue interface. Procedure 1. Specify the query properties a. In the Find Objects in the Enterprise System window, click Edit Query. b. In the Schema name or pattern field, input APPLSYS. c. Click OK. 2. Run the metadata query a. Click Run Query. b. Display advanced queue interfaces discovered by the query. c. Expand APPLSYS -> SINGLE -> OBJECT, select interface ECX_INBOUND, and click > (the Add icon) to select this interface to be imported.

276 d. In the Specify the Configuration Properties for ECX_INBOUND window, specify some default header properties for advanced queue. Click OK.

277 e. Click Next.
278 Configuring the selected objects After selecting the Advanced Queue interface, you can specify other properties for the selected interface. Procedure 1. Leave the default values for these fields: Folder Generate a business graph for each business object 2. Click Next.

279 What to do next? Next, you will specify deployment information to use at run time and information for saving the service as a module. Setting deployment properties and generating the service Use the external service wizard to configure the properties the adapter uses to set up a communication channel to a specific Oracle E-Business Suite instance for outbound processing. Then create a business integration module where all of the artifacts and property values can be saved. Procedure 1. Set configuration property values a. Clear the Using an existing JAAS alias (recommended) radio button.
280 b. Check Using security properties from the managed connection factory. The fields are initialized with the connection information you specified when you started the wizard. You can edit the existing values for User name and Password as required. Properties User name Password Values The user name used to connect to the system. The password used to connect to the system. Table 54. Oracle E-Business Suite system connection information c. Clear Join the global transaction check box. d. Click Advanced button, check Set Auto Commit on database connection under Additional connection configuration. e. Click Next.
281 2. Create a module a. In the Specify the Location Properties window, click New to the Module field.

282 b. In the Select a Business Integration Project Type window, select Module and click Next. c. In the Create a Module window, type Oracle_Outbound_AQ, and click Finish. d. In the Specify the Location Properties window, click Finish. Results The module is created and artifacts are generated. Saving the module You must save the business integration module for outbound processing that contains the artifacts and property values you created. Procedure 1. In the Business Integration view, click the Oracle_Outbound_AQ module. 2. Select File > Save. Note: If the Save option is unavailable (gray), then the module has already been saved.
283 Deploying the module for testing To test the adapter application, you need to install the module for outbound processing in the IBM Integration Designer integration test client. Before you begin The module that contains an Oracle E-Business Suite import file is produced by running the external service wizard. Procedure 1. In IBM Integration Designer, click the Servers tab to open the Servers view. 2. If your server is not displayed in the Servers view, right-click the Servers view and select New Server. Select your IBM Process Server or WebSphere Enterprise Service Bus. Click Next and click Finish. 3. If your IBM Process Server or WebSphere Enterprise Service Bus is not running, right-click the name of it and select Start. The Status changes to Started. 4. Right-click the name of your IBM Process Server or WebSphere Enterprise Service Bus, and select Add and remove projects. 5. From the Available project list on the left, select the Oracle_Outbound_AQ module, and click Add. Click Finish.

284 What to do next Next, you can test the assembled application in the integration test client. Testing the assembled adapter application After you have deployed your outbound processing application to IBM Process Server or WebSphere Enterprise Service Bus, test the assembled adapter application using the IBM Integration Designer integration test client. About this task You use this custom query to get the error code from interface tables. Procedure 1. Select the module to test

285 In IBM Integration Designer, go to the Business Integration view of the Business Integration perspective. Right-click the XgwWSIntegration module, and select Test > Test Modules. 2. Unset the verb. 3. In the left pane below Events, click Continue. From the Select a Deployment Location window, select the name of the server where your application will be deployed, and click Finish. 4. The results will be displayed as below.
 responsibility. c. Select Orders, Returns : Import Orders -> Order Import Request menu options. d. Fill in the value fields and Click OK.")
286 The returnmessageid is the message id in Oracle Advanced Queue. 5. Import the outbound data a. Logon to the Oracle E-Business Suite administration console using the operations/welcome account. b. Select Order Management Super User, Vision Operations (USA) responsibility. c. Select Orders, Returns : Import Orders -> Order Import Request menu options. d. Fill in the value fields and Click OK.


287 e. In the Order Import Request window, click Submit. f. Select Order, Returns -> Quick Order Organizer menu option. g. In the Find Orders/Quotes window, fill in the value fields and Click Find.


288 h. In the Order Organizer window, Click Open. i. The Order data sent out from test client will be the system data in Oracle E-Business Suite Order system. Clearing the sample content After you have tested the application, clear the sample content to return the data to its original state. You must deactivate the order data created in Oracle E-Business Suite.
IBM WebSphere Adapter for Oracle E-Business Suite Quick Start Tutorials
 IBM WebSphere Adapter for Oracle E-Business Suite 7.0.0.0 Quick Start Tutorials Note: Before using this information and the product it supports, read the information in the "Notices" section, at the end
IBM WebSphere Adapter for Oracle E-Business Suite Quick Start Tutorials
 IBM WebSphere Adapter for Oracle E-Business Suite 6.2.0.0 Quick Start Tutorials Note: Before using this information and the product it supports, read the information in "Notices" on page 196. This edition
Oracle EBS Adapter Sample Outbound processing
 Oracle EBS Adapter Sample Outbound processing This edition applies to version 6, release 1, modification 0 of IBM WebSphere Adapter for Oracle E-Business Suite on WebSphere Application Server (product
IBM WebSphere. IBM WebSphere Adapter for PeopleSoft Enterprise Quick Start Scenarios
 IBM WebSphere Adapter for PeopleSoft Enterprise 7.5.0.0 Quick Start Scenarios Note: Before using this information and the product it supports, read the information in the Notices section, at the end of
Configuring the module for advanced queue integration
 Configuring the module for advanced queue integration To configure a module to use the adapter for outbound or inbound processing, use the external service wizard in IBM Integration Designer to create
IBM WebSphere Sample Adapter for Enterprise Information System Simulator Deployment and Testing on WPS 7.0. Quick Start Scenarios
 IBM WebSphere Sample Adapter for Enterprise Information System Simulator 7.0.0.0 Deployment and Testing on WPS 7.0 Quick Start Scenarios Note: Before using this information and the product it supports,
IBM Operational Decision Manager Version 8 Release 5. Configuring Operational Decision Manager on WebLogic
 IBM Operational Decision Manager Version 8 Release 5 Configuring Operational Decision Manager on WebLogic Note Before using this information and the product it supports, read the information in Notices
Real Application Security Administration
 Oracle Database Real Application Security Administration Console (RASADM) User s Guide 12c Release 2 (12.2) E85615-01 June 2017 Real Application Security Administration Oracle Database Real Application
Teiid Designer User Guide 7.5.0
 Teiid Designer User Guide 1 7.5.0 1. Introduction... 1 1.1. What is Teiid Designer?... 1 1.2. Why Use Teiid Designer?... 2 1.3. Metadata Overview... 2 1.3.1. What is Metadata... 2 1.3.2. Editing Metadata
Deploying a System Center 2012 R2 Configuration Manager Hierarchy
 Deploying a System Center 2012 R2 Configuration Manager Hierarchy This document is for informational purposes only. MICROSOFT MAKES NO WARRANTIES, EXPRESS, IMPLIED, OR STATUTORY, AS TO THE INFORMATION
BW C SILWOOD TECHNOLOGY LTD. Safyr Metadata Discovery Software. Safyr User Guide
 BW C SILWOOD TECHNOLOGY LTD Safyr Metadata Discovery Software Safyr User Guide S I L W O O D T E C H N O L O G Y L I M I T E D Safyr User Guide Safyr 7.1 This product is subject to the license agreement
Exposing CICS Transactions to WLE
 Exposing CICS Transactions to WLE Lab Exercise Author: David J Brett, Version 1.0 IBM BPM 7.5 Lab Number 1 Copyright IBM Corporation, 2011 US Government Users Restricted Rights - Use, duplication or disclosure
Getting Started Tutorial - Eclipse Edition. Sybase Unwired Platform 1.2
 Getting Started Tutorial - Eclipse Edition Sybase Unwired Platform 1.2 DOCUMENT ID: DC01017-01-0120-01 LAST REVISED: March, 2009 Copyright 2009 by Sybase, Inc. All rights reserved. This publication pertains
IBM Atlas Policy Distribution Administrators Guide: IER Connector. for IBM Atlas Suite v6
 IBM Atlas Policy Distribution Administrators Guide: IER Connector for IBM Atlas Suite v6 IBM Atlas Policy Distribution: IER Connector This edition applies to version 6.0 of IBM Atlas Suite (product numbers
Oracle Database. Installation and Configuration of Real Application Security Administration (RASADM) Prerequisites
 Prerequisites") Oracle Database Real Application Security Administration 12c Release 1 (12.1) E61899-04 May 2015 Oracle Database Real Application Security Administration (RASADM) lets you create Real Application Security
Oracle Database Real Application Security Administration 12c Release 1 (12.1) E61899-04 May 2015 Oracle Database Real Application Security Administration (RASADM) lets you create Real Application Security
Siebel Connector for Oracle Applications. Version 8.0 December 2006
 Connector for Applications Version 8.0 December 2006 Copyright 2005, 2006,. All rights reserved. The Programs (which include both the software and documentation) contain proprietary information; they are
ECM-VNA Convergence Connector
 ECM-VNA Convergence Connector Installation and Setup Guide Version: 1.0.x Written by: Product Knowledge, R&D Date: September 2016 2016 Lexmark. All rights reserved. Lexmark is a trademark of Lexmark International
Oracle SQL. murach s. and PL/SQL TRAINING & REFERENCE. (Chapter 2)
") TRAINING & REFERENCE murach s Oracle SQL and PL/SQL (Chapter 2) works with all versions through 11g Thanks for reviewing this chapter from Murach s Oracle SQL and PL/SQL. To see the expanded table of contents
TRAINING & REFERENCE murach s Oracle SQL and PL/SQL (Chapter 2) works with all versions through 11g Thanks for reviewing this chapter from Murach s Oracle SQL and PL/SQL. To see the expanded table of contents
IBM. Administration Guide. IBM Emptoris Contract Management SaaS
 IBM Emptoris Contract Management IBM Administration Guide 10.1.2 SaaS IBM Emptoris Contract Management IBM Administration Guide 10.1.2 SaaS ii IBM Emptoris Contract Management: Administration Guide Copyright
Integrate a sales order validation process between SAP and Siebel using WebSphere Process Server and WebSphere Adapters
 Integrate a sales order validation process between SAP and Siebel using WebSphere Process Server and WebSphere Adapters Qian Li Jin jinql@cn.ibm.com Staff Software Engineer IBM June, 2007 Copyright International
Composer Guide for JavaScript Development
 IBM Initiate Master Data Service Version 10 Release 0 Composer Guide for JavaScript Development GI13-2630-00 IBM Initiate Master Data Service Version 10 Release 0 Composer Guide for JavaScript Development
IBM Control Desk 7.5.3
 IBM IBM Control Desk 7.5.3 Integrating with IBM Endpoint Manager for Software Deployment Version 1.0 1 Copyright International Business Machines Corporation 2014. US Government Users Restricted Rights
Using ILOG JRules in WebSphere Integration Developer
 Using ILOG JRules in WebSphere Integration Developer Table of Contents Introduction... 3 Goal... 3 Time to Complete... 3 Prerequisites... 3 System Setup... 3 Resources... 3 Overview... 4 The Application...
Database Explorer Quickstart
 Database Explorer Quickstart Last Revision: Outline 1. Preface 2. Requirements 3. Introduction 4. Creating a Database Connection 1. Configuring a JDBC Driver 2. Creating a Connection Profile 3. Opening
Information Design Tool User Guide SAP BusinessObjects Business Intelligence platform 4.0 Support Package 4
 Information Design Tool User Guide SAP BusinessObjects Business Intelligence platform 4.0 Support Package 4 Copyright 2012 SAP AG. All rights reserved.sap, R/3, SAP NetWeaver, Duet, PartnerEdge, ByDesign,
IBM FileNet Business Process Framework Version 4.1. Explorer Handbook GC
 IBM FileNet Business Process Framework Version 4.1 Explorer Handbook GC31-5515-06 IBM FileNet Business Process Framework Version 4.1 Explorer Handbook GC31-5515-06 Note Before using this information and
SAS Enterprise Case Management 2.1. Administrator s Guide
 SAS Enterprise Case Management 2.1 Administrator s Guide The correct bibliographic citation for this manual is as follows: SAS Institute, Inc. 2010. SAS Enterprise Case Management 2.1: Administrator's
Business Processes and Rules: Siebel Enterprise Application Integration. Siebel Innovation Pack 2013 Version 8.1/8.
 Business Processes and Rules: Siebel Enterprise Application Integration Siebel Innovation Pack 2013 September 2013 Copyright 2005, 2013 Oracle and/or its affiliates. All rights reserved. This software
Database to XML Wizard
 Database to XML Wizard Jitterbit Connect TM provides a fast, easy route to data transformation. This is made possible through a wizard-based integration tool built directly into Jitterbit. The wizard executes
SAS Model Manager 2.3
 SAS Model Manager 2.3 Administrator's Guide SAS Documentation The correct bibliographic citation for this manual is as follows: SAS Institute Inc. 2010. SAS Model Manager 2.3: Administrator's Guide. Cary,
Tutorial 6 : Receiving Siebel Integration Object through the Oracle AS Adapter
 Reference: 2005/04/26 Adapter Tutorial Tutorial 6 : Receiving Siebel Integration Object through the Oracle AS Adapter The Oracle AS Adapter for Siebel exposes the Siebel events - Integration Objects as
Oracle Warehouse Builder 10g Runtime Environment, an Update. An Oracle White Paper February 2004
 Oracle Warehouse Builder 10g Runtime Environment, an Update An Oracle White Paper February 2004 Runtime Environment, an Update Executive Overview... 3 Introduction... 3 Runtime in warehouse builder 9.0.3...
IBM Proventia Management SiteProtector Policies and Responses Configuration Guide
 IBM Internet Security Systems IBM Proventia Management SiteProtector Policies and Responses Configuration Guide Version2.0,ServicePack8.1 Note Before using this information and the product it supports,
Version 1.0 Last updated: August 11, 2017 Author: Albert Wang & Mike Hull
 IIS Configuration Guidelines for running: Sterling Gentran:Server HTTP Gateway Sterling Gentran:Server HTTP Message Forwarder on Microsoft Windows Server 2012 Version 1.0 Last updated: August 11, 2017
Using SQL Developer. Oracle University and Egabi Solutions use only
 Using SQL Developer Objectives After completing this appendix, you should be able to do the following: List the key features of Oracle SQL Developer Identify menu items of Oracle SQL Developer Create a
3 Connecting to Applications
 3 Connecting to Applications 3 Connecting to Applications...1 3.1 Prerequisites...1 3.2 Introduction...1 3.2.1 Pega, the Widget Supplier...2 3.2.2 Mega, the Widget Procurer...2 3.3 Create Requisition...3
Oracle Java CAPS Database Binding Component User's Guide
 Oracle Java CAPS Database Binding Component User's Guide Part No: 821 2620 March 2011 Copyright 2009, 2011, Oracle and/or its affiliates. All rights reserved. License Restrictions Warranty/Consequential
Oracle Database Express Edition
 Oracle Database Express Edition Getting Started Guide 11g Release 2 (11.2) E18585-04 July 2011 Welcome to Oracle Database Express Edition (Oracle Database XE). This guide gets you quickly up and running
SILWOOD TECHNOLOGY LTD. Safyr Metadata Discovery Software. Safyr Getting Started Guide
 SILWOOD TECHNOLOGY LTD Safyr Metadata Discovery Software Safyr Getting Started Guide S I L W O O D T E C H N O L O G Y L I M I T E D Safyr Getting Started Guide Safyr 7.1 This product is subject to the
SAS Model Manager 2.2. Tutorials
 SAS Model Manager 2.2 Tutorials The correct bibliographic citation for this manual is as follows: SAS Institute Inc. 2009. SAS Model Manager 2.2: Tutorials. Cary, NC: SAS Institute Inc. SAS Model Manager
Version 11 Release 0 May 31, IBM Interact - GDPR IBM
 Version 11 Release 0 May 31, 2018 IBM Interact - GDPR IBM This edition applies to version 11.0 of IBM Interact and to all subsequent releases and modifications until otherwise indicated in new editions.
ForeScout Open Integration Module: Data Exchange Plugin
 ForeScout Open Integration Module: Data Exchange Plugin Version 3.2.0 Table of Contents About the Data Exchange Plugin... 4 Requirements... 4 CounterACT Software Requirements... 4 Connectivity Requirements...
Siebel CRM Integration to Oracle FLEXCUBE Universal Banking Implementation Guide. Version 1.0 (Siebel CRM Version 8.2), Rev.
, Rev.") CRM Integration to Universal Banking Implementation Guide Version 1.0 ( CRM Version 8.2), Rev. A December 2011 Copyright 2005, 2011 and/or its affiliates. All rights reserved. This software and related
CRM Integration to Universal Banking Implementation Guide Version 1.0 ( CRM Version 8.2), Rev. A December 2011 Copyright 2005, 2011 and/or its affiliates. All rights reserved. This software and related
Publishing and Subscribing to Cloud Applications with Data Integration Hub
 Publishing and Subscribing to Cloud Applications with Data Integration Hub 1993-2015 Informatica LLC. No part of this document may be reproduced or transmitted in any form, by any means (electronic, photocopying,
IBM emessage Version 9 Release 1 February 13, User's Guide
 IBM emessage Version 9 Release 1 February 13, 2015 User's Guide Note Before using this information and the product it supports, read the information in Notices on page 471. This edition applies to version
IBM Optim. Edit User Manual. Version7Release3
 IBM Optim Edit User Manual Version7Release3 IBM Optim Edit User Manual Version7Release3 Note Before using this information and the product it supports, read the information in Notices on page 79. Version
Integration Developer Version 7.0 Version 7.0. Installation Guide
 Integration Developer Version 7.0 Version 7.0 Installation Guide Note Before using this information and the product it supports, be sure to read the general information under Notices on page 67. This edition
Persistence Designer User s Guide. Version 3.4
 Persistence Designer User s Guide Version 3.4 PERSISTENCE DESIGNER... 4 ADDING PERSISTENCE SUPPORT... 5 PERSIST AS COLUMNS OF A TABLE... 6 PERSIST ENTIRE MESSAGE AS XML... 7 DATABASE TABLE DESIGN... 8
Receiving PeopleSoft Message (PeopleTools 8.17) through the Oracle AS PeopleSoft Adapter. An Oracle White Paper September 2008
 through the Oracle AS PeopleSoft Adapter. An Oracle White Paper September 2008") Receiving PeopleSoft Message (PeopleTools 8.17) through the Oracle AS PeopleSoft Adapter An Oracle White Paper September 2008 Receiving PeopleSoft Message (PeopleTools 8.17) through the Oracle AS PeopleSoft
Receiving PeopleSoft Message (PeopleTools 8.17) through the Oracle AS PeopleSoft Adapter An Oracle White Paper September 2008 Receiving PeopleSoft Message (PeopleTools 8.17) through the Oracle AS PeopleSoft
Including Dynamic Images in Your Report
 Including Dynamic Images in Your Report Purpose This tutorial shows you how to include dynamic images in your report. Time to Complete Approximately 15 minutes Topics This tutorial covers the following
Lookout Mobile Endpoint Security. Deploying Lookout with BlackBerry Unified Endpoint Management
 Lookout Mobile Endpoint Security Deploying Lookout with BlackBerry Unified Endpoint Management June 2018 2 Copyright and disclaimer Copyright 2018, Lookout, Inc. and/or its affiliates. All rights reserved.
Manually Defining Constraints in Enterprise Data Manager
 Manually Defining Constraints in Enterprise Data Manager 2014 Informatica Corporation. No part of this document may be reproduced or transmitted in any form, by any means (electronic, photocopying, recording
Setting Up Resources in VMware Identity Manager. VMware Identity Manager 2.8
 Setting Up Resources in VMware Identity Manager VMware Identity Manager 2.8 You can find the most up-to-date technical documentation on the VMware website at: https://docs.vmware.com/ If you have comments
Contents Overview... 5 Downloading Primavera Gateway... 5 Primavera Gateway On-Premises Installation Prerequisites... 6
 Gateway Installation and Configuration Guide for On-Premises Version 17 September 2017 Contents Overview... 5 Downloading Primavera Gateway... 5 Primavera Gateway On-Premises Installation Prerequisites...
IBM Database Conversion Workbench 3.5
 3.5 Oracle to IBM dashdb Conversion Guide Version: 3.5 Last Updated: June 12th, 2015 Table of Contents 1. Introduction... 4 2. Prerequisites... 5 3. Overview of the Conversion Process... 6 4. Set Up Your
Policy Manager for IBM WebSphere DataPower 7.2: Configuration Guide
 Policy Manager for IBM WebSphere DataPower 7.2: Configuration Guide Policy Manager for IBM WebSphere DataPower Configuration Guide SOAPMDP_Config_7.2.0 Copyright Copyright 2015 SOA Software, Inc. All rights
Contents. Add a Form Element to a Group Box Add a Field to a Form... 22
 Workflow Design Guide Version 17 November 2017 Contents About This Guide... 7 Workflows and Forms Overview... 7 Security Permissions for Workflows and Forms... 8 Search for a Workflow Design, Workflow
Using the JSON Iterator
 Using the JSON Iterator This topic describes how to process a JSON document, which contains multiple records. A JSON document will be split into sub-documents using the JSON Iterator, and then each sub-document
IBM DB2 Query Patroller. Administration Guide. Version 7 SC
 IBM DB2 Query Patroller Administration Guide Version 7 SC09-2958-00 IBM DB2 Query Patroller Administration Guide Version 7 SC09-2958-00 Before using this information and the product it supports, be sure
Security Tips in Oracle Reports Services Release 6i with Oracle Portal Release 3.0. An Oracle Technical White Paper October 2000
 Release 6i with Oracle Portal Release 3.0 An Oracle Technical White Paper INTRODUCTION Oracle Reports Services uses Oracle Portal to perform a security check that ensures that users have the necessary
IBM i2 Analyze ibase Connector Deployment Guide. Version 4 Release 1 IBM
 IBM i2 Analyze ibase Connector Deployment Guide Version 4 Release 1 IBM This edition applies to version 4, release 1, modification 4 of IBM i2 Analyze (product number 5725-G22) and to all subsequent releases
Oracle Banking Digital Experience
 Oracle Banking Digital Experience OFSLL Setup and uration Guide Release 18.2.0.0.0 Part No. E97823-01 June 2018 OFSLL Setup and uration Guide June 2018 Oracle Financial Services Software Limited Oracle
K2 Package and Deployment April SOURCECODE TECHNOLOGY HOLDINGS, INC. Page 1.
 K2 Package and Deployment 4.6.7 April 2014 2014 SOURCECODE TECHNOLOGY HOLDINGS, INC. Page 1. Overview K2 Package and Deployment Overview K2 Package and Deployment Installation and Upgrading Important Considerations
Configuring Oracle Java CAPS Master Index (Repository) Connectivity and Environments
 Connectivity and Environments") Configuring Oracle Java CAPS Master Index (Repository) Connectivity and Environments Part No: 8 9 March 0 Copyright 008, 0, Oracle and/or its affiliates. All rights reserved. License Restrictions Warranty/Consequential
Configuring Oracle Java CAPS Master Index (Repository) Connectivity and Environments Part No: 8 9 March 0 Copyright 008, 0, Oracle and/or its affiliates. All rights reserved. License Restrictions Warranty/Consequential
IBM Operational Decision Manager Version 8 Release 5. Configuring Operational Decision Manager on Tomcat
 IBM Operational Decision Manager Version 8 Release 5 Configuring Operational Decision Manager on Tomcat Note Before using this information and the product it supports, read the information in Notices on
Oracle Financial Services Governance, Risk, and Compliance Workflow Manager User Guide. Release February 2016 E
 Oracle Financial Services Governance, Risk, and Compliance Workflow Manager User Guide Release 8.0.2.0.0 February 2016 E65393-01 Oracle Financial Services Governance, Risk, and Compliance Workflow Manager
B. Assets are shared-by-copy by default; convert the library into *.jar and configure it as a shared library on the server runtime.
 Volume A~B: 114 Questions Volume A 1. Which component type must an integration solution developer define for a non-sca component such as a Servlet that invokes a service component interface? A. Export
Setting Up Resources in VMware Identity Manager (On Premises) Modified on 30 AUG 2017 VMware AirWatch 9.1.1
 Modified on 30 AUG 2017 VMware AirWatch 9.1.1") Setting Up Resources in VMware Identity Manager (On Premises) Modified on 30 AUG 2017 VMware AirWatch 9.1.1 Setting Up Resources in VMware Identity Manager (On Premises) You can find the most up-to-date
Setting Up Resources in VMware Identity Manager (On Premises) Modified on 30 AUG 2017 VMware AirWatch 9.1.1 Setting Up Resources in VMware Identity Manager (On Premises) You can find the most up-to-date
Version 2 Release 2. IBM i2 Enterprise Insight Analysis Upgrade Guide IBM SC
 Version 2 Release 2 IBM i2 Enterprise Insight Analysis Upgrade Guide IBM SC27-5091-00 Note Before using this information and the product it supports, read the information in Notices on page 35. This edition
BEA WebLogic. Adapter for RDBMS. User Guide
 BEA WebLogic Adapter for RDBMS User Guide Release 7.0 Document Date: October 2002 Copyright Copyright 2002 BEA Systems, Inc. All Rights Reserved. Copyright 2002 iway Software. All Rights Reserved. Restricted
Integration Framework. Architecture
 Integration Framework 2 Architecture Anyone involved in the implementation or day-to-day administration of the integration framework applications must be familiarized with the integration framework architecture.
Elixir Repertoire Designer
 Aggregation and Transformation Intelligence on Demand Activation and Integration Navigation and Visualization Presentation and Delivery Activation and Automation Elixir Repertoire Designer Tutorial Guide
SAS Contextual Analysis 14.3: Administrator s Guide
 SAS Contextual Analysis 14.3: Administrator s Guide SAS Documentation August 25, 2017 The correct bibliographic citation for this manual is as follows: SAS Institute Inc. 2017. SAS Contextual Analysis
Oracle BPEL Process Manager Demonstration
 January, 2007 1 Oracle BPEL Process Manager Demonstration How to create a time scheduler for a BPEL process using the Oracle Database Job scheduler by Dr. Constantine Steriadis (constantine.steriadis@oracle.com)
Building E-Business Suite Interfaces using BPEL. Asif Hussain Innowave Technology
 Building E-Business Suite Interfaces using BPEL Asif Hussain Innowave Technology Agenda About Innowave Why Use BPEL? Synchronous Vs Asynchronous BPEL Adapters Process Activities Building EBS Interfaces
SIEBELCRM-IFLEXUBS Installation Document Oracle FLEXCUBE Universal Banking Release [May] [2017]
![SIEBELCRM-IFLEXUBS Installation Document Oracle FLEXCUBE Universal Banking Release [May] [2017]](/thumbs/92/110662733.jpg "SIEBELCRM-IFLEXUBS Installation Document Oracle FLEXCUBE Universal Banking Release [May] [2017]") SIEBELCRM-IFLEXUBS Installation Document Oracle FLEXCUBE Universal Banking Release 12.4.0.0.0 [May] [2017] Contents 1. INTRODUCTION... 1-1 1.1 SCOPE OF THE DOCUMENT... 1-1 1.2 INTENDED AUDIENCE... 1-1
SIEBELCRM-IFLEXUBS Installation Document Oracle FLEXCUBE Universal Banking Release 12.4.0.0.0 [May] [2017] Contents 1. INTRODUCTION... 1-1 1.1 SCOPE OF THE DOCUMENT... 1-1 1.2 INTENDED AUDIENCE... 1-1
ForeScout CounterACT. Configuration Guide. Version 3.4
 ForeScout CounterACT Open Integration Module: Data Exchange Version 3.4 Table of Contents About the Data Exchange Module... 4 About Support for Dual Stack Environments... 4 Requirements... 4 CounterACT
THIS IS AN OBSOLETE COPYRIGHT PAGE. Use Common/Copyright/Copyright
 Unica Marketing Operations and Unica Campaign Version 8.2.0 Integration Guide Publication Date: September 20, 2010 Copyright THIS IS AN OBSOLETE COPYRIGHT PAGE. Use Common/Copyright/Copyright Table of
Release Notes for Cisco Service Portal for Release 9.4
 Release Notes for for Release 9.4 First Published: July 27, 2012 Contents New and Changed Information, page 1 Installation Notes, page 5 Limitations and Restrictions, page 5 Important Notes, page 6 Documentation
Version 2 Release 1. IBM i2 Enterprise Insight Analysis Maintaining a deployment IBM
 Version 2 Release 1 IBM i2 Enterprise Insight Analysis Maintaining a deployment IBM Note Before using this information and the product it supports, read the information in Notices on page 13. This edition
IBM Operational Decision Manager Version 8 Release 5. Tutorial: Getting started with the Decision Center Enterprise console
 IBM Operational Decision Manager Version 8 Release 5 Tutorial: Getting started with the Decision Center Enterprise console Note Before using this information and the product it supports, read the information
Evaluation Guide - WebSphere Integration
 Evaluation Guide - WebSphere Integration Copyright 1994-2005 Embarcadero Technologies, Inc. Embarcadero Technologies, Inc. 100 California Street, 12th Floor San Francisco, CA 94111 U.S.A. All rights reserved.
EnterpriseTrack Reporting Data Model Configuration Guide Version 17
 EnterpriseTrack EnterpriseTrack Reporting Data Model Configuration Guide Version 17 October 2018 Contents About This Guide... 5 Configuring EnterpriseTrack for Reporting... 7 Enabling the Reporting Data
Create a personal geodatabase
 Create a personal geodatabase To create a personal geodatabase that corresponds to the same release as the ArcGIS for Desktop client you are using, follow these steps: 1. In ArcCatalog, right-click the
Managing Your Database Using Oracle SQL Developer
 Page 1 of 54 Managing Your Database Using Oracle SQL Developer Purpose This tutorial introduces Oracle SQL Developer and shows you how to manage your database objects. Time to Complete Approximately 50
WebSphere. Clips and Tacks: Getting started with the IBM BPM suite of products
 WebSphere Clips and Tacks: Getting started with the IBM BPM suite of products ii IBM WebSphere Clips and Tacks: Getting started with the IBM BPM suite of products Contents Chapter 1. Introduction........
Oracle Banking Platform Collections
 Oracle Banking Platform Collections Infrastructure Setup Guide Release 2.3.0.0.0 E56276-01 July 2014 Oracle Banking Platform Collections Infrastructure Setup Guide, Release 2.3.0.0.0 E56276-01 Copyright
Incident Response Platform. IBM BIGFIX INTEGRATION GUIDE v1.0
 Incident Response Platform IBM BIGFIX INTEGRATION GUIDE v1.0 Licensed Materials Property of IBM Copyright IBM Corp. 2010, 2017. All Rights Reserved. US Government Users Restricted Rights: Use, duplication
User's Guide c-treeace SQL Explorer
 User's Guide c-treeace SQL Explorer Contents 1. c-treeace SQL Explorer... 4 1.1 Database Operations... 5 Add Existing Database... 6 Change Database... 7 Create User... 7 New Database... 8 Refresh... 8
IBM TRIRIGA Version Procurement Management User Guide
 IBM TRIRIGA Version 10.3 Procurement Management User Guide Note Before using this information and the product it supports, read the information in Notices on page 192. Second edition, June 2013. This edition
Incident Response Platform Integrations BigFix Function V1.1.0 Release Date: October 2018
 Incident Response Platform Integrations BigFix Function V1.1.0 Release Date: October 2018 Resilient Functions simplify development of integrations by wrapping each activity into an individual workflow
Extracting and Storing PDF Form Data Into a Repository
 Extracting and Storing PDF Form Data Into a Repository This use case describes how to extract required information from a PDF form document to populate database tables. For example, you may have users
EMC Documentum TaskSpace
 EMC Documentum TaskSpace Version 6 Sample Application Tutorial P/N 300-005-359 A01 EMC Corporation Corporate Headquarters: Hopkinton, MA 01748-9103 1-508-435-1000 www.emc.com Copyright 2007 EMC Corporation.
Microsoft Office Groove Server Groove Manager. Domain Administrator s Guide
 Microsoft Office Groove Server 2007 Groove Manager Domain Administrator s Guide Copyright Information in this document, including URL and other Internet Web site references, is subject to change without
Oracle Fusion Middleware
 Oracle Fusion Middleware Using Oracle Eloqua Cloud Adapter Release 12.2.1.1.0 E73562-01 June 2016 Oracle Fusion Middleware Using Oracle Eloqua Cloud Adapter, Release 12.2.1.1.0 E73562-01 Copyright 2015,
Oracle Cloud. Using Oracle Eloqua Adapter Release E
 Oracle Cloud Using Oracle Eloqua Adapter Release 12.1.3 E65434-01 August 2015 Oracle Cloud Using Oracle Eloqua Adapter, Release 12.1.3 E65434-01 Copyright 2015, Oracle and/or its affiliates. All rights
COGNOS (R) ENTERPRISE BI SERIES COGNOS REPORTNET (TM)
 ENTERPRISE BI SERIES COGNOS REPORTNET (TM)") COGNOS (R) ENTERPRISE BI SERIES COGNOS REPORTNET (TM) GETTING STARTED Cognos ReportNet Getting Started 07-05-2004 Cognos ReportNet 1.1MR1 Type the text for the HTML TOC entry Type the text for the HTML
COGNOS (R) ENTERPRISE BI SERIES COGNOS REPORTNET (TM) GETTING STARTED Cognos ReportNet Getting Started 07-05-2004 Cognos ReportNet 1.1MR1 Type the text for the HTML TOC entry Type the text for the HTML
Imagine. Create. Discover. User Manual. TopLine Results Corporation
 Imagine. Create. Discover. User Manual TopLine Results Corporation 2008-2009 Created: Tuesday, March 17, 2009 Table of Contents 1 Welcome 1 Features 2 2 Installation 4 System Requirements 5 Obtaining Installation
Embarcadero PowerSQL 1.1 Evaluation Guide. Published: July 14, 2008
 Embarcadero PowerSQL 1.1 Evaluation Guide Published: July 14, 2008 Contents INTRODUCTION TO POWERSQL... 3 Product Benefits... 3 Product Benefits... 3 Product Benefits... 3 ABOUT THIS EVALUATION GUIDE...
Installing MCA Services on WebSphere 5.1
 Installing MCA Services on WebSphere 5.1 Version 2004.5, Rev. A December 2004 Siebel Systems, Inc., 2207 Bridgepointe Parkway, San Mateo, CA 94404 Copyright 2005 Siebel Systems, Inc. All rights reserved.