The Crypt Keeper Cemetery Software v.8.0. Table of Contents
|
|
|
- Patrick Glenn
- 6 years ago
- Views:
Transcription
1 The Crypt Keeper Cemetery Software v.8.0 Table of Contents Defining Custom Data Fields pg 3 o The default database comes with many data fields for you to input your record. But occasionally you may have need for more data fields than we offer. Using this feature allows you to create as many additional data fields as you deem necessary. Configuring Cemeteries pg 6 o By default you re set up with a single cemetery for your organization. Some organizations maintain multiple cemeteries, and other organizations split their cemeteries into sub-cemeteries for ease of handling and mapping purposes. You can create additional cemeteries with this feature. Configuring Lot Types pg 9 o By default you re set up with a single lot type. You can add more lot types and assign various dimensions and pricing to these with this feature. Importing Existing Data pg 12 o You can certainly manually input all your data records, but if you ve already got your data in some kind of electronic format you may be able to take advantage of our import feature to get your data uploaded instead of retyping. Networking/Sharing Your Data pg 19 o By default the software installs the database into the My Documents folder of the user that installs the software. If you intend on sharing this software with multiple users you may want to consider changing the location of the data files so that other users (either on your computer or via your network) can access your data. Inputting New Data pg 22 o As data becomes available, you can use our data entry screen to input those records. Searching Existing Data pg 25 o Our powerful search engine will scan your complete database to find the records you are looking for. Editing Existing Data pg 29 o Need to change data or input additional data elements to existing information? A click of a button allows you to perform this task. Managing Purchaser Records pg 34 o As you input data you can choose from a listing of previously inputted purchasers. If you need to modify your purchaser records you would use this feature. Creating Cemetery Maps pg 36
2 o Using this feature you can design your cemetery maps to provide a visual representation of your cemetery. The map will then be automatically colorcoded as it links to your database. Viewing Cemetery Maps pg 44 o Using this feature you can display your map with full color coding. Clicking on graves in the map will tell you who is interred and you can then select a record from the map to be viewed in detail. Adding Images To Records pg 48 o You may add an unlimited number of images to your database, including multiple images per database record. Creating Deeds pg 53 o This is a simplistic feature that allows you to create deeds for your cemetery. Creating Invoices pg 61 o Create invoices and send statements with this feature. Running Reports pg 66 o There are several already built reports you can use at any time, and using our advanced reporting tool you can create your own reports. Performing Backups pg 73 o Regular backups are a must. You never know when your computer might crash. Save your data often with this feature, and then you can restore your data should the need arise.

3 Defining Custom Data Fields 1. Start the application and click on the Configuration & Preferences feature from the main application window 2. Click on the Data menu from the Configuration & Preferences window and then click on the Define Custom Fields menu

4 3. You may rename the Section, Lot and Grave field names if necessary, but there are some restrictions. You cannot move the existing names around, meaning you can t have ID1 = Lot and ID2 = Section, these are reserved words, so be careful what you name these fields. 4. There are five already available fields in the database that you may redefine as you like. These are text fields, so anything you input will be fine. These are located in the lower left corner of the custom fields box. 5. In the grid on the right portion of this window, you can create completely new data elements. These fields can be any one of four data types: Text any data you want, up to 255 characters per field Integer any non-decimal value Currency any amount Date a valid date, must contain month and day, and must be greater than 1/1/1753 So if I want to create a brand new custom field named "Spouse Name" I might do the following:

5 You should refrain from naming ANY of your custom fields using special characters. Please limit your custom field names to letters of the alphabet, numbers, and the space key only. 6. Once you ve inputted all your custom data field names, click on the SAVE button, but be aware that any new custom fields you define cannot be deleted once they are created. 7. If you need to reset the ID and Custom 1-5 fields to their original names, you can use the Reset to Defaults button to do this.

6 Configuring Cemeteries 1. Click on the Configuration & Preferences feature from the main application window 2. Click on the Data menu and choose Cemetery Manager


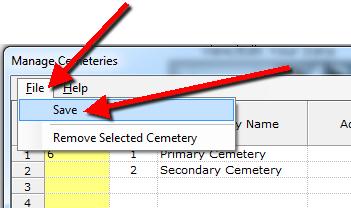
7 3. Input as many cemeteries as your organization needs, keeping in mind that you won t have separate databases, so all the records will be co-mingled, but you will then be able to create separate maps for each of the cemetery records here 4. Update the sort number to identify how you want your cemeteries displayed in various parts of the application 5. Do not leave blank rows between cemeteries, this will cause problems with the database 6. To remove any data in the grid, use the CTRL-X keys on your keyboard which will erase the contents of a cell 7. When you re all finished, either click File/Save or just close the window and it will ask if you want to save your work
8
9 Configuring Lot Types 1. Click on the Configuration & Preferences feature from the main application window 2. Click on the Data menu and choose Lot Type Manager


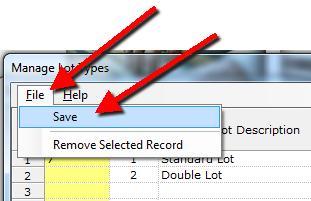
10 3. Input as many lot types as your organization needs 4. Provide a price if you intend to use this information for invoicing and billing purposes 5. Update the sort number to identify how you want your lot types displayed in various parts of the application 6. Do not leave blank rows between lot types, this will cause problems with the database 7. To remove any data in the grid, use the CTRL-X keys on your keyboard which will erase the contents of a cell 8. When you re all finished, either click File/Save or just close the window and it will ask if you want to save your work
11

12 Importing Existing Data 1. IMPORTANT!!! Before you do this, please be sure to assign all your custom data fields (if applicable) 2. Click on the Configuration & Preferences feature from the main application window 3. Click on the Data menu and choose Import Data from Tab-Delimited Text File

13 4. Your file must be a text file, with all data elements separated by a tab. The best way to do this is to save your data from Excel into a tab-delimited format. You should also have separate files for each cemetery and lot type, as the import process assigns all data in a single import file to just one cemetery and one lot type. Your data file should contain a single header row.


14 5. Choose your cemetery and lot type from the drop down boxes at the top of the window 6. Click on the button in the top right corner to select your import file 7. The application will attempt to automatically map the available data columns with the data in your import file, but likely you will need to choose the appropriate data mapping columns within the grid
15
16 8. Once you have all your data elements mapped, click on the button in the bottom right corner of the window to begin the import process


17 9. You will be asked if you want to completely wipe out all the existing data in your database before the new file is imported.

18 a. If you answer YES, all data is wiped out and only the data from your import file will exist b. If you answer NO, all data is left intact and your new data file is appended to your existing data The program will then need to close and you will need to re-open.
19 Networking/Sharing Your Data 1. IMPORTANT!!! Before you do this, please perform a data backup (see those instructions in another section of this document) 2. Click on the Configuration & Preferences feature from the main application window 3. Click on the Data menu and choose Set Data Folder


20 4. By default, your database is stored in the My Documents folder of the user that installs the software. This, of course, is no good if another user logs into your computer under a different name, or tries to access your data from another computer on your network. So you would typically have your network administrator assign you a shared network folder so you can store your Crypt Keeper data there for shared access. 5. Once you know the shared folder name, input that into the text box in the Set Data Folder window and then click on the button in the lower right corner to Locate New Data Folder
21 6. You will have to ensure that the software is installed on every computer that intends to access the data, and all the computers will have to set this same data folder to share the data

22 Inputting Data 1. From the main application window, click on the feature to View/Edit Your Data 2. A new screen appears, click on the NEW menu at the top of the window 3. A window opens with all of your available data fields waiting for you to input data. You can input as much or as little data as you like, but you must at least provide the location ID s (Section, Lot, Grave) at a minimum. Keep in mind that these ID s are used to link your database records to your map (if you choose to create maps) so be sure to maintain consistency.

23 4. When you get to the purchaser section: To input a new purchaser, click the dropdown and choose the option to Add New Purchaser. The boxes will become enabled, allowing you to input data. To choose an already inputted purchaser, click the dropdown and select the purchaser from the listing and all the boxes will then populate with the purchaser data on file
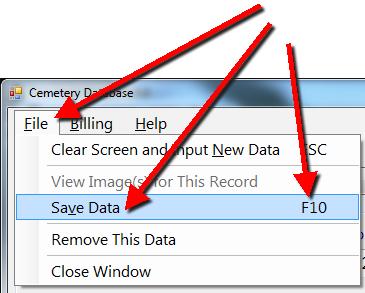
24 5. When you get to the deed and purchaser information, if you want to manually input this data, press the F7 key on your keyboard to unlock those data fields, or you can use the BILLING menu to create an invoice which will fill in those boxes for you based on invoice information. 6. When you get to the custom fields in the lower left corner of the window, you ll notice that the Undertaker and the Cause of Death fields have drop down boxes. These are listings of already inputted information that you can quickly choose from instead of re-typing that information. 7. When you are done inputting data, you can click the File/Save menu. 8. To input more records you can press the ESC key on your keyboard to clear the screen for new entry or use the File/Clear menus. 9. You can add images to your data records, but you must first SAVE your record before you can add images (this is discussed in detail in another section of the document) 10. Closing the window takes you back to the View/Edit Your Data window
25 Searching Existing Data 1. From the main application window, click on the feature to View/Edit Your Data 2. A new screen appears, click on the SEARCH menu at the top of the window 3. You have three ways to search the database a. The top box is a keyword search, where you can input one or more keywords and any matching data will appear in the results box

26 b. The middle section of three boxes is to search based on the location ID s (Section, Lot, Grave) c. The bottom section of boxes is to search dates within your database o i. DOB = date of birth o ii. DOD = date of death o iii. DOI = date of interment

27 o iv. DOP = date of purchase 4. Any matching records for your search are listed in the search results box 5. Click on the blue record ID of any record in this listing to view the full details of that record
28
29 Editing Existing Data 1. From the main application window, click on the feature to View/Edit Your Data 2. Before you can edit a record, you must first search for the record, see the instructions above this section to use the search feature
30 3. Once you ve searched for a record and clicked on its record ID you can click on the EDIT menu at the top of the window


31 4. A window opens with all of your available data fields filled in with already inputted data. You can edit this data any way necessary. 5. When you get to the purchaser section: To input a new purchaser, click the dropdown and choose the option to Add New Purchaser. The boxes will become enabled, allowing you to input data.
32 To choose an already inputted purchaser, click the dropdown and select the purchaser from the listing and all the boxes will then populate with the purchaser data on file 6. When you get to the deed and purchaser information, if you want to manually input this data, press the F7 key on your keyboard to unlock those data fields, or you can use the BILLING menu to create an invoice which will fill in those boxes for you based on invoice information. 7. When you get to the custom fields in the lower left corner of the window, you ll notice that the Undertaker and the Cause of Death fields have drop down boxes. These are listings of already inputted information that you can quickly choose from instead of re-typing that information. 8. When you are done inputting data, you can click the File/Save menu or you can simply close the window
33

34 Managing Purchaser Records 1. Click on the Configuration & Preferences feature from the main application window 2. Click on the Data menu from the Configuration & Preferences window 3. Click on the Purchasers Manager menu


35 4. Edit the data in this grid as necessary 5. If you notice you have duplications on the grid, you can use the Merge Purchaser Records feature via the File menu which will consolidate this information for you 6. To remove any data in the grid, use the CTRL-X keys on your keyboard which will erase the contents of a cell 7. If you need to remove a purchaser record completely, use the File/Remove menu 8. When you re all finished, either click File/Save or just close the window and it will ask if you want to save your work

36 Creating Cemetery Maps 1. From the main application window, choose the feature to Create/Edit Your Map 2. If you have more than one cemetery defined, you will be asked to identify the cemetery you want to work with for map creation/editing 3. If you haven t yet done this, you ll find a default grid created for you of 50 columns by 50 rows, otherwise it will display your already designed map for you

37 4. You can increase or decrease the size of your overall map by clicking on the Map menu and choosing the Maximum menu Columns = how many columns of data do you want displayed in your map Rows = how many rows of data do you want displayed in your map

38 5. Keep in mind that you don t want to have a lot of unused space around your map as this will slow the display of your map, just create enough rows/columns to properly display your map 6. You ll notice that all graves are displayed in a horizontal orientation. This cannot be changed. The top of the screen will not necessarily be north. You will have to adjust your rotation accordingly. 7. You ll notice that the graves are all of one size. We understand that you will have different physical sized graves in your cemetery, but for the purposes of this simplified map, the display will appear that all are of equal size. If you have a section of your map that is just for cremations, for example, you may want to do that section as a completely different cemetery so that you can have its own map for that section. 8. You can assign three different types to each cell of your grid/map Unused this will appear as a green cell, meaning that it s a simulated grassy area where nothing will exist Path/Road this will appear as a black cell, meaning this represents an object that is not grass and not a grave Usable Lot (Grave) this will appear as a white cell, where you can assign a grave identifier (Section,Lot,Grave)


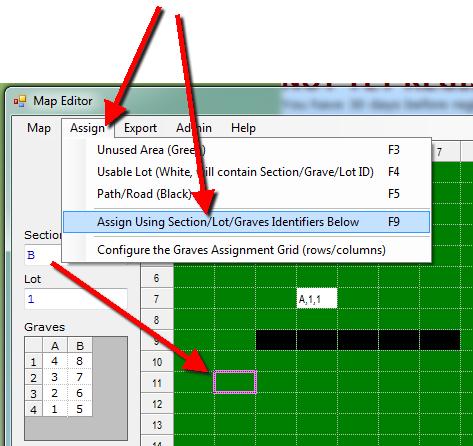
39 9. To assign a type to a cell, position your cursor over the cell that you want to modify, ensuring that cell has the cursor rectangle focused on it, and then use the ASSIGN menu s first three selections accordingly 10. If you create a cell as a usable lot (grave) and it becomes white, you can then type in that cell, and you should then assign your grave identifier (ex. A,1,1). The grave identifiers are a three piece grouping, and you must use a comma between each identifier, even if you aren t using all three. For example, if you re only using Section and Grave and not Lot, you might input: A,,1. This is necessary to link the map contents to the database records upon map viewing.


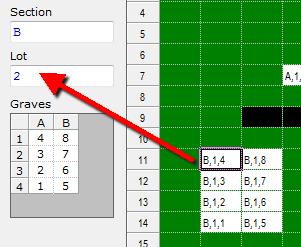
40 11. If you want to assign an entire group of graves (a lot), you could use the feature on the left hand side of the map editor window. Here you would input the section and the lot IDs, and then in the Grave grid you would assign the values for each of the graves in that lot assignment. Use the ASSIGN menu and Configure Grave Assignment Grid menu to determine the number of graves in your lot and how they should be oriented (rows/columns). Once you have all that configured, move your cursor onto the grid into the top/left most corner of where you want the assignment, ensuring that the cell is indicated with the rectangle indicator, and then either press the F9 key on your keyboard or use the Assign/Assign Using Section/Lot/Grave Identifiers Grid menus. Once you do this, you ll notice the Lot value increases by 1. This is so that you can move on to the next location on your map and press F9 again, speeding up map creation.
41


42 12. You can highlight multiple cells at once if you want to assign types in bulk. For example, if you want to make a road in row 7 stretching from column 1 to column 10, you could highlight all those cells with your mouse and then use the Assign menu to assign the road/path cell type. 13. You can insert or delete rows and/or columns using the MAP menu. These insertions or deletions would happen at the current point of the highlighted grid cell, so be very careful where your cursor is before you use these features.
43 14. If you are also a user of the Online Version, you could use the Export menu to save your map here for uploading to the Online Version. 15. Once you re done editing your map you can just close the window to save the map structure.

44 Viewing Cemetery Maps 1. From the main application window, click on the feature to View/Edit Your Data 2. A new screen appears, click on the VIEW MAP menu at the top of the window 3. If you have more than one cemetery configured, you will be asked to choose which cemetery map you want to view

45 4. The map will be displayed and automatically color coded based on the data in your database. In order for the color coding to work properly, your map must have the Section,Lot,Grave identifiers configured to mirror the data in your database. For example, if you have a record in the database with Section = A, Lot = 1, Grave = 1, then the map grave ID must be: A,1,1 5. Color coding is as follows: Records that have no interred or sales information will be colored white. Records that have an interred date will be colored red.

46 Records that have an interred name or a purchaser name, but no interred date and no sold date, will be colored yellow. Records that have no interred information but have a purchase date will be colored blue. 6. As you click on graves of the map, any record that exists in the database will be displayed in the small grid at the top of the map screen. You can have more than one record assigned to a single grave. If you double-click your mouse on one of the records in this grid you will be shown all the details of that particular database record. 7. You can change the zoom level of the map by clicking on the ZOOM menu. This will affect how large the graves will be when you print the map.
 9.")
47 8. Clicking on the CEMETERY menu allows you to choose a different cemetery map (if you have more than one cemetery created) 9. When you re done viewing the map, just close the map window

48 Adding Images to Records 1. You can add images to either NEW records or records you re EDITing. Use the instructions above to learn how to add or edit records. A new database record must be saved before you can add images. 2. Once the record is displayed, click on the FILE menu and choose the option to View Images for This Record. 3. Another window opens. If you have images already uploaded for this record, they will be listed here and the first image is displayed for you in the image pane.

49 4. To add a new image click the File menu and then Load New Image. You ll be asked where the image exists on your computer. Find the image and click OPEN.

50

51 5. Repeat step 6 until all images for this record are uploaded. Now when you view your records the images also appear...

52

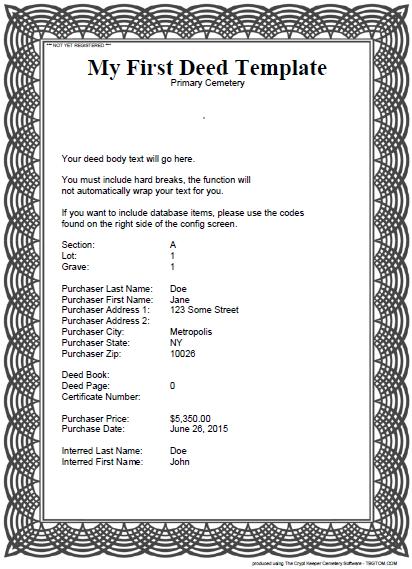
53 Creating Deeds 1. You can add images to either NEW records or records you re EDITing. Use the instructions preivously to learn how to add or edit records. A new database record must be saved before you can add images. 2. Once the record is displayed, click on the BILLING menu and then the DEEDS menu. 3. Before you create a deed, you should ensure the deed template will meet your needs. From the DEED menu, choose Configure Deed Template. The deed template is a very simplified grid that allows you to use keywords to pull in your database record data fields by way of parameters. A sample template is already configured for you, but you can adjust this template any way you deem necessary. When you are done configuring your deed click on the SAVE button. This will add the template to the available listing of templates. You may create as many deed templates as you like, and then choose the different templates by way of the dropdown box at the top of the template window for editing. When editing an existing template, you can also delete the template as a new button appears for DELETE.
54
55 Be sure to name your deed template before you save it... Then in the body of the deed, you can define if the row of text should be left justified, centered, or right justified...
56 Then in the body of the deed, you can define what you want displayed, which includes keywords that can be used to automatically fill in data from your database record...
57
58 The available keywords are listed on the right side of the window... And if you decide you need to shrink your text a little so you can fit more information, be sure to adjust the font size for the document...


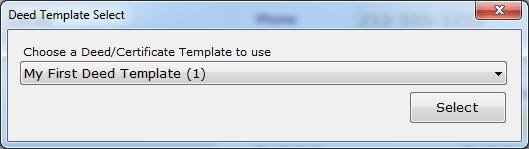
59 4. When you are ready to create a deed, click on the BILLING, DEED and Generate Deed menus. You ll then choose the template you want to use. The deed will be generated in PDF format and will open for you automatically for either printing or saving to a different location on your computer.
60

61 Creating Invoices 1. With the database record already inputted and saved, click on the BILLING menu and then the Create/View Invoice for Selected Record. 2. If you ve already created an invoice for this record, it is displayed in a read-only format where changes would not be possible. Otherwise, it will display a new invoice where you can change the variables as needed. 3. The first row of the invoice details contains the information based on the lot type pricing that you provided via the Lot Type Manager. You can change this value as needed.

62 4. When you re satisfied with the invoice, use the File/Save menus. This locks the invoice so no further edits are possible.


63 5. To print the invoice, click on the File/Print menus.
64 6. You can apply payments to your invoices by: Click on the BILLING menu Accounts Receivable Manager Pull up the purchaser record for the invoice/payment. Once it s selected, all invoices for that purchaser will be displayed in the Activity pane There are three tabs o Activity lists all invoices for this purchaser o Process Payments allows you to input payments received o Global Settings allows you to edit how the billing feature works Click on the Process Payments tab which will display all outstanding invoices and how much is owed. You can then input the Payment
65 Received amount and the date received. Click on the APPLY PAYMENT button when complete. When you re all done with payments you can send out statements using the REPORTING feature.

66 Running Reports 1. From the main application window, click on the REPORTS feature 2. A window appears with a grid in the center.

67 3. There are several reports already created and ready to run for you. You can access these pre-created reports via the STANDARD menu. List Interred o By Location ID o By Name o By Date of Birth o By Date of Death List Cemeteries List Lot Types Outstanding Receivables (any cemetery record where the amount paid is less than the amount owed) Family Associations Statements (only prints statements for records where you generated an invoice) 4. For those that would like to create their own custom reports In the Advanced Reporting grid: o In the Report Column, choose the data fields you want displayed on your report o Assign a sort order to Report Columns only for data fields where sorting is necessary o If you want to narrow down your report results, you can set conditions and filters. For example, if you wanted to return records only from Section A of your database, you could assign: Report Column = Section Condition = = Filter = A
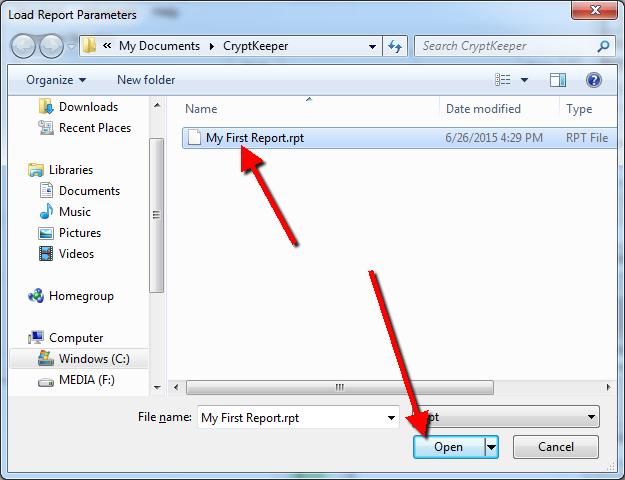
68 Once you ve defined all your report parameters, click on the ADVANCED menu to save your report. You ll be asked to name the report. You can then click on the PRODUCE REPORT button to display the report results. If you want to load a previously saved report, click on the ADVANCED menu and then the Load Report option. In the example custom report below, I've added just a few data columns and assigned sort orders. Please do not assign the same sort order value to more than one data column or you will get errors. You'll also notice I am filtering this report to return only records with an Interred Last Name greater than blank (or empty), which means only those with an existing last name will appear on the report. Now if I want to instead return my records based on the interment date, I would change the filters as illustrated below...

69 Notice that I have two columns identified as InterDate. This is so that I can do a double filter. I want to return any record greater than or equal to 1/1/2015, but less than or equal to 12/31/2015. On the resulting report, the InterDate will only appear once. To save your report so that you can run it again, click on the ADVANCED menu...

70 Be sure to save your report in your CryptKeeper folder so that when you run backups they are included.

71 Then when you go to load your report via the Advanced menu, it will be there where you left it.
72
73 Performing Backups 1. From the main application window, choose the Configuration & Preferences feature 2. Click on the DATA menu 3. Click on the Backup Your Data menu

74 4. Choose where you want your backup to be saved. We recommend you save these backups to a thumb drive. The archive files are ZIP format so they shouldn t take up too much space. But for best results, we recommend at least a 4gb thumb drive.

75 5. Click OK to start the backup 6. When finished click OK Restoring Data from Backups 1. In the event of a system crash or if you are upgrading computers, you ll need to re-install the software and then perform a data restore. 2. From the main application window, choose the Configuration & Preferences feature 3. Click on the DATA menu 4. Click on the Restore Your Data menu 5. You ll be asked to locate your previously saved ZIP file 6. Click OPEN to start the data restoration IMPORTANT!!! You should save the installation routine that you downloaded from our website so that you can re-install the software should you ever have a computer crash or are upgrading to a new computer. Your registration to the version you re currently using may not be valid with newer versions as they are released, so you ll want to ensure you have the same version your data is registered to so you don t get locked out of the software.


76 Importing Data from Online Version To perform this process you have to start with your online version account. Log into your account and then navigate to the View/Edit Your Data feature and then you'll see a new page with an EXPORT menu at the top. Click on the EXPORT menu. Now click on the EXPORT YOUR DATA button. This will collect all the data you have in your online account, including data, images and maps.


77 All your data will be placed into a unique ZIP file. That zip file link is made available to you, but the link is only valid for a short time, so download it as soon as you can. Now that you've saved your export data, you can open the Desktop Version. Click on the Configuration & Preferences feature.

78 Then choose the DATA menu and go all the way to the bottom of that listing to Import From Online Version.


79 This process completely erases EVERYTHING in your current desktop database, so if you don't want to do that, quit now!! But if you're ready to proceed, answer YES. You're asked where you stored your export data. Find the file and click on the OPEN button.

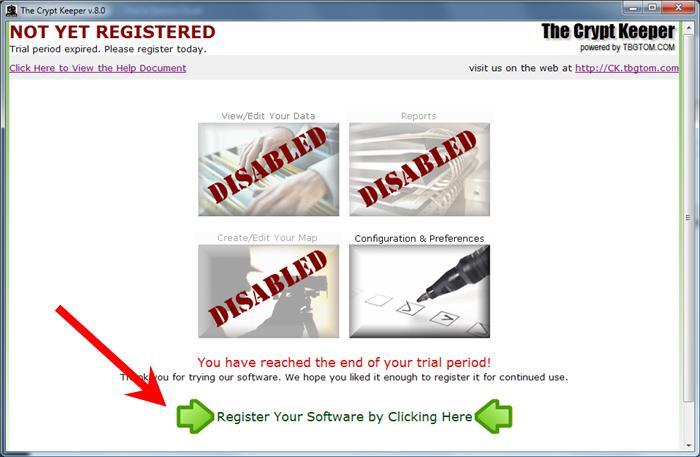
80 Once all that data is restored the application will need to close to do some house-cleaning. Re-open the application. If you haven't already registered, you'll need to do that immediately.
81
The Crypt Keeper Cemetery Software Online Version Tutorials To print this information, right-click on the contents and choose the 'Print' option.
 The Crypt Keeper Cemetery Software Online Version Tutorials To print this information, right-click on the contents and choose the 'Print' option. Home Greetings! This tutorial series is to get you familiar
Quick Start Guide - Contents. Opening Word Locating Big Lottery Fund Templates The Word 2013 Screen... 3
 Quick Start Guide - Contents Opening Word... 1 Locating Big Lottery Fund Templates... 2 The Word 2013 Screen... 3 Things You Might Be Looking For... 4 What s New On The Ribbon... 5 The Quick Access Toolbar...
CheckBook Pro 2 Help
 Get started with CheckBook Pro 9 Introduction 9 Create your Accounts document 10 Name your first Account 11 Your Starting Balance 12 Currency 13 We're not done yet! 14 AutoCompletion 15 Descriptions 16
Office 2016 Excel Basics 25 Video/Class Project #37 Excel Basics 25: Power Query (Get & Transform Data) to Convert Bad Data into Proper Data Set
 to Convert Bad Data into Proper Data Set") Office 2016 Excel Basics 25 Video/Class Project #37 Excel Basics 25: Power Query (Get & Transform Data) to Convert Bad Data into Proper Data Set Goal in video # 25: Learn about how to use the Get & Transform
Office 2016 Excel Basics 25 Video/Class Project #37 Excel Basics 25: Power Query (Get & Transform Data) to Convert Bad Data into Proper Data Set Goal in video # 25: Learn about how to use the Get & Transform
AGENT123. Full Q&A and Tutorials Table of Contents. Website IDX Agent Gallery Step-by-Step Tutorials
 AGENT123 Full Q&A and Tutorials Table of Contents Website IDX Agent Gallery Step-by-Step Tutorials WEBSITE General 1. How do I log into my website? 2. How do I change the Meta Tags on my website? 3. How
Overview of individual file utilities
 1 System: Special Topics File Utilities Overview File utilities refers to a group of utilities that work with your CounterPoint data files. File utilities allow you to export your data files to ASCII text
Series 6 Technical Admin Guide Page 1
 Series 6 Technical Admin Guide Page 1 TABLE OF CONTENTS PRODUCT REGISTRATION... 6 Free Trial Registration and the Wizard...7 How the Trial Works...8 Register Invu Document Management...8 Privileges for
A cell is highlighted when a thick black border appears around it. Use TAB to move to the next cell to the LEFT. Use SHIFT-TAB to move to the RIGHT.
 Instructional Center for Educational Technologies EXCEL 2010 BASICS Things to Know Before You Start The cursor in Excel looks like a plus sign. When you click in a cell, the column and row headings will
PART 7. Getting Started with Excel
 PART 7 Getting ed with Excel When you start the application, Excel displays a blank workbook. A workbook is a file in which you store your data, similar to a three-ring binder. Within a workbook are worksheets,
Rev. C 11/09/2010 Downers Grove Public Library Page 1 of 41
 Table of Contents Objectives... 3 Introduction... 3 Excel Ribbon Components... 3 Office Button... 4 Quick Access Toolbar... 5 Excel Worksheet Components... 8 Navigating Through a Worksheet... 8 Making
Learning Worksheet Fundamentals
 1.1 LESSON 1 Learning Worksheet Fundamentals After completing this lesson, you will be able to: Create a workbook. Create a workbook from a template. Understand Microsoft Excel window elements. Select
1-Step Appraisals Personal Property Appraisal Software
 User Guide for 1-Step Appraisals Personal Property Appraisal Software Home & Business Software for Windows Page Table of Contents Getting Started... Page 3 Image Preferences... Page 4 Adding Business/Company
Word: Print Address Labels Using Mail Merge
 Word: Print Address Labels Using Mail Merge No Typing! The Quick and Easy Way to Print Sheets of Address Labels Here at PC Knowledge for Seniors we re often asked how to print sticky address labels in
Microsoft Excel 2010 Basic
 Microsoft Excel 2010 Basic Introduction to MS Excel 2010 Microsoft Excel 2010 is a spreadsheet software in the new Microsoft 2010 Office Suite. Excel allows you to store, manipulate and analyze data in
MICROSOFT WORD 2010 BASICS
 MICROSOFT WORD 2010 BASICS Word 2010 is a word processing program that allows you to create various types of documents such as letters, papers, flyers, and faxes. The Ribbon contains all of the commands
Word Tips & Tricks. Status Bar. Add item to Status Bar To add an itme to the status bar, click on the item and a checkmark will display.
 Status Bar The status bar is located on the bottom of the Microsoft Word window. The status bar displays information about the document such as the current page number, the word count in the document,
DOWNLOADING YOUR BENEFICIARY SAMPLE Last Updated: 11/16/18. CMS Web Interface Excel Instructions
 DOWNLOADING YOUR BENEFICIARY SAMPLE Last Updated: 11/16/18 CMS Web Interface Excel Instructions Last updated: 11/16/2018 1 Smarter reporting. Smarter care. CMS Web Interface file upload. Using the Excel
A new clients guide to: Activating a new Studio 3.0 Account Creating a Photo Album Starting a Project Submitting a Project Publishing Tips
 Getting Started With Heritage Makers A Guide to the Heritage Studio 3.0 Drag and Drop Publishing System presented by Heritage Makers A new clients guide to: Activating a new Studio 3.0 Account Creating
Microsoft Office Excel
 Microsoft Office 2007 - Excel Help Click on the Microsoft Office Excel Help button in the top right corner. Type the desired word in the search box and then press the Enter key. Choose the desired topic
F-Billing Revolution 2015 User Manual F-Billing Software
 F-Billing Revolution 2015 User Manual 2 F-Billing Revolution 2015 User Manual Table of Contents Foreword 0 Part I Introduction 4 Part II Quick Start Guide 5 Part III Invoice Email Settings 6 Part IV Invoices
Excel & Business Math Video/Class Project #01 Introduction to Excel. Why We Use Excel for Math. First Formula.
 Excel & Business Math Video/Class Project #01 Introduction to Excel. Why We Use Excel for Math. First Formula. Topics Covered in Video: 1) USB Drive to store files from class... 2 2) Save As to Download
Intro to Excel. To start a new workbook, click on the Blank workbook icon in the middle of the screen.
 Excel is a spreadsheet application that allows for the storing, organizing and manipulation of data that is entered into it. Excel has variety of built in tools that allow users to perform both simple
Microsoft Office 2016 Mail Merge
 Microsoft Office 2016 Mail Merge Mail Merge Components In order to understand how mail merge works you need to examine the elements involved in the process. In any mail merge, you'll deal with three different
EXCEL BASICS: MICROSOFT OFFICE 2010
 EXCEL BASICS: MICROSOFT OFFICE 2010 GETTING STARTED PAGE 02 Prerequisites What You Will Learn USING MICROSOFT EXCEL PAGE 03 Opening Microsoft Excel Microsoft Excel Features Keyboard Review Pointer Shapes
Your Cart User Manual v3.6
 Your Cart User Manual v3.6 2 Your Cart User Manual v3.6 Table of Contents Foreword 0 7 Part I Getting Started Overview 11 Part II Categories & Products 1 Manage Categories... Overview 11 Add a New... Category
Beginner s Guide to Microsoft Excel 2002
 Beginner s Guide to Microsoft Excel 2002 Microsoft Excel lets you create spreadsheets, which allow you to make budgets, track inventories, calculate profits, and design charts and graphs. 1. Open Start
MultiSite Suite: Accounts Payable
 MultiSite Suite: Accounts Payable User s Manual version 6 Copyright & Trademarks Copyright Notice and Trademarks 2010 MultiSite Systems, All rights reserved. Microsoft, Windows, Excel, and Outlook are
Installing the application involves several steps. Note that you must install QuickBooks on your computer prior to installing this application.
 CCRQLABEL OVERVIEW This is an overview (summary) of the CCRQLabel 4.x label printing product. Full documentation is under development INSTALLING CCRQLABEL This document provides a quick review of how to
Handbook: Carbonite Safe
 1 Welcome to Carbonite! Important Things to Know...4 Carbonite Features...5 Setting Up and Installing...6 Starting a Trial... 7 Installing Carbonite for the First Time... 7 Buying a Subscription...9 Subscription
Provider Portal Handbook
 Provider Portal Handbook WELCOME! Welcome to AlphaMCS, a next generation Managed Care System designed specifically to meet the needs of Managed Care Organizations and the behavioral healthcare providers
The HOME Tab: Cut Copy Vertical Alignments
 The HOME Tab: Cut Copy Vertical Alignments Text Direction Wrap Text Paste Format Painter Borders Cell Color Text Color Horizontal Alignments Merge and Center Highlighting a cell, a column, a row, or the
ADD AND NAME WORKSHEETS
 1 INTERMEDIATE EXCEL While its primary function is to be a number cruncher, Excel is a versatile program that is used in a variety of ways. Because it easily organizes, manages, and displays information,
CRM CUSTOMER RELATIONSHIP MANAGEMENT
 CRM CUSTOMER RELATIONSHIP MANAGEMENT Customer Relationship Management is identifying, developing and retaining profitable customers to build lasting relationships and long-term financial success. The agrē
This Tutorial is for Word 2007 but 2003 instructions are included in [brackets] after of each step.
![This Tutorial is for Word 2007 but 2003 instructions are included in [brackets] after of each step.](/thumbs/72/67280806.jpg "This Tutorial is for Word 2007 but 2003 instructions are included in [brackets] after of each step.") This Tutorial is for Word 2007 but 2003 instructions are included in [brackets] after of each step. Table of Contents Just so you know: Things You Can t Do with Word... 1 Get Organized... 1 Create the
This Tutorial is for Word 2007 but 2003 instructions are included in [brackets] after of each step. Table of Contents Just so you know: Things You Can t Do with Word... 1 Get Organized... 1 Create the
Copyright 2004, Mighty Computer Services
 EZ-GRAPH DATABASE PROGRAM MANUAL Copyright 2004, Mighty Computer Services The Table of Contents is located at the end of this document. I. Purpose EZ-Graph Database makes it easy to draw and maintain basic
Adobe Premiere: Getting Started
 Prepared by Ansel Herz for the UW Department of Communication http://www.com.washington.edu/tech/irc/ Questions? Comments? Contact Kristina Bowman at kriscb@uw.edu. Adobe Premiere: Getting Started This
EXCEL BASICS: MICROSOFT OFFICE 2007
 EXCEL BASICS: MICROSOFT OFFICE 2007 GETTING STARTED PAGE 02 Prerequisites What You Will Learn USING MICROSOFT EXCEL PAGE 03 Opening Microsoft Excel Microsoft Excel Features Keyboard Review Pointer Shapes
EXCEL + POWERPOINT. Analyzing, Visualizing, and Presenting Data-Rich Insights to Any Audience KNACK TRAINING
 EXCEL + POWERPOINT Analyzing, Visualizing, and Presenting Data-Rich Insights to Any Audience KNACK TRAINING KEYBOARD SHORTCUTS NAVIGATION & SELECTION SHORTCUTS 3 EDITING SHORTCUTS 3 SUMMARIES PIVOT TABLES
Workshop. Import Workshop
 Import Overview This workshop will help participants understand the tools and techniques used in importing a variety of different types of data. It will also showcase a couple of the new import features
OpenForms360 Validation User Guide Notable Solutions Inc.
 OpenForms360 Validation User Guide 2011 Notable Solutions Inc. 1 T A B L E O F C O N T EN T S Introduction...5 What is OpenForms360 Validation?... 5 Using OpenForms360 Validation... 5 Features at a glance...
EDITING AN EXISTING REPORT
 Report Writing in NMU Cognos Administrative Reporting 1 This guide assumes that you have had basic report writing training for Cognos. It is simple guide for the new upgrade. Basic usage of report running
MAPLOGIC CORPORATION. GIS Software Solutions. Getting Started. With MapLogic Layout Manager
 MAPLOGIC CORPORATION GIS Software Solutions Getting Started With MapLogic Layout Manager Getting Started with MapLogic Layout Manager 2011 MapLogic Corporation All Rights Reserved 330 West Canton Ave.,
How to Import a Text File into Gorilla 4
 Bill Good Marketing Excel: Text to Columns How to Import a Text File into Gorilla 4 The information in this article applies to: Importing a text file into the Gorilla database. Questions that apply to
Week 5 Creating a Calendar. About Tables. Making a Calendar From a Table Template. Week 5 Word 2010
 Week 5 Creating a Calendar About Tables Tables are a good way to organize information. They can consist of only a few cells, or many cells that cover several pages. You can arrange boxes or cells vertically
UOB Offline Data Input Software (ODIS)
") UOB Offline Data Input Software (ODIS) Version 2 Collection User Guide Date: April 2015 TABLE OF CONTENT Page 1 COLLECTION FAST/GIRO... 3 1.1 Summary Listing... 3 1.1.1 Quick Search... 3 1.1.2 Main Menu...
UOB Offline Data Input Software (ODIS) Version 2 Collection User Guide Date: April 2015 TABLE OF CONTENT Page 1 COLLECTION FAST/GIRO... 3 1.1 Summary Listing... 3 1.1.1 Quick Search... 3 1.1.2 Main Menu...
Excel 2013 Intermediate
 Excel 2013 Intermediate Quick Access Toolbar... 1 Customizing Excel... 2 Keyboard Shortcuts... 2 Navigating the Spreadsheet... 2 Status Bar... 3 Worksheets... 3 Group Column/Row Adjusments... 4 Hiding
Creating Accounts Using Batch Load
 User Guide Creating Accounts Using Batch Load Document Purpose This document guides site administrators through the process of creating ACT WorkKeys online accounts for multiple examinees using a batch
Frequently Asked Questions: SmartForms and Reader DC
 Frequently Asked Questions: SmartForms and Reader DC Initial Check Browsers - Google Chrome - Other browsers Form functions - List of additional buttons and their function Field functions - Choosing a
Welcome to Introduction to Microsoft Excel 2010
 Welcome to Introduction to Microsoft Excel 2010 2 Introduction to Excel 2010 What is Microsoft Office Excel 2010? Microsoft Office Excel is a powerful and easy-to-use spreadsheet application. If you are
Microsoft Excel 2010
 Microsoft Excel 2010 omar 2013-2014 First Semester 1. Exploring and Setting Up Your Excel Environment Microsoft Excel 2010 2013-2014 The Ribbon contains multiple tabs, each with several groups of commands.
LSSP Corporation 1 PinPoint Document Management Initial Setup Guide - Advanced
 INTRODUCTION This guide will go over some of the more advanced topics involved with setting up your database. Every topic discussed in this guide is completely optional for your database none of the following
Guide to Importing Data
 Guide to Importing Data CONTENTS Data Import Introduction... 3 Who should use the Gold-Vision Import Client?... 3 Prepare your data... 3 Downloading and installing the import client... 7 Step One Getting
EXCEL 2003 DISCLAIMER:
 EXCEL 2003 DISCLAIMER: This reference guide is meant for experienced Microsoft Excel users. It provides a list of quick tips and shortcuts for familiar features. This guide does NOT replace training or
Contents. Batch & Import Guide. Batch Overview 2. Import 157. Batch and Import: The Big Picture 2 Batch Configuration 11 Batch Entry 131
 Batch & Import Guide Last Updated: 08/10/2016 for ResearchPoint 4.91 Contents Batch Overview 2 Batch and Import: The Big Picture 2 Batch Configuration 11 Batch Entry 131 Import 157 Configure Import File
ITConnect KEEPING TRACK OF YOUR EXPENSES WITH YNAB
 ITConnect Technology made practical for home APRIL 06 Edit PDF files with Word Word is the best tool we have at hand to edit PDFs without having to purchase extra software. Viruses distributed by email
User s Guide. (Virtual Terminal Edition)
") User s Guide (Virtual Terminal Edition) Table of Contents Home Page... 4 Receivables Summary... 4 Past 30 Day Payment Summary... 4 Last 10 Customer Transactions... 4 View Payment Information... 4 Customers
User s Guide (Virtual Terminal Edition) Table of Contents Home Page... 4 Receivables Summary... 4 Past 30 Day Payment Summary... 4 Last 10 Customer Transactions... 4 View Payment Information... 4 Customers
INTRODUCTION... 1 UNDERSTANDING CELLS... 2 CELL CONTENT... 4
 Introduction to Microsoft Excel 2016 INTRODUCTION... 1 The Excel 2016 Environment... 1 Worksheet Views... 2 UNDERSTANDING CELLS... 2 Select a Cell Range... 3 CELL CONTENT... 4 Enter and Edit Data... 4
USING DRUPAL. Hampshire College Website Editors Guide https://drupal.hampshire.edu
 USING DRUPAL Hampshire College Website Editors Guide 2014 https://drupal.hampshire.edu Asha Kinney Hampshire College Information Technology - 2014 HOW TO GET HELP Your best bet is ALWAYS going to be to
Workbook Also called a spreadsheet, the Workbook is a unique file created by Excel. Title bar
 Microsoft Excel 2007 is a spreadsheet application in the Microsoft Office Suite. A spreadsheet is an accounting program for the computer. Spreadsheets are primarily used to work with numbers and text.
SALES REPORTING GUIDE TO MANUALLY ENTER SALES DATA IN TRADEMARX:
 SALES REPORTING GUIDE TO MANUALLY ENTER SALES DATA IN TRADEMARX: 1. Go to http://licensing.trademarxonline.com 2. Log in using your email address and password. If you don t know your password, please click
Creating a Brochure in Publisher
 Creating a Brochure in Publisher If you closed the Flyer, as indicated above, you will see the Microsoft Publisher Task Pane on the left side of your screen. Click the Brochures selection in the Publication
2 Spreadsheet Considerations 3 Zip Code and... Tax ID Issues 4 Using The Format... Cells Dialog 5 Creating The Source... File
 Contents I Table of Contents Part 1 Introduction 1 Part 2 Importing from Microsoft Excel 1 1 Overview... 1 2 Spreadsheet Considerations... 1 3 Zip Code and... Tax ID Issues 2 4 Using The Format... Cells
Creating Reports in Access 2007 Table of Contents GUIDE TO DESIGNING REPORTS... 3 DECIDE HOW TO LAY OUT YOUR REPORT... 3 MAKE A SKETCH OF YOUR
 Creating Reports in Access 2007 Table of Contents GUIDE TO DESIGNING REPORTS... 3 DECIDE HOW TO LAY OUT YOUR REPORT... 3 MAKE A SKETCH OF YOUR REPORT... 3 DECIDE WHICH DATA TO PUT IN EACH REPORT SECTION...
Section 1 Microsoft Excel Overview
 Course Topics: I. MS Excel Overview II. Review of Pasting and Editing Formulas III. Formatting Worksheets and Cells IV. Creating Templates V. Moving and Navigating Worksheets VI. Protecting Sheets VII.
Gloucester County Library System EXCEL 2007
 Gloucester County Library System EXCEL 2007 Introduction What is Excel? Microsoft E x c e l is an electronic s preadsheet program. I t is capable o f performing many diff e r e n t t y p e s o f c a l
DataMaster for Windows
 DataMaster for Windows Version 3.0 April 2004 Mid America Computer Corp. 111 Admiral Drive Blair, NE 68008-0700 (402) 426-6222 Copyright 2003-2004 Mid America Computer Corp. All rights reserved. Table
Handbook: Carbonite Safe
 1 Important Things to Know... 4 Carbonite Features... 5 Setting Up and Installing... 6 Starting a Trial... 7 Installing Carbonite for the First Time... 7 Buying a Subscription... 8 Subscription Pricing...
Pinnacle Cart User Manual v3.6.3
 Pinnacle Cart User Manual v3.6.3 2 Pinnacle Cart User Manual v3.6.3 Table of Contents Foreword 0 Part I Getting Started Overview 7 Part II Categories & Products 11 1 Manage... Categories Overview 11 Add
Login: https://authoring.ipfw.edu/c. Quick Guide for dotcms & Accessibility April 2016 Training:
 dotcms & Accessibility Note: The recommended browser for dotcms is Mozilla Firefox. at 0). d. Show on Menu Check the box if the folder should be shown on the menu. Logging In 1. Open Mozilla Firefox and
Microsoft Excel 2007 Beginning The information below is devoted to Microsoft Excel and the basics of the program.
 Microsoft Excel 2007 Beginning The information below is devoted to Microsoft Excel and the basics of the program. Starting Excel Option 1: Click the Start button on the taskbar, then Programs>Microsoft
Basic Intro to ETO Results
 Basic Intro to ETO Results Who is the intended audience? Registrants of the 8 hour ETO Results Orientation (this training is a prerequisite) Anyone who wants to learn more but is not ready to attend the
CREATING AN AD HOC QUERY
 Ad Hoc Reporting AD HOC REPORTS are custom reports that you create on the fly so that you can view specific information that is important to you. An ad hoc report is created from a query, which means that
Making an entry into the CIS Payments workbook
 Making an entry into the CIS Payments workbook By now you should have carried out the CIS Payments workbook Setup. If you have not done so you will need to do this before you can proceed. When you have
Creating & Modifying Tables in Word 2003
 Creating & Modifying Tables in Word 2003 This bookl LaTonya Motley Trainer / Instructional Technology Specialist Staff Development 660-6452 Table of Contents Overview... 1 Inserting Tables... 1 Using Pre-Set
DOING MORE WITH EXCEL: MICROSOFT OFFICE 2013
 DOING MORE WITH EXCEL: MICROSOFT OFFICE 2013 GETTING STARTED PAGE 02 Prerequisites What You Will Learn MORE TASKS IN MICROSOFT EXCEL PAGE 03 Cutting, Copying, and Pasting Data Basic Formulas Filling Data
Enhancements Guide. Applied Business Services, Inc. 900 Wind River Lane Suite 102 Gaithersburg, MD General Phone: (800)
") Enhancements Guide Applied Business Services, Inc. 900 Wind River Lane Suite 102 Gaithersburg, MD 20878 General Phone: (800) 451-7447 Support Telephone: (800) 451-7447 Ext. 2 Support Email: support@clientaccess.com
Enhancements Guide Applied Business Services, Inc. 900 Wind River Lane Suite 102 Gaithersburg, MD 20878 General Phone: (800) 451-7447 Support Telephone: (800) 451-7447 Ext. 2 Support Email: support@clientaccess.com
Service Minder Plus Features/Helpful Hints
 Service Minder Plus Features/Helpful Hints This manual covers helpful hints and use of features. Note: These items will be addressed during the training sessions. This document is meant to be used as an
Microsoft Excel for Beginners
 Microsoft Excel for Beginners training@health.ufl.edu Basic Computing 4 Microsoft Excel 2.0 hours This is a basic computer workshop. Microsoft Excel is a spreadsheet program. We use it to create reports
Movavi PDF Editor User Guide. Quick start guide Opening files Editing documents Saving files
 Movavi PDF Editor User Guide Quick start guide Opening files Editing documents Saving files Table of Contents Quick start guide...2 Removing trial restrictions...3 Getting an activation key...4 Activating
MAKING TABLES WITH WORD BASIC INSTRUCTIONS. Setting the Page Orientation. Inserting the Basic Table. Daily Schedule
 MAKING TABLES WITH WORD BASIC INSTRUCTIONS Setting the Page Orientation Once in word, decide if you want your paper to print vertically (the normal way, called portrait) or horizontally (called landscape)
Microsoft Excel 2007
 Learning computers is Show ezy Microsoft Excel 2007 301 Excel screen, toolbars, views, sheets, and uses for Excel 2005-8 Steve Slisar 2005-8 COPYRIGHT: The copyright for this publication is owned by Steve
Version Operator Orientation. TIMMS Client. A guide to using the TIMMS System. Training & Navigation Notes
 Version 7.2.4 Operator Orientation TIMMS Client A guide to using the TIMMS System Training & Navigation Notes Disprax Pty Ltd 2015 WHAT IS TIMMS? TIMMS Stands for: Total Industry Management and Marketing
Membership Portal Manual
 Membership Portal Manual Table of Contents Login... 4 Contact Tab... 6 Contact Information Dropdown...6 Features on the Contact Information Dropdown... 6 Account Information Dropdown...6 Features on the
Application of Skills: Microsoft Excel 2013 Tutorial
 Application of Skills: Microsoft Excel 2013 Tutorial Throughout this module, you will progress through a series of steps to create a spreadsheet for sales of a club or organization. You will continue to
CRM CUSTOMER RELATIONSHIP MANAGEMENT
 CRM CUSTOMER RELATIONSHIP MANAGEMENT Customer Relationship Management is identifying, developing and retaining profitable customers to build lasting relationships and long-term financial success. The agrē
Open. Select the database and click. Print. Set printing options using the dropdown menus, then click the
 The Original Quick Reference Guides Microsoft Access 2010 Access is a tool for creating and managing databases collections of related records structured in an easily accessible format such as a table,
LawTrust Manual Updated May 19, 2018
 LawTrust Manual Updated May 19, 2018 Every question we have ever been asked is found answered in this manual or under the Support link on our website. Purchase is by subscription via PayPal. See details
ekaizen Lessons Table of Contents 1. ebook Basics 1 2. Create a new ebook Make Changes to the ebook Populate the ebook 41
 Table of Contents 1. ebook Basics 1 2. Create a new ebook 20 3. Make Changes to the ebook 31 4. Populate the ebook 41 5. Share the ebook 63 ekaizen 1 2 1 1 3 4 2 2 5 The ebook is a tabbed electronic book
COPYRIGHTED MATERIAL. Making Excel More Efficient
 Making Excel More Efficient If you find yourself spending a major part of your day working with Excel, you can make those chores go faster and so make your overall work life more productive by making Excel
Importing in Offertory Donations from Spreadsheets into Connect Now
 Importing in Offertory Donations from Spreadsheets into Connect Now When you have an excel spreadsheet that has donations in it, if you have a key identifier, such as an envelope number, then the spreadsheet
Welcome Back! Without further delay, let s get started! First Things First. If you haven t done it already, download Turbo Lister from ebay.
 Welcome Back! Now that we ve covered the basics on how to use templates and how to customise them, it s time to learn some more advanced techniques that will help you create outstanding ebay listings!
Learn to make desktop LE
 HACKING WITH SWIFT COMPLETE TUTORIAL COURSE Learn to make desktop LE P apps with real-worldam S Swift projects REEPaul Hudson F Project 1 Storm Viewer Get started coding in Swift by making an image viewer
DDX-R Quick Start Guide
 DDX-R Quick Start Guide Imaging Support 1-855-726-9995 www.scilvet.com Contents USING DDX-R... 2 Opening a Patient File... 2 Opening a New Patient File... 3 Screen Layout... 3 ACQUIRING IMAGES ON A PATIENT...
Working with Tables in Word 2010
 Working with Tables in Word 2010 Table of Contents INSERT OR CREATE A TABLE... 2 USE TABLE TEMPLATES (QUICK TABLES)... 2 USE THE TABLE MENU... 2 USE THE INSERT TABLE COMMAND... 2 KNOW YOUR AUTOFIT OPTIONS...
Using Microsoft Excel
 About Excel Using Microsoft Excel What is a Spreadsheet? Microsoft Excel is a program that s used for creating spreadsheets. So what is a spreadsheet? Before personal computers were common, spreadsheet
a guide to... the portal Portal Handbook Centre Support June 2014
 a guide to... the portal Portal Handbook Centre Support June 2014 Contents What s the NCFE Portal Page 1 Finding the Portal Page 1 Requesting to use the Portal Page 2 Logging in to the Portal Page 3 Forgotten
AccountsIQ Tips and Tricks. Updated 20/10/2008. Purpose. 1. List and describe what heading and text will be containing in each of the Tip s and tricks
 AccountsIQ Tips and Tricks Updated 20/10/2008 Purpose 1. List and describe what heading and text will be containing in each of the Tip s and tricks 2. Outline what FAQ s will be released on the System
Excel Advanced
 Excel 2016 - Advanced LINDA MUCHOW Alexandria Technical & Community College 320-762-4539 lindac@alextech.edu Table of Contents Macros... 2 Adding the Developer Tab in Excel 2016... 2 Excel Macro Recorder...
Excel 2016 Basics for Windows
 Excel 2016 Basics for Windows Excel 2016 Basics for Windows Training Objective To learn the tools and features to get started using Excel 2016 more efficiently and effectively. What you can expect to learn
Introduction to Microsoft Excel 2007
 Introduction to Microsoft Excel 2007 Microsoft Excel is a very powerful tool for you to use for numeric computations and analysis. Excel can also function as a simple database but that is another class.