ECA Video Submission Guide for Student
|
|
|
- Hugo Potter
- 6 years ago
- Views:
Transcription

1 ECA Video Submission Guide for Student
2 TABLE OF CONTENTS 1. Important Notes Hardware Requirement for Live Recording Software Requirement for Live Recording Record/Upload Media Submission... 2 I. LIVE RECORDING VIDEO SUBMISSION 2 II. UPLOADING VIDEO SUBMISSION Video Compression I. WINDOWS 17 II. MAC Learning Services Support Appendix OVERWRITE / KEEP EXISTING FILE 46
3 ECA Video Submission - Student Guide 1. Important Notes 1. Video submission can be done either by: a) Live Recording/Upload Media Submission or b) Non-Turnitin (File Upload) Submission. Students are required to read the Assignment instructions carefully before submitting their videos to Canvas. 2. Ensure your video file conform to these technical requirements: a) Time Duration: No more than 10 minutes for live recording b) File Size: No more than 500MB for upload c) Video Format:.mp4 for upload d) The limitations for point a and b are not in conjuction i. 10 minutes limitation when using Canvas to record real-time video. File size not of a concern. ii. 500MB file size limitation if upload video file is used. Duration is not of a concern. Note: Please take note that the school requirement listed in assignment paper will take precedence over the system requirements. 3. You are allowed to use any program to edit your ECA video as long as it meets the submission requirements above. 4. Submit your final MP4 video file as early as possible (preferably at least 2 days before assignment deadline). 5. A wired broadband connection is recommended for uploading large video files. 6. Using public wireless connection such as Wireless@SG will result in submission failure due to poor and slow connection. 7. You can submit multiple times even after the deadline, subjected to mark deduction. 8. You will only see your latest submission. Page 1
4 ECA Video Submission Student Guide 2. Hardware Requirement for Live Recording USB Webcam or built-in Webcam USB External Microphone or built-in Microphone Please ensure that the devices are plugged into your computing device before launching the recording application. 3. Software Requirement for Live Recording Latest Adobe Flash Player Latest Google Chrome Browser 4. Record/Upload Media Submission i. Live Recording Video Submission For Windows users, please navigate to via Google Chrome browser. For Macintosh users, please navigate to via Safari browser. 1 Click on the respective T-group course site. For example, LSA123_JUL17_T01. 1 Page 2
5 ECA Video Submission - Student Guide 2 3 Click on Assignments. Click on ECA_VIDEO Click on Submit Assignment. 4 Page 3
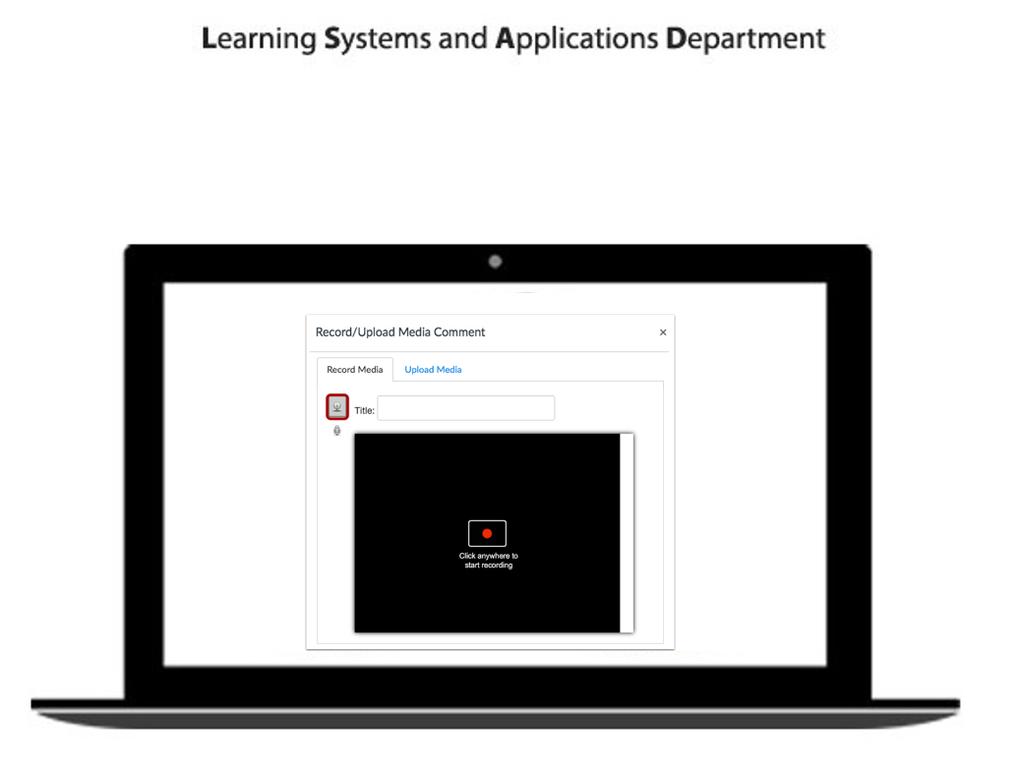
6 ECA Video Submission Student Guide 5 Click on Record / Upload Media. 5 6 Click on Allow. 6 Page 4


7 ECA Video Submission - Student Guide 7 Click on Allow. 7 8 Click on Close. 8 Page 5


8 ECA Video Submission Student Guide 9 Select your camera. For example, Integrated Camera for most built-in laptop camera Key in the submission title. For example, MaryTan_ECA_VIDEO. Click on anywhere to start recording Page 6
9 ECA Video Submission - Student Guide To Record Again Click on Click on Yes. to record again Page 7

10 ECA Video Submission Student Guide To Stop Recording 14 Click on Save to stop recording Click on Submit Assignment to submit the assignment. 15 Page 8
11 ECA Video Submission - Student Guide 16 Click on Submission Details to view your submitted assignment Click on the video to stream it online. 17 Page 9
12 ECA Video Submission Student Guide 18 To download your submitted video, right-click the video while it is playing and select Save video as Click on Save. 19 Page 10
13 ECA Video Submission - Student Guide ii. Uploading Video Submission 1 Click on the respective T-group course site. For example, LSA123_JUL17_T Click on Assignments. Click on ECA_VIDEO. 2 3 Page 11
14 ECA Video Submission Student Guide 4 Click on Submit Assignment. 4 5 Click on Record / Upload Media. 5 Page 12
15 ECA Video Submission - Student Guide 6 Click on Upload Media. 6 7 Click on Select Video File. 7 Page 13

16 ECA Video Submission Student Guide 8 9 Select the video file. For example, MaryTan_ECA_Video.mp4. Click on Open The video file uploading will commence. The uploading speed depends on your file size and the speed of your internet connection. 10 Page 14
17 ECA Video Submission - Student Guide 11 Click on Submit Assignment to submit the assignment Click on Submission details to view your submitted assignment Click on the video to stream it online. 13 Page 15
18 ECA Video Submission Student Guide 14 To download your submitted video, right-click on the video while it is playing and click on Save video as Click on Save. 15 Page 16

19 ECA Video Submission - Student Guide 5. Video Compression If your video file size exceeds the 500MB limit, you may use VLC media player to compress your video file before submission. Navigate to to download VLC media player for both Mac and Windows. i. Windows 1 Launch VLC media player on your computer Click on Media. Click on Convert / Save. 2 3 Page 17


20 ECA Video Submission Student Guide 4 Click on Add Click on your recorded video. For example, StudentTest01_ECA.mp4. Click on Open 5 6 Page 18

21 ECA Video Submission - Student Guide 7 Click on Convert / Save. 7 Page 19

22 ECA Video Submission Student Guide 8 Click on Create a new profile. Note: The video file that you need to compress will be saved using this new Profile settings, which is used to optimize your final file size. 8 Page 20

23 ECA Video Submission - Student Guide Give a Profile Name. For example, SUSS ECA VIDEO. Click on Encapsulation. Select MP4/MOV Page 21

24 ECA Video Submission Student Guide Click on Video Codec. Select the checkbox besides Video. Click on Encoding parameters. Set Codec as H-264. Set Bitrate to 340 kb/s. Set Frame Rate as fps Page 22

25 ECA Video Submission - Student Guide Click on Resolution. Set Scale to 1. Set Width to 320px. Set Height to 240px Page 23

26 ECA Video Submission Student Guide Click on Audio Codec. Select the checkbox besides Audio and Keep original audio track. Click on Create to save the settings Page 24

27 ECA Video Submission - Student Guide Select the profile that you have created. For example, SUSS ECA VIDEO. Click on Browse to select the destination to save the compressed video file to Page 25

28 ECA Video Submission Student Guide 27 Double click on the folder that you want to save the compressed video file to. For example, ECA. 27 Page 26

29 ECA Video Submission - Student Guide Key in the file name. For example, StudentTest_ECA. Click on Save Page 27
30 ECA Video Submission Student Guide 30 Click on Start. 30 Page 28

31 ECA Video Submission - Student Guide 31 The video compression will commence. The progress is indicated by the playback slider. 31 Page 29
32 ECA Video Submission Student Guide 32 Once the compression is completed, the compressed video will be made available in your specified folder. 32 Page 30


33 ECA Video Submission - Student Guide ii. Mac If your video file size exceeds the 500MB limit, you may use VLC media player to compress your video file before submission. Navigate to to download VLC media player for both Mac and Windows. 1 Launch VLC on your computer Click on File. Click on Convert/Stream. 2 3 Page 31
34 ECA Video Submission Student Guide 4 Click on Open media. 4 Page 32

35 ECA Video Submission - Student Guide 5 6 Select the video file that you need to compress. For example, ECA_Video_test.mp4. Click on Open. 5 6 Page 33
36 ECA Video Submission Student Guide 7 Click on Customize. 7 Page 34

37 ECA Video Submission - Student Guide 8 9 Click on Encapsulation. Choose MP4/MOV. 8 9 Page 35

38 ECA Video Submission Student Guide Click on Video codec. Set Codec as H.264. Set Bitrate to 340. Set Frame rate to 29. Set Width to 320. Set Height to 240. Set Scale to Page 36

39 ECA Video Submission - Student Guide Click on Audio codec. Select the checkbox besides Audio and Keep original audio track. Click on Save as new Profile to save the settings Page 37

40 ECA Video Submission Student Guide Enter a name for the new profile settings. For example, SUSS ECA VIDEO. Click on Save. Click on Apply Page 38
41 ECA Video Submission - Student Guide After saving the profile settings, it will reflect at the Profile section. Next, let s select the destination to save the compressed video file to. Click on Save as File Page 39
42 ECA Video Submission Student Guide 25 Click on Browse 25 Page 40

43 ECA Video Submission - Student Guide Key in the file name for the compressed video. For example, ECA_Test_Video. Select the destination folder. For example, ECA. Click on Save Page 41
44 ECA Video Submission Student Guide 29 Click on Save. 29 Page 42
45 ECA Video Submission - Student Guide 30 The video compression will commence. The progress is indicated by the playback slider. 30 Page 43

46 ECA Video Submission Student Guide 31 Once the compression is completed, the compressed video will be made available in your specified folder. Note: The compressed file format is m4v while the original uncompressed file format is mp4. Do ensure that your compressed video is playable before submitting it to Canvas. 31 Page 44
47 ECA Video Submission - Student Guide 6. Learning Services Support How do I contact Learning Services Support? Call (Option 1 followed by Option 2) Operating Hours 8.30am to 7.30pm (Mon - Fri) 9.00am to 1.00pm (Sat) lssupport@suss.edu.sg Page 45


48 ECA Video Submission Student Guide Appendix Overwrite / Keep existing file If there is a pop up showing: The output file already exist. If recording continues, the file will be overridden and its content will be lost. 1 2 Click on Overwrite to dismiss the pop up message. Click on the Pause button to pause the video compression. 1 2 Page 46

49 ECA Video Submission - Student Guide 3 4 Right click and select Select ALL files in VLC media player. Right click and select Delete. 4 3 Page 47
50 ECA Video Submission Student Guide 5 6 After deleting the files in VLC media player, Repeat Steps 2 to 6 from page 31 to 33. You may use back the same file or select another video file to compress. Ensure that your created profile is being selected. 7 Click on Browse to save the compressed file as another name instead of ECA_Test_Video.m4v. 6 7 Page 48

51 ECA Video Submission - Student Guide 8 Key in a new file name for the compressed video. For example, Student_ECA. 9 Click on Save. 8 9 Page 49

52 ECA Video Submission Student Guide 10 The name of the compressed video file will be updated. 11 Click on Save Page 50
53 ECA Video Submission - Student Guide 12 The video compression will commence. The progress is indicated by the playback slider. 12 Page 51

54 ECA Video Submission Student Guide 13 Once the compression is completed, the compressed video will be made available in your specified folder. Note: The compressed file format is m4v while the original uncompressed file format is mp4. Do ensure that your compressed video is playable before submitting it to Canvas. 13 Page 52
ECA Video Submission Guide for Student
 ECA Video Submission Guide for Student TABLE OF CONTENTS 1. Important Notes... 1 2. Hardware Requirement for Live Recording... 2 3. Software Requirement for Live Recording... 2 4. Record/Upload Media Submission...
Tips for Submitting a Kaltura Media Assignment
 Tips for Submitting a Kaltura Media Assignment Overview Your instructor may ask you to upload a video or audio file, use your webcam to record, or use the screen-recording feature to record a task you
Using an iphone For Your Video Submission Assignment
 Using an iphone For Your Video Submission Assignment McGraw- Hill Education s CONNECT for the following titles: Public Speaking Matters, 1 st ed., by Kory Floyd Interpersonal Communication, 3 rd ed., by
Student User Guide: Video Assessment
 Student User Guide: Video Assessment LiveText Video Assessment User Guide Video Assessment Overview... 2 Video requirements... 2 Submitting to an assignment... 3 To attach a streaming video to an assignment:...
Remote Proctor Now User Quick Guide
 Remote Proctor Now User Quick Guide Contents Step 1: System Check... 2 Step 2: Access the Online Software... 5 Step 3: Select your Exam... 7 Step 4: Verify Identity... 7 Common errors:... 14 Page 1 of
Panopto. End-User Guide
 Panopto End-User Guide Table of Contents INTRODUCTION... 3 PROVISIONING A COURSE... 3 LOGGING IN... 7 NAVIGATION... 8 PREPARING TO RECORD... 9 CREATING A SIMPLE RECORDING (AUDIO AND VIDEO ONLY)... 10 CREATING
Kaltura Media Mashup Tool
 OVERVIEW: Kaltura is a media (video, audio, images) hosting and creation application that is integrated into the Blackboard LMS. Kaltura allows students to easily create and share media wherever there
Puffin Academy User Guide
 Puffin Academy (from CloudMosa, Inc.) is a fast and functional mobile web browser designed for K-12 students, parents and teachers. It is designed to enable use of Adobe Flash based educational web materials
GoREACT Instructor FAQs
 GoREACT Instructor FAQs Systems Support Yes No Operating Systems* Windows Mac *The most current versions of operating systems and browsers are recommended. Older versions may work but have not officially
Faculty User Guide: Video Assessment
 Faculty User Guide: Video Assessment LiveText Video Assessment User Guide Video Assessment Overview... 2 Faculty Assessment... 2 Assessing a student submission... 2 To assess a student submission containing
Wattle Guide for Students Updated: January 2018
 Wattle Guide for Students Updated: January 2018 Page 1 Table of Contents Wattle Guide for Students... 1 Wattle Guide for Students... 3 Introduction... 3 Student Services... 3 Access Wattle... 3 Access
GoREACT Student FAQs. Other Software and Hardware Needs. Systems Support Yes No
 GoREACT Student FAQs Systems Support Yes No Operating Systems* Windows Mac *The most current versions of operating systems and browsers are recommended. Older versions have not been tested. Browsers Chrome
Getting Started with Panopto (Windows and OSX) for Sakai
 for Sakai") Table of Contents Enabling Panopto in Your Sakai Course... 2 How to Record Lectures with Panopto... 4 For Windows:... 6 For OSX:... 11 Student Viewing Guide for Panopto Recordings via Canvas... 14 Downloading
Table of Contents Enabling Panopto in Your Sakai Course... 2 How to Record Lectures with Panopto... 4 For Windows:... 6 For OSX:... 11 Student Viewing Guide for Panopto Recordings via Canvas... 14 Downloading
Contents A. COLLABORATE INTRODUCTION... 1 B. SYSTEM REQUIREMENTS... 1 C. CANVAS COLLABORATE... 2 D. SETTING OF AUDIO (COMPULSORY)...
...") Contents A. COLLABORATE INTRODUCTION... B. SYSTEM REQUIREMENTS... I. OPERATING SYSTEM... II. BROWSER... III. JAVA APPLICATION... C. CANVAS COLLABORATE... I. CREATING COLLABORATE SESSION... II. JOINING
Contents A. COLLABORATE INTRODUCTION... B. SYSTEM REQUIREMENTS... I. OPERATING SYSTEM... II. BROWSER... III. JAVA APPLICATION... C. CANVAS COLLABORATE... I. CREATING COLLABORATE SESSION... II. JOINING
View the full TurnItIn report. Submit the file to TurnItIn for originality checking
 D 2 L Q uickguide: Assessing Dropbox Submissions Overview D2L allows you to view submissions online alongside the grading interface or to download them. If you view submissions online, you can only provide
Welcome to MyKangan! A how to guide for student. Welcome to MyKangan. A How to guide for students
 Welcome to MyKangan A How to guide for students May 2015 Contents Welcome to MyKangan... 1 Logging in... 2 Accessing MyKangan via the Student Portal ONSITE... 2 Accessing MyKangan via the Student Portal
Submitting coursework online through BART Handbook Contents
 Submitting coursework online through BART Handbook Contents 1. Tips before submitting... 2 2. Formatting requirements checklist... 3 3. Submitting Online... 4 3.1. LOCATING YOUR ASSIGNMENT... 4 3.2. UPLOADING
Using Adobe Acrobat College. How to Host a Meeting - User s Guide
 Note: For the purpose of consistency between the Hunter College written and web documentation and the Adobe Connect pro Software terminology, we will use meeting to represent a virtual class session, host
Meeting Host Guide. Getting Stated with Adobe Connect 9.3. Adobe Connect is a web conferencing platform for web meetings, elearning, and webinars.
 Meeting Host Guide Getting Stated with Adobe Connect 9.3 Adobe Connect is a web conferencing platform for web meetings, elearning, and webinars. Adobe Connect Services support is available 24/7 at 1-800-
D2L QuickGuide: Dropbox Overview
 Office of Distance Education Academic & Student Affairs, Colorado Mesa University D2L QuickGuide: Dropbox Overview The Dropbox tool allows you to set up assignments that students can turn in online. You
Jersey City Free Public Library WIFI Hotspot
 1. Windows 2000, XP, 7 and Vista Users: a. Select the wireless icon in the system tray. or or or b. Select the SSID of the library you are currently located: JCPL- c. Launch a web browser (Internet Explorer,
For more information on Desire2Learn go to Create a new Dropbox folder
 Desire 2 Learn Quickguide: The Dropbox Overview The Dropbox tool allows you to set up assignments that students can turn in online. You can set up separate Dropbox folders for each assignment and set up
Wattle Guide for Students Version 2: July 2013
 Wattle Guide for Students Version 2: July 2013 Wattle Guide for Students 2013 Page 1 Table of Contents Wattle Guide for Students... 3 Introduction... 3 Student Services... 3 Access Wattle... 3 Access to
Getting Started with KSU s MediaSpace in D2L Brightspace - Daylight
 Getting Started with KSU s MediaSpace in D2L Brightspace - Daylight MediaSpace for Students Guide University Information Technology Services Learning Technologies, Training, Audiovisual, and Outreach Copyright
Submitting coursework online through BART Handbook Contents
 Submitting coursework online through BART Handbook Contents 1. Tips before submitting... 2 2. Formatting requirements checklist... 3 3. Submitting Online... 4 3.1. LOCATING YOUR ASSIGNMENT... 4 3.2. STEP
TABLE OF CONTENTS. 7 Chat Files Attendees Questions Settings... 18
 INSTRUCTOR MANUAL TABLE OF CONTENTS Table of Contents... 1 1 Overview... 2 2 Prerequisites... 2 3 Starting the Session... 2 4 Session Menu... 4 4.1 Extending duration... 4 4.2 Lobby Announcement... 5 4.3
Audio Recording. Technology in a Box. Box Contents: USB microphone Audacity Directions. What you can do:
 Technology in a Box Box Contents: USB microphone Audacity Directions What you can do: Record audio snippets for inclusion in your online course space Send an audio reminder via email Overview Audio recordings
Home page layout in Canvas
 Home page layout in Canvas This document describes how to change the Home page layout to a custom home page in Canvas. St e p s: 1. Click on the home tab on the left hand pane when in a course. 2. Click
U-Vision Online Introduction Workshop
 U-Vision Online Introduction Workshop Presented by: Mr. William Cheung Xaness Interactive Limited Main Page Website: http:// Support the following browsers > IE8, Firefox, Chrome, Safari Main Page HKU
1. Introduction Overview Product Information... 3
 1. Introduction... 3 1.1 Overview... 3 1.2 Product Information... 3 2. Device Connection... 3 2.1 Connection Diagram... 3 2.2 Wi-Fi Setting... 4 2.2.1 Set up WiFi by Mobile Phone... 4 2.2.2 WPS/QSS One
Using the Pearson eportfolio System
 Using the Pearson eportfolio System Candidate Guide Pearson, P.O. Box 226, Amherst, MA 01004 System Specifications To use the Pearson eportfolio system, you will need access to a computer with the following
Appendix F: Uploading, Segmenting, and Submitting Evidence Reference Guide (Video, Audio, and PDFs)
") Appendix F: Uploading, Segmenting, and Submitting Evidence Reference Guide (Video, Audio, and PDFs) What are the technical requirements for submitting evidence? In 2014 2015, most candidates will be able
Appendix F: Uploading, Segmenting, and Submitting Evidence Reference Guide (Video, Audio, and PDFs) What are the technical requirements for submitting evidence? In 2014 2015, most candidates will be able
the Virtual Classroom Camtasia Relay Virtual.Cumbria.ac.uk
 the Virtual Classroom Camtasia Relay Virtual.Cumbria.ac.uk This guide is intended for staff and covers the general and practical use of Camtasia Relay. Please look for our other related guides which you
The Producer Software
 The Producer Software Open the Producer software. The icon should be located on your desktop. If not, you can launch Producer from the Start menu and selecting All Programs. Once you have opened the Producer
Student Guide to Uploading a Video Assessment
 Student Guide to Uploading a Video Assessment Introduction Step 1: Downloading and Installing Handbrake Step 2: Converting your Video using Handbrake Step 3: Uploading your video to my.navitas-professional
INSTRUCTIONS FOR SESSION CHAIRS AND PRESENTERS
 ORAL PRESENTATION INSTRUCTIONS CONCURRENT SESSION INSTRUCTIONS Seven concurrent sessions will be held in the Wisconsin Center on the first floor: 101AB, 102AB, 102C, 102DE, 103AB, 103C, and 103DE. Each
Module 4: Communication
 Module : Communication Calendar: Adding An Event I Calendar: Adding An Event II Calendar: Editing An Event Host a Real-Time Conference I Host a Real-Time Conference II Host a Real-Time Conference III Make
Adding Your Files to Blackboard (i.e. Uploading Your Syllabus) Option A: Uploading Your File through an Item s Attach File Area
 Option A: Uploading Your File through an Item s Attach File Area") Updated 11/12/12 MH Adding Your Files to Blackboard (i.e. Uploading Your Syllabus) Blackboard allows users to upload files to many different content areas. In this tutorial, you'll learn how to navigate
Updated 11/12/12 MH Adding Your Files to Blackboard (i.e. Uploading Your Syllabus) Blackboard allows users to upload files to many different content areas. In this tutorial, you'll learn how to navigate
Mediasite Introductory Guide
 Mediasite Introductory Guide Starting the Summer 2016 session, a new lecture capture tool, Mediasite, will be used to record lectures. This software has new features that did not exist in the previous
This type of content can be added to any content area (such as Subject Materials) or a Learning Module.
 or a Learning Module.") 1 Overview A variety of content can be added to your subject site including: Item: Create and style your own text or HTML content File: Add a document (e.g. Word, PDF, ZIP) for students to download Audio:
1 Overview A variety of content can be added to your subject site including: Item: Create and style your own text or HTML content File: Add a document (e.g. Word, PDF, ZIP) for students to download Audio:
Make changes to a Panopto recording using an external video editor - Windows version
 Make changes to a Panopto recording using an external video editor - Windows version Overview As more and more AV professionals in businesses and universities use Panopto, we've received a growing number
Create, Add, and Manage Videos
 CHAPTER 4 Revised: May 31, 2011 Topics in this section describe ways that you can contribute video and supplemental files to your Cisco Show and Share community. Prerequisites, page 4-1 Procedures, page
Uploaders Guide Table of Contents
 Uploaders Guide Table of Contents Preparing & Uploading Files, Dailies, & Cuts... 3 File Preparation & Encoding Specifications... 3 Dailies and Avid Log Exchange (ALE) Requirements... 3 Base ALE Components...
Instructions for File Upload Process for Mass Media and Song Composition Entries
 Instructions for File Upload Process for Mass Media and Song Composition Entries Before getting to the file upload process, you will need to have the files and folders ready to be uploaded. For Mass Media
Getting started with Panopto Instructors
 Getting started with Panopto Instructors What is Panopto? Panopto is a video content management system for uploading, managing and sharing recorded lectures, flipped classroom videos, campus events, and
Getting Started with Panopto (Windows and OSX)
") Table of Contents Setting up Panopto in Blackboard... 2 Setting up Panopto... 6 For Windows... 8 For OSX:... 11 Removing Panopto RSS Feeds in Blackboard... 14 Creating Placeholders for Future Lectures...
Table of Contents Setting up Panopto in Blackboard... 2 Setting up Panopto... 6 For Windows... 8 For OSX:... 11 Removing Panopto RSS Feeds in Blackboard... 14 Creating Placeholders for Future Lectures...
Participant Guide. Getting started with Adobe Connect 10. Adobe Connect is a web conferencing platform for web meetings, elearning, and webinars.
 Participant Guide Getting started with Adobe Connect 10 Adobe Connect is a web conferencing platform for web meetings, elearning, and webinars. Adobe Connect Services support is available 24/7 at 1-800-422-3623.
Version 2.0. Campus 2.0 Student s Guide
 Campus 2.0 Student s Guide Version 2.0 Campus 2.0 Student s Guide Error! No text of specified style in document. i Important Notice Copyright 2008 Tegrity, Inc. Disclaimer 2008 Tegrity, Inc. all rights
Getting started with Panopto Instructors
 What is Panopto? Panopto is a video content management system for uploading, managing and sharing recorded lectures, flipped classroom videos, campus events, and more. It comes with built-in video analytics,
Jigsaw Troubleshooting Tips
 Jigsaw Troubleshooting Tips September 11, 2015 Page 1 of 15 Table of Contents Help I click Join Using Browser button, but nothing happens.... 3 Tip # 1: Clear the Internet browser s cache or settings....
UPSTAGE VIDEO HACK ANNEX
 UPSTAGE VIDEO HACK ANNEX 1 2 Published : 2013-10-25 License : None INTRODUCTION T his manual is for the UpStage Video Hack (2013) and is specifically about the new audio-visual streaming feature, developed
Frequently asked questions on how to join the webinar
 Frequently asked questions on how to join the webinar For ease of use, we recommend all participants use Google Chrome when joining the webinar. Mobile and tablet users are encouraged to download the Adobe
Creating a Recording in Canvas Embedding a Recording in Canvas To embed a recording into a discussion
 Table of Contents What is Kaltura... 3 Things to Remember... 3 My Media... 3 To access My Media... 3 Upload Media... 4 To perform a media upload... 4 Viewing Videos... 6 Add New List Options... 6 Media
How To: Panopto Tutorial for Students
 How To: Panopto Tutorial for Students Information Technology Help Desk Colorado Mesa University 8/22/2016 CMU Help Desk: 970-248-2111 or http://whd.coloradomesa.edu Page 0 Table of Contents Table of Contents...
Lorex Client 7.0 & Lorex Message Master
 Lorex Client 7.0 & Lorex Message Master Software Manual English Version 1.0 MODELS: L19WD Series www.lorexcctv.com Includes L19WD800 & L19WD1600 Copyright 2008 Lorex Technology Inc. Table of Contents Table
Blackboard Learn Kaltura Media
 Last Updated: 05/18/2017 Blackboard Learn Kaltura Media Kaltura CaptureSpace The Kaltura Building Block allows instructors to add powerful media tools to Blackboard, combing the best features of presentation
PANOPTO GUIDE Version 1.2 October 2016
 Version 1.2 October 2016 Contents INTRODUCTION:... 2 PREREQUISITES... 2 INSTRUCTIONS... 2 Log into Panopto Online... 2 Using the Recorder... 2 Larger Recorder Preview (Broadcast)... 5 View Your Session...
Powered By. Student Guide
 Powered By Student Guide Property of Therapy Source, Inc. August 2017 Table of Contents Part I Logging Into Classroom Find Your Classroom...3 Part II Meet Your Therapist Set Up Home Page.....4 Part III
Kaltura Guidebook Table of Contents
 Kaltura Guidebook Table of Contents Upload a Video... 4 Kaltura Login... 5 FlashLine Account... 6 Media Upload... 7 Choose a file to upload... 8 Add Details... 9 Privacy Settings... 10 Review Upload...
Moodle 2.2 Student User Guide My Private Files
 Moodle 2.2 Student User Guide My Private Files Using My Private Files My Private Files saves files in the cloud. Only the user may access it, but you can access it from any computer where you can access
School Installation Guide ELLIS Academic 5.2.6
 ELLIS Academic 5.2.6 This document was last updated on 2/16/11. or one or more of its direct or indirect affiliates. All rights reserved. ELLIS is a registered trademark, in the U.S. and/or other countries,
How To: Panopto Tutorial for Faculty & Staff
 How To: Panopto Tutorial for Faculty & Staff Information Technology Help Desk Colorado Mesa University 8/22/2016 CMU Help Desk: 970-248-2111 or http://whd.coloradomesa.edu Page 0 Table of Contents What
1. LOGIN & CLASS PREPARATION
 1. LOGIN & CLASS PREPARATION At the end of this topic, you should be able to: 1 Know the hardware requirements for accessing GOALS system. 2 Know how to log into GOALS system. 3 Updating personal profile.
Video. Add / edit video
 Video Videos greatly support learning in an e-earning setting. It is a rather complex topic though, due to the variety of formats, codecs, containers and combination of operating systems and browsers.
How To: Panopto Tutorial for Students
 How To: Panopto Tutorial for Students Information Technology Help Desk Colorado Mesa University 10/20/2017 CMU Help Desk: 970-248-2111 or http://whd.coloradomesa.edu Page 0 Table of Contents Table of Contents...
Submitting Coursework via SurreyLearn
 Submitting Coursework via SurreyLearn During your studies you will be expected to submit the majority of your pieces of coursework electronically via SurreyLearn this guide provides detailed instructions
EMC Bookshelf Instructor Administrator User Guide
 EMC Bookshelf Instructor Administrator User Guide Introduction As a new feature of the EMC Bookshelf these administrator accounts will enable a greater amount of control over the ebook license that you
Media Tools in Canvas
 Media Tools in Canvas 12/2017 Definition of Media Tools Media tools include any feature in Canvas that facilitates in creating or accessing images and audio or video material, as well as any feature in
BBFlashBack Training for Library Staff
 BBFlashBack Training for Library Staff Learning outcomes: By the end of the course you will be able to: record a screencast insert/import text, images, audio & video edit text, audio & video files produce
Panopto Focus- Lecture Capture, Instructions
 Table of Contents Installation... 2 Media Standards... 3 Folder Quotas... 3 Logging Into the Recorder Application... 4 The Recorder Application... 5 The Basics... 5 Using Hotkeys... 5 Settings Menu...
Introduction to the SAM Student Guide 4. How to Use SAM 5. Logging in the First Time as a Pre-registered Student 5 Profile Information 7
 Contents Introduction to the SAM Student Guide 4 How to Use SAM 5 Logging in the First Time as a Pre-registered Student 5 Profile Information 7 Logging into SAM as a New User 9 Forgot Password 14 Grace
Learning Ally s Link Quick start for Mac
 Learning Ally s Link Quick start for Mac Welcome to Link! We want to make sure installing and using Link is as easy as possible. Follow these simple steps to begin your learning experience. SYSTEM REQUIREMENTS
INSTRUCTION MANUAL Toro 720P Watch Video Recorder SB-WR8080
 INSTRUCTION MANUAL Toro 720P Watch Video Recorder SB-WR8080 Revised: Jan 15, 2013 Thank you for purchasing from SafetyBasement.com! We appreciate your business. We made this simple manual to help you enjoy
How To: Panopto Tutorial for Faculty & Staff
 How To: Panopto Tutorial for Faculty & Staff Information Technology Help Desk Colorado Mesa University 8/22/2016 CMU Help Desk: 970-248-2111 or http://whd.coloradomesa.edu Page 0 Table of Contents What
Stream and Record Lectures
 VOD Download Live Streaming Remote Student Stream and Record Lectures Remote Student Central Media Library VOD 10 Mbps MP4/MOV 3 Mbps Streaming Wowza or Adobe Flash Live Streaming Servers Educational facilities
Ultimate Video Capture v1.8 User Manual
 Ultimate Video Capture v1.8 User Manual Minimum Requirements: Processor: Intel or AMD CPU (1.0Ghz) PC, Laptop or Tabloid PC Memory: 256 Mb of RAM HD: 100 Mb of free space for basic recording and installation
Audacity is FREE as defined by the Audacity design team. IU Kokomo students can download Audacity from IUware at
 This tutorial will describe how to (1) download Audacity on either Windows or Mac computers, and (2) set up Audacity to edit and save audio files in either *.wav or *.mp3 format. All IU Kokomo student
DVS-200 Configuration Guide
 DVS-200 Configuration Guide Contents Web UI Overview... 2 Creating a live channel... 2 Inputs... 3 Outputs... 6 Access Control... 7 Recording... 7 Managing recordings... 9 General... 10 Transcoding and
1. Enter your User ID or Address associated with your Chalk & Wire account.
 Once you have been provided with your Chalk & Wire User ID and Password, go to the Chalk & Wire login web page for your institution. If you do not know the correct URL, please visit ep.chalkandwire.com
Creating a Recording Using Panopto
 Creating a Recording Using Panopto Table of Contents Accessing Panopto... 2 Panopto Recording Screen... 3 Recording a PowerPoint Presentation... 3 Recording Your Desktop... 4 Manage Recordings... 5 Viewing/Managing
SAM 2010 Student Manual
 SAM 2010 Student Manual 2012 Course Technology. 20 Channel Center Street. Boston, MA 02210. SAM 2010 SAM 2010 Student Manual Contents 1 Introduction to SAM 2010... 1 2 Before You Begin... 1 2.1 System
Student Guide to Collaborate
 Student Guide to Collaborate Collaborate is a tool that integrates Blackboard Collaborate into OWL, providing an interactive online learning environment. Instructors use it to create virtual classrooms
Speech Upload & Annotation Tool User Guide for Instructors
 Speech Upload & Annotation Tool User Guide for Instructors For technical support call 1-800-936-6899 TABLE OF CONTENTS Quick Facts & Helpful Features 2 The Upload Tool... 3 Uploading a New Clip... 3 Locating
How to Upload Videos
 Q U I C K S T A R T G U I D E How to Upload Videos Edvance360 Best Practices Videos should be under 1 Gig for best results (download speed and mobile devices), but our limit per file is 2 Gig for Lessons
Experimental Features on Kindle (2nd Generation)
") Experimental Features on Kindle (2nd Generation) Experimental Features on Kindle (2nd Generation) Use the Basic Web Feature Listen to Music Transfer MP3s Use the Basic Web Feature Launch the Basic Web
Experimental Features on Kindle (2nd Generation) Experimental Features on Kindle (2nd Generation) Use the Basic Web Feature Listen to Music Transfer MP3s Use the Basic Web Feature Launch the Basic Web
INSTRUCTOR GUIDEBOOK. Adobe Connect. Table of contents
 Adobe Connect INSTRUCTOR GUIDEBOOK for Continuing and Distance Education instructors at the UNIVERSITY OF NORTHERN IOWA Table of contents System requirements..................... 2 Preparing for class........................
IMPORT GUIDE. PowerPhoto CRM 2013/2015
 IMPORT GUIDE PowerPhoto CRM 2013/2015 Contents Import Register Configure Add, Remove, Set Default, Set Record Image, Thumbnail & View Text Display Original File Save Original File Resize Photo Resize Height
Viewpoint. This document will guide you through using Viewpoint, and highlights its major features. Viewpoint URL is
 Viewpoint Viewpoint is a free video and audio repository that allows users to upload their media (audio and video files) online and make them available to students. It also allows users to record their
Welcome to MainConcept AAC Encoder - Plug-In for Adobe Flash Media Live Encoder -
 Welcome to MainConcept AAC Encoder - Plug-In for Adobe Flash Media Live Encoder - MainConcept AAC Encoder Plug-In v1.0.6 Contents Introduction..........................................................
Fast Folders 2 Student User Guide
 Fast Folders 2 - Student User Guide Launching Fast Folders 2 (from a networked PC) 1. If you have previously installed Fast Folders 2 it will be located in Start and All Programs. 2. Otherwise, go to Start
Table of Contents. Encoder to Decoder... Audio & Antenna Connections... Encoder to Software Decoder... Encoder to Internet...
 Table of Contents Introduction... 4 Video Manual... 5 Mounting Options... 6 Power Connection... 7 Encoder & Decoder LEDs... 8 Audio & Antenna Connections... 8 Encoder to Software Decoder... 9 Encoder to
Windows Media Player Manual Update 12 For 7 32 Bit
 Windows Media Player Manual Update 12 For 7 32 Bit Media Optimizer Adobe Flash Player 18 (Win and Mac) and 11.2 (Linux) - 32 bit and 64 bit builds of Flash Player for Windows 8 are a part of the Windows
CWU LiveText Instructions for Submitting the edtpa (WA)
") Make sure you are using Mozilla Firefox as your web browser when working in LiveText. Other web browsers may have issues with compatibility. For the free download, go to http://www.mozilla.org/en-us/.
Make sure you are using Mozilla Firefox as your web browser when working in LiveText. Other web browsers may have issues with compatibility. For the free download, go to http://www.mozilla.org/en-us/.
NEARPOD SET UP. Download and install the Nearpod app on the instructors' ipad and on the students' devices from the App Store:
 NEARPOD SET UP 1. Verify that you have WiFi internet access for all devices. 2. Installing the Nearpod app: Download and install the Nearpod app on the instructors' ipad and on the students' devices from
Student Instructions SD# /16 Awards Program
 Student Instructions SD#57 2015/16 Awards Program Go to https://sd57.fluidreview.com *Please note that if you have any issues when using Internet Explorer to navigate this website, change to a different
Recording Narration in PowerPoint using ispring Free
 Recording Narration in PowerPoint using ispring Free Narrated PowerPoint shows saved as-is tend to be very large files. This makes them cumbersome and difficult to upload and share with your students or
KUMC Camtasia Relay 4 Quick Start Guide (12/06/12)
") KUMC Camtasia Relay 4 Quick Start Guide (12/06/12) Overview You can use Camtasia Relay (CR) to record your computer screen and audio. Your recording is automatically uploaded to the CR server where it
KUMC Camtasia Relay 4 Quick Start Guide (12/06/12) Overview You can use Camtasia Relay (CR) to record your computer screen and audio. Your recording is automatically uploaded to the CR server where it
Drag and drop. All done!
 Working with Moodle, a Guide for Faculty Posting Course Materials and Managing Files Summary Moodle helps you share many different types of files with your students - Word documents, PowerPoint presentations,
Training Handout Tegrity Campus 2.0
 Training Handout Tegrity Campus 2.0 Tegrity Campus 2.0 is a user-friendly video, audio, and screen capturing platform for replay by students. Tegrity is accessible anywhere via Blackboard s course management
Topic: Record Audio. Office of Online & Extended Learning D2L Brightspace Student Help. Begin an Audio Recording in an Assignment
 Office of Online & Extended Learning D2L Brightspace Student Help Topic: Record Audio You can record up to a five minute audio message in D2L Brightspace in two locations: when submitting to Assignments