How You Use the Timeline
|
|
|
- Augusta Simon
- 6 years ago
- Views:
Transcription


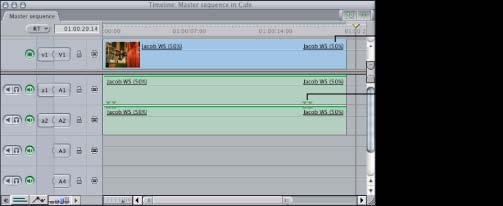
1 How You Use the Timeline The Timeline and the Canvas display two different views of the same sequence. The Timeline shows the chronological arrangement of clips and layered video and audio clip items, while the Canvas provides a single view that allows you to watch your sequence just as it will appear on a movie or television screen. The Timeline, like the Canvas, contains tabs for all open sequences. Each sequence in the Timeline is organized into separate video and audio tracks, which contain clip items you ve edited into the sequence from the Browser. Using the Timeline, you can quickly navigate through an entire edited sequence, adding, overwriting, rearranging, and removing clip items. The Timeline window below shows several items in the Timeline. This image shows the same items as they appear in the Canvas. Since the playhead in the Timeline mirrors the playhead in the Canvas, you can use the navigation, marking, and editing controls in the Canvas to navigate in the Timeline, and vice versa. To make the Timeline window active Do one of the following: Click in the Timeline window. Press Command-3. Note: To work in the Timeline, the first thing you have to do is open a sequence. If you don t have any sequences in your project, you need to create one. For more information, see Working with Projects, Clips, and Sequences.


2 Learning About the Timeline You can view the content of your sequences in many different ways in the Timeline. Track height, clip opacity and audio level overlays, keyframes, and many other sequence properties can be displayed and edited in the Timeline. Each sequence has its own unique display settings; changing the zoom setting or audio controls in one sequence doesn t affect another.


3 Vertical Multitrack Controls The following controls and areas affect vertically working with the tracks. Tracks: The main portion of the Timeline is divided into audio and video tracks, with a divider between the two regions. You can drag the divider up or down to allocate more room to either the video or audio half of the Timeline. Audio tracks 1 and 2 are just underneath the divider, and all additional audio tracks continue downward. Video track 1 is just above the divider, and all additional video tracks continue upward. For more information, see Working with Tracks in the Timeline. You can change the default number of video and audio tracks in the Timeline Options tab of the User Preferences window. For more information, see Choosing Settings and Preferences. More tracks can be added at any time. Additional audio tracks can be used for adding music or sound effects, or for organizational purposes. Additional video tracks can be used for superimposing clips and compositing layers of video clips together.


4 Unused area: This is the area either above or below the outermost video and audio tracks in your sequence. Ordinarily, this area is blank, but if you drag clips directly into this gray area, new tracks are created to accommodate them. Vertical scroll bars and thumb tabs: If you have more tracks than can be displayed in the Timeline window at one time, the scroll bars let you scroll through your video and audio tracks separately. The thumb tabs between the audio and video track regions can be used to define a static area that contains separate groups of audio or video tracks with their own scroll bars. This can come in handy when you have considerably more audio tracks than video. You can use the thumb tabs between your audio and video scroll bars to allocate more space to your audio tracks and less for video. For more information about creating a static area, see Working with Tracks in the Timeline.

.")
, or six hours (with a sample rate of 96 khz).")

5 Horizontal Time Controls The following controls and areas affect horizontally working with the tracks. Ruler: The ruler along the top of the Timeline represents the total duration of your edited sequence, from the first frame to the last. The ruler can be used for reference, to see the timecode corresponding to the location of clips in the Timeline. You can choose to view the ruler with several different units: timecode, frames, or feet and frames (for editing footage that originated on film). You can also click or drag the playhead in the ruler, which works exactly like the scrubber bar in the Canvas. Sequences can be a maximum of twelve hours (with a sample rate of 48 khz or lower), or six hours (with a sample rate of 96 khz). Playhead: The playhead displays the current frame location in a sequence. You can also use the playhead to navigate through your sequence in the Timeline. For more information, see Navigating in the Timeline. Current Timecode field: Indicates the timecode position of the playhead. Typing a new timecode number moves the playhead (as in the Viewer and Canvas). Zoom control: Lets you zoom in and out of the contents of your sequence in the Timeline. Zooming in shows more detail in the ruler, and the duration between the numbers in the ruler shrinks. Zooming out shows less detail in the ruler, but allows you to see more of the total duration of your sequence in the Timeline. If the playhead is visible, it stays centered when you use the Zoom control to zoom in on the Timeline. If the playhead is not visible, the Zoom control centers the current contents of the Timeline window instead. Using the zoom keyboard shortcuts produces slightly different results. Pressing Option-Equal Sign (=) or

6 Option-Hyphen (-) zooms in or out of the contents of the Timeline no matter which window in Final Cut Pro is currently active. If one or more clips are selected, they will be the center of the zoom. Otherwise, zooming centers on the current position of the playhead. Note: If you want to zoom in and out around the current playhead, make sure no clips are selected in the Timeline. Zoom slider: Like the Zoom control, the Zoom slider allows you to zoom in and out of a sequence in the Timeline. Dragging the thumb tabs on either side of the slider adjusts both thumb tabs and leaves the visible area of the Timeline centered. Pressing the Shift key and dragging one of the thumb tabs locks the opposite thumb tab and moves the visible area of the Timeline in the direction you re dragging. The light gray indicators inside the scroll bar indicate one-minute increments in your sequence, and widen or narrow depending on how far into your sequence you ve zoomed. Once you ve zoomed in to your sequence, you can scroll along the entire duration of the sequence by dragging the center of the zoom slider.
 clip items of the source clip in the Viewer to tracks in the Timeline.")

7 Editing Controls The Timeline editing controls determine which tracks are selected and turned on for editing and playback. Source and Destination controls: These allow you to connect (or patch) clip items of the source clip in the Viewer to tracks in the Timeline. These controls are primarily used in three-point editing to determine which source clip items tracks are edited into your sequence, and where they are placed. The number of available Source controls corresponds to the number of clip items of the source clip currently open in the Viewer. For example, a typical DV clip has one video track and two audio tracks. In this case, one video and two audio Source controls appear in the Timeline. If, instead, you open a clip in the Viewer that has one video item and four audio items, then one video and four audio Source controls appear in the Timeline. For more information, see Three-Point Editing. Track Visibility control: Determines whether the contents of a track are displayed and rendered in your sequence. When a track is disabled, it appears darkened in the Timeline, but its contents remain in your sequence and can still be edited. When you play back your sequence, disabled tracks don t appear in the Canvas or on an external monitor, nor will they be rendered or output to tape with that sequence. Note: Render files for a track are deleted if the track is disabled. You can have Final Cut Pro display a warning before this occurs by selecting the Warn if visibility change deletes render file option in the Editing tab of the User Preferences window. For more information, see Choosing Settings and Preferences. Lock Track control: Prevents a track s contents from being moved or changed in any way. Overlays in locked tracks can also be protected by deselecting the Pen tools can edit locked item overlays option in the Editing tab of the User Preferences window. Locked tracks are cross-hatched all the way across the Timeline. Tracks can be locked and unlocked at any time. For more information, see Choosing Settings and Preferences. Auto Select control: Enabling the Auto Select controls of specific tracks in the Timeline limits which tracks are affected by various functions such as copying, pasting, deleting, the Match Frame command, and so on. Note: You can think of In and Out points as limiting your edits in the horizontal (time) dimension and Auto Select as limiting your edits in the vertical dimension.

8 Audio Controls The following controls affect vertically working with audio in the tracks. Audio Controls button: Click to display the mute and solo buttons to the left of each audio track in the Timeline. By default, these controls are hidden. Mute and solo controls: Use to turn on or turn off audio playback on individual tracks for monitoring purposes. The track strips in the Audio Mixer have corresponding mute and solo buttons that work the same way. For more information, see Overview of the Audio Mixer. Mute: Click to turn off audio playback for that track. The mute button affects monitoring during playback only. Muting a track does not delete panning or audio level keyframes for the clip items in that track, nor does it prevent fader automation. Solo: Click to listen only to an individual track. When you solo a track, all others are muted except other tracks already soloed. For example, if you click the solo button on track A1, and it s the only track with solo selected, all other audio tracks are muted. If you turn on the solo button on multiple tracks, all tracks with solo turned on play back, while all other tracks are muted. Note: Mute and solo controls affect only playback in the Timeline. They do not suspend audio output during Print to Tape or Edit to Tape operations, or when exporting to a movie or audio file.

9 Positioning the Playhead Using the Ruler Moving the playhead in the Timeline ruler works in the same way as moving the playhead in the scrubber bar in the Canvas or Viewer. To scrub through a sequence in the Timeline Drag the playhead in the Timeline ruler. To jump to a specific location in the Timeline Click the desired location in the Timeline ruler. (You can do this while your sequence is stopped or playing.)

 over your video tracks, and audio level overlays (thin red lines) over any clips in the audio tracks of the")
10 About Timeline Display Controls in the Timeline Several controls in the Timeline allow you to change the display of certain items in the Timeline. Clip Keyframes control: Click this button to display the keyframe graph area additional space below each video and audio track in which to view and edit keyframes for effects that are applied to your clips. Clip Overlays control: Click this control to display opacity overlays (thin black lines) over your video tracks, and audio level overlays (thin red lines) over any clips in the audio tracks of the Timeline. These lines indicate video transparency or audio levels. Track Height control: Use this control to switch between four track display sizes Reduced, Small, Medium, and Large. The current setting is highlighted in blue and has a small dot in the center. Choosing a track height with this control resets all tracks to the new size, overriding any custom track heights previously selected. To preserve the relative heights of individually sized tracks while resizing all tracks, hold down the Option key while choosing a new height with this control. Note: When the track size is set to Reduced, neither audio waveforms nor thumbnails are displayed.


11 Real-Time Effects and the Render Status Bar Following are the Timeline s real-time and render items. RT pop-up menu: Allows you to adjust the playback quality of real-time effects in Final Cut Pro. Using the options in this menu, you can decide which is more important to you visual playback quality, or maximizing the available effects that can be played back in real time. For more information on the options in the Real Time Effects pop-up menu, see Using RT Extreme. Render status bar: This bar at the top of the Timeline indicates which parts of the sequence have been rendered at the current render quality. The top line is for video, the bottom for audio. Video render bar (upper region): Indicates the presence and render status of video effects items. Audio render bar (lower region): Indicates the presence and render status of audio effects items. Colors in the render bar above items indicate whether the items need to be rendered. Items that don t need to be rendered have dark gray bars above them. For more information, see Using RT Extreme. You can also refer to Rendering and Video Processing Settings. Clip item render bars: Audio clip items can be rendered individually. Clip items in the Timeline display individual render bars in the following cases: Audio clip items that require sample rate conversion: For example, audio clips that were captured at 44.1 khz but have been edited into a sequence set to 48 khz. Audio clip items with filters applied: Applying one or more filters causes an audio clip to display a render bar within the clip item itself. For more information about clip item render bars, see Rendering and Video Processing Settings.

. Linked Selection button: Click this to turn linked selection on and off.")
12 Other Miscellaneous Controls Following are other controls within the Timeline. Snapping button: Click to turn snapping on and off. This button appears in the Timeline button bar by default. When snapping is on, the playhead snaps to key areas in the Timeline, such as the boundaries of other clip items, sequence markers, and sequence In and Out points. This can be extremely useful when you need to quickly line up two clips without gaps in between, or to quickly move the playhead to a marker in preparation for an edit. You can also turn snapping on and off by choosing View > Snapping (or by pressing N). Linked Selection button: Click this to turn linked selection on and off. With linked selection on, clicking a video or audio clip item selects all other items linked to that item. If linked selection is off, only the clip item you click is selected, even if it is linked to other items. This is useful for editing the audio In or Out point of a clip separately from the video, such as when doing a split edit. You can also turn linked selection on and off by choosing Edit > Linked Selection (or by pressing Shift-L). For more information, see Linking and Editing Video and Audio in Sync. Link indicators (within clip items): The names of linked video and audio clip items are underlined. As long as linked selection is on, when one linked item is selected, moved, or trimmed, all other items linked to it are affected identically. Labels (within clip items): If any clip items in your edited sequence in the Timeline have been labeled, their names are highlighted in the color that matches that label. You can choose whether clip labels are displayed in the Timeline by selecting the Show Clip Labels option in the Track Layout pop-up menu. Speed indicator (within clip items): If the speed of a clip has been changed, either by using a fit to fill edit or using the Speed item in the Modify menu, its change of speed will be shown in parentheses after the name of the clip in the Timeline. If variable speed has been applied, the word Variable appears instead. Tip: Optional speed indicators can be displayed in the keyframe graph area to show you the speed of clips in your sequence using tick marks. For more information on clip keyframes, see Changing Motion Parameters. You can also refer to Adjusting Parameters for Keyframed Effects. The spacing and color of these tick marks indicate the speed and playback direction of your clips. For more information, see Changing Clip Speed. Stereo pair indicators (within clip items): Two pairs of triangles indicate that two audio clip items are linked as a stereo pair. If you select an audio clip item that is part of a stereo pair, the other clip item in the pair is also selected. This is useful when you are working with stereo audio clips such as music or sound effects. For more information, see Audio Editing Basics.
13
EDITING ON FINAL CUT PRO
 EDITING ON FINAL CUT PRO BUILDING BLOCKS OF A FINAL CUT PRO PROJECT: Projects (Think of it as a big folder, or your binder), which include all the elements of your movie, such as clips, sequences, and
For today, choose Format: NTSC Rate: Use: DV-NTSC Anamorphic (North American, widescreen)
") Final Cut Pro Final Cut Pro is a sophisticated video-editing program made by Apple. It is the editing software of choice for multimedia journalists using Apple computers, and is comparable to Adobe's Premiere
Final Cut Pro Final Cut Pro is a sophisticated video-editing program made by Apple. It is the editing software of choice for multimedia journalists using Apple computers, and is comparable to Adobe's Premiere
Premiere Pro Desktop Layout (NeaseTV 2015 Layout)
") Premiere Pro 2015 1. Contextually Sensitive Windows - Must be on the correct window in order to do some tasks 2. Contextually Sensitive Menus 3. 1 zillion ways to do something. No 2 people will do everything
Premiere Pro 2015 1. Contextually Sensitive Windows - Must be on the correct window in order to do some tasks 2. Contextually Sensitive Menus 3. 1 zillion ways to do something. No 2 people will do everything
11 EDITING VIDEO. Lesson overview
 11 EDITING VIDEO Lesson overview In this lesson, you ll learn how to do the following: Create a video timeline in Photoshop. Add media to a video group in the Timeline panel. Add motion to still images.
Media Commons Workshop: Final Cut Pro X
 Media Commons Workshop: Final Cut Pro X mediacommons@psu.edu mediacommons.psu.edu/instruction/workshops Description This is the Final Cut Pro Video Basics workshop. In this workshop we will cover how to
Editing and Effects in DaVinci Resolve 12.5
 Editing and Effects in DaVinci Resolve 12.5 1. Working with the Project Media Working with the Project Media Importing the Project Selecting a Capture Drive Relinking Media 2. Exploring the Edit Page The
Sound Editing in Final Cut Studio Creating a Sound Mix
 Sound Editing in Final Cut Studio Creating a Sound Mix Part 1: Smoothing Edits with Fades Part 2: Setting Audio Levels upart 3: Using Keyframes to Automate a Mixo Part 4: Creating Perspective Effects Part
Premiere Pro CC 2018 Essential Skills
 Premiere Pro CC 2018 Essential Skills Adobe Premiere Pro Creative Cloud 2018 University Information Technology Services Learning Technologies, Training, Audiovisual, and Outreach Copyright 2018 KSU Division
Editing in Premiere Pro CC 2015
 Editing in Premiere Pro CC 2015 Lesson 1: Exploring the Interface Exploring the Interface The Source Window The Program Window The Settings Menu Revealing the Video Scopes The Workspace Bar The Project
oit Final Cut Express Intermediate Video Editing on a Mac UMass Office of Information Technologies Introduction...
 oit UMass Office of Information Technologies Final Cut Express Intermediate Video Editing on a Mac Introduction... 2 The Interface... 3 Keep Organized... 4 Import Media... 5 Assemble Video Projects...
12 Duplicate Clips and Virtual Clips
 12 Duplicate Clips and Virtual Clips Duplicate clips and virtual clips are two powerful tools for assembling a video program in Premiere. Duplicate clips can be useful for splitting clips into a number
Final Cut Pro Trimming: The Fine Points
 Final Cut Pro Trimming: The Fine Points Part 1: Trimming Two Edit Points upart 2: Slipping One Clipo Part 3: Rolling Two Edit Points Part 4: Sliding Clips to Refine Position Part 5: Shuffling Clips to
Premiere Pro Manual Basics - Toolbars, Options and Panels
 Premiere Pro Manual 01 - Basics - Toolbars, Options and Panels 2017 1st edition This Premiere Pro Manual is one of an introductory series specially written for the Arts and Humanities Students at UEA by
Digital Video Editing Using imovie
 Digital Video Editing Using imovie This is an introductory tutorial into basic digital video editing. Participants will learn how to transfer video from tape to the computer, plus basic editing techniques
Adding Video Filters and Transitions
 Adding Video Filters and Transitions 8 You can add professional touches to your movie by applying filters to clips to create special looks or effects and adding transitions between your clips. Applying
Editing and Finishing in DaVinci Resolve 12
 Editing and Finishing in DaVinci Resolve 12 1. Introduction Resolve vs. Resolve Studio Working in the Project Manager Setting up a Multi User Login Accessing the Database Manager Understanding Database
Final Cut Pro: Intro How to Make a DVD from a mini-dv tape
 TEST Final Cut Pro: Intro How to Make a DVD from a mini-dv tape Many projects at PEPS require use of Final Cut Pro (FCP) to take a mini-dv tapes and put the footage onto a DVD. In this tutorial, we ll
Sequence settings for this project. Sequence settings for this project. source monitor. The Program Window: The Bin. The Sequence Window: The Timeline
 John Roach - Parsons the New School for Design Adobe Premier - Editing Video 1. Open Premiere and start a new project In the New Project Window name your project and then click BROWSE to either create
FINAL CUT PRO 7 COMPLETE SHORTCUT GUIDE FILTERS AND EFFECTS AUDIO CAPTURE EDITING COMPOSITING. Add Level Keyframe
 COMPILED BY ZAK RAY FINAL CUT PRO 7 COMPLETE SHORTCUT GUIDE AUDIO Add Level Keyframe!"K Audio Scrubbing #S Gain +1dB $= Gain +3dB $] Gain -1dB $- Gain -3dB $[ Pan Center $period Pan Left $comma Pan Right
Adobe After Effects CC
 Adobe After Effects CC Categories Pink Activate Tools Peach Markers Light blue Layers & Navigation Purple Properties in Timeline Orange Time Navigation Dark blue Open & Preview Yellow Timeline & Workarea
Command Key Shortcuts
 D Keyboard Shortcuts Command Key Shortcuts............................... 628 Keyboard Shortcuts................................. 634 Tabbing Commands.................................... 639 Program Mode.....................................
Adobe Audition CC Detailed Video Training Outline Chapter 1 - Overview
 Adobe Audition CC Detailed Video Training Outline Chapter 1 - Overview 01.01 Welcome An overview of this entire training 01.02 What This Training Covers What this training covers How to use this training
Exercise One: Creating a Title 3D Effect
 1 Tutorials 2 Exercise One: Creating a Title 3D Effect The exercises in this section are designed to give you a hands-on introduction to the Boris Title Generators. You will need a project with some captured
Editing & Color Grading 101 in DaVinci Resolve 15
 Editing & Color Grading 101 in DaVinci Resolve 15 1. Exploring Resolve Exploring Resolve The Media Page The Edit Page The Fusion Page The Color Page The Fairlight Page The Deliver Page The Processing Pipeline
org How to Import and Edit with Premiere Pro school Uploading Files Determine what kind of camera you used to film for your project.
 j tech org school Uploading Files How to Import and Edit with Premiere Pro Determine what kind of camera you used to film for your project. This document has been written to accommodate the JVC and CanonHD
Start Project and create Sequence. Creating a New Project - Open program with the Desktop Shortcut - Select New Project
 Start Project and create Sequence Creating a New Project - Open program with the Desktop Shortcut - Select New Project General project settings - Select Browse to specify saving location - Give name to
Creative Media User Guide.
 Creative Media User Guide. Adobe Premiere Pro CC2015 Adobe Premiere Pro CC 2015 User Guide Type: Video editing Difficulty: Intermediate to Advanced Operating system: Mac or PC (Mac only in the creative
How to Make a Movie in imovie How to Make a Movie Trailer in imovie How to Color Correct a Movie in imovie
 How to Make a Movie in imovie How to Make a Movie Trailer in imovie How to Color Correct a Movie in imovie 1. Make sure you are using the Mac. Make a Movie in imovie 2. If your files are on an external
Digital Video. Part II: Introduction to Editing and Distribution
 Digital Video Part II: Introduction to Editing and Distribution Contact Information The University of Utah Student Computing Labs Macintosh Support mac@scl.utah.edu We Will Cover History of video editing
Creating a short stop motion animation with Adobe Photoshop CC. Open Adobe Photoshop CC. A note about embedding
 Creating a short stop motion animation with Adobe Photoshop CC Open Adobe Photoshop CC A note about embedding Photoshop CC never embeds video or sound into your document. Instead, it links to the original
Final Cut Pro Trimming: The Fine Points
 Final Cut Pro Trimming: The Fine Points Part 1: Trimming Two Edit Points Part 2: Slipping One Clip upart 3: Rolling Two Edit Pointso Part 4: Sliding Clips to Refine Position Part 5: Shuffling Clips to
An Introduction to Editing Video with Adobe Premiere Pro 1.5
 An Introduction to Editing Video with Adobe Premiere Pro 1.5 Contents Page 1 - Preparing to edit 3 2 - Starting Premiere, Creating a new Project, and the Premiere Interface 4 2a - Creating a new Project
Adobe Premiere. Digital Media Commons 129 Herring Hall. (713)
") Adobe Premiere Digital Media Commons 129 Herring Hall http://dmc.rice.edu/ dmc-info@rice.edu (713) 348-3635 2 Adobe Premiere Adobe Premiere is a powerful non-linear video editing software package, designed
Adobe Premiere Digital Media Commons 129 Herring Hall http://dmc.rice.edu/ dmc-info@rice.edu (713) 348-3635 2 Adobe Premiere Adobe Premiere is a powerful non-linear video editing software package, designed
In this lesson, you will learn how to build a typical
 Lesson 1 20 21 Basic Animation Building your first animation while you learn a typical After Effects workflow. d In This Lesson 22 starting a project; creating folders 23 importing footage; alpha channels
HitFilm Express - Editing
 HitFilm Express - Editing Table of Contents Getting Started 3 Create New Project 3 Workspaces 4 The Interface 5 Trimmer 5 Viewer 5 Panels 6 Timeline 7 Import Media 7 Editing 9 Preview 9 Trim 9 Add Clip
EDITING GUIDE (EDIT SUITES)
") PREMIERE PRO CC (VERSION 2015.2) EDITING GUIDE (EDIT SUITES) Version 3.3 (FEB 2016) PREMIERE PRO CC EDIT GUIDE - La Trobe University 2015 latrobe.edu.au 2 What do you want to do? 3 1. Back up SD card footage
PREMIERE PRO CC (VERSION 2015.2) EDITING GUIDE (EDIT SUITES) Version 3.3 (FEB 2016) PREMIERE PRO CC EDIT GUIDE - La Trobe University 2015 latrobe.edu.au 2 What do you want to do? 3 1. Back up SD card footage
Keynote 08 Basics Website:
 Website: http://etc.usf.edu/te/ Keynote is Apple's presentation application. Keynote is installed as part of the iwork suite, which also includes the word processing program Pages and the spreadsheet program
Hindenburg Journalist Guide - Windows
 Hindenburg Journalist! 1 Hindenburg Journalist Guide - Windows Introduction! 4 Overview! 5 Menu Bar! 5 Tool Bar! 5 Tracks! 5 Workspace! 5 Transport bar! 6 QPPM Meter & Counter! 6 Clipboard! 6 Favorites!
CUEBC Basic Digital Video Editing with imovie 11. October Resources available at: (click under pro-d)
") CUEBC 2013 Basic Digital Video Editing with imovie 11 October 2013 Resources available at: www.jonhamlin.com (click under pro-d) Importing Your Video from a Memory Card 1. Create a back up file of your
CUEBC 2013 Basic Digital Video Editing with imovie 11 October 2013 Resources available at: www.jonhamlin.com (click under pro-d) Importing Your Video from a Memory Card 1. Create a back up file of your
imovie with Still Pictures
 imovie with Still Pictures Where to save Because movies use a lot of hard drive space, they cannot be saved on the server. 1. You must login to your personal file before you start working. When launching
Adobe Premiere Pro CC 2015 Certification Review
 Adobe Premiere Pro CC 2015 Certification Review 40 questions; 50 Minutes Need to know for matching and/or multiple choice: Razor tool Slide tool Rate Stretch tool Ripple Edit tool Mark In Mark Out Insert
Keys for selecting tools
 Keys for selecting tools Use these shortcuts in the Tools panel. In most cases, you can momentarily switch tools by holding down the keyboard shortcut for the tool. Selection tool V V Rotation tool W W
Final Cut Express HD Quick Reference
 Final Cut Express HD Quick Reference A 1 2 3 4 Browser General A. Show Effects x 5 Welcome to Final Cut Express HD There are four main windows in Final Cut Express HD: (1) Browser, (2) Viewer, (3) Canvas,
Recording. The Mixing Desk. Overview the Soundtrack Pro workspace
 Drama Sound Studios Using Soundtrack Pro 3 (v.03 updated 18 November 2010) You cannot use this system without training and a username. These notes are designed to remind you what you were shown in training.
Video Editing With Final Cut Express
 Video Editing With Final Cut Express PAGE 1 Start Up Page 1 of 4 Start Up...pages 1-4 Log and Transfer...pages 5-6 Importing Material from USB-stick, CD a.o... page 7 Working With Clips...page 8 Working
Table of Contents GETTING STARTED...4 RECORDING...11 PLAYING BACK...14
 USER GUIDE Table of Contents GETTING STARTED...4 Main Window Essentials...5 Operation Modes...7 Setup...8 RECORDING...11 Tracks... 11 > Track Names... 11 > Adding Tracks... 11 > Master Bus... 11 > Track
2018 imovie High Sierra
 2018 imovie High Sierra 1 Create a Movie Open imovie. Select the Projects button from the top menu. Click Create New. Next, Click Movie. You will see a sidebar of libraries and events, browser window with
How to edit. in FCP s Multiclip. Log and Capture. Prepare Your Clips
 How to edit in FCP s Multiclip Final Cut Pro 5 s Multiclip mode allows you to group two or more clips together, and edit between them in real-time just like live vision mixing. You can then change the
The Monitor Window. 3.The Monitor Window Premiere Pro 1.5 H O T
 3.The Monitor Window Premiere Pro 1.5 H O T 3 The Monitor Window Source vs. Program Playing Source Video In and Out Points Setting In and Out Points Clearing In and Out Points H O T Premiere Pro HOT DVD
ECLIPSECX Ethernet Software for OSX
 ECLIPSECX Ethernet Software for OSX JLCooper makes no warranties, express or implied, regarding this software s fitness for a particular purpose, and in no event shall JLCooper Electronics be liable for
Photo to Movie Help. LQ Graphics, Inc.
 Photo to Movie Help LQ Graphics, Inc. Table of Contents Photo to Movie... 1 Introduction... 1 Installation... 3 Purchasing... 4 Organizing Your Movie... 5 Planning Your Movie... 5 Adding photos to your
Premiere - Jazz Video Project Tutorial
 -Open Premiere and set up the Premiere Project -At the bottom left of the Project bin change the view from icon view to list view -Import all audio and video clips to the Project Bin window -Right Click
imovie: Digital Storytelling
 1 imovie: Digital Storytelling *** imovie s interface with terminology is located on the final page *** 1. Getting Started a) Document your activities by using the provided digital camera b) Using a USB
Adobe Premiere Elements Workspace overview. Creating a new project. About projects. Start a new project
 Adobe Premiere Elements Workspace overview The Adobe Premiere Elements workspace is optimized for the four major phases of a project: organizing footage (video, stills, and audio), editing a movie, creating
1617 APPDC Lesson 2 Worksheet Review sheet for Lesson 2 (This assignment is worth 100 POINTS!) KEY
 KEY") 1617 APPDC Lesson 2 Worksheet Review sheet for Lesson 2 (This assignment is worth 100 POINTS!) Premiere Pro Default Workspace KEY 1. Name, and then describe, the panel located in the top right corner of
1617 APPDC Lesson 2 Worksheet Review sheet for Lesson 2 (This assignment is worth 100 POINTS!) Premiere Pro Default Workspace KEY 1. Name, and then describe, the panel located in the top right corner of
Window Designer. Opening Screen: When you start Window Designer, you will see the Opening Screen. Here you will be choosing from 4 options:
 Window Designer Opening Screen: When you start Window Designer, you will see the Opening Screen. Here you will be choosing from 4 options: New Design: Use this option when no pre-built templates are available
USING GARAGE BAND. Creating a new project
 USING GARAGE BAND Creating a new project 1. Open GarageBand by clicking on the guitar icon on the dock. 2. In the project chooser select the type of project you want to create. Choose any instrument or
Cut Film and video editing term that defines the immediate and complete change (or transition) from one image to another
 from one image to another") Cuts and Transitions Creating an Image Progression in Adobe Premiere 6 Cut Film and video editing term that defines the immediate and complete change (or transition) from one image to another Wipes, Zooms,
Cuts and Transitions Creating an Image Progression in Adobe Premiere 6 Cut Film and video editing term that defines the immediate and complete change (or transition) from one image to another Wipes, Zooms,
Digital Video Act II Introduction to Editing and Distribution. University of Utah Student Computing Labs Macintosh Support
 Digital Video Act II Introduction to Editing and Distribution University of Utah Student Computing Labs Macintosh Support mac@scl.utah.edu More classes This class is a series Act I last week Introduction
Using Advanced Tools in imovie 09
 Using Advanced Tools in imovie 09-1- Why use advanced tools? If you are comfortable editing video in imovie 09 and want to expand your skills, you may want to turn on imovie s advanced tools. These tools
Final Cut Pro X for Final Cut Pro 7 Editors. White Paper September 2011
 for Editors White Paper September 2011 2 Contents Page 2 Page 4 Page 5 Page 8 Page 9 Page 11 Page 14 Page 15 Contents Introduction Getting Started Projects Events, Source Media, and Render Files Interface
Windows Movie Maker / Microsoft Photo Story Digital Video
 Windows Movie Maker / Microsoft Photo Story Digital Video http://intranet/technology/index.html TRC HELP DESK X5092 April 2006 Photo Story and Movie Maker Microsoft Photo Story 3 allows you to create fantastic
OFFICIAL USER MANUAL 1
 OFFICIAL USER MANUAL 1 Contents: Getting Started with Musician Video Maker 3 Launching And Activating Musician Video Maker 3 Beta Tester Users 5 Start Mode And Demo Mode 6 Importing Your Video Footage
Final Cut Express 2. Edit like a pro. Key Features
 Edit like a pro. Key Features Capture video. Connect a FireWire-equipped DV camcorder to your Mac and capture video directly to the Browser window. Then organize and manage your clips with ease. Customize
imovie for ipad CREATING A PROJECT
 imovie for ipad CREATING A PROJECT After opening the imovie app select the plus sign located in the dark grey box under the projects tab. A window will pop up asking for whether you want to create a movie
ADOBE 9A Adobe Premiere Pro CS4 ACE. Download Full Version :
 ADOBE 9A0-097 Adobe Premiere Pro CS4 ACE Download Full Version : http://killexams.com/pass4sure/exam-detail/9a0-097 Answer: D Adobe OnLocation provides a model that displays 720 lines to provide a full-
Avigilon Control Center Standard Web Client User Guide. Version 5.6
 Avigilon Control Center Standard Web Client User Guide Version 5.6 2006-2015, Avigilon Corporation. All rights reserved. Unless expressly granted in writing, no license is granted with respect to any copyright,
How to trim clips in the Timeline panel
 Adobe Premiere Pro CC Guide How to trim clips in the Timeline panel You can trim clips (set a clip s In and Out points) in the Timeline by using Premiere Pro tools (Figure 1), or by using shortcut keys
Working with Adobe Premiere Pro CS4
 Working with Adobe Premiere Pro CS4 Setup When you open Premiere Pro CS4, you see a window that allows you to either start a new project, open an existing project or search Premiere's help menu. For the
Adobe Premiere Pro CC 2018
 Course Outline Adobe Premiere Pro CC 2018 1 TOURING ADOBE PREMIERE PRO CC Performing nonlinear editing in Premiere Pro Expanding the workflow Touring the Premiere Pro interface Keyboard shortcuts 2 SETTING
Exposé: Part Deux Clean Your Room OS X: Child-Proof Windows No More Time On Your Side What s Your Destination? Am I Loaded?
 Get Dynamic with Interfaces Better Bins Save Your Monitors Make It Big The First Thing You Should Do: Save No, Save As That s the Spot Move the Dock When the OS Guys Don t Talk to the Pro App Guys Bring
GarageBand at a Glance t a Glanc A
 1 arageand at a lance t a lance arageand at a lance introduces you to the features and controls in the arageand windows. You use these controls to create your songs in arageand. Take a look at these pages
How to add video effects
 How to add video effects You can use effects to add a creative flair to your movie or to fix exposure or color problems, edit sound, or manipulate images. Adobe Premiere Elements comes with preset effects
Microsoft Excel 2010 Part 2: Intermediate Excel
 CALIFORNIA STATE UNIVERSITY, LOS ANGELES INFORMATION TECHNOLOGY SERVICES Microsoft Excel 2010 Part 2: Intermediate Excel Spring 2014, Version 1.0 Table of Contents Introduction...3 Working with Rows and
Basic Editing. Back to Contents. Tutorial PREMIERE 5.0. Lesson 1
 Back to Contents Tutorial PREMIERE 5.0 Lesson 1 Basic Editing Editing a video program is at the heart of the work you ll do with Adobe Premiere. Adobe Premiere makes it easy to trim video clips or other
Final Cut Pro X (FCP X) Chapter Notes
 Chapter Notes") Final Cut Pro X (FCP X) Chapter Notes Chapter 1 Introduction Fn (for F keys, top row) Editing is storytelling. It s choosing from a sometimes vast array of video and audio clips, and assembling them into
Final Cut Pro X (FCP X) Chapter Notes Chapter 1 Introduction Fn (for F keys, top row) Editing is storytelling. It s choosing from a sometimes vast array of video and audio clips, and assembling them into
Build Your Story. 4.Build Your Story Final Cut Pro HD H O T. I really wanted to call this chapter, The Ins and Outs of Ins and Outs, because it is.
 4.Build Your Story Final Cut Pro HD H O T 4 Build Your Story Introduction Creating and Saving a New Project Viewing Clips Setting Ins and Outs Building the Timeline Three-Point Editing Browser Power Tips
Avigilon Control Center Player User Guide. Version 5.10
 Avigilon Control Center Player User Guide Version 5.10 2006-2016, Avigilon Corporation. All rights reserved. AVIGILON, the AVIGILON logo, AVIGILON CONTROL CENTER, ACC and HDSM, are trademarks of Avigilon
imovie Window 2 imovie at a Glance D E F
 1 imovie at a Glance imovie at a Glance introduces you to the controls in the imovie window. You use these controls to create your own movies. Take a look at these pages even if you don t plan to complete
Shotcut would be suitable for users who are comfortable using MovieMaker.
 Shotcut Page 1 Shotcut Features Friday, August 17, 2018 1:25 PM Shotcut is a video editing application that is suited for the user who has mastered MovieMaker and needs an application that allows for audio
5. ADOBE AFTER EFFECTS MANUAL
 5. Introduction to Adobe After Effects Version 1.0-0913 2013 by VirTra Inc. All Rights Reserved. VirTra, the VirTra logo are either registered trademarks or trademarks of VirTra in the United States and/or
Basic Editing in Adobe Premiere
 AD30400 Video Art Prof. Fabian Winkler Spring 2014 Basic Editing in Adobe Premiere This workshop introduces basic techniques in Adobe Premiere that allow the editing and recombination of digitized clips.
Project 1 student guides
 Project 1 student guides Guide: Principles and rules of copyright Adobe Premiere Pro guide: Overview of workspace Adobe Premiere Pro guide: How to import files Adobe Premiere Pro guide: How to manage media
SOUND BROWSER SYSTEM PROTOTYPES SOUND FILE WINDOW. Click to update the list when files or directories have been added or removed by other programs.
 Each Sound in the list that is preceded by a cyan arrow (->) performs processing on an input (the replaceable input). These Sounds come with a default input, but a replacement input can be substituted
Warp Speed Editing in Final Cut Pro 10.4
 Warp Speed Editing in Final Cut Pro 10.4 1. Preparing Media Using Camera Archives Using Folder Names Using Finder Tags 2. Launching FCP X Launching with the Keyboard Opening Specific Libraries Finder Library
Table of Contents. iii
 Photo to Movie 4.5 Table of Contents Photo to Movie Introduction... 1 Introduction... 1 Installation... 2 Organizing Your Movie... 5 Planning your movie... 5 Adding photos to your slide show... 5 Choosing
Intro to Premiere Pro
 Intro to Premiere Pro by Tim Whitney CUNY GRADUATE SCHOOL OF JOURNALISM Contents GETTING STARTED 1 Before you Begin 1 Creating a New Project 1 Media Cache Settings 2 Auto Save 2 Project Window & Media
Avigilon Control Center Web Client User Guide
 Avigilon Control Center Web Client User Guide Version: 4.12 Standard PDF-WEBCLIENT-S-E-Rev2 Copyright 2013 Avigilon. All rights reserved. The information presented is subject to change without notice.
Adobe Premiere Elements Tutorial
 Adobe Premiere Elements Tutorial Starting a New Project To import movie clips from a digital video camera, click on the Capture Video button. You will be prompted to name your project and choose a location
Windows Movie Maker. The Toolbar. The Toolbar
 Windows Movie Maker The Menu Bar The Menu Bar gives access to all parts of the program. On the Menu Bar, click on File. Notice the choices of Save Project As and Save Movie File o Choose Save Project As
How to edit audio tracks
 How to edit audio tracks Although at times you will use Adobe Audition to record new audio, you will often use it to edit, clean up, or add effects to an existing audio file such as an audio file recorded
Pro Tools vs. Hindenburg
 Pro Tools vs. Hindenburg Windows Key Commands: Session Set-Up and Navigation New Session Control N Control N Open Session Control O Control O Save Session Control S Control S Save Session As Control shift
Final Cut Pro 7 Level One Exam Preparation Guide and Practice Exam
 Final Cut Pro 7 Level One Exam Preparation Guide and Practice Exam Updated January 2011 1 Contents About this Guide... 3 About the Final Cut Pro 7 Level One Practice Exam... 3 Becoming an Apple Certified
Opening the Program. Movie Maker II 1
 1 Opening the Program To open the Movie Maker II application, use the Start Programs Movie Maker combination from the desktop. Alternatively, you can create a shortcut on the desktop. After executing this
imovie Quick Guide Learning Technologies Center Gaskill Hall
 imovie Quick Guide Learning Technologies Center Gaskill Hall Introduction Welcome to the Miami University LTC This quick guide is designed to help acquaint you with some capabilities of imovie HD and idvd
Digital Documentaries. Students as directors of their own learning
 Digital Documentaries Students as directors of their own learning Basic Vocabulary Collection Project Movie Collection A collection contains audio clips, video clips, or pictures that you have imported
This chapter takes you step by step through the process of building your own movie in imovie HD.
 2 imovie HD Tutorial 2 This chapter takes you step by step through the process of building your own movie in imovie HD. You can use video from a variety of sources and devices to create a movie in imovie
Pro Tools vs. Hindenburg
 Pro Tools vs. Hindenburg Macintosh Key Commands: Session Set-Up and Navigation New Session N N Open Session O O Save Session S S Save Session As shift S shift S Zoom In [ + (or mousewheel) Zoom Out ] (or
Introduction to imovie
 Introduction to imovie Atomic Learning has some great online tutorials for imovie, iphoto and idvd. Check them out at http://www.atomiclearning.com. The district username is and the password is. If you
imovie 08 Basics USF College of Education Laptop Initiative EDU 252, Website:
 imovie 08 Basics USF College of Education Laptop Initiative EDU 252, Email: laptoplounge@coedu.usf.edu Website: http://fcit.usf.edu/laptop/ imovie 08 is a completely redesigned version of the video editing