Digital Documentaries. Students as directors of their own learning
|
|
|
- Brendan Hill
- 6 years ago
- Views:
Transcription


1 Digital Documentaries Students as directors of their own learning
2 Basic Vocabulary Collection Project Movie
3 Collection A collection contains audio clips, video clips, or pictures that you have imported or captured in Windows Movie Maker. A collection acts as a container for your clips, which are smaller segments of audio and video, and helps you organize the imported or captured content. Collections appear in the Collections pane of Windows Movie Maker.

4 Moving Between Media Collections
5 Importing into Collections On the File menu, click Import into Collections. In the Files of type box, select Windows Movie Maker 1.x Collection Files. In File name, enter the path and file name of the collections file you want to import, and then click Import. The collections file is named Windows Movie Maker.col and is located on your hard disk in \Documents and Settings\UserAccountName\Application Data\Microsoft\Movie Maker. For example, if Windows is installed on drive C:, and your account name is Jennifer, your collections file would be located in C:\Documents and Settings\Jennifer\Application Data\Microsoft\Movie Maker. By default, your collections file from a previous release of Windows Movie Maker is imported automatically the first time you start this version of Windows Movie Maker.
6 Project A project contains the arrangement and timing information of audio and video clips, video transitions, video effects, and titles you have added to the storyboard/timeline. A saved project file in Windows Movie Maker has an.mswmm file name extension. By saving your projects, you can open the project file later and begin editing it in Windows Movie Maker from where you last saved.
7 Movie A movie is the final project you save by using the Save Movie Wizard. You can save a movie to your computer or to a recordable CD, send it as an attachment in an message, or save and send it to the Web. The saved movie can be watched in a media player, such as Microsoft Windows Media Player, or in a Web browser. If you have a DV camera connected to your computer, you can also record your movie to a tape. You and others can then watch the movie on the DV camera or on a TV.
8 Source Files Understanding what they are and where they are stored
9 Supported Files Types You can import files with the following file name extensions into Windows Movie Maker to use in your project: Audio files:.aif,.aifc,.aiff.asf,.au,.mp2,.mp3*,.mpa,.snd,.wav, and.wma Image files:.bmp,.dib,.emf,.gif,.jfif,.jpe,.jpeg*,.jpg,.png,.tif,.tiff, and.wmf Video files:.asf*,.avi,.m1v,.mp2,.mp2v,.mpe,.mpeg,.mpg,.mpv2,.wm, and.wmv * file extensions for unitedstreaming editable content
10 Understanding Source Files Source files are the digital media files (for example, audio and video files) or pictures that you import into your current project.
11 Understanding Source Files When you import a video, audio, or picture file, the file remains in the original location from which it was imported. The resulting clip that appears in Windows Movie Maker is a representation of the original source file; it is not a copy of the source file.
12 Understanding Source Files In other words, if you edit the source file in another program after it is already imported into Windows Movie Maker, the changes that you make to the file automatically appear in Windows Movie Maker and in any Windows Movie Maker projects that include the edited clip. And, if you delete the thumbnail or clip for the file in Windows Movie Maker, the source file still remains unchanged in the original location. To ensure that you can continue to work with a project, avoid renaming, deleting, or moving the original source files.


13 Rules of Thumb Be sure to keep all your source files in one folder. If you need to open your project on another computer, you need both your source files folder and Windows Movie Maker project file.
14 Capture Devices Video and Audio
15 Video Capture Devices A video capture device lets you transfer live or recorded video to your computer. In Windows Movie Maker, you can use the following types of capture devices to capture video (and in some cases, audio as well) to your computer: Analog video source such as an analog camera or video cassette recorder (VCR) connected to an analog capture card Web camera Digital video source such as a DV camera or VCR connected to an Institute of Electrical and Electronics Engineering (IEEE) 1394 port (DV capture card or built-in port) TV tuner card
16 Audio Capture Devices An audio capture device lets you capture audio from an external source to your computer. The most popular type of audio capture device is a microphone. The microphone can be a stand-alone microphone attached to your computer, or it can be a microphone that is part of your DV or analog camera or Web camera. You can use the following types of audio capture devices: Audio card (also referred to as a sound card) Stand-alone microphone (USB or line in) Built-in microphone in an analog camera or Web camera

17 Capturing Video

18 Importing Video Files

19 Importing Still Images
20 Capturing Images from Video Use this tool to take a screen shot from a video file.
21 Importing Audio
22 Improving Video Quick tips and tricks
23 Background If possible, use a still background when recording video. If you need to record against a moving background, try reducing the depth of field to help reduce the amount of detail in the background. Reducing the depth of field or shortening the area in focus softens the background and helps reduce the amount of data that changes from frame to frame. To reduce the depth of field and make the background go out of focus, use a lower level of light and move the subject closer to the lens, or move the subject farther away from the lens and use a telephoto lens to zoom in.
24 Lighting Provide adequate lighting; use soft light, diffuse light, and consistent light levels. A certain amount of contrast is necessary for lighting a subject, but avoid direct highcontrast lighting. For example, when recording a face lit by strong sunlight from the side, the facial features in the shadow can be lost on video.
25 Clothing Have your subjects wear clothing colors that complement their skin tone and are sufficiently different from the background and other overlapping objects. Avoid bright colors, which tend to bleed or spread outside an object, and stripes, which may create moiré patterns, especially when the subject is moving slowly.
26 Tripod When possible, use a tripod when recording video. A tripod will help to keep the video camera still and improve the overall quality of the recorded video. This prevents your recorded video from being jittery and improves the source material that you plan to use in your movies.
27 Changing Camera Settings On the File menu, click Capture Video. or- In the Movie Tasks pane, under Capture Video, click Capture from video device. On the Video Capture Device page, in the Available devices list, click the video capture device you want to use for capturing video, and then click Configure. The available choices depend on the video capture devices that are connected to your computer. In the Configure Video Capture Device dialog box, click Camera Settings. In the resulting dialog box, make any necessary changes for the camera settings, such as the color, brightness, and contrast, and then close the dialog box. The specific changes you can make depend on the accompanying software installed with the capture device. In the Configure Video Capture Device dialog box, click Close, and then complete the remaining pages in the wizard.
28 Changing Video Settings On the File menu, click Capture Video. or- In the Movie Tasks pane, under Capture Video, click Capture from video device. On the Video Capture Device page, in the Available devices list, click the video capture device you want to use for capturing video, and then click Configure. The available choices depend on the video capture devices that are connected to your computer. In the Configure Video Capture Device dialog box, click Video Settings. In the resulting dialog box, make any necessary changes to the video settings such as the compression rate and display size of your video, and then close the dialog box. The specific changes you can make depend on the accompanying software installed with your capture device. In the Configure Video Capture Device dialog box, click Close, and then complete the remaining pages in the wizard.
29 Maximizing Storage Space Selecting a saving destination
30 Saving Destination This page of the Video Capture Wizard provides information about where your captured video file will be stored on your computer. The following options appear on this page. Enter a file name for your captured video Provides a space for you to enter a file name for the captured video file. After completing the wizard, you can add this file to the storyboard/timeline and then edit it. The file name cannot be longer than 64 characters and cannot include the following characters: \ / : *? " < > Choose a place to save your captured video Specifies the location to which your captured video will be saved. Browse Click to select the location to which your captured video will be saved. For performance reasons, the captured video file cannot be saved to a network location. The location to which your captured video will be saved must be a location on your computer hard disk.
31 Choosing a Video Setting Video Capture Wizard
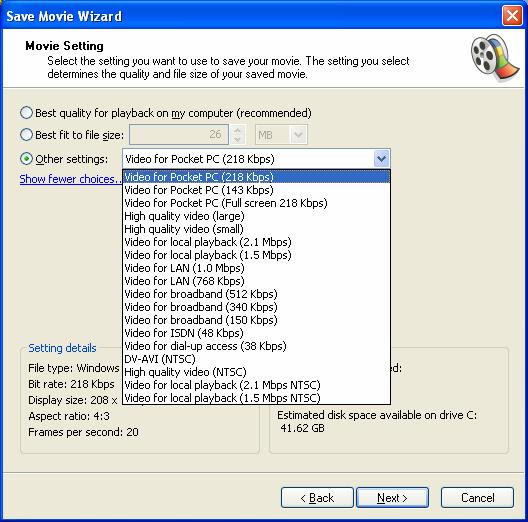
32 Choosing a Video Setting This page of the Video Capture Wizard lets you choose what settings you want to use when capturing video and audio. The video setting you choose determines the quality and file size of the captured video file. Video display size and video bit rate increase with higher video settings, and so does the file size. Consider file size along with the main purpose for your captured video when choosing the video setting.
33 Best quality for playback on my computer Specifies that you want to capture video at the recommended video setting. This video setting encodes the captured video at a higher quality setting. The specific capture profile that is detected and used by Windows Movie Maker for this video setting depends on the selected capture device and the audio and video it can output to the computer, as well as the processor speed of your computer. This setting is well-suited for a majority of the video you capture in Windows Movie Maker and plan to edit in Windows Movie Maker, and then plan to save to your computer, to a recordable CD, as an attachment to an message, or to the Web using the Save Movie Wizard.
34 Show More Choices Click to see additional video settings. Therefore, if you do not choose to use the Best quality for playback on my computer (recommended) video setting, you can choose from a listing of other capture options.
35 Digital Device Format (DV-AVI) Specifies that your captured video will be saved as DV- AVI file with an.avi file name extension. This capture option is only available if you are capturing from a DV device, such as a DV camera or DV VCR. This video setting is designed to be used if you want to edit the captured video on your computer and then later save it back to a tape in a DV camera or VCR using the Save Movie Wizard. The quality of the original video is retained when you choose this setting, so the movies you record retain their original video quality when recorded back to DV tape.
36 Other Settings Provides a list of additional video settings you can choose to capture for your captured video. When choosing a setting from this list, consider how you plan to ultimately use and share the video in your final saved movies. This list ranges from settings suited for video on a Pocket PC to video for local playback.
37 Setting Details File type. The type of file the captured video is saved as on your computer. Possible file types include Windows Media Video (WMV) or Audio-Video Interleaved (AVI). Bit rate. The total bit rate of the captured video and audio. Typically, a higher bit rate will result in higher-quality video with smoother motion. However, as the bit rate increases, so does the size of the captured video file. Display size. The dimensions of the captured video picture, in pixels. The first number indicates the width of the video, while the second number indicates the height of the video. Frames per second. The number of frames that are displayed per second in the captured video. Typically, a higher number or frames per second will make the motion of objects or persons in your video appear smoother. Video format. The video standard for the saved movie file. The two possible formats are NTSC and PAL. The specific video format depends on the selected video capture device and the video format it uses. This value is displayed when capturing video as a DV-AVI video file.
38 Video File Size Provides the estimated file size of the saved movie and disk space available to store the captured video file. The estimated amount of disk space consumed by one minute of video is displayed in this area for many video settings. For other video settings that are based on the quality of the captured video and audio, such as the recommended setting, a file size estimate is not available.
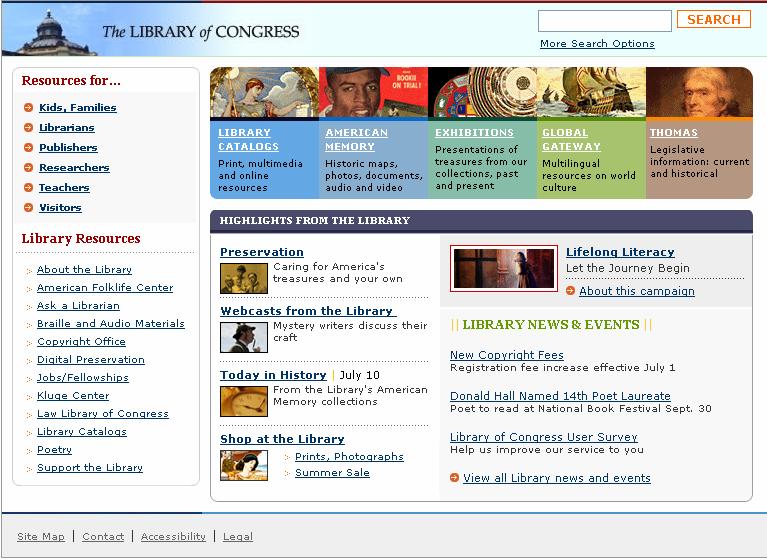
39 Finding Resources Gathering media content
40
41
42

43 Professional Development > Best Practices > Creating Movies with unitedstreaming content or Using Images to Make Movies unitedstreaming
44
45 unitedstreaming Search for editable clips Video.asf files Audio.mp3 files Images.jpeg files Import media into Windows Movie Maker
46 Library of Congress The Library of Congress has Image Libraries, Video Libraries, and Exhibitions online American Memory Collection contains historic media
47
48
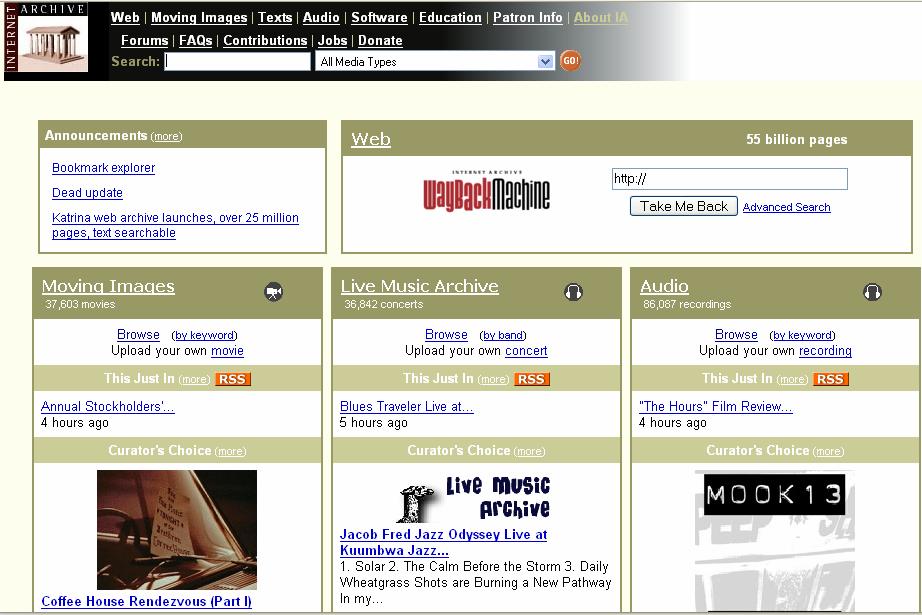
49 Internet Archive Moving Images Texts Audio Educational Resources
50
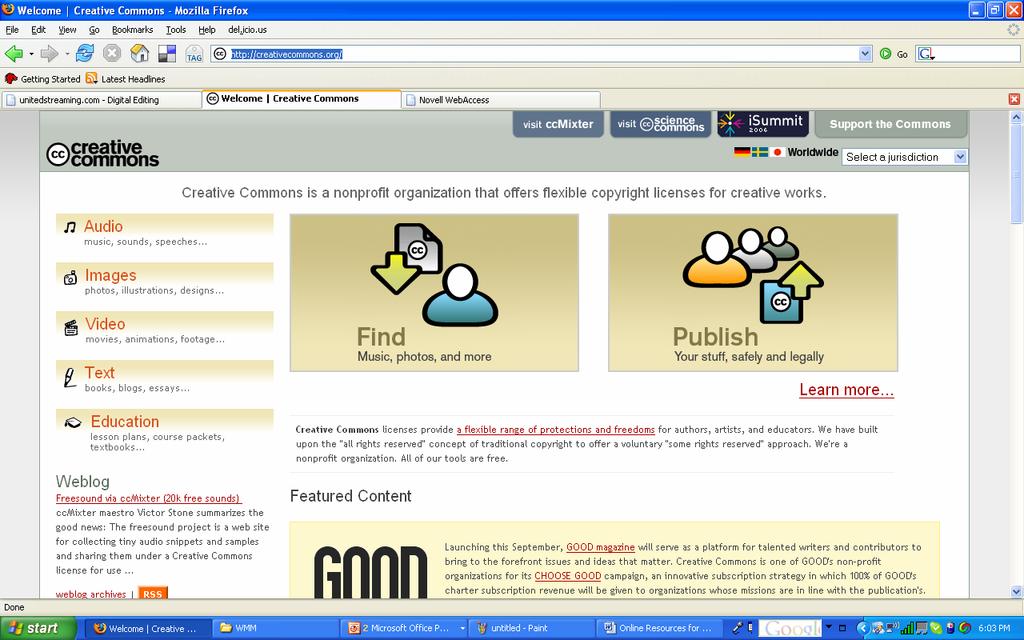
51 Creative Commons Audio Images Video Text Educational Resources
52 Sound Resources
53 Creating Clips and Clip Detection Importing video and clip detection
54 Clip Detection You can choose to have the video file separated into smaller, more manageable clips when you import video files into Windows Movie Maker. Clips are created through a process called "clip detection." When you import video files and select the Create clips for video files check box in the Import File dialog box, clips are created based on the type of video file or files you choose to import.
55 Windows Media Files If you import a Windows Media video file with an.asf or.wmv file name extension, a clip is created for each marker that is in the original file. The markers help to divide the file into manageable sizes. Markers may have been inserted into the original Windows Media file to describe a specific portion or event within the video. If the original Windows Media file contains no markers or only one marker, a clip is created when there is a substantial change in one frame of the video compared to the next frame. The minimum duration of a clip is one second.
56 Other Video File Formats If you import a video file that is not a Windows Media file, such as a video file with a.mpeg file name extension, a clip is created when there is a substantial change in one frame of the video compared to the next frame.
57 DV-AVI files If you import an AVI file that contains video captured from a DV camera, and time stamp information was added to that file, clips are created based on the time stamp information in the file.
58 Manually Creating Clips If the Create clips for video files check box is not selected when you import a video file, the video file is imported and appears as one whole clip in Windows Movie Maker. You can later run clip creation after the video file is imported into Windows Movie Maker to separate the clip into smaller clips. When importing video files, you can choose the following option: Create clips for video files Specifies whether video files are separated into smaller clips when imported. If this option is selected, the video file is separated into smaller video clips through clip detection. If this option is not selected, the video file is imported as a single video clip.
59 Editing Projects Using tools to edit your project
60 Editing a Project To start a project and begin creating your movie, you need to add any imported or captured video, audio, or pictures to the storyboard/timeline. The clips on storyboard/timeline become the contents of your project and future movie. You can use the storyboard/timeline to create and edit projects. The storyboard and timeline both display your work in progress, but each provides a different view of your work: The storyboard displays the sequence of clips. The timeline displays the timing of clips.
61 Editing a Project After you add clips to the storyboard/timeline to create a project, you can do the following: Rearrange the clips in the sequence you want. Create transitions between clips. Add video effects to video clips and pictures. Trim the clips to hide unwanted segments (on the timeline view only). Split and combine clips. Add narration that synchronizes with the clips (on the timeline view only).
62 Storyboard View

63 Timeline View

64 Video Clips
65 Add a Clip to a Project In the Collections pane, click the collection that contains the clip you want to add to your project. Then, in the Contents pane, click the clip you want to add. On the Clip menu, click Add to Storyboard or Add to Timeline (depending on the view you are working in). To quickly add a clip to your project, drag the clip (or multiple clips) to the storyboard/timeline. For consecutive files, click the first clip in the list, press and hold down the SHIFT key, click the last clip in the list, and then drag the selected clips to the storyboard/timeline. For files that are not consecutive, press and hold down the CTRL key, click each clip that you want to add, and then drag the selected clips to the storyboard/timeline.
66 Remove a Clip from a Project To remove a clip from a project Click the clip in the storyboard/timeline, and then, on the Edit menu, click Delete.
67 Clear the Storyboard/Timeline To clear the storyboard/timeline On the Edit menu, click Clear Timeline or Clear Storyboard, depending on which view you are working in.
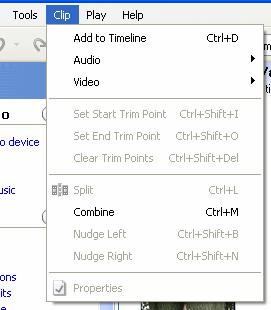
68 Zooming In and Out To zoom in or out on the timeline: On the View menu, click Timeline. Do one of the following: To see a more detailed view of the content, on the View menu, click Zoom In. To see a less detailed view of the content, on the View menu, click Zoom Out.


69 Zooming In and Out To fit the timeline on the screen On the View menu, click Zoom to Fit.
70 Zooming In and Out To increase or decrease the size of the storyboard Do one of the following: To increase the size of the storyboard, click the top of the storyboard and drag up. To decrease the size of the storyboard, click the top of the storyboard and drag down.
71 Moving and Copying Clips You can copy and move files and clips in the storyboard/timeline to other parts of the storyboard/timeline. By moving a clip, you can change its position on the storyboard/timeline without having to delete it, and then add it to the storyboard/timeline again. You can include the same content multiple times in your project by copying a clip. When you copy or move a video clip or picture on the storyboard/timeline, any added video effect is also copied, and it will appear in the new location.
72 Copy a Clip On the storyboard/timeline, select the clip you want to copy. On the Edit menu, click Copy. Do one of the following, depending on which view you are working in: On the storyboard, click the next empty cell. On the timeline, move the playback indicator to the point where you want to paste the clip. On the Edit menu, click Paste. To select multiple clips, hold down the CTRL key and click each clip that you want to copy.
73 Move a Clip On the storyboard/timeline, select the clip you want to move. On the Edit menu, click Cut. Do one of the following, depending on which view you are working in: On the storyboard, click the next empty cell. On the timeline, move the playback indicator to the point where you want to paste the clip. On the Edit menu, click Paste. To select multiple clips, hold down the CTRL key and click each clip that you want to cut.
74 Nudge a Clip On the timeline, select the clip on the Video track, Audio/Music track, or Title Overlay track that you want to move slightly. Do one of the following, depending on which way you want to move the clip: To move the clip slightly to the left on the timeline, on the Clip menu, click Nudge Left. To move the clip slightly to the right on the timeline, on the Clip menu, click Nudge Right.
75 Editing Clips Four options: Splitting a clip Combining clips Trimming a clip Creating clips
76 Splitting a Clip You can split a video clip into two clips. This is useful if you want to insert either a picture or a video transition in the middle of a clip. You can split a clip that appears on the storyboard/timeline of a current project, or you can split the clip in the Contents pane.
77 Splitting a Clip Use this tool to split the clip.
78 Combining Clips You can combine two or more contiguous video clips. Contiguous means the clips were captured together so that the end time of one clip is the same as the start time of the next clip. Combining clips is useful if you have several short clips and you want to view them as one clip on the storyboard/timeline. Similar to splitting a clip, you can combine contiguous clips in the Contents pane or on the storyboard/timeline.
79 Combining Clips In the Contents pane or on the storyboard/timeline, hold down the CTRL key, and then select the contiguous clips you want to combine. On the Clip menu, click Combine or right click with your mouse To select consecutive clips, click the first clip, press and hold down the SHIFT key, and then click the last clip. To select one clip at a time, press and hold down the CTRL key, and then click each clip that you want to combine.

80 Combining Clips
81 Trimming Clips By trimming clips, you can edit the starting and ending point and therefore the length of any video or audio clips that you have added to your project on the timeline. When trimming, you can set the start and end trim points. The start trim point determines when the clip will begin to play, and the end trim point determines when the clip will stop playing in your project. By trimming clips, you can hide unwanted parts of an audio or video clip or file. When you trim a clip, the information is not removed; it is hidden from your audience, so unwanted parts do not appear in your project and final saved movie. You can drag the trim handles, which are shown in the following illustration, to trim the unwanted parts of the clip.
82 Trimming Clips On the View menu, click Timeline. In the Collections pane, click the collection that contains the clip you want to add, and then click the clip you want to trim in the Contents pane. On the Clip menu, click Add to Timeline. On the timeline, select the clip you want to trim.
83 Trimming Clips On the timeline, click the playback indicator and drag it to the point where you want to trim the clip. -or- Use the playback controls on the monitor to go to the point where you want to trim the clip. Do the following: When the playback indicator is at the point where you want the selected video or audio clip to start playing back, on the Clip menu, click Set Start Trim Point. When the playback indicator is at the point where you want the selected video or audio clip to stop playing back, on the Clip menu, click Set End Trim Point. You can also drag the trim handles to set the start and end trim points. The trim handles appear when the clip is selected on the timeline.

84 Trimming Clips Drag the sides of the video clip to trim the length.

85 Trimming Clips
86 Clear Trim Points On the timeline with a project opened, click the trimmed clip. On the Clip menu, click Clear Trim Points.
87 Using video transitions, video effects, and titles Enhance your movies by adding different elements
88 Transitions
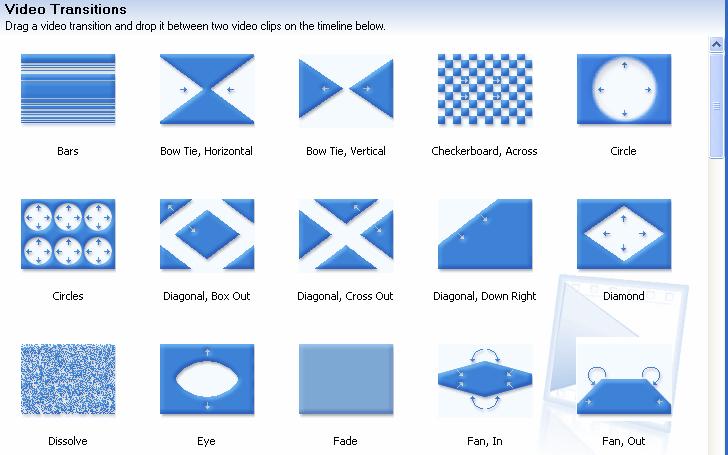
89 Video Transitions A video transition controls how your movie plays from one video clip or picture to the next. You can add a transition between two pictures, video clips, or titles, in any combination, on the storyboard/timeline. The transition plays before the one clip ends and while the other clip starts to play. Windows Movie Maker contains various transitions you can add to your project. Transitions are stored in the Video Transitions folder in the Collections pane.
90 Video Transitions

91 Working with Transitions
92 Add a Transition On the storyboard/timeline, select the second of the two video clips or pictures that you want to add a transition between. On the Tools menu, click Video Transitions. or- In the Movie Tasks pane, under Edit Movie, click View video transitions. In the Contents pane, click the video transition you want to add. On the Clip menu, click Add to Timeline or Add to Storyboard.
93 Change the Duration On the Transition track of the timeline, do one of the following: To increase the transition duration, drag the beginning of the transition towards the beginning of the timeline. To decrease the transition duration, drag the beginning of the transition towards the end of the timeline.
94 Remove a Transition Do one of the following: On the storyboard, select the transition cell that contains the transition you want to remove. On the timeline, click the transition that you want to remove on the Transition track. On the Edit menu, click Delete.
95 Video Effects
96 Video Effects A video effect determines how a video clip, picture, or title displays in your project and final movie. Video effects let you add special effects to your movie. A video effect is applied for the entire duration that the video clip, picture, or title displays in your movie. You can add any of the video effects that appear in the Video Effects folder in the Collections pane.

97 Video Effects


98 Working with Video Effects
99 Add a Video Effect On the storyboard/timeline, select the video clip or picture to which you want to add the video effect. On the Tools menu, click Video Effects. or- In the Movie Tasks pane, under Edit Movie, click View video effects. In the Contents pane, click the video effect you want to add.
100 Remove a Video Effect To remove a video effect Select the video clip or picture in the storyboard/timeline that you want to remove a video effect from. On the Clip menu, point to Video, and then click Video effects. In the Displayed effects area, click the effect you want to remove, and then click Remove.

101 Transitions and Video Effects Transition Two Video Effects Video Effect
102 Titles and Credits
103 Adding Titles and Credits Titles and credits let you enhance your movie by adding text-based information to your movie. You can add whatever text you want, but you may want to include information such as the title of your movie, your name, the date, and so forth. You can add a title to various places in your movie: at the beginning or end of a movie, before or after a clip, or overlaying a clip. The title plays for the specified amount of time, and then the video clip or picture displays in your movie.
104 Steps for Titles and Credits Select where you want your title to appear in your movie. Enter text for the title. Select an animation style for the title. Select the font and colors for your title. Add the title to your movie.


105 Adding Titles and Credits

106 Title Before a Clip

107 Title Overlay Over a Video Clip

108 Credit at the End of the Project
109 Enter Text
110 Choose Animation
111 Select Font and Color
112 Edit Existing Titles and Credits On the storyboard/timeline, select the title you want to edit. On the Edit menu, click Edit Title. or double click the title on the timeline.
113 Change a Title Duration After the title is added to the storyboard/timeline, on the View menu, click Timeline. Select the title you want to change the duration that it displays. Do one of the following: To extend the playback duration of the title, drag the end trim handle toward the end of the timeline. To reduce the playback duration of the title, drag the start trim handle toward the end of the timeline.
114 Working with Audio Creating and editing auto narration, background, and special effects
115 Audio Options Some of the different audio-related tasks you can perform in Windows Movie Maker include the following. Narrate the timeline. Adjust audio levels. Add audio effects. Adjust the volume of audio clips.
116 Narrating the Timeline You can capture an audio narration to synchronize with video clips, pictures, titles, or other items that you have added to the storyboard/timeline. Before you can begin capturing an audio narration: The playback indicator on the timeline must be at a position where the Audio/Music track is empty. You must be in the timeline view. The narration you capture is saved as a Windows Media Audio file with a.wma file name extension. By default, the audio narration file is saved in the Narration folder under My Videos on your hard disk.

117 Narrate the timeline Narrate the Timeline
118 Narrate the Timeline
119 Narrating the Timeline Add any video clips, pictures, titles, or credits that you want to display in your project to the storyboard/timeline. On the View menu, click Timeline. Move the playback indicator on the timeline, which appears as a square with a vertical line, to a point on the timeline where the Audio/Music track is empty and where you want to begin your audio narration.
120 Narrating the Timeline To see more options, click Show more options, and do the following: If you have added other audio clips to the Audio/Music track and you do not want the other clips to shift on the timeline, select the Limit narration to available free space on Audio/Music track check box. In the Audio device list, click the audio capture device you want to use. Then, in Audio input source, click the line that you want to use. To adjust the volume of your captured audio, move the Input level slider to the level you want to use. Select the Mute speakers check box to prevent the audio from a video clip on the timeline from playing back over your speakers while you are narrating the timeline. This prevents unwanted audio from being captured in your narration.
121 Narrating the Timeline Click Start Narration and begin narrating the content on the timeline. Do one of the following: If the Limit narration to available free space on Audio/Music track check box is selected, narrate the timeline until the time limit expires. If the Limit narration to available free space on Audio/Music track check box is cleared, click Stop Narration after you have finished narrating the contents on the timeline. In the File name box, type a name for your captured audio narration, and then click Save.
122 Alternative Narration Instead of recording narration directly into Windows Movie Maker, you can record your narration with another audio editing program and import audio tracks as you would with music files. Audacity Tutorial
. Adjusting the audio levels determines which audio will play louder than the other in your movie.")
123 Adjusting Audio Levels You can adjust the audio levels between the Audio and Audio/Music tracks (the audio that was captured as part of a video clip on the Audio track, and the audio that was captured or imported and added to the Audio/Music track). Adjusting the audio levels determines which audio will play louder than the other in your movie.
124 Adjusting Audio Levels On the Tools menu, click Audio Levels. Do one of the following: To increase the audio level of audio on the Audio/Music track, drag the slider bar towards Audio/Music. To increase the audio level of audio on the Audio track that is part of a video clip, drag the slider bar towards Audio from video.
125 Audio Effects Windows Movie Maker lets you add basic audio effects to your project. The basic audio effects include: Mute. The audio is not played and cannot be heard during playback. Fade In. The audio gradually increases until it reaches the final playback level. Fade Out. The audio gradually decreases until it can no longer be heard. The transition time for these audio effects is roughly two-thirds of a second.
126 Audio Effects
127 Audio Effects You may have audio that you do not want to play at all. For example, you may have a video file that contains audio you do not want to be heard in your project. You can mute the audio on the Audio track or the Audio/Music track, so it is not heard in your project. You can also mute audio for single audio files.
128 Adding Audio Effects On the Audio or Audio/Music track of the timeline, select the audio clip. Do one of the following: To fade in the audio, on the Clip menu, point to Audio, and then click Fade In. To fade out the audio, on the Clip menu, point to Audio, and then click Fade Out.
129 Remove an Audio Effect On the Audio or Audio/Music track of the timeline, select the audio clip that has an added audio effect. On the Clip menu, point to Audio, and then clear the selected effect. Any audio effects, such as a fade in, fade out, or muting are removed from the audio.
130 To Mute an Audio Clip On the Audio or Audio/Music track of the timeline, select the audio clip that you want to mute. On the Clip menu, point to Audio, and then click Mute.
131 Adjusting Audio Volume On the Audio or Audio/Music track of the timeline, select the audio clip that you want to adjust the volume for. On the Clip menu, point to Audio, and then click Volume. To adjust the volume, do one of the following: To reduce the volume, move the Audio volume level slider to the left. To increase the volume, move the Audio volume level slider to the right. To mute the clip, select the Mute clip check box. To reset the volume to the original volume, click Reset.

132 Adjusting Audio
133 Making the Movie Saving the final project as a movie file that can be shared
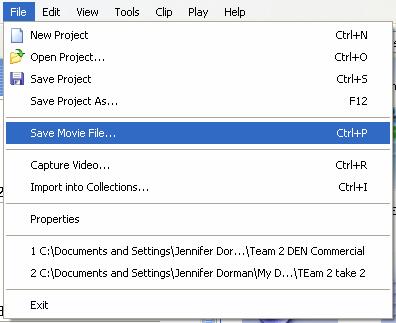
134 Save Movie Wizard The Save Movie Wizard lets you quickly save your project as a final movie. The timing, layout, and contents of the project are saved as one complete movie. You can save and store the movie on your computer or on a recordable CD, or you can send it as an attachment in an message or to a video hosting provider on the Web. In addition to these choices, you can choose to record your movie to a tape in a DV camera.

135 Save Movie Wizard

136 Finish Movie

137 Save to My Computer Enter a file name for your saved movie Choose a place to save your movie

138 Save Movie Wizard
139 Save Movie Wizard
140 Save to CD Enter a file name for your saved movie Choose a place to save your movie

141 Send in Enter a file name for your saved movie Choose a place to save your movie
142 Send to the Web Enter a file name for your saved movie Choose a place to save your movie

143 Send to DV Camera Enter a file name for your saved movie Choose a place to save your movie

144
145 AutoMovie Creating a quick and easy movie with AutoMovie
146 Using AutoMovie AutoMovie helps you quickly create a movie by automatically creating a movie based on the selected clips or collection. This helps you quickly create a movie automatically. AutoMovie analyzes the current video, pictures, and music, and combines the different elements to make one movie based on the automatic editing style you choose.
147 To Use AutoMovie... To use AutoMovie, the following must be true: A collection or multiple clips must be selected in the Collections pane or Contents pane respectively. The current selection must contain video and/or pictures that have a combined duration of at least 30 seconds. Each picture has a duration of 6 seconds. An audio clip must be at least 30 seconds long.
148 Creating an AutoMovie Select a collection in the Collections pane or select multiple clips in the Contents pane. On the Tools menu, click AutoMovie. or- In the Movie Tasks pane, under Edit Movie, click Make an AutoMovie.
149 Creating an AutoMovie On the Select an AutoMovie Editing Style page, select an AutoMovie editing style. Under More options, click Enter a title for the movie. In the Enter Text for Title page, type the text you want to appear as the title. Under More options, click Select audio or background music.
150 Creating an AutoMovie In Audio and music files, do one of the following: Select an audio or music file from the current list. Click Browse to import an audio or music file on your hard disk into Windows Movie Maker to use in your movie. Select None if you do not want any audio or music added to your movie.
151 Creating an AutoMovie Do one of the following: To increase the audio level of an audio clip on the Audio/Music track, drag the slider bar towards Audio/Music. To increase the audio level of the audio on the Audio track that is part of a video clip, drag the slider bar towards Audio from video. Click Done, edit movie to create the AutoMovie and add the clips to the storyboard/timeline.
152 Connecting Capture Devices A quick tutorial
153 Connecting Capture Devices Web camera connected to either a USB port, video capture card, or IEEE 1394 port. Depending on the type of Web camera, you can connect it to a USB port (if it s a USB camera), to an analog capture card (if it s a video composite camera), or to an IEEE 1394 port (if it s an IEEEE 1394-compatible Web camera). Some Web cameras have a built-in microphone so you can use the Web camera for capturing both video and audio for your projects.
154 Connecting Capture Devices Analog camera or VCR connected to an analog capture card. In this configuration, you connect a camera or VCR to an analog capture card. For example, you could connect the video line out on the camera to the video line in on the capture card. You could then to connect the left and right audio lines (often through RCA-style left- and rightchannel connectors to a single 3.5mm stereo plug adapter) to the line in on your audio card (or analog video capture card if your card has both audio and video). If both your camera and capture card provide S-video connections, you could also choose to use the S-video connection to record the video while leaving the audio connectors attached so the audio is captured.
155 Connecting Capture Devices DV camera or VCR connected to an IEEE 1394 port. When a DV camera is connected to an IEEE 1394 port, you get the best quality available from your DV device. Because the data is already in a digital format, it is simply passed through the IEEE 1394 port to your computer. In this configuration, the IEEE 1394 cable is connected from the DV out port of your DV camera or VCR to the DV IEEE 1394 card or built-in IEEE 1394 port.
156 Connecting Capture Devices DV camera or VCR connected to an analog video capture card. Many DV devices have analog outputs. If you have an analog video capture card, you can connect the DV camera or VCR to the analog capture card to transfer video and audio to your computer.
157 Connecting Capture Devices Microphone connected to a sound card or USB port. To capture audio from a microphone, you connect it to the microphone or line-in input on your computer. Some microphones attach to a USB port on your computer.
158 Connecting Capture Devices TV tuner card. To capture video from TV if you have a TV tuner card connected and installed on your computer.
159 Changing Capture Device On the File menu, click Capture Video. or- In the Movie Tasks pane, under Capture Video, click Capture from video device. On the Video Capture Device page, in the Available devices list, click the video capture device you want to use for capturing video. The available choices depend on the video capture devices that are connected to your computer. In the Audio device list, click the audio capture device you want to use for capturing audio. The available choices depend on the audio capture devices that are connected to your computer.
160 Changing Capture Device In the Audio input source list, click the input line that your audio capture device is connected to on your computer. If your audio capture device has only one input line, this setting is not available.
161 Changing Capture Device To adjust the audio capturing level, do one of the following: To reduce the volume, move the Input level slider down. To increase the volume, move the Input level slider up.
162 Changing Capture Device To specify the settings for your video capture device, click Configure, and then configure the video capture device settings you want to change. In the Video input source list, select the input line that your video capture device is connected to on your computer. If your capture device has only one line, this setting is not available. Complete the remaining pages in the wizard.
Windows Movie Maker. Getting started
 Page 1 of 177 Windows Movie Maker This documentation is designed to help you get started using Microsoft Windows Movie Maker. It contains overview information and procedural steps for performing common
Windows Movie Maker. System requirements. Supported file types
 Windows Movie Maker System requirements Windows Movie Maker requires the following minimum system configuration: Microsoft Windows XP Home Edition or WindowsXP Professional A 600 megahertz (MHz) processor,
Windows Movie Maker. Panes (Movie and. Menu Bar. Tool Bar. Monitor. Rewind. Play. Storyboard/Timeline. Playhead. Audio. Microphone Playback
 Menu Bar Panes (Movie and Tool Bar Monitor Rewind Play Storyboard/Timeline Playhead Audio Microphone Playback Zoom In/Out 2004 Teaching Matters, Inc.-Page 1 Importing Video (Transfer the footage from the
Digital Storytelling Students as Directors of Learning. Jennifer Carrier Dorman Central Bucks School District
 Digital Storytelling Students as Directors of Learning Jennifer Carrier Dorman Central Bucks School District Many educators believe in the exceptionality of computers, viewing them as instructional talismans
Windows Movie Maker / Microsoft Photo Story Digital Video
 Windows Movie Maker / Microsoft Photo Story Digital Video http://intranet/technology/index.html TRC HELP DESK X5092 April 2006 Photo Story and Movie Maker Microsoft Photo Story 3 allows you to create fantastic
Windows Movie Maker. The Toolbar. The Toolbar
 Windows Movie Maker The Menu Bar The Menu Bar gives access to all parts of the program. On the Menu Bar, click on File. Notice the choices of Save Project As and Save Movie File o Choose Save Project As
Windows Movie Maker 2 (aka MM2) Tutorial
 Tutorial") Windows Movie Maker 2 (aka MM2) Tutorial - 1 - Introduction This tutorial is designed as a basic introduction and guide to Microsoft s digital video editing program, Windows Movie Maker 2 (MM2) and will
Windows Movie Maker 2 (aka MM2) Tutorial - 1 - Introduction This tutorial is designed as a basic introduction and guide to Microsoft s digital video editing program, Windows Movie Maker 2 (MM2) and will
Using Windows MovieMaker pt.1
 Using Windows MovieMaker pt.1 Before you begin: Create and name (use your first name, or the title of your movie) a folder on the desktop of your PC. Inside of this folder, create another folder called
Windows Movie Maker Reinforcement Handout
 Windows Movie Maker Reinforcement Handout Windows Live Movie Maker is the fast, easy way to turn photos and videos into greatlooking movies and slide shows you can share with your class, on the Web, or
Getting started with Windows Movie Maker
 Getting started with Windows Movie Maker Windows Movie Maker is a feature of Windows Vista that enables you to create home movies and slide shows on your computer, complete with professional-looking titles,
Layout of Movie Maker. Elements of Movie Maker. Step by step instructions on how to use Movie Maker. Web resources for Movie Maker
 Layout of Movie Maker Elements of Movie Maker Step by step instructions on how to use Movie Maker Web resources for Movie Maker Materials needed to use Movie Maker: Laptop Digital camera Digital video
Import Footage You can import footage using a USB/1394 cable, 1394/1394 cable or a firewire/i.link connection.
 Windows Movie Maker Collections view screen. Where imported clips, video effects, and transitions are displayed. Preview Screen Windows Movie Maker is used for editing together video footage. Similar to
How to use Movie Maker 2
 How to use Movie Maker 2 System Requirements Windows Movie Maker requires the following minimum system configuration for your PC. Microsoft Windows XP 600 MHz processor such as an Intel Pentium III 128
Opening the Program. Movie Maker II 1
 1 Opening the Program To open the Movie Maker II application, use the Start Programs Movie Maker combination from the desktop. Alternatively, you can create a shortcut on the desktop. After executing this
How to use Movie Maker
 How to use Movie Maker -Every desktop computer in our district has Windows Movie Maker. In order to access it, visit the Start menu, scroll up to Programs and then move the cursor to the right and locate
An Introduction to Video Editing Using Windows Movie Maker 2 Duncan Whitehurst - ICT Advisory Teacher Pembrokeshire County Council
 1. Connect the DV out socket on your video camera to your computer using an IEEE1394 4pin to 4pin or 4 to 6 pin ( firewire ) cable. 2. Switch your camera on to Play and start up your computer. Movie Tasks
Consolidated High School District Orland Park, Illinois Windows Movie Maker Instruction Guide
 When you start Windows Movie Maker, you may see a collection from the previous user. To delete the collection, click on each pane and right-click to delete. To start a new project, click on File, Save
Movie Maker How-To s
 Movie Maker How-To s Two Views Storyboard Timeline Switch between Storyboard and Timeline view using the and icon Add Pictures, Video, Transitions, Video Effects, Titles/Credits
Working with Windows Movie Maker
 518 442-3608 Working with Windows Movie Maker Windows Movie Maker allows you to make movies and slide shows that can be saved to your computer, put on a CD, uploaded to a Web service (such as YouTube)
Digital Story Telling Microsoft Windows Movie Maker 2.0
 The Windows Movie Maker Interface Movie Tasks: Takes you step by step through the movie making process Document Area TimeLine: This is called the storyboard Project preview Area: Preview your project Saving
Digital Storytelling. Movie Maker
 Digital Storytelling Movie Maker http://webclass.org Online Handouts Select Windows Movie Maker 2 Objectives Disk cleanup defrag C: drive Preview podcast equipment Movie Maker settings Create edit save
WINDOWS MOVIE MAKER CREATING A VIDEO USING STILL PICTURES
 WINDOWS MOVIE MAKER CREATING A VIDEO USING STILL PICTURES 1. Open your My Documents folder. Open the My Videos folder. Under File and Folder Tasks, select>make a new folder. All of the pictures/video clips
Making Effective Videos for Teaching & Learning (T&L) Purposes
 Purposes") Making Effective Videos for Teaching & Learning (T&L) Purposes Using Windows Movie Maker [2.1 XP] [2.6 Vista] [Windows 7] Disclaimer: Attending this training does not earn you a nomination for the Oscars!
Making Effective Videos for Teaching & Learning (T&L) Purposes Using Windows Movie Maker [2.1 XP] [2.6 Vista] [Windows 7] Disclaimer: Attending this training does not earn you a nomination for the Oscars!
GET FAMILIAR WITH WINDOWS MOVIE MAKER
 GET FAMILIAR WITH WINDOWS MOVIE MAKER TASKS SELECTION COLLECTION PALETTE PREVIEW SCREEN PRODUCTION PALETTE The production palette has two modes: storyboard and timeline. To switch between the two click
1 To access Movie Maker
 Windows Movie Maker Handout i What you will be doing in the practical session 1 To access Movie Maker You will be creating a Movie of your choice using text, images, video clips and sound Before you start
STORYTELLING-PowerPoint-Windows Movie Maker 2
 Judy Honaker Storytelling Using PowerPoint & Movie Maker 2 1 STORYTELLING-PowerPoint-Windows Movie Maker 2 By: Judy Honaker-Instructional Technology Resource Teacher Introduction This tutorial is designed
Advice for How To Create a Film Project in Windows MovieMaker
 Advice for How To Create a Film Project in Windows MovieMaker This document was compiled to provide initial assistance to teachers and/or students to create a movie project using the Windows MovieMaker
Using Movie Maker for Editing Video
 Using Movie Maker for Editing Video Windows Movie Maker Overview of Digital Film Festival Basic steps of video editing 1. Import video 2. Edit video Effects Transitions Titles and credits 3. Save video
How to Use Windows Movie Maker to Create a Video
 How to Use Windows Movie Maker to Create a Video Windows Movie Maker is a free video-editing program that typically comes with any computer running Windows XP, Windows Vista, and Windows 7. Videos area
Digital Video Projects (Creating)
") Tim Stack (801) 585-3054 tim@uen.org www.uen.org Digital Video Projects (Creating) OVERVIEW: Explore educational uses for digital video and gain skills necessary to teach students to film, capture, edit
Tim Stack (801) 585-3054 tim@uen.org www.uen.org Digital Video Projects (Creating) OVERVIEW: Explore educational uses for digital video and gain skills necessary to teach students to film, capture, edit
Introduction to Windows Movie Maker 2
 Introduction to Windows Movie Maker 2 2 Introduction to Digital Video... 1 What is digital video...1 Digital video file types and compression...1 Hardware what you need to edit video...1 PAL and NTSC...2
Creating Instructional Videos Don Carlin Walter Bracken Magnet School CCSD Technology Conference October 23-24, 2009
 Using Windows Movie Maker Introduction We all know the usefulness and educational importance of using videos to teach. With United Streaming, we have thousands of titles only a mouse click away. When it
Windows Movie Maker Live
 Windows Live Movie Maker is available on your PC for creating and editing videos. The program provides a step-by-step guide for creating a video with your videos and images. Open Movie Maker... 2 Overview...
Movie Maker Tutorial created by Cheryl McKnight
 Movie Maker Tutorial created by Cheryl McKnight The Movie Task Pane list the steps necessary in completing an editing project. If the Task Pane is turned off, go to View, and select Task Pane to toggle
Digital Video. Part II: Introduction to Editing and Distribution
 Digital Video Part II: Introduction to Editing and Distribution Contact Information The University of Utah Student Computing Labs Macintosh Support mac@scl.utah.edu We Will Cover History of video editing
Using Movie Maker. for Editing Video. Larry Nelson Instructional Technology Technology Services El Paso ISD. Technology.
 Using Movie Maker for Editing Video Larry Nelson Instructional Technology Technology Services El Paso ISD Technology El Paso ISD Windows Movie Maker Overview of Digital Film Festival Basic steps of video
Digital Video Act II Introduction to Editing and Distribution. University of Utah Student Computing Labs Macintosh Support
 Digital Video Act II Introduction to Editing and Distribution University of Utah Student Computing Labs Macintosh Support mac@scl.utah.edu More classes This class is a series Act I last week Introduction
How to Make a Movie in imovie How to Make a Movie Trailer in imovie How to Color Correct a Movie in imovie
 How to Make a Movie in imovie How to Make a Movie Trailer in imovie How to Color Correct a Movie in imovie 1. Make sure you are using the Mac. Make a Movie in imovie 2. If your files are on an external
STEP 1: Import Your Pictures Import pictures *Note:
 STEP 1: Import Your Pictures Transferring your still pictures to your PC is the first step in making your own slide show. Then you'll need to import them into Windows Movie Maker. A tip before you begin
Picture & Video Importing, Editing and CD Creation Using Picasa and Movie Maker
 Picture & Video Importing, Editing and CD Creation Using Picasa and Movie Maker By John Gontowicz 609-668-0695 yourpcguide@comcast.net www.yourpcguide.com www.yourpcguide.com/photo.pdf Download Picasa
imovie The imovie Screen Monitor Window Shelf Home Play Full Screen Playhead Play Fast Forward Rewind Clip Viewer Timeline Design Panels Volume
 The imovie Screen Monitor Window Shelf Playhead Home Play Full Screen Rewind Play Fast Forward Camera Mode Edit Mode Clip Viewer Timeline Volume Project Trash Design Panels 2004 Teaching Matters, Inc.-Page
imovie: Digital Storytelling
 1 imovie: Digital Storytelling *** imovie s interface with terminology is located on the final page *** 1. Getting Started a) Document your activities by using the provided digital camera b) Using a USB
Windows Movie Maker Instructions
 Windows Movie Maker Instructions A. Getting Started: 1. To open Windows moviemaker, go to: Start > All Programs > Accessories > Windows Movie Maker. 2. Go to File > New Project. Please note: You should
Getting to know Photostage. The software interface. The Menu bar. Step 01: Inserting images/photographs
 Installing Photostage 1. Download the application 2. Double click on the downloaded file to run it. 3. Choose the drive and folder where you want to install Photostage or accept the default "C:\Program
Working with Windows Movie Maker
 Working with Windows Movie Maker These are the work spaces in Movie Maker. Where can I get content? You can use still images, OR video clips in Movie Maker. If these are not images you created yourself,
Opening the Program. Adding Images and Videos. Movie Maker II 1
 1 Opening the Program To open the Movie Maker II application, use the Start All Programs Windows Live Movie Maker combination from the desktop. Alternatively, you can create a shortcut on the desktop.
Creating a slideshow with captions
 Creating a slideshow with captions Follow these instructions to create a slideshow that shows a timeline of events in chronological order. Open Windows Live Movie Maker Add photos - add content by clicking
Make Your Pictures Come to Life with Photo Story 3
 Page 1 of 6 Click Here to Install Silverlight United States Change All Microsoft Sites Search Microsoft.com Submit Windows Media Home For Home Windows Media Player Music & Video Cool Devices For Professionals
BE A MOVIE MAKER! Before we import our pictures, we want to change the default frame rate -- in other words, how fast our movie will run.
 BE A MOVIE MAKER! Tips: Keep shapes simple Keep action to 20 frames or fewer Put one object that doesn t move at the edge of the frame to use to keep the frames steady Make a lot of tiny changes between
Windows MovieMaker 2
 Windows MovieMaker 2 http://www.microsoft.com/windowsxp/using/moviemak er/default.mspx Build a Storyboard Movie Maker automatically divides your video into segments to make it easier to drag and drop the
Digital Story Telling with Windows Movie Maker
 Digital Story Telling with Windows Movie Maker 1 Getting Started 1. To open Windows moviemaker, go to: Start > All Programs > Windows Movie Maker. (Figure 1.1) Figure 1.1 Please note: You should have your
Camtasia Studio 5.0 PART I. The Basics
 Camtasia Studio 5.0 Techsmith s Camtasia Studio software is a video screenshot creation utility that makes it easy to create video tutorials of an on screen action. This handout is designed to get you
Animation Part 2: Using Windows Movie Maker for Voiceovers and More Duncan Whitehurst ICT Advisory Teacher Pembrokeshire County Council
 1. To edit an animation produced in I Can Animate click Start, All Programs and find Windows Movie Maker. 2. In the Movie Tasks pane click Import Video. 3. Go looking on your computer for your animation.
Digital Video Editing Using imovie
 Digital Video Editing Using imovie This is an introductory tutorial into basic digital video editing. Participants will learn how to transfer video from tape to the computer, plus basic editing techniques
Video Modeling & Video Self-Modeling: Research to Practice
 Video Modeling & Video Self-Modeling: Research to Practice It s Showtime with ShowBiz Presented by the Virginia Department of Education s Autism Priority Project Developed by Teresa Lyons, T-TAC/VT How
Windows Live Movie Maker for teachers and faculty
 Windows Live Movie Maker for teachers and faculty Step-by-step Get Windows Live Movie Maker Download Download Windows Live Movie Maker at http://windowslive.com/desktop/moviemaker Run After the program
Digital Documentaries Premiere Elements 8
 Premiere Elements 8 Creating a new project Select New Project In the Premiere welcome screen and go to File, New Project on the top menu. Type in a project name and select Browse to locate the Desktop
imovie Window 2 imovie at a Glance D E F
 1 imovie at a Glance imovie at a Glance introduces you to the controls in the imovie window. You use these controls to create your own movies. Take a look at these pages even if you don t plan to complete
How You Use the Timeline
 How You Use the Timeline The Timeline and the Canvas display two different views of the same sequence. The Timeline shows the chronological arrangement of clips and layered video and audio clip items,
Adobe Premiere Elements Workspace overview. Creating a new project. About projects. Start a new project
 Adobe Premiere Elements Workspace overview The Adobe Premiere Elements workspace is optimized for the four major phases of a project: organizing footage (video, stills, and audio), editing a movie, creating
PHOTO DVD MAKER USER MANUAL
 Photo DVD Maker User Manual 1 PHOTO DVD MAKER USER MANUAL Version 7.04 http://www.photo-dvd-maker.com Photo DVD Maker User Manual 2 0.1 WELCOME TO PHOTO DVD MAKER...4 0.2 GETTING HELP...5 1. GETTING STARTED...6
Lesson Plans. Put It Together! Combining Pictures with Words to Create Your Movie
 Lesson Plans L e s s o n 4 : Put It Together! Combining Pictures with Words to Create Your Movie National Language Arts Standard 3: Students apply a wide range of strategies to comprehend, interpret, evaluate,
Digital Story Telling with Windows Movie Maker Advanced STM Workshop Delwar Sayeed Center for Teaching and Learning
 Digital Story Telling with Windows Movie Maker Advanced STM Workshop Delwar Sayeed Center for Teaching and Learning Getting Started 1. To open Windows moviemaker, go to: Start > All Programs > Windows
PowerPoint Intermediate 2010
 PowerPoint Intermediate 2010 I. Creating a Slide Master A. Using the design feature of PowerPoint essentially sets up similar formatting for all of your slides within a presentation. However, there are
Adobe Premiere Elements Tutorial
 Adobe Premiere Elements Tutorial Starting a New Project To import movie clips from a digital video camera, click on the Capture Video button. You will be prompted to name your project and choose a location
Selection tool - for selecting the range of audio you want to edit or listen to.
 Audacity Quick Guide Audacity is an easy-to-use audio editor and recorder. You can use Audacity to: Record live audio. Convert tapes and records into digital recordings or CDs. Edit sound files. Cut, copy,
Using Digital Cameras. Digital Storytelling
 Using Digital Cameras Digital Storytelling http://webclass.org Online Handouts Select Digital Cameras 2 Objectives Camera formats and features Video shooting techniques Create 60-second movie Import video
Project Storyboard. Project Name: Date: Project Members: Scene: Scene: (#) Frames to Show: (#) Frames to Show: Scene: Scene: (#) Frames to Show:
 Frames to Show: (#) Frames to Show: Scene: Scene: (#) Frames to Show:") Project Storyboard Project Name: Date: Project Members: 2002 Tech4Learning, Inc. www.tech4learning.com 1 Project Storyboard 2002 Tech4Learning, Inc. www.tech4learning.com 2 Setting Up Stop Motion Animator
Project Storyboard Project Name: Date: Project Members: 2002 Tech4Learning, Inc. www.tech4learning.com 1 Project Storyboard 2002 Tech4Learning, Inc. www.tech4learning.com 2 Setting Up Stop Motion Animator
Exercise 1: Importing a PowerPoint Presentation... 6 Importing Files... 6 Editing and Clip Detection... 7
 Table of Contents Table of Contents... i Features at a Glance... 1 Capturing, importing, and organizing... 1 Synchronizing and editing... 1 Publishing and sharing... 1 Usage Scenarios... 1 Creating Cost-Effective
How to add video effects
 How to add video effects You can use effects to add a creative flair to your movie or to fix exposure or color problems, edit sound, or manipulate images. Adobe Premiere Elements comes with preset effects
WINDOWS MOVIE MAKER 6.0. A Technology Tutorial
 WINDOWS MOVIE MAKER 6.0 A Technology Tutorial Emma Turell and Alejandro Martinez LIS 488 Online 2/21/2018 Welcome Are you interested in learning how to make some home movies? Are you also interested in
Creating DVDs and CDs. With Your DVD Writer/CD Writer Drive
 Creating DVDs and CDs With Your DVD Writer/CD Writer Drive The information in this document is subject to change without notice. Hewlett-Packard Company makes no warranty of any kind with regard to this
imovie 08 Basics USF College of Education Laptop Initiative EDU 252, Website:
 imovie 08 Basics USF College of Education Laptop Initiative EDU 252, Email: laptoplounge@coedu.usf.edu Website: http://fcit.usf.edu/laptop/ imovie 08 is a completely redesigned version of the video editing
 S4B Split Movie Soft4Boost Help S4B Split Movie www.sorentioapps.com Sorentio Systems, Ltd. All rights reserved Contact Us If you have any comments, suggestions or questions regarding S4B Split Movie or
First, collect your digital photos prior to starting this project. You may want to storyboard (plan) your PhotoStory also.
 your PhotoStory also.") PhotoStory 3 Microsoft PhotoStory 3 allows you to create a digital slideshow of your photos with music and narration. It s a free download at http://www.microsoft.com/windowsxp/using/digitalphotography/photostory/default.mspx.
PhotoStory 3 Microsoft PhotoStory 3 allows you to create a digital slideshow of your photos with music and narration. It s a free download at http://www.microsoft.com/windowsxp/using/digitalphotography/photostory/default.mspx.
Media Commons Workshop: Final Cut Pro X
 Media Commons Workshop: Final Cut Pro X mediacommons@psu.edu mediacommons.psu.edu/instruction/workshops Description This is the Final Cut Pro Video Basics workshop. In this workshop we will cover how to
This chapter takes you step by step through the process of building your own movie in imovie HD.
 2 imovie HD Tutorial 2 This chapter takes you step by step through the process of building your own movie in imovie HD. You can use video from a variety of sources and devices to create a movie in imovie
PowerPoint 2016 Advanced for Windows
 1 PowerPoint 2016 Advanced for Windows PowerPoint 2016 Advanced for Windows Training Objective To learn advanced features of PowerPoint 2016 in order to create more elaborate presentations. What you can
2018 imovie High Sierra
 2018 imovie High Sierra 1 Create a Movie Open imovie. Select the Projects button from the top menu. Click Create New. Next, Click Movie. You will see a sidebar of libraries and events, browser window with
APPLE IMOVIE HD TUTORIAL
 APPLE IMOVIE HD TUTORIAL O V E R V I E W Movie HD is consumer-level digital video editing software for Mac OS. You can use imovie to edit the footage you film with digital video cameras and HD video cameras.
imovie Lesson User Guide Part One
 imovie Lesson User Guide This User Guide consists of two parts. The first part gives a web page address where all of the lesson materials, practice imovie files, imovie lessons, and an Instructional imovie
imovie Quick Guide Learning Technologies Center Gaskill Hall
 imovie Quick Guide Learning Technologies Center Gaskill Hall Introduction Welcome to the Miami University LTC This quick guide is designed to help acquaint you with some capabilities of imovie HD and idvd
Instruction Guide: Using Microsoft Movie Maker 2
 Instruction Guide: Using Microsoft Movie Maker 2 2008, David L. Bahn & Adrian Yardley. All rights reserved. ISBN: (Pending) 1. Double click on your Movie Maker icon. (Alternatively, locate it under Start\Programs\Accessories
PowerDirector Basics. Section 1. The Muvipix.com Guide to CyberLink PowerDirector 12 Ultimate. Chapter 1 Get to Know PowerDirector 12...
 The Muvipix.com Guide to CyberLink PowerDirector 12 Ultimate Section 1 PowerDirector Basics Chapter 1 Get to Know PowerDirector 12... 3 What s what and what it does Welcome to easy yet powerful moviemaking!
North & South America Ulead Systems Inc. Support:
 User Guide Ulead Systems, Inc. May 2005 English edition for Ulead CD & DVD PictureShow 4, May 2005. 1992-2005 Ulead Systems, Inc. All rights reserved. No part of this publication may be reproduced or transmitted
The Muvipix.com Guide to CyberLink PowerDirector 15 Ultimate
 The Muvipix.com Guide to CyberLink PowerDirector 15 Ultimate The Muvipix.com Guide to CyberLink PowerDirector 15 Ultimate Section 1: PowerDirector Basics Chapter 1 Get to Know PowerDirector 15... 3 What
imovie 10 Workshop #1 from basics to badass
 imovie 10 Workshop #1 from basics to badass interface importing open / save previewing selecting 1) The Project Area shows how your clips are arranged in your project 2) The Viewer allows you to preview
Apple imovie 3. Cal Poly State University, San Luis Obispo Instructor: Luanne Fose, Ph.D
 Apple imovie 3 Cal Poly State University, San Luis Obispo Instructor: Luanne Fose, Ph.D Introduction imovie 3, for Mac OS X users, is a user-friendly digital video editing application that allows movie
CyberLink. StreamAuthor 4. User's Guide
 CyberLink StreamAuthor 4 User's Guide Copyright and Disclaimer CyberLink reserves all rights to this publication. No part of this publication may be reproduced, duplicated, saved or transmitted without
Figure 1 Add Media panel
 How to import video There are four basic methods for adding media to your projects: capturing from tape or live sources, importing files from other types of storage, adding from the Organizer workspace,
Creating Machinima using Camtasia
 Creating Machinima using Camtasia Camtasia Studio is a screen video capture software developed by TechSmith. Camtasia is mostly used to create video tutorials demonstrating how to perform tasks on your
The Muvipix.com Guide to Sony Movie Studio Platinum 13
 The Muvipix.com Guide to Sony Movie Studio Platinum 13 Chapter 1 Get to know Sony Movie Studio Platinum 13... 5 What s what and what it does The Sony Movie Studio 13 interface 6 The Project Media window
You can view the LoiLoScope 2 user manual from within the software.
 LoiLoScope 2 User Manual You can view the LoiLoScope 2 user manual from within the software. From the File menu at the top left of the screen, click on "Download Manual" to open the download page in your
GETTING STARTED TABLE OF CONTENTS
 imovie 11 Tutorial GETTING STARTED imovie 11 is consumer-level digital video editing software for Macintosh. You can use imovie 11 to edit the footage you film with digital video cameras and HD video cameras.
Adobe Captivate Level 1
 Information Technology Services Kennesaw State University Adobe Captivate Level 1 Presented by Technology Outreach in collaboration with The Multimedia Development Group (MDG) Copyright 2007 Information
Adobe Premiere Pro CC 2015 Certification Review
 Adobe Premiere Pro CC 2015 Certification Review 40 questions; 50 Minutes Need to know for matching and/or multiple choice: Razor tool Slide tool Rate Stretch tool Ripple Edit tool Mark In Mark Out Insert
Chapter 25. Build Creations with Your Photos
 Chapter 25 Build Creations with Your Photos 2 How to Do Everything with Photoshop Elements How to Create a slide show to show off your images Post your images in web pages Build cards, calendars, and postcards
oit Final Cut Express Intermediate Video Editing on a Mac UMass Office of Information Technologies Introduction...
 oit UMass Office of Information Technologies Final Cut Express Intermediate Video Editing on a Mac Introduction... 2 The Interface... 3 Keep Organized... 4 Import Media... 5 Assemble Video Projects...
The Muvipix.com Guide to Vegas Movie Studio Platinum 14
 The Muvipix.com Guide to Vegas Movie Studio Platinum 14 What have I gotten myself into?... 1 Some basic questions and simple answers about Vegas Movie Studio 14 and how it works Chapter 1 Get to know Vegas
Avid epublisher Start-up Guide
 Avid epublisher Start-up Guide S o ft w a re f o r Wi n d ow s 2 0 0 0 1 2 Copyright and Disclaimer Information in this document is subject to change without notice and does not represent commitment on