Morae Manager. User Guide. Release March TechSmith Corporation. All rights reserved
|
|
|
- Maud Day
- 6 years ago
- Views:
Transcription
1 Morae Manager User Guide Release March TechSmith Corporation. All rights reserved
2 This manual, as well as the software described in it, is furnished under license and may be used or copied only in accordance with the terms of such license. The content of this manual is furnished for informational use only, is subject to change without notice and should not be construed as a commitment by TechSmith Corporation. TechSmith Corporation assumes no responsibility or liability for any errors or inaccuracies that may appear in this manual. Trademarks Camtasia, Camtasia Relay, Camtasia Studio, DubIt, EnSharpen, Enterprise Wide, Expressshow, Jing, Morae, Rich Recording Technology (RRT), Screencast.com, Show The World, SmartFocus, Snagit, TechSmith, TSCC and UserVue are either registered marks or marks of TechSmith Corporation in the U.S. and/or other countries. This list is not a comprehensive list of all TechSmith Corporation marks. The absence of a name/mark or logo in this notice does not constitute a waiver of any intellectual property rights that TechSmith Corporation has established in any of its product, feature or service names/marks or logos. All other marks are the property of their respective owners.
3 Table of Contents Table of Contents 1 Welcome to Morae Getting Help with Morae 13 Morae Help Files 13 Morae Learning Center 14 TechSmith Technical Support 14 TechSmith Website 14 Balloon Tips and Tip Dialogs 14 Morae Overview 14 Quick Overview of Morae Applications 16 Record - Morae Recorder 16 Observe and Log Morae Observer 16 Analyze, Graph, and Share Morae Manager 17 System Requirements 17 Welcome to Morae Manager 18 How to Use Manager 18 The Example Project 18 Get to Know the Manager Interface 20 Analyze Tab 20 Analyze Tab Toolbar 21 Change the Default Project Path for Manager 21 Graph Tab 22 Graph Tab Toolbar 23 Graph Properties Toolbar 24 Manager Preferences 24 Present Tab 25 Present Tab Toolbar 26 Show and Hide Tabs in Manager 26 Study Configurations
4 What Is a Study? 28 What is a Study Configuration? 28 AutoPilot 29 Uses of AutoPilot 29 Set Up AutoPilot 29 Add AutoPilot to a Study Configuration 29 Create Handouts 32 Study Components Available in the Morae Add-In for Microsoft Word 33 Run an AutoPilot Session 34 Create or Modify a Study Configuration File 35 Modify a Study 36 Modify a Study Name and Description 36 Modify Marker Definitions in Manager 36 Modify Survey Answers in Manager 37 Modify Task Definitions in Manager 40 Define Recording Details 41 Capture Options 42 Data 42 Main Video Source and Picture-in-Picture 42 Mouse Video Effects 43 File Details 43 Defer Processing of Recordings 44 Batch Process Recording Files 44 Processing 45 Prompt for File Details When Recording Stops 46 Password Protect Recording Files 46 Password Protect a Recording File Before Recording 47 Password Protect a Recording File after Recording 47 Recording Name, Recording Folder, and Description 47 Define File Details Before Recording 47 Define File Details After Recording 48 Recording Start Settings
5 Automatically Restart Recorder 50 Task Logger Settings 51 Defining the Task Logger 51 Designate the Task Logger 52 Designate Who Sends Surveys 53 Auto Pilot Settings 53 Enable AutoPilot 54 At End of Recording 54 Timeout Options 55 Observer Settings 55 Recorder Stop Settings 55 Define Study Details 57 Define Study Tasks 58 To Define a Task 58 Modify Task and Success Score Definitions 60 Success Score 60 Task Instructions 61 Task Name and Description 61 Define Study Markers 61 To Define a Marker 62 Marker Color, Type, and Definition 63 Marker Scores 63 Modify Marker and Marker Scores Definitions 64 Define the Study Surveys 64 Survey Name 65 Survey Association 65 Create a Survey Using Custom Questions 66 Create a Survey Using System Usability Scale Questions 67 Survey Question Types 69 Custom Question Types 69 Scale Question 69 Select One Answer
6 Select One or More Question 71 Freeform Question 72 Configure the Wii Remote for Logging 73 Requirements 73 Connect the Wii Remote 73 Configure the Wii Remote 74 Troubleshooting 75 Define Study Details 75 Define the Study Description 76 Study Name and Study Description 76 Study Instructions 77 Create and Modify a Project 78 Create a New Project 78 Import Project Components 80 To Import Project Components 81 Import Recordings 82 Import Video Files 82 Merge Studies 82 Match Survey Questions 83 Why Match Surveys? 83 Survey Viewer Overview 83 Update Survey Answers 84 Match Marker Definitions 87 Match Marker Scores 88 Match Task Definitions 89 Match Task Scores 91 Merge a Study 92 Organize Your Project 95 To Add Folders to the Project Pane 96 To Delete Folders from the Project Pane 96 Analyze 97 Image Clips
7 Create Image Clips 97 To Create an Image Clip 98 Edit Image Clips 98 Edit the Image Clip in an Image Editor 98 Edit Image Clip Properties 99 Markers in Manager 100 Create a New Marker in Manager 101 Edit a Marker in Manager 103 Log a Recording in Manager 103 Move a Marker in Manager 103 Search for Data in Recordings 104 Overview of Search Pane 104 View Search Results 105 Search Results Chart View 105 Search Results List View 107 Search Results In the List View 108 Search Results Metrics 109 Applications Search Options 110 Chat Search Options 111 Cross Recording Search 113 Why Search Entire Recordings? 113 Why Search Only Select Tasks? 114 Why Search All Recordings? 114 Why Search Only Select Recordings? 114 Events by Web Page 114 Keystrokes Search Options 115 Markers Search Results 116 Mouse Clicks Search Options 117 Screen Text Search Options 118 Search in Morae 119 To Search for Data 119 Web Page Changes Search Options
8 Window or Dialog Events Search Options 121 Search Profiles 122 Save Search Profiles 123 Tasks in Manager 123 Edit Tasks in Manager 124 Add a Selection to a Task 124 Example One: Add a Separate Selection to a Task 124 Example Two: Add a Adjoining Selection to a Task 125 Edit the Duration of a Task 125 Remove Part of a Task 126 Add Tasks to Recordings 126 Create/Add tasks in Manager: 126 Rename Tasks in Manager 128 Tasks in Sections 128 Undefined Tasks 128 Update an Undefined Task 129 Timeline and Player 129 Filter Markers on the Timeline 129 Normalize Audio 130 Tips for the Normalize Audio Option 130 Normalization Example 130 Normalize audio disabled 130 Normalize audio enabled 130 Player Controls 131 Player Controls 131 Additional Player Options 132 Player Window Overview 132 Additional Player Window Information 133 Timeline and Player 134 Timeline Overview 134 Additional Timeline Information 134 Video Clips
9 Edit Video Clips 135 Adjust the Duration of a Video Clip 135 Edit a Video Clip on the Timeline 136 Edit Video Clip Properties 136 Create a Video Clip on the Timeline 137 Create a Video Clip by Dragging a Task 138 Create Video Clips 139 Video Clips 139 Work with the Camera Video Picture-in-Picture 140 Set Default PiP Location, Size, and Opacity 140 Tips for Working in the Analyze Tab 140 View Survey Answers 141 Survey Viewer Overview 141 Graph 143 Customize the Appearance of a Graph 143 Change Axis Settings 143 X-Axis Examples 144 Y-Axis Examples 145 Display Point Labels 146 Display the Series Legend 147 Edit Graph Chart Options 148 Edit Graph Playback Options 149 Edit Graph Series Options 150 Edit Graph X-Axis Options 150 Edit Graph Y-Axis Options 151 Graph Gallery 152 Use Auto Scaling 154 Graph Analysis Examples 155 Average Marker Score Graph 155 Count of Markers Graph 156 Distribution of Marker Types Graph 157 Distribution of Markers Scores Graph
10 Graph Average (Mean) of Each Participant or Task 160 Graph by Participant 161 Graph by Task 162 Graph Details of Each Participant or Task 163 Maximum Time In Between Inputs Graph 163 Mouse Clicks Graph 164 Mouse Movement Graph 165 Percent Success Graph 165 Survey Answer Frequency Graph 166 Survey Average Score Graph 167 SUS Survey Graph 168 Task Score Graph 168 Task Success Distribution Graph 169 Time on Task Graph 169 Time Spent in Specific Applications Graph 170 Time Spent in Specific Windows or Dialogs Graph 170 Time Spent on Web Pages Graph 171 Web Page Changes Graph 171 Create a Graph 172 Graph Templates 174 Save a Graph as a Template 174 Use a Graph Template 175 Graph vs. Graph Template 175 A saved graph includes the following: 175 A graph template includes the following: 175 Save a Graph 176 To Save a Graph 176 Tips for Working in the Graph Tab 176 View the Graph Data Table 176 Present 178 Audio and Text Notes 178 Audio Tracks on a Video Clip
11 Add Notes to a Clip 179 Add Notes to a Graph 179 Add Notes to a Marker 180 Add Notes to a Task 181 Add Text Notes 181 Add or Edit a Text Note 181 Clear an Audio Note 182 Switch Microphones and Adjust the Volume of Audio Notes 182 Adjust Your System s Default Microphone Settings 182 Clip Bin 183 Clip Bin List View 183 Sort Clips in List View 183 Clip Bin Thumbnail View 183 Sort Clips in Thumbnail View 184 Change the Size of the Thumbnails in the Clip Bin 184 Clip Bin Views 184 Export Data from Morae 185 Export Clips and Storyboards to PowerPoint 185 Quick Tips for Export to PowerPoint 185 Export Clips to PowerPoint 185 Export Storyboards to PowerPoint 187 Export Clips and Storyboards to Screencast.com 188 Export Clips to Screencast.com 189 Export Storyboards to Screencast.com 190 Morae Add-In for Word 191 Open the Morae Task Pane 191 Add Morae Project Components to Report 191 Add Study Configuration Components to Session Handouts 192 Morae Add-In for Word 193 Open the Morae Task Pane 193 Study Components Available in a Configuration File 194 Study Components Available in a Project
12 Task Pane Does Not Appear 196 Enable Morae Add-In for Word Export Graph Data 197 Export Graph Data 198 Export Graphs 198 Export a Graph 198 Export Project Componants 198 Export Project Components 198 Export Results from the Search Editor 199 Export All Results 199 Export Specific Results 199 Export Screenshots from a Morae Recording 199 Capture One Frame of Video 200 Export Survey Results 200 Export Results from a Survey 200 Produce Highlight Videos 200 Produce Storyboards 201 Audio Settings Options 201 Custom Settings Options 202 Produce Video Options 203 Video Compression Setup Configuration Button 203 Video Compression Setup Options 204 Video Size Option 205 Preview the Storyboard 206 Produce Video Clips 206 Share Highlight Videos 207 Share on a Network 207 Share with 207 Share on the Internet or Intranet 207 Share Highlights with a Mac User 208 Share Video on a Website 208 To share MP4 video:
13 Storyboard 209 Add a Clip, Graph, or Task to the Storyboard 209 Add a Clip, Graph or Task to the Storyboard Insert a Clip, Graph, or Task before Another Clip 210 Create Multiple Storyboards 210 Edit a Clip, Graph, or Task on the Storyboard 211 Edit a Video Clip on the Storyboard 211 Edit Clip, Graph, or Task Properties 211 Move a Clip, Graph, or Task on the Storyboard 211 Move Multiple Clips, Graphs, or Tasks 211 Delete Multiple Clips, Graphs, or Tasks From the Storyboard 211 Normalize Storyboard Audio 211 Tips for the Normalize Audio Option 211 Storyboard Normalization Example 212 Normalize audio disabled 212 Normalize audio enabled 212 Preview Clips on the Storyboard 212 Transitions 213 To Modify a Transition 213 Change the Default Transition 213 Title Clips 214 Create Title Clips 214 Create a Title Clip 214 Pack and Show 215 Pack and Show Advantages 215 What is a Pack and Show EXE? 215 How Does Pack and Show work? 216 Considerations when using Pack and Show 216 To Use Pack and Show 216 Tips for Working in the Present Tab
14 Tips and Reference 219 Codecs in Morae 219 Video Compression Setup Options 219 Morae File Management 220 Morae File Sizes 220 Morae Recorder File Size 220 File Rollover for Long Recordings 220 Moving Recorder Files 221 Morae Highlight Video File Size 221 Morae File Types 221 Morae Player 223 Morae Player Playback Controls 224 Morae Player System Requirements 224 Morae Player Command Line Customizations 224 Morae Player Command Line Options 225 Change the Morae Player Background Colors from the Command Line 226 How to determine the RGB values for a color 226 Check for Upgrade Settings Options 227 How Rich Recording Technology (RRT) Works 227 Manage Recording Files 228 Recording File Processing and Verification 228 Morae Recorder COM Server 228 Record Silently 229 Record Silently by Automating Repeated Recordings 229 Record Silently from the Command Line 229 To create a shortcut to the command line 229 Record Silently with the Recorder COM Server 230 Recording File Recovery Options 230 If Recorder was unable to recover any recording data 230 If Recorder finds data that might be recoverable
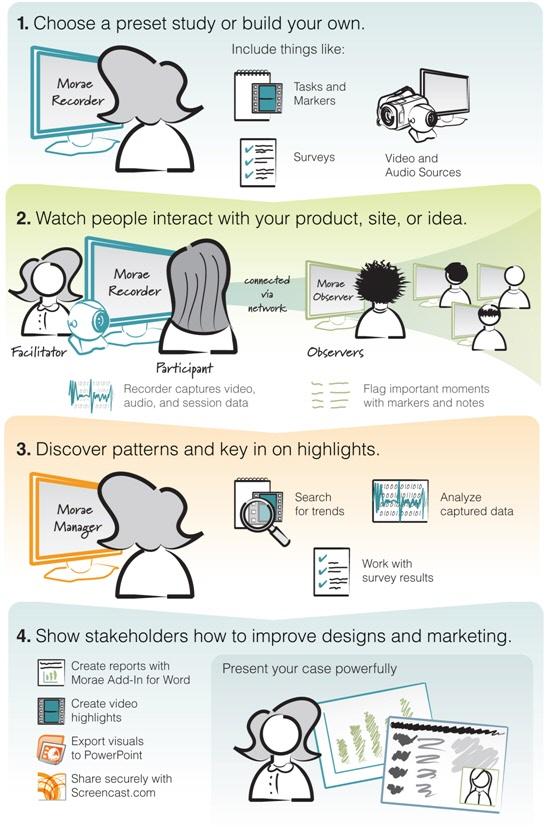
15 Welcome to Morae Morae is the premier software for deeply understanding customer experiences, and for sharing those insights clearly and powerfully. From usability testing to focus groups and beyond, Morae helps you transform designs and marketing to make things people love. Want to test your design? Morae makes it easy to pinpoint usability problems in software applications, websites, prototypes, or mobile devices. Install Morae on a laptop to test at a conference or in the field. The software captures every nuance of your testing session. See the look on a participant s face, hear the frustration in her voice, and discover hidden problems in your product or site. Search across recordings, automatically calculate and graph standard metrics, and more. Doing market research? Use Morae with up to two video cameras to record a focus group or in-depth interview. Type notes and flag important moments as you go all your observations are indexed to the digital video on your hard drive, eliminating hours of tedious work. When it s time to present your findings, simply drag and drop video clips to produce a highlight reel. Export charts, screenshots, and videos in standard format, or send them directly to Microsoft Office with a click. Work faster, more flexibly, and deliver stronger results with Morae. Morae consists of three applications Morae Recorder, Morae Observer and Morae Manager. These three applications work together to record, observe, log, analyze and share a user s experience. Morae Overview System Requirements Welcome to Morae Manager Get to Know the Manager Interface Study Configurations Create and Modify a Project Analyze Graph Present Tips and Reference Information Getting Help with Morae Several resources are available to help when you run into questions or problems with Morae. Morae Help Files Each of the Morae components has its own Help File. Recorder, Observer, and Manager s Help files contain detailed information describing how to use Morae. Access the Help files through the Help menu or Help buttons found in the user interface. To open a help topic for the screen or area you are currently using, press <F1> on your keyboard
16 Morae Learning Center For additional help, videos, and tutorials see the Morae Learning Center. TechSmith Technical Support We provide help with Morae installation-related issues at no cost. If you experience problems installing Morae, search our Knowledge Base. If you don t find your answer there, use the Contact Support tab in the Knowledge Base to send your question to TechSmith Technical Support. TechSmith Website Additional support resources are available online at TechSmith s Website. Balloon Tips and Tip Dialogs Morae provides balloon tips (in Manager only) and tip dialogs (in Manager and Recorder). Both types of tips contain helpful information and recommendations related to the task you are trying to complete. Balloon tips appear only the first couple of times you complete a particular task and then they automatically stop appearing. To reset the balloon tips, choose Help > Reset Balloon Tips. Tip dialogs always appear unless you disable one or more of the dialogs manually. To disable all of the tip dialogs: Recorder Choose Tools > Preferences tab and remove the checkmark from the Show all tips option. Manager Choose Tools > Preferences and remove the checkmark from the Show all tips option. You can disable an individual tip dialog by removing the checkmark from the Show tip again option in the lower left-hand corner of the dialog box. Morae Overview Morae is the premier software for deeply understanding customer experiences, and for sharing those insights clearly and powerfully. From usability testing to focus groups and beyond, Morae helps you transform designs and marketing to make things people love. Morae reduces the amount of work needed, not only at setup, but also during the data logging, analysis, reporting and presentation stages. Based on TechSmith s patented Rich Recording Technology (RRT), Morae is a complete solution that records the computer screen and camera video and also automatically creates a synchronized index of events occurring behind the scenes in applications and in the operating system. You can search screen and video recordings for specific events that occurred like when a user viewed a Web page, clicked a link, pressed a certain key, opened a dialog box or viewed specific text. You can easily perform in-depth analysis, log tasks, create reports and quickly create video presentations to share. See also Quick Overview of Morae Applications
17
.")
 and audio of the user (through a microphone).")
18 Quick Overview of Morae Applications Morae includes three applications: Record - Morae Recorder,Observe and Log Morae Observer, and Analyze, Graph, and Share Morae Manager. These components work together to provide an easy-touse, total recording system based on TechSmith s patented Rich Recording Technology (RRT). Record - Morae Recorder Utilizing RRT, Morae Recorder creates a complete chronicle of the events that occur behind the scenes in applications and the operating system, as well as the onscreen and keyboard activity of the user. These data streams are recorded in sync with video of the user (through a web camera or other camera device) and audio of the user (through a microphone). Because Recorder runs silently in the background, it never disturbs the user. Recorder captures only the input streams you specify during configuration. Recorder saves the recording in a file format you can open in Morae Manager for analysis. Observe and Log Morae Observer Morae Observer provides support for one or multiple computers to connect over a network to a computer running Recorder. This flexibility allows your entire usability team to observe the screen and camera video and hear the audio of the user, streaming from the Recorder source computer. Anyone logged into an Observer computer can add markers during recording complete with text notes. Tasks are logged by one Observer designated as the task logger. Observer automatically saves and indexes the markers and tasks with the accompanying video and audio streams. The camera video, screen video and audio streams can be saved locally in a WMV file for immediate playback. Utilizing multiple Observers, usability teams can conduct collaborative user experience testing

19 Analyze, Graph, and Share Morae Manager Within Morae Manager, you can start new projects and edit existing projects, configure Recorder settings, open and analyze recordings, create graphs of your analysis and metrics and create a presentation video. Rich Recording Technology automatically indexes the screen and video recordings collected by Recorder, allowing you to easily search through recordings in Morae Manager. You can isolate tasks, important points in the video, add text notes, annotate with audio and quickly create video highlights to share. You can display the screen video with the video of the user as a picture-in-picture image. System Requirements These are the not the same for all three Morae components on desktops and laptops. These requirements pertain to the Manager only. Microsoft Windows XP, Windows Vista, or Windows 7 Windows Media Player 9 or later Intel Core 2 Duo 2.0 GHz or equivalent processor RAM Windows XP: 1GB RAM Windows Vista and Windows 7: 2 GB RAM Dedicated video card with at least 64MB of on-board RAM PCI Express graphics Microsoft DirectX version 9.0c or later Windows-compatible sound card, microphone, and speakers Approximately MB disk space per minute for recording Networked computer with 10 Mbps (Required for Observer) Recommended: 100 Mbps or higher Microsoft Windows compatible FireWire (IEEE 1394) card for DV cameras Bluetooth-capable computer or Bluetooth adapter (Required for logging with a remote) Wii Remote (Required for logging with a remote)
20 Welcome to Morae Manager In Morae Manager, you can start new projects and edit existing projects, create and modify study configurations, open and analyze recordings, create graphs of your analysis and metrics, and create presentation videos. Rich Recording Technology automatically indexes the screen and video recordings collected by Recorder, allowing you to easily search through recordings in Morae Manager. You can isolate tasks, important points in the video, add text notes, annotate with audio and quickly create video highlights to share. You can display the screen video with the video of the user as a picture-in-picture image. How to Use Manager The Example Project Get to Know the Manager Interface Create and Modify a Project Analyze Graph Present Study Configurations How to Use Manager Use Morae Manager to analyze, graph, and present results. For more on what Manager is, see Welcome to Morae Manager. The general process of using Manager is: 1. Create a new project. 2. Import recordings. 3. If needed, log or modify tasks and markers. 4. Analyze recordings, creating video clips and graphs, as needed. 5. Create presentations to share your findings with others. You can also create Study Configurations to use in Recorder. The Example Project File > Open Example > Project or File > Open Example > Study Configuration
21 Morae contains an example project to help demonstrate the various types of data captured and how the data can be manipulated and presented. You can use this project to familiarize yourself with Morae s capabilities before conducting actual tests. The online help uses the example project in all the screen captures. The example project contains three studies: Morae Example Project Focus Group This study demonstrates the use of a focus group to gather customer opinions. It contains one recording created using only one camera and logged on the computer running Recorder. Morae Example Project Paper Prototype Test This study demonstrates testing a paper prototype. It contains one recording that demonstrates using two cameras to run a test on a paper prototype of a website. Morae Example Project Usability Test This study demonstrates usability testing on a web site. It contains three recordings: two facilitator run sessions, and one AutoPilot run session

22 Get to Know the Manager Interface Morae Manager includes three components accessed by tabs on the left or the View menu: Analyze Tab Graph Tab Present Tab Analyze Tab In the Analyze tab, import, organize and analyze recordings. Use markers, tasks, and a powerful search to find key moments in recordings. Review markers synchronized with the video, so you can instantly jump to the important moments to understand what was happening. You can adjust logged markers and tasks or log new markers and tasks if you were not able to with Observer. Graph Tab Present Tab
23 Analyze Tab Toolbar Button Description Creates a new project. The Create New Project wizard leads you through the process. For more information, see Create a New Project. Opens an existing Morae project (.mpr). Saves the current project. Click to undo the last action or select multiple actions from the dropdown list. Click to redo the last undo or select multiple actions from the dropdown list. Import recordings into the project. Opens the survey viewer for the open study. Opens the Analyze Tab Quick Help topics. Click the visible topic or select a topic from the dropdown box to view help topics. Opens the Morae Learning Center web site in your default browser. Opens the Morae Manager Help. Change the Default Project Path for Manager While you are working within a project, Manager transfers a large amount of data to and from the default project folder. For the best performance from Manager, be sure to choose a default project folder that is located on a local drive (on the same machine). To change your Default Project Path in Manager choose Tools > Preferences and click the Browse button next to the Default Project Folder Path field to browse for and select a new location. While working within a project, Manager transfers a large amount of data to and from the default project folder. For the best performance, choose a default project folder located on a local drive (on the same machine). To change your Default Project Path in Manager, choose Tools > Preferences and click Browse next to the Default Project Folder Path field to select a new location

24 Manager Preferences Show and Hide Tabs in Manager Graph Tab Create graphs to analyze Morae s Rich Recording Technology (RRT) data in new and innovative ways across all participants in a study. Include the graphs in highlight videos or export the graphs as images to use in written reports or presentations. Save graphs as templates to use repeatedly across multiple studies. Morae also provides a set of default graph templates. Morae automatically calculates and graphs the usability metrics specified in the Common Industry Format (CIF) standard effectiveness, efficiency and satisfaction: Measure effectiveness with error rate and completion rate graphs Measure efficiency with a time on task graph Measure satisfaction with a System Usability Scale (SUS) survey or customized survey delivered to participants at the end of the recording Graphs are based on markers, tasks, marker scores, and task scores you log in Observer or add in Manager s Analyze tab. You can create graphs across all or select recordings in a study. Analyze Tab Present Tab
25 Graph Tab Toolbar Button Description Creates a new project. The Create New Project wizard leads you through the process. For more information, see Create a New Project. Opens an existing Morae project (.mpr). Saves the current project. Click to undo the last action or select multiple actions from the dropdown list. Click to redo the last undo or select multiple actions from the dropdown list. Import recordings into the project. For more information, see Import Recordings. Saves the current graph analysis, metric and display settings as a template on the computer. For more information, see Save a Graph as a Template. Opens the survey viewer for the open study. Opens the Graph Tab Quick Help topics. Click the visible topic or select a topic from the dropdown box to view help topics. Opens the Morae Learning Center website in your default browser. Opens the Morae Manager Help
26 Graph Properties Toolbar Button Description Displays the properties you can use to change a graph s appearance. For more information, see Customize the Appearance of a Graph. Displays a data table with the information used to create the graph. You can export the data table and open in another application, for example Microsoft Excel. For more information, see Export Graph Data. Saves the graph as a.gif or.emf file to use in other applications. For more information, see Export Graphs. Switches between horizontal and vertical bars. Enables/disables several options for the background of the graph and the labels on the X and Y axis of the graph. Shows/hides point labels on the graph. Shows/hides the graph legend. Switches between a fixed scale or automatic scale for the graph. Manager Preferences Tools > Preferences In the Manager Preferences dialog box, you can change the following: Show or hide all tips Show or hide the Welcome dialog box on start up Define the default project folder path Define the temporary folder path Choose the program used to edit image clips Disable display acceleration (if available) You cannot control the hardware acceleration on Windows Vista operating systems. (Morae version and later)

27 Show and Hide Tabs in Manager Change the Default Project Path for Manager Present Tab When you are ready to organize the results of your analysis into a highlight video for presentation, select Manager s Present tab. In the Present tab, assemble the important video clips, graphs and tasks into a highlight video to share with stakeholders. Include just the participant s screen and audio in the highlight video or add a Picture-in-Picture (PIP) window showing the participant s facial expressions. Use the Clip Bin and Storyboard to create, view, edit and sort clips and graphs and assemble them into a video presentation. Produce the Storyboards as a highlight video in AVI or WMV format for easy presentation and distribution to your stakeholders. You can also export several types of data out of Morae. Analyze Tab Graph Tab
28 Present Tab Toolbar Button Description Creates a new project. The Create New Project wizard leads you through the process. For more information, see Create a New Project. Opens an existing Morae project (.mpr). Saves the current project. Click to undo the last action or select multiple actions from the dropdown list. Click to redo the last undo or select multiple actions from the dropdown list. Import recordings into the project. For more information, see Import Recordings. Creates a new Title clip that appears in the Clip Bin. Saves the current graph analysis, metric and display settings as a template on the computer. For more information, see Save a Graph as a Template. Switches between the List and Thumbnail view of the Clip Bin. Opens the survey viewer for the open study. Opens the Present Tab Quick Help topics. Click the visible topic or select a topic from the dropdown box to view help topics. Opens the Morae Learning Center website in your default browser. Opens the Morae Manager Help. Show and Hide Tabs in Manager In Manager, View > Tabs

29 To maximize your viewing of the data in Manager, you can hide the application tabs. Manager Preferences Change the Default Project Path for Manager
30 Study Configurations The ideas of the Study and the Study Configuration are important to understand when working with Morae. For information on working with study configurations, see Create or Modify a Study Configuration and Modify a Study. What Is a Study? A study involves recording, observing, and logging multiple user research sessions, analyzing the results, and sharing the results with stakeholders. In Morae, recordings in a study share a common study configuration file (.mrcfg), which includes the Study Details: tasks, markers, and surveys. Because the recordings in a study use the same configuration, you can compare and analyze the recordings in Manager. For example, when all the sessions use the same tasks, you can compare the time it took to complete a task across multiple participants. You can search for tasks, markers, events, and more across all recordings in a study. To make sure that all recordings have the same Study Details, define and save a study configuration prior to recording any sessions. If you need to combine recordings with different configurations into a single study, you can merge the recordings in Manager. You can also choose to have more than one study in a single Manager project file. What is a Study Configuration? A study configuration file (.mrcfg) defines study-specific information including Study Details and Recording Details. Only recordings with the same study configuration can be searched and graphed together in Morae Manager. Study Details must be the same for all recordings in a study and include the following: Study name, description, and instructions Tasks definitions and instructions Marker definitions and instructions Survey definitions and associations Recording Details do not have to be the same for all recordings in a study and include the following: File saving and processing options Video sources What data to capture Who logs tasks How to start and end recordings

31 Create or Modify a Study Configuration Modify a Study AutoPilot Morae AutoPilot presents study and task instructions along with surveys right on the computer running Recorder. By default, AutoPilot logs the start and end of tasks automatically, while Observers can still connect and log markers. Uses of AutoPilot There are many reasons to use AutoPilot. Here are some examples: You do not have someone to log tasks with Observer. You want to conduct unmoderated sessions. You want to log tasks automatically. You want to present surveys automatically. You want to avoid the need print task and survey paperwork. For more information on how an AutoPilot session works, see Run an AutoPilot Session. Set Up AutoPilot To set up Recorder to use AutoPilot, Add AutoPilot to a Study Configuration. Add AutoPilot to a Study Configuration File > New or Open > Study Configuration 1. Click Modify Study Details to open the Study Details dialog box. 2. In the Study Details dialog box, modify the study details making sure to include the following:

32 Description tab: Fill in the Study Instructions field with directions for the participant. This could include an introduction to the test along with scenario information. Task Definitions tab: Fill in the Task instructions for participant field for all tasks. Include the task and any information a participant needs to complete the task, such as a user name and password. Survey Definitions tab: Create and associate surveys with session events, such as the end of Task 1. Only associated surveys automatically display with AutoPilot


33 3. Click OK. If you modify study details, new recordings will not automatically match recordings previously made using this study configuration. You can merge these recordings later into a single study in Manager. For more information, see the Morae Manager Help. 4. Click Modify Recording Details to open the Recording Details dialog box. 5. In the Recording Details dialog box, click AutoPilot. 6. Select to Enable AutoPilot 7. When you enable AutoPilot, all other settings needed to run an AutoPilot session automatically change to provide the recommended configuration

34 8. Modify any other recording details and click OK. 9. Click Save. Make sure to save the study configuration in a location that you can access it with Recorder. 10. Click Done to close the Study Configuration dialog box. Create Handouts With the help of the Morae Add-In for Word, you can use a study configuration to create paper handouts for your sessions. To create session handouts from a study configuration: 1. In Recorder, create a study configuration, making sure to enter the Study Instructions and Task Instructions in the Study Details dialog box. 2. Save the study configuration. 3. Open Microsoft Word and the Morae Task Pane. In Word 2007, by default, the Morae Task Pane opens with Word. Open or close the Morae Task Pane with the check box in Add-Ins tab > TechSmith Morae group. 4. In the Morae Task Pane, click Browse to locate the saved study configuration file (.mrcfg). 5. All available study components open in the Morae Task Pane. Click and drag the task Instructions and surveys to the open Word file


35 6. Add page breaks and text formatting, as needed. 7. Save and print the handouts. Study Components Available in the Morae Add-In for Microsoft Word


36 Run an AutoPilot Session The following is the step by step of how an AutoPilot session works: 1. Open Recorder. The Welcome to Morae Recorder dialog box opens. 2. Select Open a saved study configuration and open your saved AutoPilot study configuration. 3. Click the Record button. 4. AutoPilot starts and displays the study instructions. The participant clicks Start. 5. The first task displays. The participant reads the task and clicks Start. Recorder automatically logs a Start Task marker. 6. The AutoPilot window collapses and the participant works on the task. 7. The participant can click Show Instructions to view the task instructions for the task. 8. The participant finishes the task and clicks End Task. Recorder automatically logs an End Task marker. 9. If there is a survey associated with the end of the task, it displays before moving to the next task. 10. The participant finishes the survey and clicks Done. 11. The next task displays. This process continues until the participant reaches the end of the test
37 12. After the participant clicks End Task for the final task, if there is a survey associated with the end of the test, it displays. 13. When the final survey is complete, a thank you message appears. The participant clicks OK to end the test. 14. If you have enabled the Start a new AutoPilot recording automatically option, a new test will appear and start recording when the participant clicks Start. To exit the automatic restart and return to Recorder, click Exit Session. If prompted, enter the password set in the Recording Details. Create or Modify a Study Configuration File Create: File > New > Study Configuration Modify: File > Open > Study Configuration To create a new study configuration file, modify the default study configuration: 1. In the Study Configuration dialog box, click Modify Recording Details to open the Recording Details dialog box. 2. In the Study Details dialog box, define the study details and click OK. 3. Click Save as and browse to a location to save the study configuration. 4. In the Recording Details dialog box, define the recording details and click OK. 5. Click Modify Study Details to open the Study Details dialog box. Make sure to save the study configuration in a location that you can access it with Recorder. 6. Click Done to close the Study Configuration dialog box. Modify a Study Recording Details
38 Study Details Modify a Study After importing recordings into studies in Manager, you may need to edit the study details. For example, edit a task definition or add another task definition to the study. Each study contains task and marker definitions. The recordings contain instances of those markers and tasks that you logged in Observer or created in Manager. A study configuration (.mrcfg file) contains study and recording details. In Manager when you edit a study configuration, you only edit the Study details. The Recording details have already been used to create the recording. When you edit the study configuration in Manager, the changes are applied to all the recordings in the study. In Manager, you can edit the following: Modify a Study Name and Description Modify Task Definitions in Manager Modify Marker Definitions in Manager Modify Survey Answers in Manager Modify a Study Name and Description Edit > Study Configuration You can edit the Study name and Study description. Modify Marker Definitions in Manager Modify Task Definitions in Manager Modify Survey Answers in Manager Modify Marker Definitions in Manager Edit > Marker Definitions In the study configuration file, define the markers for the study. You should define the study configuration (.mrcfg) before creating any recordings. You can change the marker definitions or color or add additional marker definitions in Manager after you import recordings. You can also change the marker score definitions. In Manager, you cannot edit the marker type or marker score scale because the recordings already contain markers
39 When you edit the study configuration in Manager, the changes are applied to all the recordings in the study. Every defined marker must have both a Type and a Definition or you cannot save the configuration. You cannot edit Start task and End task marker definitions, they are required for logging tasks. You can change the color or type (letter). Modify a Study Name and Description Modify Task Definitions in Manager Modify Survey Answers in Manager Modify Survey Answers in Manager View > Survey(s) If participants did not fill in a survey you included in the study configuration file you can edit the survey in Manager

40 To edit a survey: 1. In the Survey Viewer dialog box, select the survey from the dropdown box. 2. Click the recording name link to open the selected survey for that recording. 3. Enter answers for each question in the survey
41 4. When the survey is completed and click Done. You can now see and compare all answers for this survey. 5. Close the Survey Viewer dialog box. Modify a Study Name and Description Modify Task Definitions in Manager Modify Marker Definitions in Manager
 before creating any recordings. You can change the marker definitions or color or add additional marker definitions in Manager after you import recordings.")
42 Modify Task Definitions in Manager Edit > Marker Definitions In the study configuration file, define the markers for the study. You should define the study configuration (.mrcfg) before creating any recordings. You can change the marker definitions or color or add additional marker definitions in Manager after you import recordings. You can also change the marker score definitions. In Manager, you cannot edit the marker type or marker score scale because the recordings already contain markers. When you edit the study configuration in Manager, the changes are applied to all the recordings in the study. Every defined marker must have both a Type and a Definition or you cannot save the configuration. You cannot edit Start task and End task marker definitions, they are required for logging tasks. You can change the color or type (letter)

43 Modify a Study Name and Description Modify Task Definitions in Manager Modify Survey Answers in Manager Define Recording Details File >New > Study Configuration > Modify Recording Details button Recording Details define how to record a session with Morae. In the Recording Details dialog box, define the following: File Details Capture Options AutoPilot Settings Task Logger Settings Recording Start Settings Recorder Stop Settings Observer Settings Recording Details apply to a specific test environment or participant set up. Recording Details do not have to be the same for all recordings in a study
44 Capture Options File > New or Open > Study Configuration > Modify Recording Details button > Capture Options In Capture Options, define the main video source, Picture-in-Picture option, mouse video effects, and the data to capture during recording. The fields in the Capture Options of the Recording Details dialog box define the data you want Recorder to include in the recording. Use this data later in Manager for analysis and graphs. Data File Details AutoPilot Settings Task Logger Settings Recording Start Settings Recorder Stop Settings Observer Settings Define which kinds of data you record. Choose to capture or exclude: Mouse clicks Keystrokes Screen text By default, Recorder captures all of this data. If you are dealing with sensitive or proprietary information, you may need to exclude some data from capture. For example, if the test deals with user names and passwords, you can choose to exclude keystrokes. By excluding keystrokes, the recording will not capture the password. Main Video Source and Picture-in-Picture Mouse Video Effects Main Video Source and Picture-in-Picture Define if you are recording the computer screen or camera video as the main video source for your recording and if you want to include a Picture-in-Picture (PiP) video. These options are also available on the main interface in Video and Audio Sources. If you change the main video source or PiP options in the Recording Details dialog box, options selected in Video and Audio Sources update automatically. Mouse Video Effects Data

45 Mouse Video Effects Define which, if any, mouse video effects to include in the recordings. Mouse video effects help clarify mouse when you analyze recordings in Manager. The mouse video effects do not appear on the participant s screen or in the Observer during recording. The effects appear when you import the recording in Manager. Main Video Source and Picture-in-Picture Data File Details File > New or Open > Study Configuration > Modify Recording Details button > File Details The fields in the Recording File Details settings of the Recording Details dialog box define the recording name, folder, and description, along with the file processing options. Capture Options AutoPilot Settings Task Logger Settings Recording Start Settings Recorder Stop Settings Observer Settings
46 Defer Processing of Recordings If you defer the final processing, your data is not at an increased risk of being lost or damaged if a crash occurs. Recorded data is written to disk immediately during recording whether you choose to defer final processing or not. Final processing involves compressing the files into an archive. By default, Recorder writes out and verifies each recording (.rdg) file immediately after a recording is completed. Depending on the length and content of the recording, this processing can take some time. Enable the Defer Processing of Recordings checkbox to defer recording processing, which allows you to start another recording immediately and save recordings in the Batch Processing Queue to later process several recordings at one time. Use the Defer Processing of Recordings option with the Automatically restart Recorder option to automatically run repeated recordings or conduct several recordings without waiting for file processing in between. Processing Batch Process Recording Files When you complete a series of recordings and are ready to process them: 1. Click Process Deferred Recordings or File > Process Deferred Recordings. The Batch Process Recordings dialog appears

47 2. Select the recording files to process in Recording queue.the recording files that you do not select remain in the list. 3. Click OK to process the selected recordings. When processing is complete, the Batch Processing Results dialog appears. This dialog gives summary information about each recording file, including whether it was successfully processed and where it is saved. Processing Choose one of these options for processing recordings: Prompt for File Details When Recording Stops Password Protect Recording Files Defer Processing of Recordings (Start the next recording immediately.)

48 Recording Name, Recording Folder, and Description. Prompt for File Details When Recording Stops You cannot save a recording without a name. You can lose the data from a recording if the test participant, or anyone else, closes the dialog prompting for these details after the recording stops. Enable the Prompt for file details when recording stops checkbox if you do not want to define the file name, folder, and description prior to recording. At the end of recording, Recorder prompts you to Define File Details After Recording. Password Protect Recording Files Enable the Password protect recording file checkbox to lock the recording files if your recordings include sensitive material. You can define the password before the recording starts or after it ends. Remember your password. After you assign a password, you cannot open the recording in Manager without the password. TechSmith cannot retrieve your password or open the recording file if you forget your password
49 Password Protect a Recording File Before Recording If you know that you want to password protect a recording before the session occurs, you can set a password before you start recording. 1. Enable the Password protect recording file checkbox and click OK. 2. When the recording starts, Recorder prompts you to select and verify a password, Password Protect a Recording File after Recording If you are not sure if you need to password protect a recording before the session occurs, you can set Recorder to prompt you at the end of a recording. 1. Enable the Prompt for details when recording stops checkbox and click OK. 2. When the recording stops and the Recording File Details dialog box opens, enable the Password protect recording file checkbox. 3. The Enter Recording File Password dialog box opens and prompts you to enter and confirm a password. Passwords are case sensitive and can include letters, numbers and symbols in any combination. There is no maximum length for passwords. Defer Processing of Recordings Recording Name, Recording Folder, and Description Each recording (.rdg) needs a unique name. Define the file name, location and description for a recording in one of the following ways: Before you record in the File Details settings. After you create a recording, if you use the Prompt for details when recording stops option. You cannot save a recording without a name. You can lose the data from a recording if the test participant, or anyone else, closes the dialog prompting for these details after the recording stops. For information on the processing options, see Processing. Define File Details Before Recording If you choose to define the File Details before you record, put information in these fields to name the recording file, define the folder to save the recording, and describe details about the recording (optional)


50 Define File Details After Recording When the recording is finished, the Recording File Details dialog box appears. Put information in these fields to name the recording file, define the folder to save the recording, and describe details about the recording (optional.) You can also choose processing options in this dialog box
51 Recording Start Settings File > New or Open > Study Configuration > Modify Recording Details button > Recording Start Recorder provides flexible options to start Recorder depending on your equipment and participant set up. The following table describes the available options to start a recording: Start Option Description Start Button Manually Recording starts when you click the Start button or use the hotkey combination <Ctrl + Alt + Shift + F9>. Based on an event Recording starts when a certain event occurs. Choose one of the event types from the dropdown menu: Mouse Click Recording starts at the click of the mouse. Application Launch Recording starts when the specified application launches, for example when the participant launches Internet Explorer. Application Exit Recording starts when the participant exits a specified application. In an application Click the Browse button to find the application s executable name (for example IEXPLORE.EXE). Mouse click Application launch Application exit At a specific Date/Time Recording starts at a particular date and time. Leave the box next to the Date field unchecked if you want the recording to start at that time on any date. Recorder must be running at the time the recording is set to begin. A time-based start only occurs one time. After the recording is complete, you must click Start again to set Recorder to wait for the next time-based start. A time-based start can be set up to 49 days in advance of the recording. If the time has already passed for today, the recording starts at the specified time tomorrow
52 Start Option Description Start Button Recording starts when an Observer clicks Start the recording button on Observer s toolbar. Using Observer Click the Start button in Recorder to wait for the start signal from Observer. If you leave the Observer name field blank, any Observer can start Recorder. You need to return to the Recorder computer between recordings to click Start. To avoid this additional interaction with Recorder, see Automatically Restart Recorder. AutoPilot Click the Start button to launch the AutoPilot interface. Recording starts when the participant clicks Start after reading the study instructions in AutoPilot. Recorder start AutoPilot start File Details Capture Options AutoPilot Settings Task Logger Settings Recorder Stop Settings Observer Settings Automatically Restart Recorder Enable the Automatically restart Recorder checkbox to automatically restart Recorder after each recording, using the same recording settings. The Automatically restart Recorder option does not work if you use the following Start and Stop options: - Manual star - Time based start with a date specified - Time based stop with a date specified - Event based start on a mouse click To automatically restart Recorder: 1. In Recorder, click the Modify Recorder Details button. The Recording Details dialog box appears. 2. Click Recording Start and select the Recorder Start Setting
53 3. Enable the Automatically restart Recorder checkbox. 4. Click File Details. 5. Disable the Prompt for details when recording stops checkbox.this prevents the Recording file details dialog from appearing after each recording. 6. Enable the Defer processing of recordings checkbox.this places the recording files in a queue for later processing. When you are finished with a series of automated recordings, go back to Recorder and batch process the recording files (File > Process Deferred Recordings). For more information, see Batch Process Recording Files. Recorder sequentially numbers the recording files by adding a number to the file name entered in the Recording Folder field. For example, if you entered Test in the Recording name field, the recording names are test.rdg, test-0001.rdg and test-0002.rdg, etc. Task Logger Settings File > New or Open > Study Configuration > Modify Recording Details button > Task Logger The task logger is the one observer can log tasks for each recording. Only the task logger can mark the start and end of tasks. Who Should Be The Task Logger? Designate the Task Logger Designate Who Sends Surveys File Details Capture Options AutoPilot Settings Recording Start Settings Recorder Stop Settings Observer Settings Defining the Task Logger When defining the task logger, choose one of the following options. First Observer connected Use this option if you only have one Observer or everyone connecting to the session could log tasks. If the task logger disconnects Observer from the session, intentionally or not, the next Observer who connects automatically becomes the task logger. Designated Observer Use this option if you know exactly who you want to log the tasks
54 If the designated task logger disconnects Observer from the session, whether intentionally or not, no one else can log tasks. If the task logger re-connects, he or she can again log tasks. See Designate the Task Logger. The task logger name must match the name entered in Observer. For example, if you enter only a first name in the Recoding Details and the Observer enters a first and last name, they will not be designated as task logger. AutoPilot Use this option with AutoPilot. As the participant clicks Start Task and End Task in AutoPilot, it logs the corresponding markers in the recording. When you enable AutoPilot, the Recording Details update to set AutoPilot to log tasks. Recording computer (Local Logger) This option only available when the main video source is set to Video. Use this option if you record camera as the Main video source and want to log the session on the same computer you are recording on. You do not need to have any Observers connected to log a camera video-based session. If desired, you can log the test using a Wii Remote and interacting with the logging interface. Recording computer (Wii Remote) This option only available when the main video source is set to Screen. Use this option if you record screen as the Main video source and want to log the session using the Wii Remote. This setting allows you to log on the same computer you are recording on. You do not need to have any Observers connected to log a camera video-based session. Task Logger Settings Designate the Task Logger Designate the Task Logger File > New or Open > Study Configuration > Modify Recording Details button > Task Logger 1. To designate a specific task logger by name: 2. Select the Observer option. 3. Select Designate the task logger. 4. Enter the name of the task logger. 5. Click OK. When the task logger connects to Recorder, the Observer name must match the name designated in Recorder

55 Task Logger Settings Who Should Be The Task Logger? Designate Who Sends Surveys You may want to allow only the task logger to send surveys to the recording computer. Select Task logger only to make sure that post-task surveys are sent only after the task is complete. To designate who can send surveys: Enable Any Observer to allow all observers to send surveys during a session Enable Task logger only to allow only the task logger send surveys during a session. Auto Pilot Settings File > New or Open > Study Configuration > Modify Recording Details button > AutoPilot The checkboxes in the AutoPilot Settings of the Recording Details dialog box define if and how you want to use AutoPilot


56 Enable AutoPilot Enable this checkbox to turn on AutoPilot. When you choose to use AutoPilot, the Task Logger, Recording Start, and Recording Stop change to Auto- Pilot to provide the recommended configuration. At End of Recording Enable the Start a new AutoPilot recording automatically checkbox to set up AutoPilot for a new recording as soon as one recording ends. To make sure that a participant cannot get to the Recorder interface, select a password to exit an AutoPilot test. To return to Recorder at the end of a session, click Exit Session on the AutoPilot test Start screen and enter the password, if needed
57 Timeout Options If you use AutoPilot to run an non-moderated test, someone may not finish a session. Enable the checkbox and enter the amount of time you want AutoPilot to wait until ending the session. AutoPilot File Details Capture Options Task Logger Settings Recording Start Settings Recorder Stop Settings Observer Settings Observer Settings File > New or Open > Study Configuration > Modify Recording Details > Observers With Morae, you can allow one or multiple computers to connect over a network to a computer running Recorder. All observers can view the recording and log markers during a session. This flexibility allows your entire team to observe the screen and camera video and hear the audio of the user, streaming from the Recorder computer. To allow Observers to connect to Recorder: 1. Enable the Allow Observer checkbox. 2. Enter the amount of time Recorder waits for pending (unfinished) tasks and markers before ending the recording. By default, Recorder waits 60 seconds. 3. Click OK. File Details Capture Options AutoPilot Settings Task Logger Settings Recording Start Settings Recorder Stop Settings Recorder Stop Settings File > New or Open > Study Configuration > Modify Recording Details button > Recording Stop Morae provides several options to choose how and when recordings stop. Stop recordings manually or use one of the automated stop options. The following table describes the available options to stop a recording:
58 Stop Recorder Option Manually Description Recording stops when you click the Stop button, use the hotkey combination <Ctrl + Alt + Shift + F9>, or right-click the tray icon and choose Stop from the menu. You can always stop Recorder manually, even if you selected another stop option. Stop Button Based on an event Time based Recording stops when a certain event occurs. Choose one of the event types from the dropdown menu: Application Launch Recording stops when the specified application launches, for example when the participant launches Internet Explorer. Application Exit Recording stops when the participant exits a specified application. In an application Click the Browse button to find the application s executable name (for example IEXPLORE.EXE). Recording stops at a particular date and time. Leave the date field disabled to stop the recording at the specified time today. If this time has already passed for today, the recording stops at the specified time tomorrow. A time-based stop only occurs one time. After that recording is complete, you must click the Start button again to set Recorder to wait for the next time-based start. A time-based stop can be set up to 49 days in advance of the recording. Application launch Application exit After Recording stops after number of hours entered. The dropdown list only shows durations up to 2.0 hours, you can type in up to 1176 hours (49 days). Recording stops when an Observer clicks Stop the recording button on Observer s toolbar. Using Observer If you leave the Observer name field blank, any Observer can stop Recorder. You need to return to the Recorder computer between recordings to click Start. To avoid this additional interaction with Recorder, see Automatically Restart Recorder
59 Stop Recorder Option Description Stop Button If you automatically restart, you click Start in Recorder once and then the Observer user who has control of Recorder can start and stop recordings repeatedly, without returning to the Recorder computer. AutoPilot Recording ends when: You click Stop in Recorder. A participant clicks OK in AutoPilot after completing the session tasks and surveys. A participant clicks Exit Session in AutoPilot to leave a session at any time. Enable the Start a new AutoPilot recording automatically checkbox to set up AutoPilot for a new recording as soon as one recording ends. See AutoPilot Settings. Recorder stop AutoPilot stop Leave AutoPilot File Details Capture Options AutoPilot Settings Task Logger Settings Recording Start Settings Observer Settings Define Study Details File > New or Open > Study Configuration > Modify Study Details Study Details define the study including the study name, session instructions, tasks, markers, and surveys. In the Study Details dialog box, define the following: Study name, description, and instructions Tasks definitions and instructions Marker definitions and instructions Survey definitions and associations The study-specific information defined in the Study Details dialog box should be the same for all recordings in a study
60 If you modify study details, new recordings will not automatically match recordings previously made using this study configuration. You can merge these recordings later into a single study in Manager. For more information, see the Morae Manager Help. To Define a Task To Define a Marker Create a Survey Using Custom Questions Create a Survey Using System Usability Scale Questions Define Study Tasks File > New or Open > Study Configuration > Modify Study Details > Task Definitions tab The fields in the Task Definitions tab of the Study Details dialog box define the task names and descriptions, instructions, and success scores. You can open the configuration in the Morae Add-In for Microsoft Office Word and drop the task definitions and instructions into a Word file to create handouts for participants. See Create Session Handouts for more information. For information on working with tasks and success definitions in the Task Definitions tab, see Modify Task Definitions in Manager. To Define a Task Click Add to create a new task. Enter a name and description for the task. Enter participant instructions for the task. Click OK


61 Hover over the defined link to see a preview of the instructions
62 Define the Study Description Define the Study Markers Define the Study Surveys Modify Task and Success Score Definitions Once you save a study configuration, adding or modifying anything on this tab changes your study configuration. You will need to merge recordings if you want them in the same study in Manager. In the Task Definitions tab, use the following icons to modify the tasks and success scores. Button Use Click Add to create a new task or success definition. You can also click in an empty row to add a new task or success definition. Select a task or success definition and click Edit to modify the task name and description or success definition. You can also double-click in a field to edit it. Select a task or success definition and click Remove to delete a task or success definition. You can also select a row and press Delete to remove a task or success definition. Select a task and click Move Up to move a task up in the list. If your tasks are numbered, moving the task does not change the number. Select a task and click Move Down to move a task down in the list. If your tasks are numbered, moving the task does not change the number. Task Name and Description Task Instructions Success Score Success Score Success scores apply to all the tasks in a study. If you are the task logger, once you enter an End task marker, you choose the score from a dropdown list. You can use the default completion rate scores or create your own scale. After importing recordings into Manager, you can quickly create a task score graph to automatically calculate and visually display the completion rate. Completion rate is a standard metric used to analyze usability tests
63 Task Name and Description Task Instructions Modify Task Definitions in Manager Task Instructions Task instructions appear on the computer running AutoPilot. The task instructions are presented to the participant to guide them through a session. After reading a task, the participant clicks Start Task, which automatically logs a Start task marker. After completing the task, the participant clicks End Task, which automatically logs an End task marker. While working on a task, the participant can show or hide the instructions as needed. You can also pull these instructions into Microsoft Word to create handouts if you are not using AutoPilot to run your session. Put information in this field to describe the task for the participant. Task Name and Description Success Score Modify Task Definitions in Manager Task Name and Description The task name and description appear when observing a session. If you are the task logger, once you start a task, you choose the task from a dropdown list. Put information in these fields to give the task logger enough information to quickly select the correct choice when entering a Start task marker. After importing recordings into Manager, tasks become the basis for graphs created in Manager. You are also able to search across recordings for events or markers that occur during a given task. Task Instructions Success Score Modify Task Definitions in Manager Define Study Markers File > New or Open > Study Configuration > Modify Study Details > Marker Definitions tab The fields in the Marker Definitions tab of the Study Details dialog box define the marker colors, types, definitions, and scores

64 Looking for a way to log a session discretely while facilitating a session? You can configure a Wii Remote to log markers. For more information, see Configure Wii Remote for Logging. Markers allow you to flag important points in a recording including errors, quotes, and the start and end of tasks. For example, you can create markers for Participant actions Participant comments and questions Observations about how the participant performs a task Interesting comments or actions to include in a highlight video You can open the configuration in the Morae Add-In for Microsoft Office Word and drop the marker definitions into a Word file to use to prior to a session. For example, you may want share the markers with observers prior to the session to give them an idea what to watch for. See Create Session Handouts for more information. For information on working with markers and score definitions in the Marker Definitions tab, see Modify Marker Definitions in Manager. To Define a Marker Click Add to create a new marker Select a color and type (letter) and add a description to define the marker. Observers can use <Ctrl+ [letter]> as a keyboard shortcut to log tasks in Observer, where [letter] is the letter assigned in the Type column

65 Defined markers are available to observers as hotkeys as <CTRL + Type (letter)>. Observers can set undefined markers with <CTRL + Space>. Define the Study Description Define the Study Tasks Define the Study Surveys Marker Color, Type, and Definition The marker color, type, and definition appear when observing a session. People observing with Morae Observer can enter markers and add notes to these markers during the recording. By adding markers and notes during a session, you can save time analyzing and automatically create graphs after importing the recordings into Morae Manager. If you cannot add markers and notes during a session, you can do so in Manager. Color distinguishes the markers on the Manager Timeline. Type is a letter that is used in combination with CTRL as a keyboard shortcut for entering a marker in Observer. Definition explains to observers what each marker should be used to flag during a session. Marker Scores Modify Marker Definitions in Manager Marker Scores Marker scores apply to all markers in a study. After entering a marker, observers can include a score. For example, if you use marker scores for errors, analysis would determine the average severity of the errors. You can use the default marker scores or create your own scale. After importing recordings into Manager, you can create marker score graphs to automatically calculate and visually display the marker severity rate. Marker Color, Type, and Definition Modify Marker Definitions in Manager
66 Modify Marker and Marker Scores Definitions Once you save a study configuration, adding or modifying anything on this tab changes your study configuration. You will need to merge recordings if you want them in the same study in Manager. See the Morae Manager Help. In the Marker Definitions tab, use the following icons to modify the markers and score scores. Button Use Click Add to create a new marker or marker score definition. You can also click in an empty row to add a new marker or marker score definition. Select a marker or marker score definition and click Edit to modify the marker color, type, and description or marker score definition. You can also double-click in a field to edit it. Select a marker or marker score definition and click Remove to delete a marker or marker score definition. You can also select a row and press Delete to remove a marker or marker score definition. Select a marker and click Move Up to move a marker up in the list. Select a marker and click Move Down to move a marker down in the list. Marker Color, Type, and Definition Marker Scores Define the Study Surveys File > New or Open > Study Configuration > Modify Study Details > Survey Definitions tab The Survey Definitions tab of the Study Details dialog box lists the surveys available in a study and associates a survey with a point in the session, such as the end of the task. You can either Create a Survey Using Custom Questions or Create a Survey Using System Usability Scale Questions. Morae includes the ability to deliver multiple surveys during a session. The participant answers are captured and saved with the recording file. When you import the recordings into Manager, you can review, adjust, analyze, and graph survey responses

67 You can open the configuration in the Morae Add-In for Microsoft Office Word and drop surveys into a Word file to create handouts for participants. See Create Session Handouts for more information. Define the Study Description Define the Study Tasks Define the Study Markers Survey Name The survey name appears as the title of a survey dialog box and identifies a survey in the study configuration. You can only edit the name of an existing survey in the Survey Definition tab. To create a new survey, click the Add button. For information on how to create a new survey, see Create a Survey Using Custom Questions and Create a Survey Using System Usability Scale Questions. Survey Association Choose to associate surveys with session events. Session events include the beginning and end of the recording, as well as the end of each defined task. By associating a survey with a session event, it is linked to that event. AutoPilot automatically displays surveys when the associated session event occurs


68 Observer readies the survey associated with the current session event. Click Send Survey to display the survey. Create a Survey Using Custom Questions File > New or Open > Study Configuration > Modify Study Details > Survey Definitions tab > Add To create a new survey: 1. In the Survey Definitions tab, click Add. The Survey Definition dialog box opens. 2. Enter the Survey Details

69 You can modify survey names and associations in the Survey Definitions tab. 1. Select Custom Questions. For information on creating a survey using the SUS questions, see Create a Survey Using System Usability Scale Questions. 1. Define questions for the survey. For more on adding questions and the available types, see Survey Question Types. When you finish adding questions, click OK to close the Survey Definition dialog box. Create a Survey Using System Usability Scale Questions Survey Question Types Create a Survey Using System Usability Scale Questions Recorder main interface > Modify Study Details > Survey Definitions tab > Add The System Usability Scale (SUS) is freely available for use in usability assessment and is used for a variety of research projects; the only prerequisite for its use is that any published report must acknowledge the source of the measure. Acknowledgements SUS was developed as part of the usability engineering program in integrated office systems development at Digital Equipment Co Ltd., Reading, United Kingdom

70 Morae only allows you to use the SUS questions once in a study. You cannot modify the SUS questions. To create a survey using the SUS questions: 1. In the Survey Definitions tab, click. The Survey Definition dialog box opens. 2. Enter the Survey Details. You can modify survey names and associations in the Survey Definitions tab. 3. Select Standard System Usability Scale (SUS) questions (one SUS survey per study). For information on creating a survey using custom questions, see Create a Survey Using Custom Questions. 4. Click OK to close the Survey Definition dialog box. Create a Survey Using Custom Questions Survey Question Types
71 Survey Question Types File > New or Open > Study Configuration > Modify Study Details > Survey Definitions tab > Survey Definition > Add Create custom questions or use the System Usability Scale (SUS) questions to populate your surveys. You can use the SUS questions only once in a study. Custom Question Types You can create various types of questions including the following: Scale Question Select One Answer Select One or More Question Freeform Question Create a Survey Using Custom Questions Create a Survey Using System Usability Scale Questions Scale Question For a Scale question in a custom survey, you can define the question, the scale from 1-10, the labels for each end of the scale and you can include a freeform comment. You can add a freeform answer to the Scale custom questions
72 Select One Answer For a Select One question in a custom survey, you can define the question, the answers where participants can only select one answer and if you want to include a freeform comment. You can add a freeform answer to the Select one custom question

73 Select One or More Question For a Select One or More question in a custom survey, you can define the question, the answers where participants can select one or more of the answers and if you want to include a freeform comment. You can add a freeform answer to the Select one or more answers custom questions

74 Freeform Question For a Freeform question in a custom survey, you can define the question and have the participants enter a text answer or ask for participant comments

75 Configure the Wii Remote for Logging Facilitators with only one computer, or those who are working alone, can mark important moments during the session easily and quickly using a remote to set markers and start or end tasks without disrupting the participant. This frees up staff-time, allows for faster analysis, and doesn t require network privileges at remote testing sites. Requirements Wii Remote You must purchase a Wii Remote to use this feature. Currently, the Wii Remote is the only supported remote device. Wii Remotes can usually be purchased for around $40 from many major retail, toy, or online stores. Bluetooth Capability To use a Wii Remote to log tasks and create markers, your computer needs Bluetooth capability. Many laptops have Bluetooth functionality; most desktops will require a Bluetooth adapter of some kind. Connect the Wii Remote To make the Wii Remote findable by your computer, hold down the and buttons on the Wii Remote at the same time until the blue LED lights on the Wii Remote flash, indicating the Wii Remote is ready to connect

76 Open Bluetooth Devices located in the Windows Control Panel (click Classic View in Windows Vista to find this more easily.) Click Add on the Devices tab. The Bluetooth Device Wizard displays available devices. Select the Wii Remote, which should show up as a Nintendo device, and click Next. Start Recorder. Recorder automatically connects to the Wii Remote. A battery indicator appears in the Recorder status bar. If Recorder is unable to connect to the Wii Remote, an error message is displayed. Restart Recorder to attempt to connect again. Configure the Wii Remote To configure the Wii Remote, click Modifiy Study Details > Marker Definitions tab > Configure Wii Remote. The Wii Remote is configured by study, and can be configured when the Wii Remote is not connected to Recorder. The Configure Wii Remote dialog window can be viewed in Observer, but settings cannot be changed. The Wii Remote configuration is a part of the study configuration
77 The Configure Wii Remote dialog box can be opened directly from the Wii Remote after it is connected to Recorder by pressing the button. Troubleshooting The Wii Remote does not appear in the list of available Bluetooth devices to choose from: The Wii Remote is not broadcasting. Make sure that it has batteries installed. When you hold the 1 and 2 buttons down, some or all of the LEDs should begin flashing. If they do not, consult the manual that came with your Wii Remote. The LEDs must flash during the entire connection process. A dialog appears asking me to restart my computer: This occurs if you have Morae open when connecting to the Wii Remote. Windows cannot replace drivers that are currently in use by Morae to talk to the Wii Remote. You should select the Restart Later option as it is not necessary to restart your session. A notification with a red X appears telling me the drivers could not be installed and the Wii Remote then turns off: This may happen if Morae is already open. Close Morae and then follow these steps. 1. Open the Bluetooth device dialog. 2. Select the Wii Remote from the list of peripherals and then select properties. 3. Press and hold the 1 and 2 buttons on the Wii Remote as above, then select Services from the dialog. 4. Select Drivers for keyboard, mice, etc. and select Ok. 5. If a notification appears with a green check saying that the drivers were installed, you may release the buttons on the Wii Remote and start Morae. Otherwise, you should start the connection process from the beginning. The marks Nintendo and Wii are marks owned by Nintendo of America, Inc. and Nintendo of America, Inc. is in no way affiliated or associated with TechSmith nor has it sponsored the content of the materials or the products or services referenced in the same. Define Study Details File > New or Open > Study Configuration > Modify Study Details Study Details define the study including the study name, session instructions, tasks, markers, and surveys. In the Study Details dialog box, define the following: Study name, description, and instructions Tasks definitions and instructions Marker definitions and instructions Survey definitions and associations

78 The study-specific information defined in the Study Details dialog box should be the same for all recordings in a study. If you modify study details, new recordings will not automatically match recordings previously made using this study configuration. You can merge these recordings later into a single study in Manager. For more information, see the Morae Manager Help. To Define a Task To Define a Marker Create a Survey Using Custom Questions Create a Survey Using System Usability Scale Questions Define the Study Description The fields in the Description tab of the Study Details dialog box define the study name, description, and instructions. You can open the configuration in the Morae Add-In for Microsoft Office Word and drop the study details into a Word file to create handouts for participants. See Create Session Handouts for more information. Study Name and Study Description The name and description appear in Recorder and are available when you import recordings into Manager. Put information in these fields to describe why and when you would want to use this configuration. It will help you to choose the correct study configuration for a session
79 Study Instructions The study name and instructions appear on the computer running AutoPilot. They are presented to the participant before they begin a session. You can also pull these instructions into Microsoft Word to create handouts if you are not using AutoPilot to run your session. Put information in this field to describe the scenario or any special instructions for the participant. Define the Study Tasks Define the Study Markers Define the Study Surveys
 file is not altered.")
80 Create and Modify a Project In Manager, import your recordings into either a single study or multiple studies. Use a project to organize the studies in Manager. When you import a recording into a project and begin adding markers, tasks and clips, the original recording (.rdg) file is not altered. Any markers, tasks or clips created in the project are saved within the project, not the recording file. The project is saved as a Morae Project file (.mpr) in your Default project folder. To change this folder, choose Tools > Preferences. You can import additional recordings for analysis into a study or create a new study for the recordings in a project. You can import Morae recording (.rdg), and standard video (.wmv) files into a project. Create a New Project Organize Your Project Merge Studies Create a New Project You can only have one project open in Manager at a time. 1. Open Manager. The Welcome to Morae dialog box appears. Select Create a new project. 2. Click OK. The Project Name screen of the Create New Project wizard appears

81 3. Enter a Project name and type the path for the project folder, or use the Browse button to locate the folder. 4. Click Next. The Import Recordings screen in the wizard appears

82 5. Click Add to browse for and select the recording files to import into the project. You can import Morae recording (.rdg) and standard video (.wmv) files into a project. 6. Click Finish to exit the wizard. If the recordings you import in the new project are password protected, a dialog appears asking you to enter the correct password. If the study configuration files match, the new project containing the selected recordings is added to Manager s Project pane and the recordings are in a single study. You can now start to analyze your study. If the study configuration files do not match, you can merge the recordings into a single study. For more information, see Merge a Study. Import Recordings Import Video Files Import Project Components Organize Your Project Merge Studies Import Project Components The Import Project Components option offers a convenient way to move components from project to project and to share components with other Morae Manager users. You can bring all of your analysis from recordings in one project into another project. You can import recordings and title clips. When components are exported, they are stored in a Morae Project Component Archive (.mpca) file. You can import the archive file into a Manager project

83 To Import Project Components Components in the current project cannot be overwritten by components with the same name from an.mpca file.to replace the components in a current project with imported components with the same name, first delete the components from the original project and then import them using the File > Import Project Components option. 1. In Manager, choose File > Import > Project Components. The Import Project Components dialog appears. 2. Select the archive (.mpca) file and choose Open. The Import Project Components dialog appears. If the file is password protected, the Enter Password dialog appears. Enter the password and click OK. 3. Select the components to import. Components that already exist in the current project are not listed here because you cannot import them again. 4. Click OK to import the selected components into the current project. If the study configuration files match, the new project containing the selected recordings is added to Manager s Project pane and the recordings are in a single study. If the study configuration files do not match, you can merge the recordings into a single study. For more information, see Merge a Study. Import Recordings Import Video Files Merge Studies
84 Import Recordings You can import additional recordings for analysis into a study or create a new study for the recordings in a project. You can import Morae recording (.rdg) and standard video (.avi,.wmv,.asf) files into a project. 1. Click the Open Project button to browse for and open an existing Morae project file (.mpr). 2. Choose File > Import > Recording or click the Import Recording button. The Import Recording dialog box appears. 3. Browse to locate the folder containing the Morae recording file(s) (*.rdg). 4. Select.rdg files and click Open. If the recording(s) you import are password protected, a dialog appears asking you to enter the correct password. If the study configuration files match, the new project containing the selected recordings is added to Manager s Project pane and the recordings are in a single study. If the study configuration files do not match, you can merge the recordings into a single study. For more information, see Merge a Study. After you import recordings for this project, you can begin using Manager s analysis tools to view and sort through your data. Import Video Files Import Project Components Merge Studies Import Video Files In addition to Morae recording (.rdg) files, you can import video files (formats including.avi, wmv and.asf) into Morae Manager. Video files, created by an application other than Morae Recorder, do not have the same set of searchable RRT data streams (i.e., mouse clicks, Web page changes, application events, etc.). However, you can set markers and create tasks in these videos and incorporate portions of these videos into your highlight video presentation. To import a video file, choose File > Import > Video and locate the video to import. Click Open. Import Recordings Import Project Components Merge Studies Merge Studies You can search and create graphs for all recordings in the same study. Manager automatically puts imported recordings into the same study if their study configurations match. If they do not match, you can merge the recordings into a single study
85 You may want to keep multiple related studies in the same project to help analyzing over the lifetime of a project. For example, you may start your project with a focus group, followed by paper prototype testing, electronic prototype testing, and final product testing. With these four studies in the same Morae project, you can create highlight clips with videos and graphs from all of the studies. Merge studies by importing recordings or by dragging and dropping recordings into a study in the Project pane Match Task Definitions Match Task Scores Match Marker Definitions Match Marker Scores Match Survey Create a New Project Organize Your Project Match Survey Questions Import recordings or drag and drop recordings into a study when the study configurations do not match. In the Mismatched Study Configurations dialog box, click Merge Recordings Into a Single Study. Select a study in the Select Study dialog box. Click OK. Go to View > Survey(s). If you merge recordings with different surveys, you need to look at and update the surveys. During study merging, all surveys that do not match are added to the study, and answers from matching surveys are merged into the existing surveys. Why Match Surveys? For all recording within a study, you can: Export survey results into a comma separated values (CSV) file to open in other programs, such as Microsoft Office Excel. Graph survey answer frequency and average scores. Automatically calculate mean and standard deviation of scores (found in the graph data table). Merge Studies Survey Viewer Overview Update Survey Answers Survey Viewer Overview View > Survey(s) To view and edit an individual survey:
86 Select a study tab. Select a survey from the dropdown list of all surveys in the selected study. Click to export all results for the selected survey as a.csv file. Click a recording name to open the survey for editing. Edit or enter survey answers for the selected recording. Merge Studies Update Survey Answers Update Survey Answers 1. If surveys do not match, you will see a message that says surveys that are different from the study were copied over. Click OK to close the dialog box. 2. In the View menu, choose Survey(s). 3. The Survey Viewer dialog box opens. Compare the surveys and decide which set of surveys you will use. All surveys from the study and the merged recording(s) are available in the dropdown list in the selected study tab

87 4. Select a survey from the Viewing dropdown box. 5. Click the recording name link to open the selected survey for that recording. 6. Enter answers for each question in the survey. If you had a similar question in the recording s original survey, repeat the answer in this new study


88 7. When the survey is completed and click Done. You can now see and compare all answers for this survey. 8. Update all surveys, as needed. 9. Close the Survey Viewer dialog box. You can now graph and export survey results. Merge Studies Survey Viewer Overview
89 Match Marker Definitions If the imported recordings or drag and drop recordings in a study and the study configurations do not match: In the Mismatched Study Configurations dialog box, click Merge Recordings Into a Single Study. Select a study in the Select Study dialog box. Click OK. In the Merge Recordings Into Example Study dialog, click Match for the Marker Definitions. Select a marker definition on the left from the recording. Select a marker definition on the right from the study. Click Match. The matched marker definition appears below: If you match a marker, Matched appears. If you are changing a marker definition, Becomes appears. If you are defining a marker, Defines appears. To change any of the matched marker definitions, click Unmatch and the marker definitions reappear in the Unmatched group box

90 For more information, see Merge Studies. Match Marker Scores If the imported recordings or drag and drop recordings in a study and the study configurations do not match: In the Mismatched Study Configurations dialog box, click Merge Recordings Into a Single Study. Select a study in the Select Study dialog box. Click OK. In the Merge Recordings into Example Study dialog, click Match for the Marker Scores. Select a marker score on the left from the recording. Select a marker score on the right from the study
91 Click Match. The matched marker score appears below: If you match a marker score, Matched appears. If you are changing a marker score, Becomes appears. If you are defining an undefined marker score, Defines appears. To change any of the matched marker scores, click Unmatch and the marker score definitions reappear in the Unmatched group box. Match Task Definitions If the imported recordings or drag and drop recordings in a study and the study configurations do not match:
92 In the Mismatched Study Configurations dialog box, click Merge Recordings Into a Single Study. Select a study in the Select Study dialog box. Click OK. In the Merge Recordings into Example Study dialog, click Match for the Task Definitions. Select a task definition on the left from the recording. Select a task definition on the right from the study. Click Match. The matched task definition appears below: If you match a task definition, Matched appears. If you are changing a task definition, Becomes appears. If you are defining an undefined task, Defines appears. To change any of the matched task definitions, click Unmatch and the task definitions reappear in the Unmatched group box

93 Match Task Scores If the imported recordings or drag and drop recordings in a study and the study configurations do not match: In the Mismatched Study Configurations dialog box, click Merge Recordings Into a Single Study. Select a study in the Select Study dialog box. Click OK. In the Merge Recordings Into Example Study dialog, click Match for the Task Scores. Select a task score on the left from the recording. Select a task score on the right from the study. Click Match. The matched task score appears below:
94 If you match a task score, Matched appears. If you are changing a task score, Becomes appears. If you are defining an undefined task score, Defines appears. To change any of the matched task scores, click Unmatch and the task score definitions reappear in the Unmatched group box. For more information, see Merge Studies. Merge a Study 1. Choose File > Import > Recordings. If the study configurations of the recordings do not match each other or if the imported recordings don t match an existing study, the Mismatched Study Configurations dialog box appears

95 2. Click the Merge Recordings Into a Single Study button. The Select Study dialog box appears. If you click the Don t Merge Recordings and Create Multiple Studies button, the recordings are imported into multiple studies, depending on how many different study configurations are in the recordings. You can only create graphs for one study


96 3. Select a study for the recordings. Click Show/Hide Details to view which recordings match the study. 4. Click View Study Details to open a copy of the study details for the selected study. 5. When finished, click OK. The Merge Recordings into Study dialog box appears. 6. Click Match to merge match an item. 7. For any of the items that list Mismatched, click Match. For more information on matching specific items, see:
97 Match Task Definitions Match Task Scores Match Marker Definitions Match Marker Scores Match Survey 8. When you finish matching everything, click OK to merge the recordings into the study. If you click Cancel, the recordings are imported into multiple studies, depending on how many different study configurations are in the recordings. To merge the recording into a study, drag the recording in the Project pane and drop it into a study. For more information, see Merge Studies. Organize Your Project The Manager s Project pane allows you to organize your studies, recordings (.rdg files) and imported video files (.avi,.wmv, or.asf). When you create tasks, markers, graphs and clips, these elements are stored in subfolders under the recordings in the Project pane. Access the Project pane from all of Manager s tabs. Under each recording in your project, Manager creates default subfolders for Tasks, Markers and Video Clips. In each study, Manager creates a Graphs folder. In the project, Manager creates a Title Clips folder. You cannot delete these default folders. You can only open one project in Manager at a time. The name of the project appears in Manager s title bar. You can rename this top-level Project folder, but that does not rename the Morae project (.mpr) file

98 To Add Folders to the Project Pane You can create new folders to add deeper levels of organization. However, each item must always reside in a subfolder of that same type. For example, tasks can only reside in a Tasks folder; markers can only reside in a Markers folder, etc. To create additional folders, right-click on a folder and choose Add Folder. To Delete Folders from the Project Pane You cannot delete the default Tasks, Markers, Video Clips, Graphs, and Title Clips folders created by Manager within a project. To delete any other sub-folders you have created in the Project pane, right-click on the folder and select Delete Folder. Create a New Project Merge Studies
99 Analyze In Morae Manager s Analyze tab, you can: Create a study configuration to use in Recorder. See Create or Modify a Study Configuration File. Create a project for your study or studies and import recordings into the study. See Create a New Project, Organize Your Project, and Merge Studies. Review screen video automatically synchronized with user video and audio. See Timeline and Player. Create additional tasks, define undefined tasks, and edit logged tasks, markers, notes, and scores. See Markers in Manager and Tasks in Manager. Search for specific event types or text that appeared onscreen, with a powerful, natural language Search Editor (i.e., find every time the user clicked on a specific web page). See Search for Data in Recordings and Search Profiles. View completed satisfaction survey answers. See View Survey Answers. Create video clips to use in a highlight video. See Video Clips. Graph Present Image Clips Use image clips to capture a still image of something in your recording you want for use in highlight videos or a report. You can open your image clip in an image editor, edit the image, and include the updated image in your highlight video or report. Some ways to use image clips include: Point out a problem with a website Show a suggested change for a software interface Point out participant body language or facial expression Image clips are available in the Clip Bin on the Present tab, in the Project pane, and in the Morae Add-In for Microsoft Word. Create Image Clips Edit Image Clips Create Image Clips You can create image clips during your analysis for later use in your highlight video or report. To create an image clip, locate a still frame in a recording and save it as an image clip. Manager creates a snapshot of that frame and stores it in the Image Clips folder in the Project pane
100 To Create an Image Clip 1. In the Project pane, click a recording. 2. Move the playhead to the frame you want for your image clip and click the Create Image Clip button. 3. The Video Clip Properties dialog box appears. Select the details for and/or edit the image clip. 4. Click OK. The image clip appears in the Image Clip folder in the Project pane and the Clip Bin on the Present tab. For information on how to edit an image clip, see Edit Image Clips. Edit Image Clips You can both the actual image clip and the image clip properties. Edit the Image Clip in an Image Editor 1. Right-click on the image clip in the Project pane, Clip Bin, or on the Storyboard. 2. Choose Edit Properties from the context menu that appears. The Image Clip Properties dialog box appears. 3. Click Edit Image

101 4. The image opens in the image editor defined in Tools > Preferences. Edit the image, as needed. Click Save and close the image in the image editor. If you close the Image Clip Properties dialog box and later make changes to the image in the image editor, those changes are not updated in Manager. Edit Image Clip Properties 1. Right-click on the image clip in the Project pane, Clip Bin, or on the Storyboard. 2. Choose Edit Properties from the context menu that appears. The Image Clip Properties dialog box appears. Properties changed to a clip in the Storyboard are applied to that clip in the Clip Bin and any other instances of that clip in the Storyboard

102 For information on how to edit an image clip, see Create Image Clips. Markers in Manager Each marker allows you to flag and annotate a specific point in time during a recording. In Manager, you can view the Observer markers set during the recording and you can create new markers as you review and analyze the video data post-recording. Markers appear as color-coded diamonds along the Timeline in the Player window. Navigate to marked points in the video by clicking directly on the diamonds
103 Markers definitions are stored in a study. If you change a definition, it changes for all of the recordings within the study. Markers for a given recording are sorted in chronological order (by default) within that project s Markers folder in the Project pane. When you select a marker in the Project pane, the playhead moves to that marker s position in the recording. Create a New Marker in Manager Edit a Marker in Manager Move a Marker in Manager Log a Recording in Manager Create a New Marker in Manager Creating a marker in Manager is equivalent to logging a marker in Observer. Each marker allows you to flag and annotate a specific point in time during a recording. In Manager, you can view the Observer markers set during the recording and you can create new markers as you review and analyze the video data post-recording. To add a new marker to a recording: 1. In the Project pane, click the title of a recording, imported video, or a task. The selected item loads into the Player window. 2. Use the Player and Timeline controls in the Player window to locate the point to add the marker. 3. Click the Create Marker button. The Marker Details dialog box appears. Fill in the dialog box as described by the callouts below. Fill out a field and press Tab to quickly move to the next field. Choose a marker type from the dropdown list or press the letter for the marker on your keyboard. Enter a text note for the marker. Select a marker score from the dropdown list. Enter a name for the marker. Select a folder for the marker

104 If you do not select a folder, the marker is saved in the default Marker folder for the recording in the Project pane. Adjust the time for the marker, if needed. Add an audio note, if needed. The marker types and scores are defined in the study configuration file. You can add or edit markers in Manager. For more information, see Modify Marker Definitions in Manager. The new marker, with the name you assigned, is added to the selected Markers folder under the recording in the Project pane and to the Timeline with a diamond. To view the frame of video related to a marker, click on the marker s name in the Project pane, or click on its diamond on the Timeline. Move a Marker in Manager Edit a Marker in Manager
105 Edit a Marker in Manager In the Marker Details dialog for a marker you can change the marker s name, folder, time, type, text note or audio note. To access the Marker Details dialog for a specific marker: 1. Right-click on the marker in the Project pane or on the marker on the Timeline. 2. Choose Properties from the context menu that appears. Create a New Marker in Manager Move a Marker in Manager Log a Recording in Manager If you were not able to log a session during recording, here are some tips to log recordings once you ve imported them into Manager: Add additional task and marker definitions to the study. For more information, see Modify a Study. To create a new marker on the timeline, play the recording and press <Ctrl + M> when you find a point of interest. The playback pauses, creates a marker at the playhead location, and opens the Marker Details window. When you click OK, playback continues. Create tasks and video clips on the timeline. Use variable speed playback with SonicFit to view recordings at high speed with audio pitch correction. Participant s voices are minimally distorted with this technology. Create a New Marker in Manager Edit a Marker in Manager Move a Marker in Manager Undefined Tasks Add Tasks to Recordings Move a Marker in Manager There are three ways to move an existing marker to a new point on the Timeline: To adjust the marker location directly on the Timeline: 1. Move the playhead to a new position for the marker. 2. Right-click on the marker and choose Move Marker to. To adjust the marker location using the Timeline and then set the time in the Marker Details dialog: 1. Move the playhead to a new position for the Marker. 2. Right-click on the marker and choose Properties
106 3. Enable the Move Marker to option. 4. Click OK. To move the marker to a specific time by setting the time in the Marker Details dialog: 1. Right-click on the marker and choose Properties. 2. In the Marker point field, use the arrow controls to set the new time/location for the marker. 3. Click OK. Create a New Marker in Manager Edit a Marker in Manager Search for Data in Recordings Morae recording (.rdg) files are unique because they are composed of multiple, rich data streams collected by TechSmith s patented Rich Recording Technology (RRT). Manager s Search feature allows you to quickly create custom searches across all or select recordings to look for Web page changes, window/dialog events, mouse clicks, chat text, keystrokes, screen text, markers, and tasks. Overview of Search Pane Choose to search in the whole recording or only in select tasks. Choose to search in all recordings or only in select recordings. Click Modify Search to choose search options. After you enable an item, click Modify to choose additional search options. Search results. Click the Elapsed Time link or double-click an item to load it in the Player window. Select or save search profiles. Choose to view search results in List or Chart view

107 How Rich Recording Technology (RRT) Works Search in Morae View Search Results Search Profiles View Search Results Once you have conducted a search, your results appear in the Search Results pane. This section describes the features of the List and Graph views and how to use these features to calculate metrics, navigate through your results and export the critical results to a spreadsheet program. Search Results Metrics Search Results List View Search Results Chart View Search in Morae Cross Recording Search Search Results Chart View The Chart view illustrates the distribution of your search results over time. At a glance, you can see where activity occurred and, sometimes more importantly, where there was no activity at all. The x-axis of the chart is Time, which is the duration of the entire recording or the section of the recording you searched in. The y-axis is Density, which is the number of events that occurred at any point in time. Each circle (on a line graph) or bar (on a histogram) marks the number of events that occurred at that sampling point in time. The sampling interval, which is the space between circles or the width of each bar, is determined by the resolution (or scale) of the chart


108 If you search in select tasks, click the tabs to access the charts for each task across recordings. The red dot is the current location in the recording showing in the Player window. The recording showing in the Player window has focus in the chart. Recordings not showing in player are gray. Hover over a gray line to highlight. Click the highlighted line to load the recording in the Player window. Select the recording to show in the Player window. Selected recording receives focus in the chart. The options in the Chart Options dialog box allow you to change the graph scale and change the graph style from a line graph to a histogram. To access the Chart Options dialog box, right-click on the Chart and choose Chart Options, or choose Search > Chart Options

109 Option Resolution Description Choose a length of time between points graphed. The entire length of the task or recording is always represented along the horizontal axis of the graph. If you have the resolution set to 10 seconds, the graph points will be 10 seconds apart. The number of events that occurred at each 10-second point appears along the vertical axis. When the Scale to fit option is enabled, you cannot change the resolution. Disable the Scale to fit option to access the Resolution setting. Scale to fit Choose this option to scale to fit the graph area during resizing. The total task or recording time is divided into evenly sized intervals. Search Results Metrics Search Results List View Search in Morae Cross Recording Search Search Results List View After you conduct a search, your results appear in the Search Results pane. When you select an item in the results, the video is automatically synced with the item selected. For example, if you search for Error markers you can quickly select and view each moment in the video where an error occurred. In the List view, the search results appear in a detailed list format. The columns that appear depend on the search criteria selected. Columns with no data for a particular search result do not display. In the List view, to move a column, click on the column header and drag the column to the new location. To sort a column in ascending or descending order, click once on the column header. Click again to reverse the order
110 To navigate through your results using the List view, click on a result in the list and the screen video and camera video jumps to that point in the recording. Use the up and down arrows on your keyboard to quickly move through the list of results. Use the left and right arrows to scroll left or right while viewing a particular result (or click and drag the scroll bar). To select a group of consecutive results, click on the first result and Shift-click on the last result in the group. All of the results in between are selected. To select specific, nonconsecutive results, use Ctrl-click. If you select more than one result in the list, the first item in the list (the selected item) appears in the Player window. Search Results In the List View To go to a search result point in a specific recording, you can: Click the Elapsed Time link for the result. Double-click anywhere in the result row. Use the playback controls to view the video. If the Search includes some onscreen data, the important event is highlighted with a red box and an arrow

111 Search Results Metrics Search Results Chart View Search in Morae Cross Recording Search Search Results Metrics The Metrics area, contains a dynamic calculator that displays three different values. The Selected Duration field displays the duration between the first and last result in a group you have selected. In the Number of Events group, the Total field displays the total number of results in the list and the Selected field displays the total number of results currently selected

112 Before you begin sorting through your search results, it is helpful to understand the different ways these results can be viewed in the Search results pane. In the View group box, there are two options: Search Results List View Search Results Chart View Applications Search Options Modify Search > In all applications > Modify Select the applications to include in a search. For example, you may only want to search for data collected while the participant was using Windows Explorer

113 For more information, see Search for Data in Recordings. Chat Search Options Search > Modify Search > Chat Text> Modify During analysis, you can quickly find and review key words, phrases, or questions posed to identify points of interest. The options in the chat dialog box allow you to search for data in the recording. By default, the chat search results will include all text
114 Limit the search results by selecting the Specific chat text, and entering criteria under one or both of the following subgroups: Created by Chat Text: Containing the text

115 For more information, see Search for Data in Recordings. Cross Recording Search You can choose to search in: Entire recording or only in select tasks All or select recordings The following examples describe some uses for the cross recording search. Why Search Entire Recordings? Search all tasks to compare data across the complete recordings. For example:
116 1. Enable the Entire Recording option. 2. Search for all Error markers. 3. Click the List View button to view a list of all Error markers in all recordings. 4. Click the Task column heading to sort the results by task. 5. Review the results and see if any tasks have a high number of error markers. Why Search Only Select Tasks? Search in selected recordings to compare data across only select sessions. In the previous example, there is Task 2 has a higher number of Error markers. To further analyze this task, select to search only in this task: 1. Enable the Selected Tasks option. 2. Enable the Task 2 checkbox. 3. Choose additional search items and review the recordings to analyze the cause for the high number of errors in this task. Why Search All Recordings? Search in all recordings to compare data across all sessions. For example: 1. Enable the All Recordings option. 2. Search for all Error markers. 3. Click the Chart View button to view a graphic representation of the frequency of Error markers in all recordings. 4. Compare the charts for each recording and see if there are any participants with an extremely high number of errors. Why Search Only Select Recordings? Search in selected recordings to compare data across only select sessions. In the previous example, there is one participant with an extremely high number of Error markers. If we review the video for this participant and see that this participant has a much lower level of experience than the rest of the participants, we may want to exclude this recording from our searches. To search only select recordings: 1. Enable the Selected Tasks option. 2. Enable all recording checkboxes except Participant Continue analysis without including Participant 1 recording in search results. Events by Web Page Modify Search > Window/Dialog Events > Modify The options in the Events by Web Page dialog box allow you to search for specific events that occurred during any Web pages or specific Web pages based on the text in the URL or page title
117 You can think of it as a conditional search where you can first filter by Web page, and then return specific event data on such pages. For more information, see Search for Data in Recordings. Keystrokes Search Options Modify Search > Keystrokes > Modify The options in the Keystrokes dialog box allow you to search for all input from the keyboard that occurred during a particular time span. You can also refine your search to include only specific keys or key combinations

118 For more information, see Search for Data in Recordings. Markers Search Results Modify Search > Markers > Modify The options in the Markers dialog box allow you to search for all marker information or just the information for particular markers (based on type, text in the name or notes and/or where the marker was created) during a specified time span

119 For more information, see Search for Data in Recordings. Mouse Clicks Search Options Modify Search > Mouse Clicks > Modify The options in the Mouse Clicks dialog box allow you to search for all mouse clicks that occurred during a particular time span, search by the button clicked and modifier keys used with that button or search for mouse clicks that occurred inside a specific window/dialog

120 For more information, see Search for Data in Recordings. Screen Text Search Options Modify Search > Screen Text > Modify The options in the Screen Text dialog box allow you to search for specific text that appeared on the screen during the selected time span. You can choose the depth of the text search. Low Includes the text from only the window/dialog that had focus. Medium Includes the text within the entire application currently in focus. High Includes all of the text from the windows in all applications running during the recording

121 For more information, see Search for Data in Recordings. Search in Morae Search for specific event types or text that appeared onscreen with a powerful Search (i.e., find every time the user clicked on a specific Web page). To Search for Data 1. In the Analyze tab, select one of the following options to search within: Entire recording or only in select tasks All or select recordings 2. Click the Modify Search button in the Search results pane, or choose Search > Modify Search. 3. Enable the checkbox for the items to search. 4. For the enabled items, click Modify to select additional search options. Cross Recording Search Applications Search Options Web Page Changes Search Options Events by Web Page The options in the Events by Web Page dialog box allow you to search for specific events that occurred during any Web pages or specific Web pages based on the text in the URL or page title. You can think of it as a conditional search where you can first filter by Web page, and then return specific event data on such pages

122 For more information, see: Search for Data in Recordings Window/Dialog Events Search Options Mouse Clicks Search Options Chat Search Options Keystrokes Search Options Screen Text Search Options Markers Search Options View Search Results Web Page Changes Search Options Modify Search > Web Page Changes > Modify The options in the Web Page Changes dialog box allow you to search for either all Web page changes or just specific Web pages based on the text in the URL or page title

123 For more information, see Search for Data in Recordings. Window or Dialog Events Search Options Modify Search > Window/Dialog Events > Modify The options in the Window/Dialog Events dialog box allow you to search for windows/dialogs that had focus, or were moved or resized. You can search for all window/dialog events or include only those windows/dialogs with specific text in the window title. In the Window/dialog title field, enter the text that appears in the title of the specific/window you are searching for. If you leave this field blank, the search will include all window/dialog events. You can choose the depth of the window/dialog search. Low Search results include the focus, move and size events from only the window/dialog that had focus. Medium Search results include the focus, move and size events from the windows/dialogs in the application that had focus. High Search results include all of the focus, move and size events from the windows/dialogs in all applications running during the recording

124 For more information, see Search for Data in Recordings. Search Profiles To make the analysis process more efficient, save your most commonly used searches as profiles. There are two options when saving search profiles. You can either save the search settings with a new name or overwrite an existing profile with new search settings. When you save a search profile, it includes all of the settings you chose in Search except for the time span (in the Search during field). Save Search Profiles Search in Morae

125 Cross Recording Search View Search Results Save Search Profiles To save a search profile: 1. Click the Modify Search button in the Search results pane, or choose Search > Modify Search. Search appears. 2. Select all the options to include in this search. 3. Click the Save As button. The Save Search Profile As dialog box appears: You can also select an existing profile to overwrite. 4. Click Save. Tasks in Manager In Manager, a task on the Timeline represents the time during the recording when the participant engaged in each task. Manager allows you to create, play, and edit an unlimited number of tasks in each recording. To create a task, you specify a Selection start and end. Manager creates a copy of that section of the recording and stores it in your Tasks folder. Creating a task never alters the original content of your recording. Creating a task in Manager is equivalent to logging a task in Observer. In the study configuration file, you define the tasks for the study. For more information, see Define the Study Tasks. Add tasks directly to the Storyboard to use in your highlight video. For more information, see Add a Clip, Graph or Task to the Storyboard

126 Tasks in Sections Undefined Tasks Add Tasks to Recordings Rename Tasks in Manager Edit Tasks in Manager Edit Tasks in Manager Manager provides several ways to edit tasks: Edit the Duration of a Task Add a Selection to a Task Remove Part of a Task Tasks in Sections Undefined Tasks Add Tasks to Recordings Rename Tasks in Manager Add a Selection to a Task If you need to add some more of a recording to an existing task, you can make a selection and add it to a task. The following are two examples of adding a selection to a task. Example One: Add a Separate Selection to a Task


127 Example Two: Add a Adjoining Selection to a Task Edit the Duration of a Task Remove Part of a Task Tasks in Sections Undefined Tasks Add Tasks to Recordings Rename Tasks in Manager Edit the Duration of a Task Do the following to edit the duration of a task: Add a Selection to a Task Remove Part of a Task

128 Tasks in Sections Undefined Tasks Add Tasks to Recordings Rename Tasks in Manager Remove Part of a Task If you need to add remove some of a recording from an existing task, you can make a selection and remove it from a task. The following is an example of removing a selection from a task. Edit the Duration of a Task Add a Selection to a Task Tasks in Sections Undefined Tasks Add Tasks to Recordings Rename Tasks in Manager Add Tasks to Recordings Adding (or creating) a task in Manager is equivalent to logging a task in Observer. You can add a defined or undefined task on the timeline. To define new tasks in Manager, see Define the Study Tasks. Tasks can be split into multiple sections to accommodate the actual time the participant worked on the task during the test. For more information, see Tasks in Sections. Create/Add tasks in Manager: 1. In the Project pane, select a recording

129 2. Drag the playhead to the starting point for the task and click the Selection Start button. 3. Drag the playhead to the ending point for the task and click the Selection End button. To preview your selected section of the recording before creating the task, click the Play Selection button. If you are not satisfied with your selection, adjust and reset the Selection start and Selection end by dragging them on the Timeline. 4. Click the Log Task button or choose Create > Task from Selection. The Task Details dialog box appears. You cannot search for or graph undefined tasks. Add a new task definition and then update the undefined task before searching or creating graphs. Tasks in Sections Undefined Tasks Rename Tasks in Manager Edit Tasks in Manager

130 Rename Tasks in Manager Right-click on any existing task and choose Properties from the context menu that appears. The Task Details dialog box appears. Select a task from the list and click OK. The tasks in the list are defined in the study configuration file. You cannot search for or graph undefined tasks. Add a new task definition and then update the undefined task before searching or creating graphs. Tasks in Sections Undefined Tasks Add Tasks to Recordings Edit Tasks in Manager Tasks in Sections Tasks can be split into multiple sections to reflect the actual time the participant worked on the task during the test. For example, if your computer crashed or the participant had to step out of the room, you would not want that time included. Accurate logging of tasks is essential for accurate analysis and graphs, for example a Time on Task graph. Undefined Tasks Add Tasks to Recordings Rename Tasks in Manager Edit Tasks in Manager Undefined Tasks When you log a task in Observer, you can select from the list of tasks you defined in the study configuration (.mrcfg) or choose to log an Undefined Task. During a session, the participant may complete a task you didn t plan on or you decided to add a task during the session. Log these tasks as undefined tasks. Undefined tasks are a temporary option to use until you can add a new task to the study configuration. Undefined tasks let you add flexibility into your sessions by letting you add tasks on the fly
 to the study configuration. 3.")
131 When you bring the recording into Manager, define the new task in the study configuration and change the undefined tasks. Update an Undefined Task 1. Import a recording with undefined tasks, or log a new undefined task in Manager. 2. Add the new task(s) to the study configuration. 3. Right-click on an undefined task and choose Properties from the context menu that appears. The Task Details dialog box appears. 4. Select a newly defined task from the list and click OK. You cannot search for or graph undefined tasks. Tasks in Sections Add Tasks to Recordings Rename Tasks in Manager Edit Tasks in Manager Timeline and Player Use Manager s Timeline and Player controls to create new tasks, markers, and clips, and navigate through existing recordings, tasks, markers and clips. Timeline Overview Player Window Overview Normalize Audio Player Controls Filter Markers on the Timeline Filter Markers on the Timeline You can filter the markers that appear in color on the Timeline. This can be helpful when trying to analyze or isolate different types of markers. For example, all the start and end task markers, or all the user quotes. You can filter by: Current Search Results. For more information, see Search for Data in Recordings. Your own Marker criteria: marker type, marker score, creator, Morae application created in or markers with specific text


132 Timeline Overview Player Window Overview Player Controls Normalize Audio If your recording has some very loud parts and some very quiet parts, enable Normalize audio to even out the volume of the entire recording. Tips for the Normalize Audio Option When you enable the Normalize audio option, it is on for all recordings. To normalize an entire highlight video, click a clip in the storyboard and enable Normalize audio. When you enable the Normalize audio option, the waveform changes to show the change in volume. Normalization Example The following graphic shows the Participant 2 recording in the Example Project included with Manager with and without Normalize audio enabled. Normalize audio disabled Normalize audio enabled To open the Example Project, go to File > Open > Example Project
133 Timeline Overview Player Window Overview Filter Markers on the Timeline Player Controls The Player window offers several convenient tools in the toolbar and Play menu. Player Controls Option Button and Shortcut Menu Option Description and Use Play <Space> Play > Play/Pause Start playing the video at the current position of the Timeline. Click again to stop playback. Pause <Space> Play > Play/Pause Pause the video at the current position of the Timeline. Click again to start playback. Set playback speed dropdown -- Select the playback speed. Slide the speed selector to speed up or slow down the video playback. Set playback speed button -- Toggle between normal (gray circle) and variable speed (green circle). Play Selection <Ctrl + Alt + Space> Play > Play> Selection Play the video in between the Selection start and Selection end or play a selected task or video clip. Set Selection Start Edit > Selection > Set Selection Start Set the Selection start at the current Timeline position. Set Selection End Edit > Selection > Set Selection End Set the Selection end at the current Timeline position
134 Additional Player Options Option Shortcut Menu Option Description <Ctrl + Up Arrow> Play > Volume > Up Increases audio volume for Manager. Volume <Ctrl + Down Arrow> Play > Volume > Down Decreases audio volume for Manager. -- Play > Volume > Mute Mutes audio volume for Manager. Play to Task <Ctrl + Shift + Space> Play > Play > Task Plays the video for the selected task. Previous Frame <Ctrl + Left Arrow> Play > Previous Frame Allows you to rewind the video one frame at a time. Next Frame <Ctrl + Right Arrow> Play > Next Frame Allows you to advance the video one frame at a time. Step Back <Ctrl +Shift + Left Arrow> Play > Step Back Steps the video backward ½ second. Step Forward <Ctrl + Shift + Right Arrow> Play > Step Forward Steps the video forward ½ second. <Ctrl + Shift + 1> Play > Skip Back > 1 second Steps the video backward 1 second. Skip Back <Ctrl + Shift +2> Play > Skip Back > 2 second Steps the video backward 2 seconds. <Ctrl + Shift + 5> Play > Skip Back > 5 second Steps the video backward 5 seconds. <Ctrl + Shift + 10> Play > Skip Back > 10 second Steps the video backward 10 seconds. <Ctrl + Shift + 1> Play > Skip Forward > 1 second Steps the video forward 1 second. Skip Forward <Ctrl + Shift + 2> Play > Skip Forward > 2 second Steps the video forward 2 seconds. <Ctrl + Shift + 5> Play > Skip Forward > 5 second Steps the video forward 5 seconds. <Ctrl + Shift + 10> Play > Skip Forward > 10 second Steps the video forward 10 seconds. Jump To Time -- Play > Jump to Time Moves the playhead to the exact time specified in the field inside the Jump to Time dialog. Timeline Overview Player Window Overview Filter Markers on the Timeline Player Window Overview The Player window allows you to view and navigate through the screen video portion of your recording. All of the Player control options can also be found on the Player menu. For more information, see Player Controls

135 Additional Player Window Information Toggle Shrink to Fit button. Click to resize the screen recording video to allow you to see the full frame of the screen video within the Player window. Manage Drawing Plug-ins button. Morae includes a video overlay plug-in called Mouse Paths. Enable it to show the path of a participant s cursor as they interact with the software. Third-party developers can create additional plug-ins that could overlay such things as eye tracking or display various keystrokes as they are pressed. Dock/Undock button. Click to undock the Player window from the Analyze tab. Click again to dock the Player window. Player Window. The Player window displays the video from the currently selected recording, imported video, video clip, task, or marker. Player controls. Using the Player controls, you can navigate through the recording, zoom to specific areas of the recording, set a Selection start and Selection end and create markers, tasks and video clips. For more information, see Player Controls. Normalize audio. Enable this option to keep all audio for the recording at a similar level. Loud parts of the recording are made less loud; quiet parts are made louder

136 Timeline Overview Normalize Audio Filter Markers on the Timeline Timeline and Player Use Manager s Timeline and Player controls to create new tasks, markers, and clips, and navigate through existing recordings, tasks, markers and clips. Timeline Overview Player Window Overview Normalize Audio Player Controls Filter Markers on the Timeline Timeline Overview The following figure describes the timeline: Additional Timeline Information Playhead. The playhead marks the location on the Timeline of the frame currently displayed in the Player window. Zoom guides. The zoom guides show you where the Selection start, Selection end and playhead are located in the context of the entire recording. The guides are helpful when your zoom level puts one of these Timeline elements out of view on the Timeline. Zoom bar. You can scroll within the zoomed area by dragging the zoom bar left and right. Increase or decrease the zoom level by grabbing and dragging either end of the zoom bar in or out. Normalize audio. Enable this option to keep all audio for the recording at a similar level. Loud parts of the recording are made less loud; quiet parts are made louder. Player Window Overview Normalize Audio

137 Filter Markers on the Timeline Video Clips Use video clips to isolate sections of your recordings that contain important activity you want to include in a highlight video. In Manager you can create, play and edit an unlimited number of video clips from each recording. You can copy your tasks directly into video clip form. You can drag a task on the Storyboard for inclusion in a highlight video. Dragging a task to the Storyboard creates a new video clip in the Clip Bin. If you make any changes to the clip in the Clip Bin, the changes are reflected in the Storyboard and produced highlight videos. Create Video Clips Edit Video Clips Work with the Camera Video Picture-in-Picture Edit Video Clips Manager provides several ways to edit video clips: Edit a Video Clip on the Timeline Edit Video Clip Properties Adjust the Duration of a Video Clip Adjust the Duration of a Video Clip Edit a Video Clip on the Timeline Edit Video Clip Properties

138 Edit a Video Clip on the Timeline To edit a video clip from the timeline, click and drag the beginning or end of a clip to the desired spot. Edit Video Clip Properties Adjust the Duration of a Video Clip Edit Video Clip Properties 1. Right-click on the video clip in the Project pane, Clip Bin, or on the Storyboard. 2. Choose Edit Properties from the context menu that appears. The Video Clip Properties dialog box appears. Properties changed to a clip in the Storyboard are applied to that clip in the Clip Bin and any other instances of that clip in the Storyboard
139 Edit a Video Clip on the Timeline Adjust the Duration of a Video Clip Create a Video Clip on the Timeline 1. In the Project pane, click on a recording. 2. Move the playhead to the starting point for your video clip and click the Selection Start button. 3. Move the playhead to the ending point for your video clip and click the Selection End button. 4. Click the Play to Selection button to view the selected section. 5. Click the Create Video Clip button. The Video Clip Properties dialog box appears

140 6. Click OK. The video clip appears on the Timeline. Click Create Video Clip to create a 30-second video clip that uses the playhead location for the selection start. Create a Video Clip by Dragging a Task This method only applies creating video clips in the Present tab. Click a task in the Project pane and drag it to the Clip Bin. The task appears in the Clip Bin and in the Video Clips folder in the Project pane
141 If you drag a task to the Storyboard, a video clip is added to the Clip Bin. The video clip in the Clip Bin is linked to the video clip in the Storyboard. If you change the video clip in the Clip Bin, the changes are reflected in the Storyboard. Edit Video Clips Work with the Camera Video Picture-in-Picture Create Video Clips You can create video clips during your analysis for later use in your highlight video. To create a video clip, you need to specify both a Selection start and Selection end. Using those points, Manager creates a copy of that section of the recording and stores it in the Video Clips folder in the Project pane. The video clips you create do not alter the original session recordings. Video clips are copies of selected sections of the recording to either produce individually or include in your final highlight video. There are several ways to create a video clip in Manager. For more information, see Create a Video Clip on the Timeline. Video Clips Use video clips to isolate sections of your recordings that contain important activity you want to include in a highlight video. In Manager you can create, play and edit an unlimited number of video clips from each recording. You can copy your tasks directly into video clip form. You can drag a task on the Storyboard for inclusion in a highlight video. Dragging a task to the Storyboard creates a new video clip in the Clip Bin. If you make any changes to the clip in the Clip Bin, the changes are reflected in the Storyboard and produced highlight videos. Create Video Clips Edit Video Clips Work with the Camera Video Picture-in-Picture

142 Work with the Camera Video Picture-in-Picture For each video clip with a corresponding camera video, you can include the camera video as a Picture-in-Picture (PiP) image over the screen video. You can use a default PiP location and size for every video clip in the highlight video, or you can customize the PiP location and size on for each clip. Set Default PiP Location, Size, and Opacity The options in the Edit Default PiP Position dialog box define the camera video PiP options that apply to all new video clips you create. In this box, choose to show or hide the camera video PiP and determine the default location and size of the camera video PiP over the screen video. 1. Select a task or recording in the Project pane. 2. Go to Edit > Default PiP Position. The Edit Default PiP Position dialog box appears: The PiP size and location set are the default for any new video clips. You can customize the PiP size and location for each clip by right-clicking on the clip and choosing Properties. Tips for Working in the Analyze Tab The following are some tips and tricks for working in the Analyze tab:
143 If your recording has some very loud parts and some very quiet parts, enable Normalize Audio to even out the volume of the entire recording. For faster analysis, get to know the Player Controls hotkeys. Filter Markers on the Timeline to focus on specific filters, while still viewing all markers. If you were not able to log during a session, you can Log a Recording in Manager. Use variable speed playback to view and listen to recordings at high speed. Did your participant give up on a task only to return to it later? You can create Tasks in Sections. You can search entire recordings or selected tasks, all recordings or selected recordings. For more information, see Cross Recording Search. Are you trying to find specific events and moments in the recordings? Use the Search Results List View. Are you investigating general trends within your search results? Try the Search Results Chart View. Do you run the same custom searches on different projects? Save the searches as Search Profiles to use in all of your projects. Did your participants fill out surveys on paper? For information on how to include the survey results in your project, see View Survey Answers. Nothing is more powerful than seeing real users working with your products. Create Video Clips to support your recommendations or results. View Survey Answers In Manager, use the Survey Viewer to view a summary of all results for an individual survey. In the Survey Viewer, you can: Access all surveys from all studies in a project Edit or enter survey results Export results from each survey Survey Viewer Overview View > Survey(s) Select a study tab. Select a survey from the dropdown list of all surveys in the selected study. Click to export all results for the selected survey as a.csv file. View the results by question for all recordings in the study. Click a recording name to open a survey to edit or enter survey answers for the selected recording
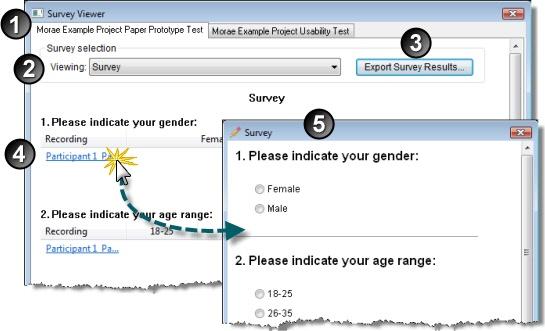
144
145 Graph Instead of manually calculating data and building graphs, Morae creates graphs to help you share results faster, conduct more testing and spend more time focused on solving usability issues rather than scrubbing data. Quantitative data provides hard evidence of usability issues, which complements the qualitative highlight videos. Highlight videos appear more professional and powerful with graphs included to support the qualitative video clips. You can create graphs for a single study. Analyze and graph captured data in unique ways by creating custom graphs specific to your methodology or study. When creating graphs, you can filter the information used to create the graph and customize how the graph looks. Save the graph settings as templates to use in all your projects. Create a Graph Save a Graph Customize the Appearance of a Graph Graph Templates Graph vs. Graph Template View the Graph Data Table Graph Analysis Examples Customize the Appearance of a Graph When creating graphs, you can filter the information used to create the graph and customize how the graph looks. Save these settings as templates to use in all your projects. You can also add graphs to a Storyboard and highlight video. Each graph can contain an audio note, text note and duration for the highlight video. For details on how to customize the graphs, see: Edit Graph Chart Options Edit Graph Series Options Edit Graph X-Axis Options Edit Graph Y-Axis Options Edit Graph Playback Options Graph Gallery Change Axis Settings Display Point Labels Display the Series Legend Use Auto Scaling Change Axis Settings The following pictures describe the axes settings in the Graph tab: Y-Axis Examples X-Axis Examples
146 Edit Graph Chart Options Edit Graph Series Options Edit Graph X-Axis Options Edit Graph Y-Axis Options Graph Gallery Display Point Labels Display the Series Legend Use Auto Scaling X-Axis Examples Graph tab > Edit > Properties > X-Axis tab The following are examples of ways you can adjust the properties along the x-axis:

147 Y-Axis Examples Graph tab > Edit > Properties > Y-Axis tab

148 The following are examples of ways you can adjust the properties along the y-axis: Display Point Labels Graph tab > Edit > Properties > Series tab


149 Edit Graph Chart Options Edit Graph Series Options Edit Graph X-Axis Options Edit Graph Y-Axis Options Edit Graph Playback Options Graph Gallery Change Axis Settings Display the Series Legend Use Auto Scaling Display the Series Legend Graph tab > Edit > Properties > Chart tab In graphs, you can choose to show or hide the legend

150 Edit Graph Chart Options Edit Graph Series Options Edit Graph X-Axis Options Edit Graph Y-Axis Options Edit Graph Playback Options Graph Gallery Change Axis Settings Display Point Labels Use Auto Scaling Edit Graph Chart Options Graph tab > Edit > Properties > Chart tab For information on creating a graph, see Create a Graph

151 Create a Graph Edit Graph Series Options Edit Graph X-Axis Options Edit Graph Y-Axis Options Edit Graph Playback Options Graph Gallery Change Axis Settings Display Point Labels Use Auto Scaling Edit Graph Playback Options Present tab > Edit > Properties > Playback tab For information on creating a graph, see Create a Graph. Create a Graph Edit Graph Series Options Edit Graph X-Axis Options Edit Graph Y-Axis Options Edit Graph Chart Options Graph Gallery Change Axis Settings

152 Display Point Labels Use Auto Scaling Edit Graph Series Options Graph tab > Edit > Properties > Series tab For information on creating a graph, see Create a Graph. Create a Graph Edit Graph X-Axis Options Edit Graph Y-Axis Options Edit Graph Chart Options Graph Gallery Change Axis Settings Display Point Labels Use Auto Scaling Edit Graph X-Axis Options Graph tab > Edit > Properties > X-Axis tab For information on creating a graph, see Create a Graph

153 Create a Graph Edit Graph Series Options Edit Graph Y-Axis Options Edit Graph Chart Options Graph Gallery Change Axis Settings Display Point Labels Use Auto Scaling Edit Graph Y-Axis Options Graph tab > Edit > Properties > Y-Axis tab For information on creating a graph, see Create a Graph

154 Create a Graph Edit Graph Series Options Edit Graph X-Axis Options Edit Graph Chart Options Graph Gallery Change Axis Settings Display Point Labels Use Auto Scaling Graph Gallery Graph tab >Edit > Properties > Chart tab You can change bars on a graph from horizontal to vertical

155 Create a Graph Edit Graph Series Options Edit Graph X-Axis Options Edit Graph Y-Axis Options Edit Graph Chart Options Change Axis Settings Display Point Labels Use Auto Scaling

156 Use Auto Scaling Graph tab > Edit > Properties > Y-Axis tab Use auto-scaling when the scale to adjust the axis to fit the data the graph. To use a specific scale, define the scale in the Graph Options dialog box. For more information, see Edit Graph Y-Axis Options. Create a Graph Edit Graph Series Options Edit Graph X-Axis Options Edit Graph Y-Axis Options Edit Graph Chart Options
157 Change Axis Settings Display Point Labels Graph Analysis Examples Manager s Graph tab provides options for each graph including the type of analysis, the specific metric, additional metric-specific options, if you want to graph details or an average (mean) and you want the graph by participants or tasks. For examples of the following graph options, see: Graph Average (Mean) Of Each Participant or Task Graph Details of Each Participant or Task Graph by Participant Graph by Task For information on the different analysis types and metrics, see: Time Spent in Specific Applications Graph Time Spent in Specific Windows or Dialogs Graph Maximum Time In Between Inputs Graph Mouse Clicks Graph Mouse Movement Graph Average Marker Score Graph Count of Markers Graph Distribution of Markers Scores Graph Distribution of Marker Types Graph Survey Answer Frequency Graph Survey Average Score Graph SUS Survey Graph Percent Success Graph Task Score Graph Task Success Distribution Graph Time on Task Graph Time Spent on Web Pages Graph Web Page Changes Graph Average Marker Score Graph For information on creating a graph, see Create a Graph. Marker Analysis Average Marker Score Values Use this graph to analyze scored markers. Scored markers might include errors; bugs, usability problems, etc. For errors, analysis would determine the average severity of the errors made during the study

158 If you click the Edit Metric button, you can filter markers by type, score, or creator to include in the graph. Back to Graph Analysis Examples. Count of Markers Graph For information on creating a graph, see Create a Graph. Marker Analysis Count of Markers Use this graph to analyze how many total markers were set, how many of a certain type of markers were set, etc. When looking at how many errors occurred, for example, you would get a count of E markers. The graph would help in understanding how many errors participants make when doing tasks. If you click the Edit Metric button, you can filter markers by type, score, or creator to include in the graph

159 Back to Graph Analysis Examples. Distribution of Marker Types Graph For information on creating a graph, see Create a Graph. Marker Analysis Distribution of Marker Types Use this graph to compare the frequency of marker types relative to each other. For example, you use marker type A to mark times where the user gave positive feedback and type B for places where the user had a complaint about the product, a graph showing the total percent of type A markers versus type B markers would be a quick indicator of how many rough spots there are in the product versus how many places are really designed well. If you click the Edit Metric button, you can filter markers by type, score, or creator to include in the graph

160 Back to Graph Analysis Examples. Distribution of Markers Scores Graph For information on creating a graph, see Create a Graph

161 Marker Analysis Distribution of Marker Scores Use this graph to compare the frequency of marker scores or relative to each other. For example, if an A type marker designates points in the video where the facilitator is expecting the user to have trouble s/he can mark the A marker with a Error! Bookmark not defined. score of 0-2 and decide before hand that 2 means user had a lot of trouble and 0 meaning user had next to no trouble. Then with a quick distribution graph of A markers the user gets a visual indication of how many A markers had score 0 versus score 1 versus score 2 and can deduce just how much difficulty users had at that point. If you click the Edit Metric button, you can filter markers by type, score, or creator to include in the graph
 of Each Participant or Task www.techsmith.")
162 Back to Graph Analysis Examples. Graph Average (Mean) of Each Participant or Task Back to Graph Analysis Examples

163 Graph by Participant Back to Graph Analysis Examples

164 Graph by Task Back to Graph Analysis Examples

165 Graph Details of Each Participant or Task Back to Graph Analysis Examples. Maximum Time In Between Inputs Graph For information on creating a graph, see Create a Graph. Input Device Analysis Maximum Time in Between Inputs Use the graph to measure how long users spend between clicks. This measure can help in understanding how easy or hard it is for participants to understand what the next step is and long pauses can mean users don t know what to do next. If you click the Edit Metric button, you can filter markers by type, score, or creator to include in the graph


166 Back to Graph Analysis Examples. Mouse Clicks Graph For information on creating a graph, see Create a Graph. Input Device Analysis Mouse Clicks Use the graph to measure the number of clicks required to complete a process. Add a constant line to show optimal clicks. For example, if the goal is for participants to find information on a web site in three clicks or less, you can easily see if that goal has been met. If you click the Edit Metric button, you can filter markers by type, score, or creator to include in the graph. Back to Graph Analysis Examples

167 Mouse Movement Graph For information on creating a graph, see Create a Graph. Input Device Analysis Mouse Movement Use this graph to measure how far the participant s mouse travels to complete tasks. If there are repetitive stress concerns with the application, minimizing how far users have to move the mouse to complete tasks is important. If you click the Edit Metric button, you can filter markers by type, score, or creator to include in the graph. Back to Graph Analysis Examples. Percent Success Graph For information on creating a graph, see Create a Graph. Input Device Analysis Percent Success Use this graph to demonstrate the percentage of participants that succeeded or failed at each task, or the quality of the discussion in a focus group. For example, by selecting Failed to complete for all usability test participants, you can show the percentage of participants that failed each task. If you click the Edit Metric button, you can filter markers by type, score, or creator to include in the graph

168 Back to Graph Analysis Examples. Survey Answer Frequency Graph For information on creating a graph, see Create a Graph. Use this graph to measure how often individual answers occur. Survey Analysis Answer Frequency If you click the Edit Metric button, you can filter markers by type, score, or creator to include in the graph

169 Back to Graph Analysis Examples. Survey Average Score Graph Use this graph to measure how often individual answers occur. Use this graph to measure satisfaction from a customized survey. Survey Analysis Average Scores If you click the Edit Metric button, you can filter markers by type, score, or creator to include in the graph
 survey.")
170 Back to Graph Analysis Examples. SUS Survey Graph For information on creating a graph, see Create a Graph. Survey Analysis SUS Survey Calculation Use this graph to measure satisfaction from a System Usability Scale (SUS) survey. SUS scores can range from 0 (very little satisfaction) to 100 (very high satisfaction). Back to Graph Analysis Examples. Task Score Graph For information on creating a graph, see Create a Graph

171 Task Analysis Task Score Use this graph to measure effectiveness by reviewing the completion rates for tasks. Effectiveness is a way of trying to understand better how successfully users will be able to use a site or software. This is usually measured by determining how many scenarios or tasks participants are able to complete. Back to Graph Analysis Examples. Task Success Distribution Graph For information on creating a graph, see Create a Graph. Task Analysis Task Success Distribution Use this graph to show how each participant varied in success. The graph can show each participant s success per task or overall success. Success distribution by task can demonstrate where some participants found the task simple and others struggled with the same task. Back to Graph Analysis Examples. Time on Task Graph For information on creating a graph, see Create a Graph. Task Analysis Time on Task Use this graph to measure efficiency. Efficiency is usually measured by determining how quickly participants are able to complete scenarios or tasks. Participants may be able to successfully complete an activity, but they take a long time. In fact, they may take so long to complete a Web-based task that they find it easier to call someone on the telephone or walk to someone else s desk and ask them. If you click the Edit Metric button, you can select the units of time for the graph: seconds, minutes or hours. Back to Graph Analysis Examples

172 Time Spent in Specific Applications Graph For information on creating a graph, see Create a Graph. Application Analysis Time Spent in Specific Applications Use the graph to measure how long participants spend in each application being studied. This measure is particularly useful for field studies when you want to understand when and how long participants use various software tools as part of a larger process. If you click the Edit Metric button, you can select the units of time for the graph: seconds, minutes or hours. Back to Graph Analysis Examples. Time Spent in Specific Windows or Dialogs Graph For information on creating a graph, see Create a Graph. Application Analysis Time Spent in Specific Window(s) or Dialog(s) Use the graph to analyze what windows / dialogs can be optimized or are sticking points for participants. Also can be used to look at specific windows such as the Help window to measure how many times users access Help. If you click the Edit Metric button, you can select the units of time for the graph: seconds, minutes or hours
 Use this graph to measure how long participants spend in each web site being studied.")

173 Back to Graph Analysis Examples. Time Spent on Web Pages Graph For information on creating a graph, see Create a Graph. Web Page Analysis Time Spent on Web Page(s) Use this graph to measure how long participants spend in each web site being studied. This measure is particularly useful for field studies when you want to understand when and how long participants spend on each web page. If you click the Edit Metric button, you can select the units of time for the graph: seconds, minutes or hours. Back to Graph Analysis Examples. Web Page Changes Graph For information on creating a graph, see Create a Graph

174 Web Page Analysis Web Page Changes Use this graph to understand how many web pages participants used, include a constant line to show how many pages are in the optimal path and illustrate the difference. If you click the Edit Metric button, you can select the units of time for the graph: seconds, minutes or hours. Back to Graph Analysis Examples. Create a Graph For information on changing the graph s appearance, see Customize the Appearance of a Graph. Follow callouts below to create a graph: Click the Create new graph button. Select an analysis type from the drop-down button. Select a metric for that analysis type from the drop-down button. Select Average (mean) of or uncheck to see the details of each task and participant. Click Edit Metric to define details or the metric and to filter data that appears on the graph

175 Select to see the graph either by participant or by task. Use All recordings in the graph or select specific recordings. Use All tasks in the graph or select specific tasks. Modify the graph s appearance. For information, see Customize the Appearance of a Graph

176 Save a Graph Customize the Appearance of a Graph Graph Templates Graph vs. Graph Template View the Graph Data Table Graph Analysis Examples Graph Templates Do you have a certain graph that you use for multiple projects? In Morae, you can customize the type of analysis and appearance of your graphs. You can save these settings in a template to use with all your projects. Morae also ships with a set of common default templates you can use. Confused on the difference between a graph and a graph template? See Graph vs. Graph Template. User-defined templates are stored on a computer, not as part of a project. Save a Graph as a Template 1. Create a graph and customize the analysis and appearance of the graphs. 2. Go to File > Save > Graph as Template or right-click on a graph and choose Save As Template
177 3. Enter a name for the graph template. The template appears in the list of templates in the Graph tab. For information on creating a graph, see Create a Graph. Use a Graph Template 1. On the Graph tab, click a study to graph in the Project pane. 2. Click the graph template you created. 3. Save this specific graph (template and data) by clicking Save Graph As under the Graph Preview. Create a Graph Save a Graph Customize the Appearance of a Graph Graph vs. Graph Template View the Graph Data Table Graph Analysis Examples Graph vs. Graph Template You can save a graph as a graph, template, or both. The following explains what each one includes. A saved graph includes the following: The graph configuration (analysis type, metric type, metric specifics) What to search (all or some recordings, all or some tasks) The data for the selected study The look (colors, properties, graph type) When you save a graph, it is stored in the Graphs folder of the Project pane and the Clip Bin. A graph template includes the following: The graph configuration (analysis type, metric type, metric specifics) What to search (all or some recordings, all or some tasks) The look (colors, properties, graph type) A graph template does not include any specific data. When you save as a template, it is stored in the Graph Templates pane. Create a Graph Save a Graph Customize the Appearance of a Graph Graph Templates View the Graph Data Table Graph Analysis Examples
178 Save a Graph Once you have a graph that you are happy with, save the graph and use it in a highlight video, export it into a PowerPoint presentation, or add it into a report in Microsoft Word. To Save a Graph 1. Create a graph. (For ideas, see Graph Analysis Examples.) 2. Customize the look of the graph. 3. When you are happy with the graph, click Save Graph As. 4. In the Present tab, drag a graph from the Clip Bin to the Storyboard. If you make and save changes to a graph after it is in a storyboard, the storyboard and highlight videos reflect these changes. Create a Graph Customize the Appearance of a Graph Graph Templates Graph vs. Graph Template View the Graph Data Table Graph Analysis Examples Tips for Working in the Graph Tab The following are some tips and tricks for working in the Graph tab: Not sure where to start with graphs? See Graph Analysis Examples for information on how to create specific graphs and why and when to use them. Want to customize the look of your graphs? See Customize the Appearance of a Graph. Do you create the same graph(s) for different projects? Graph Templates to use in all of your projects. Confused about the difference between a graph and a graph template? See Graph vs. Graph Template. Want to take your table data to another application? See View the Graph Data Table. View the Graph Data Table Graph tab > View > Data table View the data table used to create a graph. The data table contains the specific data for each recording and the minimum, maximum, mean and standard deviation statistics. Right-click the data table to export the data as a.csv file or copy the values to paste in another application

179 Create a Graph Save a Graph Customize the Appearance of a Graph Graph Templates Graph vs. Graph Template Graph Analysis Examples
180 Present In the Present tab, assemble the important video clips, graphs and tasks into a highlight video to share with stakeholders. Include just the participant s screen and audio in the highlight video or add a Picture-in-Picture (PiP) window showing the participant s facial expressions. The highlight video can be produced in either AVI or WMV format. When you are ready to organize the results of your analysis into a highlight video for presentation, select Manager s Present tab. Use the Clip Bin and Storyboard to create, view, edit and sort clips and graphs and assemble them into a video presentation. Produce the Storyboards as a highlight video in AVI or WMV format for easy presentation and distribution to your stakeholders. You can also export different types of data out of Morae. For more information, see: Clip Bin Storyboard Title Clips Audio and Text Notes Produce Highlight Video Export Data from Morae Pack and Show Graph Analyze Audio and Text Notes You can add an audio note to any video clip, title clip or graph in the Storyboard. Additional audio note information: By default, the system microphone is used for audio notes in Manager. For information about how to select a different microphone and adjust the volume of the selected microphone, see Switch Microphones and Adjust the Volume of Audio Notes. Audio notes added to tasks carry through to video clips created from those tasks. For example, if you added an audio note to a task in Analyze and then switch to Present and create a video clip from that task, the audio is automatically part of the video clip. If you do not want to include the audio note from the task in the highlight video, you can clear it and/or record another audio note for the video clip. Add Notes to a Clip Add Notes to a Graph Add Notes to a Task Add Notes to a Marker Clear an Audio Note

181 Switch Microphones and Adjust the Volume of Audio Notes Add Text Notes Audio Tracks on a Video Clip There are two possible audio tracks for any video clip: Original audio track the audio from the original recording. Audio note track the audio note you intentionally recorded for the video clip. The audio note track plays prior to the video clip. The video clip remains still until the audio note track finishes playing. If the original audio option is enabled in the Video Clip Details dialog box, the audio track from the recording plays during the video clip. In most situations, you may want the original audio track from the recording to play during the Video Clip. To play silence during the video clip, disable the original audio option. Add Notes to a Clip To add an audio note to a graph, video or title clip: 1. Right-click on the clip or graph in the Project pane, Clip Bin or Storyboard and choose Edit. 2. In the Video Clip Details or Title Clip Details dialog box, locate the Audio note group box. 3. Click the Record button to begin recording the audio note. 4. When the recording is complete, click the Stop button. 5. Click the Play button to play back your audio note. 6. To erase the audio note, choose the Clear Audio Note button. For Video Clips: Choose Use Original Audio to play original audio from the recording during the clip. Disable this option to play silence during the clip. For more information, see Audio Tracks on a Video Clip. Add Notes to a Graph Add Notes to a Task Add Notes to a Marker Clear an Audio Note Switch Microphones and Adjust the Volume of Audio Notes Add Text Notes Add Notes to a Graph Using a peripheral microphone, you can add audio notes to your graphs. By default, the system microphone is used for audio notes in Manager. To add an audio note to a graph:

182 1. Right-click on a graph in the Project pane and choose Properties. The Graph Properties dialog box appears. 2. In the Playback tab, click the Record button to begin recording the audio note. 3. When the recording is complete, click the Stop button. 4. Click the Play button to play back your audio note. 5. To clear an audio note, click the Clear Audio Note button. The note is erased immediately. 6. Click OK. Add Notes to a Clip Add Notes to a Task Add Notes to a Marker Clear an Audio Note Switch Microphones and Adjust the Volume of Audio Notes Add Text Notes Add Notes to a Marker Using a peripheral microphone, you can add audio notes to your markers. Once the audio note has been added, the icon for the marker in the Project pane changes to reflect an audio note is present. By default, the system microphone is used for audio notes in Manager. If you create a video clip from a marker with audio note, the audio note becomes part of the clip. If you do not want the audio note to be included in your highlight video, clear it and/or rerecord it in the Video Clip Details dialog box. To add an audio note to a marker:
183 1. Right-click on a marker in the Project pane and choose Properties. 2. In the Marker Details dialog box, click the Record button to begin recording the audio note. 3. When the recording is complete, click the Stop button. 4. Click the Play button to play back your audio note. 5. To clear an audio note, click the Clear Audio Note button. The note is erased immediately. 6. Click OK. Add Notes to a Clip Add Notes to a Task Add Notes to a Graph Clear an Audio Note Switch Microphones and Adjust the Volume of Audio Notes Add Text Notes Add Notes to a Task Using a peripheral microphone, you can add audio notes to your task if you drag it to the Storyboard and create a video clip. By default, the system microphone is used for audio notes in Manager. To add or edit an audio note to a task: 1. Drag the task to the Storyboard. A video clip is added to the Clip Bin. 2. Right-click on task in the Clip Bin and choose Properties. 3. In the Video Clip Properties dialog box, click the Record button to begin recording the audio note. 4. When the recording is complete, click the Stop button. 5. Click the Play button to play back your audio note. 6. To clear an audio note, click the Clear Audio Note button. The note is erased immediately. 7. Click OK. Add Notes to a Graph Add Notes to a Marker Clear an Audio Note Switch Microphones and Adjust the Volume of Audio Notes Add Text Notes Add Text Notes You can add a text note to a task, marker, graph or video clip. You can view the text note in the Details pane when you click on a task, marker, graph or video clip. Text notes have no character limit and you can search their contents using Manager s Search Editor. Add or Edit a Text Note 1. Right-click on the task, marker, graph or clip in the Project pane and choose Properties. 2. Type a text note in the Text note field. 3. Click OK
184 Add Notes to a Graph Add Notes to a Task Add Notes to a Marker Clear an Audio Note Switch Microphones and Adjust the Volume of Audio Notes Add Notes to a Clip Clear an Audio Note To clear an audio note: 1. Right-click on the clip or graph and choose Properties. 2. Click the Clear Audio Note button. The note is erased immediately. Add Notes to a Graph Add Notes to a Task Add Notes to a Marker Add Notes to a Clip Switch Microphones and Adjust the Volume of Audio Notes Add Text Notes Switch Microphones and Adjust the Volume of Audio Notes In Morae Manager, audio notes for markers, tasks, clips and graphs are recorded using the system s default microphone. This microphone selection and its volume cannot be adjusted from within Manager. If you are having difficulty recording audio notes, you may need to check that the system default microphone is set to the one you are using during recording. Adjust Your System s Default Microphone Settings 1. Go to Windows Start > Control Panel > Sounds and Audio Devices. The Sounds and Audio Devices Properties dialog box appears. 2. Choose the Audio tab. 3. In the Sound recording group box, use the dropdown list to set the default device to the microphone to use for recording audio notes in Manager. 4. To adjust the volume for this microphone, click on the Volume button in the Sound recording group box. Use the volume slider to increase or decrease the volume. If you have Morae Recorder installed on the same machine as Manager, keep in mind that changing the default microphone device may also change the device you have selected for recording with Recorder. Add Notes to a Graph Add Notes to a Task Add Notes to a Marker

185 Add Notes to a Clip Add Text Notes Clip Bin Present s Clip Bin offers additional sorting and viewing options for your clips not available in the Project pane. The Clip Bin views allow you to see all clips and graphs from all of your recordings in one location. You can then sort them by name, recording, study, duration, etc. For more information, see: Clip Bin List View Clip Bin Thumbnail View Clip Bin Views Clip Bin List View The Clip Bin s List view shows all of the clips and graphs in detailed list format. The List view contains five columns along the top: Clip Name, Recording, Duration, Folder, Study, and Text Note. Sort Clips in List View By default, the List view is sorted alphabetically by Clip Name. You can sort any of the columns in ascending or descending order by clicking the column name. Clip Bin Thumbnail View The Clip Bin s Thumbnail view shows first-frame thumbnails of all of the clips and graphs

186 Sort Clips in Thumbnail View By default, the Thumbnail view is sorted alphabetically by Clip Name. From the main menu, go to Clip > Sort By and select a category to sort by: Clip Name, Recording, Study, Duration, Text Note or Folder. Change the Size of the Thumbnails in the Clip Bin Choose View > Clip Bin > Thumbnail Size and select the size: Large, Medium, or Small. Clip Bin Views There are three ways to toggle between the List and Thumbnail views in the Clip Bin: Click the Switch Clip Bin View button to toggle between the List and Thumbnail views. You can also click on the button s dropdown arrow and select a view. Go to View > Clip Bin and select a view from the flyout menu
187 Right-click in the Clip Bin and choose View from the context menu. Select a view from the flyout menu. Export Data from Morae The Present tab gives you the tools to create a professional highlight video, complete with title clips and transitions. Morae also provides other options to help you present your results in a variety of forms. You can also export AVI files to Camtasia Studio and then re-import edited video files for use in your highlight video. For more information, see: Export Graphs Export Graph Data Export Results from the Search Editor Export Project Components Export Survey Results Export Screenshots from a Morae Recording Export Clips and Storyboards to PowerPoint Export Clips and Storyboards to Screencast.com Morae Add-In for Word Pack and Show Export Clips and Storyboards to PowerPoint You can easily export items created in Morae Manager directly into a PowerPoint presentation. You can select to export a storyboard, multiple storyboards, video clips, title clips, and graphs. Export Clips to PowerPoint Export Storyboards to PowerPoint Quick Tips for Export to PowerPoint PowerPoint presentations link to the videos exported from Morae. You can choose the destination directory for the videos but if you move the presentation file, any links to videos may break. To move a presentation from one computer to another, in PowerPoint, go to File > Package for CD to create a folder that contains the PPT file and all linked files, including the videos. PowerPoint does not automatically save a PPT after creating or adding to it through the export from Manager. Manager always creates a new slide in the presentation instead of adding to an existing one. New slides appear directly after the active slide. Title clips and graph clips export as images and cannot be modified once in PowerPoint. If you have any Text Notes in the video clip properties, they are exported onto the slide as Speaker Notes. Export Clips to PowerPoint To export one or more video, title, and/or graph clips:

188 1. Select the clip(s) in the Clip Bin. 2. Right-click on the clip(s) and choose Produce and Share Highlight Video... The Production Wizard appears and leads you through the production process. 3. Select Produce to PowerPoint and click Next. 4. The PowerPoint Options dialog box appears. Select the PowerPoint Options. If you have any Text Notes in the video clip properties, they are exported onto the slide as Speaker Notes. 5. Click Next to continue. The Video Encoding Options dialog box appears. 6. Select a compression option: WMV This option (previously know in Manager as Full Motion Video ) option is the best choice for recordings created by Recorder and videos produced by Manager that contain a lot of real-world motion. AVI This option (previously know in Manager as Lossless Video ) option provides the highest quality video, but may increase the size of your recording file, especially if the video contains areas with a lot of motion. MP4 PowerPoint does not accept MP4 files. Custom (produces an AVI file) Allows you to completely customize your production configuration. 7. Click Next. The Video Size dialog box appears. 8. Set the size of the produced highlight video. For screen video, we recommend using the default setting, which is Largest video size. For more information about the options in this dialog box, see Video Size Options. 9. Click Next to continue. The Produce Video dialog box appears. 10. Set the destination folder, file options, and whether you want an opportunity to view the video(s) after rendering

189 11. Click Finish. The rendering begins immediately. 12. When the videos finish rendering, the videos, title clips, and graphs are placed in new slides. Quick Tips for Export to PowerPoint Export Storyboards to PowerPoint Export Storyboards to PowerPoint To export one or more Storyboards: 1. Click Produce and Share Highlight Video. The Production Wizard appears and leads you through the production process. 2. Select Produce to PowerPoint and click Next. 3. Select the storyboards you want to produce and choose whether to produce a slide for each item (clip) in a storyboard or to produce a single slide that contains a highlight video for each storyboard. All Storyboards export into the same PowerPoint presentation
190 4. Click Next. The PowerPoint Options dialog box appears. 5. Select the PowerPoint Options. If you have any Text Notes in the video clip properties, they are exported onto the slide as Speaker Notes. 6. Click Next to continue. The Video Encoding Options dialog box appears. 7. Select a compression option: WMV This option (previously know in Manager as Full Motion Video ) option is the best choice for recordings created by Recorder and videos produced by Manager that contain a lot of real-world motion. For more information, see Full Motion Video Default Settings. AVI This option (previously know in Manager as Lossless Video ) option provides the highest quality video, but may increase the size of your recording file, especially if the video contains areas with a lot of motion. For more information, see Lossless Video Default Settings. MP4 PowerPoint does not accept MPEG-4 files. Custom (produces an AVI file) Allows you to completely customize your production configuration. For more information, see Custom Settings Options. 8. Click Next. The Video Size dialog box appears. 9. Set the size of the produced highlight video. For screen video, we recommend using the default setting, which is Largest video size. For more information about the options in this dialog box, see Video Size Options. 10. Click Next to continue. The Produce Video dialog box appears. 11. Set the destination folder, file options, and whether you want an opportunity to view the video(s) after rendering. 12. Click Finish. The rendering begins immediately. 13. When the videos finish rendering, the videos, title clips, and graphs are placed in new slides. Quick Tips for Export to PowerPoint Export Clips to PowerPoint Export Clips and Storyboards to Screencast.com You can easily export items created in Morae Manager directly to Screencast.com for easy online sharing. You can select to export videos of a storyboard, multiple storyboards, video clips, title clips, image clips, and/or graphs. Export Clips to Screencast.com Export Storyboards to Screencast.com
191 Export Clips to Screencast.com To export one or more video, title, image, and/or graph clips: 1. Select the clip(s) in the Clip Bin. 2. Right-click on the clip(s) and choose Produce and Share Highlight Video... The Production Wizard appears and leads you through the production process. 3. Select Upload to Screencast.com. Do one of the following, as needed: Click Sign In to sign in to or create a Screencast.com account and access Upload Options. Click Upload Options to access options for uploading to Screencast.com. 4. Click OK to close the Screencast.com options dialog box. 5. Click Next. The Video Size dialog box appears. 6. Set the size of the produced highlight video. For screen video, we recommend using the default setting, which is Largest video size. For more information about the options in this dialog box, see Video Size Options. 7. Click Next. The Produce Video dialog box appears. 8. Set the destination folder for a local copy, file name options, and file size options. 9. Click Finish. The rendering begins immediately. When rendered, videos are uploaded to your Screencast.com library. After production, URLs for the videos are listed in the Production Results dialog box. To use a URL: With the cursor, highlight the URL. Right-click and select Copy. In an , document, web browser, etc, right-click and select Paste

192 Export Storyboards to Screencast.com Export Storyboards to Screencast.com To export one or more Storyboards: 1. Click Produce Highlight Video. The Production Wizard appears and leads you through the production process. 2. Select Upload to Screencast.com. Do one of the following, as needed: Click Sign In to sign in to or create a Screencast.com account and access Upload Options. Click Upload Options to access options for uploading to Screencast.com.Click Next. Select the storyboards you want to produce. 3. Click OK to close the Screencast.com options dialog box. 4. Click Next. Select one or more Storyboards to produce as WMV or AVI videos. 5. Click Next. The Video Size dialog box appears. 6. Set the size of the produced highlight video. For screen video, we recommend using the default setting, which is Largest video size. For more information about the options in this dialog box, see Video Size Options. 7. Click Next to continue. The Produce Video dialog box appears
193 8. Set the destination folder for a local copy, file name options, and file size options. 9. Click Finish. The rendering begins immediately. When rendered, videos are uploaded to your Screencast.com library. Export Clips to Screencast.com Morae Add-In for Word The Morae Add-In for Word provides access to the most important elements of a Morae Manager project, right within Word. Quickly make handouts or add project components into your reports. Choose a Morae project from the Morae Task Pane, and add any of the following: Study configuration options including task definitions and success score scales, study and task instructions, marker definitions and scores, and survey definitions Project information including task definitions and success score scale, study and task instructions, marker definitions and scores surveys, graph data tables, graphs, and image clips. For more information, see the following: Add Morae Project Components to Report Study Components Available in a Project Add Study Configuration Components to Session Handouts Study Components Available in a Configuration File Task Pane Does Not Appear Open the Morae Task Pane To open the Morae Task Pane: In Word 2007, by default, the Morae Task Pane opens with Word. Open or close the Morae Task Pane with the check box in Add-Ins tab > TechSmith Morae group. If the task pane does not appear, see Task Pane Does Not Appear. Add Morae Project Components to Report With the help of the Morae Add-In for Word, you can use a Morae project to add surveys, tasks, graphs and more to your reports. To add items from a Morae project: Open Microsoft Word and the Morae Task Pane. The list of projects in the dropdown is made up of projects recently opened in Morae Manager. In the Morae Task Pane, click Browse to locate the saved project file (.mpr) or select a recently used project from the dropdown list. If you have more than one study in a project, select a study from the dropdown list. All Study Components Available in a Project open in the Morae Task Pane. Click and drag the project components to the open Word file. You can also right-click to place an item at the current cursor position

194 Study Components Available in a Project Add Study Configuration Components to Session Handouts Study Components Available in a Configuration File Task Pane Does Not Appear Add Study Configuration Components to Session Handouts With the help of the Morae Add-In for Word, you can use a study configuration to create paper handouts for your sessions. To create session handouts from a study configuration:
195 1. In Recorder, create a study configuration, making sure to enter the Study Instructions and Task Instructions in the Study Details dialog box. 2. Save the study configuration. 3. Open Microsoft Word and the Morae Task Pane. In Word 2007, by default, the Morae Task Pane opens with Word. Open or close the Morae Task Pane with the check box in Add-Ins tab > TechSmith Morae group. 4. In the Morae Task Pane, click Browse to locate the saved study configuration file (.mrcfg). 5. All available study components open in the Morae Task Pane. Click and drag the task instructions and surveys to the open Word file. You can also right-click to place an item at the current cursor position. 6. Add page breaks and text formatting, as needed. 7. Save and print the handouts. Study Components Available in a Project Study Components Available in a Configuration File Task Pane Does Not Appear Morae Add-In for Word The Morae Add-In for Word provides access to the most important elements of a Morae Manager project, right within Word. Quickly make handouts or add project components into your reports. Choose a Morae project from the Morae Task Pane, and add any of the following: Study configuration options including task definitions and success score scales, study and task instructions, marker definitions and scores, and survey definitions Project information including task definitions and success score scale, study and task instructions, marker definitions and scores surveys, graph data tables, graphs, and image clips. For more information, see the following: Add Morae Project Components to Report Study Components Available in a Project Add Study Configuration Components to Session Handouts Study Components Available in a Configuration File Task Pane Does Not Appear Open the Morae Task Pane To open the Morae Task Pane:
196 In Word 2007, by default, the Morae Task Pane opens with Word. Open or close the Morae Task Pane with the check box in Add-Ins tab > TechSmith Morae group. If the task pane does not appear, see Task Pane Does Not Appear. Study Components Available in a Configuration File Click and drag any of the following study components from a Morae 3.0 or later configuration file (.mrcfg). Task definitions and success score scale Use to create protocol documents and to share tasks and success scores with the task logger prior to sessions. Study and task instructions Use to create handouts for participants and/or create protocol documents. Table of marker definitions and scores Use to share markers with observers prior to sessions to give them an idea what to watch for during the sessions. Surveys Use to create handouts for participants and/or create protocol documents. Add Morae Project Components to Report Study Components Available in a Project Add Study Configuration Components to Session Handouts Task Pane Does Not Appear Study Components Available in a Project Click and drag any of the following study components from a Morae 3.0 or later configuration file (.mrcfg)


197 Task definitions and success score scale Include in a report to show your tasks and success score. Study and task instructions Include in a report to show the scenario, any special instructions, and task instructions used in the sessions. Table of marker definitions and scores Include in a report to show what kind of events, issues, etc. you were looking for in the sessions. Surveys Include in a report to show the surveys presented to the participants. Results are not included. Graph data table Include data tables in a report to show graph data for each recording and the minimum, maximum, mean and standard deviation statistics. Graph Include graph images to visually communicate important points. Graph is actual preview of graph image
198 Image Clip Include still images from participant recordings to provide visual context. Graphic is a thumbnail view of actual image clip. Add Morae Project Components to Report Add Study Configuration Components to Session Handouts Task Pane Does Not Appear Task Pane Does Not Appear If the task pane does not appear when you open Word: Enable Morae Add-In for Word In the Microsoft Office menu, click the Word Options button. 2. In the Add-Ins group click the Go button. The COM Add-ins dialog box appears. 3. Select Morae Manager add-in for Word 2007 and click OK

199 Add Morae Project Components to Report Study Components Available in a Project Add Study Configuration Components to Session Handouts Export Graph Data Export the data table used to create a graph and open the file in another application, like Microsoft Excel. The data table contains the specific data for each recording and automatically calculates the minimum, maximum, mean, and standard deviation statistics for the study
200 Export Graph Data 1. In the Graph tab, click, and go to View > Data table, or right-click on a graph and choose View Data Table to open the data table. 2. Choose File > Export > Graph data, click Export As button and select Graph data, or right-click on a graph and choose Export Data. 3. Save the data table as a (.csv) file. Export Graphs Add graphs to the Storyboard and highlight video in the Present tab. Export the graphs as bitmap images to use in other applications. Export a Graph 1. Create a graph in the Graph tab. 2. Click, choose File > Export > Graph as image, or click Export As button and select Image. 3. Select either enhanced metafile (.emf) or bitmap (.gif). Export Project Componants Export and import project components (recordings and Title clips) to share your analysis with another user. You can bring all of your analysis from recordings in one project into another project. Export Project Components 1. In Manager, choose File > Export > Project Components. The Export Project Components dialog appears:

201 2. Check the components to export to the archive (.mpca) file. 3. If you want the archive file to be password protected, type the password in the Enter password field and in the Re-enter password field. 4. Click OK to export the components to the archive (.mpca) file. 5. Choose a name and location for the archive file and then click Save. Export Results from the Search Editor Export the results from any search directly from the List view into a file to open and manipulate in other applications, such as Microsoft Excel. You can export all of the results or only selected results. Export All Results 1. Right-click on the List view and choose Export Results. The Export Data To dialog appears. 2. Choose a location and name for the file (a.csv file) and click Save. Export Specific Results 1. <Shift + click> or <CTRL + click> to select results. 2. Right-click on the List view and choose Export Selected Results. The Export Data To dialog appears. 3. Choose a location and name for the file. 4. Click Save. Export Screenshots from a Morae Recording Capture different types of screenshots from any Morae recording: a frame of screen video, a frame of camera video, screen video with PiP, and camera video with PiP

202 Capture One Frame of Video To capture a screenshot of a highlighted event in the recording, conduct a search and select the result from the list. The highlighted result appears in the Player Window and you can proceed to take the screenshot. 1. Launch Manager, open your existing project and switch to the Analyze tab. 2. Using the Timeline or Player controls, locate the frame of screen video to capture and export. 3. Choose File > Export > Video Frame. The Save As dialog box appears. 4. Enter a name and location for the GIF or JPG screenshot. 5. Click Save. The screenshot is now available for use outside of Morae. Export Survey Results You can export the results from a study survey into a comma-delimited file that can then be opened and manipulated in other applications, such as Microsoft Excel. Export Results from a Survey 1. In the View menu, choose Survey(s). 2. The Survey Viewer dialog box opens. 3. Select the survey from the dropdown box and click Export Survey Results. Produce Highlight Videos Use the Production Wizard to quickly turn clips and Storyboards into AVI or WMV files. The Production Wizard allows you to produce an individual clip or Storyboard, or batch produce multiple clips and Storyboards. Preview the Storyboard Produce Video Clips Produce Storyboards Share Highlight Videos Export Data from Morae
203 Produce Storyboards 1. Click the Produce Highlight Video button or choose File > Produce Highlight Video. The Production Wizard appears and leads you through the production process. 2. Select Produce to file and click Next. 3. Select one or more Storyboards to produce as MPEG-4, WMV or AVI videos. 4. Click Next to continue. The Video Encoding Options dialog box appears. 5. Select a compression option: WMV This option (previously know in Manager as Full Motion Video ) option is the best choice for recordings created by Recorder and videos produced by Manager that contain a lot of real-world motion. AVI This option (previously know in Manager as Lossless Video ) option provides the highest quality video, but may increase the size of your recording file, especially if the video contains areas with a lot of motion. MPEG-4 This option provides high video quality with lower file size and is the best choice for sharing online, such as on Screencast.com. This is also the way to Share Highlights with a Mac User. This option produces multiple files. Custom (produces an AVI file) Allows you to completely customize your production configuration. For more information, see Custom Settings Options. 6. Click Next. The Video Size dialog box appears. 7. Set the size of the produced highlight video. For screen video, we recommend using the default setting, which is Largest video size. For more information about the options in this dialog box, see Video Size Options. 8. Click Next to continue. The Product Video dialog box appears. 9. Set the destination folder, file options, and whether you want an opportunity to view the video(s) after rendering. 10. Click Finish. The rendering begins immediately. Share Highlight Videos Preview the Storyboard Produce Video Clips Normalize Storyboard Audio Audio Settings Options To access the Audio Setup dialog box, click the Audio Setup button in the Custom Settings dialog box. The following table the Audio Setup dialog box. Option Name Description and Use Lists the Name of the audio format. Choose a preconfigured format from the dropdown list, or save one with a meaningful name. For example, on most computers you can select Radio Quality in the
204 Option Description and Use Name list box and it automatically set the Attributes list to khz, 8 Bit, Mono. Save As Remove Format Attributes Save an audio format under a custom name using the Save As button. Remove an existing audio format using the Remove button. Select an audio file format from the Format dropdown menu. Refer to the file type provider for information about the individual selections. Select the audio Attributes from the dropdown menu. A higher kb/sec, results in a larger, but better quality, file. Custom Settings Options The Custom Settings options allow you to create your own custom highlight video production profile. You can adjust the color depth, frame rate and codec selections to fit your production situation. The following table describes the Custom Settings dialog box. Option Colors Frame Rate Audio Setup Video Setup Encode Audio Interleave audio Description and Use Select a color option from the dropdown list. The default Automatic option preserves the highest color setting on the Storyboard. If you want to decrease the overall file size of the file, select a lower color depth. Select a frame rate option from the dropdown list. The default Automatic option preserves the highest frame rate setting on the Storyboard. If you want to decrease the overall file size of the file, select a lower frame rate. Keep in mind that dropping the frame rate will affect the playback quality of the video. Provides access to the Audio Setup dialog box. In this dialog box, you can set the compression options for audio playback. Opens the Video Compression Setup dialog box. In this dialog box you can set the compression options for video playback. If enabled, the Wizard encodes the audio into the video. Remove the checkmark from the Encode Audio box if you do not want to include audio in the highlight video you are producing. Specifies how often to interleave the audio and video streams. The lower the number specified for x the smoother the playback will be. Interleaving the audio and video data allows it to playback smoothly when the file is played on a slower device, such as a floppy disk or CD-ROM. If you check this option, you need to choose whether the units for interleaving will be frames or seconds: Frames: Enter how often the audio should be interleaved, in frames
205 Option Description and Use Seconds: Enter how often the audio should be interleaved, in seconds. It is strongly recommended that you produce your video with this option enabled at the default value of every one second. The only reason to disable the Interleave audio option would be to speed up the video file rendering time. Details Provides information about the selections made in this dialog box for the audio and video options of the videos you are recording. Produce Video Options The final step in producing a video is the actual rendering. This process assembles all of the audio and video data into one video file based on the sequence you have established on the Storyboard. The Produce Video dialog box allows you to enter the destination folder name and file name for the video and lets you choose the post-production options. The following table describes the Produce Video dialog box. Option Destination folder Use clip titles or Storyboard names Name for your video(s) Disable transitions to decrease file size Show production results Description and Use Select a folder in which to save the produced video from the dropdown list of recently used folders, or click on the Browse button to look for one. Place a checkmark next to this option if you want the use the Clip or Storyboard s original name as the name for the produced video. Enter a name for your video(s). This option is disabled if you have selected the Use clip titles or Storyboard names option. Select this option to produce the video without transitions. This option is helpful if your situation requires you to keep the final video file sizes as small as possible. Enable this option to see the Production Results dialog box after the production process is complete. Video Compression Setup Configuration Button Use the Configure button in the Video Compression Setup dialog box to customize the compression settings for the screen video codec. For the TechSmith Screen Capture Codec (TSCC), the Configure TSCC dialog box appears
206 This topic describes the TSCC codec. Each codec has unique configuration options. For information on each of those options, consult the manufacturer s documentation. For information about the company providing a particular codec, select the codec from the Compressor dropdown list and then choose the About button. The following table describes the Configure TSCC dialog box: Option Compression Control Description and Use Choose faster compression (resulting in a larger file size) or better compression (resulting in a smaller file size). In all cases, the TSCC video codec is 100% lossless. Typically, you want faster compression during recording and a smaller file size when producing/editing. Video Compression Setup Options In the Video Compression Setup dialog box, you can change your screen video codec selection and adjust compression quality and key frame rate. To access this dialog box, choose the Video Setup button in the Custom Settings dialog box. The contents of this dialog box may differ and certain options may be disabled, depending on the screen video codec chosen. Additional configuration options for the codec may be available by clicking the Configure button within the Video Compression Setup dialog box. Each codec has unique configuration options. For more information about a particular codec s options, consult the documentation from the company providing that codec. For information about the company providing the codec, click the About button within the Video Compression Setup dialog box. The following table describes the Video Compression Setup dialog box: Option Compressor Compression quality Key frame every (n) frames Description and Use Choose the screen capture codec for Recorder to use. Configures the codec to compress at a lower image quality and create a smaller file size, or compress at a higher image quality, resulting in a larger file size. Adjust the compression quality using the slider bar. For higher quality, move the bar to the right. For lower quality, move the bar to the left. Specify how often a key frame is recorded. We recommend that you accept the default value for the codec you have chosen
207 Option Description and Use The codec will place key frames at regular intervals, either spacing them by number of seconds or number of frames. Each codec has an optimized key frame setting. Data rate (KB/Sec) When enabled, this option allows you to determine the number of bytes of data the codec transmits or receives in one second. The units here are kilobytes per second. A higher data rate results in better quality and larger file sizes. If this option is available for the codec chosen, place a checkmark in the adjacent box and specify the data rate in Kb/Sec in the box provided. Video Size Option The options in the Video Size dialog box allow you to set the size of the produced highlight video. If you chose the Lossless Video option on the Video Encoding Options screen, you must use the Largest video size option on the Video Size screen to maintain lossless quality. If you change the size of the video, image quality in the resulting video may be degraded. The following table describes the Video Size dialog box: Option Largest video size Standard video size Custom size Stretch to fit Background color Description and Use Creates the highlight video using the size of the largest Clip on the Storyboard. Selecting this option is recommended because Manager calculates the size required to include the largest dimensions encountered in the Clips included in the project. Creates your highlight video using a standard size of your choice. Click on the radio button to enable the option and then choose the size from the dropdown list. Creates your video using custom dimensions that you set. Click the radio button to enable this option, then type the width and height in the boxes provided. Enlarges small Clips and reduces larger ones to fit with the current size of the video. Note that choosing this option may affect the aspect ratio of some images. Sets the background color for the Clips that are smaller than the size specified. Click on the Background Color button to open the Color dialog box. Select the color and click OK
208 Preview the Storyboard Once you have arranged your graphs, tasks, video and title clips for your highlight video, use the Preview Highlight Video option to see and hear how your highlight video will playback before you go through the production process. Choose File > Preview Highlight Video (or right-click on the Storyboard and choose Preview Highlight Video) to play the clips in their current order on the Storyboard. If you are satisfied with your Storyboard contents, continue with Produce and Share Highlight Video. You can also produce a graph, title clip or video clip into AVI or WMV files. For more information, see Produce Video Clips. Produce Video Clips Produce Storyboards Normalize Storyboard Audio Share Highlight Videos Produce Video Clips You can produce a title clip or video clip as an AVI or WMV files. You can also produce a storyboard. For information, see Produce Storyboards. 1. Select the clip(s) in the Clip Bin, then right-click and choose Produce Clip(s). The Production Wizard appears and leads you through the production process. 2. Select Produce to file and click next. 3. Select a compression option: WMV This option (previously know in Manager as Full Motion Video ) option is the best choice for recordings created by Recorder and videos produced by Manager that contain a lot of real-world motion. AVI This option (previously know in Manager as Lossless Video ) option provides the highest quality video, but may increase the size of your recording file, especially if the video contains areas with a lot of motion. For more information, see Lossless Video Default Settings. MPEG-4 This option provides high video quality with lower file size and is the best choice for sharing online, such as on Screencast.com. This is also the way to Share Highlights with a Mac User. This option produces multiple files. Custom (produces an AVI file) Allows you to completely customize your production configuration. For more information, see Custom Settings Options. 4. Click Next. The Video Size dialog box appears. 5. Set the size of the produced highlight video. For screen video, we recommend using the default setting, which is Largest video size. For more information about the options in this dialog box, see Video Size Options. 6. Click Next. The Produce Video dialog box appears. 7. Set the destination folder, file options, and whether you want an opportunity to view the video(s) after rendering
209 8. Click Finish. The rendering begins immediately. Share Highlight Videos Preview the Storyboard Produce Storyboards Normalize Storyboard Audio Share Highlight Videos There are various ways to share highlight videos with stakeholders: Share on a network Send in Share on the internet or intranet Export highlight videos to a PowerPoint presentation All of the above options will work to share with people that use Microsoft Windows operating systems. If you d like to share with people that use Mac operating systems, see Share Highlights with a Mac User. Share on a Network 1. Produce highlight clips. 2. Copy the highlight videos to a network location that stakeholders can access. 3. Send the link to the highlight video location to stakeholders. You should try viewing the highlight videos from the network location prior to sending the link to stakeholders. Sometimes videos will not play well over a network. Share with 1. Produce highlight clips. 2. Attach the highlight videos to an Send the to stakeholders. Video files are usually large and stakeholders may not be able to receive and open them. This option is best for very short clips. Share on the Internet or Intranet Because video files can be large, the best way to share them is by storing them on the internet or on an intranet, so stakeholders can view them without having to download large files onto their computer. You can do one of the following:
210 Produce and upload to Screencast.com. This option is good if you do not have a lot of experience with HTML and creating web pages. See Export Clips and Storyboards to Screencast.com. Produce and upload files to another video hosting location or internal website. This option is for advanced users who have experience with HTML and creating websites. See Share Video on a Website. To share highlight videos with people that use Mac operating systems, see Share Highlights with a Mac User. Share Highlights with a Mac User If you would like to share highlight videos with a Mac user, you can either Share on the Internet or Intranet or you can share an MP4 file. An MP4 file is a self-contained video that plays within the free, downloadable QuickTime Player from Apple. QuickTime is the default media player for Mac operating systems. To share an MP4 file: 1. Produce and share a highlight video or video clips, selecting the MP4 video encoding option. 2. When production is complete, open the production folder and locate the folder containing the created MP4 files. 3. Copy and distribute the MP4 file located in the folder. You do not need any of the additional files to play an MP4 in QuickTime. Share Video on a Website The best production option for sharing on a website is to produce your highlight videos in the MP4 format. This format produces the following output files:.html: HTML wrapper that opens in the viewer s default Web browser..mp4: Self-contained video that plays within the free, downloadable QuickTime Player..jpg: A thumbnail of the first frame of the storyboard (used on Screencast.com). Player files needed to play the embedded video: expressinstall.swf swfobject.js videoplayer.swf To share MP4 video: 1. Produce a highlight video or video clips, selecting the MP4 video encoding option. 2. When production is complete, click open the production folder and locate the folder containing the created files. 3. Copy all of the files in the folder onto a web server. 4. Create and share a hyperlink from the website that points to the.html file on the web server
 after the last clip. For more information, see Transitions. You can create multiple Storyboards.")
211 Storyboard The Storyboard appears at the bottom of the Present tab. The Storyboard is the staging area you use to assemble title clips, video clips, tasks and graphs to include in a highlight video. Enable a transition before the first clip on the Storyboard and a transition (to black) after the last clip. For more information, see Transitions. You can create multiple Storyboards. Click on the tabs to switch between Storyboards. For more information, see Create Multiple Storyboards. Drag a clip, task or graph to the Storyboard. For more information, see Add a Clip, Graph, or Task to the Storyboard. If your clips have some very loud parts and some very quiet parts, enable Normalize audio to even out the volume of the entire storyboard. Add a Clip, Graph, or Task to the Storyboard You can add video clips, title clips, tasks, and graphs to a Storyboard from the Project pane or the Clip Bin. You can also create Title clips directly on the Storyboard (Right-click on an item in the Storyboard and select Insert New Title Clip). The graphs and clips stored in the Project pane, the Clip Bin, and the Storyboard are identical and are linked to each other. Edits you make to a clip in the Project pane, the Clip Bin, and the Storyboard apply in all three places. Add a Clip, Graph or Task to the Storyboard Select the task, clip, or graph from the Project pane or Clip Bin and drag it onto the Storyboard. A thumbnail image appears on the Storyboard. If you drop files onto a Storyboard tab (on the tab itself), the dropped clips are appended to the end of the Storyboard. If the tab you dropped on was not the currently visible Storyboard, the Storyboard associated with the tab you dropped on is selected and made visible. If you drop the files within a Storyboard (not on the tab), they are added at the point the mouse was when they were dropped


212 Insert a Clip, Graph, or Task before Another Clip Drop the clip, graph or task on top of the one you want to follow the current clip. Create Multiple Storyboards Present allows you to create and manage multiple Storyboards inside one project. Multiple Storyboards are presented in a tabbed view within the Storyboard pane. To navigate from one Storyboard to another, click from one tab to the next

213 Edit a Clip, Graph, or Task on the Storyboard The graphs and clips stored in the Project pane, the Clip Bin, and the Storyboard are identical and are linked to each other. Edits you make to a clip in the Project pane, the Clip Bin, and the Storyboard apply in all three places. When you click on a clip, graph, or task on the Storyboard, the Timeline becomes a representation of the entire duration of the Storyboard, rather than displaying the duration of that individual clip, graph or task. Edit a Video Clip on the Storyboard To edit a video clip on the Storyboard, right-click a video clip and select Modify Clip to access the Timeline controls. Edit Clip, Graph, or Task Properties Right-click on the clip, graph, or task and click Properties. Move a Clip, Graph, or Task on the Storyboard Click and drag the clip, graph or task from its current position to a new position. Move Multiple Clips, Graphs, or Tasks You can <Ctrl + Click> or <Shift + Click> on a group of clips, graphs or tasks in the Project pane or the Clip Bin and then drag them to the Storyboard. You can also drag clips, graphs, or tasks from one Storyboard to another Storyboard. If you drop the clips, graphs or tasks on the tab, they are added to the end of that Storyboard. If you hover over the tab, that Storyboard becomes visible and you can drop them wherever you choose on that Storyboard. Delete Multiple Clips, Graphs, or Tasks From the Storyboard You can select multiple clips in the Clip Bin or Project pane, using <Shift + Click> or <Ctrl + Click> and then delete them by pressing the <Delete> key. Normalize Storyboard Audio If your recordings have some very loud parts and some very quiet parts or vary between clips on the Storyboard, enable Normalize audio to even out the volume of the entire highlight video. Tips for the Normalize Audio Option To normalize an entire highlight video, click a clip in the storyboard and enable Normalize audio. When you enable the Normalize audio option, it is on for all recordings and storyboards


214 If you only want apply normalization to certain highlight videos, make sure to only choose those storyboards when you are producing multiple highlight videos with the Normalize audio enabled. When you enable the Normalize audio option, the waveform changes to show the change in volume. Storyboard Normalization Example The following graphic shows the Usability Test Highlighs storyboard in the Example Project included with Manager with and without Normalize audio enabled. Normalize audio disabled Normalize audio enabled Example Project, go to File > Open > Example Project. Preview Clips on the Storyboard When you use the Preview Highlight Video option, the Storyboard visually highlights the graph or clip currently being played, so that you can always tell where you are on the Storyboard. To preview your highlight video, choose File > Preview Highlight Video. For more information, see: Add a Clip, Graph, or Task to the Storyboard Edit a Clip, Graph, or Task on the Storyboard Transitions Produce Highlight Video

215 Transitions Transitions are animated effects that allow you to move smoothly between graphs and clips as well as provide a more professional-looking intro and outro. If you do not enable a transition between clips, the first clip cuts abruptly to the next. You can enable a transition before the first clip on the Storyboard and after the last clip. The default transition is a 3 second fade from black. You can select from a variety of transitions as well as change the default transition type and duration. The last transition placeholder automatically adjusts its position as you add graphs and clips to the Storyboard, so it always remains to the right of the last clip. To Modify a Transition 1. To change the type of transition (for example use spiral instead of fade) right-click the transition placeholder and select Choose Transition Type. 2. To change the duration of a transition right-click the transition placeholder and select Edit Transition Properties. The duration can be between 1 and 30 seconds. Change the Default Transition By default, transitions fade from black and last 3 seconds. You can change the default by clicking Edit > Transitions > Default Transition. Note that you must be in Morae Manager in the Present tab for this option to be available. Changing the default transition will not change transitions already in place on your Storyboard. The default transition only applies to subsequent transitions. To quickly enable all transitions, including fade in, fade out and all transitions between clips, right-click on any transition placeholder and choose Enable All Transitions. To disable all transitions at once, right-click on any transition placeholder button and choose Disable All Transitions

216 Title Clips Title clips can introduce a video or act as static transitions between video clips and graphs. You can customize the color, text and duration of the title clips and add audio narration and a background image. Title clips are stored in the Title Clips folder. Title clips are global, which means they are used throughout the project, not specific to a given recording. You can create title clips in any tab and use them when you assemble a Storyboard in the Present tab. For more information, see Create Title Clips. Storyboard Clip Bin Create Title Clips You can create title clips in any tab in Manager. For more information, see: Storyboard Clip Bin Create a Title Clip Click the Create Title Clip button or choose Create > Title Clip. The Title Clip Details dialog box appears
217 If there is an audio note on the title clip, the display duration must be equal to or longer than the duration of the audio note. You can enable the Match to audio note duration option for the title clip to appear exactly as long as the audio note plays. For more information, see Audio and Text Notes. Pack and Show Pack and Show allows you to package the Morae Player along with your AVI video in a single.exe file. This allows you to distribute 100% lossless, perfect-quality videos and not have to worry about codec installation or know which media player is installed on a user s system. Pack and Show creates a Windows executable (.exe) file that users can double-click to unpack, install the TSCC codec and Morae Player (if you have included them) and play the video. The TSCC codec is built into the Morae Player. You do not need to install the TSCC codec on the host machine in order to view the video if you use Morae Player for playback. For more information, see: Pack and Show Advantages What is a Pack and Show EXE? How Does Pack and Show work? Considerations when using Pack and Show To Use Pack and Show Pack and Show Advantages Control over which player is used to view your video. Unlike other media players, Morae Player always play videos at their original size without scaling, which can cause image quality degradation. Morae Player is highly configurable. When creating a Pack and Show file, configure Morae Player to run in full screen mode, or with or without controls. For other file formats, Pack and Show can use the system s default media player. Pack and Show can install the TSCC video codec. If the codec is installed when the user runs the Pack and Show.exe, a third party media player could also play the TSCC-compressed video file. The packaging process may reduce the size of files you distribute without affecting the video quality. For example, when the video contains uncompressed audio, packaging reduces the file size, but the audio quality is unaffected. What is a Pack and Show EXE? Pack and Show creates a self-extracting zipped.exe file. The.exe file contains the AVI and, optionally, Morae Player and/or the installation program for the TSCC video codec. The.exe, depending on the production options configured when creating the Pack and Show.exe, contains: Your movie file (always included) TSCC.exe (optional TSCC video codec installation program)

218 Moraeplay.exe (optional Morae Player) How Does Pack and Show work? When you double-click on the Pack and Show.exe, the contents of the file are extracted to a temporary directory. If included, the TSCC codec is silently installed on the user s machine. Windows may require administrator rights to install video codecs. If the Morae Player, Moraeplay.exe, is included, then the video plays using the Morae Player. If the Morae Player is not included the video is played using whatever player is configured in Windows to play that type of video. When the video has completed, the temp folder and its contents are deleted. Considerations when using Pack and Show Because a Pack and Show.exe file is a zip type file, the contents must be extracted (unzipped) before the video plays. If the video has a very large file size or is located on a slow CD-ROM, there is a delay while the file is unzipped to the local hard disk. If the local hard disk has little free disk space, a large video may fill the remaining space. EXE files may be blocked by some firewalls. To Use Pack and Show 1. In Present, choose File > Pack and Show. The Pack and Show Wizard dialog box opens: 2. In the Video file name field select a video to package. The name of the executable file and its path is automatically populated in the Executable file name field based upon the name of the video. It is stored in the same directory as your selected video. You can accept the default entry or enter a new file name and/or path. 3. Click Next. The TSCC AVI Options dialog box appears for packaging an AVI video with the TSCC codec


219 4. By default, the Use Morae Player option is selected. To use the default player installed on the host machine, select the Use default player option. You can still select to Include TSCC codec installer. 5. Click Next. The Package Video dialog box appears. To view the video after it has been packaged, enable the Run video after packaging option. To package another video using this wizard, enable the Package another video option. The current video is packaged and then the wizard returns you to the first screen to package the next video. 6. Click Finish to start the packaging process. To distribute the video, ship the file with the.exe extension, and tell the recipient to double-click the file to open and play it
220 Tips for Working in the Present Tab The following are some tips and tricks for working in the Graph tab: Want to make sure stakeholders see the recordings in full resolution? Pack and Show allows you to distribute 100% lossless, perfect-quality videos and not have to worry about codec installation or know which media player is installed on a user s system. Do you need to include the highlight videos in a PowerPoint presentation? See Export Clips and Storyboards to PowerPoint. Do you need to create a written report? Use the Morae Add-In for Word to easily pull project components into a Word document. Need to edit a video clip? The clips in the Storyboard are copies of the clips in the Clip Bin. Edits made to one are not reflected in the other. If your recordings have some very loud parts and some very quiet parts, enable Normalize audio to even out the volume of the entire recording
221 Tips and Reference This section contains additional information based on some frequently asked user questions. The topics covered in this section include: How Rich Recording Technology (RRT) Works Check for Upgrade Settings Options Morae Player Recording File Recovery Options Codecs in Morae Morae Recorder COM Server Record Silently Morae File Management Manage Recording Files Codecs in Morae The word codec stands for compressor/decompressor. A codec compresses videos down to smaller sizes, or decompresses videos for playback. A codec is the algorithm used to create a video. By default, Windows comes with many different codecs you can use in Morae. Each codec has its own set of strengths and weaknesses. Certain codecs are better to use in certain situations, because of the way they compress content. This section describes the most commonly used codecs and the ideal content they are suited for and how to select different codecs in Recorder and Manager. WMV3, sometimes known as "Windows Media Video 9," is the default codec used for both recording screen and camera video. For more information on codecs, see also: Video Compression Setup Options Video Compression Setup Options Recorder: Machine Settings > Screen Video tab > Custom compression > Video Compression Setup button In the Video Compression Setup dialog box, you can change your screen video codec selection and adjust compression quality and key frame rate. The contents of this dialog box may differ and certain options may be disabled, depending on the screen video codec chosen. Additional configuration options for the codec may be available by clicking the Configure button in the Video Compression Setup dialog box. Custom video compression is not generally recommended, as it unlikely to improve quality or performance. Each codec has unique configuration options. For more information about a particular codec s options, consult the documentation from the company providing that codec. The following table describes the Video Compression Setup dialog box
222 Option Compressor Compression quality Key frame every (n) frames Data rate (KB/Sec) Configure Description Select the codec from the dropdown list. Configures the codec to compress at a lower image quality and create a smaller file size, or compress at a higher image quality, resulting in a larger file size. Adjust the compression quality using the slider bar. For higher quality, move the bar to the right. For lower quality, move the bar to the left. Specify how often a key frame is recorded. We recommend that you accept the default value for the codec you have chosen. The codec places key frames at regular intervals, either spacing them by number of seconds or number of frames. Each codec has an optimized key frame setting. Determine the number of bytes of data the codec transmits or receives in one second. A higher data rate results in better quality and larger file sizes. If this option is available for the codec, place a checkmark in the adjacent box and specify the data rate in Kb/Sec. Set configuration options for the selected compressor. Morae File Management For more information on Morae File Management, see the following: Morae File Sizes Morae File Types Morae File Sizes The following topics provide information about Morae file sizes and moving Recorder files. The location of files stored during the recording process is set by the "Temporary folder" setting found in Tools > Preferences. Morae Recorder File Size As a general rule, you can expect to use 10 to 15 MB per minute in a recording (.rdg) file. However, various factors determine file size and the actual content being recorded is the biggest factor. File Rollover for Long Recordings The maximum size for a recording (.rdg) file is approximately 600 MB (the size allowed on a CD-ROM). If a recording is long, or less compressed (depending on your codec selections), it may exceed the 600 MB file size. If this happens, Recorder creates rollover files so the recording can continue to be stored in 600 MB parcels. The first rollover file has the extension.r02 and subsequent files are numbered in sequence
223 When you have finished recording, you need to move the.rdg file and all of its companion rollover files together in a folder that Manager can access. When you import the.rdg file into a project, Manager automatically collects all of the associated rollover files. If you do not move all of the rollover files to a common folder with the.rdg file, Manager cannot import the recording. Moving Recorder Files During recording, always record to the hard drive of the Recorder machine. Recording over a network is not recommended because if the network gets busy, the recording can t stream the data fast enough, resulting in file corruption or failure. Morae recording files may not fit on smaller removable storage disks (such as floppy or zip disks). If you record frequently, recording files may begin to consume hard drive space. After the recording is completed, you have several options for saving and moving the recording files from the Recorder machine to a location accessible for Manager. If Manager and Recorder are not installed on the same computer, we recommend using one of the following methods for recording file storage and transfer: Storage Location Description Moving files to Manager Shared network directory Hard drive and then burn to CD/DVD Thumb drive or portable external drive Save the recording files in a folder both Recorder and Manager can access. During recording, save the files temporarily to the Recorder source computer s hard drive. Record directly onto a thumb drive or portable external drive to the Recorder computer. Most of these drives offer generous storage space at a reasonable price. Using Manager, browse to the shared location and import the recordings. Burn the files to a CD or DVD and then move them to the Manager computer. Disconnect the drive and reconnect it to the Manager computer. Import the recording files directly into Manager from the portable drive. Morae Highlight Video File Size The file size of highlight videos can vary greatly depending on the video format selected for production. If you need to distribute your highlight videos over the web, via or through other limited space or low bandwidth mediums, we recommend using MP4. Morae File Types The following table describes files types used with Morae
224 File Extension RDG Description Morae Recorder saves a recording to create a file with an.rdg extension. One recording is created per participant. The recording (.rdg) file includes video (camera and screen), logged markers and tasks, selected event streams (camera, microphone, keystrokes, screen text and mouse clicks) and study configuration information. If you do not move all of the rollover files (.r02,.r03, etc.) to a common folder with the.rdg file, Manager cannot import the recording. MRCFG MP4 MPR MPCA MGSRCH CSV TXT In Morae, you create a study configuration (.mrcfg) that contains your study information, including task definitions, marker definitions and satisfaction surveys. The study configuration file also contains recording information, including how you want to start and stop Recorder, what events you want to capture, who will log tasks in Observer and how you want to process the recordings. Produce highlight videos in this preferred file type to also create the following: HTML, JPEG, XML, SWF, and JS files. These can be used to display the produced video in a web browser. In Manager, use a project file (.mpr) to organize your recordings and studies and analyze data across recordings and studies. Export and import project components (recordings and Title clips) to share your analysis with another user. You can bring all of your analysis from recordings in one project into another project using a Morae project component archive. Once you have created and run a couple of searches, you may find that you use one or more of them repeatedly. To make the analysis process more efficient, you can save your most commonly used search profiles in a Morae Manager Search Profile (.mgsrch) file. Save the following data in Manager as a.csv file to open in other applications such as Microsoft Excel: Search results from the Analyze tab Graph data from the Graph tab Save the Log from Observer after a session is finished in a.txt format. Import the.txt of the file into Microsoft Excel or other applications for review or to print the Log. The file is tab-delimited so if you open the file in Excel, it will open with the data in columns that match the Log. WMV Record content displayed in Observer and save the video as a.wmv file to
225 File Extension Description immediately playback and share the recording session. Produce a highlight video in Manager as either.avi or.wmv format. BMP EMF Pack and Show EXE Save a graph or screenshot from Recorder as a bitmap image (.gif) to use in other applications such as Microsoft Word or PowerPoint. Save a graph as an bitmap image (.emf) to use in other applications such as Microsoft Word or PowerPoint. Use Pack and Show to package the Morae Player along with your AVI video in a single self-extracting zipped.exe file for clients or team members to view. You do not have to worry about codec installation or know which media player is installed on a client s system. Morae Player Start > All Programs > Morae > Morae Player Morae Player is a standalone video player, optimized for playing screen recordings. Morae Player always plays videos at 100% of their original size so that they remain readable. The Player is a single.exe file that does not need any setup, nor does it use the registry or any configuration files. Command line options allow Morae Player to be invoked in various ways from CD-ROMs, multimedia authoring tools and scripting languages or batch files. The command line options are listed in Morae Player Command Line Customizations. Morae Player only plays AVI video files. Morae Player has built-in support for the TechSmith Screen Capture Codec (TSCC). This means that an AVI encoded with the TSCC codec always plays in the Morae Player, even if the TSCC codec is not installed on the system. Any other audio or video codecs required by the AVI file must be installed before Morae Player can play the video. Morae Player does not setup any shell associations to become the default AVI player. At this time, the only file type allowed for the Pack and Show option is AVI
 360 KB of hard-disk space for program installation Basic Windows multimedia and AVI file support must be installed.")
226 Morae Player Playback Controls Morae Player System Requirements To run Morae Player, your system must meet the following requirements: Microsoft Windows 98, Me, NT, 2000, XP, 7, or later version. Windows-compatible sound card and speakers (recommended) 360 KB of hard-disk space for program installation Basic Windows multimedia and AVI file support must be installed. This is normally installed by default with Windows. The standard Windows MCI Microsoft Video for Windows must be installed. To check if the Windows MCI Microsoft Video for Windows is installed: 1. Choose Start > Control Panel > Sounds and Audio Devices > Sounds and Audio Devices > Hardware tab. 2. Double-click on Media Control Devices. 3. Click on the Properties tab. The (MCI) Microsoft Video for Windows should appear. Any audio or video codecs required by your AVI files must be installed. To check if a codec is installed: 1. Choose Control Panel > Sounds and Audio Devices> Sounds and Audio Devices > Hardware tab. 2. Double-click on the Audio Codecs or Video Codecs category. Click on the Properties tab the installed codecs. How Rich Recording Technology (RRT) Works Codecs in Morae Morae Recorder COM Server Morae Player Command Line Customizations When you launch Morae Player, by default it has a title bar, a menu bar, a tool bar and a status bar. You can customize those elements by specifying arguments on the command line when launching Morae Player. If you have installed Morae Player in the default directory, the exact syntax for the command line arguments is:
Morae 3.0. Manager Help File PDF. By TechSmith Corporation
 Morae 3.0 Manager Help File PDF By TechSmith Corporation TechSmith License Agreement TechSmith Corporation provides this manual "as is", makes no representations or warranties with respect to its contents
Morae 3.0. Recorder Help File PDF. By TechSmith Corporation
 Morae 3.0 Recorder Help File PDF By TechSmith Corporation TechSmith License Agreement TechSmith Corporation provides this manual "as is", makes no representations or warranties with respect to its contents
Morae 3.0. Observer Help File PDF. By TechSmith Corporation
 Morae 3.0 Observer Help File PDF By TechSmith Corporation TechSmith License Agreement TechSmith Corporation provides this manual "as is", makes no representations or warranties with respect to its contents
How UserVue and Morae 1.3 Work Together
 Version 1.0 How UserVue and Morae 1.3 Work Together By TechSmith Corporation Morae 1.3 Online Help Guide Online Help Guide Morae 1.3 Contents How UserVue and Morae 1.3 Work Together 1 About the UserVue
All-in-One Capture, Camtasia, Camtasia Relay, Camtasia Studio, Coach's Eye, DubIt, EnSharpen, Enterprise
 All rights reserved This manual, as well as the software described in it, is furnished under license and may be used or copied only in accordance with the terms of such license. The content of this manual
Version 5. August TechSmith Corporation. All rights reserved.
 Version 5 August 2016 2016 TechSmith Corporation. All rights reserved. All rights reserved This manual, as well as the software described in it, is furnished under license and may be used or copied only
Snagit 12. Snagit Deployment Tool Guide. Version October TechSmith Corporation
 12 Version 12.2.1 October 2014 2014 TechSmith Corporation All rights reserved This manual, as well as the software described in it, is furnished under license and may be used or copied only in accordance
All-in-One Capture, Camtasia, Camtasia Relay, Camtasia Studio, Coach's Eye, DubIt, EnSharpen, Enterprise
 2 All rights reserved This manual, as well as the software described in it, is furnished under license and may be used or copied only in accordance with the terms of such license. The content of this manual
Snagit Deployment Tool
 Snagit Deployment Tool Version 2018 July 2018 Copyright 2018 TechSmith Corporation. All rights reserved All rights reserved This manual, as well as the software described in it, is furnished under license
Deployment Tool Guide
 Deployment Tool Guide Version 2018.0.0 October 2017 All rights reserved This manual, as well as the software described in it, is furnished under license and may be used or copied only in accordance with
Camtasia Studio 5.0 PART I. The Basics
 Camtasia Studio 5.0 Techsmith s Camtasia Studio software is a video screenshot creation utility that makes it easy to create video tutorials of an on screen action. This handout is designed to get you
Screencast.com. Getting the Most from Your Screencast.com Account. July TechSmith Corporation. All rights reserved.
 Screencast.com Getting the Most from Your Screencast.com Account July 2009 2009 TechSmith Corporation. All rights reserved. Contents Contents...2 First Things First: Get Organized...3 Get Familiar with
Snagit MSI Installation
 Snagit MSI Installation Version 18.0.0 October 2017 All rights reserved This manual, as well as the software described in it, is furnished under license and may be used or copied only in accordance with
MSI Installation Guide
 MSI Installation Guide Version 2018 January 2018 Copyright 2018 TechSmith Corporation. All rights reserved All rights reserved This manual, as well as the software described in it, is furnished under license
First Walkthrough: Fundamentals of Camtasia Studio
 First Walkthrough: Fundamentals of Camtasia Studio First Walkthrough: Fundamentals of Camtasia Studio 2 Table of Contents Recording with Camtasia Studio.............. 3-4 Editing with Camtasia Studio.................
User Guide. FTR Reporter For more information, visit
 FTR Reporter 5.7.1 For more information, visit www.fortherecord.com TABLE OF CONTENTS INTRODUCTION... 5 Overview... 5 About This Document... 5 GETTING STARTED... 6 Installation... 6 Starting Reporter...
For Organizers (Hosts) at OSU
 at OSU") Adobe Connect Pro 8.2 Overview For Organizers (Hosts) at OSU Getting Started 1. Access Adobe Connect Pro Central via this URL: http://oregonstate.adobeconnect.com 2. Login using your email address and
Adobe Connect Pro 8.2 Overview For Organizers (Hosts) at OSU Getting Started 1. Access Adobe Connect Pro Central via this URL: http://oregonstate.adobeconnect.com 2. Login using your email address and
Tech Day Camtasia. What is Camtasia Studio?
 Tech Day 2008 Camtasia What is Camtasia Studio? Camtasia Studio is a video-based screen capturing software program. It is analogous to using a video camera to record your screen. However, unlike using
SupportCenter Getting Started Guide
 SupportCenter Getting Started Guide In partnership with WebEx Communications, Inc, we provide SupportCenter web conferencing services. Because SupportCenter is powered by WebEx TM, this guide makes several
Getting Started Guide
 SnagIt Getting Started Guide Welcome to SnagIt Thank you for your purchase of SnagIt. SnagIt is the premier application to use for all of your screen capturing needs. Whatever you can see on your screen,
MagicInfo VideoWall Author
 MagicInfo VideoWall Author MagicInfo VideoWall Author User Guide MagicInfo VideoWall Author is a program designed to construct a VideoWall layout and create VideoWall content by adding various elements
SeeSnake HQ User Guide
 SeeSnake HQ User Guide SeeSnake HQ Version 1.53.85.1426 23 May 2010 About SeeSnake HQ 3 Digital Technology 3 Installation and Updates 5 Windows XP 5 Windows Vista 5 Windows 7 5 The Home Window 6 Home Toolbar
CyberLink. U Webinar. User's Guide
 CyberLink U Webinar User's Guide Copyright and Disclaimer All rights reserved. To the extent allowed by law, U Webinar IS PROVIDED AS IS, WITHOUT WARRANTY OF ANY KIND, EITHER EXPRESS OR IMPLIED, INCLUDING
Multi-NVR Manager. Quick Start Configuration Usage
 Multi-NVR Manager Quick Start Configuration Usage 2014. All rights are reserved. No portion of this document may be reproduced without permission. All trademarks and brand names mentioned in this publication
Polycom Converged Management Application (CMA ) Desktop for Mac OS X. Help Book. Version 5.0.0
 Desktop for Mac OS X. Help Book. Version 5.0.0") Polycom Converged Management Application (CMA ) Desktop for Mac OS X Help Book Version 5.0.0 Copyright 2010 Polycom, Inc. Polycom and the Polycom logo are registered trademarks and Polycom CMA Desktop
Polycom Converged Management Application (CMA ) Desktop for Mac OS X Help Book Version 5.0.0 Copyright 2010 Polycom, Inc. Polycom and the Polycom logo are registered trademarks and Polycom CMA Desktop
TECHSMITH RELAY Santa Ana College Distance Education, Cesar Chavez Building Room A-101, (714) ,
 ,") TECHSMITH RELAY Santa Ana College Distance Education, Cesar Chavez Building Room A-101, (714) 564-6725, DistEd@sac.edu Techsmith Relay is a simple video creation program that allows users to record video
TECHSMITH RELAY Santa Ana College Distance Education, Cesar Chavez Building Room A-101, (714) 564-6725, DistEd@sac.edu Techsmith Relay is a simple video creation program that allows users to record video
User Guide. BlackBerry Workspaces for Windows. Version 5.5
 User Guide BlackBerry Workspaces for Windows Version 5.5 Published: 2017-03-30 SWD-20170330110027321 Contents Introducing BlackBerry Workspaces for Windows... 6 Getting Started... 7 Setting up and installing
A+ Suite Software. User Manual
 A+ Suite Software User Manual 2012.03 Table of Contents Introduction... 1 Minimum System Requirements... 1 Using the A+ Plug-in for PowerPoint... 2 Spotlight... 2 Visor... 3 Setting... 3 Floating Toolbox...
Beginner Level. Adobe Connect Pro
 Adobe Connect Pro Topic Page Number Overview 2 Prerequisite Terms 2 System Requirements 4 Logging into an Adobe Connect meeting 5 The Meeting Room 6 Meeting Preflight 8 Working in an Adobe Connect meeting
GOM Cam User Guide. Please visit our website (cam.gomlab.com) regularly to check out our. latest update.
 regularly to check out our. latest update.") GOM Cam User Guide Please visit our website (cam.gomlab.com) regularly to check out our latest update. From screen recording to webcam video and gameplay recording GOM Cam allows you to record anything
GOM Cam User Guide Please visit our website (cam.gomlab.com) regularly to check out our latest update. From screen recording to webcam video and gameplay recording GOM Cam allows you to record anything
Share Content. Share Content
 , page 1 Quick reference tasks: share content, page 2 Share a file, page 4 Share an application, page 11 About sharing a remote computer, page 14 Take a Poll, page 17 Transfer and Download Files During
Presenting a Live Meeting Session
 Presenting a Live Meeting Session LIVE MEETING CONSOLE COMPONENTS The Live Meeting console is made up of multiple components: Presentation area in the middle of the console. Control panels (panes) accessible
Version 2.0. Campus 2.0 Student s Guide
 Campus 2.0 Student s Guide Version 2.0 Campus 2.0 Student s Guide Error! No text of specified style in document. i Important Notice Copyright 2008 Tegrity, Inc. Disclaimer 2008 Tegrity, Inc. all rights
New Features. Importing Resources
 CyberLink StreamAuthor 4 is a powerful tool for creating compelling media-rich presentations using video, audio, PowerPoint slides, and other supplementary documents. It allows users to capture live videos
Creating DVDs and CDs. With Your DVD Writer/CD Writer Drive
 Creating DVDs and CDs With Your DVD Writer/CD Writer Drive The information in this document is subject to change without notice. Hewlett-Packard Company makes no warranty of any kind with regard to this
Lectora Video Editor Information Center
 Lectora Video Editor Information Center - 1 - Welcome to the Lectora Video Editor Information Center The Video Editor Information Center was designed so that you can quickly find the information you need
Creating Interactive Video with Camtasia
 Creating Interactive Video with Camtasia Audio SCORM Quizzes PowerPoint and Screen Shots v1.2: 2009 Page 1 Camtasia Studio 6.0.2 http://www.techsmith.com/camtasia.asp (free trial download) Table of Contents
WebEx Recording Editor. User Guide
 WebEx Recording Editor User Guide 042310 Copyright 1997 2010 Cisco and/or its affiliates. All rights reserved. WEBEX, CISCO, Cisco WebEx, the CISCO logo, and the Cisco WebEx logo are trademarks or registered
Remote Support. User Guide 7.23
 Remote Support User Guide 7.23 Copyright 1997 2011 Cisco and/or its affiliates. All rights reserved. WEBEX, CISCO, Cisco WebEx, the CISCO logo, and the Cisco WebEx logo are trademarks or registered trademarks
Camtasia Studio 7 User Guide
 Camtasia Studio 7 User Guide TechSmith & Camtasia Studio: TechSmith Corporation released popular desktop recording tools like Snagit, Jing, and Camtasia. TechSmith also launched Screencast.com, a screencast
Lectora Audio Editor Information Center
 Lectora Audio Editor Information Center - 1 - Welcome to the Lectora Audio Editor Information Center The Audio Editor Information Center was designed so that you can quickly find the information you need
Bridgit Conferencing Software User s Guide. Version 3.0
 Bridgit Conferencing Software User s Guide Version 3.0 ii Table Of Contents Introducing Bridgit Conferencing Software... 1 System Requirements... 1 Getting Bridgit Conferencing Software... 2 The Bridgit
English Table of Contents
 Table of Contents Agama V-2025 Features 1 Set up the device 2 720P HD Video Recording 3-6 Using Instant Messenger Application 7-8 CrazyTalk CamSuite PRO 9-19 CrazyTalk CamSuite PRO with IM Application
WebEx Network Recording Player User Guide
 WebEx Network Recording Player User Guide for Advanced Recording Format (.arf) files Version 2.3 Copyright 1997-2009 Cisco Systems, Inc. and/or its affiliated entities. All rights reserved. WEBEX, CISCO,
HP Visual Collaboration Desktop. User Guide
 HP Visual Collaboration Desktop User Guide HP Visual Collaboration Desktop v2.0 First edition: November 2010 Legal notices Copyright 2010 Hewlett-Packard Development Company, L.P. The information contained
Windows Movie Maker / Microsoft Photo Story Digital Video
 Windows Movie Maker / Microsoft Photo Story Digital Video http://intranet/technology/index.html TRC HELP DESK X5092 April 2006 Photo Story and Movie Maker Microsoft Photo Story 3 allows you to create fantastic
ivms320 Platform User Manual
 ivms320 Platform User Manual Version: 9.1.8.5 Table of Contents Chapter 1 Overview... 4 1.1. Description... 4 1.2. Installation... 4 1.3. Uninstallation... 10 1.4. Log in... 13 1.4.1. First Login... 13
PediGait IP. Users Manual
 PediGait IP Users Manual April 2012 Table of Contents Clients Tab... 2 Open a Client file... 2 Delete Client file(s)... 2 Edit a Client... 3 Add a new client... 3 Add Comments to client files... 4 Profiles
Parallels Toolbox for Windows User's Guide
 Parallels Toolbox for Windows User's Guide Parallels International GmbH Vordergasse 59 8200 Schaffhausen Switzerland Tel: + 41 52 672 20 30 www.parallels.com Copyright 1999-2018 Parallels International
RealPresence Media Manager
 RealPresence CloudAXIS Suite Administrators Guide Software 1.3.1 USER GUIDE Software 6.7 January 2015 3725-75302-001A RealPresence Media Manager Polycom, Inc. 1 Copyright 2015, Polycom, Inc. All rights
SnagIt 9.0. Help File PDF By TechSmith Corporation
 SnagIt 9.0 Help File PDF By TechSmith Corporation TechSmith License Agreement TechSmith Corporation provides this manual "as is", makes no representations or warranties with respect to its contents or
WebEx Recorder and Player
 WebEx Recorder and Player User s Guide Version 2.8.4902 Copyright WebEx Communications, Inc. and Cisco Systems, Inc. reserve the right to make changes in the information contained in this publication without
Wimba Pronto. Version 2.0. User Guide
 Wimba Pronto Version 2.0 User Guide Wimba Pronto 2.0 User Guide Welcome to Wimba Pronto 1 What's New in Wimba Pronto 2.0 2 Getting Started 3 Wimba Pronto System Requirements 3 Creating a New Wimba Pronto
Exercise 1: Importing a PowerPoint Presentation... 6 Importing Files... 6 Editing and Clip Detection... 7
 Table of Contents Table of Contents... i Features at a Glance... 1 Capturing, importing, and organizing... 1 Synchronizing and editing... 1 Publishing and sharing... 1 Usage Scenarios... 1 Creating Cost-Effective
PowerPoint X. 1. The Project Gallery window with the PowerPoint presentation icon already selected. 2. Click on OK.
 PowerPoint X Launching PowerPointX 1. Start PowerPointX by clicking on the PowerPoint icon in the dock or finding it in the hard drive in the Applications folder under Microsoft PowerPoint. PowerPoint
Desktop Client USER GUIDE. Version 2. Strategic Vision, Inc.
 Desktop Client USER GUIDE Version 2 Strategic Vision, Inc. Table of Contents Welcome Desktop Client Interface................... Audio and Webcam Settings................. Tool Overview........................
Microsoft Office 2007
 Microsoft Office 2007 Adding Slide Transitions Transition Sound Transitions Transition Speed Apply to All A slide transition is the way one slide changes to the next in Slide Show view. Animations Tab:
Using Sitecore 5.3.1
 Using Sitecore 5.3.1 An End-User s Guide to Using and Administrating Sitecore Author: Sitecore Corporation Date: December 12, 2007 Release: Rev. 1.0 Language: English Sitecore is a registered trademark.
Wimba Pronto. Version 3.1. User Guide
 Wimba Pronto Version 3.1 User Guide Wimba Pronto 3.1 User Guide Welcome to Wimba Pronto 1 Top Wimba Pronto Features 1 What's New in Wimba Pronto? 3 Getting Started 4 Wimba Pronto System Requirements 4
Avigilon Control Center Standard Client User Guide. Version 6.0
 Avigilon Control Center Standard Client User Guide Version 6.0 2006-2017, Avigilon Corporation. All rights reserved. AVIGILON, the AVIGILON logo, AVIGILON CONTROL CENTER, ACC, HIGH DEFINITION STREAM MANAGEMENT
Blackboard Collaborate Classroom in D2L Brightspace Daylight Experience
 Blackboard Collaborate Classroom in D2L Brightspace Daylight Experience Moderators Guide University Information Technology Services Learning Technology, Training, Audiovisual, and Outreach Copyright 2018
Mirasys NVR. User s Guide
 Mirasys NVR User s Guide CONTENTS Contents... 2 Before you start... 3 Introduction... 6 Logging in... 9 User interface... 13 Navigator... 16 Cameras... 25 Video outputs... 41 Digital outputs... 46 Digital
Blackboard Collaborate for Faculty
 New York City College of Technology Instructional Technology & Technology Enhancement Center -- itec Blackboard Collaborate for Faculty Contact Information: 718-254-8565 ITEC@citytech.cuny.edu System Requirements:
Snagit Help Version 13.1 February 2017
 Snagit Help Version 13.1 February 2017 All rights reserved This manual, as well as the software described in it, is furnished under license and may be used or copied only in accordance with the terms of
Getting Help in Microsoft Office
 LESSON 3 Getting Help in Microsoft Office In this lesson, you learn how to access and use the Help system in Microsoft Office. HELP: WHAT S AVAILABLE? Microsoft Office supplies a Help system that makes
OptionPower 3.2. for Office 2007 STARTUP GUIDE. Interactive Audience Response Systems
 OptionPower for Office 2007 3.2 STARTUP GUIDE Interactive Audience Response Systems OptionPower for Office 2007 3.2 STARTUP GUIDE 2008 Option Technologies Interactive This document is the copyrighted and
Want to Create Engaging Screencasts? 57 Tips to Create a Great Screencast
 What makes a screencast interesting, good, or engaging? Want to Create Engaging Screencasts? 57 Tips to Create a Great Screencast We thought you would like to see each of the categories that the focus
Version WebEx Event Center User's Guide
 Version 6.17 WebEx Event Center User's Guide Copyright 1997 2010 Cisco and/or its affiliates. All rights reserved. WEBEX, CISCO, Cisco WebEx, the CISCO logo, and the Cisco WebEx logo are trademarks or
What is Adobe Connect Pro? Setting up a Meeting. Using Adobe Connect Pro
 What is Adobe Connect Pro? Adobe Acrobat Connect Pro is a Flash based application that allows you to have real-time, multi-point meetings and class sessions that participants can access through a web browser.
Avigilon Control Center Player User Guide. Version 5.10
 Avigilon Control Center Player User Guide Version 5.10 2006-2016, Avigilon Corporation. All rights reserved. AVIGILON, the AVIGILON logo, AVIGILON CONTROL CENTER, ACC and HDSM, are trademarks of Avigilon
Blackboard Collaborate for Students
 New York City College of Technology Blackboard Collaborate for Students Contact Information: 718-254-8565 ITEC@citytech.cuny.edu System Requirements: Windows XP (32 bit), Windows Vista (32 or 64 bit) or
PRESENTER 09 Documentation
 a PRESENTER 09 Documentation Presenter 09 Documentation General 3 System Requirements for Presenter 09 3 Installing Presenter 09 4 Activating Presenter 09 5 Send to Articulate Presenter Package 7 Managing
icms Pro USER s MANUAL Ver 1.0
 icms Pro USER s MANUAL Ver 1.0 Contents Target Audience for this Document... 5 Copyright, Trademarks and Important Information... 5 Copyright... 5 Disclaimer... 5 Introduction... 6 Tabs... 6 Panes... 7
FaceCam 321 Table of Contents
 FaceCam 321 Table of Contents FaceCam 321 Features.2 Set up the device 2 I.P.M(Image Protection Mechanism) setting.3 Using Instant Messenger Application.3 Arcsoft Webcam Companion 4.4 How to use WCC4..4-7
Chapter 1 : Getting Started with Integrity... Chapter 2 : Interface Layout... Chapter 3 : Navigation... Chapter 4 : Printing...
 .0 User s Manual Table of Contents Chapter : Getting Started with Integrity... Chapter : Interface Layout... Chapter : Navigation... Chapter : Printing... Chapter : Quick Search and Results Pane... Results
Digital Storytelling. Movie Maker
 Digital Storytelling Movie Maker http://webclass.org Online Handouts Select Windows Movie Maker 2 Objectives Disk cleanup defrag C: drive Preview podcast equipment Movie Maker settings Create edit save
Avigilon Control Center Virtual Matrix User Guide. Version 5.6
 Avigilon Control Center Virtual Matrix User Guide Version 5.6 2006-2015, Avigilon Corporation. All rights reserved. Unless expressly granted in writing, no license is granted with respect to any copyright,
A Reference guide to Using the Collaborate tool in your LMS (Mac Users)
") A Reference guide to Using the Collaborate tool in your LMS (Mac Users) Your LMS includes a synchronous (real-time) tool for online communication within your subject or community. The Collaborate tool
A Reference guide to Using the Collaborate tool in your LMS (Mac Users) Your LMS includes a synchronous (real-time) tool for online communication within your subject or community. The Collaborate tool
SMART Classroom Suite 2011
 SMART Classroom Suite 2011 Windows operating systems System administrator s guide Trademark notice SMART Board, SMART Classroom Suite, SMART Notebook, SMART Response, SMART Sync, SMART Document Camera,
PowerPoint Creating Presentations 25
 Contents Contents 3 PowerPoint 00 7 What is PowerPoint? 8 PowerPoint Requirements 9 New and Improved Features 0 Installing PowerPoint 00 Starting PowerPoint 00 3 Exploring the Ribbon 4 003 Commands in
Camera Control for Windows
 Camera Control for Windows 1910012275 REV1.1.0 Contents Chapter 1 Introduction... 1 1.1 Overview... 1 1.2 System Requirement... 1 Chapter 2 Software Installation... 2 Chapter 3 Quick Start... 5 3.1 Create
Microsoft Lync 2013 Quick-Start Guide. ThinkTel Communications Professional Services Last Updated: June 18, 2013
 Microsoft Lync 2013 Quick-Start Guide ThinkTel Communications Professional Services Last Updated: June 18, 2013 Instant Messaging & Presence Accept an IM request Click anywhere on the picture display area
TABLE OF CONTENTS 1. SYSTEM REQUIREMENTS INSTALLATION ACCOUNT MANAGEMENT RAZER CORTEX GENERAL SETTINGS...
 Welcome to Razer Cortex, the nerve center of your entire gaming experience. From effortlessly finding the best deals on your games to launching and boosting them for peak pc performance while backing up
Training Handout Tegrity Campus 2.0
 Training Handout Tegrity Campus 2.0 Tegrity Campus 2.0 is a user-friendly video, audio, and screen capturing platform for replay by students. Tegrity is accessible anywhere via Blackboard s course management
Intel Unite Solution. Small Business User Guide
 Intel Unite Solution Small Business User Guide March 2017 Legal Disclaimers & Copyrights All information provided here is subject to change without notice. Contact your Intel representative to obtain the
PowerPoint Launching PowerPointX
 PowerPoint 2004 Launching PowerPointX 1. Start PowerPoint by clicking on the PowerPoint icon in the dock or finding it in the hard drive in the Applications folder under Microsoft Office 2004. PowerPoint
Quick Start Guide GV-VMS
 Quick Start Guide GV-VMS Thank you for purchasing GV-VMS. This guide is designed to assist the new user in getting immediate results from the GV-VMS. For advanced information on how to use the GV-VMS,
TABLE OF CONTENTS 1. SYSTEM REQUIREMENTS INSTALLATION ACCOUNT MANAGEMENT RAZER CORTEX GENERAL SETTINGS...
 Welcome to Razer Cortex, the nerve center of your entire gaming experience. From effortlessly finding the best deals on your games to launching and boosting them for peak pc performance while backing up
Layout of Movie Maker. Elements of Movie Maker. Step by step instructions on how to use Movie Maker. Web resources for Movie Maker
 Layout of Movie Maker Elements of Movie Maker Step by step instructions on how to use Movie Maker Web resources for Movie Maker Materials needed to use Movie Maker: Laptop Digital camera Digital video
Get Started. Estimating Explorer
 Get Started Estimating Explorer NOTICE This document and the Sage Timberline Office software may be used only in accordance with the accompanying Sage Timberline Office End User License Agreement. You
Microsoft Office Communicator 2007 R2 Getting Started Guide. Published: December 2008
 Microsoft Office Communicator 2007 R2 Getting Started Guide Published: December 2008 Information in this document, including URL and other Internet Web site references, is subject to change without notice.
CAMTASIA RELAY TUTORIAL Santa Ana College Distance Education, Cesar Chavez Building Room A-101, (714) ,
 ,") CAMTASIA RELAY TUTORIAL Santa Ana College Distance Education, Cesar Chavez Building Room A-101, (714) 564-6725, DistEd@sac.edu Camtasia Relay is a simple video creation program that allows users to record
CAMTASIA RELAY TUTORIAL Santa Ana College Distance Education, Cesar Chavez Building Room A-101, (714) 564-6725, DistEd@sac.edu Camtasia Relay is a simple video creation program that allows users to record
GRS Enterprise Synchronization Tool
 GRS Enterprise Synchronization Tool Last Revised: Thursday, April 05, 2018 Page i TABLE OF CONTENTS Anchor End User Guide... Error! Bookmark not defined. Last Revised: Monday, March 12, 2018... 1 Table
Table of Contents 1. INTRODUCING DLL MODES AND SETTINGS IN DLL GENERAL DLL FEATURES...4
 Table of Contents 1. INTRODUCING DLL...1 2. MODES AND SETTINGS IN DLL...2 2.1 TEACHING MODE... 2 2.2 SELF LEARNING MODE... 2 2.3 NORMAL SETTING... 3 2.4 MANUAL SETTING... 3 2.5 CAPTURE SETTING... 3 3.
1 To access Movie Maker
 Windows Movie Maker Handout i What you will be doing in the practical session 1 To access Movie Maker You will be creating a Movie of your choice using text, images, video clips and sound Before you start
Transcribing and Coding Audio and Video Files
 Transcribing and Coding Audio and Video Files Contents TRANSCRIBING AND CODING AUDIO AND VIDEO FILES... 1 GENERAL INFORMATION ABOUT THE ANALYSIS OF AUDIO AND VIDEO FILES... 1 THE MEDIA PLAYER TOOLBAR...
Blackboard Collaborate for Students
 Blackboard Collaborate for Students Participants Guide University Information Technology Services Training, Outreach, Learning Technologies and Video Production Copyright 2014 KSU Department of University
Table of Contents. Preface... iii COMPUTER BASICS WINDOWS XP
 Table of Contents Preface... iii COMPUTER BASICS Fundamentals of Computer 1 Various Types of Computers 2 Personal Computer 2 Personal Digital Assistant 3 Laptop Computer 3 Tablet PC 3 Main Frame Computer